Amazon CloudWatch dashboards are customizable pages in the CloudWatch console that you can use to monitor your resources in a single view. This post focuses on deploying a CloudWatch dashboard that you can use to create a customizable monitoring solution for your AWS Network Firewall firewall. It’s designed to provide deeper insights into your firewall’s performance and security events simplifying security monitoring.
Network Firewall is a managed service that you can use to deploy essential network protections to Amazon Virtual Private Clouds (Amazon VPCs). Network Firewall provides comprehensive logs and metrics through CloudWatch, and we’re expanding its capabilities with this CloudWatch dashboard. This enhancement makes it easier to visualize, analyze, and act on the wealth of data generated by your firewall.
This open source solution streamlines network security monitoring with a user-friendly AWS CloudFormation template that quickly deploys a dedicated monitoring dashboard. This solution incorporates a suite of CloudWatch features—basic monitoring metrics, vended logs, Logs Insights queries, Contributor Insights rules, and the dashboard itself—into a centralized view. Preconfigured widgets provide instant insights into critical areas such as top talkers, protocol distributions, and alert log trends, in addition to HTTP and TLS flow analysis. A consolidated view of key metrics and logs enables faster identification of potential security threats or performance issues. With all of this relevant network firewall data in one place, your team can respond more quickly to emerging security events.
In this blog post, we provide an overview of the dashboard and a step-by-step guide to deploy it in your environment.
Solution overview
The CloudWatch dashboard can be deployed in all AWS Regions where Network Firewall is available today, including the AWS GovCloud (US) Regions and China Regions. While the dashboard comes pre-configured, you can quickly adjust queries, time ranges, and refresh intervals to help meet your specific needs. By default, the dashboard queries firewall flow and alert log events over a 3-hour period, impacting the number of log events scanned. Logs Insights and Contributor Insights widgets showcase the top 10 data points by default, but you can enhance results by modifying queries or adjusting the Top Contributors value, though this might lead to increased costs. You can configure the auto-refresh interval of the widgets to get real-time visibility and optimize costs. See the Amazon CloudWatch Pricing guide for up-to-date free and paid tier pricing considerations.
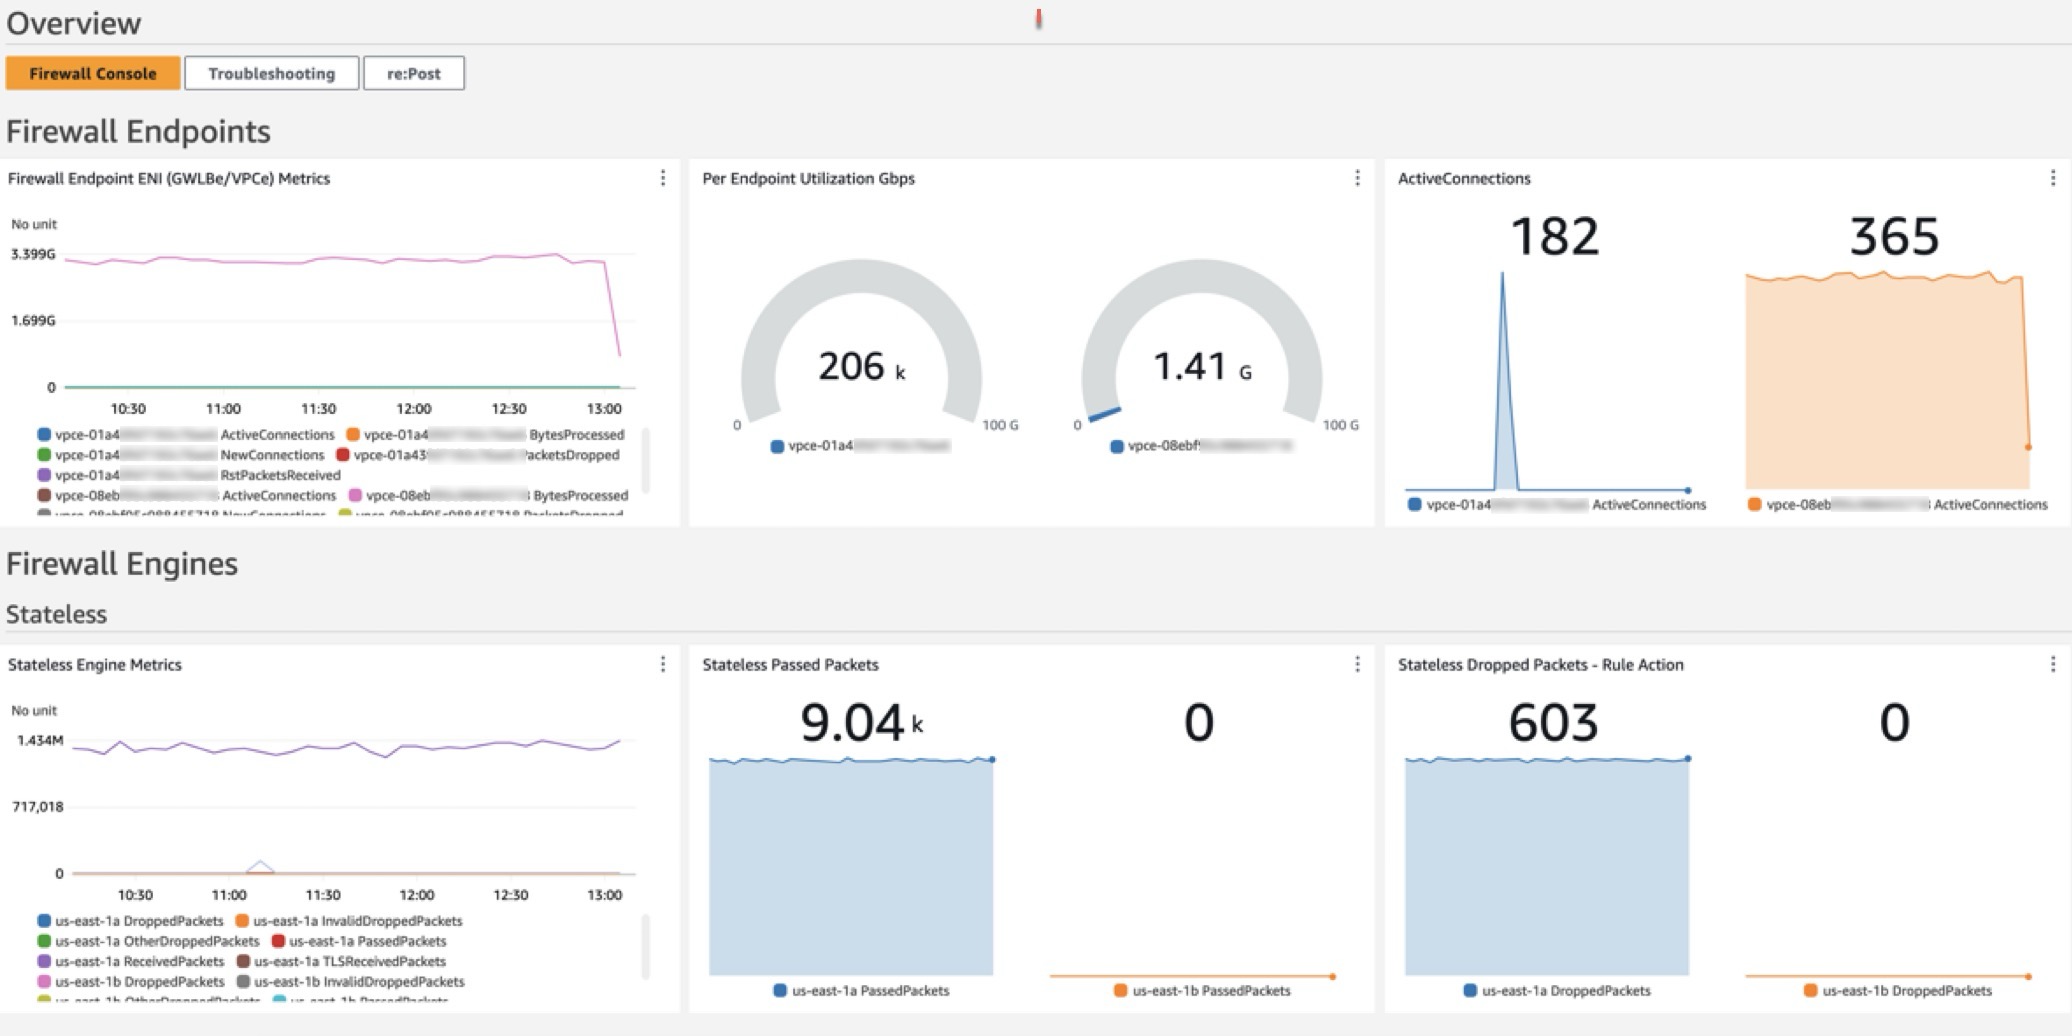
The dashboard, shown in Figure 1, can be deployed using CloudFormation and includes data and analytics from the following sources:
Native CloudWatch metrics from the AWS/NetworkFirewall and AWS/PrivateLinkEndpoints namespaces
CloudWatch Logs Insights queries that analyze Network Firewall flow and alert logs
CloudWatch Contributor Insights rules that aggregate data from Network Firewall flow and alert logs.
Figure 1: CloudWatch dashboard
Walkthrough
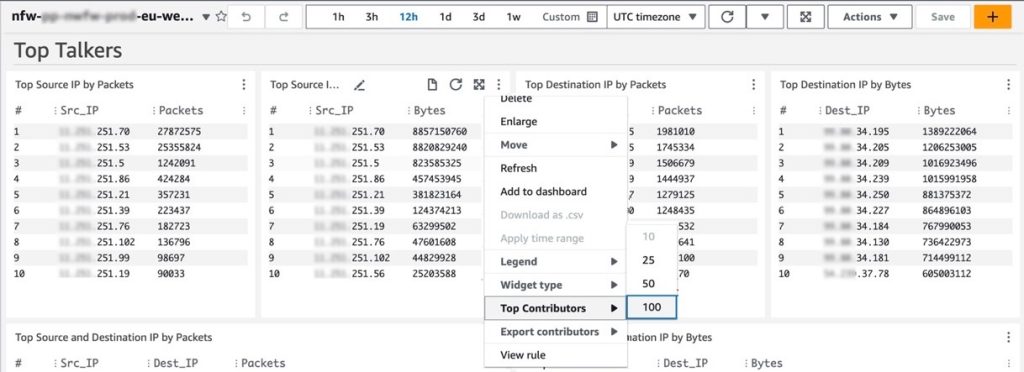
In the dashboard, the Logs Insights and Contributor Insights widgets display the top 10 data points by default. You can edit the Insights queries or change the Top Contributors to a larger value to display more results, as shown in Figure 2.
Figure 2: Top Talkers dashboard showing a change to the Top Contributors value
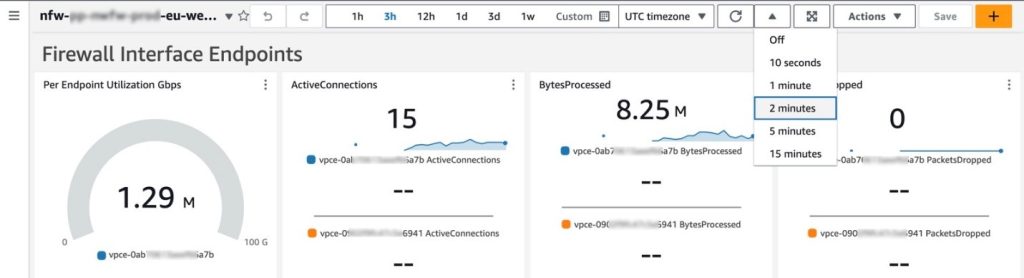
You can also manually refresh the data within a single or multiple widgets, or you can configure the entire dashboard to automatically refresh at a configured time interval as shown in Figure 3. The dashboard won’t automatically refresh the widget data by default.
Figure 3: Configuring the dashboard to automatically refresh
Prerequisites
Deploying the Network Firewall CloudWatch Dashboard is straightforward. You will need the following:
A Network Firewall in your VPC.
Your Network Firewall must be configured to publish firewall flow and alert logs to two different CloudWatch log groups. For example, firewall flow logs are published to /my-firewall-flow-logs and alert logs are published to /my-firewall-alert-logs.
If you haven’t deployed Network Firewall in your VPC, you can use one of the available AWS Network Firewall Deployment Architecture templates to create a firewall. After creating a firewall, configure CloudWatch log groups for the firewall flow and alert logs and configure stateful logging as described previously. Fine-tune your firewall policy and rule configuration and make sure that you’re routing traffic symmetrically through the firewall. With the firewall now in the routed path and publishing metrics and log events, you can proceed with this Network Firewall CloudWatch dashboard template.
Deployment
The Network Firewall dashboard CloudFormation template creates a monitoring dashboard for a single Network Firewall firewall. Make sure that you launch this CloudFormation stack in the same AWS Region and account as the firewall, regardless of whether the firewall is set up centrally or in a distributed manner.
To deploy the dashboard:
Choose Launch Stack for the relevant AWS Region. Make sure that you’re signed in to the appropriate AWS account and Region.
Region: China
Region: Gov Cloud
Region: All other regions supported by AWS Network Firewall
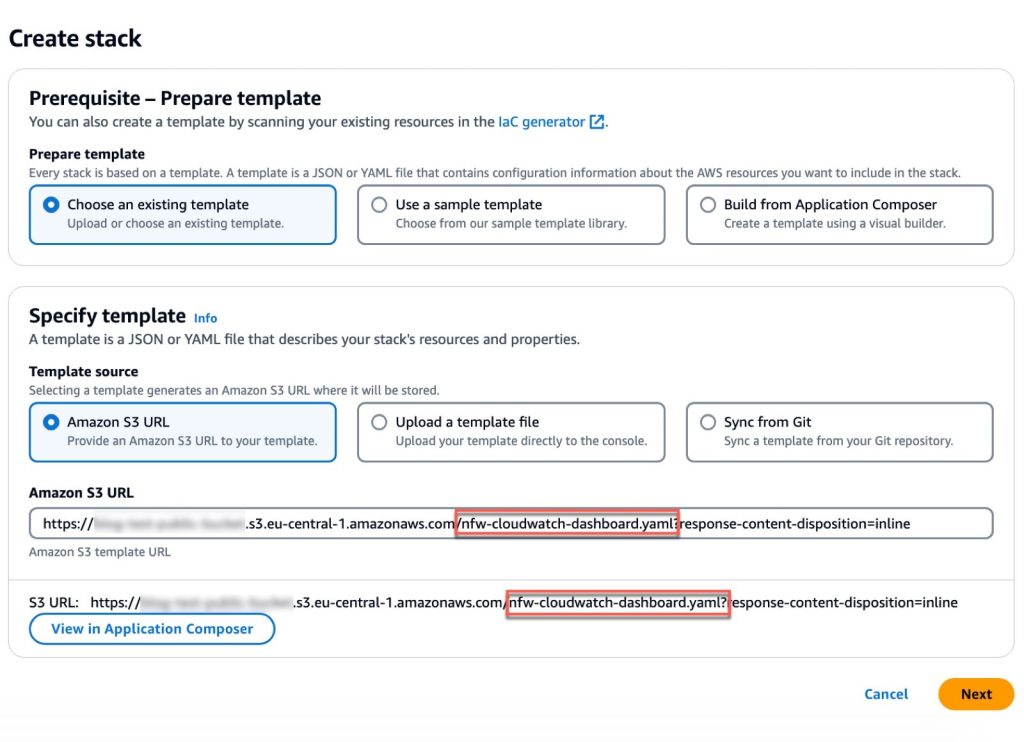
You will be redirected to the Create stack page in the AWS Management Console for CloudFormation. Make sure that you’re in the correct Region and using the correct template. Choose Next. The following are the Regions and their template names:
Figure 4: Make sure that you’re using the correct template
When launching the stack, you will need to enter the following parameters:
Stack name: A descriptive name for this CloudFormation stack. For example, my-firewall-dashboard.
Firewall name: The firewall name as seen in the Amazon VPC console. In the Amazon VPC console, choose Network Firewall in the navigation pane, then choose Firewalls.
Firewall subnets: The firewall subnet IDs to which your firewall endpoints are attached. The firewall subnets can be found on the Firewall details tab of your firewall in the Amazon VPC
Flow log group name: The name of the CloudWatch log group where your firewall flow logs are stored.
Alert log group name: The name of the CloudWatch log group where your firewall alert logs are stored.
Contributor Insights rule state: Enable or disable the Contributor Insights rules (the template defaults to enabled). Disabling will stop the rules from scanning log data and displaying results in the Contributor Insights widgets. After the rules are created, you can change the state of one or more Contributor Insights rules from CloudWatch console by choosing Insights from the navigation pane, and then choosing Contributor Insights.
After the stack reaches CREATE_COMPLETE status, go to the Outputs tab and choose the FirewallDashboardURI link to open the new dashboard in the CloudWatch Dashboards console. It might take a few minutes for the Logs Insights and Contributor Insights widgets to start displaying data. For more details about each widget, see the README. If you don’t have log events matching the query parameters in the widgets, some widgets might not show data points.
Troubleshooting
If you encounter issues during or after deployment, review the following:
Both firewall flow and alert logging are enabled, not just one.
Log group names are entered correctly; incorrect names will cause widgets to point to invalid data.
Correct subnets are selected. Incorrect choices can impact the PrivateLink metrics widgets.
Firewall name is entered correctly. An incorrect name can disrupt metrics widgets, dashboard, and Contributor Insights widget names and break the firewall link.
Cleaning up
You can delete the Network Firewall CloudWatch dashboard and all of the associated resources with a few clicks. Deleting the dashboard will not impact the routing and network traffic inspection performed by the firewall.
Sign in to the CloudFormation console in the Region where you launched the stack and choose Stacks from the navigation pane.
Select the Stack name you chose when launching the stack. For example, my-firewall-dashboard.
Choose Delete.
Conclusion
We encourage you to see for yourself how this new dashboard can enhance your network security management. To get started with the AWS Network Firewall CloudWatch Dashboard, visit our GitHub repository for detailed instructions and the CloudFormation template. For a visual overview of the dashboard and its capabilities, check out our YouTube video.
If you have feedback about this post, submit comments in the Comments section below. If you have questions about this post, contact AWS Support.
Network Firewall offers three deployment models: Distributed, centralized, and combined. Many customers opt for a centralized model to reduce costs. In this model, customers allocate the responsibility for managing the rulesets to the owners of the VPC infrastructure (spoke accounts) being protected, thereby shifting accountability and providing flexibility to the spoke accounts. Managing rulesets in a shared firewall policy generated from distributed input configurations of protected VPCs (spoke accounts) is challenging without proper input validation, state-management, and request throttling controls.
In this post, we show you how to automate firewall rule management within the central firewall using distributed firewall configurations spread across multiple AWS accounts. The anfw-automate solution provides input-validation, state-management, and throttling controls, reducing the update time for firewall rule changes from minutes to seconds. Additionally, the solution reduces operational costs, including rule management overhead while integrating seamlessly with the existing continuous integration and continuous delivery (CI/CD) processes.
Prerequisites
For this walkthrough, the following prerequisites must be met:
Basic knowledge of networking concepts such as routing and Classless Inter-Domain Routing (CIDR) range allocations.
Basic knowledge of YAML and JSON configuration formats, definitions, and schema.
The firewall VPC in the central account must be reachable from a spoke account (see centralized deployment model). For this solution, you need two AWS accounts from the centralized deployment model:
The spoke account is the consumer account the defines firewall rules for the account and uses central firewall endpoints for traffic filtering. At least one spoke account is required to simulate the user workflow in validation phase.
The central account is an account that contains the firewall endpoints. This account is used by application and the Network Firewall.
StackSets deployment with service-managed permissions must be enabled in AWS Organizations (Activate trusted access with AWS Organizations). A delegated administrator account is required to deploy AWS CloudFormation stacks in any account in an organization. The CloudFormation StackSets in this account deploy the necessary CloudFormation stacks in the spoke accounts. If you don’t have a delegated administrator account, you must manually deploy the resources in the spoke account. Manual deployment isn’t recommended in production environments.
A resource account is the CI/CD account used to deploy necessary AWS CodePipeline stacks. The pipelines deploy relevant cross-account cross-AWS Region stacks to the preceding AWS accounts.
IAM permissions to deploy CDK stacks in the resource account.
Solution description
In Network Firewall, each firewall endpoint connects to one firewall policy, which defines network traffic monitoring and filtering behavior. The details of the behavior are defined in rule groups — a reusable set of rules — for inspecting and handling network traffic. The rules in the rule groups provide the details for packet inspection and specify the actions to take when a packet matches the inspection criteria. Network Firewall uses a Suricata rules engine to process all stateful rules. Currently, you can create Suricata compatible or basic rules (such as domain list) in Network Firewall. We use Suricata compatible rule strings within this post to maintain maximum compatibility with most use cases.
Figure 1 describes how the anfw-automate solution uses the distributed firewall rule configurations to simplify rule management for multiple teams. The rules are validated, transformed, and stored in the central AWS Network Firewall policy. This solution isolates the rule generation to the spoke AWS accounts, but still uses a shared firewall policy and a central ANFW for traffic filtering. This approach grants the AWS spoke account owners the flexibility to manage their own firewall rules while maintaining the accountability for their rules in the firewall policy. The solution enables the central security team to validate and override user defined firewall rules before pushing them to the production firewall policy. The security team operating the central firewall can also define additional rules that are applied to all spoke accounts, thereby enforcing organization-wide security policies. The firewall rules are then compiled and applied to Network Firewall in seconds, providing near real-time response in scenarios involving critical security incidents.
Figure 1: Workflow launched by uploading a configuration file to the configuration (config) bucket
The Network Firewall firewall endpoints and anfw-automate solution are both deployed in the central account. The spoke accounts use the application for rule automation and the Network Firewall for traffic inspection.
As shown in Figure 1, each spoke account contains the following:
An Amazon Simple Storage Service (Amazon S3) bucket to store multiple configuration files, one per Region. The rules defined in the configuration files are applicable to the VPC traffic in the spoke account. The configuration files must comply with the defined naming convention ($Region-config.yaml) and be validated to make sure that only one configuration file exists per Region per account. The S3 bucket has event notifications enabled that publish all changes to configuration files to a local default bus in Amazon EventBridge.
EventBridge rules to monitor the default bus and forward relevant events to the custom event bus in the central account. The EventBridge rules specifically monitor VPCDelete events published by Amazon CloudTrail and S3 event notifications. When a VPC is deleted from the spoke account, the VPCDelete events lead to the removal of corresponding rules from the firewall policy. Additionally, all create, update, and delete events from Amazon S3 event notifications invoke corresponding actions on the firewall policy.
Two AWS Identity and Access Manager (IAM) roles with keywords xaccount.lmb.rc and xaccount.lmb.re are assumed by RuleCollect and RuleExecute functions in the central account, respectively.
A CloudWatch Logs log group to store event processing logs published by the central AWS Lambda application.
In the central account:
EventBridge rules monitor the custom event bus and invoke a Lambda function called RuleCollect. A dead-letter queue is attached to the EventBridge rules to store events that failed to invoke the Lambda function.
The RuleCollect function retrieves the config file from the spoke account by assuming a cross-account role. This role is deployed by the same stack that created the other spoke account resources. The Lambda function validates the request, transforms the request to the Suricata rule syntax, and publishes the rules to an Amazon Simple Queue Service (Amazon SQS) first-in-first-out (FIFO) queue. Input validation controls are paramount to make sure that users don’t abuse the functionality of the solution and bypass central governance controls. The Lambda function has input validation controls to verify the following:
The VPC ID in the configuration file exists in the configured Region and the same AWS account as the S3 bucket.
The Amazon S3 object version ID received in the event matches the latest version ID to mitigate race conditions.
Users don’t have only top-level domains (for example, .com, .de) in the rules.
The custom Suricata rules don’t have any as the destination IP address or domain.
The VPC identifier matches the required format, that is, a+(AWS Account ID)+(VPC ID without vpc- prefix) in custom rules. This is important to have unique rule variables in rule groups.
The rules don’t use security sensitive keywords such as sid, priority, or metadata. These keywords are reserved for firewall administrators and the Lambda application.
CIDR ranges for a VPC are mapped appropriately using IP set variables.
The input validations make sure that rules defined by one spoke account don’t impact the rules from other spoke accounts. The validations applied to the firewall rules can be updated and managed as needed based on your requirements. The rules created must follow a strict format, and deviation from the preceding rules will lead to the rejection of the request.
The Amazon SQS FIFO queue preserves the order of create, update, and delete operations run in the configuration bucket of the spoke account. These state-management controls maintain consistency between the firewall rules in the configuration file within the S3 bucket and the rules in the firewall policy. If the sequence of updates provided by the distributed configurations isn’t honored, the rules in a firewall policy might not match the expected ruleset.
Rules not processed beyond the maxReceiveCount threshold are moved to a dead-letter SQS queue for troubleshooting.
The Amazon SQS messages are subsequently consumed by another Lambda function called RuleExecute. Multiple changes to one configuration are batched together in one message. The RuleExecute function parses the messages and generates the required rule groups, IP set variables, and rules within the Network Firewall. Additionally, the Lambda function establishes a reserved rule group, which can be administered by the solution’s administrators and used to define global rules. The global rules, applicable to participating AWS accounts, can be managed in the data/defaultdeny.yaml file by the central security team.
The RuleExecute function also implements throttling controls to make sure that rules are applied to the firewall policy without reaching the ThrottlingException from Network Firewall (see common errors). The function also implements back-off logic to handle this exception. This throttling effect can happen if there are too many requests issued to the Network Firewall API.
The function makes cross-Region calls to Network Firewall based on the Region provided in the user configuration. There is no need to deploy the RuleExecute and RuleCollect Lambda functions in multiple Regions unless a use case warrants it.
Walkthrough
The following section guides you through the deployment of the rules management engine.
Deployment: Outlines the steps to deploy the solution into the target AWS accounts.
Validation: Describes the steps to validate the deployment and ensure the functionality of the solution.
Cleaning up: Provides instructions for cleaning up the deployment.
Deployment
In this phase, you deploy the application pipeline in the resource account. The pipeline is responsible for deploying multi-Region cross-account CDK stacks in both the central account and the delegated administrator account.
If you don’t have a functioning Network Firewall firewall using the centralized deployment model in the central account, see the README for instructions on deploying Amazon VPC and Network Firewall stacks before proceeding. You need to deploy the Network Firewall in centralized deployment in each Region and Availability Zone used by spoke account VPC infrastructure.
The application pipeline stack deploys three stacks in all configured Regions: LambdaStack and ServerlessStack in the central account and StacksetStack in the delegated administrator account. It’s recommended to deploy these stacks solely in the primary Region, given that the solution can effectively manage firewall policies across all supported Regions.
LambdaStack deploys the RuleCollect and RuleExecute Lambda functions, Amazon SQS FIFO queue, and SQS FIFO dead-letter queue.
ServerlessStack deploys EventBridge bus, EventBridge rules, and EventBridge Dead-letter queue.
StacksetStack deploys a service-managed stack set in the delegated administrator account. The stack set includes the deployment of IAM roles, EventBridge rules, an S3 Bucket, and a CloudWatch log group in the spoke account. If you’re manually deploying the CloudFormation template (templates/spoke-serverless-stack.yaml) in the spoke account, you have the option to disable this stack in the application configuration.
Figure 2: CloudFormation stacks deployed by the application pipeline
Follow the README and cdk bootstrapping guide to bootstrap the resource account. Then, bootstrap the central account and delegated administrator account (optional if StacksetStack is deployed manually in the spoke account) to trust the resource account. The spoke accounts don’t need to be bootstrapped.
Create a folder to be referred to as <STAGE>, where STAGE is the name of your deployment stage — for example, local, dev, int, and so on — in the conf folder of the cloned repository. The deployment stage is set as the STAGE parameter later and used in the AWS resource names.
Create global.json in the <STAGE> folder. Follow the README to update the parameter values. A sample JSON file is provided in conf/sample folder.
Run the following commands to configure the local environment:
Create a file named app.json in the <STAGE> folder and populate the parameters in accordance with the README section and defined schema.
If you choose to manage the deployment of spoke account stacks using the delegated administrator account and have set the deploy_stacksets parameter to true, create a file named stackset.json in the <STAGE> folder. Follow the README section to align with the requirements of the defined schema.
You can also deploy the spoke account stack manually for testing using the AWS CloudFormation template in templates/spoke-serverless-stack.yaml. This will create and configure the needed spoke account resources.
Run the following commands to deploy the application pipeline stack:
export STACKNAME=app && make deploy
Figure 3: Example output of application pipeline deployment
After deploying the solution, each spoke account is required to configure stateful rules for every VPC in the configuration file and upload it to the S3 bucket. Each spoke account owner must verify the VPC’s connection to the firewall using the centralized deployment model. The configuration, presented in the YAML configuration language, might encompass multiple rule definitions. Each account must furnish one configuration file per VPC to establish accountability and non-repudiation.
Validation
Now that you’ve deployed the solution, follow the next steps to verify that it’s completed as expected, and then test the application.
To validate deployment
Sign in to the AWS Management Console using the resource account and go to CodePipeline.
Verify the existence of a pipeline named cpp-app-<aws_ organization_scope>-<project_name>-<module_name>-<STAGE> in the configured Region.
Verify that stages exist in each pipeline for all configured Regions.
Confirm that all pipeline stages exist. The LambdaStack and ServerlessStack stages must exist in the cpp-app-<aws_organization_scope>-<project_name>-<module_name>-<STAGE> stack. The StacksetStack stage must exist if you set the deploy_stacksets parameter to true in global.json.
To validate the application
Sign in and open the Amazon S3 console using the spoke account.
Follow the schema defined in app/RuleCollect/schema.json and create a file with naming convention ${Region}-config.yaml. Note that the Region in the config file is the destination Region for the firewall rules. Verify that the file has valid VPC data and rules.
Figure 4: Example configuration file for eu-west-1 Region
Upload the newly created config file to the S3 bucket named anfw-allowlist-<AWS_REGION for application stack>-<Spoke Account ID>-<STAGE>.
If the data in the config file is invalid, you will see ERROR and WARN logs in the CloudWatch log group named cw-<aws_organization_scope>-<project_name>-<module_name>-CustomerLog-<STAGE>.
If all the data in the config file is valid, you will see INFO logs in the same CloudWatch log group.
Figure 5: Example of logs generated by the anfw-automate in a spoke account
After the successful processing of the rules, sign in to the Network Firewall console using the central account.
Navigate to the Network Firewall rule groups and search for a rule group with a randomly assigned numeric name. This rule group will contain your Suricata rules after the transformation process.
Figure 6: Rules created in Network Firewall rule group based on the configuration file in Figure 4
Access the Network Firewall rule group identified by the suffix reserved. This rule group is designated for administrators and global rules. Confirm that the rules specified in app/data/defaultdeny.yaml have been transformed into Suricata rules and are correctly placed within this rule group.
Instantiate an EC2 instance in the VPC specified in the configuration file and try to access both the destinations allowed in the file and any destination not listed. Note that requests to destinations not defined in the configuration file are blocked.
Cleaning up
To avoid incurring future charges, remove all stacks and instances used in this walkthrough.
Sign in to both the central account and the delegated admin account. Manually delete the stacks in the Regions configured for the app parameter in global.json. Ensure that the stacks are deleted for all Regions specified for the app parameter. You can filter the stack names using the keyword <aws_organization_scope>-<project_name>-<module_name> as defined in global.json.
After deleting the stacks, remove the pipeline stacks using the same command as during deployment, replacing cdk deploy with cdk destroy.
Terminate or stop the EC2 instance used to test the application.
Conclusion
This solution simplifies network security by combining distributed ANFW firewall configurations in a centralized policy. Automated rule management can help reduce operational overhead, reduces firewall change request completion times from minutes to seconds, offloads security and operational mechanisms such as input validation, state-management, and request throttling, and enables central security teams to enforce global firewall rules without compromising on the flexibility of user-defined rulesets.
In addition to using this application through S3 bucket configuration management, you can integrate this tool with GitHub Actions into your CI/CD pipeline to upload the firewall rule configuration to an S3 bucket. By combining GitHub actions, you can automate configuration file updates with automated release pipeline checks, such as schema validation and manual approvals. This enables your team to maintain and change firewall rule definitions within your existing CI/CD processes and tools. You can go further by allowing access to the S3 bucket only through the CI/CD pipeline.
Finally, you can ingest the AWS Network Firewall logs into one of our partner solutions for security information and event management (SIEM), security monitoring, threat intelligence, and managed detection and response (MDR). You can launch automatic rule updates based on security events detected by these solutions, which can help reduce the response time for security events.
If you have feedback about this post, submit comments in the Comments section below. If you have questions about this post, contact AWS Support.
The collective thoughts of the interwebz
Manage Consent
To provide the best experiences, we use technologies like cookies to store and/or access device information. Consenting to these technologies will allow us to process data such as browsing behavior or unique IDs on this site. Not consenting or withdrawing consent, may adversely affect certain features and functions.
Functional
Always active
The technical storage or access is strictly necessary for the legitimate purpose of enabling the use of a specific service explicitly requested by the subscriber or user, or for the sole purpose of carrying out the transmission of a communication over an electronic communications network.
Preferences
The technical storage or access is necessary for the legitimate purpose of storing preferences that are not requested by the subscriber or user.
Statistics
The technical storage or access that is used exclusively for statistical purposes.The technical storage or access that is used exclusively for anonymous statistical purposes. Without a subpoena, voluntary compliance on the part of your Internet Service Provider, or additional records from a third party, information stored or retrieved for this purpose alone cannot usually be used to identify you.
Marketing
The technical storage or access is required to create user profiles to send advertising, or to track the user on a website or across several websites for similar marketing purposes.