All posts by Arun A K

Enable strategic data quality management with AWS Glue DQDL labels

Post Syndicated from Arun A K original https://aws.amazon.com/blogs/big-data/enable-strategic-data-quality-management-with-aws-glue-dqdl-labels/

Organizations increasingly depend on trusted, high-quality data to drive analytics, regulatory reporting, and operational decision-making. When data quality issues go undetected, they can lead to inaccurate insights, stalled initiatives, and compliance gaps that directly affect business outcomes. As data volumes grow and pipelines become more distributed, maintaining consistent data quality across teams and data domains becomes progressively more challenging.

You can address these challenges with AWS Glue Data Quality by providing automated, rule-based data validation across datasets in the AWS Glue Data Catalog and within AWS Glue ETL pipelines. With the Data Quality Definition Language (DQDL), you can author both straightforward and advanced validation rules to detect data quality issues early in the lifecycle, before they reach downstream applications or analytics environments.

In this post, we highlight the new DQDL labels feature, which enhances how you organize, prioritize, and operationalize your data quality efforts at scale. We show how labels such as business criticality, compliance requirements, team ownership, or data domain can be attached to data quality rules to streamline triage and analysis. You’ll learn how to quickly surface targeted insights (for example, “all high-priority customer data failures owned by marketing” or “GDPR-related issues from our Salesforce ingestion pipeline”) and how DQDL labels can help teams improve accountability and accelerate remediation workflows.

Managing complex data quality rules across teams and use cases

As organizations advance in their data quality programs, a few rules often grow into hundreds or thousands maintained across many teams and business domains. Take the example of AnyCompany, a large retail organization with multiple data teams managing customer, product, and sales data across different business units. These teams run a variety of data quality rules, including weekly customer checks, daily product validations, frequent sales checks, and monthly compliance reviews, with different naming patterns, schedules, and response processes. This creates a fragmented, hard-to-navigate system where teams operate in isolation and data quality practices become inconsistent.

The challenge lies in the volume of rules and the lack of organizational context around them. When dozens of data quality rules pass or fail, teams still lack clarity on ownership, urgency, or business impact. This slows incident response, limits executive insight, and complicates resource planning. To move from technical monitoring to strategic value, organizations need a unified structure that connects data quality rules to teams, domains, and priorities, bringing essential business context to data quality operations.

Metadata-driven rule organization

AWS Glue DQDL labels address organizational challenges because you can attach custom metadata to data quality rules, transforming anonymous validations into contextually rich, business-aware checks. Labels work as key-value pairs attached to individual rules or entire rule sets, and you can organize quality operations around business dimensions such as team ownership, criticality, frequency, and regulatory requirements, as in the case of the AnyCompany example. When a rule fails, you immediately identify what failed, who should respond, how urgent it is, and which business area is affected, whether it’s the marketing department tracking email completeness with daily frequency tags, compliance teams monitoring age verification with regulation labels, or the finance team validating payment data with high-criticality markers.

Labels integrate with existing DQDL syntax without requiring changes to current rule definitions, working consistently across AWS Glue Data Quality execution contexts. The feature’s flexibility supports organizational taxonomies from cost centers and geographic regions to data sensitivity levels and service-level agreement (SLA) requirements with single rules carrying multiple labels simultaneously for sophisticated filtering and analysis. Labels appear in the outputs, including rule outcomes, row-level results, and API responses, so organizational context travels with quality results whether you’re troubleshooting failures, analyzing trends in Amazon Athena, or building executive dashboards in Amazon Quick Sight.

Getting started: Writing your first labeled data quality rules

Let’s walk through creating your first labeled data quality rules using AnyCompany’s customer data scenario. We’ll use their customer demographics dataset, which contains customer information that multiple teams need to validate with different priorities and frequencies.

DQDL labels follow a straightforward key-value pair syntax that integrates naturally with existing rule definitions. The basic syntax supports two approaches: default labels that apply to the rules in a rule set, and rule-specific labels that apply to individual rules. Rule-specific labels can override default labels when using the same key, providing fine-grained control over your labeling strategy.

When implementing DQDL labels, keep the following constraints in mind:

  • Maximum of 10 labels per rule
  • Label keys are limited to 128 characters and can’t be empty
  • Label values are limited to 256 characters and can’t be empty
  • Both keys and values are case-sensitive
  • Rule-specific labels override default labels when using the same key

Using this labeling approach, you can organize and manage data quality rules efficiently across different teams and validation requirements.

Best practices for label naming conventions

Here are some proven labeling strategies that scale across enterprise environments:

  • Establish a complete standardized taxonomy upfront – Define label keys in DefaultLabels with sensible defaults such as regulation=none or sla=24h to provide rules with identical keys for cross-team queries.
  • Use consistent key naming patterns – Establish standard keys such as team, criticality, sla, impact, and regulation across rule sets to maintain query consistency.
  • Implement hierarchical values – Use formats such as team=marketing-analytics to support both broad and specific filtering while keeping key structure consistent.
  • Include operational metadata in defaults – Define labels such as sla, escalation-level, or notification-channel as defaults to drive automated response workflows.
  • Plan for reporting dimensions – Include keys such as cost-center, region, or business-unit in your default taxonomy to support meaningful business analytics.
  • Use standardized value patterns – Establish consistent formats such as criticality=high/medium/low or sla=15m/1h/1d for predictable filtering and sorting.

These are guidelines rather than requirements but following them from the start enables powerful cross-team analytics and reduces future refactoring effort.

Customer data validation hands-on example

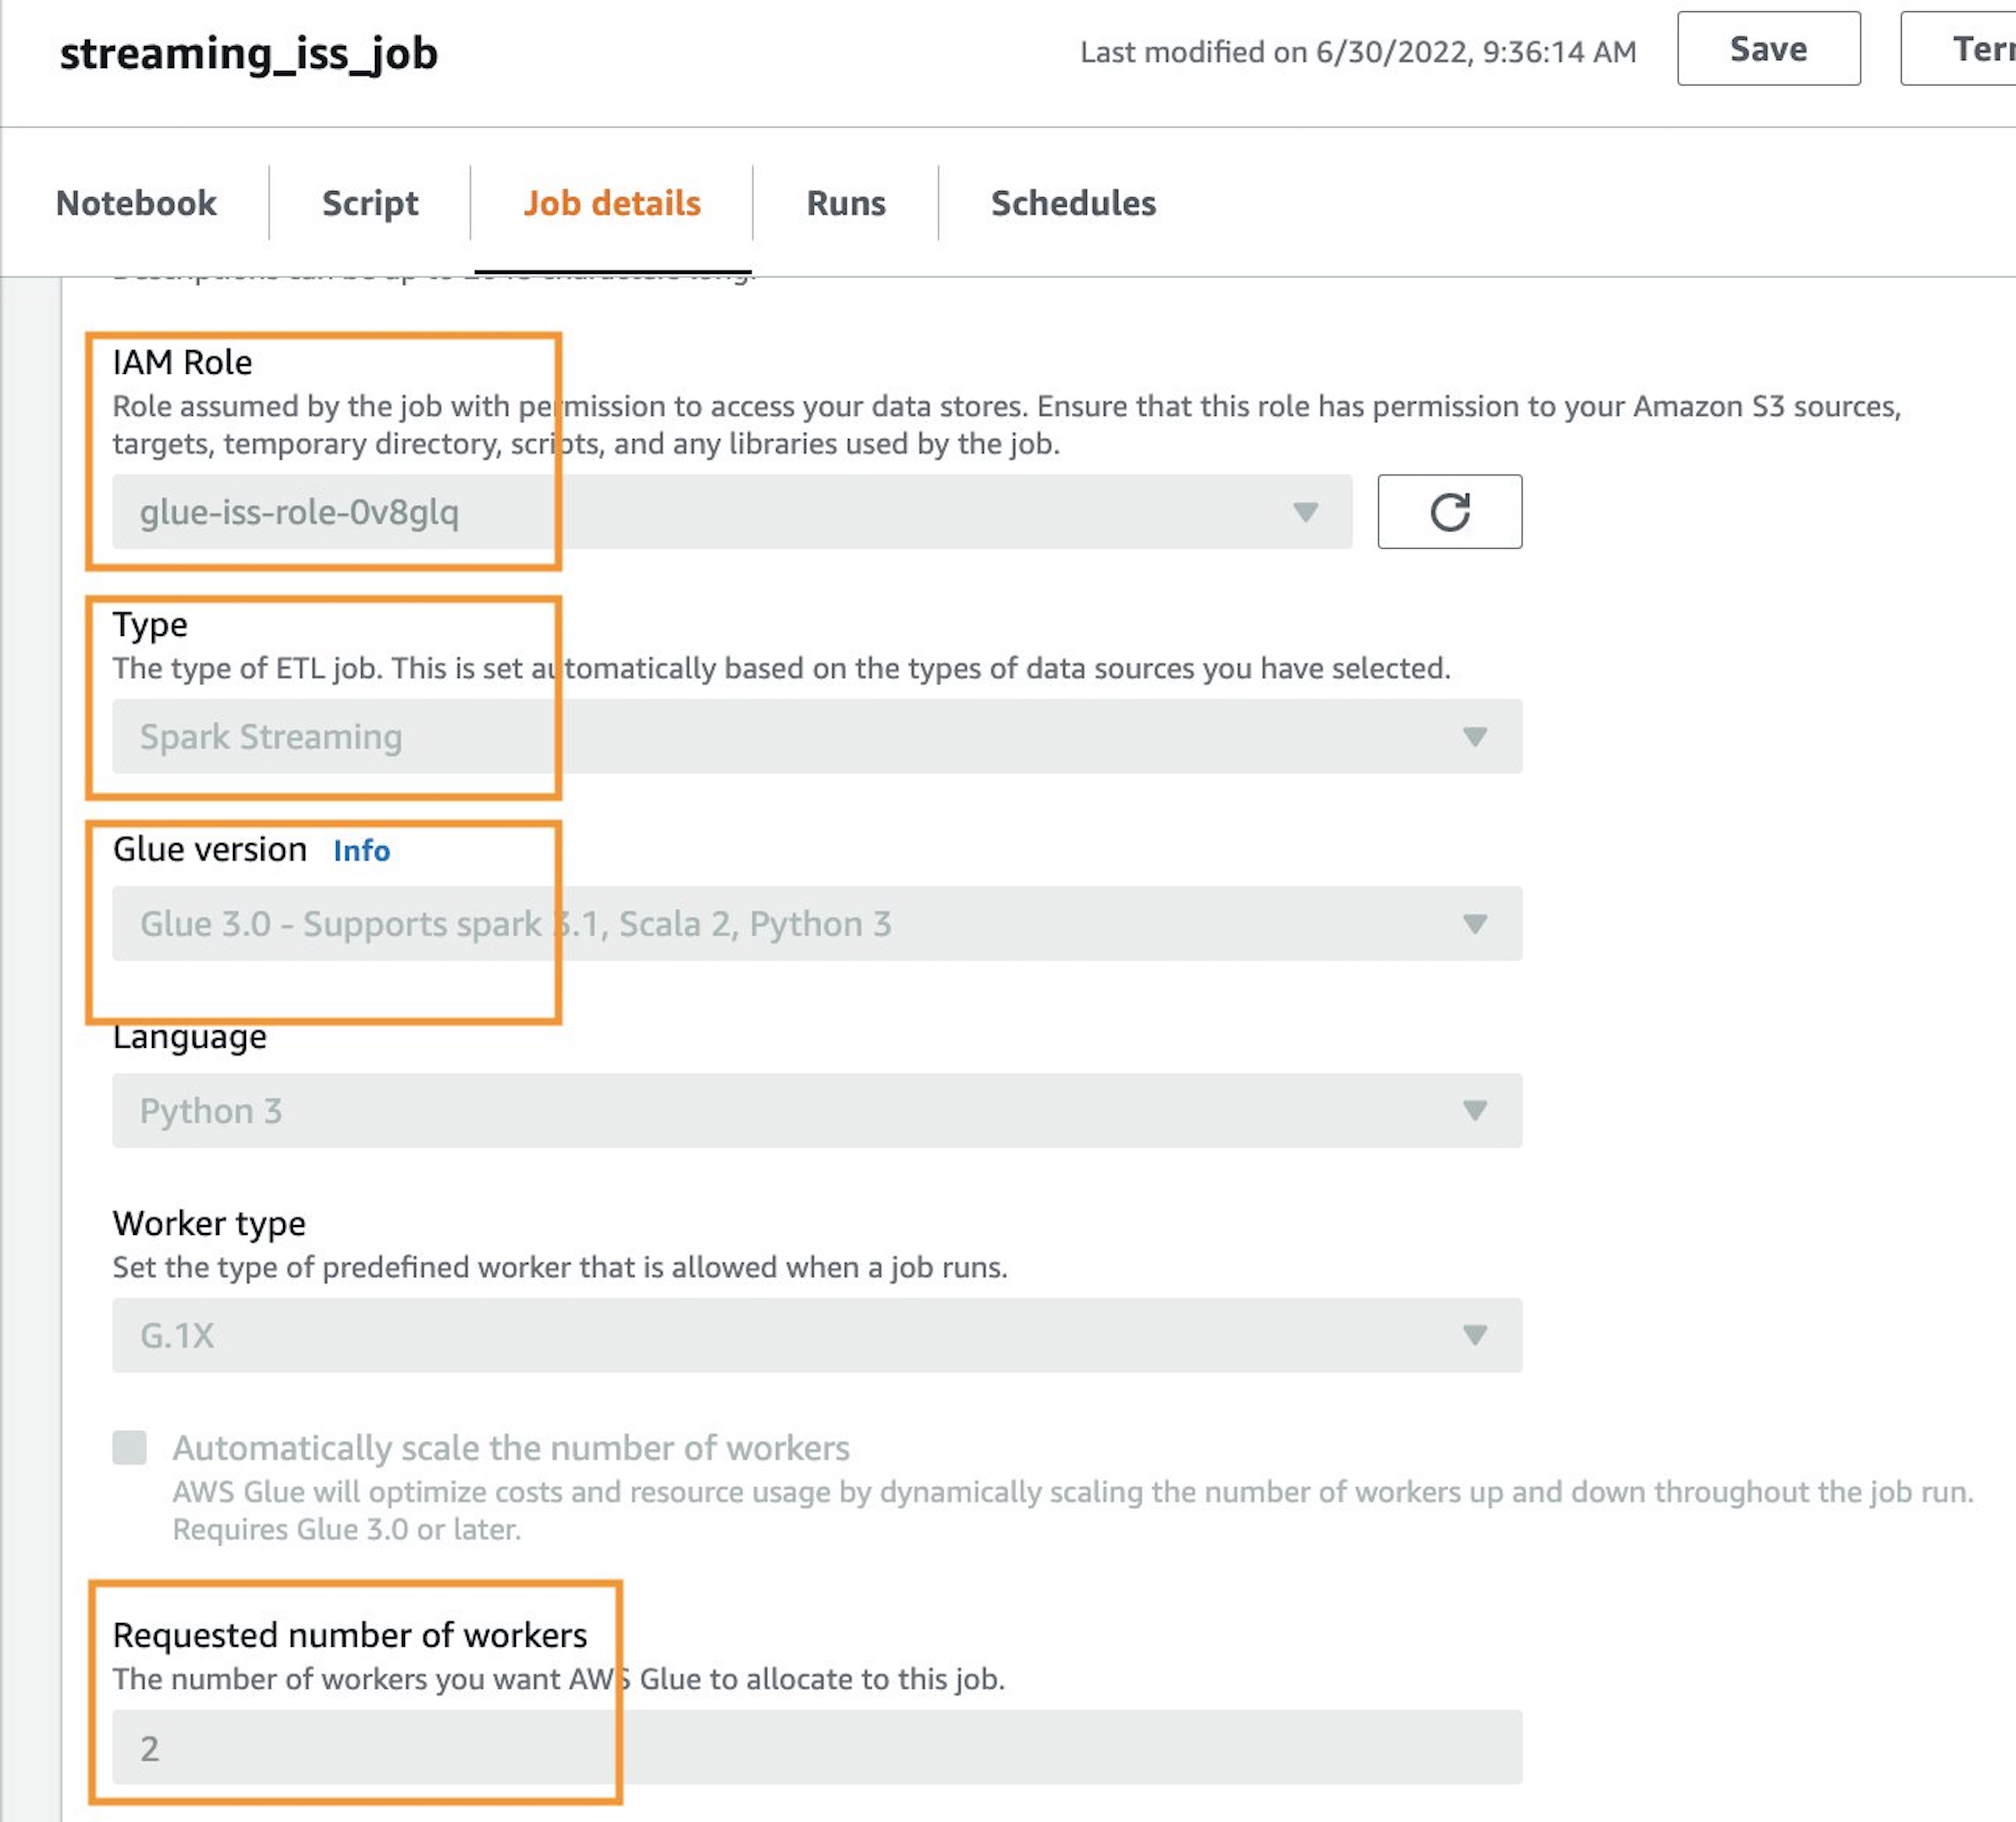
This post assumes you’re familiar with AWS Glue Data Quality and ETL operations. Using the following hands-on walkthrough, you’ll learn how to implement DQDL labels for organizational data quality management.

Start by establishing default labels that automatically apply to every rule in the rule set, providing consistent organizational context:

DefaultLabels = ["team"="data-team", "criticality"="medium", "regulation"="none", "sla"="24h", "impact"="medium"]

DefaultLabels provide a foundational taxonomy that automatically propagates across your entire rule set, creating uniformity and reducing configuration overhead. By defining default values at the organizational level, such as team=data-team, criticality=medium, regulation=none, sla=24h, and impact=medium, every rule inherits these standardized attributes without requiring explicit declaration. This inheritance model promotes consistency while maintaining the flexibility individual teams need to address their unique operational contexts.

Individual teams can selectively override inherited defaults to reflect their specific requirements. For example, examine the following complete rule set:

DefaultLabels = ["team"="data-team", "criticality"="medium", "regulation"="none", "sla"="24h", "impact"="medium"]

Rules = [
    IsComplete "c_customer_id" labels=["team"="analytics", "criticality"="high", "sla"="15m", "impact"="high"],
    ColumnValues "c_customer_id" matches "e.*" labels=["team"="analytics", "criticality"="medium", "impact"="low"],
    ColumnLength "c_city" > 6 labels=["team"="marketing", "criticality"="medium", "sla"="4h", "impact"="medium"],
    IsComplete "c_name" labels=["team"="marketing", "sla"="4h"],
    ColumnValues "c_age" >= 21 labels=["team"="compliance", "criticality"="high", "regulation"="age21", "impact"="high"] with threshold > 0.99,
    IsComplete "c_birth_date" labels=["team"="compliance", "criticality"="medium", "regulation"="gdpr", "impact"="medium"],
    IsComplete "c_creditissuer" labels=["team"="finance", "impact"="high"],
    ColumnValues "c_creditcardnumber" > 100000000000 labels=["team"="finance", "criticality"="high", "regulation"="payment", "impact"="high"] with threshold > 0.95
]

Notice how the compliance team changes regulation from 'none' to 'age21' for age verification rules and analytics elevates criticality to 'high' for business-critical checks. Unspecified labels automatically inherit the default values, providing consistency while maintaining team-level flexibility.

Applying labeled rules against the dataset

Now let’s see DQDL labels in action by applying AnyCompany’s rule set to actual data through an AWS Glue ETL pipeline. This section assumes you’re familiar with AWS Glue EvaluateDataQuality transform and basic extract, transform, and load (ETL) job creation.

We use AWS Glue EvaluateDataQuality transform within an ETL job to process our customer dataset and apply our labeled rule set. The transform generates two types of outputs: rule-level outcomes that show which rules passed or failed with their associated labels and row-level results that identify specific records and the labeled rules they violated.

By default, labels are excluded from row-level results. However, by enabling them you can analyze data quality results at both the individual record level and across organizational dimensions such as teams and criticality levels.

To enable labels in row-level results, you must configure the additionalOptions parameter in your EvaluateDataQuality transform. The key setting is "rowLevelConfiguration.ruleWithLabels":"ENABLED", which instructs AWS Glue to include label metadata for each rule evaluation at the individual record level.

Here’s how to implement an ETL pipeline that applies our AnyCompany’s rule set with labels enabled:

import sys
from awsglue.transforms import *
from awsglue.utils import getResolvedOptions
from pyspark.context import SparkContext
from awsglue.context import GlueContext
from awsglue.job import Job
from awsgluedq.transforms import EvaluateDataQuality
from awsglue.dynamicframe import DynamicFrame
import boto3

def create_table(athena,s3_bucket,df,db_name,table_name):
    ddl = spark.sparkContext._jvm.org.apache.spark.sql.types.DataType.fromJson(df.schema.json()).toDDL()
    ddl_stmt_string=f"""CREATE EXTERNAL TABLE IF NOT EXISTS {db_name}.{table_name} ({str(ddl)}) ROW FORMAT SERDE 'org.apache.hadoop.hive.ql.io.parquet.serde.ParquetHiveSerDe' STORED AS INPUTFORMAT 'org.apache.hadoop.hive.ql.io.parquet.MapredParquetInputFormat' OUTPUTFORMAT 'org.apache.hadoop.hive.ql.io.parquet.MapredParquetOutputFormat' LOCATION 's3://{s3_bucket}/label/{table_name}/'"""
    athena.start_query_execution(QueryString=ddl_stmt_string,ResultConfiguration={'OutputLocation': f"s3://{s3_bucket}/athena_results/"})

args = getResolvedOptions(sys.argv, ['JOB_NAME'])

sc = SparkContext()
glueContext = GlueContext(sc)
spark = glueContext.spark_session
job = Job(glueContext)
job.init(args['JOB_NAME'], args)

rules="""
DefaultLabels = ["team"="data-team", "criticality"="medium", "regulation"="none", "sla"="24h", "impact"="medium"] 
Rules = [ 
        IsComplete "c_customer_id" labels=["team"="analytics", "criticality"="high", "sla"="15m", "impact"="high"], 
        ColumnValues "c_customer_id" matches "e.*" labels=["team"="analytics", "criticality"="medium", "impact"="low"], 
        ColumnLength "c_city" > 6 labels=["team"="marketing", "criticality"="medium", "sla"="4h", "impact"="medium"], 
        IsComplete "c_name" labels=["team"="marketing", "sla"="4h"], 
        ColumnValues "c_age" >= 21 labels=["team"="compliance", "criticality"="high", "regulation"="age21", "impact"="high"] with threshold > 0.99, 
        IsComplete "c_birth_date" labels=["team"="compliance", "criticality"="medium", "regulation"="gdpr", "impact"="medium"], 
        IsComplete "c_creditissuer" labels=["team"="finance", "impact"="high"], 
        ColumnValues "c_creditcardnumber" > 100000000000 labels=["team"="finance", "criticality"="high", "regulation"="payment", "impact"="high"] with threshold > 0.95 
        ]
"""

s3_bucket="REPLACE"

row_level_table="dqrowlevel"
rule_level_table="dqrulelevel"
db_name="default"

additional_options={}
additional_options["observations.scope"]="ALL"
additional_options["performanceTuning.caching"]="CACHE_INPUT"

additional_options["rowLevelConfiguration.ruleWithLabels"]="ENABLED"

df = spark.read.option("header", "true").option("inferSchema", "true").csv("s3://aws-data-analytics-workshops/aws_glue/aws_glue_data_quality/data/customers/")

anycompany_customers=DynamicFrame.fromDF(df, glueContext, "anycompany_customers")

dq_check = EvaluateDataQuality().process_rows(frame=anycompany_customers, ruleset=rules, publishing_options={"dataQualityEvaluationContext": "dq_check","enableDataQualityCloudWatchMetrics": True, "enableDataQualityResultsPublishing": True}, additional_options=additional_options)

rowlevel = SelectFromCollection.apply(dfc=dq_check, key="rowLevelOutcomes", transformation_ctx="rowlevel")
rulelevel = SelectFromCollection.apply(dfc=dq_check, key="ruleOutcomes", transformation_ctx="rulelevel")

rowlevel_df=rowlevel.toDF()
rulelevel_df=rulelevel.toDF()

rowlevel_df.write.mode("overwrite").parquet(f"s3://{s3_bucket}/label/{row_level_table}/")
rulelevel_df.write.mode("overwrite").parquet(f"s3://{s3_bucket}/label/{rule_level_table}/")

athena = boto3.client('athena')
create_table(athena,s3_bucket,rowlevel_df,db_name,row_level_table)
create_table(athena,s3_bucket,rulelevel_df,db_name,rule_level_table)
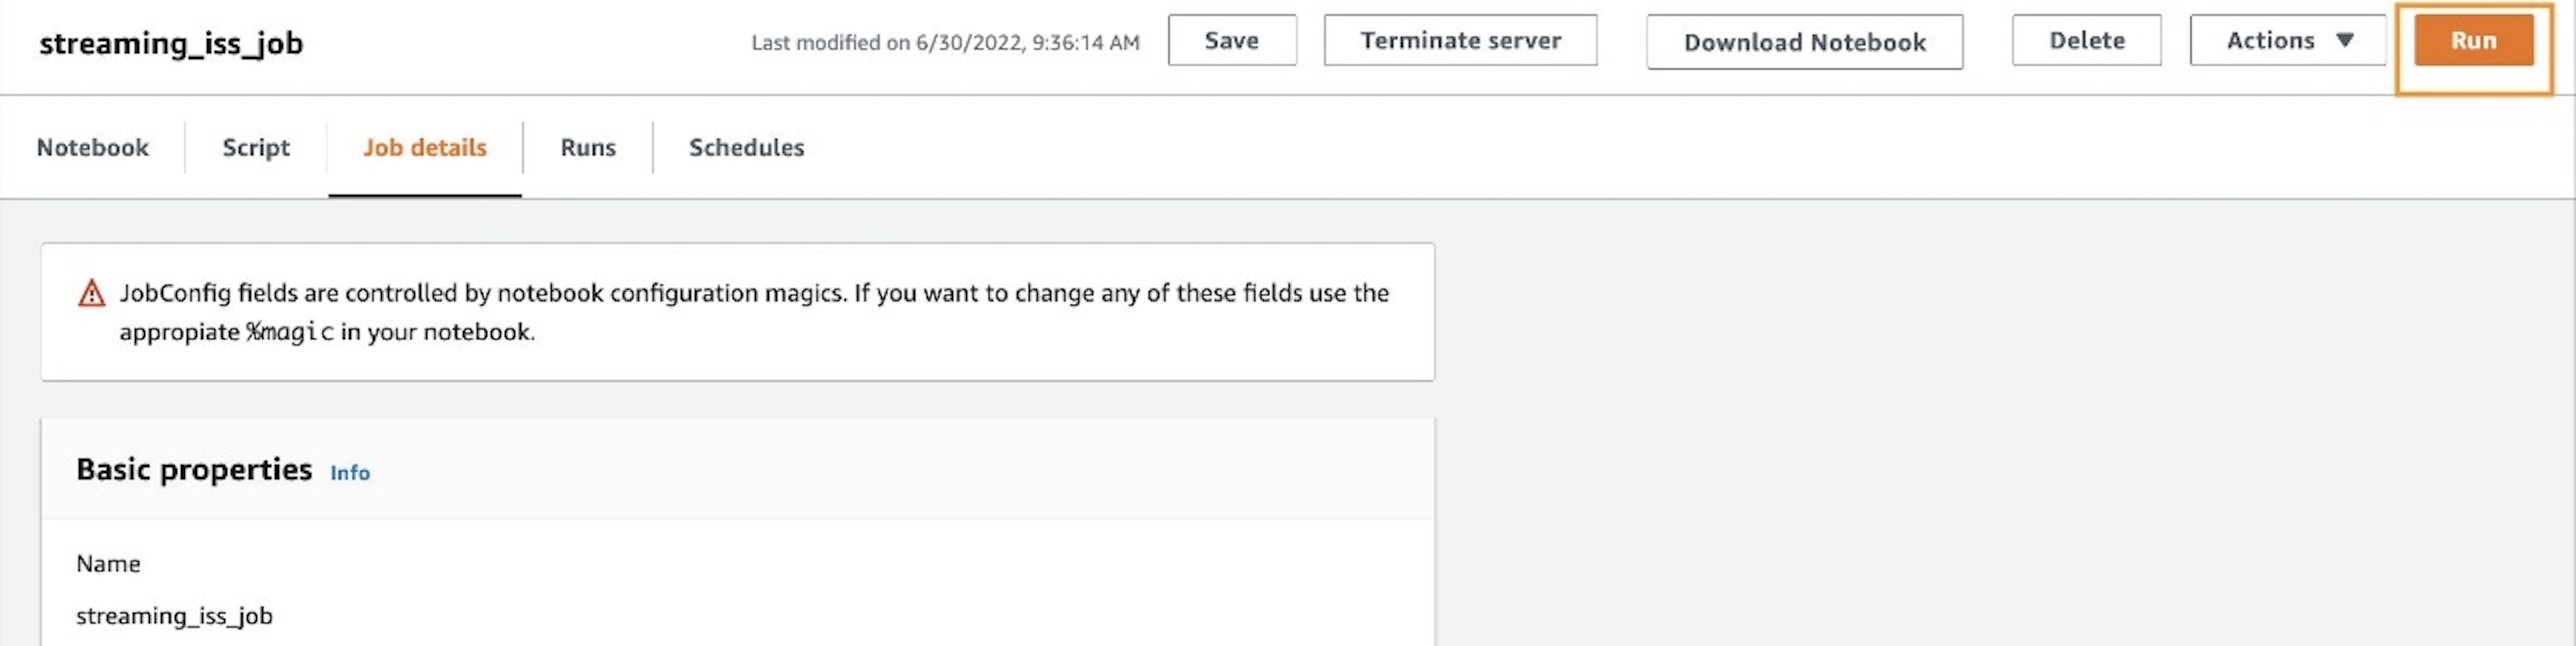
job.commit()

To run this example, update the s3_bucket variable with your own Amazon Simple Storage Service (Amazon S3) bucket name, then create and execute the ETL job in AWS Glue.

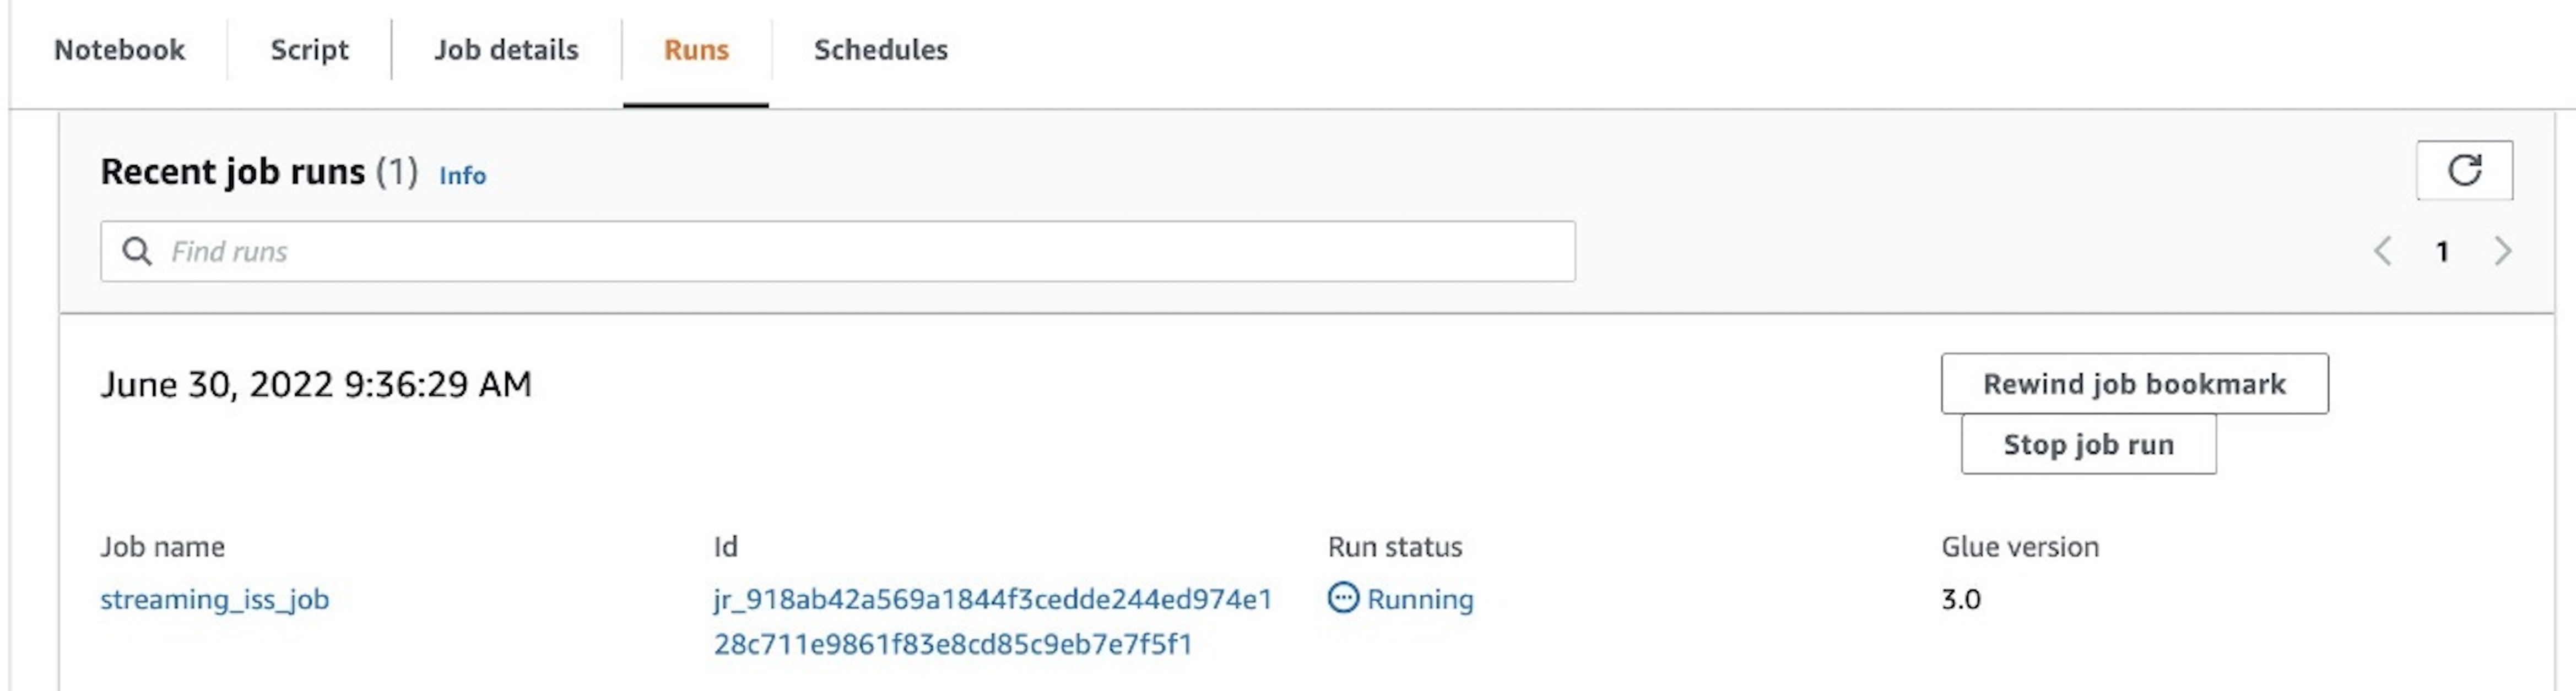
After the job is completed, you’ll find:

  • Rule-level and row-level results stored in your S3 bucket
  • Two new tables automatically created in your default database: dqrulelevel and dqrowlevel

In the next section, we query these tables using Amazon Athena to analyze the labeled data quality outcomes and extract actionable insights.

Analyzing data quality results by labels using Amazon Athena

We’ve stored our labeled data quality results in Amazon S3 and as a table in the AWS Glue data catalog. Now, we can use Amazon Athena to analyze these results across the organizational dimensions captured in your labels. The labeled metadata transforms raw data quality outcomes into actionable business intelligence that drives targeted remediation and strategic decision-making.

Querying row-level results

With labels stored alongside row-level outcome, you can query specific records that failed data quality checks based on label criteria. For example, the following query identifies individual customer records that failed high criticality compliance rules. You can use it to quickly locate and remediate problematic data for regulatory or business-critical use cases:

SELECT
c_customer_id,
c_age,
failed_rule
FROM (
SELECT *
FROM dqrowlevel
WHERE dataqualityevaluationresult = 'Failed'
)
CROSS JOIN UNNEST(dataqualityrulesfail) AS t(failed_rule)
WHERE failed_rule LIKE '%criticality"="high"%'
AND failed_rule LIKE '%team"="compliance"%'
LIMIT 5;

You can see the query results above showing failed records filtered by 'high' criticality and 'compliance' team labels.

Querying rule-level results

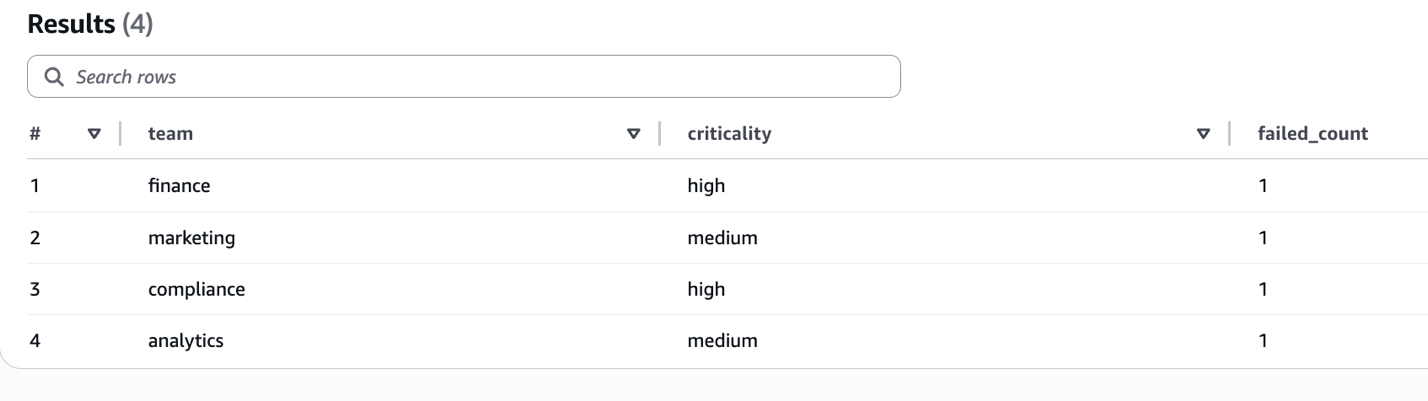
Now that we have stored rule-level outcomes with labels, we can run aggregation queries to analyze failures across different dimensions. For example, the following query groups failed rules by criticality and team to identify which teams have the most high-severity failures. You can use it to prioritize remediation efforts and allocate resources effectively:

SELECT 
    labels['team'] AS team,
    labels['criticality'] AS criticality,
    COUNT(*) AS failed_count
FROM dqrulelevel
WHERE outcome = 'Failed'
GROUP BY labels['criticality'], labels['team']
ORDER BY failed_count DESC;

The following screenshot shows aggregated failure counts grouped by team and criticality level.

Viewing data quality results using AWS CLI

Beyond querying results in Athena, you can also retrieve data quality outcomes directly using the AWS Command Line Interface (AWS CLI). This is useful for automation, scripting, and integrating data quality checks into continuous integration and continuous delivery (CI/CD) pipelines.

To list data quality results for your ETL job, enter the following:

aws glue list-data-quality-results --filter '{"JobName":"<your-job-name>"}'

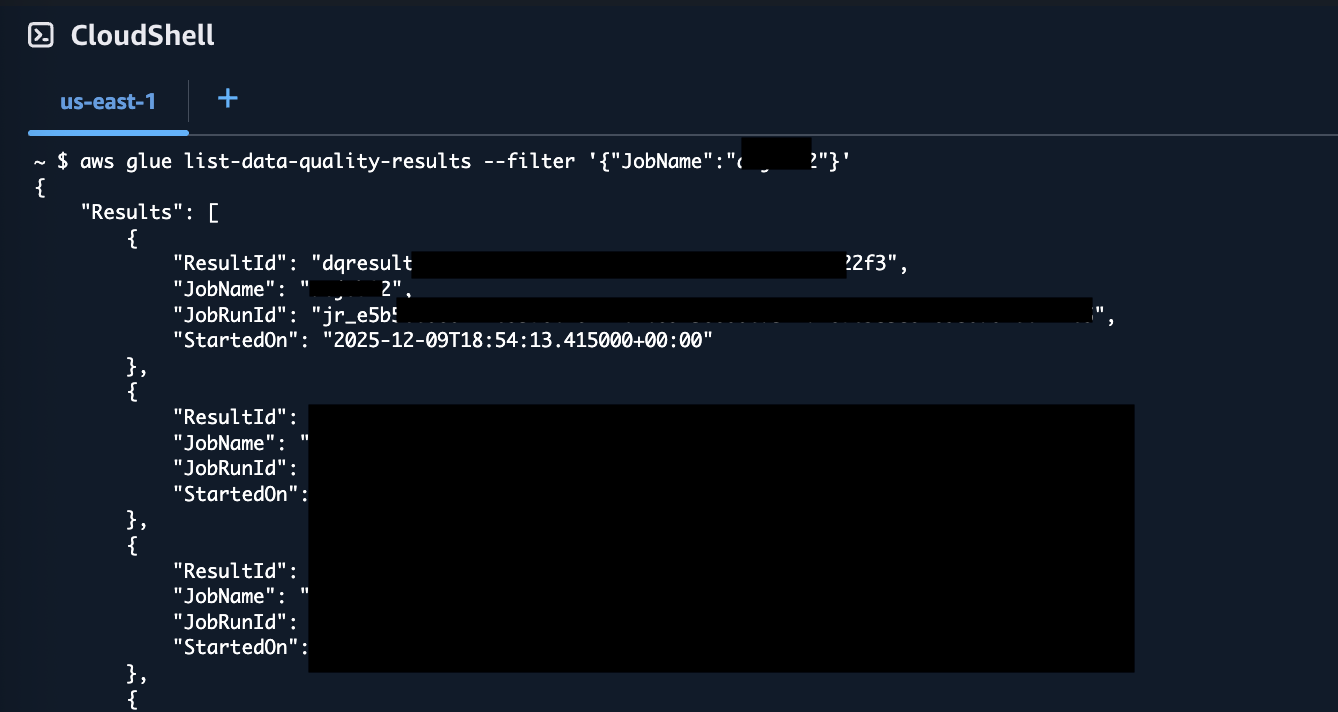
You can see in the above screenshot that the resultant JSON includes a ResultId for each data quality run.

To retrieve details of a specific result, enter the following:

aws glue get-data-quality-result --result-id <result-id>

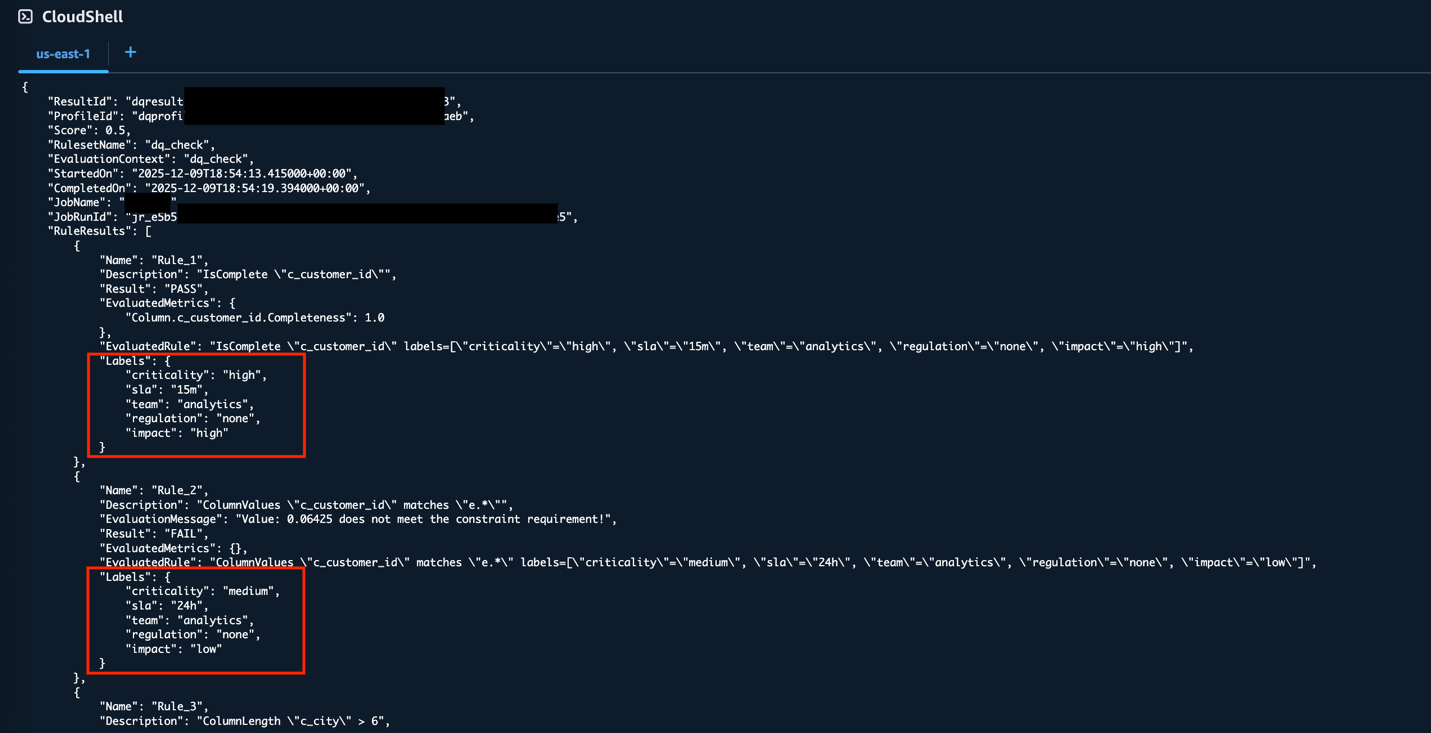
The output includes a Labels object for each rule in the RuleResults array, containing the label key-value pairs you defined. This provides programmatic access to the same labeled data quality results, which can be useful for automation and scripting workflows.

Cleanup

To avoid incurring ongoing charges, delete the resources created in this post:

  • To delete the S3 folders containing the data quality results, follow the directions at Deleting Amazon S3 objects.
  • To delete the ETL job you created for the test, follow the directions at Delete jobs in the AWS Glue User Guide.
  • To delete the AWS Glue Data Catalog dqrulelevel and dqrowlevel tables, follow the directions at DeleteTable in the AWS Glue Web API Reference.

Conclusion

AWS Glue DQDL labels add organizational context to data quality management by attaching business metadata directly to validation rules. This helps teams identify rule ownership, prioritize failures, and coordinate remediation efforts more effectively.Throughout this post, we’ve seen how AnyCompany moved from managing hundreds of generic rules to implementing a labeled system where data quality results include team ownership and business context. Marketing teams can identify their email validation failures, compliance teams can focus on regulatory violations, and finance teams can address payment-related issues without manual coordination.To implement DQDL Labels in your organization:

  • Start simple – Begin with basic organizational dimensions such as team ownership, criticality levels, and SLA requirements. Expand your labeling approach as needed.
  • Establish standards – Define your label taxonomy up front, including default values for unused dimensions. This consistency supports analytics across teams.
  • Integrate gradually – Add labels to existing rule sets during routine maintenance.
  • Use analytics – Apply the Athena query patterns from this post to build tools such as dashboards and alerting workflows.
  • Build smart automation – Explore creating alerts and notifications tailored to your business criticality and SLA definitions. For example, configure immediate notifications for high-criticality compliance failures while batching low-priority marketing issues into daily reports.

We look forward to seeing how you implement DQDL labels in your organization and expand beyond the examples we’ve covered here. To dive into the AWS Glue Data Quality APIs, refer to Data Quality API documentation. To learn more about AWS Glue Data Quality, check out AWS Glue Data Quality.


About the authors

Arun A K

Arun A K

Arun is a Senior Big Data Specialist Solutions Architect at Amazon Web Services (AWS). He helps customers design and scale data platforms that power innovation through analytics and AI. Arun is passionate about exploring how data and emerging technologies can solve real-world problems. Outside of work, he enjoys sharing knowledge with the tech community and spending time with his family.

Annie Wang

Annie Wang

Annie is a Software Development Engineer at AWS Glue. She focuses on building data quality features, including DQDL, that help customers define, monitor, and validate data quality across their pipelines. She is passionate about making data reliability easier for customers.

Roshin Babu

Roshin Babu

Roshin is a Sr. Specialist Solutions Architect at AWS, where he collaborates with the sales team to support public sector clients. When he’s not working, Roshin is passionate about exploring new destinations, discovering great food, and enjoying soccer both as a player and fan.

Configure seamless single sign-on with SQL analytics in Amazon SageMaker Unified Studio

Post Syndicated from Arun A K original https://aws.amazon.com/blogs/big-data/configure-seamless-single-sign-on-with-sql-analytics-in-amazon-sagemaker-unified-studio/

Amazon SageMaker Unified Studio provides a unified experience for using data, analytics, and AI capabilities. SageMaker Unified Studio now supports trusted identity propagation (TIP) for SQL workloads, enabling fine-grained data access control based on individual user identities. Organizations can use this integration to manage data permissions through AWS Lake Formation while using their existing single sign-on (SSO) infrastructure.

Organizations already using Amazon Redshift with TIP can extend their existing Lake Formation permissions to SageMaker Unified Studio. Users simply log in through SSO and access their authorized data using the SQL editor, maintaining consistent security controls across their analytics environment.

This post demonstrates how to configure SageMaker Unified Studio with SSO, set up projects and user onboarding, and access data securely using integrated analytics tools.

Solution overview

For our use case, a retail corporation is planning to implement sales analytics to identify sales patterns and product categories that are doing well. This will help the sales team improve on sales planning with targeted promotions and help the finance team plan budgeting with better inventory management. The corporation stores a customer table in an Amazon Simple Storage Service (Amazon S3) data lake and a store_sales table in a Redshift cluster.

The corporation uses SageMaker Unified Studio as the UI, with users onboarded from their identity provider (IdP) to AWS IAM Identity Center with TIP. Amazon SageMaker Lakehouse centralizes data from Amazon S3 and Amazon Redshift, and Lake Formation provides fine-grained access control based on user identity. For our example use case, we explore two different users. The following table summarizes their roles, the tools they use, and their data access.

User Group Tool Data Access
Ethan (Data Analyst) Sales Amazon Athena for interactive SQL analysis Non-sensitive customer data (id, c_country, birth_year) and store_sales full table access
Frank (BI Analyst) Finance Amazon Redshift for reports and visualization US customer data (c_country='US')

The following diagram illustrates the solution architecture.

SageMaker Unified Studio with IAM Identity Center simplifies the user journey from authentication to data analysis. The workflow consists of the following steps:

  1. Users sign in with organizational SSO credentials through their IdP and are redirected to SageMaker Unified Studio.
  2. Users configure IAM Identity Center authentication for Amazon Redshift, linking identity management with data access.
  3. Users access the query editor for Amazon Redshift or SageMaker Lakehouse, triggering IAM Identity Center federation to generate session and access tokens.
  4. SageMaker Unified Studio retrieves user authorization details and group membership using the session token.
  5. Users are authenticated as IAM Identity Center users, ready to explore and analyze data using Amazon Redshift and Amazon Athena.

To implement our solution, we walk through the following high-level steps:

  1. Set up SageMaker Lakehouse resources.
  2. Create a SageMaker Unified Studio domain with SSO and TIP enabled.
  3. Configure Amazon Redshift for TIP and validate access.
  4. Validate data access using Amazon Athena.

Prerequisites

Before you begin implementing the solution, you must have the following in place:

  1. If you don’t have an AWS account, you can sign up for one.
  2. We provide utility scripts to help set up various sections of the post. To use them:
    1. Right-click this link and save the utility scripts zip file.
    2. Unzip the file to a terminal that has the AWS Command Line Interface (AWS CLI) configured. You can also use AWS CloudShell.
    3. Run the scripts only when prompted in the relevant sections.
    Note: The utility scripts are configured for
    us-east-1 region. If you prefer another region, edit the region in the scripts before running them.
  3. To deploy the infrastructure, right-click this link and select ‘Save Link As’ to save it as sagemaker-unified-studio-infrastructure.yaml. Then upload the file when creating a new stack in the AWS CloudFormation console, which will create the following resources:
    1. An S3 bucket to hold the customer data used in this post.
    2. An AWS Identity and Access Management (IAM) role called DataTransferRole with permissions as defined in Prerequisites for managing Amazon Redshift namespaces in the AWS Glue Data Catalog.
    3. An IAM role called IAMIDCRedshiftRole, which will be used later to set up the IAM Identity Center Redshift application.
    4. An IAM role called LakeFormationRegistrationRole, following the instructions in Requirements for roles used to register locations, and necessary IAM policies.
  4. If you don’t have a Lake Formation user, you can create one. For this post, we use an admin user. For instructions, see Create a data lake administrator.
  5. If IAM Identity Center is not enabled, refer to Enabling AWS IAM Identity Center for instructions to enable it.
    1. If you need to migrate existing Redshift users and groups, use the IAM Identity Center Redshift migration utility.
    2. For a quick way to test the feature and familiarize yourself with the process, we provide a script to generate mock users and groups. Run the setup-idc.sh script, which is provided in Step 2, to create test users and groups in IAM Identity Center for demonstration purposes.
  6. Integrate IAM Identity Center with Lake Formation. For instructions, see Connecting Lake Formation with IAM Identity Center.
  7. Register the S3 bucket as a data lake location:
    1. On the Lake Formation console, choose Data lake locations in the navigation pane.
    2. Choose Register location.
    3. For the role, use LakeFormationRegistrationRole.
  8. Create an IAM Identity Center Redshift application, as detailed in our previous post:
    1. On the Amazon Redshift console, choose IAM Identity Center connections in the navigation pane and choose Create application.
    2. For both the display name and application name, enter redshift-idc-app.
    3. Set the IdP namespace to awsidc.
    4. Choose IAMIDCRedshiftRole as the IAM role.
    5. Choose Next to create the application.
    6. Take note of the application Amazon Resource Name (ARN) to use in subsequent steps. The ARN format is arn:aws:sso::<ACCOUNT_NUMBER>:application/ssoins-<RANDOM_STRING>/apl-<RANDOM_STRING>.
  9. If you don’t have existing Redshift tables to work with, run the script setup-producer-redshift.sh, which is provided in Step 2, to create a producer namespace and workgroup, set up a sample sales database, and generate necessary tables with test data.
  10. The post also uses simulated customer data stored in the AWS Glue Data Catalog. To set up this data and configure the necessary Lake Formation permissions, run the setup-glue-tables-and-access.sh script provided in Step 2.

Set up SageMaker Lakehouse resources

In this section, we configure the foundational lakehouse resources required for SageMaker to access and analyze data across multiple storage systems. We’ll register the Redshift instance to the AWS Glue Data Catalog to make warehouse data discoverable and establish Lake Formation permissions on lakehouse resources for user identities to ensure secure, governed access to both data lake and data warehouse resources from within SageMaker environments.

Register Redshift instance to the Data Catalog

In this step, we use the store_sales data, which we created earlier using the setup-producer-redshift.sh script. You can register entire clusters to the Data Catalog and create catalogs managed by AWS Glue. To register a cluster to the Data Catalog, complete the following steps:

  1. On the Lake Formation console, choose Administrative roles and tasks in the navigation pane.
  2. Under Data lake administrators, choose Add.
  3. Choose Read-only administrator, then choose AWSServiceRoleForRedshift.
  4. On the Amazon Redshift console, open your namespace.
  5. On the Actions dropdown menu, chose Register with AWS Glue Data Catalog, then choose Register.
  6. Sign in to the Lake Formation console as the data lake administrator and choose Catalogs in the navigation pane.
  7. Under Pending catalog invitations, select the namespace and accept the invitation by choosing Approve and create catalog.
  8. Provide the name for the catalog as salescatalog.
  9. Select Access this catalog from Apache Iceberg compatible engines, choose DataTransferRole for the IAM role, then choose Next.
  10. Choose Add permissions and choose the admin IAM role under IAM users and roles.
  11. Select Super user for catalog permissions and choose Add.
  12. Choose Next.
  13. Choose Create catalog.

Set up Lake Formation permission on lakehouse resources for user identities

In this section, we configure Lake Formation permissions to enable secure access to lakehouse resources for federated user identities. Lake Formation provides fine-grained access control that works seamlessly with IAM Identity Center, allowing you to manage permissions centrally while maintaining security boundaries.

We’ll focus on granting database access to IAM Identity Center groups in Lake Formation and setting table-level permissions for federated Redshift catalog tables. These permissions form the security foundation for our federated query architecture, enabling users to seamlessly access both S3 data lake and Redshift data warehouse resources through a unified interface.

Grant database access to IAM Identity Center groups in Lake Formation

After you share your Redshift catalog with the Data Catalog and integrate with Lake Formation, you must grant appropriate database access. Follow these steps to set up permissions on your data lake resources for corporate identities:

  1. On the Lake Formation console, under Permissions in the navigation pane, choose Data permissions.
  2. Choose Grant.
  3. Select Principals for Principal type.
  4. Under Principals, select IAM Identity Center and choose Add.
  5. In the pop-up window, if this is your first time assigning users and groups, choose Get started.
  6. Search for and select the IAM Identity Center groups awssso-sales and awssso-finance.
  7. Choose Assign.
  8. Under LF-Tags or catalog resources, choose Named Data Catalog resources.
    1. Choose <accountid>:salescatalog/dev for Catalogs.
    2. Choose sales_schema for Database.
  9. Under Database permissions, select Describe.
  10. Choose Grant to apply the permissions.

Grant table-level permissions for federated Redshift catalog tables

Complete the following steps to grant table permissions to the IAM Identity Center groups:

  1. On the Lake Formation console, under Permissions in the navigation pane, choose Data permissions.
  2. Choose Grant.
  3. Select Principals for Principal type.
  4. Under Principals, select IAM Identity Center and choose Add.
  5. In the pop-up window, if this is your first time assigning users and groups, choose Get started.
  6. Search for and select the IAM Identity Center group awssso-sales.
  7. Choose Assign.
  8. Under LF-Tags or catalog resources, choose Named Data Catalog resources.
    1. Choose <accountid>:salescatalog/dev for Catalogs.
    2. Choose sales_schema for Database.
    3. Choose store_sales for Table.
  9. Select Select and Describe for Table permissions.
  10. Choose Grant to apply the permissions.

Create a SageMaker Unified Studio domain with SSO and TIP enabled

For instructions to create a SageMaker Unified Studio domain, refer to Create an Amazon SageMaker Unified Studio domain – quick setup. Because your IAM Identity Center integration is already complete, you can specify an IAM Identity Center user in the domain configuration settings.

Enable TIP in SageMaker Unified Studio

Complete the following steps to enable TIP in SageMaker Unified Studio:

  1. On the SageMaker console, use the AWS Region selector in the top navigation bar to choose the appropriate Region.
  2. Choose View domains and choose the domain’s name from the list.
  3. On the domain’s details page, on the Project profiles tab, choose a project profile, for example, SQL analytics.
  4. Select SQL analytics and choose Edit.
  5. In the Blueprint parameters section, select enableTrustedIdentityPropagationPermissions and choose Edit.
  6. Update the value as true.
  7. To enforce authorization-based on TIP, the SageMaker Unified Studio admin can make this parameter non-editable.
  8. Choose Save.

Enable user access for SageMaker Unified Studio domain

Complete the following steps to enable user access for the SageMaker Unified Studio domain:

  1. Open the SageMaker console in the appropriate Region and choose Domains in the navigation pane.
  2. Choose an existing SageMaker Unified Studio domain where you want to add SSO user access.
  3. On the domain’s details page, on the User management tab, in the Users section, choose Add and Add SSO users and groups.
  4. Choose the user (for this post, we add the user Frank) from the dropdown list and choose Add users and groups.

Add project members

SageMaker Unified Studio projects facilitate team collaboration for different business initiatives. As the project owner, Ethan now can add Frank as a team member to enable their collaboration. To add members to an existing project, complete the following steps:

  1. Sign in to the SageMaker Unified Studio console using the SSO credentials of who owns the project (for this post, Ethan).
  2. Choose Select a project.
  3. Choose the project you want to edit.
  4. On the Project overview page, expand Actions and choose Manage members.
  5. Choose Add members.
  6. Enter the name of the user or group you want to add (for this post, we add Frank).
  7. Select Contributor if you want to add the project member as a contributor.
  8. (Optional) Repeat these steps to add more project members. You can add up to eight project members at a time.
  9. Choose Add members.

Create a SQL analytics project in Unified Studio

In this step, we federate into SageMaker Unified Studio and create a project using SQL analytics. Complete the following steps:

  1. Federate into SageMaker Unified Studio using your IAM Identity Center credentials:
    1. On the SageMaker console, choose Domains in the navigation pane.
    2. Copy the SageMaker Unified Studio URL for your domain and enter it into a new browser window.
    3. Choose Sign in with SSO.
    4. A browser pop-up will redirect you to your preferred IdP login page, where you enter your IdP credentials.
    5. If authentication if successful, you will be redirected to SageMaker Unified Studio.
  2. After logging in, choose Create project.
  3. Enter a name for your project. This project name is final and can’t be changed later.
  4. (Optional) Enter a description for your project. You can edit this later.
  5. Choose a project profile. For this demo, we choose the SQL analytics profile from the available templates.
  6. Leave the default values as they are or modify them according to your use case, then choose Continue.
  7. Choose Create project to finalize the project and initialize your SQL analytics workspace.

For more detailed information and advanced configurations, refer to Create a project.

Configure Amazon Redshift for TIP and validate access

Run the setup-consumer-redshift.sh script (provided in the prerequisites). This script will create a new namespace and workgroup and add the required tags, which you will use later to integrate with SageMaker Unified Studio compute.

If you are creating the cluster manually, add one of the following tags to the Redshift cluster or workgroup that you want to add to SageMaker Unified Studio:

  • Option 1 – Add a tag to allow only a specific SageMaker Unified Studio project to access it: AmazonDataZoneProject=<projectID>
  • Option 2 – Add a tag to allow all SageMaker Unified Studio projects in this account to access it: for-use-with-all-datazone-projects=true

Create compute using IAM Identity Center authentication

After you set up your project, the next step is to establish a compute resource connection on the SageMaker Unified Studio console. Follow these steps to add either Amazon Redshift Serverless or a provisioned cluster to your project environment:

  1. Go to the Compute section of your project in SageMaker Unified Studio.
  2. On the Data warehouse tab, choose Add compute.
  3. You can create a new compute resource or choose an existing one. For this post, we choose Connect to existing compute resources, then choose Next.
  4. Choose the type of compute resource you want to add, then choose Next. For this post, we choose Redshift Serverless.
  5. Under Connection properties, provide the JDBC URL or the compute you want to add, which is integrated with IAM Identity Center. If the compute resource is in the same account as your SageMaker Unified Studio project, you can select the compute resource from the dropdown menu. In our example, we use the consumer account that was just provisioned.
  6. Under Authentication, select IAM Identity Center.
  7. For Name, enter the name of the Redshift Serverless or provisioned cluster you want to add.
  8. For Description, enter a description of the compute resource.
  9. Choose Add compute.

The SageMaker Unified Studio Project Compute and Data pages will now display information for that resource.

If everything is configured correctly, your compute will be created using IAM Identity Center. Because your IdP credentials are already cached while you’re logged in to SageMaker Unified Studio, it uses the same credentials and creates the compute.

Test data access using Amazon Redshift

When Ethan logs in to SageMaker Unified Studio using IAM Identity Center authentication, he successfully federates and can access customer data from all countries but only for non-sensitive columns. Let’s connect to Amazon Redshift in SageMaker Unified Studio by following these steps:

  1. Choose Actions and choose Open Query editor.
  2. Choose Redshift in the Data explorer pane.
  3. Run the customer sales calculation query to observe that user Ethan (a data analyst) can access customer data from all countries but only non-sensitive columns (id, birth_country, product_id):
    select current_user, c.*, sum(s.sales_amount) as total_sales
    from "awsdatacatalog"."customerdb"."customer" c
    join "dev@salescatalog"."sales_schema"."store_sales" s 
    on c.id=s.id
    group by all;

You have successfully configured Redshift to use IAM Identity Center authentication in SageMaker Unified Studio.

Validate data access using Amazon Athena

When Frank logs in to SageMaker Unified Studio using IAM Identity Center authentication, he successfully federates and can access customer data only for the United States. To query with Athena, complete the following steps:

  1. Choose Actions and choose Open Query editor.
  2. Choose Lakehouse in the Data explorer pane.
  3. Explore AwsDataCatalog, expand the database, choose the respective table, and on the options menu (three dots), choose Preview data.

The following demonstration illustrates how user Frank, a BI analyst, can perform SQL analysis using Athena. Due to row-level filtering implemented through Lake Formation, Frank’s access is restricted to customer data from the United States only. Additionally, you can observe that in the Data explorer pane, Frank can only view the customerdb database. The dev@salescatalog database is not visible to Frank because no access has been granted to his respective group from Lake Formation.

The IAM Identity Center authentication integration is complete; you can use both Amazon Redshift and Athena through SageMaker Unified Studio in a simplified, all-in-one interface.Note that, at the time of writing, Athena doesn’t work with Redshift Managed Storage (RMS).

Clean up

Complete the following steps to clean up the resources you created as part of this post:

  1. Delete the data from the S3 bucket.
  2. Delete the Data Catalog objects.
  3. Delete the Lake Formation resources and Athena account.
  4. Delete the SageMaker Unified Studio project and associated domain.
  5. If you created new Redshift cluster for testing this solution, delete the cluster.

Conclusion

In this post, we provided a comprehensive guide to enabling trusted identity propagation within SageMaker Unified Studio. We covered the setup of a SageMaker Unified Studio domain with SSO, the creation of tailored projects, efficient user onboarding with appropriate permissions, and the management of AWS Glue and Amazon Redshift managed catalog permissions using Lake Formation. Through practical examples, we demonstrated how to use both Amazon Redshift and Athena within SageMaker Unified Studio, showcasing secure data access and analysis capabilities. This approach helps organizations maintain strict identity controls while helping data scientists and analysts derive valuable insights from both data lake and data warehouse environments, supporting both security and productivity in machine learning workflows.

For more information on this integration, refer to Trusted identity propagation.


About the authors

Maneesh Sharma

Maneesh Sharma

Maneesh is a Sr. Architect at AWS with 15 years of experience designing and implementing large-scale data warehouse and analytics solutions. He works closely with customers to help them modernize their legacy applications to AWS cloud-based platforms.

Srividya Parthasarathy

Srividya Parthasarathy

Srividya is a Senior Big Data Architect with Amazon SageMaker Lakehouse. She works with the product team and customers to build robust features and solutions for their analytical data platform. She enjoys building data mesh solutions and sharing them with the community.

Arun A K

Arun A K

Arun is a Senior Big Data Specialist Solutions Architect at Amazon Web Services. He helps customers design and scale data platforms that power innovation through analytics and AI. Arun is passionate about exploring how data and emerging technologies can solve real-world problems. Outside of work, he enjoys sharing knowledge with the tech community and spending time with his family.

Interactively develop your AWS Glue streaming ETL jobs using AWS Glue Studio notebooks

Post Syndicated from Arun A K original https://aws.amazon.com/blogs/big-data/interactively-develop-your-aws-glue-streaming-etl-jobs-using-aws-glue-studio-notebooks/

Enterprise customers are modernizing their data warehouses and data lakes to provide real-time insights, because having the right insights at the right time is crucial for good business outcomes. To enable near-real-time decision-making, data pipelines need to process real-time or near-real-time data. This data is sourced from IoT devices, change data capture (CDC) services like AWS Data Migration Service (AWS DMS), and streaming services such as Amazon Kinesis, Apache Kafka, and others. These data pipelines need to be robust, able to scale, and able to process large data volumes in near-real time. AWS Glue streaming extract, transform, and load (ETL) jobs process data from data streams, including Kinesis and Apache Kafka, apply complex transformations in-flight, and load it into a target data stores for analytics and machine learning (ML).

Hundreds of customers are using AWS Glue streaming ETL for their near-real-time data processing requirements. These customers required an interactive capability to process streaming jobs. Previously, when developing and running a streaming job, you had to wait for the results to be available in the job logs or persisted into a target data warehouse or data lake to be able to view the results. With this approach, debugging and adjusting code is difficult, resulting in a longer development timeline.

Today, we are launching a new AWS Glue streaming ETL feature to interactively develop streaming ETL jobs in AWS Glue Studio notebooks and interactive sessions.

In this post, we provide a use case and step-by-step instructions to develop and debug your AWS Glue streaming ETL job using a notebook.

Solution overview

To demonstrate the streaming interactive sessions capability, we develop, test, and deploy an AWS Glue streaming ETL job to process Apache Webserver logs. The following high-level diagram represents the flow of events in our job.
BDB-2464 High Level Application Architecture
Apache Webserver logs are streamed to Amazon Kinesis Data Streams. An AWS Glue streaming ETL job consumes the data in near-real time and runs an aggregation that computes how many times a webpage has been unavailable (status code 500 and above) due to an internal error. The aggregate information is then published to a downstream Amazon DynamoDB table. As part of this post, we develop this job using AWS Glue Studio notebooks.

You can either work with the instructions provided in the notebook, which you download when instructed later in this post, or follow along with this post to author your first streaming interactive session job.

Prerequisites

To get started, click the Launch Stack button below, to run an AWS CloudFormation template on your AWS environment.

BDB-2063-launch-cloudformation-stack

The template provisions a Kinesis data stream, DynamoDB table, AWS Glue job to generate simulated log data, and the necessary AWS Identity and Access Management (IAM) role and polices. After you deploy your resources, you can review the Resources tab on the AWS CloudFormation console for detailed information.

Set up the AWS Glue streaming interactive session job

To set up your AWS Glue streaming job, complete the following steps:

  1. Download the notebook file and save it to a local directory on your computer.
  2. On the AWS Glue console, choose Jobs in the navigation pane.
  3. Choose Create job.
  4. Select Jupyter Notebook.
  5. Under Options, select Upload and edit an existing notebook.
  6. Choose Choose file and browse to the notebook file you downloaded.
  7. Choose Create.
BDB-2464 Create Job
  1. For Job name¸ enter a name for the job.
  2. For IAM Role, use the role glue-iss-role-0v8glq, which is provisioned as part of the CloudFormation template.
  3. Choose Start notebook job.
BDB-2464 Start Notebook

You can see that the notebook is loaded into the UI. There are markdown cells with instructions as well as code blocks that you can run sequentially. You can either run the instructions on the notebook or follow along with this post to continue with the job development.

BDB-2464 Explore Notebook

Run notebook cells

Let’s run the code block that has the magics. The notebook has notes on what each magic does.

  1. Run the first cell.
BDB-2464 Run First Cell

After running the cell, you can see in the output section that the defaults have been reconfigured.

BDB-2464 Configurations Set

In the context of streaming interactive sessions, an important configuration is job type, which is set to streaming. Additionally, to minimize costs, the number of workers is set to 2 (default 5), which is sufficient for our use case that deals with a low-volume simulated dataset.

Our next step is to initialize an AWS Glue streaming session.

  1. Run the next code cell.
BDB-2464 Initiate Session

After we run this cell, we can see that a session has been initialized and a session ID is created.

A Kinesis data stream and AWS Glue data generator job that feeds into this stream have already been provisioned and triggered by the CloudFormation template. With the next cell, we consume this data as an Apache Spark DataFrame.

  1. Run the next cell.
BDB-2464 Fetch From Kinesis

Because there are no print statements, the cells don’t show any output. You can proceed to run the following cells.

Explore the data stream

To help enhance the interactive experience in AWS Glue interactive sessions, GlueContext provides the method getSampleStreamingDynamicFrame. It provides a snapshot of the stream in a static DynamicFrame. It takes three arguments:

  • The Spark streaming DataFrame
  • An options map
  • A writeStreamFunction to apply a function to every sampled record

Available options are as follows:

  • windowSize – Also known as the micro-batch duration, this parameter determines how long a streaming query will wait after the previous batch was triggered.
  • pollingTimeInMs – This is the total length of time the method will run. It starts at least one micro-batch to obtain sample records from the input stream. The time unit is milliseconds, and the value should be greater than the windowSize.
  • recordPollingLimit – This is defaulted to 100, and helps you set an upper bound on the number of records that is retrieved from the stream.

Run the next code cell and explore the output.

BDB-2464 Sample Data

We see that the sample consists of 100 records (the default record limit), and we have successfully displayed the first 10 records from the sample.

Work with the data

Now that we know what our data looks like, we can write the logic to clean and format it for our analytics.

Run the code cell containing the reformat function.

Note that Python UDFs aren’t the recommended way to handle data transformations in a Spark application. We use reformat() to exemplify troubleshooting. When working with a real-world production application, we recommend using native APIs wherever possible.

BDB-2464 Run The UDF

We see that the code cell failed to run. The failure was on purpose. We deliberately created a division by zero exception in our parser.

BDB-2464 Error Running The Code

Failure and recovery

In case of a regular AWS Glue job, for any error, the whole application exits, and you have to make code changes and resubmit the application. However, in case of interactive sessions, the coding context and definitions are fully preserved and the session is still operational. There is no need to bootstrap a new cluster and rerun all the preceding transformation. This allows you to focus on quickly iterating your batch function implementation to obtain the desired outcome. You can fix the defects and run them in a matter of seconds.

To test this out, go back to the code and comment or delete the erroneous line error_line=1/0 and rerun the cell.

BDB-2464 Error Corrected

Implement business logic

Now that we have successfully tested our parsing logic on the sample stream, let’s implement the actual business logic. The logics are implemented in the processBatch method within the next code cell. In this method, we do the following:

  • Pass the streaming DataFrame in micro-batches
  • Parse the input stream
  • Filter messages with status code >=500
  • Over a 1-minute interval, get the count of failures per webpage
  • Persist the preceding metric to a DynamoDB table (glue-iss-ddbtbl-0v8glq)
  1. Run the next code cell to trigger the stream processing.
BDB-2464 Trigger DDB Write
  1. Wait a few minutes for the cell to complete.
  2. On the DynamoDB console, navigate to the Items page and select the glue-iss-ddbtbl-0v8glq table.
BDB-2464 Explore DDB

The page displays the aggregated results that have been written by our interactive session job.

Deploy the streaming job

So far, we have been developing and testing our application using the streaming interactive sessions. Now that we’re confident of the job, let’s convert this into an AWS Glue job. We have seen that the majority of code cells are doing exploratory analysis and sampling, and aren’t required to be a part of the main job.

A commented code cell that represents the whole application is provided to you. You can uncomment the cell and delete all other cells. Another option would be to not use the commented cell, but delete just the two cells from the notebook that do the sampling or debugging and print statements.

To delete a cell, choose the cell and then choose the delete icon.

BDB-2464 Delete a Cell

Now that you have the final application code ready, save and deploy the AWS Glue job by choosing Save.

BDB-2464 Save Job

A banner message appears when the job is updated.

BDB-2464 Save Job Banner

Explore the AWS Glue job

After you save the notebook, you should be able to access the job like any regular AWS Glue job on the Jobs page of the AWS Glue console.

BDB-2464 Job Page

Additionally, you can look at the Job details tab to confirm the initial configurations, such as number of workers, have taken effect after deploying the job.

BDB-2464 Job Details Page

Run the AWS Glue job

If needed, you can choose Run to run the job as an AWS Glue streaming job.

BDB-2464 Job Run

To track progress, you can access the run details on the Runs tab.

BDB-2464 Job Run Details

Clean up

To avoid incurring additional charges to your account, stop the streaming job that you started as part of the instructions. Also, on the AWS CloudFormation console, select the stack that you provisioned and delete it.

Conclusion

In this post, we demonstrated how to do the following:

  • Author a job using notebooks
  • Preview incoming data streams
  • Code and fix issues without having to publish AWS Glue jobs
  • Review the end-to-end working code, remove any debugging, and print statements or cells from the notebook
  • Publish the code as an AWS Glue job

We did all of this via a notebook interface.

With these improvements in the overall development timelines of AWS Glue jobs, it’s easier to author jobs using the streaming interactive sessions. We encourage you to use the prescribed use case, CloudFormation stack, and notebook to jumpstart your individual use cases to adopt AWS Glue streaming workloads.

The goal of this post was to give you hands-on experience working with AWS Glue streaming and interactive sessions. When onboarding a productionized workload onto your AWS environment, based on the data sensitivity and security requirements, ensure you implement and enforce tighter security controls.


About the authors

Arun A K is a Big Data Solutions Architect with AWS. He works with customers to provide architectural guidance for running analytics solutions on the cloud. In his free time, Arun loves to enjoy quality time with his family.

Linan Zheng is a Software Development Engineer at AWS Glue Streaming Team, helping building the serverless data platform. His works involve large scale optimization engine for transactional data formats and streaming interactive sessions.

Roman Gavrilov is an Engineering Manager at AWS Glue. He has over a decade of experience building scalable Big Data and Event-Driven solutions. His team works on Glue Streaming ETL to allow near real time data preparation and enrichment for machine learning and analytics.

Shiv Narayanan is a Senior Technical Product Manager on the AWS Glue team. He works with AWS customers across the globe to strategize, build, develop, and deploy modern data platforms.