Post Syndicated from Bijith Nair original https://aws.amazon.com/blogs/devops/how-to-mitigate-docker-hubs-pull-rate-limit-error-through-aws-code-build-and-ecr/
How to mitigate Docker Hub’s pull rate limit errors
Docker, Inc. has announced that its hosted repository service, Docker Hub, will begin limiting the rate at which the Docker images are being pulled. The pull rate limit will purely be based on the individual IP Address. The anonymous user can do 100 pulls per 6 hours per IP Address, while the authenticated user can do 200 pulls per 6 hours.
This post shows how you can overcome those errors while you’re working with AWS Developer Tools, such as AWS CodeCommit, AWS CodeBuild, and Amazon Elastic Container Registry (Amazon ECR).
Solution overview
The workflow and architecture of the solution work as follows:
- The developer will push the code, in this case (buildspec, Dockerfile, README.md) to CodeCommit by using Git client installed locally.
- CodeBuild will pull the latest commit id from CodeCommit.
- CodeBuild will build the base Docker image by going through the build steps listed in buildspec and Dockerfile.
Finally, Docker image will be pushed to Amazon ECR, and it can be used for future deployments.
AWS Services Overview:

Figure 1. Architectural Overview – Leverage AWS Developer tools to mitigate Docker hub’s pull rate limit error.
For this post, we’ll be using the following AWS services
- AWS CodeCommit – a fully-managed source control service that hosts secure Git-based repositories.
- AWS CodeBuild – a fully managed continuous integration service that compiles source code, runs tests, and produces software packages that are ready to deploy.
- Amazon ECR – an AWS managed container image registry service that is secure, scalable, and reliable.
Prerequisites
The prerequisites, before we build the pipeline, are as follows:
- Install a Git client to clone the source code and to push the code to CodeCommit.
- Dockerfile – Sample file to produce the Docker image and push it to an Amazon ECR.
- Install Docker daemon on your localhost or laptop, and make sure that it’s up and running.The latest version of the AWS Command Line Interface (AWS CLI). For more information, see Installing, updating, and uninstalling the AWS CLI.
- An AWS account with local credentials properly configured (typically under
~/.aws/credentials). - An IAM user with Git credentials.
Setup Amazon ECR repositories
We’ll be setting up two Amazon ECR repositories. The first repository, “golang”, will hold the base image which we will be migrating from Docker hub. And the second repository, “mydemorepo”, will hold the final image for your sample application.
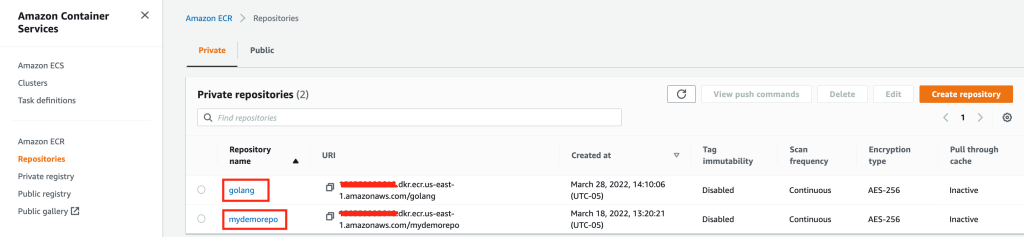
Figure 2. ECR Repositories with Source and Target image.
Migrate your existing Docker image from Docker Hub to Amazon ECR
Note that for this post, I’ll be using golang:1.12-alpine as the base Docker image to be migrated to Amazon ECR.
Once you have your base repository setup, the next step is to pull the golang:1.12-alpine public image from docker hub to you laptop/Server.
To do that, log in to your local server where you have deployed all of the prerequisites. This includes the Docker engine, Git Client, AWS CLI, etc., and run the following command:
docker pull golang:1.12-alpine
Authenticate to your Amazon ECR private registry, and click here to learn more about private registry authentication.
aws ecr get-login-password --region us-east-1 | docker login --username AWS --password-stdin 12345678910.dkr.ecr.us-east-1.amazonaws.com
Apply the appropriate Tag to your image.
docker tag golang:1.12-alpine 12345678910.dkr.ecr.us-east-1.amazonaws.com/golang:1.12-alpine
Push your image to the Amazon ECR repository.
docker push 150359982618.dkr.ecr.us-east-1.amazonaws.com/golang:1.12-alpine

Figure 3. The Source Image.
Once your image gets pushed to Amazon ECR with all of the required tags, the next step is to use this base image as the source image to build our sample application. Furthermore, while going through the “Overview of the Solution” section, you might have noticed that we must have a source code repository for CodeBuild to fetch the latest code from, and to build a sample application. Let’s go through how to set up your source code repository.
Set up a source code repository using CodeCommit
Let’s start by setting up the repository name. In this case, let’s call it “mysampleapp”. Keep rest of the settings as is, and then select create.
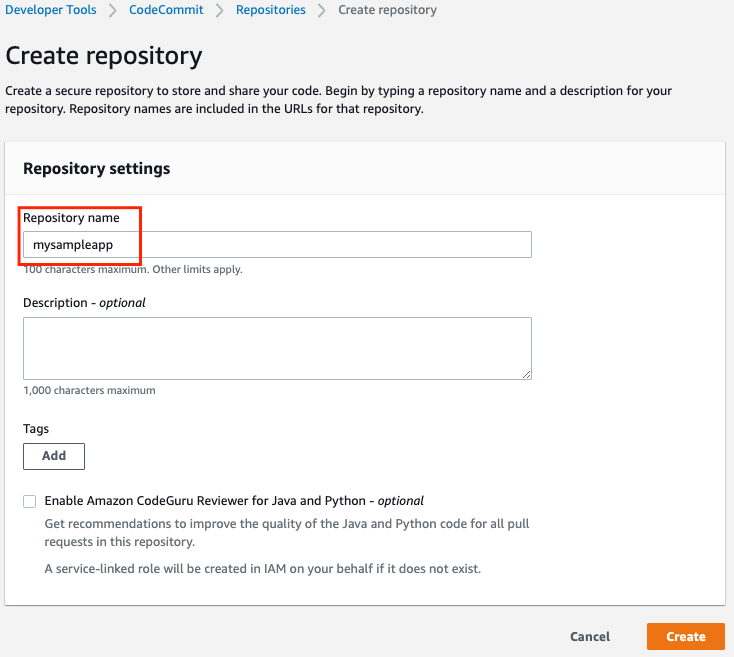
Figure 4. Screenshot for creating a repository under AWS Code Commit.
Once the repository gets created, go to the top-right corner. Under Clone URL, select Clone HTTPS.

Figure 5. Clone URL to copy the code Locally on your desktop or server.
Go back to your local server or laptop where you want to clone the repo, and authenticate your repository. Learn more about how to HTTPS connections to AWS Codecommit repositories.
git clone https://git-codecommit.us-east-1.amazonaws.com/v1/repos/mysampleapp mysampleapp
Note that you have your empty repository cloned locally with a folder name “mysampleapp”. The next step is to set up Dockerfile and buildspec.
Set up a Dockerfile and buildspec for building the base image of your Sample Application
To build a Docker image, we’ll set up three files under the “mysampleapp” folder.
Buildspec.yml
Dockerfile
README.md

Figure 6. List out the base code pushed to AWS Code commit.
Note that I have also listed the content inside of buildspec.yml, Dockerfile, and ReadME.md in case you want a sample code to test the scenario.
buildspec.yml
Dockerfile
Point your Dockfile to use Amazon ECR repository instead of Docker hub.
FROM golang:1.12-alpine AS build << Replace the public Image with ECR private image
FROM 150359982618.dkr.ecr.us-east-1.amazonaws.com/golang: 1.12-alpine
AS build
#Install git
RUN apk add --no-cache git
#Get the hello world package from a GitHub repository
RUN go get github.com/golang/example/hello
WORKDIR /go/src/github.com/golang/example/hello
#Build the project and send the output to /bin/HelloWorld
RUN go build -o /bin/HelloWorld
README.md
> Demo Repository has files related to CodeBuild spec and Dockerfile
* buildspec.yaml
* Dockerfile
Now, commit your changes locally, and push them to Amazon ECR. Note that to learn more about how to set up HTTPS users using Git Credentials, click here.
git add .
git commit -m "My First Commit - Sample App"
git push -u origin master
Now, go back to your AWS Management Console, and Under Developer Tools, select CodeCommit. Go to mysampleapp, and you should see three files with the latest commits.

Figure 7. Screenshot with buildspec, Dockerfile and README
That concludes our setup to CodeCommit. Next, we’ll set up a build project.
Set up a CodeBuild project
Enter the project name, in this case let’s use “mysamplbuild”.

Figure 8. Setting up a Build Project.
Select the provider as CodeCommit, followed by the repository and the branch that contains the latest commit.

Figure 9. Selecting the source code provider which is Code Commit and the source repository.
Select the runtime as standard, and then choose the latest Amazon Linux image. Make sure that the environment type is set to Linux. Privileged option should be checked. For the rest of the options, go with the defaults.
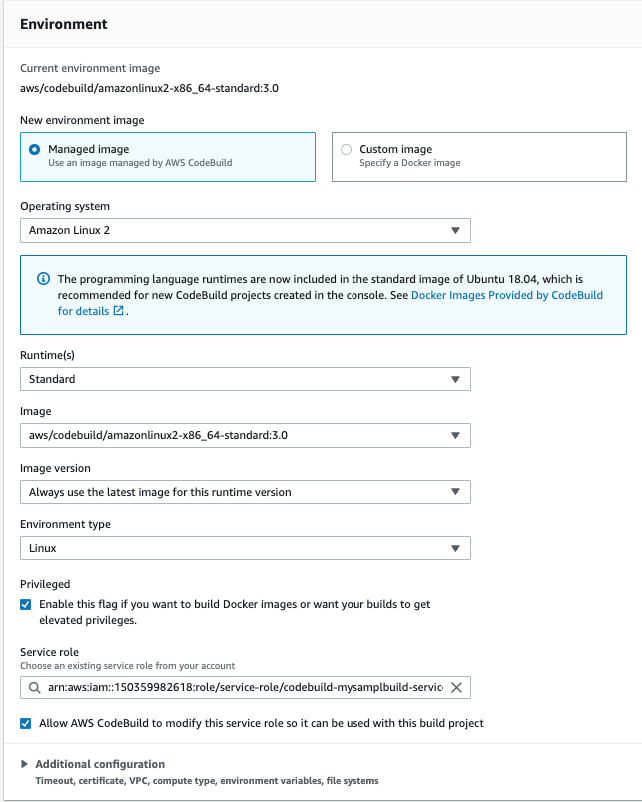
Figure 10. Required environment variables and attributes.
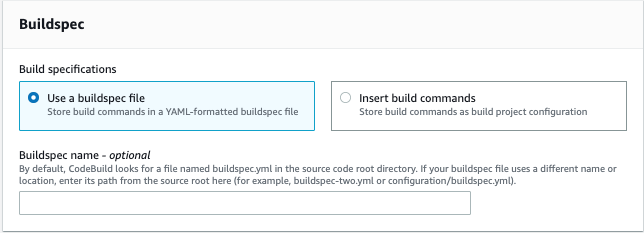
Figure 11. Choose the buildspec.
Once the project gets created, select the project, and select start Build.

Figure 12. Screenshot of the build project along with details.
Once you trigger the build, you will notice that CodeBuild is pulling the image from Amazon ECR instead of Docker hub.

Figure 13. The log file for the build.
Clean up
To avoid incurring future charges, delete the resources.
- Delete an AWS CodeCommit Repository.
- Delete a build project in AWS CodeBuild.
- Delete an Amazon ECR repository.
Conclusion
Developers can use AWS to host both their private and public container images. This decreases the need to use different public websites and registries. Public images will be geo-replicated for reliable availability around the world, and they’ll offer fast downloads to quickly serve up images on-demand. Anyone (with or without an AWS account) will be able to browse and pull containerized software for use in their own applications.
Author: