All posts by Himanshu Sahni

Automate email notifications for governance teams working with Amazon SageMaker Catalog

Post Syndicated from Himanshu Sahni original https://aws.amazon.com/blogs/big-data/automate-email-notifications-for-governance-teams-working-with-amazon-sagemaker-catalog/

Amazon SageMaker Catalog simplifies the discovery, governance, and collaboration for data and AI across Data Lakehouse, AI models, and applications. With Amazon SageMaker Catalog, you can securely discover and access approved data and models using semantic search with generative AI–created metadata or could just ask Amazon Q Developer with natural language to find their data.

Large enterprise customers have multiple lines of businesses who produce and consume data using a central SageMaker Data Catalog. Many customers have a central data governance team that is responsible for creating, publishing, and maintaining data governance standards and best practices across the firm. As the customer’s data platform scales, it becomes challenging for the central governance team to maintain the standards across all data producers and consumers. Because of this, many governance teams need to monitor user activity in Amazon SageMaker Catalog to ensure data assets are published according to established organizational governance standards and best practices. In this scenario, there is a need for automation where the central governance teams can be notified when critical events happen in Amazon SageMaker Catalog.

In this post, we show you how to create custom notifications for events occurring in SageMaker Catalog using Amazon EventBridge, AWS Lambda, and Amazon Simple Notification Service (Amazon SNS). You can expand this solution to automatically integrate SageMaker Catalog with in-house enterprise workflow tools like ServiceNow and Helix.

Solution overview

The following solution architecture shows how SageMaker Catalog integrates with other AWS services like AWS IAM Identity Center, Amazon EventBridge, Amazon SQS, AWS Lambda, and Amazon SNS to generate automated notifications to capture critical events in the enterprise catalog.

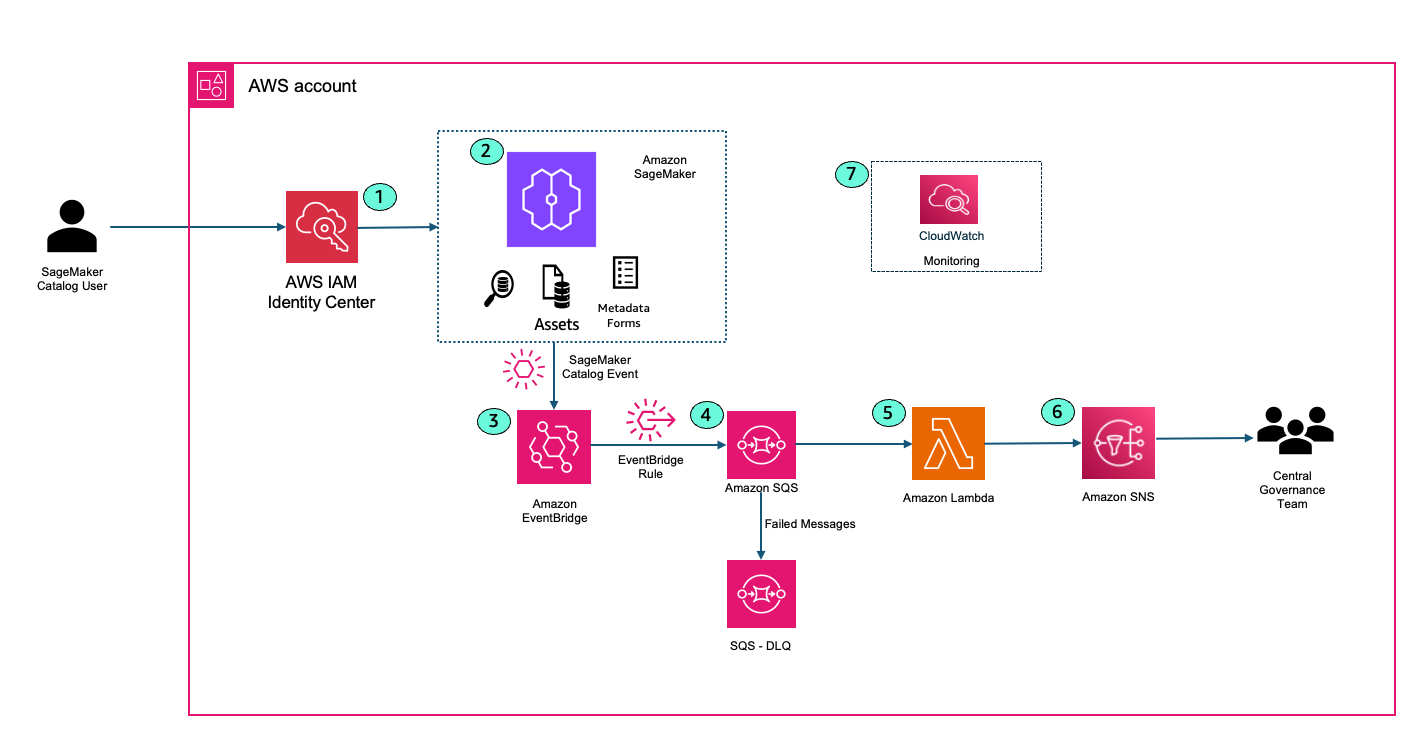
  1. A SageMaker Catalog user logs into Amazon SageMaker Unified Studio using IAM Identity center. This could be a data scientist, machine learning engineer, or analyst looking for published data sets in the firm. AWS IAM Identity center ensures that only authorized personnel can access the cataloged assets and ML resources.
  2. User performs an activity within SageMaker Catalog. Example user creates a new project or user searches for a data asset and creates a subscription request to access the asset.
  3. User events from SageMaker Catalog are captured in Amazon EventBridge. Amazon EventBridge is a fully managed, serverless event bus service designed to help you build scalable, event-driven applications across AWS, SaaS, and custom applications. Amazon EventBridge provides the ability to filter events and allow users to take action on specific events.The following example event pattern in EventBridge filters DataZone create project events.
    {
      "source": [
        "aws.datazone"
      ],
      "detail": {
        "eventSource": [
          "datazone.amazonaws.com"
        ],
        "eventName": [
          "CreateProject"
        ]
      }
    }

  4. Amazon EventBridge sends the filtered events to Amazon SQS. Routing events to an SQS queue improves reliability and durability. Amazon SQS acts as a buffer between Amazon EventBridge and AWS Lambda, decoupling event producers from consumers. This allows your Lambda functions to process messages at their own pace, preventing overload during traffic spikes or when downstream resources are temporarily slow or unavailable. Amazon SQS provides durable, persistent storage for events. If Lambda service is unavailable or throttled, messages remain in the queue until they can be successfully processed, reducing the risk of data loss. There is a Dead Letter Queue (DLQ) attached to the main SQS queue. Attaching a DLQ to SQS ensures that any messages that can’t be processed after multiple attempts are safely captured for inspection and troubleshooting, preventing them from blocking or endlessly circulating in the main queue.
  5. AWS Lambda function reads the messages from SQS queue. Lambda function formats the notification based on your needs.
  6. AWS Lambda publishes the message to Amazon SNS. End users and Central Governance team can subscribe to the SNS topic to receive email alerts when an event happens in SageMaker catalog.
  7. Amazon CloudWatch integrates with AWS Lambda to monitor performance, logs events, and can trigger alarms if anything goes awry, ensuring your workflows run smoothly.

Prerequisites

You need to setup the following prerequisite resources:

  • An AWS account with a configured Amazon Amazon Virtual Private Cloud (Amazon VPC) and base network.
  • An existing SageMaker Unified Studio domain (follow instructions on Setting up Amazon SageMaker Unified Studio).
  • Grant Lambda Access in SageMaker Unified Studio (required for Publishing the assets)
    • Add the Lambda execution role as an IAM role in SageMaker Unified Studio.
    • Assign the Lambda execution role to your project within the SageMaker Unified Studio portal.

This configuration ensures that Lambda function has the required authorization to access Data Zone resources and successfully publish assets from your SageMaker Unified Studio projects.

Code Deployment

Review the instructions on our GitHub repository to deploy the framework in your AWS account using AWS CDK. The CDK provisions an event-driven notification architecture for Amazon SageMaker Unified Studio, focusing on project creation and asset publishing events.

Core AWS Resources Deployed – The following are the core AWS resourced deployed:

  1. EventBridge Rules
    • DataZoneCreateProjectRule: Captures DataZone project creation events (CreateProject).
    • DataZonePublishAssetRule: Captures DataZone asset publishing events (CreateListingChangeSet with PUBLISH action for ASSET entity type).
  2. SQS Queue
    • DataZoneEventQueue: Buffers DataZone events from EventBridge before processing.
    • Queue Policy: Allows EventBridge to send messages to the SQS queue.
  3. Lambda Function
    • ProjectNotificationLambda: Processes messages from the SQS queue, retrieves event details from DataZone, and sends notifications to an SNS topic.
      • IAM Role: Grants permissions to access SQS, SNS, CloudWatch Logs, and DataZone services.
      • Event Source Mapping: Triggers the Lambda function for each SQS message.
  4. SNS Topic
    • LambdaSNSTopic: Receives notifications from the Lambda function.
      • Email Subscriptions: Two email endpoints are subscribed to receive notifications.
    • Add your email ID to the SNS topic. You’ll receive an email to request for subscription, click on ‘Confirm Subscription’
  5. Permissions
    • Amazon EventBridge sends events to SQS (requiring SQS permissions), Lambda poll reads messages from Amazon SQS (requiring Lambda role in SQS permissions), and Lambda publishes to Amazon SNS (requiring SNS permissions).
    • IAM Policies: Lambda execution role has necessary permissions for SQS, SNS, logging, and Data Zone operations.

Outputs Provided (CloudFormation Output)

  • Amazon SNS Topic ARN: For notification publishing.
  • Amazon SQS Queue ARN: For event buffering.
  • AWS Lambda Function ARN: For event processing.
  • Amazon EventBridge Rule ARNs: For both asset publishing and project creation events.

Project Creation Notification

Execute the following steps to login to SageMaker Unified Studio and create a project.

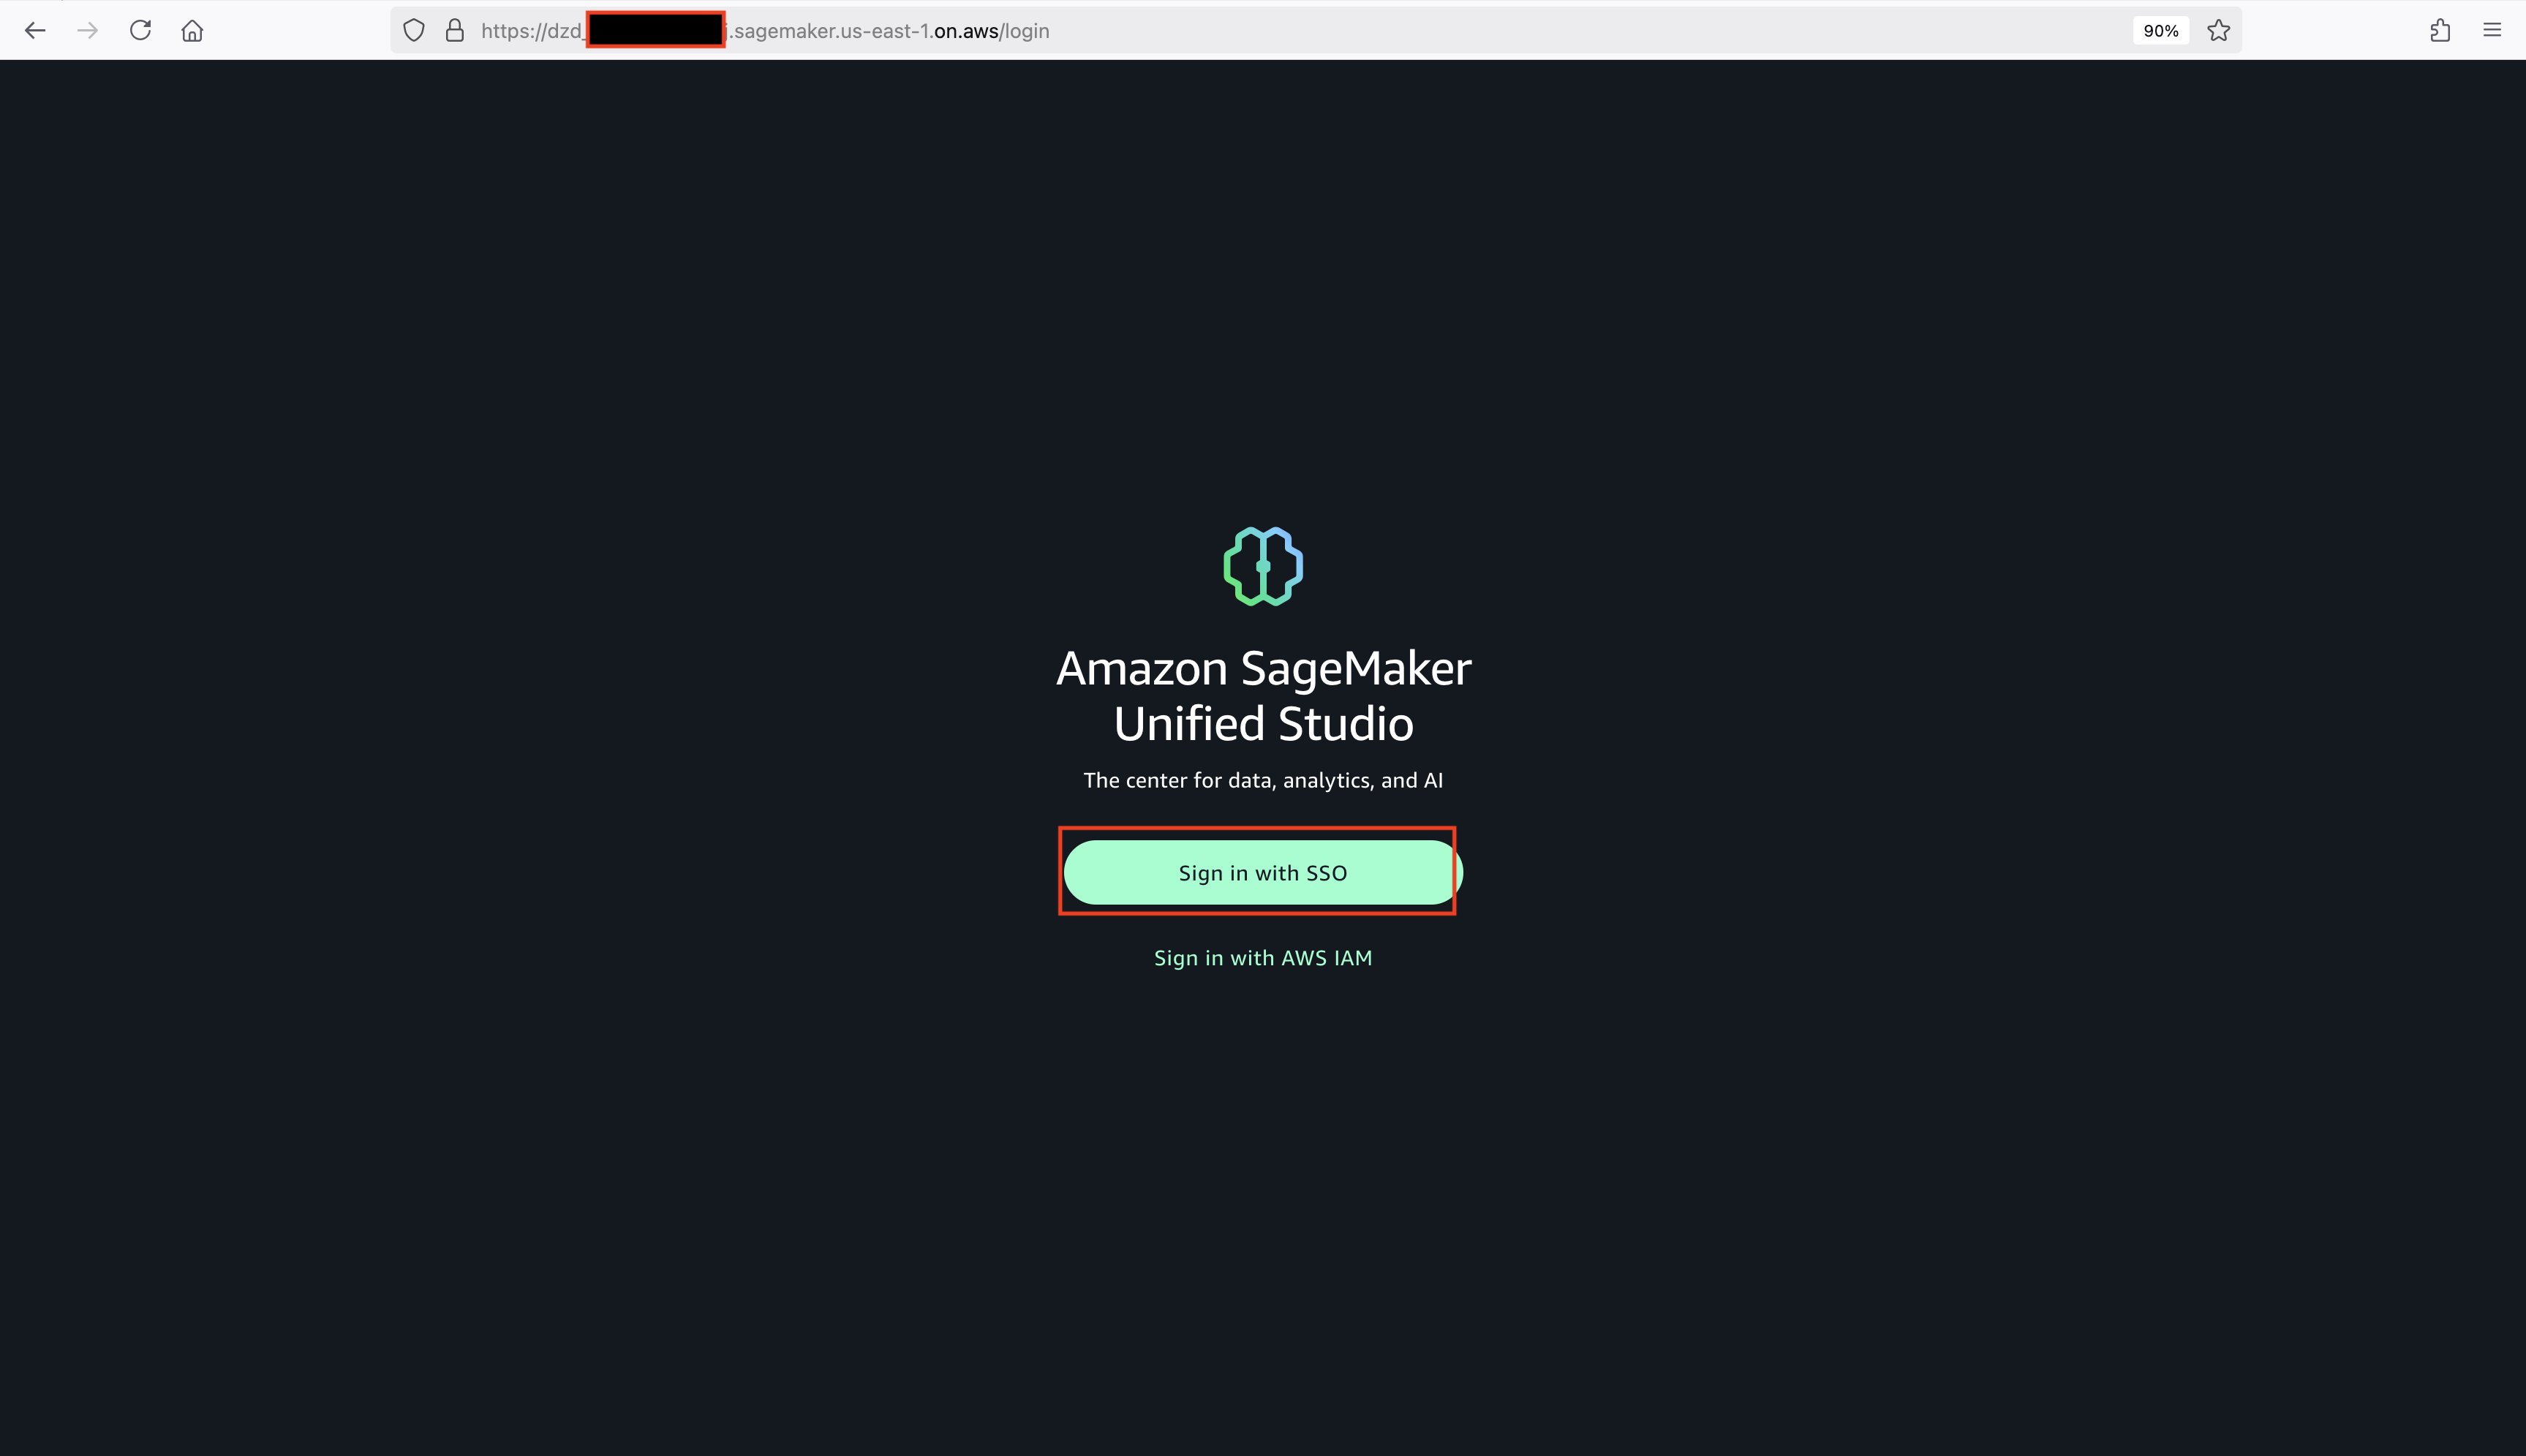
  1. Login to SageMaker Unified Studio Console. This takes you to Amazon SageMaker Unified Studio domain login screen (SSO and IAM sign-in options).
    SageMaker Unified Studio Login
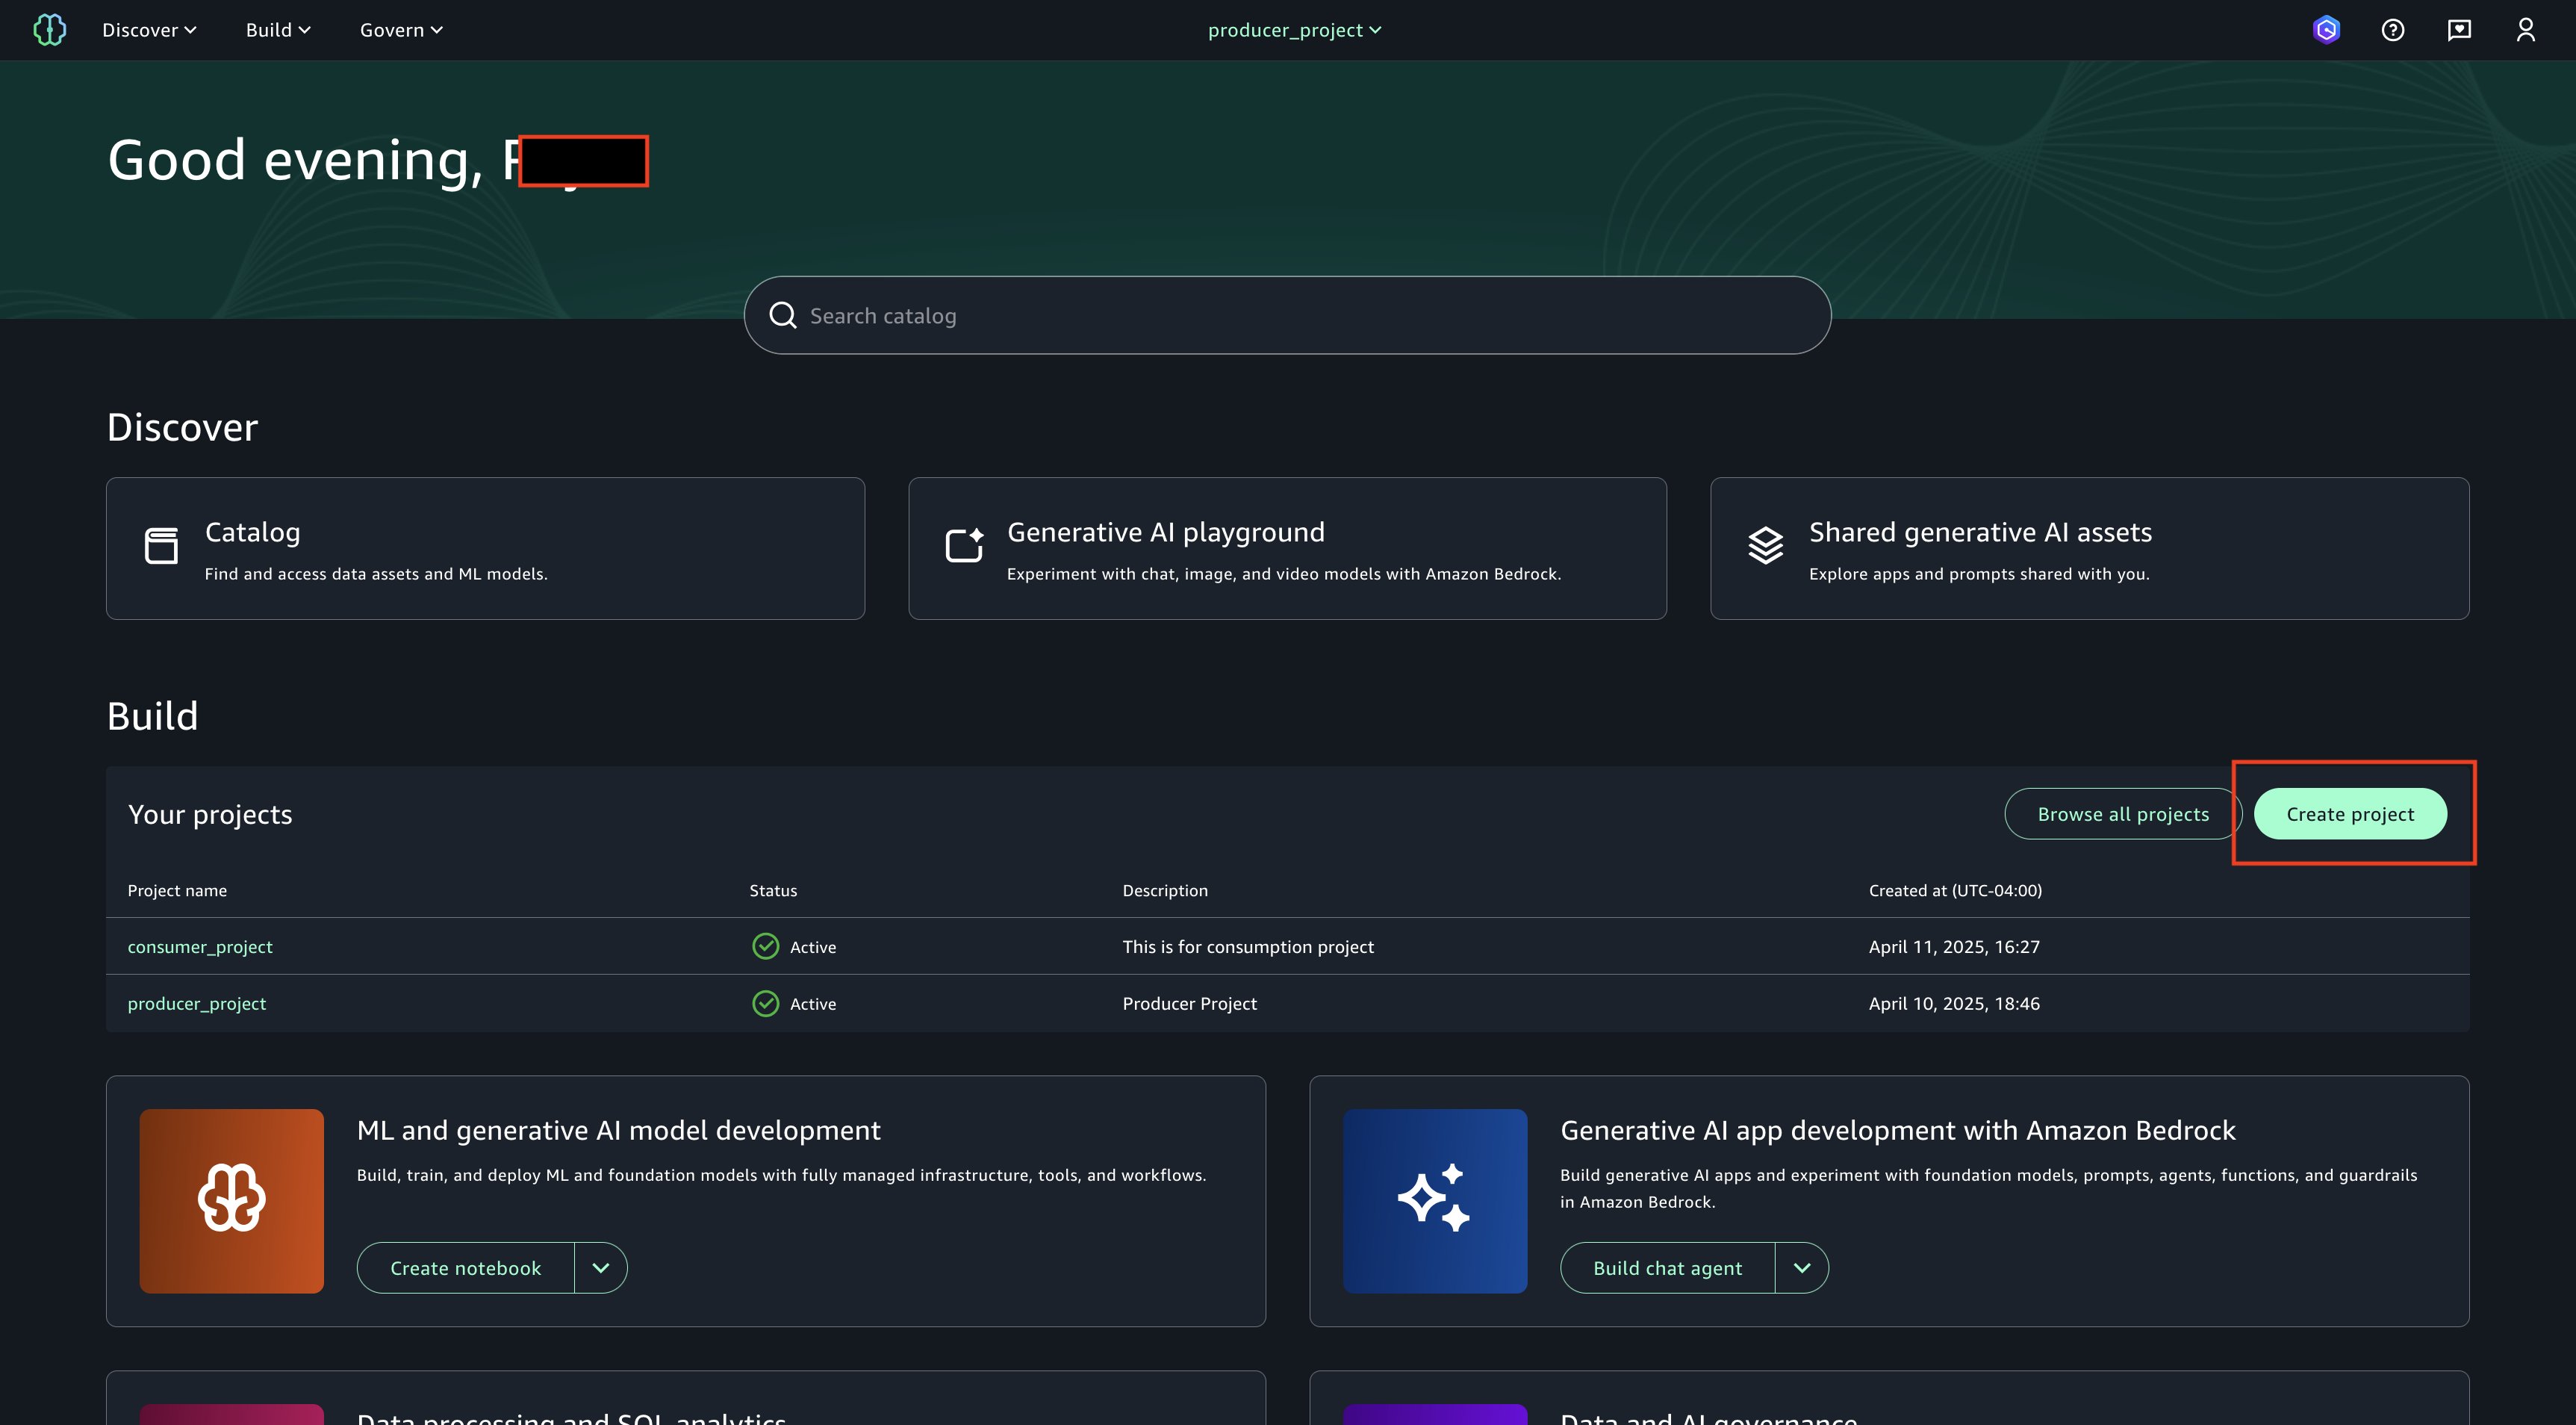
  2. Choose Create Project on SageMaker Unified Studio login page.
    Create Project
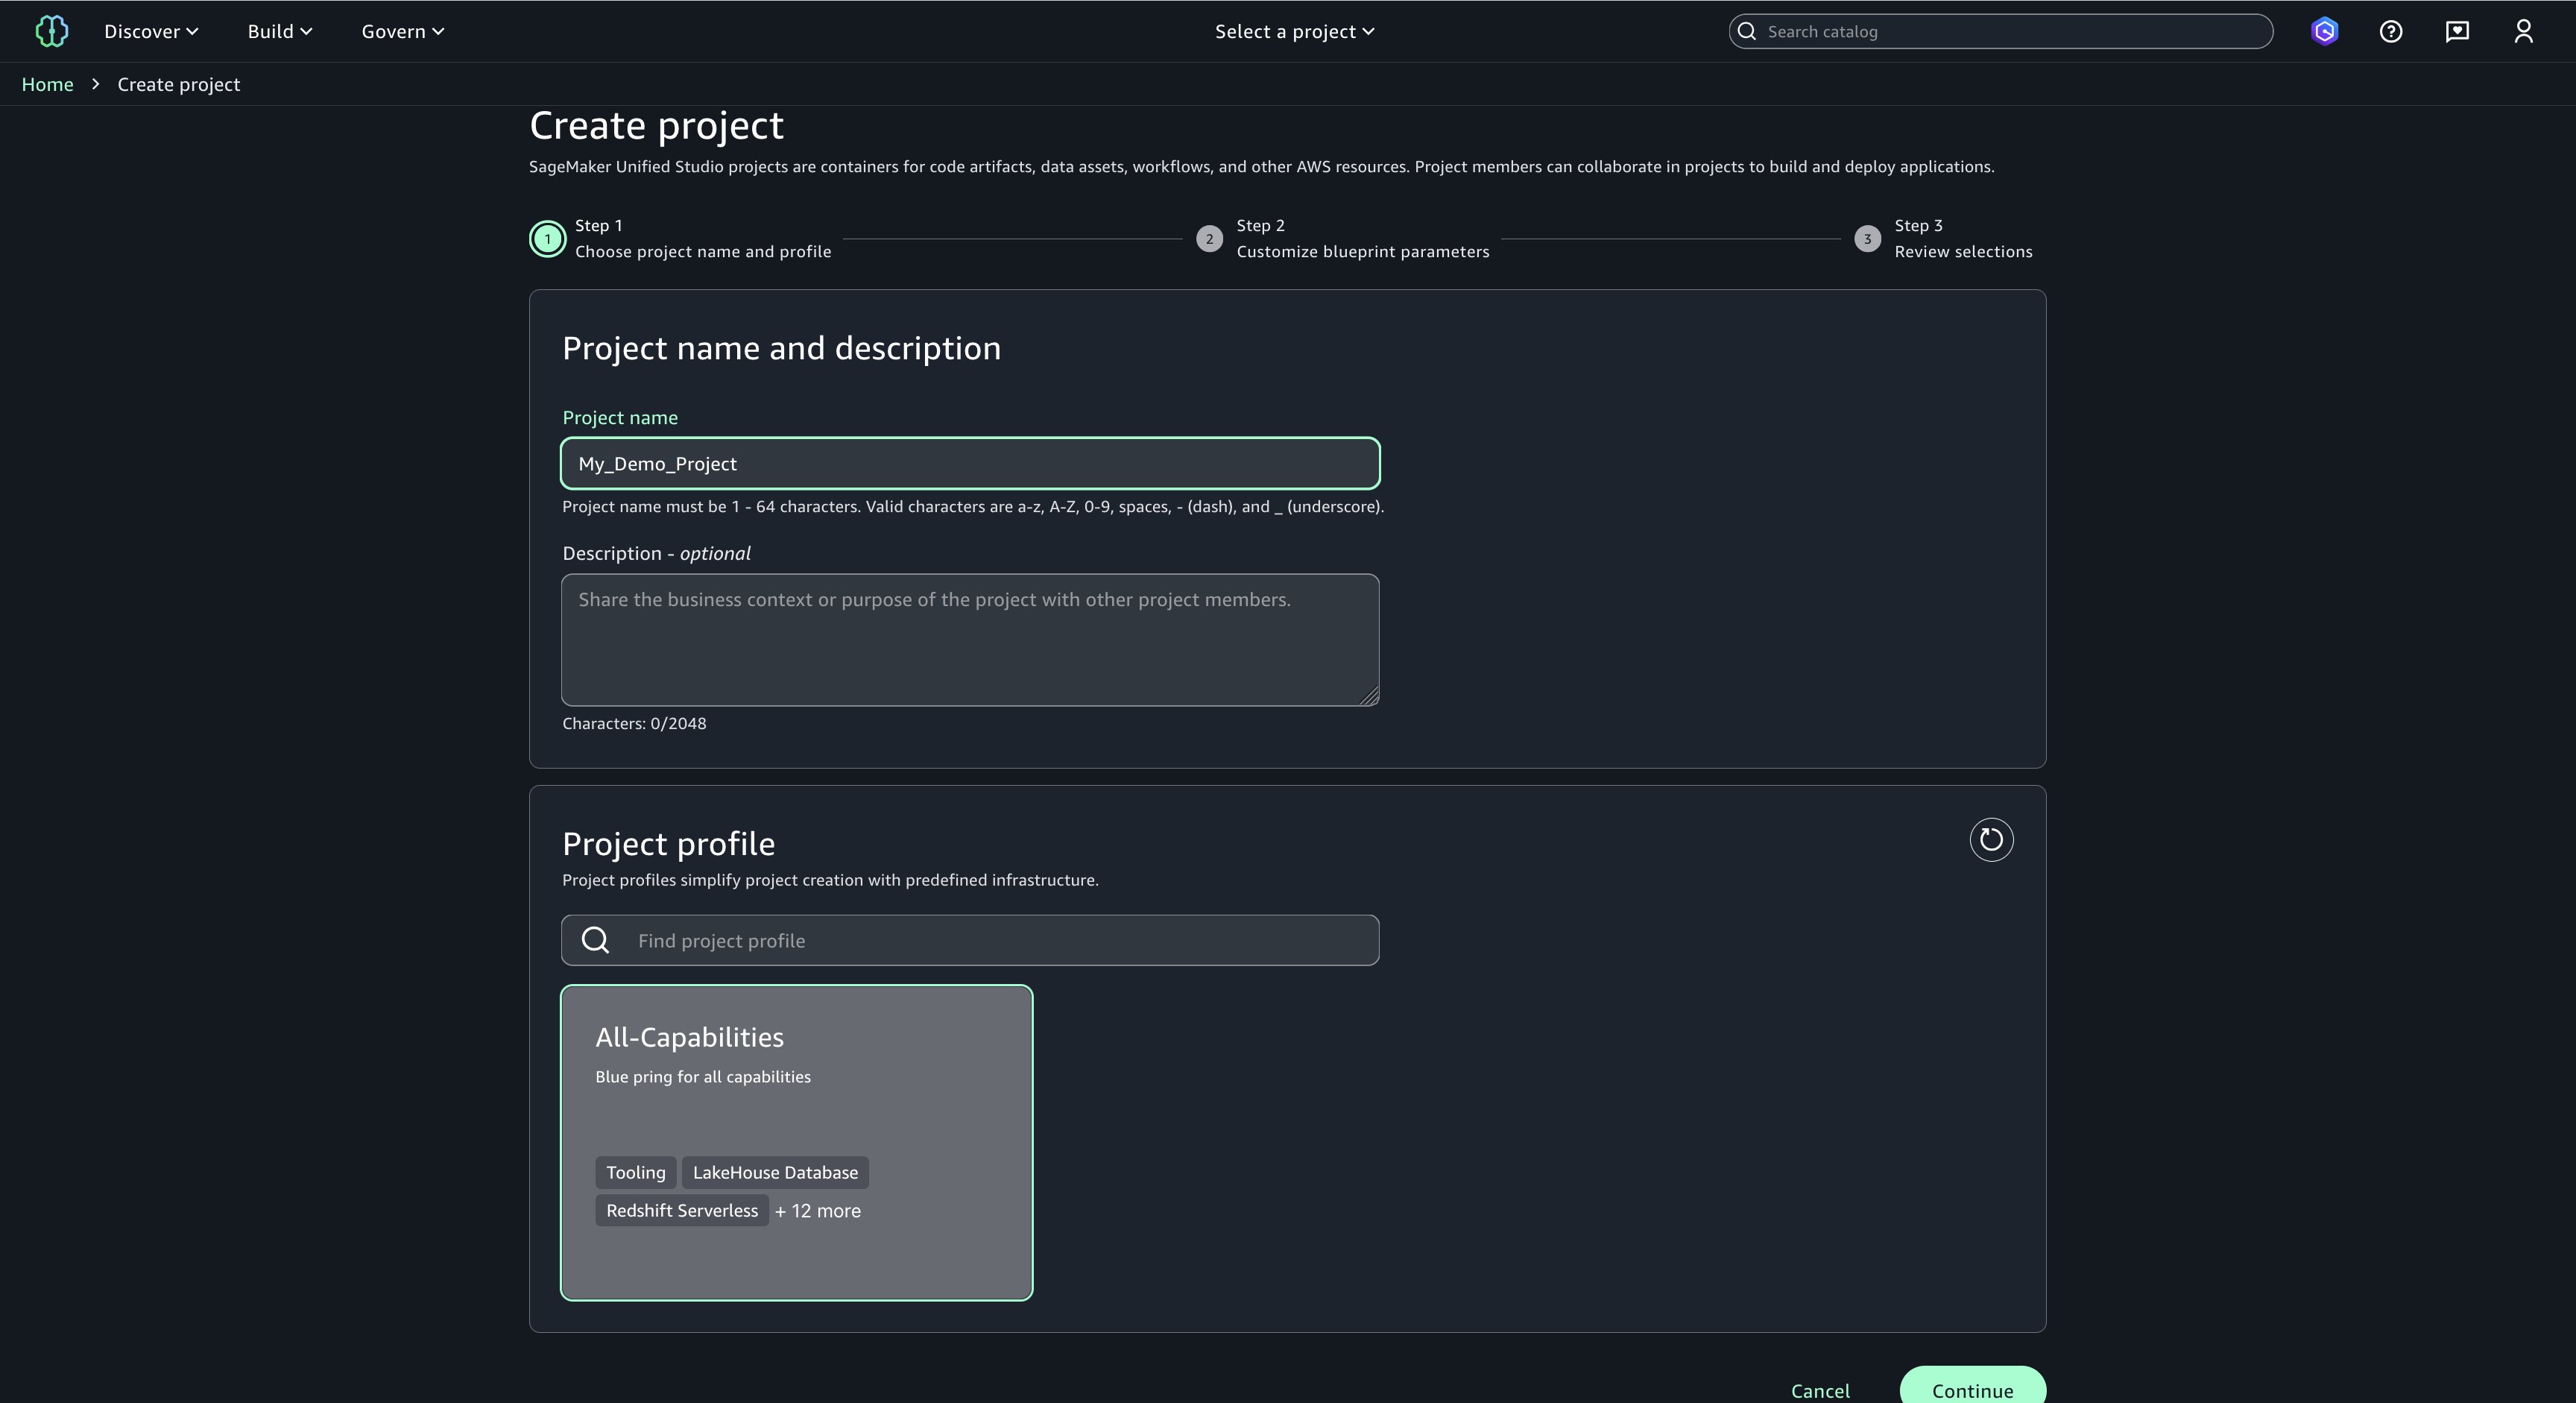
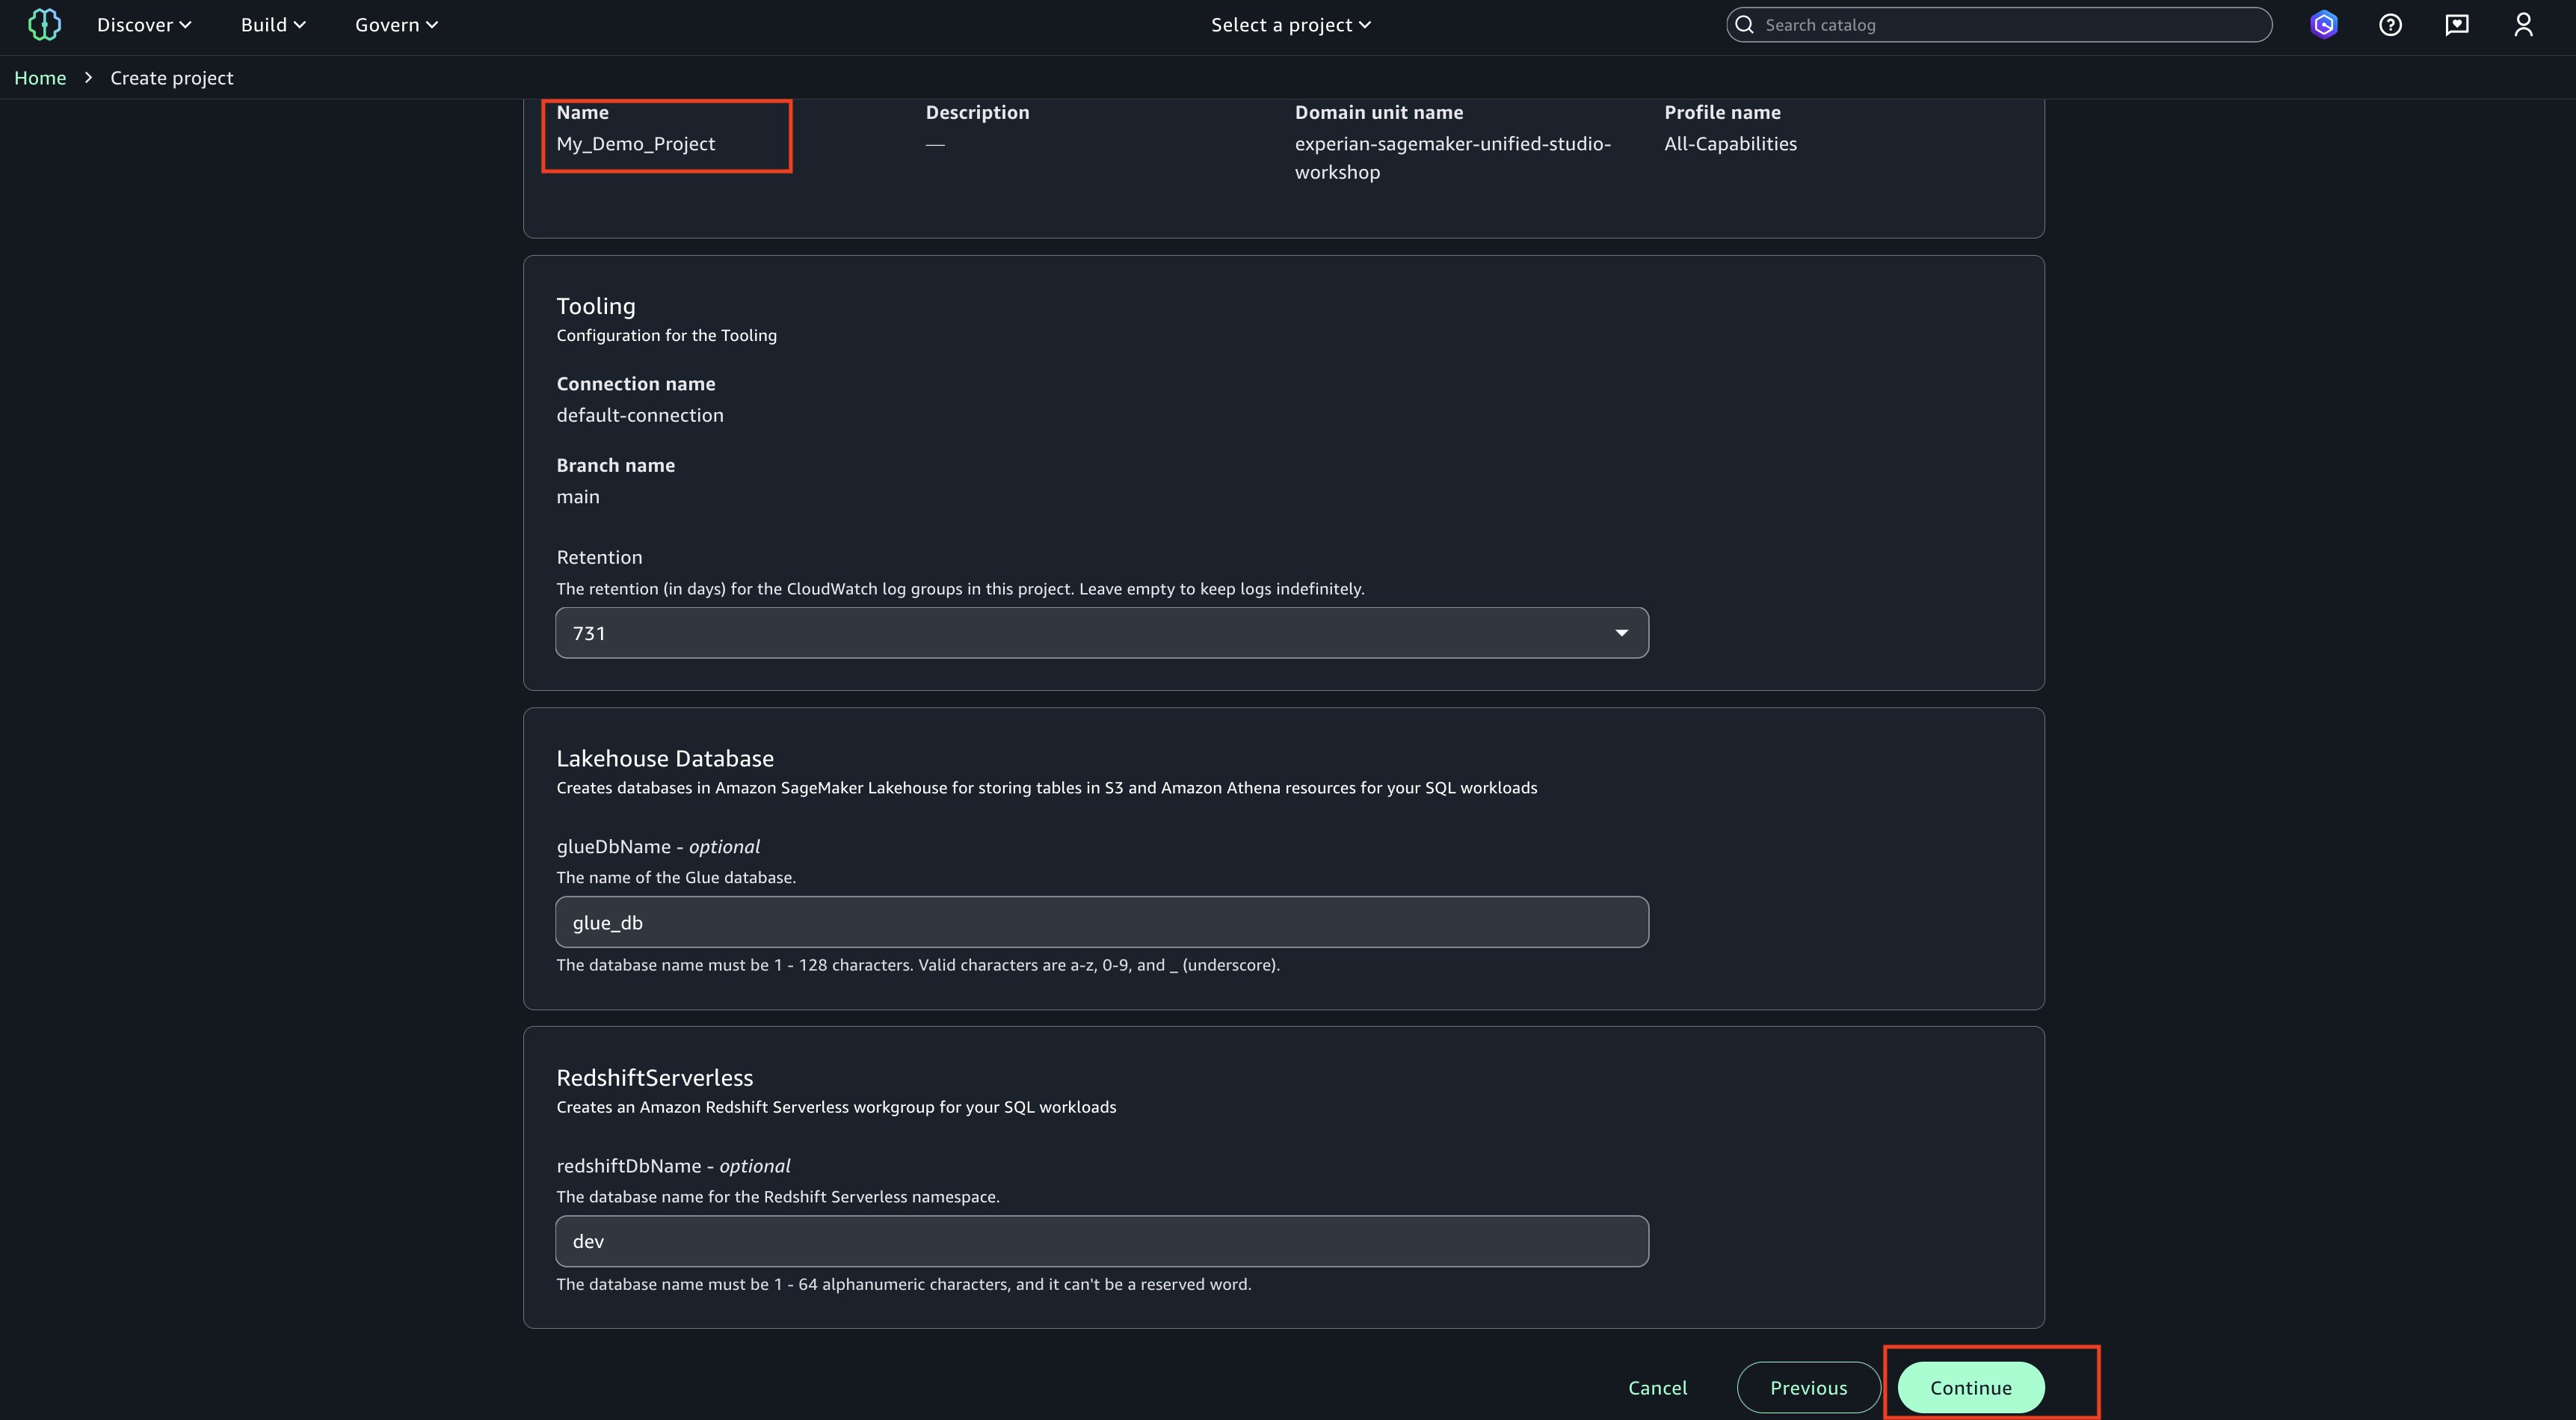
  3. Choose a project name of your choice, such as ‘My_Demo_Project’. In Project profile, select ‘All-Capabilities’.
    Demo Project
  4. Choose Continue. Keep everything as default.
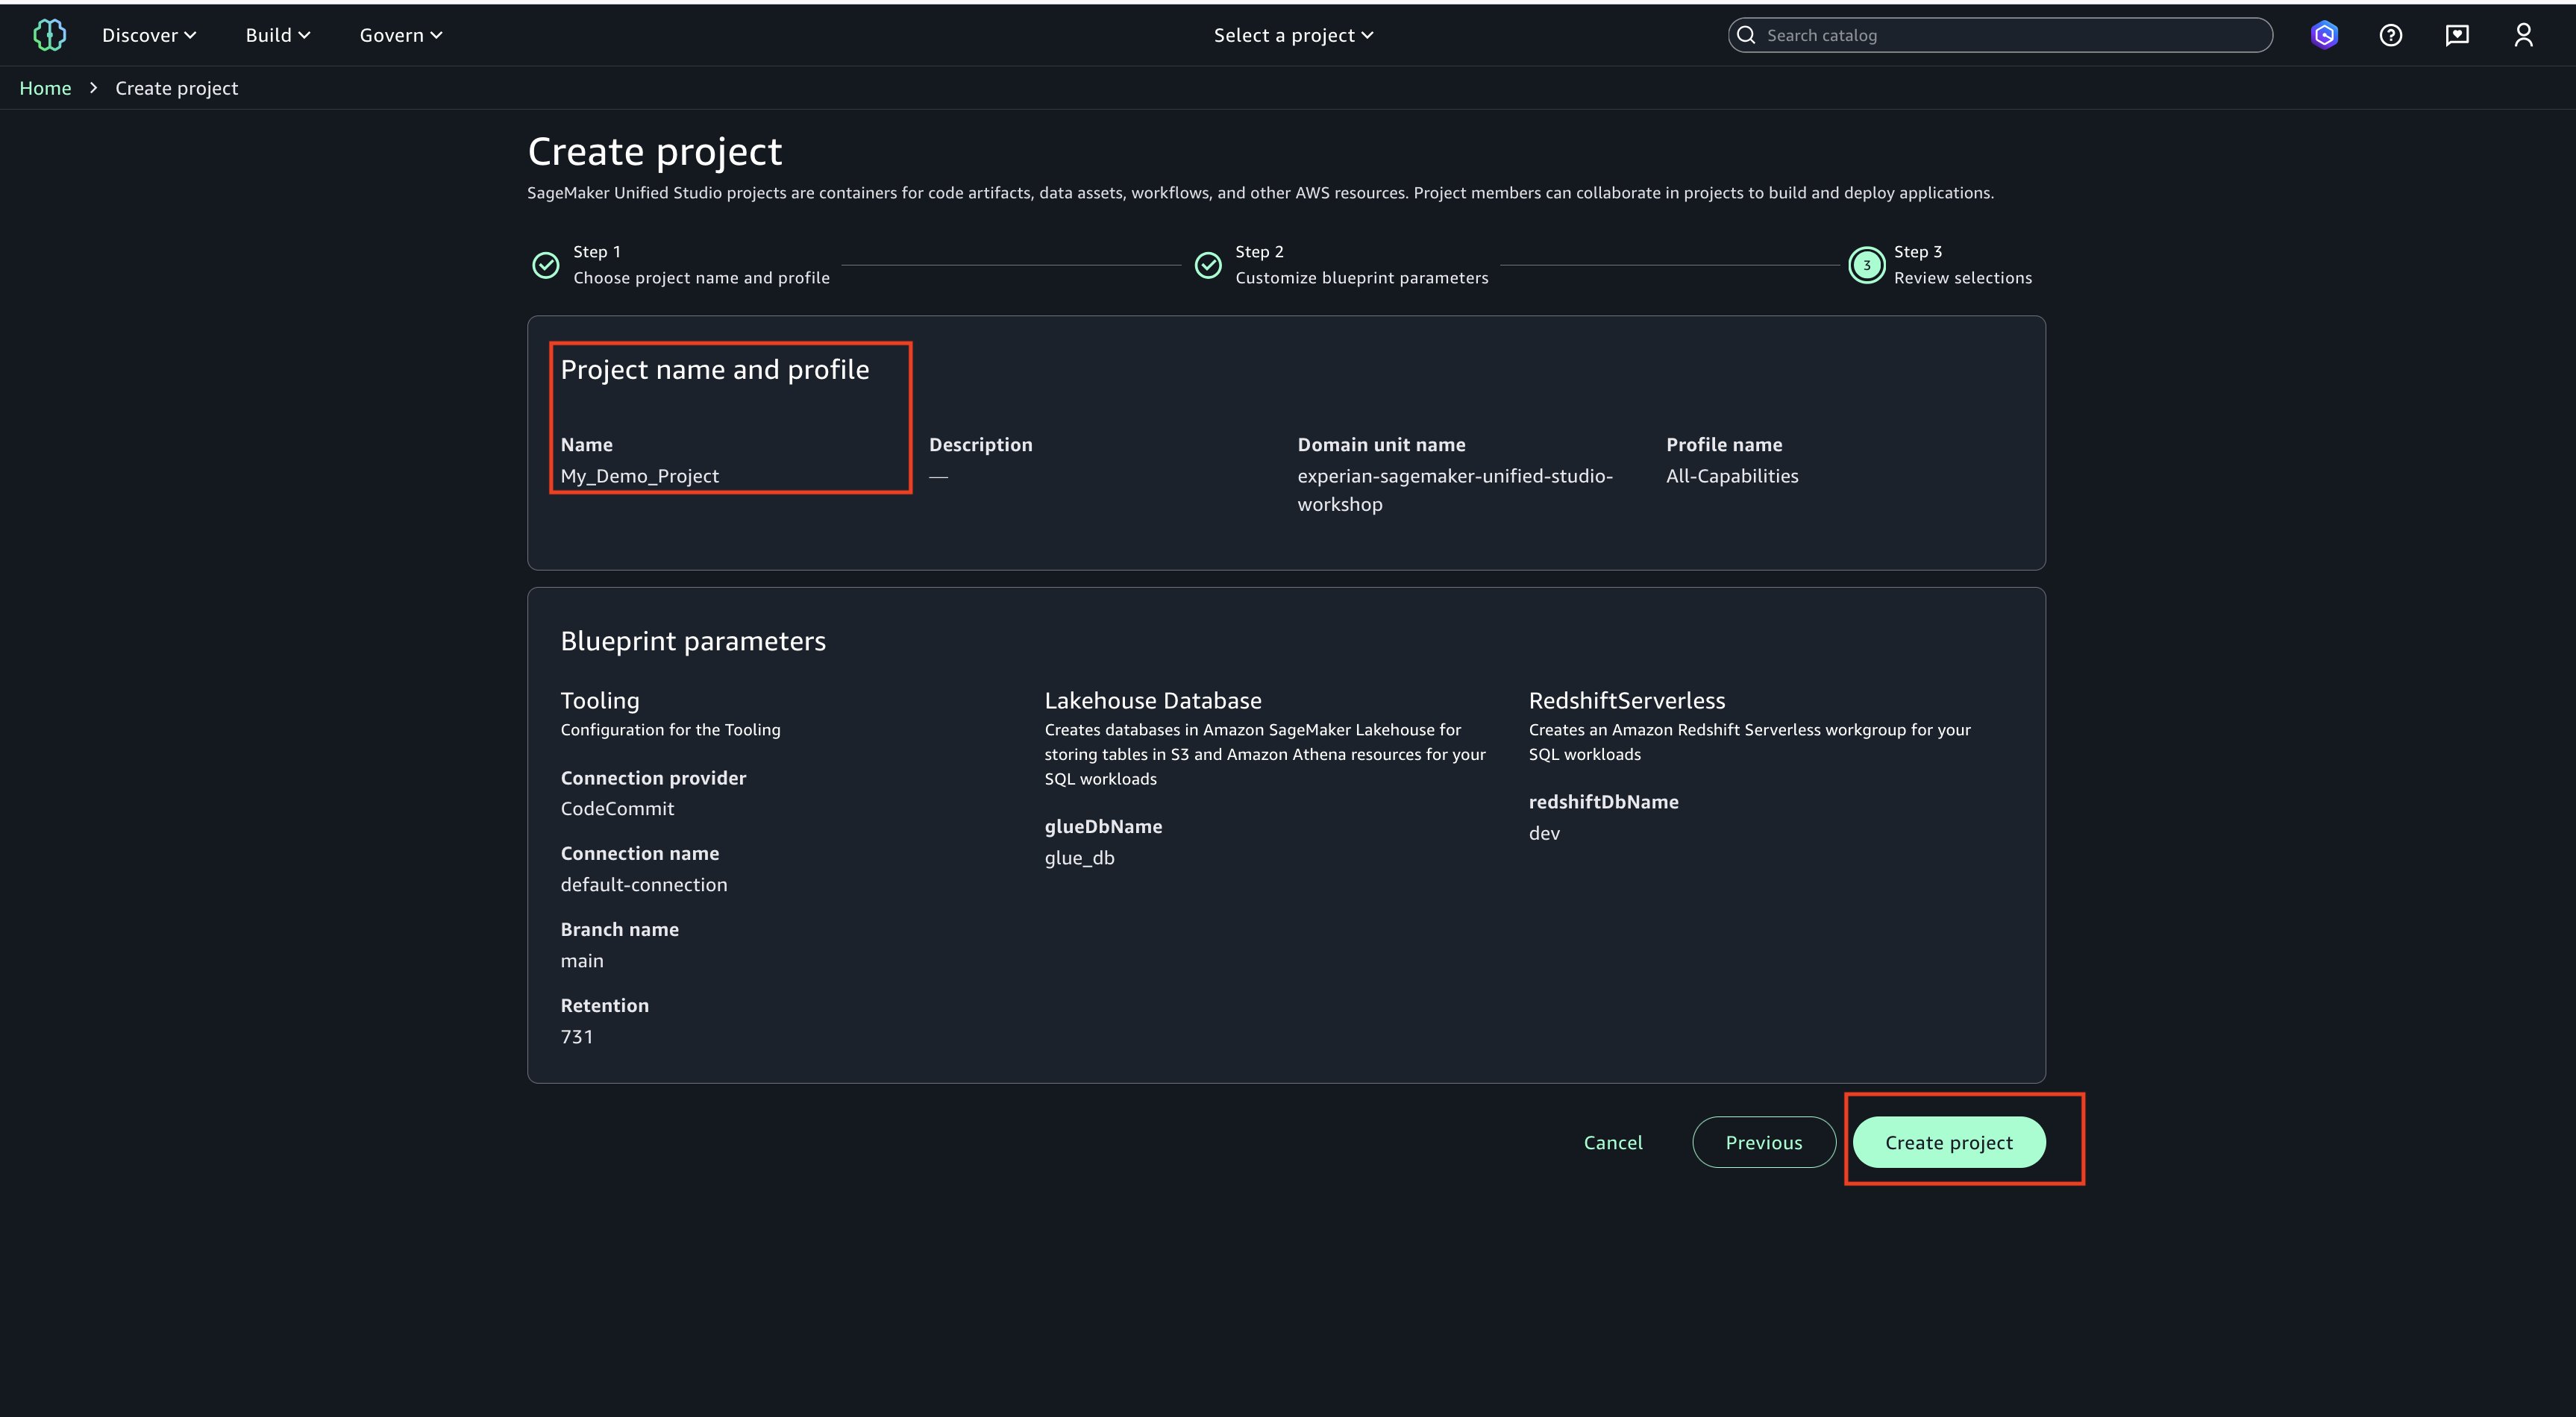
  5. Choose Continue. On next page, create on ‘Create project’.
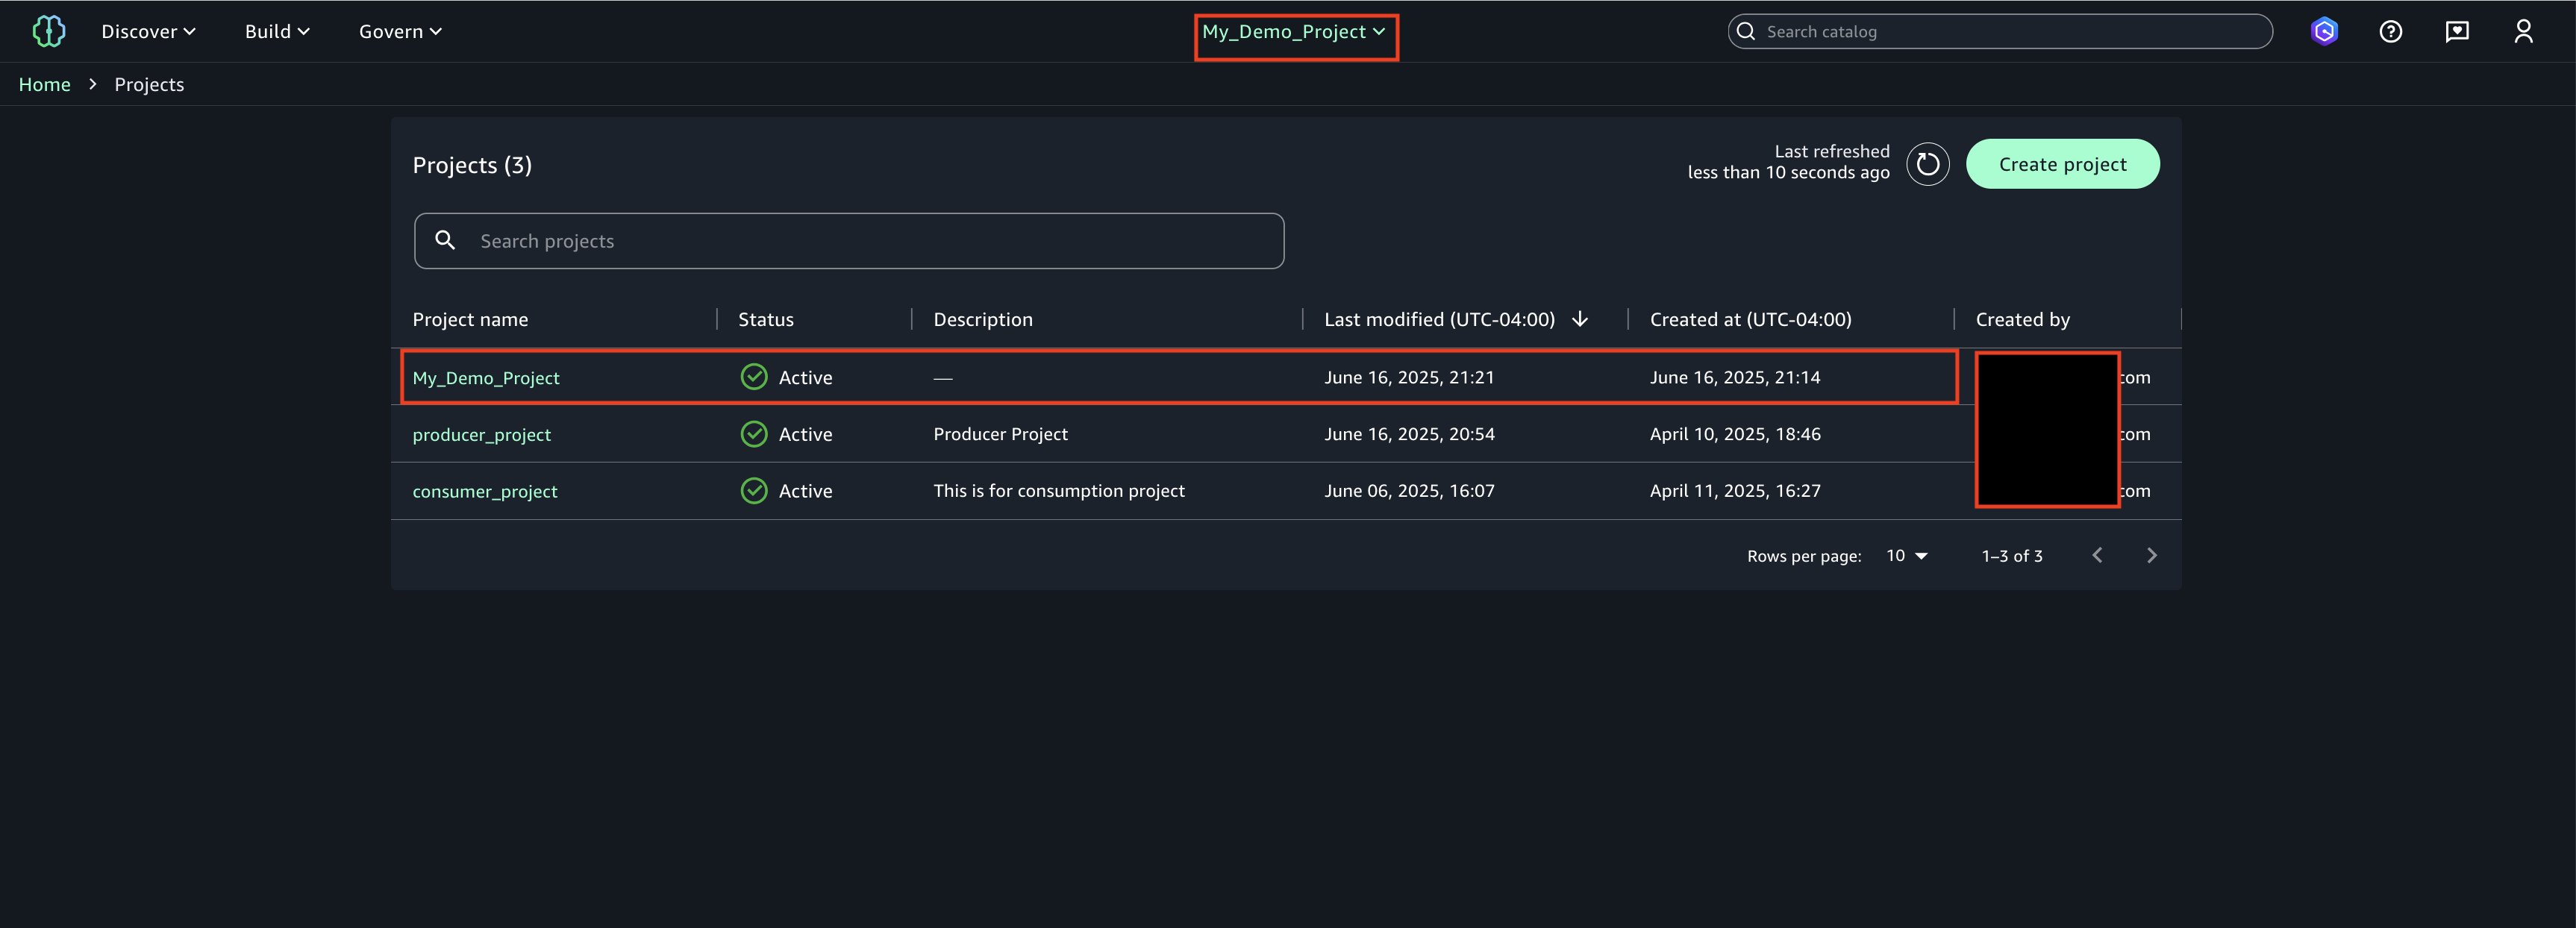
  6. Project creation final screen
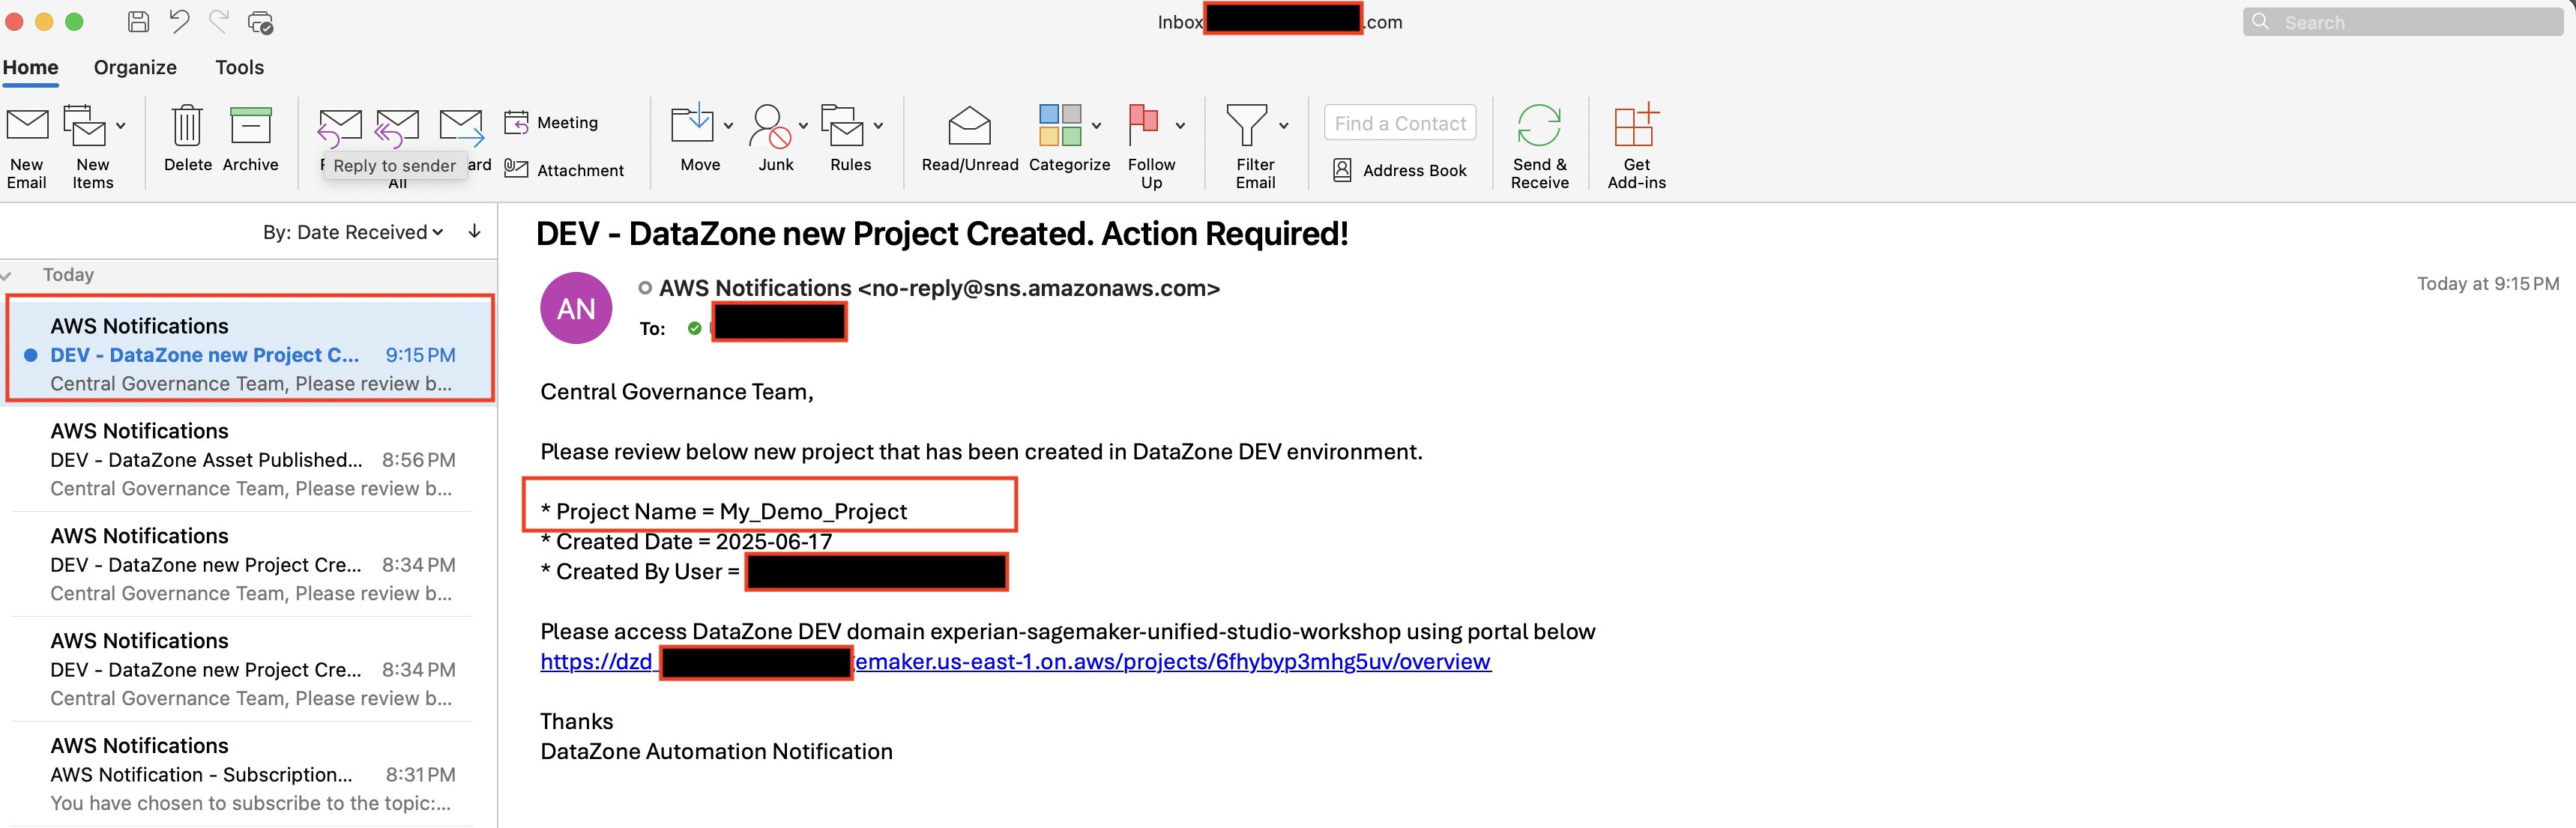
  7. Email Notification. Once project creation is successful, you should see an email notification sent by the above deployed automation.

Asset Publish Notification

To publish a sample asset in SageMaker Unified Studio.

  1. Lambda Permissions
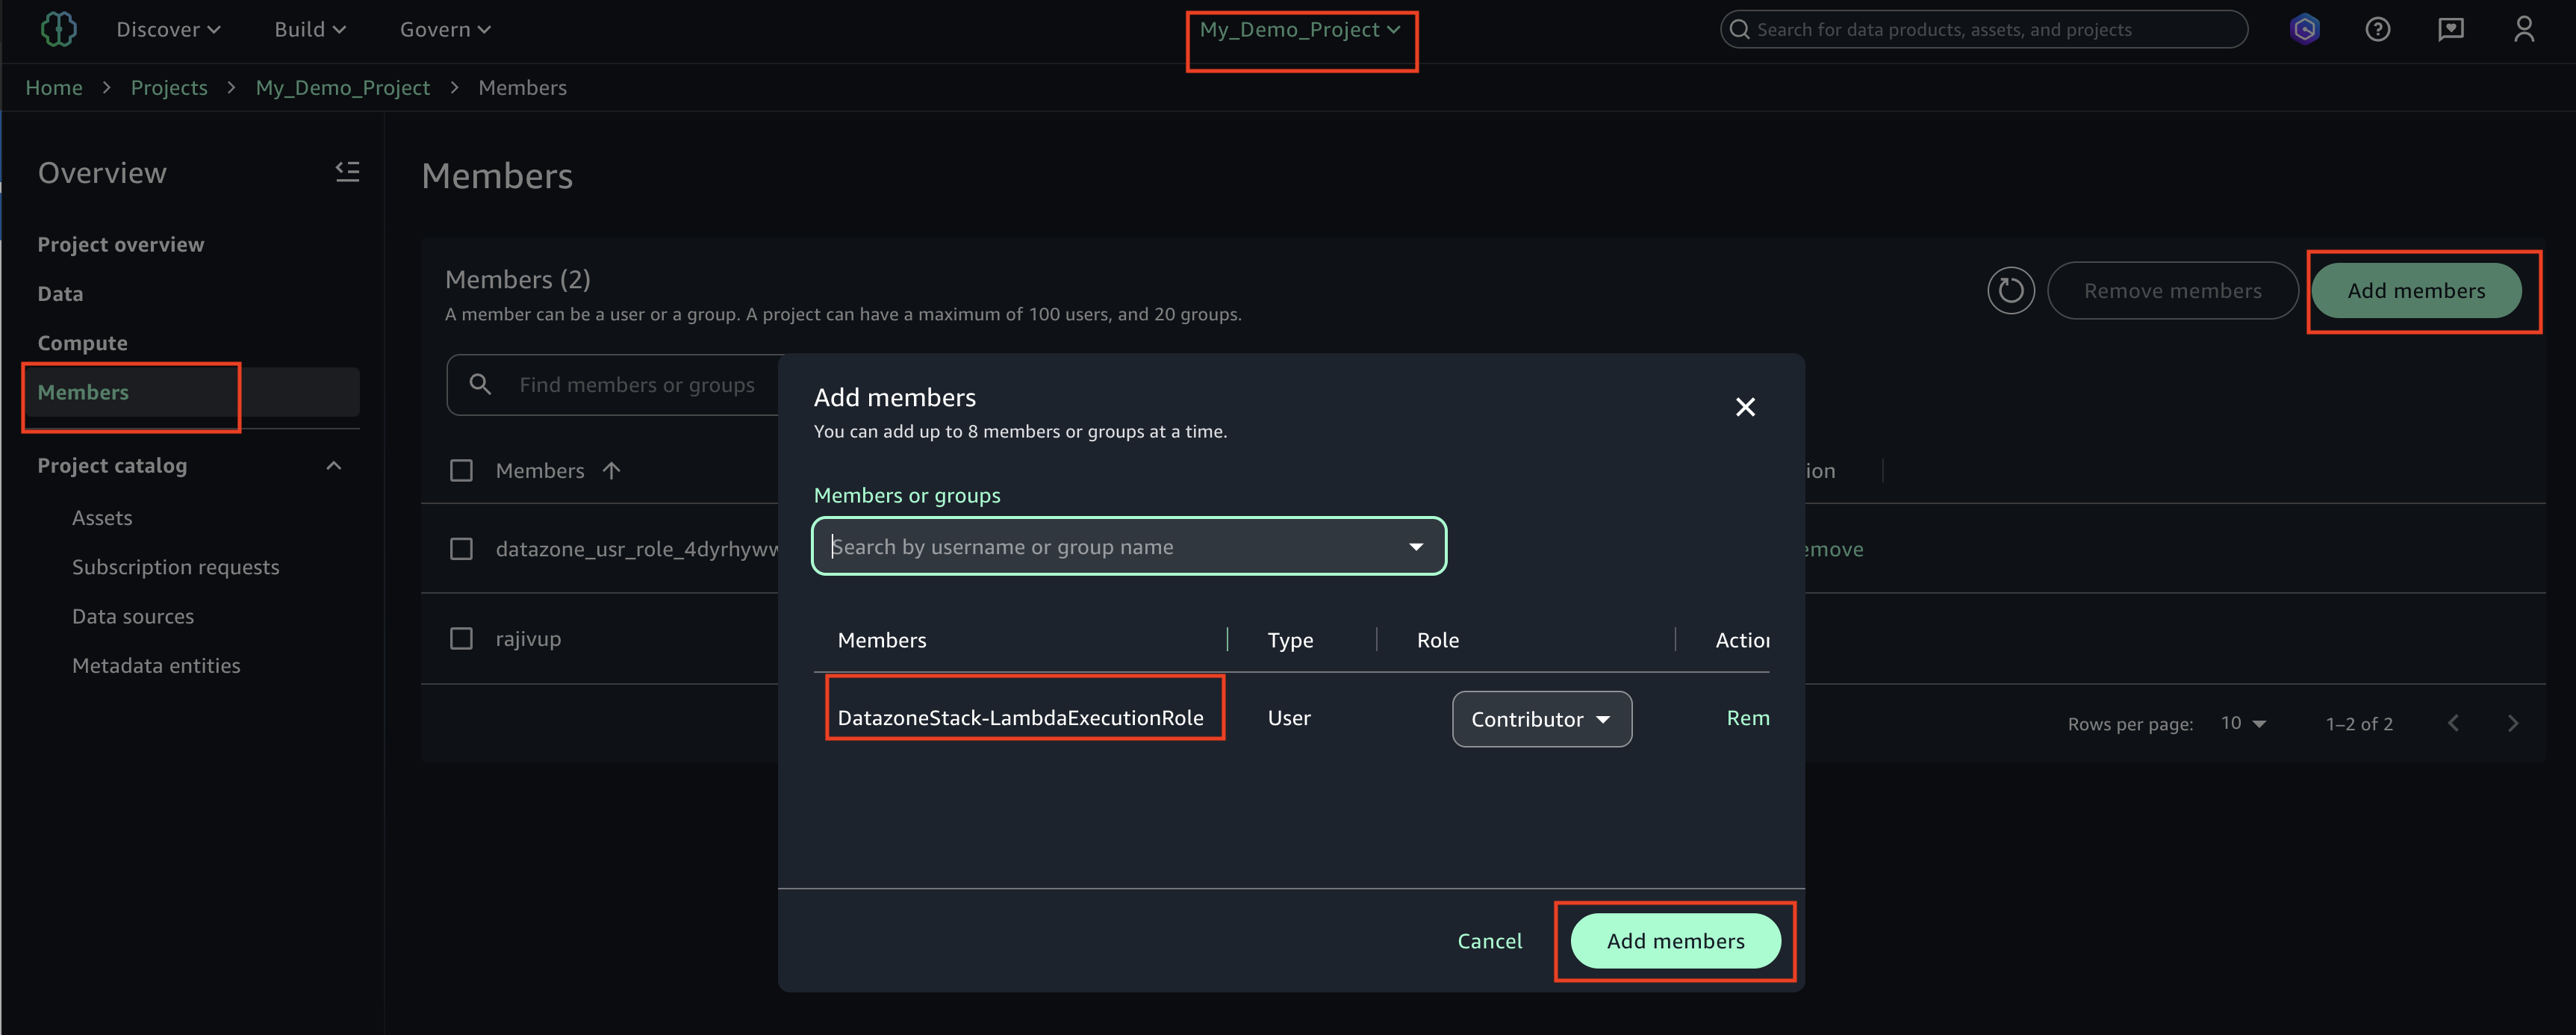
    After the CDK Stack creates the Lambda execution role ‘DatazoneStack-LambdaExecutionRole’, use the following procedure to integrate this role into your SageMaker Studio project. This integration enables Lambda functions to interact with DataZone API in SageMaker Unified Studio project.

    1. Login to SageMaker Unified studio using SSO, click on Members, Add members.
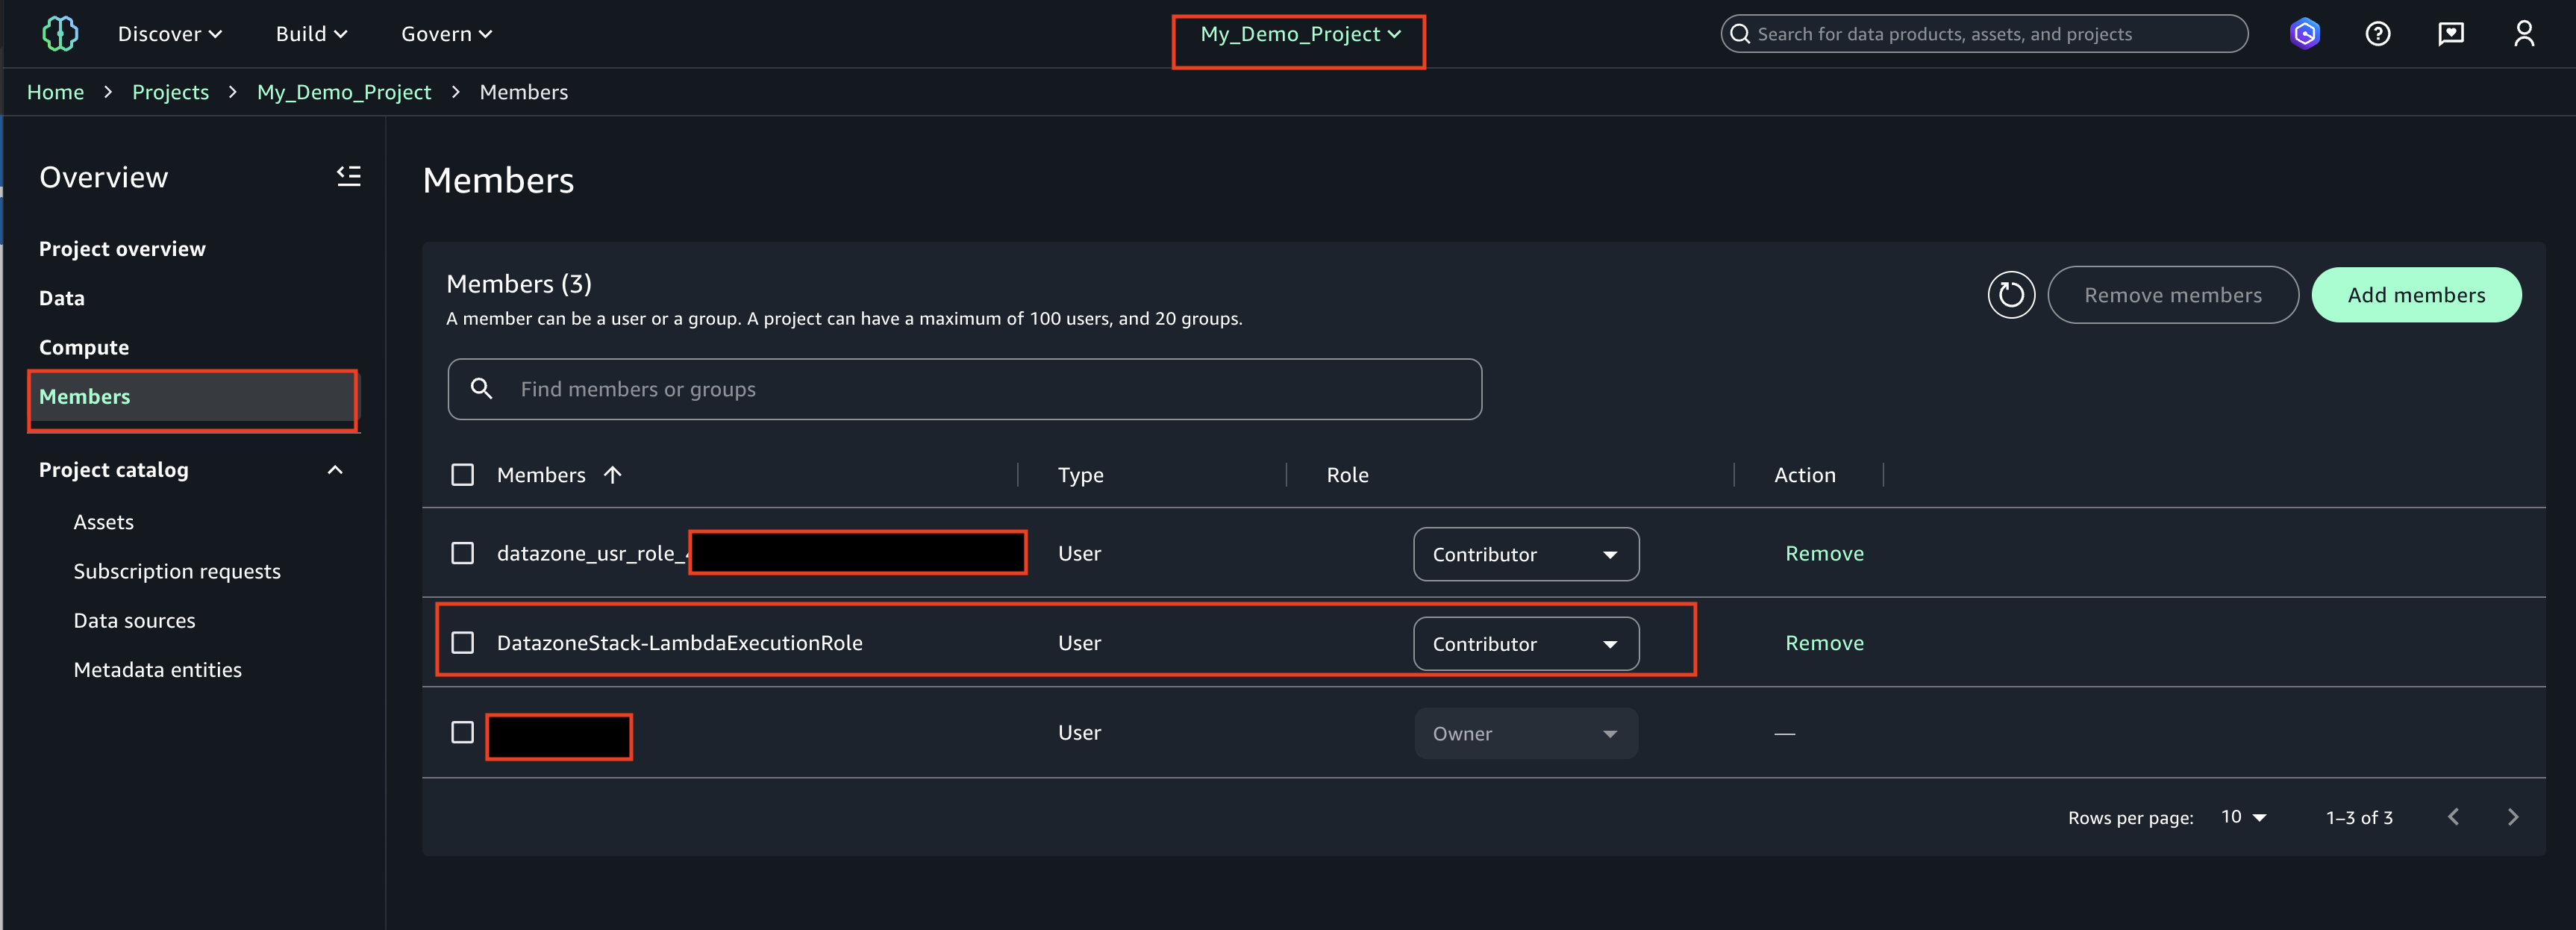
    2. Find the role ‘DatazoneStack-LambdaExecutionRole’ and add as a ‘Contributor’

      The LambdaExecutionRole (<cf-stack-name>-LambdaExecutionRole) has been added as a member to a project in SageMaker Unified Studio.

  2. Create Asset
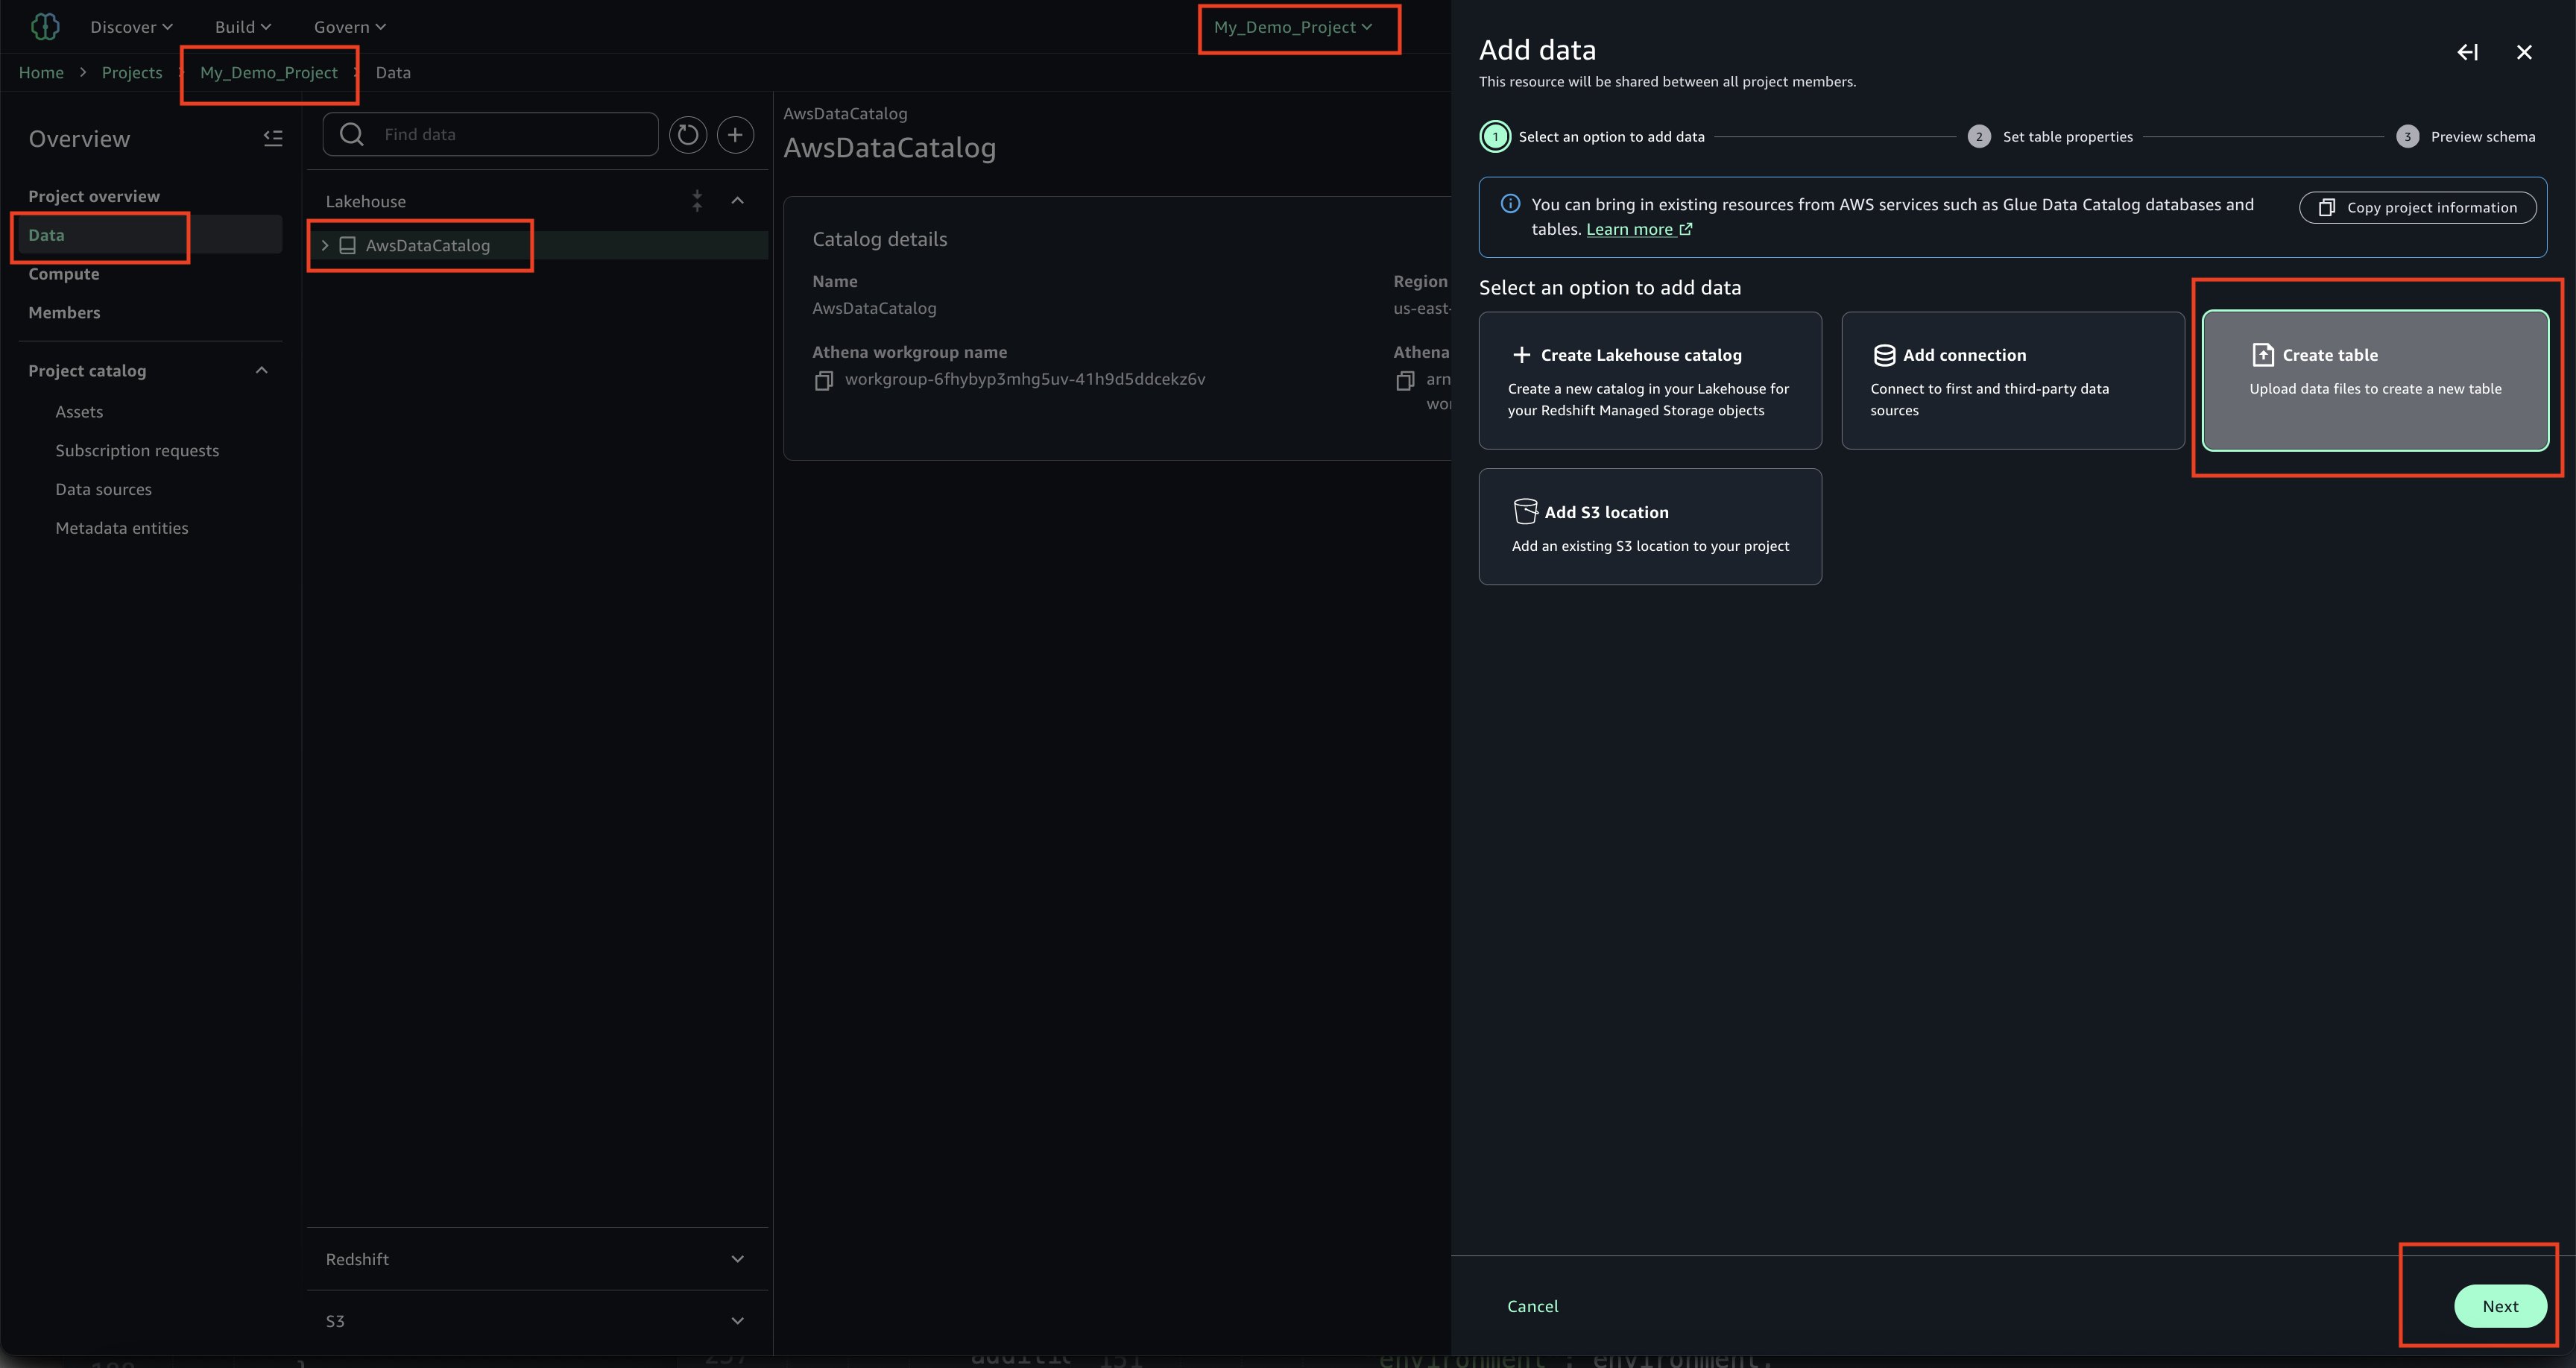
    1. In your project ‘My_Demo_Project’, click on Data. Choose the plus sign to add a data set.

    2. Upload your CSV file using the sample ‘Product_v6.csv’ found in the checkout folder of the ‘sample-sagemaker-unified-studio-governance-notifications’ GitHub repository.

    3. Use table type as S3/external table.

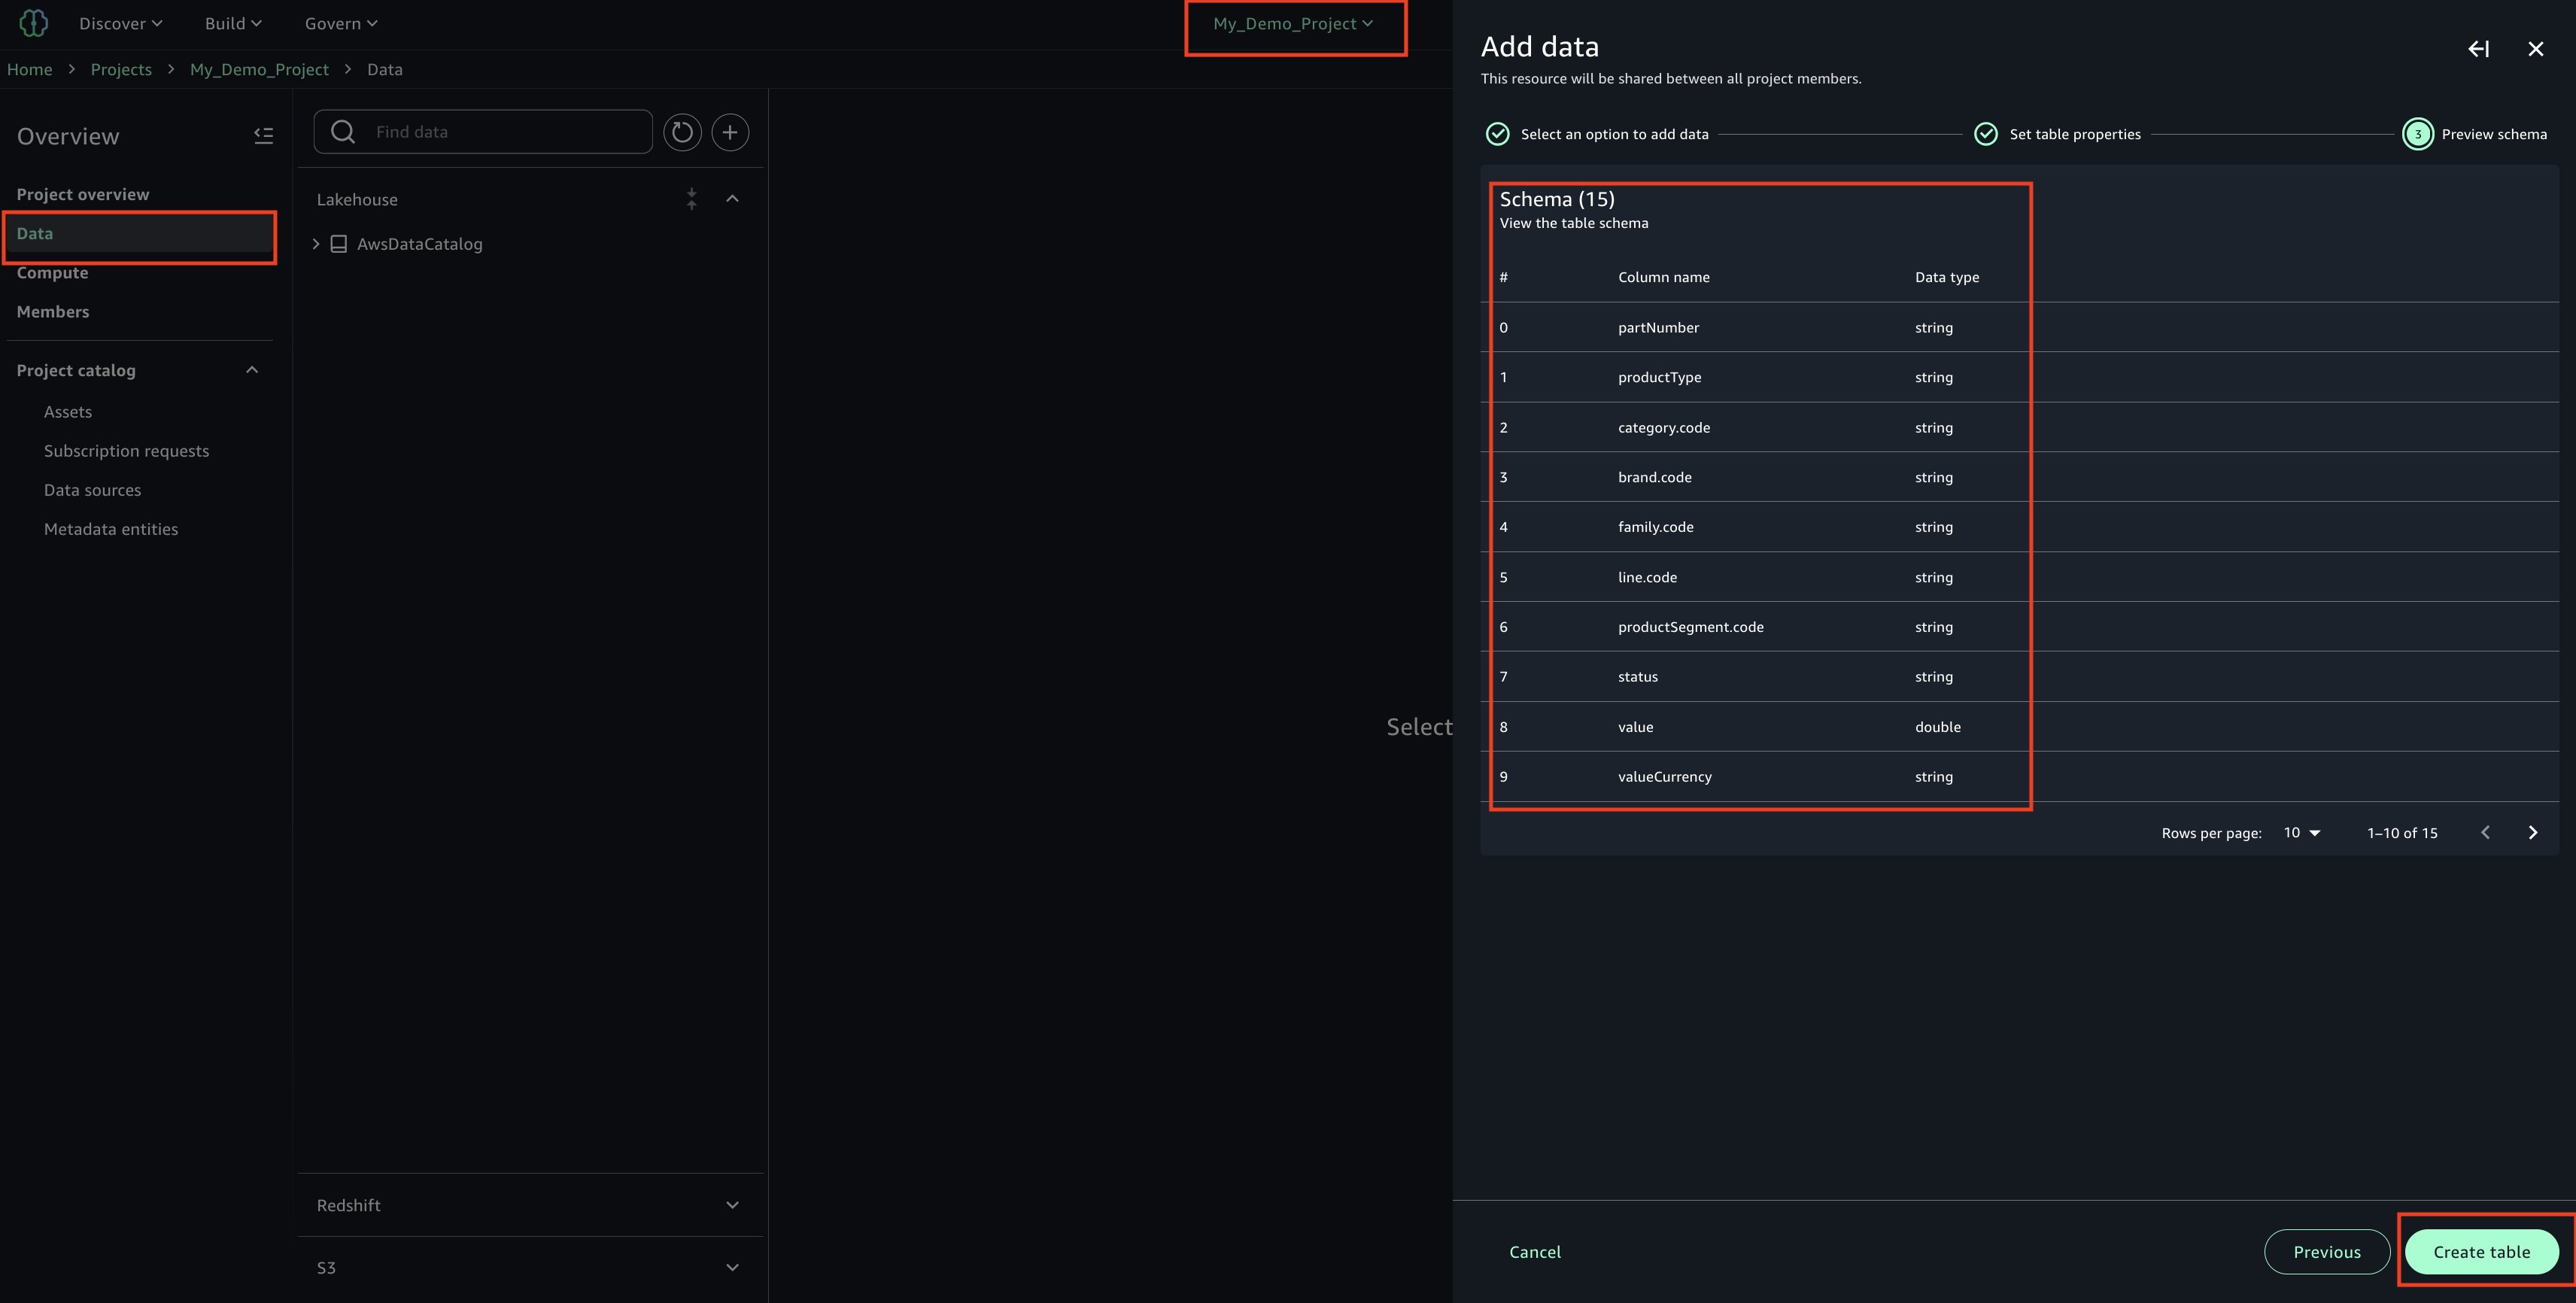
    4. Review and confirm that the column/attribute names in the uploaded CSV file.

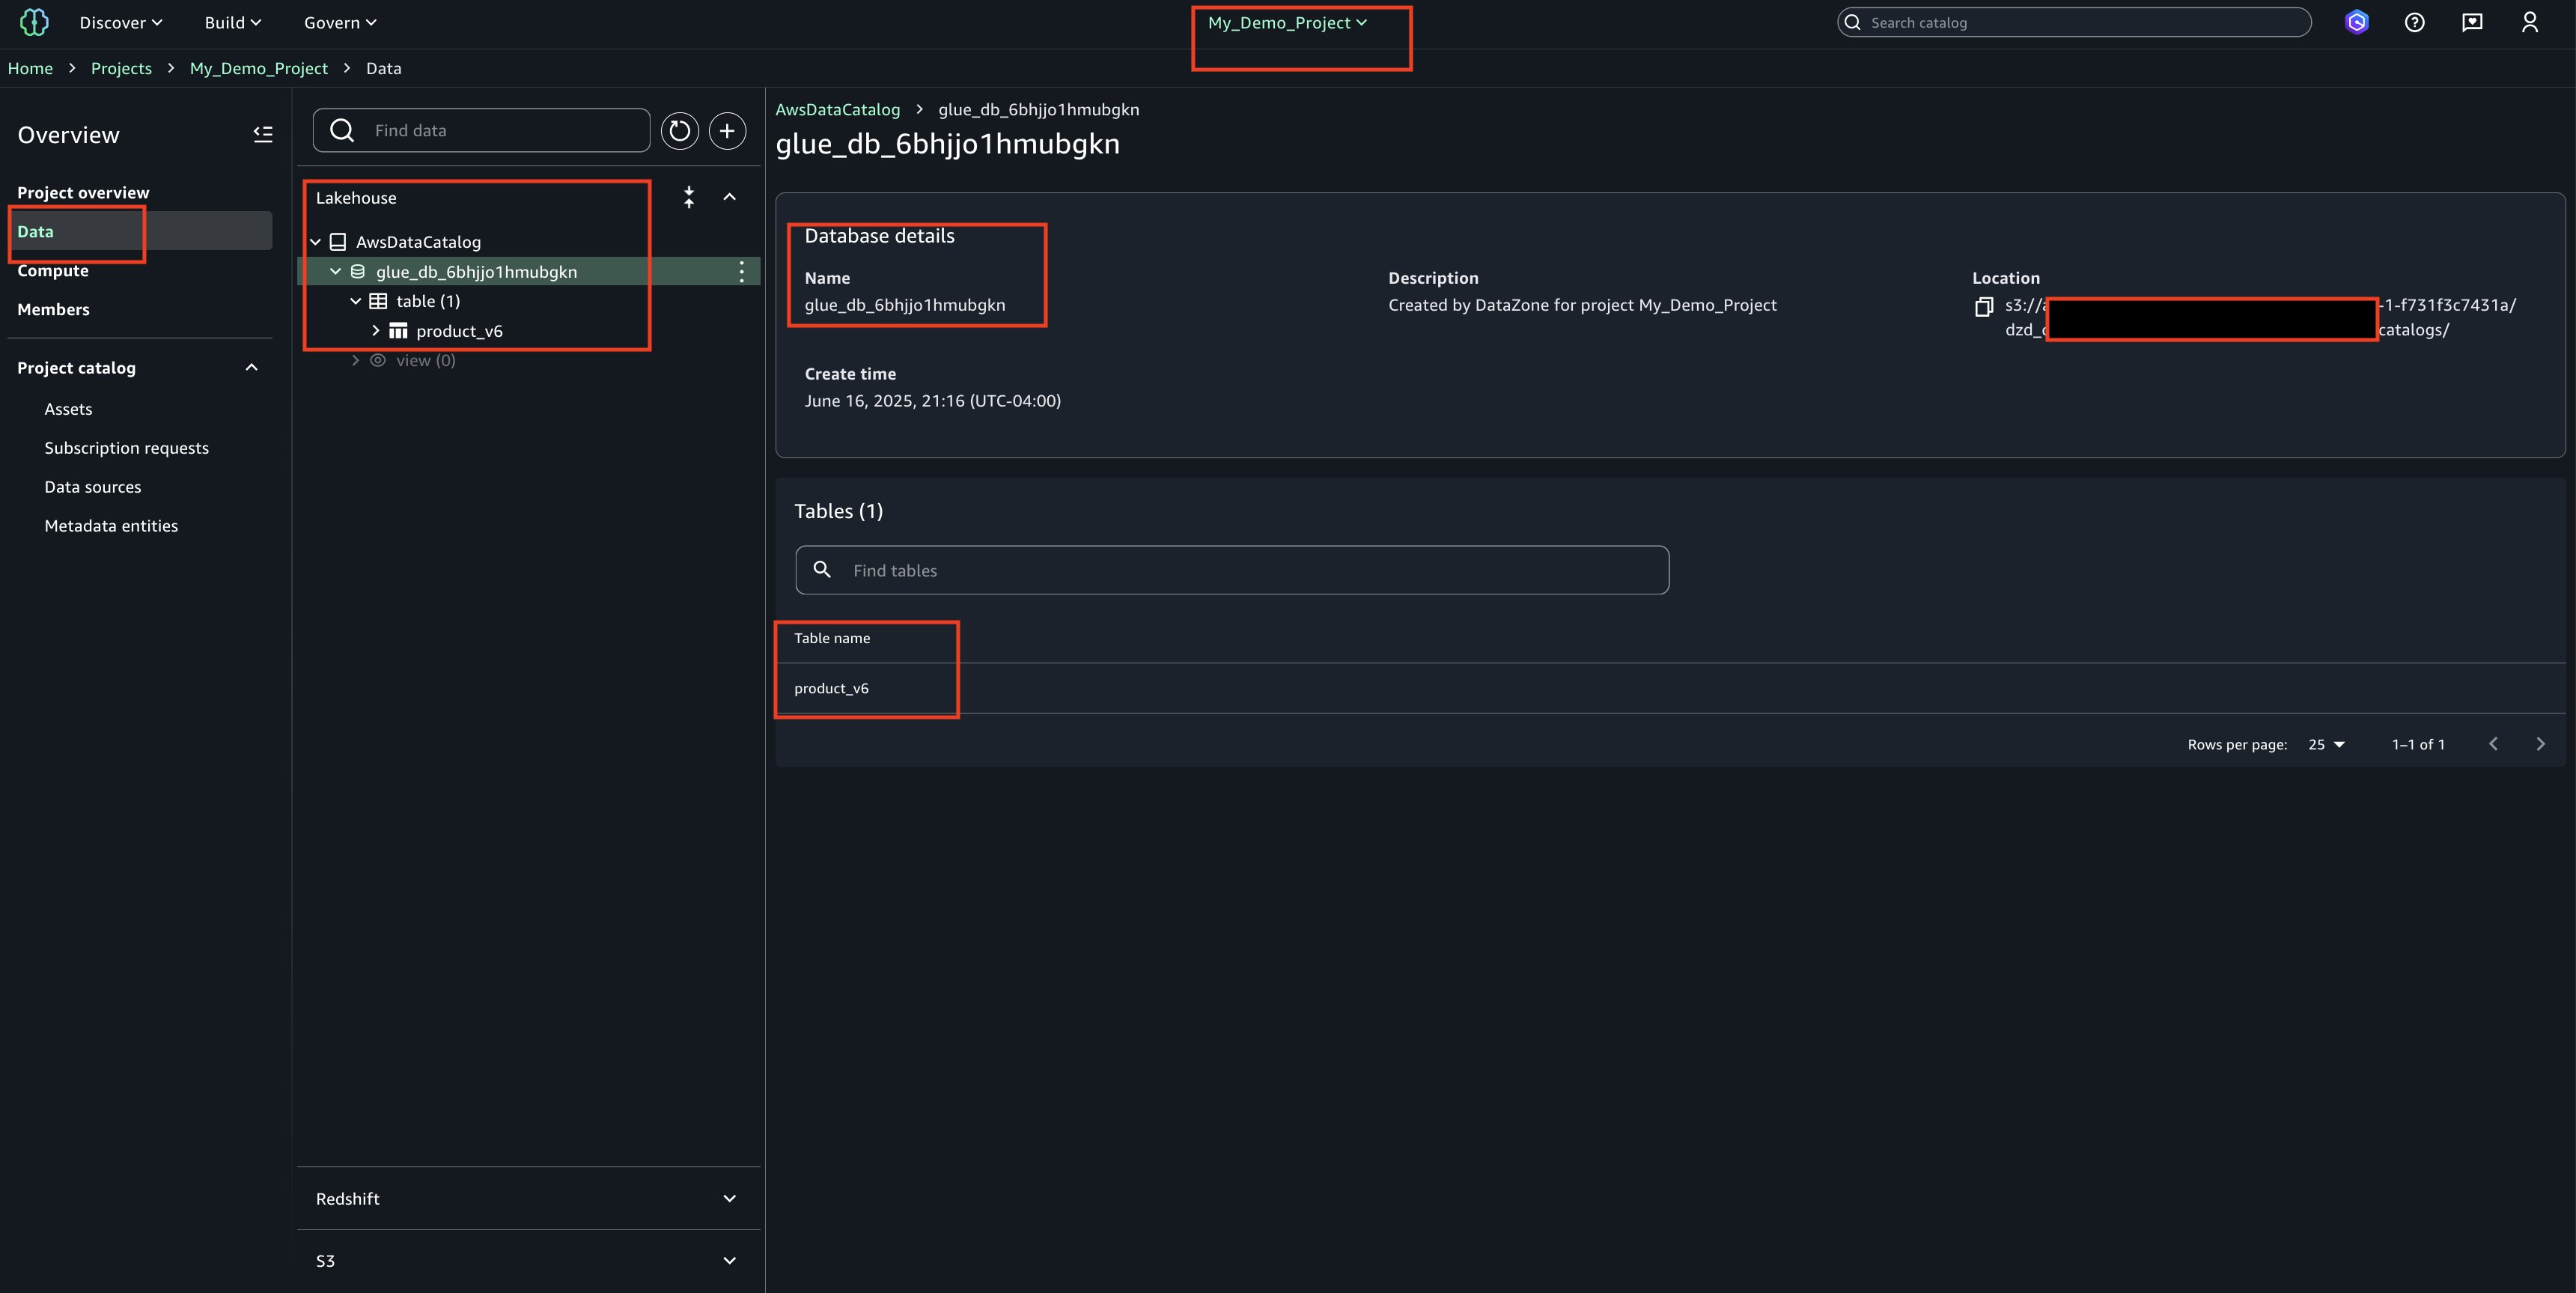
    5. Check the Glue database(glue_db_<unique_id>) to confirm that the table has been created and properly imported
  3. Publish Asset
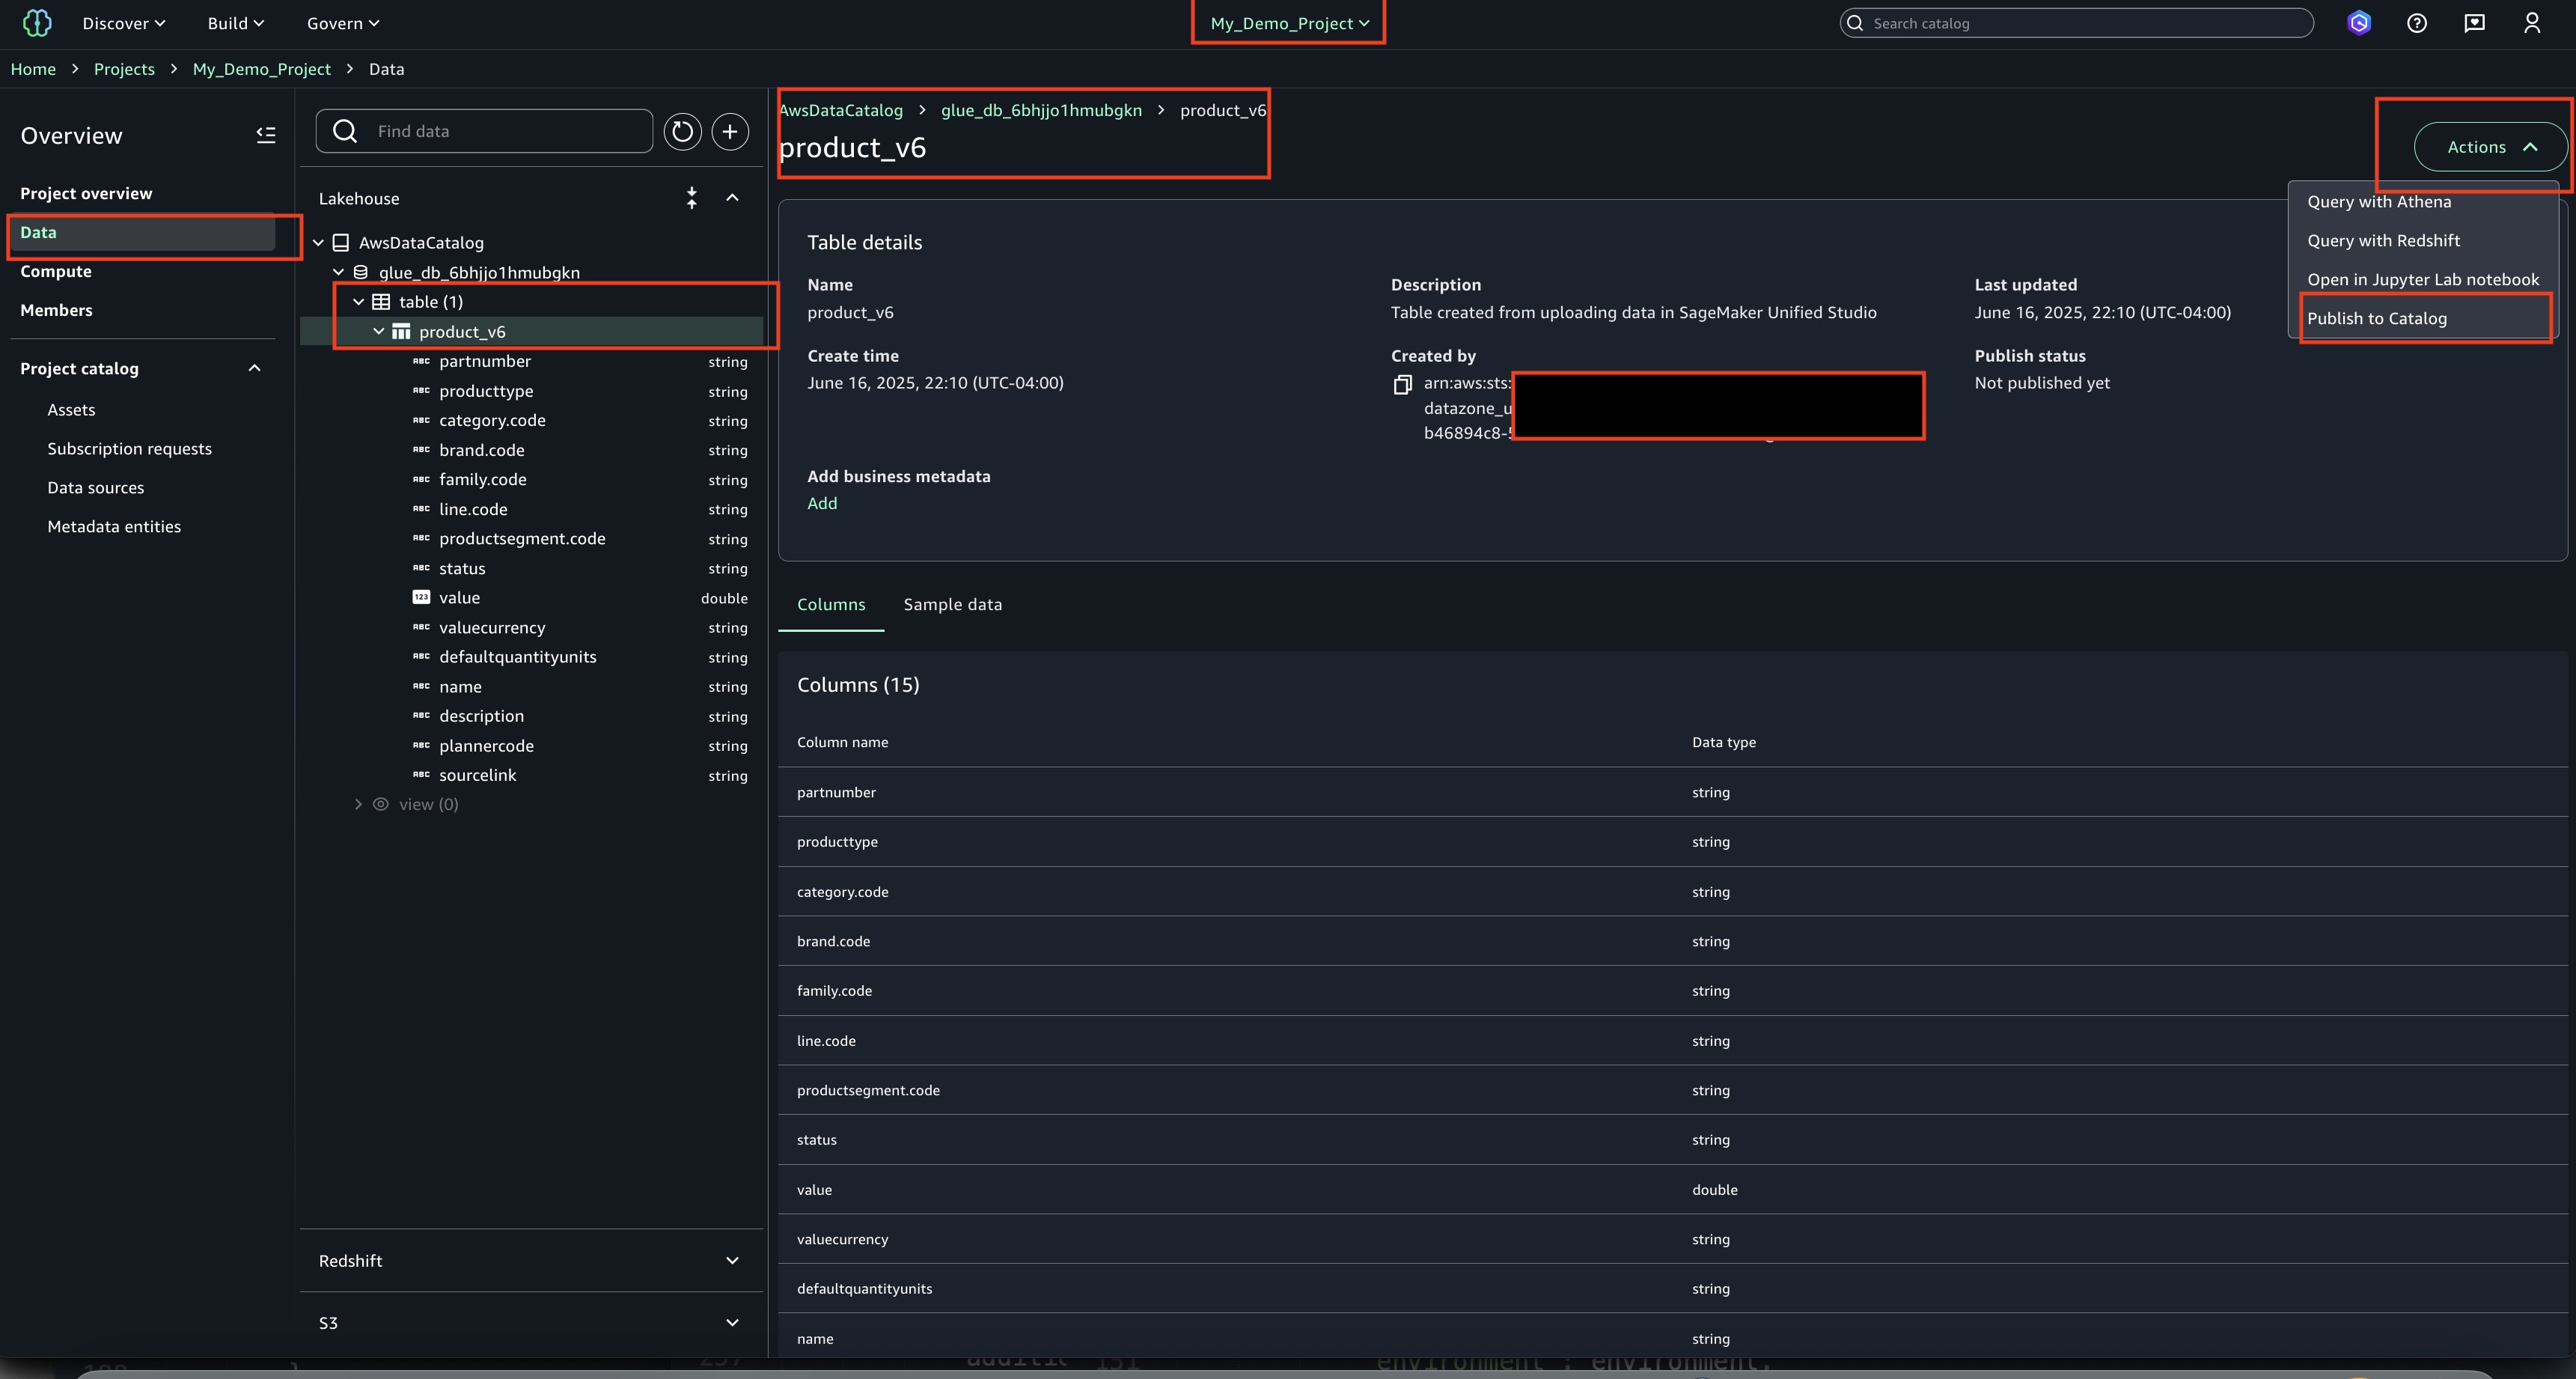
    1. Select the asset, choose Actions and Publish to Catalog.

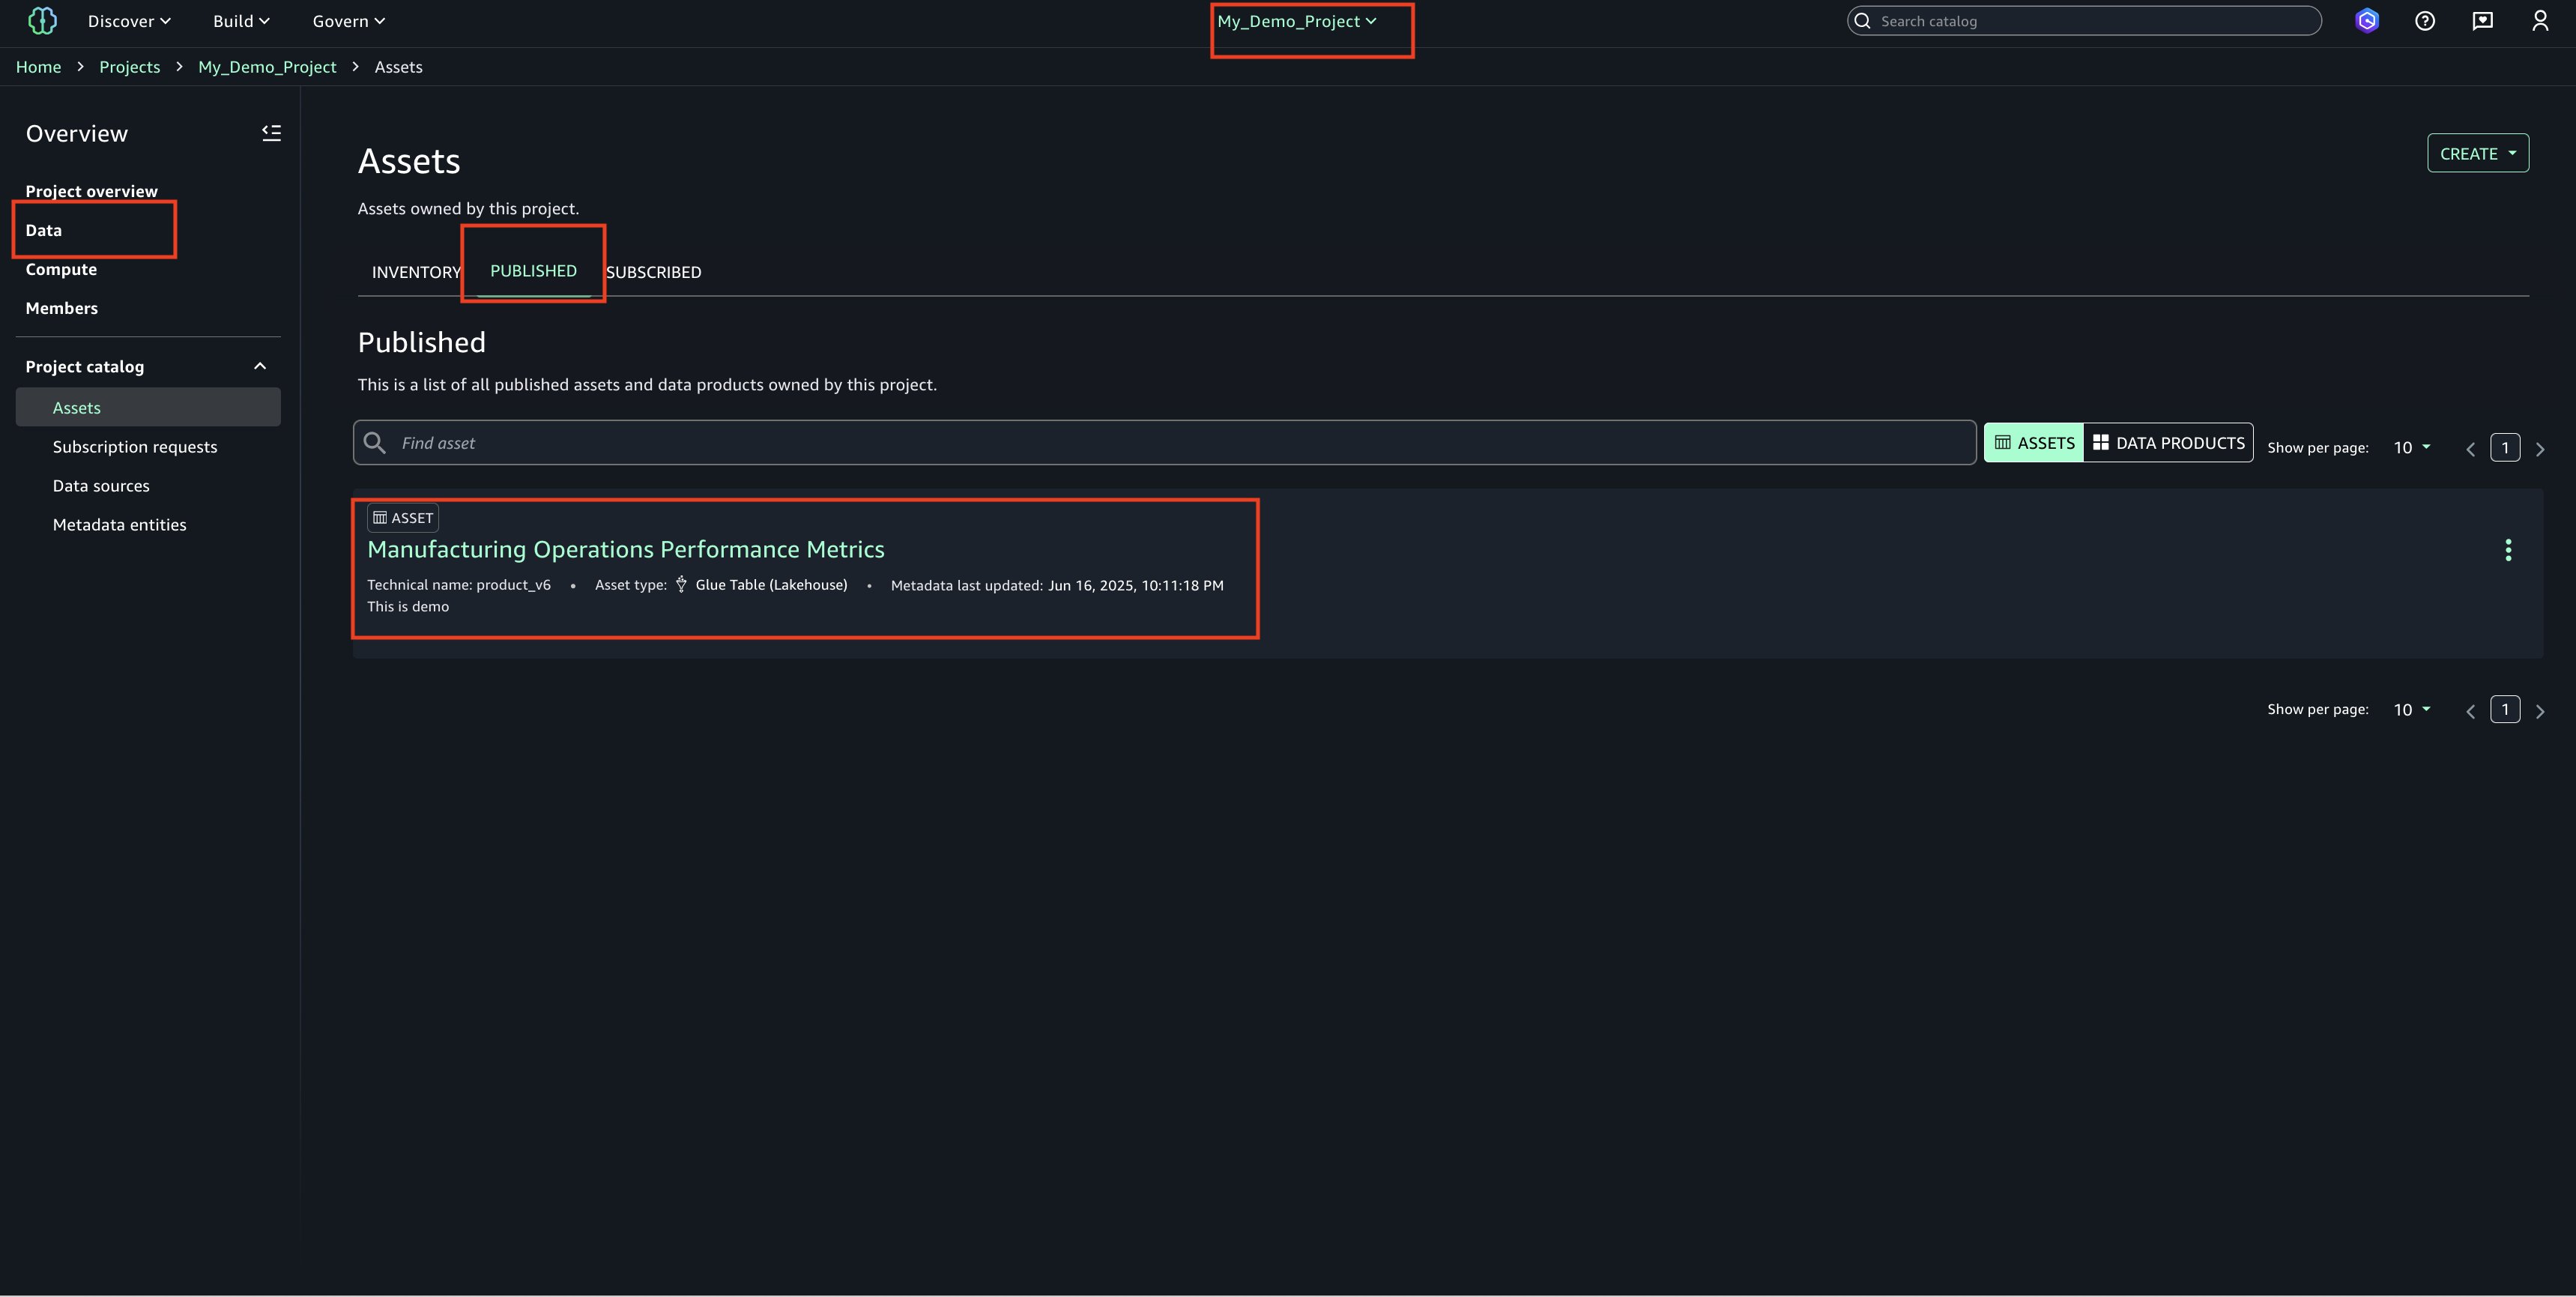
    2. View the published asset below.

    3. In the Project Catalog’s Assets section, locate the highlighted entry and verify the published table’s name

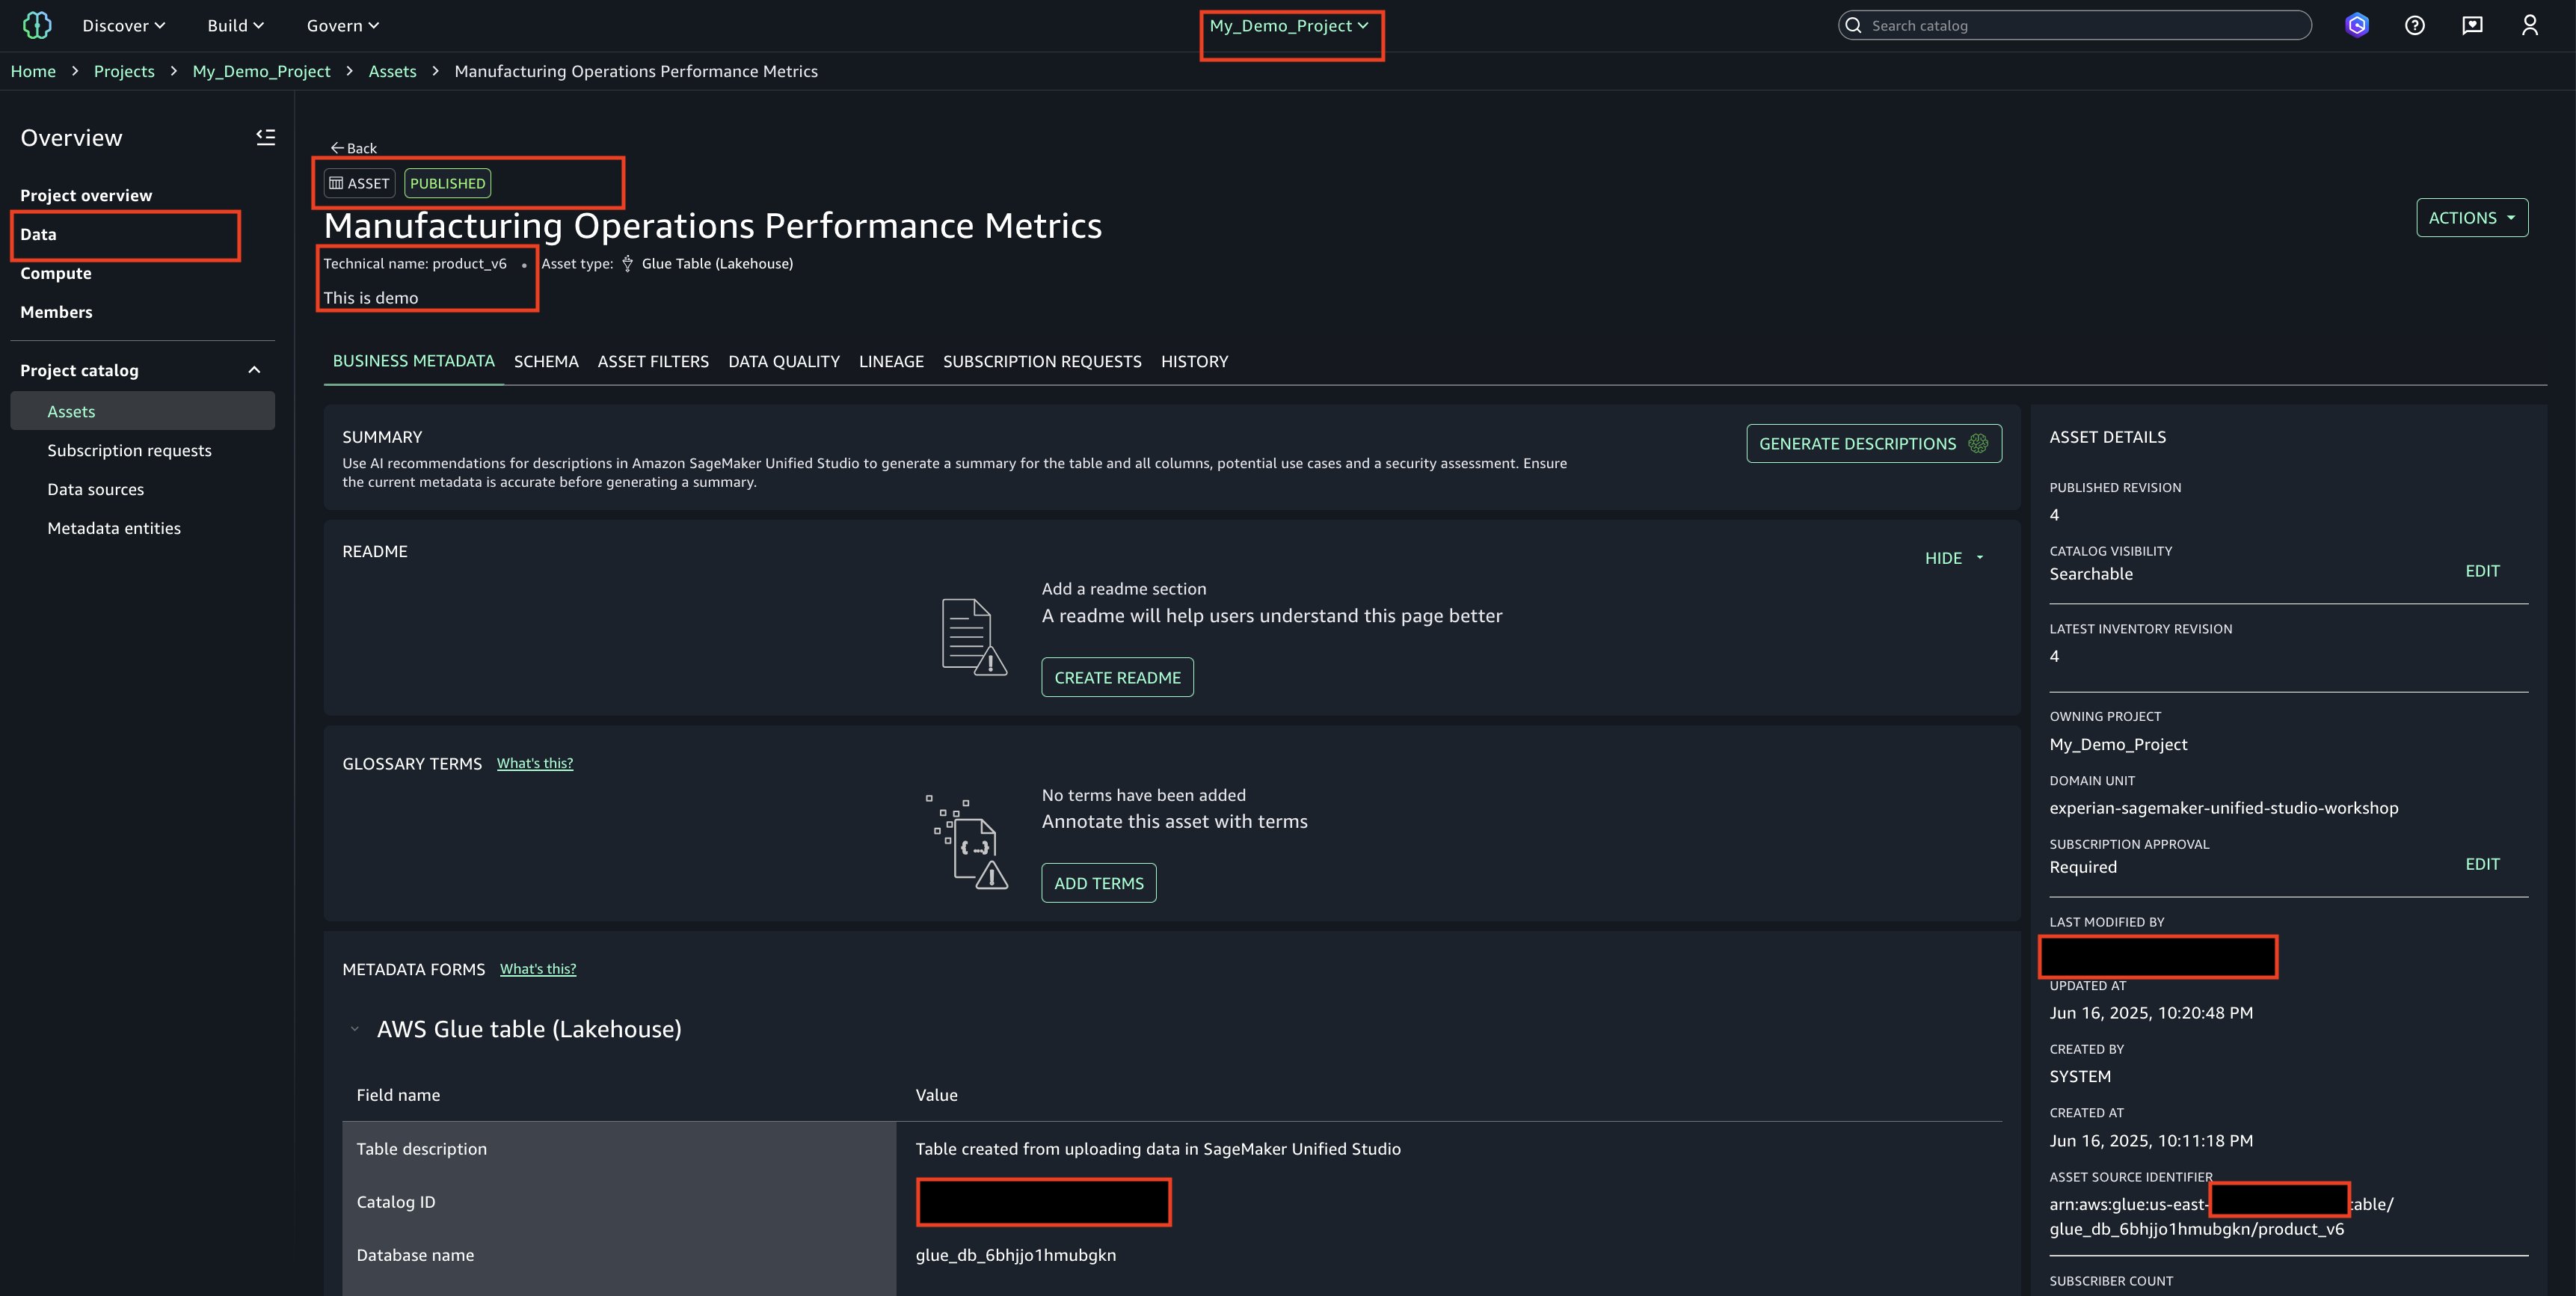
    4. Choose the asset name to display additional details and properties about the table/asset.
  4. Email Alerts
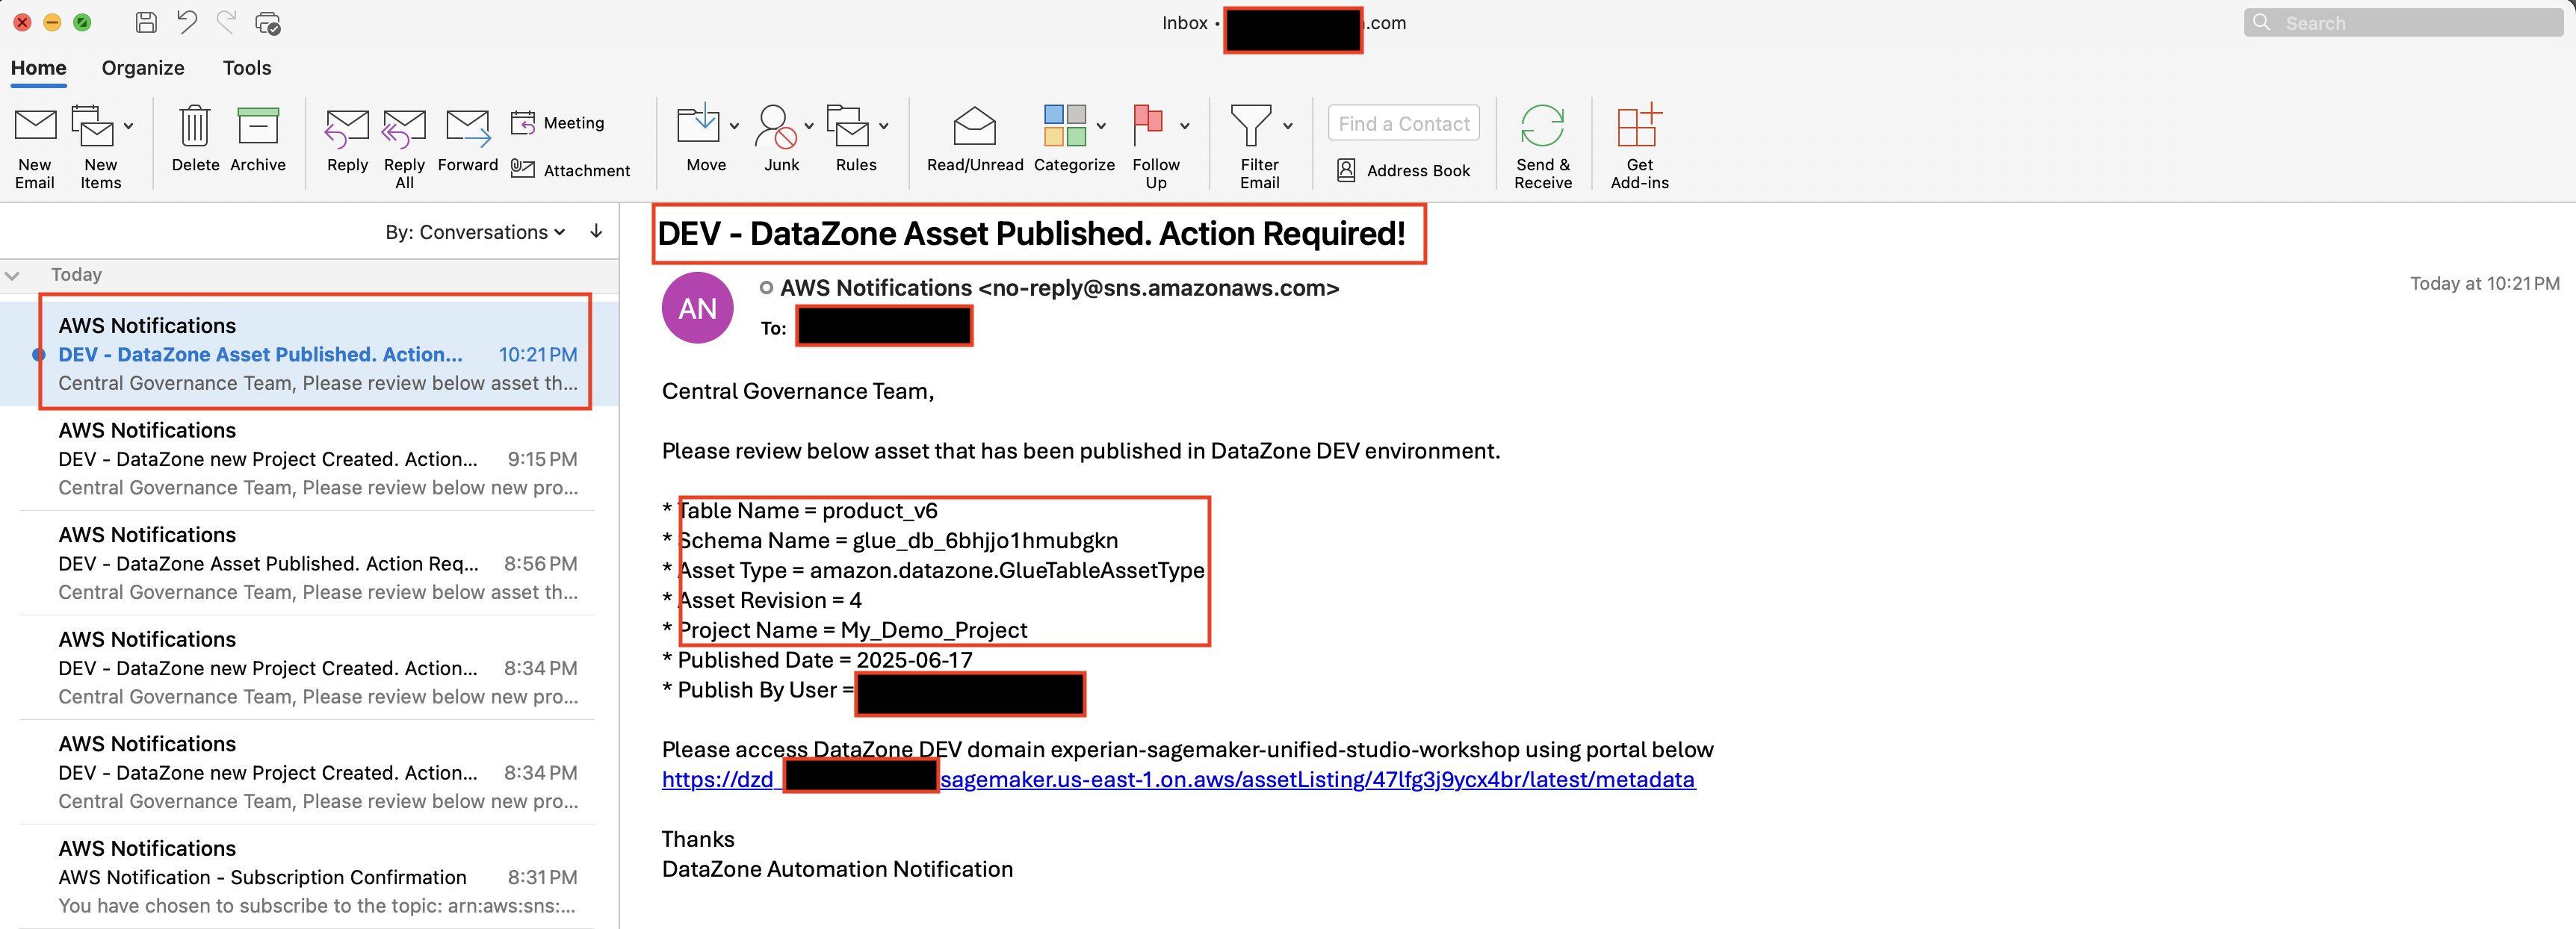
    1. Once the asset is published to SageMaker Unified studio, you’ll receive an email alert sent with details of the published asset. Central governance teams can use this alert to review the published asset to ensure it aligns with the enterprise standards.

      Email alerts are sent to notify users when assets have been published

Cleanup

To clean up your resources, complete the following steps:

cdk destroy --profile <PIPELINE-PROFILE>

Conclusion

In this post, you learned how to build an automated notification system for Amazon SageMaker Unified Studio using AWS services. Specifically, we covered:

  • How to set up event-driven notifications from Amazon SageMaker Unified Studio leveraging Amazon EventBridge, AWS Lambda, and Amazon SNS
  • The step-by-step process of deploying the solution using AWS CDK
  • Practical examples of monitoring critical events like project creation and asset publishing
  • How to integrate AWS Lambda permissions with SageMaker Unified Studio for secure operations
  • Best practices for implementing governance controls through automated notifications

Amazon SageMaker Catalog helps governance teams stay informed of catalog activities in real-time, enabling them to maintain organizational standards as their Data and ML platforms scale. The architecture is flexible and can be extended to integrate with enterprise workflow tools like ServiceNow or to monitor additional event types based on your organization’s needs.

We look forward to hearing how you adapt this solution for your organization’s governance needs. Fork the CDK code from our repository and share your implementation experience in the comments below


About the Authors

Himanshu Sahni

Himanshu Sahni

Himanshu is a Senior Data and AI Architect in AWS Professional Services. Himanshu specializes in building Data and Analytics solutions for enterprise customers using AWS tools and services. He is an expert in AI/ ML and Big Data tools like Spark, AWS Glue and Amazon EMR. Outside of work, Himanshu likes playing chess and tennis.

Rajiv Upadhyay

Rajiv Upadhyay

Rajiv is a Data Architect at AWS, specialized in building Data and Analytics solutions for enterprise customers using AWS tools and services. He guides organizations through their digital transformation journey, with expertise in data lakes, data governance, and AI/ML solutions.

Jitesh Kumar

Jitesh Kumar

Jitesh is a Senior Customer Solutions Manager at Amazon Web Services (AWS), where he helps organizations realize the full potential of cloud technologies. Passionate about driving digital innovation, Jitesh combines deep technical knowledge with a customer-first mindset to guide enterprises through their cloud transformation journeys and deliver measurable business outcomes.

Perform data parity at scale for data modernization programs using AWS Glue Data Quality

Post Syndicated from Himanshu Sahni original https://aws.amazon.com/blogs/big-data/perform-data-parity-at-scale-for-data-modernization-programs-using-aws-glue-data-quality/

Today, customers are embarking on data modernization programs by migrating on-premises data warehouses and data lakes to the AWS Cloud to take advantage of the scale and advanced analytical capabilities of the cloud. Customers are migrating their on-premises data warehouse solutions built on databases like Netezza, PostgreSQL, Greenplum, and Teradata to AWS based modern data platforms using services like Amazon Simple Storage Service (Amazon S3) and Amazon Redshift. AWS based modern data platforms help you break down data silos and enable analytics and machine learning (ML) use cases at scale.

During migration, you might want to establish data parity checks between on-premises databases and AWS data platform services. Data parity is a process to validate that data was migrated successfully from source to target without any errors or failures. A successful data parity check means that data in the target platform has the equivalent content, values, and completeness as that of the source platform.

Data parity can help build confidence and trust with business users on the quality of migrated data. Additionally, it can help you identify errors in the new cloud-based extract, transform, and load (ETL) process.

Some customers build custom in-house data parity frameworks to validate data during migration. Others use open source data quality products for data parity use cases. These options involve a lot of custom code, configurations, and installation, and have scalability challenges. This takes away important person hours from the actual migration effort into building and maintaining a data parity framework.

In this post, we show you how to use AWS Glue Data Quality, a feature of AWS Glue, to establish data parity during data modernization and migration programs with minimal configuration and infrastructure setup. AWS Glue Data Quality enables you to automatically measure and monitor the quality of your data in data repositories and AWS Glue ETL pipelines.

Overview of solution

In large data modernization projects of migrating from an on-premises database to an Amazon S3 based data lake, it’s common to have the following requirements for data parity:

  • Compare one-time historical data from the source on-premises database to the target S3 data lake.
  • Compare ongoing data that is replicated from the source on-premises database to the target S3 data lake.
  • Compare the output of the cloud-based new ETL process with the existing on-premises ETL process. You can plan a period of parallel runs, where the legacy and new systems run in parallel, and the data is compared daily.
  • Use functional queries to compare high-level aggregated business metrics between the source on-premises database and the target data lake.

In this post, we use an example of PostgreSQL migration from an on-premises database to an S3 data lake using AWS Glue Data Quality.

The following diagram illustrates this use case’s historical data migration architecture.

The architecture shows a common pattern for on-premises databases (like PostgreSQL) to Amazon S3 based data lake migration. The workflow includes the following steps:

  1. Schemas and tables are stored in an on-premises database (PostgreSQL), and you want to migrate to Amazon S3 for storage and AWS Glue for compute.
  2. Use AWS Database Migration Service (AWS DMS) to migrate historical data from the source database to an S3 staging bucket.
  3. Use AWS Glue ETL to curate data from the S3 staging bucket to an S3 curated bucket. In the curated bucket, AWS Glue tables are created using AWS Glue crawlers or an AWS Glue ETL job.
  4. Use an AWS Glue connection to connect AWS Glue with the on-premises PostgreSQL database.
  5. Use AWS Glue Data Quality to compare historical data from the source database to the target S3 bucket and write results to a separate S3 bucket.

The following diagram illustrates the incremental data migration architecture.

After historical data is migrated and validated, the workflow proceeds to the following steps:

  1. Ingest incremental data from the source systems to the S3 staging bucket. This is done using an ETL ingestion tool like AWS Glue.
  2. Curate incremental data from the S3 staging bucket to the S3 curated bucket using AWS Glue ETL.
  3. Compare the incremental data using AWS Glue Data Quality.

In the next sections, we demonstrate how to use AWS Glue Data Quality to establish data parity between source (PostgreSQL) and target (Amazon S3). We cover the following scenarios:

  • Establish data parity for historical data migration – Historical data migration is defined as a one-time bulk data migration of historical data from legacy on-premises databases to the AWS Cloud. The data parity process maintains the validity of migrated historical data.
  • Establish data parity for incremental data – After the historical data migration, incremental data is loaded to Amazon S3 using the new cloud-based ETL process. The incremental data is compared between the legacy on-premises database and the AWS Cloud.
  • Establish data parity using functional queries – We perform business- and functional-level checks using SQL queries on migrated data.

Prerequisites

You need to set up the following prerequisite resources:

Establish data parity for historical data migration

For historical data migration and parity, we’re assuming that setting up a PostgreSQL database, migrating data to Amazon S3 using AWS DMS, and data curation have been completed as a prerequisite to perform data parity using AWS Glue Data Quality. For this use case, we use an on-premises PostgreSQL database with historical data loaded on Amazon S3 and AWS Glue. Our objective is to compare historical data between the on-premises database and the AWS Cloud.

We use the following tables in the on-premises PostgreSQL database. These have been migrated to the AWS Cloud using AWS DMS. As part of data curation, the following three additional columns have been added to the test_schema.sample_data table in the curated layer: id, etl_create_ts, and etl_user_id.

  1. Create sample_data with the following code:
create table test_schema.sample_data
(
    job              text,
    company          text,
    ssn              text,
    residence        text,
    current_location text,
    website          text,
    username         text,
    name             text,
    gender_id        integer,
    blood_group_id   integer,
    address          text,
    mail             text,
    birthdate        date,
    insert_ts        timestamp with time zone,
    update_ts        timestamp with time zone
);
  1. Create gender with the following code (contains gender details for lookup):
create table test_schema.gender
(
    gender_id integer,
    value     varchar(1)
);
  1. Create blood_group with the following code (contains blood group information for lookup):
create table test_schema.blood_group
(
    blood_group_id integer,
    value          varchar(10)
);

We’re assuming that the preceding tables have been migrated to the S3 staging bucket using AWS DMS and curated using AWS Glue. For detailed instructions on how to set up AWS DMS to replicate data, refer to the appendix at the end of this post.

In the following sections, we showcase how to configure an AWS Glue Data Quality job for comparison.

Create an AWS Glue connection

AWS Glue Data Quality uses an AWS Glue connection to connect to the source PostgreSQL database. Complete the following steps to create the connection:

  1. On AWS Glue console, under Data Catalog in the navigation pane, choose Connections.
  2. Choose Create connection.
  3. Set Connector type as JDBC.
  4. Add connection details like the connection URL, credentials, and networking details.

Refer to AWS Glue connection properties for additional details.

AWS Glue 4.0 uses PostgreSQL JDBC driver 42.3.6. If your PostgreSQL database requires a different version JDBC driver, download the JDBC driver corresponding to your PostgreSQL version.

Create an AWS Glue data parity job for historical data comparison

As part of the preceding steps, you used AWS DMS to pull historical data from PostgreSQL to the S3 staging bucket. You then used an AWS Glue notebook to curate data from the staging bucket to the curated bucket and created AWS Glue tables. As part of this step, you use AWS Glue Data Quality to compare data between PostgreSQL and Amazon S3 to confirm the data is valid. Complete the following steps to create an AWS Glue job using the AWS Glue visual editor to compare data between PostgreSQL and Amazon S3:

  1. Set the source as the PostgreSQL table sample_data.
  2. Set the target as the AWS Glue table sample_data.

  1. In the curated layer, we added a few additional columns: id, etl_create_ts, and etl_user_id. Because these columns are newly created, we use a transformation to drop these columns for comparison.
  2. Additionally, the birth_date column is a timestamp in AWS Glue, so we change it to date format prior to comparison.

  1. Choose Evaluate Data Quality in Transformations.
  2. Specify the AWS Glue Data Quality rule as DatasetMatch, which checks if the data in the primary dataset matches the data in a reference dataset.
  3. Provide the unique key (primary key) information for source and target. In this example, the primary key is a combination of columns job and username.

  1. For Data quality transform output, specify your data to output:
    1. Original data – This output includes all rows and columns in original data. In addition, you can select Add new columns to indicate data quality errors. This option adds metadata columns for each row that can be used to identify valid and invalid rows and the rules that failed validation. You can further customize row-level output to select only valid rows or convert the table format based on the use case.
    2. Data quality results – This is a summary output grouped by a rule. For our data parity example, this output will have one row with a summary of the match percentage.

  1. Configure the Amazon S3 targets for ruleOutcomes and rowLevelOutcomes to write AWS Glue Data Quality output in the Amazon S3 location in Parquet format.

  1. Save and run the AWS Glue job.
  2. When the AWS Glue job is complete, you can run AWS Glue crawler to automatically create rulesummary and row_level_output tables and view the output in Amazon Athena.

The following is an example of rule-level output. The screenshot shows the DatasetMatch value as 1.0, which implies all rows between the source PostgreSQL database and target data lake matched.

The following is an example of row-level output. The screenshot shows all source rows along with additional columns that confirm if a row has passed or failed validation.

Let’s update a few records in PostgreSQL to simulate a data issue during the data migration process:

update test_schema.sample_data set residence = null where blood_group_id = 8
Records updated 1,272

You can rerun the AWS Glue job and observe the output in Athena. In the following screenshot, the new match percentage is 87.27%. With this example, you were able to capture the simulated data issue with AWS Glue Data Quality successfully.

If you run the following query, the output will match the record count with the preceding screenshot:

SELECT count(*) FROM "gluedqblog"."rowleveloutput" where dataqualityevaluationresult='Failed'

Establish data parity for incremental data

After the initial historical migration, the next step is to implement a process to validate incremental data between the legacy on-premises database and the AWS Cloud. For incremental data validation, data output from the existing ETL process and the new cloud-based ETL process is compared daily. You can add a filter to the preceding AWS Glue data parity job to select data that has been modified for a given day using a timestamp column.

Establish data parity using functional queries

Functional queries are SQL statements that business analysts can run in the legacy system (for this post, an on-premises database) and the new AWS Cloud-based data lake to compare data metrics and output. To make sure the consumer applications work correctly with migrated data, it’s imperative to validate data functionally. The previous examples are primarily technical validation to make sure there is no data loss in the target data lake after data ingestion from both historical migration and change data capture (CDC) context. In a typical data warehouse migration use case, the historical migration pipeline often pulls data from a data warehouse, and the incremental or CDC pipeline integrates the actual source systems, which feed the data warehouse.

Functional data parity is the third step in the overall data validation framework, where you have the flexibility to continue similar business metrics validation driven by an aggregated SQL query. You can construct your own business metrics validation query, preferably working with subject matter experts (SMEs) from the business side. We have noticed that agility and perfection matter for a successful data warehouse migration, therefore reusing the time-tested and business SME-approved aggregated SQL query from the legacy data warehouse system with minimal changes can fast-track the implementation as well as maintain business confidence. In this section, we demonstrate how to implement a sample functional parity for a given dataset.

In this example, we use a set of source PostgreSQL tables and target S3 data lake tables for comparison. We use an AWS Glue crawler to create Data Catalog tables for the source tables, as described in the first example.

The sample functional validation compares the distribution count of gender and blood group for each company. This could be any functional query that joins facts and dimension tables and performs aggregations.

You can use a SQL transformation to generate an aggregated dataset for both the source and target query. In this example, the source query uses multiple tables. Apply SQL functions on the columns and required filter criteria.

The following screenshot illustrates the Source Functional Query transform.

The following screenshot illustrates the Target Functional Query transform.

The following screenshot illustrates the Evaluate Data Quality transform. You can apply the DatasetMatch rule to achieve a 100% match.

After the job runs, you can find the job run status on AWS Glue console.

The Data quality tab displays the data quality results.

AWS Glue Data Quality provides row- and rule-level outputs, as described in the previous examples.

Check the rule-level output in the Athena table. The outcome of the DatasetMatch rule shows a 100% match between the PostgreSQL source dataset and target data lake.

Check the row-level output in the Athena table. The following screenshot displays the row-level output with data quality evaluation results and rule status.

Let’s change the company value for Spencer LLC to Spencer LLC – New to simulate the impact on the data quality rule and overall results. This creates a gap in the count of records for the given company name while comparing source and target.

By rerunning the job and checking the AWS Glue Data Quality results, you will discover that the data quality rule has failed. This is due to the difference in company name between the source and target dataset because the data quality rule evaluation is tracking a 100% match. You can reduce the match percentage in the data quality expression based on the required threshold.

Next, revert the changes made for the data quality rule failure simulation.


If you rerun the job and validate the AWS Glue Data Quality results, you can find the data quality score is back to 100%.


Clean up

If you no longer want to keep the resources you created as part of this post in your AWS account, complete the following steps:

  1. Delete the AWS Glue notebook and visual ETL jobs.
  2. Remove all data and delete the staging and curated S3 buckets.
  3. Delete the AWS Glue connection to the PostgreSQL database.
  4. Delete the AWS DMS replication task and instance.
  5. Delete the Data Catalog.

Conclusion

In this post, we discussed how you can use AWS Glue Data Quality to build a scalable data parity pipeline for data modernization programs. AWS Glue Data Quality enables you to maintain the quality of your data by automating many of the manual tasks involved in data quality monitoring and management. This helps prevent bad data from entering your data lakes and data warehouses. The examples in this post provided an overview on how to set up historical, incremental, and functional data parity jobs using AWS Glue Data Quality.

To learn more about AWS Glue Data Quality, refer to Evaluating data quality with AWS Glue Studio and AWS Glue Data Quality. To dive into the AWS Glue Data Quality APIs, see Data Quality API.

Appendix

In this section, we demonstrate how to set up AWS DMS and replicate data. You can use AWS DMS to copy one-time historical data from the PostgreSQL database to the S3 staging bucket. Complete the following steps:

  1. On the AWS DMS console, under Migrate data in the navigation pane, choose Replication instances.
  2. Choose Create a replication instance.
  3. Choose a VPC that has connectivity to the PostgreSQL instance.

After the instance is created, it should appear with the status as Available on the AWS DMS console.

  1. 4. Based on our solution architecture, you now create an S3 staging bucket for AWS DMS to write replicated output. For this post, the staging bucket name is gluedq-blog-dms-staging-bucket.
  2. Under Migrate data in the navigation pane, choose Endpoints.
  3. Create a source endpoint for the PostgreSQL connection.

  1. After you create the source endpoint, choose Test endpoint to make sure it’s connecting successfully to the PostgreSQL Instance.
  2. Similarly, create a target endpoint with the S3 staging bucket as a target and test the target endpoint.

  1. We’ll be writing replicated output from PostgreSQL in CSV format. the addColumnName=true; property in the AWS DMS configuration to make sure the schema information is written as headers in CSV output.

Now you’re ready to create the migration task.

  1. Under Migrate data in the navigation pane, choose Database migration tasks.
  2. Create a new replication task.
  3. Specify the source and target endpoints you created and choose the table that needs to be replicated.

After the replication task is created, it will start replicating data automatically.

When the status shows as Load complete, data should appear in the following S3 locations (the bucket name in this example is a placeholder):

  • s3://<gluedq-blog-dms-staging-bucket>/staging_layer/test_schema/sample_data/
  • s3://<gluedq-blog-dms-staging-bucket>/staging_layer/test_schema/gender/
  • s3://<gluedq-blog-dms-staging-bucket>/staging_layer/test_schema/blood_group/

About the Authors

Himanshu Sahni is a Senior Data Architect in AWS Professional Services. Himanshu specializes in building Data and Analytics solutions for enterprise customers using AWS tools and services. He is an expert in AI/ ML and Big Data tools like Spark, AWS Glue and Amazon EMR. Outside of work, Himanshu likes playing chess and tennis.

Arunabha Datta is a Senior Data Architect at AWS Professional Services. He collaborates with customers and partners to create and execute modern data architecture using AWS Analytics services. Arunabha’s passion lies in assisting customers with digital transformation, particularly in the areas of data lakes, databases, and AI/ML technologies. Besides work, his hobbies include photography and he likes to spend quality time with his family.

Charishma Ravoori is an Associate Data & ML Engineer at AWS Professional Services. She focuses on developing solutions for customers that include building out data pipelines, developing predictive models and generating ai chatbots using AWS/Amazon tools. Outside of work, Charishma likes to experiment with new recipes and play the guitar.