Tag Archives: Amazon DataZone

Scaling data governance with Amazon DataZone: Covestro success story

Post Syndicated from Jörg Janssen original https://aws.amazon.com/blogs/big-data/scaling-data-governance-with-amazon-datazone-covestro-success-story/

Covestro Deutschland AG, headquartered in Leverkusen, Germany, is a global leader in high-performance polymer materials and components. Since its spin-off from Bayer AG in 2015, Covestro has established itself as a key player in the chemical industry, with 48 production sites worldwide, €14.4 billion 2023 revenue, and 17,500 employees. Covestro’s core business focuses on developing innovative, sustainable solutions for products used in various aspects of daily life. The company offers materials for mobility, building and living, electrical and electronics sectors, in addition to sports and leisure, cosmetics, health, and the chemical industry. The company’s products, such as polycarbonates, polyurethanes, coatings, adhesives, and specialty elastomers, are important components in automotive, construction, electronics, and medical device industries.

To support this global operation and diverse product portfolio, Covestro adopted a robust data management solution. In this post, we show you how Covestro transformed its data architecture by implementing Amazon DataZone and AWS Serverless Data Lake Framework (SDLF), transitioning from a centralized data lake to a data mesh architecture. Through this strategic shift, teams can share and consume data while maintaining high quality standards through a consolidated data marketplace and business metadata glossary. The result: streamlined data access, better data quality, and stronger governance at scale that various producer and consumer teams can use to run data and analytics workloads at scale, enabling over 1,000 data pipelines and achieving a 70% reduction in time-to-market.

Business and data challenges

Prior to their transformation, Covestro operated with a centralized data lake managed by a single data platform team that handled the data engineering tasks. This centralized approach created several challenges: bottlenecks in project delivery because of limited engineering resources, complicated prioritization of use cases, and inefficient data sharing processes. The setup often resulted in unnecessary data duplication, which in turn slowed down time-to-market for new analytics initiatives, increased costs, and limited the ability of business units to act quickly on insights.The lack of visibility into data assets created significant operational challenges:

  • Teams could not find existing datasets, often recreating data already stored elsewhere
  • No clear understanding of data lineage or quality metrics
  • Difficulty in determining who owned specific data assets or who to contact for access
  • Absence of metadata and documentation about available datasets
  • Departments shared little knowledge about how they were using data

These visibility issues, combined with the lack of unified access controls, led to:

  • Siloed data initiatives across departments
  • Reduced trust in data quality
  • Inefficient use of resources
  • Delayed project timelines
  • Missed opportunities for cross-functional collaboration and insights

A strategic solution: Why Amazon DataZone and SDLF?

The challenges Covestro faced reflect deeper structural limitations of centralized data architectures. As Covestro scaled, central data teams often became bottlenecks, and lack of domain context led to fragmented quality, inconsistent standards, and poor collaboration. Instead of centralizing control, a data mesh gives ownership to the teams who generate and understand the data, while keeping the governance and interoperability consistent across the organization. This makes it well-suited for Covestro’s environment, which requires agility, scalability, and cross-team collaboration.

AWS Serverless Data Lake Framework (SDLF) is a solution to these challenges, providing a robust foundation for data mesh architectures. Traditional data lake implementations often centralize data ownership and governance, but with the flexible design of SDLF, organizations can build decentralized data domains that align with modern data mesh principles. The framework provides domain-oriented teams with the infrastructure, security controls, and operational patterns needed to own and manage their data products independently, while maintaining consistent governance across the organization. Through its modular architecture and infrastructure as code templates, SDLF accelerates the creation of domain-specific data products, so that Covestro’s teams can deploy standardized yet customizable data pipelines. This approach supports the key pillars of data mesh: domain-oriented decentralization, data as a product, self-serve infrastructure, and federated governance, providing Covestro with a practical path to overcome the limitations of traditional centralized architectures.

Amazon DataZone enhances the data mesh implementation through a unified experience for discovering and accessing data across decentralized domains. As a data management service, Amazon DataZone helps organizations catalog, discover, share, and govern data across organizational boundaries. It provides a central governance layer where organizations can establish data sharing agreements, manage access controls, and enable self-service data access while supporting security and compliance. While teams can use the SDLF framework to build and operate domain-specific data products, Amazon DataZone complements it with a searchable catalog enriched with metadata, business context, and usage policies, making data products easier to find, trust, and reuse.

Through the sharing capabilities of Amazon DataZone, domain teams can share their data products with other domains while maintaining granular access controls and governance policies, enabling cross-domain collaboration and data reuse. This integration means that domain teams can publish their SDLF-managed datasets to an Amazon DataZone catalog, so authorized consumers across the organization can discover and access them. Through the built-in governance capabilities built into Amazon DataZone, organizations can implement standardized data sharing workflows, check data quality, and enforce consistent access controls across their distributed data system, strengthening their data mesh architecture with robust data governance and democratization capabilities.Together, SDLF and Amazon DataZone provide Covestro with a comprehensive solution for implementing a modern data mesh architecture, enabling autonomous data domains to operate with consistent governance, seamless data sharing, and enterprise-wide data discovery.

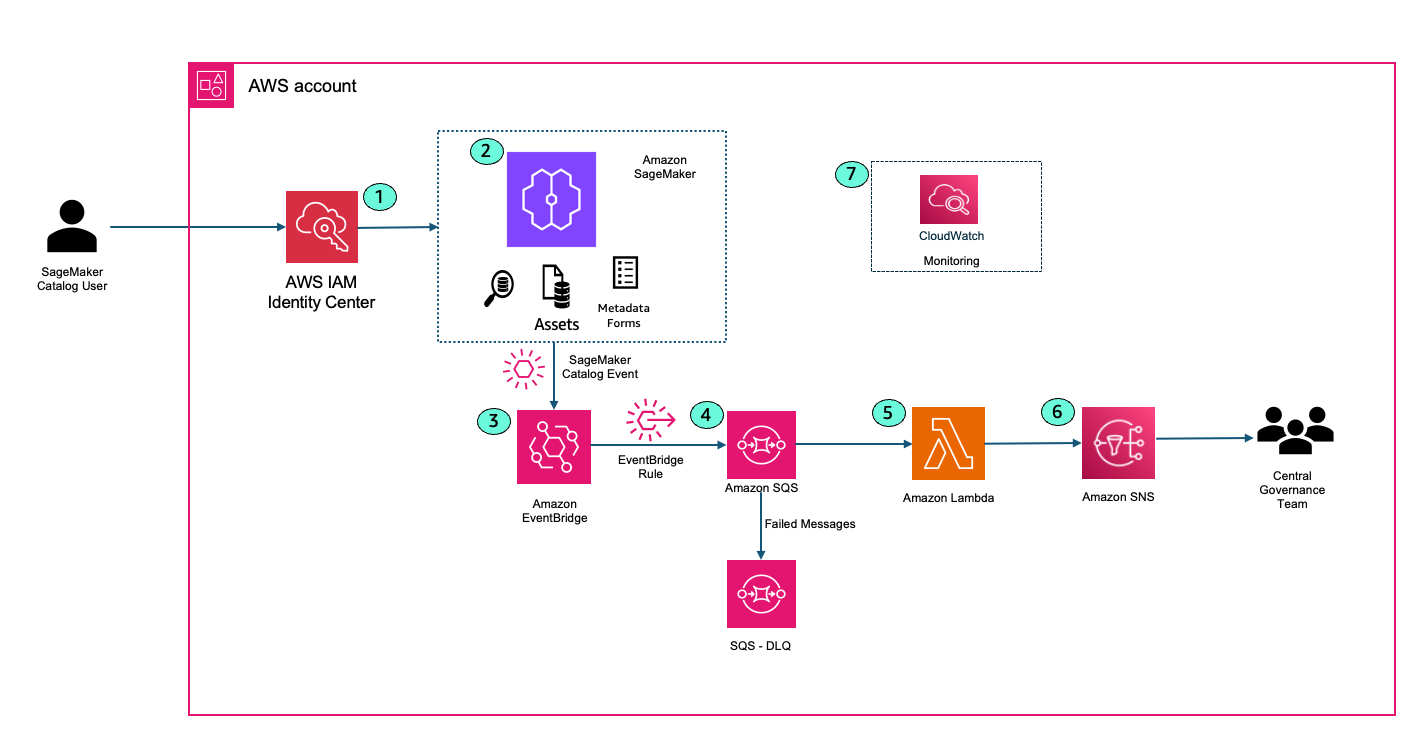
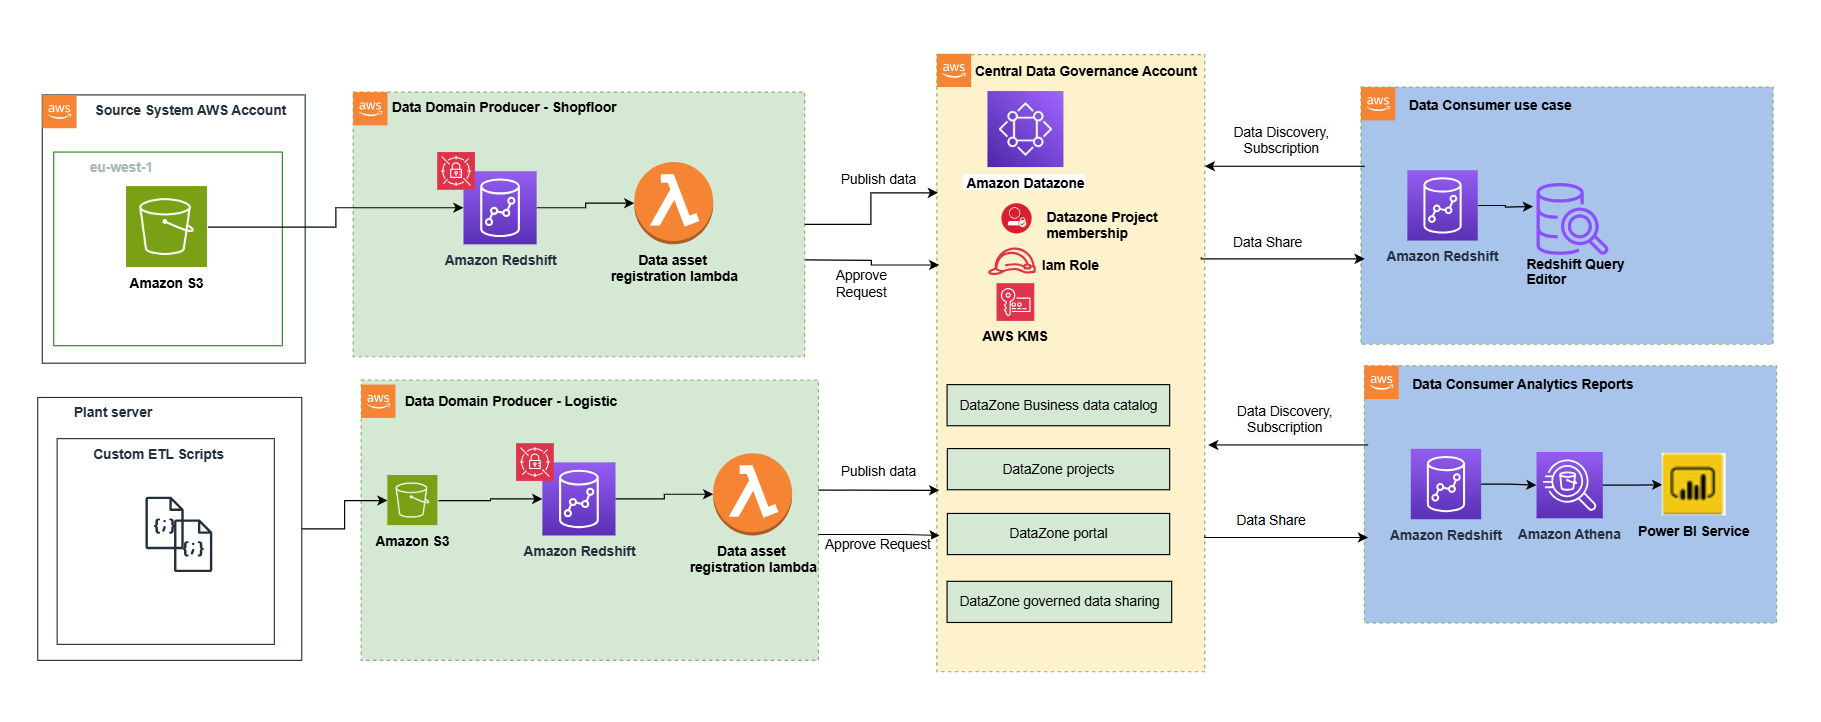
Solution architecture and implementation

The following architecture illustrates the high-level design of the data mesh solution. The implementation used a comprehensive AWS solution built on AWS services to create a robust, scalable, and governed data mesh that serves multiple business domains across the Covestro organization.

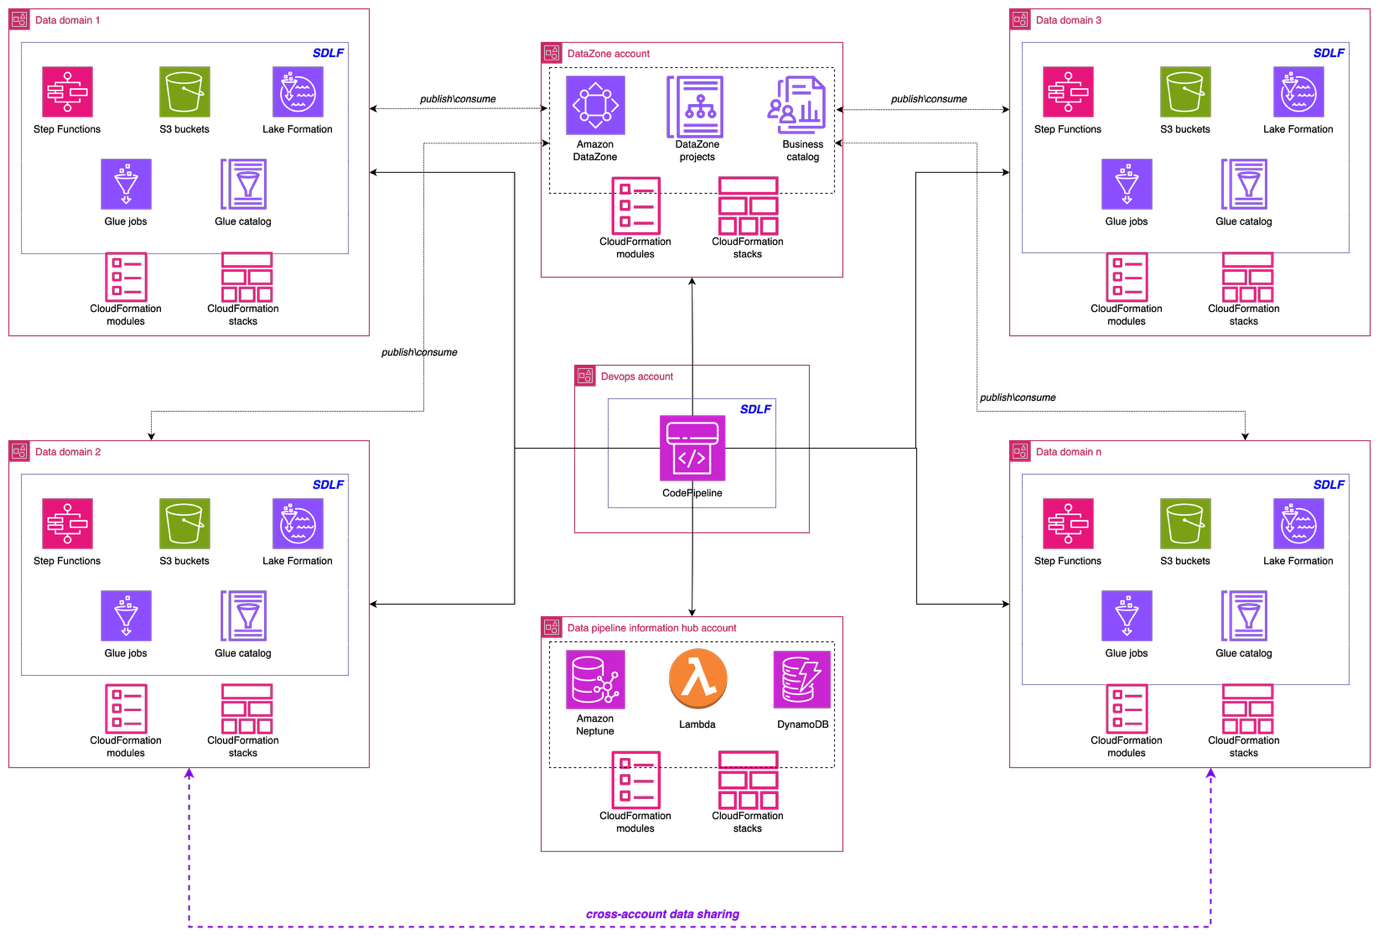
Data domain foundation: Serverless Data Lake Framework

A key pillar of the implementation is the Serverless Data Lake Framework (SDLF), which provides the foundational infrastructure and security needed to support data mesh strategies. SDLF delivers the core building blocks for data domains such as Amazon S3 storage layers, built-in encryption with AWS KMS, IAM-based access control, and infrastructure as code (IaC) automation. By using these components, Covestro can deploy decentralized, domain-owned data products rapidly while maintaining consistent governance across the enterprise.

The framework uses Amazon Simple Storage Service (Amazon S3) as the primary data storage layer, delivering virtually unlimited scalability and eleven nines of durability for diverse data assets. The proposed S3 bucket architecture follows AWS Well-Architected principles, implementing a multi-tiered structure with distinct raw, staging, and analytics data zones. This layered approach helps different business domains to maintain data sovereignty (each domain owns and controls its data, while keeping accessibility patterns organization-wide).

Security is a fundamental aspect in Covestro’s data mesh implementation. SDLF automatically implements encryption at rest and in transit across data storage and processing components. AWS Key Management Service (AWS KMS) provides centralized key management, while carefully crafted AWS Identity and Access Management (IAM) roles enable resource isolation.

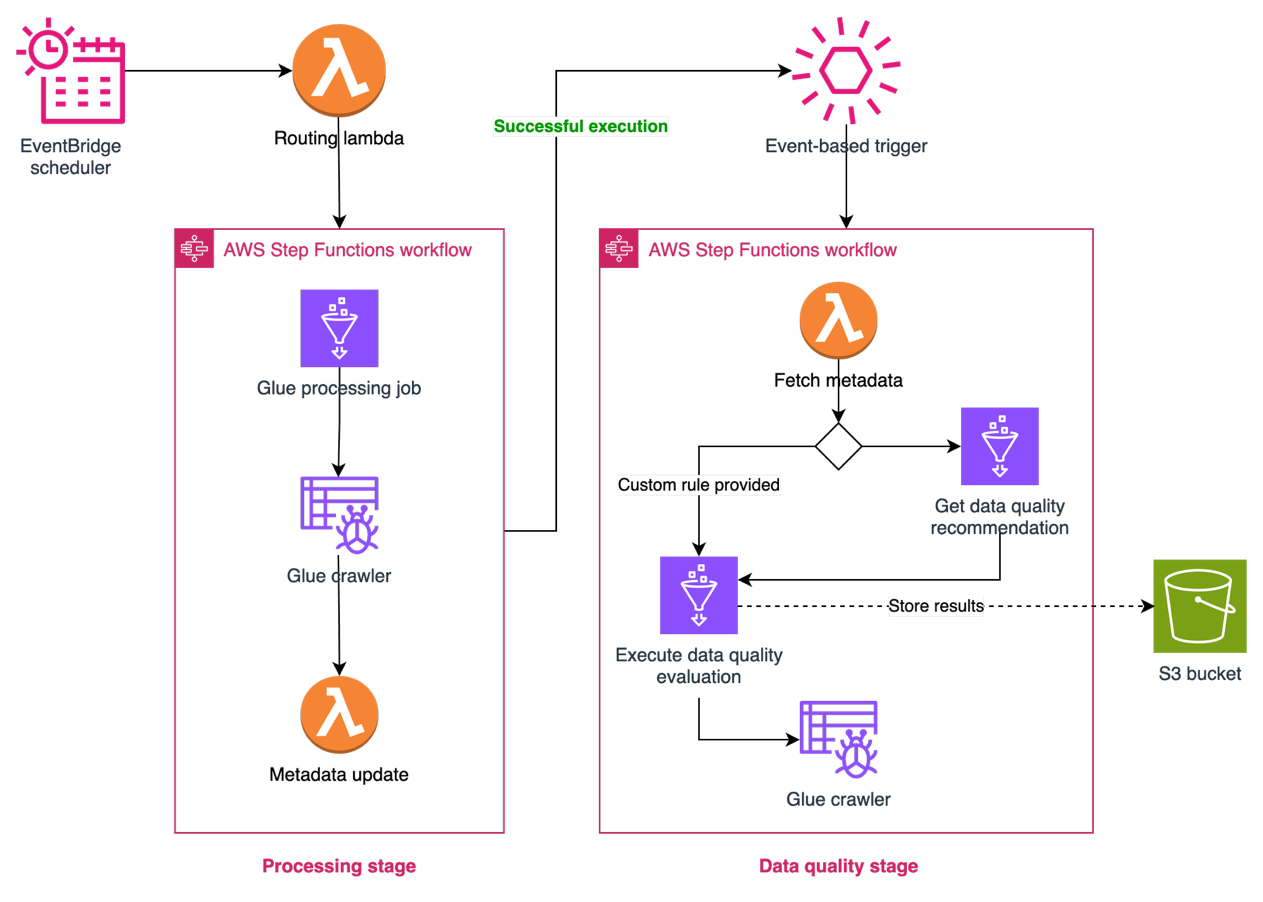
Data processing with AWS Glue

AWS Glue serves as the cornerstone of the data processing and transformation capabilities, offering serverless extract, transform, and load ETL services that automatically scale based on workload demands.

Covestro’s pre-existent centralized data lake was fed by more than 1,000 ingestion data pipelines interacting with a variety of source systems. To support the migration of existing ingestion and processing pipelines, Covestro developed reusable blueprints that included the development and security standards defined for the data mesh.Covestro released standardized patterns that teams can deploy across multiple domains while providing the flexibility needed for domain-specific requirements. These blueprints support diverse source systems, from traditional databases like Oracle, SQL Server, and MySQL to modern software as a service (SaaS) applications such as SAP C4C.

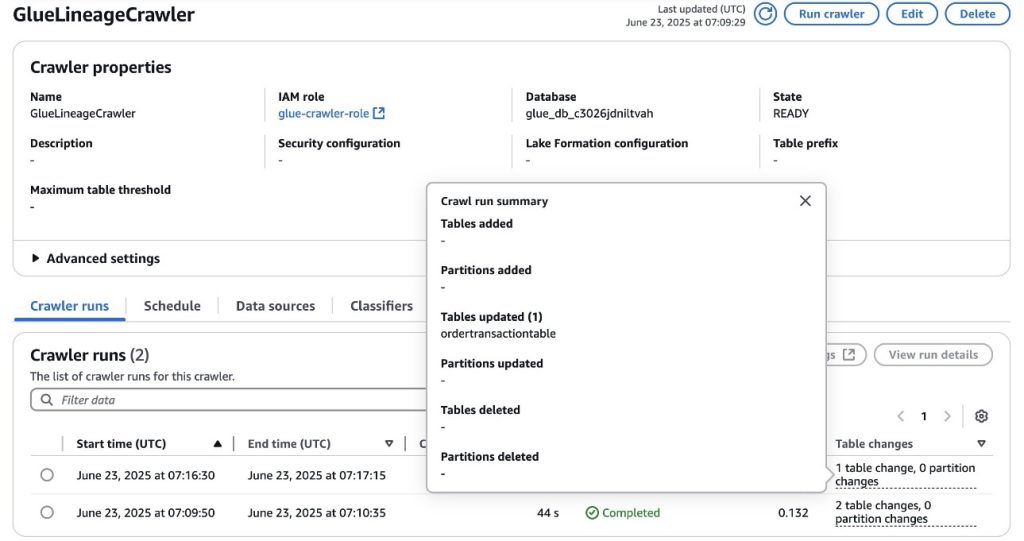
They also developed specialized blueprints for processing, standardizing, and cleaning ingested raw data. These blueprints store processed data in Apache Iceberg format, automatically saving metadata in the AWS Glue Data Catalog and providing built-in capabilities to handle schema evolution seamlessly.

Covestro relies on SDLF to quickly configure and deploy the blueprints as AWS Glue jobs inside the domain. With SDLF, teams deploy a data pipeline through a YAML configuration file, and the orchestration and management mechanisms of SDLF handle the rest. The solution includes comprehensive monitoring capabilities built on Amazon DynamoDB, providing real-time visibility into data pipeline health and performance metrics (when teams deploy a pipeline through SDLF, the system automatically integrates it with the monitoring setup).

Data quality with AWS Glue Data Quality

To achieve data reliability across domains, Covestro extended the capabilities of SDLF to incorporate AWS Glue Data Quality into data processing pipelines. This integration enables automated data quality checks as part of the standard data processing workflow. Thanks to the configuration-driven design of SDLF, data producers can implement quality controls either using recommended rules, which are automatically generated through data profiling, or applying their own domain-specific rules.

The integration provides data teams with the flexibility to define quality expectations while maintaining consistency in how quality checks are implemented at the pipeline level. The solution logs quality evaluation results, providing visibility into the data quality metrics for each data product. These elements are illustrated in the following figure.

Enterprise-ready access control with AWS Lake Formation

AWS Lake Formation integration with the Data Catalog supports the security and access control layer that makes the data mesh implementation enterprise-ready. Through Lake Formation, Covestro implemented fine-grained access controls that respect domain boundaries while enabling controlled cross-domain data sharing.

The service’s integration with IAM means that Covestro can implement role-based access patterns that align with their organizational structure, so users can access the data they need while keeping appropriate security boundaries.

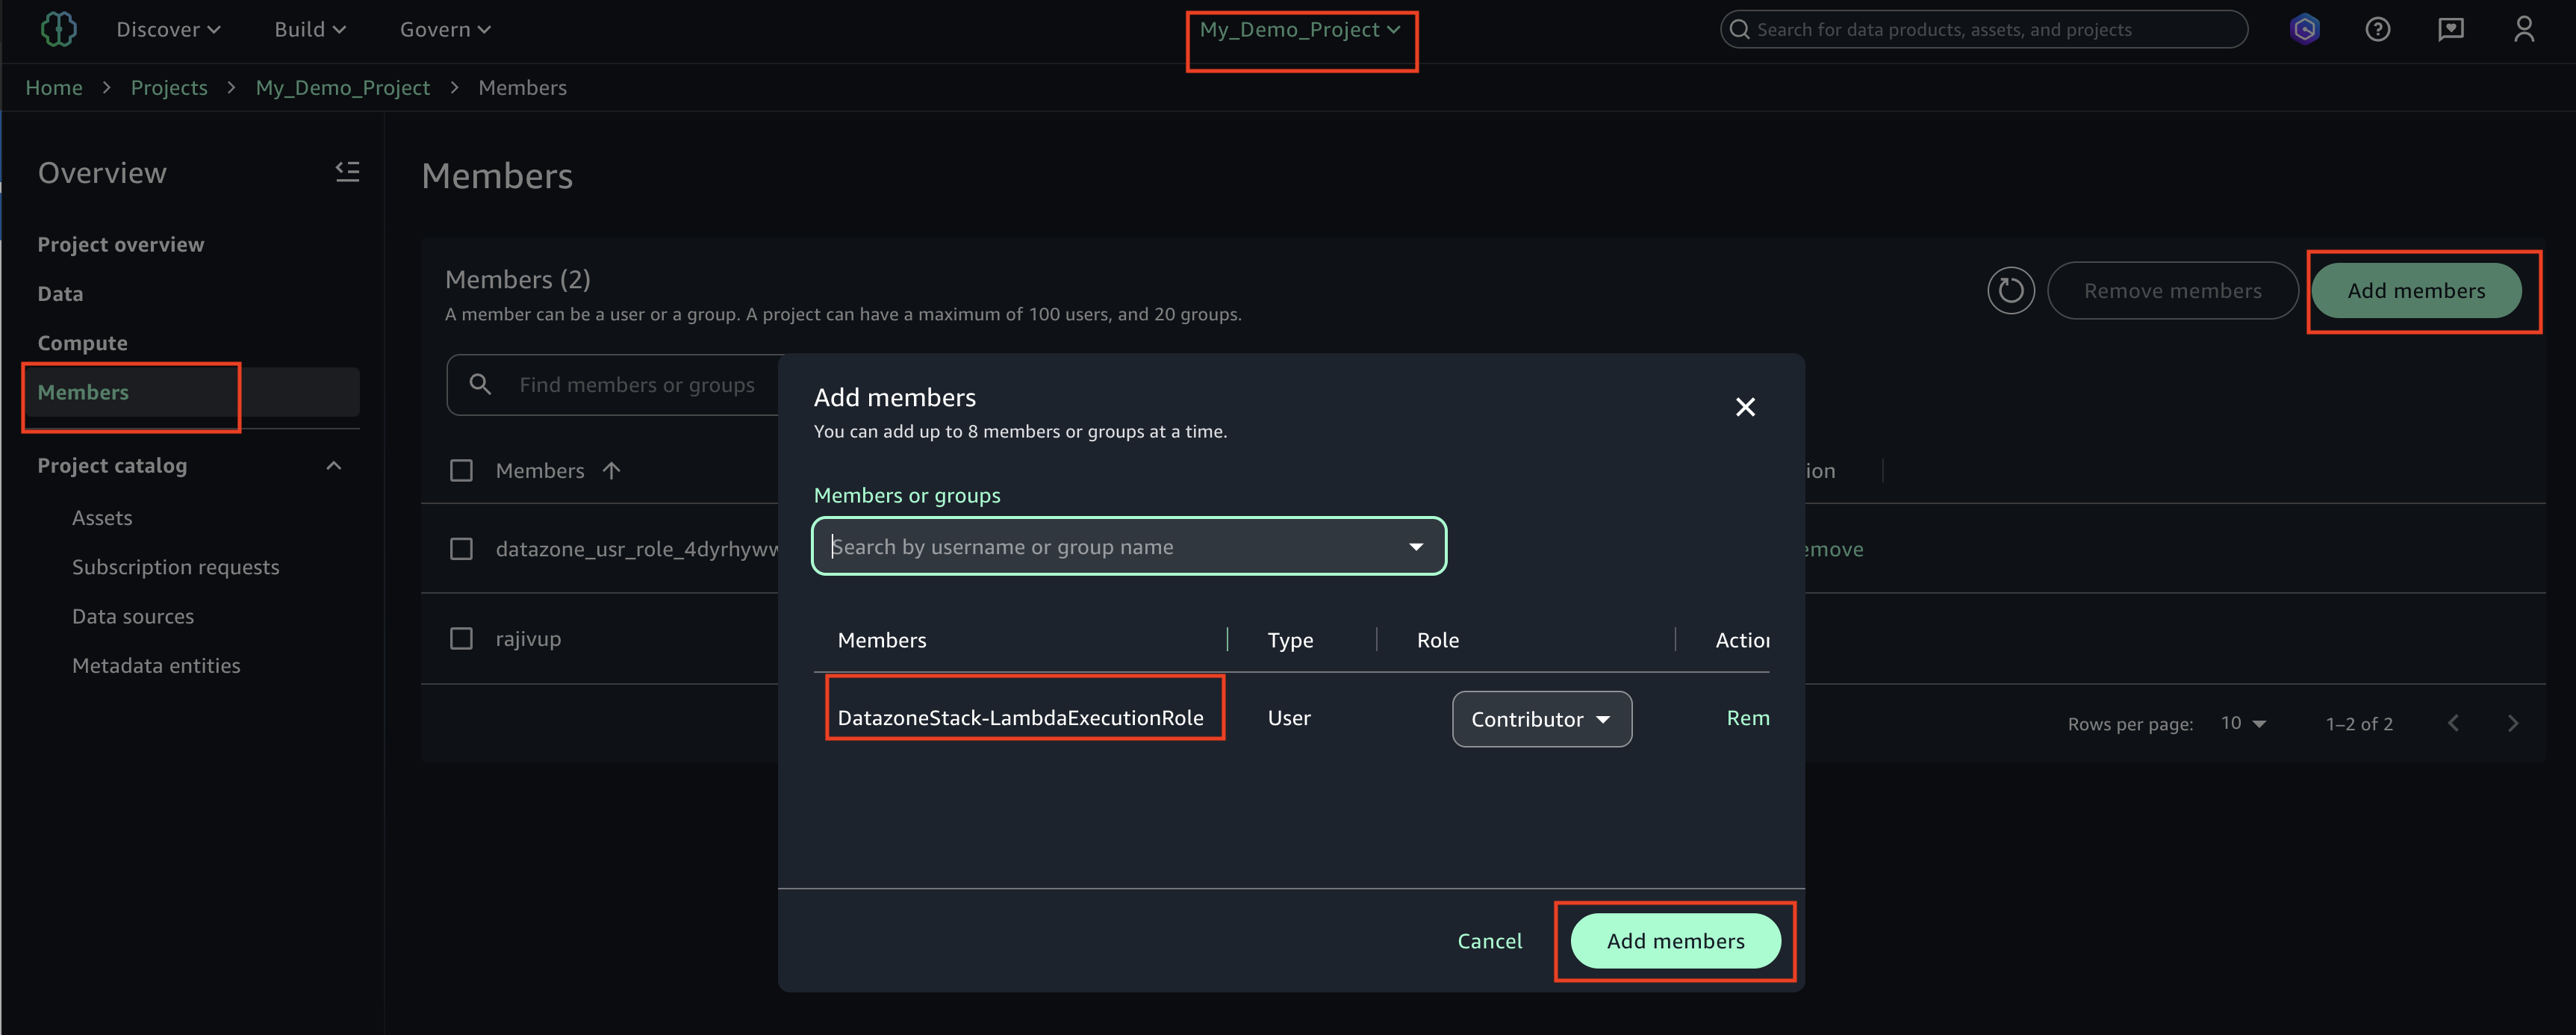
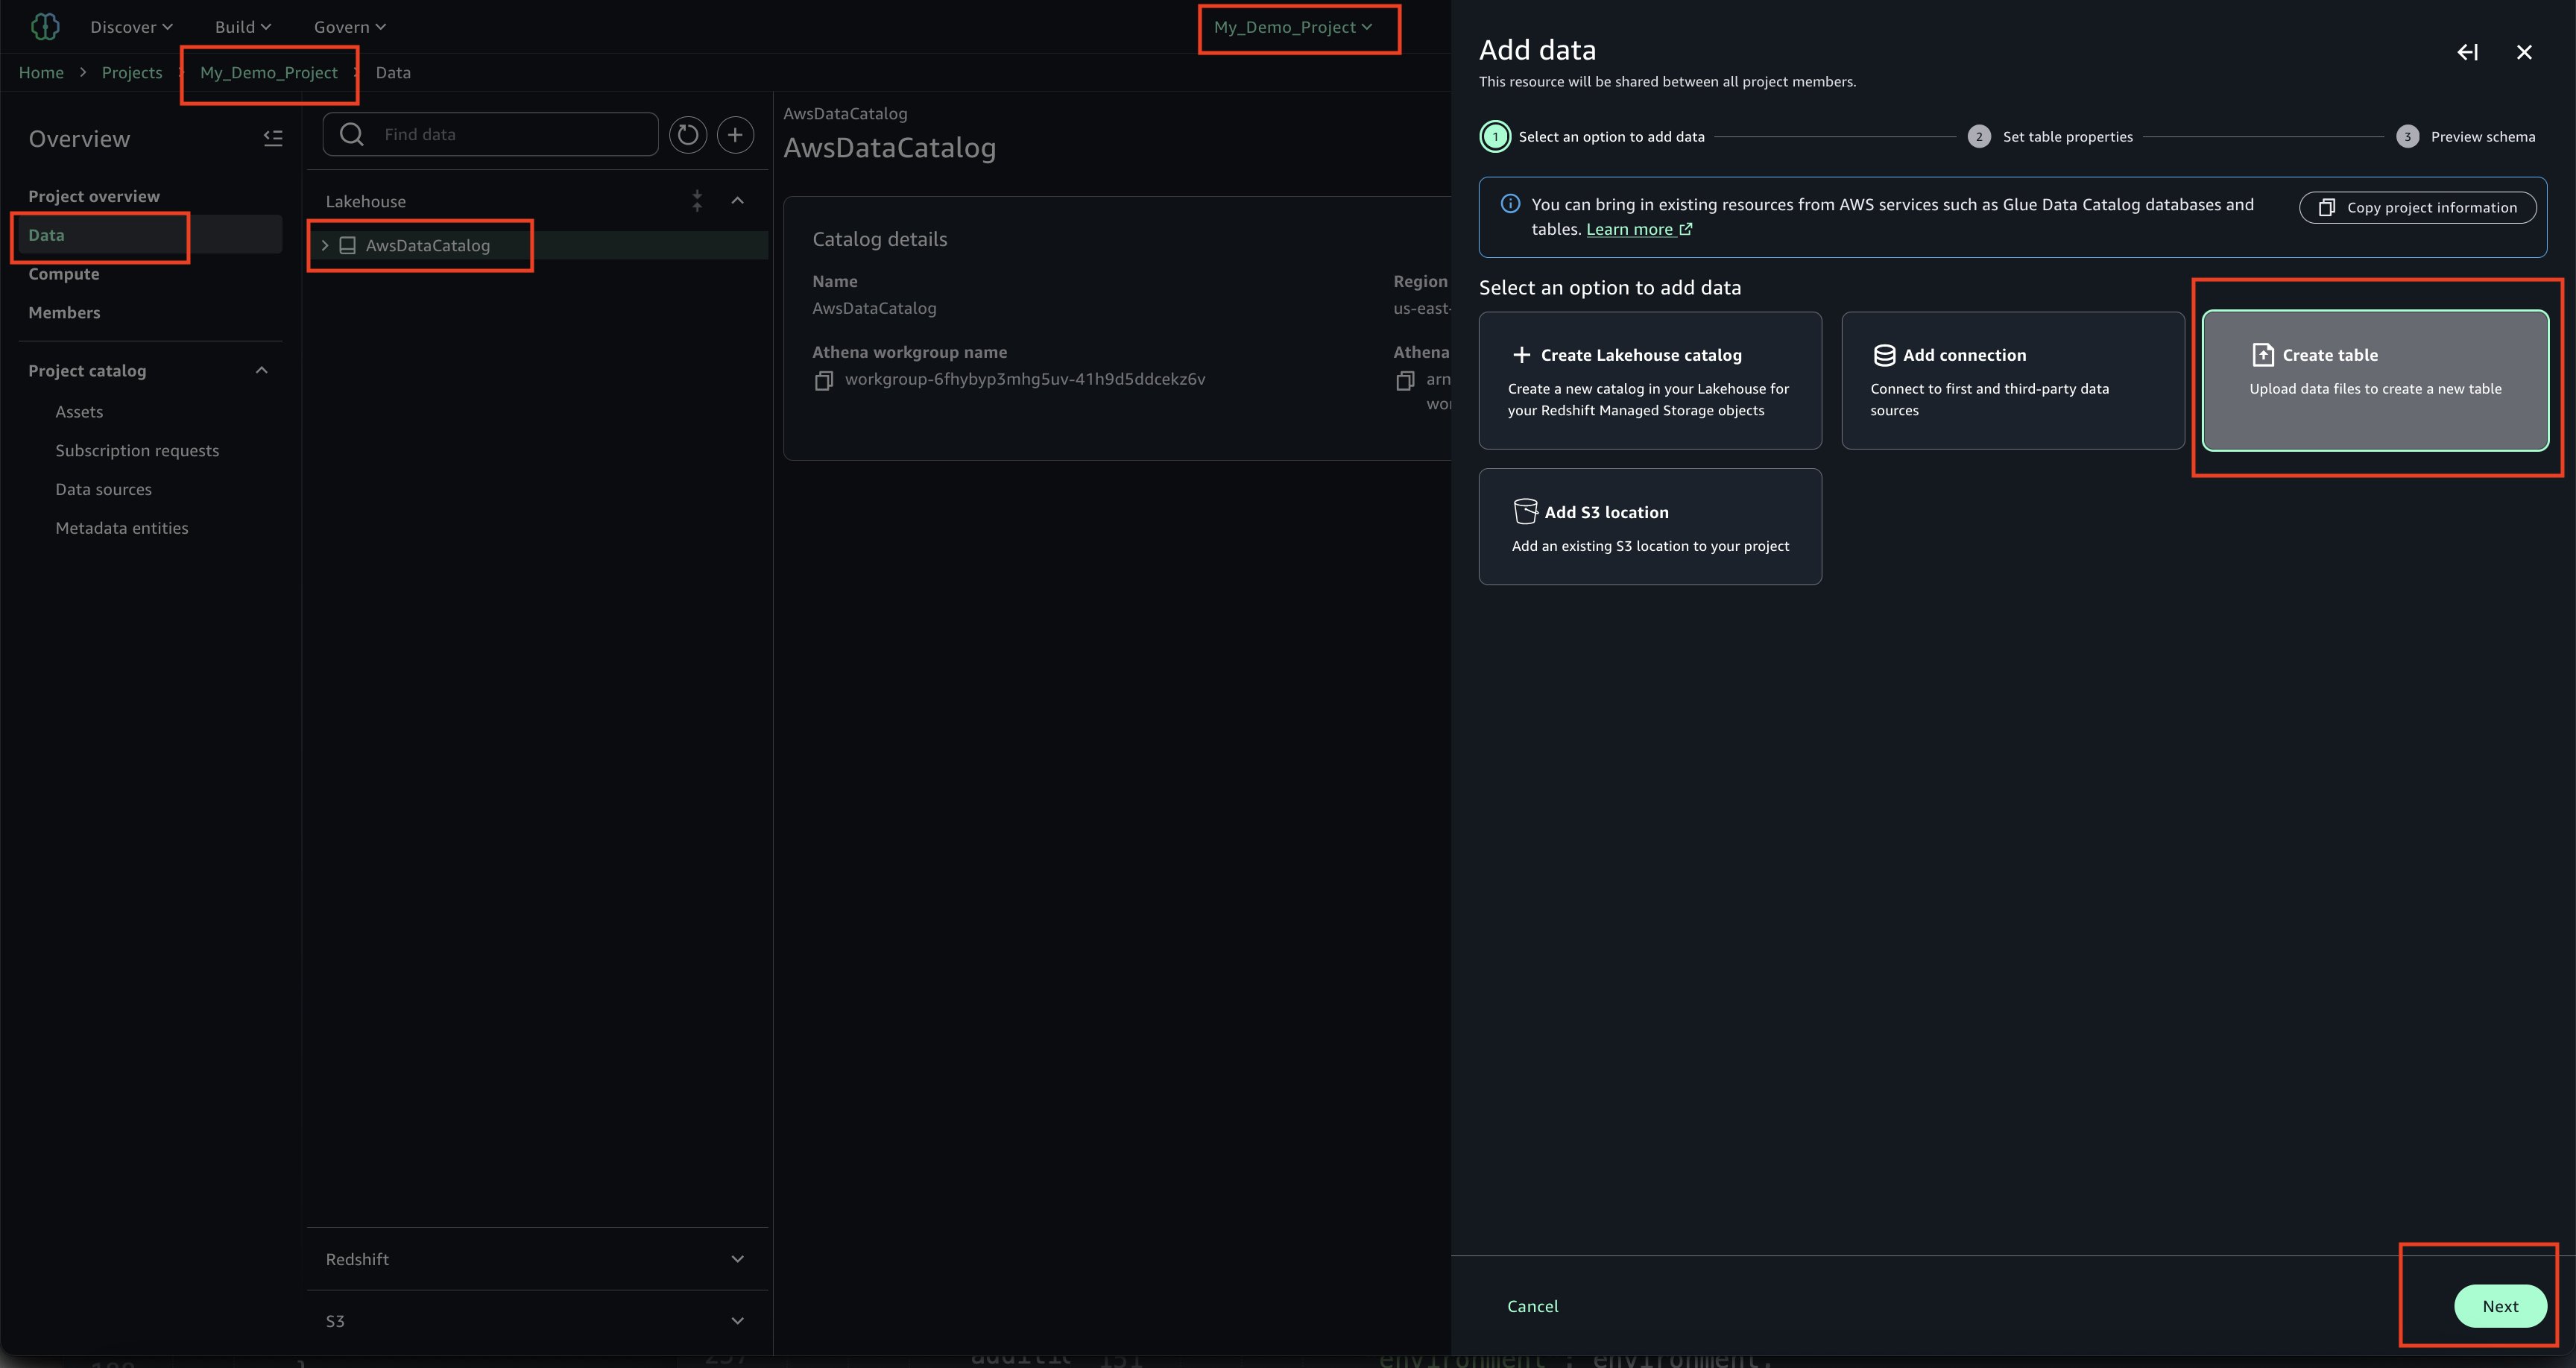
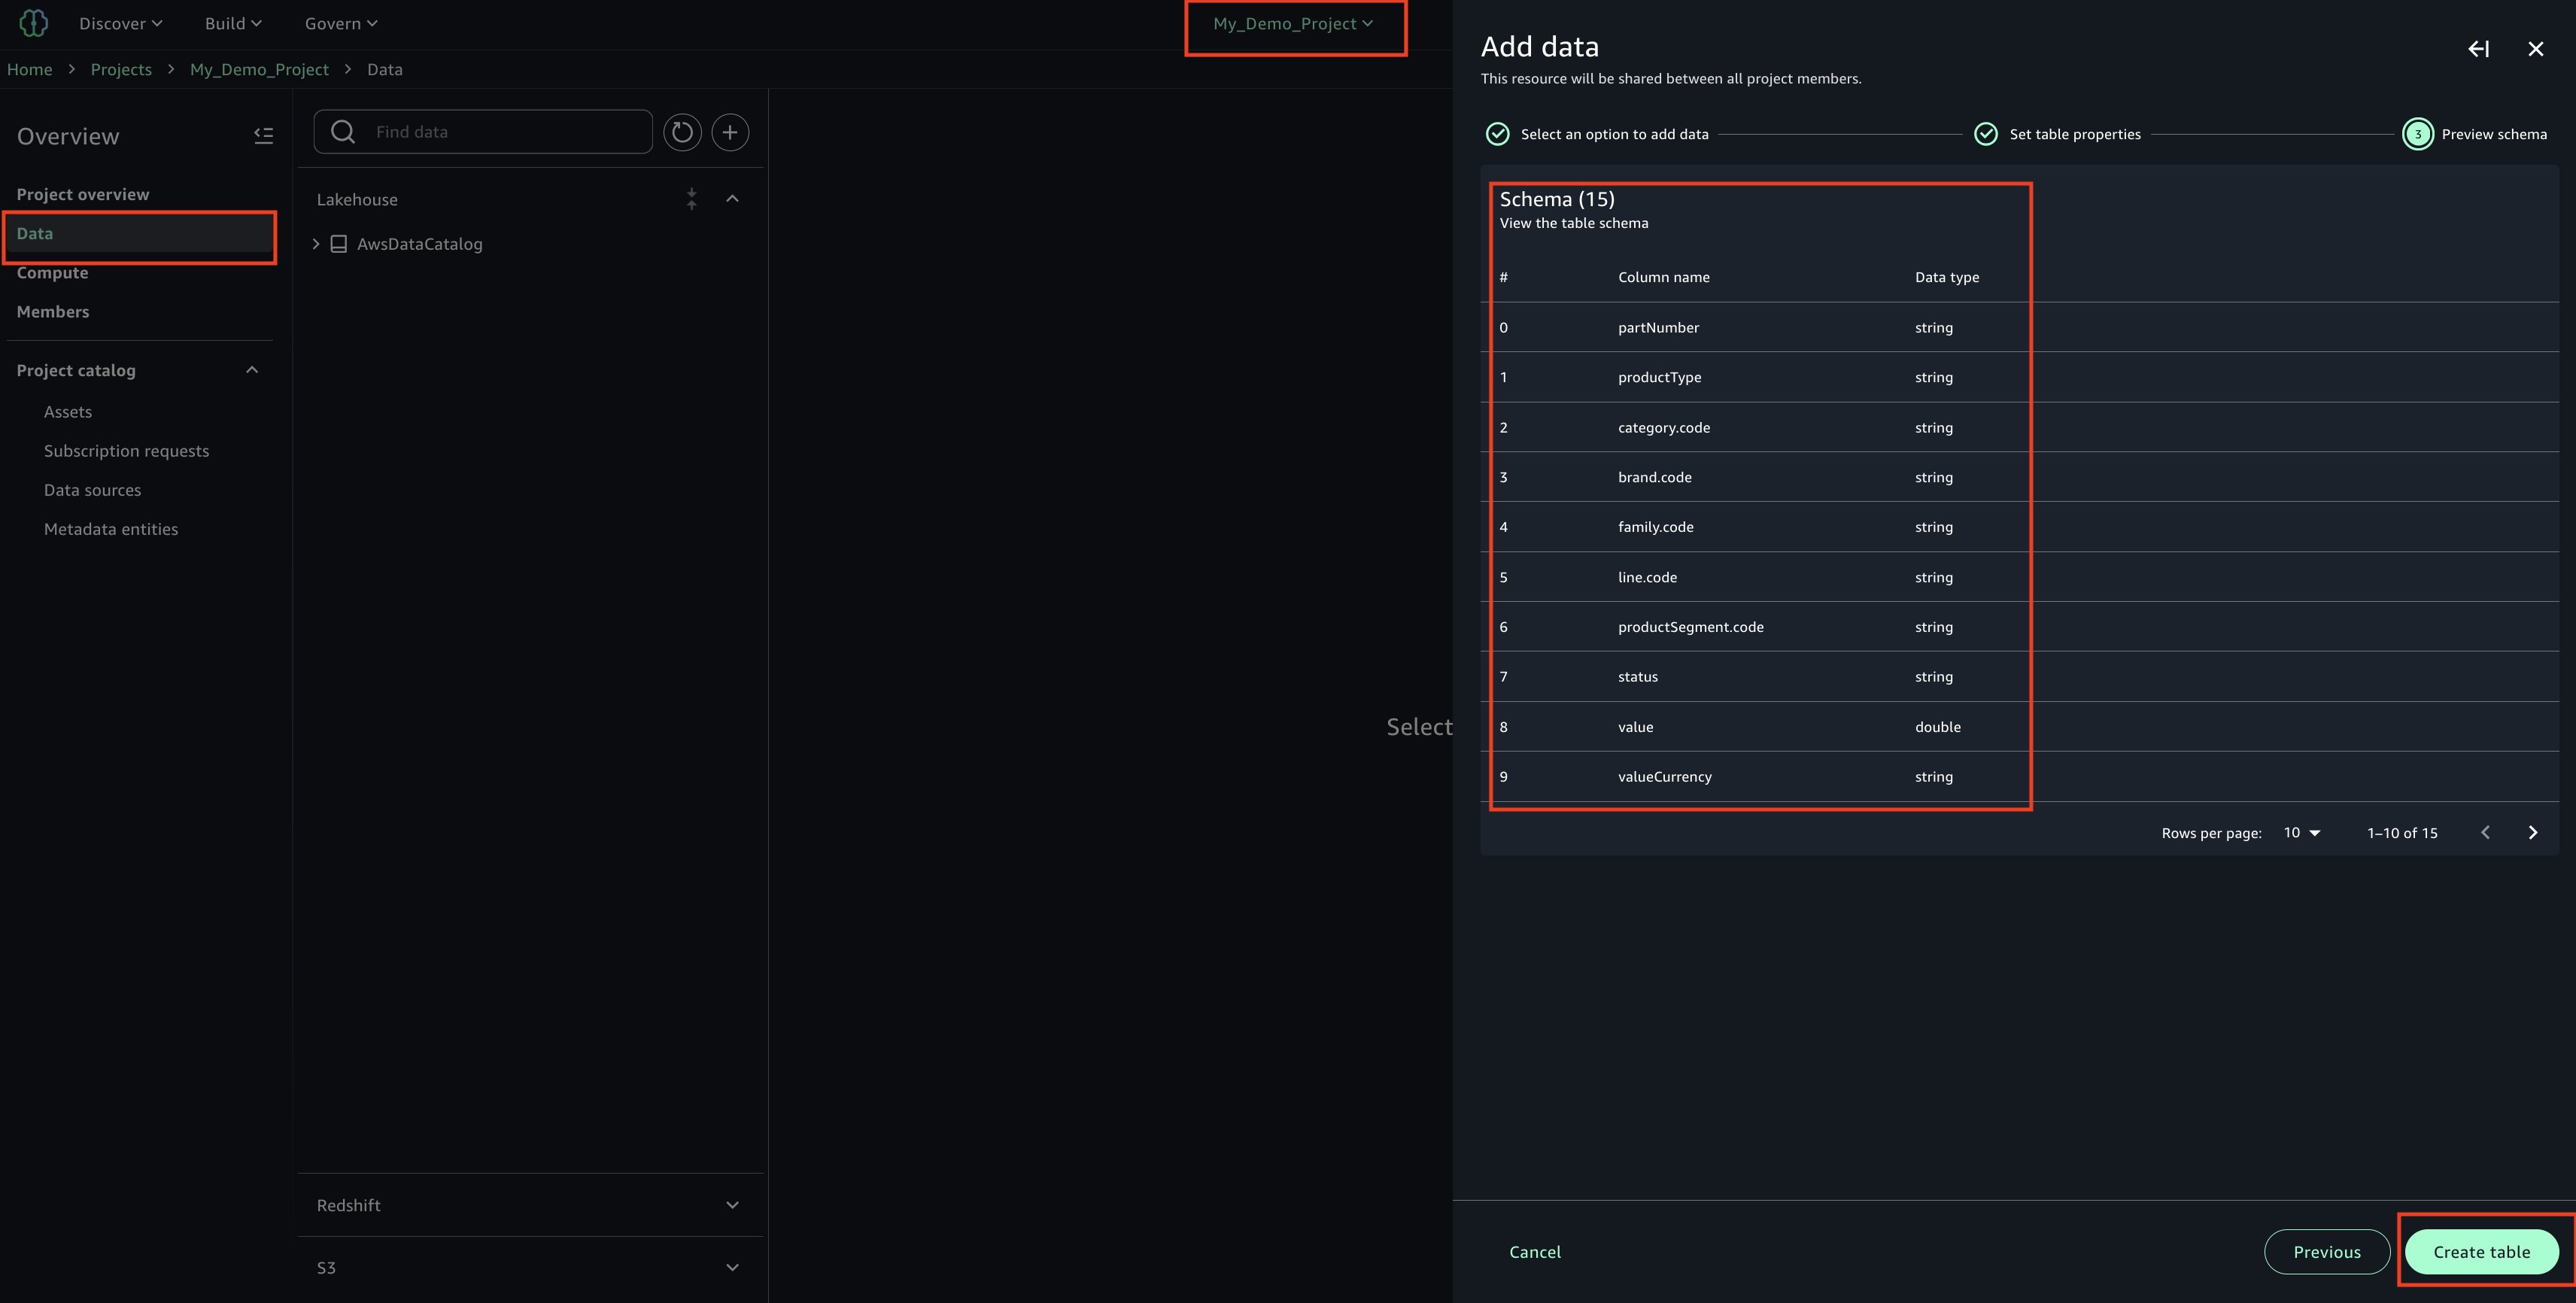
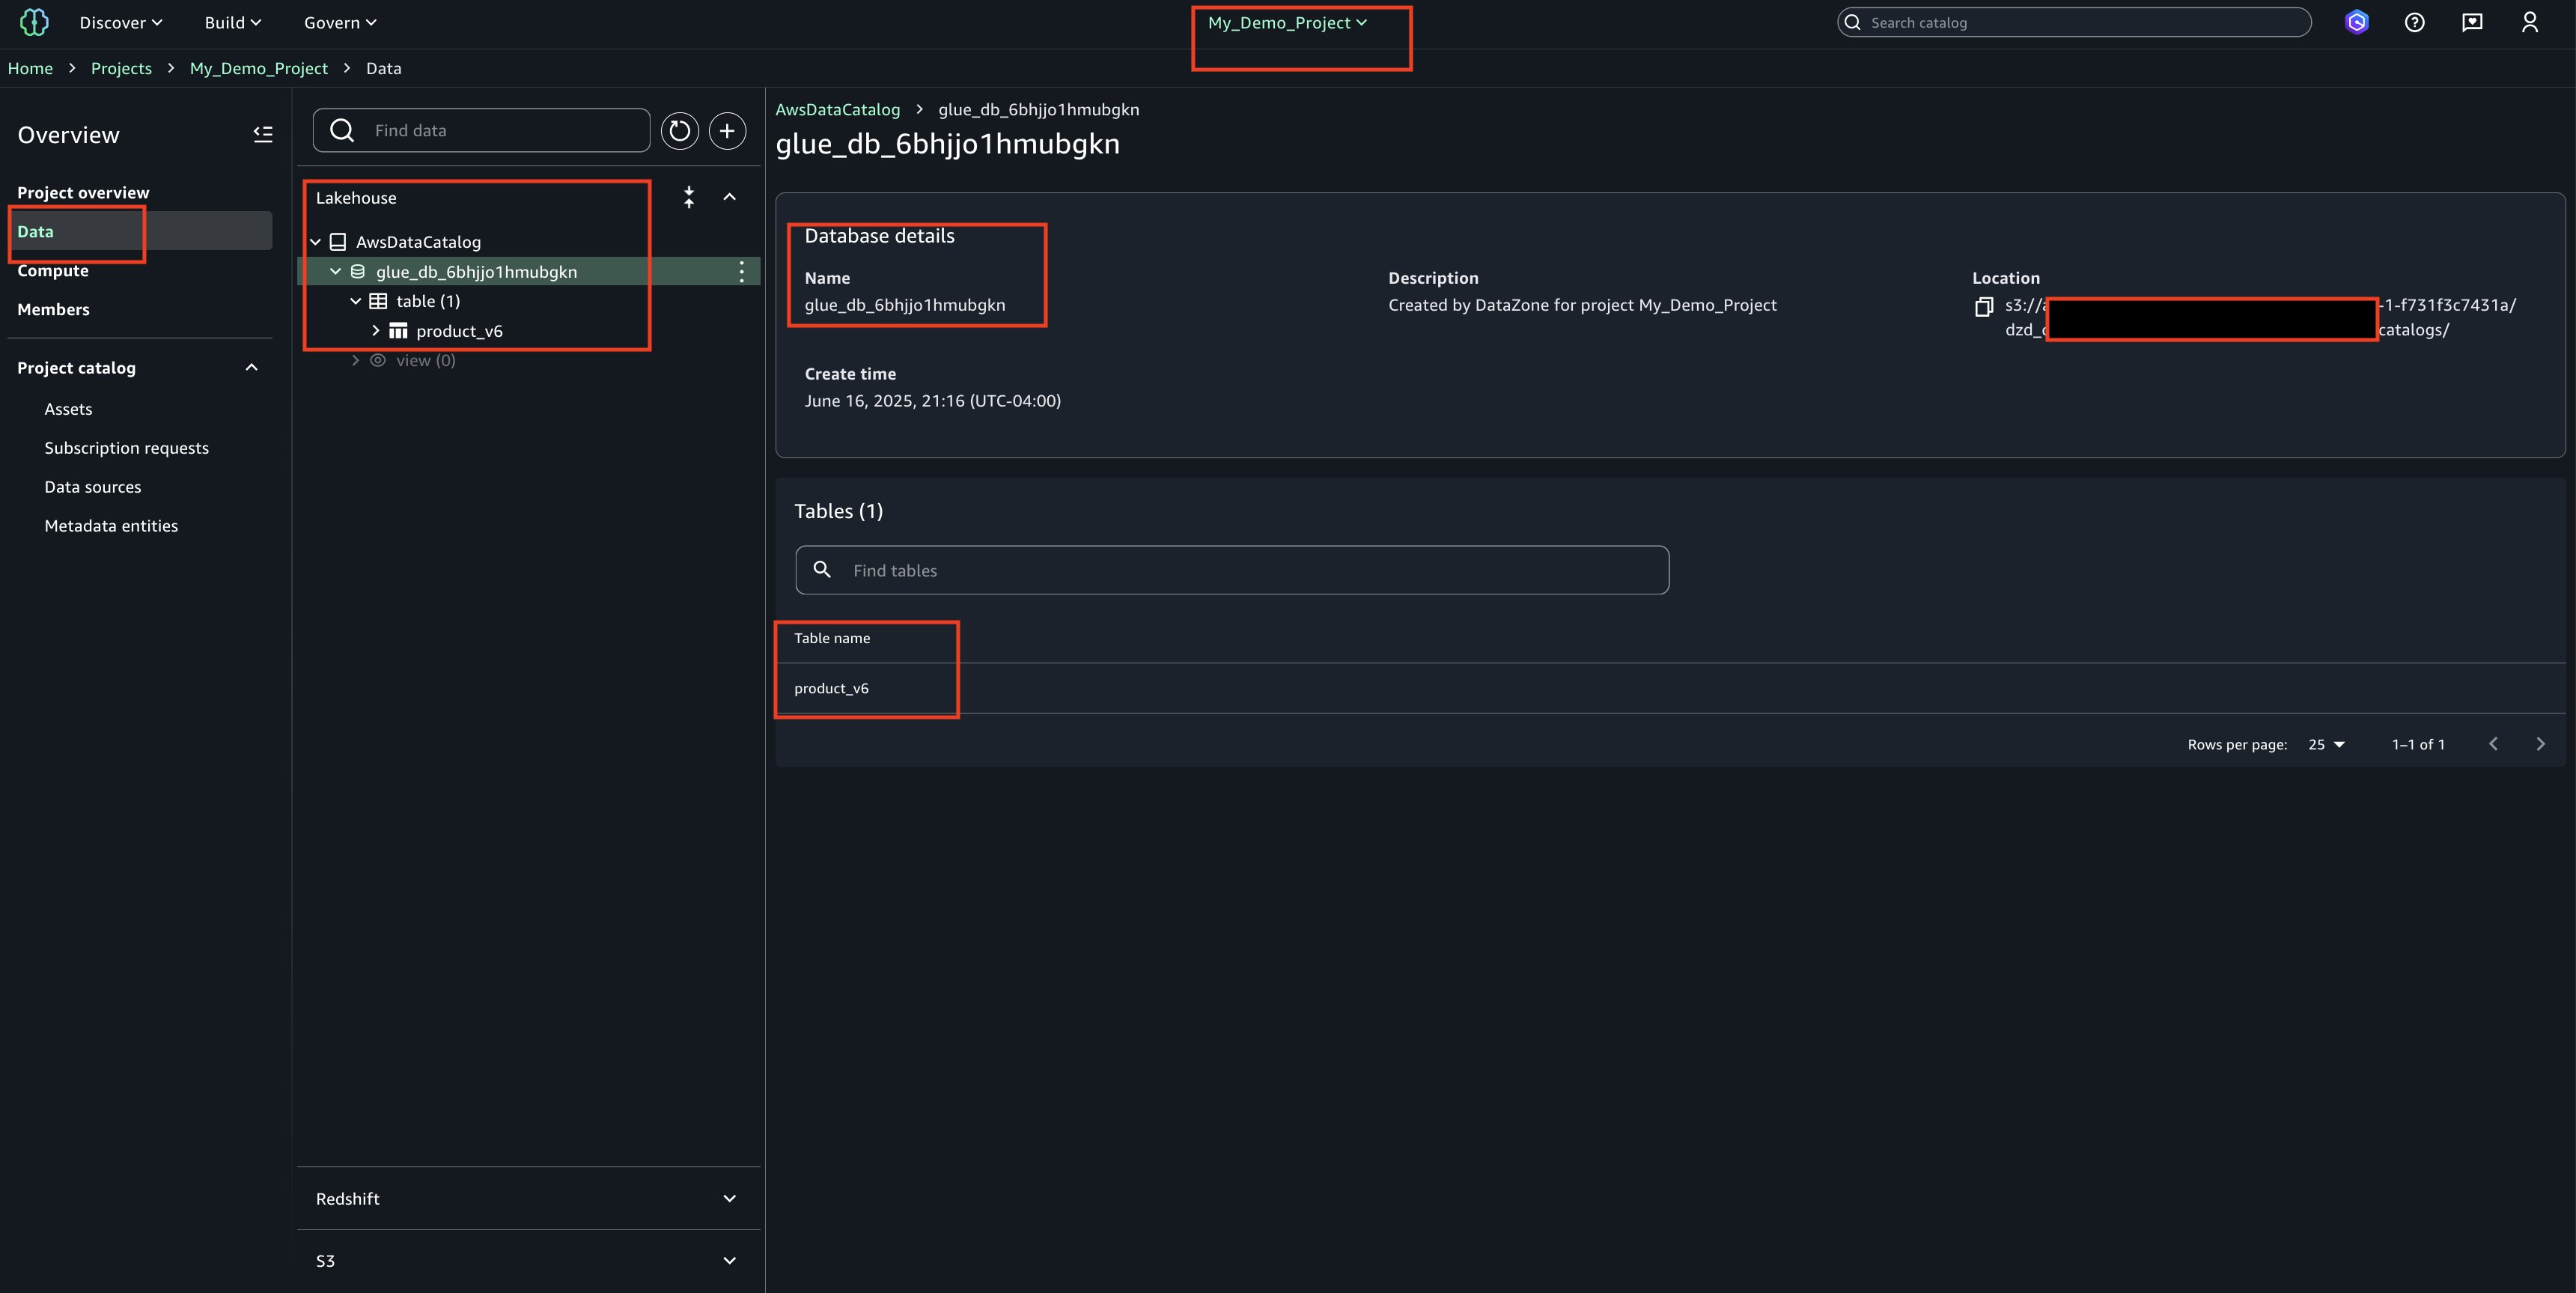
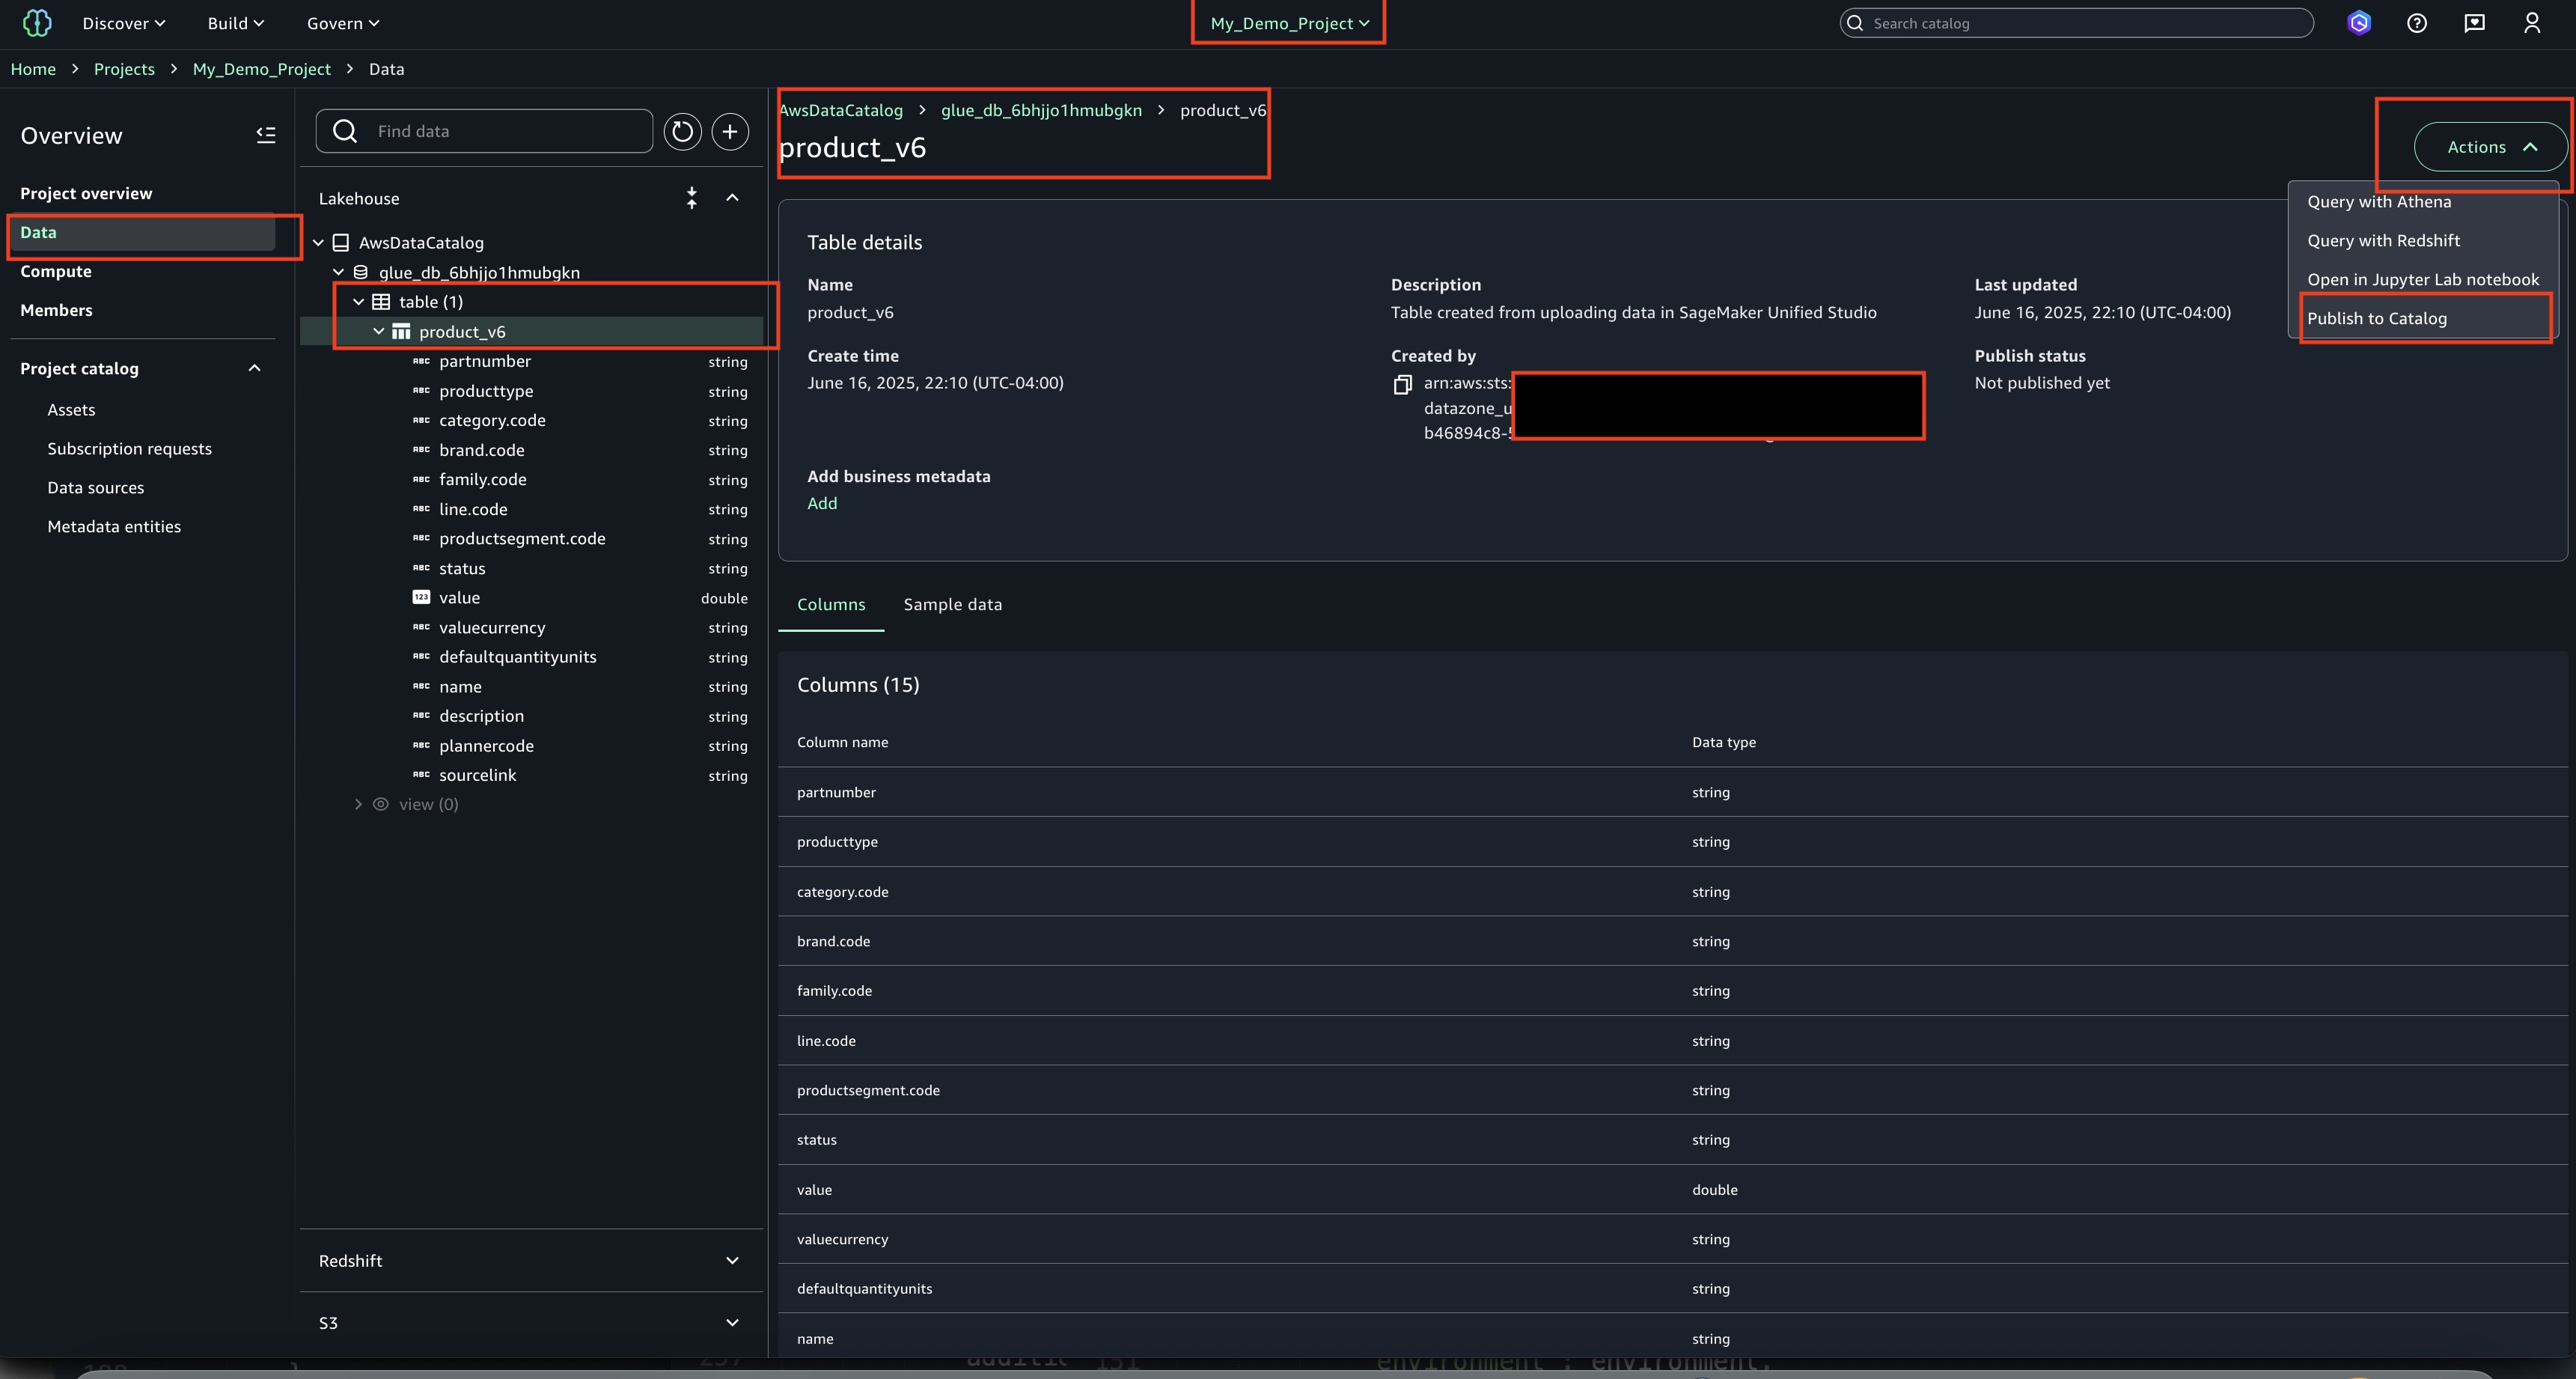
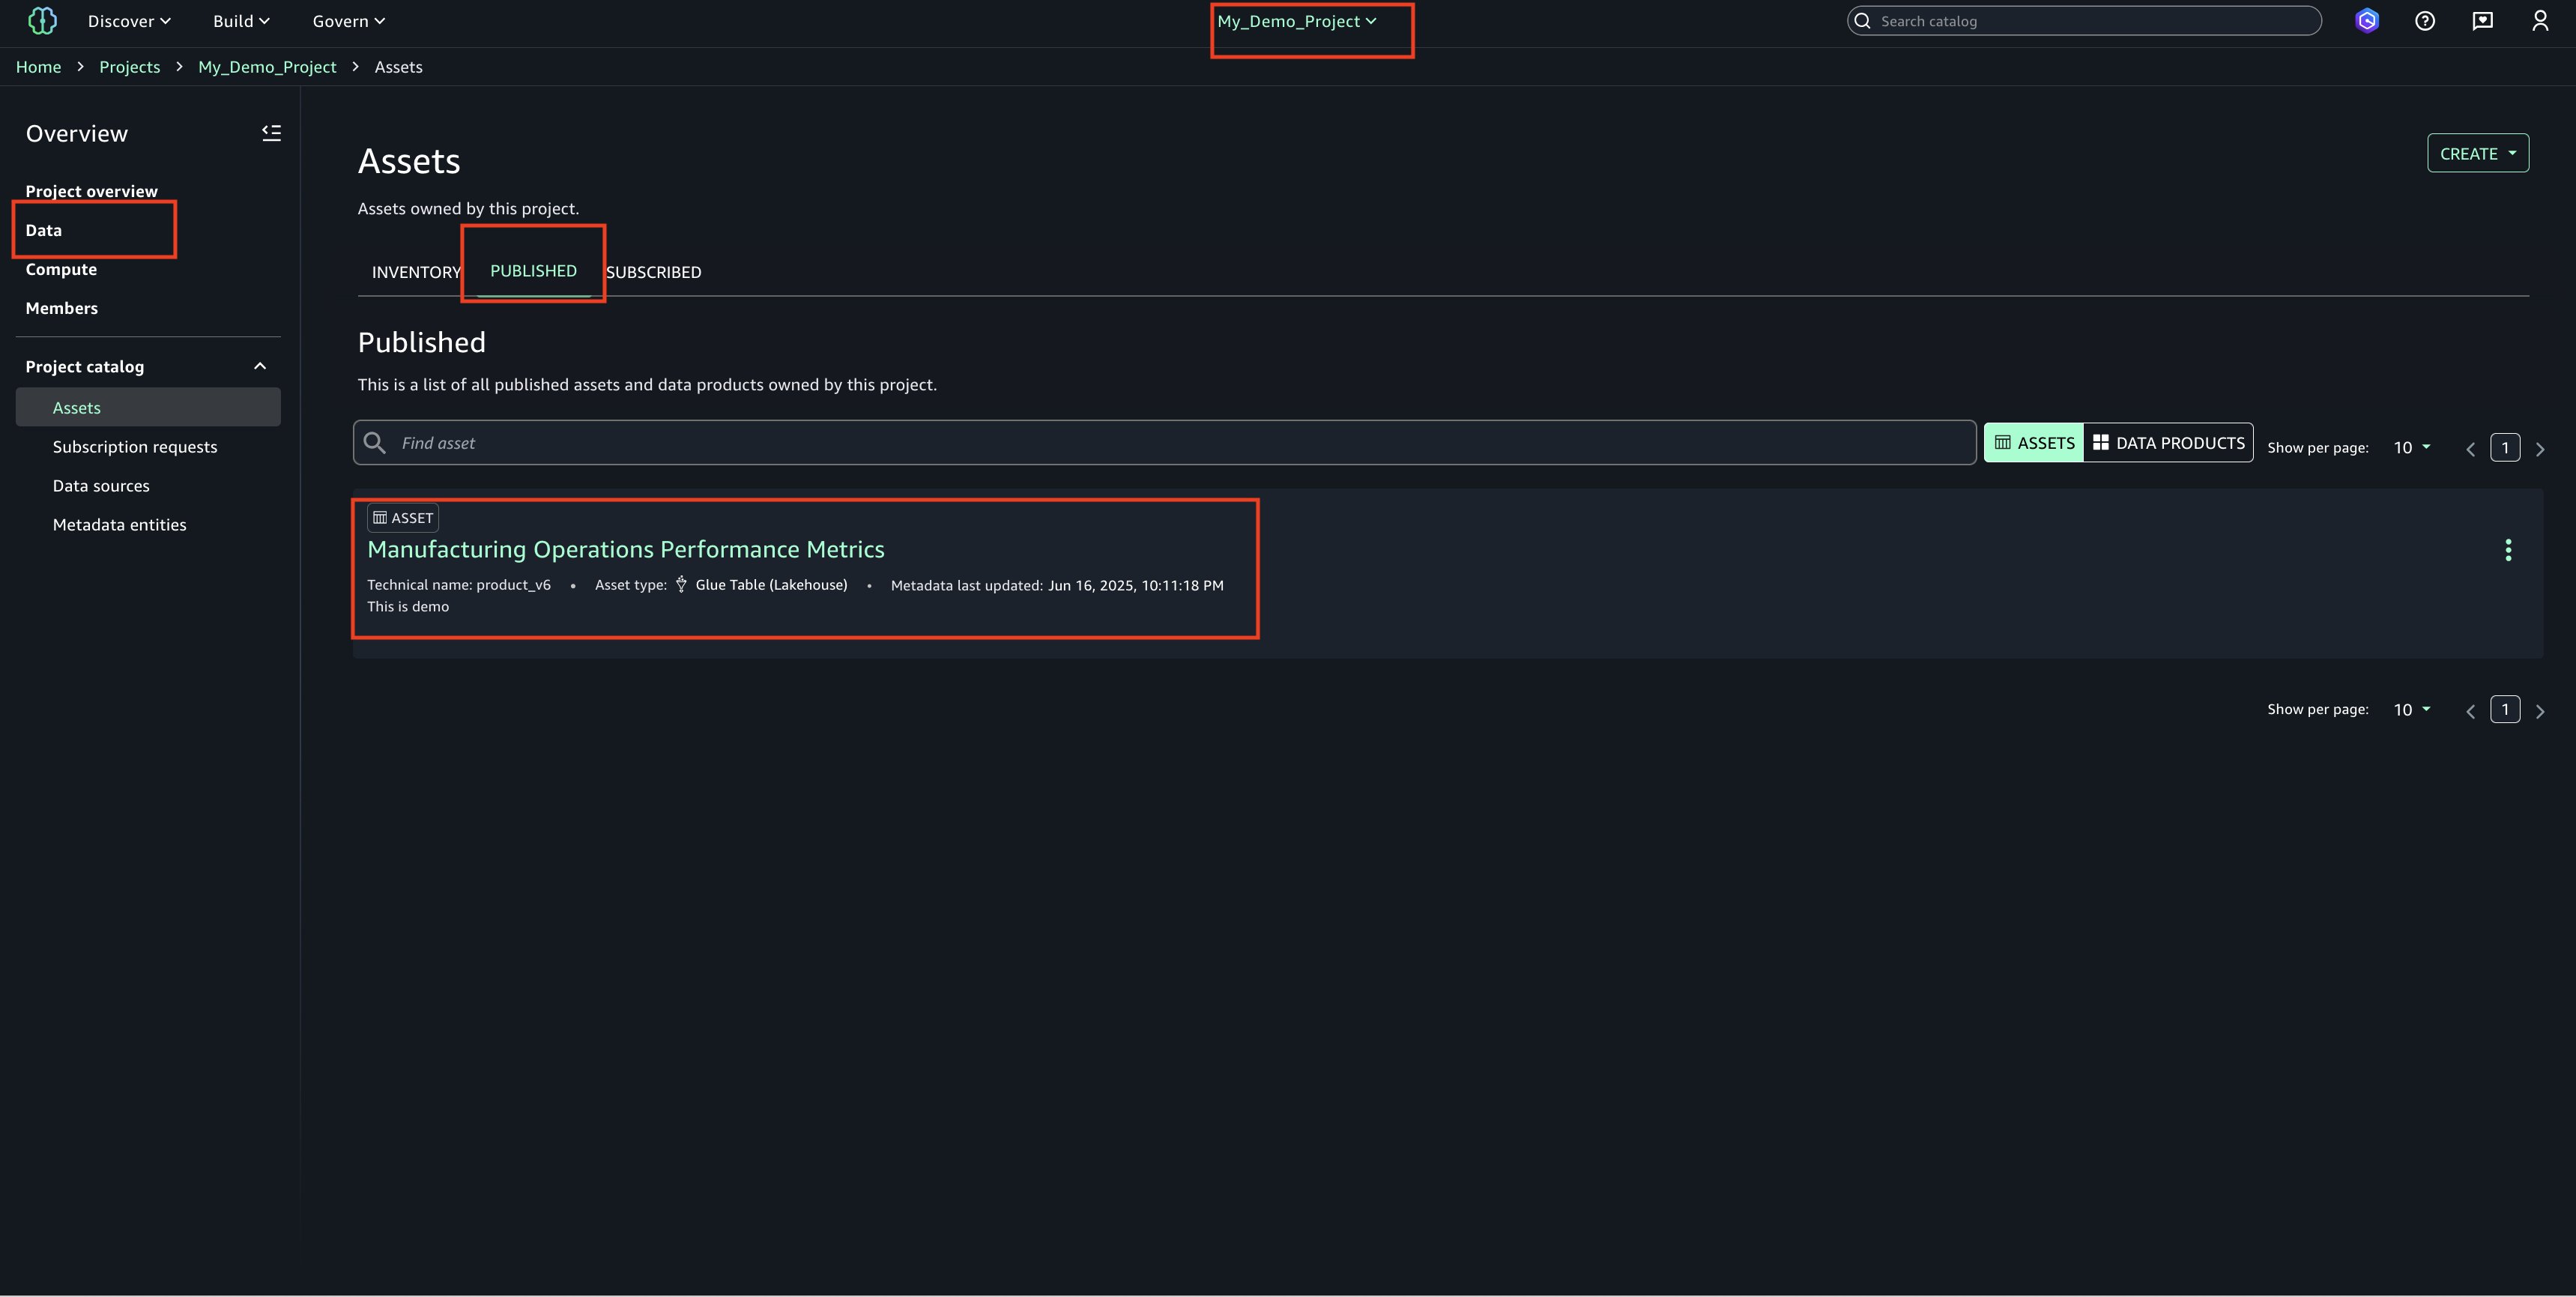
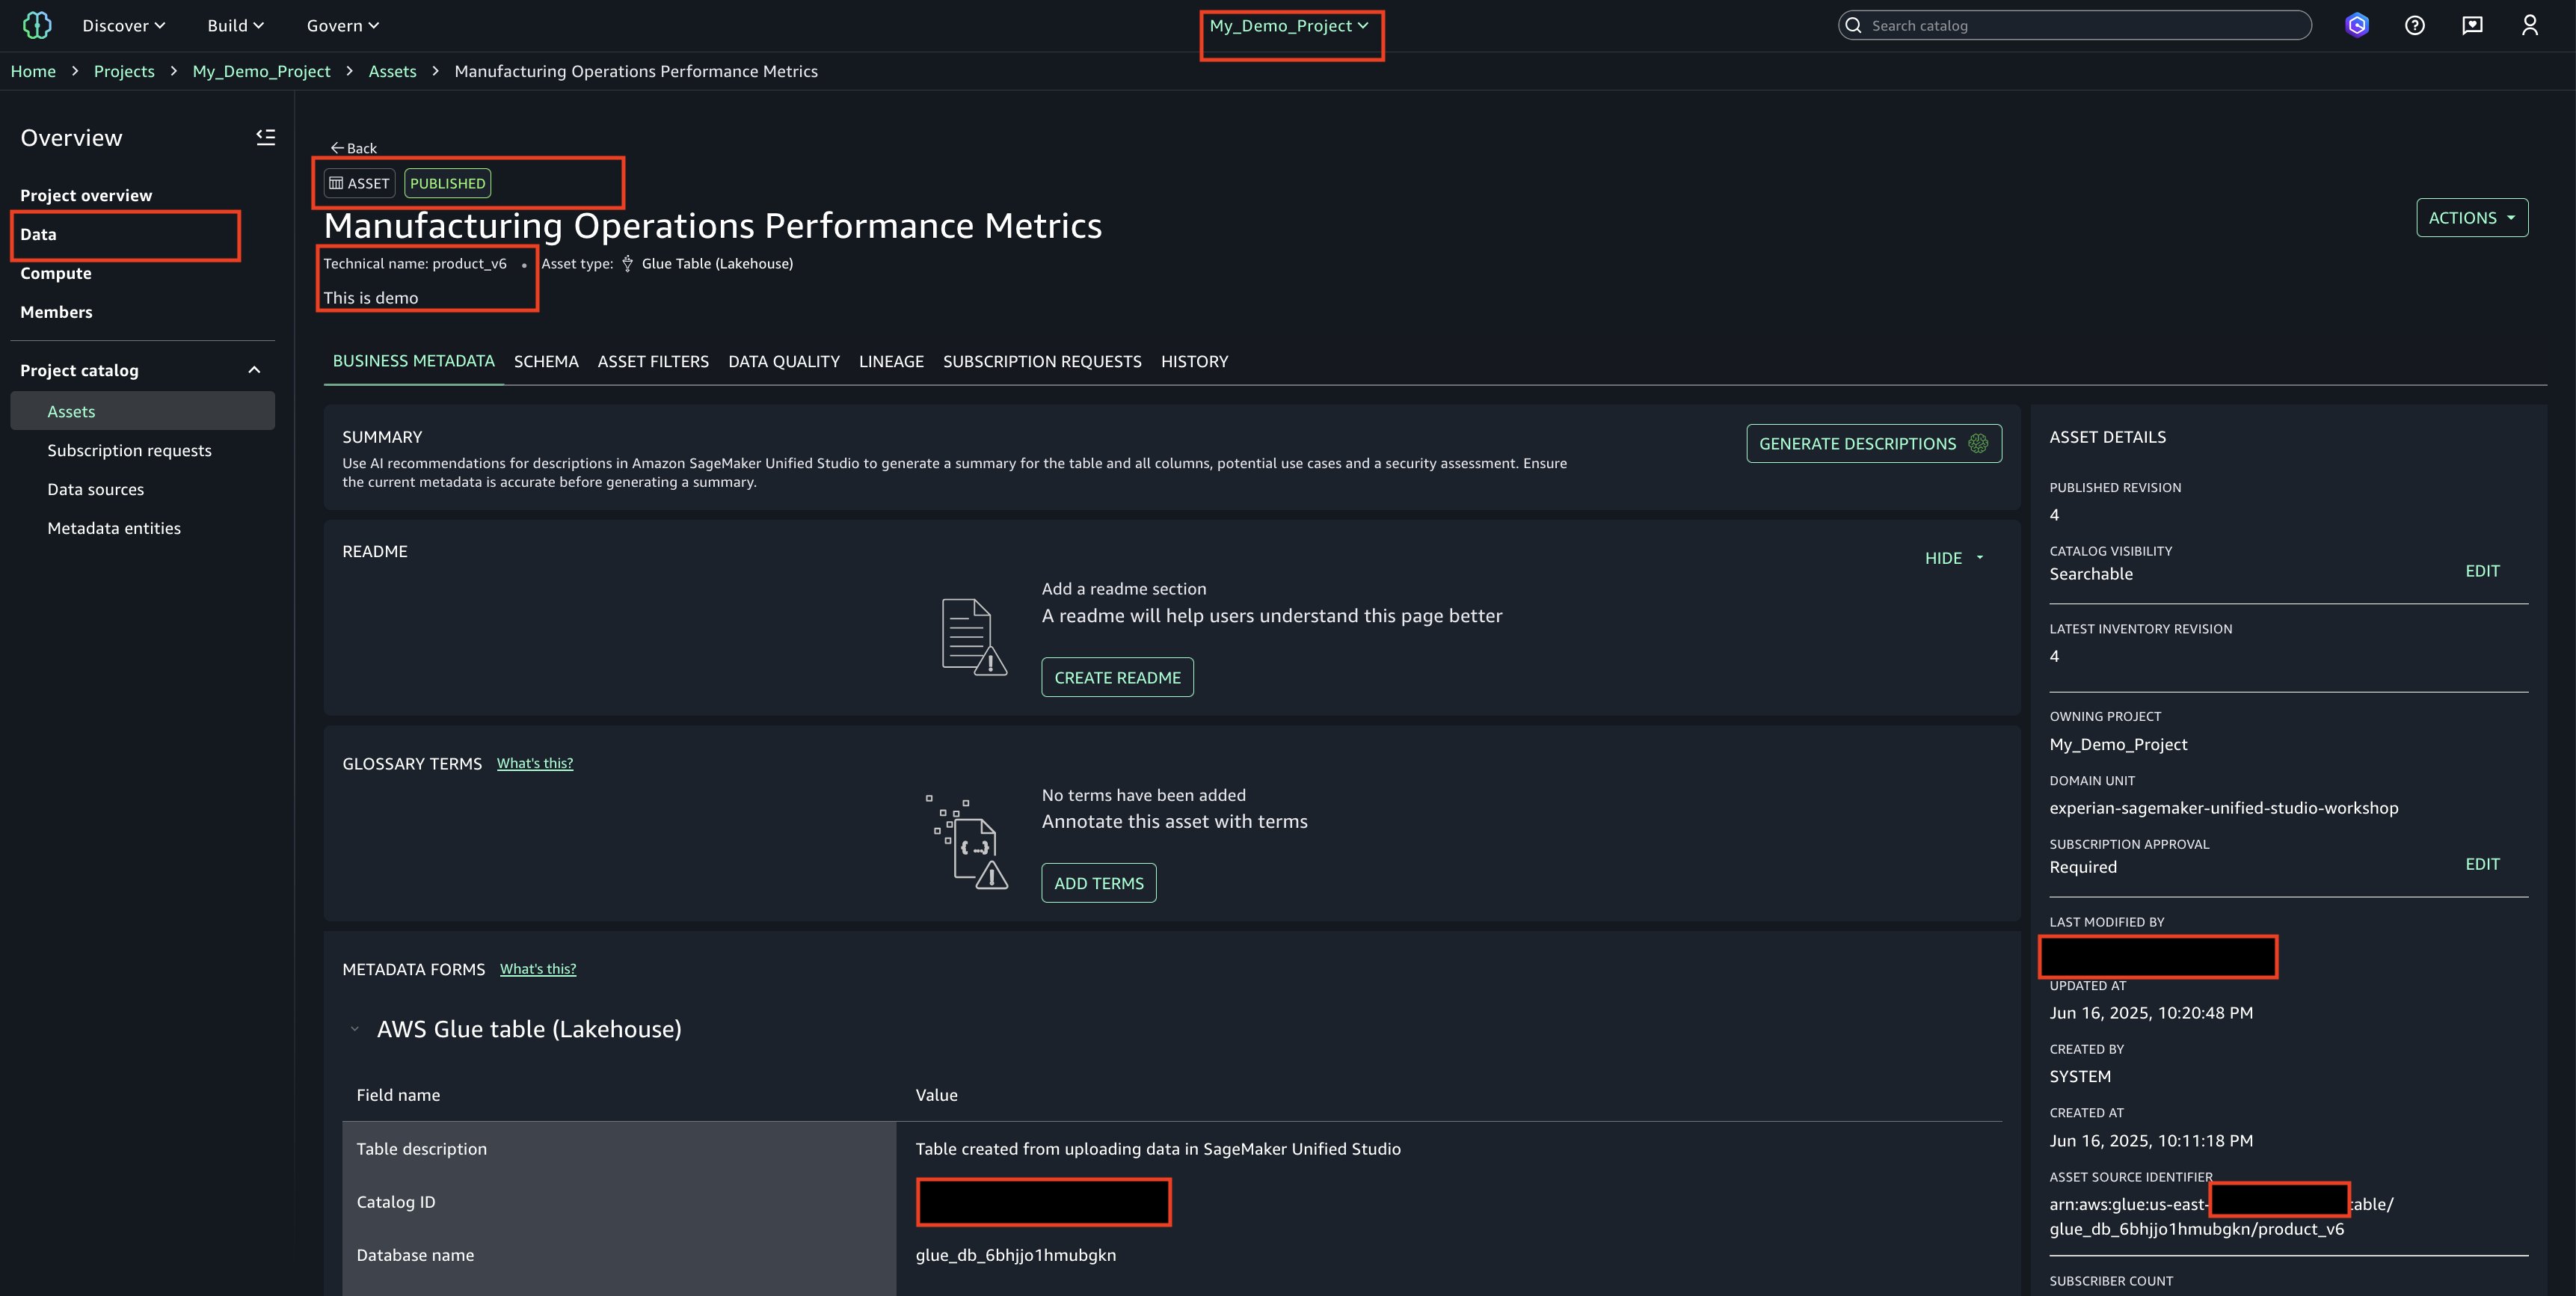
Data democratization with Amazon DataZone

Amazon DataZone functions as the heart of the data mesh implementation. Deployed in a dedicated AWS account, it provides the data governance, discovery, and sharing capabilities that were missing in the previous centralized approach. DataZone offers a unified, searchable catalog enriched with business context, automated access controls, and standardized sharing workflows that enable true data democratization across the organization.

Through Amazon DataZone, Covestro established a comprehensive data catalog that helps business users across different domains to discover, understand, and request access to data assets without requiring deep technical expertise. The business glossary functionality supports consistent data definitions across domains, eliminating the confusion that often arises when different teams use different terminology for the same concepts.

Data product owners can use the integration of Amazon DataZone integration with AWS Lake Formation to grant or revoke cross-domain access to data, streamlining the data sharing process while supporting security and compliance requirements.

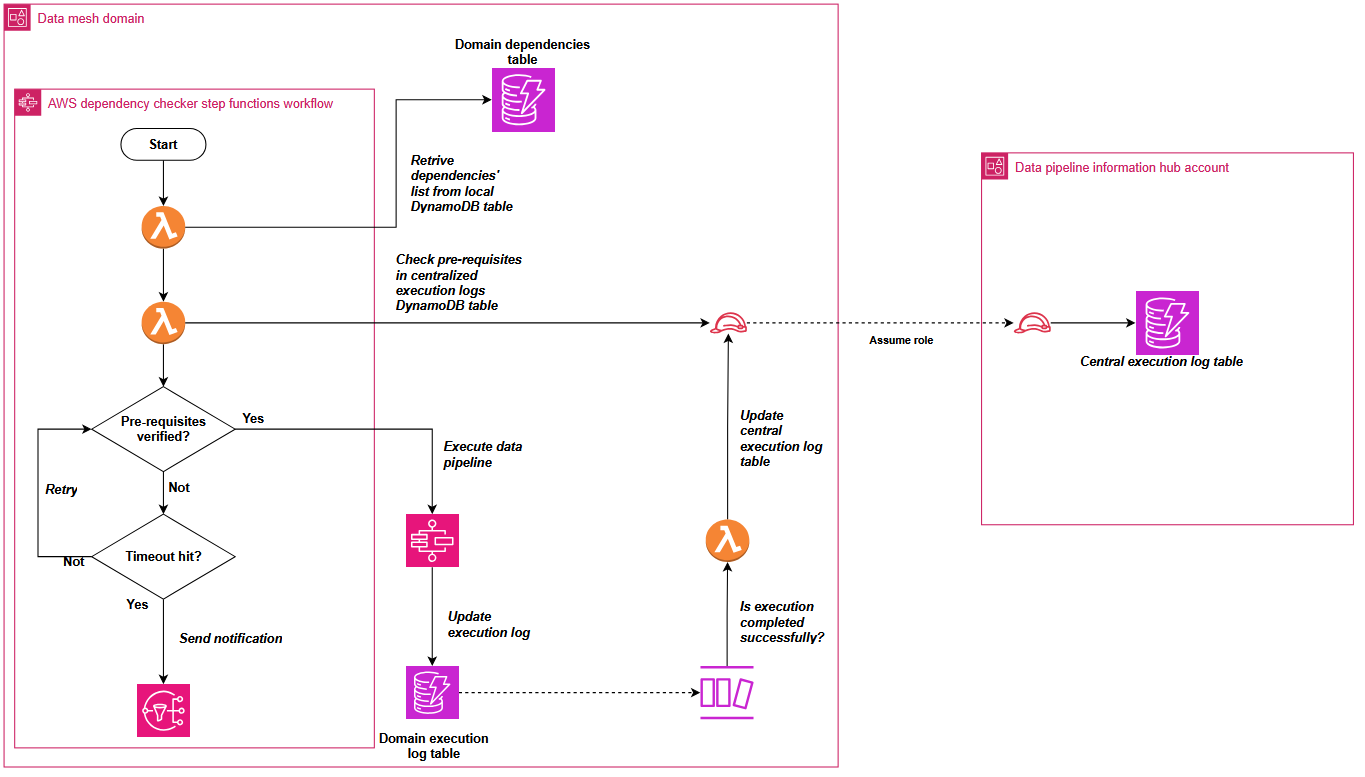
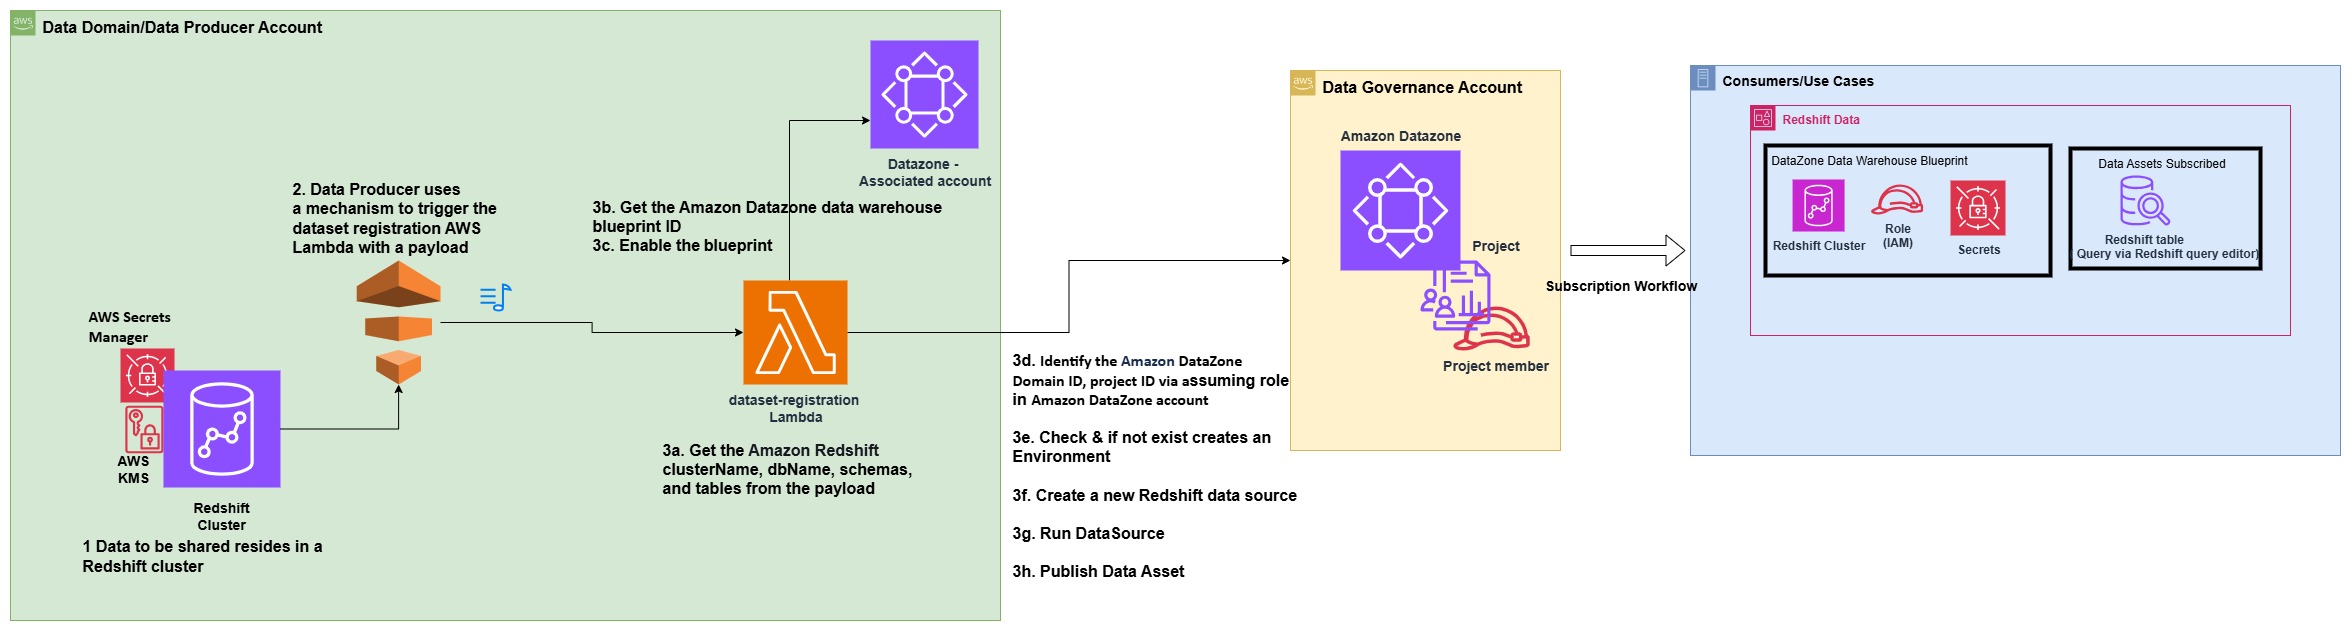
Managing cross-domain data pipeline dependencies

When implementing Covestro’s data mesh architecture on AWS, one of the most significant challenges was orchestrating data pipelines across multiple domains. The core question to address was “How can Data Domain A determine when a required dataset from Data Domain B has been refreshed and is ready for consumption?”.

In a data mesh architecture, domains maintain ownership of their data products while enabling consumption by other domains. This distributed model creates complex dependency chains where downstream pipelines must wait for upstream data products to complete processing before execution can begin.

To address this cross-domain dependency coordination, Covestro extended the SDLF with a custom dependency checker component that operates through both shared and domain-specific elements.

The shared components consist of two centralized Amazon DynamoDB tables located in a hub AWS account: one collecting successful pipeline execution logs from the domains, and another aggregating pipeline dependencies across the entire data mesh.

These domains deploy local components such as a dependency-tracking Amazon DynamoDB table and an AWS Step Functions state machine. The state machine checks prerequisites using centralized execution logs and integrates seamlessly as the first step in every SDLF-deployed pipeline, without additional configuration. The following diagram shows the process described.

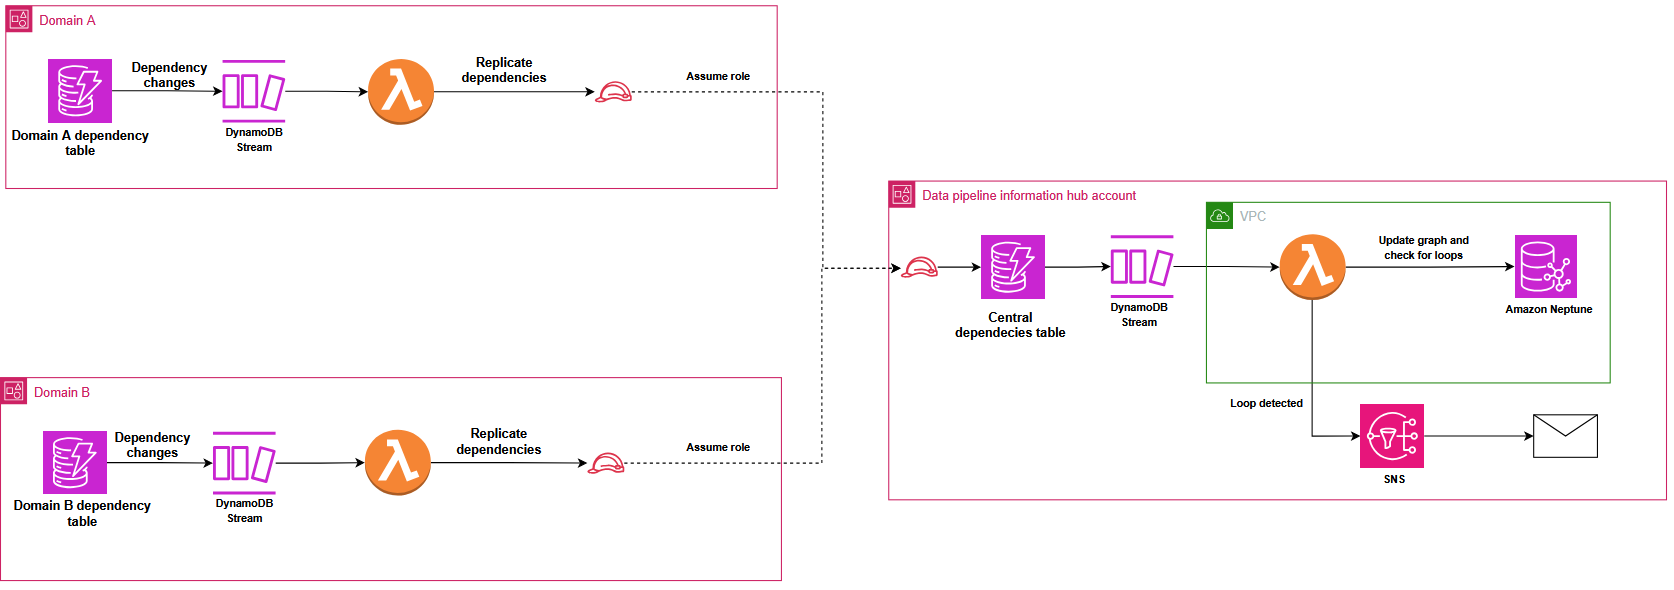
To prevent circular dependencies that could create locks in the distributed orchestration system, Covestro implemented a sophisticated detection mechanism using Amazon Neptune. DynamoDB Streams automatically replicate dependency changes from domain tables to the central registry, triggering an AWS Lambda function that uses the Gremlin graph traversal language (using pygremlin) to construct, update, and analyze a directed acyclic graph (DAG) of the pipeline relationships, with native Gremlin functions detecting circular dependencies and sending automated notifications, as illustrated in the following diagram. This process continuously updates the graph to reflect any new pipeline dependencies or changes across the data mesh.

Operational excellence through infrastructure as code

Infrastructure as code (IaC) practices using AWS CloudFormation and the AWS Cloud Development Kit (AWS CDK) significantly improve the operational efficiency of the data mesh implementation. The infrastructure code is version-controlled in GitHub repositories, providing complete traceability and collaboration capabilities for data engineering teams. This approach uses a dedicated deployment account that uses AWS CodePipeline to orchestrate consistent deployments across multiple data mesh domains.

The centralized deployment model supports that infrastructure changes follow a standardized continuous integration and deployment (CI/CD) process, where code commits trigger automated pipelines that validate, test, and deploy infrastructure components to the appropriate domain accounts. Each data domain resides in its own separate set of AWS accounts (dev, qa, prod), and the centralized deployment pipeline respects these boundaries while enabling controlled infrastructure provisioning.

IaC enables the data mesh to scale horizontally when onboarding new domains, supporting the maintenance of consistent security, governance, and operational standards across the entire environment. Covestro provisions new domains quickly using proven templates, accelerating time-to-value for business teams.

Business impact and technical outcomes

The implementation of the data mesh architecture using Amazon DataZone and SDLF has delivered significant measurable benefits across Covestro’s organization:

Accelerated data pipeline development

  • 70% reduction in time-to-market for new data products through standardized blueprints
  • Successful migration of more than 1,000 data pipelines to the new architecture
  • Automated pipeline creation without manual coding requirements
  • Standardized approach and sharing across domains

Enhanced data governance and quality

  • Comprehensive business glossary implementation that supports consistent terminology
  • Automated data quality checks integrated into pipelines
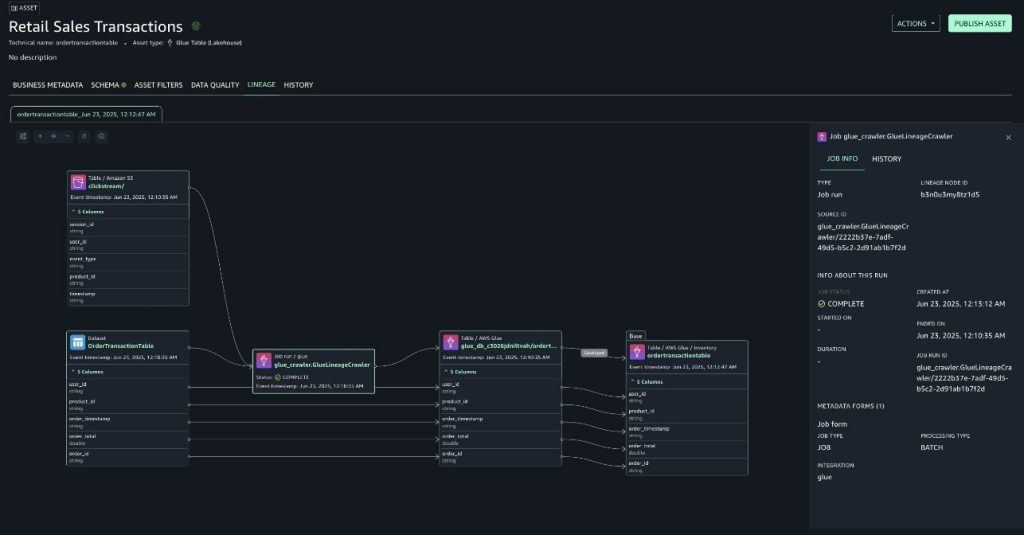
  • End-to-end data lineage visibility across domains
  • Standardized metadata management through Apache Iceberg integration

Improved data discovery and access

  • Self-service data discovery portal through Amazon DataZone
  • Streamlined cross-domain data sharing with appropriate security controls
  • Reduced data duplication through improved visibility of existing assets
  • Efficient management of cross-domain pipeline dependencies

Operational efficiency

  • Decreased central data team bottlenecks through domain-oriented ownership
  • Reduced operational overhead through automated deployment processes
  • Improved resource utilization through elimination of redundant data processing
  • Enhanced monitoring and troubleshooting capabilities

The new infrastructure has fundamentally transformed how Covestro’s teams interact with data, enabling business domains to operate autonomously while upholding enterprise-wide standards for quality and governance. This has created a more agile, efficient, and collaborative data ecosystem that supports both current needs and future growth.

What’s next

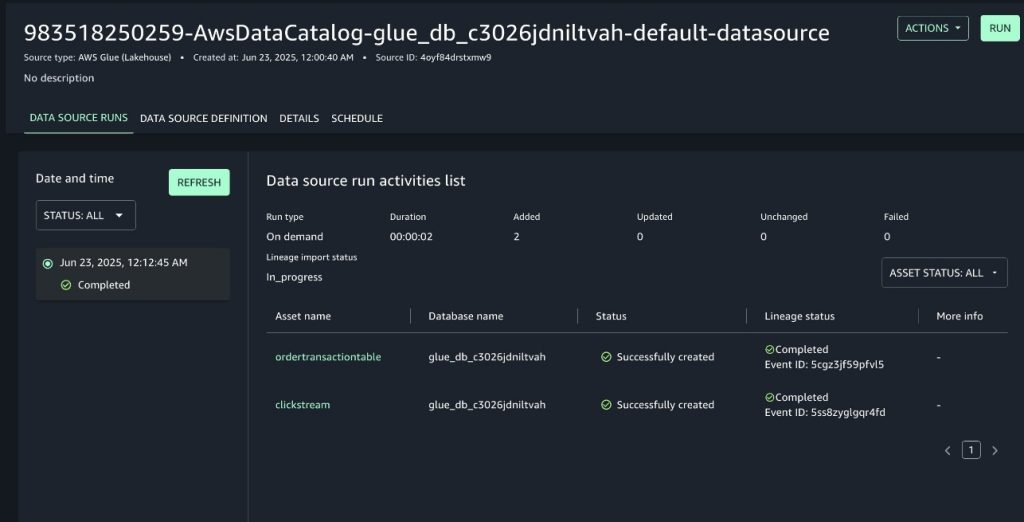
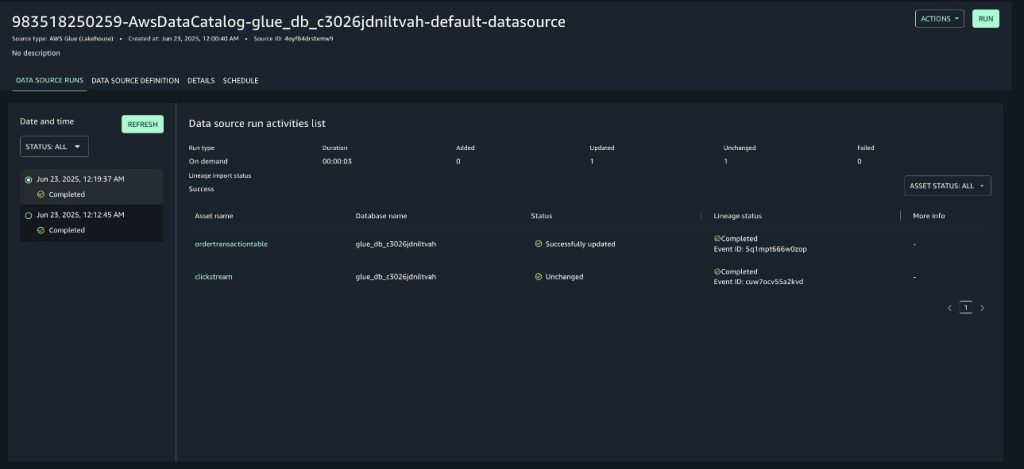
As Covestro’s data platform continues to evolve, the focus is now to support domain teams to effectively built data products for cross domain analytics. In parallel, Covestro is actively working to improve data transparency with data lineage in Amazon DataZone through OpenLineage to support more comprehensive data traceability across a diverse set of processing tools and formats.

Conclusion

In this post, we showed you how Covestro transformed its data architecture transitioning from a centralized data lake to a data mesh architecture, and how this foundation will prove invaluable in supporting their journey toward becoming a more data-driven organization. Their experience demonstrates how modern data architectures, when properly implemented with the right tools and frameworks, can transform business operations and unlock new opportunities for innovation.

This implementation serves as a blueprint for other enterprises looking to modernize their data infrastructure while maintaining security, governance, and scalability. It shows that with careful planning and the right technology choices, organizations can successfully transition from centralized to distributed data architectures without compromising on control or quality.

For more on Amazon DataZone, see the Getting Started guide. To learn about the SDLF, see Deploy and manage a serverless data lake on the AWS Cloud by using infrastructure as code.


About the authors

Jörg Janssen

Jörg Janssen

Jörg serves as the Product Owner of the Covestro Data and Analytics Platform within Covestro IT & D. In this role, he bridges business requirements and technical execution, enabling data-driven innovation across the organization. With a strong background in chemistry and decades of IT experience, he plays a key role in advancing Covestro’s data strategy—empowering business units to develop innovative solutions in chemical manufacturing and operations, while ensuring effective data governance and stewardship.

Mousam Majhi

Mousam Majhi

Mousam is a Senior ProServe Cloud Architect focusing on Data & AI within AWS Professional Services. He works with Manufacturing and Travel, Transportation, and Logistics customers in DACH to achieve their business outcomes by leveraging data and AI powered solutions. Outside of work, Mousam enjoys hiking in the Bavarian Alps.

Giuseppe Perillo

Giuseppe Perillo

Giuseppe is a Data Architect at AWS Professional Services, specializing in data governance and the design of reliable, enterprise-grade data platforms. With a strong foundation in dimensional modeling, data warehousing, integration, and data quality, he helps customers build structured, trusted, and analytics-ready data environments.

Maddyzeth Ariza

Maddyzeth Ariza

Maddyzeth is a Data Architect at AWS Professional Services. She designs and implements scalable, cloud data solutions that support enterprise analytics, machine learning, and real-time processing. She specializes in serverless data architectures on AWS, including data lakes, data mesh, and enterprise-wide data governance. Outside of work, she enjoys exploring historic cities and landmarks across Europe.

Automate email notifications for governance teams working with Amazon SageMaker Catalog

Post Syndicated from Himanshu Sahni original https://aws.amazon.com/blogs/big-data/automate-email-notifications-for-governance-teams-working-with-amazon-sagemaker-catalog/

Amazon SageMaker Catalog simplifies the discovery, governance, and collaboration for data and AI across Data Lakehouse, AI models, and applications. With Amazon SageMaker Catalog, you can securely discover and access approved data and models using semantic search with generative AI–created metadata or could just ask Amazon Q Developer with natural language to find their data.

Large enterprise customers have multiple lines of businesses who produce and consume data using a central SageMaker Data Catalog. Many customers have a central data governance team that is responsible for creating, publishing, and maintaining data governance standards and best practices across the firm. As the customer’s data platform scales, it becomes challenging for the central governance team to maintain the standards across all data producers and consumers. Because of this, many governance teams need to monitor user activity in Amazon SageMaker Catalog to ensure data assets are published according to established organizational governance standards and best practices. In this scenario, there is a need for automation where the central governance teams can be notified when critical events happen in Amazon SageMaker Catalog.

In this post, we show you how to create custom notifications for events occurring in SageMaker Catalog using Amazon EventBridge, AWS Lambda, and Amazon Simple Notification Service (Amazon SNS). You can expand this solution to automatically integrate SageMaker Catalog with in-house enterprise workflow tools like ServiceNow and Helix.

Solution overview

The following solution architecture shows how SageMaker Catalog integrates with other AWS services like AWS IAM Identity Center, Amazon EventBridge, Amazon SQS, AWS Lambda, and Amazon SNS to generate automated notifications to capture critical events in the enterprise catalog.

  1. A SageMaker Catalog user logs into Amazon SageMaker Unified Studio using IAM Identity center. This could be a data scientist, machine learning engineer, or analyst looking for published data sets in the firm. AWS IAM Identity center ensures that only authorized personnel can access the cataloged assets and ML resources.
  2. User performs an activity within SageMaker Catalog. Example user creates a new project or user searches for a data asset and creates a subscription request to access the asset.
  3. User events from SageMaker Catalog are captured in Amazon EventBridge. Amazon EventBridge is a fully managed, serverless event bus service designed to help you build scalable, event-driven applications across AWS, SaaS, and custom applications. Amazon EventBridge provides the ability to filter events and allow users to take action on specific events.The following example event pattern in EventBridge filters DataZone create project events.
    {
      "source": [
        "aws.datazone"
      ],
      "detail": {
        "eventSource": [
          "datazone.amazonaws.com"
        ],
        "eventName": [
          "CreateProject"
        ]
      }
    }

  4. Amazon EventBridge sends the filtered events to Amazon SQS. Routing events to an SQS queue improves reliability and durability. Amazon SQS acts as a buffer between Amazon EventBridge and AWS Lambda, decoupling event producers from consumers. This allows your Lambda functions to process messages at their own pace, preventing overload during traffic spikes or when downstream resources are temporarily slow or unavailable. Amazon SQS provides durable, persistent storage for events. If Lambda service is unavailable or throttled, messages remain in the queue until they can be successfully processed, reducing the risk of data loss. There is a Dead Letter Queue (DLQ) attached to the main SQS queue. Attaching a DLQ to SQS ensures that any messages that can’t be processed after multiple attempts are safely captured for inspection and troubleshooting, preventing them from blocking or endlessly circulating in the main queue.
  5. AWS Lambda function reads the messages from SQS queue. Lambda function formats the notification based on your needs.
  6. AWS Lambda publishes the message to Amazon SNS. End users and Central Governance team can subscribe to the SNS topic to receive email alerts when an event happens in SageMaker catalog.
  7. Amazon CloudWatch integrates with AWS Lambda to monitor performance, logs events, and can trigger alarms if anything goes awry, ensuring your workflows run smoothly.

Prerequisites

You need to setup the following prerequisite resources:

  • An AWS account with a configured Amazon Amazon Virtual Private Cloud (Amazon VPC) and base network.
  • An existing SageMaker Unified Studio domain (follow instructions on Setting up Amazon SageMaker Unified Studio).
  • Grant Lambda Access in SageMaker Unified Studio (required for Publishing the assets)
    • Add the Lambda execution role as an IAM role in SageMaker Unified Studio.
    • Assign the Lambda execution role to your project within the SageMaker Unified Studio portal.

This configuration ensures that Lambda function has the required authorization to access Data Zone resources and successfully publish assets from your SageMaker Unified Studio projects.

Code Deployment

Review the instructions on our GitHub repository to deploy the framework in your AWS account using AWS CDK. The CDK provisions an event-driven notification architecture for Amazon SageMaker Unified Studio, focusing on project creation and asset publishing events.

Core AWS Resources Deployed – The following are the core AWS resourced deployed:

  1. EventBridge Rules
    • DataZoneCreateProjectRule: Captures DataZone project creation events (CreateProject).
    • DataZonePublishAssetRule: Captures DataZone asset publishing events (CreateListingChangeSet with PUBLISH action for ASSET entity type).
  2. SQS Queue
    • DataZoneEventQueue: Buffers DataZone events from EventBridge before processing.
    • Queue Policy: Allows EventBridge to send messages to the SQS queue.
  3. Lambda Function
    • ProjectNotificationLambda: Processes messages from the SQS queue, retrieves event details from DataZone, and sends notifications to an SNS topic.
      • IAM Role: Grants permissions to access SQS, SNS, CloudWatch Logs, and DataZone services.
      • Event Source Mapping: Triggers the Lambda function for each SQS message.
  4. SNS Topic
    • LambdaSNSTopic: Receives notifications from the Lambda function.
      • Email Subscriptions: Two email endpoints are subscribed to receive notifications.
    • Add your email ID to the SNS topic. You’ll receive an email to request for subscription, click on ‘Confirm Subscription’
  5. Permissions
    • Amazon EventBridge sends events to SQS (requiring SQS permissions), Lambda poll reads messages from Amazon SQS (requiring Lambda role in SQS permissions), and Lambda publishes to Amazon SNS (requiring SNS permissions).
    • IAM Policies: Lambda execution role has necessary permissions for SQS, SNS, logging, and Data Zone operations.

Outputs Provided (CloudFormation Output)

  • Amazon SNS Topic ARN: For notification publishing.
  • Amazon SQS Queue ARN: For event buffering.
  • AWS Lambda Function ARN: For event processing.
  • Amazon EventBridge Rule ARNs: For both asset publishing and project creation events.

Project Creation Notification

Execute the following steps to login to SageMaker Unified Studio and create a project.

  1. Login to SageMaker Unified Studio Console. This takes you to Amazon SageMaker Unified Studio domain login screen (SSO and IAM sign-in options).
    SageMaker Unified Studio Login
  2. Choose Create Project on SageMaker Unified Studio login page.
    Create Project
  3. Choose a project name of your choice, such as ‘My_Demo_Project’. In Project profile, select ‘All-Capabilities’.
    Demo Project
  4. Choose Continue. Keep everything as default.
  5. Choose Continue. On next page, create on ‘Create project’.
  6. Project creation final screen
  7. Email Notification. Once project creation is successful, you should see an email notification sent by the above deployed automation.

Asset Publish Notification

To publish a sample asset in SageMaker Unified Studio.

  1. Lambda Permissions
    After the CDK Stack creates the Lambda execution role ‘DatazoneStack-LambdaExecutionRole’, use the following procedure to integrate this role into your SageMaker Studio project. This integration enables Lambda functions to interact with DataZone API in SageMaker Unified Studio project.

    1. Login to SageMaker Unified studio using SSO, click on Members, Add members.
    2. Find the role ‘DatazoneStack-LambdaExecutionRole’ and add as a ‘Contributor’

      The LambdaExecutionRole (<cf-stack-name>-LambdaExecutionRole) has been added as a member to a project in SageMaker Unified Studio.

  2. Create Asset
    1. In your project ‘My_Demo_Project’, click on Data. Choose the plus sign to add a data set.

    2. Upload your CSV file using the sample ‘Product_v6.csv’ found in the checkout folder of the ‘sample-sagemaker-unified-studio-governance-notifications’ GitHub repository.

    3. Use table type as S3/external table.

    4. Review and confirm that the column/attribute names in the uploaded CSV file.

    5. Check the Glue database(glue_db_<unique_id>) to confirm that the table has been created and properly imported
  3. Publish Asset
    1. Select the asset, choose Actions and Publish to Catalog.

    2. View the published asset below.

    3. In the Project Catalog’s Assets section, locate the highlighted entry and verify the published table’s name

    4. Choose the asset name to display additional details and properties about the table/asset.
  4. Email Alerts
    1. Once the asset is published to SageMaker Unified studio, you’ll receive an email alert sent with details of the published asset. Central governance teams can use this alert to review the published asset to ensure it aligns with the enterprise standards.

      Email alerts are sent to notify users when assets have been published

Cleanup

To clean up your resources, complete the following steps:

cdk destroy --profile <PIPELINE-PROFILE>

Conclusion

In this post, you learned how to build an automated notification system for Amazon SageMaker Unified Studio using AWS services. Specifically, we covered:

  • How to set up event-driven notifications from Amazon SageMaker Unified Studio leveraging Amazon EventBridge, AWS Lambda, and Amazon SNS
  • The step-by-step process of deploying the solution using AWS CDK
  • Practical examples of monitoring critical events like project creation and asset publishing
  • How to integrate AWS Lambda permissions with SageMaker Unified Studio for secure operations
  • Best practices for implementing governance controls through automated notifications

Amazon SageMaker Catalog helps governance teams stay informed of catalog activities in real-time, enabling them to maintain organizational standards as their Data and ML platforms scale. The architecture is flexible and can be extended to integrate with enterprise workflow tools like ServiceNow or to monitor additional event types based on your organization’s needs.

We look forward to hearing how you adapt this solution for your organization’s governance needs. Fork the CDK code from our repository and share your implementation experience in the comments below


About the Authors

Himanshu Sahni

Himanshu Sahni

Himanshu is a Senior Data and AI Architect in AWS Professional Services. Himanshu specializes in building Data and Analytics solutions for enterprise customers using AWS tools and services. He is an expert in AI/ ML and Big Data tools like Spark, AWS Glue and Amazon EMR. Outside of work, Himanshu likes playing chess and tennis.

Rajiv Upadhyay

Rajiv Upadhyay

Rajiv is a Data Architect at AWS, specialized in building Data and Analytics solutions for enterprise customers using AWS tools and services. He guides organizations through their digital transformation journey, with expertise in data lakes, data governance, and AI/ML solutions.

Jitesh Kumar

Jitesh Kumar

Jitesh is a Senior Customer Solutions Manager at Amazon Web Services (AWS), where he helps organizations realize the full potential of cloud technologies. Passionate about driving digital innovation, Jitesh combines deep technical knowledge with a customer-first mindset to guide enterprises through their cloud transformation journeys and deliver measurable business outcomes.

Breaking down data silos: Volkswagen’s approach with Amazon DataZone

Post Syndicated from Bandana Das original https://aws.amazon.com/blogs/big-data/breaking-down-data-silos-volkswagens-approach-with-amazon-datazone/

Over the years, organizations have invested in building purpose-built cloud-based data warehouses that are siloed from one another. One of the major challenges these organizations encounter today is enabling cross-organization discovery and access to data across these siloed data warehouses built using different technology stacks. The data mesh pattern addresses these issues, founded in four principles: domain-oriented decentralized data ownership and architecture, treating data as a product, providing self-serve data infrastructure as a platform, and implementing federated governance. The data mesh pattern helps organizations mimic their organizational structure into data domains and makes it possible to share the data across the organization and beyond to improve their business models.

In 2019, Volkswagen AG and Amazon Web Services (AWS) started their collaboration to co-develop the Digital Production Platform (DPP), with the goal of enhancing production and logistics efficiency by 30% while reducing production costs by the same margin. The DPP was developed to streamline access to data from shop floor devices and manufacturing systems by handling integrations and providing a range of standardized interfaces. However, as applications and use cases evolved on the platform, a significant challenge emerged: the ability to share data across applications stored in isolated data warehouses (within Amazon Redshift in isolated AWS accounts designated for specific use cases), without the need to consolidate data into a central data warehouse. Another challenge was discovering all the available data stored across multiple data warehouses and facilitating a workflow to request access to data across business domains within each plant. The common method used was largely manual, relying on emails and general communication (through tickets and emails). The manual approach not only increased the overhead but also varied from one use case to another in terms of data governance.

In this post, we introduce Amazon DataZone and explore how Volkswagen used Amazon DataZone to build their data mesh, tackle the challenges encountered, and break the data silos. A key aspect of the solution was enabling data providers to automatically publish their data products to Amazon DataZone, serving as a central data mesh for enhanced data discoverability. Additionally, we provide code to guide you through the deployment and implementation process.

Introduction to Amazon DataZone

Amazon DataZone is a data management service that makes it faster and straightforward to catalog, discover, share, and govern data stored across AWS, on-premises, and third-party sources. Key features of Amazon DataZone include the business data catalog, with which users can search for published data, request access, and start working on data in days instead of weeks. In addition, the service facilitates collaboration across teams and helps them manage and monitor data assets across different organizational units. The service also includes the Amazon DataZone portal, which offers a personalized analytics experience for data assets through a web-based application or API. Lastly, Amazon DataZone offers governed data sharing, which makes sure the right data is accessed by the right user for the right purpose with a governed workflow.

Solution overview

The following architecture diagram represents a high-level design that is built on top of the data mesh pattern. It separates source systems, data domain producers (data publishers), data domain subscribers (data consumers), and central governance to highlight the key aspects. This data mesh architecture is specially tailored for cross-AWS account usage. The objective of this approach is to create a foundation for building data governance on a scale, supporting the objectives of data producers and consumers with strong and consistent governance.

This architecture allows for the integration of multiple data warehouses into a centralized governance account that stores all the metadata from each environment.

A data domain producer uses Amazon Redshift as their analytical data warehouse to store, process, and manage structured and semi-structured data. The data domain producers load data into their respective Amazon Redshift clusters through extract, transform, and load (ETL) pipelines they manage, own, and operate. The producers maintain control over their data through Amazon Redshift security features, including column-level access controls and dynamic data masking, supporting data governance at the source. A data domain producer uses Amazon Redshift ETL and Amazon Redshift Spectrum to process and transform raw data into consumable data products. The data products could be Amazon Redshift tables, views, or materialized views.

Data domain producers expose datasets to the rest of the organization by registering them to Amazon DataZone service, which acts as a central data catalog. They can choose what data assets to share, for how long, and how consumers can interact with these. They’re also responsible for maintaining the data and making sure it’s accurate and current.

The data assets from the producers are then published using the data source run to Amazon DataZone in the central governance account. This process populates the technical metadata into the business data catalog for each data asset. The business metadata can be added by business users (data analysts) to provide business context, tags, and data classification for the datasets. This approach provides the required features to allow producers to create catalog entries with Amazon Redshift from all their data warehouses built in with Redshift clusters. In addition, the central data governance account is used to share datasets securely between producers and consumers. It’s important to note that sharing is done through metadata linking alone. No data (except logs) exists in the governance account. The data isn’t copied to the central account; just a reference to the data is used, so that the data ownership remains with the producer.

Amazon DataZone provides a streamlined way to search for data. The Amazon DataZone data portal provides a personalized view for users to discover and search data assets. An Amazon DataZone user (consumer) with permissions to access the data portal can search for assets and submit requests for subscription of data assets using a web-based application. An approver can then approve or reject the subscription request.

When a data domain consumer has access to an asset in the catalog, they can consume it (query and analyze) using the Amazon Redshift query editor. Each consumer runs their own workload based on their use case. In this way, the team can choose the tools for the job to perform analytics and machine learning activities in its AWS consumer environment.

Publishing and registering data assets to Amazon DataZone

To publish a data asset from the producer account, each asset must be registered in Amazon DataZone for consumer subscription. For more information, refer to Create and run an Amazon DataZone data source for Amazon Redshift. In the absence of an automated registration process, required tasks must be completed manually for each data asset.

Using the automated registration workflow, the manual steps can be automated for the Amazon Redshift data asset (Redshift table or view) that needs to be published in an Amazon DataZone domain or when there’s a schema change in an already published data asset.

The following architecture diagram represents how data assets from Amazon Redshift data warehouses have been automatically published to the data mesh created with Amazon DataZone.

The process consists of the following steps:

  1. In the producer account (Account B), the data to be shared resides in a Redshift cluster.
  2. The producer account (Account B) uses a mechanism to trigger the dataset registration AWS Lambda function with a specific payload containing the information and name of the database, schema, table, or view that has a change in metadata.
  3. The Lambda function performs the steps to automatically register and publish the dataset in Amazon DataZone:
    1. Get the Amazon Redshift clusterName, dbName, schemas, and tables from the JSON payload, which is used as the event to trigger the Lambda function.
    2. Get the Amazon DataZone data warehouse blueprint ID.
    3. Enable the blueprint in the data producer account.
    4. Identify the Amazon DataZone Domain ID and project ID for the producer via assuming role in Amazon DataZone account (Account A).
    5. Check if an environment already exists in the project. If not, create an environment.
    6. Create a new Redshift data source by providing the correct Redshift database information in the newly created environment.
    7. Initiate a data source run request in the data source to make the Redshift tables or views available in Amazon DataZone.
    8. Publish the tables or views in the Amazon DataZone catalog.

Prerequisites

The following prerequisites are required before starting:

  • Two AWS accounts to implement the solution have been described in this post. However, you can also use Amazon DataZone to publish data within a single account or across multiple accounts.
    • Amazon DataZone account (Account A) – This is the central data governance account, which will have the Amazon DataZone domain and project.
    • Data domain producer account (Account B) – This account acts as the data domain producer. It has been added as an associated account to Account A.

Prerequisites in data domain producer account (Account B)

As part of this post, we want to publish assets and subscribe to assets from a Redshift cluster that already exists. Complete the following prerequisite steps to set up Account B:

  1. Set up the Redshift cluster, including database, schema, tables, and views (optional). The node type must be from the RA3 family. For more information, see Amazon Redshift provisioned clusters.

    Create a superuser in Amazon Redshift for Amazon DataZone. For the Redshift cluster, the database user you provide in AWS Secrets Manager must have superuser permissions. For reference please see the note section in this QuickStart guide with sample Amazon Redshift data

  2. Store the user’s credentials in Secrets Manager. Select the credential type, enter the credential values, and choose the AWS Key Management Service (AWS KMS) key with which to encrypt the secret.
  3. Add the tags to the Secret Manager secret to allow Amazon DataZone to find this secret and limit the access to a particular Amazon DataZone domain and Amazon DataZone project. The Redshift cluster Amazon Resource Name (ARN) must be added as a tag so it can be used by Amazon Redshift as a valid credential. For reference please see the note section in this QuickStart guide with sample Amazon Redshift data
  4. Add an Amazon DataZone provisioning IAM role and Amazon Redshift manage access IAM role in the secret’s resource policy. The AWS Identity and Access Management (IAM) roles are created as part of the AWS Cloud Development Kit (AWS CDK) deployment (discussed later in this post). The following code shows an example of the Secrets Manager secret’s resource policy. Store the secret ARN in an AWS Systems Manager parameter.
    {
      "Version" : "2012-10-17",
      "Statement" : [ {
        "Effect" : "Allow",
        "Principal" : "*",
        "Action" : "secretsmanager:GetSecretValue",
        "Resource" : "*",
        "Condition" : {
          "ArnEquals" : {
            "aws:PrincipalArn" : [ 
              "arn:aws:iam::<<Data_Producer_Acct_Id(Account B)>>:role/DzRedshiftAccess-<<AWS_Region>>-<< Amazon_DataZone _Domain_Name>>",
              "arn:aws:iam::<<Data_Producer_Acct_Id(Account B)>>:role/DataZoneProvisioning-<< Amazon_DataZone_Account_id(Account A)>>"
            ]
          }
        }
      } ]
    }

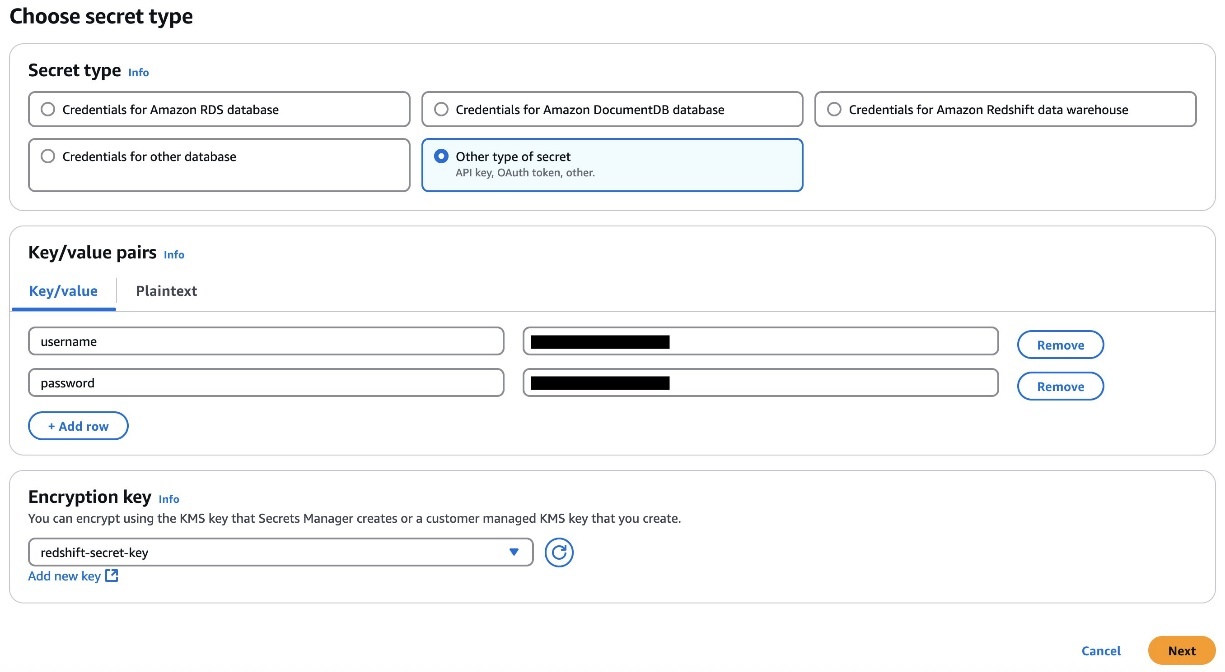
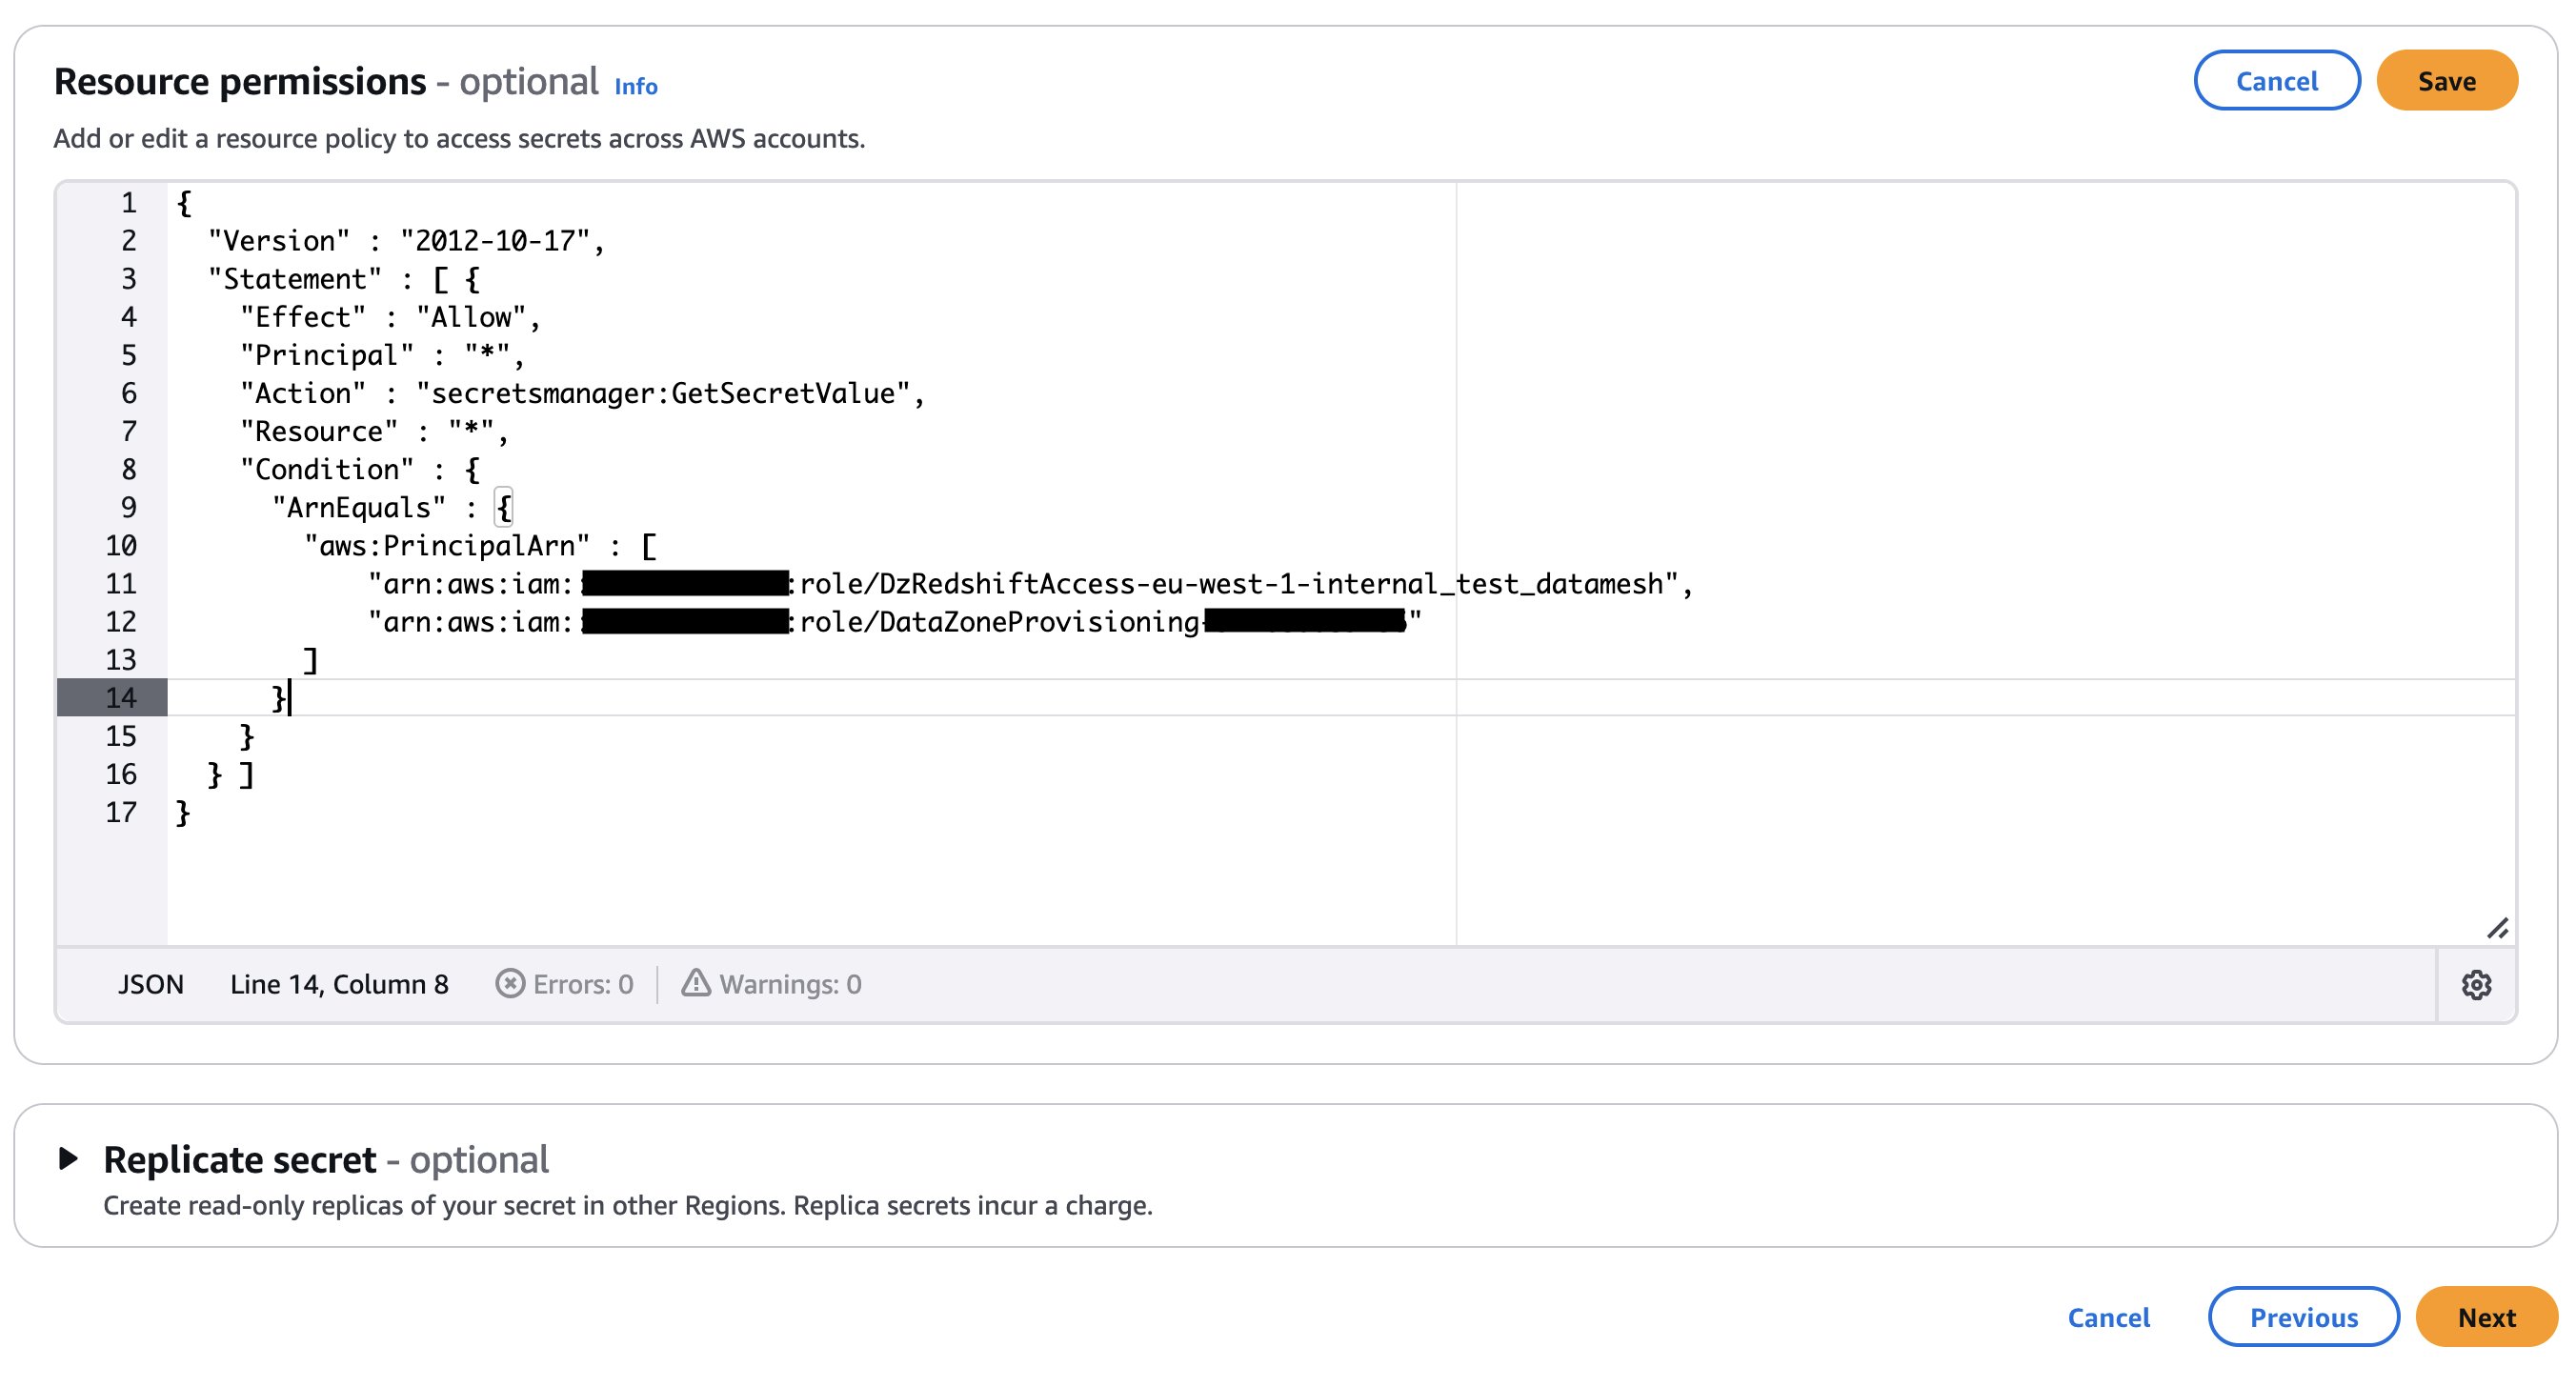
    If your secret is encrypted with a custom KMS key, append the key policy with the following statement and add a tag to the key: AmazonDatazoneEnvironment = All. You can skip this step if you’re using an AWS managed KMS key.

    {
        "Effect": "Allow",
        "Principal": {
            "Service": "logs.<<AWS_Region>>.amazonaws.com",
            "AWS": "arn:aws:iam::<<Data_Producer_Acct_Id(Account B)>>:root"
        },
        "Action": [
            "kms:Decrypt",
            "kms:Encrypt",
            "kms:GenerateDataKey*",
            "kms:ReEncrypt*"
        ],
        "Resource": "*"
     },
     {
        "Sid": "AllowDatazoneRoles-DEV",
        "Effect": "Allow",
        "Principal": {
            "AWS": "*"
        },
        "Action": [
            "kms:Decrypt",
            "kms:Describe*",
            "kms:Get*",
            "kms:Encrypt",
            "kms:GenerateDataKey",
            "kms:ReEncrypt*",
            "kms:CreateGrant"
        ],
        "Resource": "*",
        "Condition": {
            "StringLike": {
                "aws:PrincipalArn": [
                    "arn:aws:iam::<<Data_Producer_Acct_Id(Account B)>>:role/aws-service-role/redshift.amazonaws.com/AWSServiceRoleForRedshift",
                    "arn:aws:iam::<<Data_Producer_Acct_Id(Account B)>>:role/datazone_*",
                    "arn:aws:iam::<<Data_Producer_Acct_Id(Account B)>>:role/<<Redshift_Cluster_IAM_Role>>",
                    "arn:aws:iam::<<Data_Producer_Acct_Id(Account B)>>:role/service-role/AmazonDataZoneRedshiftAccess-<<AWS_Region>>-*"
                ]
             }
         }
     } 

  5. Place a mechanism to generate the following payload to trigger the dataset registration Lambda function. The payload must contain the relevant Redshift database, schema, and table or view that you want to publish in the Amazon DataZone domain. The following example code assumes you have three databases in your Redshift cluster and within those databases you have different schemas, tables, and views. You should adjust the payload based on your use case.
    {
        "source": "redshift-user-initiated",
        "detail-type": "Amazon Redshift dataset registration in Amazon DataZone",
        "datasets": [
            {
                "clusterName": "<<YOUR_REDSHIFT_CLUSTER_NAME>>",
                "dbName":"<<YOUR_REDSHIFT_DATABASE_NAME_1>>",
                "schemas": [
                    {
                        "schemaName":"<<YOUR_REDSHIFT_SCHEMA_NAME>>",
                        "addAllTables":false,
                        "addAllViews":false,
                        "tables":[
                            "<<YOUR_REDSHIFT_TABLE_NAME>>",
                            "<<YOUR_REDSHIFT_TABLE_NAME>>"
                        ],
                        "views":[
                            "<<YOUR_REDSHIFT_VIEW_NAME>>"
                        ]
                    }
                ]
            },
            {
                "clusterName": "<<YOUR_REDSHIFT_CLUSTER_NAME>>",
                "dbName":"<<YOUR_REDSHIFT_DATABASE_NAME_2>>",
                "schemas": [
                    {
                        "schemaName":"<<YOUR_REDSHIFT_SCHEMA_NAME>>",
                        "addAllTables":true,
                        "addAllViews":true,
                        "tables":[],
                        "views":[]
                    }
                ]
            },
            {
                "clusterName": "<<YOUR_REDSHIFT_CLUSTER_NAME>>",
                "dbName":"<<YOUR_REDSHIFT_DATABASE_NAME_3>>",
                "schemas": [
                    {
                        "schemaName":"<<YOUR_REDSHIFT_SCHEMA_NAME>>",
                        "addAllTables":true,
                        "addAllViews":false,
                        "tables":[],
                        "views":[
                            "<<YOUR_REDSHIFT_VIEW_NAME>>"
                        ]
                    }
                ]
            }
        ]
    }

Prerequisites in Amazon DataZone account (Account A)

Complete the following steps to set up your Amazon DataZone account (Account A):

  1. Sign in to Account A and make sure you have already deployed an Amazon DataZone domain and a project within that domain. Refer to Create Amazon DataZone domains for instructions to create a domain.
  2. If your Amazon DataZone domain is encrypted with a KMS key, add the data domain account (Account B) to the KMS key policy with the following actions:
    "Action": [
        "kms:Encrypt",
        "kms:Decrypt",
        "kms:ReEncrypt*",
        "kms:GenerateDataKey*",
        "kms:DescribeKey"
    ]

  3. Create an IAM role that is assumable by Account B and make sure the role has a following policy attached and is a member (as contributor) of your Amazon DataZone project. For this post, we call the role dz-assumable-env-dataset-registration-role. By adding this role, you can successfully run the registration Lambda function.
    1. In the following policy, provide the AWS Region and account ID corresponding to where your Amazon DataZone domain is created, and the KMS key ARN used to encrypt the domain:
        {
          "Version": "2012-10-17",
          "Statement": [
              {
                  "Action": [
                      "datazone:CreateDataSource",
                      "datazone:CreateEnvironment",
                      "datazone:CreateEnvironmentProfile",
                      "datazone:GetDataSource",
                      "datazone:GetDataSourceRun",
                      "datazone:GetEnvironment",
                      "datazone:GetEnvironmentProfile",
                      "datazone:GetIamPortalLoginUrl",
                      "datazone:ListDataSources",
                      "datazone:ListDomains",
                      "datazone:ListEnvironmentProfiles",
                      "datazone:ListEnvironments",
                      "datazone:ListProjectMemberships",
                      "datazone:ListProjects",
                      "datazone:StartDataSourceRun",
                      "datazone:UpdateDataSource",
                      "datazone:SearchUserProfiles"
                  ],
                  "Resource": "*",
                  "Effect": "Allow"
              },
              {
                  "Action": [
                      "kms:Decrypt",
                      "kms:DescribeKey",
                      "kms:GenerateDataKey"
                  ],
                  "Resource": "arn:aws:kms:<<account_region>>:<<Datazone_Account_id(Account A)>>
      
      
      }:key/${DataZonekmsKey}",
                  "Effect": "Allow"
              }
          ]
      }

    2. Add Account B in the trust relationship of this role with the following trust relationship:
      {
          "Version": "2012-10-17",
          "Statement": [
              {
                  "Effect": "Allow",
                  "Principal": {
                      "AWS": [
                          "arn:aws:iam::<<Data_Producer_Acct_Id(Account B)>>:root",
                          "arn:aws:iam::<<Datazone_Account_id(Account A)>>:root",
                      ]
                  },
                  "Action": "sts:AssumeRole"
              }
          ]
      }

    3. Add the role as a member of the Amazon DataZone project in which you want to register your data sources. For more information, see Add members to a project.

Additional tools

The following tools are needed to deploy the solution using the AWS CDK:

Deploy the solution

After you complete the prerequisites, use the AWS CDK stack provided on the GitHub repo to deploy the solution for automatic registration of data assets into the Amazon DataZone domain. Complete the following steps:

  1. Clone the repository from GitHub to your preferred integrated development environment (IDE) using the following commands:
    git clone https://github.com/aws-samples/sample-how-to-automate-amazon-redshift-cluster-data-asset-publish-to-amazon-datazone

    $ cd sample-how-to-automate-amazon-redshift-cluster-data-asset-publish-to-amazon-datazone

  2. At the base of the repository folder, run the following commands to build and deploy resources to AWS:
    $ npm install

    $ npm run lint

  3. Sign in to Account B (the data domain producer account) using the AWS CLI with your profile name.
  4. Make sure you have configured the Region in your credential’s configuration file.
  5. Bootstrap the AWS CDK environment with the following commands at the base of the repository folder. Provide the profile name of your deployment account (Account B). Bootstrapping is a one-time activity and is not needed if your AWS account is already bootstrapped.
    $ export AWS_PROFILE=<<PROFILE_NAME>>

    $ npm run cdk bootstrap

  6. Replace the placeholder parameters (marked with the suffix _PLACEHOLDER) in the file config/DataZoneConfig.ts:
    1. Amazon DataZone domain and project name of your Amazon DataZone instance. Make sure all names are in lowercase.
    2. The AWS account ID of the Amazon DataZone account (Account A).
    3. The assumable IAM role from the prerequisites.
    4. The AWS Systems Manager parameter name containing the Secrets Manager secret ARN of the Amazon Redshift credentials.

  7. Use the following command in the base folder to deploy the AWS CDK solution. During deployment, enter y if you want to deploy the changes for some stacks when you see the prompt Do you wish to deploy these changes (y/n)?
    npm run cdk deploy --all

  8. After the deployment is complete, sign in to Account B and open the AWS CloudFormation console to verify that the infrastructure was deployed.

Test automatic data registration to Amazon DataZone

Complete the following steps to test the solution:

  1. Sign in to Account B (producer account).
  2. On the Lambda console, open the datazone-redshift-dataset-registration function.
  3. Under TEST EVENTS, choose Create new test event.
  4. For Event name, enter Redshift, and for Event JSON, enter the following JSON structure (change the cluster, schema, database, and table names according to your environment):
    {
      "source": "redshift-user-initiated",
      "detail-type": "Amazon Redshift dataset registration in Amazon DataZone",
      "datasets": [
        {
          "clusterName": "YOUR_REDSHIFT_CLUSTER_NAME",
          "dbName": "DATABASE_NAME",
          "schemas": [
            {
              "schemaName": "SCHEMA_NAME_1",
              "addAllTables": false,
              "addAllViews": false,
              "tables": [
                "TABLE_NAME"
              ],
              "views": []
            },
            {
              "schemaName": "SCHEMA_NAME_2",
              "addAllTables": false,
              "addAllViews": false,
              "tables": [],
              "views": [
                "VIEW_NAME"
              ]
            }
          ]
        }
      ]
    }

  5. Choose Save.
  6. Choose Invoke.
  7. Open the Amazon DataZone console in Account A where you deployed the resources.
  8. Choose Domains in the navigation pane, then open your domain.
  9. On the domain details page, locate the Amazon DataZone data portal URL in the Summary section. Choose the link to the data portal.

    For more details about accessing Amazon DataZone, refer to How can I access Amazon DataZone?

  10. In the data portal, open your project and choose the Data tab.
  11. In the navigation pane, choose Data sources and find the newly created data source for Amazon Redshift.
  12. Verify that the data source has been successfully published.

After the data sources are published, users can discover the published data and submit a subscription request. The data producer can approve or reject requests. Upon approval, users can consume the data by querying the data in the Amazon Redshift query editor. The following screenshot illustrates data discovery in the Amazon DataZone data portal.

Clean up

Complete the following steps to clean up the resources deployed through the AWS CDK:

  1. Sign in to Account B, go to the Amazon DataZone domain portal, and check there is no subscription for your published data asset. If there is a subscription, either ask the subscriber to unsubscribe or revoke the subscription request.
  2. Delete the published data assets that were created in the Amazon DataZone project by the dataset registration Lambda function.
  3. Delete the remaining resources created using the following command in the base folder:
    npm run cdk destroy –all

Conclusion

Amazon DataZone offers a seamless integration with AWS services, providing a powerful solution for organizations like Volkswagen to break down their data silos and implement effective data mesh architectures through a straightforward implementation highlighted in this post. By using Amazon DataZone, Volkswagen addressed its immediate data sharing hurdles and laid the groundwork for a more agile, data-driven future in automotive manufacturing. The automated data publishing from various warehouses, coupled with standardized governance workflows, has significantly reduced the manual overhead that once slowed down Volkswagen’s data engineering teams. Now, instead of navigating a labyrinth of emails, tickets, and communication, Volkswagen’s data engineers and data scientists can quickly discover and access the data they need, all while maintaining their security and compliance standards.

By using Amazon DataZone, organizations can bring their isolated data together in ways that make it simpler for teams to collaborate while maintaining security and compliance at scale. This approach not only addresses current data governance challenges but also creates a highly scalable foundation for future data-driven innovations. For guidance on establishing your organization’s data mesh with Amazon DataZone, contact your AWS team today.


About the Authors

Bandana Das

Bandana Das

Bandana is a Senior Data Architect in AWS and specializes in data and analytics. She builds event-driven data architectures to support customers in data management and data-driven decision-making. She is also passionate about helping customers on their data management journey to the cloud.

Anirban Saha

Anirban Saha

Anirban is a DevOps Architect at AWS, specializing in architecting and implementation of solutions for customer challenges in the automotive domain. He is passionate about well-architected infrastructures, automation, data-driven solutions, and helping make the customer’s cloud journey as seamless as possible. In his spare time, he likes to keep himself engaged with reading, painting, language learning, and traveling.

Stoyan Stoyanov

Stoyan Stoyanov

Stoyan works for AWS as a DevOps Engineer. He has more than 10 years of experience in software engineering, cloud technologies, DevOps, data engineering, and security.

Sindi Cali

Sindi Cali

Sindi is a ProServe Associate Consultant with AWS Professional Services. She supports customers in building data-driven applications in AWS.

Use the Amazon DataZone upgrade domain to Amazon SageMaker and expand to new SQL analytics, data processing, and AI uses cases

Post Syndicated from David Victoria original https://aws.amazon.com/blogs/big-data/use-the-amazon-datazone-upgrade-domain-to-amazon-sagemaker-and-expand-to-new-sql-analytics-data-processing-and-ai-uses-cases/

Amazon DataZone and Amazon SageMaker announced a new feature that allows an Amazon DataZone domain to be upgraded to the next generation of SageMaker, making the investment customers put into developing Amazon DataZone transferable to SageMaker. All content created and curated through Amazon DataZone such as assets, metadata forms, glossaries, subscriptions, and so on are available to users through Amazon SageMaker Unified Studio after the upgrade.

As an Amazon DataZone administrator, you can choose which of your domains to upgrade to SageMaker through a user interface driven experience. You can use the upgraded domain to use your existing Amazon DataZone implementation in the new SageMaker environment and expand to new SQL analytics, data processing and AI uses cases. Additionally, after the upgrade, both Amazon DataZone and SageMaker portals remain accessible. This provides administrators flexibility with user rollout of SageMaker while providing business continuity for users operating within Amazon DataZone. By upgrading to SageMaker, users can build on their investment from Amazon DataZone by using the SageMaker unified platform, which serves as a central hub for all data, analytics, and AI needs.

SageMaker delivers an integrated experience for analytics and AI with unified access to all your data. Collaborate and build faster from a unified studio using familiar Amazon Web Services (AWS) tools for model development, generative AI, data processing, and SQL analytics, accelerated by Amazon Q Developer, the most capable generative AI assistant for software development. Access all your data whether it’s stored in data lakes, data warehouses, or third-party or federated data sources, with governance built in to meet enterprise security needs.

What we hear from customers

Customers have successfully used Amazon DataZone, enabling data analysts, data engineers, and machine learning teams to collaborate around a shared data catalog. With generative AI moving to center stage, these organizations now aim to address a wider range of use cases, from interactive notebook exploration to prompt engineering for generative-AI projects. Upgrading their Amazon DataZone domains to SageMaker Unified Studio brings everyone together in one place. Data analysts, data engineers, machine learning (ML) specialists, and AI innovators can create integrated solutions on the same governed data while using the tools that best match their work. For example, one of our customers, HEMA, uses Amazon DataZone as a single solution for cataloging, discovery, sharing, and governance of their enterprise data across business domains. They are moving to SageMaker to enable more machine learning and generative AI use cases.

“The launch of the domain upgrade feature allows us to take the investment from our production Amazon DataZone deployment and utilize it in Amazon SageMaker. Organizationally, we are doing more in the generative AI space and with Amazon SageMaker we can accomplish new use cases that leverage the assets curated through Amazon DataZone. With this feature we also love that both portals remain open at the same time so that we can thoughtfully transition user populations to Amazon SageMaker.”

– Tommaso Paracciani, Head of Data & Cloud Platforms at HEMA.

“We’ve invested a lot in building our data management platform for production and logistics, using Amazon DataZone, to accelerate our digital transformation. Evolving our data management solution to use Amazon SageMaker Unified Studio means Data Analysis, Data Engineering, Machine Learning & Generative AI features can now be done from the same place. With the domain upgrade feature, it allows us to onboard to Amazon SageMaker faster by utilizing the work done from Amazon DataZone“

– Volkswagen AG

Upgrade your Amazon DataZone domain to SageMaker Unified Studio

  1. On your Amazon DataZone domain home page, a banner appears at the top announcing the new domain upgrade feature. Choose Get started on this banner to open the upgrade wizard.

  1. A summary page explains the actions the upgrade wizard will perform and what to expect while it runs. Read the information carefully, then choose Start to begin the upgrade.

  1. On the configuration screen, specify the AWS Identity and Access Management (IAM) roles and ownership for your new SageMaker Unified Studio domain:
    1. Domain execution role – The runtime role the domain assumes for SageMaker operations.
    2. Domain service role – Authorizes the service to create and manage domain resources.
    3. Root domain owner (optional) – Designates the administrators of the upgraded root domain. IAM roles cannot sign in to the SageMaker Unified Studio UI. It is helpful to have a root domain owner who can sign in to the UI to modify authorization policies for the root domain.

After selecting the appropriate roles—and, if applicable, a root owner—choose Upgrade domain to launch the upgrade.

  1. When the upgrade finishes, a confirmation banner appears at the top of the domain detail page with two items:
    1. The Amazon DataZone portal URL
    2. The Manage Amazon DataZone upgrade button. Here you can see the Amazon DataZone URL, information about the upgrade, and an option to roll back the upgrade to Amazon DataZone.

  1. Scroll to the Users section of the SageMaker Unified Studio console. All identities that belonged to your original Amazon DataZone domain—along with the root domain owner you assigned in Step 3—now appear in the new domain automatically. No additional setup is required.

  1. Use the URL provided in Step 4 to open SageMaker Unified Studio, then sign in with your existing credentials. You’ll land on the SageMaker Unified Studio home page, confirming that you’re now working in your upgraded domain.

  1. In the Projects list, choose a project that existed in your original Amazon DataZone domain and that the current user can access. Select its name to open it and confirm that every asset and permission transferred correctly to SageMaker Unified Studio.

  1. Inside the project, you can view two key areas:
    • Project Environments – Verify that every environment linked to the project has been migrated.
    • Overview – Confirm the project’s general information, including owner, description, and status.

Checking both sections helps ensure that the project moved to SageMaker Unified Studio as expected.

Conclusion

In this post, we discussed the new capability in Amazon DataZone that allows a domain to be upgraded to the next generation of Amazon SageMaker. The investment customers put into developing Amazon DataZone is now transferable to SageMaker. All content created and curated through Amazon DataZone such as assets, metadata forms, glossaries, subscriptions, and so on are available to users through SageMaker Unified Studio after the upgrade. By upgrading to SageMaker, customers build on their investment from Amazon DataZone by using the SageMaker unified platform.

To learn more, visit the domain upgrade documentation.


About the authors

David Victoria is a Senior Technical Product Manager with Amazon SageMaker at AWS. He focuses on improving administration and governance capabilities needed for customers to support their analytics systems. He is passionate about helping customers realize the most value from their data in a secure, governed manner.

Leonardo David Gomez Virahonda is a Principal Analytics Specialist Solutions Architect at AWS, with a strong focus on data governance. He helps organizations across industries implement effective governance strategies using AWS services like Amazon DataZone, AWS Glue, Lake Formation, and SageMaker Catalog. Leonardo’s work spans metadata management, data lineage, access control, and compliance—empowering customers to make their data secure, discoverable, and ready for analytics and AI. He regularly shares best practices through technical blogs, enablement content, and sessions at AWS events like re:Invent and regional Summits.

Automate data lineage in Amazon SageMaker using AWS Glue Crawlers supported data sources

Post Syndicated from Mohit Dawar original https://aws.amazon.com/blogs/big-data/automate-data-lineage-in-amazon-sagemaker-using-aws-glue-crawlers-supported-data-sources/

The next generation of Amazon SageMaker is the center for all your data, analytics, and AI. Bringing together widely adopted Amazon Web Services (AWS) machine learning (ML) and analytics capabilities, it delivers an integrated experience for analytics and AI with unified access to all your data. From Amazon SageMaker Unified Studio, a single data and AI development environment, you can access your data and use a suite of powerful tools for data processing, SQL analytics, model development, training and inference, and generative AI development.

With data lineage, now part of Amazon SageMaker Catalog, you can centralize lineage metadata of your data assets in a single place. You can track the flow of data over time, determining a clear understanding of where it originated, how it has changed, and its usage across the business. By providing this level of transparency, data lineage helps data consumers gain trust that the data is correct and compliant for their use cases. With data lineage captured at the table, column, and job level, data producers can conduct impact analysis of changes in their data pipelines and respond to data issues when needed, for example, when a column in the resulting dataset is missing the quality required by the business.

Data lineage is a powerful tool that can transform how organizations understand and manage their data flows. In this post, we explore its real-world impact through the lens of an ecommerce company striving to boost their bottom line.

To illustrate this practical application, we walk you through how you can use the prebuilt integration between SageMaker Catalog and AWS Glue crawlers to automatically capture lineage for data assets stored in Amazon Simple Storage Service (Amazon S3) and Amazon DynamoDB. Using this workflow, you can capture lineage automatically from additional data sources using AWS Glue crawlers. Refer to the Data lineage support matrix in the SageMaker Unified Studio User Guide for supported sources. We also use SageMaker Unified Studio to navigate these data assets and learn about their origin, transformations, and dependencies, thanks to the lineage metadata captured using the AWS Glue crawlers.

Key features of the SageMaker Catalog lineage graph

In SageMaker Unified Studio, you can explore and discover data assets of your organization suited for your use case. As you dive into these data assets, you can learn more about its business context, schema, quality, and lineage. When you decide to work with a subset of these assets, you can subscribe to them in a self-service fashion and start working with them. For more detail, visit Data discovery, subscription, and consumption in the SageMaker Unified Studio User Guide.

SageMaker Studio provides a visual lineage graph that shows how a data asset has evolved from its source through transformations to its final state. This helps data scientists, engineers, and analysts answer key questions such as:

  • Where did this data come from?
  • What transformations has it gone through?
  • Which downstream assets will be impacted by a change?

With this level of visibility, teams can perform faster impact analysis, find the root cause of data quality issues, and ensure models are built on trusted data. It also supports better collaboration so users can confidently use and share data across the organization. The following screenshot shows how SageMaker Unified Studio visualizes data lineage, making it straightforward to trace data flow and understand dependencies.

  • Column-level lineage – You can expand column-level lineage when available in dataset nodes. This automatically shows relationships with upstream or downstream dataset nodes if source column information is available.
  • Column search – If the dataset has more than 10 columns, the node presents pagination to navigate to columns not initially presented. To quickly view a particular column, you can search on the dataset node that lists only the searched column.
  • Details pane – Each lineage node captures and displays the following details:
    • Every dataset node has three tabs: LINEAGE, SCHEMA, and HISTORY. The HISTORY tab lists the different versions of lineage event captured for that node.
    • The job node has a details pane to display job details with the tabs Job info and History. The details pane also captures queries or expressions run as part of the job.
  • View dataset nodes only – If you want to filter out the job nodes, you can choose the open view control icon in the graph viewer and toggle the display dataset nodes only, which will remove all the job nodes from the graph and let you navigate only the dataset nodes.
  • Version tabs – All lineage nodes in Amazon DataZone data lineage will have versioning, captured as history, based on lineage events captured. You can view lineage at a selected timestamp that opens a new tab on the lineage page to help compare or contrast between the different timestamps.

You can try some of these features as you explore the data assets of this post. To learn more on data lineage in SageMaker, we encourage you to dive deep into the Data lineage in Amazon SageMaker Unified Studio.

Solution overview

Imagine a scenario where an ecommerce company aims to optimize conversion rates and enhance customer experience by gaining deeper insights into the customer journey. They need to connect the dots between user interactions and actual purchases, but with data scattered across multiple sources, where do they begin? This is where data lineage becomes invaluable. To perform their analysis, they need data from two primary sources:

  • Clickstream data stored in Amazon S3 (in JSON or Parquet format)
  • Transactional order data stored as items in Amazon DynamoDB

To make these datasets discoverable across the business, you need to:

  1. Create a project in SageMaker Unified Studio that will be used to source and manage the datasets
  2. Enable data lineage capture in the SageMaker Unified Studio project
  3. Set up the resources for this use case, which includes an AWS Glue data source (set up in SageMaker Unified Studio) and AWS Glue crawler (set up in AWS Glue)
  4. Run the AWS Glue crawler to catalog the datasets in AWS Glue Data Catalog
  5. Source the metadata of the data assets into the SageMaker Catalog by running the data source
  6. Use SageMaker Unified Studio to navigate through the lineage of the data assets and visualize their origin
  7. Understand how schema evolution is captured in the data asset’s lineage

Prerequisites

To complete the steps on this post, you need an SageMaker Unified Studio domain already deployed in your AWS account. To get started quickly in a testing environment, we suggest creating your SageMaker domain using the quick setup option as explained in Create an Amazon SageMaker Unified Studio domain – quick setup.

Solution steps

To capture data lineage for AWS Glue tables managed with AWS Glue crawlers using SageMaker Unified Studio, complete the steps in the following sections.

Set up a SageMaker project with SQL capability

In SageMaker Unified Studio, a project profile defines an uber template for projects in your Amazon SageMaker unified domain. By setting up a project with the right tooling (project profile), you will provision resources you can use to work with data, which might include cataloging it in SageMaker, transforming it into new data assets, analyzing it to drive business value, or even use it for ML or AI applications.

To demonstrate data lineage effectively, we use SageMaker SQL analytics project profile for a streamlined setup. Although this profile offers comprehensive data analytics capabilities, we focus specifically on two key components:

  • AWS Glue database – A lakehouse for storing and managing technical metadata
  • Data source job – Automatically collects and tracks metadata into SageMaker Catalog

We’ve chosen this profile to bypass complex manual configurations so we can focus on the core concepts of data lineage.

To create a new project in your SageMaker domain using the SQL analytics project profile, follow the steps detailed in SQL analytics project profile. Keep all default configurations when creating the project.

After creating your project in SageMaker Studio, you’ll unlock powerful data lineage capabilities that make tracking and understanding your data flows intuitive. Through the data sourcing feature, you can easily monitor how data moves from source to the AWS Glue database. This visibility becomes particularly valuable when debugging data issues—you can quickly trace data back to its source, understand how changes impact downstream processes, and identify affected analyses or reports. Next, populate the AWS Glue database with sample data to observe these features in action and demonstrate how they can streamline your data operations.

For further guidance on how to access the details of the new SageMaker project, refer to Get project details. After you access the data source details, in the Database name field, take note of the AWS Glue database name associated to the SageMaker project.

Enable data lineage capture in the SageMaker project’s data source

To enable lineage capture, follow these steps:

  1. Expand the Actions menu, then choose Edit data source.
  2. Go to the connections and select Import data lineage to configure lineage capture from the source, as shown in the following screenshot.
  3. Make other changes to the data source fields as desired, then choose Save.

Enabling lineage will make sure the data source job will capture lineage in the next run.

Deploy resources for the use case

Follow these steps:

  1. To deploy the resources required for this post, download the AWS CloudFormation template amazon-datazone-examples in the AWS Samples GitHub repository. Deploy it in your AWS account.

For further guidance on how to deploy a CloudFormation stack, refer to Create a stack from the CloudFormation console. You need to provide a Stack name and the name of the AWS GlueDatabaseName associated to the project of your SageMaker domain, as shown in the following screenshot.

  1. Choose Next.

The template will deploy the following resources:

  • A S3 bucket with a sample file of clickstream data. The bucket name and location of the file will follow the path pattern s3://ecomm-analytics-<ACCOUNT_ID>-<REGION>/clickstream/<YYYY>/<MM>/<DD>/data.json. The file will contain a sample record with the following structure:
{
    "session_id": "abc123",
    "user_id": "u789",
    "event_type": "product_view",
    "product_id": "prod456",
    "timestamp": "2025-06-04T09:23:12Z"
}
  • A DynamoDB table with a sample item of order data (transactions). The table will be named OrderTransactionTable. The sample item will have the following structure:
{
    "order_id": "ord789",
    "user_id": "u789",
    "product_id": "prod456",
    "order_total": 79.99,
    "order_timestamp": "2025-06-04T09:27:10Z"
}
  • An AWS Glue crawler configured to crawl the S3 bucket and DynamoDB table deployed as part of the stack and store the metadata in the AWS Glue database associated to the SageMaker project. You can access the crawler’s details in the AWS console, as shown in the following screenshot.

Run the AWS Glue crawler

The AWS Glue crawler deployed in the previous step will allow you to capture metadata from the two data sources, Amazon S3 and DynamoDB, and store it in AWS Glue Data Catalog, specifically in the database associated to the SageMaker project. After the metadata is stored, it will be accessible to SageMaker.

Before running the crawler, you need to provide AWS Lake Formation permissions to the IAM role that the AWS Glue crawler will use to interact with your data source and target AWS Glue database. The following command will grant the permissions needed for the crawler to store metadata into the AWS Glue database of the SageMaker project.

To invoke this command, we recommend using AWS CloudShell on the AWS console as explained in AWS CloudShell Concepts. Update the <REGION>, <ACCOUNT_ID> and <GLUE_DATABASE_NAME> placeholders with the right values for your AWS Region, AWS account ID, and name of the AWS Glue database associated to the SageMaker project.

aws lakeformation grant-permissions \
  --region  \
  --principal DataLakePrincipalIdentifier=arn:aws:iam:::role/glue-crawler-role \ 
  --permissions CREATE_TABLE \
  --resource '{ "Database": { "Name": "" } }'
  

Next, run the AWS Glue Crawler on the AWS console. After the crawler successfully finishes, two new tables, clickstream and ordertransactiontable, will be created in the AWS Glue database associated to the SageMaker project. Refer to Viewing crawler results and details to learn more about AWS Glue crawler results.

Source metadata from the AWS Glue database into SageMaker

To source metadata from data assets in the AWS Glue database, including their lineage, into SageMaker, use the data source that was deployed as part of the SageMaker project creation.

  1. To run the data source, go to the data source details page.
  2. Choose Run. (Data sources can be scheduled to run as well, however, for this demonstration we trigger a manual run).

After the data source run is complete, metadata from both data assets in the AWS Glue database will be imported into the SageMaker domain as the project’s inventory assets. You can find the details of the data source run from within SageMaker Unified Studio, which include:

  • The data assets from the AWS Glue database that were ingested into SageMaker.
  • The status of the data lineage import for each data asset, which includes an event ID for traceability. This lineage event ID can be used to debug inconsistencies in the resulting lineage graph. You can use the GetLineageEvent API to retrieve the raw payload of the lineage event.

Visualizing the data lineage graph of the data assets in SageMaker Unified Studio

With SageMaker Unified Studio, you have a single place to manage and discover data assets. When accessing a data asset published in the SageMaker central catalog or in your project’s own inventory, you can dive into the asset’s metadata, which includes its schema, business description, custom metadata forms, quality, lineage, and more. To visualize the lineage graph of each data asset of this post, follow these steps:

  1. In SageMaker Studio, navigate to the Assets section of the SageMaker project details page and choose INVENTORY
  2. Select the asset that you want to explore. You can also access the asset directly from the data source run by selecting the asset name.
  3. To view the lineage graph of the data asset up to its origin, shown in the following screenshots, choose the LINEAGE tab.
    • For clickstream table (Sourced from S3)

    • For order transactions table (Sourced from DynamoDB)

With lineage, you can now confirm that the data originated from sources such as Amazon S3 and Amazon DynamoDB and understand how it has been transformed along the way. Because of this end-to-end visibility, you can trust the data, make informed decisions, and provide compliance with confidence. The lineage graph captures essential metadata that forms the foundation of lineage tracking.

  • This includes table schemas, column definitions and their data types.
  • Column-level lineage becomes particularly powerful in this context. Imagine your clickstream’s AWS Glue table powers an Amazon QuickSight dashboard analyzing customer purchase patterns and notice discrepancies in your revenue reports. With column lineage, you can instantly trace the source of those columns.
  • This granular visibility not only accelerates debugging but also proves invaluable during schema changes, as we show in the following section by changing the source schema.
  • The crawler details such as crawlerRunId (present in the source identifier of the lineage node) and crawler start and end times can be used to debug which crawler runs updated the table.

Understanding your data asset’s schema evolution through lineage in SageMaker Unified Studio

Imagine the order transactions source in DynamoDB was updated with new information. Because this source powers an Amazon QuickSight report for the customer using the AWS Glue database table, it’s important for consumers to know what changes in the data pipeline updated the report.

  1. Edit the DynamoDB table item with additional columns to learn how lineage graph can be used to view historical updates:
{
    "order_id": "ord789",
    "user_id": "u789",
    "product_id": "prod456",
    "order_total": 79.99,
    "order_timestamp": "2025-06-04T09:27:10Z",
	"customerSegment": "new-customer",
    "conversionSource": "primeDayEmailCampaign"
}
  1. Enter the OrderTransactionsCrawler Glue crawler again on the AWS console. After completion, you’ll notice that it updated the ordertransactiontable AWS Glue table, as shown in the following screenshot.

  1. Run again the data source associated to the project in SageMaker Unified Studio to import the latest metadata into the SageMaker Catalog. After completion, you’ll notice the data source updated the ordertransactiontable data asset in the SageMaker Catalog, as shown in the following screenshot.

This section explores how lineage can be useful to track the updates.

Navigate to the ordertransactiontable data asset in SageMaker Catalog by selecting it from the data source run and choose the LINEAGE tab, as shown in the following screenshot.

Notice how the new columns are available in the lineage graph. A new crawler run ID is present as the source identifier of the crawler lineage node. The history tab shows multiple crawler runs. You can navigate to check the state of the system during the first run.

Cleanup

After you’re done, we recommend to cleaning up the resources created for this post to avoid unintended charges:

  1. Delete the inventory assets that were cataloged in the SageMaker project’s inventory, as explained in Delete an Amazon SageMaker Unified Studio asset.
  2. Delete the SageMaker project that was created as part of this post, as explained in Delete a project.
  3. Delete the CloudFormation stack that was deployed as part of this post, as explained in Delete a stack from the CloudFormation console.
  4. The S3 bucket created as part of the CloudFormation stack will remain after its deletion because it contains a data file in it. Empty and delete the bucket, as explained in Deleting a general purpose bucket.

Conclusion

In this post, you were able to explore the data lineage capabilities of Amazon SageMaker, specifically when working with AWS Glue crawlers. You learned how you can set up an AWS Glue crawler to infer metadata from data assets in multiple sources such as Amazon S3 and DynamoDB and store it the AWS Glue Data Catalog. You also imported this metadata, including data lineage, into Amazon SageMaker through the data source capability of a SageMaker project. Finally, you explored the resulting lineage graph of data assets in SageMaker Unified Studio and saw some of the functionalities available to understand the origin path of them, understand how columns are transformed, and what impact looks like when performing changes to any step of the pipeline.We encourage you to now test the capabilities you explored in this post with your own data. By following the pattern presented in this post, many customers have been able to achieve governance of their data lake and lakehouse platforms on top of Amazon SageMaker with data lineage and more.


About the authors

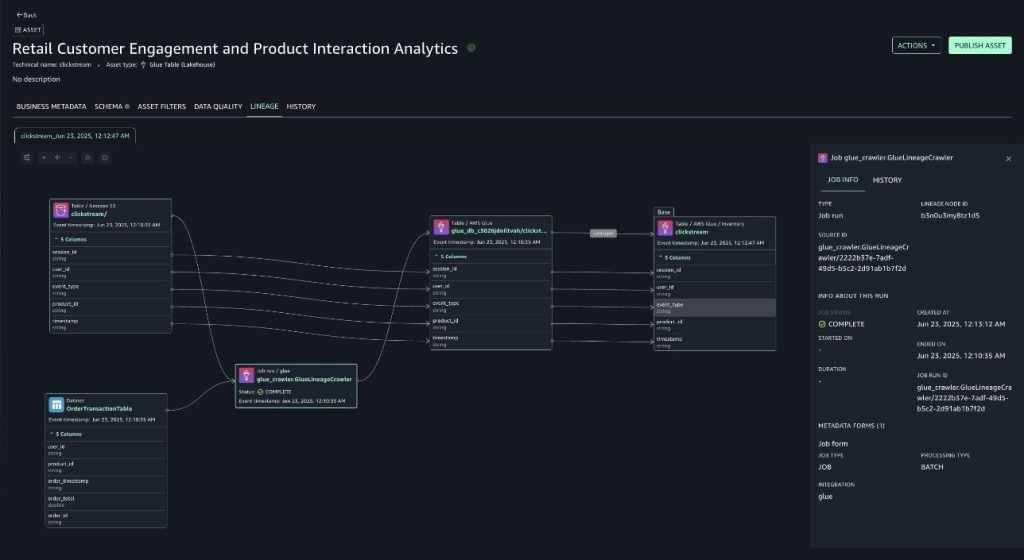
Mohit Dawar is a Senior Software Engineer at Amazon Web Services (AWS) working on Amazon DataZone. Over the past 3 years, he has led efforts around the core metadata catalog, generative AI–powered metadata curation, and lineage visualization. He enjoys working on large-scale distributed systems, experimenting with AI to improve user experience, and building tools that make data governance feel effortless. Connect with him on LinkedIn: Mohit Dawar.

Jose Romero is a Senior Solutions Architect for Startups at Amazon Web Services (AWS) based in Austin, TX, US. He is passionate about helping customers architect modern platforms at scale for data, AI, and ML. As a former senior architect in AWS Professional Services, he enjoys building and sharing solutions for common complex problems so that customers can accelerate their cloud journey and adopt best practices. Connect with him on LinkedIn: Jose Romero.

Realizing ocean data democratization: Furuno Electric’s initiatives using Amazon DataZone

Post Syndicated from Akira Mikami original https://aws.amazon.com/blogs/big-data/realizing-ocean-data-democratization-furuno-electrics-initiatives-using-amazon-datazone/

This is a guest post authored by Akira Mikami, a technical expert at Furuno Electric. The content and opinions in this post are those of the third-party author and AWS is not responsible for the content or accuracy of this post.

Since successfully commercializing the world’s first fish finder in 1948, Furuno Electric has been developing unique ultrasonic and electronic technologies in the marine electronics field. Under the company motto of “making the invisible visible”, they’ve have expanded their business centered on marine sensing technology and are now extending into subscription-based data businesses using Internet of Things (IoT) data. They’re are actively promoting the planning and development of data businesses to realize their new management vision outlined in FURUNO GLOBAL VISION NAVI NEXT 2030.

Like many manufacturing companies, Furuno Electric faced significant changes in revenue structure and technical architecture as they transitioned from traditional business to data-driven business. To succeed in this transformation, it was essential to build a foundation that promotes data utilization across the entire organization.

This post demonstrates how Furuno Electric built their system using Amazon DataZone and other Amazon Web Services (AWS) services to address technical infrastructure fragmentation, establish proper security governance, and develop an effective data business promotion system as part of their journey transitioning from a traditional manufacturing company to a data-driven business.

Challenges

Furuno Electric faced three specific challenges in promoting their data business: technical infrastructure fragmentation and duplication, lack of security governance, and underdeveloped data business promotion system.

Project managers in the data business were independently designing and building data infrastructure, resulting in duplication of components for data collection, processing, and storage. This situation created wasteful development investments, hindered effective use of common data, and caused inefficient states that took time to launch businesses. Marine data services including fishing vessel data collection and sharing system, FWC, and Furuno Open Platform (FOP) had similar functions implemented separately for each project along the functional axes of data collection, processing, visualization, and analysis, resulting in unnecessary workload across the organization.

Security measures were considered and implemented separately by each department, and although checklists existed, they weren’t applied uniformly. This resulted in a lack of consistency in security measures, duplicate consideration costs for each department, and uncertainty in the comprehensiveness of measures. Integrated risk management was also difficult.

The organizational structure wasn’t prepared for the iterative development processes and long-term revenue models specific to data businesses, and there was a lack of mechanisms for cross-departmental data utilization and joint development. The distributed operational structure across departments made it difficult to rapidly deploy and continuously improve data businesses. In the process of creating data businesses, it became necessary to build entirely different customer relationships compared to traditional product sales businesses. In terms of organizational management and talent strategy, there was a need to transition from a top-down, risk-averse, specialized skill-focused structure to a bottom-up, challenge-oriented structure that emphasizes communication skills and diversity.

Solution overview

Furuno Electric built a data management foundation centered on Amazon DataZone, Amazon Simple Storage Service (Amazon S3), AWS Glue, and AWS Control Tower, a comprehensive solution designed to address each of the three challenges mentioned in the preceding section.

Building the integrated data platform JuBuRaw

To address technical infrastructure fragmentation and duplication, they built Junction Architecture of Business Raw Data (JuBuRaw), a platform that consolidates common components for data collection, storage, management, and authentication. Using AWS Cloud Development Kit (AWS CDK) to code the infrastructure, they achieved standardization and automation of environment construction. This provides consistency and reproducibility, making it easier to add new systems and migrate existing systems to the common platform. Merely by executing CDK, a standard data pipeline (using AWS IoT Core, Amazon S3, AWS Glue, Amazon Kinesis, Amazon API Gateway, and AWS Lambda) for a specific system is automatically built. This eliminates duplicate design and development within the organization, reducing business launch time and improving fixed cost management. By standardizing common functions, they reduced the management and operation costs of existing systems and enabled the launch of new systems in half the time compared to before.

The following diagram is the overall JuBuRaw architecture.

Security control with AWS Control Tower

To address the lack of security governance, they implemented a comprehensive security framework centered on AWS Control Tower to apply consistent security policies across multiple accounts. With automated monitoring systems using AWS Security Hub, AWS Config, and AWS CloudTrail and an integrated authentication system using AWS IAM Identity Center, they provide security consistency while reducing operational costs and management burden.

With the organization’s management account at the top, they placed AWS Control Tower, AWS Organizations, and AWS IAM Identity Center to achieve hierarchical security management. By adopting a multi-layered defense structure consisting of account baselines with AWS CloudTrail and AWS Config enabled, log archive environments, and audit and security operation environments, consistent security policies are applied to all accounts, enabling early detection and response to security incidents. This integrated approach has reduced the workload for security responses. This configuration is shown in the following diagram.

Establishing a data democratization foundation with Amazon DataZone

To address the underdeveloped data business promotion system, they introduced Amazon DataZone to streamline data discovery, sharing, and governance across the organization. They clarified the role division between the infrastructure management team and the data management team, centralizing data security policies, quality management, and metadata standardization. With a project-based collaboration environment, they promoted cross-departmental data utilization, establishing a foundation to support the creation and continuous monetization of data businesses.

Organizational reform and operational structure establishment

In parallel with the introduction of technical solutions, they implemented organizational reforms to support medium- to long-term data utilization. The new organizational structure consists of three main roles: the infrastructure management team, the data management team, and the chief data officer. The following chart shows this organizational structure.

The infrastructure management team is responsible for maintaining and developing the technical foundation of the platform, managing multiple accounts using AWS Control Tower, applying and monitoring security baselines, and tracking infrastructure version management and changing history. By specializing in common technologies, they can provide a stable platform.

The data management team is responsible for data quality management and continual improvement using AWS Glue Data Quality, standardization and maintenance of metadata, definition and application of data security policies, management of Amazon DataZone data Catalog, and providing data governance using Amazon DataZone. To maximize the value of data, they focus on deeply understanding business requirements and data characteristics and performing appropriate data management.

The chief data officer is responsible for formulating data business strategies and determining direction, promoting coordination and collaboration between teams, making decisions regarding the evolution of the data management foundation, and fostering a data utilization culture throughout the organization. From a strategic perspective, they oversee the whole and bridge business goals and technology.

This clear division of roles has established an operational structure for effective data utilization, accelerating the data business creation process. Additionally, clarifying data ownership has improved data quality and reliability, promoting data utilization across the organization. This structure is sustainable and can flexibly respond to technological changes and changes in the business environment.

Benefits of the modernized platform

As a concrete application example of the integrated data platform JuBuRaw and organizational structure explained in the previous section, we introduce the migration project of the existing service SHIPS. This use case is a comprehensive migration case that uses all three solution elements of data collection, management, and utilization mentioned earlier.

Furuno Electric provides a system called SHIPS that plots ship position information and monitors the status of equipment installed on ships. By migrating this existing service to the JuBuRaw foundation, the several functional enhancements are expected.

In terms of data integration enhancement, by using the data catalog function of Amazon DataZone, it becomes easier to integrate not only ship position information but also various data sources such as internal systems, IoT devices, other company systems, automatic identification system (AIS) data, and weather and sea condition data. This enables swift data analysis and comprehensive ship management, which means operators can detect potential issues and implement preventive measures before they develop into serious problems. Particularly important is that by storing this data in a common data lake and retaining them as master data, they create an environment where the data can be easily used by other applications.

For security enhancement, organizations can use Amazon DataZone federated governance with publish-subscribe (pubsub) workflow mechanism and fine-grained access control capabilities. This means they can implement detailed permissions management specifically for data assets, rows, and columns while maintaining unified access control and data governance across multiple AWS accounts and organizational boundaries.

In this case, by using the new integrated data management foundation, it becomes possible to integrate individually designed and built data foundations, improving both efficiency and functionality. A consistent data flow from data sources to the data platform and then to individual applications is realized, enabling flexible data utilization centered on the data lake. Linkage with each application can also be easily realized from the data lake, providing expandability for future data utilization.

This SHIPS migration case is a comprehensive approach using the solution elements of the JuBuRaw foundation and is expected to serve as a reference model for future system migrations. It’s expected to achieve both service quality improvement and operational cost reduction.

Future vision and next steps

Based on the data management foundation they’ve built, Furuno Electric aims to further expand and deepen data utilization. As part of their plan to continue and expand digital transformation, they’re currently starting with the migration of SHIPS, but plan to gradually migrate other IoT-related services (such as FOP, FWC, and Ichidake) to the new data management foundation in the future. This is expected to further strengthen the foundation for company-wide data utilization and enhance synergies between services.

Continuous enhancement of secure data sharing and access control is also essential. With the increase in data and expansion of utilization scope, the importance of security and access control will further increase. They’ll optimize the balance between data protection and utilization while incorporating practices accumulated through operations.

Additionally, Furuno Electric is exploring the expansion of their data management capabilities to Amazon SageMaker, specifically using Amazon SageMaker Catalog integrated with Amazon DataZone. This integration will enable them to seamlessly extend their existing data analytics governance workflows into artificial intelligence and machine learning (AI/ML) workloads. By applying the same data discovery, data sharing, and access control foundation across both data analytics and AI model development, they can accelerate the development of new AI-powered services. The unified governance framework will also provide secure and efficient AI adoption throughout the organization.

Through these initiatives, Furuno Electric is realizing their company motto of “making the invisible visible” in the field of data business as well. The integrated data platform JuBuRaw isn’t just an integration of technical foundations but serves as a foundation to support organizational culture transformation and the creation of new business models. As seen in the SHIPS migration case, using this foundation not only enhances existing services but also expands possibilities for new data utilization.

Through building a data foundation that can flexibly respond to business growth and changes while using a cloud-based environment, Furuno Electric has successfully led their digital transformation. They’ll continue to provide new value to customers through the democratization of marine data and accelerate the transition to data-driven business.

This case serves as a reference for many manufacturing companies promoting data utilization, showing that approaches from both technical and organizational perspectives are key to success. As Furuno Electric’s initiatives demonstrate, data democratization and effective utilization play an important role in the digital transformation of manufacturing.


About the Authors

Akira Mikami is a technical expert who played a central role in the FURUNO Data Platform (JuBuRaw) Construction Project at Furuno Electric Co., Ltd. Specializing in data platform construction and architecture, he led the implementation of cloud solutions utilizing AWS. He contributed to achieving efficient data management and strengthening team collaboration, leading the project to success.

Junpei Ozono is a Sr. Go-to-market (GTM) Data & AI solutions architect at Amazon Web Services (AWS) in Japan. He drives technical market creation for data and AI solutions while collaborating with global teams to develop scalable GTM motions. He guides organizations in designing and implementing innovative data-driven architectures powered by AWS services, helping customers accelerate their cloud transformation journey through modern data and AI solutions. His expertise spans across modern data architectures including data mesh, data lakehouse, and generative AI, so customers can build scalable and innovative solutions on Amazon Web Services (AWS).

Mitsuhiko Nishida is an Enterprise Solutions Architecture Automotive & Manufacturing Group Solutions Architect at Amazon Web Services (AWS) in Japan. He serves as a field Solutions Architect for manufacturing customers, helping them solve their business challenges. With expertise in generative AI and manufacturing IT, he guides the design and implementation of innovative solutions leveraging cutting-edge technologies. He supports manufacturing customers in building efficient architecture powered by AWS services to accelerate their cloud transformation journey and contribute to their digital transformation initiatives.

Capture data lineage from dbt, Apache Airflow, and Apache Spark with Amazon SageMaker

Post Syndicated from Jose Romero original https://aws.amazon.com/blogs/big-data/capture-data-lineage-from-dbt-apache-airflow-and-apache-spark-with-amazon-sagemaker/

The next generation of Amazon SageMaker is the center for your data, analytics, and AI. SageMaker brings together AWS artificial intelligence and machine learning (AI/ML) and analytics capabilities and delivers an integrated experience for analytics and AI with unified access to data. From Amazon SageMaker Unified Studio, a single interface, you can access your data and use a suite of powerful tools for data processing, SQL analytics, model development, training and inference, as well as generative AI development. This unified experience is assisted by Amazon Q and Amazon SageMaker Catalog (powered by Amazon DataZone), which delivers an embedded generative AI and governance experience at every step.

With data lineage, now part of SageMaker Catalog, domain administrators and data producers can centralize lineage metadata of their data assets in a single place. You can track the flow of data over time, giving you a clear understanding of where it originated, how it has changed, and its ultimate use across the business. By providing this level of transparency around the origin of data, data lineage helps data consumers gain trust that the data is correct for their use case. Because data lineage is captured at the table, column, and job level, data producers can also conduct impact analysis and respond to data issues when needed.

Capture of data lineage in SageMaker starts after connections and data sources are configured and lineage events are generated when data is transformed in AWS Glue or Amazon Redshift. This capability is also fully compatible with OpenLineage, so you can further augment data lineage capture to other data processing tools. This post walks you through how to use the OpenLineage-compatible API of SageMaker or Amazon DataZone to push data lineage events programmatically from tools supporting the OpenLineage standard like dbt, Apache Airflow, and Apache Spark.

Solution overview

Many third-party and open source tools that are used today to orchestrate and run data pipelines, like dbt, Airflow, and Spark, have active support of the OpenLineage standard to provide interoperability across environments. With this capability, you only need to include and configure the right library to your environment, to be able to stream lineage events from jobs running on this tool directly to their corresponding output logs or to a target HTTP endpoint that you specify.

With the target HTTP endpoint option, you can introduce a pattern to post lineage events from these tools into SageMaker or Amazon DataZone to further help you centralize governance of your data assets and processes in a single place. This pattern takes the form of a proxy, and its simplified architecture is illustrated in the following figure.

The way that the proxy for OpenLineage works is simple:

  • Amazon API Gateway exposes an HTTP endpoint and path. Jobs running with the OpenLineage package on top of the supported data processing tools can be set up with the HTTP transport option pointing to this endpoint and path. If connectivity allows, lineage events will be streamed into this endpoint as the job runs.
  • An Amazon Simple Queue Service (Amazon SQS) queue buffers the events as they arrive. By storing them in a queue, you have the option to implement strategies for retries and errors when needed. For cases where event order is required, we recommend the use of first-in-first-out (FIFO) queues; however, SageMaker and Amazon DataZone are able to map incoming OpenLineage events, even if they are out of order.
  • An AWS Lambda function retrieves events from the queue in batches. For every event in a batch, the function can perform transformations when needed and post the resulting event to the target SageMaker or Amazon DataZone domain.
  • Even though it’s not shown in the architecture, AWS Identity and Access Management (IAM) and Amazon CloudWatch are key capabilities that allow secure interaction between resources with minimum permissions and logging for troubleshooting and observability.

The AWS sample OpenLineage HTTP Proxy for Amazon SageMaker Governance and Amazon DataZone provides a working implementation of this simplified architecture that you can test and customize as needed. To deploy in a test environment, follow the steps as described in the repository. We use an AWS CloudFormation template to deploy solution resources.

After you have deployed the OpenLineage HTTP Proxy solution, you can use it to post lineage events from data processing tools like dbt, Airflow, and Spark into a SageMaker or Amazon DataZone domain, as shown in the following examples.

Set up the OpenLineage package for Spark in AWS Glue 4.0

AWS Glue added built-in support for OpenLineage with AWS Glue 5.0 (to learn more, see Introducing AWS Glue 5.0 for Apache Spark). For jobs that are still running on AWS Glue 4.0, you still can stream OpenLineage events into SageMaker or Amazon DataZone by using the OpenLineage HTTP Proxy solution. This serves as an example that can be applied to other platforms running Spark like Amazon EMR, third-party solutions, or self-managed clusters.

To properly add OpenLineage capabilities to an AWS Glue 4.0 job and configure it to stream lineage events into the OpenLineage HTTP Proxy solution, complete the following steps:

  1. Download the official OpenLineage package for Spark. For our example, we used the JAR package version 2.12 release 1.9.1.
  2. Store the JAR file in an Amazon Simple Storage Service (Amazon S3) bucket that can be accessed by your AWS Glue job.
  3. On the AWS Glue console, open your job.
  4. Under Libraries, for Dependent JARs path, enter the path of the JAR package stored in your S3 bucket.

  1. In the Job parameters section, add the following parameters:
    1. Enable the OpenLineage package:
      1. Key: --user-jars-first
      2. Value: true
    2. Configure how the OpenLineage package will be used to stream lineage events. Replace <OPENLIMEAGE_PROXY_ENDPOINT_URL> and <OPENLIMEAGE_PROXY_ENDPOINT_PATH> with the corresponding values of the OpenLineage HTTP Proxy solution. These values can be found as outputs of the deployed CloudFormation stack. Replace <ACCOUNT_ID> with your AWS account ID.
      1. Key: --conf
      2. Value:
        spark.extraListeners=io.openlineage.spark.agent.OpenLineageSparkListener 
        --conf spark.openlineage.transport.type=http 
        --conf spark.openlineage.transport.url=<OPENLIMEAGE_PROXY_ENDPOINT_URL>
        --conf spark.openlineage.transport.endpoint=/<OPENLIMEAGE_PROXY_ENDPOINT_PATH>
        --conf spark.openlineage.facets.custom_environment_variables=[AWS_DEFAULT_REGION;GLUE_VERSION;GLUE_COMMAND_CRITERIA;GLUE_PYTHON_VERSION;] 
        --conf spark.glue.accountId=<ACCOUNT_ID>

With this setup, the AWS Glue 4.0 job will use the HTTP transport option of the OpenLineage package to stream lineage events into the OpenLineage proxy, which will post events to the SageMaker or Amazon DataZone domain.

  1. Run the AWS Glue 4.0 job.

The job’s resulting datasets should be sourced into SageMaker or Amazon DataZone so that OpenLineage events are mapped to them. As you explore the sourced dataset in SageMaker Unified Studio, you can observe its origin path as described by the OpenLineage events streamed through the OpenLineage proxy.

When working with Amazon DataZone, you will get the same result.

The origin path in this example is extensive and maps the resulting dataset down to its origin, in this case, a couple of tables hosted in a relational database and transformed through a data pipeline with two AWS Glue 4.0 (Spark) jobs.

Set up the OpenLineage package for dbt

dbt has rapidly become a popular framework to build data pipelines on top of data processing and data warehouse tools like Amazon Redshift, Amazon EMR, and AWS Glue, as well as other traditional and third-party solutions. This framework supports OpenLineage as a way to standardize generation of lineage events and integrate with the growing data governance ecosystem.dbt deployments might vary per environment, which is why we don’t dive into the specifics in this post. However, to simply configure your dbt project to leverage the OpenLineage HTTP Proxy solution, complete the following steps:

  1. Install the OpenLineage package for dbt. You can learn more in the OpenLineage documentation.
  2. In the root folder of your dbt project, create an openlineage.yml file where you can specify the transport configuration. Replace <OPENLIMEAGE_PROXY_ENDPOINT_URL> and <OPENLIMEAGE_PROXY_ENDPOINT_PATH> with the values of the OpenLineage HTTP Proxy solution. These values can be found as outputs of the deployed CloudFormation stack.
transport:
  type: http
  url: <OPENLIMEAGE_PROXY_ENDPOINT_URL>
  endpoint: <OPENLIMEAGE_PROXY_ENDPOINT_PATH>
  timeout: 5

  1. Run your dbt pipeline. As explained in the OpenLineage documentation, instead of running the standard dbt run command, you run the dbt-ol run command. The latter command is just a wrapper on top of the standard dbt run command so that lineage events are captured and streamed as configured.

The job’s resulting datasets should be sourced into SageMaker or Amazon DataZone so that OpenLineage events are mapped to them. As you explore the sourced dataset in SageMaker Unified Studio, you can observe its lineage path as described by the OpenLineage events streamed through the OpenLineage proxy.

When working with Amazon DataZone, you will get the same result.

In this example, the dbt project is running on top of Amazon Redshift, which is a common use case among customers. Amazon Redshift is integrated for automatic lineage capture with SageMaker and Amazon DataZone, but such capabilities weren’t used as part of this example to illustrate how you can still integrate OpenLineage events from dbt using the pattern implemented in the OpenLineage HTTP Proxy solution.The dbt pipeline is made by two stages running sequentially, which are illustrated in the origin path as the nodes with the dbt type.

Set up the OpenLineage package for Airflow

Airflow is a well-positioned tool to orchestrate data pipelines at any scale. AWS provides Amazon Managed Workflows for Apache Airflow (Amazon MWAA) as a managed alternative for customers that want to reduce management and accelerate the development of their data strategy with Airflow in a cost-effective way. Airflow also supports OpenLineage, so you can centralize lineage with tools like SageMaker and Amazon DataZone.

The following steps are specific for Amazon MWAA, but they can be extrapolated to other forms of deployment of Airflow:

  1. Install the OpenLineage package for Airflow. You can learn more in the OpenLineage documentation. For versions 2.7 and later, it’s recommended to use the native Airflow OpenLineage package (apache-airflow-providers-openlineage), which is the case for this example.
  2. To install the package, add it to the requirements.txt file that you are storing in Amazon S3 and that you are pointing to when provisioning your Amazon MWAA environment. To learn more, refer to Managing Python dependencies in requirements.txt.
  3. As you install the OpenLineage package or afterwards, you can configure it to send lineage events to the OpenLineage proxy:
    1. When filling the form to create a new Amazon MWAA environment or edit an existing one, in the Airflow configuration options section, add the following. Replace <OPENLIMEAGE_PROXY_ENDPOINT_URL> and <OPENLIMEAGE_PROXY_ENDPOINT_PATH> with the values of the OpenLineage HTTP Proxy solution. These values can be found as outputs of the deployed CloudFormation stack:
      1. Configuration option: openlineage.transport
      2. Custom value: {"type": "http", "url": "<OPENLIMEAGE_PROXY_ENDPOINT_URL>", "endpoint": "<OPENLIMEAGE_PROXY_ENDPOINT_PATH>"}

  1. Run your pipeline.

The Airflow tasks will automatically use the transport configuration to stream lineage events into the OpenLineage proxy as they run. The task’s resulting datasets should be sourced into SageMaker or Amazon DataZone so that OpenLineage events are mapped to them.As you explore the sourced dataset in SageMaker Unified Studio, you can observe its origin path as described by the OpenLineage events streamed through the OpenLineage proxy.

When working with Amazon DataZone, you will get the same result.

In this example, the Amazon MWAA Directed Acyclic Graph (DAG) is operating on top of Amazon Redshift, similar to the dbt example before. However, it’s still not using the native integration for automatic data capture between Amazon Redshift and SageMaker or Amazon DataZone. This way, we can illustrate how you can still integrate OpenLineage events from Airflow using the pattern implemented in the OpenLineage HTTP Proxy solution.The Airflow DAG is made by a single task that outputs the resulting dataset by using datasets that were created as part of the dbt pipeline in the previous example. This is illustrated in the origin path, where it includes nodes with the dbt type and a node with AIRFLOW type. With this final example, note how SageMaker and Amazon DataZone map all datasets and jobs to reflect the reality of your data pipelines.

Additional considerations when implementing the OpenLineage proxy pattern

The OpenLineage proxy pattern implemented in the sample OpenLineage HTTP Proxy solution and presented in this post has shown to be a practical approach to integrate a growing set of data processing tools into a centralized data governance strategy on top of SageMaker. We encourage you to dive into it and use it in your test environments to learn how it can be best used for your specific setup.If interested in taking this pattern to production, we suggest you first review it thoroughly and customize it to your particular needs. The following are some items worth reviewing as you evaluate this pattern implementation:

  • The solution used in the examples of this post uses a public API endpoint with no authentication or authorization mechanism. For a production workload, we recommend limiting access to the endpoint to a minimum so only authorized resources are able to stream messages into it. To learn more, refer to Control and manage access to HTTP APIs in API Gateway.
  • The logic implemented in the Lambda function is intended to be customized depending on your use case. You might need to implement transformation logic, depending on how OpenLineage events are created by the tool you are using. As a reference, for the case of the Amazon MWAA example of this post, some minor transformations were required on the name and namespace fields of the inputs and outputs elements of the event for full compatibility with the format expected for Amazon Redshift datasets as described in the dataset naming conventions of OpenLineage. You might also need to change how the function logs execution details or include retry/error logic and more.
  • The SQS queue used in the OpenLineage HTTP Proxy solution is standard, which implies that events aren’t delivered in order. If this is a requirement, you could use FIFO queues instead.

For cases where you want to post OpenLineage events directly into SageMaker or Amazon DataZone, without using the proxy pattern explained in this post, a custom transport is now available as an extension of the OpenLineage project version 1.33.0. Leverage this feature in cases where you don’t need additional controls on your OpenLineage event stream, for example, if you don’t need any custom transformation logic.

Summary

In this post, we showed how to use the OpenLineage-compatible APIs of SageMaker to capture data lineage from any tool supporting this standard, by following an architectural pattern introduced as the OpenLineage proxy. We presented some examples of how you can set up tools like dbt, Airflow, and Spark to stream lineage events to the OpenLineage proxy, which subsequently posts them to a SageMaker or Amazon DataZone domain. Finally, we introduced a working implementation of this pattern that you can test and discussed some considerations when implementing this same pattern to production.

The SageMaker compatibility with OpenLineage can help simplify governance of your data assets and increase trust in your data. This capability is one of the many features that are now available to build a comprehensive governance strategy powered by data lineage, data quality, business metadata, data discovery, access automation, and more. By bundling data governance capabilities with the growing set of tools available for data and AI development, you can derive value from your data faster and get closer to consolidating a data-driven culture. Try out this solution and get started with SageMaker to join the growing set of customers that are modernizing their data platform.


About the authors

Jose Romero is a Senior Solutions Architect for Startups at AWS, based in Austin, Texas. He is passionate about helping customers architect modern platforms at scale for data, AI, and ML. As a former senior architect in AWS Professional Services, he enjoys building and sharing solutions for common complex problems so that customers can accelerate their cloud journey and adopt best practices. Connect with him on LinkedIn.

Priya Tiruthani is a Senior Technical Product Manager with Amazon SageMaker Catalog (Amazon DataZone) at AWS. She focuses on building products and their capabilities in data analytics and governance. She is passionate about building innovative products to address and simplify customers’ challenges in their end-to-end data journey. Outside of work, she enjoys being outdoors to hike and capture nature’s beauty. Connect with her on LinkedIn.

Collaborate and build faster with Amazon SageMaker Unified Studio, now generally available

Post Syndicated from Donnie Prakoso original https://aws.amazon.com/blogs/aws/collaborate-and-build-faster-with-amazon-sagemaker-unified-studio-now-generally-available/

Today, we’re announcing the general availability of Amazon SageMaker Unified Studio, a single data and AI development environment where you can find and access all of the data in your organization and act on it using the best tool for the job across virtually any use case. Introduced as preview during AWS re:Invent 2024, my colleague, Antje, summarized it as:

SageMaker Unified Studio (preview) is a single data and AI development environment. It brings together functionality and tools from the range of standalone “studios,” query editors, and visual tools that we have today in Amazon AthenaAmazon EMRAWS GlueAmazon RedshiftAmazon Managed Workflows for Apache Airflow (Amazon MWAA), and the existing SageMaker Studio.

Here’s a video to see Amazon SageMaker Unified Studio in action:

SageMaker Unified Studio breaks down silos in data and tools, giving data engineers, data scientists, data analysts, ML developers and other data practitioners a single development experience. This saves development time and simplifies access control management so data practitioners can focus on what really matters to them—building data products and AI applications.

This post focuses on several important announcements that we’re excited to share:

To get started, go to the Amazon SageMaker console and create a SageMaker Unified Studio domain. To learn more, visit Create an Amazon SageMaker Unified Studio domain in the AWS documentation.

New capabilities for Amazon Bedrock in SageMaker Unified Studio
The capabilities of Amazon Bedrock within Amazon SageMaker Unified Studio offer a governed collaborative environment for developers to rapidly create and customize generative AI applications. This intuitive interface caters to developers of all skill levels, providing seamless access to the high-performance FMs offered in Amazon Bedrock and advanced customization tools for collaborative development of tailored generative AI applications.

Since the preview launch, several new FMs have become available in Amazon Bedrock and are fully integrated with SageMaker Unified Studio, including Anthropic’s Claude 3.7 Sonnet and DeepSeek-R1. These models can be used for building generative AI apps and chatting in the playground in SageMaker Unified Studio.

Here’s how you can choose Anthropic’s Claude 3.7 Sonnet on the model selection in your project.

You can also source data or documents from S3 folders within your project and select specific FMs when creating knowledge bases. 

During preview, we introduced Amazon Bedrock Guardrails to help you implement safeguards for your Amazon Bedrock application based on your use cases and responsible AI policies. Now, Amazon Bedrock Guardrails is extended to Amazon Bedrock Flows with this general availability release.

Additionally, we have streamlined generative AI setup for associated accounts with a new user management interface in SageMaker Unified Studio, making it straightforward for domain administrators to grant associated account admins access to model governance projects. This enhancement eliminates the need for command line operations, streamlining the process of configuring generative AI capabilities across multiple AWS accounts.

These new features eliminate barriers between data, tools, and builders in the generative AI development process. You and your team will gain a unified development experience by incorporating the powerful generative AI capabilities of Amazon Bedrock — all within the same workspace.

Amazon Q Developer is now generally available in SageMaker Unified Studio
Amazon Q Developer is now generally available in Amazon SageMaker Unified Studio, providing data professionals with generative AI–powered assistance across the entire data and AI development lifecycle.

Amazon Q Developer integrates with the full suite of AWS analytics and AI/ML tools and services within SageMaker Unified Studio, including data processing, SQL analytics, machine learning model development, and generative AI application development, to accelerate collaboration and help teams build data and AI products faster. To get started, you can select Amazon Q Developer icon.

For new users of SageMaker Unified Studio, Amazon Q Developer serves as an invaluable onboarding assistant. It can explain core concepts such as domains and projects, provide guidance on setting up environments, and answer your questions.

Amazon Q Developer helps you discover and understand data using powerful natural language interactions with SageMaker Catalog. What makes this implementation particularly powerful is how Amazon Q Developer combines broad knowledge of AWS analytics and AI/ML services with the user’s context to provide personalized guidance.

You can chat about your data assets through a conversational interface, asking questions such as “Show all payment related datasets” without needing to navigate complex metadata structures.

Amazon Q Developer offers SQL query generation through its integration with the built-in query editor available in SageMaker Unified Studio. Data professionals of varying skill levels can now express their analytical needs in natural language, receiving properly formatted SQL queries in return.

For example, you can ask, “Analyze payment method preferences by age group and region” and Amazon Q Developer will generate the appropriate SQL with proper joins across multiple tables.

Additionally, Amazon Q Developer is also available to assist with troubleshooting and generating real-time code suggestions in SageMaker Unified Studio Jupyter notebooks, as well as building ETL jobs.

Now available

  • Availability — Amazon SageMaker Unified Studio is now available in the following AWS Regions: US East (N. Virginia, Ohio), US West (Oregon), Asia Pacific (Seoul, Singapore, Sydney, Tokyo), Canada (Central), Europe (Frankfurt, Ireland, London), South America (São Paulo). Learn more about the availability of these capabilities on supported Region documentation page.
  • Amazon Q Developer subscription — The free tier of Amazon Q Developer is available by default in SageMaker Unified Studio, requiring no additional setup or configuration. If you already have Amazon Q Developer Pro Tier subscriptions, you can use those enhanced capabilities within the SageMaker Unified Studio environment. For more information, visit the documentation page.
  • Amazon Bedrock capabilities — To learn more about the capabilities of Amazon Bedrock in Amazon SageMaker Unified Studio, refer to this documentation page

Start building with Amazon SageMaker Unified Studio today. For more information, visit the Amazon SageMaker Unified Studio page.

Happy building!

Donnie Prakoso

— How is the News Blog doing? Take this 1 minute survey! (This survey is hosted by an external company. AWS handles your information as described in the AWS Privacy Notice. AWS will own the data gathered via this survey and will not share the information collected with survey respondents.)

Cross-account data collaboration with Amazon DataZone and AWS analytical tools

Post Syndicated from Arun Pradeep Selvaraj original https://aws.amazon.com/blogs/big-data/cross-account-data-collaboration-with-amazon-datazone-and-aws-analytical-tools/

Data sharing has become a crucial aspect of driving innovation, contributing to growth, and fostering collaboration across industries. According to this Gartner study, organizations promoting data sharing outperform their peers on most business value metrics. A straightforward data access and sharing mechanism is crucial for enabling effective data sharing across an organization. There are challenges such as complexity in managing cross-account permissions and difficulty in discovering the right data across accounts that organizations face when trying to share data products across AWS accounts. Amazon DataZone is a fully managed data management service that customers can use to catalog, discover, share, and govern data stored across Amazon Web Services (AWS).

In this post, we will cover how you can use Amazon DataZone to facilitate data collaboration between AWS accounts.

Solution overview

This solution provides a streamlined way to enable cross-account data collaboration using Amazon DataZone domain association while maintaining security and governance. This post describes the process of using the business data catalog resource of Amazon DataZone to publish data assets so they’re discoverable by other accounts. After they’ve been published, you can query the published assets from another AWS account using analytical tools such as Amazon Athena and the Amazon Redshift query editor, as shown in the following figure.

In this solution (as shown in the preceding figure), the AWS account that contains the data assets is referred to as the producer account. The AWS account that needs to access or use the data from the producer account is referred to as the consumer account. The Amazon DataZone domain is created and managed within the producer account and then the consumer account is associated with that domain.

As part of Amazon DataZone domain association, Amazon DataZone uses AWS Resource Access Manager (AWS RAM) to share the resource. When the producer and consumer AWS accounts are in the same organization within AWS Organizations, the domain association happens automatically. If the producer and consumer AWS accounts are in different organizations, AWS RAM sends an invitation to the consumer AWS account to accept or reject the resource grant.

This solution presents three Amazon DataZone user personas as:

  • Data administrators: Account owners in both producer and consumer AWS accounts. The data administrators are responsible for creating Amazon DataZone domains, configuring domain associations, and accepting domain associations within the Amazon DataZone domain.
  • Data publishers: Users in producer AWS accounts. The data publishers are responsible for creating Amazon DataZone publish projects and environments, producing and publishing data assets, and accepting subscription requests.
  • Data subscribers: Users in consumer AWS accounts. The data subscribers are responsible for creating Amazon DataZone subscribe projects and environments, searching for and subscribing to data assets, and querying the data and deriving insights.

Prerequisites

To follow along with the instructions, you will need:

  • Two AWS accounts, one serving as producer and other account serving as consumer. Create new AWS accounts if necessary.
  • An Amazon Redshift provisioned cluster or Amazon Redshift Serverless workgroup in the producer and consumer AWS accounts provisioned by a data administrator.
  • A secret in AWS Secrets Manager storing the master user credentials for the Amazon Redshift cluster or workgroup in the producer and consumer AWS accounts.
    • The data administrators are responsible for creating secrets.
    • The data producers and consumers can obtain the Amazon Resource Name (ARN) of the secrets from the data administrators during the environment or environment profile creation steps.

Amazon DataZone uses Amazon Redshift Datashares to share data across clusters and accounts. There are specific requirements and limitations for using Amazon Redshift datashares.

  • For cross-account data sharing, both the producer and consumer clusters must be encrypted. See Cluster encryption section of datashare-considerations for more information about the encryption process.
  • Data sharing is supported only for provisioned ra3 cluster types (ra3.16xlarge, ra3.4xlarge, and ra3.xlplus) and Amazon Redshift Serverless.

Walkthrough:

The following are the high level steps to configure cross-account access. We’ve provided step-by-step instructions in the following sections.

  1. Create an Amazon DataZone domain in the producer account. The data administrator creates an Amazon DataZone domain.
  2. Request Amazon DataZone domain association from the producer account to the consumer account.
  3. Accept the domain association request in the consumer account. The data administrator accepts the domain association.
  4. Add data users to the Amazon DataZone domain.
  5. Create the necessary publish project for AWS Glue and Amazon Redshift in the producer account.
  6. Create AWS Glue and Amazon Redshift environments to publish the data assets in the producer account.
  7. Create and run a data source for AWS Glue and Amazon Redshift to publish assets into the business catalog.
  8. Create subscribe projects for AWS Glue and Amazon Redshift.
  9. Create AWS Glue and Amazon Redshift environment profiles and environments in the subscribe project
  10. Subscribe to AWS Glue and Amazon Redshift tables. Consume the data using Athena and Amazon redshift editors. This step is performed by the data subscriber.

Create the Amazon DataZone domain in the producer account

Amazon DataZone domains serve as high-level organizational units for assets, users, and projects, facilitating cross-team and cross-account collaboration. This step focusses on creating the Amazon DataZone domain in the producer account.

  1. Sign in to the producer account AWS Management Console for Amazon DataZone using the data administrator credentials.
  2. Create an Amazon DataZone domain titled Demo_cross_account_domain using the instructions at create domains.
  3. On the Create domain screen, select Quick setup checkbox to automate several configuration steps, saving time and reducing the potential for setup errors. Quick setup enables two default blueprints and creates the default environment profiles for the data lake and data warehouse default blueprints.


Request Amazon DataZone domain association from the producer account to the consumer account

To associate the Amazon DataZone domain with the consumer account, the producer account requests a domain association. This involves providing necessary information about the consumer account and granting appropriate permissions for data access and management.

  1. Sign in to the Amazon DataZone console of the producer account using the data administrator credentials.
  2. Navigate to the domain detail page, and then scroll down and select the Associated Accounts tab.
  3. Enter the consumer account IDs that you want to request association. Choose Add another account if you want to add more than one account. When you’re satisfied with the list of account IDs, choose Request association.
    • Use the latest (AWS RAM DataZonePortalReadWrite policy when requesting the account association. This policy allows users in the consumer account to execute Amazon DataZone APIs and to use the data portal interface.

Accept an account association request from an Amazon DataZone domain

This step focuses on accepting the account association request from the Amazon DataZone domain in the consumer account. This allows the consumer account to be linked with the Amazon DataZone domain to enable data sharing and collaboration between the producer and consumer accounts.

  1. Sign in to the consumer account and go to the Amazon DataZone console  in the same AWS Region as the domain. On the Amazon DataZone home page, choose View requests.
  2. Select the name of the inviting Amazon DataZone domain and choose Review request.
  3. Choose Accept association, you should see the Demo_cross_account_domain state as associated in the Associated domains screen

  1. Choose the domain for which you want to enable an environment blueprint.
  2. From the Blueprints list, choose either the DefaultDataLake blueprint
  3. On the Permissions and resources page, for enabling the DefaultDataLake blueprint, for Glue Manage Access role, specify a new role that grants Amazon DataZone authorization to ingest and manage access to tables in AWS Glue and AWS Lake Formation.

  1. Repeat steps 4 to 6 to enable the DefaultDataWarehouse blueprint by choosing DefaultDataWarehouse instead of DefaultDataLake

Add data users to the Amazon DataZone domain

To grant access to the Amazon DataZone data portal from the console for data publisher and data Subscriber IAM users, use the following steps to add them in the User Management section of the Amazon DataZone domain. See Manage users in the Amazon DataZone console for additional details.

  1. Sign in to the Amazon DataZone console as a data administrator using the producer account.
  2. Select the Amazon DataZone domain and, in the User management section, choose Add and select Add IAM users.
  3. On the Add users page, choose Current account and add the user ARN of the data producer and choose Add users.
  4. Next choose Associated account, and enter the data subscriber user’s ARN and add the user by choosing Add users.

Create the publish project for AWS Glue and Amazon Redshift

This step focuses on creating the publish project for AWS Glue and Amazon Redshift in the producer account. The project will be used to publish data from your data sources to the appropriate AWS services.

  1. Using the producer account, sign in to the Amazon DataZone console as a data publisher.
  2. Select View domains and select the demo_cross_account_domain.
  3. Choose the Open data portal link and sign in to the data portal.
  4. Choose Create New Project and create a project named Glue_Publish_Project for publishing AWS Glue data assets and create the project under demo_cross_account_domain.
  5. Create another project named Redshift_Publish_Project for publishing Amazon Redshift data assets, also under the demo_cross_account_domain.

Create AWS Glue and Amazon Redshift environments to publish the data assets

In this step, you set up AWS Glue and Amazon Redshift environments in the producer account to share data assets. The required infrastructure, such as the AWS Glue Data Catalog and Redshift cluster for storing data, should already be in place. After setup, this will allow the consumer account to access and use the shared data assets. See Create a new environment for detailed instructions on creating a new environment.

Create the AWS Glue environment and a new AWS Glue table

  1. In the same Amazon DataZone domain demo_cross_account_domain, choose Browse Project and select the Glue_Publish_Project and create Glue_Publish_Environment using the default DataLakeProfile.
  2. Leave the producer_glue_db_name, consumer_glue_db_name and Workgroup_name blank.
  3. Choose Create Environment and wait for the process to complete.
  4. After the environment is created, browse the list of available projects and choose Glue_publish_project.
  5. Next, navigate to the Glue_Publish_Environment, and under Analytics tools, choose Amazon Athena to open the Athena query editor
  6. Choose Open Athena and make sure that Glue_Publish_Environment is selected in the Amazon DataZone environment dropdown at the upper right and that in Data on the left, glue_publish_environment_pub_db is selected as the Database.
  7. Create a new AWS Glue table for publishing to Amazon DataZone. Paste the following create table as select (CTAS) query script in the Query window and run it to create a new table named mkt_sls_table. The script creates a table with sample marketing and sales data.
    CREATE TABLE mkt_sls_table AS
    SELECT 146776932 AS ord_num, 23 AS sales_qty_sld, 23.4 AS wholesale_cost, 45.0 as lst_pr, 43.0 as sell_pr, 2.0 as disnt, 12 as ship_mode,13 as warehouse_id, 23 as item_id, 34 as ctlg_page, 232 as ship_cust_id, 4556 as bill_cust_id
    UNION ALL SELECT 46776931, 24, 24.4, 46, 44, 1, 14, 15, 24, 35, 222, 4551
    UNION ALL SELECT 46777394, 42, 43.4, 60, 50, 10, 30, 20, 27, 43, 241, 4565
    UNION ALL SELECT 46777831, 33, 40.4, 51, 46, 15, 16, 26, 33, 40, 234, 4563
    UNION ALL SELECT 46779160, 29, 26.4, 50, 61, 8, 31, 15, 36, 40, 242, 4562
    UNION ALL SELECT 46778595, 43, 28.4, 49, 47, 7, 28, 22, 27, 43, 224, 4555
    UNION ALL SELECT 46779482, 34, 33.4, 64, 44, 10, 17, 27, 43, 52, 222, 4556
    UNION ALL SELECT 46779650, 39, 37.4, 51, 62, 13, 31, 25, 31, 52, 224, 4551
    UNION ALL SELECT 46780524, 33, 40.4, 60, 53, 18, 32, 31, 31, 39, 232, 4563
    UNION ALL SELECT 46780634, 39, 35.4, 46, 44, 16, 33, 19, 31, 52, 242, 4557
    UNION ALL SELECT 46781887, 24, 30.4, 54, 62, 13, 18, 29, 24, 52, 223, 4561

  8. Go to the Tables and Views section and verify that the mkt_sls_table table was successfully created.

Create the Amazon Redshift publish environment and a new Redshift table

  1. Staying in the same Amazon DataZone domain demo_cross_account_domain, choose Browse Project, to create an Amazon Redshift publish environment, select the Redshift_Publish_Project and create Redshift_Publish_Environment using the default data warehouse profile.
  2.  To configure environment parameters, enter the name of your Amazon Redshift cluster or workgroup, specify the database name and enter the AWS Secrets Manager secret ARN for the Redshift cluster or workgroup. You need to make sure that the secret in Secrets Manager includes the following tags. These tags help Amazon DataZone implement proper access control so that only authorized users within the correct Amazon DataZone project and domain can access the Amazon Redshift resource:
    1. For Amazon Redshift cluster: DataZone.rs.cluster: <cluster_name:database name>
    2. For Amazon Redshift Serverless workgroup: DataZone.rs.workgroup:  <workgroup_name:database_name>
    3. AmazonDataZoneProject: <projectID>
    4. AmazonDataZoneDomain: <domainID>For more information for creating redshift database user secret in secret manager, see Storing database credentials in AWS Secrets Manager.

For more information for creating redshift database user secret in secret manager, see Storing database credentials in AWS Secrets Manager.

  1. Note that the database user you provide in Secrets Manager must have superuser permissions. Data publishers should work with the data administrator to get the details of the Redshift cluster or workgroup, database name, and secret ARN.
  2. The schema is optional.
  3. Choose Create Environment and wait for the process to complete.
  4. Verify that the environment is created successfully without errors.
  5. Browse the list of available projects and select Redshift_publish_project. Navigate to Redshift_publish_environment.
  6. Under Analytics tools, choose Amazon Redshift to open the Amazon Redshift query editor.
  7. Select the Redshift cluster that you want to connect, choose Save and then choose Create Connection using temporary credentials with your IAM identity.
  8. Create a new Redshift table. You can use the CTAS query to create a new table named rs_sls_tbl. Use the provided CTAS script, which creates a table with sample sales data in the datazone_env_redshift_publish_environment schema.
    CREATE TABLE "datazone_env_redshift_publish_environment"."rs_sls_tbl" AS
    SELECT 146776932 AS ord_num, 23 AS sales_qty_sld, 23.4 AS wholesale_cost, 45.0 as lst_pr, 43.0 as sell_pr, 2.0 as disnt, 12 as ship_mode,13 as warehouse_id, 23 as item_id, 34 as ctlg_page, 232 as ship_cust_id, 4556 as bill_cust_id
    UNION ALL SELECT 46776931, 24, 24.4, 46, 44, 1, 14, 15, 24, 35, 222, 4551
    UNION ALL SELECT 46777394, 42, 43.4, 60, 50, 10, 30, 20, 27, 43, 241, 4565
    UNION ALL SELECT 46777831, 33, 40.4, 51, 46, 15, 16, 26, 33, 40, 234, 4563
    UNION ALL SELECT 46779160, 29, 26.4, 50, 61, 8, 31, 15, 36, 40, 242, 4562
    UNION ALL SELECT 46778595, 43, 28.4, 49, 47, 7, 28, 22, 27, 43, 224, 4555
    UNION ALL SELECT 46779482, 34, 33.4, 64, 44, 10, 17, 27, 43, 52, 222, 4556
    UNION ALL SELECT 46779650, 39, 37.4, 51, 62, 13, 31, 25, 31, 52, 224, 4551
    UNION ALL SELECT 46780524, 33, 40.4, 60, 53, 18, 32, 31, 31, 39, 232, 4563
    UNION ALL SELECT 46780634, 39, 35.4, 46, 44, 16, 33, 19, 31, 52, 242, 4557
    UNION ALL SELECT 46781887, 24, 30.4, 54, 62, 13, 18, 29, 24, 52, 223, 4561

  9.  Make sure that the rs_sls_tbl table is successfully created.

Publish assets into the common business catalog

In this step, you create and run the Amazon DataZone data sources for AWS Glue and Amazon Redshift. You will then publish the data assets from these data sources.

The Amazon DataZone data sources allow you to connect to various data sources, including databases, data warehouses, and data lakes, and ingest metadata into Amazon DataZone. By creating and running these data sources, you can make your data available for analysis, transformation, and sharing within your organization.

After the data sources are set up, you can publish the data assets from these sources to make them accessible to other users and applications. This process involves mapping the data assets to the appropriate business terms and metadata, making sure that the data is properly described and categorized.

Add an AWS Glue data source to publish the new AWS Glue table.

  1. Stay signed in the producer account and Amazon DataZone console as a data publisher.
  2. Choose Select project from the top navigation pane and select the Glue_Publish_Project that you want to add the data source to.
  3. Select the Glue_Publish_Environment.
  4. Choose Create data source. Enter glue-publish-datasource as the name.
  5. Under Data source type, choose AWS Glue.
  6. Under Select an environment, select Glue_Publish_Environment.
  7. Under Data selection, select the AWS Glue database glue_publish_environment_pub_db, enter your table selection criteria as “*“, and then and choose Next.
  8. Leave all other setting as default and choose Next.
  9. For Run Preference, select Run on demand to ingest metadata from the specified AWS Glue tables into Amazon DataZone.
  10. Review and choose Create.
  11. After the data source has been created choose Run. The mkt_sls_table will be listed in the inventory and available to publish.
  12. Select the mkt_sls_table table and review the metadata that was generated. Choose Accept All if you’re satisfied with the metadata.
  13. Choose Publish Asset and the mkt_sls_table table will be published to the business data catalog, making it discoverable and understandable across your organization.

Add an Amazon Redshift data source to publish the new Amazon Redshift table.

  1. Stay signed in the producer account and Amazon DataZone console as a data publisher.
  2. Choose Select project from the top navigation pane and select the Redshift_Publish_Project that you want to add the data source to.
  3. Choose the Redshift_Publish_Environment.
  4. Choose Create data source. Enter rs-publish-datasource as the name.
  5. Under Data source type, select Amazon Redshift.
  6. Under Select an environment, select Redshift_Publish_Environment.
  7. Under Redshift Credentials, enter the Redshift cluster and secret details provided by the data administrator.
  8. Under Data Selection, select the database dev and schema datazone_env_redshift_publish_environment.
  9. Keep other setting as default and choose Next.
  10. For Run Preference, select Run on Demand.
  11. Choose Save. After the data source is created, choose Run. The data source runs and the rs_sls_tbl will be listed in the inventory and available to publish.
  12. Select the rs_sls_tbl table and review the metadata that was generated. Choose Accept All if you are satisfied with the metadata.
  13. Choose Publish Asset and the rs_sls_table table will be published to the business data catalog.

Create subscribe projects for AWS Glue and Amazon Redshift

In this step, you create the projects for subscribing to AWS Glue and Amazon Redshift data assets within your Amazon DataZone domain.

  1. Sign in to the Amazon DataZone console as a data subscriber IAM user using the consumer account.
  2. Choose Associated domains and select the demo_cross_account_domain.
  3. Select the Open data portal link and sign in to the data portal.
  4. Choose Create New Project and create a project named Glue_Subscribe_Project for subscribing to the AWS Glue data assets.
  5. Create another project named Redshift_Subscribe_Project for subscribing to the Redshift data assets.

Create AWS Glue and Amazon Redshift environment profiles

In this step, you will set up the environment profiles and environments for AWS Glue and Amazon Redshift in your Amazon DataZone projects. This will allow you to connect and interact with resources across AWS accounts.

The purpose of environment profiles in Amazon DataZone is to streamline the process of environment creation. By using environment profiles, you can preconfigure essential placement information such as AWS account and AWS Region. In this solution, you will configure environment profiles with placement information pointing to your consumer account.

You will also create an Amazon DataZone environment from the profiles you are about to create. This will provision the necessary resources in the consumer account and establish the connections between the Amazon DataZone domain and the consumer account. After the environments are created, you can work with AWS Glue and Amazon Redshift assets seamlessly across different AWS accounts within your Amazon DataZone ecosystem.

Create an AWS Glue profile and environment

  1. Stay signed in the consumer account’s Amazon DataZone console as a data subscriber IAM, select the Environments tab and then choose Create environment profile.
  2. Configure the fields as follows:
    1. Name: Enter glue_subscribe-env-profile.
    2. Owner: The project where the profile is being created is selected by default in this field. Verify that it’s Glue_Subscribe_Project.
    3. Blueprint: Select Default Data Lake.
    4. AWS account parameters: Enter the consumer AWS account number and select the Region.
    5. Authorized projects: Select All projects.
    6. Publishing: Select Publish from any database.
    7. Choose Create Environment Profile.
  3. On the Create environment page, enter the following:
    1. Name: Enter glue_subscribe_environment.
    2. Verify that the Environment profile is set to glue_subscribe-env-profile.
  4. (Optional) Parameters: Enter the Producer glue db name, Consumer glue db name, and Workgroup name.
  5. Choose Create environment.
  6. It takes a few minutes for the environment to be created. Verify that the environment creation is successful without any errors.

Create a Redshift environment profile and environment

  1. Staying in the consumer account’s Amazon DataZone management console as a data subscriber IAM user, navigate to the Redshift_Subscribe_Project you created previously.
  2. Select the Environments tab and then choose Create environment profile.
  3. Configure the fields as follows:
    1. Name: Enter redshift_subscribe-env-profile.
    2. Owner: Verify that Project is set to Redshift_Subscribe_Project.
    3. Blueprint: Select Default Data Warehouse.
    4. Parameter set: Select Enter my own.
    5. AWS account parameters: Enter the consumer AWS account number and select the Region.
    6. Parameters: Select either Amazon Redshift Cluster or Amazon Redshift Serverless in the consumer account.
      • AWS Secret ARN: Enter the AWS Secrets Manager secret ARN for the Redshift cluster or workgroup. You need to make sure that the secret in Secrets Manager includes the following tags. These tags help Amazon DataZone implement proper access control so that only authorized users within the correct Amazon DataZone project and domain can access the Amazon Redshift resource.
        1. AmazonDataZoneDomain: [Domain_ID]
        2. AmazonDataZoneProject:  [Project_ID]

      For more information for creating redshift database user secret in secret manager, see Storing database credentials in AWS Secrets Manager.

      Note that the database user you provide in AWS Secrets Manager must have superuser permissions. Data publishers should work with the data administrator to get the details of the Redshift cluster or workgroup, database name, and secret ARN.

      • Redshift cluster name: Enter the name of the Amazon Redshift cluster or Amazon Redshift Serverless workgroup.
      • Database name: Enter the name of the database within the selected Amazon Redshift cluster or Amazon Redshift Serverless workgroup
    7. Authorized projects: Select All projects.
    8. Publishing: Select Publish any schema.
  4. Choose Create environment profile.
  5. Create an environment from this profile: Create an environment from this profile:
    1. Name: Enter redshift_subscribe_environment.
    2. Verify that the Environment profile is set to redshift_subscribe-env-profile.
  6. Choose Create Environment.

It takes a few minutes for the environment to be created. Verify that the environment creation is successful without any errors.

Subscribe to the AWS Glue and Redshift tables

In this step, you will subscribe AWS Glue and Amazon redshift tables published by the data producer.

Subscribe to the AWS Glue table

  1. Sign in to the Amazon DataZone console of the consumer account using the data subscriber credentials and navigate to the Glue_Subscribe_project you created previously.
  2. Search for the Market Sales Table in the Search bar.
  3. Select the Market Sales Table and choose Subscribe.
  4. In the Subscribe pop-up window, provide the following information:
    • Project: Enter the name of the project that you want to subscribe to the asset. By default this will be Glue_Subscribe_Project.
    • Enter a justification for your subscription request.
  5. Choose Subscribe.
  6. Switch to the data publisher role to approve the subscription request, then back to data subscriber after choosing Approve.
  7. Select the Glue_subscribe_project and choose Subscribed Assets. Verify that the Market Sales Table is added to your environment.
  8. Navigate to the Amazon Athena query editor using the link in the project’s home page.
  9. Choose OPEN AMAZON ATHENA.
  10. You will now be automatically routed to the Athena console, make sure that the Amazon DataZone Environment is set to glue_subscribe_environment.
  11. For Database, select glue_subscribe_environment_sub_db.
  12. You should see the mkt_sls_table in the Tables list. Preview the table by choosing the three-dot menu next to the table name and selecting Preview Table
  13. Review the table preview results. You will be able to see all the sales related data from the mkt_sls_table

Subscribe to the Redshift table

  1. Stay signed in to the Amazon DataZone management console as the data subscriber, Choose Select project from the top navigation pane and select the Redshift_Subscribe_project.
  2. Search for Sales Table in the search bar, and select the Sales Table.
  3. In the Subscribe pop-up window, provide the following information:
    • Project: Enter the name of the project that you want to subscribe to the asset. By default this will be Redshift_Subscribe_Project.
    • Enter a justification for your subscription request.
  4. Choose Subscribe.
  5. Switch back to the data publisher who is the producer of the Market Sales Table choose Approve.
  6. After the subscription request is approved, switch back to data subscriber.
  7. Select the Redshift_subscribe_project and choose Subscribed Assets. After the Sales Table is added to your environment, you can query the data in the table.
  8. Select the Amazon Redshift link in the right side panel of the project home page and navigate to the Amazon Redshift query editor.
  9. Select Open Amazon Redshift and the Redshift query editor v2 will open in a new tab.
  10. In the query editor, right-click your Amazon DataZone environment’s Amazon Redshift cluster and select Create a connection.
  11. Select Temporary credentials using your IAM identity for authentication.
    • If that authentication method isn’t available, open Account settings by choosing the gear icon in the bottom left corner, choose Authenticate with IAM credentials and choose Save.
  12. Enter the name of the Amazon DataZone environment’s database to create the connection.
  13. Choose Create connection.
  14. You can now view the Redshift table rs_sls_tbl in the datazone_env_redshift_subscribe_environment.
  15. Execute the following query to make sure the data is accessible
SELECT * FROM "dev"."datazone_env_redshift_subscribe_environment"."rs_sls_tbl";

You will be able to preview the rs_sls_tbl which will show the sale data from the table.

Clean up

To avoid unnecessary future charges, follow these steps:

Summary

Organizations often face significant challenges when trying to share data products across multiple AWS accounts. These challenges stem from the complexity of configuring proper cross-account access permissions and roles while maintaining robust data governance and security controls.

You can use the solution described in the post to publish and consume data across AWS accounts and make sure that reliable access and consistent data governance is in place. By combining the power of AWS Glue and Amazon Redshift, you can unlock valuable insights and accelerate your data-driven decision-making processes.

In this post, you followed a step-by-step guide to set up cross-account data sharing using Amazon DataZone domain association. You learned how to publish data assets from a producer account. You also learned how to subscribe to and query the published assets from a consumer account. You can optionally use AWS Lake Formation access monitoring to view permissions and data access activities. AWS Lake Formation uses AWS CloudTrail for historical analysis and CloudTrail retains logs for 90 days by default.

Now that you’re familiar with the elements involved in cross-account data sharing using Amazon DataZone and your choice of analytical tool, you’re ready to try it with multiple accounts.


About the Authors

Arun Pradeep Selvaraj is a Senior Solutions Architect at AWS. Arun is passionate about working with his customers and stakeholders on digital transformations and innovation in the cloud while continuing to learn, build and reinvent. He is creative, fast-paced, deeply customer-obsessed, and uses the working backwards process to build modern architectures to help customers solve their unique challenges. Connect with him on LinkedIn.

Piyush Mattoo is a Senior Solution Architect for the Financial Services Data Provider segment at Amazon Web Services. He’s a software technology leader with over a decade of experience building scalable and distributed software systems to enable business value through the use of technology. He has an educational background in Computer Science with a master’s degree in computer and information science from University of Massachusetts. He is based out of Southern California and current interests include camping and nature walks.

Mani Yamaraja is a Senior Customer Solutions Manager for Financial Services Data Provider segment at Amazon Web Services. He has over a decade long experience working with financial services customers enabling their digital transformation journey. Mani adopts a customer centric approach and provides technology solutions working backwards from customer’s business goals. He is passionate about the financial services industry and helps the customers accelerate their cloud based transformation using the proven mechanisms of AWS.

Governing streaming data in Amazon DataZone with the Data Solutions Framework on AWS

Post Syndicated from Vincent Gromakowski original https://aws.amazon.com/blogs/big-data/governing-streaming-data-in-amazon-datazone-with-the-data-solutions-framework-on-aws/

Effective data governance has long been a critical priority for organizations seeking to maximize the value of their data assets. It encompasses the processes, policies, and practices an organization uses to manage its data resources. The key goals of data governance are to make data discoverable and usable by those who need it, accurate and consistent, secure and protected from unauthorized access or misuse, and compliant with relevant regulations and standards. Data governance involves establishing clear ownership and accountability for data, including defining roles, responsibilities, and decision-making authority related to data management.

Traditionally, data governance frameworks have been designed to manage data at rest—the structured and unstructured information stored in databases, data warehouses, and data lakes. Amazon DataZone is a data governance and catalog service from Amazon Web Services (AWS) that allows organizations to centrally discover, control, and evolve schemas for data at rest including AWS Glue tables on Amazon Simple Storage Service (Amazon S3), Amazon Redshift tables, and Amazon SageMaker models.

However, the rise of real-time data streams and streaming data applications impacts data governance, necessitating changes to existing frameworks and practices to effectively manage the new data dynamics. Governing these rapid, decentralized data streams presents a new set of challenges that extend beyond the capabilities of many conventional data governance approaches. Factors such as the ephemeral nature of streaming data, the need for real-time responsiveness, and the technical complexity of distributed data sources require a reimagining of how we think about data oversight and control.

In this post, we explore how AWS customers can extend Amazon DataZone to support streaming data such as Amazon Managed Streaming for Apache Kafka (Amazon MSK) topics. Developers and DevOps managers can use Amazon MSK, a popular streaming data service, to run Kafka applications and Kafka Connect connectors on AWS without becoming experts in operating it. We explain how they can use Amazon DataZone custom asset types and custom authorizers to: 1) catalog Amazon MSK topics, 2) provide useful metadata such as schema and lineage, and 3) securely share Amazon MSK topics across the organization. To accelerate the implementation of Amazon MSK governance in Amazon DataZone, we use the Data Solutions Framework on AWS (DSF), an opinionated open source framework that we announced earlier this year. DSF relies on AWS Cloud Development Kit (AWS CDK) and provides several AWS CDK L3 constructs that accelerate building data solutions on AWS, including streaming governance.

High-level approach for governing streaming data in Amazon DataZone

To anchor the discussion on supporting streaming data in Amazon DataZone, we use Amazon MSK as an integration example, but the approach and the architectural patterns remain the same for other streaming services (such as Amazon Kinesis Data Streams). At a high level, to integrate streaming data, you need the following capabilities:

  • A mechanism for the Kafka topic to be represented in the Amazon DataZone catalog for discoverability (including the schema of the data flowing inside the topic), tracking of lineage and other metadata, and for consumers to request access against.
  • A mechanism to handle the custom authorization flow when a consumer triggers the subscription grant to an environment. This flow consists of the following high-level steps:
    • Collect metadata of target Amazon MSK cluster or topic that’s being subscribed to by the consumer
    • Update the producer Amazon MSK cluster’s resource policy to allow access from the consumer role
    • Provide Kafka topic level AWS Identity and Access Management (IAM) permission to the consumer roles (more on this later) so that it has access to the target Amazon MSK cluster
    • Finally, update the internal metadata of Amazon DataZone so that it’s aware of the existing subscription between producer and consumer

Amazon DataZone catalog

Before you can represent the Kafka topic as an entry in the Amazon DataZone catalog, you need to define:

  1. A custom asset type that describes the metadata that’s needed to describe a Kafka topic. To describe the schema as part of the metadata, use the built-in form type amazon.datazone.RelationalTableFormType and create two more custom form types:
    1. MskSourceReferenceFormType that contains the cluster_ARN and the cluster_type. The type is used to determine whether the Amazon MSK cluster is provisioned or serverless, given that there’s a different process to grant consume permissions.
    1. KafkaSchemaFormType, which contains various metadata on the schema, including the kafka_topic, the schema_version, schema_arn, registry_arn, compatibility_mode (for example, backward-compatible or forward-compatible) and data_format (for example, Avro or JSON), which is helpful if you plan to integrate with the AWS Glue Schema registry.
  1. After the custom asset type has been defined, you can now create an asset based on the custom asset type. The asset describes the schema, the Amazon MSK cluster, and the topic that you want to be made discoverable and accessible to consumers.

Data source for Amazon MSK clusters with AWS Glue Schema registry

In Amazon DataZone, you can create data sources for AWS Glue Data Catalog to import technical metadata of database tables from AWS Glue and have the assets registered in the Amazon DataZone project. For importing metadata related to Amazon MSK, you need to use a custom data source, which can be an AWS Lambda function, using the Amazon DataZone APIs.

We provide as part of the solution a custom Amazon MSK data source with the AWS Glue Schema registry, for automating the creation, update, and deletion of custom Amazon MSK assets. It uses AWS Lambda to extract schema definitions from a Schema registry and metadata from the Amazon MSK clusters and then creates or updates the corresponding assets in Amazon DataZone.

Before explaining how the data source works, you need to know that every custom asset in Amazon DataZone has a unique identifier. When the data source creates an asset, it stores the asset’s unique identifier in Parameter Store, a capability of AWS Systems Manager.

The steps for how the data source works are as follows:

  1. The Amazon MSK AWS Glue Schema registry data source can be scheduled to be triggered on a given interval or by listening to AWS Glue Schema events such as Create, Update or Delete Schema. It can also be invoked manually through the AWS Lambda console.
  2. When triggered, it retrieves all the existing unique identifiers from Parameter Store. These parameters serve as reference to identify if an Amazon MSK asset already exists in Amazon DataZone.
  3. The function lists the Amazon MSK clusters and retrieves the Amazon Resource Name (ARN) for the given Amazon MSK name and additional metadata related to the Amazon MSK cluster type (serverless or provisioned). This metadata will be used later by the custom authorization flow.
  4. Then the function lists all the schemas in the Schema registry for a given registry name. For each schema, it retrieves the latest version and schema definition. The schema definition is what will allow you to add schema information when creating the asset in Amazon DataZone.
  5. For each schema retrieved in the Schema registry, the Lambda function checks if the assets already exist by looking into the Systems Manager parameters retrieved in the second step.
    1. If the asset exists, the Lambda function updates the asset in Amazon DataZone, creating a new revision with the updated schema or forms.
    2. If the asset doesn’t exist, the Lambda function creates the asset in Amazon DataZone and stores its unique identifier in Systems Manager for future reference.
  6. If there are schemas registered in Parameter Store that are no longer in the Schema registry, the data source deletes the corresponding Amazon DataZone assets and removes the associated parameters from Systems Manager.

The Amazon MSK AWS Glue Schema registry data source for Amazon DataZone enables seamless registration of Kafka topics as custom assets in Amazon DataZone. It does require that the topics in the Amazon MSK cluster are using the Schema registry for schema management.

Custom authorization flow

For managed assets such as AWS Glue Data Catalog and Amazon Redshift assets, the process to grant access to the consumer is managed by Amazon DataZone. Custom asset types are considered unmanaged assets, and the process to grant access needs to be implemented outside of Amazon DataZone.

The high-level steps for the end-to-end flow are as follows:

  1. (Conditional) If the consumer environment doesn’t have a subscription target, create it through the CreateSubscriptionTarget API call. The subscription target tells Amazon DataZone which environments are compatible with an asset type.
  2. The consumer triggers a subscription request by subscribing to the relevant streaming data asset through the Amazon DataZone portal.
  3. The producer receives the subscription request and approves (or denies) the request.
  4. After the subscription request has been approved by the producer, the consumer can observe the streaming data asset in their project under the Subscribed data section.
  5. The consumer can opt to trigger a subscription grant to a target environment directly from the Amazon DataZone portal, and this action triggers the custom authorization flow.

For steps 2–4, you rely on the default behavior of Amazon DataZone and no change is required. The focus of this section is then step 1 (subscription target) and step 5 (subscription grant process).

Subscription target

Amazon DataZone has a concept called environments within a project, which indicates where the resources are located and the related access configuration (for example, the IAM role) that is used to access those resources. To allow an environment to have access to the custom asset type, consumers have to use the Amazon DataZone CreateSubscriptionTarget API prior to the subscription grants. The creation of the subscription target is a one-time operation per custom asset type per environment. In addition, the authorizedPrincipals parameter inside the CreateSubscriptionTarget API lists the various IAM principals given access to the Amazon MSK topic as part of the grant authorization flow. Lastly, when calling CreateSubscriptionTarget, the underlying principle used to call the API must belong to the target environment’s AWS account ID.

After the subscription target has been created for a custom asset type and environment, the environment is eligible as a target for subscription grants.

Subscription grant process

Amazon DataZone emits events based on user actions, and you use this mechanism to trigger the custom authorization process when a subscription grant has been triggered for Amazon MSK topics. Specifically, you use the Subscription grant requested event. These are the steps of the authorization flow:

  1. A Lambda function collects metadata on the following:
    1. Producer Amazon MSK cluster or Kinesis data stream that the consumer is requesting access to. Metadata is collected using the GetListing API.
    2. Metadata about the target environment using a call to GetEnvironment API.
    3. Metadata about the subscription target using a call to GetSubscriptionTarget API to collect the consumer roles to grant.
    4. In parallel, Amazon DataZone internal metadata about the status of the subscription grant needs to be updated, and this happens in this step. Depending on the type of action that’s being done (such as GRANT or REVOKE), the status of the subscription grant is updated respectively (for example, GRANT_IN_PROGRESS, REVOKE_IN_PROGRESS).

After the metadata has been collected, it’s passed downstream as part of the AWS Step Functions state.

  1. Update the resource policy of the target resource (for example, Amazon MSK cluster or Kinesis data stream) in the producer account. The update allows authorized principals from the consumer to access or read the target resource. Example of the policy is as follows:
{
    "Effect": "Allow",
    "Principal": {
        "AWS": [
            "<CONSUMER_ROLES_ARN>"
        ]
    },
    "Action": [
        'kafka-cluster:Connect',
        'kafka-cluster:DescribeTopic',
        'kafka-cluster:DescribeGroup',
        'kafka-cluster:AlterGroup',
        'kafka-cluster:ReadData',
        "kafka:CreateVpcConnection",
        "kafka:GetBootstrapBrokers",
        "kafka:DescribeCluster",
        "kafka:DescribeClusterV2"
    ],
    "Resource": [
        "<CLUSTER_ARN>",
        "<TOPIC_ARN>",
        "<GROUP_ARN>"
    ]
}
  1. Update the configured authorized principals by attaching additional IAM permissions depending on specific scenarios. The following examples illustrate what’s being added.

The base access or read permissions are as follows:

{
    "Effect": "Allow",
    "Action": [
        'kafka-cluster:Connect',
        'kafka-cluster:DescribeTopic',
        'kafka-cluster:DescribeGroup',
        'kafka-cluster:AlterGroup',
        'kafka-cluster:ReadData'
    ],
    "Resource": [
        "<CLUSTER_ARN>",
        "<TOPIC_ARN>",
        "<GROUP_ARN>"
    ]
}

If there’s an AWS Glue Schema registry ARN provided as part of the AWS CDK construct parameter, then additional permissions are added to allow access to both the registry and the specific schema:

{
    "Effect": "Allow",
    "Action": [
        "glue:GetRegistry",
        "glue:ListRegistries",
        "glue:GetSchema",
        "glue:ListSchemas",
        "glue:GetSchemaByDefinition",
        "glue:GetSchemaVersion",
        "glue:ListSchemaVersions",
        "glue:GetSchemaVersionsDiff",
        "glue:CheckSchemaVersionValidity",
        "glue:QuerySchemaVersionMetadata",
        "glue:GetTags"
    ],
    "Resource": [
        "<REGISTRY_ARN>",
        "<SCHEMA_ARN>"
    ]
}

If this grant is for a consumer in a different account, the following permissions are also added to allow managed VPC connections to be created by the consumer:

{
    "Effect": "Allow",
    "Action": [
        "kafka:CreateVpcConnection",
        "ec2:CreateTags",
        "ec2:CreateVPCEndpoint"
    ],
    "Resource": "*"
}
  1. Update the Amazon DataZone internal metadata on the progress of the subscription grant (for example, GRANTED or REVOKED). If there’s an exception in a step, it’s handled inside Step Functions and the subscription grant metadata is updated with a failed state (for example, GRANT_FAILED or REVOKE_FAILED).

Because Amazon DataZone supports multi-account architecture, the subscription grant process is a distributed workflow that needs to perform actions across different accounts, and it’s orchestrated from the Amazon DataZone domain account where all the events are received.

Implement streaming governance in Amazon DataZone with DSF

In this section, we deploy an example to illustrate the solution using DSF on AWS, which provides all the required components to accelerate the implementation of the solution. We use the following CDK L3 constructs from DSF:

  • DataZoneMskAssetType creates the custom asset type representing an Amazon MSK topic in Amazon DataZone
  • DataZoneGsrMskDataSource automatically creates Amazon MSK topic assets in Amazon DataZone based on schema definitions in the Schema registry
  • DataZoneMskCentralAuthorizer and DataZoneMskEnvironmentAuthorizer implement the subscription grant process for Amazon MSK topics and IAM authentication

The following diagram is the architecture for the solution.

Overall solution

In this example, we use Python for the example code. DSF also supports TypeScript.

Deployment steps

Follow the steps in the data-solutions-framework-on-aws README to deploy the solution. You need to deploy the CDK stack first, then create the custom environment and redeploy the stack with additional information.

Verify the example is working

To verify the example is working, produce sample data using the Lambda function StreamingGovernanceStack-ProducerLambda. Follow these steps:

  1. Use the AWS Lambda console to test the Lambda function by running a sample test event. The event JSON should be empty. Save your test event and click Test.

AWS Lambda run test

  1. Producing test events will generate a new schema producer-data-product in the Schema registry. Check the schema is created from the AWS Glue console using the Data Catalog menu from the left and selecting Stream schema registries.

AWS Glue schema registry

  1. New data assets should be in the Amazon DataZone portal, under the PRODUCER project
  2. On the DATA tab, in the left navigation pane, select Inventory data, as shown in the following screenshot
  3. Select producer-data-product

Streaming data product

  1. Select the BUSINESS METADATA tab to view the business metadata, as shown in the following screenshot.

business metadata

  1. To view the schema, select the SCHEMA tab, as shown in the following screenshot

data product schema

  1. To view the lineage, select the LINEAGE tab
  2. To publish the asset, select PUBLISH ASSET, as shown in the following screenshot

asset publication 

Subscribe

To subscribe, follow these steps:

  1. Switch to the consumer project by selecting CONSUMER in the top left of the screen
  2. Select Browse Catalog
  3. Choose producer-data-product and choose SUBSCRIBE, as shown in the following screenshot

subscription

  1. Return to the PRODUCER project and choose producer-data-product, as shown in the following screenshot

subscription grant

  1. Choose APPROVE, as shown in the following screenshot

subscription grant approval

  1. Go to the AWS Identity and Access Management (IAM) console and search for the consumer role. In the role definition, you should see an IAM inline policy with permissions on the Amazon MSK cluster, the Kafka topic, the Kafka consumer group, the AWS Glue schema registry and the schema from the producer.

IAM consumer policy

  1. Now let’s switch to the consumer’s environment in the Amazon Managed Service for Apache Flink console and run the Flink application called flink-consumer using the Run button.

Flink consumer

  1. Go back to the Amazon DataZone portal, and confirm that the lineage under the CONSUMER project was updated and the new Flink job run node was added to the lineage graph, as shown in the following screenshot

lineage

Clean up

To clean up the resources you created as part of this walkthrough, follow these steps:

  1. Stop the Amazon Managed Streaming for Apache Flink job.
  2. Revoke the subscription grant from the Amazon DataZone console.
  3. Run cdk destroy in your local terminal to delete the stack. Because you marked the constructs with a RemovalPolicy.DESTROY and configured DSF to remove data on destroy, running cdk destroy or deleting the stack from the AWS CloudFormation console will clean up the provisioned resources.

Conclusion

In this post, we shared how you can integrate streaming data from Amazon MSK within Amazon DataZone to create a unified data governance framework that spans the entire data lifecycle, from the ingestion of streaming data to its storage and eventual consumption by diverse producers and consumers.

We also demonstrated how to use the AWS CDK and the DSF on AWS to quickly implement this solution using built-in best practices. In addition to the Amazon DataZone streaming governance, DSF supports other patterns, such as Spark data processing and Amazon Redshift data warehousing. Our roadmap is publicly available, and we look forward to your feature requests, contributions, and feedback. You can get started using DSF by following our Quick start guide.


About the Authors

Vincent GromakowskiVincent Gromakowski is a Principal Analytics Solutions Architect at AWS where he enjoys solving customers’ data challenges. He uses his strong expertise on analytics, distributed systems and resource orchestration platform to be a trusted technical advisor for AWS customers.

Francisco MorilloFrancisco Morillo is a Sr. Streaming Solutions Architect at AWS, specializing in real-time analytics architectures. With over five years in the streaming data space, Francisco has worked as a data analyst for startups and as a big data engineer for consultancies, building streaming data pipelines. He has deep expertise in Amazon Managed Streaming for Apache Kafka (Amazon MSK) and Amazon Managed Service for Apache Flink. Francisco collaborates closely with AWS customers to build scalable streaming data solutions and advanced streaming data lakes, ensuring seamless data processing and real-time insights.

Jan Michael Go TanJan Michael Go Tan is a Principal Solutions Architect for Amazon Web Services. He helps customers design scalable and innovative solutions with the AWS Cloud.

Sofia ZilbermanSofia Zilberman is a Sr. Analytics Specialist Solutions Architect at Amazon Web Services. She has a track record of 15 years of creating large-scale, distributed processing systems. She remains passionate about big data technologies and architecture trends, and is constantly on the lookout for functional and technological innovations.

How EUROGATE established a data mesh architecture using Amazon DataZone

Post Syndicated from Dr. Leonard Heilig original https://aws.amazon.com/blogs/big-data/how-eurogate-established-a-data-mesh-architecture-using-amazon-datazone/

This post is co-written by Dr. Leonard Heilig and Meliena Zlotos from EUROGATE.

For container terminal operators, data-driven decision-making and efficient data sharing are vital to optimizing operations and boosting supply chain efficiency. Internally, making data accessible and fostering cross-departmental processing through advanced analytics and data science enhances information use and decision-making, leading to better resource allocation, reduced bottlenecks, and improved operational performance. Externally, sharing real-time data with partners such as shipping lines, trucking companies, and customs agencies fosters better coordination, visibility, and faster decision-making across the logistics chain. Together, these capabilities enable terminal operators to enhance efficiency and competitiveness in an industry that is increasingly data driven.

EUROGATE is a leading independent container terminal operator in Europe, known for its reliable and professional container handling services. Every day, EUROGATE handles thousands of freight containers moving in and out of ports as part of global supply chains. Their terminal operations rely heavily on seamless data flows and the management of vast volumes of data. Recently, EUROGATE has developed a digital twin for its container terminal Hamburg (CTH), generating millions of data points every second from Internet of Things (IoT)devices attached to its container handling equipment (CHE).

In this post, we show you how EUROGATE uses AWS services, including Amazon DataZone, to make data discoverable by data consumers across different business units so that they can innovate faster. Two use cases illustrate how this can be applied for business intelligence (BI) and data science applications, using AWS services such as Amazon Redshift and Amazon SageMaker. We encourage you to read Amazon DataZone concepts and terminology to become familiar with the terms used in this post.

Data landscape in EUROGATE and current challenges faced in data governance

The EUROGATE Group is a conglomerate of container terminals and service providers, providing container handling, intermodal transports, maintenance and repair, and seaworthy packaging services. In recent years, EUROGATE has made significant investments in modern cloud applications to enhance its operations and services along the logistics chains. With the addition of these technologies alongside existing systems like terminal operating systems (TOS) and SAP, the number of data producers has grown substantially. However, much of this data remains siloed and making it accessible for different purposes and other departments remains complex. Thus, managing data at scale and establishing data-driven decision support across different companies and departments within the EUROGATE Group remains a challenge.

Need for a data mesh architecture

Because entities in the EUROGATE group generate vast amounts of data from various sources—across departments, locations, and technologies—the traditional centralized data architecture struggles to keep up with the demands for real-time insights, agility, and scalability. The following requirements were essential to decide for adopting a modern data mesh architecture:

  • Domain-oriented ownership and data-as-a-product: EUROGATE aims to:
    • Enable scalable and straightforward data sharing across organizational boundaries.
    • Enhance agility by localizing changes within business domains and clear data contracts.
    • Improve accuracy and resiliency of analytics and machine learning by fostering data standards and high-quality data products.
    • Eliminate centralized bottlenecks and complex data pipelines.
  • Self-service and data governance: EUROGATE wants to ensure that the discovery, access, and use of data by consumers is as direct as possible through a data portal where information about shared data sets can be published, while data governance is streamlined through automated policy enforcement, ensuring compliance during key stages such as data discovery, access, and deployment.
  • Plug-and-play integration: A seamless, plug-and-play integration between data producers and consumers should facilitate rapid use of new data sets and enable quick proof of concepts, such as in the data science teams.

How Amazon DataZone helped EUROGATE address those challenges

In the first phase of establishing a data mesh, EUROGATE focused on standardized processes to allow data producers to share data in Amazon DataZone and to allow data consumers to discover and access data. The vision, as shown in the following figure, is that data from digital services, such as from the terminal operating system (TOS) and TwinSim (a project to create a digital twin of real-world operations), can be shared with Amazon DataZone and used by BI dashboards and data science teams, among others, while those digital services and other domain users can also consume subscribed data from Amazon DataZone.

EUROGATE_pic1

In the following section, two use cases demonstrate how the data mesh is established with Amazon DataZone to better facilitate machine learning for an IoT-based digital twin and BI dashboards and reporting using Tableau.

Use case 1: Machine learning for IoT-based digital twin

Through the TwinSim project, EUROGATE has developed a digital twin using AWS services that gathers real-time data (for example, positions, machinery, and pick/deck events) from CHE (including straddle carriers and quay cranes), integrates it with planning data from the TOS, and enhances it with additional sources such as weather information. In addition to real-time analytics and visualization, the data needs to be shared for long-term data analytics and machine learning applications. EUROGATE’s data science team aims to create machine learning models that integrate key data sources from various AWS accounts, allowing for training and deployment across different container terminals. To achieve this, EUROGATE designed an architecture that uses Amazon DataZone to publish specific digital twin data sets, enabling access to them with SageMaker in a separate AWS account.

As part of the required data, CHE data is shared using Amazon DataZone. The data originates in Amazon Kinesis Data Streams, from which it is copied to a dedicated Amazon Simple Storage Service (Amazon S3) bucket by using Amazon Data Firehose in combination with an AWS Lambda function for data filtering. An extract, transform, and load (ETL) process using AWS Glue is triggered once a day to extract the required data and transform it into the required format and quality, following the data product principle of data mesh architectures. From here, the metadata is published to Amazon DataZone by using AWS Glue Data Catalog. This process is shown in the following figure.

EUROGATE_2

To work with the shared data, the data science and AI teams subscribe to the data and query it using Amazon Athena by using Amazon SageMaker Data Wrangler. The following is an example query.

import awswrangler as wr
wr.athena.read_sql_query('SELECT * FROM "sagemakedatalakeenvironment_sub_db"."cycle_end"', "sagemakedatalakeenvironment_sub_db", ctas_approach=False)

A similar approach is used to connect to shared data from Amazon Redshift, which is also shared using Amazon DataZone.

import awswrangler as wr
con = wr.redshift.connect(secret_id="ai-dev-redshift-credentials",is_serverless=True,serverless_work_group="ai-dev-workgroup")
with con.cursor() as cursor:
cursor.execute('SELECT * FROM 
"datazone_datashare_db_269e5790f589258657fcc48d8cfd65ea3f3cd7f7"."datazone_env_twinsimsilverdata"."cycle_end";')
con.close()

With this, as the data lands in the curated data lake (Amazon S3 in parquet format) in the producer account, the data science and AI teams gain instant access to the source data eliminating traditional delays in the data availability. The data science and AI teams are able to explore and use new data sources as they become available through Amazon DataZone. Because Amazon DataZone integrates the data quality results, by subscribing to the data from Amazon DataZone, the teams can make sure that the data product meets consistent quality standards.

After experimentation, the data science teams can share their assets and publish their models to an Amazon DataZone business catalog using the integration between Amazon SageMaker and Amazon DataZone. This will be the future use case of EUROGATE where the ability to publish trained machine learning (ML) models back to an Amazon DataZone catalog promotes reusability, allowing models to be discovered by other teams and projects. This approach fosters knowledge sharing across the ML lifecycle.

Use case 2: BI for cloud applications

In recent years, EUROGATE has developed several cloud applications for supporting key container logistics processes and services, such as special container terminal and container depot applications or digital platforms for organizing container transports using rail and truck. The applications are hosted in dedicated AWS accounts and require a BI dashboard and reporting services based on Tableau. In the past, one-to-one connections were established between Tableau and respective applications. This led to a complex and slow computations. In this use case, EUROGATE implemented a hybrid data mesh architecture using Amazon Redshift as a centralized data platform. This approach transformed their fragmented Tableau connections into a scalable, efficient analytics ecosystem.

By centralizing container and logistics application data through Amazon Redshift and establishing a governance framework with Amazon DataZone, EUROGATE achieved both performance optimization and cost efficiency. The hybrid data mesh enables batch processing at scale while maintaining the data access controls, security, and governance; effectively balancing the distributed ownership with centralized analytics capabilities.

The data is shared from on-premises to an Amazon Relational Database Service (Amazon RDS) database in the AWS Cloud. AWS Database Migration Service (AWS DMS) is used to securely transfer the relevant data to a central Amazon Redshift cluster. AWS DMS tasks are orchestrated using AWS Step Functions. A Step Functions state machine is run on a daily using Amazon EventBridge scheduler. The data in the central data warehouse in Amazon Redshift is then processed for analytical needs and the metadata is shared to the consumers through Amazon DataZone. The consumer subscribes to the data product from Amazon DataZone and consumes the data with their own Amazon Redshift instance. This is further integrated into Tableau dashboards. The architecture is depicted in the following figure.

EUROGATE_3

Implementation benefits

As we continue to scale, efficient and seamless data sharing across services and applications becomes increasingly important. By using Amazon DataZone and other AWS services including Amazon Redshift and Amazon SageMaker, we can achieve a secure, streamlined, and scalable solution for data and ML model management, fostering effective collaboration and generating valuable insights. This approach supports both the immediate needs of visualization tools such as Tableau and the long-term demands of digital twin and IoT data analytics.

  • Centralized, scalable data sharing and native integration

Amazon DataZone facilitates integration with applications such as Tableau, enabling data to flow seamlessly within the AWS ecosystem. Those integrations reduce the need for complex, manual configurations, allowing EUROGATE to share data across the organization efficiently. The architecture centralizes key data, such as CHE data, for analytics and ML, ensuring that teams across the organization have access to consistent, up-to-date information, enhancing collaboration and decision-making at all levels. Insights from ML models can be channeled through Amazon DataZone to inform internal key decision makers internally and external partners.

  • Reduced complexity, greater scalability, and cost efficiency

The Amazon DataZone architecture reduces unnecessary complexity and scales with EUROGATE’s growing needs, whether through new data sources or increased user demand. In parallel, using Amazon Data Firehose to stream data into an S3 bucket and AWS Glue for daily ETL transformations provides an automated pipeline that prepares the data for long-term analytics. This batch-oriented approach reduces computational overhead and associated costs, allowing resources to be allocated efficiently. While real-time data is processed by other applications, this setup maintains high-performance analytics without the expense of continuous processing.

  • Faster and easier data integration for Tableau and enhanced data preparation for ML

Amazon DataZone streamlines data integration for tools such as Tableau, enabling BI teams to quickly add and visualize data without building complex pipelines. This agility accelerates EUROGATE’s insight generation, keeping decision-making aligned with current data. Additionally, daily ETL transformations through AWS Glue ensure high-quality, structured data for ML, enabling efficient model training and predictive analytics. This combination of ease and depth in data management equips EUROGATE to support both rapid BI needs and robust analytical processing for IoT and digital twin projects.

  • Faster onboarding and data sharing of data assets between organizational units

Amazon DataZone helps the teams to autonomously discover data assets that are created in the organization and to onboard data assets across AWS accounts within minutes with metadata synchronization. EUROGATE has already onboarded 500 data assets from different organizational units using Amazon DataZone. The new process of onboarding data assets is 15 times faster, leading to immediate visibility of data assets while simplifying data sharing and discovery through an intuitive point-and-click interface that removes traditional barriers to data access.

Conclusion

The implementation of Amazon DataZone marks a transformative step for EUROGATE’s data management by providing a scalable, and efficient solution for data sharing, machine learning and analytics. By integrating various data producers and connecting them to data consumers such as Amazon SageMaker and Tableau, Amazon DataZone functions as a digital library to streamline data sharing and integration across EUROGATE’s operations. In the first phase of production, Amazon DataZone has already demonstrated measurable benefits, including access to data and ML and the ability to incorporate a wider range of datasets to its unified catalog repository. By centralizing metadata with Amazon DataZone, EUROGATE is setting a solid foundation for efficient operations and improved data and ML governance, because teams can now discover, govern, and analyze data with greater confidence and speed. This capability supports rapid responses to business needs, helping EUROGATE to maintain agility and stay ahead of the curve. With this, EUROGATE is better positioned to onboard new data sources, integrate additional terminals, and expand machine learning applications across our container terminals.

Amazon DataZone empowers EUROGATE by setting the stage for long-term operational excellence and scalability. With a unified catalog, enhanced analytics capabilities, and efficient data transformation processes, we’re laying the groundwork for future growth. This infrastructure enables EUROGATE to extract predictive insights, drive smarter business decisions, and scale operations efficiently, ultimately supporting our goal of sustained innovation and competitive advantage.

Future vision and next steps

As EUROGATE continues to advance its digital transformation, the integration of Amazon DataZone and EUROGATE’s architecture lays the groundwork for a more data-driven and intelligent future. In the upcoming phases, the vision is to further expand the role of Amazon DataZone as the central platform for all data management, enabling seamless integration across an even broader set of data sources and consumers. This will include additional data from more container terminals and logistics service providers, enhanced operational metrics, IoT sensor data, and advanced third-party sources such as global supply chain data and maritime analytics.

The continued focus on secure data sharing and governance will also foster better collaboration with partners, suppliers, and customers, leading to improved service levels and a more resilient supply chain. This future vision will help EUROGATE maintain its position as a leader in container terminal operations while continuously adapting to technological advancements and market dynamics.

Ultimately, EUROGATE’s investment in this architecture ensures that the organization is well-positioned to scale and innovate in a dynamic industry through a future of smarter, more connected, and highly efficient container terminal operations.

To learn more about Amazon DataZone and how to get started, see the Getting started guide. See the YouTube playlist for some of the latest demos of Amazon DataZone and short descriptions of the capabilities available.


About the Authors

Dr. Leonard Heilig is CTO at driveMybox and drives digitalization and AI initiatives at EUROGATE, bringing over 10 years of research and industry experience in cloud-based platform development, data management, and AI. Combining a deep understanding of advanced technologies with a passion for innovation, Leonard is dedicated to transforming logistics processes through digitalization and AI-driven solutions.

Meliena ZlotosMeliena Zlotos is a DevOps Engineer at EUROGATE with a background in Industrial Engineering. She has been heavily involved in the Data Sharing Project, focusing on the implementation of Amazon DataZone into EUROGATE’s IT environment. Through this project, Meliena has gained valuable experience and insights into DataZone and Data Engineering, contributing to the successful integration and optimization of data management solutions within the organization.

Lakshmi Nair is a Senior Specialist Solutions Architect for Data Analytics at AWS. She focuses on architecting solutions for organizations across their end-to-end data analytics estate, including batch and real-time streaming, data governance, big data, data warehousing, and data lake workloads. She can reached via LinkedIn.

Siamak NarimanSiamak Nariman is a Senior Product Manager at AWS. He is focused on AI/ML technology, ML model management, and ML governance to improve overall organizational efficiency and productivity. He has extensive experience automating processes and deploying various technologies.

HEMA accelerates their data governance journey with Amazon DataZone

Post Syndicated from Luis Campos original https://aws.amazon.com/blogs/big-data/hema-accelerates-their-data-governance-journey-with-amazon-datazone/

This post is cowritten by Tommaso Paracciani and Oghosa Omorisiagbon from HEMA.

Data has become an invaluable asset for businesses, offering critical insights to drive strategic decision-making and operational optimization. However, many companies today still struggle to effectively harness and use their data due to challenges such as data silos, lack of discoverability, poor data quality, and a lack of data literacy and analytical capabilities to quickly access and use data across the organization. To address these growing data management challenges, AWS customers are using Amazon DataZone, a data management service that makes it fast and effortless to catalog, discover, share, and govern data stored across AWS, on-premises, and third-party sources.

HEMA is a household Dutch retail brand name since 1926, providing daily convenience products using unique design. HEMA’s more than 17,000 employees bring exclusive, sustainably designed products in more than 750 stores in the Netherlands but also in Belgium, Luxembourg, France, Germany, and Austria, with webstores available in all these countries. HEMA built its first ecommerce system on AWS in 2018 and 5 years later, its developers have the freedom to innovate and build software fast with their choice of tools in the AWS Cloud. Today, this is powering every part of the organization, from the customer-favorite online cake customization feature to democratizing data to drive business insight.

This post describes how HEMA used Amazon DataZone to build their data mesh and enable streamlined data access across multiple business areas. It explains HEMA’s unique journey of deploying Amazon DataZone, the key challenges they overcame, and the transformative benefits they have realized since deployment in May 2024. From establishing an enterprise-wide data inventory and improving data discoverability, to enabling decentralized data sharing and governance, Amazon DataZone has been a game changer for HEMA.

Data landscape at HEMA

After moving its entire data platform from on premises to the AWS Cloud, the wave of change presented a unique opportunity for the HEMA Data & Cloud function to invest and commit in building a data mesh.

HEMA has a bespoke enterprise architecture, built around the concept of services. These services are individual software functionalities that fulfill a specific purpose within the company. Each service is hosted in a dedicated AWS account and is built and maintained by a product owner and a development team, as illustrated in the following figure.

HEMA runs over 400 services, and 20 of them run extract, transform, and load (ETL) pipelines with dedicated data resources, which produce and consume data assets shared across the data mesh.

Data management in a data mesh

Weeks after launch, HEMA’s data platform wasn’t where the company wanted it to be. Building an agile organization that runs on reliable and streamlined processes was the primary goal. Initially, the data inventories of different services were siloed within isolated environments, making data discovery and sharing across services manual and time-consuming for all teams involved.

Implementing robust data governance is challenging. In a data mesh architecture, this complexity is amplified by the organization’s decentralized nature. In this context, HEMA concluded that data governance was no longer a nice-to-have, but had become a foundational piece required to build a healthy data organization.

Why HEMA selected Amazon DataZone

By exploring the preview, HEMA saw how Amazon DataZone covered all the critical pillars of data management in a single solution. It was clear how Amazon DataZone would bring benefit to both the technical teams as well as the business end-users. The technical organization could take advantage of a robust programmatic solution to manage the availability, accessibility, and quality of the data assets that make the enterprise data catalog. The business end-users were given a tool to discover data assets produced within the mesh and seamlessly self-serve on their data sharing needs.

Features such as AI-generated metadata were key to providing end-users with reliable and use case-driven explanations of what a certain data product could provide and solve, while the subscription feature allowed them to start using a certain data asset within their own environment in a matter of seconds, as opposed to the existing lengthy and human-driven process.

These reasons, as well as the self-service capabilities, resulted in HEMA’s decision to adopt and roll out Amazon DataZone at the enterprise level.

Solution overview

The HEMA data landscape is multifaceted, with various teams across the organization using a range of technologies and systems, including Databricks. To effectively govern this complex data environment, HEMA has adopted a data mesh architecture on AWS. This architecture maintains a central intelligence platform (CIP) that enables the activities of both data producers and data consumers by providing the necessary platform and infrastructure. The overall structure can be represented in the following figure.

Each service uses two AWS accounts, one for pre-production and one for production. This separation means changes can be tested thoroughly before being deployed to live operations.

Amazon DataZone is the central piece in this architecture. It helps HEMA centralize all data assets across disparate data stacks into a single catalog. It plays a pivotal role in bridging the gap and integrating different systems, such as Databricks and native AWS services. The integration of Databricks Delta tables into Amazon DataZone is done using the AWS Glue Data Catalog. Delta tables’ technical metadata is stored in the Data Catalog, which is a native source for creating assets in the Amazon DataZone business catalog. Access control is enforced using AWS Lake Formation, which manages fine-grained access control and data sharing on data lake data. The following figure illustrates the data mesh architecture.

The Amazon DataZone implementation follows the same approach as individual services: HEMA maintains two distinct domain data catalogs: preprod-hema-data-catalog and prod-hema-data-catalog. These catalogs serve as the backbone for data sharing across pre-production and production accounts, allowing flexible access to data assets based on the environment’s needs.

The prod-hema-data-catalog is the production-grade catalog that supports data sharing across production services and, in some cases, pre-production services. This catalog only facilitates the production of data assets from production services (disallows publishing of assets belonging to pre-production services) and allows pre-production services to access production-grade data. The following diagram illustrates the architecture of both accounts.

To establish isolation between services in the data mesh, a project is dedicated to a unique service account. The environment profiles and environments are configured to be explicitly used only by the service. This Amazon DataZone configuration is managed centrally by the core team using AWS CloudFormation. After projects are created and configured by the central team, project teams have access to self-service capabilities to create their own environments according to their needs.

The following diagram illustrates the full workflow for onboarding HEMA service teams in Amazon DataZone.

The workflow includes the following steps:

  1. A service team (either a data producer or a data consumer) initiates a request to the core data platform team to enable data sharing for their service accounts. This request is typically made when a service team has a use case where they need to either publish data to the catalog (for other teams to consume) or access data that another team has published.
  2. After the request is received, the core data platform team assesses the requirements and initiates the creation of projects and environments in Amazon DataZone. This is done using AWS CloudFormation and a continuous integration and delivery (CI/CD) pipeline. The core data platform team makes sure that the appropriate AWS account (pre-production or production) is linked to the environment within the project in the respective catalogs.
  3. After the projects and environments are set up, service teams can use Amazon DataZone features to produce and consume data assets:
    1. Producers (for example, Service A) can publish their data assets to the Data Catalog and approve or reject subscription requests.
    2. Consumers (for example, Service B) can search and access these published data assets using the Amazon DataZone catalog and request data access through subscription requests.

In a decentralized data mesh environment, there is a risk of service teams creating resources in service accounts they are not authorized to manage, which may lead to governance issues and data mismanagement. To address this challenge, HEMA followed two principles:

  • Amazon DataZone project structure – Each project contains resources that are solely managed by the service team (project members) responsible for it. Each service team’s project provides a clear boundary for the resources they manage.
  • Environment isolation – The core teams enforce governance policies in the Amazon DataZone configuration, allowing teams to only deploy resources within their own environments.

Adoption plan: Strategy

In HEMA’s data mesh, the catalog must be built in collaboration with all the services that produce data, so the key for the central data governance team was ideating an adoption plan that would add value to these teams, rather than disrupting the delivery of their projects. With that in mind, HEMA’s adoption strategy was designed on three core principles:

  • Launch it – Do not wait until you can ship to production a full-scale service that covers every single feature available. Instead, define an MVP that solves the most critical need for the business and make it available for the business as soon as you can.
  • Prove value – HEMA’s data team ran several internal seminars, and dedicated presentations with each of the involved teams to showcase how Amazon DataZone would simplify their data sharing needs. Do not tell them they must invest time to learn and start using a new service, but rather let them get drawn in by the new advantages of the new functionality and stimulate self-adoption.
  • Be there – This connects with what HEMA as a company stands for. Be close to the teams when they need support during the adoption stage, like HEMA is close to their customers whenever they need a new product for their lives. Create space for Q&A and develop a collaborative experience for everyone in their adoption curve.

Adoption plan: Action points

While deploying the adoption plan for a decentralized data marketplace using Amazon DataZone, HEMA followed a “start small, fine-tune, and iterate” approach. In practice, this meant that the Data & Cloud team started working with one business unit, expanding then to several business units, while focusing on one single feature: data asset subscription. To increase interest and adoption, this process was introduced for the core data assets that were more used in the company.

After this part of the process was well understood and embraced by everyone, the next step was to start supporting the data pipeline adaptation work needed for each business unit.

Finally, when all teams were onboarded and familiar with the subscription feature, HEMA moved to introduce the business units to the second critical feature: data publishing. In summary, HEMA released new features and allowed the domains to pick up the implementation at their preferred pace before moving onto the next one.

When adoption was at a point where all core data assets were being consumed through the Amazon DataZone catalog, the Lake Formation resource links used previously to share data across accounts were decommissioned, and at the same time the Data & Cloud team interrupted their duty to share data between business units, stimulating the peer-to-peer data sharing practice, where teams can directly talk to each other without having to involve a third party.

Results

The popularity of Amazon DataZone across the enterprise ramped up quickly, and all the involved business units started using the service daily to self-serve their needs. The existence of a central data catalog enabled teams to seamlessly search, discover, share, and subscribe to data assets produced within the business. Only a few months after launching the service, HEMA observed stunning statistics:

  • Over 200 data assets published to the catalog
  • Over 180 active subscriptions
  • Over 100 active users monthly
  • Over 20 business units (services) onboarded
  • Data sharing average turnaround time cut from 4 working days to few seconds, without the support of any other team

Additionally, they saw massive benefits that can’t be represented by statistics. Above all, the ability to autonomously discover data produced by other teams is enabling a series of new use cases for the business, which weren’t even visible to them earlier due to the lack of awareness and visibility on what others were producing. For example, the data science team quickly developed a new predictive model for sales by reusing data already available in Amazon DataZone, instead of rebuilding it from scratch. This is resulting in an energized data organization, which can collaborate and contribute to shaping the future of HEMA’s data operations.

Conclusion

At HEMA, Amazon DataZone made data governance a reality, and so the company wants to implement new features in close collaboration with AWS, while continuing to work on the rollout of items that are already in HEMA’s roadmap. The team is continuously developing the service, launching a series of new features that will continue to improve the data operations:

  • Data quality scores – This feature helps data producers monitor and optimize their data assets, while consumers can see upfront the nuances of a certain asset that they might be using or are looking to use within their ETL pipelines
  • Data lineage – This feature allows consumers and the central governance team to trace data sources, transformation stages, and observe cross-organizational usage of data assets
  • Fine-grained access control – This feature enables producers to be in full control of what they share with other units, making sure that only the relevant pieces of a data asset are shared with the consuming teams

The long-term vision of HEMA is clear: Amazon DataZone is set to become the central solution for data sharing and data cataloging across the enterprise. Although as of today, Amazon DataZone is focused on supporting the teams running ETL pipelines, the goal is to extend the service to all the business teams that work with data, with the ultimate goal of streamlining their daily operations. Data is one of the most valuable resources a company has, and HEMA is determined to democratize its role by building an efficient data organization, who relies on the most advanced data governance solution on the market.


About the authors

Luis Campos is the Data & AI Governance GTM Lead for the EMEA market at AWS where he helps customers with their data strategies starting with strong data governance and uses his expertise in end-to-end data & analytics management. Luis is also a public speaking coach, based in the Netherlands, and has two boys with 18 years apart, which has taught him to see problems from both ends of a spectrum.

Vincent Gromakowski is a Principal Analytics Solutions Architect at AWS where he enjoys solving customers’ data challenges. He uses his strong expertise on analytics, distributed systems and resource orchestration platform to be a trusted technical advisor for AWS customers.

Tommaso is the Head of Data & Cloud Platforms at HEMA. He joined the business with the goal of modernising the Data Organization by building cloud-based Data Platform – hosted in AWS – which would power a Data Mesh architecture. With a strong passion for both technical and organizational challenges, Tommaso leads the Solution Architecture efforts as well as all core Data Management and Data Governance initiatives, for which he is also a passionate public speaker. Outside the office, Tommaso is a full-time dad with a passion for traveling and sports.

Oghosa Omorisiagbon is a Senior Data Engineer at HEMA. He focuses on leveraging AWS-native tools to optimise data pipelines, modernise HEMA’s data infrastructure and introduce reliable and scalable end-to-end data architecture solutions. Outside of work, he enjoys traveling, playing video games and outdoor activities.

Implement a custom subscription workflow for unmanaged Amazon S3 assets published with Amazon DataZone

Post Syndicated from Somdeb Bhattacharjee original https://aws.amazon.com/blogs/big-data/implement-a-custom-subscription-workflow-for-unmanaged-amazon-s3-assets-published-with-amazon-datazone/

Organizational data is often fragmented across multiple lines of business, leading to inconsistent and sometimes duplicate datasets. This fragmentation can delay decision-making and erode trust in available data. Amazon DataZone, a data management service, helps you catalog, discover, share, and govern data stored across AWS, on-premises systems, and third-party sources. Although Amazon DataZone automates subscription fulfillment for structured data assets—such as data stored in Amazon Simple Storage Service (Amazon S3), cataloged with the AWS Glue Data Catalog, or stored in Amazon Redshift—many organizations also rely heavily on unstructured data. For these customers, extending the streamlined data discovery and subscription workflows in Amazon DataZone to unstructured data, such as files stored in Amazon S3, is critical.

For example, Genentech, a leading biotechnology company, has vast sets of unstructured gene sequencing data organized across multiple S3 buckets and prefixes. They need to enable direct access to these data assets for downstream applications efficiently, while maintaining governance and access controls.

In this post, we demonstrate how to implement a custom subscription workflow using Amazon DataZone, Amazon EventBridge, and AWS Lambda to automate the fulfillment process for unmanaged data assets, such as unstructured data stored in Amazon S3. This solution enhances governance and simplifies access to unstructured data assets across the organization.

Solution overview

For our use case, the data producer has unstructured data stored in S3 buckets, organized with S3 prefixes. We want to publish this data to Amazon DataZone as discoverable S3 data. On the consumer side, users need to search for these assets, request subscriptions, and access the data within an Amazon SageMaker notebook, using their own custom AWS Identity and Access Management (IAM) roles.

The proposed solution involves creating a custom subscription workflow that uses the event-driven architecture of Amazon DataZone. Amazon DataZone keeps you informed of key activities (events) within your data portal, such as subscription requests, updates, comments, and system events. These events are delivered through the EventBridge default event bus.

An EventBridge rule captures subscription events and invokes a custom Lambda function. This Lambda function contains the logic to manage access policies for the subscribed unmanaged asset, automating the subscription process for unstructured S3 assets. This approach streamlines data access while ensuring proper governance.

To learn more about working with events using EventBridge, refer to Events via Amazon EventBridge default bus.

The solution architecture is shown in the following screenshot.

Custom subscription workflow architecture diagram

To implement the solution, we complete the following steps:

  1. As a data producer, publish an unstructured S3 based data asset as S3ObjectCollectionType to Amazon DataZone.
  2. For the consumer, create a custom AWS service environment in the consumer Amazon DataZone project and add a subscription target for the IAM role attached to a SageMaker notebook instance. Now, as a consumer, request access to the unstructured asset published in the previous step.
  3. When the request is approved, capture the subscription created event using an EventBridge rule.
  4. Invoke a Lambda function as the target for the EventBridge rule and pass the event payload to it:
  5. The Lambda function does 2 things:
    1. Fetches the asset details, including the Amazon Resource Name (ARN) of the S3 published asset and the IAM role ARN from the subscription target.
    2. Uses the information to update the S3 bucket policy granting List/Get access to the IAM role.

Prerequisites

To follow along with the post, you should have an AWS account. If you don’t have one, you can sign up for one.

For this post, we assume you know how to create an Amazon DataZone domain and Amazon DataZone projects. For more information, see Create domains and Working with projects and environments in Amazon DataZone.

Also, for simplicity, we use the same IAM role for the Amazon DataZone admin (creating domains) as well the producer and consumer personas.

Publish unstructured S3 data to Amazon DataZone

We have uploaded some sample unstructured data into an S3 bucket. This is the data that will be published to Amazon DataZone. You can use any unstructured data, such as an image or text file.

On the Properties tab of the S3 folder, note the ARN of the S3 bucket prefix.

Complete the following steps to publish the data:

  1. Create an Amazon DataZone domain in the account and navigate to the domain portal using the link for Data portal URL.

DataZone domain creation

  1. Create a new Amazon DataZone project (for this post, we name it unstructured-data-producer-project) for publishing the unstructured S3 data asset.
  2. On the Data tab of the project, choose Create data asset.

Data asset creation

  1. Enter a name for the asset.
  2. For Asset type, choose S3 object collection.
  3. For S3 location ARN, enter the ARN of the S3 prefix.

After you create the asset, you can add glossaries or metadata forms, but it’s not necessary for this post. You can publish the data asset so it’s now discoverable within the Amazon DataZone portal.

Set up the SageMaker notebook and SageMaker instance IAM role

Create an IAM role which will be attached to the SageMaker notebook instance. For the trust policy, allow SageMaker to assume this role and leave the Permissions tab blank. We refer to this role as the instance-role throughout the post.

SageMaker instance role

Next, create a SageMaker notebook instance from the SageMaker console. Attach the instance-role to the notebook instance.

SageMaker instance

Set up the consumer Amazon DataZone project, custom AWS service environment, and subscription target

Complete the following steps:

  1. Log in to the Amazon DataZone portal and create a consumer project (for this post, we call it custom-blueprint-consumer-project), which will used by the consumer persona to subscribe to the unstructured data asset.

Custom blueprint project name

We use the recently launched custom blueprints for AWS services for creating the environment in this consumer project. The custom blueprint allows you to bring your own environment IAM role to integrate your existing AWS resources with Amazon DataZone. For this post, we create a custom environment to directly integrate SageMaker notebook access from the Amazon DataZone portal.

  1. Before you create the custom environment, create the environment IAM role that will be used in the custom blueprint. The role should have a trust policy as shown in the following screenshot. For the permissions, attach the AWS managed policy AmazonSageMakerFullAccess. We refer to this role as the environment-role throughout the post.

Custom Environment role

  1. To create the custom environment, first enable the Custom AWS Service blueprint on the Amazon DataZone console.

Enable custom blueprint

  1. Open the blueprint to create a new environment as shown in the following screenshot.
  2. For Owning project, use the consumer project that you created earlier and for Permissions, use the environment-role.

Custom environment project and role

  1. After you create the environment, open it to create a customized URL for the SageMaker notebook access.

SageMaker custom URL

  1. Create a new custom AWS link and enter the URL from the SageMaker notebook.

You can find it by navigating to the SageMaker console and choosing Notebooks in the navigation pane.

  1. Choose Customize to add the custom link.

Add the custom link

  1. Next, create a subscription target in the custom environment to pass the instance role that needs access to the unstructured data.

A subscription target is an Amazon DataZone engineering concept that allows Amazon DataZone to fulfill subscription requests for managed assets by granting access based on the information defined in the target like domain-id, environment-id, or authorized-principals.

Currently, creation of subscription targets is only allowed using the AWS Command Line Interface (AWS CLI). You can use the command create-subscription-target to create the subscription target.

The following is an example JSON payload for the subscription target creation. Create it as a JSON file on your workstation (for this post, we call it blog-sub-target.json). Replace the domain ID and the environment ID with the corresponding values for your domain and environment.

{
"domainIdentifier": "<<your-domain-id>>",
"environmentIdentifier": "<<your-environment-id>>",
"name": "custom-s3-target-consumerenv",
"type": "GlueSubscriptionTargetType",
"manageAccessRole": "<<provide the environment-role here>>",
"applicableAssetTypes": ["S3ObjectCollectionAssetType"],
"provider": "Custom Provider",
"authorizedPrincipals": [ "<<provide the instance-role here>>"],
"subscriptionTargetConfig": [{
"formName": "GlueSubscriptionTargetConfigForm",
"content": "{\"databaseName\":\"customdb1\"}"
}]
}

You can get the domain ID from the user name button in the upper right Amazon DataZone data portal; it’s in the format dzd_<<some-random-characters>>.

For the environment ID, you can find it on the Settings tab of the environment within your consumer project.

  1. Open an AWS CloudShell environment and upload the JSON payload file using the Actions option in the CloudShell terminal.
  2. You can now create a new subscription target using the following AWS CLI command:

aws datazone create-subscription-target --cli-input-json file://blog-sub-target.json

Create subscription target

  1. To verify the subscription target was created successfully, run the list-subscription-target command from the AWS CloudShell environment:
aws datazone list-subscription-targets —domain-identifier <<domain-id>> —environment-identifier <<environment-id>>

Create a function to respond to subscription events

Now that you have the consumer environment and subscription target set up, the next step is to implement a custom workflow for handling subscription requests.

The simplest mechanism to handle subscription events is a Lambda function. The exact implementation may vary based on environment; for this post, we walk through the steps to create a simple function to handle subscription creation and cancellation.

  1. On the Lambda console, choose Functions in the navigation pane.
  2. Choose Create function.
  3. Select Author from scratch.
  4. For Function name, enter a name (for example, create-s3policy-for-subscription-target).
  5. For Runtime¸ choose Python 3.12.
  6. Choose Create function.

Author Lambda function

This should open the Code tab for the function and allow editing of the Python code for the function. Let’s look at some of the key components of a function to handle the subscription for unmanaged S3 assets.

Handle only relevant events

When the function gets invoked, we check to make sure it’s one of the events that’s relevant for managing access. Otherwise, the function can simply return a message without taking further action.

def lambda_handler(event, context):
    # Get the basic info about the event
    event_detail = event['detail']

    # Make sure it's one of the events we're interested in
    event_source = event['source']
    event_type = event['detail-type']

    if event_source != 'aws.datazone':
        return '{"Response" : "Not a DataZone event"}'
    elif event_type not in ['Subscription Created', 'Subscription Cancelled', 
                               'Subscription Revoked']:
        return '{"Response" : "Not a subscription created, cancelled, or revoked event"}'

These subscription events should include both the domain ID and a request ID (among other attributes). You can use these to look up the details of the subscription request in Amazon DataZone:

sub_request = dz.get_subscription_request_details(
domainIdentifier = domain_id,
identifier= sub_request_id
)
asset_listing = sub_request['subscribedListings'][0]['item']['assetListing']
form_data = json.loads(asset_listing['forms'])
asset_id = asset_listing['entityId']
asset_version = asset_listing['entityRevision']
asset_type = asset_listing['entityType']

Part of the subscription request should include the ARN for the S3 bucket in question, so you can retrieve that:

# We only want to take action if this is a S3 asset
    if asset_type == 'S3ObjectCollectionAssetType':
        # Get the bucket ARN from the form info for the asset
        bucket_arn = form_data['S3ObjectCollectionForm']['bucketArn']
        
        #Get the principal from the subscription target
        principal = get_principal(domain_id,project_id)

        try:
            # Get the bucket name from the ARN                    
            bucket_name_with_prefix = bucket_arn.split(':')[5]
            bucket_name = bucket_name_with_prefix.split('/')[0]
           
        except IndexError:
            response = '{"Response" : "Could not find bucket name in ARN"}'
            return response

You can also use the Amazon DataZone API calls to get the environment associated with the project making the subscription request for this S3 asset. After retrieving the environment ID, you can check which IAM principals have been authorized to access unmanaged S3 assets using the subscription target:

        list_sub_target = dz.list_subscription_targets(
            domainIdentifier=domain_id,
            environmentIdentifier=environment_id,
            maxResults=50,
            sortBy='CREATED_AT',
            sortOrder='DESCENDING'
            )
        
        print('asset type:', list_sub_target['items'][0]['applicableAssetTypes'])
        
        if list_sub_target['items'][0]['applicableAssetTypes'] == ['S3ObjectCollectionAssetType']:
            role_arn = list_sub_target['items'][0]['authorizedPrincipals']
            print('role arn',role_arn)

If this is a new subscription, add the relevant IAM principal to the S3 bucket policy by appending a statement that allows the desired S3 actions on this bucket for the new principal:

        if event_type == 'Subscription Created':
            if bucket_arn[-1] == '/':
                statement_block.append({
                    'Sid' : sid_string,
                    'Action': S3_ACTION_STRING,
                    'Resource': [
                        bucket_arn,
                        bucket_arn + '*'
                    ],
                    'Effect': 'Allow',
                    'Principal': {'AWS': principal}
                })

Conversely, if this is a subscription being revoked or cancelled, remove the previously added statement from the bucket policy to make sure the IAM principal no longer has access:

        elif event_type == 'Subscription Cancelled' or event_type == 'Subscription Revoked':
            # Remove the statement from the policy if it's there
            # Made sure to handle case where there's no Sid for a statement
            pruned_statement_block = []
            for statement in statement_block:
                if 'Sid' not in statement or statement['Sid'] != sid_string:
                    pruned_statement_block.append(statement)
            statement_block = pruned_statement_block

The completed function should be able to handle adding or removing principals like IAM roles or users to a bucket policy. Be sure to handle cases where there is no existing bucket policy or where a cancellation means removing the only statement in the policy, meaning the entire bucket policy is no longer needed.

The following is an example of a completed function:

import json
import boto3
import os


dz = boto3.client('datazone')
s3 = boto3.client('s3')

# The list of actions to be permitted on the bucket in the newly granted policy
S3_ACTION_STRING = 's3:*'

def build_policy_statements(event_type, statement_block, principal, sub_request_id, bucket_arn):
        # Generate a Sid that should be unique
        sid_string = ''.join(c for c in f'DZ{principal}{sub_request_id}' if c.isalnum())
        # Add a new policy statement that gives the prinicpal access to whole bucket.
        # If it turns out something other than bucket ARN is allowed in asset, we can
        # get more granular than that
        # Sid that should be unique in case we need to handle unsubscribe
        print('statement block :',statement_block)
        if event_type == 'Subscription Created':
            if bucket_arn[-1] == '/':
                statement_block.append({
                    'Sid' : sid_string,
                    'Action': S3_ACTION_STRING,
                    'Resource': [
                        bucket_arn,
                        bucket_arn + '*'
                    ],
                    'Effect': 'Allow',
                    'Principal': {'AWS': principal}
                })
            else:
                statement_block.append({
                    'Sid' : sid_string,
                    'Action': S3_ACTION_STRING,
                    'Resource': [
                        bucket_arn,
                        bucket_arn + '/*'
                    ],
                    'Effect': 'Allow',
                    'Principal': {'AWS': principal}
                })
        elif event_type == 'Subscription Cancelled' or event_type == 'Subscription Revoked':
            # Remove the statement from the policy if it's there
            # Made sure to handle case where there's no Sid for a statement
            pruned_statement_block = []
            for statement in statement_block:
                if 'Sid' not in statement or statement['Sid'] != sid_string:
                    pruned_statement_block.append(statement)
            statement_block = pruned_statement_block
           

        return statement_block

def lambda_handler(event, context):
    """Lambda function reacting to DataZone subscribe events

    Parameters
    ----------
    event: dict, required
        Event Bridge Events Format

    context: object, required
        Lambda Context runtime methods and attributes

    Returns
    ------
        Simple reponse indicating success or failure reason
    """
    # Get the basic info about the event
    event_detail = event['detail']

    # Make sure it's one of the events we're interested in
    event_source = event['source']
    event_type = event['detail-type']

    if event_source != 'aws.datazone':
        return '{"Response" : "Not a DataZone event"}'
    elif event_type not in ['Subscription Created', 'Subscription Cancelled', 
                               'Subscription Revoked']:
        return '{"Response" : "Not a subscription created, cancelled, or revoked event"}'

    
    # get the domain_id and other information
    domain_id = event_detail['metadata']['domain']
    project_id = event_detail['metadata']['owningProjectId']
    sub_request_id = event_detail['data']['subscriptionRequestId']
    listing_id = event_detail['data']['subscribedListing']['id']
    listing_version = event_detail['data']['subscribedListing']['version']
    
    print('domain-id',domain_id)
    print('project-id:',project_id)
    
    sub_request = dz.get_subscription_request_details(
        domainIdentifier = domain_id,
        identifier= sub_request_id
    )
   
    # Retrieve info about the asset from the request
    asset_listing = sub_request['subscribedListings'][0]['item']['assetListing']
    form_data = json.loads(asset_listing['forms'])
    asset_id = asset_listing['entityId']
    asset_version = asset_listing['entityRevision']
    asset_type = asset_listing['entityType']

    # We only want to take action if this is a S3 asset
    if asset_type == 'S3ObjectCollectionAssetType':
        # Get the bucket ARN from the form info for the asset
        bucket_arn = form_data['S3ObjectCollectionForm']['bucketArn']
        
        #Get the principal from the subscription target
        principal = get_principal(domain_id,project_id)

        try:
            # Get the bucket name from the ARN                    
            bucket_name_with_prefix = bucket_arn.split(':')[5]
            bucket_name = bucket_name_with_prefix.split('/')[0]
           
        except IndexError:
            response = '{"Response" : "Could not find bucket name in ARN"}'
            return response

        # Get the current bucket policy, or else make a blank one if there currently
        # is no policy
        try:
            bucket_policy = json.loads(s3.get_bucket_policy(Bucket=bucket_name)['Policy'])
        except s3.exceptions.from_code('NoSuchBucketPolicy'):
            bucket_policy = {'Statement': []}
        except:
            response = '{"Response" : "Could not get bucket policy"}'
            return response
        
        # Gets new policy with the subscribing principal either added or removed based on
        # event type
        new_policy_statements = build_policy_statements(event_type, bucket_policy['Statement'], principal, 
                                               sub_request_id, bucket_arn)

            
        # Write back the new policy. This can fail if the new policy is too big
        # or if for some reason the function role doesn't have rights to do this
        # If we removed the only policy statement, then just delete the policy
        try: 
            if not new_policy_statements:
                s3.delete_bucket_policy(Bucket = bucket_name)
            else:
                bucket_policy['Statement'] = new_policy_statements
                policy_string = json.dumps(bucket_policy)
                print('policy string :',policy_string)
                s3.put_bucket_policy(
                    Bucket=bucket_name,
                    Policy = policy_string
                )
        except Exception as e: 
            response = f'{{"Response" : "Error updating bucket policy: {e.args}"}}'
            return response
        
        # If we got here everything went as planned
        response = f'{{"Response" : "Updated policy for " + {bucket_name}}}'
    else:
        response = '{"Response" : "Not an S3 asset"}'


    return response

def get_principal(domain_id,project_id):
    # Call list environments to get the environment id
    listenv_request = dz.list_environments(
        domainIdentifier = domain_id,
        projectIdentifier= project_id
    )
    
   # In our example environment, there is only one of these
    environment_id = listenv_request['items'][0]['id']

   # Get the role we want to give access to from the subscription target info
    list_sub_target = dz.list_subscription_targets(
        domainIdentifier=domain_id,
        environmentIdentifier=environment_id,
        maxResults=50,
        sortBy='CREATED_AT',
        sortOrder='DESCENDING'
        )

    if list_sub_target['items'][0]['applicableAssetTypes'] == ['S3ObjectCollectionAssetType']:
       role_arn = list_sub_target['items'][0]['authorizedPrincipals']
   else:
        role_arn = []

    return role_arn

Because this Lambda function is intended to manage bucket policies, the role assigned to it will need a policy that allows the following actions on any buckets it is intended to manage:

  • s3:GetBucketPolicy
  • s3:PutBucketPolicy
  • s3:DeleteBucketPolicy

Now you have a function that is capable of editing bucket policies to add or remove the principals configured for your subscription targets, but you need something to invoke this function any time a subscription is created, cancelled, or revoked. In the next section, we cover how to use EventBridge to integrate this new function with Amazon DataZone.

Respond to subscription events in EventBridge

For events that take place within Amazon DataZone, it publishes information about each event in EventBridge. You can watch for any of these events, and invoke actions based on matching predefined rules. In this case, we’re interested in asset subscriptions being created, cancelled, or revoked, because those will determine when we grant or revoke access to the data in Amazon S3.

  1. On the EventBridge console, choose Rules in the navigation pane.

The default event bus should automatically be present; we use it for creating the Amazon DataZone subscription rule.

  1. Choose Create rule.
  2. In the Rule detail section, enter the following:
    1. For Name, enter a name (for example, DataZoneSubscriptions).
    2. For Description, enter a description that explains the purpose of the rule.
    3. For Event bus, choose default.
    4. Turn on Enable the rule on the selected event bus.
    5. For Rule type, select Rule with an event pattern.
  3. Choose Next.

EventBridge rule

  1. In the Event source section, select AWS Events or EventBridge partner events as the source of the events.

Define Event source

  1. In the Creation method section, select Custom Pattern (JSON editor) to enable exact specification of the events needed for this solution.

Choose custom pattern

  1. In the Event pattern section, enter the following code:

{
"detail-type": ["Subscription Created", "Subscription Cancelled", "Subscription Revoked"],
"source": ["aws.datazone"]
}

Define custom pattern JSON

  1. Choose Next.

Now that we’ve defined the events to watch for, we can make sure those Amazon DataZone events get sent to the Lambda function we defined in the previous section.

  1. On the Select target(s) page, enter the following for Target 1:
    1. For Target types, select AWS service.
    2. For Select a target, choose Lambda function
    3. For Function, choose create-s3policy-for-subscription-target.
  2. Choose Skip to Review and create.

Define event target

  1. On the Review and create page, choose Create rule.

Subscribe to the unstructured data asset

Now that you have the custom subscription workflow in place, you can test the workflow by subscribing to the unstructured data asset.

  1. In the Amazon DataZone portal, search for the unstructured data asset you published by browsing the catalog.

Search unstructured asset

  1. Subscribe to the unstructured data asset using the consumer project, which starts the Amazon DataZone approval workflow.

Subscribe to unstructured asset

  1. You should get a notification for the subscription request; follow the link and approve it.

When the subscription is approved, it will invoke the custom EventBridge Lambda workflow, which will create the S3 bucket policies for the instance role to access the S3 object. You can verify that by navigating to the S3 bucket and reviewing the permissions.

Access the subscribed asset from the Amazon DataZone portal

Now that the consumer project has been given access to the unstructured asset, you can access it from the Amazon DataZone portal.

  1. In the Amazon DataZone portal, open the consumer project and navigate to the Environments
  2. Choose the SageMaker-Notebook

Choose SageMaker notebook on the consumer project

  1. In the confirmation pop-up, choose Open custom.

Choose Custom

This will redirect you to the SageMaker notebook assuming the environment role. You can see the SageMaker notebook instance.

  1. Choose Open JupyterLab.

Open JupyterLab Notebook

  1. Choose conda_python3 to launch a new notebook.

Launch Notebook

  1. Add code to run get_object on the unstructured S3 data that you subscribed earlier and run the cells.

Now, because the S3 bucket policy has been updated to allow the instance role access to the S3 objects, you should see the get_object call return a HTTPStatusCode of 200.

Multi-account implementation

In the instructions so far, we’ve deployed everything in a single AWS account, but in larger organizations, resources can be distributed throughout AWS accounts, often managed by AWS Organizations. The same pattern can be applied in a multi-account environment, with some minor additions. Instead of directly acting on a bucket, the Lambda function in the domain account can assume a role in other accounts that contain S3 buckets to be managed. In each account with an S3 bucket containing assets, create a role that allows editing the bucket policy and has a trust policy referencing the Lambda role in the domain account as a principal.

Clean up

If you’ve finished experimenting and don’t want to incur any further cost for the resources deployed, you can clean up the components as follows:

  1. Delete the Amazon DataZone domain.
  2. Delete the Lambda function.
  3. Delete the SageMaker instance.
  4. Delete the S3 bucket that hosted the unstructured asset.
  5. Delete the IAM roles.

Conclusion

By implementing this custom workflow, organizations can extend the simplified subscription and access workflows provided by Amazon DataZone to their unstructured data stored in Amazon S3. This approach provides greater control over unstructured data assets, facilitating discovery and access across the enterprise.

We encourage you to try out the solution for your own use case, and share your feedback in the comments.


About the Authors

Somdeb Bhattacharjee is a Senior Solutions Architect specializing on data and analytics. He is part of the global Healthcare and Life sciences industry at AWS, helping his customers modernize their data platform solutions to achieve their business outcomes.

Sam YatesSam Yates is a Senior Solutions Architect in the Healthcare and Life Sciences business unit at AWS. He has spent most of the past two decades helping life sciences companies apply technology in pursuit of their missions to help patients. Sam holds BS and MS degrees in Computer Science.

Building end-to-end data lineage for one-time and complex queries using Amazon Athena, Amazon Redshift, Amazon Neptune and dbt

Post Syndicated from Nancy Wu original https://aws.amazon.com/blogs/big-data/building-end-to-end-data-lineage-for-one-time-and-complex-queries-using-amazon-athena-amazon-redshift-amazon-neptune-and-dbt/

One-time and complex queries are two common scenarios in enterprise data analytics. One-time queries are flexible and suitable for instant analysis and exploratory research. Complex queries, on the other hand, refer to large-scale data processing and in-depth analysis based on petabyte-level data warehouses in massive data scenarios. These complex queries typically involve data sources from multiple business systems, requiring multilevel nested SQL or associations with numerous tables for highly sophisticated analytical tasks.

However, combining the data lineage of these two query types presents several challenges:

  1. Diversity of data sources
  2. Varying query complexity
  3. Inconsistent granularity in lineage tracking
  4. Different real-time requirements
  5. Difficulties in cross-system integration

Moreover, maintaining the accuracy and completeness of lineage information while providing system performance and scalability are crucial considerations. Addressing these challenges requires a carefully designed architecture and advanced technical solutions.

Amazon Athena offers serverless, flexible SQL analytics for one-time queries, enabling direct querying of Amazon Simple Storage Service (Amazon S3) data for rapid, cost-effective instant analysis. Amazon Redshift, optimized for complex queries, provides high-performance columnar storage and massively parallel processing (MPP) architecture, supporting large-scale data processing and advanced SQL capabilities. Amazon Neptune, as a graph database, is ideal for data lineage analysis, offering efficient relationship traversal and complex graph algorithms to handle large-scale, intricate data lineage relationships. The combination of these three services provides a powerful, comprehensive solution for end-to-end data lineage analysis.

In the context of comprehensive data governance, Amazon DataZone offers organization-wide data lineage visualization using Amazon Web Services (AWS) services, while dbt provides project-level lineage through model analysis and supports cross-project integration between data lakes and warehouses.

In this post, we use dbt for data modeling on both Amazon Athena and Amazon Redshift. dbt on Athena supports real-time queries, while dbt on Amazon Redshift handles complex queries, unifying the development language and significantly reducing the technical learning curve. Using a single dbt modeling language not only simplifies the development process but also automatically generates consistent data lineage information. This approach offers robust adaptability, easily accommodating changes in data structures.

By integrating Amazon Neptune graph database to store and analyze complex lineage relationships, combined with AWS Step Functions and AWS Lambda functions, we achieve a fully automated data lineage generation process. This combination promotes consistency and completeness of lineage data while enhancing the efficiency and scalability of the entire process. The result is a powerful and flexible solution for end-to-end data lineage analysis.

Architecture overview

The experiment’s context involves a customer already using Amazon Athena for one-time queries. To better accommodate massive data processing and complex query scenarios, they aim to adopt a unified data modeling language across different data platforms. This led to the implementation of both Athena on dbt and Amazon Redshift on dbt architectures.

AWS Glue crawler crawls data lake information from Amazon S3, generating a Data Catalog to support dbt on Amazon Athena data modeling. For complex query scenarios, AWS Glue performs extract, transform, and load (ETL) processing, loading data into the petabyte-scale data warehouse, Amazon Redshift. Here, data modeling uses dbt on Amazon Redshift.

Lineage data original files from both parts are loaded into an S3 bucket, providing data support for end-to-end data lineage analysis.

The following image is the architecture diagram for the solution.

Figure 1-Architecture diagram of DBT modeling based on Athena and Redshift

Some important considerations:

This experiment uses the following data dictionary:

Source table Tool Target table
imdb.name_basics DBT/Athena stg_imdb__name_basics
imdb.title_akas DBT/Athena stg_imdb__title_akas
imdb.title_basics DBT/Athena stg_imdb__title_basics
imdb.title_crew DBT/Athena stg_imdb__title_crews
imdb.title_episode DBT/Athena stg_imdb__title_episodes
imdb.title_principals DBT/Athena stg_imdb__title_principals
imdb.title_ratings DBT/Athena stg_imdb__title_ratings
stg_imdb__name_basics DBT/Redshift new_stg_imdb__name_basics
stg_imdb__title_akas DBT/Redshift new_stg_imdb__title_akas
stg_imdb__title_basics DBT/Redshift new_stg_imdb__title_basics
stg_imdb__title_crews DBT/Redshift new_stg_imdb__title_crews
stg_imdb__title_episodes DBT/Redshift new_stg_imdb__title_episodes
stg_imdb__title_principals DBT/Redshift new_stg_imdb__title_principals
stg_imdb__title_ratings DBT/Redshift new_stg_imdb__title_ratings
new_stg_imdb__name_basics DBT/Redshift int_primary_profession_flattened_from_name_basics
new_stg_imdb__name_basics DBT/Redshift int_known_for_titles_flattened_from_name_basics
new_stg_imdb__name_basics DBT/Redshift names
new_stg_imdb__title_akas DBT/Redshift titles
new_stg_imdb__title_basics DBT/Redshift int_genres_flattened_from_title_basics
new_stg_imdb__title_basics DBT/Redshift titles
new_stg_imdb__title_crews DBT/Redshift int_directors_flattened_from_title_crews
new_stg_imdb__title_crews DBT/Redshift int_writers_flattened_from_title_crews
new_stg_imdb__title_episodes DBT/Redshift titles
new_stg_imdb__title_principals DBT/Redshift titles
new_stg_imdb__title_ratings DBT/Redshift titles
int_known_for_titles_flattened_from_name_basics DBT/Redshift titles
int_primary_profession_flattened_from_name_basics DBT/Redshift
int_directors_flattened_from_title_crews DBT/Redshift names
int_genres_flattened_from_title_basics DBT/Redshift genre_titles
int_writers_flattened_from_title_crews DBT/Redshift names
genre_titles DBT/Redshift
names DBT/Redshift
titles DBT/Redshift

The lineage data generated by dbt on Athena includes partial lineage diagrams, as exemplified in the following images. The first image shows the lineage of name_basics in dbt on Athena. The second image shows the lineage of title_crew in dbt on Athena.

Figure 3-Lineage of name_basics in DBT on Athena

Figure 4-Lineage of title_crew in DBT on Athena

The lineage data generated by dbt on Amazon Redshift includes partial lineage diagrams, as illustrated in the following image.

Figure 5-Lineage of name_basics and title_crew in DBT on Redshift

Referring to the data dictionary and screenshots, it’s evident that the complete data lineage information is highly dispersed, spread across 29 lineage diagrams. Understanding the end-to-end comprehensive view requires significant time. In real-world environments, the situation is often more complex, with complete data lineage potentially distributed across hundreds of files. Consequently, integrating a complete end-to-end data lineage diagram becomes crucial and challenging.

This experiment will provide a detailed introduction to processing and merging data lineage files stored in Amazon S3, as illustrated in the following diagram.

Figure 6-Merging data lineage from Athena and Redshift into Neptune

Prerequisites

To perform the solution, you need to have the following prerequisites in place:

  • The Lambda function for preprocessing lineage files must have permissions to access Amazon S3 and Amazon Redshift.
  • The Lambda function for constructing the directed acyclic graph (DAG) must have permissions to access Amazon S3 and Amazon Neptune.

Solution walkthrough

To perform the solution, follow the steps in the next sections.

Preprocess raw lineage data for DAG generation using Lambda functions

Use Lambda to preprocess the raw lineage data generated by dbt, converting it into key-value pair JSON files that are easily understood by Neptune: athena_dbt_lineage_map.json and redshift_dbt_lineage_map.json.

  1. To create a new Lambda function in the Lambda console, enter a Function name, select the Runtime (Python in this example), configure the Architecture and Execution role, then click the “Create function” button.

Figure 7-Basic configuration of athena-data-lineage-process Lambda

  1. Open the created Lambda function and on the Configuration tab, in the navigation pane, select Environment variables and choose your configurations. Using Athena on dbt processing as an example, configure the environment variables as follows (the process for Amazon Redshift on dbt is similar):
    • INPUT_BUCKET: data-lineage-analysis-24-09-22 (replace with the S3 bucket path storing the original Athena on dbt lineage files)
    • INPUT_KEY: athena_manifest.json (the original Athena on dbt lineage file)
    • OUTPUT_BUCKET: data-lineage-analysis-24-09-22 (replace with the S3 bucket path for storing the preprocessed output of Athena on dbt lineage files)
    • OUTPUT_KEY: athena_dbt_lineage_map.json (the output file after preprocessing the original Athena on dbt lineage file)

Figure 8-Environment variable configuration for athena-data-lineage-process-Lambda

  1. On the Code tab, in the lambda_function.py file, enter the preprocessing code for the raw lineage data. Here’s a code reference using Athena on dbt processing as an example (the process for Amazon Redshift on dbt is similar). The preprocessing code for Athena on dbt’s original lineage file is as follows:

The athena_manifest.json, redshift_manifest.json, and other files used in this experiment can be obtained from the Data Lineage Graph Construction GitHub repository.

import json
import boto3
import os

def lambda_handler(event, context):
    # Set up S3 client
    s3 = boto3.client('s3')

    # Get input and output paths from environment variables
    input_bucket = os.environ['INPUT_BUCKET']
    input_key = os.environ['INPUT_KEY']
    output_bucket = os.environ['OUTPUT_BUCKET']
    output_key = os.environ['OUTPUT_KEY']

    # Define helper function
    def dbt_nodename_format(node_name):
        return node_name.split(".")[-1]

    # Read input JSON file from S3
    response = s3.get_object(Bucket=input_bucket, Key=input_key)
    file_content = response['Body'].read().decode('utf-8')
    data = json.loads(file_content)
    lineage_map = data["child_map"]
    node_dict = {}
    dbt_lineage_map = {}

    # Process data
    for item in lineage_map:
        lineage_map[item] = [dbt_nodename_format(child) for child in lineage_map[item]]
        node_dict[item] = dbt_nodename_format(item)

    # Update key names
    lineage_map = {node_dict[old]: value for old, value in lineage_map.items()}
    dbt_lineage_map["lineage_map"] = lineage_map

    # Convert result to JSON string
    result_json = json.dumps(dbt_lineage_map)

    # Write JSON string to S3
    s3.put_object(Body=result_json, Bucket=output_bucket, Key=output_key)
    print(f"Data written to s3://{output_bucket}/{output_key}")

    return {
        'statusCode': 200,
        'body': json.dumps('Athena data lineage processing completed successfully')
    }

Merge preprocessed lineage data and write to Neptune using Lambda functions

  1. Before processing data with the Lambda function, create a Lambda layer by uploading the required Gremlin plugin. For detailed steps on creating and configuring Lambda Layers, see the AWS Lambda Layers documentation.

Because connecting Lambda to Neptune for constructing a DAG requires the Gremlin plugin, it needs to be uploaded before using Lambda. The Gremlin package can be obtained from the Data Lineage Graph Construction GitHub repository.

Figure 9-Lambda layers

  1. Create a new Lambda function. Choose the function to configure. To the recently created layer, at the bottom of the page, choose Add a layer.

Figure 10_Add a layer

Create another Lambda layer for the requests library, similar to how you created the layer for the Gremlin plugin. This library will be used for HTTP client functionality in the Lambda function.

  1. Choose the recently created Lambda function to configure. Connect to Neptune through Lambda to merge the two datasets and construct a DAG. On the Code tab, the reference code to execute is as follows:
import json
import boto3
import os
import requests
from botocore.auth import SigV4Auth
from botocore.awsrequest import AWSRequest
from botocore.credentials import get_credentials
from botocore.session import Session
from concurrent.futures import ThreadPoolExecutor, as_completed

def read_s3_file(s3_client, bucket, key):
    try:
        response = s3_client.get_object(Bucket=bucket, Key=key)
        data = json.loads(response['Body'].read().decode('utf-8'))
        return data.get("lineage_map", {})
    except Exception as e:
        print(f"Error reading S3 file {bucket}/{key}: {str(e)}")
        raise

def merge_data(athena_data, redshift_data):
    return {**athena_data, **redshift_data}

def sign_request(request):
    credentials = get_credentials(Session())
    auth = SigV4Auth(credentials, 'neptune-db', os.environ['AWS_REGION'])
    auth.add_auth(request)
    return dict(request.headers)

def send_request(url, headers, data):
    try:
        response = requests.post(url, headers=headers, data=data, timeout=30)
        response.raise_for_status()
        return response.text
    except requests.exceptions.RequestException as e:
        print(f"Request Error: {str(e)}")
        if hasattr(e.response, 'text'):
            print(f"Response content: {e.response.text}")
        raise

def write_to_neptune(data):
    endpoint = 'https://your neptune endpoint name:8182/gremlin'
    # replace with your neptune endpoint name

    # Clear Neptune database
    clear_query = "g.V().drop()"
    request = AWSRequest(method='POST', url=endpoint, data=json.dumps({'gremlin': clear_query}))
    signed_headers = sign_request(request)
    response = send_request(endpoint, signed_headers, json.dumps({'gremlin': clear_query}))
    print(f"Clear database response: {response}")

    # Verify if the database is empty
    verify_query = "g.V().count()"
    request = AWSRequest(method='POST', url=endpoint, data=json.dumps({'gremlin': verify_query}))
    signed_headers = sign_request(request)
    response = send_request(endpoint, signed_headers, json.dumps({'gremlin': verify_query}))
    print(f"Vertex count after clearing: {response}")
    
    def process_node(node, children):
        # Add node
        query = f"g.V().has('lineage_node', 'node_name', '{node}').fold().coalesce(unfold(), addV('lineage_node').property('node_name', '{node}'))"
        request = AWSRequest(method='POST', url=endpoint, data=json.dumps({'gremlin': query}))
        signed_headers = sign_request(request)
        response = send_request(endpoint, signed_headers, json.dumps({'gremlin': query}))
        print(f"Add node response for {node}: {response}")

        for child_node in children:
            # Add child node
            query = f"g.V().has('lineage_node', 'node_name', '{child_node}').fold().coalesce(unfold(), addV('lineage_node').property('node_name', '{child_node}'))"
            request = AWSRequest(method='POST', url=endpoint, data=json.dumps({'gremlin': query}))
            signed_headers = sign_request(request)
            response = send_request(endpoint, signed_headers, json.dumps({'gremlin': query}))
            print(f"Add child node response for {child_node}: {response}")

            # Add edge
            query = f"g.V().has('lineage_node', 'node_name', '{node}').as('a').V().has('lineage_node', 'node_name', '{child_node}').coalesce(inE('lineage_edge').where(outV().as('a')), addE('lineage_edge').from('a').property('edge_name', ' '))"
            request = AWSRequest(method='POST', url=endpoint, data=json.dumps({'gremlin': query}))
            signed_headers = sign_request(request)
            response = send_request(endpoint, signed_headers, json.dumps({'gremlin': query}))
            print(f"Add edge response for {node} -> {child_node}: {response}")

    with ThreadPoolExecutor(max_workers=10) as executor:
        futures = [executor.submit(process_node, node, children) for node, children in data.items()]
        for future in as_completed(futures):
            try:
                future.result()
            except Exception as e:
                print(f"Error in processing node: {str(e)}")

def lambda_handler(event, context):
    # Initialize S3 client
    s3_client = boto3.client('s3')

    # S3 bucket and file paths
    bucket_name = 'data-lineage-analysis' # Replace with your S3 bucket name
    athena_key = 'athena_dbt_lineage_map.json' # Replace with your athena lineage key value output json name
    redshift_key = 'redshift_dbt_lineage_map.json' # Replace with your redshift lineage key value output json name

    try:
        # Read Athena lineage data
        athena_data = read_s3_file(s3_client, bucket_name, athena_key)
        print(f"Athena data size: {len(athena_data)}")

        # Read Redshift lineage data
        redshift_data = read_s3_file(s3_client, bucket_name, redshift_key)
        print(f"Redshift data size: {len(redshift_data)}")

        # Merge data
        combined_data = merge_data(athena_data, redshift_data)
        print(f"Combined data size: {len(combined_data)}")

        # Write to Neptune (including clearing the database)
        write_to_neptune(combined_data)

        return {
            'statusCode': 200,
            'body': json.dumps('Data successfully written to Neptune')
        }
    except Exception as e:
        print(f"Error in lambda_handler: {str(e)}")
        return {
            'statusCode': 500,
            'body': json.dumps(f'Error: {str(e)}')
        }

Create Step Functions workflow

  1. On the Step Functions console, choose State machines, and then choose Create state machine. On the Choose a template page, select Blank template.

Figure 11-Step Functions blank template

  1. In the Blank template, choose Code to define your state machine. Use the following example code:
{
  "Comment": "Daily Data Lineage Processing Workflow",
  "StartAt": "Parallel Processing",
  "States": {
    "Parallel Processing": {
      "Type": "Parallel",
      "Branches": [
        {
          "StartAt": "Process Athena Data",
          "States": {
            "Process Athena Data": {
              "Type": "Task",
              "Resource": "arn:aws:states:::lambda:invoke",
              "Parameters": {
                "FunctionName": "athena-data-lineange-process-Lambda", ##Replace with your Athena data lineage process Lambda function name
                "Payload": {
                  "input.$": "$"
                }
              },
              "End": true
            }
          }
        },
        {
          "StartAt": "Process Redshift Data",
          "States": {
            "Process Redshift Data": {
              "Type": "Task",
              "Resource": "arn:aws:states:::lambda:invoke",
              "Parameters": {
                "FunctionName": "redshift-data-lineange-process-Lambda", ##Replace with your Redshift data lineage process Lambda function name
                "Payload": {
                  "input.$": "$"
                }
              },
              "End": true
            }
          }
        }
      ],
      "Next": "Load Data to Neptune"
    },
    "Load Data to Neptune": {
      "Type": "Task",
      "Resource": "arn:aws:states:::lambda:invoke",
      "Parameters": {
        "FunctionName": "data-lineage-analysis-lambda" ##Replace with your Lambda function Name
      },
      "End": true
    }
  }
}
  1. After completing the configuration, choose the Design tab to view the workflow shown in the following diagram.

Figure 12-Step Functions design view

Create scheduling rules with Amazon EventBridge

Configure Amazon EventBridge to generate lineage data daily during off-peak business hours. To do this:

  1. Create a new rule in the EventBridge console with a descriptive name.
  2. Set the rule type to “Schedule” and configure it to run once daily (using either a fixed rate or the Cron expression “0 0 * * ? *”).
  3. Select the AWS Step Functions state machine as the target and specify the state machine you created earlier.

Query results in Neptune

  1. On the Neptune console, select Notebooks. Open an existing notebook or create a new one.

Figure 13-Neptune notebook

  1. In the notebook, create a new code cell to perform a query. The following code example shows the query statement and its results:
%%gremlin -d node_name -de edge_name
g.V().hasLabel('lineage_node').outE('lineage_edge').inV().hasLabel('lineage_node').path().by(elementMap())

You can now see the end-to-end data lineage graph information for both dbt on Athena and dbt on Amazon Redshift. The following image shows the merged DAG data lineage graph in Neptune.

Figure 14-Merged DAG data lineage graph in Neptune

You can query the generated data lineage graph for data related to a specific table, such as title_crew.

The sample query statement and its results are shown in the following code example:

%%gremlin -d node_name -de edge_name
g.V().has('lineage_node', 'node_name', 'title_crew')
  .repeat(
    union(
      __.inE('lineage_edge').outV(),
      __.outE('lineage_edge').inV()
    )
  )
  .until(
    __.has('node_name', within('names', 'genre_titles', 'titles'))
    .or()
    .loops().is(gt(10))
  )
  .path()
  .by(elementMap())

The following image shows the filtered results based on title_crew table in Neptune.

Figure 15-Filtered results based on title_crew table in Neptune

Clean up

To clean up your resources, complete the following steps:

  1. Delete EventBridge rules
# Stop new events from triggering while removing dependencies
aws events disable-rule --name <rule-name>
# Break connections between rule and targets (like Lambda functions)
aws events remove-targets --rule <rule-name> --ids <target-id>
# Remove the rule completely from EventBridge
aws events delete-rule --name <rule-name>
  1. Delete Step Functions state machine
# Stop all running executions
aws stepfunctions stop-execution --execution-arn <execution-arn>
# Delete the state machine
aws stepfunctions delete-state-machine --state-machine-arn <state-machine-arn>
  1. Delete Lambda functions
# Delete Lambda function
aws lambda delete-function --function-name <function-name>
# Delete Lambda layers (if used)
aws lambda delete-layer-version --layer-name <layer-name> --version-number <version>
  1. Clean up the Neptune database
# Delete all snapshots
aws neptune delete-db-cluster-snapshot --db-cluster-snapshot-identifier <snapshot-id>
# Delete database instance
aws neptune delete-db-instance --db-instance-identifier <instance-id> --skip-final-snapshot
# Delete database cluster
aws neptune delete-db-cluster --db-cluster-identifier <cluster-id> --skip-final-snapshot
  1. Follow the instructions at Deleting a single object to clean up the S3 buckets

Conclusion

In this post, we demonstrated how dbt enables unified data modeling across Amazon Athena and Amazon Redshift, integrating data lineage from both one-time and complex queries. By using Amazon Neptune, this solution provides comprehensive end-to-end lineage analysis. The architecture uses AWS serverless computing and managed services, including Step Functions, Lambda, and EventBridge, providing a highly flexible and scalable design.

This approach significantly lowers the learning curve through a unified data modeling method while enhancing development efficiency. The end-to-end data lineage graph visualization and analysis not only strengthen data governance capabilities but also offer deep insights for decision-making.

The solution’s flexible and scalable architecture effectively optimizes operational costs and improves business responsiveness. This comprehensive approach balances technical innovation, data governance, operational efficiency, and cost-effectiveness, thus supporting long-term business growth with the adaptability to meet evolving enterprise needs.

With OpenLineage-compatible data lineage now generally available in Amazon DataZone, we plan to explore integration possibilities to further enhance the system’s capability to handle complex data lineage analysis scenarios.

If you have any questions, please feel free to leave a comment in the comments section.


About the authors

nancynwu+photo

Nancy Wu is a Solutions Architect at AWS, responsible for cloud computing architecture consulting and design for multinational enterprise customers. Has many years of experience in big data, enterprise digital transformation research and development, consulting, and project management across telecommunications, entertainment, and financial industries.

Xu+Feng+PhotoXu Feng is a Senior Industry Solution Architect at AWS, responsible for designing, building, and promoting industry solutions for the Media & Entertainment and Advertising sectors, such as intelligent customer service and business intelligence. With 20 years of software industry experience, currently focused on researching and implementing generative AI and AI-powered data solutions.

Xu+Da+PhotoXu Da is a Amazon Web Services (AWS) Partner Solutions Architect based out of Shanghai, China. He has more than 25 years of experience in IT industry, software development and solution architecture. He is passionate about collaborative learning, knowledge sharing, and guiding community in their cloud technologies journey.

How ANZ Institutional Division built a federated data platform to enable their domain teams to build data products to support business outcomes

Post Syndicated from Leo Ramsamy original https://aws.amazon.com/blogs/big-data/how-anz-institutional-division-built-a-federated-data-platform-to-enable-their-domain-teams-to-build-data-products-to-support-business-outcomes/

In today’s rapidly evolving financial landscape, data is the bedrock of innovation, enhancing customer and employee experiences and securing a competitive edge. Recognizing this paradigm shift, ANZ Institutional Division has embarked on a transformative journey to redefine its approach to data management, utilization, and extracting significant business value from data insights.

Like many large financial institutions, ANZ Institutional Division operated with siloed data practices and centralized data management teams. As time went on, the limitations of this approach became apparent due to rising data complexity, larger volumes, and the growing demand for swift, business-driven insights. Consequently, the bank encountered several challenges and needed to take the following actions:

  • Create business insights from untapped data potential, estimated to be approximately $150 million in the Institutional Division alone
  • Improve operational efficiency by removing manual data handling, the use of spreadsheets, and duplicate data entries
  • Increase agility by making data expertise more readily available, thereby improving time to market and overall customer experience
  • Address data quality
  • Standardize tooling and remove the Shadow IT culture, driving scalability, reducing risk, and minimizing overall operational inefficiencies

These challenges are not unique to ANZ Institutional Division. Globally, financial institutions have been experiencing similar issues, prompting a widespread reassessment of traditional data management approaches.

One major trend, embraced by many financial institutions, has been the adoption of the data mesh architecture and the shift towards treating data as a product. This paradigm, pioneered by thought leaders like Zhamak Dehghani, introduces a decentralized approach to data management that aligns closely with modern organizational structures and agile methodologies.

Some notable global examples of leading companies embracing and implementing this trend are JPMorgan Chase, Capital One, and Saxo Bank.

Inspired by these global trends and driven by its own unique challenges, ANZ’s Institutional Division decided to pivot from viewing data as a byproduct of projects to treating it as a valuable product in its own right.

This shift promises several business benefits:

  • Empowered domain expertise – By decentralizing data ownership to domain-based teams, ANZ can use the deep business knowledge within each unit to create more relevant and valuable data products
  • Increased agility – Domain teams can now respond more quickly to business needs, creating and iterating on data products without relying on a centralized bottleneck
  • Improved data quality – With domain experts overseeing their own data, there’s a greater likelihood of catching and correcting quality issues at the source
  • Scalability – The federated approach allows for greater scalability, enabling ANZ to handle increasing data volumes and complexity more effectively
  • Innovation catalyst – By democratizing data access and empowering teams to create data products, ANZ is fostering a culture of innovation and data-driven decision-making across the organization

This transition is not just about technology; it represents a fundamental shift in how ANZ views and values its data assets. By treating data as a product, the bank is positioned to not only overcome current challenges, but to unlock new opportunities for growth, customer service, and competitive advantage.

This post explores how the shift to a data product mindset is being implemented, the challenges faced, and the early wins that are shaping the future of data management in the Institutional Division.

ANZ’s federated data strategy

In response to the challenges, ANZ Group formulated a data strategy that focuses on empowering employees to securely use data to improve the sustainability and financial well-being of their customers. At its core are the following pillars:

  • Introducing new ways of working that focus on generating customer value first
  • New technology platforms and tooling that allow the bank to collect, share, archive, and dispose data in a secure and controlled way
  • Achieving consistency in how data is produced and consumed across the entire bank through data products and better-connected systems
  • Supporting the bank’s risk and regulatory obligations by providing a secure and resilient data platform that provides fine-grained, controlled access to quality data products

ANZ has made the strategic decision to adopt an architectural and operational model aligned with the data mesh paradigm, which revolves around four key principles: domain ownership, data as a product, a self-serve data platform, and federated computational governance.

Domain ownership recognizes that the teams generating the data have the deepest understanding of it and are therefore best suited to manage, govern, and share it effectively. This principle makes sure data accountability remains close to the source, fostering higher data quality and relevance.

Treating data as a product instils a product-centric mindset, emphasizing that data must be secure, discoverable, understandable, interoperable, reusable, and managed throughout its lifecycle. This principle makes sure data consumers, both internal and external, derive consistent value from well-designed data products.

A self-serve data platform empowers domains to create, discover, and consume data products independently. It abstracts technical complexities and provides user-friendly tools, enabling a scalable, repeatable, and automated approach to producing high-quality data products.

Under the federated mesh architecture, each divisional mesh functions as a node within the broader enterprise data mesh, maintaining a degree of autonomy in managing its data products. To effectively coordinate these autonomous nodes and facilitate seamless integration, enterprise-wide standards, such as those related to data governance, interoperability, and security, are essential to maintain alignment and consistency across all nodes and domains and teams within.

With this approach, each node in ANZ maintains its divisional alignment and adherence to data risk and governance standards and policies to manage local data products and data assets. This enables global discoverability and collaboration without centralizing ownership or operations.

As a result, governance resides with the data products themselves, making sure standards and policies, such as access control, data quality, and compliance, are enforced where the data lives. In this regard, the enterprise data product catalog acts as a federated portal, facilitating cross-domain access and interoperability while maintaining alignment with governance principles. This model balances node or domain-level autonomy with enterprise-level oversight, creating a scalable and consistent framework across ANZ.

Within the ANZ enterprise data mesh strategy, aligning data mesh nodes with the ANZ Group’s divisional structure provides optimal alignment between data mesh principles and organizational structure, as shown in the following diagram.

Central to the success of this strategy is its support for each division’s autonomy and freedom to choose their own domain structure, which is closely aligned to their business needs. Divisions decide how many domains to have within their node; some may have one, others many. These nodes can implement analytical platforms like data lake houses, data warehouses, or data marts, all united by producing data products. Nodes and domains serve business needs and are not technology mandated.

Under the federated computational governance model, the ANZ Group strategy defines guardrails that treat a node as a logical data container suitable for the following:

  • Ingestion and metadata management
  • Creating source-aligned data products complying with ANZ’s Data Product Specification (DPS)
  • Integrating source-aligned data products from other nodes
  • Producing consumer-aligned data products for specific business purposes
  • Publishing conforming data products to ANZ’s Data Product Catalog (DPC)

Following on from this strategy is organizing its domain structure to provide autonomy to various functional teams while preserving the core values of data mesh. The following diagram depicts an example of the possible structure.

For instance, Domain A will have the flexibility to create data products that can be published to the divisional catalog, while also maintaining the autonomy to develop data products that are exclusively accessible to teams within the domain. These products will not be available to others until they are deemed ready for broader enterprise use.

This strategy supports each division’s autonomy to implement their own data catalogs and decide which data products to publish to the group-level catalog. This flexibility extends to divisional domains, which can choose which data products to publish to the divisional catalog or keep visible only to domain consumers.

Institutional Data & AI Platform architecture

The Institutional Division has implemented a self-service data platform to enable the domain teams to build and manage data products autonomously. The Institutional Data & AI platform adopts a federated approach to data while centralizing the metadata to facilitate simpler discovery and sharing of data products. The following diagram illustrates the building blocks of the Institutional Data & AI Platform.

The building blocks are as follows:

  1. Foundational Data & AI Platform capabilities – A dedicated data platform team provides domain-agnostic tools, systems, and capabilities to enable autonomous data product development across domains. This self-serve infrastructure allows domain teams to manage the full data lifecycle without relying on a centralized data team. Key capabilities include data storage, data onboarding and transformation, and data utilities that facilitate data sharing with interoperability between domains. These capabilities abstract the technical complexities associated with data management infrastructure, allowing domain experts to focus on creating valuable data products rather than infrastructure management.
  2. Domain-owned data assets – The domain-oriented data ownership approach distributes responsibility for data across the business units within the Institutional Division. Domain teams are responsible for developing, deploying, and managing their own analytical data products alongside operational data services. Data contracts authored by data product owners automate data product creation and provide a standard to access data products. By treating the data as a product, the outcome is a reusable asset that outlives a project and meets the needs of the enterprise consumer. Consumer feedback and demand drives creation and maintenance of the data product.
  3. Division-level metadata management and data governance – A centrally hosted service provides domain teams with the capability to publish their data products along with relevant metadata, like business definitions and lineage. Some of the key features implemented are:
    1. Metadata management that centralizes metadata and presents it within the context of data products, such as data quality scores and data product lineage.
    2. A data portal for consumers to discover data products and access associated metadata.
    3. Subscription workflows that simplify access management to the data products.
    4. Computational governance that enforces divisional and enterprise data policies and standards, such as data classification and business data models for aligning terminology.

The following diagram is a high-level example of the technical architecture approach towards the Institutional Data & AI Platform. The solution uses a building block approach, on a cloud-centered platform comprised of AWS services, with partner solutions and open standards like OpenLineage and Apache Iceberg.

Let’s look at the key services that enable the federated platform to operate at scale:

  • Data storage and processing:
    • Apache Iceberg on Amazon Simple Storage Service (Amazon S3) offers an optimized way to store data assets and products and promotes interoperability across other services
    • Amazon Redshift allows domain teams to create and manage fit-for-purpose data marts
    • AWS Lambda and AWS Glue are used for data onboarding and processing, and data utilities created in Python and PySpark promote reusability and quality across the data processing pipelines
    • dbt simplifies data transformation rules and allows sub-domain data analysts to build modeling logic as SQL statements
    • Amazon Managed Workflows for Apache Airflow (Amazon MWAA) enables efficient management of workflows and data pipeline orchestration using out-of-the-box integrations with AWS services
  • Metadata management and data governance:
    • To maintain data reliability and accuracy, a robust data quality framework using Soda core is used that automates data quality using checks defined in a data contract
    • Amazon DataZone enables data product cataloging, discovery, metadata management, and implementing computational governance
    • OpenLineage simplifies harvesting and collection of data and process-level lineage, which are then published to Amazon DataZone
    • AWS Lake Formation, combined with AWS Glue Data Catalog, provides data governance and access management to data products that reside within sub-domains
  • Analytics:
    • Tableau offers capabilities for sub-domains with data visualization and business intelligence capabilities
  • Observability and security:
    • Observability needs of the platform are built into all the processes using monitoring, with logging functionality provided by Amazon CloudWatch and AWS CloudTrail
    • AWS Secrets Manager makes sure secrets are stored and made available for data pipelines to access services in a secure manner

The technical implementation actualizes the data product strategy at ANZ Institutional Division. Amazon DataZone plays an essential role in facilitating data product management for the domain teams. The service addresses several critical aspects of the Institutional Division’s data product strategy, including:

  • Data cataloging and metadata management – Amazon DataZone provides comprehensive data cataloging and metadata management capabilities
  • Data governance and compliance – Effective data governance is essential for scaling data products
  • Self-service capabilities – Amazon DataZone empowers domain teams with self-service capabilities, enabling them to create, manage, and deploy data products independently
  • Integration and interoperability – One of the challenges in scaling data products is providing seamless integration across various data sources and systems
  • Collaboration and sharing – Amazon DataZone provides a platform for sharing data and metadata across teams and domains

Institutional Division’s delivery model to achieve scale

The Institutional Division has successfully used the federated architecture, and key to this delivery model is the implementation of Foundational Data & AI Platform capabilities that serve all domains within the division. This model promotes self-service and accelerates the delivery of subsequent initiatives by using the capabilities built for previous use cases.

To evaluate the success of the delivery model, ANZ has implemented key metrics, such as cost transparency and domain adoption, to guide the data mesh governance team in refining the delivery approach. For instance, one enhancement involves integrating cross-functional squads to support data literacy.

The key to scaling the Institutional Division operating model are the following considerations:

  • Data as a product approach – Use techniques like event storming and domain-driven design to capture business events and their meanings.
  • Education and enablement – Conduct learning interventions to upskill teams on understanding and using the data as a product approach.
  • Iterative data platform delivery – Work backward from business initiative to iteratively deliver self-service data platform infrastructure capabilities.
  • Managing demand efficiently – Implement a feedback mechanism to manage demand on data products. Track and manage data debt using standard data contract specifications. Most importantly, adopt governance and standards to make sure data products are built and maintained with a long-term perspective, minimizing technical debt.

“The Institutional Data & Analytics Platform (IDAP) has allowed the Institutional team to establish a base foundation to allow various teams to aggregate and consume the wealth of data across the division. This self-service platform enables business leaders to both create and consume reusable data products, unlocking value across this division. It’s also an excellent proof point for our broader data mesh architecture, allowing us to connect this divisional data to broader enterprise data stores—further positioning us to put the customer at the center of everything we do.”

– Tim Hogarth, CTO ANZ

“AWS believes that democratizing data, while not compromising on security and fine-grained access, is a key component of any future-proof, scalable data platform, so we are pleased to be enabling ANZ bank’s IDAP metadata management and data governance capabilities through Amazon DataZone. This allows the diverse business functions at ANZ the autonomy to self-serve on their data needs with built-in governance.”

– Shikha Verma, Head of Product, Amazon DataZone

Conclusion

ANZ’s journey to move towards a data product approach has improved the organization’s approach to manage data and reduce data silos, and has positioned it to become a data-driven, customer-centric organization. By combining federated platform practices and adopting AWS services and open standards, ANZ Institutional Division is achieving its objectives in decentralization with a scalable data platform that enables its domain teams to make informed decisions, drive innovation, and maintain a competitive edge.

Special thanks: This implementation success is a result of close collaboration between ANZ Institutional Division, AWS ProServe, and the AWS account team. We want to thank ANZ Institutional Executives and the Leadership Team for the strong sponsorship and direction.


About the Authors

Leo Ramsamy is a Platform Architect specializing in data and analytics for ANZ’s Institutional division. He focuses on modern data practices, including Data Mesh architecture, data governance, quality management, and observability. His work aligns data strategies with business goals, improving accessibility and enabling better decision-making across ANZ.

Srinivasan Kuppusamy is a Senior Cloud Architect – Data at AWS ProServe, where he helps customers solve their business problems using the power of AWS Cloud technology. His areas of interests are data and analytics, data governance, and AI/ML.

Rada Stanic is a Chief Technologist at Amazon Web Services, where she helps ANZ customers across different segments solve their business problems using AWS Cloud technologies. Her special areas of interest are data analytics, machine learning/AI, and application modernization.

Discover, govern, and collaborate on data and AI securely with Amazon SageMaker Data and AI Governance

Post Syndicated from Esra Kayabali original https://aws.amazon.com/blogs/aws/discover-govern-and-collaborate-on-data-and-ai-securely-with-amazon-sagemaker-data-and-ai-governance/

Today, we announced the next generation of Amazon SageMaker, which is a unified platform for data, analytics, and AI, bringing together widely-adopted AWS machine learning and analytics capabilities. This announcement includes Amazon SageMaker Data and AI Governance, a set of capabilities that streamline the management of data and AI assets.

Data teams often face challenges when trying to locate, access, and collaborate on data and AI models across their organizations. The process of discovering relevant assets, understanding their context, and obtaining proper access can be time-consuming and complex, potentially hindering productivity and innovation.

SageMaker Data and AI Governance offers a comprehensive set of features by providing a unified experience for cataloging, discovering, and governing data and AI assets. It’s centered around SageMaker Catalog built on Amazon DataZone, providing a centralized repository that is accessible through Amazon SageMaker Unified Studio (preview). The catalog is built directly into the SageMaker platform, offering seamless integration with existing SageMaker workflows and tools, helping engineers, data scientists, and analysts to safely find and use authorized data and models through advanced search features. With the SageMaker platform, users can safeguard and protect their AI models using guardrails and implementing responsible AI policies.

Here are some of the key Data and AI governance features of SageMaker:

  1. Enterprise-ready business catalog – To add business context and make data and AI assets discoverable by everyone in the organization, you can customize the catalog with automated metadata generation which uses machine learning (ML) to automatically generate business names of data assets and columns within those assets. We improved metadata curation functionality, helping you attach multiple business glossary terms to assets and glossary terms to individual columns in the asset.
  2. Self-service for data and AI workers – To provide data autonomy for users to publish and consume data, you can customize and bring any type of asset to the catalog using APIs. Data publishers can automate metadata discovery through data source runs or manually published files from the supported data sources and enrich metadata with generative AI–generated data descriptions automatically as datasets are brought into the catalog. Data consumers can then use faceted search to quickly find, understand, and request access to data.
  3. Simplified access to data and tools – To govern data and AI assets based on business purpose, projects serve as business use case–based logical containers. You can create a project and collaborate on specific business use case–based groupings of people, data, and analytics tools. Within the project, you can create an environment that provides the necessary infrastructure to project members such as analytics and AI tools and storage so that project members can easily produce new data or consume data they have access to. This helps you add multiple capabilities and analytics tools to the same project, depending on your needs.
  4. Governed data and model sharing – Data producers own and manage access to data with a subscription approval workflow that allows consumers to request access and data owners to approve. You can now set up subscription terms to be attached to assets when published and automate subscription grant fulfillment for AWS managed data lakes and Amazon Redshift with customizations using Amazon EventBridge events for other sources.
  5. Bring a consistent level of AI safety across all your applications: Amazon Bedrock Guardrails helps evaluate user inputs and Foundation Model (FM) responses based on use case specific policies, and provides an additional layer of safeguards regardless of the underlying Foundation Models. AWS AI portfolio provides hundreds of built-in algorithms with pre-trained models from model hubs, including TensorFlow Hub, PyTorch Hub, Hugging Face, and MxNet GluonCV. You can also access built-in algorithms using the SageMaker Python SDK. Built-in algorithms cover common ML tasks, such as data classifications (image, text, tabular) and sentiment analysis.

For seamless integration with existing processes, SageMaker Data and AI Governance provides API support, enabling programmatic access for setup and configuration.

How to use Amazon SageMaker Data and AI Governance
For this demonstration, I use a preconfigured environment. I go to the Amazon SageMaker Unified Studio (preview) console, which provides an integrated development experience for all your data and AI use cases. This is where you can create and manage projects, which serve as shared workspaces. These projects allow team members to collaborate, work with data, and develop ML models together.

Let me start with the Govern menu in the navigation bar.

New data governance capabilities called domain units and authorization policies that help you create business unit- and team-level organization and manage policies according to your business needs. With the addition of domain units, you can organize, create, search, and find data assets and projects associated with business units or teams. With authorization policies, you can set access policies for creating projects and glossaries.

Domain units also help you with self-service governance over critical actions such as publishing data assets and utilizing compute resources within Amazon SageMaker. I choose a project and navigate to the Data sources tab in the left navigation pane. You can use this section to add new or manage existing data sources for publishing data assets to the business data catalog, making them discoverable for all users.

I return to the homepage and continue exploring by choosing Data Catalog, which serves as a centralized hub where users can explore and discover all available data assets across multiple data sources within the organization. This catalog connects to various data sources, including Amazon Simple Storage Service (Amazon S3), Amazon Redshift, and AWS Glue.

The semantic search feature helps you find relevant data assets quickly and efficiently using natural language queries, which makes data discovery more intuitive. I enter events in the Search data area.

You can apply filters based on asset type, such as AWS Glue table and Amazon Redshift.

Amazon Q Developer integration helps you interact with data using conversational language, making it easier for users to find and understand data assets. You can use example commands such as “Show me datasets that relate to events” and “Show me datasets that relate to revenue.” The detailed view provides comprehensive information about each dataset, including AI-generated descriptions, data quality metrics, and data lineage, helping you understand the content and origin of the data.

The subscription process implements a controlled access mechanism where users must justify their need for data access, providing proper data governance and security. I choose Subscribe to request access.

In the pop-up window, I select a Project, provide a Reason for request such as need access, and choose Request. The request is sent to the data owner.

This final step makes sure that data access is properly governed through a structured approval workflow, maintaining data security and compliance requirements. During the owner approval process, the data owner receives a notification and can review the request details before choosing to approve or deny access, after which the requester can access the data table if approved.

Now available
Amazon SageMaker Data and AI Governance offers significant benefits for organizations looking to improve their data and AI asset management. The solution helps data scientists, engineers, and analysts overcome challenges in discovering and accessing resources by offering comprehensive features for cataloging, discovering, and governing data and AI assets, while providing security and compliance through structured approval workflows.

For pricing information, visit Amazon SageMaker pricing.

To get started with Amazon SageMaker Data and AI Governance, visit Amazon SageMaker Documentation.

— Esra

Announcing the general availability of data lineage in the next generation of Amazon SageMaker and Amazon DataZone

Post Syndicated from Esra Kayabali original https://aws.amazon.com/blogs/aws/announcing-the-general-availability-of-data-lineage-in-the-next-generation-of-amazon-sagemaker-and-amazon-datazone/

Today, I’m happy to announce the general availability of data lineage in Amazon DataZone, following its preview release in June 2024. This feature is also extended as part of the catalog capabilities in the next generation of Amazon SageMaker, a unified platform for data, analytics, and AI.

Traditionally, business analysts have relied on manual documentation or personal connections to validate data origins, leading to inconsistent and time-consuming processes. Data engineers have struggled to evaluate the impact of changes to data assets, especially as self-service analytics adoption increases. Additionally, data governance teams have faced difficulties in enforcing practices and responding to auditor queries about data movement.

Data lineage in Amazon DataZone addresses the challenges faced by organizations striving to remain competitive by using their data for strategic analysis. It enhances data trust and validation by providing a visual, traceable history of data assets, enabling business analysts to quickly understand data origins without manual research. For data engineers, it facilitates impact analysis and troubleshooting by clearly showing relationships between assets and allowing easy tracing of data flows.

The feature supports data governance and compliance efforts by offering a comprehensive view of data movement, helping governance teams to quickly respond to compliance queries and enforce data policies. It improves data discovery and understanding, helping consumers grasp the context and relevance of data assets more efficiently. Additionally, data lineage contributes to better change management, increased data literacy, reduced data duplication, and enhanced cross-team collaboration. By tackling these challenges, data lineage in Amazon DataZone helps organizations build a more trustworthy, efficient, and compliant data ecosystem, ultimately enabling more effective data-driven decision-making.

Automated lineage capture is a key feature of the data lineage in Amazon DataZone, which focuses on automatically collecting and mapping lineage information from AWS Glue and Amazon Redshift. This automation significantly reduces the manual effort required to maintain accurate and up-to-date lineage information.

Get started with data lineage in Amazon DataZone
Data producers and domain administrators get started by setting up the data source run jobs for the AWS Glue Data Catalog and Amazon Redshift sources to Amazon DataZone to periodically collect metadata from the source catalog. Additionally, the data producers can hydrate the lineage information programmatically by creating custom lineage nodes using APIs that accept OpenLineage compatible events from existing pipeline components—such as schedulers, warehouses, analysis tools, and SQL engines—to send data about datasets, jobs, and runs directly to Amazon DataZone API endpoint. With the information being sent, Amazon DataZone will start populating the lineage model and map them to the assets already cataloged. As new lineage events are captured, Amazon DataZone maintains versions of events that were already captured, so users can navigate to previous versions if needed.

From the consumer’s perspective, lineage can help with three scenarios. First, a business analyst browsing an asset, can go to the Amazon DataZone portal, search for an asset by name, and select an asset that interests them to dive into the details. Initially, they’ll be presented with details in the Business Metadata tab and move right to neighboring tabs. To view lineage, the analyst can go the Lineage tab for details of upstream nodes to find the source. The analyst is presented with a view of that asset’s lineage with 1-level upstream and downstream. To get the source, the analyst can choose upstream and get to the source of the asset. When the analyst is sure that this is the correct asset, they can subscribe to the asset and continue with their work.

Second, if a data issue is reported—for instance, when a dashboard unexpectedly shows a significant increase in customer count—a data engineer can use the Amazon DataZone portal to locate and examine the relevant asset details. In the asset details page, the data engineer navigates to the Lineage tab to view the details of upstream nodes of the asset in question. The engineer can dive into the details of each node, its snapshots, column mapping between each table node, the jobs that ran in between, and view the query that was executed in the job run. Using this information, the data engineer can spot that a new input table was added to the pipeline, which has introduced an uptick in customer count, because they notice that this new table wasn’t part of the previous snapshots of the job runs. This helps them clarify that a new source was added and hence the data shown in the dashboard is accurate.

Lastly, a steward looking to respond to questions from an auditor can go to the asset in question and navigates to the Lineage tab of that asset. The steward traverses the graph upstream to see where the data is coming from and notices that the data is from two different teams—for instance, from two different on-premises databases—that has its own pipelines until it reaches a point where the pipelines merge. While navigating through the lineage graph, the steward can expand the columns to make sure sensitive columns are dropped during the transformations processes and respond to the auditors with details in a timely manner.

How Amazon DataZone automates lineage collection
Amazon DataZone now enables automatic capture of lineage events, helping data producers and administrators to streamline the tracking of data relationships and transformations across their AWS Glue and Amazon Redshift resources. To allow automatic capture of lineage events from AWS Glue and Amazon Redshift, you have to opt in because some of your jobs or connections might be for testing and you might not need any lineage to be captured. With the integrated experience available, the services will provide you an option in your configuration settings to opt-in to collect and emit lineage events directly to Amazon DataZone.

These events should capture the various data transformation operations you perform on tables and other objects, such as table creation with column definitions, schema changes, and transformation queries, including aggregations and filtering. By obtaining these lineage events directly from your processing engines, Amazon DataZone can build a foundation of accurate and consistent data lineage information. This will then help you, as a data producer, to further curate the lineage data as part of the broader business data catalog capabilities.

Administrators can enable lineage when setting up the built-in DefaultDataLake or the DefaultDataWarehouse blueprints.

Data producers can view the status of automated lineage while setting up the data source runs.

With the recent launch of the next generation of Amazon SageMaker, data lineage is available as one of the catalog capabilities in the Amazon SageMaker Unified Studio (preview). Data users can set up lineage using connections, and that configuration will automate the capture of lineage in the platform for all users to browse and understand the data. Here’s how data lineage in next generation Amazon SageMaker will look.

Now available
You can begin using this capability to gain deeper insights into your data ecosystem and drive more informed, data-driven decision-making.

Data lineage is generally available in all AWS Regions where Amazon DataZone is available. For a list of Regions where Amazon DataZone domains can be provisioned, visit AWS Services by Region.

Data lineage costs are dependent on storage usage and API requests, which are already included in the Amazon DataZone pricing model. For more details, visit Amazon DataZone pricing.

To get started with data lineage in Amazon DataZone, visit the Amazon DataZone User Guide.

— Esra

Introducing the next generation of Amazon SageMaker: The center for all your data, analytics, and AI

Post Syndicated from Antje Barth original https://aws.amazon.com/blogs/aws/introducing-the-next-generation-of-amazon-sagemaker-the-center-for-all-your-data-analytics-and-ai/

Today, we’re announcing the next generation of Amazon SageMaker, a unified platform for data, analytics, and AI. The all-new SageMaker includes virtually all of the components you need for data exploration, preparation and integration, big data processing, fast SQL analytics, machine learning (ML) model development and training, and generative AI application development.

The current Amazon SageMaker has been renamed to Amazon SageMaker AI. SageMaker AI is integrated within the next generation of SageMaker while also being available as a standalone service for those who wish to focus specifically on building, training, and deploying AI and ML models at scale.

Highlights of the new Amazon SageMaker
At its core is SageMaker Unified Studio (preview), a single data and AI development environment. It brings together functionality and tools from the range of standalone “studios,” query editors, and visual tools that we have today in Amazon Athena, Amazon EMR, AWS Glue, Amazon Redshift, Amazon Managed Workflows for Apache Airflow (MWAA), and the existing SageMaker Studio. We’ve also integrated Amazon Bedrock IDE (preview), an updated version of Amazon Bedrock Studio, to build and customize generative AI applications. In addition, Amazon Q provides AI assistance throughout your workflows in SageMaker.

Here’s a list of key capabilities:

In this post, I give you a quick tour of the new SageMaker Unified Studio experience and how to get started with data processing, model development, and generative AI app development.

Working with Amazon SageMaker Unified Studio (preview)
With SageMaker Unified Studio, you can discover your data and put it to work using familiar AWS tools to complete end-to-end development workflows, including data analysis, data processing, model training, and generative AI app building, in a single governed environment.

An integrated SQL editor lets you query data from multiple sources, and a visual extract, transform, and load (ETL) tool simplifies the creation of data integration and transformation workflows. New unified Jupyter notebooks enable seamless work across different compute services and clusters. With the new built-in data catalog functionality, you can find, access, and query data and AI assets across your organization. Amazon Q is integrated to streamline tasks across the development lifecycle.

Amazon SageMaker Unified Studio

Let’s explore the individual capabilities in more detail.

Data processing
SageMaker integrates with SageMaker Lakehouse and lets you analyze, prepare, integrate, and orchestrate your data in a unified experience. You can integrate and process data from various sources using the provided connectivity options.

Start by creating a project in SageMaker Unified Studio, choosing the SQL analytics or data analytics and AI-ML model development project profile. Projects are a place to collaborate with your colleagues, share data, and use tools to work with data in a secure way. Project profiles in SageMaker define the preconfigured set of resources and tools that are provisioned when you create a new project. In your project, choose Data in the left menu and start adding data sources.

Amazon SageMaker Unified Studio

The built-in SQL query editor lets you query your data stored in data lakes, data warehouses, databases, and applications directly within SageMaker Unified Studio. In the top menu of SageMaker Unified Studio, select Build and choose Query Editor to get started. Also, try creating SQL queries using natural language with Amazon Q while you’re at it.

Amazon SageMaker Unified Studio

You should also explore the built-in visual ETL tool to create data integration and transformation workflows using a visual, drag-and-drop interface. In the top menu, select Build and choose Visual ETL flow to get started.

Amazon SageMaker Unified Studio

If Amazon Q is enabled, you can also use generative AI to author flows. Visual ETL comes with a wide range of data connectors, pre-built transformations, and features such as scheduling, monitoring, and data previewing to streamline your data workflows.

Model development
SageMaker Unified Studio includes capabilities from SageMaker AI, which provides infrastructure, tools, and workflows for the entire ML lifecycle. From the top menu, select Build to access tools for data preparation, model training, experiment tracking, pipeline creation, and orchestration. You can also use these tools for model deployment and inference, machine learning operations (MLOps) implementation, model monitoring and evaluation, as well as governance and compliance.

To start your model development, create a project in SageMaker Unified Studio using the data analytics and AI-ML model development project profile and explore the new unified Jupyter notebooks. In the top menu, select Build and choose JupyterLab. You can use the new unified notebooks to seamlessly work across different compute services and clusters. You can use these notebooks to switch between environments without leaving your workspace, streamlining your model development process.

Amazon SageMaker Unified Studio

You can also use Amazon Q Developer to assist with tasks such as code generation, debugging, and optimization throughout your model development process.

Generative AI app development
Use the new Amazon Bedrock IDE to develop generative AI applications within Amazon SageMaker Unified Studio. The Amazon Bedrock IDE includes tools to build and customize generative AI applications using FMs and advanced capabilities such as Amazon Bedrock Knowledge Bases, Amazon Bedrock Guardrails, Amazon Bedrock Agents, and Amazon Bedrock Flows to create tailored solutions aligned with your requirements and responsible AI guidelines.

Choose Discover in the top menu of SageMaker Unified Studio to browse Amazon Bedrock models or experiment with the model playgrounds.

Amazon Bedrock IDE

Create a project using the GenAI Application Development profile to start building generative AI applications. Choose Build in the top menu of SageMaker Unified Studio and select Chat agent.

Amazon Bedrock IDE

With the Amazon Bedrock IDE, you can build chat agents and create knowledge bases from your proprietary data sources with just a few clicks, enabling Retrieval-Augmented Generation (RAG). You can add guardrails to promote safe AI interactions and create functions to integrate with any system. With built-in model evaluation features, you can test and optimize your AI applications’ performance while collaborating with your team. Design flows for deterministic genAI-powered workflows, and when ready, share your applications or prompts within the domain or export them for deployment anywhere—all while maintaining control of your project and domain assets.

For a detailed description of all Amazon SageMaker capabilities, check the SageMaker Unified Studio User Guide.

Getting started
To begin using SageMaker Unified Studio, administrators need to complete several setup steps. This includes setting up AWS IAM Identity Center, configuring the necessary virtual private cloud (VPC) and AWS Identity and Access Management (IAM) roles, creating a SageMaker domain, and enabling Amazon Q Developer Pro. Instead of IAM Identity Center, you can also configure SAML through IAM federation for user management.

After the environment is configured, users sign in through the provided SageMaker Unified Studio domain URL with single sign-on. You can create projects to collaborate with team members, choosing from pre-configured project profiles for different use cases. Each project connects to a Git repository for version control and includes an example unified Jupyter notebook to get you started.

For detailed setup instructions, check the SageMaker Unified Studio Administrator Guide.

Now available
The next generation of Amazon SageMaker is available today in the US East (N. Virginia, Ohio), US West (Oregon), Asia Pacific (Tokyo), and Europe (Ireland) AWS Regions. Amazon SageMaker Unified Studio and Amazon Bedrock IDE are available today in preview in these AWS Regions. Check the full Region list for future updates.

For pricing information, visit Amazon SageMaker pricing and Amazon Bedrock pricing. To learn more, visit Amazon SageMaker, SageMaker Unified Studio, and Amazon Bedrock IDE.

Existing Amazon Bedrock Studio preview domains will be available until February 28, 2025, but you may not create new workspaces. To experience the advanced features of Bedrock IDE, create a new SageMaker domain following the instructions in the Administrator Guide.

Give the new Amazon SageMaker a try in the console today and let us know what you think! Send feedback to AWS re:Post for Amazon SageMaker or through your usual AWS Support contacts.

— Antje

Enhance data governance with enforced metadata rules in Amazon DataZone

Post Syndicated from Ramesh H Singh original https://aws.amazon.com/blogs/big-data/enhance-data-governance-with-enforced-metadata-rules-in-amazon-datazone/

We’re excited to announce a new feature in Amazon DataZone that offers enhanced metadata governance for your subscription approval process. With this update, domain owners can define and enforce metadata requirements for data consumers when they request access to data assets. By making it mandatory for data consumers to provide specific metadata, domain owners can achieve compliance, meet organizational standards, and support audit and reporting needs.

Many organizations require additional metadata from data consumers during the subscription request process to align with internal workflows and regulatory requirements. With enforced metadata rules, domain unit owners can establish consistent governance practices across all data subscriptions. For example, financial services organizations can mandate specific compliance-related metadata when data consumers request access to sensitive financial data. Similarly, healthcare providers can enforce metadata requirements to align with regulatory standards for patient data access. This feature simplifies the approval process by guiding data consumers through completing mandatory fields and enabling data owners to make informed decisions, ensuring data access requests meet organizational policies.

By streamlining metadata governance, Amazon DataZone empowers customers to meet compliance standards, maintain audit readiness, and simplify access workflows for enhanced efficiency and control. For example, one of our customers, Bristol Myers Squibb (BMS), leverages Amazon DataZone to address their specific data governance needs. Sitikantha Sarangi, Director of Data Engineering and ML Ops Platform at BMS, says:

“At BMS, our teams have been leveraging Amazon DataZone’s comprehensive data governance solution to catalog and enable secure data subscriptions across the organization within governed project environments. With the new custom metadata enforcement feature, we now can more easily navigate our data catalog. This capability allows us to set specific requirements for data consumers, such as providing a compliance certification link or detailing data usage intentions, ensuring that access requests for sensitive data are thoroughly reviewed and approved in alignment with our standards. This customization helps us more efficiently ensure we are appropriately utilizing data while facilitating efficient, secure data sharing across teams.” 

Key benefits

The feature benefits multiple stakeholders. Domain unit owners can ensure compliance by enforcing metadata requirements, granting access only after thorough reviews. Data consumers benefit from a streamlined subscription request process, guided by metadata requirements that reduce complexity. Data producers gain clarity with detailed subscription requests, enabling informed decisions aligned with required standards. Overall, the key benefits are:

  • Enhanced control for domain owners – Admins and domain unit owners can now enforce additional metadata requirements on subscription requests, making sure that data consumers supply essential information for thorough review and compliance checks
  • Custom workflow support – Organizations can build custom workflows for assets by capturing critical metadata from data consumers, such as AWS account IDs or project-specific identifiers, to fulfill access requests

In this post, we walk you through setting up and using metadata enforcement to create seamless, compliant data access workflows.

Solution overview

The solution in this post is composed of two parts. In the first part, we walk through the steps necessary to enforce metadata for subscription requests for managed assets. In the second part, we walk through the steps necessary to request subscriptions for custom assets.

Prerequisites

To follow this post, user should already have Amazon DataZone setup with respective projects to publish and consume the assets. The publisher of the Retail project must have published a shipments data asset in Amazon DataZone. The domain owner or admin must have created a metadata form required for the subscription request.

This feature also supports metadata enforcement for subscription requests of a data product. For instructions on how to set this up, refer to Amazon DataZone data products.

Solution walkthrough: Enhance data governance with enforced metadata rules for Managed Assets

To perform the solution in this post, follow the steps in the next sections.

Metadata enforcement for subscription requests

To enforce metadata for subscription requests, use the following steps.

Step 1: Domain owner configures metadata requirements

Domain unit owners can configure metadata enforcement in Amazon DataZone as follows:

  1. On the Amazon DataZone console, choose Domain to open your domain or domain unit settings.
  2. Choose dataplatform, as shown in the following screenshot.
  3. To add metadata forms for subscription requests, on the RULES tab, choose ADD, as shown in the following screenshot.
  4. Provide the name to the metadata form rule.
  5. Choose ADD ANOTHER METADATA FORM.
  6. Choose from a list of available metadata forms within the domain or domain unit. Search options make navigation straightforward.

You can select multiple forms for enforcement on subscription requests.

  1. Choose Add, as shown in the following screenshot.

Create metadata form rule as below:

  1. In the next screen, you can specify additional settings. You can apply metadata forms across all asset types or limit them to specific asset types. Additionally, choose whether the rule applies to a specific project or all projects within the domain. After the scope is defined as shown in the screenshot, choose ADD RULE.

    Note: Enable metadata enforcement across child domains, with optional permissions allowing child domains to override the parent domain’s enforced forms. This option is available while defining the scope, if the domain owner chooses All projects, as shown in the following screenshot.

Step 2: Data consumer submits subscription request

After metadata enforcement is configured, data consumers follow these steps to request access:

  1. To find and select an asset in the Amazon DataZone catalog, choose MARKETING and then sign in to the Amazon DataZone console as a data consumer. On the search bar, enter the shipments data asset, as shown in following screenshot.
  2. Choose SUBSCRIBE to open the subscription request modal, as shown in the following screenshot.
  3. Choose a project and provide a Reason for request, as shown in the following screenshot.
  4. Fill in the required metadata fields as specified by the domain unit. If mandatory fields are incomplete, they will be highlighted, and the submission will be disabled until resolved. After all the mandatory fields are entered, choose APPLY, as shown in the following screenshot.
  5. Choose Request to submit the subscription request, as shown in the following screenshot.

After submitting, an event is generated in Amazon EventBridge, which can be used in custom workflows outside of Amazon DataZone as needed.

Step 3: Data producer (owner) approves the subscription

After a data consumer submits a subscription request, they review the metadata. The data producer receives the subscription request with all metadata provided by the data consumer.

  1. Sign in to the Amazon DataZone console as a data producer. Choose RETAIL as the
  2. In the navigation pane, choose Incoming requests and find the subscription request. Choose View request, as shown in the following screenshot.
  3. Data producers can review the metadata, including document links and account IDs, to determine if the request meets compliance and workflow requirements before granting access, as shown in the following screenshot.
  4. Under Approval access, choose Full access to provide full access to data. For fine-grain access control, choose Approve with row or column filters. For this post, we choose Full access.
  5. Provide the Decision comment.
  6. Choose APPROVE, as shown in the following screenshot.

Step 4: Data consumer consumes the data

Now, data consumers follow these steps:

  1. After the subscription grants are approved and fulfilled, sign in to the Amazon DataZone console as data consumer from MARKETING project to query the subscribed data.
  2. Choose MARKETING On the Environments tab, choose Query data through Amazon Athena, as shown in the following screenshot.
  3. Query the subscribed data asset shipments in Amazon Athena, with below query and as shown in the screenshot.
    SELECT * from “env_mkt_datalake_sub_db”.“shipments” limit 10;

Solution walkthrough: Enhance data governance with enforced metadata rules for Custom Assets

Customers can manage access grants for unmanaged assets using Amazon DataZone. When a subscription to an asset in the business data catalog is approved by the data owner, Amazon DataZone publishes an event in Amazon EventBridge in the account along with all the necessary information in the payload that you can use to create the access grants between the source and the target. Using metadata enforcement for unmanaged assets, customers can provide all context in the single request.

STEP 1: Create a custom asset type

To create a custom asset type Metrics with an attached metadata form to describe the metric asset type, follow these steps:

Below is an example of a custom asset type – “Metrics” which has two fields 1/Dashboard Link and 2/Calculation

Step 2: Data producer creates a custom asset using the “Metrics” asset type

The data producer creates a Conversion Rate Metric with all metadata along with associated metadata forms by following these steps:

Below is “Conversion Rate Metric” asset created in DataZone. The highlighted boxes show that is an Unmanaged asset and of type “Metrics” that was created in the previous step.

Step 3: Domain owner configures metadata requirements

Domain unit owners can configure metadata enforcement in Amazon DataZone as follows:

  1. On the Amazon DataZone console, choose Domain to open your domain or domain unit settings.
  2. To add metadata forms for subscription requests, on the RULES tab, choose ADD, as shown in the following screenshot.
  3. To select metadata forms, provide the Name to the metadata form rule.
  4. Choose ADD METADATA FORM, as shown in the following screenshot.
  5. Remaining fields can be left as default. For this blog, please set it as shown in below
  6. In the Add metadata form pop-up, enter MetricsRequestForm, as shown in the following screenshot.

  7. Choose ADD Rule as shown above to create the rule for all metrics assets. Below is the screenshot of the rule once created.

Step 4: Admins sets up an EventBridge rule

To set up an EventBridge rule, follow these steps:

  1. Create an EventBridge rule to capture all new subscription requests. Please see the documentation Amazon DataZone events and notifications for details to setup.
  2. Create an AWS Lambda function as a target to action on the event. Please see documentation – Event bus targets in Amazon EventBridge to setup targets.

For this blog, set the below event pattern that triggers the lambda only for new Subscription requests.

{
  "source": ["aws.datazone"],
  "detail-type": ["Subscription Request Created"]
}

Step 5: Data consumer submits subscription request

After metadata enforcement is configured, data consumers follow these steps to request access:

  1. To locate the asset in the Amazon DataZone catalog, sign in to the Amazon DataZone console as a data consumer from the marketing Use the search bar to find the Conversion Rate Metric asset. Choose SUBSCRIBE, as shown in the following screenshot.
  2. Provide details, including the Metrics Request Form associated with the Metrics asset type.
  3. Choose REQUEST, as shown in the following screenshot.

You will receive notification confirming that your subscription request is submitted, as shown in the following screenshot.

For the request, EventBridge will capture the following request event and send it to the setup target:

{
    'version': '0',
    'id': '3fdf59a2-f95c-192f-0901-4025dc6e6a61',
    'detail-type': 'Subscription Request Created',
    'source': 'aws.datazone',
    'account': '1234567890', 
    'time': '2024-11-15T18:57:16Z', 
    'region': 'us-east-1', 
    'resources': [], 
    'detail': 
        {
            'version': '283',
            'internal': None,
            'metadata': 
                {'
                    id': 'cwaxxxlj', 
                    'version': '1',
                    'typeName': 'SubscriptionRequestEntityType',
                    'domain': 'dzd_xxxxxxxxx1z',
                    'user': 'd1xxxxx-eexxx-xxxx-axxxx-0xxxxxxxx8ce',
                    'awsAccountId': '1234567890', 
                    'owningProjectId': '555xxxxxxrmv', 
                    'clientToken': '3bxxxxxxxxxxc91bb76d6'
                }, 
            'data': 
                {
                    'autoApproved': False, 
                    'requesterId': 'd1xxxxx848ce',
                    'reviewerId': '54uxxxxxxd3',
                    'status': 'PENDING',
                    'subscribedListings': [{'id': '6ixxgev', 'item': {'assetListing': {'entityId': 'xxxxxxxxx7', 'entityType': 'Metrics'}}, 'ownerProjectId': '5xxxxxx3', 'version': '2'}], 
                    'subscribedPrincipals': [{'id': '555xxxxxxrmv', 'type': 'PROJECT'}]
                }
            }
}

The data steward and asset owner can get details for the request with the  GetSubscriptionRequestDetails API and view the asset details and form associated with the request:

{
    "id": "cwxxxlj",
    "createdBy": "d17xxxxxxx848ce",
    "domainId": "dzd_xxxxxxz",
    "status": "PENDING",
    "createdAt": "2024-11-15T20:26:01.014000+00:00",
    "updatedAt": "2024-11-15T20:26:01.014000+00:00",
    "requestReason": "Marketing Analytics use case",
    "subscribedPrincipals": [
        {
            "project": {
                "id": "bxxxxx23hj",
                "name": "Marketing"
            }
        }
    ],
    "subscribedListings": [
        {
            "id": "6xxxxxxx1ev",
            "revision": "2",
            "name": "Conversion Rate Metric",
            "description": "Conversion rate calculates the percentage of web visitors who complete a desired action, such as creating an account, placing an order or clicking a link",
            "item": {
                "assetListing": {
                    "entityId": "b8xxxxxd7",
                    "entityRevision": "7",
                    "entityType": "Metrics",
                    "forms": "{\n  \"DZ_Internal_Basic_Form\" : {\n    \"name\" : \"Conversion Rate Metric\",\n    \"description\" : \"Conversion rate calculates the percentage of web visitors who complete a desired action, such as creating an account, placing an order or clicking a link\"\n  },\n  \"amazonstatus\" : {\n    \"publishingPrecedence\" : \"PUBLISHED_INDIVIDUALLY\",\n    \"status\" : \"ACTIVE\"\n  },\n  \"AssetCommonDetailsForm\" : {\n    \"readMe\" : \"Conversion Rate is a key performance metric used in marketing, e-commerce, and digital analytics. It measures the percentage of users or visitors who take a desired action out of the total number of users or visitors. This desired action, known as a \\\"conversion,\\\" can vary depending on the specific goals of a business or campaign.\\n\\n\\nApplications:\\n\\n- E-commerce: Percentage of website visitors who make a purchase\\n- Marketing: Percentage of leads who become customers\\n- Digital Advertising: Percentage of ad viewers who click on an ad or complete a form\\n- Email Marketing: Percentage of email recipients who click a link or perform a desired action\\n\\n\\nImportance:\\n\\n- Measures effectiveness of marketing efforts and user experience\\n- Helps in understanding customer behavior and preferences\\n- Guides optimization efforts for websites, ads, and marketing campaigns\\n- Often used as a key metric for ROI (Return on Investment) calculations\"\n  },\n  \"MarketingMetrics\" : {\n    \"DashboardLink\" : \"www.anycompany.com/marketing/conversion_rate\",\n    \"Calculation\" : \"Conversion rate = Conversions / Total visitors x 100\"\n  },\n  \"amazonmetadata\" : {\n    \"entityVersion\" : \"7\",\n    \"createdAt\" : \"2024-11-15T16:43:15.325935428Z\",\n    \"typeNamespace\" : \"dzd_6xxxxxx1z\",\n    \"sourceCategory\" : \"asset\",\n    \"typeName\" : \"Metrics\",\n    \"entityId\" : \"byxxxxxdolk7\",\n    \"sourceEntityFormDetails\" : [ {\n      \"typeNamespace\" : \"dzd_xxxxx1z\",\n      \"typeVersion\" : \"15\",\n      \"formName\" : \"MarketingMetrics\",\n      \"typeName\" : \"MarketingMetrics\"\n    }, {\n      \"typeNamespace\" : \"amazon.datazone\",\n      \"typeVersion\" : \"10\",\n      \"formName\" : \"DZ_Internal_Basic_Form\",\n      \"typeName\" : \"NamedDataZoneBasicFormType\"\n    }, {\n      \"typeNamespace\" : \"amazon.datazone\",\n      \"typeVersion\" : \"6\",\n      \"formName\" : \"AssetCommonDetailsForm\",\n      \"typeName\" : \"AssetCommonDetailsFormType\"\n    }, {\n      \"typeNamespace\" : \"amazon.datazone.internal\",\n      \"typeVersion\" : \"1\",\n      \"formName\" : \"DZ_Internal_Rendering_Config_Form\",\n      \"typeName\" : \"RenderingConfigFormType\"\n    } ]\n  },\n  \"DZ_Internal_Rendering_Config_Form\" : {\n    \"metadataFormItems\" : [ {\n      \"formName\" : \"MarketingMetrics\",\n      \"collapse\" : false\n    }, {\n      \"formName\" : \"AssetCommonDetailsForm\",\n      \"collapse\" : false\n    } ]\n  }\n}",
                    "glossaryTerms": []
                }
            },
            "ownerProjectId": "54xxxxxd3",
            "ownerProjectName": "Custom-Metrics-Assets"
        }
    ],
    "metadataForms": [
        {
            "formName": "MetricsRequestForm",
            "typeName": "MetricsRequestForm",
            "typeRevision": "5",
            "content": "{\"BusinessUnit\": \"AWS\",\"ContactEmail\": \"[email protected]\",\"Team\": \"DataZone\"}"
        }
    ]
}

The data and asset owner can use these details to orchestrate an approval workflow using the Lambda function. After it has been validated, the asset owner or steward can then call the AcceptSubscriptionRequest API to grant access. The data consumer will be notified after access is approved. The following screenshot shows the notification that the subscription was approved.

Now that the subscription is approved, users can use the dashboard URL to access the metric.

Cleanup

To make sure no additional charges are incurred after testing, delete the Amazon DataZone domain. Refer to Delete Amazon DataZone domains for the process.

Conclusion

The new metadata enforcement rule for subscription requests in Amazon DataZone strengthens data governance by empowering domain unit owners to establish clear metadata requirements for data consumers, streamlining access requests and enhancing data governance. This feature enables organizations to align with the organization’s metadata standards, implement custom workflows, and provide a consistent, governed data access experience.

The feature is supported in all AWS Regions where Amazon DataZone is available at the time of this writing. To check which Regions are available, refer to AWS Services by Region. Check out the video below to learn more about how to set up metadata rules for subscription workflows. Get started with the technical documentation.


About the Authors

Ramesh H Singh is a Senior Product Manager Technical (External Services) at AWS in Seattle, Washington, currently with the Amazon DataZone team. He is passionate about building high-performance ML/AI and analytics products that enable enterprise customers to achieve their critical goals using cutting-edge technology. Connect with him on LinkedIn.

Pradeep Misra PicPradeep Misra is a Principal Analytics Solutions Architect at AWS. He works across Amazon to architect and design modern distributed analytics and AI/ML platform solutions. He is passionate about solving customer challenges using data, analytics, and AI/ML. Outside of work, Pradeep likes exploring new places, trying new cuisines, and playing board games with his family. He also likes doing science experiments, building LEGOs and watching anime with his daughters.

Lakshmi Nair is a Senior Analytics Specialist Solutions Architect at AWS. She specializes in designing advanced analytics systems across industries. She focuses on crafting cloud-based data platforms, enabling real-time streaming, big data processing, and robust data governance.

Santhosh Padmanabhan is a Software Development Manager at AWS, leading the Amazon DataZone engineering team. His team designs, builds, and operates services specializing in data, machine learning, and AI governance. With deep expertise in building distributed data systems at scale, Santhosh plays a key role in advancing AWS’s data governance capabilities.

How Volkswagen Autoeuropa built a data solution with a robust governance framework, simplifying access to quality data using Amazon DataZone

Post Syndicated from Dhrubajyoti Mukherjee original https://aws.amazon.com/blogs/big-data/how-volkswagen-autoeuropa-built-a-data-solution-with-a-robust-governance-framework-simplifying-access-to-quality-data-using-amazon-datazone/

This is a joint post co-authored with Martin Mikoleizig from Volkswagen Autoeuropa.

This second post of a two-part series that details how Volkswagen Autoeuropa, a Volkswagen Group plant, together with AWS, built a data solution with a robust governance framework using Amazon DataZone to become a data-driven factory. Part 1 of this series focused on the customer challenges, overall solution architecture and solution features, and how they helped Volkswagen Autoeuropa overcome their challenges. This post dives into the technical details, highlighting the robust data governance framework that enables ease of access to quality data using Amazon DataZone.

At Amazon, we work backward, a systematic way to vet ideas and create new products. The key tenet of this approach is to start by defining the customer experience, then iteratively work backward from that point until the team achieves clarity of thought around what to build. The first section of this post discusses how we aligned the technical design of the data solution with the data strategy of Volkswagen Autoeuropa. Next, we detail the governance guardrails of the Volkswagen Autoeuropa data solution. Finally, we highlight the key business outcomes.

Aligning the solution with the data strategy

At an early stage of the project, the Volkswagen Autoeuropa and AWS team identified that a data mesh architecture for the data solution aligns with the Volkswagen Autoeuropa’s vision of becoming a data-driven factory. With this in mind, the team implemented the following steps:

  • Define data domains – In a workshop, the team identified the data landscape and its distribution in Volkswagen Autoeuropa. Next, the team grouped the data assets of the organization along the lines of business and defined the data domains. Because Volkswagen Autoeuropa is at an early stage of their data mesh journey, defining data domains along the lines of business is the recommended approach. As the data solution evolves, Volkswagen Autoeuropa might consider other criteria such as business subdomains to define data domains. The team defined more than five data domains, such as production, quality, logistics, planning, and finance.
  • Identify pioneer cases – The team identified the pioneer use cases that onboard the data solution first, to validate its business value. The team identified two use cases. The first use case helps predict test results during the car assembly process. The second use case enables the creation of reports containing shop floor key metrics for different management levels. The following criteria were considered to identify these use cases:
    • Use cases that deliver measurable business value for Volkswagen Autoeuropa.
    • Use cases with high AWS maturity.
    • Use cases whose requirements can be met with the first release version of the data solution.
  • Onboard key data products – The team identified the key data products that enabled these two use cases and aligned to onboard them into the data solution. These data products belonged to data domains such as production, finance, and logistics. In addition, the team aligned on business metadata attributes that would help with data discovery. The data products are classified as either source-based data or consumer-based data. Source-based data is the unaltered, raw data that is generated from source systems (for example, quality data, safety data) and is useful for other business use cases. Consumer-based data is the aggregated and transformed data from source systems. Reuse of consumer-based data saves cost in extract, transform, and load (ETL) implementation and system maintenance.

In addition to the preceding steps, the team established a data quality framework to improve the quality of the data product registered in the data solution. The following table shows the mapping of the data mesh-based solution components to Amazon DataZone and AWS Glue features. The table also provides generic examples of the components in the automotive industry.

Data Solution Components AWS Service Features Generic Examples
Data domains Amazon DataZone projects and Amazon DataZone domain units Production, logistics
Use cases Amazon DataZone projects Smart manufacturing, predictive maintenance
Data products Amazon DataZone assets Sales data, sensor data
Business metadata Amazon DataZone glossaries and metadata forms Data product owner information, data refresh frequency
Data quality framework AWS Glue Data Quality  A quality score of 92%

Empowering teams with a governance framework

This section discusses the governance framework that was put in place to empower the teams at Volkswagen Autoeuropa by enhancing their analytics journey. It highlights the guardrails that enable ease of access to quality data.

Business metadata

Business metadata helps users understand the context of the data, which can lead to increased trust in the data. Moreover, establishing a common set of attributes of the data products promotes a consistent experience for the users. In addition to the business context, at Volkswagen Autoeuropa, the metadata includes information related to data classification and if the data contains personally identifiable information (PII). The data solution uses Amazon DataZone glossaries and metadata forms to provide business context to their data. Apart from the previous benefits, using the appropriate keywords in Amazon DataZone glossary terms and metadata forms can help with the search and filtering capability of data products in the Amazon DataZone data portal.

Data quality framework

The data quality framework is a comprehensive solution designed to streamline the process of data quality checks and publishing a quality score. It uses AWS Glue Data Quality to generate recommendation rulesets, run orchestrated jobs, store results, and send notifications. This framework can be seamlessly integrated into an AWS Glue job, providing a quality score for data pipeline jobs. The quality score of a data product is published in the Amazon DataZone data portal for consumers to evaluate. The key components of the solution are as follows:

  • Recommendation ruleset generation – The framework generates tailored rulesets based on metadata from the AWS Glue Data Catalog table, providing relevant and comprehensive quality checks.
  • Orchestrated job execution – Jobs are run in AWS Step Functions to perform data quality checks using the generated rulesets against data sources, evaluating data quality based on defined rules and criteria.
  • Result storage and notification – Results, including quality scores, quality status, and rulesets checked, are stored in an Amazon Simple Storage Service (Amazon S3) bucket, maintaining a historical record. End-users receive notifications with relevant details.
  • Data quality score publishing – The quality scores are published in the Amazon DataZone data portal, enabling consumers to access and evaluate data quality.
  • Subscription and quality score requirements – Consumers can subscribe to data sources or targets based on their desired quality score thresholds, making sure they receive data that meets their specific needs and standards.
  • Integration and extensibility – The framework is designed for seamless integration into existing AWS Glue jobs or data pipelines and provides a flexible and extensible architecture for customization and enhancement.

Federated governance

Federated governance empowers producer and consumer teams to operate independently while adhering to a central governance model. For the data solution at Volkswagen Autoeuropa, this meant a centralized team defined the governance guardrails and decentralized data teams employed those guardrails. The following are a few examples of how the team established federated governance in Volkswagen Autoeuropa:

  • Management of Amazon DataZone glossaries and metadata forms – In this mechanism, the Volkswagen Autoeuropa IT team defined the Amazon DataZone glossaries and metadata forms in a central manner. The data teams used them to publish the data assets in the Amazon DataZone. This provides consistency of business metadata across the organization. The following figure explains the process.
    The workflow in the Amazon DataZone data portal consists of the following steps:
    1. The data solution administrator belonging to the Volkswagen Autoeuropa IT team aligns with stakeholders such as data producers, data consumers, and source system owners, and maintains the business metadata using the Amazon DataZone glossaries and metadata forms.
    2. The producer project teams use the Amazon DataZone glossary terms and fill the Amazon DataZone metadata forms to enrich the inventory assets.
    3. After the business metadata is populated, the team publishes the assets in the Amazon DataZone data portal.
  • Management of Amazon DataZone project membership – In this scenario, the management of Amazon DataZone project membership is delegated to a designated administrator of the project. The following figure explains the process.
    The workflow consists of the following steps:
    1. The data solution administrator belonging to the Volkswagen Autoeuropa IT team provisions the Amazon DataZone project and environment using automation. The data solution administrator is the owner of the project.
    2. The data solution administrator delegates the management of the Amazon DataZone project membership to a designated administrator by assigning the owner role.
    3. The Amazon DataZone project administrator assigns the contributor role to eligible users.
    4. The users access the Amazon DataZone project and its assets from the Amazon DataZone data portal.

Authentication and authorization

The Amazon DataZone portal supports two types of authorizations: AWS Identity and Access Management (IAM) roles and AWS IAM Identity Center users. The data solution supports both of these authorization methods. The choice of authentication mechanism is a function of the type of authorization used for Amazon DataZone.

For IAM role authorization, an IAM role is created for each user, incorporating a prefix. Each data solution user role has a permission to list the Amazon DataZone domains (datazone:ListDomains) and to get the data portal login URL (datazone:GetIamPortalLoginUrl) in the Amazon DataZone AWS account. For reasons that are out of scope for this post, there could only be three SAML federated roles in an AWS account in the customer environment. As such, the team didn’t have a dedicated SAML federated role for each Amazon DataZone user. The data solution user role implemented a trust policy allowing the user’s AWS Security Token Service (AWS STS) federated user session principal Amazon Resource Name (ARN). If you don’t have limitations on the number of SAML federated roles per AWS account, you can make all data solution user roles SAML federated roles and update the trust policy accordingly.

For IAM Identity Center authorization, the configuration is done either at the AWS Organizations level or AWS account level in IAM Identity Center. Because there are currently no APIs available for identity source configuration in IAM Identity Center, the team followed the appropriate instructions to configure the identity source on the AWS Management Console.

After the chosen authorization option is activated, Amazon DataZone administrators grant the IAM principals (IAM role or IAM Identity Center user) access to the Amazon DataZone portal. For more details, refer to Manage users in the Amazon DataZone console.

Business outcomes

Volkswagen Autoeuropa and AWS established an iterative mechanism to enable the continuous growth of the data solution. This iterative improvement is expressed as a flywheel as shown in the following figure.

The outcome of each component of the flywheel powers the next component, creating a virtuous cycle. The data solution flywheel consists of five components:

  1. Data solution growth – The primary focus of the flywheel is to accelerate the growth of the data solution. This growth is measured by metrics such as number of data products, number of use cases onboarded into the solution, and number of users.
  2. Enhancing user experience – This component focuses on enhancing the user experience of the data solution. One way to measure the user experience is through user feedback surveys.
  3. Data solution use cases – Improved, positive user experience with the data solution contributes to the increased number of use cases that want to onboard the data solution.
  4. Data producers and consumers – As the number of use cases increases, so does the number of data producers and consumers. Data producers make data available to power the use cases. Data consumers use the data to drive the use cases.
  5. Selection of data products – After data producers onboard the data solution, they publish the assets in the Amazon DataZone data portal. This leads to a larger selection of data products. This, in turn, creates a positive experience for the data solution users.

In addition to the previous components, the positive user experience is reinforced by improving governance guardrails, increasing number of reusable assets, and maximizing operational excellence.

As of writing this post, Volkswagen Autoeuropa reduced the time to discover data from days to minutes using the data solution. This led to approximately 384 times improvement in data discovery time. Data access took several weeks before the Volkswagen Autoeuropa and AWS collaboration. With the help of the data solution powered by Amazon DataZone, the data access time was reduced to minutes. Overall, the data solution resulted in regaining between 48 hours and weeks of customer productivity over the course of a month.

The data solution powered by Amazon DataZone is driving measurable business impact for Volkswagen Autoeuropa. It enables Volkswagen Autoeuropa to deliver digital use cases faster, with less effort, and a higher overall quality. Volkswagen Autoeuropa believes that Amazon DataZone will be key in their journey to become a data-driven factory and to leverage AI.

Conclusion

This post explored how Volkswagen Autoeuropa built a robust and scalable data solution using Amazon DataZone. The first step was to align the solution with Volkswagen Autoeuropa’s overarching data strategy to drive business value.

The establishment of a comprehensive governance framework was central to this effort. This framework encompasses key components, such as business metadata, data quality, federated governance, access controls, and security, which maintain the trustworthiness and reliability of Volkswagen Autoeuropa’s data assets. The post highlighted the Volkswagen Autoeuropa data solution flywheel, showcasing how the solution enabled improved decision-making, increased operational efficiency, and accelerated digital transformation initiatives across the organization.

The data solution built at Volkswagen Autoeuropa is one of the first implementations within the Volkswagen Group and is a blueprint for other Volkswagen production plants.

“This project is a blueprint for other Volkswagen production plants. By involving the AWS team and using Amazon DataZone, we are able to govern our data centrally and make it accessible in an automated and secure way.”

– Daniel Madrid, Head of IT, Volkswagen Autoeuropa.

If you’re looking to harness the power of data mesh to drive innovation and business value within your organization, we’ve got you covered. In Strategies for building a data mesh-based enterprise solution on AWS, we dive deep into the key considerations and current recommendations to establish a robust, scalable, and well-governed data mesh on AWS. This documentation covers everything from aligning your data mesh with overall business strategy to implementing the data mesh strategy framework.

To get hands-on experience with real-world code examples, see our GitHub repository. This open source project provides a step-by-step blueprint for constructing a data mesh architecture using the powerful capabilities of Amazon DataZone, AWS Cloud Development Kit (AWS CDK), and AWS CloudFormation.


About the Authors

BDB-4558-DhrubaDhrubajyoti Mukherjee is a Cloud Infrastructure Architect with a strong focus on data strategy, data analytics, and data governance at AWS. He uses his deep expertise to provide guidance to global enterprise customers across industries, helping them build scalable and secure AWS solutions that drive meaningful business outcomes. Dhrubajyoti is passionate about creating innovative, customer-centric solutions that enable digital transformation, business agility, and performance improvement. An active contributor to the AWS community, Dhrubajyoti authors AWS Prescriptive Guidance publications, blog posts, and open source artifacts, sharing his insights and best practices with the broader community. Outside of work, Dhrubajyoti enjoys spending quality time with his family and exploring nature through his love of hiking mountains.

BDB-4558-RaviRavi Kumar is a Data Architect and Analytics expert at AWS, where he finds immense fulfilment in working with data. His days are dedicated to designing and analyzing complex data systems, uncovering valuable insights that drive business decisions. Outside of work, he unwinds by listening to music and watching movies, activities that allow him to recharge after a long day of data wrangling.

Martin Mikoleizig studied mechanical engineering and production technology at the RWTH Aachen University before starting to work in Dr. h.c. Ing. F. Porsche AG 2015 as a production planner for the engine assembly. Over several years as a Project Manager on Testing Technology for new engine models, he also introduced several innovations like human-machine collaborations and intelligent assistance systems. Starting in 2017, he was responsible for the shop floor IT team of the module lines in Zuffenhausen before he became responsible for the planning of the E-Drive assembly at Porsche. Additionally, he was responsible for the Digitalisation Strategy of the Production Ressort at Porsche. In October 2022, he was assigned to Volkswagen Autoeuropa in Portugal in the role of a Digital Transformation Manager for the plant, driving the digital transformation towards a data-driven factory.

BDB-4558-WeiWeizhou Sun is a Lead Architect at AWS, specializing in digital manufacturing solutions and IoT. With extensive experience in Europe, she has enhanced operational efficiencies, reducing latency and increasing throughput. Weizhou’s expertise includes industrial computer vision, predictive maintenance, and predictive quality, consistently delivering top performance and client satisfaction. A recognized thought leader in IoT and remote driving, she has contributed to business growth through innovations and open source work. Committed to knowledge sharing, Weizhou mentors colleagues and contributes to practice development. Known for her problem-solving skills and customer focus, she delivers solutions that exceed expectations. In her free time, Weizhou explores new technologies and fosters a collaborative culture.

BDB-4558-AjinkyaAjinkya Patil is a Senior Security Architect with AWS Professional Services, specializing in security consulting for customers in the automotive industry. Since joining AWS in 2019, he has played a key role in helping automotive companies design and implement robust security solutions on AWS. Ajinkya is an active contributor to the AWS community, having presented at AWS re:Inforce and authored articles for the AWS Security Blog and AWS Prescriptive Guidance. Outside of his professional pursuits, Ajinkya is passionate about travel and photography, often capturing the diverse landscapes he encounters on his journeys.

BDB-4558-AdjoaAdjoa Taylor has over 20 years of experience in industrial manufacturing, providing industry and technology consulting services, digital transformation, and solution delivery. Currently, Adjoa leads Product Centric Digital Transformation, enabling customers in solving complex manufacturing problems using smart factory and industry-leading transformation mechanisms. Most recently, she drives value with AI/ML and generative AI use cases for the plant floor. Adjoa is an experienced leader, having spent over 20 years of her career delivering projects in countries throughout North America, Latin America, Europe, and Asia. Adjoa brings deep experience across multiple business segments with a focus on business outcome-driven solutions. Adjoa is passionate about helping customers solve problems while realizing the art of the possible through implementing value-based solutions.