Post Syndicated from Ilya Pupko original https://aws.amazon.com/blogs/messaging-and-targeting/automate-phone-number-validation-with-amazon-pinpoint/
Amazon Pinpoint allows you to engage with your customers across multiple messaging channels like SMS text, email, and voice messages. While planning and executing standard text (SMS) and voice-based campaigns, one of the challenges developers often run into is the need to verify if the phone numbers in their internal database are valid and conform to the standard E.164 format. You can attempt to verify the phone numbers manually one at a time, but it’s tedious. To overcome this issue, Amazon Pinpoint provides a phone number validation service that you can use to determine if a phone number is valid, have it automatically formatted, and obtain additional information about the phone number itself. For example, when you use the phone number validation service, it returns the following information:
- The phone number in E.164 format.
- The phone number type (such as mobile, landline, or VoIP).
- The city and country where the phone number is based.
- The service provider that is associated with the phone number.
This blog post aims to provide a step-by-step implementation guide and the necessary code to enable an integrated solution for number verification.
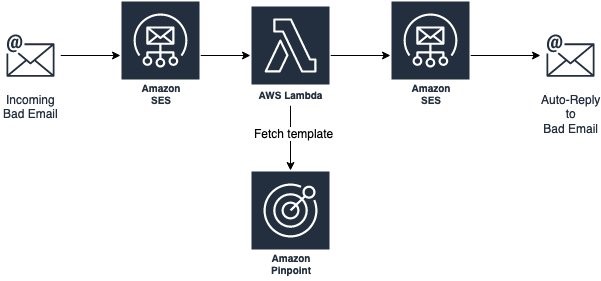
Process flows and architecture

This solution uses Amazon Simple Storage Service (Amazon S3), Amazon Pinpoint, AWS Step Functions, Amazon Simple Notification Service (SNS) and AWS Lambda. To initiate the process, you upload your source contact file in the CSV format to the dedicated Amazon S3 bucket. When the CSV file is uploaded, S3 triggers the associated tasks. Based on the optional configuration rules, the application code either runs the Phone Validate logic first or imports the contact information as-is into Amazon Pinpoint as a new imported segment and updates overall Amazon Pinpoint audience information. If Phone Validation is enabled, the system will first generate and save the new output file to Amazon S3 with the valid phone number, metadata, etc. and use this updated contact information during import. Additionally, the system will kick-off a scheduled campaign to all imported contacts.

This CloudFormation template will automatically create the following new resources on your first deploy:
- AWS Lambda function: These functions contains the application code which validate the phone numbers. It also creates the segment for the uploaded contacts.
- S3 event notification: When the CSV file is uploaded to the S3 bucket, the S3 Event Notification triggers the AWS Lambda function which initiate the AWS Step Functions State Machine. To learn more about the S3 Event Notification, check the documentation.
- AWS Step Functions: This solution will set up an infrastructure to automatically trigger when a new file is placed in an S3 bucket. The process, managed by an AWS Step Functions state machine, will start a Pinpoint import process, wait for it to complete, and send notifications that the job started, successfully finished, or failed.
- IAM role: The IAM role is used to make Amazon Pinpoint calls, to access S3, and interact with AWS Step Functions and Amazon SNS. You can check the IAM documentation to learn more about IAM roles.
Prerequisites and deployment steps
Step 1: Set up the Amazon Pinpoint project and the S3 bucket
In Amazon Pinpoint, a project (also sometimes referred to as “application”) is a collection of settings, customer information, segments, and campaigns. Setting up a Pinpoint project is the first step to deploy our solution. It holds the segment we will use in the later steps.
- Navigate to the Amazon Pinpoint from the services tab in the AWS Management Console and create a new Amazon Pinpoint project.
- Copy the Project ID from the Amazon Pinpoint console and save it in notepad. You will need it later.
In Amazon S3, create a new bucket to upload the files to. Make sure it is setup according to your company’s security practices. If you have an existing bucket you want to use instead, note that this solution will require a source bucket in the same region as the solution itself and it will override any triggers already in place on the bucket.
Step 2: Deploy code and services
AWS CloudFormation is a service that gives developers and businesses an easy way to create a collection of related AWS and third-party resources. You can provision them in an orderly and predictable fashion.
- Download the latest version of the solution from https://github.com/aws-samples/digital-user-engagement-reference-architectures/blob/master/cloudformation/S3_triggered_import.yaml
- Log in to your AWS account and navigate to the Amazon CloudFormation from the services tab in the AWS Management Console: https://console.aws.amazon.com/cloudformation/home
- Click on the Create Stack button and choose to provision New Resources. Then select Upload a template file and choose the file you just downloaded in the first step.
- On the Specify stack details screen all the information is pre-populated as shown in the screenshot below. Parameters:
· Replace the PinpointProjectID field with the value you saved in Step 1
· ValidatePhone: Choose true if you wish to validate the numbers via the Pinpoint API before importing the segment.
· AssumeUS: Choose true if you want to assume US (+1) phone number for any phone 10 digits long or false if you want to import as-is.
· AutoCreateCampaign: Choose true if you want to automatically create a campaign based on the imported file or false if you want to just import into the system without automatically scheduling any campaigns. This setting will be saved as an ImportSegment Lambda environment variable so you can adjust it later.
· CampaignDelay: Number of minutes from the time of import to start of the campaign (if AutoCreateCampaign is set to true). Allows for the last-minute double check and/or pause as needed. Will be saved as CreateCampaign Lambda environment variable.
· FileDropS3Bucket: Name of the existing Amazon S3 Bucket where new import files will be placed. Note that it has to be in the same region as you are running this template and the bucket should not have any existing notification configurations or they will be overwritten.
· FileDropS3Prefix: Prefix (sub-folder name) of the Amazon S3 Bucket where you will be uploading new files to be imported. - Settings on the configure stack options page are optional, click Next.
Select all acknowledgment boxes and click Create Stack. It takes a couple of minutes for the AWS CloudFormation to deploy all the resources.

The solution is now deployed and you can test it by uploading the sample CSV file to the Amazon S3 bucket. You will notice that the output CSV file is created in the “results” folder of the same S3 bucket, if you have validation enabled. You can also navigate to the Amazon Pinpoint console to check the Amazon Pinpoint segment. Once the deployment is complete and the segment is created, you can leverage Amazon Pinpoint campaigns to reach out to your customers.
Conclusion and Next Steps
Enabling solutions such as this provides an efficient and integrated mechanism to validate phone numbers and import customer contacts into Amazon Pinpoint. It saves time so that you can focus on creating effective campaigns to engage with your customers.
As the potential next steps, you can look into further expanding the solution by:
- Adjusting the default security of the Amazon S3 bucket by limiting who has access to new files. You can also adjust its encryption and the expiration of the files.
- Build out the lookup AWS Lambda to additionally fetch other information about the contact using your other systems of records and/or even 3rd party tools. You can also add business logic such as blocking numbers from certain countries (or vice versa, only allow certain countries).
- Add more dynamic segments and new endpoint (or user) attributes to more easily track the contacts based on their upload dates, type of phone number, etc.
Create a nice interface your users can use to interact with when needing to upload instead of using the S3 console directly. This “interface” may even be just a backend flow that simply integrates your system of records. This is so they don’t have to deal with any interface and uploads in the first place.
For this, and some other reference architectures you could consider, see https://github.com/aws-samples/digital-user-engagement-reference-architectures.
References
Amazon Pinpoint
https://aws.amazon.com/pinpoint/
Validating phone numbers in Amazon Pinpoint
https://docs.aws.amazon.com/pinpoint/latest/developerguide/validate-phone-numbers.html
Amazon Pinpoint Campaigns
https://docs.aws.amazon.com/pinpoint/latest/userguide/campaigns.html
Pinpoint Segment
https://docs.aws.amazon.com/pinpoint/latest/userguide/tutorials-create-a-segment.html