Post Syndicated from Jason Pedreza original https://aws.amazon.com/blogs/big-data/simplify-data-ingestion-from-amazon-s3-to-amazon-redshift-using-auto-copy/
Amazon Redshift is a fast, scalable, secure, and fully managed cloud data warehouse that makes it simple and cost-effective to analyze your data using standard SQL and your existing business intelligence (BI) tools. Tens of thousands of customers today rely on Amazon Redshift to analyze exabytes of data and run complex analytical queries, making it the most widely used cloud data warehouse.
Data ingestion is the process of getting data to Amazon Redshift. You can leverage one of the many zero-ETL integration methods to make data available in Amazon Redshift directly. However, if your data is in your Amazon S3 bucket, then you can simply load data from Amazon Simple Storage Service (Amazon S3) to Amazon Redshift using the COPY command. A COPY command is the most efficient way to load a table from S3 because it uses the Amazon Redshift’s massively parallel processing (MPP) architecture to read and load data in parallel.
Amazon Redshift launched auto-copy support to simplify data loading from Amazon S3 into Amazon Redshift. You can now setup continuous file ingestion rules to track your Amazon S3 paths and automatically load new files without the need for additional tools or custom solutions. This also enables end users to have the latest data available in Amazon Redshift shortly after the source data is available.
This post shows you how to build automatic file ingestion pipelines in Amazon Redshift when source files are located on Amazon S3 by using a simple SQL command. In addition, we show you how to enable auto-copy using auto-copy jobs, how to monitor jobs, considerations, and best practices.
Overview of the auto-copy feature in Amazon Redshift
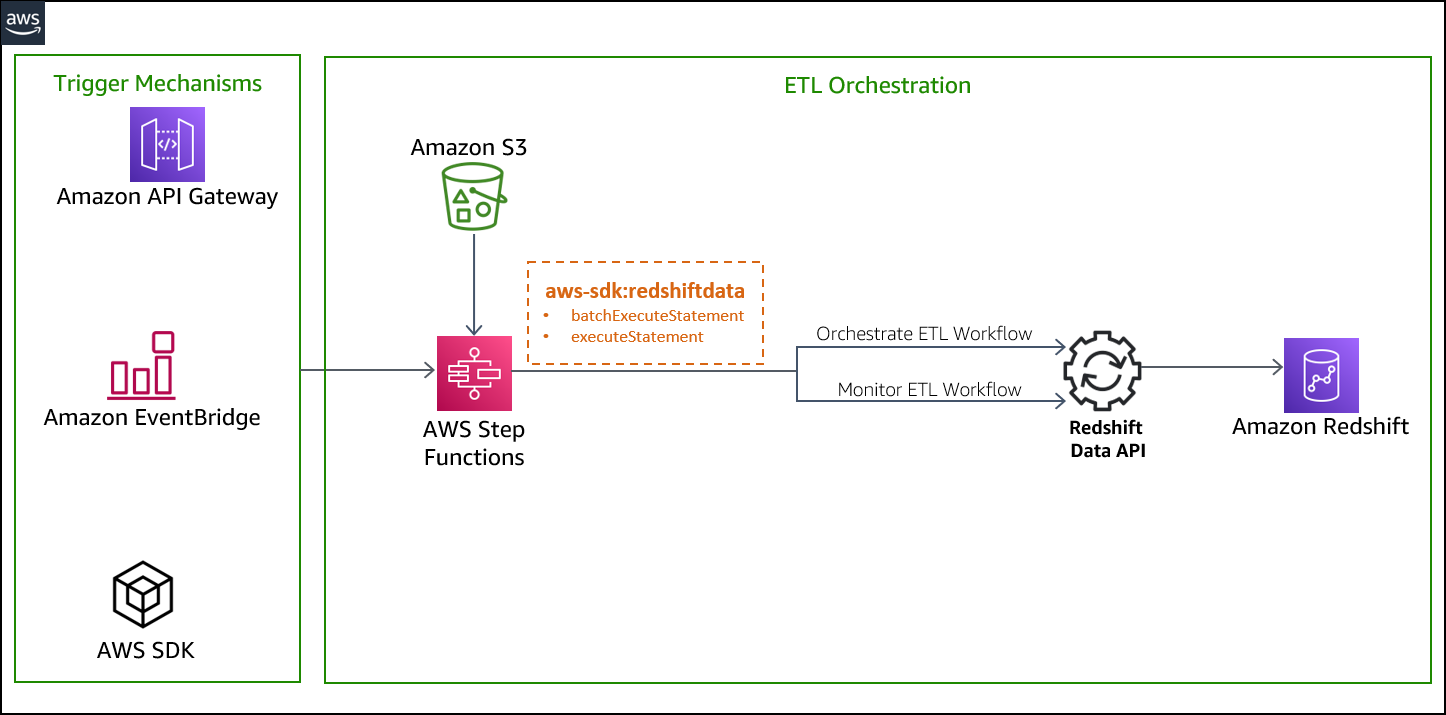
The auto-copy feature in Amazon Redshift leverages the S3 event integration to automatically load data into Amazon Redshift and simplifies automatic data loading from Amazon S3 with a simple SQL command. You can enable Amazon Redshift auto-copy by creating auto-copy jobs. A auto-copy job is a database object that stores, automates, and reuses the COPY statement for newly created files that land in the S3 folder.
The following diagram illustrates this process.

S3 event integration and auto-copy jobs have the following benefits:
- Users can now load data from Amazon S3 automatically without having to build a pipeline or using an external framework
- auto-copy jobs offer automatic and incremental data ingestion from an Amazon S3 location without the need to implement a custom solution
- This functionality comes at no additional cost
- Existing COPY statements can be converted into auto-copy jobs by appending the
JOB CREATE <job_name>parameter - It keeps track of loaded files and minimizes data duplication.
- It can be quickly set up using a simple SQL statement using your choice of JDBC/ODBC clients.
- It has automatic error handling of bad quality data files.
- It has a mechanism to load-once for each file. This means that there is no need to generate explicit manifest files.
Prerequisites
To get started with auto-copy, you need the following prerequisites:
- An AWS account
- An encrypted Amazon Redshift provisioned cluster or Amazon redshift serverless workgroup
- An Amazon S3 bucket
- Add following to the Amazon S3 bucket policy
Set up Amazon S3 event Integration
An Amazon S3 event integration facilitates seamless and automated data ingestion from S3 buckets into an Amazon Redshift data warehouse, streamlining the process of transferring and storing data for analytical purposes
- Sign in to the AWS Management Console and Navigate to Amazon Redshift home page. Under Integrations section choose S3 event integrations

- Choose Create S3 event integration

- Enter Integration name and Description, choose Next

- Choose Browse S3 buckets, a dialog box pops up, select the Amazon S3 bucket and choose Continue

- Amazon S3 bucket is selected. Choose Next

- Choose Browse Redshift data warehouse

- Choose the Amazon Redshift data warehouse and choose Continue

- Then Amazon Redshift resource policy needs access to S3 event integration. In case of Resource policy error, check Fix it for me and choose Next

- Add Tags as required and choose Next

- Review changes and choose Create S3 event integration


- An S3 event integration is created. Wait until the status of S3 event integration is Active


Set up auto-copy jobs
In this section, we demonstrate how to automate data loading of files from Amazon S3 into Amazon Redshift. With the existing COPY syntax, we add the JOB CREATE parameter to perform a one-time setup for automatic file ingestion. See the following code:
Auto ingestion is enabled by default on auto-copy jobs. Files already present at the S3 location will not be visible to the auto-copy job. Only files added after JOB creation are tracked by Amazon Redshift.
Automate ingestion from a single data source
With a auto-copy job, you can automate ingestion from a single data source by creating one job and specifying the path to the S3 objects that contain the data. The S3 object path can reference a set of folders that have the same key prefix.
In this example, we have multiple files that are being loaded on a daily basis containing the sales transactions across all the stores in the US. For this we can create a store_sales folder in the bucket.

The following code creates the store_sales table:
Next, we create the auto-copy job to automatically load the gzip-compressed files into the store_sales table:
Each day’s sales transactions are loaded to their own folder in Amazon S3.

Now upload the files for transaction sold on 2002-12-31. Each folder contains multiple gzip-compressed files.

Since the auto-copy job is already created, it automatically loads the gzip-compressed files located in the S3 object path specified in the COPY command to the store_sales table.
Let’s run a query to get the daily total of sales transactions across all the stores in the US:
The output shown comes from the transactions sold on 2002-12-31.

The following day, incremental sales transactions data are loaded to a new folder in the same S3 object path.

As new files arrive to the same S3 object path, the auto-copy job automatically loads the unprocessed files to the store_sales table in an incremental fashion.
All new sales transactions for 2003-01-01 are automatically ingested, which can be verified by running the following query:

Automate ingestion from multiple data sources
We can also load an Amazon Redshift table from multiple data sources. When using a pub/sub pattern where multiple S3 buckets populate data to an Amazon Redshift table, you have to maintain multiple data pipelines for each source/target combination. With new parameters in the COPY command, this can be automated to handle data loads efficiently.
In the following example, the Customer_1 folder has Green Cab Company sales data, and the Customer_2 folder has Red Cab Company sales data. We can use the COPY command with the JOB parameter to automate this ingestion process.

The following screenshot shows sample data stored in files. Each folder has similar data but for different customers.

The target for these files in this example is the Amazon Redshift table cab_sales_data.
Define the target table cab_sales_data:
You can define two auto-copy jobs as shown in the following code to handle and monitor the ingestion of sales data belonging to different customers, in our case Customer_1 and Customer_2. These jobs monitor the Customer_1 and Customer_2 folders and load new files that are added here.
After setting up the two jobs, we can upload the relevant files into their respective folders. This will make sure that the data is loaded efficiently as soon as the files arrive. Each customer is assigned its own vendorid, as shown in the following output:

Manually run a auto-copy job
There might be scenarios wherein the auto-copy job needs to be paused, meaning it needs to stop looking for new files, for example, to fix a corrupted data pipeline at the data source.
In that case, either use the auto-copy job ALTER command to set AUTO to OFF or create a new auto-copy job with AUTO OFF. Once this is set, auto copy will no longer look for new files.
If necessary, users can manually invoke auto-copy job which will do the work and ingest if new files are found.
auto-copy job RUN <auto-copy job Name>
You can disable “AUTO ON” in the existing auto-copy job using the following command:
auto-copy job ALTER <auto-copy job Name> AUTO OFF
The following table compares the syntax and data duplication between a regular copy statement and the new auto-copy job
| . | Copy | Auto-copy job |
| Syntax | COPY <table-name> |
COPY <table-name> |
| Data Duplication | If it is run multiple times against the same S3 folder, it will load the data again, resulting in data duplication. | It will not load the same file twice, preventing data duplication. |
Error handling and monitoring for auto-copy jobs
auto-copy jobs continuously monitor the S3 folder specified during job creation and perform ingestion whenever new files are created. New files created under the S3 folder are loaded exactly once to avoid data duplication.
By default, if there are data or format issues with the specific files, the auto-copy job will fail to ingest the files with a load error and log details to the system tables. The auto-copy job will remain AUTO ON with new data files and will continue to ignore previously failed files.
Amazon Redshift provides the following system tables for users to monitor or troubleshoot auto-copy jobs as needed:
- List auto-copy jobs – Use SYS_COPY_JOB to list the auto-copy jobs stored in the database:

- Get a summary of a auto-copy job – Use the SYS_LOAD_HISTORY view to get the aggregate metrics of a auto-copy job operation by specifying the
copy_job_id. It shows the aggregate metrics of the files that have been processed by a auto-copy job.

- Get details of a auto-copy job – Use STL_LOAD_COMMITS to get the status and details of each file that was processed by a auto-copy job:

- Get exception details of a auto-copy job – Use STL_LOAD_ERRORS to get the details of files that failed to ingest from a auto-copy job:

Auto-copy job best practices
In an auto-copy job, when a new file is detected and ingested (automatically or manually), Amazon Redshift stores the file name and doesn’t run this specific job when a new file is created with the same file name.
The following are the recommended best practices when working with files using the auto-copy job:
- Use unique file names for each file in a auto-copy job (for example,
2022-10-15-batch-1.csv). However, you can use the same file name as long as it’s from different auto-copy jobs:- job_customerA_sales –
s3://redshift-blogs/sales/customerA/2022-10-15-sales.csv - job_customerB_sales –
s3://redshift-blogs/sales/customerB/2022-10-15-sales.csv
- job_customerA_sales –
- Do not update file contents. Do not overwrite existing files. Changes in existing files will not be reflected to the target table. The auto-copy job doesn’t pick up updated or overwritten files, so make sure they’re renamed as new file names for the auto-copy job to pick up.
- Run regular COPY statements (not a job) if you need to ingest a file that was already processed by your auto-copy job. (COPY statement without a JOB CREATE syntax doesn’t track loaded files.) For example, this is helpful in scenarios where you don’t have control of the file name and the initial file received failed. The following figure shows a typical workflow in this case.

- Delete and recreate your auto-copy job if you want to reset file tracking history and start over. You can drop auto-copy job using following command.
auto-copy job considerations
Here are the main things to consider when using auto-copy:
- Existing files in Amazon S3 prefix are not loaded, use Copy command to catch up historical data
- The following features are unsupported:
For additional details on other considerations for auto-copy, refer to the AWS documentation.
Customer feedback
GE Aerospace is a global provider of jet engines, components, and systems for commercial and military aircraft. The company has been designing, developing, and manufacturing jet engines since World War I.
“GE Aerospace uses AWS analytics and Amazon Redshift to enable critical business insights that drive important business decisions. With the support for auto-copy from Amazon S3, we can build simpler data pipelines to move data from Amazon S3 to Amazon Redshift. This accelerates our data product teams’ ability to access data and deliver insights to end users. We spend more time adding value through data and less time on integrations.”
– Alcuin Weidus Sr Principal Data Architect at GE Aerospace
Conclusion
This post demonstrated how to automate data ingestion from Amazon S3 to Amazon Redshift using the auto-copy feature. This new functionality helps make Amazon Redshift data ingestion easier than ever, and will allow SQL users to get access to the most recent data using a simple SQL command.
Users can begin ingesting data to Redshift from Amazon S3 with simple SQL commands and gain access to the most up-to-date data without the need for third-party tools or custom implementation.
About the authors
 Tahir Aziz is an Analytics Solution Architect at AWS. He has worked with building data warehouses and big data solutions for over 15+ years. He loves to help customers design end-to-end analytics solutions on AWS. Outside of work, he enjoys traveling and cooking.
 Omama Khurshid is an Acceleration Lab Solutions Architect at Amazon Web Services. She focuses on helping customers across various industries build reliable, scalable, and efficient solutions. Outside of work, she enjoys spending time with her family, watching movies, listening to music, and learning new technologies.
 Raza Hafeez is a Senior Product Manager at Amazon Redshift. He has over 13 years of professional experience building and optimizing enterprise data warehouses and is passionate about enabling customers to realize the power of their data. He specializes in migrating enterprise data warehouses to AWS Modern Data Architecture.
 Jason Pedreza is an Analytics Specialist Solutions Architect at AWS with data warehousing experience handling petabytes of data. Prior to AWS, he built data warehouse solutions at Amazon.com. He specializes in Amazon Redshift and helps customers build scalable analytic solutions.
 Nita Shah is an Analytics Specialist Solutions Architect at AWS based out of New York. She has been building data warehouse solutions for over 20 years and specializes in Amazon Redshift. She is focused on helping customers design and build enterprise-scale well-architected analytics and decision support platforms.
 Eren Baydemir, a Technical Product Manager at AWS, has 15 years of experience in building customer-facing products and is currently focusing on data lake and file ingestion topics in the Amazon Redshift team. He was the CEO and co-founder of DataRow, which was acquired by Amazon in 2020.
 Eesha Kumar is an Analytics Solutions Architect with AWS. He works with customers to realize the business value of data by helping them build solutions using the AWS platform and tools.
 Satish Sathiya is a Senior Product Engineer at Amazon Redshift. He is an avid big data enthusiast who collaborates with customers around the globe to achieve success and meet their data warehousing and data lake architecture needs.
 Hangjian Yuan is a Software Development Engineer at Amazon Redshift. He’s passionate about analytical databases and focuses on delivering cutting-edge streaming experiences for customers.