All posts by Kunal Ghosh

Extract data from Amazon Aurora MySQL to Amazon S3 Tables in Apache Iceberg format

Post Syndicated from Kunal Ghosh original https://aws.amazon.com/blogs/big-data/extract-data-from-amazon-aurora-mysql-to-amazon-s3-tables-in-apache-iceberg-format/

If you manage data in Amazon Aurora MySQL-Compatible Edition and want to make it available for analytics, machine learning (ML), or cross-service querying in a modern lakehouse format, you’re not alone.

Organizations often need to run analytics, build ML models, or join data across multiple sources. These are examples of workloads that can be resource-intensive and impractical to run directly against a transactional database. By extracting your Aurora MySQL data into Amazon S3 Tables in Apache Iceberg format, you can offload analytical queries from your production database without impacting its performance, while storing data in a fully managed Iceberg table store optimized for analytics. Built on the open Apache Iceberg standard, Amazon Simple Storage Service (Amazon S3) Table data is queryable from engines like Amazon Athena, Amazon Redshift Spectrum, and Apache Spark without additional data copies. You can also combine relational data with other datasets already in your data lake, enabling richer cross-domain insights.

Apache Iceberg and Amazon S3 Tables

Apache Iceberg is a widely adopted open table format that offers Atomicity, Consistency, Isolation, Durability (ACID) transactions, schema evolution, and time travel capabilities. It enables multiple engines to work concurrently on the same dataset, making it a popular choice for building open lakehouse architectures.

Amazon S3 Tables is a purpose-built, fully managed Apache Iceberg table store designed for analytics workloads. It delivers up to 3x faster query performance and up to 10x more transactions per second compared to self-managed Iceberg tables. It also automatically compacts data and removes unreferenced files to optimize storage and performance.

In this post, you learn how to set up an automated, end-to-end solution that extracts tables from Amazon Aurora MySQL Serverless v2 and writes them to Amazon S3 Tables in Apache Iceberg format using AWS Glue. The entire infrastructure is deployed using a single AWS CloudFormation stack.

Requirements

AWS offers zero-ETL integrations from Amazon Aurora to Amazon Redshift and Amazon SageMaker AI, enabling seamless data flow for analytics and machine learning workloads.

However, there isn’t yet a native zero-ETL integration between Amazon Aurora and Amazon S3 Tables. This means that organizations looking to use Amazon S3 Tables for their Lakehouse architecture currently face several requirements:

  • Setting up ETL pipelines to extract data from Amazon Aurora and transform it into Apache Iceberg format
  • Configuring networking and security for AWS Glue jobs to access Amazon Aurora databases in private subnets
  • Coordinating the provisioning of source databases, ETL pipelines, and target table stores
  • Managing the end-to-end workflow without native automation

Solution overview

In this solution, you automate the extraction of relational database tables from Amazon Aurora MySQL Serverless v2 to Amazon S3 Tables in Apache Iceberg format using AWS Glue 5.0. To help you get started and test this solution, a CloudFormation template is provided. This template provisions the required infrastructure, loads sample data, and configures the Extract, Transform, Load (ETL) pipeline. You can adapt this template for your own scenario.
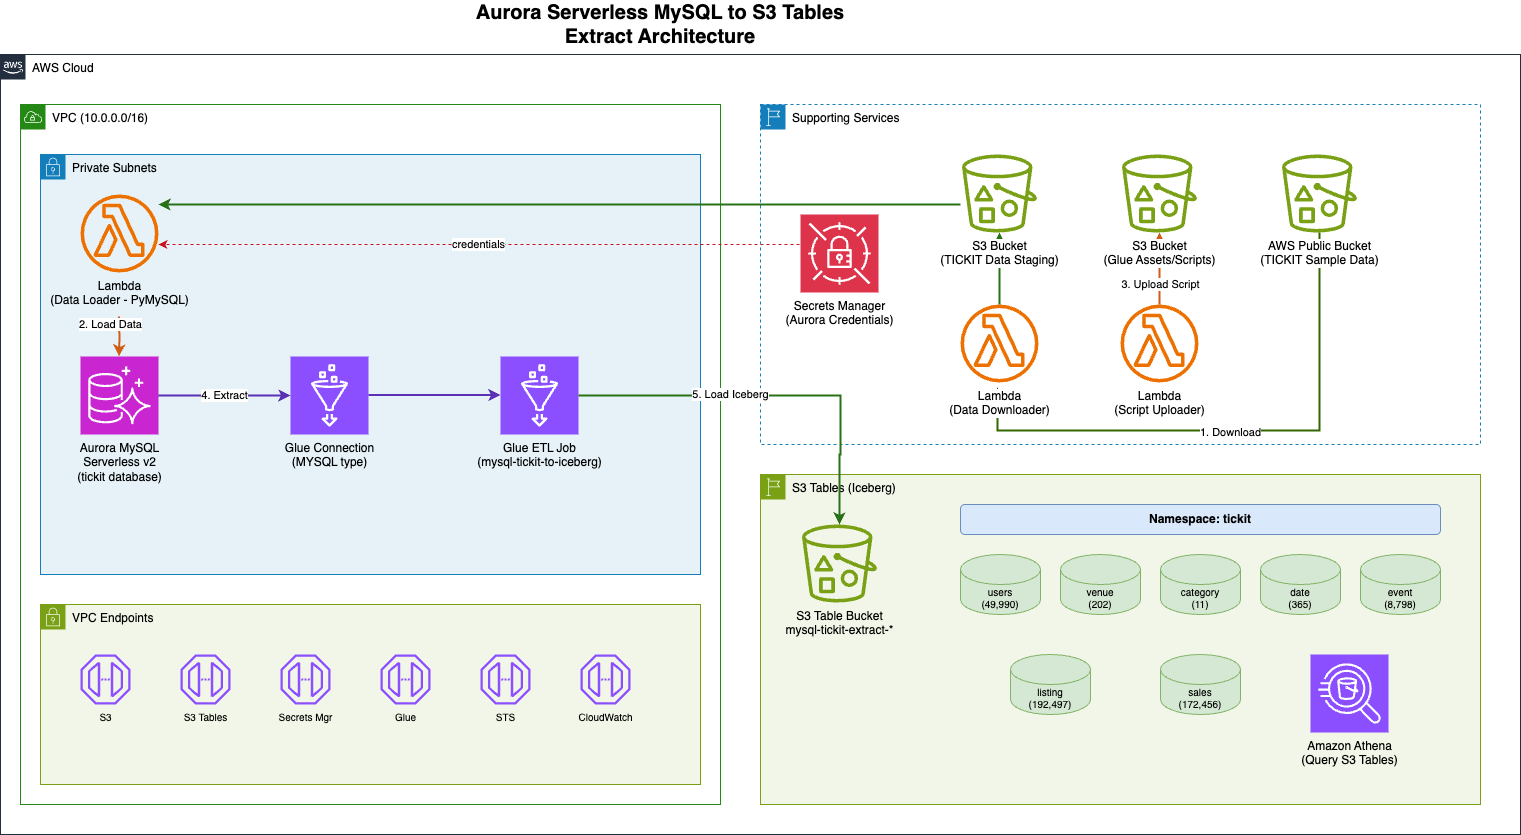
Solution overview

Sample data

This solution uses the TICKIT sample database, a well-known dataset used in Amazon Redshift documentation. The TICKIT data models a fictional ticket sales system with seven interrelated tables: users, venue, category, date, event, listing, and sales. The dataset is publicly available as mentioned in the Amazon Redshift Getting Started Guide.

Solution flow

The solution flow as shown in the previous architecture diagram:

  1. An AWS Lambda function downloads the TICKIT sample dataset (a fictional ticket sales system used in Amazon Redshift documentation) from a public Amazon S3 bucket to a staging S3 bucket.
  2. A second Lambda function, using PyMySQL (a Python MySQL client library), loads the staged data files into the Aurora MySQL Serverless v2 database using LOAD DATA LOCAL INFILE.
  3. The AWS Glue job reads seven TICKIT tables from Aurora MySQL through a native MySQL connection and writes them to Amazon S3 Tables in Apache Iceberg format using the S3 Tables REST catalog endpoint with SigV4 authentication.
  4. You can query the migrated data in S3 Tables using Amazon Athena.

The solution consists of the following key components:

  1. Amazon Aurora MySQL Serverless v2 as the source relational database containing the TICKIT sample dataset (users, venue, category, date, event, listing, and sales tables)
  2. AWS Secrets Manager to store the Aurora MySQL database credentials securely
  3. Amazon S3 staging bucket for the TICKIT sample data files downloaded from the public redshift-downloads S3 bucket
  4. AWS Lambda functions using PyMySQL to load data into Aurora MySQL
  5. AWS Glue 5.0 job (PySpark) to read tables from Aurora MySQL and write them to S3 Tables in Apache Iceberg format
  6. Amazon S3 Tables as the target storage for the migrated Iceberg tables
  7. Amazon VPC with private subnets and VPC endpoints for Amazon S3, S3 Tables, AWS Glue, Secrets Manager, AWS Security Token Service (AWS STS), CloudWatch Logs, and CloudFormation

Here are some advantages of this architecture:

  • Fully automated setup: A single CloudFormation stack provisions the required infrastructure, loads sample data, and configures the ETL pipeline.
  • Serverless and cost-efficient: Aurora MySQL Serverless v2 and AWS Glue both scale based on demand, minimizing idle costs.
  • Apache Iceberg table format: Data is stored in Apache Iceberg format, enabling ACID transactions, schema evolution, and time travel queries.
  • Network isolation and credential management: The resources run within private subnets with Virtual Private Cloud (VPC) endpoints, and database credentials are managed through AWS Secrets Manager.
  • Extensible pattern: The same approach can be adapted for other relational databases (PostgreSQL, SQL Server) and other target formats supported by AWS Glue.

Prerequisites

To follow along, you need an AWS account. If you don’t yet have an AWS account, you must create one. The CloudFormation stack deployment takes approximately 30-45 minutes to complete and requires familiarity with Amazon S3 Tables, AWS CloudFormation, Apache Iceberg, AWS Glue, Amazon Aurora. This solution will incur AWS costs. The main cost drivers are AWS Glue ETL job runs (billed per DPU-hour, proportional to data volume) and Amazon S3 Tables storage and request charges. Remember to clean up resources when you are done to avoid unnecessary charges.

CloudFormation parameters

You can configure the following parameters before deploying the CloudFormation stack:

Parameter Description Default Required
S3TableBucketName Name of the S3 Tables bucket to create (or use existing) Yes
DatabaseName Name of the initial Aurora MySQL database tickit No
MasterUsername Master username for Aurora MySQL admin No
VpcCidr CIDR block for the VPC 10.1.0.0/16 No
S3TableNamespace Namespace for S3 Tables tickit No

Implementation walkthrough

The following steps walk you through the implementation. These steps are to deploy and test an end-to-end solution from scratch. If you are already running some of these components, you may skip to the relevant step. You can also refer to the aws-samples repository, sample-to-write-aurora-mysql-to-s3tables-using-glue for the entire solution.

Step 1: Deploy the CloudFormation stack

Deploy the CloudFormation template scripts/aurora-mysql-to-s3tables-stack.yaml using the AWS Console or the AWS Command Line Interface (AWS CLI). Provide a name for the S3 Tables bucket; the stack will create it automatically (or use an existing one if it already exists).

To deploy using the AWS Console (recommended), navigate to the AWS CloudFormation Console and use the CloudFormation template. Alternatively, to deploy using the AWS CLI first upload the template to an S3 bucket (the template exceeds the 51,200 byte limit for inline –template-body), then create the stack.

# Upload the template to S3
aws s3 cp scripts/aurora-mysql-to-s3tables-stack.yaml \
  s3://<your-s3-bucket>/aurora-mysql-to-s3tables-stack.yaml \
  --region <your-region>
# Create the stack using the S3 template URL
aws cloudformation create-stack \
  --stack-name aurora-mysql-tickit-stack \
  --template-url https://<your-s3-bucket>.s3.<your-region>.amazonaws.com/aurora-mysql-to-s3tables-stack.yaml \
  --parameters \
    ParameterKey=S3TableBucketName,ParameterValue=<your-s3-table-bucket-name> \
  --capabilities CAPABILITY_NAMED_IAM \
  --region <your-region>

The stack will automatically:

  • Create the S3 Tables bucket (or use existing if it already exists)
  • Create a VPC with private subnets and VPC endpoints
  • Provision an Aurora MySQL Serverless v2 cluster
  • Download TICKIT sample data from the public Amazon S3 bucket
  • Load the sample data into Aurora MySQL via a Lambda function using PyMySQL
  • Create a Glue job configured to migrate data to S3 Tables in Iceberg format

Note: The S3 Tables bucket is retained when the stack is deleted to preserve your data.

Step 2: Verify the Aurora MySQL data

Retrieve the AuroraClusterEndpoint, DatabaseName, and SecretArn values from the CloudFormation stack, make a note of the AuroraClusterEndpoint, DatabaseName, and SecretArn. You can navigate to the Amazon Aurora Console, choose the Query Editor, and enter the values from the CloudFormation stack to connect. You can also choose your preferred method of connecting to an Amazon Aurora DB cluster.

Use the AWS CLI to retrieve the stack outputs: –

aws cloudformation describe-stacks --stack-name aurora-mysql-tickit-stack --region <your-region> --query "Stacks[0].Outputs"

Then run the following SQL commands to verify the data load:

-- Verify if the tables are created
SELECT * FROM information_schema.tables WHERE table_schema = 'tickit';

-- Verify if the data is loaded
SELECT 'users' AS table_name, COUNT(*) AS record_count FROM tickit.users
UNION ALL SELECT 'venue', COUNT(*) FROM tickit.venue
UNION ALL SELECT 'category', COUNT(*) FROM tickit.category
UNION ALL SELECT 'date', COUNT(*) FROM tickit.date
UNION ALL SELECT 'event', COUNT(*) FROM tickit.event
UNION ALL SELECT 'listing', COUNT(*) FROM tickit.listing
UNION ALL SELECT 'sales', COUNT(*) FROM tickit.sales;

Step 3: Run the Glue job

Navigate to the AWS Glue Console, choose ETL jobs under Data Integration and ETL from the left panel. Select the AWS Glue job mysql-tickit-to-iceberg-job and choose Run job to start execution. You can also start the ETL job using the AWS CLI:

aws glue start-job-run --job-name mysql-tickit-to-iceberg-job --region <your-region>

The AWS Glue job performs the following operations for each of the seven TICKIT tables:

  • Reads the table from Aurora MySQL through the native MYSQL Glue connection
  • Converts the data to a Spark DataFrame
  • Creates the Iceberg table in the S3 Tables namespace using CREATE TABLE IF NOT EXISTS with the USING ICEBERG clause
  • Inserts the data using INSERT INTO (or INSERT OVERWRITE if the table already exists)
  • Verifies the record count and displays sample data

Step 4: Verify the results

After the AWS Glue job completes, verify that the tables have been created in your S3 Table bucket by navigating to the Amazon S3 Console. Choose Table buckets under Buckets and select your S3 Table bucket. You can also verify using the AWS CLI:

aws s3tables list-tables \
  --table-bucket-arn arn:aws:s3tables:<your-region>:<your-account-id>:bucket/<your-s3-table-bucket-name> \
  --namespace tickit \
  --region <your-region>

Select a table from the tickit namespace and choose Preview to inspect the data.
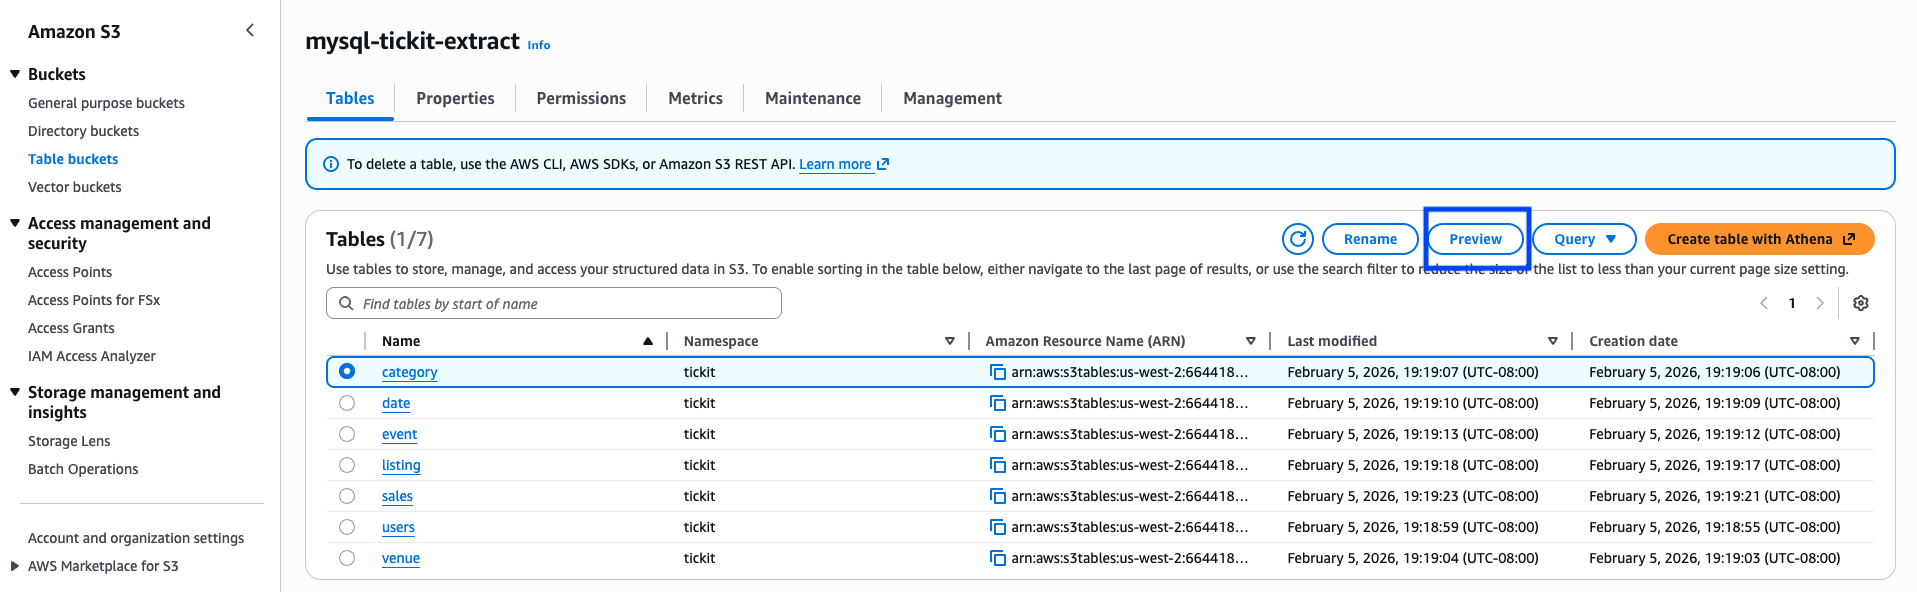
Preview S3 data

You can also query the migrated tables using Amazon Athena to validate the data.

Clean up resources

Remember to clean up resources when you no longer need them to avoid unnecessary charges.

Navigate to the CloudFormation console, search for your stack and choose Delete. Alternatively, use the AWS CLI:

aws cloudformation delete-stack --stack-name aurora-mysql-tickit-stack --region <your-region>

The S3 Tables bucket is retained by default. To delete it, use the Amazon S3 console or the AWS CLI to remove the table bucket separately. The staging S3 bucket will be automatically emptied and deleted as part of the stack deletion.

aws s3tables delete-table-bucket --table-bucket-arn arn:aws:s3tables:<your-region>:<your-account-id>:bucket/<your-s3-table-bucket-name> --region <your-region>

Summary

In this post, we showed you how to extract data from Amazon Aurora MySQL Serverless v2 and write it to Amazon S3 Tables in Apache Iceberg format using AWS Glue 5.0. By using the native Iceberg support of AWS Glue and the S3 Tables REST catalog endpoint, you can bridge the gap between relational databases and modern lakehouse storage formats. By automating the entire pipeline through CloudFormation, you can quickly set up and replicate this pattern across multiple environments.

As AWS Glue and Amazon S3 Tables continue to evolve, you can take advantage of future enhancements while maintaining this automated migration pattern.

If you have questions or suggestions, leave us a comment.


About the authors

Kunal Ghosh

Kunal Ghosh

Kunal is a Sr. Solutions Architect at AWS. He is passionate about building efficient and effective solutions on AWS, especially involving generative AI, analytics, data science, and machine learning. Besides family time, he likes reading, swimming, biking, and watching movies.

Arghya Banerjee

Arghya Banerjee

Arghya is a Sr. Solutions Architect at AWS in the San Francisco Bay Area, focused on helping customers adopt and use the AWS Cloud. He is focused on big data, data lakes, streaming and batch analytics services, and generative AI technologies.

Indranil Banerjee

Indranil Banerjee

Indranil is a Sr. Solutions Architect at AWS in the San Francisco Bay Area, focused on helping customers in the hi-tech and semi-conductor sectors solve complex business problems using the AWS Cloud. His special interests are in the areas of legacy modernization and migration, building analytics platforms and helping customers adopt cutting edge technologies such as generative AI.

Vipan Kumar

Vipan Kumar

Vipan is a Sr. Solutions Architect at AWS, where he works with strategic customers. He has extensive experience in machine learning and generative AI. With a background in application development, he is passionate about designing and building enterprise applications for the cloud.

Author AWS Glue jobs with PyCharm using AWS Glue interactive sessions

Post Syndicated from Kunal Ghosh original https://aws.amazon.com/blogs/big-data/author-aws-glue-jobs-with-pycharm-using-aws-glue-interactive-sessions/

Data lakes, business intelligence, operational analytics, and data warehousing share a common core characteristic—the ability to extract, transform, and load (ETL) data for analytics. Since its launch in 2017, AWS Glue has provided serverless data integration service that makes it easy to discover, prepare, and combine data for analytics, machine learning, and application development.

AWS Glue interactive sessions allows programmers to build, test, and run data preparation and analytics applications. Interactive sessions provide access to run fully managed serverless Apache Spark using an on-demand model. AWS Glue interactive sessions also provide advanced users the same Apache Spark engine as AWS Glue 2.0 or AWS Glue 3.0, with built-in cost controls and speed. Additionally, development teams immediately become productive using their existing development tool of choice.

In this post, we walk you through how to use AWS Glue interactive sessions with PyCharm to author AWS Glue jobs.

Solution overview

This post provides a step-by-step walkthrough that builds on the instructions in Getting started with AWS Glue interactive sessions. It guides you through the following steps:

  1. Create an AWS Identity and Access Management (IAM) policy with limited Amazon Simple Storage Service (Amazon S3) read privileges and associated role for AWS Glue.
  2. Configure access to a development environment. You can use a desktop computer or an OS running on the AWS Cloud using Amazon Elastic Compute Cloud (Amazon EC2).
  3. Integrate AWS Glue interactive sessions with an integrated development environments (IDE).

We use the script Validate_Glue_Interactive_Sessions.ipynb for validation, available as a Jupyter notebook.

Prerequisites

You need an AWS account before you proceed. If you don’t have one, refer to How do I create and activate a new AWS account? This guide assumes that you already have installed Python and PyCharm. Python 3.7 or later is the foundational prerequisite.

Create an IAM policy

The first step is to create an IAM policy that limits read access to the S3 bucket s3://awsglue-datasets, which has the AWS Glue public datasets. You use IAM to define the policies and roles for access to AWS Glue.

  1. On the IAM console, choose Policies in the navigation pane.
  2. Choose Create policy.
  3. On the JSON tab, enter the following code:
    {
        "Version": "2012-10-17",
        "Statement": [
            {
                "Effect": "Allow",
                "Action": [
                    "s3:Get*",
                    "s3:List*",
                    "s3-object-lambda:Get*",
                    "s3-object-lambda:List*"
                ],
                "Resource": ["arn:aws:s3:::awsglue-datasets/*"]
            }
        ]
    }

  4. Choose Next: Tags.
  5. Choose Next: Review.
  6. For Policy name, enter glue_interactive_policy_limit_s3.
  7. For Description, enter a description.
  8. Choose Create policy.

Create an IAM role for AWS Glue

To create a role for AWS Glue with limited Amazon S3 read privileges, complete the following steps:

  1. On the IAM console, choose Roles in the navigation pane.
  2. Choose Create role.
  3. For Trusted entity type, select AWS service.
  4. For Use cases for other AWS services, choose Glue.
  5. Choose Next.
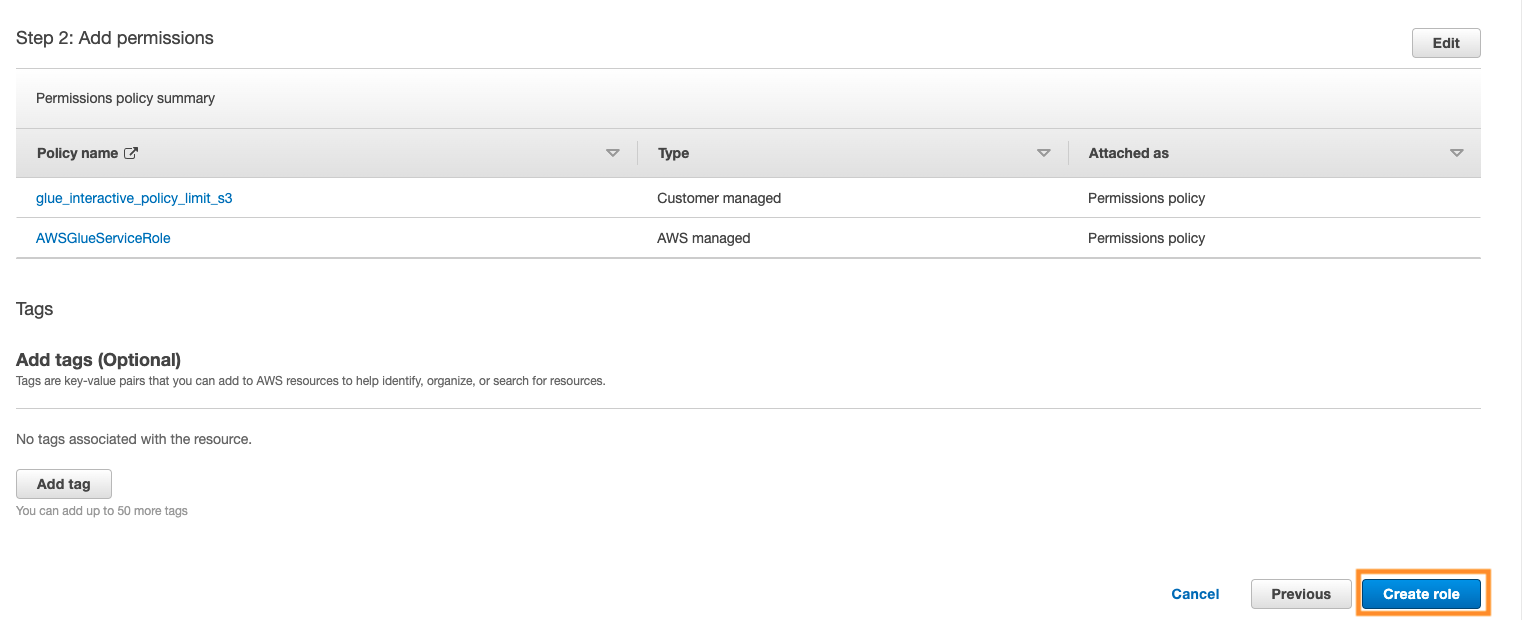
  6. On the Add permissions page, search and choose the AWS managed permission policies AWSGlueServiceRole and glue_interactive_policy_limit_s3.
  7. Choose Next.
  8. For Role name, enter glue_interactive_role.
  9. Choose Create role.
  10. Note the ARN of the role, arn:aws:iam::<replacewithaccountID>:role/glue_interactive_role.

Set up development environment access

This secondary level of access configuration needs to occur on the developer’s environment. The development environment can be a desktop computer running Windows or Mac/Linux, or similar operating systems running on the AWS Cloud using Amazon EC2. The following steps walk through each client access configuration. You can select the configuration path that is applicable to your environment.

Set up a desktop computer

To set up a desktop computer, we recommend completing the steps in Getting started with AWS Glue interactive sessions.

Set up an AWS Cloud-based computer with Amazon EC2

This configuration path follows the best practices for providing access to cloud-based resources using IAM roles. For more information, refer to Using an IAM role to grant permissions to applications running on Amazon EC2 instances.

  1. On the IAM console, choose Roles in the navigation pane.
  2. Choose Create role.
  3. For Trusted entity type¸ select AWS service.
  4. For Common use cases, select EC2.
  5. Choose Next.
  6. Add the AWSGlueServiceRole policy to the newly created role.
  7. On the Add permissions menu, choose Create inline policy.
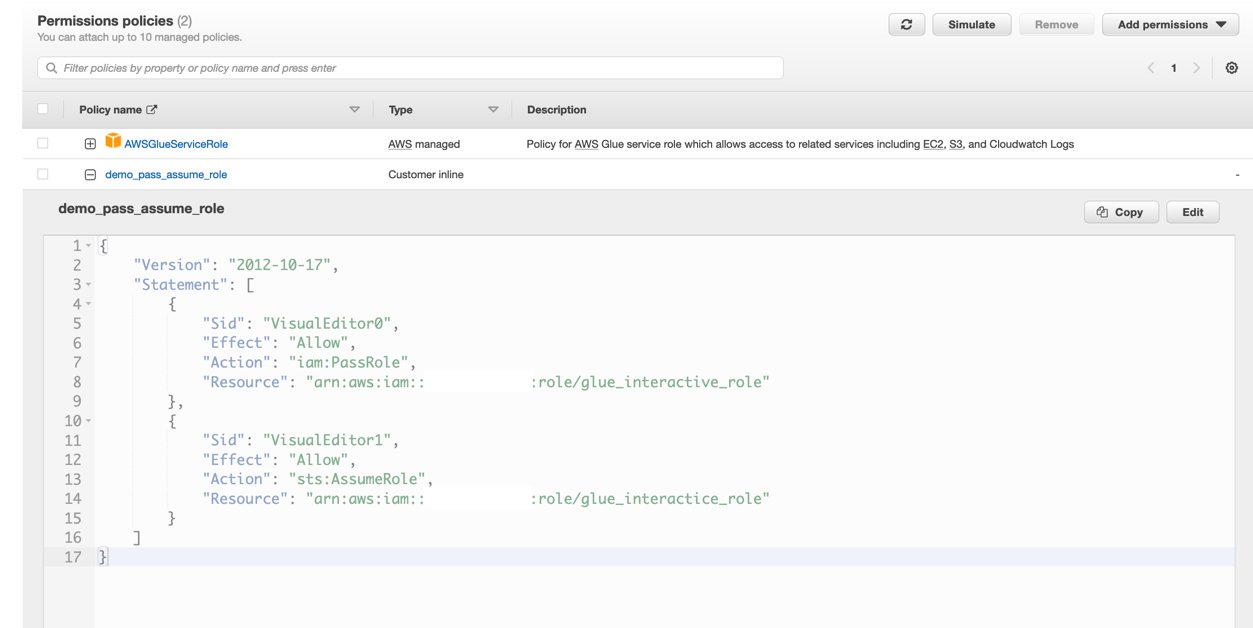
  8. Create an inline policy that allows the instance profile role to pass or assume glue_interactive_role and save the new role as ec2_glue_demo.

Your new policy is now listed under Permissions policies.

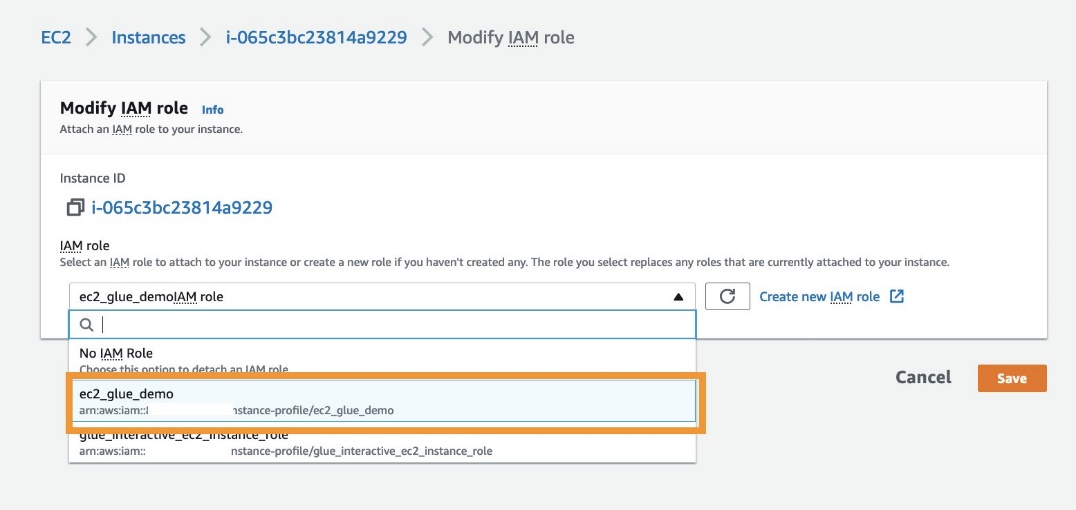
  1. On the Amazon EC2 console, choose (right-click) the instance you want to attach to the newly created role.
  2. Choose Security and choose Modify IAM role.
  3. For IAM role¸ choose the role ec2_glue_demo.
  4. Choose Save.
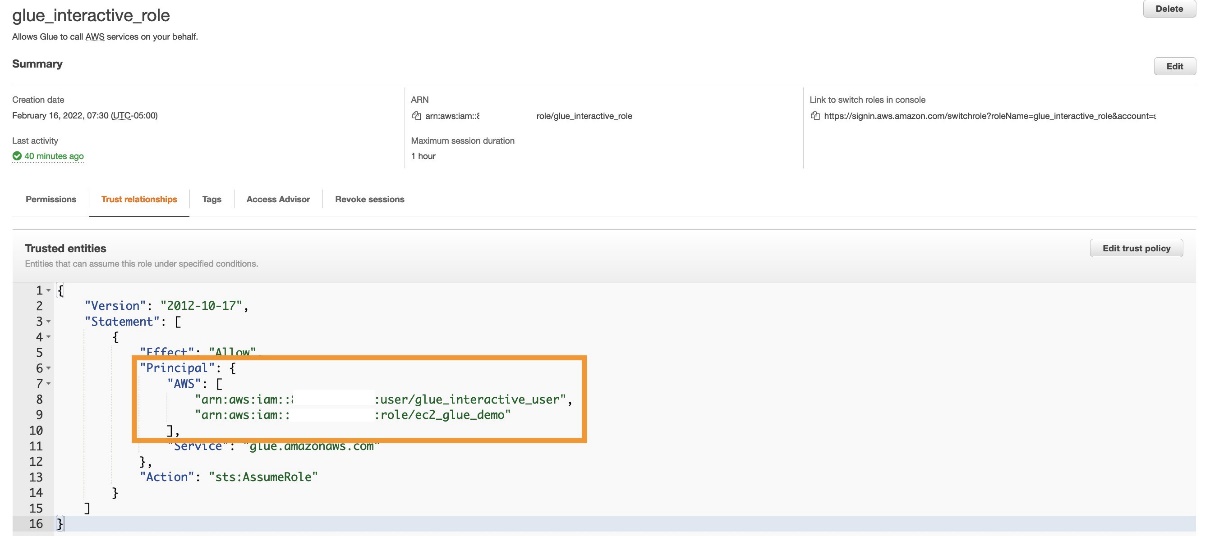
  5. On the IAM console, open and edit the trust relationship for glue_interactive_role.
  6. Add “AWS”: [“arn:aws:iam:::user/glue_interactive_user”,”arn:aws:iam:::role/ec2_glue_demo”] to the principal JSON key.
  7. Complete the steps detailed in Getting started with AWS Glue interactive sessions.

You don’t need to provide an AWS access key ID or AWS secret access key as part of the remaining steps.

Integrate AWS Glue interactive sessions with an IDE

You’re now ready to set up and validate your PyCharm integration with AWS Glue interactive sessions.

  1. On the welcome page, choose New Project.
  2. For Location, enter the location of your project glue-interactive-demo.
  3. Expand Python Interpreter.
  4. Select Previously configured interpreter and choose the virtual environment you created earlier.
  5. Choose Create.

The following screenshot shows the New Project page on a Mac computer. A Windows computer setup will have a relative path beginning with C:\ followed by the PyCharm project location.

  1. Choose the project (right-click) and on the New menu, choose Jupyter Notebook.
  2. Name the notebook Validate_Glue_Interactive_Sessions.

The notebook has a drop-down called Managed Jupyter server: auto-start, which means the Jupyter server automatically starts when any notebook cell is run.

  1. Run the following code:
    print("This notebook will start the local Python kernel")

You can observe that the Jupyter server started running the cell.

  1. On the Python 3 (ipykernal) drop-down, choose Glue PySpark.
  2. Run the following code to start a Spark session:
    spark

  3. Wait to receive the message that a session ID has been created.
  4. Run the following code in each cell, which is the boilerplate syntax for AWS Glue:
    import sys
    from awsglue.transforms import *
    from awsglue.utils import getResolvedOptions
    from pyspark.context import SparkContext
    from awsglue.context import GlueContext
    from awsglue.job import Job
    glueContext = GlueContext(SparkContext.getOrCreate())

  5. Read the publicly available Medicare Provider payment data in the AWS Glue data preparation sample document:
    medicare_dynamicframe = glueContext.create_dynamic_frame.from_options(
        's3',
        {'paths': ['s3://awsglue-datasets/examples/medicare/Medicare_Hospital_Provider.csv']},
        'csv',
        {'withHeader': True})
    print("Count:",medicare_dynamicframe.count())
    medicare_dynamicframe.printSchema()

  6. Change the data type of the provider ID to long to resolve all incoming data to long:
    medicare_res = medicare_dynamicframe.resolveChoice(specs = [('Provider Id','cast:long')])
    medicare_res.printSchema()

  7. Display the providers:
    medicare_res.toDF().select('Provider Name').show(10,truncate=False)

Clean up

You can run %delete_session which deletes the current session and stops the cluster, and the user stops being charged. Have a look at the AWS Glue interactive sessions magics. Also please remember to delete IAM policy and role once you are done.

Conclusion

In this post, we demonstrated how to configure PyCharm to integrate and work with AWS Glue interactive sessions. The post builds on the steps in Getting started with AWS Glue interactive sessions to enable AWS Glue interactive sessions to work with Jupyter notebooks. We also provided ways to validate and test the functionality of the configuration.


About the Authors

Kunal Ghosh is a Sr. Solutions Architect at AWS. His passion is building efficient and effective solutions on cloud, especially involving analytics, AI, data science, and machine learning. Besides family time, he likes reading and watching movies. He is a foodie.

Sebastian Muah is a Solutions Architect at AWS focused on analytics, AI/ML, and big data. He has over 25 years of experience in information technology and helps customers architect and build highly scalable, performant, and secure cloud-based solutions on AWS. He enjoys cycling and building things around his home.