All posts by limillan

How to mount Linux volume and keep mount point consistency

Post Syndicated from limillan original https://aws.amazon.com/blogs/compute/how-to-mount-linux-volume-and-keep-mount-point-consistency/

This post is written by: Leonardo Azize Martins, Cloud Infrastructure Architect, Professional Services

Customers often use Amazon Elastic Compute Cloud (Amazon EC2) Linux based instances with many Amazon Elastic Block Store (Amazon EBS) volumes attached. In this case, device name can vary depending on some facts, such as virtualization type, instance type, or operating system. As the device name can change, the customer shouldn’t rely on the device name to mount volumes from it. The customer wants to avoid the situation where a volume is mounted on a different mount point just because the device name changed, or the device name doesn’t exist because the name pattern changed.

Customers who want to utilize the latest instance family usually change the instance type when a new one is available. The device name can be different between instance families, such as T2 and T3. T2 uses /dev/sd[a-z], while T3 uses /dev/nvme[0-26]n1. If you mount a device on T2 called /dev/sdc, when you change the instance family to T3 the same device won’t be called /dev/sdc anymore. In this case, it will fail to mount.

Amazon EBS volumes are exposed as NVMe block devices on instances built on the AWS Nitro System. The block device driver can assign NVMe device names in a different order than what you specified for the volumes in the block device mapping. In this situation, a device that should be mounted on /data could end-up being mounted on /logs.

On Linux, you can use the fstab file to mount devices using kernel name descriptors (the traditional way), file system labels, or the file system UUID. Kernel name descriptors aren’t persistent and can change each boot. Therefore, they shouldn’t be used in configuration files.

UUID is a mechanism for giving each filesystem a unique identifier. These identifiers’ attributes are generated by filesystem utilities (mkfs.*) when the device is formatted, and they’re designed so that collisions are unlikely. All GNU/Linux filesystems (including swap and LUKS headers of raw encrypted devices) support UUID.

As UUID is a filesystem attribute, it can also be used with Logical Volume Manager (LVM) and Linux software RAID (mdadm).

Depending on the fstab file configuration, you may find that you can’t access your instance, which requires you to follow a rescue process to fix issues. This is the case if you configure the fstab file with the device name and change the instance type.

This post shows how to mount Linux volumes and keep mount points preserved when the instance type is changed or the instance is rebooted.

Overview of solution

When you create an instance, you specify block devices mapping. It doesn’t mean that the Linux device has the same name or can be discovered in the same order as specified on the instance mapping. This situation can be more evident when using applications that require more volumes.

Using UUID to mount volumes lets you mitigate future issues when you stop and start your instance or change the instance type.

EC2 instance block device mapping

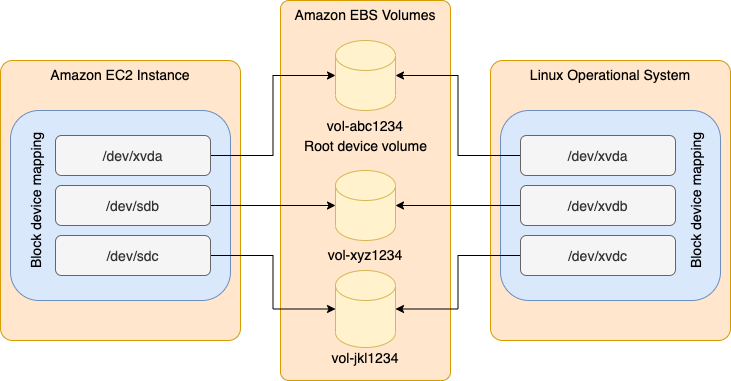
Figure 1: EC2 instance block device mapping

Walkthrough

You will create one instance with three volumes: one root volume and two data volumes. We use Amazon Linux 2 in this post. In this instance type, volumes have a specific name format. Later, you will change the instance type. The new instance type volumes will have another name format.

Follow these steps:

  • Create an instance with three volumes
  • Create the filesystem on the volumes and mount them
  • Change the instance type

Prerequisites

For this walkthrough, you should have the following prerequisites:

Create instance

Create one instance with three volumes: a root volume and two data volumes. Use Launch Instance Wizard with the following details.

Launch Amazon Linux 2 instance

  1. On Step 1, choose Amazon Linux 2 AMI (HVM), SSD Volume Type.
  2. On Step 2, choose micro.
  3. On Step 3, choose Next.
  4. On Step 4, add two new volumes, device /dev/sdb 10 GiB and device /dev/sdc 12 GiB.

Launch instances, add storage

Figure 2: Launch instances, add storage

Create filesystem and mount

Connect to your instance using EC2 Instance Connect or any other method that feels comfortable for you. Mount the device using UUID instead of the device name. Run the following instructions as the user root.

Format and mount the device

  1. Run the following command to confirm that you have three disks:
    $ lsblk
  2. Format disk as xfs, and run the following commands:
    mkfs.xfs /dev/xvdb
    mkfs.xfs /dev/xvdc
  3. Create mount point, and run the following commands:
    mkdir /mnt/disk1
    mkdir /mnt/disk2
  4. Add mount instructions, and run the following commands:
    echo "$(blkid /dev/xvdb | awk '{print $2}') /mnt/disk1 xfs defaults,noatime" | tee -a /etc/fstab
    echo "$(blkid /dev/xvdc | awk '{print $2}') /mnt/disk2 xfs defaults,noatime" | tee -a /etc/fstab
  5. Mount volumes, create dummy file, and run the following commands:
    mount -a
    touch /mnt/disk1/file1.txt
    touch /mnt/disk2/file2.txt

You will have an fstab file like the following:

cat /etc/fstab
UUID=7b355c6b-f82b-4810-94b9-4f3af651f629     /           xfs    defaults,noatime  1   1
UUID="2c160dd6-586c-4258-84bb-c79933b9ae02" /mnt/disk1 xfs defaults,noatime
UUID="3e7a0c28-7cf1-40dc-82a1-2f5cfb53f9a4" /mnt/disk2 xfs defaults,noatime

Change instance type

Change the instance type from t2.micro to t3.micro.

Launch Amazon Linux 2 instance

  1. Stop instance.
  2. Change the instance type to micro.
  3. Start instance.
  4. Connect to your instance using EC2 Instance Connect.
  5. Check the device name, and run the following command:
lsblk
  1. List files, and run the following command:
ls -l /mnt/*

Note that the device names are changed from xvd* to nvme*. All of the devices are mounted without any issue and with the correct mount points.

Cleaning up

To avoid incurring future charges, delete the instance and all of the volumes that you created in this post.

The other side

UUID is an attribute of the filesystem that was generated when you formatted your device. Therefore, it will follow your device even if you create an AMI or snapshot. So you don’t need to worry about a restore process, and it will smoothly proceed to an instance restore. You must be careful if you restore a snapshot from one volume and attach it to the same instance, as you will end-up with two volumes that are using the same UUID. If you try to mount the restored volume on the same instance, then it will fail and you will find this message on /var/log/messages file. kernel: XFS (xvdf1): Filesystem has duplicate UUID f6646b81-f2a6-46ca-9f3d-c746cf015379 - can't mount It is even more important to be careful if you attach a volume created from the snapshot of the root volume and restart your instance. Since both volumes have the same UUID, you may find that a volume other than the one attached to /dev/xvda or /dev/sda has become the root volume of your instance. See the following example for details. Note that both volumes have the same UUID, but the one mounted on / is /dev/xvdf1, not /dev/xvda1, which is the real root volume for this instance.

$ blkid
/dev/xvda1: LABEL="/" UUID="f6646b81-f2a6-46ca-9f3d-c746cf015379" TYPE="xfs" PARTLABEL="Linux" PARTUUID="79fae994-3708-4293-bb29-4d069d1c786b"
/dev/xvdf1: LABEL="/" UUID="f6646b81-f2a6-46ca-9f3d-c746cf015379" TYPE="xfs" PARTLABEL="Linux" PARTUUID="79fae994-3708-4293-bb29-4d069d1c786b"
$ lsblk
NAME    MAJ:MIN RM SIZE RO TYPE MOUNTPOINT
xvda    202:0    0   8G  0 disk
└─xvda1 202:1    0   8G  0 part
xvdf    202:80   0   8G  0 disk
└─xvdf1 202:81   0   8G  0 part /

Conclusion

In this post, we covered how to use UUID to mount Linux devices using fstab file. This keeps the mount point on the correct device. It also lets you change the instance type without changes to the fstab file. You can use UUID with LVM and Linux software RAID (mdadm), UUID, as an attribute of the filesystem, will be the same even after a backup and restore process, snapshot, or clone. To learn more, check out our block device mappings and device names on Linux instances documentation.

Expanding Your EC2 Possibilities By Utilizing the CPU Launch Options

Post Syndicated from limillan original https://aws.amazon.com/blogs/compute/expanding-your-ec2-possibilities-by-utilizing-the-cpu-launch-options/

This post is written by: Matthew Brunton, Senior Solutions Architect – WWPS

To ensure our customers have the appropriate machines available for their workloads, AWS offers a wide range of hardware options that include hundreds of types of instances that help customers achieve the best price performance for their workloads.  In some specialized circumstances, our customers need an even wider range of options, or more flexibility. This could be driven by a desire to optimize licensing costs, or the customer wanting more hardware configuration options. Some high performance workloads can improve by turning off simultaneous multithreading. In our AWS Well Architected Framework – High Performance Computing Lens we have the following recommendation “Unless an application has been tested with hyperthreading enabled, it is recommended that hyperthreading be disabled”. With these factors in mind, AWS offers the ability to configure some options regarding the CPU configuration in launched instances.

Our larger instance types that have a higher number of cores, and offer multithreaded cores will translate to a larger combination of potential options. The valid combinations of cores and threads per core can be found here. To consider utilizing the CPU options for both cores and threads per core, you will need to consider instance types that have multiple CPU’s and/or cores.

You can specify numerous CPU options for some of our larger instances via the console, command line interface, or the API. Moreover, you can remove CPUs from the launch configuration, or deactivate threading within CPUs that have multiple threads per core. Amazon Elastic Compute Cloud (Amazon EC2) FAQ’s for the Optimize CPU’s feature can be found here. You should be aware that this feature is only available during instance launch and cannot be modified after launch. The launch options persist after you reboot, stop, or start an instance.

You can easily determine how many CPUs and threads a machine has. There are numerous ways to see this via the AWS Management Console and the AWS Command Line Interface (CLI).

Within the AWS Management Console, under the ‘Instance Details’ section, opening up the ‘Host and placement group’ item reveals the number of vCPUs that your machine has.

Instance Details showing the number of vCPU's a particular EC2 machine has

Figure 1: Console details showing number of vCPU’s

This information is also available using the AWS CLI as follows:

aws ec2 describe-instances --region us-east-1 --filters "Name=instance-type,Values='c6i.*large'"

...
    "Instances": [
        {
            "Monitoring": {
                "State": "disabled"
            }, 
            "PrivateDnsName": "ip-172-31-44-121.ec2.internal",
 "PrivateIpAddress": "172.31.44.121",                              
 "State": {
                "Code": 16, 
                "Name": "running"
            }, 
            "EbsOptimized": false, 
            "LaunchTime": "2021-11-22T01:46:58+00:00",
            "ProductCodes": [], 
            "VpcId": " vpc-7f7f1502", 
            "CpuOptions": { "CoreCount": 32, "ThreadsPerCore": 1 }, 
            "StateTransitionReason": "", 
            ...
        }
    ]
...

Figure 2: ec2 describe-instances cli output

A handy AWS CLI command ‘describe-instance-types’ will show the list of valid cores, the possible threads-per-core, and the default values for the vCPUs and cores. These are listed in the ‘DefaultVCpus’ and ‘DefaultCores’ items in the returned JSON listed as follows.

aws ec2 describe-instance-types --region us-east-1 --filters "Name=instance-type,Values='c6i.*'"
{
    "InstanceTypes": [
        {
            "InstanceType": "c6i.4xlarge",
            "CurrentGeneration": true,
            "FreeTierEligible": false,
            "SupportedUsageClasses": [
                "on-demand",
                "spot"
            ],
            "SupportedRootDeviceTypes": [
                "ebs"
            ],
            "SupportedVirtualizationTypes": [
                "hvm"
            ],
            "BareMetal": false,
            "Hypervisor": "nitro",
            "ProcessorInfo": {
                "SupportedArchitectures": [
                    "x86_64"
                ],
                "SustainedClockSpeedInGhz": 3.5
            },
            "VCpuInfo": { "DefaultVCpus": 16, "DefaultCores": 8, "DefaultThreadsPerCore": 2, "ValidCores": [ 2, 4, 6, 8 ], "ValidThreadsPerCore": [ 1, 2 ] },
            "MemoryInfo": {
                "SizeInMiB": 32768
            },


Figure 3: ec2 describe-instance-types cli output

To utilize the AWS CLI to launch one or multiple instances, you should use the run instances CLI command.

The following is the shorthand syntax:

aws ec2 run-instances --image-id xxx --instance-type xxx --cpu-options “CoreCount=xx,ThreadsPerCore=xx” --key-name xxx --region xxx

For example, the following command launches a 32-core machine with only 1 thread per core instead of the standard 2 threads per core:

aws ec2 run-instances --image-id ami-0c2b8ca1dad447f8a --instance-type c6i.16xlarge
--cpu-options " CoreCount =32, ThreadsPerCore =1" --key-name MyKeyPair --region xxx

If you are using the CPU options parameters in CloudFormation templates, then the following applies:

https://docs.aws.amazon.com/AWSCloudFormation/latest/UserGuide/aws-properties-ec2-instance-cpuoptions.html

The following is an example of the YAML syntax for specifying the CPU configuration.

Resources:
  CustomEC2Instance:
    Type: "AWS::EC2::Instance"
    Properties:
      InstanceType: xxx
      ImageId: xxx
      CpuOptions:
CoreCount: xx
ThreadsPerCore: x

As can be seen in the following table, there are a number of valid CPU core options, as well as the option to set one or two threads per core for each CPU for certain instance types. This significantly opens up the number of combinations and permutations to meet your specific workload need. In the case of the c6i instance listed in the following table, there are an additional 32 CPU core and threading combinations available to customers.

Instance type Default vCPUs Default CPU cores Default threads per core Valid CPU cores Valid threads per core
c6i.16xlarge 64 32 2 2, 4, 6, 8, 10, 12, 14, 16, 18, 20, 22, 24, 26, 28, 30, 32 1, 2

Figure 4: Valid Core and Thread Launch Options

Note that you still pay the same amount for the EC2 instance, even if you deactivate some of the cores or threads.

Conclusion

This approach can let customers customize the EC2 hardware options even further to ensure a wider range of CPU/memory combinations over and above the already extensive AWS instance options. This lets customers finely tune hardware for their exact application requirements, whether that is running High Performance workloads or trying to save money where license restrictions mean you can benefit from a specific CPU configuration.

We have run through various scenarios in this post, which detailed how to launch instances with alternate CPU configurations, easily check the current configuration of your running instances via our API and console, and how to configure the options in CloudFormation templates.

We love to see our customers maximizing the flexibility of the AWS platform to deliver outstanding results. Have a look at some of your High Performance workloads and give the threading options a try, or take a deep dive into any of your more expensive licenses to see if you could benefit from an alternate CPU configuration. In order to get started, check out our detailed developer documentation for the optimize CPU options.