All posts by Rajdeep Banerjee

Implementing customer managed keys for AWS Lambda durable functions with Terraform

Post Syndicated from Rajdeep Banerjee original https://aws.amazon.com/blogs/compute/implementing-customer-managed-keys-for-aws-lambda-durable-functions-with-terraform/

If you run regulated workloads, you must control how persisted data is encrypted and who can access it. You need to manage encryption key rotation schedules, restrict decryption to authorized principals, and produce audit evidence that proves encryption controls are operating as designed.

AWS Lambda durable functions build resilient, multi-step workflows that survive failures through automatic checkpointing. The checkpoint mechanism persists execution state, including step results, payloads, and callback responses, to durable storage. For payment processing workloads, this persisted data is sensitive. AWS Lambda durable functions support customer managed keys from AWS Key Management Service (AWS KMS). A customer managed key gives you three controls: you set the key rotation schedule, you restrict decryption access through the key policy, and you generate per-function audit trails in AWS CloudTrail. A durable execution uses the same encryption key it started with for its entire lifetime. Changing or removing the key affects only executions that start after the change.

Updating the customer managed key policy to remove decrypt permissions, or disabling the key, stops the Lambda service from accessing previously checkpointed state. Customer managed key deletion is a permanent action, and all durable executions encrypted with that key become unrecoverable because the Lambda service has no mechanism to restore the data. Before scheduling key deletion, use the AWS KMS waiting period (7 to 30 days) and monitor AWS CloudTrail for Decrypt calls to confirm that the key is no longer in active use.

In this post, you learn to configure a customer managed key to encrypt durable execution data in an event-driven payment processing workflow. You create a symmetric encryption key in AWS KMS and define a key policy that grants the Lambda service, the function’s execution role, the function author, and durable execution operators only the AWS KMS actions each principal requires. You then configure the function to use the key for durable execution encryption and verify encryption operations through AWS CloudTrail logs. By the end, you have a deployable reference architecture you can adapt for regulated workloads running on Lambda durable functions.

To learn more about how AWS Lambda encrypts durable execution data, see Encrypting AWS Lambda durable execution data in the AWS Lambda Developer Guide.

Solution overview

The sample application implements an event-driven payment processing pipeline using Amazon DynamoDB, Amazon EventBridge, Amazon EventBridge Pipes, AWS Lambda, and Amazon SQS. The pipeline receives authorized payment transactions, validates and enriches them. A Lambda durable function applies business rules to the enriched transactions. The approved transactions are sent to a downstream settlement system for posting.

The following section covers the key architectural steps.

Architecture steps

  1. The upstream authorization system writes authorized payment records to a DynamoDB table.
  2. DynamoDB Streams captures each new record as an ordered change event.
  3. Amazon EventBridge Pipes polls the record from the DynamoDB stream. The pipe triggers a Lambda function as part of enrichment step for duplicate checking.
  4. The deduplication Lambda uses a DynamoDB table with conditional writes to identify duplicate inbound transactions based on transaction properties and time window.
  5. When the deduplication is successful, the pipe publishes an event to the Amazon EventBridge custom event bus.
  6. An Amazon EventBridge rule invokes a Lambda function for matching events. The function adds business context such as account type, bank routing details, and merchant category codes. The function publishes a new enriched event to the custom event bus.
  7. Another Amazon EventBridge rule matches the enriched events to a Lambda durable function. The durable function applies business rules to the incoming event. When the event passes all business rules, the function publishes a new event to the event bus.
  8. An Amazon EventBridge rule routes the approved event to an Amazon SQS queue preserving ordering for settlement and buffering against downstream throughput limits.
  9. The Posting Lambda function reads from the Amazon SQS and invokes the downstream posting subsystem to post the transaction. Finally, the function publishes a completion event to the event bus completing the transaction lifecycle.

With customer managed keys configured on DynamoDB, Amazon EventBridge, SQS, and the AWS Lambda durable function, every piece of persisted data in this pipeline is encrypted with keys you own and control. The walkthrough that follows shows you how to deploy this configuration with Terraform.

Figure 1 shows the reference architecture for this solution.

Reference architecture
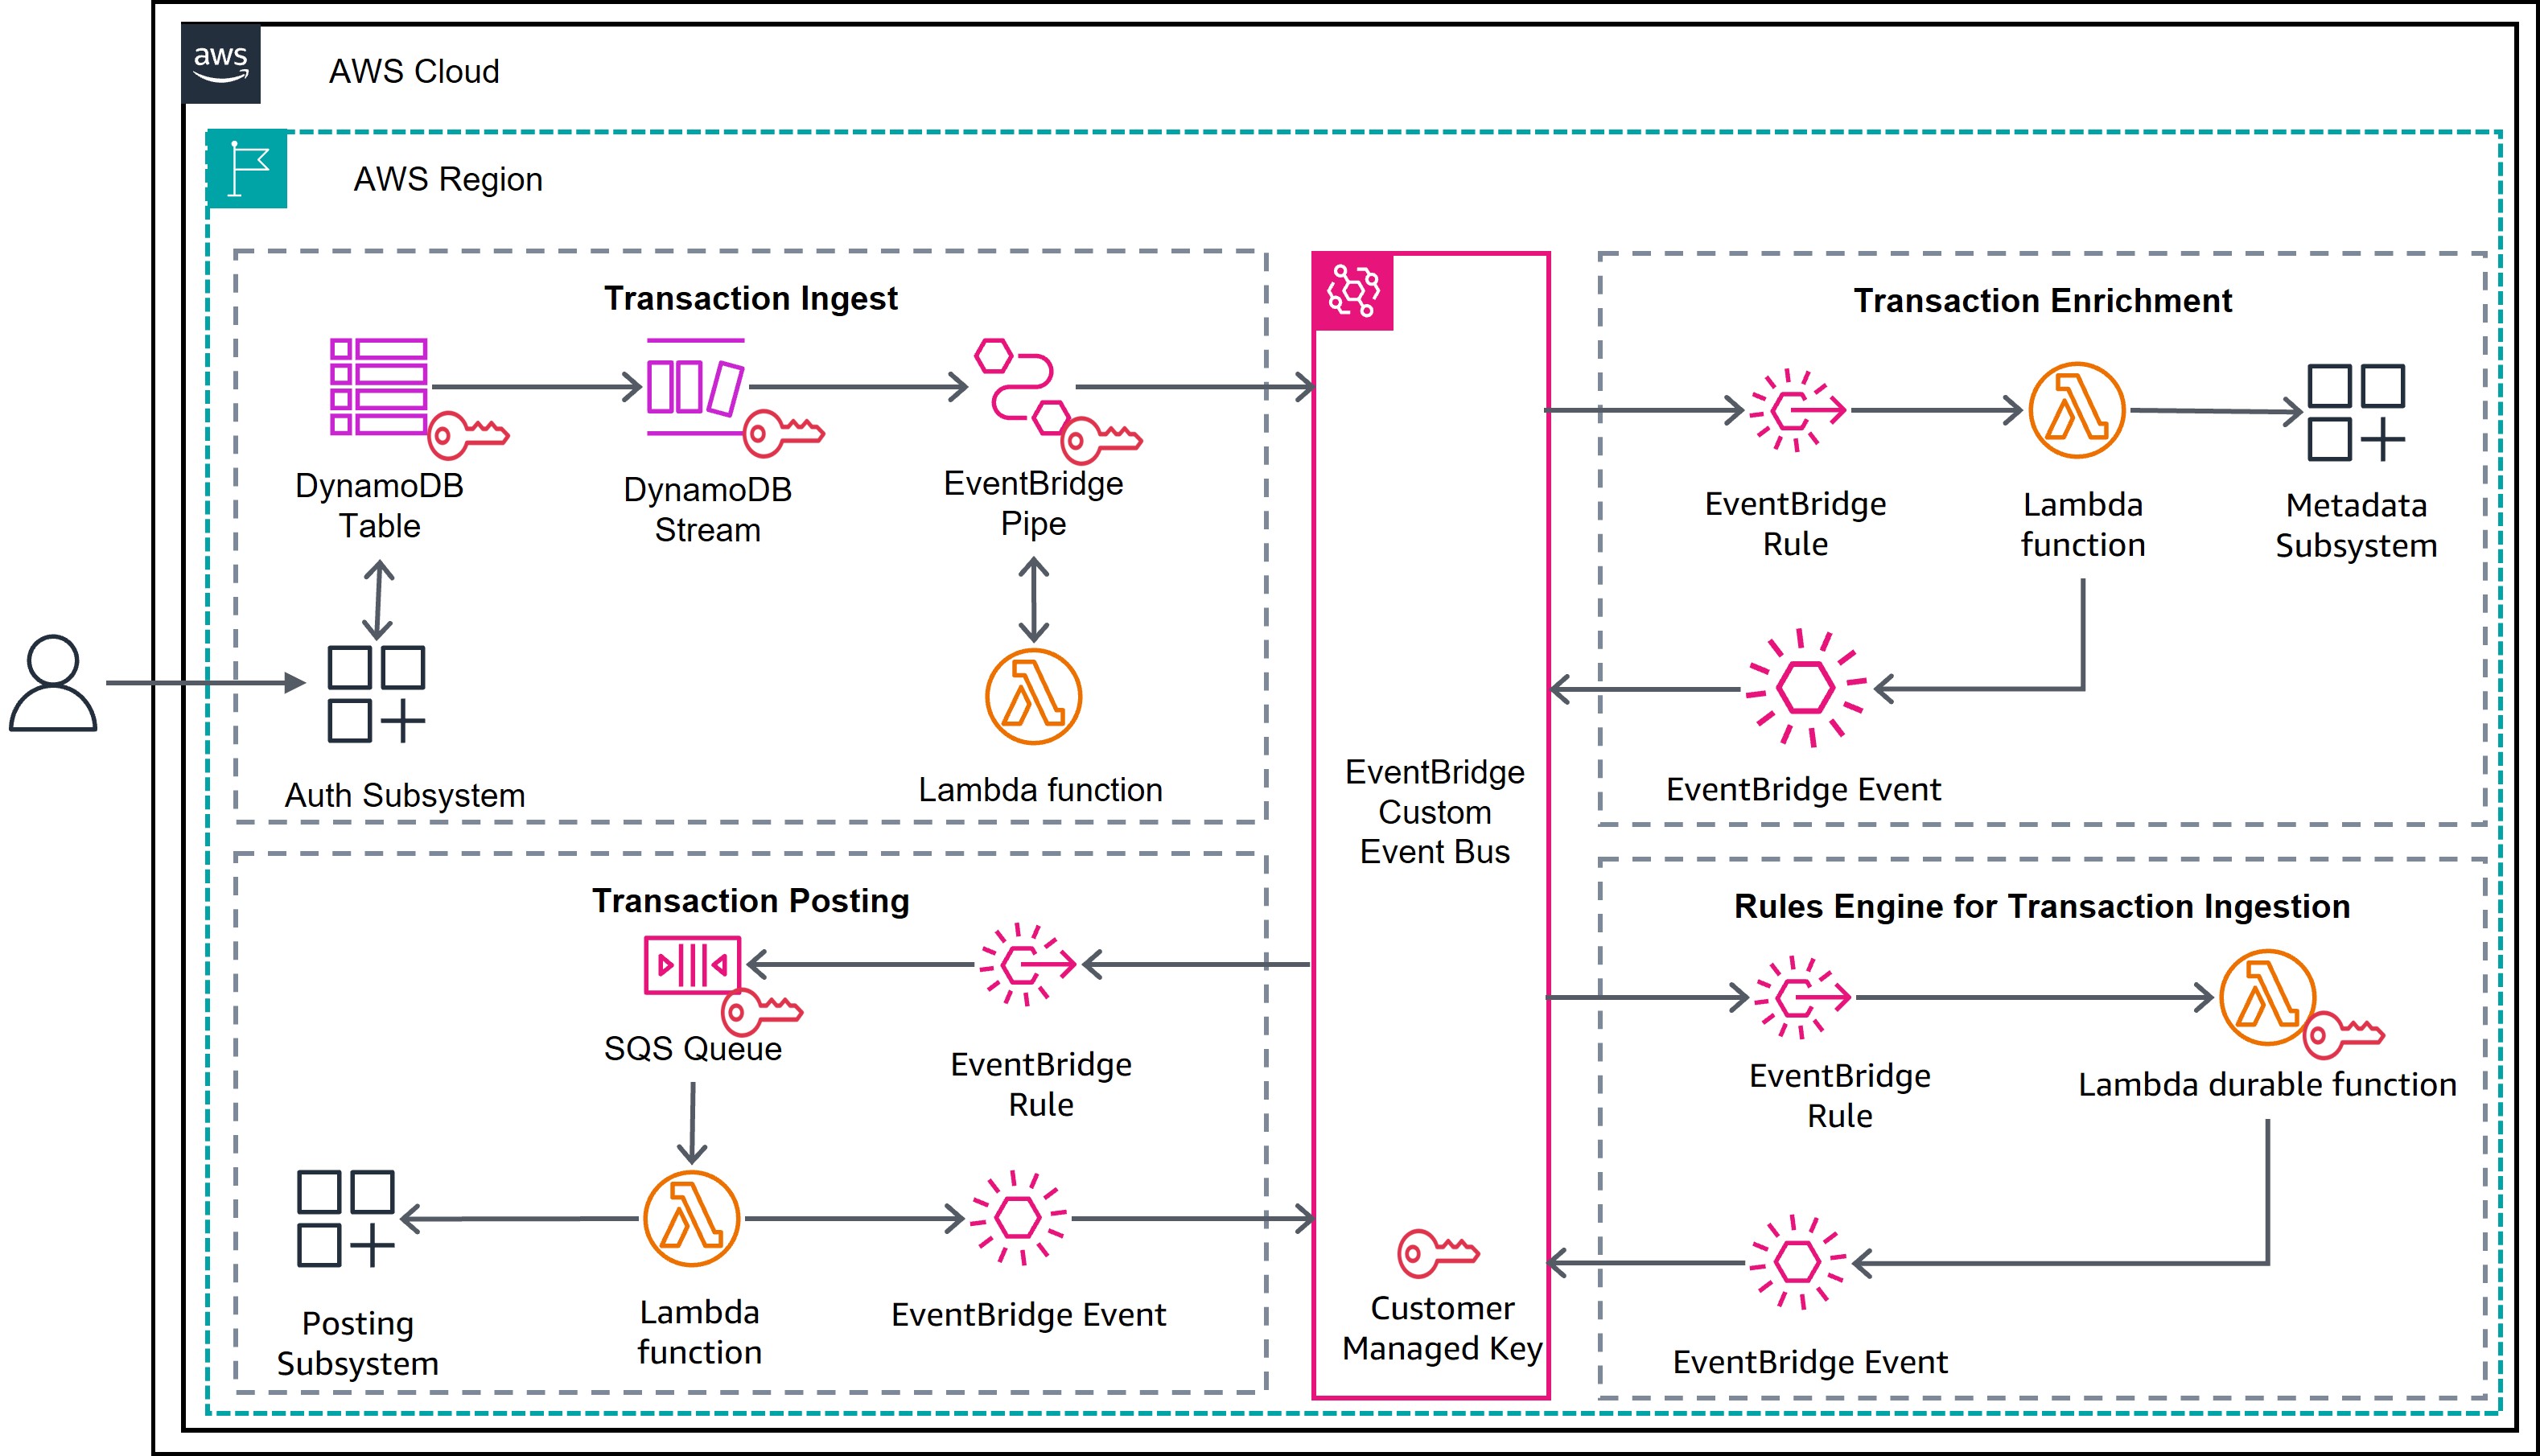
Reference architecture for payment processing using Lambda durable functions

Figure 1: Payment processing using Lambda durable functions

Prerequisites

To deploy this solution, you need the following prerequisites:

  1. AWS account and CLI: An active AWS account with the AWS CLI installed and configured with appropriate credentials.
  2. Terraform: Terraform installed (version 1.0 or later) for infrastructure provisioning.
  3. Python environment: Python 3.11 or later, with pytest for running unit tests. The aws-durable-execution-sdk-python package requires Python 3.11 or later.
  4. AWS Identity and Access Management (IAM) permissions: The IAM permissions to create the resources. Follow the sample repository for the sample policy.
  5. Basic understanding and familiarity with AWS Serverless services.

Solution walkthrough

The following is a step-by-step guide to deploy and test the payment processing solution.

Step 1: Clone the repository

git clone https://github.com/aws-samples/sample-payment-processing-with-lambda-durable-functions.git
cd sample-payment-processing-with-lambda-durable-functions/source

Step 2: Run unit tests

Validate the payment processing logic locally before deploying:

cd lambda-src/business_rules
pip3 install -r requirements-test.txt
pytest test_app.py -v

This runs unit tests that cover transaction validation, business rule checks (foreign transaction detection, currency conversion, merchant type), event schema validation, and misconfiguration handling. The tests use the AWS Durable Execution Testing SDK to run the handler locally without deploying AWS resources.

Figure 2 shows an example of test results running locally.
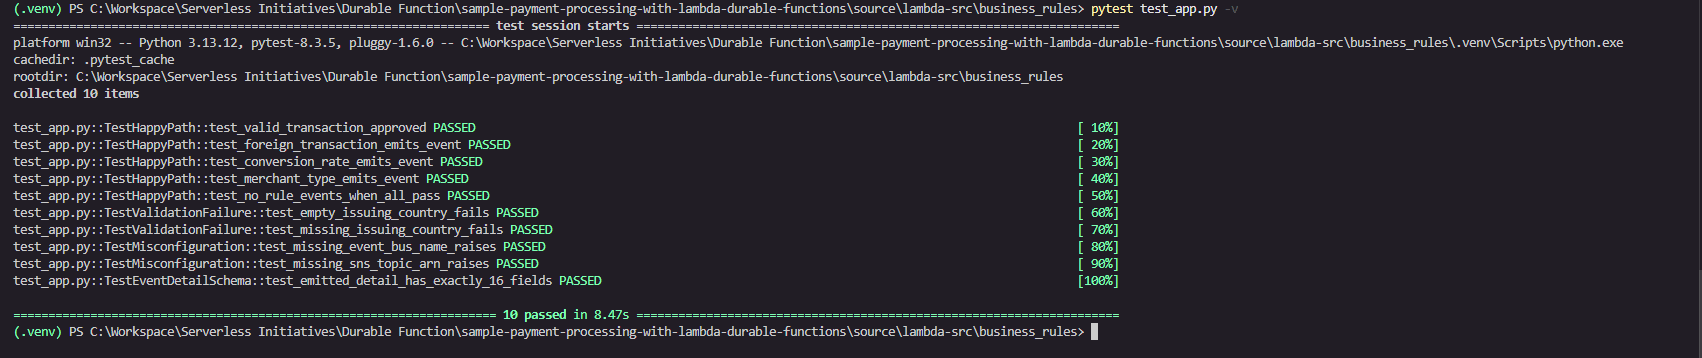
Test run results of the business rules

Figure 2: Test run results of the business rules

Step 3: Inspect the Lambda durable functions construct

Open the payments-business-rules Lambda function in source/lambda-src/business_rules/business-rules-app.py for a sample Lambda durable function. Refer to Figure 3 for the code walkthrough.

Key features used

  1. @durable_execution decorator: Transforms a standard Lambda handler into a durable function handler. The durable execution SDK manages checkpointing automatically. No infrastructure changes are required.
  2. context.step("validate-transaction"): Validates that the transaction has a non-empty issuingCountryCode. The durable execution checkpoints the result (True or False) to durable storage. The durable execution restores checkpoint results instead of re-executing steps during the replay phase. This phase occurs whenever the function is re-invoked after an interruption such as a wait period completing, a failure, or a suspension. This checkpointed result is part of the durable execution data encrypted by your customer managed key.
  3. context.step("publish-posting-failure"): Publishes the full Amazon EventBridge envelope to Amazon SNS when validation fails. This step only runs on the failure path. The runtime checkpoints the Amazon SNS publish response to durable storage.
  4. context.parallel("run-business-rules"): Runs three independent rule checks concurrently: foreign transaction detection, currency conversion, and merchant type validation. Each branch checkpoints independently. If one branch fails, the others are not replayed on resume. Each branch result is persisted to durable storage and encrypted by the customer managed key.
  5. ctx.step("trigger-foreign-transaction-rule") (inside parallel): Compares billingAmount against transactionAmount. If they differ, it emits a ForeignTransactionFound event to Amazon EventBridge. This step is checkpointed independently within the parallel group.
  6. ctx.step("trigger-conversion-rate-rule") (inside parallel): Checks whether conversionRate equals 1. If so, it emits a CurrencyConversionTransactionFound event to Amazon EventBridge. This step is checkpointed independently within the parallel group.
  7. ctx.step("trigger-merchant-rule") (inside parallel): Checks whether merchantType equals AAFF. If so, it emits a WarningMerchantTypeTransactionFound event to Amazon EventBridge. This step is checkpointed independently within the parallel group.
  8. context.step("post-transaction-processed"): Emits the final TransactionPostingApproved event to Amazon EventBridge. This step is only reached when validation passes and all business rules complete. The runtime checkpoints the Amazon EventBridge response. On replay, if this step already succeeded, the event is not re-published, which guarantees exactly-once approval semantics.
  9. context.logger: Provides replay-aware logging throughout the handler. During replay of previously completed steps, log statements are suppressed to prevent duplicate log entries in Amazon CloudWatch.
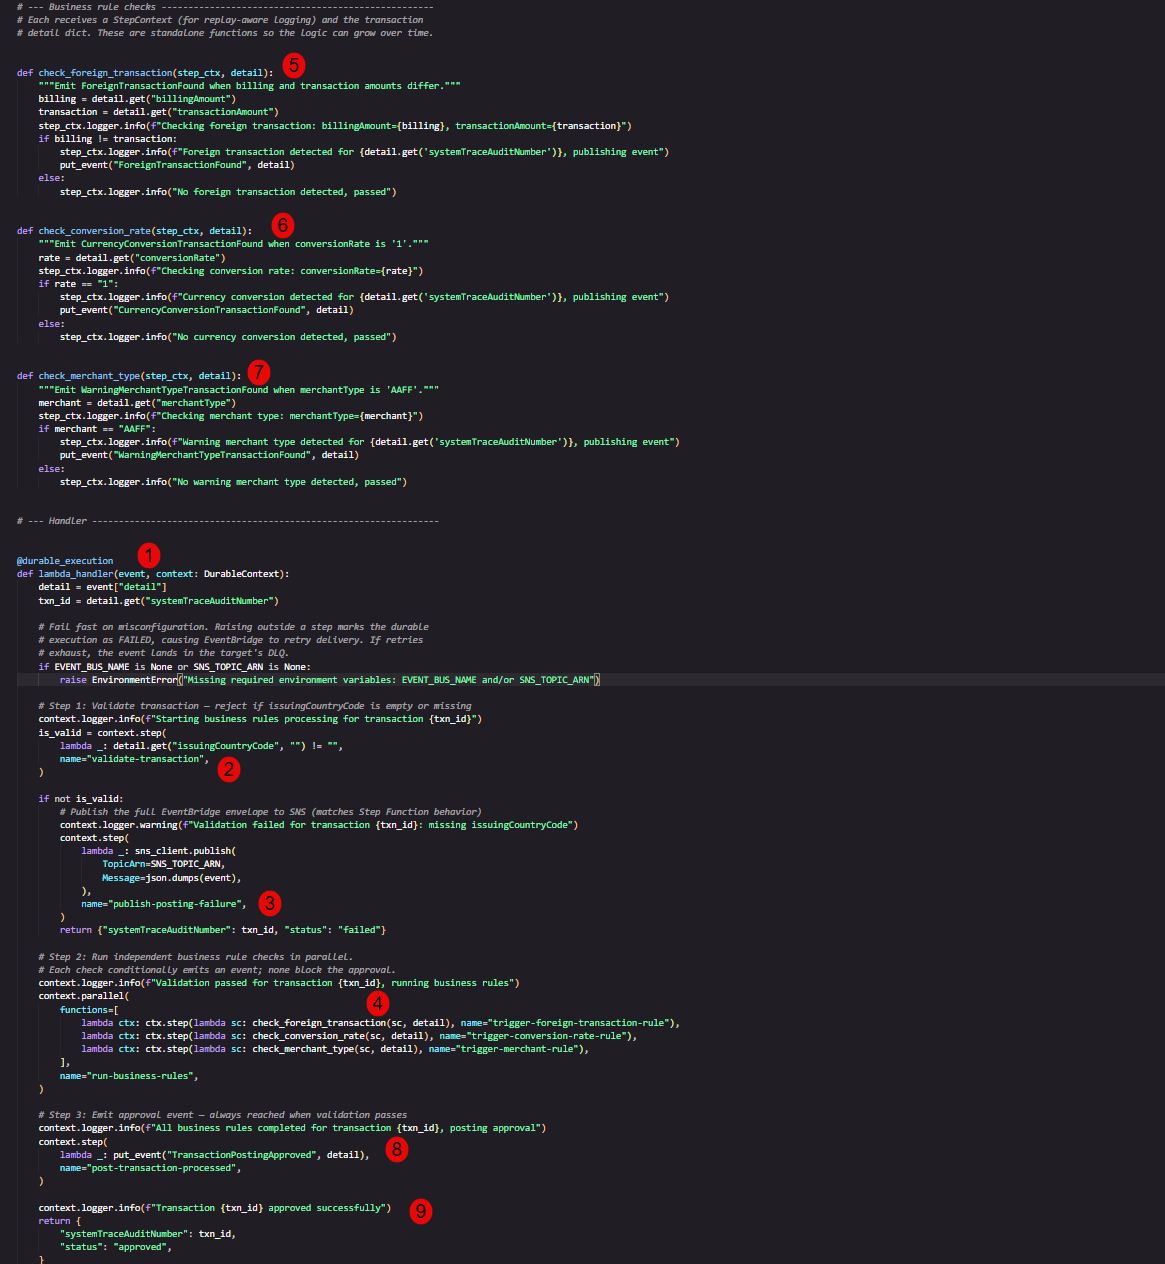
Lambda durable functions code walkthrough

Figure 3: Sample Lambda durable functions code

Step 4: Deploy infrastructure with Terraform

Terraform currently doesn’t support attaching a customer managed key directly to the durable function. You create the symmetric key in Terraform and then associate the key with the durable function on the AWS Management Console. Refer to source/durable_kms.tf for the key configuration.

Initialize and deploy the AWS resources that make up the solution:

cd ../../
terraform init
terraform plan -var="region=us-east-2"

Review the plan output, then apply:

terraform apply -var="region=us-east-2" --auto-approve

Note: Replace us-east-2 with your preferred AWS Region.

On successful completion, Terraform outputs the AWS KMS key alias, key ARN, and DynamoDB Streams ARN used by the event-driven pipeline:

Apply complete! Resources: N added, 0 changed, 0 destroyed.

Outputs:

durable_kms_key_alias = "durable-function-encryption"
durable_kms_key_arn = "arn:aws:kms:us-east-2:xxxxxxxxxxxx:key/4e87d4c2-1190-4db4-8b97-46657f83ee00"
stream_arn = "arn:aws:dynamodb:us-east-2:xxxxxxxxxxxx:table/visa/stream/2026-03-16T14:25:47.847"

Step 5: Verify Lambda durable functions configuration

In the AWS Lambda console, navigate to the payments-business-rules function. Confirm that the function Type displays Durable, which indicates that the checkpoint-and-replay mechanism is active. Figure 4 shows the expected function configuration.
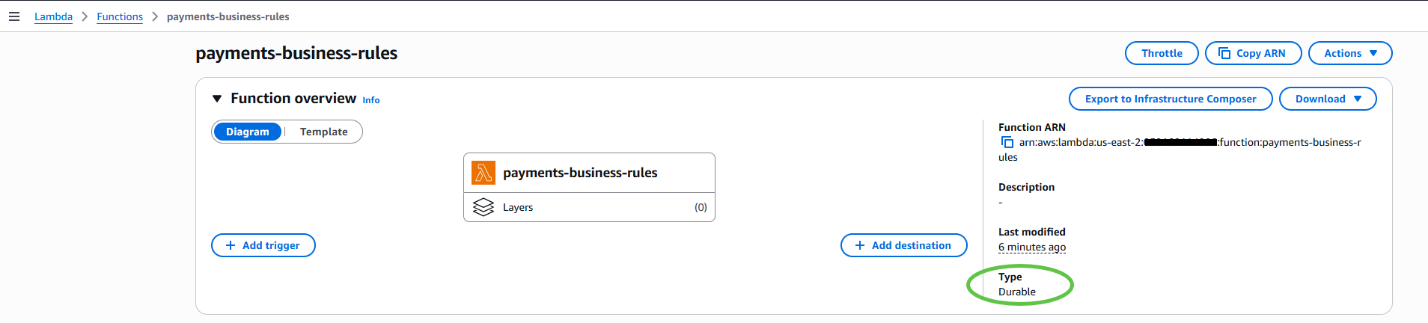
The durable function in the AWS Lambda console

Figure 4: The Lambda durable function in the AWS Lambda console

Step 6: Add the AWS KMS key to the Lambda durable function

  1. The durable function is not encrypted with a customer managed key. Figure 5 shows the function’s encryption configuration as empty.

    The Lambda durable function missing an AWS KMS key in the AWS Lambda console

    Figure 5: The Lambda durable function missing a customer managed key in the AWS Lambda console
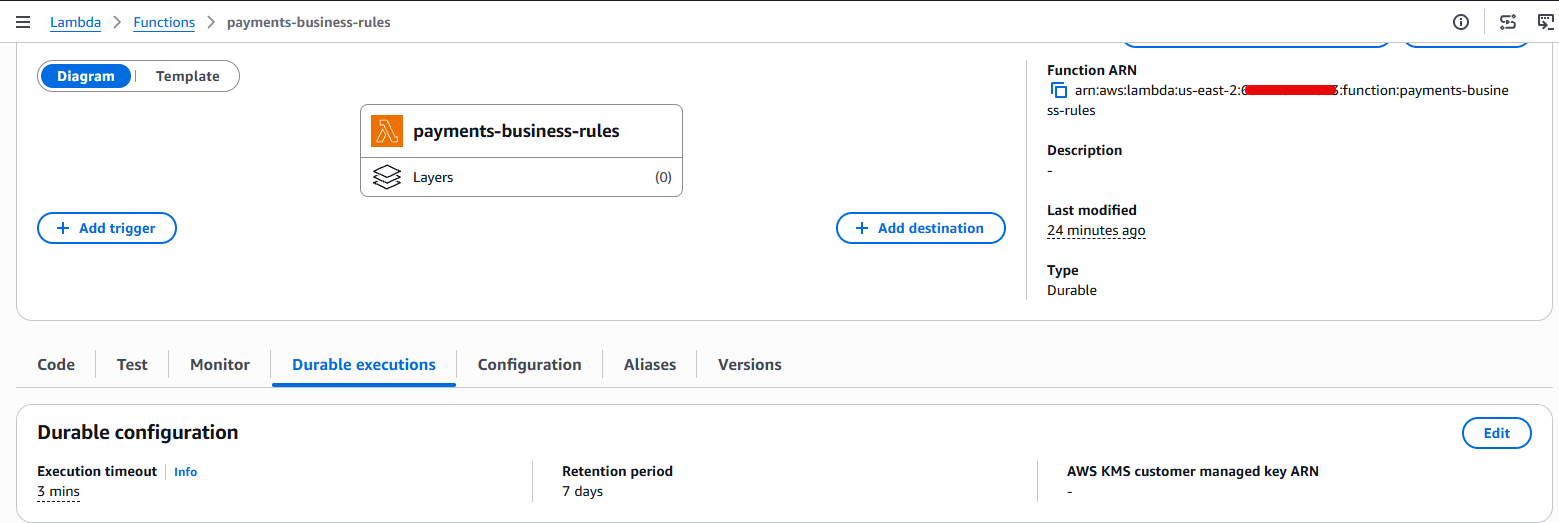
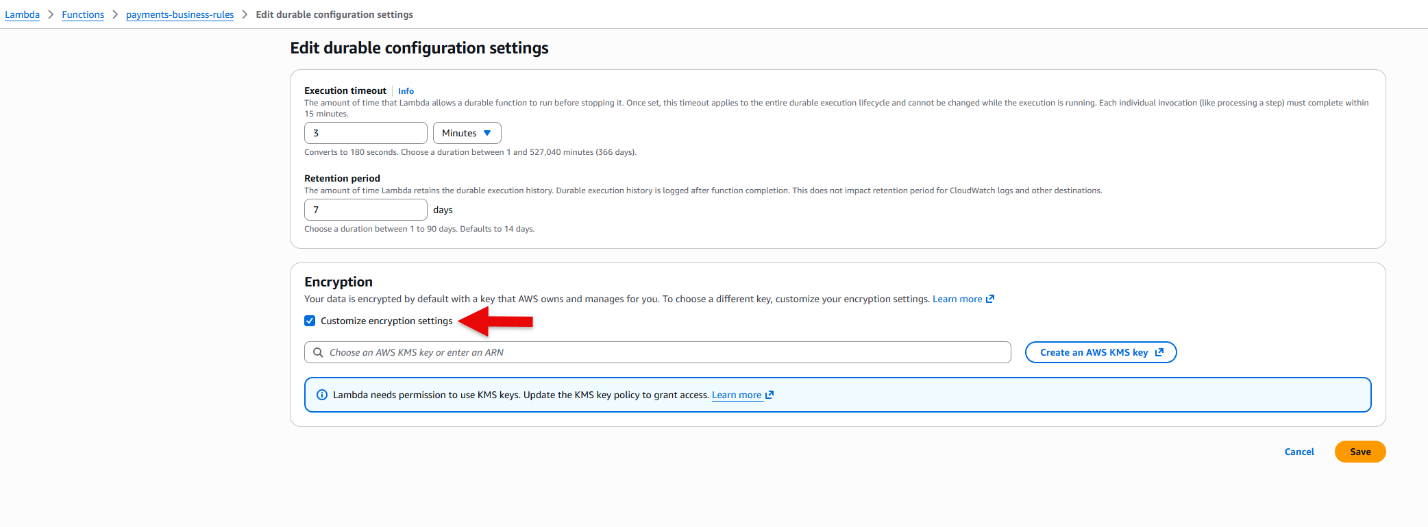
  2. Choose Edit, then turn on Customize encryption settings as shown in Figure 6.

    The Lambda durable function encryption settings in the AWS Lambda console

    Figure 6: The Lambda durable function check encryption in the AWS Lambda console

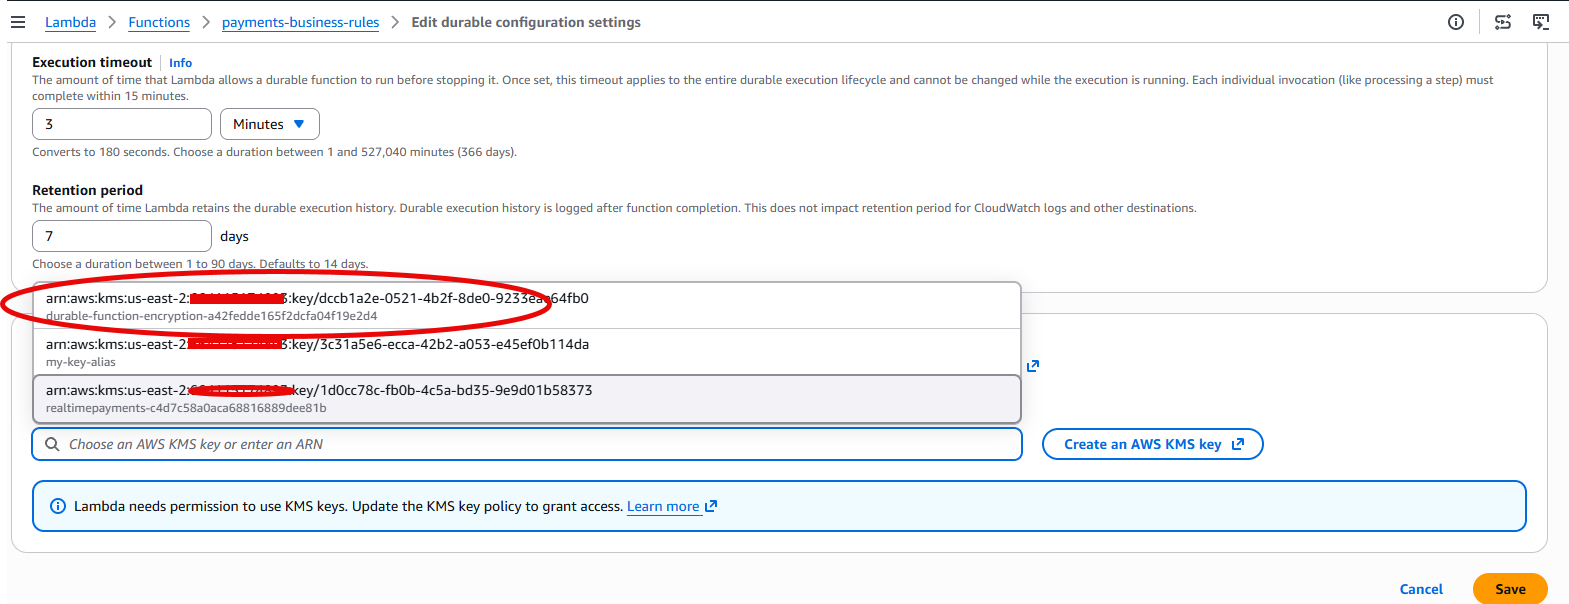
  3. Select the AWS KMS key ARN created for the durable function. The key ARN is available in the Terraform output from Step 4. Figure 7 shows the key selection.

    Selecting the AWS KMS key for the durable function in the AWS Lambda console

    Figure 7: Select the AWS KMS key ARN for the durable function in the AWS Lambda console

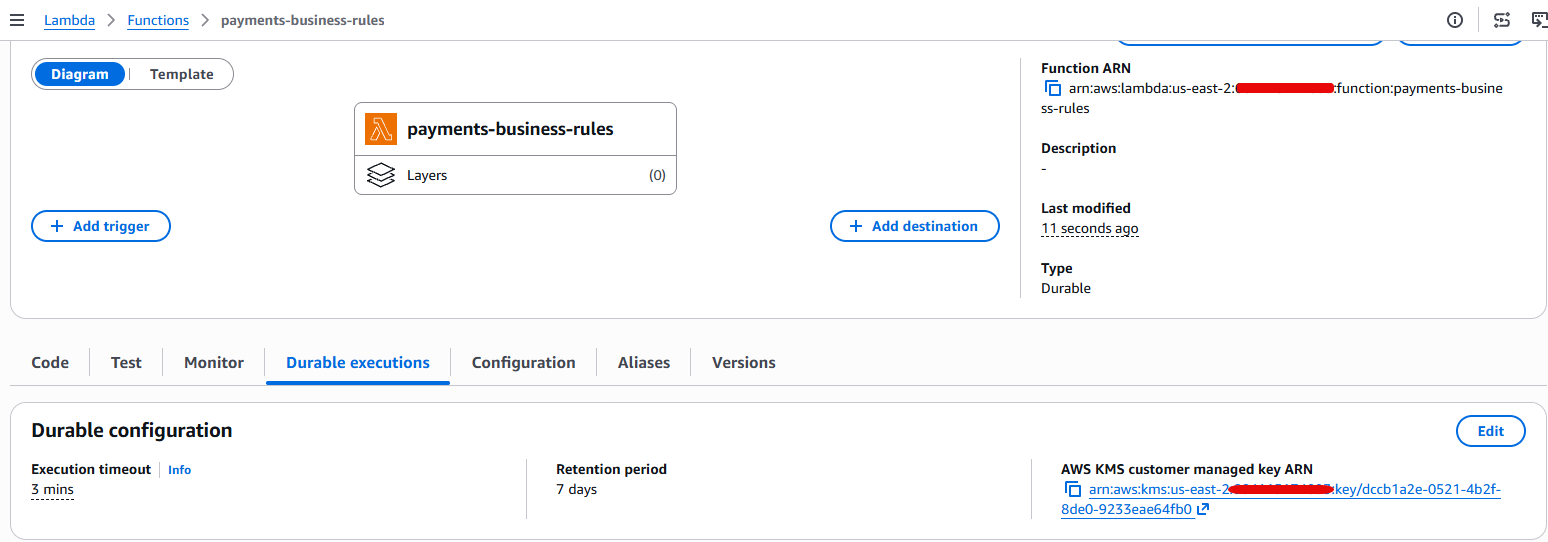
  4. Choose Save and confirm that the durable function is now encrypted with a customer managed key, as shown in Figure 8.

    The Lambda durable function with the AWS KMS key in the AWS Lambda console

    Figure 8: AWS Lambda durable function with the customer managed key in the AWS Lambda console
Step 7: Execute a test payment

Invoke the payments-visa-mock Lambda function to simulate an end-to-end authorization flow. The mock function reads sample Visa authorization messages from a CSV file and writes them to DynamoDB, which triggers the event-driven pipeline. Figure 9 shows a sample test invocation.
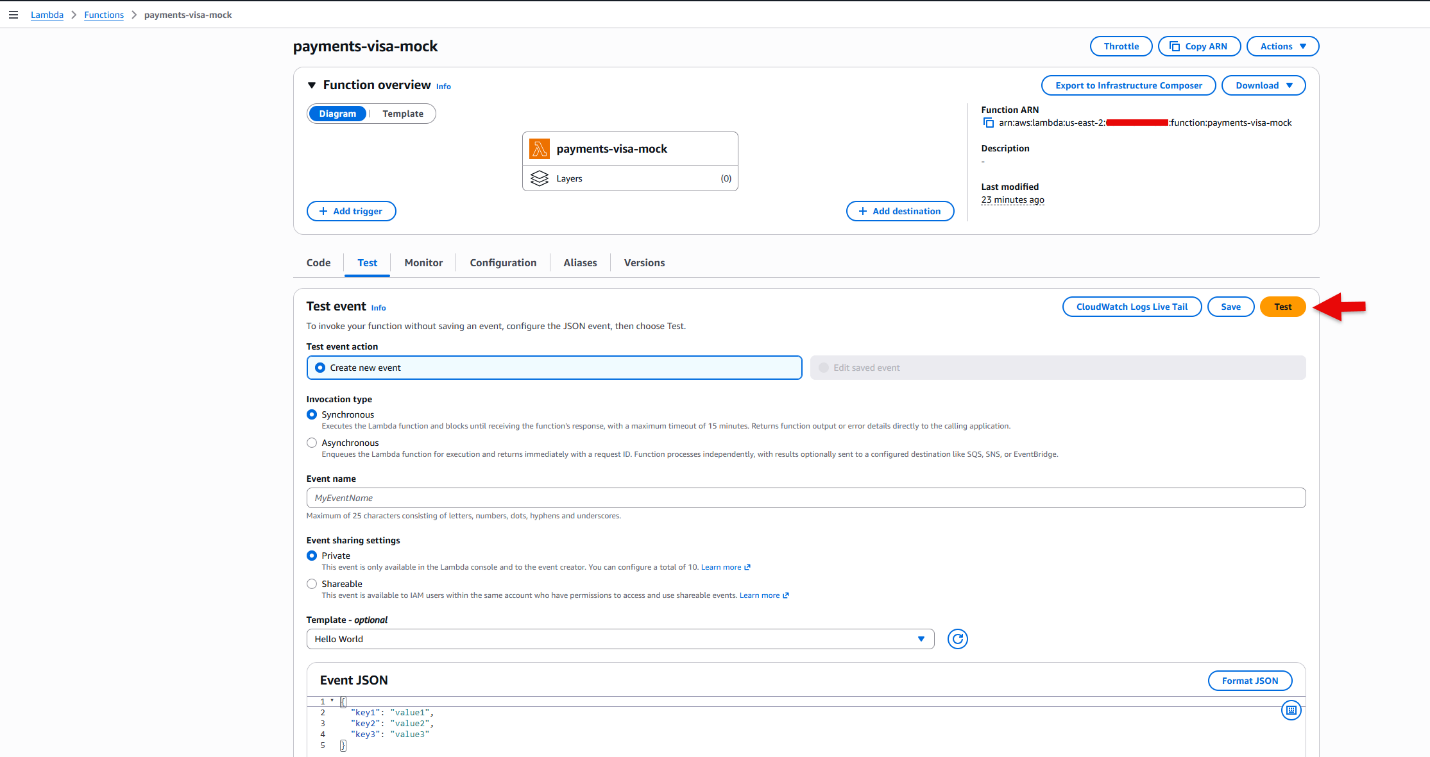
Invoking the payments-visa-mock function to trigger the workflow

Figure 9: Invoke the payments-visa-mock function to trigger workflow

Figure 10 shows a sample response after invocation.
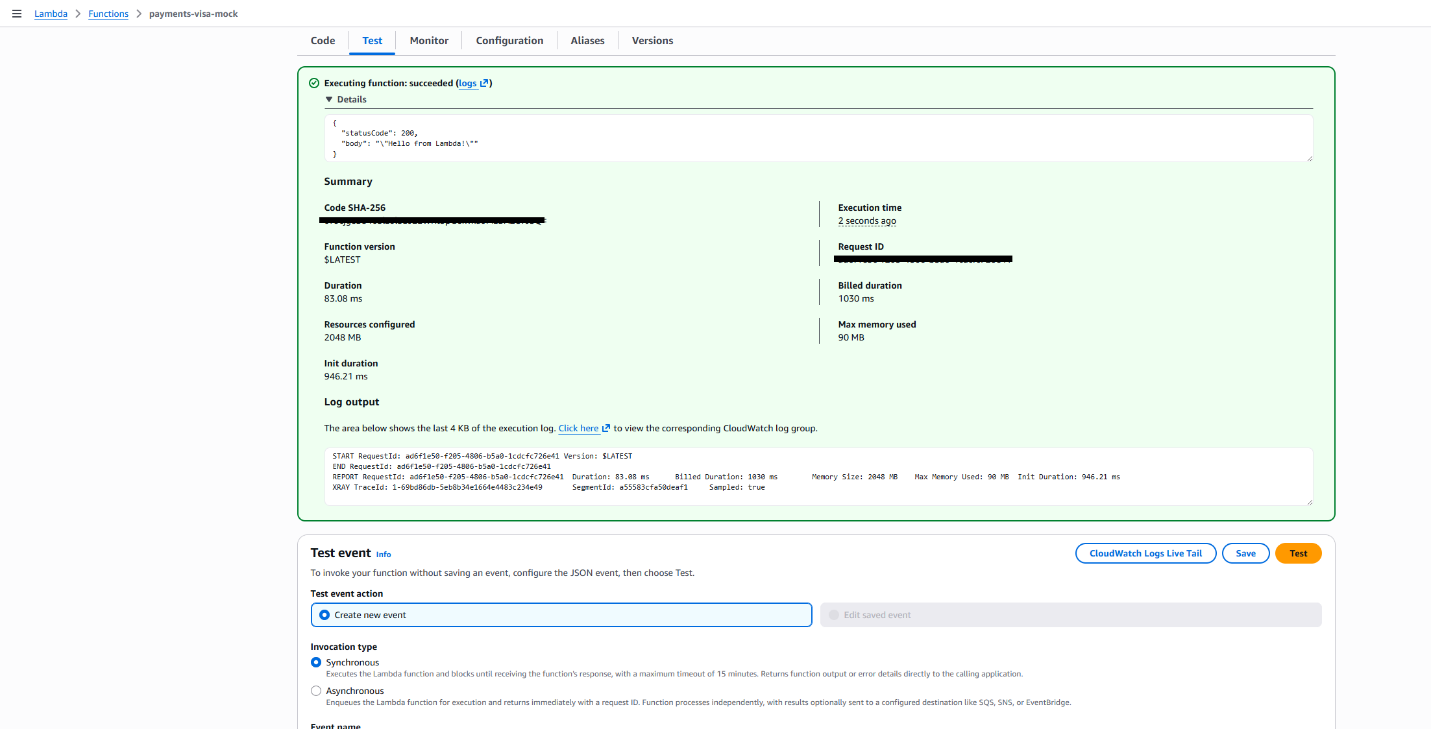
Test results from the payments-visa-mock function

Figure 10: Test results from the payments-visa-mock function to trigger workflow

The mock Lambda invocation creates records that follow the process described in the preceding architecture steps.

Step 8: Verify results

Open Amazon CloudWatch Logs and inspect the log group /aws/lambda/payments-business_rules. This log group belongs to the Lambda durable function for this use case. Figure 11 shows the CloudWatch log group on the console.
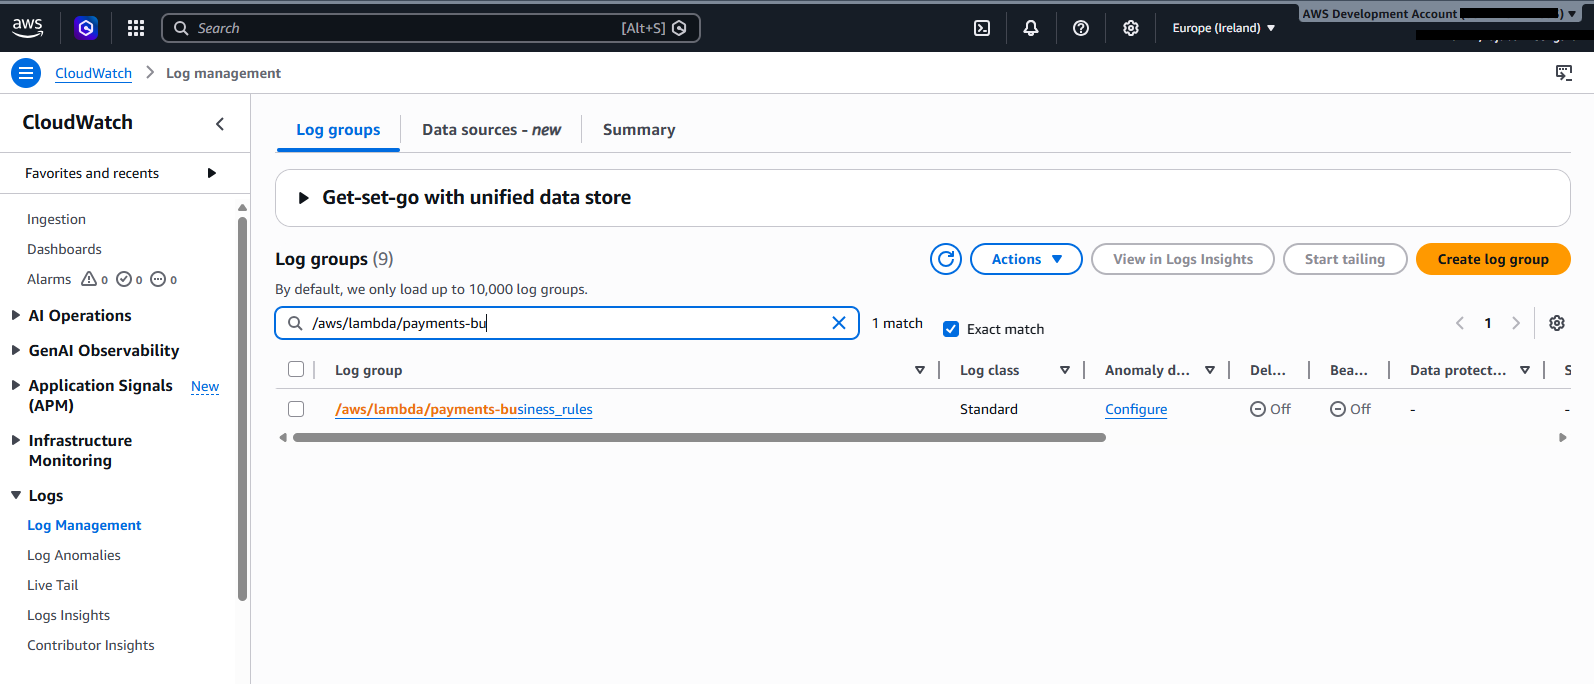
Search in CloudWatch Logs for the durable function log group

Figure 11: Search in CloudWatch

You see the complete business rules lifecycle for each transaction, as shown in Figure 12. The highlighted sections show all the business rules performed by the durable function. Each step is checkpointed by the runtime and encrypted by the customer managed key.
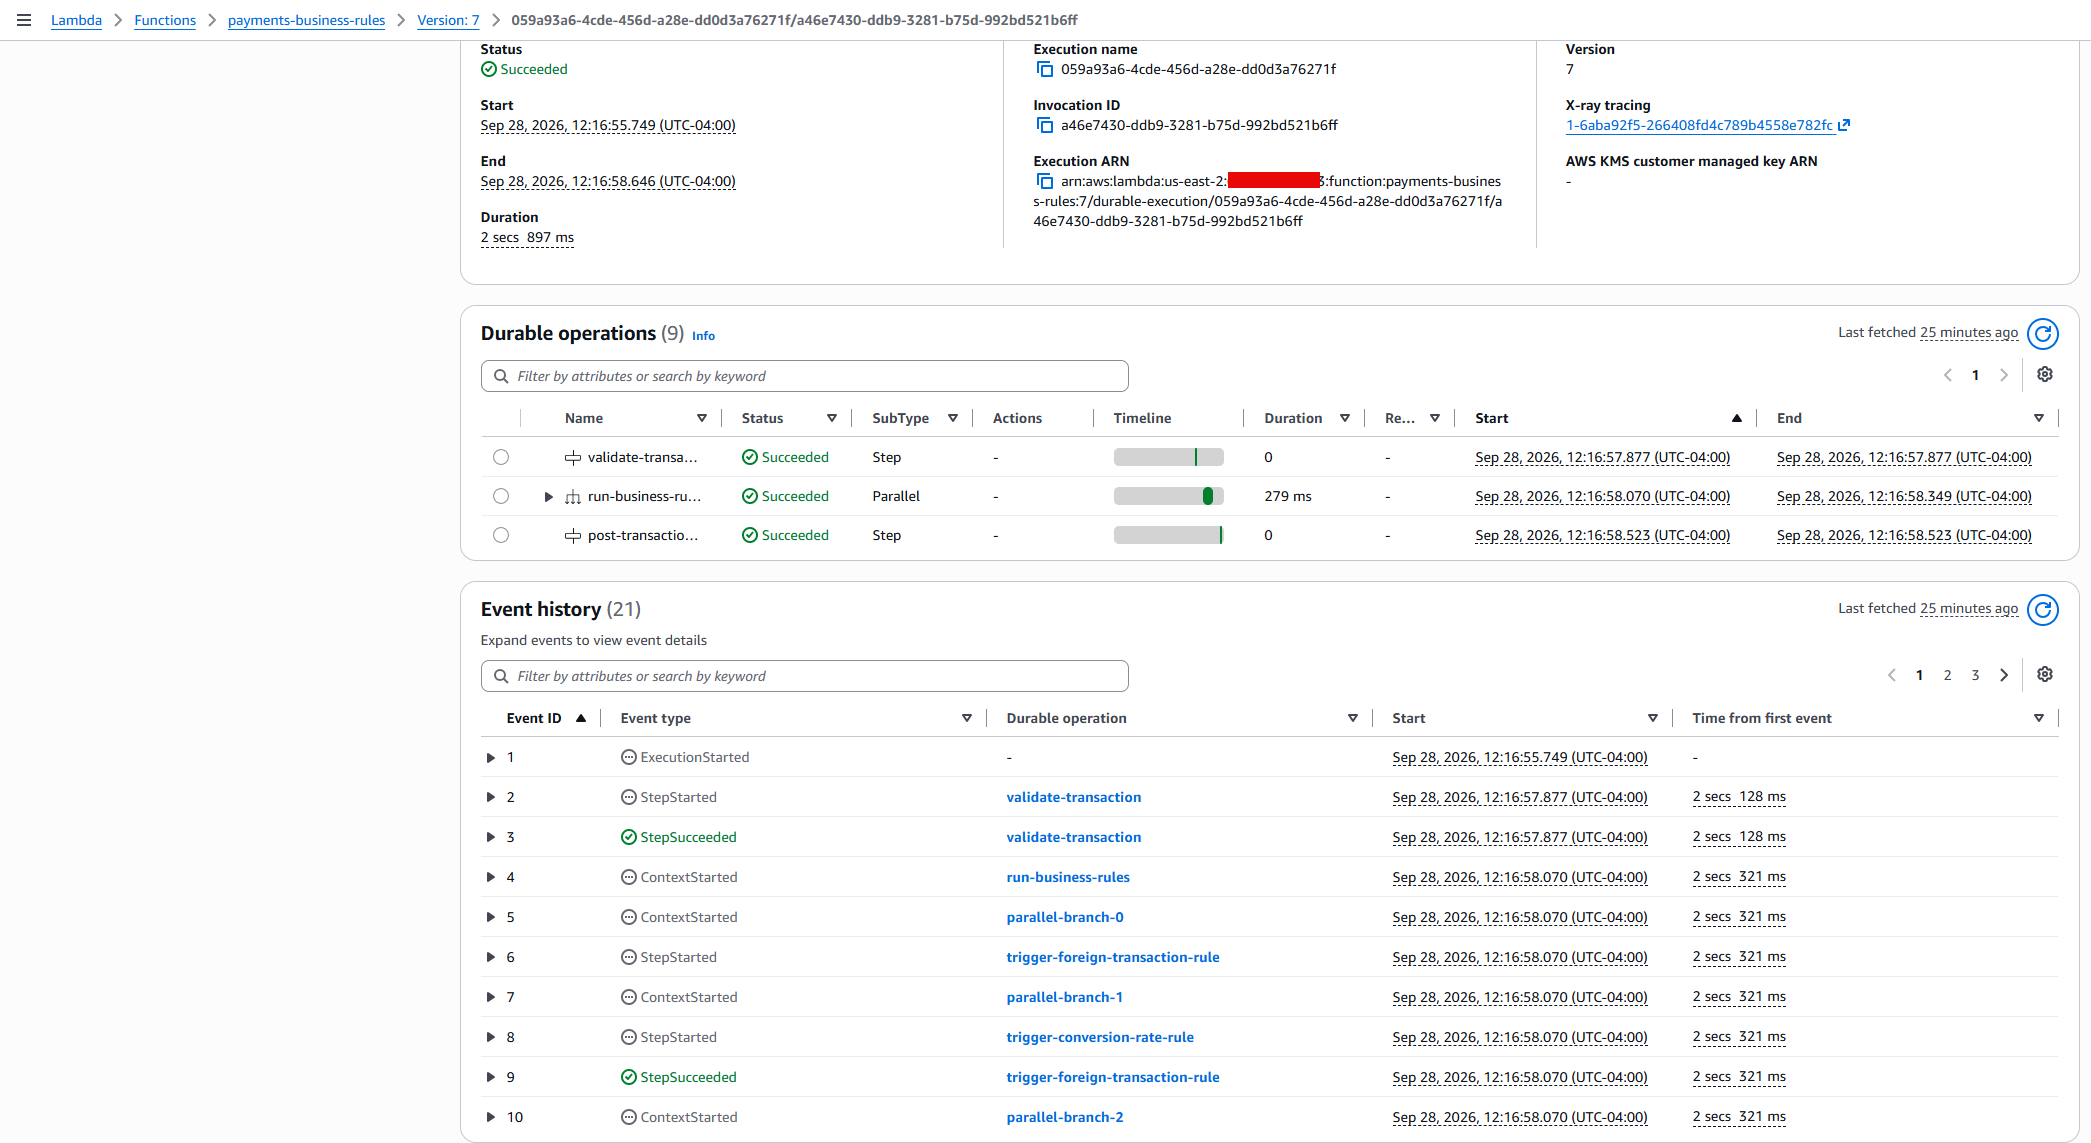
Search Results in lambda durable functions console

Figure 12: Search Results in lambda durable functions console

You can also check the other log groups to trace the full pipeline:

  • /aws/lambda/payments-enrich: Transaction enrichment logs.
  • /aws/lambda/payments-posting: Settlement posting logs.

Step 9: Verify the customer managed key configuration

You can verify the key configuration by using the AWS CLI:

aws lambda get-function-configuration \
    --function-name payments-business-rules \
    --query "DurableConfig" \
    --region us-east-2

Expected response:

{
    "KMSKeyArn": "arn:aws:kms:us-east-2:xxxxxxxxxxxx:key/4e87d4c2-1190-4db4-8b97-46657f83ee00",
    "RetentionPeriodInDays": 7,
    "ExecutionTimeout": 180
}

You can search in AWS CloudTrail to track the AWS KMS calls. When you configure or update the customer managed key on a durable function, Lambda validates the key policy with dry-run GenerateDataKey and Decrypt calls. These appear in CloudTrail with a DryRunOperationException error code, which confirms that the key policy permissions are correct and does not indicate an actual error. For more details, see Encrypting AWS Lambda durable execution data.

Clean up

To avoid ongoing charges, destroy all deployed resources using the following command:

terraform destroy -var="region=us-east-2" --auto-approve

Expected output:

Destroy complete! Resources: N destroyed.

Conclusion

In this post, you configured a customer managed key to encrypt durable execution data in a Lambda durable function. With a customer managed key, you control the key rotation schedule, restrict decryption access through the key policy, and generate per-function audit trails in AWS CloudTrail. You can revoke access to durable execution data at any time by updating the key policy, giving you full control over who can read execution state. In-flight executions stop at the next checkpoint call and new executions must be started after restoring access. For details, see When the customer managed key is unavailable.

For payment processors and financial institutions, encrypting durable execution data with a customer managed key satisfies compliance obligations for data-at-rest encryption, key governance, and access auditability across multi-step transaction workflows.

To get started, clone the sample repository and follow the preceding walkthrough. To learn more about Lambda durable functions, see the AWS Lambda Developer Guide.

Developing with Java and Spring Boot using Amazon CodeWhisperer

Post Syndicated from Rajdeep Banerjee original https://aws.amazon.com/blogs/devops/developing-with-java-and-spring-boot-using-amazon-codewhisperer/

Developers often have to work with multiple programming languages depending on the task at hand.  Sometimes, this is a result of choosing the right tool for a specific problem, or it is mandated by adhering to a specific technology adopted by a team.  Within a specific programming language, developers may have to work with frameworks, software libraries, and popular cloud services from providers such as Amazon Web Services (AWS). This must be done while adhering to secure and best programming practices.  Despite these challenges, developers must continue to release code at a sufficiently high velocity.    

 Amazon CodeWhisperer is a real-time, AI coding companion that provides code suggestions in your IDE code editor. Developers can simply write a comment that outlines a specific task in plain English, such as “method to upload a file to S3.” Based on this, CodeWhisperer automatically determines which cloud services and public libraries are best suited to accomplish the  task and recommends multiple code snippets directly in the IDE. The code is generated based on the context of your file, such as comments as well as surrounding source code and import statements. CodeWhisperer is available as part of the AWS Toolkit for Visual Studio Code and JetBrain family of IDEs.  CodeWhisperer is also available for AWS Cloud9, AWS Lambda console, JupyterLab, Amazon SageMaker Studio and AWS Glue Studio. CodeWhisperer supports popular programming languages like Java, Python, C#, TypeScript, GO, JavaScript, Rust, PHP, Kotlin, C, C++, Shell scripting, SQL, and Scala. 

 In this post, we will explore how to leverage CodeWhisperer in Java applications specifically using the Spring Boot framework. Spring Boot is an extension of the Spring framework that makes it easier to develop Java applications and microservices. Using CodeWhisperer, you will be spending less time creating boilerplate and repetitive code and more time focusing on business logic. You can generate entire Java Spring Boot functions and logical code blocks without having to search for code snippets from the web and customize them according to your requirements.  CodeWhisperer will enable you to responsibly use AI to create syntactically correct and secure Java Spring Boot applications. To enable CodeWhisperer in your IDE, please see Setting up CodeWhisperer for VS Code or Setting up Amazon CodeWhisperer for JetBrains depending on which IDE you are using.

 Note: Please note that CodeWhisperer uses artificial intelligence to provide code recommendations and this is non-deterministic. This code might differ from what you get from Amazon CodeWhisperer in your case.

Creating Data Transfer Objects (DTO)

Amazon CodeWhisperer makes it easier to develop the classes as you include import statements and provide brief comments on the purpose of the class.  Let’s start with the basics and develop a simple DTO or Plain Old Java Object (POJO).  This class will contain properties representing a product.  This DTO will be referenced later as part of a REST controller we generate to serialize the output to JSON.  CodeWhisperer will create a DTO class by using the class name and comments provided in plain language. Detailed and contextual comments will enable CodeWhisperer to generate code suggestions ranging from snippets to full functions in real time. For this use case, you are going to create a product class with id, name, price, description and rating properties.

 Type the following or similar comment in the class :

package com.amazonws.demo.cart.dto;

//create a Product class with id, name, price, description and rating properties. 

Quickly develop a Java class using Amazon Codewhisperer

After entering the comment and pressing ENTER, CodeWhisperer will start providing code suggestions. You can use the Tab key to accept a suggestion based on the context or use the left/right arrow keys to see more suggestions.  As shown below, the product class is auto generated with five properties id, name, price, rating and description with default getter/setter methods and two constructors. If you need more properties, you can either update the comment to include the new columns or manually create the columns in the file:

package com.amazonws.demo.cart.dto;

//create a Product class with id, name, price, description and rating properties. 

public class Product {
    private String id;
    private String name;
    private Double price;
    private String description;
    private Integer rating;
    
    public Product() {
    }
  
    public Product(String id, String name, Double price) {
      this.id = id;
      this.name = name;
      setPrice(this.price = price);
    }
  
    public String getId() {
      return id;
    }
  
    public void setId(String id) {
      this.id = id;
    }
  
    public String getName() {
      return name;
    }
  
    public void setName(String name) {
      this.name = name;
    }
  
    public Double getPrice() {
      return price;
    }
  
    public void setPrice(Double price) {
      this.price = price;
    }
    
    public String getDescription(){
      return description;
    }

    public void setDescription(String description){
      this.description = description;
    }

    public Integer getRating(){
      return rating;
    }
    
    public void setRating(Integer rating){
      this.rating = rating;
    }
}

Implementing Data Access Object  (DAO) pattern

Next, we implement the DAO pattern in this case for Amazon DynamoDB. The DAO pattern allows you to decouple the application/business layers from the persistence layer. It contains all the implementation logic for interacting with the persistence layer. We will create an entity class which represents the data to persist in DynamoDB along with the DAO class which contains the persistence logic.

 First, create a ProductDaoEntity class which maps to the Amazon DynamoDB table. Create a blank ProductDaoEntity class and import DynamoDB packages for annotations, attributes, and partition key, as shown below. Notice that the class has a comment about the class structure and use of the DynamoDB enhanced client, so that CodeWhisperer can provide meaningful suggestion. The enhanced client allows you to map client-side classes to DynamoDB tables.

package com.amazonws.demo.cart.dao.entity;

import software.amazon.awssdk.enhanced.dynamodb.mapper.annotations.DynamoDbAttribute;
import software.amazon.awssdk.enhanced.dynamodb.mapper.annotations.DynamoDbBean;
import software.amazon.awssdk.enhanced.dynamodb.mapper.annotations.DynamoDbPartitionKey;
import software.amazon.awssdk.enhanced.dynamodb.mapper.annotations.DynamoDbSortKey;

//create a dynamo db ProductDaoEntity class with partition Key as id, name, price, description, rating attributes using dynamo db enhanced mapper annotations

CodeWhisperer can now infer the comments, contexts, and import statements and start to generate the class implementation. You can accept or reject comments based on your requirements. Below, you can see the complete class generated by CodeWhisperer.

@DynamoDbBean
public class ProductDaoEntity {

    private String id;
    private String name;
    private double price;
    private String description;
    private int rating;
    
    public ProductDaoEntity() {
    }

    public ProductDaoEntity(String id, String name, double price, String description, int rating) {
        this.id = id;
        this.name = name;
        this.price = price;
        this.description = description;
        this.rating = rating;
    }

    @DynamoDbPartitionKey
    @DynamoDbAttribute("id")
    public String getId() {
        return id;
    }

    public void setId(String id) {
        this.id = id;
    }

    @DynamoDbSortKey
    @DynamoDbAttribute("name")
    public String getName() {
        return name;
    }

    public void setName(String name) {
        this.name = name;
    }

    @DynamoDbAttribute("price")
    public double getPrice() {
        return price;
    }

    public void setPrice(double price) {
        this.price = price;
    }

    @DynamoDbAttribute("description")
    public String getDescription() {
        return description;
    }

    public void setDescription(String description) {
        this.description = description;
    }

    @DynamoDbAttribute("rating")
    public int getRating() {
        return rating;
    }

    public void setRating(int rating) {
        this.rating = rating;
    }
    
    @Override
    public String toString() {
        return "ProductDaoEntity [id=" + id + ", name=" + name + ", price=" + price + ", description=" + description
                + ", rating=" + rating + "]";
    }

}

Notice how CodeWhisperer includes the appropriate DynamoDB related annotations such as @DynamoDbBean, @DynamoDbPartitionKey, @DynamoDbSortKey and @DynamoDbAttribute. This will be used to generate a TableSchema for mapping classes to tables.

 Now that you have the mapper methods completed, you can create the actual persistence logic that is specific to DynamoDB. Create a class named ProductDaoImpl. (Note: it’s a best practice for DAOImpl class to implement a DAO interface class.  We left that out for brevity.) Using the import statements and comments, CodeWhisperer can auto-generate most of the DynamoDB persistence logic for you. Create a ProductDaoImpl class which uses a DynamoDbEnhancedClient object as shown below.

package com.amazonws.demo.cart.dao;

import javax.annotation.PostConstruct;
import org.slf4j.Logger;
import org.slf4j.LoggerFactory;
import org.springframework.beans.factory.annotation.Autowired;
import org.springframework.stereotype.Component;

import com.amazonws.demo.cart.dao.Mapper.ProductMapper;
import com.amazonws.demo.cart.dao.entity.ProductDaoEntity;
import com.amazonws.demo.cart.dto.Product;

import software.amazon.awssdk.core.internal.waiters.ResponseOrException;
import software.amazon.awssdk.enhanced.dynamodb.DynamoDbEnhancedClient;
import software.amazon.awssdk.enhanced.dynamodb.DynamoDbTable;
import software.amazon.awssdk.enhanced.dynamodb.Key;
import software.amazon.awssdk.enhanced.dynamodb.TableSchema;


@Component
public class ProductDaoImpl{
    private static final Logger logger = LoggerFactory.getLogger(ProductDaoImpl.class);
    private static final String PRODUCT_TABLE_NAME = "Products";
    private final DynamoDbEnhancedClient enhancedClient;

    @Autowired
    public ProductDaoImpl(DynamoDbEnhancedClient enhancedClient){
        this.enhancedClient = enhancedClient;

    }

Rather than providing comments that describe the functionality of the entire class, you can provide comments for each specific method here. You will use CodeWhisperer to generate the implementation details for interacting with DynamoDB.  If the Products table doesn’t already exist, you will need to create it. Based on the comment, CodeWhisperer will generate a method to create a a Products table if one does not exist.  As you can see, you don’t have to memorize or search through the DynamoDB API documentation to implement this logic. CodeWhisperer will save you time and effort by giving contextualized suggestions.

//Create the DynamoDB table through enhancedClient object from ProductDaoEntity. If the table already exists, log the error.
    @PostConstruct
    public void createTable() {
        try {
            DynamoDbTable<ProductDaoEntity> productTable = enhancedClient.table(PRODUCT_TABLE_NAME, TableSchema.fromBean(ProductDaoEntity.class));
            productTable.createTable();
        } catch (Exception e) {
            logger.error("Error creating table: ", e);
        }
    }

Now, you can create the CRUD operations for the Product object. You can start with the createProduct operation to insert a new product entity to the DynamoDB table. Provide a comment about the purpose of the method along with relevant implementation details.

    // Create the createProduct() method 
    // Insert the ProductDaoEntity object into the DynamoDB table
    // Return the Product object

CodeWhisperer will start auto generating the Create operation as shown below. You can accept/reject the suggestions as needed. Or, you may select from alternate suggestion if available using the left/right arrow keys.

   // Create the createProduct() method
   // Insert the ProductDaoEntity object into the DynamoDB table
   // Return the Product object
    public ProductDaoEntity createProduct(ProductDaoEntity productDaoEntity) {
        DynamoDbTable<ProductDaoEntity> productTable = enhancedClient.table(PRODUCT_TABLE_NAME, TableSchema.fromBean(ProductDaoEntity.class));
        productTable.putItem(productDaoEntity);
        return product;
    }  

Similarly, you can generate a method to return a specific product by id. Provide a contextual comment, as shown below.

// Get a particular ProductDaoEntity object from the DynamoDB table using the
 // product id and return the Product object

Below is the auto-generated code. CodeWhisperer has correctly analyzed the comments and generated the method to get a Product by its id.

    //Get a particular ProductDaoEntity object from the DynamoDB table using the
    // product id and return the Product object
    
    public ProductDaoEntity getProduct(String productId) {
        DynamoDbTable<ProductDaoEntity> productTable = enhancedClient.table(PRODUCT_TABLE_NAME, TableSchema.fromBean(ProductDaoEntity.class));
        ProductDaoEntity productDaoEntity = productTable.getItem(Key.builder().partitionValue(productId).build());
        return productDaoEntity;
    }

Similarly, you can implement the DAO layer to delete and update products using DynamoDB table.

Creating a Service Object

Next, you will generate the ProductService class which retrieves the Product using ProductDAO.  In Spring Boot, a class annotated with @Service allows it to be detected through classpath scanning.

Let’s provide a comment to generate the ProductService class:

package com.amazonws.demo.cart.service;

import java.util.List;

import org.springframework.beans.factory.annotation.Autowired;
import org.springframework.stereotype.Service;

import com.amazonws.demo.cart.dto.Product;
import com.amazonws.demo.cart.dao.ProductDao;

//Create a class called ProductService with methods: getProductById(string id),
//getAllProducts(), updateProduct(Product product), 
//deleteProduct(string id), createProduct(Product product)

CodeWhisperer will create the following class implementation.  Note, you may have to adjust return types or method parameter types as needed.  Notice the @Service annotation for this class along with the productDao property being @Autowired.

@Service
public class ProductService {

   @Autowired
   ProductDao productDao;

   public Product getProductById(String id) {
      return productDao.getProductById(id);
   }

   public List<Product> getProducts() {
      return productDao.getAllProducts();
   }

   public void updateProduct(Product product) {
      productDao.updateProduct(product);
   }

   public void deleteProduct(String id) {
      productDao.deleteProduct(id);
   }

   public void createProduct(Product product) {
      productDao.createProduct(product);
   }

}

Creating a REST Controller

The REST controller typically handles incoming client HTTP requests and responses and its output is typically serialized into JSON or XML formats.  Using annotations, Spring Boot maps the HTTPS methods such as GET, PUT, POST, and DELETE to appropriate methods within the controller.  It also binds the HTTP request data to parameters defined within the controller methods.

Provide a comment as shown below specifying that the class is a REST controller that should support CORS along with the required methods.

package com.amazonws.demo.product.controller;

import java.util.List;

import org.springframework.beans.factory.annotation.Autowired;
import org.springframework.web.bind.annotation.CrossOrigin;
import org.springframework.web.bind.annotation.DeleteMapping;
import org.springframework.web.bind.annotation.GetMapping;
import org.springframework.web.bind.annotation.PathVariable;
import org.springframework.web.bind.annotation.PostMapping;
import org.springframework.web.bind.annotation.PutMapping;
import org.springframework.web.bind.annotation.RequestBody;
import org.springframework.web.bind.annotation.RequestMapping;
import org.springframework.web.bind.annotation.RestController;

import com.amazonws.demo.product.dto.Product;
import com.amazonws.demo.product.service.ProductService;

//create a RestController called ProductController to get all
//products, get a product by id, create a product, update a product,
//and delete a product. support cross origin requests from all origins.
 

Notice how the appropriate annotations are added to support CORS along with the mapping annotations that correspond with the GET, PUT, POST and DELETE HTTP methods. The @RestController annotation is used to specify that this controller returns an object serialized as XML or JSON rather than a view.

@RestController
@RequestMapping("/product")
@CrossOrigin(origins = "*")
public class ProductController {

    @Autowired
    private ProductService productService;
    
    @GetMapping("/getAllProducts")
    public List<Product> getAllProducts() {
        return productService.getAllProducts();
    }

    @GetMapping("/getProductById/{id}")
    public Product getProductById(@PathVariable String id) {
        return productService.getProductById(id);
    }

    @PostMapping("/createProduct")
    public Product createProduct(@RequestBody Product product) {
        return productService.createProduct(product);
    }

    @PutMapping("/updateProduct")
    public Product updateProduct(@RequestBody Product product) {
        return productService.updateProduct(product);
    }

    @DeleteMapping("/deleteProduct/{id}")
    public void deleteProduct(@PathVariable String id) {
        productService.deleteProduct(id);
    }

}

Conclusion

In this post, you have used CodeWhisperer to generate DTOs, controllers, service objects, and persistence classes. By inferring your natural language comments, CodeWhisperer will provide contextual code snippets to accelerate your development.  In addition, CodeWhisperer has additional features like reference tracker that detects whether a code suggestion might resemble open-source training data and can flag such suggestions with the open-source project’s repository URL, file reference, and license information for your review before deciding whether to incorporate the suggested code.

Try out Amazon CodeWhisperer today to get a head start on your coding projects.

Rajdeep Banerjee

Rajdeep Banerjee

Rajdeep Banerjee is a Senior Partner Solutions Architect at AWS helping strategic partners and clients in the AWS cloud migration and digital transformation journey. Rajdeep focuses on working with partners to provide technical guidance on AWS, collaborate with them to understand their technical requirements, and designing solutions to meet their specific needs. He is a member of Serverless technical field community.Rajdeep is based out of Richmond,Virginia.

Jason Varghese

Jason Varghese

Jason is a Senior Solutions Architect at AWS guiding enterprise customers on their cloud migration and modernization journeys. He has served in multiple engineering leadership roles and has over 20 years of experience architecting, designing and building scalable software solutions. Jason holds a bachelor’s degree in computer engineering from the University of Oklahoma and an MBA from the University of Central Oklahoma.