All posts by Ritik Khatwani

Analyze and remediate technical debt autonomously with AWS Transform – continuous modernization

Post Syndicated from Ritik Khatwani original https://aws.amazon.com/blogs/devops/analyze-and-remediate-technical-debt-autonomously-with-aws-transform-continuous-modernization/

Introduction

In a recent post, my colleague Micah Walter introduced AWS Transform – continuous modernization in public preview. Today, this capability is generally available in regions supported for AWS Transform .

Development velocity continues to increase. But velocity without maintenance accumulates technical debt at speed. The faster software scales, the faster technical debt compounds. At the same time, more sophisticated exploits and attack vectors are emerging – and the risk is increasing (Figure 1). For organizations, this makes staying on top of tech debt and maintaining a strong security posture across an increasing sphere of responsibility not only important, but business-critical.
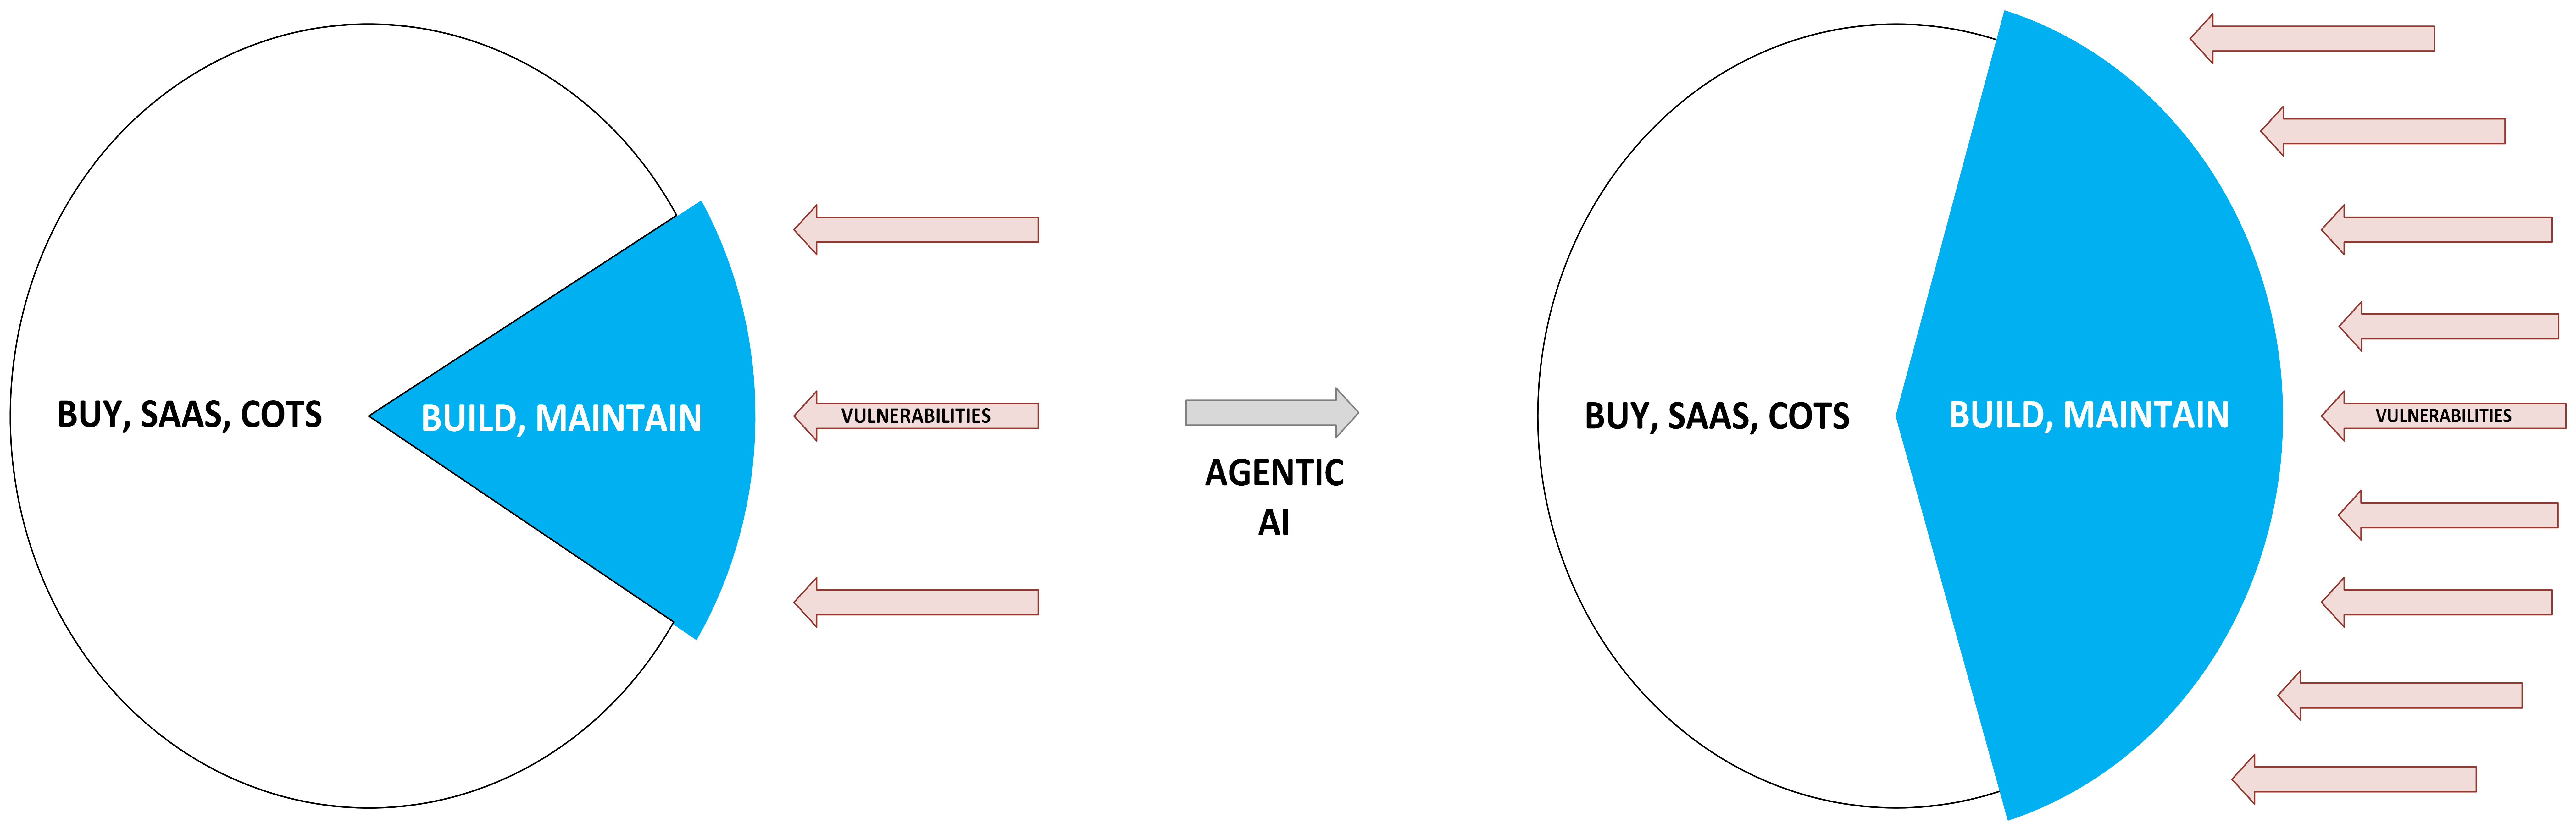
Two pie-circle diagrams connected by an arrow labeled "AGENTIC AI." In the left circle, most of the area is labeled "BUY, SAAS, COTS" while a small blue wedge labeled "BUILD, MAINTAIN" faces three arrows labeled "VULNERABILITIES." In the right circle, the blue "BUILD, MAINTAIN" section has grown to roughly half the circle and faces many more vulnerability arrows, illustrating how agentic AI expands the amount of code organizations build and maintain — and the corresponding vulnerability surface.

Figure 1: Changing landscape of software maintenance

To contend with compounding technical debt, engineering organizations have typically stitched together point tools, spent app-by-app cycles wasting engineering capacity, and relied on self-reports for status that lags reality and hides regressions.

This is the problem continuous modernization capability was built to solve: shift code transformation from a periodic project into an automated, always-on practice. Rather than scheduling modernization sprints or relying on manual audits, your repositories are analyzed on demand or on a recurring schedule, with findings prioritized by severity and impact, and validated pull requests are generated autonomously to resolve them.

In this post, I’ll recap the preview launch and then I’ll walk you through additional capabilities we’ve added since. I’ll also show how you can use it today to get started.

What continuous modernization provides

AWS Transform – continuous modernization connects to your source control systems (GitHub, GitLab, Bitbucket, or local repositories), scans repositories, and generates prioritized findings. At your direction, it autonomously creates pull requests with validated code changes.

The capability supports several analysis types:

  • Rapid tech debt analysis: fast metadata-only scans of package manifests (pom.xml, package.json, requirements.txt) to identify stale versions and outdated dependencies
  • Comprehensive tech debt analysis: deep code-level analysis examining source code for debt patterns, code quality issues, architecture concerns, and improvement opportunities
  • Security analysis: Common vulnerability detection within the source code and dependencies via AWS Security Agent (now part of AWS Continuum)
  • Agentic readiness: assesses your code base readiness for agent integration
  • Modernization readiness: evaluates candidates for containerization, serverless migration, and platform upgrades
  • Custom analysis: run your own transformation definition as an analysis, including organization-specific policies your platform team already enforces

You can run these analyses on demand or schedule them on a recurring cadence. The system accumulates findings over time, giving you trend data and portfolio-wide visibility that periodic manual audits can’t match.

Initiate and schedule recurring analysis from the AWS Transform web app

We’re excited to add the ability to connect your source code management (SCM) provider and initiate an analysis directly from the AWS Transform web application so you can get value from real insights faster than before (Figure 2). You can also schedule recurring analysis, review findings, and create remediations from within the web app. To learn more about the web app and how to set it up, see AWS Transform web application.
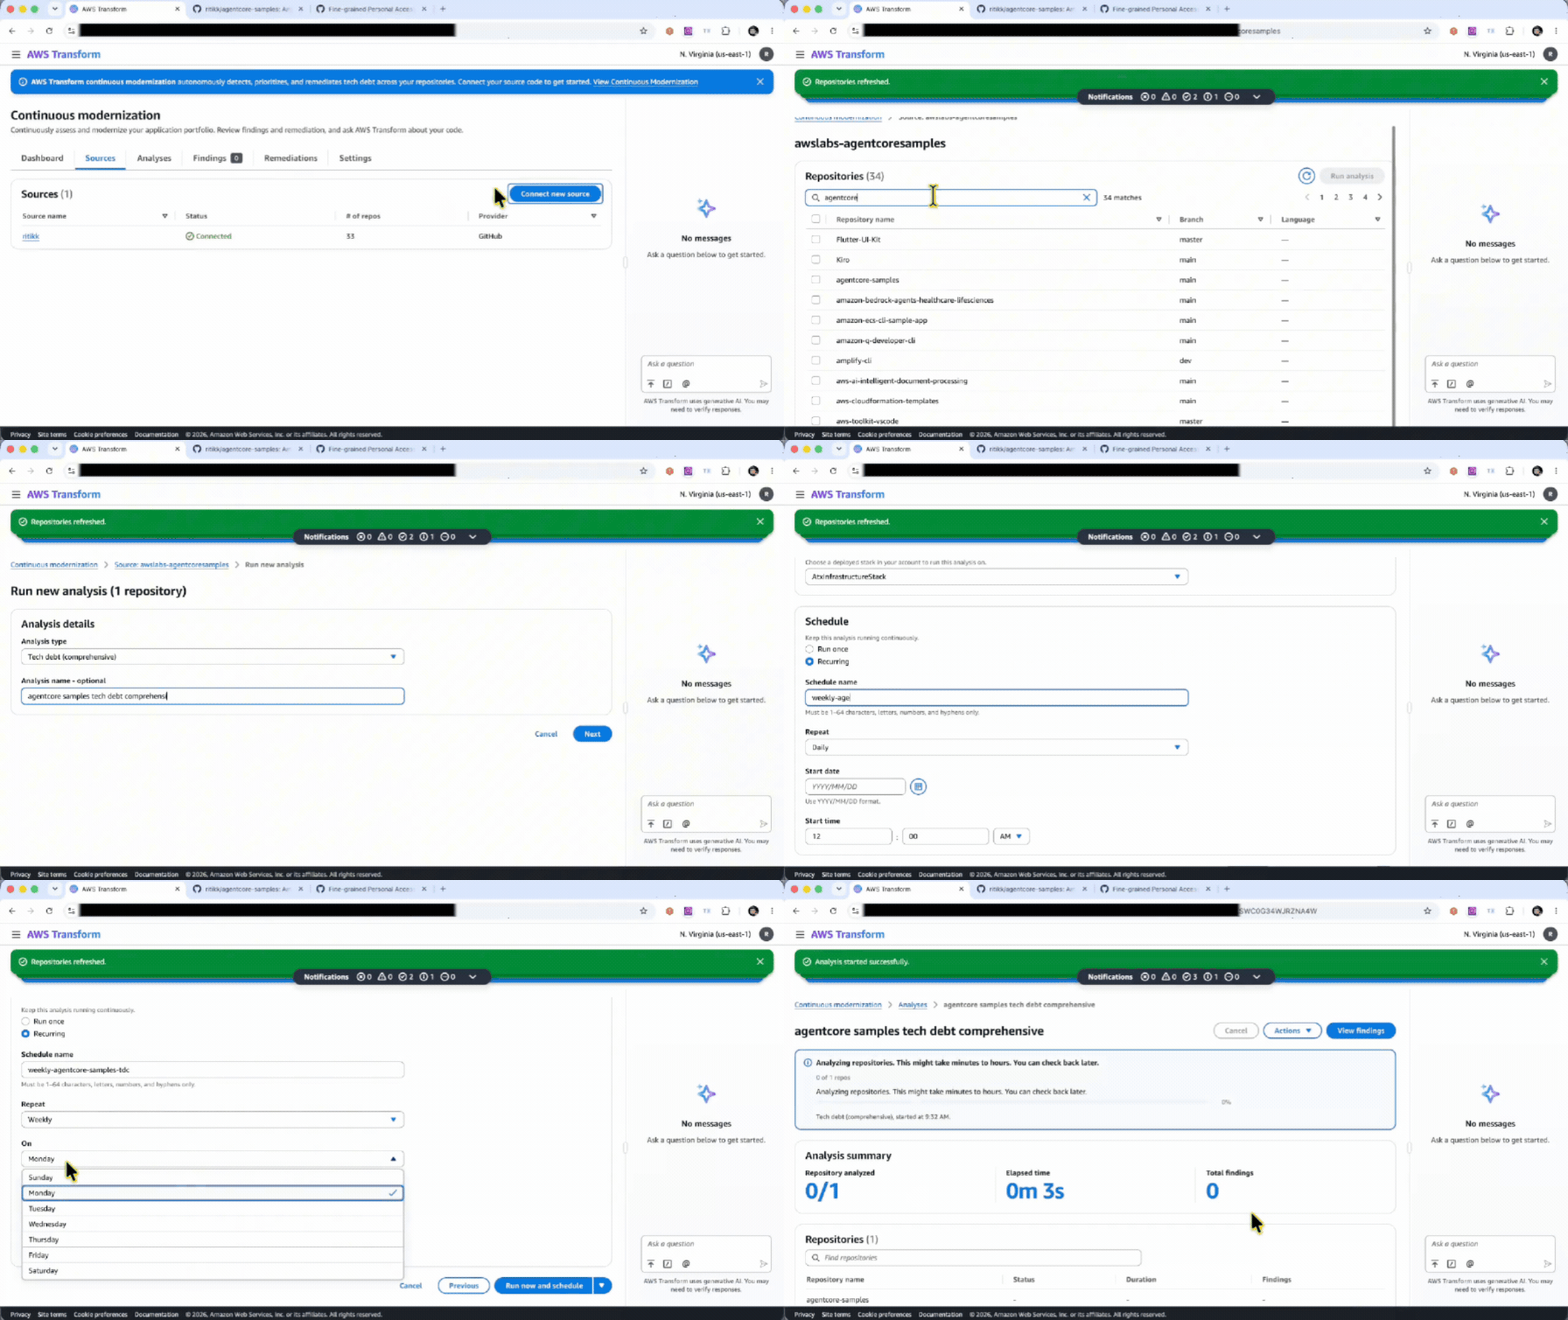
Screen recording of the AWS Transform Continuous Modernization console (N. Virginia region). A "Connect new source" dialog is filled in with GitHub as the provider, then repositories refresh and "agentcore-samples" is selected from the awslabs-agentcoresamples source. A new analysis is configured with type "Tech debt (comprehensive)" and named "agentcore samples tech debt comprehensive." In the Schedule step, "Recurring" is chosen with a weekly cadence on Mondays, a start date of 2026/07/28, and a start time, ending with the "Run now and schedule" button.

Figure 2: Set up continuous modernization in the AWS Transform web application

Interact via your IDE or terminal with the new CLI and developer tools

The new version of the AWS Transform CLI and it’s atx ct(v3.8.0) introduce additional capabilities that simplify how you setup and work with continuous modernization. The new atx ct remote sub-commands allow you to provision infrastructure and run scheduled analyses and remediations with Amazon Elastic Compute Cloud (Amazon EC2) and AWS Batch (Figure 3). To learn more about the CLI commands, refer to working with continuous modernization. The updated AWS Transform Kiro power and plugin make it even easier to configure your source repositories and run analyses directly from your IDE or terminal. To learn more, see developer tools.

You can also leverage labels with your repositories to group them and organize operations in batches. In the example below, I create a subset of repositories from my GitHub organization that I want to run agentic readiness analysis on and trigger a one-time analysis.
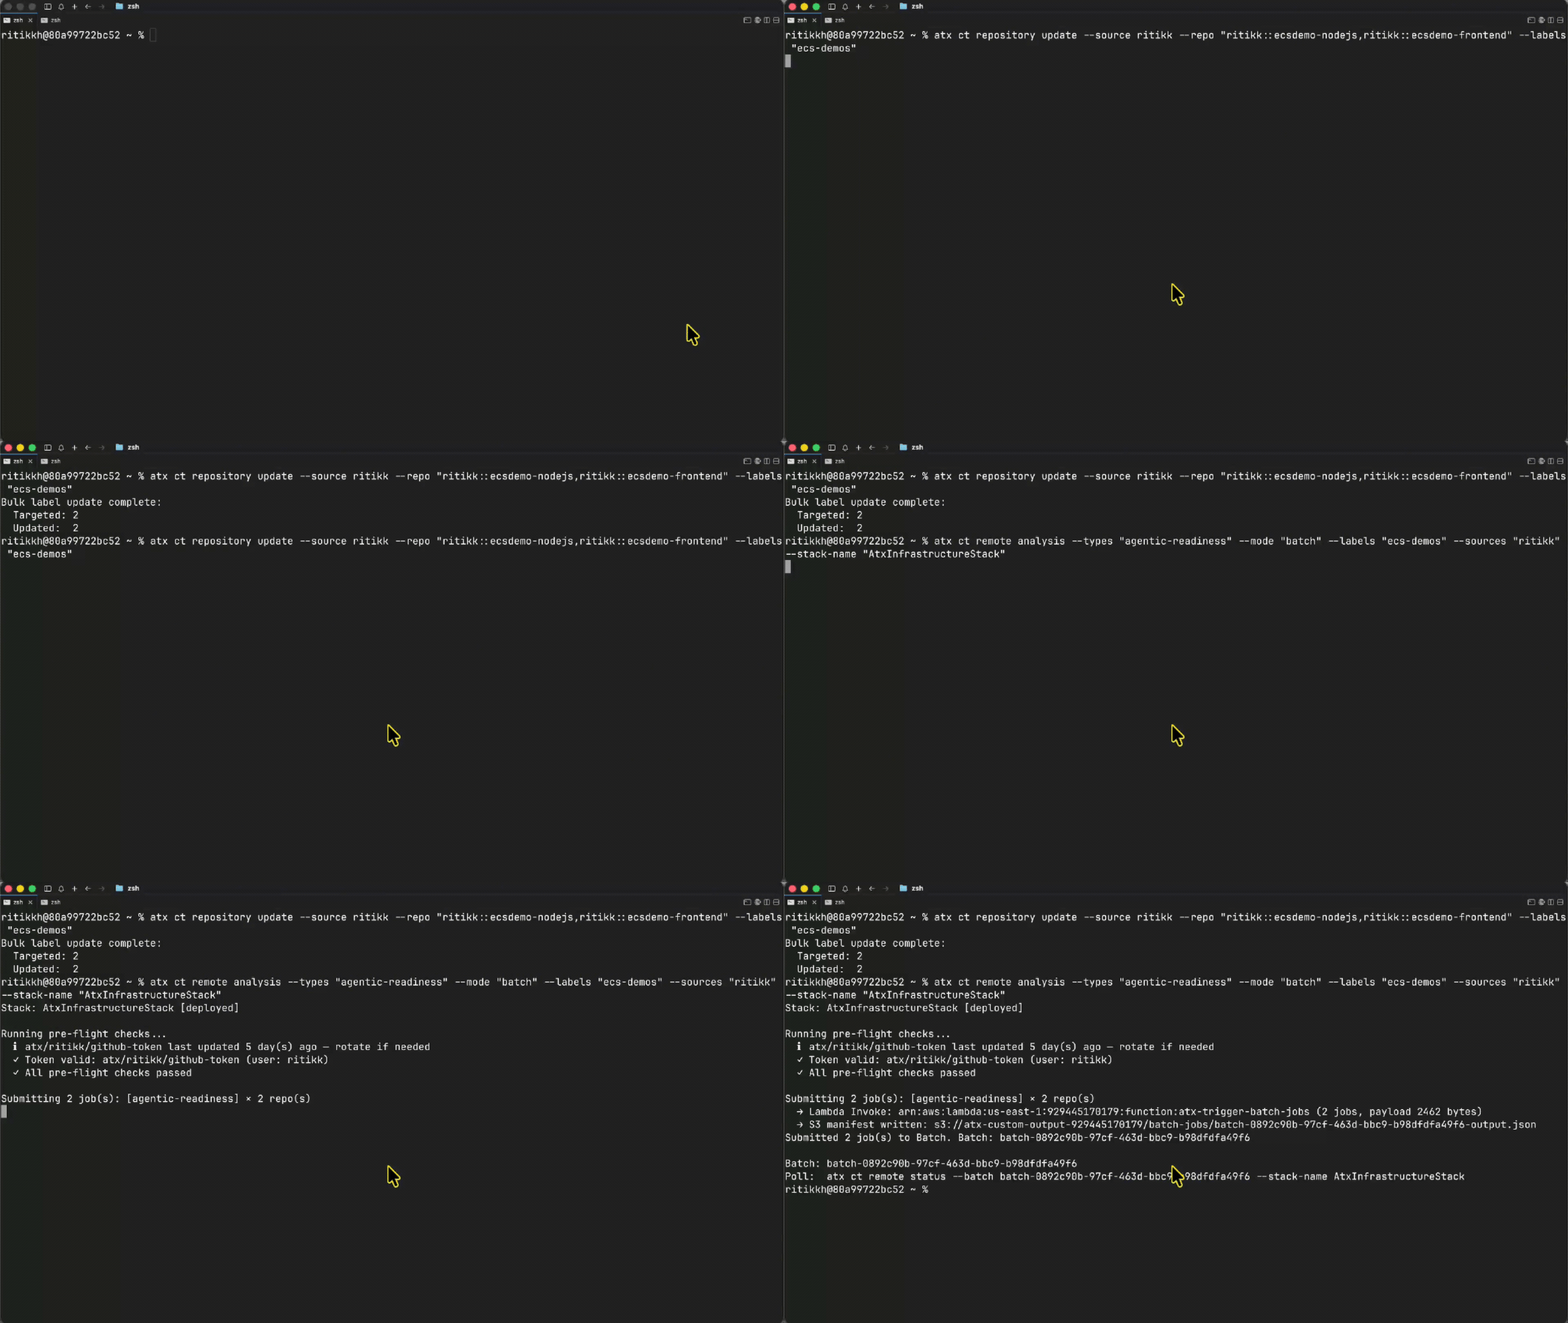
Screen recording of a macOS zsh terminal running AWS Transform CLI commands. First, atx ct repository update tags two repositories (ritikk::ecsdemo-nodejs and ritikk::ecsdemo-frontend) with the label "ecs-demos"; the output confirms "Bulk label update complete: Targeted 2, Updated 2." Then atx ct remote analysis --types "agentic-readiness" --mode "batch" --labels "ecs-demos" --sources "ritikk" --stack-name "AtxInfrastructureStack" kicks off a batch analysis. Pre-flight checks pass, a Lambda function is invoked, an S3 manifest is written, and two jobs are submitted to Batch with a batch ID and a poll command shown to check status.

Figure 3: Use the AWS Transform cli to analyze your repositories

Real-world results

Across industries, partners and enterprises are already seeing the impact of continuous modernization. The results speak to a consistent theme: what used to take months of manual effort now happens in minutes, at a scale that was previously impractical with manual review.

From weeks of manual assessment to insights in days

Quantiphi ran continuous modernization across a large portfolio and compressed a multi-week assessment into a matter of days:

“At Quantiphi, we’re helping enterprises accelerate application modernization through AI-powered engineering. Using AWS Transform continuous modernization, we analyzed more than 500 repositories and uncovered over 3,000 technical debt findings in less than a week, a time frame that traditionally required nearly three weeks of manual assessment. By automating technical debt discovery and providing actionable remediation insights, we reduced assessment effort by more than 60%, accelerated modernization planning, and enabled our customers to focus engineering investments on innovation instead of analysis. We believe AWS Transform continuous modernization is a foundational capability for delivering continuous, AI-driven enterprise modernization at scale.”

Sanchit Jain, Migration and Modernization Practice Leader, Quantiphi AWS Practice

Shifting from reactive maintenance to proactive modernization

For Hexaware, the value is in continuously surfacing what needs attention across large portfolios, so teams can get ahead of debt rather than react to it:

“At Hexaware, we’re constantly looking for ways to help clients modernize faster while controlling cost and complexity. AWS Transform continuous modernization provides a scalable approach to identifying technical debt, modernization opportunities, and AI-readiness gaps across large application portfolios. By automating analysis and continuously surfacing remediation recommendations, organizations can shift from reactive maintenance to proactive modernization. This capability has the potential to significantly accelerate transformation roadmaps and help enterprises build more resilient, future-ready applications, very quickly.”

Inderjeet Gurtatta, Vice President, Hexaware Technologies

An 80 percent reduction in assessment time

Tech Mahindra measured the impact directly, cutting assessment time from 40 hours to 8 across 25 repositories:

“Achieving an 80 percent reduction in assessment time, from 40 hours down to 8, across 25 enterprise repositories is just the beginning of what we see as a transformative shift in how organizations approach continuous modernization. AWS Transform’s scanning and analysis engine is solid, and the structured output allows our teams to validate findings quickly and build prioritized remediation plans with confidence. As the platform matures with features like scan resume capabilities and broader platform support, we expect to embed AWS Transform continuous modernization into our standard delivery methodology while maintaining the depth and accuracy our enterprise clients demand.”

Sanjeev Agarwal, Global Head of AWS Business, Tech Mahindra

Uncovering risks that traditional scanners miss

Cybage found that the continuous modernization capability surfaced hidden security risks that conventional scans overlooked, then fed those findings into their own delivery framework:

“AWS Transform continuous modernization completes codebase analysis in under an hour, work which normally takes weeks, while uncovering risks that traditional scanners miss like disabled security warnings, vulnerable code copied into applications, and security controls intentionally switched off. Cybage’s CLEAR Framework builds on these findings by converting them into a prioritized, customer-specific modernization plan with confidence scoring, technical-debt measurement, and integration with tools like GitHub, Jira, and SonarQube. Together, AWS Transform discovers hidden risks at speed, and CLEAR determines what matters most and how teams move from analysis to execution.”

Mohammad Mahdee-uz Zaman, Vice President, AWS Strategic Alliances, Cybage Software Inc.

Straight from discovery to a concrete migration plan

3Pillar moved directly from discovery to an actionable migration plan:

“For most IT leaders, application modernization is the bane of their existence. We put AWS Transform continuous modernization to the test across more than 25 repos, and came away very impressed. Analysis that would have taken our engineers an estimated 3-4 weeks of manual code reviews surfaced in an hour, uncovering over 190 tech debt findings, including outdated dependencies, dead code, and migration risks. The service’s ability to build migration rules purpose-built for each repo let us move straight from discovery to a concrete migration plan, without weeks of manual mapping. Based on our testing, we estimate AWS Transform continuous modernization can cut 40-50% off the overall modernization lifecycle. This speed means tech leaders can embark on modernization initiatives with confidence that it won’t drag on for many years.”

Pankaj Chawla, CTO, 3Pillar

Conclusion

AWS Transform – continuous modernization helps you go from one-off projects and campaigns to a fully operational tech debt management program: connecting sources, running analyses, triaging findings, launching remediation campaigns, and scheduling recurring scans. The web app dashboard and reports provide prioritization signals directly from your code. When a repository diverges from your baseline, the next analysis can surface the change and help teams understand its severity and breadth. This reduces reliance on manual status collection and periodic code-health audits.

To get started, you can access the capability through the AWS Transform Kiro power, the AWS Transform web application, or directly via the atx ct CLI. To learn more, visit the AWS Transform documentation.

Ritik Khatwani

Ritik Khatwani

Ritik is a Sr Worldwide Specialist Solutions Architect at AWS based in New York City. He has deep expertise in software engineering and currently works with customers to modernize their development workflows using generative AI.

Use Model Context Protocol with Amazon Q Developer for context-aware IDE workflows

Post Syndicated from Ritik Khatwani original https://aws.amazon.com/blogs/devops/use-model-context-protocol-with-amazon-q-developer-for-context-aware-ide-workflows/

Earlier today, Amazon Q Developer announced Model Context Protocol (MCP) support in their Integrated Development Environment (IDE) plugins for Visual Studio Code and JetBrains. This allows developers to connect external tools or MCP servers to Q Developer, enabling more context-aware responses and complex workflows. MCP support has already been available in Amazon Q Developer for Command Line since April 29, 2025.

Introduction

Q Developer already had the ability to use tools within the IDE such as executing shell commands, reading local files, and generating code with the addition of the agentic coding experience. Now, developers have the ability to add additional tools that support MCP to their toolkit. MCP is an open protocol that standardizes how Large Language Models (LLMs) integrate with applications. It provides a way to share context, access data sources, and interact with APIs. You can read more about MCP in this introduction.

This ability to add additional context and tools allows Q Developer to write more accurate code, integrate with your planning tools, create UI components from designs, generate database documentation by examining your actual schema, and execute complex multi-tool tasks – all without the need for custom integration code. I’m excited to see this functionality coming to Q Developer IDE plugins, enhancing the development process right where developers spend most of their time.

In this post, I’ll walk you through a common scenario where I, as a developer, am tasked with working on an issue defined in a project management tool like Jira. The issue contains a user story, acceptance criteria, a link to a Figma design of the user interface, and additional technical implementation notes. To accomplish this efficiently, I’ll demonstrate how Q Developer can streamline the entire process by using two separate MCP servers to interact with Jira and Figma independently. Rather than manually switching between browser tabs, copying information, and trying to keep track of requirements across multiple tools, I’ll show how Q Developer can automatically fetch details using MCP and help me implement the feature while maintaining context across both platforms as shown in the figure below.

Q Developer extension in Visual Studio Code interacting with external tools using MCP servers

Figure 1: Q Developer extension in Visual Studio Code interacting with external tools using MCP servers

Configuring MCP Servers

To begin setup, click on the Configure MCP servers button at the top of the Chat tab bar as shown in the image below. This will bring up the list of MCP servers currently configured. Click the + (Add new MCP) button to add a new server.

Add MCP server configuration in Visual Studio Code’s Q Developer extension

Figure 2: Add MCP server configuration in Visual Studio Code’s Q Developer extension

You will set the scope of your MCP servers during configuration. A Global scope allows you to use the MCP server across all your projects, whereas a Workspace scope sets it up for only the current IDE workspace. Here’s an example configuration for the Atlassian and Figma MCPs I’ll be using:

Atlassian
Scope: This workspace
Name: Atlassian
Transport: stdio
Command: npx
Arguments:
-y
mcp-remote
https://mcp.atlassian.com/v1/sse
Figma
Scope: This workspace
Name: Figma
Transport: stdio
Command: npx
Arguments:
-y
mcp-remote
http://127.0.0.1:3845/sse

Note: The first time you set up the Atlassian MCP server, you’ll be asked to complete the OAuth authentication flow in your browser and provide access permissions to your Jira projects. Similarly, to connect to the Figma Dev Mode MCP server, you’ll need to enable it via the Figma desktop app.

Q Developer’s MCP management window showing configured Figma and Atlassian MCPs servers

Figure 3: Q Developer’s MCP management window showing configured Figma and Atlassian MCPs servers

To understand an MCP server’s individual tools, click on the expand icon next to its name as shown in the image below. Tools are executable functions exposed by the MCP server. They enable Q Developer’s agentic chat to perform actions and interact with external systems on your behalf. You can also configure permissions for individual tools. Each tool presents the option to Ask, Always allow, or Deny it such that Q Developer can’t invoke it. In my example, I’ll set all tools that only read data to Always allow for my workspace and set the rest of the tools to Ask.

MCP tool descriptions and configuration dropdown with options to Ask, Always allow or Deny

Figure 4: MCP tool descriptions and configuration dropdown with options to Ask, Always allow or Deny

With the MCP servers configured, let’s see how I can integrate them into my workflow.

Walkthrough

Q Developer is now enriched with additional information and tools available via the configured MCP servers. To demonstrate how this accelerates my developer productivity, I’ll be working with the Q Words game.

Scenario

Q-Words is an interactive word guessing game used in our customers’ workshops to demonstrate Q Developer’s capabilities. I’ve been tasked by the Product Manager to add a dark mode to the game. The User Story is logged in Jira and links to a Figma design that our designers have prepared.

Jira ticket showing user story and acceptance criteria for adding dark mode to a Q-Words game application

Figure 5: Jira ticket showing user story and acceptance criteria for adding dark mode to a Q-Words game application

Figma design showing dark and light mode interfaces for a QWords game application

Figure 6: Figma design showing dark and light mode interfaces for a QWords game application

Integrating MCPs into your development workflow

Let’s begin by asking Q Developer to check on tasks assigned to me in Jira by typing the following prompt in the agentic chat:

List issues that I need to work on

Q Developer will understand your intent and interact with your Atlassian MCP server to filter and show Jira issues that are assigned to you and in the To Do state. You can optionally prompt Q Developer to use a particular MCP server. Just as with any prompt, providing clear instructions will yield better results. In the image below, Q Developer retrieves details for the issue I’m assigned to work on.

Q Developer retrieves and describes issues assigned to me in Jira using the Atlassian MCP server

Figure 7: Q Developer retrieves and describes issues assigned to me in Jira using the Atlassian MCP server

Let’s begin work on the issue with the following prompt:

Move issue CRM-9 to In Progress and checkout a new git branch named after the issue id to begin working on it

Prompt Q Developer to begin working on an assigned issue

Figure 8: Prompt Q Developer to begin working on an assigned issue

Next, I’d like to understand the impact of the design changes on the current application. I can use the following prompt to accomplish this:

Analyze the Jira User Story and linked Figma design. Give me a technical implementation plan explaining the UI components that will need to be modified in the existing code.

Prompt Q Developer to help you analyze changes in existing code to implement the new UI

Figure 9: Prompt Q Developer to help you analyze changes in existing code to implement the new UI

Q Developer automatically pulls in issue details from Jira, along with the design specifics like colors from Figma. Before MCP, I would have had to add those details directly into the prompt or provided them as context from a local file. Now, my prompt only includes the description of the task whereas the context is enriched with details from the MCP servers. Review the proposed plan and suggest edits if needed. Once satisfied, prompt Q Developer to begin working on the changes:

Implement the plan

The diff view of changes by Q Developer to implement a dark mode feature in HTML and CSS

Figure 10: The diff view of changes by Q Developer to implement a dark mode feature in HTML and CSS

After reviewing the diff of the files changed by Q Developer, I can verify that the new Dark Mode feature has been implemented as desired. Let’s test the changes and ensure all acceptance criteria is met. To run the application, I use the following prompt:

Run the application locally

Q Developer will ask permission and run commands to spin up the local web server. I can then test the changes in my browser.

Updated application with dark mode toggle button implemented by Q Developer using MCP

Figure 11: Updated application with dark mode toggle button implemented by Q Developer using MCP

After a bit of testing, I can confirm that we’ve met all the acceptance criteria for the story. Let’s update the rest of the team on what we’ve accomplished with the following prompt:

Update the Jira issue status to Done and add a comment summarizing the changes made.

This convenient integration between Q Developer and Jira via MCP, saves me the back and forth between different tools to document the work accomplished.

A Jira ticket comment detailing the completed implementation of dark mode features, including theme toggle, CSS variables, and UI components

Figure 12: A Jira ticket comment detailing the completed implementation of dark mode features, including theme toggle, CSS variables, and UI components

Conclusion

The addition of MCP support in Amazon Q Developer for the IDE provides a standardized way to share context and interact with additional tools. In this post, I’ve demonstrated how I can use Q Developer in the IDE to interact with Atlassian Jira for task management and Figma for UI updates. I was able to do this without explicitly including user story details in my prompts or separately downloading design assets from UI mockups. Instead, Q Developer could automatically access user story context and easily integrate design assets using tools exposed by MCP servers. I encourage you to explore the new MCP capabilities and also check out the AWS MCP Servers repository on GitHub. Refer MCP configuration for Q Developer in the IDE to learn more.

To learn more about Amazon Q Developer’s features and pricing details, visit the Amazon Q Developer product page.

About the Author

Ritik Khatwani

Ritik Khatwani

Ritik is a Generative AI Specialist Solutions Architect at AWS based in New York City. He has deep expertise in building products as an engineer, architect, and founder. At AWS, he previously advised startups on how to build and grow in the cloud and now works with developers to reimagine their software development lifecycle using Amazon Q Developer.