Post Syndicated from Siddhesh Keluskar original https://aws.amazon.com/blogs/architecture/field-notes-deliver-messages-using-an-iot-rule-action-to-amazon-managed-streaming-for-apache-kafka/
With IoT devices scaling up rapidly, real-time data integration and data processing has become a major challenge. This is why customers often choose Message Queuing Telemetry Transport (MQTT) for message ingestion, and Apache Kafka to build a real-time streaming data pipeline. AWS IoT Core now supports a new IoT rule action to deliver messages from your devices directly to your Amazon MSK or self-managed Apache Kafka clusters for data analysis and visualization, without you having to write a single line of code.
In this post, you learn how to set up a real-time streaming data pipeline for IoT data using AWS IoT Core rule and Amazon Managed Streaming for Apache Kafka. The audience for this post is architects and developers creating solutions to ingest sensor data, and high-volume high-frequency streaming data, and process it using a Kafka cluster. Also, this blog describes the SASL_SSL (using user name and password) method to access your Kafka cluster.
Overview of solution
Figure 1 represents an IoT data ingestion pipeline where multiple IoT devices connect to AWS IoT Core. These devices can send messages to AWS IoT Core over MQTT or HTTPS protocol. AWS IoT Core rule for Kafka is configured to intercept messages from the desired topic and route them to the Apache Kafka cluster. These messages can then be received by multiple consumers connected to the Kafka cluster. In this post, we will use AWS Python SDK to represent IoT devices and publish messages.
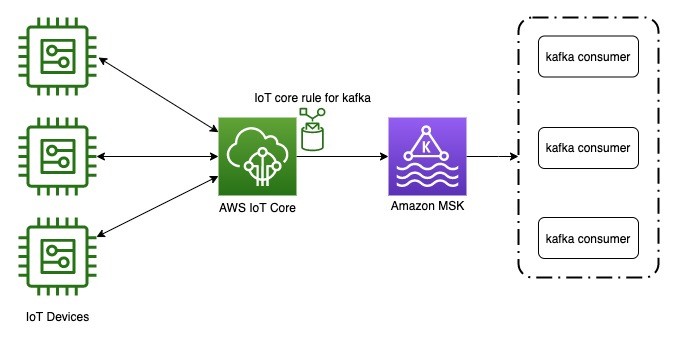
Figure 1 – Architecture representing an IoT ingestion pipeline
Prerequisites
- Familiarity with MQTT protocol and Kafka command line interface (CLI)
- AWS account with console access
Walkthrough
I will show you how to stream AWS IoT data on an Amazon MSK cluster using AWS IoT Core rules and SASL_SSL SCRAM-SHA-512 mechanism of authentication. Following are the steps for this walkthrough:
- Create an Apache Kafka cluster using Amazon MSK.
- Configure an Apache Kafka cluster for SASL_SSL authentication.
- Set up a Kafka producer and consumer on AWS Cloud9 to test the setup.
- Configure an IoT Rule action to send a message to Kafka.
1. Create an Apache Kafka cluster using Amazon MSK
- The first step is to create an Apache Kafka cluster. Open the service page for Amazon MSK by signing in to your AWS account.
- Choose Create Cluster, and select Custom Create. AWS IoT Core supports SSL and SASL_SSL based authentication for Amazon MSK. We are using custom settings to configure these authentication methods.
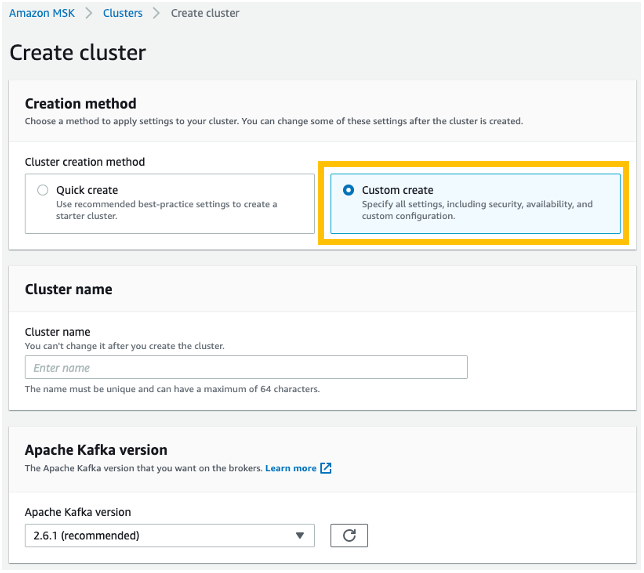
Figure 2 – Screenshot showing how to create an MSK cluster.
- Assign a cluster name, and select Apache Kafka (version of your choice), for this walkthrough, we are using 2.6.1.
- Keep the configuration as Amazon MSK default configuration. Choose your Networking components: VPC, number of Availability Zones (a minimum of two is required for high availability), and subnets.
- Choose SASL/SCRAM authentication (default selection is None).
Use the encryption settings as shown in the following screenshot:
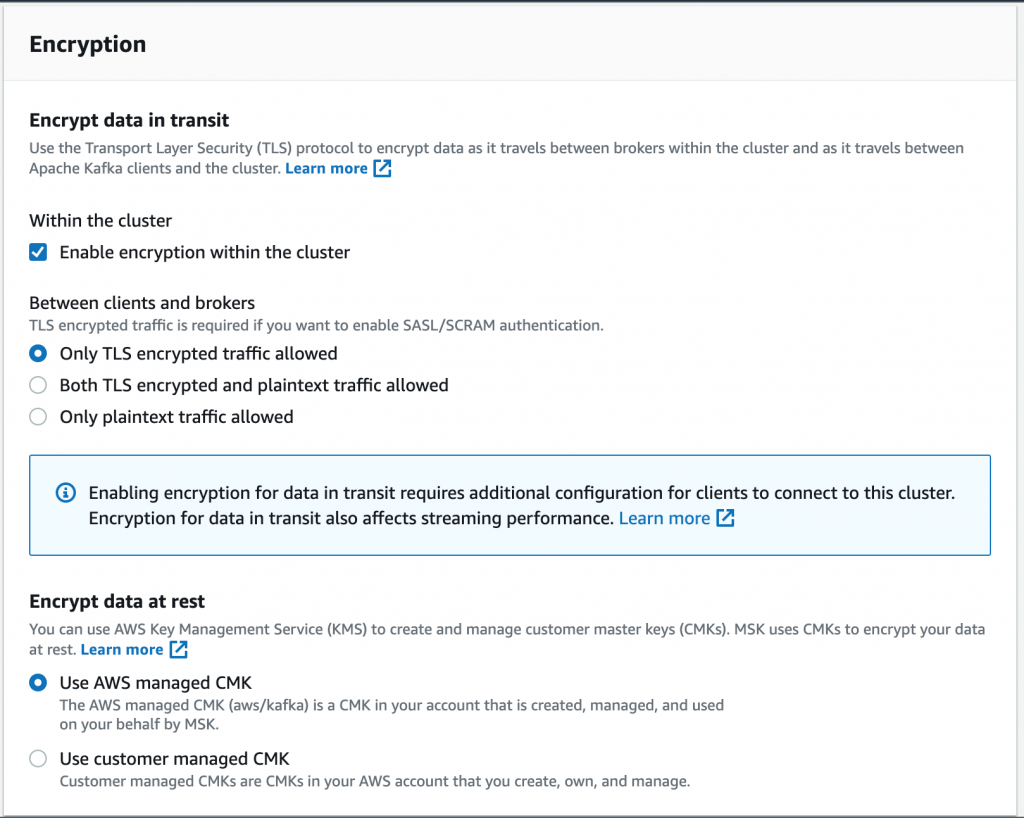
Figure 3 – Screenshot showing Encryption Settings
- Keep the monitoring settings as Basic Monitoring, and Choose Create Cluster.
- It takes approximately 15–20 minutes for the cluster to be created.
2. Configure an Apache Kafka cluster for SASL_SSL authentication
- When the Apache Kafka cluster is available, we must then configure authentication for producers and consumers.
- Open AWS Secrets Manager, choose Store a new secret, and then choose Other type of secrets.
- Enter user name and password as two keys, and assign the user name and password values of your choice.
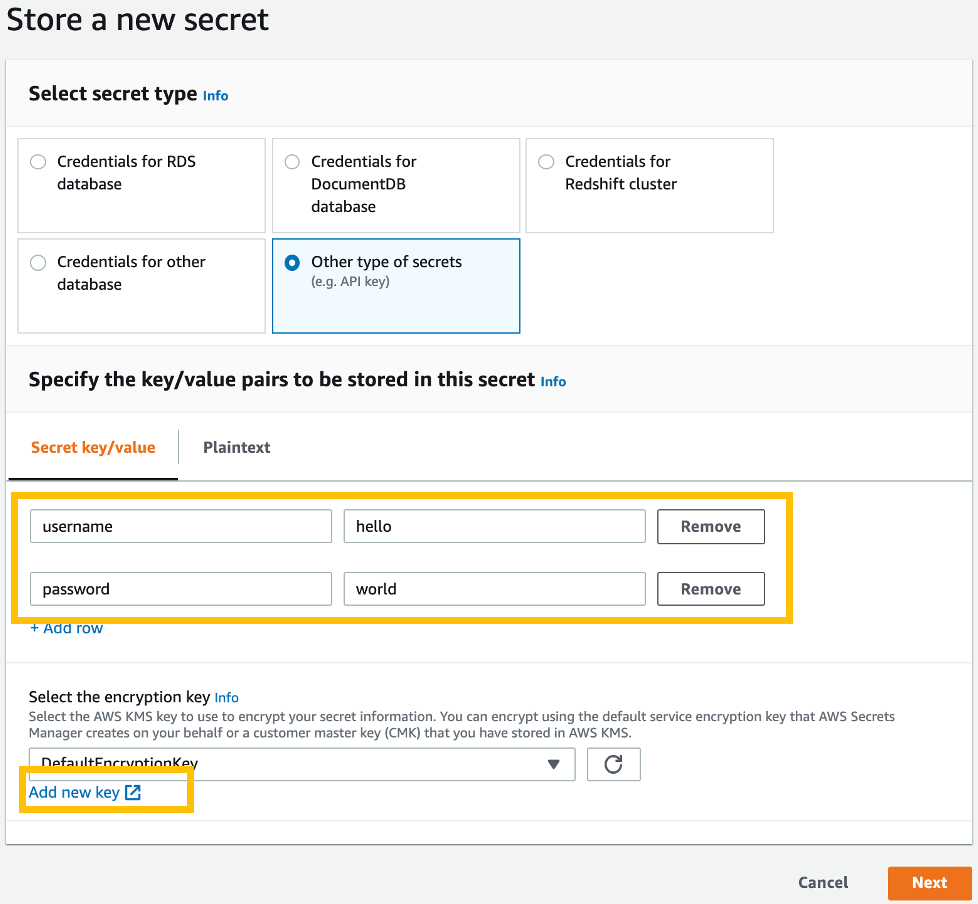
Figure 4 – Screenshot showing how to store a new secret
- Next, select Add new key link.
- Note: Do not select DefaultEncryptionKey! A secret created with the default key cannot be used with an Amazon MSK cluster. Only a Customer managed key can be used as an encryption key for an Amazon MSK–compatible secret.
- To add a new key, select Create key, select Symmetric key, and choose Next.
- Type an Alias, and choose Next.
- Select appropriate users as Key administrators, and choose Next.
- Review the configuration, and select Finish.
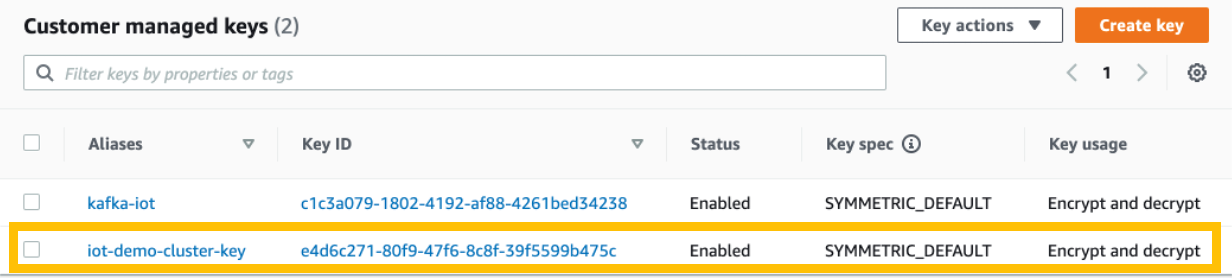
Figure 5 – Select the newly-created Customer Managed Key as the encryption key

Figure 6 – Specify the key value pair to be stored in this secret
- Select the newly-created Customer Managed Key as the encryption key, and choose Next.
- Provide a Secret name (Secret name must start with AmazonMSK_ for Amazon MSK cluster to recognize it), for example, AmazonMSK_SECRET_NAME.
- Choose Next twice, and then choose Store.
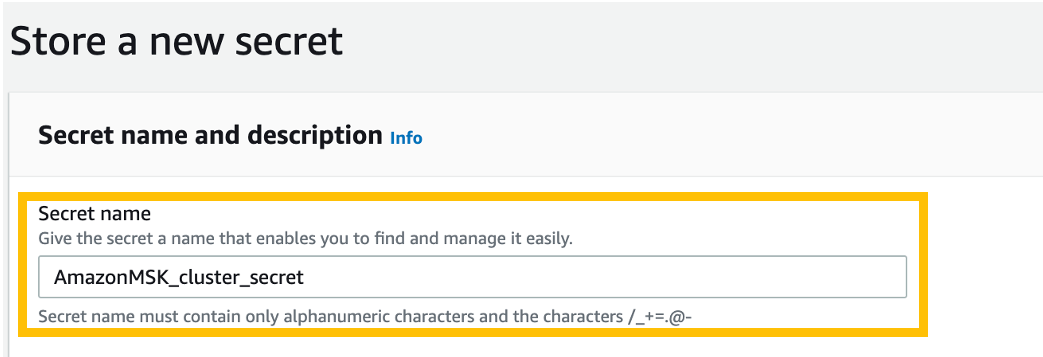
Figure 7 – Storing a new secret
- Open the Amazon MSK service page, and select your Amazon MSK cluster. Choose Associate Secrets, and then select Choose secrets (this will only be available after the cluster is created and in Active Status).
- Choose the secret we created in the previous step, and choose Associate secrets. Only the secret name starting with AmazonMSK_ will be visible.
3. Set up Kafka producer and consumer on AWS Cloud9 to test the setup
- To test if the cluster and authentication is correctly setup, we use Kafka SDK on AWS Cloud9 IDE.
- Choose Create environment, and follow the console to create a new AWS Cloud9 environment. You can use an existing AWS Cloud9 environment, in addition to an environment with Kafka consumer and producer already configured.
- This blog requires Java 8 or earlier.
- Verify your version of Java with the command:
java -version. Next, add your AWS Cloud9 instance Security Group to inbound rules of your Kafka cluster. - Open the Amazon MSK page and select your cluster, then choose Security groups applied.
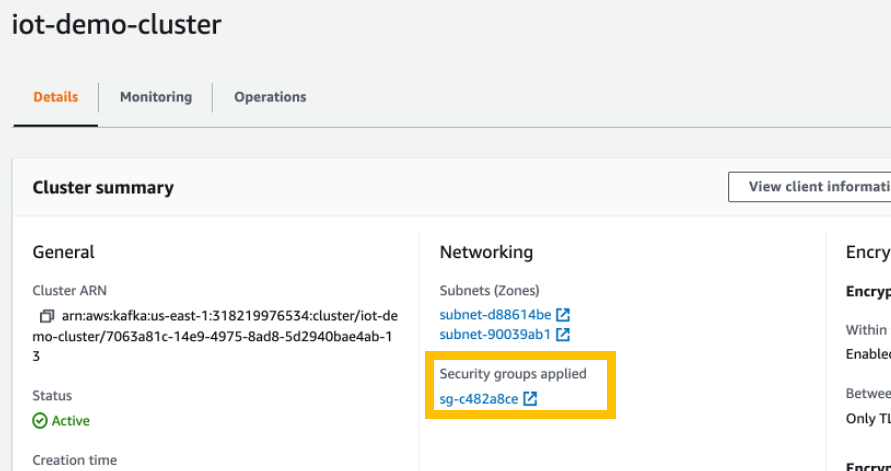
Figure 8 – Selecting Security Groups Applied
- Next, choose Inbound rules, and then choose Edit inbound rules.
- Choose Add rule, and add Custom TCP ports 2181 and 9096 with Security Group of your AWS Cloud9 instance.
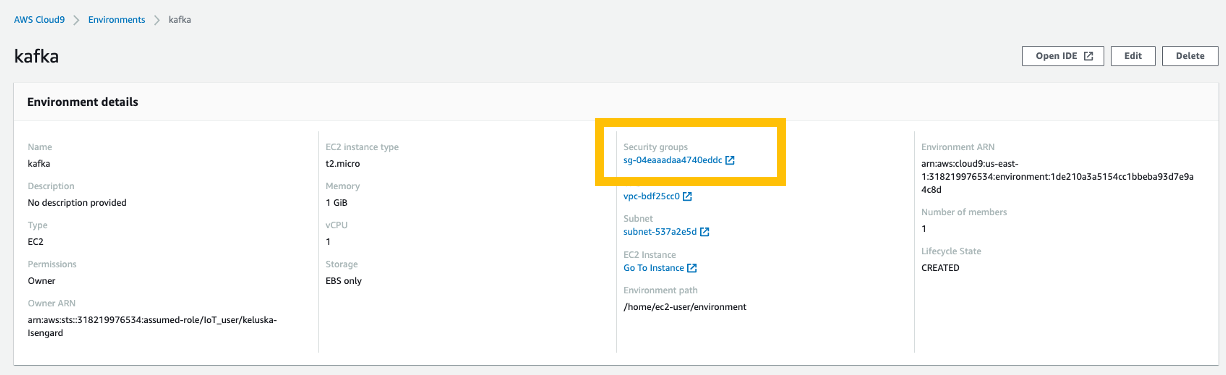
Figure 9 – Screenshot showing rules applied
- The Security Group for your AWS Cloud9 can be found in the Environment details section of your AWS Cloud9 instance.
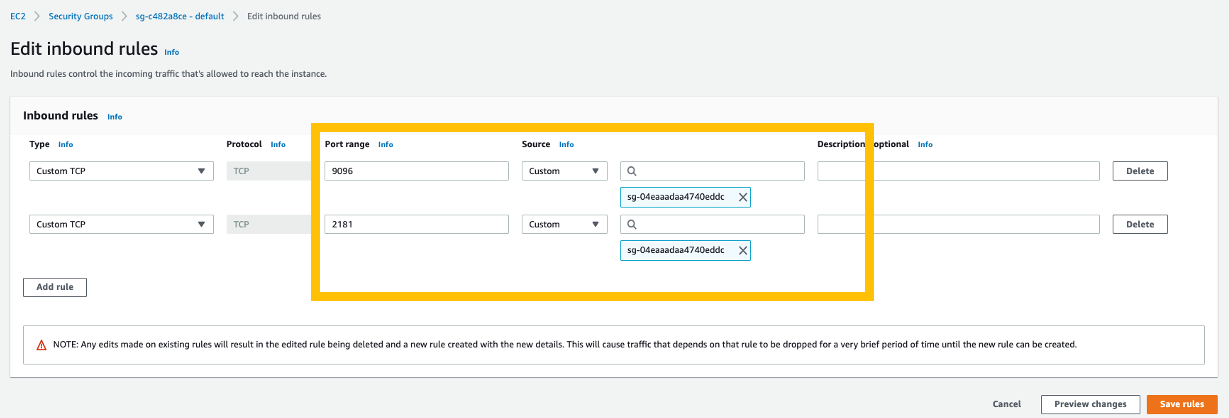
Figure 10 – Screenshot showing Edit Inbound Rules added
- Use Port range values as per the client information section of your Bootstrap server and Zookeeper connection.
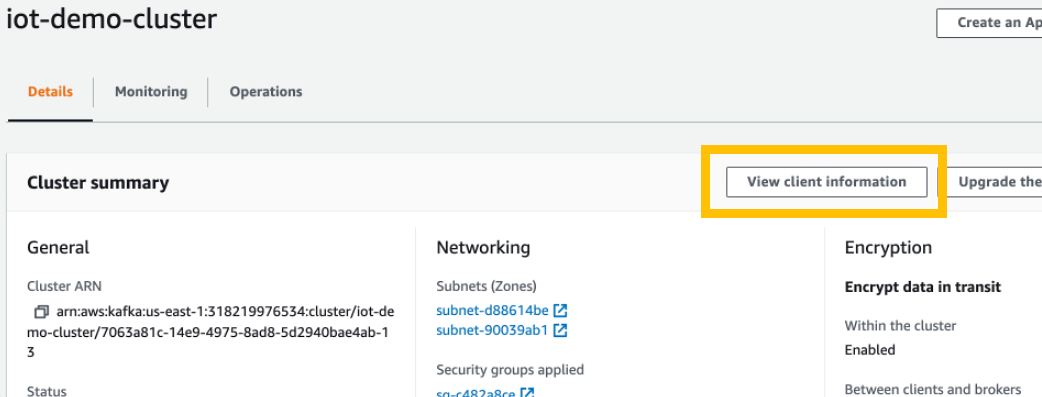
Figure 11 – Screenshot showing where to access ‘View client information’
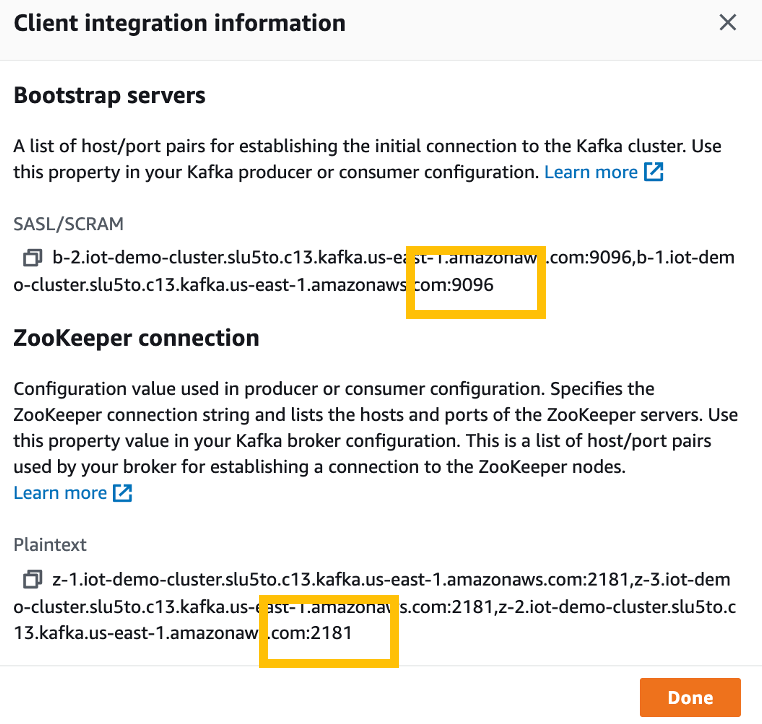
Figure 12 – Screenshot showing client integration information
Invoke the following commands on AWS Cloud9 console to download and extract Kafka CLI tools:
wget https://archive.apache.org/dist/kafka/2.2.1/kafka_2.12-2.2.1.tgz
tar -xzf kafka_2.12-2.2.1.tgz
cd kafka_2.12-2.2.1/
mkdir client && cd client
Next, create a file users_jass.conf, and add the user name and password that you added in Secrets Manage:
sudo nano users_jaas.conf
Paste the following configuration and save. Verify the user name and passwords are the same as saved in Secrets Manager.
KafkaClient {
   org.apache.kafka.common.security.scram.ScramLoginModule required
   username="hello"
   password="world";
};
Invoke the following commands:
export KAFKA_OPTS=-Djava.security.auth.login.config=$PWD/users_jaas.confCreate a new file with name client_sasl.properties.
sudo nano client_sasl.properties
Copy the following content to file:
security.protocol=SASL_SSL
sasl.mechanism=SCRAM-SHA-512
ssl.truststore.location=<path-to-keystore-file>/kafka.client.truststore.jks
<path-to-keystore-file> can be retrieved by running following command:
cd ~/environment/kafka_2.12-2.2.1/client
echo $PWD
Next, copy the cacerts file from your Java lib folder to client folder. The path of Java lib folder might be different based on your version of Java.
cd ~/environment/kafka_2.12-2.2.1/client
cp /usr/lib/jvm/java-11-amazon-corretto.x86_64/lib/security/cacerts kafka.client.truststore.jks
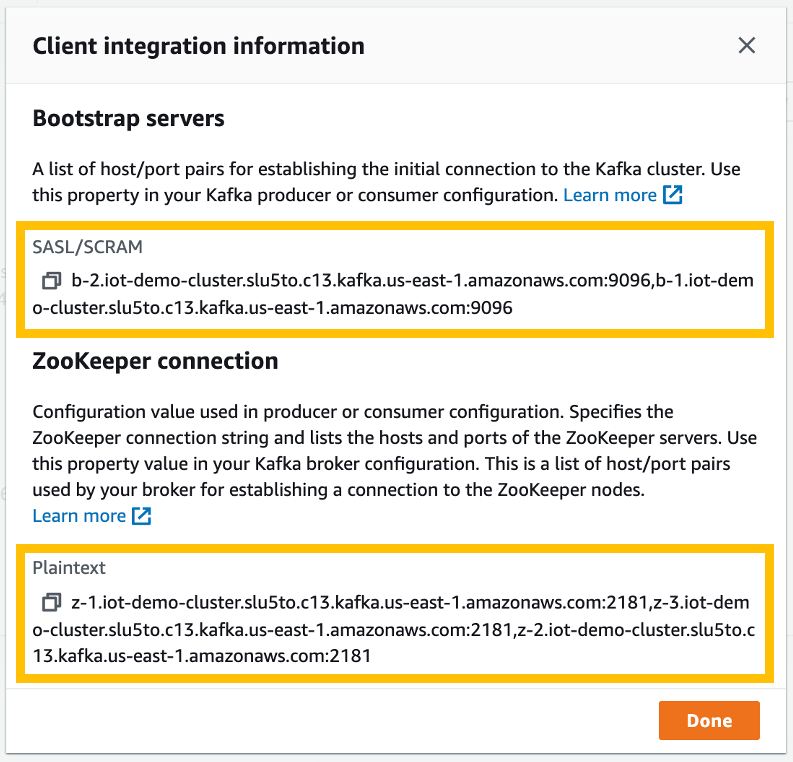
Figure 13 – Screenshot showing client integration information
Save the previous endpoints as BOOTSTRAP_SERVER and ZOOKEEPER_STRING.
export BOOTSTRAP_SERVER=b-2.iot-demo-cluster.slu5to.c13.kafka.us-east-1.amazonaws.com:9096,b-1.iot-demo-cluster.slu5to.c13.kafka.us-east-1.amazonaws.com:9096
export ZOOKEEPER_STRING=z-1.iot-demo-cluster.slu5to.c13.kafka.us-east-1.amazonaws.com:2181,z-3.iot-demo-cluster.slu5to.c13.kafka.us-east-1.amazonaws.com:2181,z-2.iot-demo-cluster.slu5to.c13.kafka.us-east-1.amazonaws.com:2181
Save the Topic name in an environment variable.
TOPIC="AWSKafkaTutorialTopic"
- Next, create a new Topic using the Zookeeper String.
cd ~/environment/kafka_2.12-2.2.1
bin/kafka-topics.sh --create --zookeeper $ZOOKEEPER_STRING --replication-factor 2 --partitions 1 --topic $TOPIC
- Confirm that you receive the message: Created topic AWSKafkaTutorialTopic.
- Start Kafka producer by running this command in your Kafka folder:
cd ~/environment/kafka_2.12-2.2.1

bin/kafka-console-producer.sh --broker-list $BOOTSTRAP_SERVER --topic $TOPIC --producer.config client/client_sasl.properties- Next, open a new Terminal by pressing the + button, and initiate the following commands to configure the environment variables:
export BOOTSTRAP_SERVER=b-2.iot-demo-cluster.slu5to.c13.kafka.us-east-1.amazonaws.com:9096,b-1.iot-demo-cluster.slu5to.c13.kafka.us-east-1.amazonaws.com:9096
TOPIC="AWSKafkaTutorialTopic"

cd ~/environment/kafka_2.12-2.2.1/client
export KAFKA_OPTS=-Djava.security.auth.login.config=$PWD/users_jaas.conf

cd ~/environment/kafka_2.12-2.2.1/
bin/kafka-console-consumer.sh --bootstrap-server $BOOTSTRAP_SERVER --topic $TOPIC --from-beginning --consumer.config client/client_sasl.properties --from-beginning
- Now that you have a Kafka consumer and producer opened side-by-side, you can type in producer terminal and verify it from the consumer terminal.
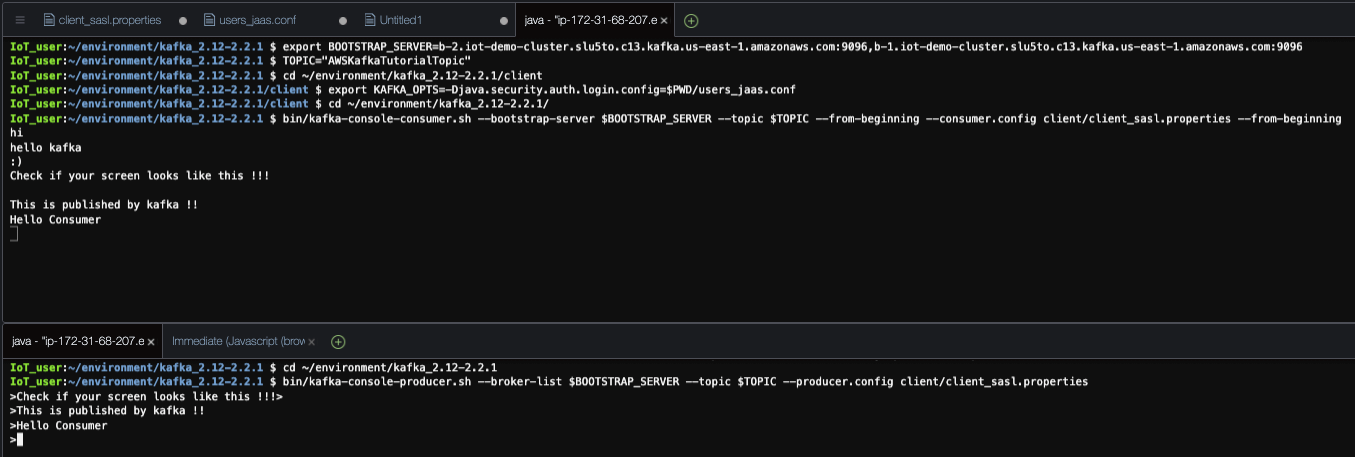
Figure 14 – Screenshot showing Kafka consumer and producer opened side-by-side
4. Configure an IoT Rule action to send a message to Kafka
- Create an AWS Identity and Access Management (IAM) role with SecretsManager permissions to allow IoT rule to access Kafka KeyStore in AWS Secrets Manager.
- Sign in to IAM, select Policies from the left-side panel, choose Create policy.
- Select Choose a service, and search for AWS KMS.
- In Actions, choose All AWS KMS actions. Select All resources in the Resources section, and choose Next.
- Name the policy KMSfullAccess, and choose Create policy.
- Select Roles from the left-side panel, choose Create Role, then select EC2 from Choose a use case, and choose Next:Permissions.
- Assign the policy SecretsManagerReadWrite. Note: if you do not select EC2, SecretsManager Policy will be unavailable.
- Search for and select SecretsManagerReadWrite and KMSfullAccess Policy.
Add tags, type Role name as kafkaSASLRole, and choose Create Role.
- After the Role is created, search the newly-created Role name to view the Summary of the role.
- Choose the Trust relationships tab, and choose Edit trust relationship.
Enter the following trust relationship:
{
  "Version": "2012-10-17",
  "Statement": [
    {
      "Effect": "Allow",
      "Principal": {
        "Service": "iot.amazonaws.com"
      },
      "Action": "sts:AssumeRole"
    }
  ]
}
- Choose Update Trust Policy.
- Next, create a new AWS IoT Core rule by signing in to the AWS IoT Core service. Choose Act from the left side-menu, and select Rules.
- Choose Create. Insert details for Name, Description, and Rule query statement, and then choose Add action. The following query is used for this post:
SELECT * from ‘iot/topic’- Select Send a message to an Apache Kafka cluster. Next, choose Configure action.
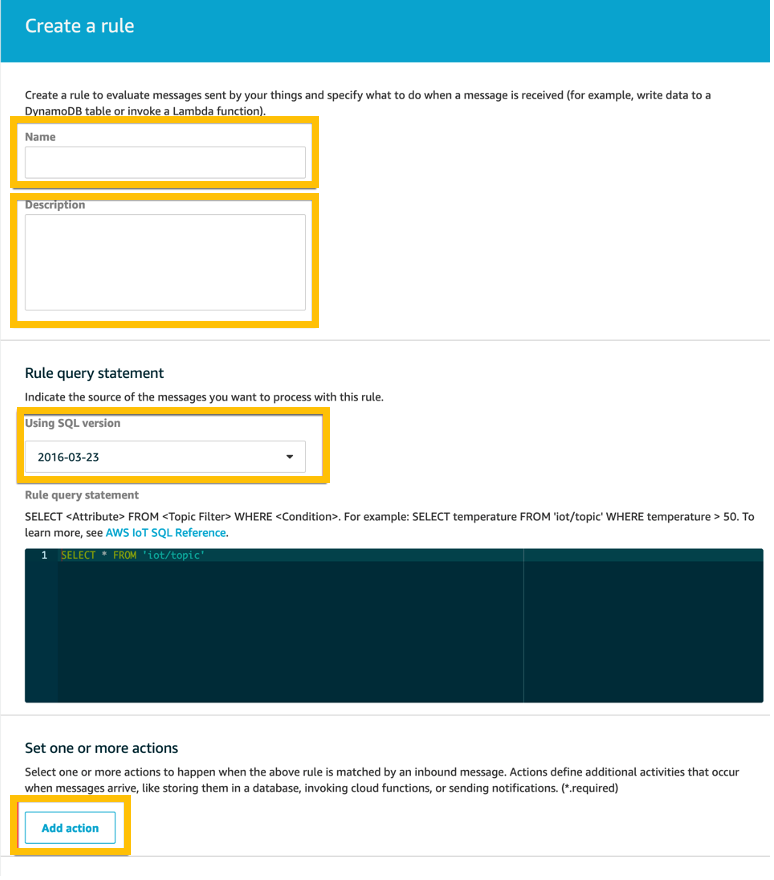
Figure 15 – Screenshot to create a rule
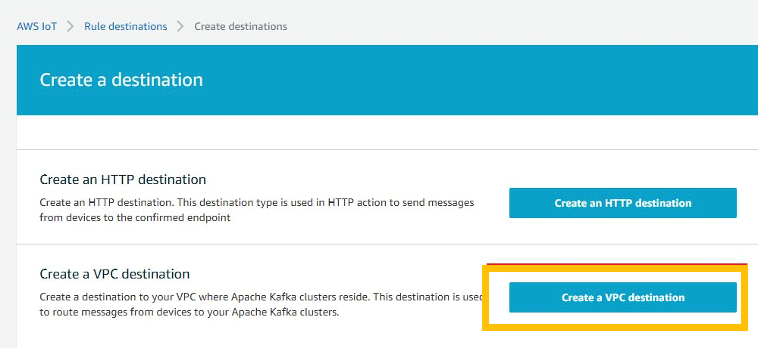
Figure 16 – How to Create a VPC destination
- Create a VPC destination (if you do not already have one).
- Select the VPC ID of your Kafka cluster. Select a Security Group with access to Kafka cluster Security Group.
- Choose security group settings of the EC2 instance we created, or the security group of Kafka cluster.
- Choose Create Role, and then select Create Destination. It takes approximately 5–10 minutes for the Destination to be Enabled. After the status is Enabled, navigate back to the Rule creation page and select the VPC Destination.
- Enter AWSKafkaTutorialTopic as Kafka topic (confirm there is no extra space after the topic name, or you will get an error). Do not update Key and Partition boxes.

Figure 17 – Screenshot showing how to enter the AWSKafkaTutorialTopic
- Verify the Security Group of your VPC destination is added to the inbound list for your Kafka cluster.


Figure 18 – Showing Security Group for Kafka Cluster
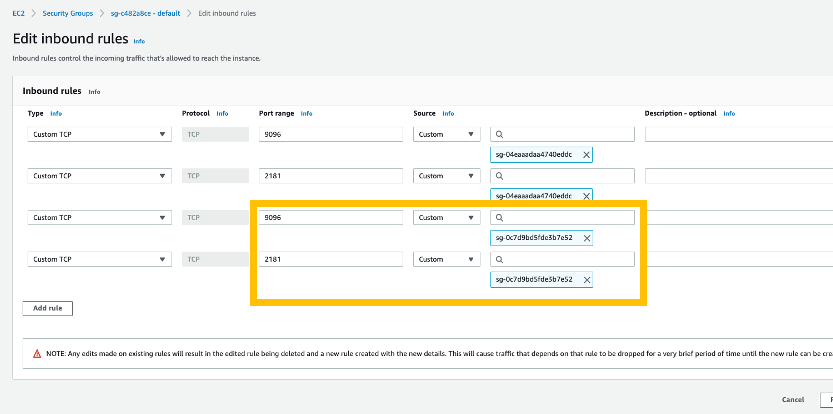
Figure 19 -Screenshot showing Inbound Inbound rules
The first two Custom TCP entries are for AWS Cloud9 security group. The last two entries are for VPC endpoint.
Set the Client properties as follows:
Bootstrap.server = The TLS bootstrap string for Kafka cluster
security.protocol = SASL_SSL
ssl.truststore = EMPTY for Amazon MSK, enter SecretBinary template for self-managed Kafka
ss.truststore.password = EMPTY for Amazon MSK, enter truststore password for self-managed Kafka
sasl.mechanism = SCRAM-SHA-512
- Replace the secret name with your stored secret name starting with AmazonMSK_, replace the IAM role ARN with your IAM role ARN.
- The secret and IAM role are created in previous steps of this post. Enter the following template in the sasl.scram.username field to retrieve username from Secrets Manager.
${get_secret('AmazonMSK_cluster_secret','SecretString','username','arn:aws:iam::318219976534:role/kafkaSASLRole')}Perform a similar step for sasl.scram.password field:
${get_secret('AmazonMSK_cluster_secret','SecretString','password','arn:aws:iam::318219976534:role/kafkaSASLRole')}- Choose Add action.
- Choose Create rule.
Testing the data pipeline
- Open MQTT test client from AWS IoT Core page.
- Publish the message to the MQTT topic that you configured while creating the rule.
- Keep the consumer session active (created in earlier step). You will see data published on the MQTT topic being streamed to Kafka consumer.
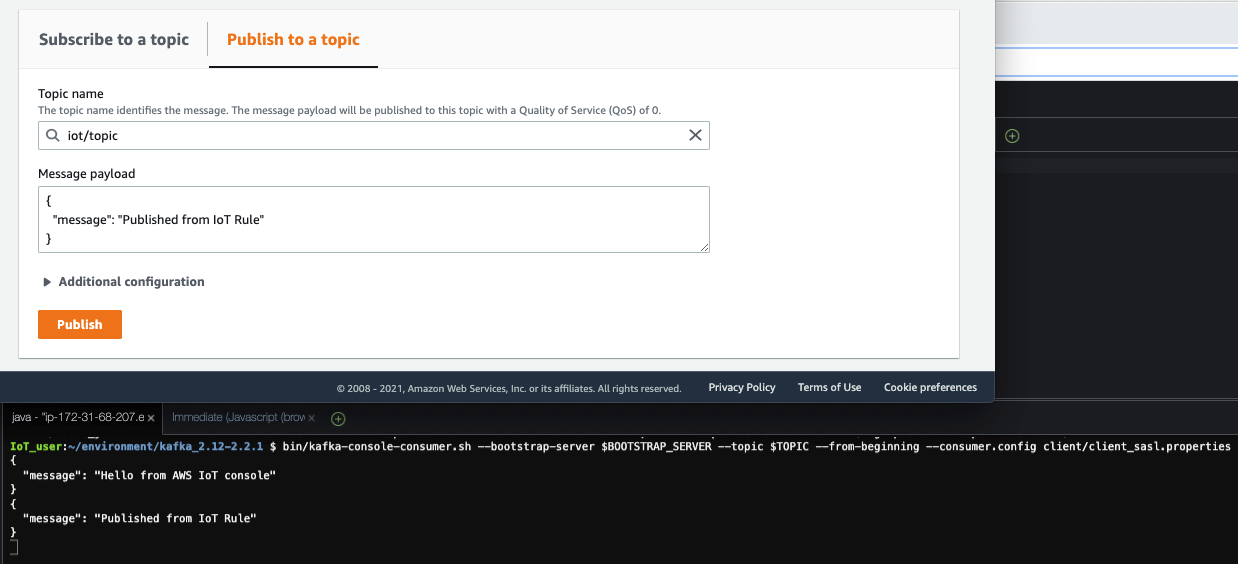
Figure 20 – Screenshot showing testing the data pipeline
Common troubleshooting checks
Confirm that your:
- AWS Cloud9 Security Group is added to Amazon MSK Security Group Inbound rule
- VPC endpoint Security Group is added to Amazon MSK Security Group Inbound rule
- Topic is created in the Kafka cluster
- IAM role has Secrets Manager and KMS permissions
- Environment variables are correctly configured in terminal
- Folder paths have been correctly followed
Cleaning up
To avoid incurring future changes, delete the following resources:
- Amazon MSK cluster
- AWS IoT Core rule
- IAM role
- Secrets Manager Secret
- AWS Cloud9 instance
Conclusion
In this post, I showed you how to configure an IoT Rule Action to deliver messages to Apache Kafka cluster using AWS IoT Core and Amazon MSK. You can now build a real-time streaming data pipeline by securely delivering MQTT messages to a highly-scalable, durable, and reliable system using Apache Kafka.
Field Notes provides hands-on technical guidance from AWS Solutions Architects, consultants, and technical account managers, based on their experiences in the field solving real-world business problems for customers.