All posts by Sohaib Katariwala

The next generation of Amazon OpenSearch Serverless: Built from the ground up for agents

Post Syndicated from Sohaib Katariwala original https://aws.amazon.com/blogs/big-data/the-next-generation-of-amazon-opensearch-serverless-built-from-the-ground-up-for-agents/

Audience note: This is the deep-dive technical launch post. For a shorter overview of what changed and why, see the related post on the AWS News Blog.

Today, we are announcing a ground-up re-architecture of Amazon OpenSearch Serverless that delivers up to 20 times faster autoscaling, scale to zero, and up to 60% lower cost than provisioning clusters for peak load. Amazon OpenSearch Service is a fully managed, open source retrieval engine that unifies vector, lexical, hybrid, and agentic search, delivering low-latency, accurate and relevant results. Amazon OpenSearch Serverless is an automatically scaled deployment option.

Modern workloads are increasingly dynamic and unpredictable. An ecommerce platform sees a 10x traffic spike during a flash sale. An artificial intelligence (AI) agent triggers hundreds of concurrent vector queries while reasoning through a multi-step task, then goes idle. A multi-tenant SaaS application serves dozens of tenants with wildly different activity patterns. These workloads need infrastructure that scales up to meet demand and releases resources when demand drops.

That is why we rebuilt the Amazon OpenSearch Serverless architecture from the ground up. The new architecture decouples compute from storage. The service provisions infrastructure in seconds instead of minutes, and scales compute all the way to zero when your application is idle. In this post, we walk through the new architecture, what it means for your applications, and how to get started with a hands-on tutorial.

With this launch, Amazon OpenSearch Serverless introduces two named architectures. Existing collections are now referred to as
Classic collections. The new architecture is called
NextGen and is now the default when you create a new collection via the AWS Console. You can use NextGen architecture in the API by specifying
--generation NEXTGEN in the CLI. To continue using the Classic architecture, specify
--generation CLASSIC in the CLI or omit the optional
--generation parameter.

What this means for your applications

The new architecture delivers improvements across three pillars: performance, cost, and a simplified user experience.

Performance: Autoscaling in seconds

An OpenSearch Compute Unit (OCU) is the unit of compute capacity that powers your indexing and search workloads. Amazon OpenSearch Serverless now provisions additional OCUs in seconds. When traffic arrives, the service adds resources in line with demand instead of reacting after a worker is already under pressure. The same mechanism scales the infrastructure back down quickly when traffic drops. The new architecture scales capacity up to 20 times faster than the previous architecture, so your users experience consistent performance during traffic surges, and you stop paying for capacity when you no longer need it.

Cost efficiency: Pay only for what you use

Indexing, search, storage, and Vector Index GPU-Acceleration are metered and billed independently, so you can see and optimize each dimension of your workload separately.

Decoupled compute and storage: OpenSearch Serverless now has full decoupling between compute and storage, allowing OCUs to scale up and down irrespective of the amount of data stored in a collection. This is powered by a new storage layer that is accessible to both indexing and search OCUs. You can now have multiple indices with data indexed in them but not pay any compute costs if you are not actively indexing or searching data. For workloads with significant idle time, the new architecture can reduce infrastructure costs by up to 60% compared to the cost of provisioning OpenSearch Service domains for peak capacity.

Scale to zero: When no requests arrive within the idle timeout window (10 minutes), the service releases compute resources and your OCU usage scales to 0. When traffic resumes, capacity is back in approximately 10 seconds. During this window, the service queues incoming requests and serves them once capacity is available; it does not drop them. If you anticipate a burst of traffic, for example before a scheduled batch job or a marketing campaign, you can send a lightweight query (such as a match_all with size=1) to warm the collection before your application starts sending production traffic. This reduces the latency your users experience on the first real request. Indexing and search scale independently. If you have no search requests, search OCUs scale to zero, even while OpenSearch Serverless maintains indexing OCUs for indexing requests, and vice versa.

GPU acceleration for vector workloads: For vector collections created in the new architecture, OpenSearch Serverless automatically uses GPU-backed compute to accelerate Hierarchical Navigable Small World (HNSW) vector index construction, significantly reducing indexing time compared to CPU-only builds. GPU acceleration kicks in automatically whenever there is an opportunity to leverage GPUs to reduce overall indexing time and cost. In the Classic architecture, you had to opt in or out of GPU acceleration at the collection level through the API. If you want to disable GPU acceleration for NextGen collections for a specific index, you can
turn off the remote index build setting at the index level. GPU usage appears as a separate line item on your bill, so you have full visibility into when acceleration was active and what it cost. For more details on how GPU acceleration works and performance benchmarks, refer to
Build billion-scale vector databases in under an hour with GPU acceleration on Amazon OpenSearch Service.

Simplified experience: Fewer steps to production

We also simplified the day-to-day experience of running OpenSearch Serverless:

With the new architecture, you can provision a collection and start sending requests in seconds. There is no need for capacity planning, no sizing decisions, and no waiting for infrastructure to warm up. This makes Amazon OpenSearch Serverless a natural fit for agentic workloads, where an AI agent can spin up a vector search or retrieval step on demand and expect a response without delay.

To make getting started even faster, we have introduced Express Create on the console. You supply a collection name and a collection type, choose Express Create, and your collection is active in seconds with no upfront network, encryption, or access policies to configure. You can add those later if your workload requires them.

Collection groups and collections can also be created programmatically using the AWS Command Line Interface (AWS CLI) and AWS SDKs. AWS CloudFormation support is coming soon.

The new architecture introduces two endpoint formats on the on.aws domain. The per-collection endpoint (<collectionId>.aoss.<region>.on.aws) works the same way as before with one endpoint per collection. The per-account Regional endpoint (<accountId>.aoss.<region>.on.aws) is new: it serves all of your collections through a single hostname, with the target collection identified in each request using the x-amz-aoss-collection-name or x-amz-aoss-collection-id header. This means one connection pool, one Transport Layer Security (TLS) session, and one endpoint to manage regardless of how many collections you have — a significant improvement for multi-tenant workloads where each tenant maps to its own collection. Both endpoints use standard AWS PrivateLink, so you create virtual private cloud (VPC) endpoints from the VPC console or the EC2 API just like any other AWS service. Private Domain Name System (DNS) is configured automatically, eliminating the Amazon Route 53 Private Hosted Zones, forwarding rules, and custom DNS infrastructure that were required with the original architecture. Cross-VPC, cross-account, and on-premises access all work using standard vpce-* DNS names with no additional setup.

Collection groups are the new unit of organization for your collections. You can share compute capacity across multiple collections with Collection Groups, which reduces cost for smaller collections that have complementary traffic patterns. You can also assign different AWS Key Management Service (AWS KMS) keys to collections within the same group, so you get both cost efficiency and per-collection encryption isolation. Collection groups are required when creating collections with the new architecture.

You also get the benefits of OpenSearch open-source releases without needing to manage versions and upgrades. The service tracks upstream releases automatically.

Amazon OpenSearch Serverless is also available on the Vercel Marketplace, making it straightforward for developers to add search infrastructure directly from their Vercel projects. You can link an existing AWS account through delegated access, or get started through a Limited Scope Account with USD $100 in AWS credit if you are new to AWS.

The integration creates a collection with sensible defaults, scale-to-zero billing, public endpoints, and AWS-managed encryption, and automatically sets connection details as environment variables in your Vercel project. You can choose from Search or Vector Search collection types depending on your use case, whether that is full-text search or semantic and AI-powered search.

How the architecture works

The new Amazon OpenSearch Serverless architecture separates compute from storage entirely. OCUs are stateless and read from and write to a distributed shared storage layer that is accessible to both indexing and search OCUs. The storage layer is designed for high durability, keeping your data available independently of the compute nodes that process it.
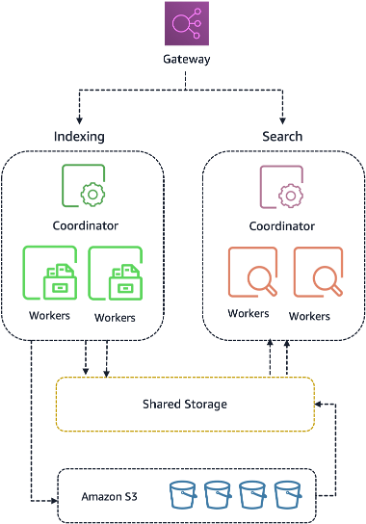
Architecture diagram showing OpenSearch Serverless NextGen with stateless indexing and search OCUs reading from and writing to a shared distributed storage layer

This design has two practical consequences:

  1. Fast provisioning. New OCUs start serving requests in seconds because there is no local disk to bootstrap. The OCU mounts the shared storage layer and begins processing immediately.
  2. Efficient scale down. Idle capacity can be released with no impact to your stored data, because the data never lived on the OCU. When traffic subsides, compute resources are released and your cost drops accordingly.

Architecture comparison

The following table summarizes the key differences between the original and new architectures:

Capability Classic Architecture NextGen Architecture
Minimum capacity 2 OCUs (always on) 0 OCUs (scale to zero)
Scaling speed Minutes Seconds
Storage Local storage per compute node Distributed shared storage (decoupled)
Collection organization

Individual collections (Default)

Collection groups (Optional)

Collection groups (required)
Cold start from zero N/A (always on) ~10 seconds
Endpoint Per-collection endpoint Regional endpoint (static per account)
Cost vs. OpenSearch Service domain Baseline Up to 60% lower cost
Scaling speed (vs. Classic) Baseline Up to 20 times faster than baseline

Walkthrough: Create a vector collection and observe scale to zero

In this walkthrough, you create a vector search collection with Express Create, index a few sample documents with embeddings, run a k-nearest neighbor (k-NN) query, and watch the collection scale to zero in Amazon CloudWatch. The entire process takes about 10 minutes.

Prerequisites

  • An AWS account with permissions to create Amazon OpenSearch Serverless collections.
  • AWS Command Line Interface (AWS CLI) configured with appropriate credentials.
  • curl 7.75 or later (for built-in --aws-sigv4 support).

Step 1: Configure security policies

Create encryption, network, and data access policies. These must exist before the collection can be created.

# Create an encryption policy
aws opensearchserverless create-security-policy \
    --name product-vectors-encryption \
    --type encryption \
    --policy '{"Rules":[{"ResourceType":"collection","Resource":["collection/product-vectors"]}],"AWSOwnedKey":true}' \
    --endpoint-url "https://aoss.us-east-2.amazonaws.com" \
    --region "us-east-2"

# Create a network policy (public access for this tutorial)
aws opensearchserverless create-security-policy \
    --name product-vectors-network \
    --type network \
    --policy '[{"Rules":[{"ResourceType":"collection","Resource":["collection/product-vectors"]},{"ResourceType":"dashboard","Resource":["collection/product-vectors"]}],"AllowFromPublic":true}]' \
    --endpoint-url "https://aoss.us-east-2.amazonaws.com" \
    --region "us-east-2"

# Get your principal ARN
PRINCIPAL_ARN=$(aws sts get-caller-identity --query 'Arn' --output text)

# Create a data access policy
aws opensearchserverless create-access-policy \
    --name product-vectors-data \
    --type data \
    --policy "[{\"Rules\":[{\"ResourceType\":\"index\",\"Resource\":[\"index/product-vectors/*\"],\"Permission\":[\"aoss:CreateIndex\",\"aoss:DescribeIndex\",\"aoss:UpdateIndex\",\"aoss:DeleteIndex\",\"aoss:ReadDocument\",\"aoss:WriteDocument\"]}],\"Principal\":[\"\${PRINCIPAL_ARN}\"]}]" \
    --endpoint-url "https://aoss.us-east-2.amazonaws.com" \
    --region "us-east-2"

Note: If you use the AWS console’s Express Create workflow, these policies are created automatically.

Important: After creating the data access policy, wait approximately 30 to 60 seconds for the policy to propagate before making API calls to the collection. If you receive a 403 Forbidden error, wait and retry.

Step 2: Create a collection group and collection

Create a collection group with scale-to-zero capacity limits, then create a vector search collection within it.

# Create a collection group with scale-to-zero enabled (min OCU = 0)
aws opensearchserverless create-collection-group \
    --name product-search-cg \
    --generation NEXTGEN \
    --standby-replicas ENABLED \
    --capacity-limits "minIndexingCapacityInOCU=0,maxIndexingCapacityInOCU=4,minSearchCapacityInOCU=0,maxSearchCapacityInOCU=4" \
    --endpoint-url "https://aoss.us-east-2.amazonaws.com" \
    --region "us-east-2"

# Create a vector search collection in the group
aws opensearchserverless create-collection \
    --name product-vectors \
    --type VECTORSEARCH \
    --collection-group-name product-search-cg \
    --endpoint-url "https://aoss.us-east-2.amazonaws.com" \
    --region "us-east-2"

The collection status transitions to ACTIVE within seconds.

Step 3: Create a vector index

Retrieve the collection endpoint and create a k-NN index using 3-dimensional vectors:

ENDPOINT=$(aws opensearchserverless batch-get-collection \
    --names product-vectors \
    --query 'collectionDetails[0].collectionEndpoint' \
    --output text \
    --endpoint-url "https://aoss.us-east-2.amazonaws.com" \
    --region "us-east-2")

awscurl --service aoss --region us-east-2 \
    -XPUT "${ENDPOINT}/items" \
    -H "Content-Type: application/json" \
    -d '{
      "settings": {"index.knn": true},
      "mappings": {
        "properties": {
          "description": {"type": "text"},
          "embedding": {"type": "knn_vector", "dimension": 3,
            "method": {"name": "hnsw", "space_type": "cosinesimil", "engine": "faiss"}}
        }
      }
    }'

Note: If the collection has scaled to zero, the first request might take a few seconds while capacity scales up. If the request times out, wait 10 to 15 seconds and retry.

Step 4: Index sample documents with embeddings

awscurl --service aoss --region us-east-2 \
    -XPOST "${ENDPOINT}/items/_bulk" \
    -H "Content-Type: application/json" \
    -d '
{ "index": { "_id": "1" } }
{ "description": "Wireless noise-cancelling headphones", "embedding": [0.8, 0.2, 0.1] }
{ "index": { "_id": "2" } }
{ "description": "Portable Bluetooth speaker", "embedding": [0.7, 0.3, 0.2] }
{ "index": { "_id": "3" } }
{ "description": "Over-ear studio monitor headphones", "embedding": [0.9, 0.1, 0.05] }
'

Step 5: Run a k-NN query

Search for the two nearest neighbors to a query vector. Wait 30 seconds after indexing to allow the vector index to build before running this query:

awscurl --service aoss --region us-east-2 \
    -XGET "${ENDPOINT}/items/_search" \
    -H "Content-Type: application/json" \
    -d '{
      "query": {
        "knn": {
          "embedding": {
            "vector": [0.85, 0.15, 0.08],
            "k": 2
          }
        }
      }
    }'

The response returns the two most similar items, in this case, the headphone documents whose embeddings are closest to your query vector.

You can also run this query in OpenSearch UI by navigating to your collection in the Amazon OpenSearch Service console and choosing the OpenSearch UI Application URL. Then follow the steps outlined in this blog to create a workspace. Then navigate to Dev Tools and paste and run the following query.

GET items/_search
{
  "query": {
    "knn": {
      "embedding": {
        "vector": [0.85, 0.15, 0.08],
        "k": 2
      }
    }
  }
}

Step 6: Observe scale to zero

After a period of inactivity (no indexing or search traffic), the collection group scales down to 0 OCU. Verify with:

aws opensearchserverless batch-get-collection-group \
    --names product-search-cg \
    --endpoint-url "https://aoss.us-east-2.amazonaws.com" \
    --region "us-east-2"

In the response, currentCapacity.search.capacityInOcu and currentCapacity.indexing.capacityInOcu will show 0 after the collection has scaled down.

You can also navigate to the Collection groups page in the Amazon OpenSearch Service console. Choose your collection group, then scroll down to the Monitoring section. Here you can see two charts: Indexing capacity (OCUs) and Search capacity (OCUs). After 10 minutes of idle time (no indexing or search requests), both metrics drop to zero, confirming that the service has released all compute resources for your collection.
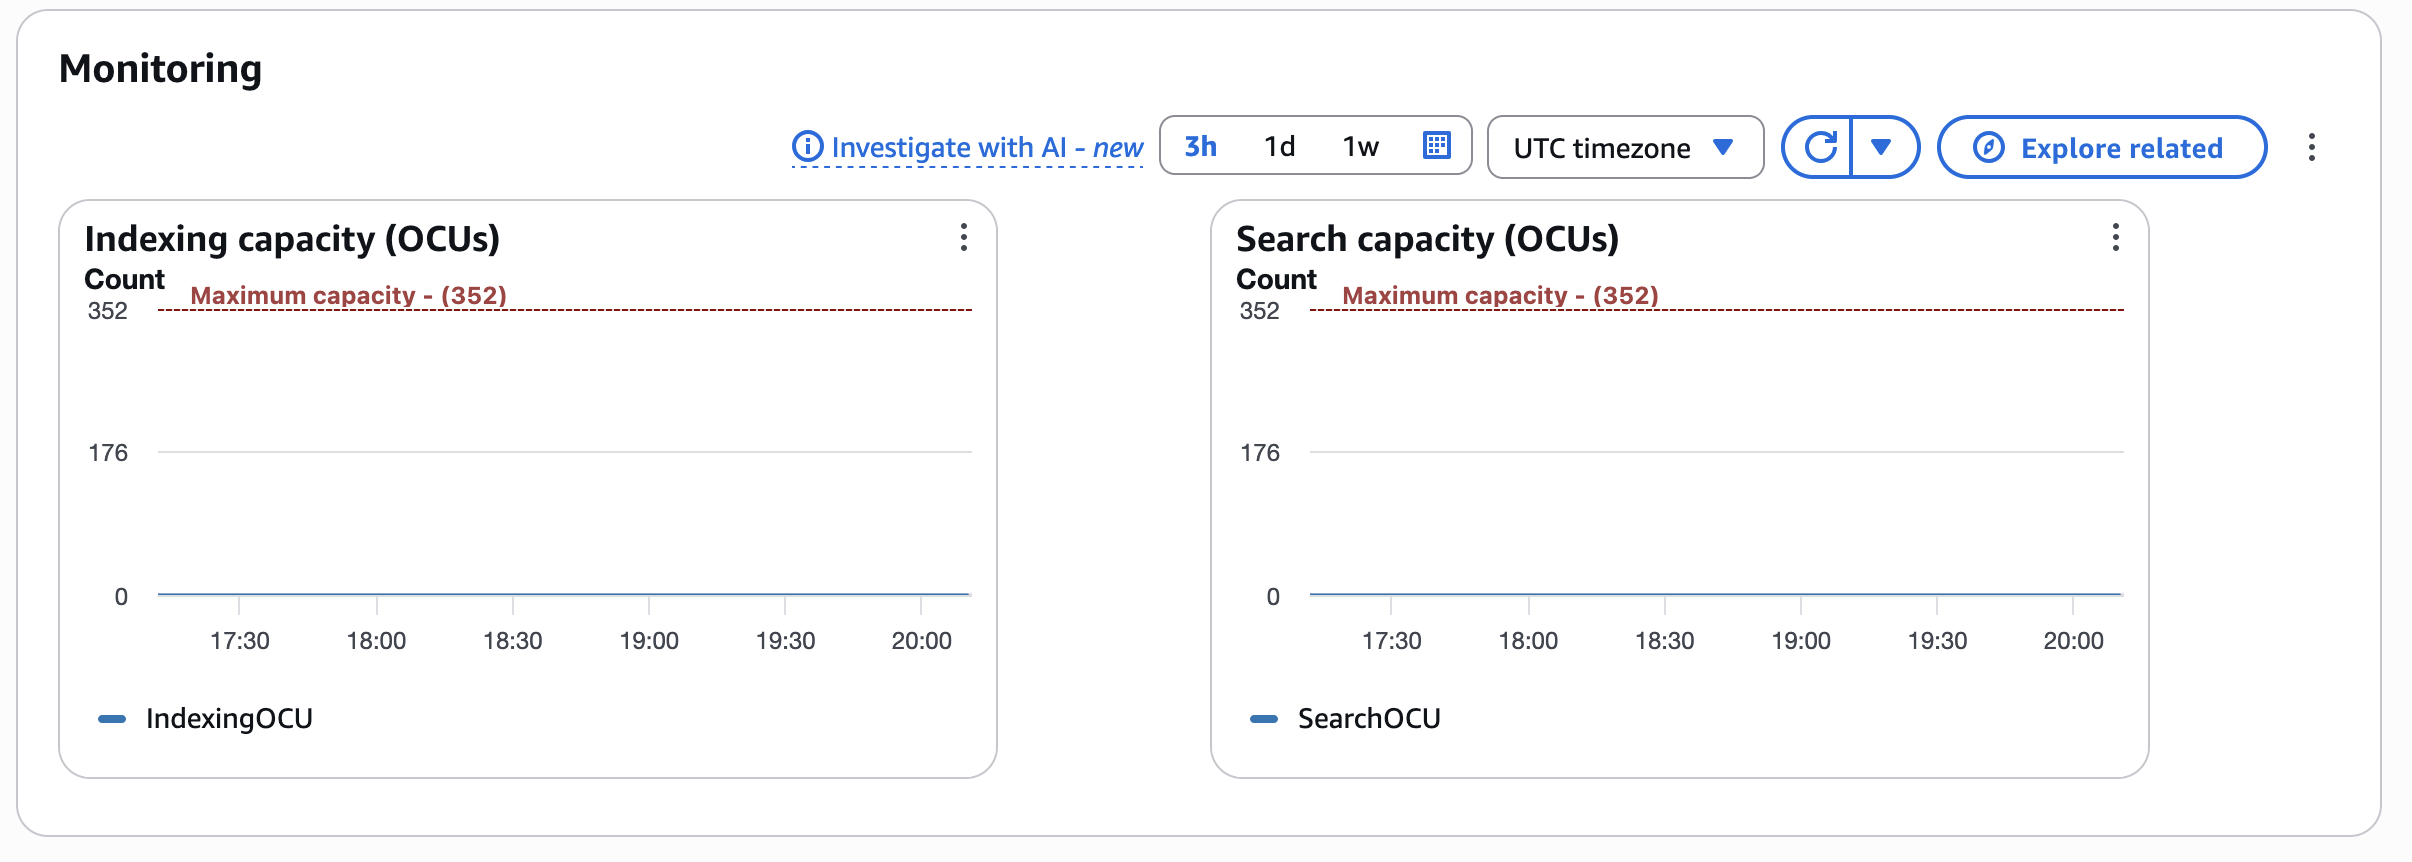
CloudWatch monitoring charts in the Amazon OpenSearch Service console showing indexing and search capacity dropping to zero OCUs after 10 minutes of idle time

Clean up

To avoid ongoing charges, delete the resources you created in this walkthrough when you are done. Delete the collection first so the collection group becomes empty, then delete the group, then remove the security and access policies.

# Look up the collection ID, then delete the collection
COLLECTION_ID=$(aws opensearchserverless batch-get-collection \
    --names product-vectors \
    --query 'collectionDetails[0].id' \
    --output text \
    --endpoint-url "https://aoss.us-east-2.amazonaws.com" \
    --region "us-east-2")

aws opensearchserverless delete-collection \
    --id "${COLLECTION_ID}" \
    --endpoint-url "https://aoss.us-east-2.amazonaws.com" \
    --region "us-east-2"

# Look up the collection group ID, then delete the collection group
GROUP_ID=$(aws opensearchserverless batch-get-collection-group \
    --names product-search-cg \
    --query 'collectionGroupDetails[0].id' \
    --output text \
    --endpoint-url "https://aoss.us-east-2.amazonaws.com" \
    --region "us-east-2")

aws opensearchserverless delete-collection-group \
    --id "${GROUP_ID}" \
    --endpoint-url "https://aoss.us-east-2.amazonaws.com" \
    --region "us-east-2"

# Delete the security and access policies
aws opensearchserverless delete-security-policy \
    --name product-vectors-encryption \
    --type encryption \
    --endpoint-url "https://aoss.us-east-2.amazonaws.com" \
    --region "us-east-2"

aws opensearchserverless delete-security-policy \
    --name product-vectors-network \
    --type network \
    --endpoint-url "https://aoss.us-east-2.amazonaws.com" \
    --region "us-east-2"

aws opensearchserverless delete-access-policy \
    --name product-vectors-data \
    --type data \
    --endpoint-url "https://aoss.us-east-2.amazonaws.com" \
    --region "us-east-2"

Upgrading existing collections

To move to the new architecture, create a new collection group and collection, then reindex your data into it. For a step-by-step walkthrough of the reindexing process, refer to Perform reindexing in Amazon OpenSearch Serverless using Amazon OpenSearch Ingestion. Your queries and index mappings remain the same. Only the collection endpoint changes. With the new static Regional endpoint, that is a one-time update.

The new architecture supports SEARCH and VECTORSEARCH collection types. TIMESERIES is not supported at launch.

Conclusion

The new Amazon OpenSearch Serverless architecture is available today. You can create your first OpenSearch Serverless collection in seconds with Express Create, scale it to handle production traffic, and your OpenSearch Serverless compute costs drop to zero when it sits idle.

To learn more:

  1. Amazon OpenSearch Service documentation.
  2. Amazon OpenSearch Service console.
  3. Amazon OpenSearch Service pricing page.

If you have questions or feedback, open a support case or reach out through your AWS account team. We look forward to seeing what you build.
About the authors

Sohaib Katariwala

Sohaib Katariwala

Sohaib is a Senior Specialist Solutions Architect at AWS focused on Amazon OpenSearch Service based out of Chicago, IL. His interests are in all things data and analytics. More specifically he loves to help customers use AI in their data strategy to solve modern day challenges.

Raj Ramasubbu

Raj Ramasubbu

Raj is a Senior Analytics and AI Specialist Solutions Architect at AWS, focused on big data, analytics, and AI/ML. He partners with customers to architect and build highly scalable, performant, and secure cloud-based solutions.

Arjun Nambiar

Arjun Nambiar

Arjun is a Product Manager with Amazon OpenSearch Service. He focuses on ingestion technologies that enable ingesting data from a wide variety of sources into Amazon OpenSearch Service at scale. Arjun is interested in large-scale distributed systems and cloud-centered technologies, and is based out of Seattle, Washington.

Trusted identity propagation using IAM Identity Center for Amazon OpenSearch Service

Post Syndicated from Sohaib Katariwala original https://aws.amazon.com/blogs/big-data/trusted-identity-propagation-using-iam-identity-center-for-amazon-opensearch-service/

Enterprise customers of Amazon OpenSearch Service require comprehensive security controls with seamless authentication and authorization mechanisms when accessing data in provisioned domains and Amazon OpenSearch Serverless collections. Security teams within these organizations must not only maintain compliance with enterprise policies but also need to make sure that their users can access data securely, with robust identity management. AWS IAM Identity Center is a popular mechanism for identity management that provides single sign-on (SSO) capabilities for these enterprise customers. IAM Identity Center can use Security Assertion Markup Language (SAML) with both OpenSearch Service provisioned domains and OpenSearch Serverless. Now, by using trusted identity propagation, IAM Identity Center provides a new, direct method for accessing data in OpenSearch Service.

In this post, we outline how you can take advantage of this new access method to simplify data access using the OpenSearch UI and still maintain robust role-based access control for your OpenSearch data.

Trusted identity propagation overview

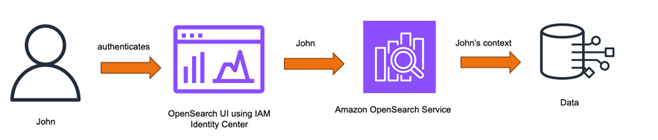
Trusted identity propagation in IAM Identity Center adds the identity context of a user to a role when accessing OpenSearch Service, which in turn uses this context to authorize and scope OpenSearch data access. This simplifies the authentication and authorization flow for customers because the applications access the data on their behalf. Users or user agents need not be present between the application and the backend services for this authorization to happen, unlike methods like SAML where a user agent needs to be present between these entities as a go-between for exchanging assertions. This flexibility helps simplify accessing a wide variety of data sources such as data residing within the Amazon Virtual Private Cloud (Amazon VPC) of an OpenSearch Service domain, or an OpenSearch Serverless collection. By using the OpenSearch UI, you can additionally simplify the backend connections, resulting in seamless access to the data. The following figures shows how the identity propagation works with OpenSearch Service.

Prerequisites

Before starting to use IAM Identity Center with OpenSearch Service, there are a few options that you must enable. To start, set up an organization or account instance of IAM Identity Center following the instruction in this guide. For OpenSearch Service-provisioned domains, you must enable the IAM Identity Center (IDC) Authentication –new option. You can do this though AWS CloudFormation, OpenSearch REST API, AWS SDK, or the AWS Management Console.

To enable Identity Center using the console

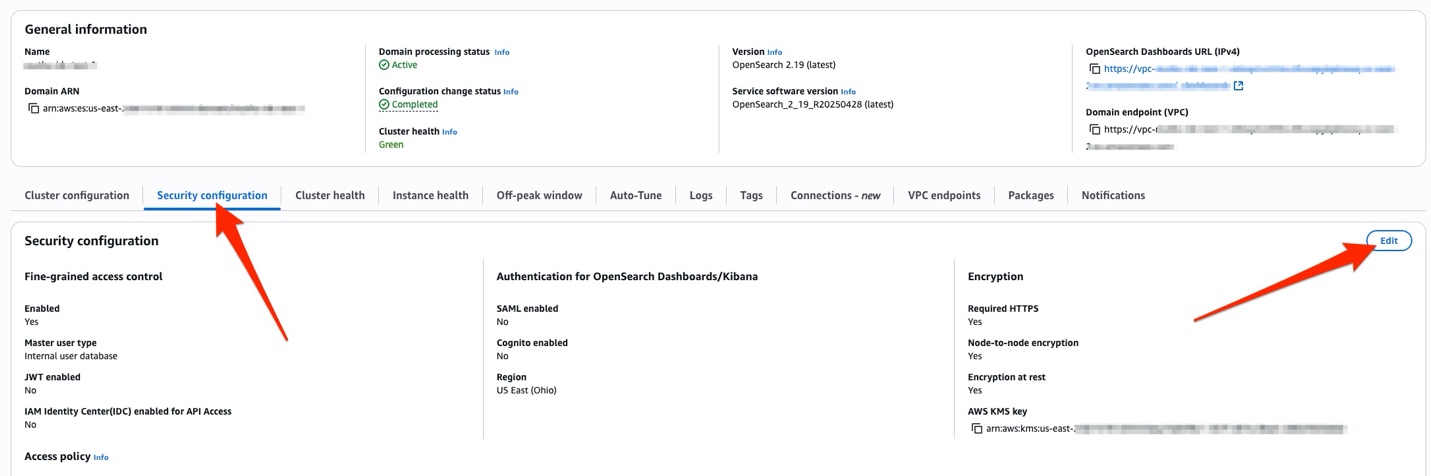
  1. To add the capability for an existing provisioned domain, go to the OpenSearch Service console and navigate to the Security configuration tab and choose Edit.

Amazon OpenSearch Service console highlighting security settings, cluster health status, and VPC endpoint configuration

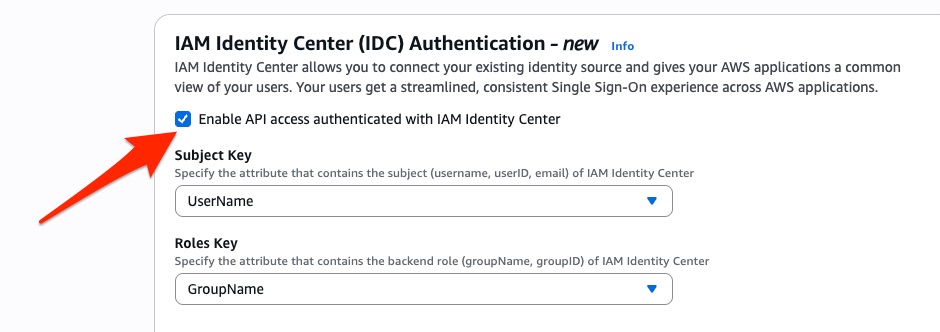
  1. After this step, or if you are creating new domain, select the check box for IAM Identity Center (IDC) Authentication – new.
  2. You have various options to choose for Subject Key and Roles Key depending upon how you want to establish your role-based access control discussed later in this post. For now, select UserName for Subject Key and GroupName for Roles Key.

AWS IAM Identity Center SSO configuration interface with API authentication controls and identity mapping settings

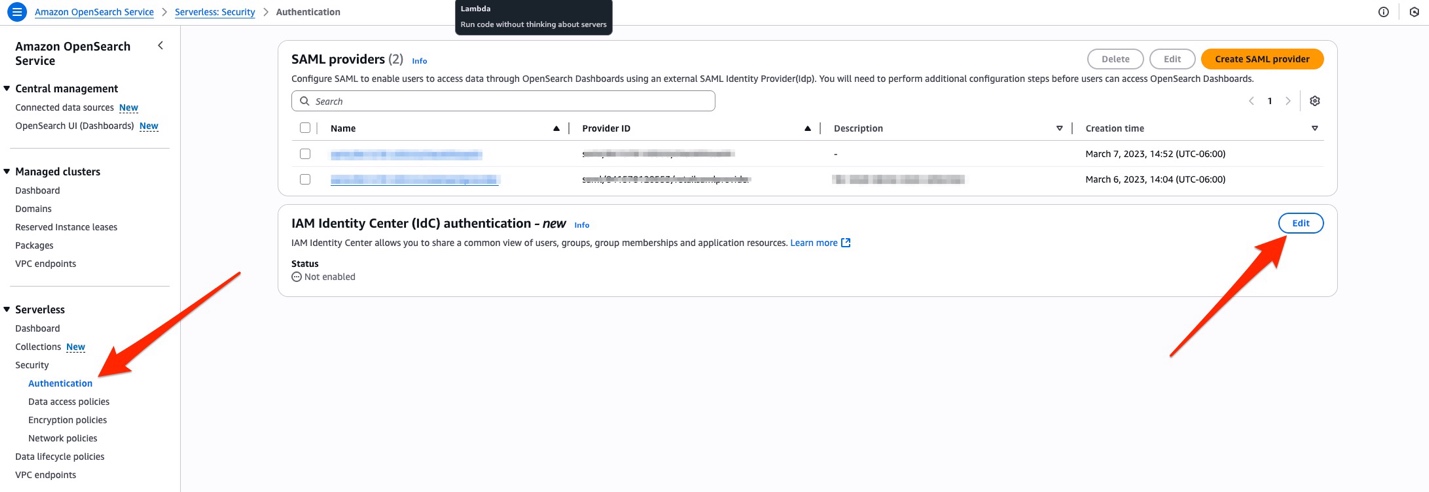
  1. For OpenSearch Serverless, choose Serverless in the navigation pane, then Security and Authentication. Choose Edit in the IAM Identity Center (IdC) authentication – new section.

AWS OpenSearch Service authentication management console with SAML providers list and IAM Identity Center integration status

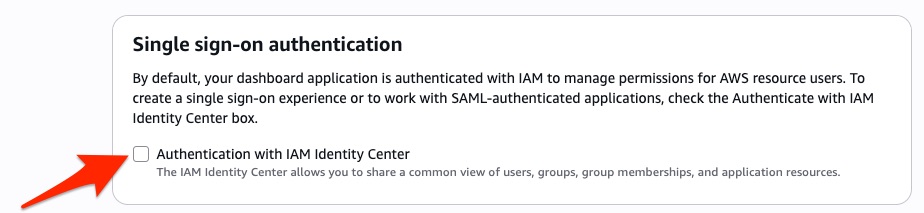
  1. Select the checkbox for Authenticate with IAM Identity Center, and then choose Save.

AWS IAM Identity Center configuration modal for enabling centralized authentication and resource access management

  1. Select the checkbox for Authentication with IAM Identity Center under Single sign-on authentication, when creating an OpenSearch UI application. For step-by-step instructions on how to create an OpenSearch UI application, see Creating an OpenSearch UI application

AWS single sign-on setup interface with option to enable IAM Identity Center for unified access management

After these steps, you’re ready to configure IAM Identity Center by creating new users and groups, or by using existing user identities.

Propagating IAM Identity Center identities

Currently, adding single sign-on authentication with IAM Identity Center can be done while setting up a new OpenSearch UI application. Use the following steps to create a new OpenSearch UI application. Note that single sign-on currently cannot be turned on after an application is created. After single sign-on is enabled, you should see an AWS managed application under Applications in the Identity Center console.

AWS Identity Center interface showing managed applications tab with OpenSearch integration and service details

Assigning users and groups

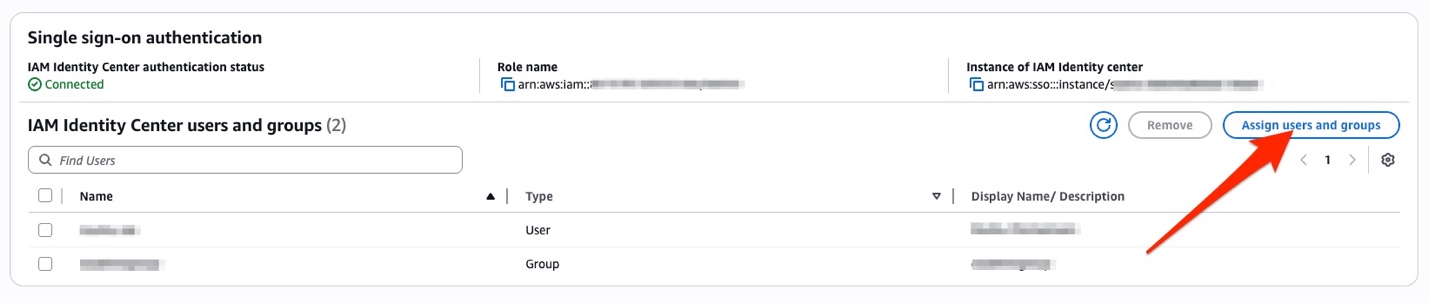
After the application is created and the status shows as Active, you need to assign users and groups to the application. This assignment is important and recommended because these assignments determine the scope and permissions for data access within OpenSearch Service. To do this, select the application you created in the previous steps in the OpenSearch Service console. Here, you will see an option for IAM Identity Center user and groups under Single sign-on authentication. Choose Assign users and groups and select the appropriate Identity Center users and groups.

 AWS IAM Identity Center dashboard showing connected status, role details, and option to assign users and groups for SSO

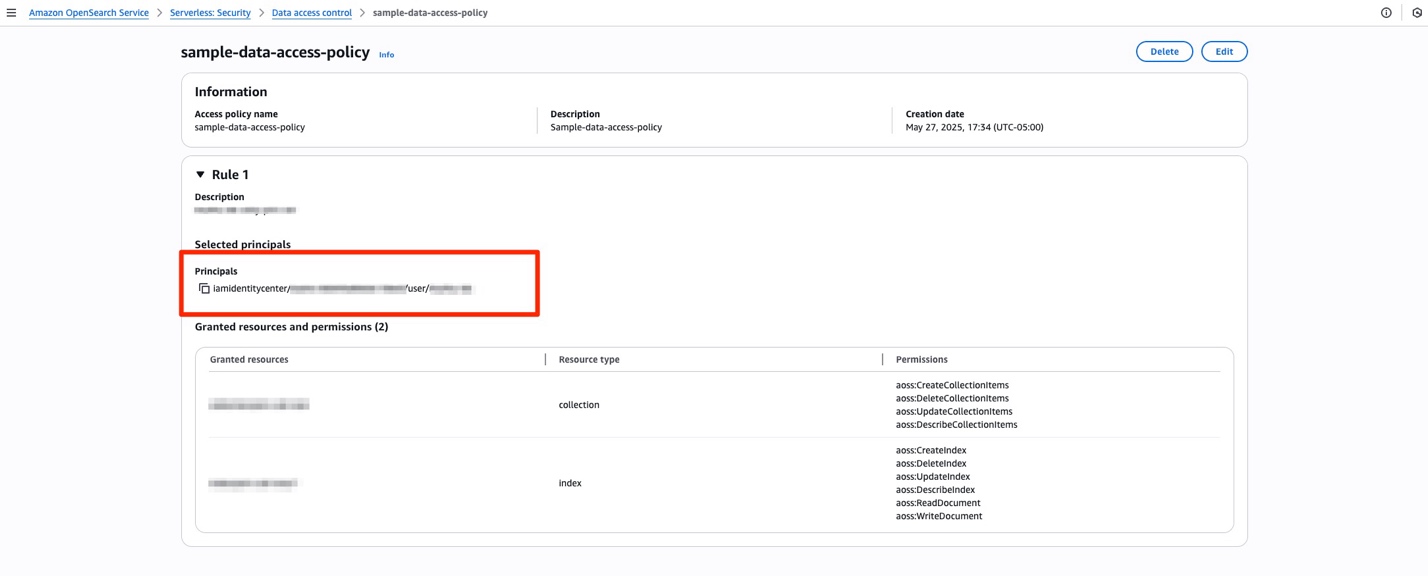
For OpenSearch Serverless, you must create a new data access policy or add a rule to an existing one to grant IAM Identity Center principals appropriate permissions to access the collections. For example, the following figure shows a data access policy that grants specific permissions to a one user with Rule 1 and provide a more restrictive permission to a group with Rule 2.

Amazon OpenSearch Service console displaying sample data access policy with IAM principal and collection/index permissions

At this point your OpenSearch Service domains, OpenSearch Serverless collections and OpenSearch UI are set up for identity propagation.

Fine grained access control for IAM Identity Center identities

Fine grained access control is a role-based access control for OpenSearch Service that provides security at index, document, and field levels for provisioned domains. You can choose what aspects of identity context you propagate to OpenSearch Service. You can choose between UserId, UserName, and Email for your Subject keys, and GroupId and GroupName for your Roles key. This configuration is important because the values of the properties in the identity context are used to match exactly with the user and backend role mapping within OpenSearch Service provisioned domains. Note that if IAM Identity Center sign-on isn’t enabled, OpenSearch Service can only evaluate the request signature with AWS signature Version 4. This means that the role your OpenSearch UI will use won’t contain identity context for authorization. To complete authorization, add the values of the identity context fields to the OpenSearch role mapping. See Mapping roles to users under Managing permissions. Role mapping can be done using OpenSearch REST API, AWS SDK, or using OpenSearch Dashboards.

To map roles using OpenSearch Dashboards

  1. From the menu icon  on the top left corner or your screen, select Management, Security, Roles, <Your role>.
  2. Choose the Mapped Users tab and select Manage mapping.

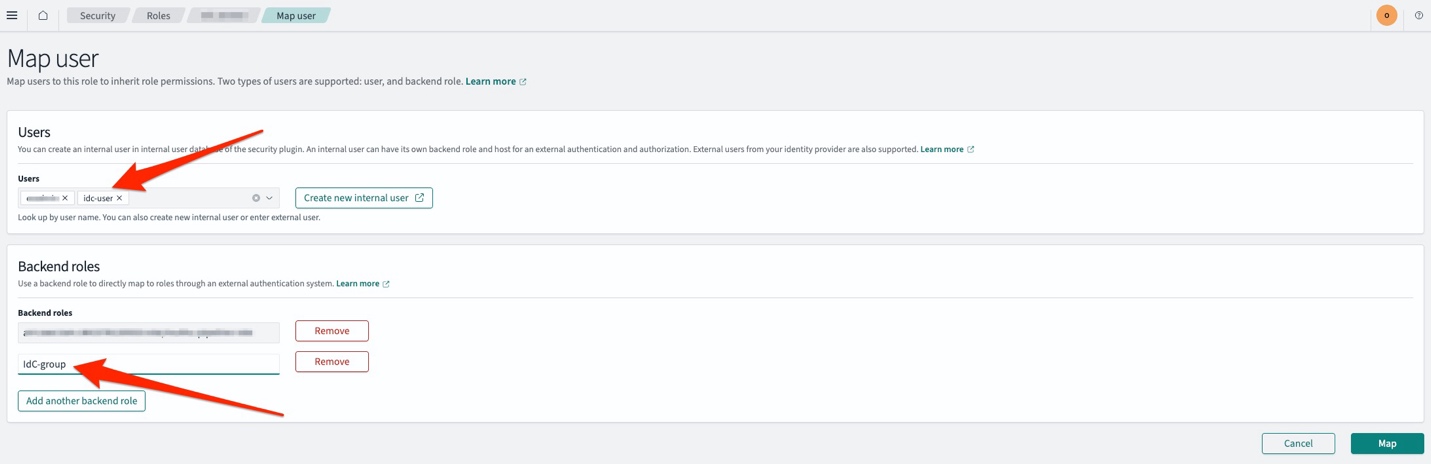
AWS security console showing Map User interface with internal user creation and backend role management for IAM

  1. When mapping the role, make sure that you enter the values corresponding to the Subject key. This value must be the same as in your identity context. Additionally, use the Roles key to assign access-based IAM Identity Center groups.

With OpenSearch Serverless, the granularity of access control is at the index level so you will need to add additional rules in the Data Access Policy to control principals who can access collections or indices within a collection.

Verifying identity propagation

The final step is to verify identity propagation.

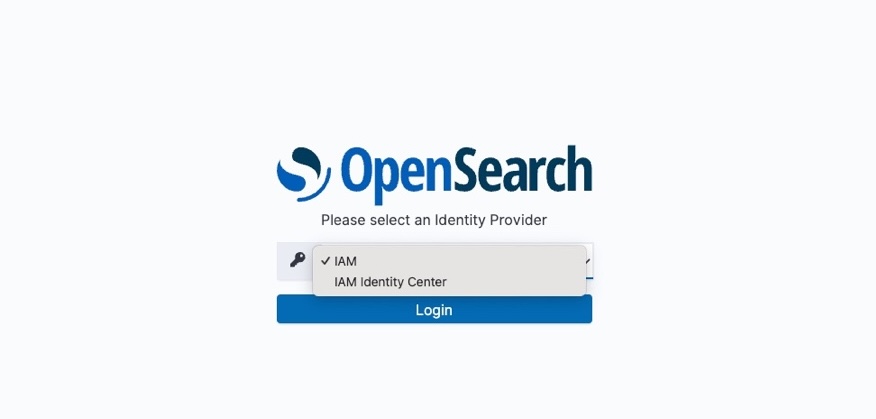
  1. Open the OpenSearch UI application and select IAM Identity Center from the Login drop down.

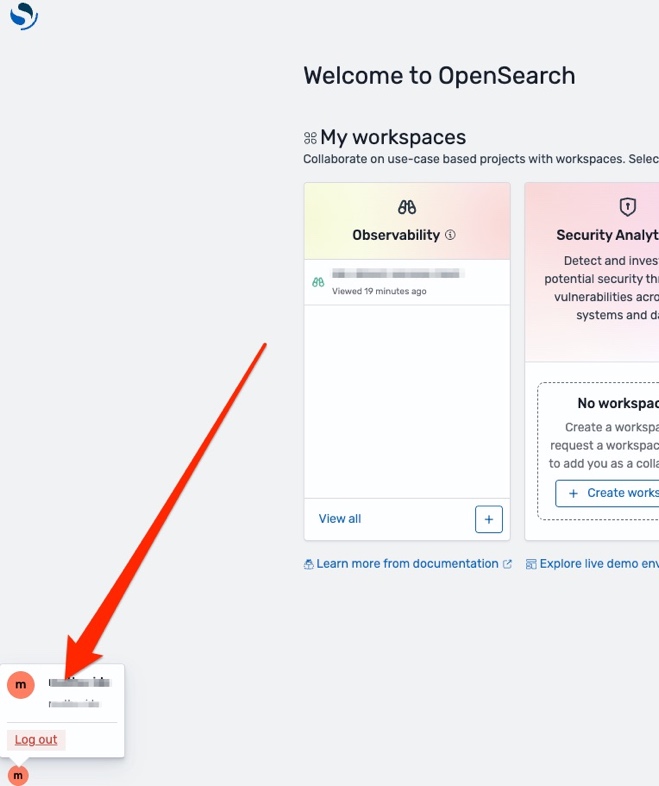
  1. After you complete the login process with IAM Identity Center, the OpenSearch UI will open. Choose the user icon in the lower left corner of the screen to verify that it’s your correct principal from Identity Center. It should match the Identity Center property you chose earlier.

OpenSearch welcome interface showing available workspaces, documentation links, and user profile menu with logout option

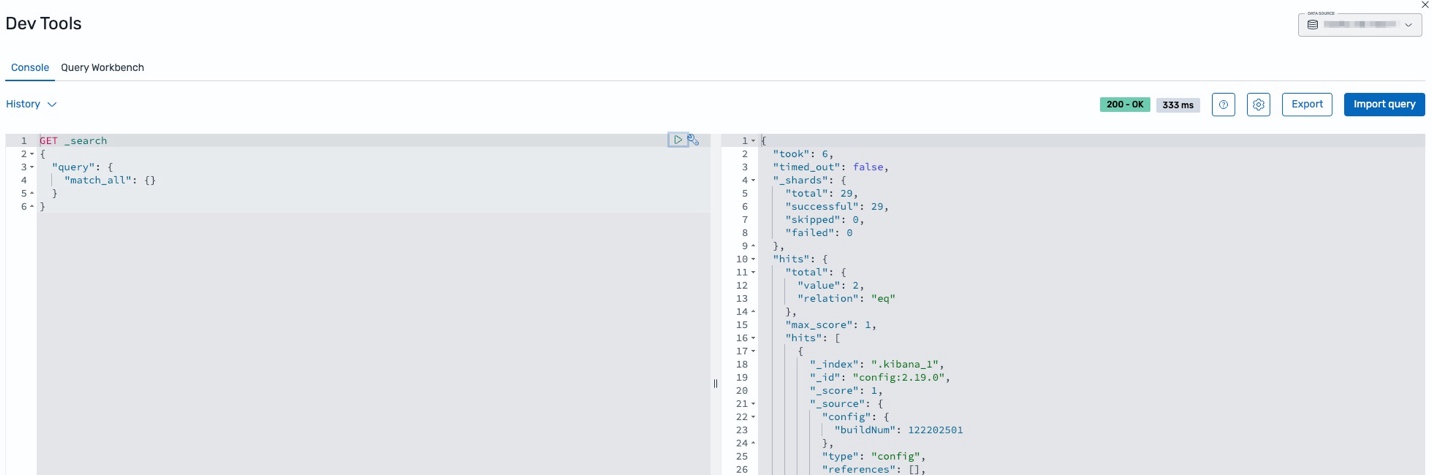
  1. To verify correct identity propagation, choose the Dev tools  icon just above the user profile icon in the bottom left corner of the screen.
  2. Select the correct OpenSearch domain or OpenSearch Serverless collection data source in the top right corner of the screen and run a _search query. You should see results from the data source confirming that the identity is correctly propagated to OpenSearch Service.

Dev tools showing successful search operation with 5ms response time and config details

Conclusion

In this post, we showed you how to use Trusted Identity Propagation using IAM Identity Center for Amazon OpenSearch Service, providing a streamlined approach to secure data access while maintaining robust access controls. This solution offers several key benefits:

  • Simplified authentication: By eliminating the need for user agents between applications and backend services, the solution streamlines the authentication process compared to traditional SAML-based approaches.
  • Enhanced security: The integration maintains comprehensive security controls while providing seamless authentication and authorization mechanisms for both OpenSearch Service provisioned domains and Amazon OpenSearch Serverless collections.
  • Flexible identity management: Organizations can use existing IAM Identity Center implementations to manage user access, making it easier to maintain compliance with enterprise security policies.
  • Fine-grained access control: The solution supports detailed access control at the index, document, and field level for provisioned domains, allowing organizations to implement precise security measures.

Get started implementing this solution in your environment today!

For more information about identity management and security best practices with OpenSearch Service, we recommend:


About the authors

Muthu Pitchaimani is a Search Specialist with Amazon OpenSearch Service. He builds large-scale search applications and solutions. Muthu is interested in the topics of networking and security, and is based out of Austin, Texas.

Sohaib Katariwala is a Senior Specialist Solutions Architect at AWS focused on Amazon OpenSearch Service based out of Chicago, IL. His interests are in all things data and analytics. More specifically he loves to help customers use AI in their data strategy to solve modern day challenges.

Optimizing vector search using Amazon S3 Vectors and Amazon OpenSearch Service

Post Syndicated from Sohaib Katariwala original https://aws.amazon.com/blogs/big-data/optimizing-vector-search-using-amazon-s3-vectors-and-amazon-opensearch-service/

NOTE: As of July 15, the Amazon S3 Vectors Integration with Amazon OpenSearch Service is in preview release and is subject to change.

The way we store and search through data is evolving rapidly with the advancement of vector embeddings and similarity search capabilities. Vector search has become essential for modern applications such as generative AI and agentic AI, but managing vector data at scale presents significant challenges. Organizations often struggle with the trade-offs between latency, cost, and accuracy when storing and searching through millions or billions of vector embeddings. Traditional solutions either require substantial infrastructure management or come with prohibitive costs as data volumes grow.

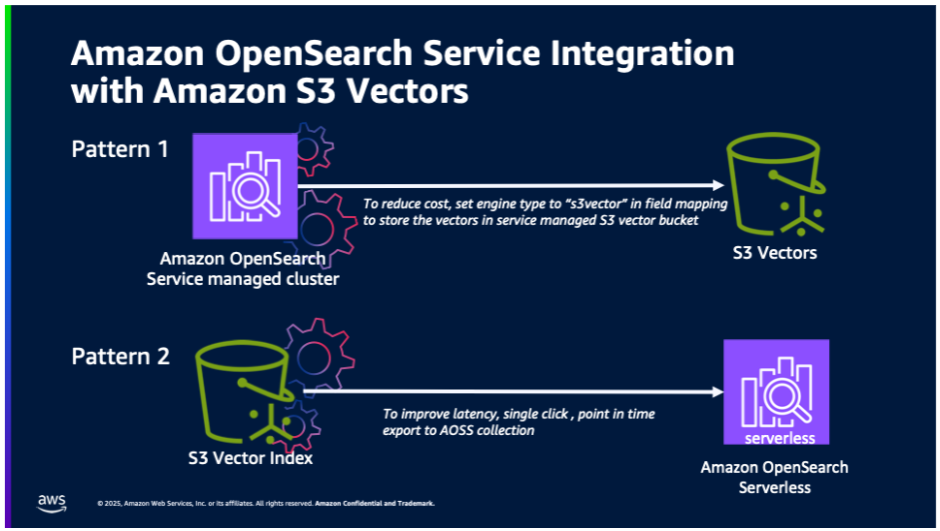
We now have a public preview of two integrations between Amazon Simple Storage Service (Amazon S3) Vectors and Amazon OpenSearch Service that give you more flexibility in how you store and search vector embeddings:

  1. Cost-optimized vector storage: OpenSearch Service managed clusters using service-managed S3 Vectors for cost-optimized vector storage. This integration will support OpenSearch workloads that are willing to trade off higher latency for ultra-low cost and still want to use advanced OpenSearch capabilities (such as hybrid search, advanced filtering, geo filtering, and so on).
  2. One-click export from S3 Vectors: One-click export from an S3 vector index to OpenSearch Serverless collections for high-performance vector search. Customers who build natively on S3 Vectors will benefit from being able to use OpenSearch for faster query performance.

By using these integrations, you can optimize cost, latency, and accuracy by intelligently distributing your vector workloads by keeping infrequent queried vectors in S3 Vectors and using OpenSearch for your most time-sensitive operations that require advanced search capabilities such as hybrid search and aggregations. Further, OpenSearch performance tuning capabilities (that is, quantization, k-nearest neighbor (knn) algorithms, and method-specific parameters) help to improve the performance with little compromise of cost or accuracy.

In this post, we walk through this seamless integration, providing you with flexible options for vector search implementation. You’ll learn how to use the new S3 Vectors engine type in OpenSearch Service managed clusters for cost-optimized vector storage and how to use one-click export from S3 Vectors to OpenSearch Serverless collections for high-performance scenarios requiring sustained queries with latency as low as 10ms. By the end of this post, you’ll understand how to choose and implement the right integration pattern based on your specific requirements for performance, cost, and scale.

Service overview

Amazon S3 Vectors is the first cloud object store with native support to store and query vectors with sub-second search capabilities, requiring no infrastructure management. It combines the simplicity, durability, availability, and cost-effectiveness of Amazon S3 with native vector search functionality, so you can store and query vector embeddings directly in S3. Amazon OpenSearch Service provides two complementary deployment options for vector workloads: Managed Clusters and Serverless Collections. Both harness Amazon OpenSearch’s powerful vector search and retrieval capabilities, though each excels in different scenarios. For OpenSearch users, the integration between S3 Vectors and Amazon OpenSearch Service offers unprecedented flexibility in optimizing your vector search architecture. Whether you need ultra-fast query performance for real-time applications or cost-effective storage for large-scale vector datasets, this integration lets you choose the approach that best fits your specific use case.

Understanding Vector Storage Options

OpenSearch Service provides multiple options for storing and searching vector embeddings, each optimized for different use cases. The Lucene engine, which is OpenSearch’s native search library, implements the Hierarchical Navigable Small World (HNSW) method, offering efficient filtering capabilities and strong integration with OpenSearch’s core functionality. For workloads requiring additional optimization options, the Faiss engine (Facebook AI Similarity Search) provides implementations of both HNSW and IVF (Inverted File Index) methods, along with vector compression capabilities. HNSW creates a hierarchical graph structure of connections between vectors, enabling efficient navigation during search, while IVF organizes vectors into clusters and searches only relevant subsets during query time. With the introduction of the S3 engine type, you now have a cost-effective option that uses Amazon S3’s durability and scalability while maintaining sub-second query performance. With this variety of options, you can choose the most suitable approach based on your specific requirements for performance, cost, and accuracy. For instance, if your application requires sub-50 ms query responses with efficient filtering, Faiss’s HNSW implementation is the best choice. Alternatively, if you need to optimize storage costs while maintaining reasonable performance, the new S3 engine type would be more appropriate.

Solution overview

In this post, we explore two primary integration patterns:

OpenSearch Service managed clusters using service-managed S3 Vectors for cost-optimized vector storage.

For customers already using OpenSearch Service domains who want to optimize costs while maintaining sub-second query performance, the new Amazon S3 engine type offers a compelling solution. OpenSearch Service automatically manages vector storage in Amazon S3, data retrieval, and cache optimization, eliminating operational overhead.

One-click export from an S3 vector index to OpenSearch Serverless collections for high-performance vector search.

For use cases requiring faster query performance, you can migrate your vector data from an S3 vector index to an OpenSearch Serverless collection. This approach is ideal for applications that require real-time response times and gives you the benefits that come with Amazon OpenSearch Serverless, including advanced query capabilities and filters, automatic scaling and high availability, and no administration. The export process automatically handles schema mapping, vector data transfer, index optimization, and connection configuration.

The following illustration shows the two integration patterns between Amazon OpenSearch Service and S3 Vectors.

Prerequisites

Before you begin, make sure you have:

  • An AWS account
  • Access to Amazon S3 and Amazon OpenSearch Service
  • An OpenSearch Service domain (for the first integration pattern)
  • Vector data stored in S3 Vectors (for the second integration pattern)

Integration pattern 1: OpenSearch Service managed cluster using S3 Vectors

To implement this pattern:

  1. Create an OpenSearch Service Domain using OR1 instances on OpenSearch version 2.19.
    1. While creating the OpenSearch Service domain, choose the Enable S3 Vectors as an engine option in the Advanced features section.
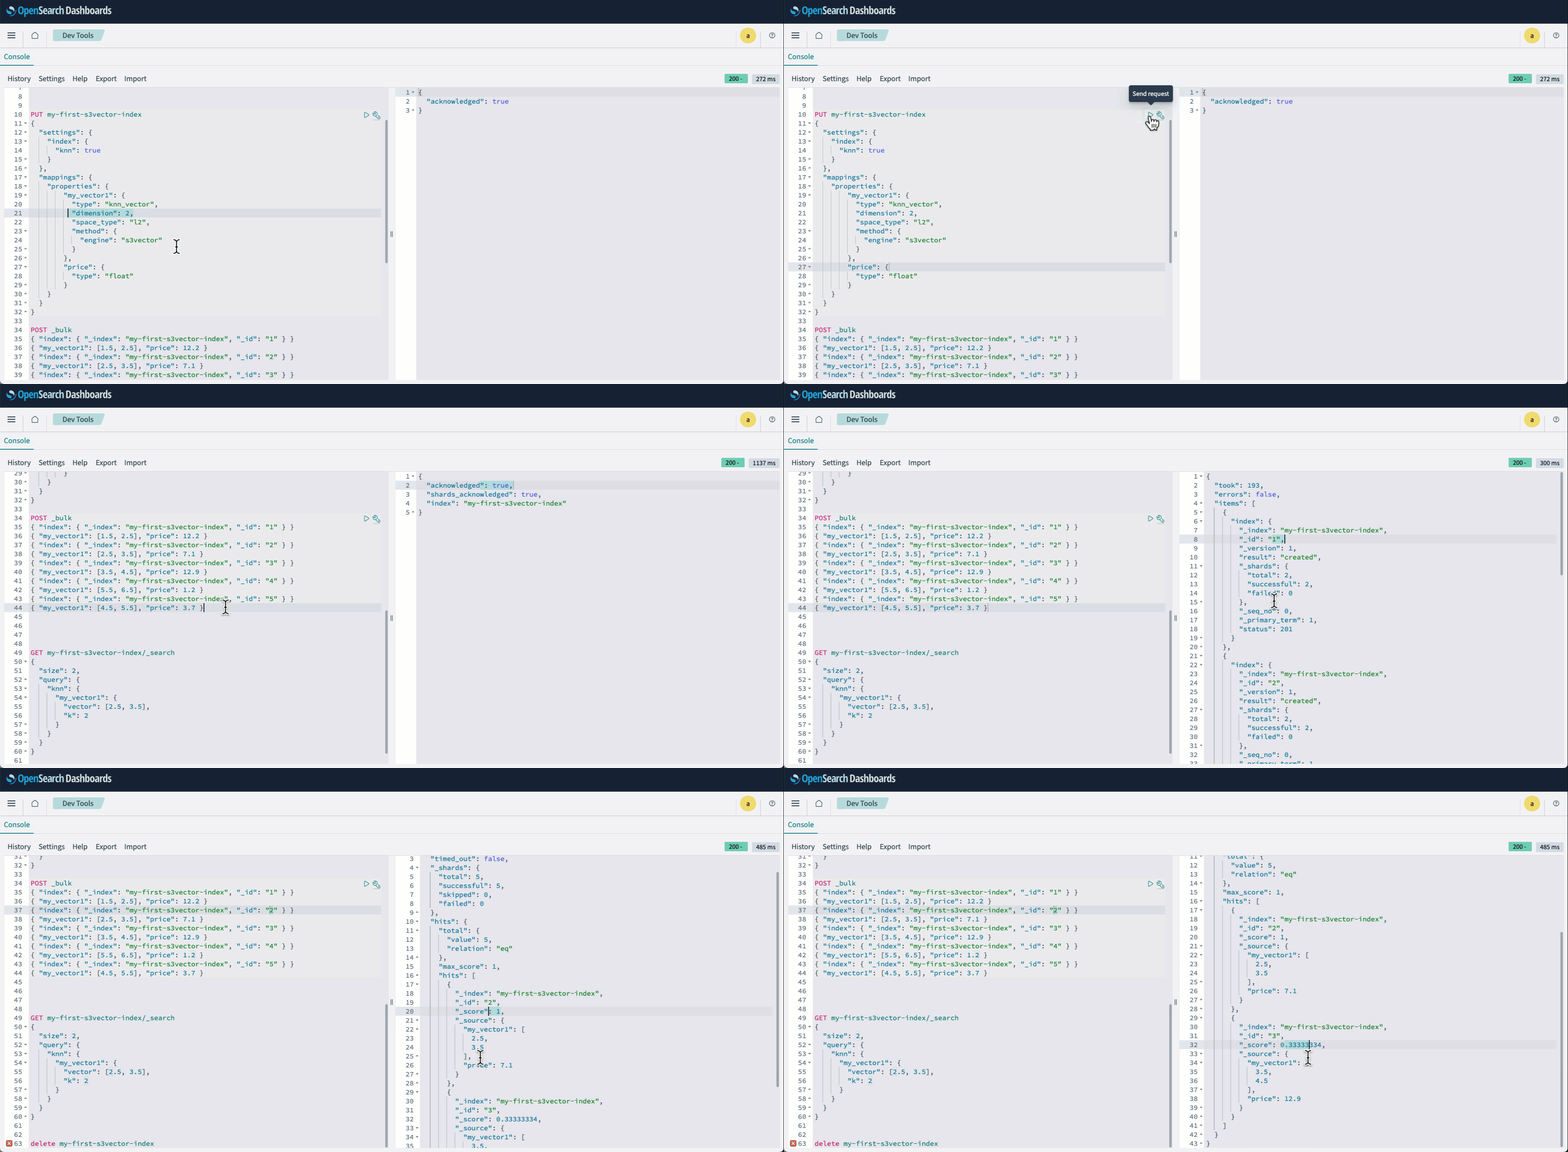
  2. Sign in to OpenSearch Dashboards and open Dev tools. Then create your knn index and specify s3vector as the engine.
PUT my-first-s3vector-index
{
  "settings": {
    "index": {
      "knn": true
    }
  },
  "mappings": {
    "properties": {
        "my_vector1": {
          "type": "knn_vector",
          "dimension": 2,
          "space_type": "l2",
          "method": {
            "engine": "s3vector"
          }
        },
        "price": {
          "type": "float"
        }
    }
  }
} 
  1. Index your vectors using the Bulk API:
POST _bulk
{ "index": { "_index": "my-first-s3vector-index", "_id": "1" } }
{ "my_vector1": [2.5, 3.5], "price": 7.1 }
{ "index": { "_index": "my-first-s3vector-index", "_id": "3" } }
{ "my_vector1": [3.5, 4.5], "price": 12.9 }
{ "index": { "_index": "my-first-s3vector-index", "_id": "4" } }
{ "my_vector1": [5.5, 6.5], "price": 1.2 }
{ "index": { "_index": "my-first-s3vector-index", "_id": "5" } }
{ "my_vector1": [4.5, 5.5], "price": 3.7 }
{ "index": { "_index": "my-first-s3vector-index", "_id": "6" } }
{ "my_vector1": [1.5, 2.5], "price": 12.2 }
  1. Run a knn query as usual:
GET my-first-s3vector-index/_search
{
  "size": 2,
  "query": {
    "knn": {
      "my_vector1": {
        "vector": [2.5, 3.5],
        "k": 2
      }
    }
  }
}

The following animation demonstrates steps 2-4 above.

Integration pattern 2: Export S3 vector indexes to OpenSearch Serverless

To implement this pattern:

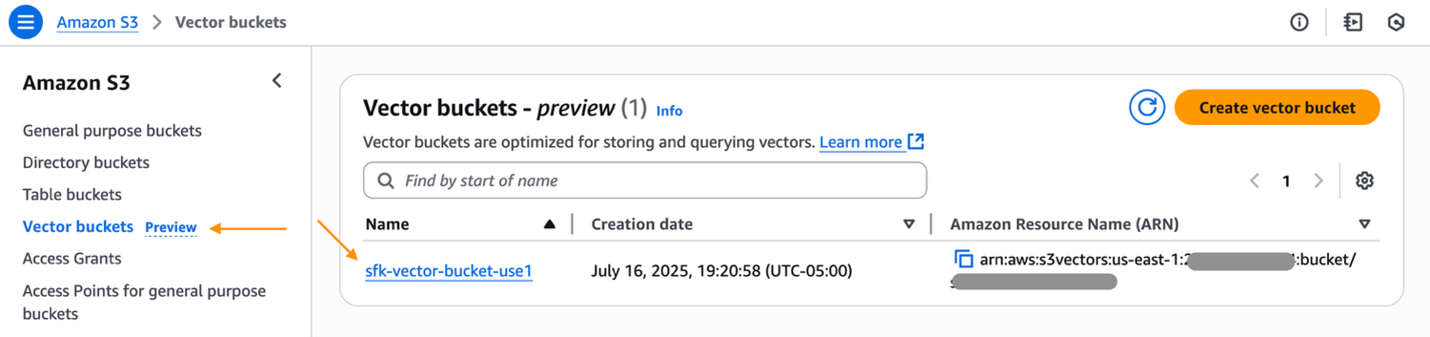
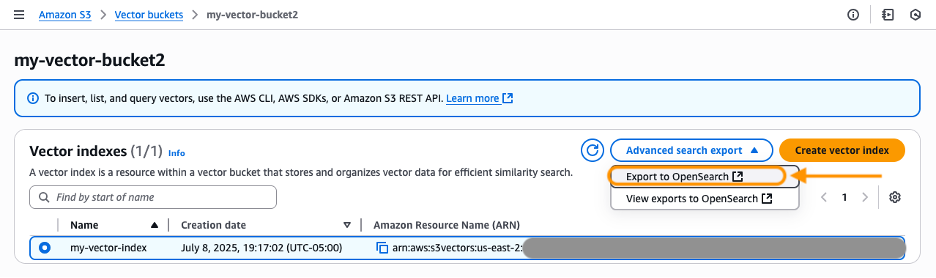
  1. Navigate to the AWS Management Console for Amazon S3 and select your S3 vector bucket.

  1. Select a vector index that you want to export. Under Advanced search export, select Export to OpenSearch.

Alternatively, you can:

  1. Navigate to the OpenSearch Service console.
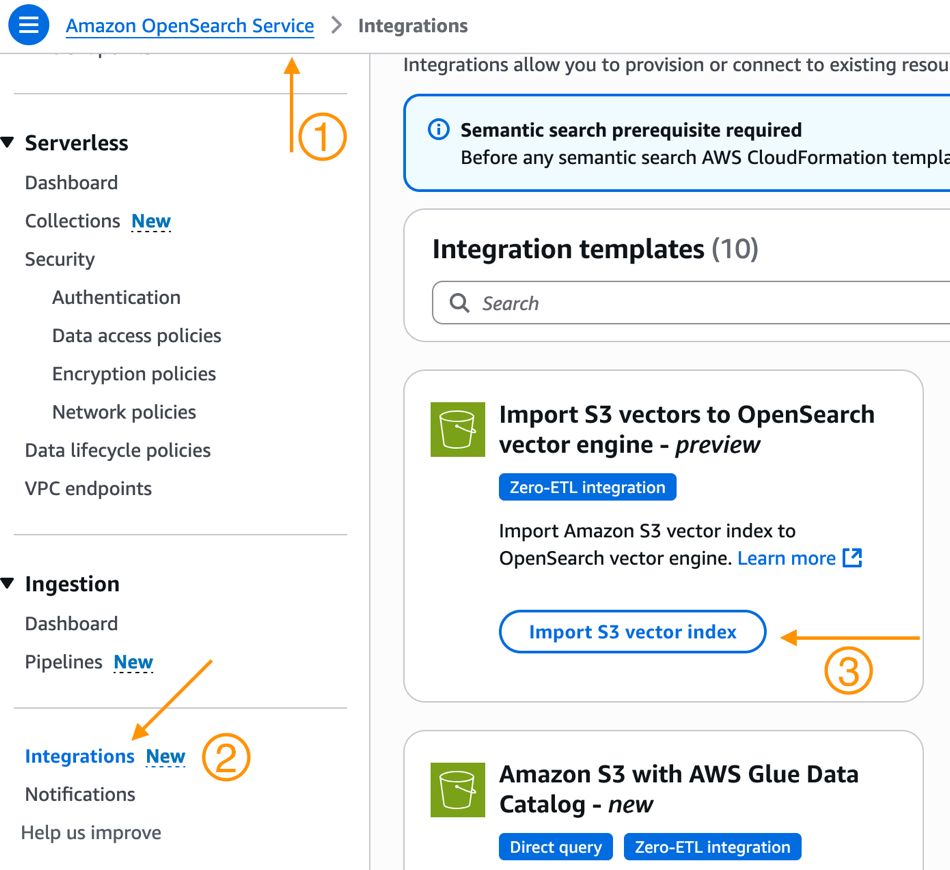
  2. Select Integrations from the navigation pane.
  3. Here you will see a new Integration Template to Import S3 vectors to OpenSearch vector engine – preview. Select Import S3 vector index.

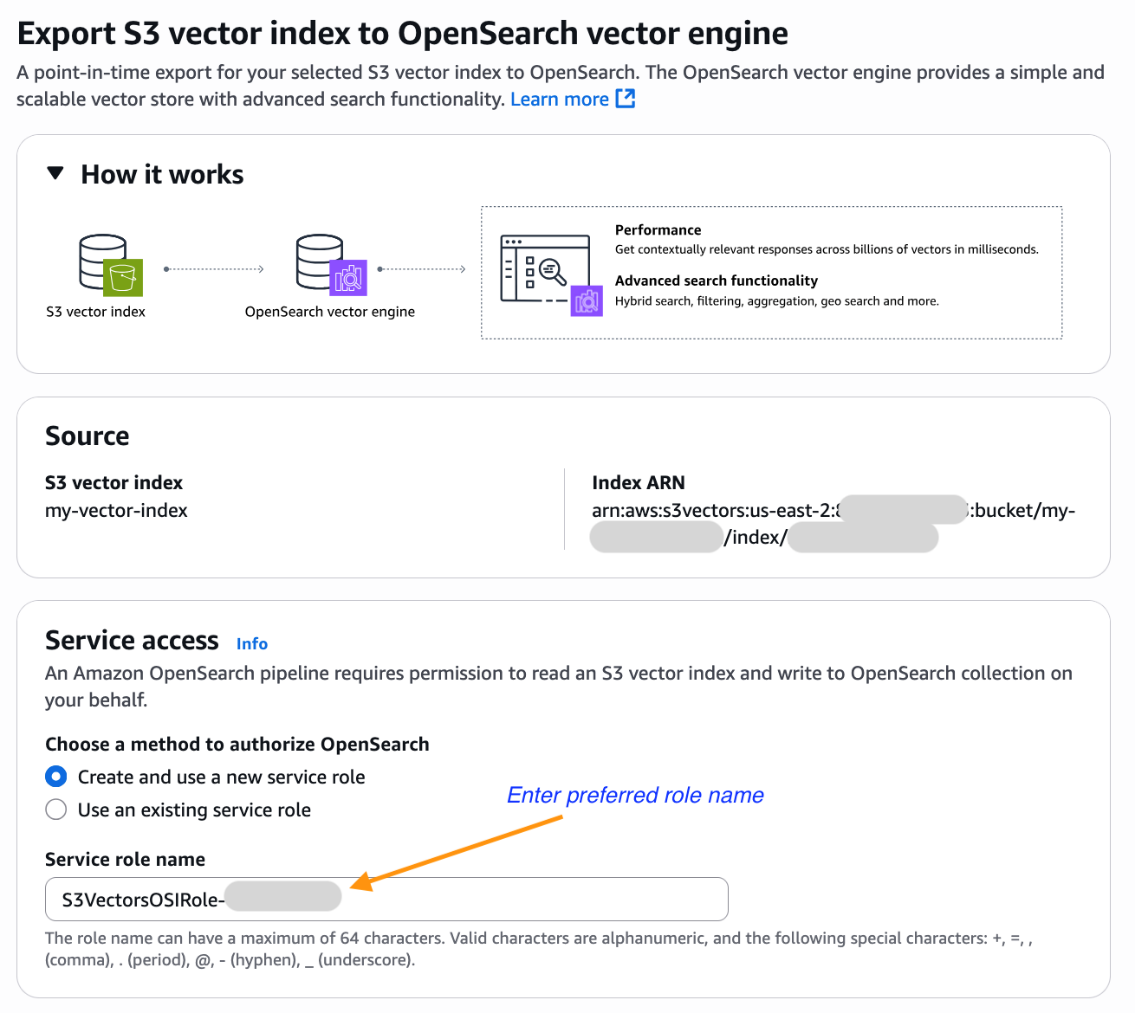
  1. You will now be brought to the Amazon OpenSearch Service integration console with the Export S3 vector index to OpenSearch vector engine template pre-selected and pre-populated with your S3 vector index Amazon Resource Name (ARN). Select an existing role that has the necessary permissions or create a new service role.

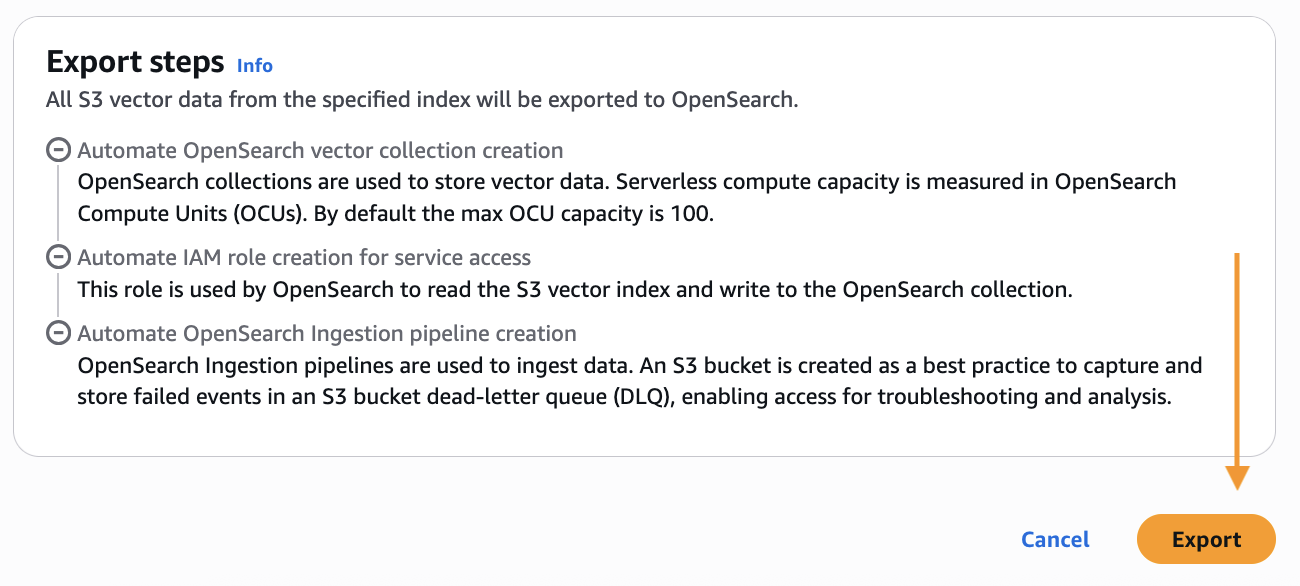
  1. Scroll down and choose Export to start the steps to create a new OpenSearch Serverless collection and copy data from your S3 vector index into an OpenSearch knn index.

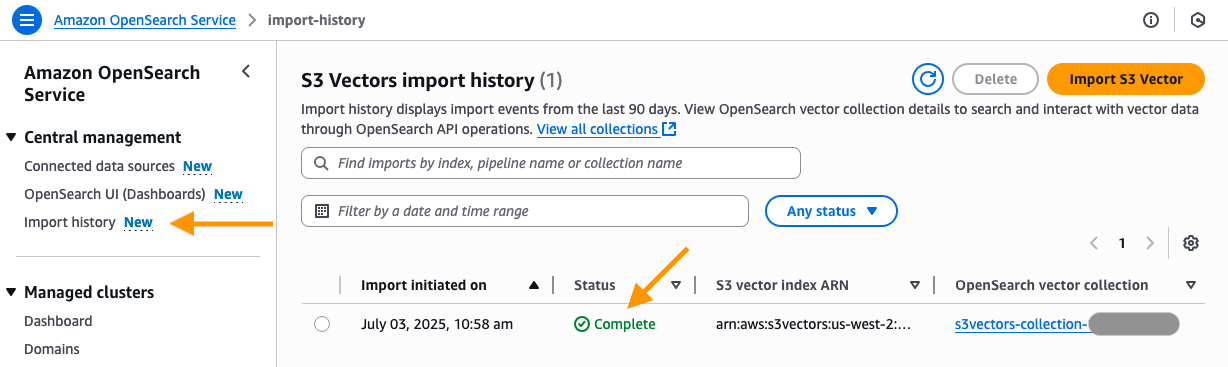
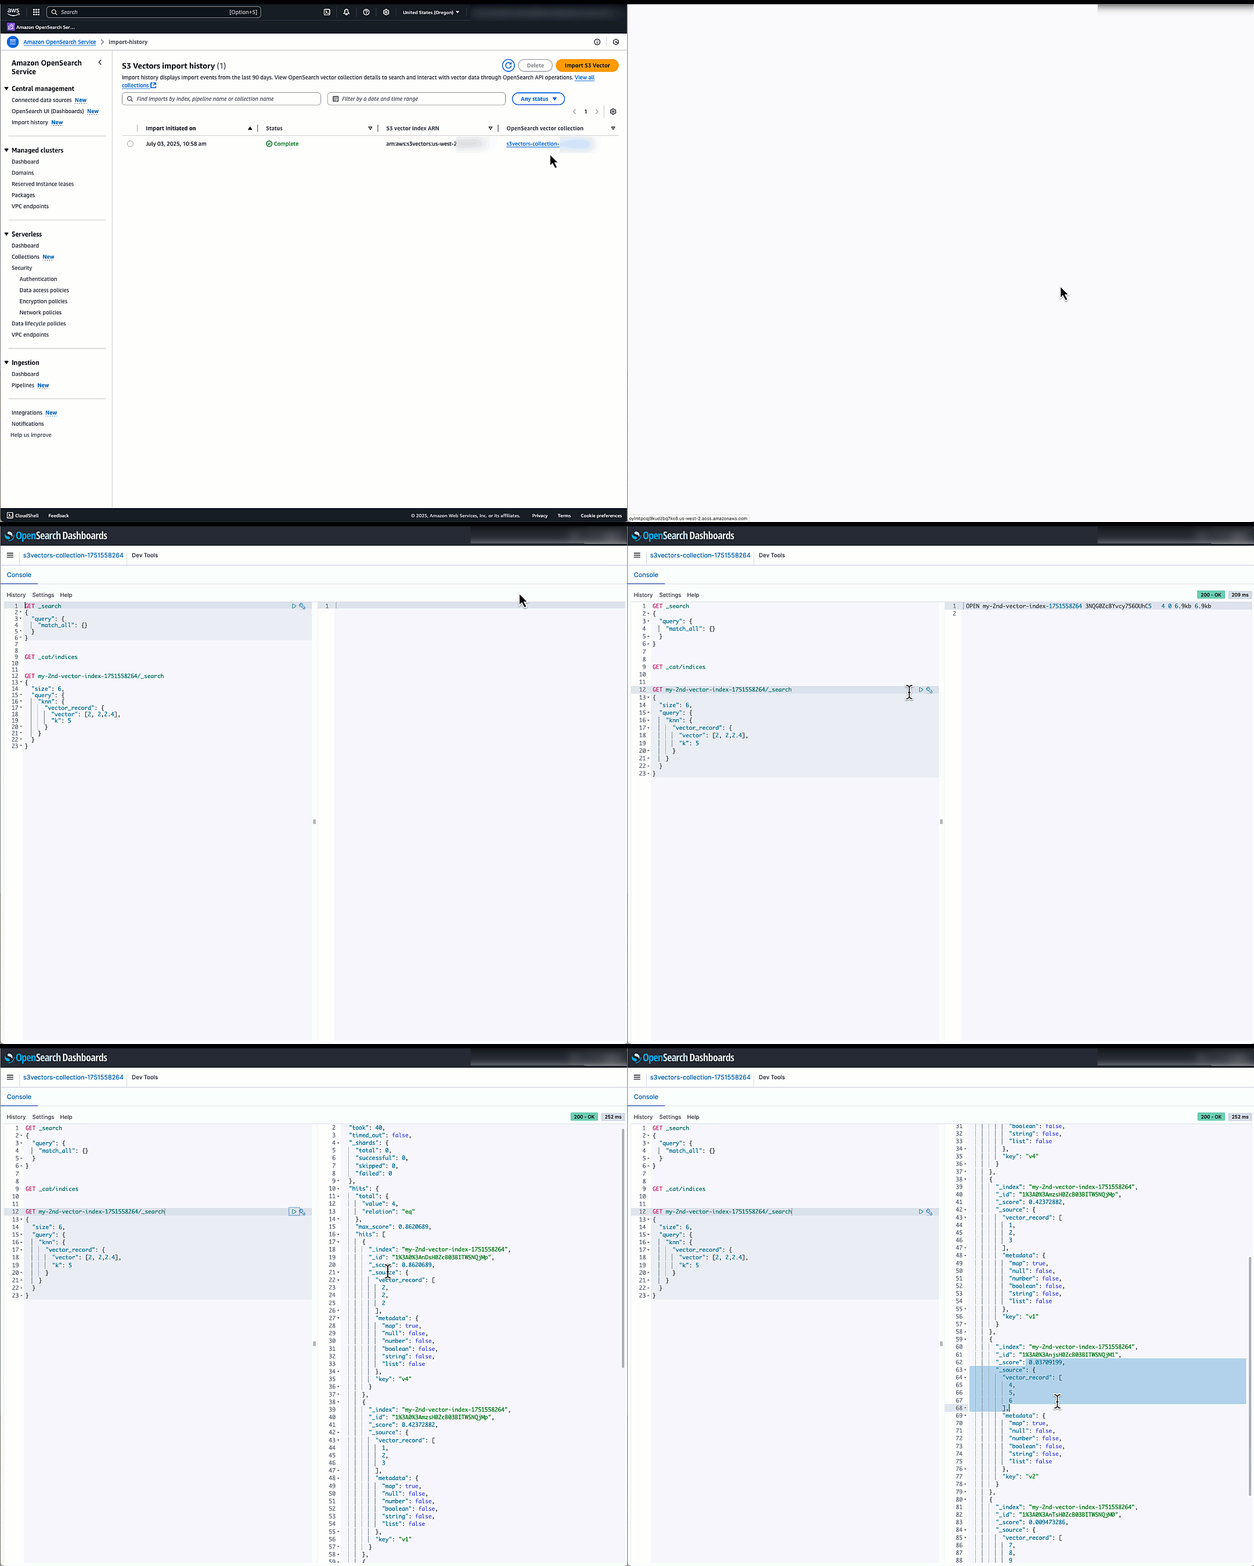
  1. You will now be taken to the Import history page in the OpenSearch Service console. Here you will see the new job that was created to migrate your S3 vector index into the OpenSearch serverless knn index. After the status changes from In Progress to Complete, you can connect to the new OpenSearch serverless collection and query your new OpenSearch knn index.

The following animation demonstrates how to connect to the new OpenSearch serverless collection and query your new OpenSearch knn index using Dev tools.

Cleanup

To avoid ongoing charges:

  1. For Pattern 1:
  1. For Pattern 2:
    • Delete the import task from the Import history section of the OpenSearch Service console. Deleting this task will remove both the OpenSearch vector collection and the OpenSearch Ingestion pipeline that was automatically created by the import task.

Conclusion

The innovative integration between Amazon S3 Vectors and Amazon OpenSearch Service marks a transformative milestone in vector search technology, offering unprecedented flexibility and cost-effectiveness for enterprises. This powerful combination delivers the best of both worlds: The renowned durability and cost efficiency of Amazon S3 merged seamlessly with the advanced AI search capabilities of OpenSearch. Organizations can now confidently scale their vector search solutions to billions of vectors while maintaining control over their latency, cost, and accuracy. Whether your priority is ultra-fast query performance with latency as low as 10ms through OpenSearch Service, or cost-optimized storage with impressive sub-second performance using S3 Vectors or implementing advanced search capabilities in OpenSearch, this integration provides the perfect solution for your specific needs. We encourage you to get started today by trying S3 Vectors engine in your OpenSearch managed clusters and testing the one-click export from S3 vector indexes to OpenSearch Serverless.

For more information, visit:


About the Authors

Sohaib Katariwala is a Senior Specialist Solutions Architect at AWS focused on Amazon OpenSearch Service based out of Chicago, IL. His interests are in all things data and analytics. More specifically he loves to help customers use AI in their data strategy to solve modern day challenges.

Mark Twomey is a Senior Solutions Architect at AWS focused on storage and data management. He enjoys working with customers to put their data in the right place, at the right time, for the right cost. Living in Ireland, Mark enjoys walking in the countryside, watching movies, and reading books.

Sorabh Hamirwasia is a senior software engineer at AWS working on the OpenSearch Project. His primary interest include building cost optimized and performant distributed systems.

Pallavi Priyadarshini is a Senior Engineering Manager at Amazon OpenSearch Service leading the development of high-performing and scalable technologies for search, security, releases, and dashboards.

Bobby Mohammed is a Principal Product Manager at AWS leading the Search, GenAI, and Agentic AI product initiatives. Previously, he worked on products across the full lifecycle of machine learning, including data, analytics, and ML features on SageMaker platform, deep learning training and inference products at Intel.