Today, we’re announcing IAM Policy Autopilot, a new open source Model Context Protocol (MCP) server that analyzes your application code and helps your AI coding assistants generate AWS Identity and Access Management (IAM) identity-based policies. IAM Policy Autopilot accelerates initial development by providing builders with a starting point that they can review and further refine. It integrates with AI coding assistants such as Kiro, Claude Code, Cursor, and Cline, and it provides them with AWS Identity and Access Management (IAM) knowledge and understanding of the latest AWS services and features. IAM Policy Autopilot is available at no additional cost, runs locally, and you can get started by visiting our GitHub repository.
Amazon Web Services (AWS) applications require IAM policies for their roles. Builders on AWS, from developers to business leaders, engage with IAM as part of their workflow. Developers typically start with broader permissions and refine them over time, balancing rapid development with security. They often use AI coding assistants in hopes of accelerating development and authoring IAM permissions. However, these AI tools don’t fully understand the nuances of IAM and can miss permissions or suggest invalid actions. Builders seek solutions that provide reliable IAM knowledge, integrate with AI assistants and get them started with policy creation, so that they can focus on building applications.
Create valid policies with AWS knowledge IAM Policy Autopilot addresses these challenges by generating identity-based IAM policies directly from your application code. Using deterministic code analysis, it creates reliable and valid policies, so you spend less time authoring and debugging permissions. IAM Policy Autopilot incorporates AWS knowledge, including published AWS service reference implementation, to stay up to date. It uses this information to understand how code and SDK calls map to IAM actions and stays current with the latest AWS services and operations.
The generated policies provide a starting point for you to review and scope down to implement least privilege permissions. As you modify your application code—whether adding new AWS service integrations or updating existing ones—you only need to run IAM Policy Autopilot again to get updated permissions.
Getting started with IAM Policy Autopilot Developers can get started with IAM Policy Autopilot in minutes by downloading and integrating it with their workflow.
As an MCP server, IAM Policy Autopilot operates in the background as builders converse with their AI coding assistants. When your application needs IAM policies, your coding assistants can call IAM Policy Autopilot to analyze AWS SDK calls within your application and generate required identity-based IAM policies, providing you with necessary permissions to start with. After permissions are created, if you still encounter Access Denied errors during testing, the AI coding assistant invokes IAM Policy Autopilot to analyze the denial and propose targeted IAM policy fixes. After you review and approve the suggested changes, IAM Policy Autopilot updates the permissions.
You can also use IAM Policy Autopilot as a standalone command line interface (CLI) tool to generate policies directly or fix missing permissions. Both the CLI tool and the MCP server provide the same policy creation and troubleshooting capabilities, so you can choose the integration that best fits your workflow.
When using IAM Policy Autopilot, you should also understand the best practices to maximize its benefits. IAM Policy Autopilot generates identity-based policies and doesn’t create resource-based policies, permission boundaries, service control policies (SCPs) or resource control policies (RCPs). IAM Policy Autopilot generates policies that prioritize functionality over minimal permissions. You should always review the generated policies and refine if necessary so they align with your security requirements before deploying them.
Let’s try it out To set up IAM Policy Autopilot, I first need to install it on my system. To do so, I just need to run a one-liner script:
Then I can follow the instructions to install any MCP server for my IDE of choice. Today, I’m using Kiro!
In a new chat session in Kiro, I start with a straightforward prompt, where I ask Kiro to read the files in my file-to-queue folder and create a new AWS CloudFormation file so I can deploy the application. This folder contains an automated Amazon Simple Storage Service (Amazon S3) file router that scans a bucket and sends notifications to Amazon Simple Queue Service (Amazon SQS) queues or Amazon EventBridge based on configurable prefix-matching rules, enabling event-driven workflows triggered by file locations.
The last part asks Kiro to make sure I’m including necessary IAM policies. This should be enough to get Kiro to use the IAM Policy Autopilot MCP server.
Next, Kiro uses the IAM Policy Autopilot MCP server to generate a new policy document, as depicted in the following image. After it’s done, Kiro will move on to building out our CloudFormation template and some additional documentation and relevant code files.
Finally, we can see our generated CloudFormation template with a new policy document, all generated using the IAM Policy Autopilot MCP server!
Enhanced development workflow IAM Policy Autopilot integrates with AWS services across multiple areas. For core AWS services, IAM Policy Autopilot analyzes your application’s usage of services such as Amazon S3, AWS Lambda, Amazon DynamoDB, Amazon Elastic Compute Cloud (Amazon EC2), and Amazon CloudWatch Logs, then generates necessary permissions your code needs based on the SDK calls it discovers. After the policies are created, you can copy the policy directly into your CloudFormation template, AWS Cloud Development Kit (AWS CDK) stack, or Terraform configuration. You can also prompt your AI coding assistants to integrate it for you.
IAM Policy Autopilot also complements existing IAM tools such as AWS IAM Access Analyzer by providing functional policies as a starting point, which you can then validate using IAM Access Analyzer policy validation or refine over time with unused access analysis.
Now available IAM Policy Autopilot is available as an open source tool on GitHub at no additional cost. The tool currently supports Python, TypeScript, and Go applications.
These capabilities represent a significant step forward in simplifying the AWS development experience so builders of different experience levels can develop and deploy applications more efficiently.
Next week, don’t miss AWS re:Invent, Dec. 1-5, 2025, for the latest AWS news, expert insights, and global cloud community connections! Our News Blog team is finalizing posts to introduce the most exciting launches from our service teams. If you’re joining us in person in Las Vegas, review the agenda, session catalog, and attendee guides before arriving. Can’t attend in person? Watch our Keynotes and Innovation Talks via livestream.
AWS CloudFormation StackSets offers deployment ordering for auto-deployment mode. You can define the sequence in which your stack instances automatically deploy across accounts and Regions.
AWS NAT Gateway supports Regional availability to create a single NAT Gateway that automatically expands and contracts across availability zones (AZs).
As organizations scale, managing access permissions for storage resources becomes increasingly complex and time-consuming. As new team members join, existing staff changes roles, and new S3 buckets are created, organizations must constantly update multiple types of access policies to govern access across their S3 buckets. This challenge is especially pronounced in multi-tenant S3 environments where administrators must frequently update these policies to control access across shared datasets and numerous users.
Today we’re introducing attribute-based access control (ABAC) for Amazon Simple Storage Service (S3) general purpose buckets, a new capability you can use to automatically manage permissions for users and roles by controlling data access through tags on S3 general purpose buckets. Instead of managing permissions individually, you can use tag-based IAM or bucket policies to automatically grant or deny access based on tags between users, roles, and S3 general purpose buckets. Tag-based authorization makes it easy to grant S3 access based on project, team, cost center, data classification, or other bucket attributes instead of bucket names, dramatically simplifying permissions management for large organizations.
How ABAC works Here’s a common scenario: as an administrator, I want to give developers access to all S3 buckets meant to be used in development environments.
With ABAC, I can tag my development environment S3 buckets with a key-value pair such as environment:development and then attach an ABAC policy to an AWS Identity and Access Management (IAM) principal that checks for the same environment:development tag. If the bucket tag matches the condition in the policy, the principal is granted access.
Let’s see how this works.
Getting started First, I need to explicitly enable ABAC on each S3 general purpose bucket where I want to use tag-based authorization.
I navigate to the Amazon S3 console, select my general purpose bucket then navigate to Properties where I can find the option to enable ABAC for this bucket.
I can also use the AWS Command Line Interface (AWS CLI) to enable it programmatically by using the new PutBucketAbac API. Here I am enabling ABAC on a bucket called my-demo-development-bucket located in the US East (Ohio) us-east-2 AWS Region.
Alternatively, if you use AWS CloudFormation, you can enable ABAC by setting the AbacStatus property to Enabled in your template.
Next, let’s tag our S3 general purpose bucket. I add an environment:development tag which will become the criteria for my tag-based authorization.
Now that my S3 bucket is tagged, I’ll create an ABAC policy that verifies matching environment:development tags and attach it to an IAM role called dev-env-role. By managing developer access to this role, I can control permissions to all development environment buckets in a single place.
I navigate to the IAM console, choose Policies, and then Create policy. In the Policy editor, I switch to JSON view and create a policy that allows users to read, write and list S3 objects, but only when they have a tag with a key of “environment” attached and its value matches the one declared on the S3 bucket. I give this policy the name of s3-abac-policy and save it.
I then attach this s3-abac-policy to the dev-env-role.
That’s it! Now a user assuming the dev-role can access any ABAC-enabled bucket with the tag environment:development such as my-demo-development-bucket.
Using your existing tags Keep in mind that although you can use your existing tags for ABAC, because these tags will now be used for access control, we recommend reviewing your current tag setup before enabling the feature. This includes reviewing your existing bucket tags and tag-based policies to prevent unintended access, and updating your tagging workflows to use the standard TagResource API (since enabling ABAC on your buckets will block the use of the PutBucketTagging API). You can use AWS Config to check which buckets have ABAC enabled and review your usage of PutBucketTagging API in your application using AWS Cloudtrail management events.
Additionally, the same tags you use for ABAC can also serve as cost allocation tags for your S3 buckets. Activate them as cost allocation tags in the AWS Billing Console or through APIs, and your AWS Cost Explorer and Cost and Usage Reports will automatically organize spending data based on these tags.
Enforcing tags on creation To help standardize access control across your organization, you can now enforce tagging requirements when buckets are created through service control policies (SCPs) or IAM policies using the aws:TagKeys and aws:RequestTag condition keys. Then you can enable ABAC on these buckets to provide consistent access control patterns across your organization. To tag a bucket during creation you can add the tags to your CloudFormation templates or provide them in the request body of your call to the existing S3 CreateBucket API. For example, I could enforce a policy for my developers to create buckets with the tag environment=development so all my buckets are tagged accurately for cost allocation. If I want to use the same tags for access control, I can then enable ABAC for these buckets.
Things to know
With ABAC for Amazon S3, you can now implement scalable, tag-based access control across your S3 buckets. This feature makes writing access control policies simpler, and reduces the need for policy updates as principals and resources come and go. This helps you reduce administrative overhead while maintaining strong security governance as you scale.
Attribute-based access control for Amazon S3 general purpose buckets is available now through the AWS Management Console, API, AWS SDKs, AWS CLI, and AWS CloudFormation at no additional cost. Standard API request rates apply according to Amazon S3 pricing. There’s no additional charge for tag storage on S3 resources.
You can use AWS CloudTrail to audit access requests and understand which policies granted or denied access to your resources.
You can also use ABAC with other S3 resources such as S3 directory bucket, S3 access points and S3 tables buckets and tables. To learn more about ABAC on S3 buckets see the Amazon S3 User Guide.
You can use the same tags you use for access control for cost allocation as well. You can activate them as cost allocation tags through the AWS Billing Console or APIs. Check out the documentation for more details on how to use cost allocation tags.
When building applications that span multiple cloud providers or integrate with external services, developers face a persistent challenge: managing credentials securely. Traditional approaches require storing long-term credentials like API keys and passwords, creating security risks and operational overhead.
Today, we’re announcing a new capability called AWS Identity and Access Management (IAM) outbound identity federation that customers can use to securely federate their Amazon Web Services (AWS) identities to external services without storing long-term credentials. You can now use short-lived JSON Web Tokens (JWTs) to authenticate your AWS workloads with a wide range of third-party providers, software-as-a-service (SaaS) platforms and self-hosted applications.
This feature enables IAM principals—such as IAM roles and users—to obtain cryptographically signed JWTs that assert their AWS identity. External services, such as third-party providers, SaaS platforms, and on-premises applications, can verify the token’s authenticity by validating its signature. Upon successful verification, you can securely access the external service.
How it works With IAM outbound identity federation, you exchange your AWS IAM credentials for short-lived JWTs. This mitigates the security risks associated with long-term credentials while enabling consistent authentication patterns.
Let’s walk through a scenario where your application running on AWS needs to interact with an external service. To access the external service’s APIs or resources, your application calls the AWS Security Token Service (AWS STS) `GetWebIdentityToken` API to obtain a JWT.
The following diagram shows this flow:
Your application running on AWS requests a token from AWS STS by calling the GetWebIdentityToken API. The application uses its existing AWS credentials obtained from the underlying platform (such as Amazon EC2 instance profiles, AWS Lambda execution roles, or other AWS compute services) to authenticate this API call.
AWS STS returns a cryptographically signed JSON Web Token (JWT) that asserts the identity of your application.
Your application sends the JWT to the external service for authentication.
The external service fetches the verification keys from the JSON Web Key Set (JWKS) endpoint to verify the token’s authenticity.
The external service validates the JWT’s signature using these verification keys and confirms the token is authentic and was issued by AWS.
After successful verification, the external service exchanges the JWT for its own credentials. Your application can then use these credentials to perform its intended operations.
Setting up AWS IAM outbound identity federation To begin using this feature, I need to enable outbound identity federation for my AWS account. I navigate to IAM and choose Account settings under Access management in the left-hand navigation pane.
After I enable the feature, AWS generates a unique issuer URL for my AWS account that hosts the OpenID Connect (OIDC) discovery endpoints at /.well-known/openid-configuration and /.well-known/jwks.json. The OpenID Connect (OIDC) discovery endpoints contain the keys and metadata necessary for token verification.
Next, I need to configure IAM permissions. My IAM principal (role or user) must have the sts:GetWebIdentityToken permission to request tokens.
For example, the following identity policy specifies access to the STS GetWebIdentityToken API, enabling the IAM principal to generate tokens.
At this stage, I need to configure the external service to trust and accept tokens issued by my AWS account. The specific steps vary by service, but generally involve:
Registering my AWS account issuer URL as a trusted identity provider
Configuring which claims to validate (audience, subject patterns)
Mapping token claims to permissions in the external service
Let’s get started Now, let me walk you through an example showing both the client-side token generation and server-side verification process.
First, I call the STS GetWebIdentityToken API to obtain a JWT that asserts my AWS identity. When calling the API, I can specify the intended audience, signing algorithm, and token lifetime as request parameters.
Audience: Populates the `aud` claim in the JWT, identifying the intended recipient of the token (for example, “my-app”)
DurationSeconds: The token lifetime in seconds, ranging from 60 seconds (1 minute) to 3600 seconds (1 hour), with a default of 600 seconds (5 minutes)
SigningAlgorithm: Choose either ES384 (ECDSA using P-384 and SHA-384) or RS256 (RSA using SHA-256)
Tags (optional): An array of key-value pairs that appear as custom claims in the token, which you can use to include additional context that enables external services to implement fine-grained access control
Also, the payload contains standard OIDC claims plus AWS specific metadata. The standard OIDC claims include subject (“sub”), audience (“aud”), issuer (“iss”), and others.
AWS STS also enriches the token with identity-specific claims (such as account ID, organization ID, and principal tags) and session context. These claims provide information about the compute environment and session where the token request originated. AWS STS automatically includes these claims when applicable based on the requesting principal’s session context. You can also add custom claims to the token by passing request tags to the API call. To learn more about claims provided in the JWT, visit the documentation page.
Note the iss (issuer) claim. This is your account-specific issuer URL that external services use to verify that the token originated from a trusted AWS account. External services can verify the JWT by validating its signature using AWS’s verification keys available at a public JSON Web Key Set (JWKS) endpoint hosted at the /.well-known/jwks.json endpoint of the issuer URL.
Now, let’s look at how external services handle this identity token.
Here’s a snippet of Python example that external services can use to verify AWS tokens:
import json
import jwt
import requests
from jwt import PyJWKClient

# Trusted issuers list - obtained from EnableOutboundFederation API response
TRUSTED_ISSUERS = [
    "https://EXAMPLE.tokens.sts.global.api.aws",
    # Add your trusted AWS account issuer URLs here
    # Obtained from EnableOutboundFederation API response
]

def verify_aws_jwt(token, expected_audience=None):
    """Verify an AWS IAM outbound identity federation JWT"""
    try:
        # Get issuer from token
        unverified_payload = jwt.decode(token, options={"verify_signature": False})
        issuer = unverified_payload.get('iss')

 	# Verify issuer is trusted
        if not TRUSTED_ISSUERS or issuer not in TRUSTED_ISSUERS:
            raise ValueError(f"Untrusted issuer: {issuer}")

        # Fetch JWKS from AWS using PyJWKClient
        jwks_client = PyJWKClient(f"{issuer}/.well-known/jwks.json")
        signing_key = jwks_client.get_signing_key_from_jwt(token)

        # Verify token signature and claims
        decoded_token = jwt.decode(
            token,
            signing_key.key,
            algorithms=["ES384", "RS256"],
            audience=expected_audience,
            issuer=issuer
        )
        return decoded_token
    except Exception as e:
        print(f"Token verification failed: {e}")
        return None
Using IAM policies to control access to token generation An IAM principal (such as a role or user) must have the sts:GetWebIdentityToken permission in their IAM policies to request tokens for authentication with external services. AWS account administrators can configure this permission in all relevant AWS policy types such as identity policies, service control policies (SCPs), resource control policies (RCPs), and virtual private cloud endpoint (VPCE) policies to control which IAM principals in their account can generate tokens.
Additionally, administrators can use the new condition keys to specify signing algorithms (sts:SigningAlgorithm), permitted token audiences (sts:IdentityTokenAudience), and maximum token lifetimes (sts:DurationSeconds). To learn more about the condition keys, visit IAM and STS Condition keys documentation page.
Additional things to know Here are key details about this launch:
Getting credentials for local development with AWS is now simpler and more secure. A new AWS Command Line Interface (AWS CLI) command, aws login, lets you start building immediately after signing up for AWS without creating and managing long-term access keys. You use the same sign-in method you already use for the AWS Management Console.
In this blog, we’ll show you how to get temporary credentials to your workstation for use with the AWS CLI, AWS Software Development Kits (AWS SDKs), and tools or applications built using them with the new aws login command.
Getting started with programmatic access to AWS
You can use the aws login command with your AWS Management Console sign-in method, as described in the following sections.
Scenario 1: Using IAM credentials (root or IAM user)
To obtain programmatic credentials using your root or IAM user username and password:
Install the latest AWS CLI (version 2.32.0 or later).
Run the aws login command.
If you have not set a default Region, the CLI prompts you to specify the AWS Region of your choice (e.g., us-east-2, eu-central-1). The CLI remembers which Region you set once you enter it into this prompt.
Figure 1: CLI Region prompt
The CLI opens your default browser.
Follow the instructions in the browser window:
If you have already signed into the AWS Management Console, you will see a screen that says, “Continue with an active session.”
Figure 2: Sign in to AWS – active session selection
If you haven’t signed into the AWS Management Console, you will see the sign-in options page. Select “Continue with Root or IAM user” and log in to your AWS account.
Figure 3: AWS Sign in to AWS – Sign-in options
Success! You’re ready to run AWS CLI commands. Try the aws sts get-caller-identity command to verify the identity you’re currently using.
Figure 4: Sign in to AWS – completion
Scenario 2: Using federated sign-in
This scenario applies when you authenticate through your organization’s identity provider. To retrieve programmatic credentials for roles you assumed with federation:
Complete steps 1–4 from Scenario 1, then continue with the following instructions.
Follow the instructions in the browser window:
If you have already signed into the AWS Management Console, the browser provides you with the option to select your active IAM role session from federated sign-in to the console. This enables you to switch between 5 active AWS sessions if you have multi-session support enabled on your AWS Management Console.
Figure 5: Sign in to AWS – active IAM role session selection
If you have not signed into the AWS Management Console or want to get temporary credentials for a different IAM role, sign into your AWS account using your current authentication mechanism in another browser tab. Upon successful login, switch back to this tab and select the “Refresh” button. Your console session should now be available under the active sessions.
Return to the AWS CLI once you have successfully completed the aws login process.
Regardless of the console sign-in method you choose, the temporary credentials issued by the aws login command are automatically rotated by the AWS CLI, AWS Tools for PowerShell and AWS SDKs every 15 minutes. They are valid up to the set session duration of the IAM principal (maximum of 12 hours). After reaching the session duration limit, you will be prompted to log in again.
Figure 6: AWS Sign in – session expiration
Accessing AWS using local developer tools
The aws login command supports switching between multiple AWS accounts and roles using profiles. You can configure a profile with aws login --profile <PROFILE_NAME> and run AWS commands with the profile using: aws sts get-caller-identity --profile <PROFILE_NAME>. The short-term credentials issued by aws login work with more than the AWS CLI. You can also use them with:
AWS SDKs: If you use AWS SDKs for development, the SDK clients can use these temporary credentials to authenticate with AWS.
Remote development servers: Use aws login --remote on a remote server without browser access, to deliver temporary credentials from your device with browser access to the AWS console.
Older versions of AWS SDKs that do not support the new console credentials provider: Any software written using these older SDKs can support credentials delivered by aws login by using the credential_process provider with the AWS CLI.
Controlling access to aws login with IAM policies
The aws login command is controlled by two IAM actions: signin:AuthorizeOAuth2Access and signin:CreateOAuth2Token. Use the SignInLocalDevelopmentAccess managed policy or add these actions to your IAM policies to allow IAM users and IAM roles with console access to use this feature.
AWS Organizations customers looking to control the usage of this login feature on member accounts can deny the two actions above using Service Control Policies (SCPs). These IAM actions and their resources are usable in all relevant IAM policies.
AWS recommends using centralized root access management in AWS Organizations to eliminate long-term root credentials from member accounts. This feature allows security teams to perform privileged tasks through short-term, task-scoped root sessions from a central management account. After you enable centralized root management and delete root credentials on member accounts, root login to member accounts is denied, which also prevents programmatic access with root credentials using aws login. For developers using root credentials or IAM users, aws login delivers short-lived credentials to development tools, providing a secure alternative to long-term static access keys.
Logging and security of programmatic access using aws login
AWS Sign-In logs API activity through AWS CloudTrail, which now includes two new events specific to aws login. The service logs two new event names called AuthorizeOAuth2Access and CreateOauth2Token in the AWS Region where the user logs in.
Here’s a CloudTrail sample for an AuthorizeOAuth2Access event:
The aws login command uses the OAuth 2.0 authorization code flow with PKCE (Proof Key for Code Exchange) to protect against authorization code interception attacks. This provides a secure alternative to setting up IAM user access keys for getting started with development on AWS. For guidance on additional modern authentication approaches and alternatives to long-term IAM access keys, see the AWS Security Blog post “Beyond IAM access keys: Modern authentication approaches for AWS.”
Conclusion
The login for AWS local development feature is a secure-by-default enhancement that helps customers eliminate the use of long-term credentials for programmatic access with AWS. With aws login, you can start building immediately using the same credentials you use to sign in to the AWS Management Console. This feature is now available across all AWS commercial Regions (excluding China and GovCloud) at no additional cost to customers.
For more information, visit the authentication and access section in the CLI user guide.
If you have feedback about this post, submit comments in the Comments section below.
As organizations increasingly adopt AI-powered development tools, a critical challenge emerges: how do you maintain security governance when AI assistants execute AWS operations on behalf of users? Organizations want to leverage AI assistance for development and read operations while maintaining strict controls over write operations that impact production systems and auditing calls made via AI assistants. Consider this scenario: A developer asks Amazon Q Developer“List my S3 buckets”, Q Developer suggests aws s3 ls, the developer approves, and Q Developer executes the command via AWS CLI. From an AWS perspective, this looks identical to the developer manually running the aws s3 ls command on the terminal outside of Amazon Q Developer. But what if your organization needs to distinguish between AI-assisted operations and manual commands for governance or compliance?
Amazon Q Developer, the most capable generative AI–powered assistant for software development, generates AWS CLI commands in response to user requests and executes them using its use_aws and execute_bashbuilt-in tools. The challenge of distinguishing AI-assisted operations from manual commands is a key consideration for Amazon Q Developer adoption in enterprise environments. To address this governance challenge, Amazon Q Developer includes a built-in solution: user-agent markers that automatically identify AWS CLI calls made through Q Developer in CloudTrail logs, enabling precise IAM policy controls.
This blog post explores how Amazon Q Developer’s built-in user agent markers set for AWS CLI calls enable precise IAM policy controls, allowing organizations to distinguish and govern AI-assisted AWS operations while maintaining the productivity benefits of AI-powered development. The following sections demonstrate how these user agent markers work, how to implement IAM policies that leverage them, and how to monitor their effectiveness in your environment.
Understanding Amazon Q Developer User Agent Markers
Prerequisites
This section builds on your knowledge of these concepts and assumes you have the necessary setup in place. These foundational elements are essential for understanding how user agent markers work and for implementing the governance controls discussed later in this post. If you need guidance on any of these topics, please refer to the linked documentation:
Amazon Q Developer setup for CLI and/or IDE extensions – Needed to generate the user agent markers this post examines
AWS CloudTrail concepts and API logging – Essential for monitoring and verifying user agent markers in practice
IAM policies and permissions management – Critical for implementing the governance controls that leverage these markers
Amazon Q Developer automatically includes identifiable markers in the user agent string of all AWS API calls it makes via AWS CLI. These markers appear in two primary contexts: CLI tool operations and IDE integration operations.
Q Developer CLI Tool
When using Amazon Q Developer CLI (both use_aws and execute_bash tools), all AWS CLI calls include:
exec-env/AmazonQ-For-CLI-Version-<QCLI-VersionNo>
How It Works: Amazon Q Developer CLI automatically sets:
This means all AWS CLI commands executed through Q Developer CLI – whether via the use_aws tool or execute_bash commands – automatically include this marker.
This applies when Q Developer makes AWS API calls through IDE integrations, such as when analyzing your codebase or suggesting AWS resource configurations. The IDE marker enables you to distinguish between CLI-based and IDE-based Q Developer operations.
Complete User Agent Example
Here’s how a complete user agent string appears in CloudTrail:
The key identifiers are exec-env/AmazonQ-For-CLI-Version-* and exec-env/AmazonQ-For-IDE-Version-*, which clearly distinguish Amazon Q Developer operations from regular AWS CLI/SDK usage executed outside of Q Developer.
Use the aws:userAgent condition in IAM policies to control Amazon Q Developer operations through two approaches:
IAM Policies: Deploy in each AWS account where developers have access for deploying workloads or performing AWS operations. Q Developer operates using the developer’s existing AWS credentials and permissions – it doesn’t have additional access beyond what the user already possesses. Attach these policies to the same IAM users, groups, or roles that developers use for their regular AWS work.
Service Control Policies (SCPs): Deploy once at the AWS Organizations level for organization-wide governance. SCPs apply to all member accounts automatically and cannot be overridden by account-level policies.
The following policy allows read operations from Q Developer, blocks write operations from Q Developer, and allows write operations from regular AWS CLI executed outside Q Developer:
Note: This IAM policy example is for illustration purposes only. Follow least privilege principles in production environments. For more details refer prepare for least previlege permissions.
Note on User Agent Reliability: While AWS warns that user agents can be “spoofed,” this concern is reduced for Q Developer governance use cases. The user agent is automatically set by Q Developer’s tools, not manually controlled by users. Any spoofing would require deliberate effort and would be detectable through usage pattern analysis. This approach is designed for operational governance and policy differentiation, not as a sole security control.
Additional Control Layer: Custom Agent Configuration
For an additional layer of control, you can create a custom agent configuration that restricts which AWS services Amazon Q Developer can access using allowedServices and deniedServices parameters for the use_aws tool:
This custom agent configuration works in conjunction with IAM policies to provide defense-in-depth governance of AI-assisted AWS operations. For more details, refer to the agent configuration documentation.
Verification and Monitoring
CloudTrail Event Analysis
To verify that your policies are working correctly, examine CloudTrail events. Here’s what to look for:
Create a simple monitoring script to track Amazon Q Developer usage:
#!/bin/bash
# Monitor Amazon Q Developer AWS API usage
# Get events from last 24 hours and filter for Q Developer user agents
aws cloudtrail lookup-events \
  --start-time $(date -u -v-24H '+%Y-%m-%dT%H:%M:%SZ') \
  --lookup-attributes AttributeKey=EventName,AttributeValue=GetCallerIdentity \
  --query 'Events[?contains(CloudTrailEvent, `AmazonQ-For-CLI`)].[EventTime,EventName,UserIdentity.userName]' \
  --output table
Conclusion
Amazon Q Developer’s built-in user agent markers provide a powerful foundation for implementing enterprise-grade security controls around AI-assisted AWS operations. By leveraging these markers in IAM policies, organizations can:
Distinguish between AI-assisted and manual AWS operations
Implement differentiated security policies based on operation source
Maintain detailed audit trails for compliance requirements
Enable secure Amazon Q Developer adoption in enterprise environments while maintaining strict controls over write operations that could impact production systems
For organizations currently evaluating Amazon Q Developer adoption, implementing user agent marker-based controls is a key component of your deployment strategy. This approach enables you to realize the productivity benefits of AI-assisted development while maintaining the governance and security controls your organization requires.
Experience the power of Amazon Q Developer as your AI-powered coding assistant, and implement the governance controls outlined in this post to ensure secure adoption in your enterprise environment. These built-in user agent markers enable you to maintain enterprise-grade security while unlocking the productivity benefits of AI-assisted development.
Kirankumar Chandrashekar is a Generative AI Specialist Solutions Architect at AWS, focusing on Amazon Q Developer/Kiro and developer productivity. Bringing deep expertise in AWS cloud services, DevOps, modernization, and infrastructure as code, he helps customers accelerate their development cycles and elevate developer productivity through innovative AI-powered solutions. By leveraging Amazon Q Developer and Kiro, he enables teams to build applications faster, automate routine tasks, and streamline development workflows. Kirankumar is dedicated to enhancing developer efficiency while solving complex customer challenges, and enjoys music, cooking, and traveling.
Amazon Web Service (AWS) recently announced that AWS Organizations now offers full AWS Identity and Access Management (IAM) policy language support for service control policies (SCPs). With this feature, you can use conditions, individual resource Amazon Resource Names (ARNs), and the NotAction element with Allow statements. Additionally, you can now use wildcards at the beginning or middle of the Action element strings and implement the NotResource element in both Allow and Deny statements in SCPs. This feature is now available across AWS commercial and AWS GovCloud (US) Regions.
In this blog post, we walk through a set of newly supported SCP language capabilities that simplify permission management cases. These enhancements enable more intuitive and concise policy designs. We explore how these capabilities address past limitations to reduce operational overhead and improve policy readability. We also show what the previous implementation looked like and provide an example of how the new capability makes the intent clearer and implementation simpler.
Overview of the newly supported elements
The following table lists the supported SCP language elements along with their purpose and applicable effects. Elements and effects shown in bold indicate newly supported capabilities.
Specifies the conditions for when the statement is in effect.
Allow, Deny
Additionally, you can now use the wildcard characters * and ? anywhere in the Action or NotAction element. Previously, these wildcards were only allowed by themselves or at the end of an element. For example, all of the following are now valid:
"servicename:action*"
"servicename:*action"
"servicename:some*action"
"servicename:*"
Navigating new SCP language capabilities
Let’s explore recommended policy strategies and best practices by walking through some examples.
Using Deny with NotResource
You can use the NotResource element to apply a policy across resources except those explicitly listed. This is especially useful for implementing broad deny-by-default policies with scoped exceptions, simplifying policy structure while enforcing strong boundaries.
Example 1:
The goal of this example is to enforce a resource perimeter that blocks access to resources outside the organization, except for a defined set of service-owned resources.
Previous implementation: The policy used a tag-based approach to manage exceptions. It required tagging IAM principals with dp:exclude:resource:s3=true to grant access to external resources. This created operational overhead in tag management and introduced potential security risks if tags were incorrectly applied.
Improved implementation: With support for NotResource in Deny statements, the updated SCP uses a single, consolidated Deny statement denying the action except for a defined set of AWS-owned resources.
This example denies access to Amazon Bedrock models except for one specific model.
Before this change: SCP relied on a broad permission baseline for AWS accounts within the organization by allowing access to Amazon Bedrock actions by default, while explicitly denying invocation of three specific models (examples: Deepseek, Anthropic, and meta). However, this approach requires continuous operational overhead to make sure policies are updated to deny access to newly added models to avoid exposure to potentially unwanted models.
Improved implementation: With support for NotResource in Deny statements, the updated SCP uses a single, consolidated Deny statement that denies actions except Amazon models.
By using the Condition element, you can specify the circumstances under which a policy statement is in effect. While optional, this element is now supported in Allow statements within SCPs, enabling more precise and scalable access control.
Note: We recommend using explicit Deny statements when authoring SCPs in most cases. Using Deny statements help make sure that each control works independently and remains enforceable. Relying solely on allow statements and the implicit deny-by-default model can lead to unintended access, because broader or overlapping Allow statements can override more restrictive ones.
The following example allows access to specific AWS services in certain AWS Regions.
Before this change: The policy uses a single Allow statement under the Sid: AllowSpecificServices. It lists broad service-level actions (for example, "ec2:", "s3:", and so on) in the Action element and applies them across resources ("Resource": "*"). Because AWS SCPs operate under a deny-by-default model, this setup effectively permits actions across the listed services while implicitly denying access to other services not included. For example, an explicit Deny restricts actions outside us-east-1, us-west-2, and eu-central-1 using a Region condition.
Improved implementation: In the updated example, the policy allows the same services, but only when they are requested in specific Regions (for example, "us-east-1", "us-west-2", and "eu-central-1"). This is achieved using the aws:RequestedRegion condition key in the Allow statement. This enhancement allows organizations to retain basic Allow logic while introducing contextual boundaries—such as limiting access by Region, account, or resource tag—previously only possible with Deny conditions.
Note: We recommend using one broad Allow statement and multiple targeted Deny statements in your policies. Avoid writing additional Allow statements that might overlap, because doing so could lead to unintended access. The recommended approach is to start with a broad Allow statement and then use Deny statements to refine and restrict access as needed.
Policy structure before support for Allow with conditions
Policy structure after support for Allow with conditions
To bring SCPs to full IAM policy language support, additional elements are now supported. While technically valid, some of these constructs require additional considerations and testing in practice because of their potential for unintended access if not carefully managed.
Newly supported feature
Important considerations
Action with wildcards (*, ?)
Can help shorten policies but use with caution—new actions added by AWS will match existing wildcard patterns as designed, potentially granting unintended permissions.
NotAction with wildcards (*, ?)
We recommend using NotAction with a Deny statement if you want to deny all actions except those listed, which helps future-proof your controls (for example, denying everything in Amazon EC2 except actions that don’t match “*vpn*”.
Allow with NotResource
Limited use cases. While supported, Allow with NotResource can default to including all resources—potentially allowing access to new resources added later. Use with caution and prefer explicit Deny statements when possible.
Allow with NotAction
Limited use cases. While supported, Allow with NotAction can unintentionally permit access to new actions added by AWS. Use with caution and prefer explicit Deny statements to maintain control as services evolve.
Allow with Resource other than wildcard “*”.
When using Allow with specific resources (not "*"), make sure your policy design avoids conflicting or overlapping Allow statements. Start with a broad Allow, then use targeted Deny statements to restrict access—this helps prevent unintended access from overlapping Allow statements.
Validate your policies with IAM Access Analyzer
You can use AWS IAM Access Analyzer to validate your SCPs before applying them, using both policy validation and custom policy checks.
IAM Access Analyzer validates your policy against IAM policy grammar and best practices. You can view policy validation check findings that include security warnings, errors, general warnings, and suggestions. These findings provide actionable recommendations to help you author policies that are both functional and aligned with security best practices.
Custom policy checks are an IAM Access Analyzer capability that security teams can use to help them accurately and proactively identify critical permissions in their policies. Custom policy checks can determine whether a new version of a policy is more permissive than the previous version. They use automated reasoning—a form of static analysis—to provide a higher level of security assurance in the cloud.
Custom policy checks can be embedded into continuous integration and continuous delivery (CI/CD) pipelines, so that policies can be checked without being deployed. Developers can also run custom policy checks from their local development environments and receive fast feedback on whether the policies they are authoring comply with your organization’s security standards. For more information refer to introducing IAM Access Analyzer custom policy checks.
Conclusion
The latest enhancements to AWS service control policies improve policy expressiveness and precision while reducing operational effort. By enabling constructs like Allow with conditions and specific resource ARNs, supporting NotResource in Deny statements, and expanding wildcard flexibility, you can simplify your policies and avoid layered or complex policies to achieve your goals. These updates bring SCPs in parity with IAM policy capabilities and empower organizations to implement cleaner, more intuitive access controls. As a best practice, it’s important to use these capabilities carefully—especially wildcard use—to avoid unintended permissions as AWS services evolve. We also encourage the implementation of explicit Deny statements as a best practice and using Allow statements when needed.
If you have feedback about this post, submit comments in the Comments section below. If you have questions about this post, contact AWS Support.
Meanwhile, it’s been an exciting week for AWS builders focused on reliability and observability. The standout announcement has to be Amazon SQS fair queues, which tackles one of the most persistent challenges in multi-tenant architectures: the “noisy neighbor” problem. If you’ve ever dealt with one tenant’s message processing overwhelming shared infrastructure and affecting other tenants, you’ll appreciate how this feature enables more balanced message distribution across your applications.
On the AI front, we’re also seeing AWS continue to enhance our observability capabilities with the preview launch of Amazon CloudWatch generative AI observability. This brings AI-powered insights directly into your monitoring workflows, helping you understand infrastructure and application performance patterns in new ways. And for those managing Amazon Connect environments, the addition of AWS CloudFormation for message template attachments makes it easier to programmatically deploy and manage email campaign assets across different environments.
Last week’s launches
Amazon SQS Fair Queues — AWS launched Amazon SQS fair queues to help mitigate the “noisy neighbor” problem in multi-tenant systems, enabling more balanced message processing and improved application resilience across shared infrastructure.
Amazon CloudWatch Generative AI Observability (Preview) — AWS launched a preview of Amazon CloudWatch generative AI observability, enabling users to gain AI-powered insights into their cloud infrastructure and application performance through advanced monitoring and analysis capabilities.
Amazon Connect CloudFormation Support for Message Template Attachments —AWS has expanded the capabilities of Amazon Connect by introducing support for AWS CloudFormation for Outbound Campaign message template attachments, enabling customers to programmatically manage and deploy email campaign attachments across different environments.
Amazon Connect Forecast Editing — Amazon Connect introduces a new forecast editing UI that allows contact center planners to quickly adjust forecasts by percentage or exact values across specific date ranges, queues, and channels for more responsive workforce planning.
Bloom Filters for Amazon ElastiCache — Amazon ElastiCache now supports Bloom filters in version 8.1 for Valkey, offering a space-efficient way to quickly check if an item is in a set with over 98% memory efficiency compared to traditional sets.
Amazon EC2 Skip OS Shutdown Option — AWS has introduced a new option for Amazon EC2 that allows customers to skip the graceful operating system shutdown when stopping or terminating instances, enabling faster application recovery and instance state transitions.
AWS HealthOmics Git Repository Integration — AWS HealthOmics now supports direct Git repository integration for workflow creation, allowing researchers to seamlessly pull workflow definitions from GitHub, GitLab, and Bitbucket repositories while enabling version control and reproducibility.
AWS Organizations Tag Policies Wildcard Support — AWS Organizations now supports a wildcard statement (ALL_SUPPORTED) in Tag Policies, allowing users to apply tagging rules to all supported resource types for a given AWS service in a single line, simplifying policy creation and reducing complexity.
Blogs of note
Beyond IAM Access Keys: Modern Authentication Approaches — AWS recommends moving beyond traditional IAM access keys to more secure authentication methods, reducing risks of credential exposure and unauthorized access by leveraging modern, more robust approaches to identity management.
Upcoming AWS events
AWS re:Invent 2025 (December 1-5, 2025, Las Vegas) — AWS’s flagship annual conference offering collaborative innovation through peer-to-peer learning, expert-led discussions, and invaluable networking opportunities.
AWS Summits — Join free online and in-person events that bring the cloud computing community together to connect, collaborate, and learn about AWS. Register in your nearest city: Mexico City (August 6) and Jakarta (August 7).
AWS Community Days — Join community-led conferences that feature technical discussions, workshops, and hands-on labs led by expert AWS users and industry leaders from around the world: Singapore (August 2), Australia (August 15), Adria (September 5), Baltic (September 10), and Aotearoa (September 18).
Enterprise customers of Amazon OpenSearch Service require comprehensive security controls with seamless authentication and authorization mechanisms when accessing data in provisioned domains and Amazon OpenSearch Serverless collections. Security teams within these organizations must not only maintain compliance with enterprise policies but also need to make sure that their users can access data securely, with robust identity management. AWS IAM Identity Center is a popular mechanism for identity management that provides single sign-on (SSO) capabilities for these enterprise customers. IAM Identity Center can use Security Assertion Markup Language (SAML) with both OpenSearch Service provisioned domains and OpenSearch Serverless. Now, by using trusted identity propagation, IAM Identity Center provides a new, direct method for accessing data in OpenSearch Service.
In this post, we outline how you can take advantage of this new access method to simplify data access using the OpenSearch UI and still maintain robust role-based access control for your OpenSearch data.
Trusted identity propagation overview
Trusted identity propagation in IAM Identity Center adds the identity context of a user to a role when accessing OpenSearch Service, which in turn uses this context to authorize and scope OpenSearch data access. This simplifies the authentication and authorization flow for customers because the applications access the data on their behalf. Users or user agents need not be present between the application and the backend services for this authorization to happen, unlike methods like SAML where a user agent needs to be present between these entities as a go-between for exchanging assertions. This flexibility helps simplify accessing a wide variety of data sources such as data residing within the Amazon Virtual Private Cloud (Amazon VPC) of an OpenSearch Service domain, or an OpenSearch Serverless collection. By using the OpenSearch UI, you can additionally simplify the backend connections, resulting in seamless access to the data. The following figures shows how the identity propagation works with OpenSearch Service.
Prerequisites
Before starting to use IAM Identity Center with OpenSearch Service, there are a few options that you must enable. To start, set up an organization or account instance of IAM Identity Center following the instruction in this guide. For OpenSearch Service-provisioned domains, you must enable the IAM Identity Center (IDC) Authentication –new option. You can do this though AWS CloudFormation, OpenSearch REST API, AWS SDK, or the AWS Management Console.
To enable Identity Center using the console
To add the capability for an existing provisioned domain, go to the OpenSearch Service console and navigate to the Security configuration tab and choose Edit.
After this step, or if you are creating new domain, select the check box for IAM Identity Center (IDC) Authentication – new.
You have various options to choose for Subject Key and Roles Key depending upon how you want to establish your role-based access control discussed later in this post. For now, select UserName for Subject Key and GroupName for Roles Key.
For OpenSearch Serverless, choose Serverless in the navigation pane, then Security and Authentication. Choose Edit in the IAM Identity Center (IdC) authentication – new section.
Select the checkbox for Authenticate with IAM Identity Center, and then choose Save.
Select the checkbox for Authentication with IAM Identity Center under Single sign-on authentication, when creating an OpenSearch UI application. For step-by-step instructions on how to create an OpenSearch UI application, see Creating an OpenSearch UI application
After these steps, you’re ready to configure IAM Identity Center by creating new users and groups, or by using existing user identities.
Propagating IAM Identity Center identities
Currently, adding single sign-on authentication with IAM Identity Center can be done while setting up a new OpenSearch UI application. Use the following steps to create a new OpenSearch UI application. Note that single sign-on currently cannot be turned on after an application is created. After single sign-on is enabled, you should see an AWS managed application under Applications in the Identity Center console.
Assigning users and groups
After the application is created and the status shows as Active, you need to assign users and groups to the application. This assignment is important and recommended because these assignments determine the scope and permissions for data access within OpenSearch Service. To do this, select the application you created in the previous steps in the OpenSearch Service console. Here, you will see an option for IAM Identity Center user and groups under Single sign-on authentication. Choose Assign users and groups and select the appropriate Identity Center users and groups.
For OpenSearch Serverless, you must create a new data access policy or add a rule to an existing one to grant IAM Identity Center principals appropriate permissions to access the collections. For example, the following figure shows a data access policy that grants specific permissions to a one user with Rule 1 and provide a more restrictive permission to a group with Rule 2.
At this point your OpenSearch Service domains, OpenSearch Serverless collections and OpenSearch UI are set up for identity propagation.
Fine grained access control for IAM Identity Center identities
Fine grained access control is a role-based access control for OpenSearch Service that provides security at index, document, and field levels for provisioned domains. You can choose what aspects of identity context you propagate to OpenSearch Service. You can choose between UserId, UserName, and Email for your Subject keys, and GroupId and GroupName for your Roles key. This configuration is important because the values of the properties in the identity context are used to match exactly with the user and backend role mapping within OpenSearch Service provisioned domains. Note that if IAM Identity Center sign-on isn’t enabled, OpenSearch Service can only evaluate the request signature with AWS signature Version 4. This means that the role your OpenSearch UI will use won’t contain identity context for authorization. To complete authorization, add the values of the identity context fields to the OpenSearch role mapping. See Mapping roles to users under Managing permissions. Role mapping can be done using OpenSearch REST API, AWS SDK, or using OpenSearch Dashboards.
To map roles using OpenSearch Dashboards
From the menu icon on the top left corner or your screen, select Management, Security, Roles, <Your role>.
Choose the Mapped Users tab and select Manage mapping.
When mapping the role, make sure that you enter the values corresponding to the Subject key. This value must be the same as in your identity context. Additionally, use the Roles key to assign access-based IAM Identity Center groups.
With OpenSearch Serverless, the granularity of access control is at the index level so you will need to add additional rules in the Data Access Policy to control principals who can access collections or indices within a collection.
Verifying identity propagation
The final step is to verify identity propagation.
Open the OpenSearch UI application and select IAM Identity Center from the Login drop down.
After you complete the login process with IAM Identity Center, the OpenSearch UI will open. Choose the user icon in the lower left corner of the screen to verify that it’s your correct principal from Identity Center. It should match the Identity Center property you chose earlier.
To verify correct identity propagation, choose the Dev tools icon just above the user profile icon in the bottom left corner of the screen.
Select the correct OpenSearch domain or OpenSearch Serverless collection data source in the top right corner of the screen and run a _search query. You should see results from the data source confirming that the identity is correctly propagated to OpenSearch Service.
Simplified authentication: By eliminating the need for user agents between applications and backend services, the solution streamlines the authentication process compared to traditional SAML-based approaches.
Enhanced security: The integration maintains comprehensive security controls while providing seamless authentication and authorization mechanisms for both OpenSearch Service provisioned domains and Amazon OpenSearch Serverless collections.
Flexible identity management: Organizations can use existing IAM Identity Center implementations to manage user access, making it easier to maintain compliance with enterprise security policies.
Fine-grained access control: The solution supports detailed access control at the index, document, and field level for provisioned domains, allowing organizations to implement precise security measures.
Get started implementing this solution in your environment today!
For more information about identity management and security best practices with OpenSearch Service, we recommend:
Muthu Pitchaimani is a Search Specialist with Amazon OpenSearch Service. He builds large-scale search applications and solutions. Muthu is interested in the topics of networking and security, and is based out of Austin, Texas.
Sohaib Katariwala is a Senior Specialist Solutions Architect at AWS focused on Amazon OpenSearch Service based out of Chicago, IL. His interests are in all things data and analytics. More specifically he loves to help customers use AI in their data strategy to solve modern day challenges.
When it comes to AWS authentication, relying on long-term credentials, such as AWS Identity and Access Management (IAM) access keys, introduces unnecessary risks; including potential credential exposure, unauthorized sharing, or theft. In this post, I present five common use cases where AWS customers traditionally use IAM access keys and present more secure alternatives that you should consider.
AWS CLI access: Embrace CloudShell
If you’re primarily using access keys for AWS Command Line Interface (AWS CLI) access, consider AWS CloudShell—a browser-based CLI that minimizes the need for local credential management while providing the same powerful CLI capabilities that you’re accustomed to.
AWS CLI with enhanced security: IAM Identity Center
If you need a more robust solution, AWS CLI v2 combined with AWS IAM Identity Center offers a superior authentication approach. This integration enables:
For developers working in local environments, modern integrated development environments (IDEs) such as Visual Studio Code, with AWS Toolkit support offer secure authentication through IAM Identity Center. This alleviates the need for static access keys while maintaining a smooth development experience. Learn more about AWS IDE integrations.
AWS compute services and CI/CD access
When your applications and automation pipelines need AWS resource access, whether running on AWS compute services (Amazon Elastic Compute Cloud (Amazon EC2), Amazon Elastic Container Service (Amazon ECS), or AWS Lambda) or through continuous integration and delivery (CI/CD) tools, IAM roles can provide the ideal solution. These roles automatically manage temporary credential rotation and follow security best practices.
For AWS compute services: Use standard IAM roles with your compute resources. Review the EC2 IAM roles documentation for implementation details.
For CI/CD tools self-hosted on Amazon EC2: If you’re running tools such as Jenkins or GitLab on AWS resources, use the instance profile roles the same as you would with other compute services.
For third-party CI/CD services (such as GitHub Actions, CircleCI, and so on), see External access requirements.
External access requirements
For scenarios involving third-party applications or on-premises workloads, AWS offers three methods:
Third-party applications: Implement temporary security credentials through IAM roles instead of static access keys. Never use root account access keys. See third-party access documentation.
CI/CD software as a service (SaaS): For cloud-based CI/CD services, use OpenID Connect (OIDC) integration with IAM roles to minimize the need for long-term credentials. This allows your CI/CD pipelines to obtain temporary credentials through trust relationships. See the AWS OIDC provider documentation for implementation details.
Best practice: Principle of least privilege
Regardless of your authentication method, always implement the principle of least privilege. This helps make sure that users and applications have only the permissions they need. For guidance on crafting precise IAM policies, see Techniques for writing least privilege IAM policies.
Note: AWS also offers policy generation based on AWS CloudTrail logs, helping you create permission templates based on actual usage patterns. Learn about this feature in the IAM policy generation documentation.
Conclusion
As you’ve seen, there are numerous secure alternatives to IAM access keys that you can use to enhance your AWS authentication strategy while reducing security risks. By using tools such as CloudShell, IAM Identity Center, IDE integrations, IAM roles, and IAM Roles Anywhere, you can implement robust authentication mechanisms that align with modern security best practices.Key takeaways:
Prefer temporary credentials over long-term access keys
Choose the authentication method that best fits your use case
Implement the principle of least privilege across all access methods
Take advantage of the built-in tools provided by AWS for policy generation and management
Regularly review and update your authentication methods as new solutions become available
By making these changes, you can not only improve your security posture but also streamline your authentication processes across your AWS environment. Start small by identifying your current IAM access key use cases and gradually transition to these more secure alternatives. Your future self—and your security team—will thank you.
If you have feedback about this post, submit comments in the Comments section below.
Running applications across hybrid or multicloud environments creates a common challenge: fragmented logs scattered across different platforms. This fragmentation complicates monitoring, slows troubleshooting, and reduces operational visibility. To address this, many organizations seek to implement secure log ingestion from all environments into a centralized platform.
Amazon OpenSearch Service provides a unified solution for real-time search, analytics, and log management across your entire infrastructure. Amazon OpenSearch Ingestion, a fully managed data collector, simplifies data processing with built-in capabilities to filter, transform, and enrich your logs before analysis.
However, securely sending logs from non-AWS environments presents a challenge. Every request to OpenSearch Ingestion requires AWS Signature Version 4 (AWS SigV4) authentication, traditionally requiring long-term credentials that introduce security risks. AWS Identity and Access Management Roles Anywhere solves this problem by providing temporary credentials for workloads running outside AWS.
In this post, we demonstrate how to configure Fluent Bit, a fast and flexible log processor and router supported by various operating systems, to securely send logs from any environment to OpenSearch Ingestion using IAM Roles Anywhere. This approach alleviates the need for long-term credentials while providing a comprehensive view of your application logs across all environments—improving security, simplifying operations, and enhancing your ability to quickly resolve issues.
Solutions overview
The solution in this post uses Fluent Bit to collect logs, retrieve temporary credentials from IAM Roles Anywhere, and sign HTTP log ingestion requests with AWS SigV4 before sending them to the OpenSearch Ingestion pipeline. The following diagram shows the architecture.
This solution provisions the following key components:
IAM Roles Anywhere configuration – This includes the following:
Trust anchor – Establishes trust between IAM Roles Anywhere and the specified CA.
IAM role – Grants permissions for log ingestion and trusts the IAM Roles Anywhere service principal. At minimum, this role must be granted permission for the osis:Ingest action.
Profile – Defines which roles IAM Roles Anywhere can assume and the maximum permissions granted with the temporary credentials.
OpenSearch Service domain – For this post, we use an OpenSearch Service domain, which is an AWS provisioned equivalent of an open source OpenSearch cluster. We create the domain within a virtual private cloud (VPC); see VPC versus public domains for more information. Alternatively, you can use an Amazon OpenSearch Serverless collection, which is an OpenSearch cluster that scales compute capacity based on your application’s needs.
OpenSearch Ingestion – This is configured to receive logs over HTTP as the pipeline source and forward them to the OpenSearch Service domain as the pipeline sink.
Connectivity between AWS and your hybrid or multicloud environments
You can access your OpenSearch Ingestion pipelines using an interface VPC endpoint with push-based HTTP source, which provides private IP address connectivity. For production environments, we recommend using these private connections through interface endpoints for enhanced security.
Setting up this connectivity requires additional configuration, such as creating an AWS Site-to-Site VPN connection with your hybrid and multicloud network. Although this post focuses on the log ingestion solution, you can find detailed guidance on network connectivity in the following resources:
Hybrid connectivity – Learn about different methods to connect your on-premises networks to AWS
How Fluent Bit retrieves temporary credentials using IAM Roles Anywhere
Using the HTTP output plugin, Fluent Bit can send logs to the OpenSearch Ingestion pipeline. The following diagram is a simplified view of how Fluent Bit retrieves AWS credentials.
On Linux systems, Fluent Bit can use an AWS Command Line Interface (AWS CLI) profile that uses the credential_process parameter to trigger an external process. This external process is invoked to generate or retrieve credentials not directly supported by the AWS CLI.
The following are two common mechanisms for the external process:
As of this writing, the Fluent Bit aws_profile configuration is supported only on Linux. It is untested on other Unix-based systems (such as macOS) and is not implemented for Windows.
Prerequisites
Before you begin this walkthrough, make sure you have the following:
Access to AWS CloudShell for exporting a sample private certificate we will create using AWS CloudFormation in a later step.
Remote (hybrid or multicloud) environment – You must have a remote machine with Linux-based operating system. This solution was tested on Ubuntu 24.04 with the following additional tooling installed:
Follow these steps to deploy AWS resources required for this solution:
Choose Launch Stack:
Enter a unique name for Stack name. The default value is osis-with-iamra.
Configure the stack parameters. Default values are provided in the following table.
Parameter
Default value
Description
CACommonName
example.com
Common Name for the CA
CACountry
US
Organization for the CA
CAOrganization
Example Org
Country for the CA
CAValidityInDays
1826
Validity period in days for the CA certificate
VPCCIDR
10.0.0.0/16
IPv4 CIDR range for the VPC used for OpenSearch Service domain
PublicSubnetCIDR
10.0.0.0/24
IPv4 CIDR range for public subnet
PrivateSubnet1CIDR
10.0.1.0/24
IPv4 CIDR range for private subnet
PrivateSubnet2CIDR
10.0.2.0/24
IPv4 CIDR range for private subnet
DomainName
test-domain
Name of the OpenSearch Service domain
PipelineName
test-pipeline
Name of the OpenSearch Ingestion pipeline
PipelineIngestionPath
/test-ingestion-path
Ingestion path for the OpenSearch Ingestion pipeline
Select the acknowledgement check box and choose Create Stack. Stack deployment takes about 30 minutes to complete.
When stack creation is complete, navigate to the Outputs tab on the AWS CloudFormation console and note down the values for the resources created. The following table summarizes the output values.
Output
Description
Example value
ACMCertificateArn
Amazon Resource Name (ARN) of the ACM certificate. You will use this for exporting certificate and private key files using the AWS CLI in a later step.
Export the certificate ARN from the CloudFormation outputs. If you changed the stack name in the previous step, use that value for <stack-name>, otherwise use the default value osis-with-iamra.
Create a new profile named osis-pipeline-credentials that invokes the credential process. Replace the placeholders with your specific values. Find the values for trusted-anchor-arn, profile-arn, and ingestion-role-arn in your CloudFormation stack outputs.
Run the following command to create a Fluent Bit configuration. Replace the placeholders with your specific values. Find the osis-pipeline-endpoint and pipeline-ingestion-path values in your CloudFormation stack outputs.
cat << 'EOF' > ~/fluent-bit.conf
[INPUT]
  name                  tail
  path                  /var/log/syslog
  read_from_head        true
  refresh_interval      5
[OUTPUT]
  name 			http
  match	   		*
  aws_service 		osis
  host 			<osis-pipeline-endpoint>
  port 			443
  uri 			<pipeline-ingestion-path>
  format 		json
  aws_auth	 	true
  aws_region 		<aa-example-1>
  aws_profile 		osis-pipeline-credentials
  tls 			On
EOF
This example configuration includes the following:
Uses the tail input plugin to monitor the /var/log/syslog file
Uses the http output plugin to flush log records to the OpenSearch Ingestion pipeline endpoint
Uses the osis-pipeline-credentials profile to obtain temporary AWS credentials for SigV4 authentication (aws_auth set to true)
Test the solution
Follow these steps to test the setup:
Start the Fluent Bit client with the configuration file fluent-bit.conf that you created in the previous step. Replace the placeholder with the value applicable to your environment. For Ubuntu 24.04, the default path of the Fluent Bit client is /opt/fluent-bit/bin/fluent-bit. Adjust the path if using other distributions.
Because the solution in this post launched the OpenSearch Service domain within a VPC, you will need an environment that has connectivity to the VPC. For this post, we create a CloudShell VPC environment to run the commands in the next step. Find the VPC, subnet, and security group to use from your CloudFormation stack outputs.
The solution that you deployed through AWS CloudFormation dynamically creates indexes based on ingestion timestamps, format logs-%{yyyy.MM.dd}. You can specify your preferred naming using OpenSearch Ingestion index management. You can query your OpenSearch index using your preferred tool to see the ingested logs from Fluent Bit. We use awscurl in a CloudShell environment as shown in the following example. Replace the placeholders with your specific values. Find the opensearch-domain-endpoint value in your CloudFormation stack outputs.
pip install awscurl

export OPENSEARCH_DOMAIN_ENDPOINT=https://<opensearch-domain-endpoint>

# List indices matching logs-%{yyyy.MM.dd} format and get most recent one to query
export INDEX=$(awscurl --service es "$OPENSEARCH_DOMAIN_ENDPOINT/_cat/indices?v" | grep -E "logs-[0-9]{4}\.[0-9]{2}\.[0-9]{2}" | sort -r | head -1 | awk '{print $3}')

awscurl --service es $OPENSEARCH_DOMAIN_ENDPOINT/$INDEX/_search \
        -X GET -H "Content-Type: application/json" \
        -d '{
            "size": 10,
            "sort": [
              {"@timestamp": {"order": "desc"}}
            ],
            "query": { "match_all": {} }
          }' | jq '.hits.hits[]._source'
The following is an example of the expected output:
In this post, we demonstrated how to obtain temporary credentials from IAM Roles Anywhere and securely ingest logs from hybrid or multicloud environments into OpenSearch Service using OpenSearch Ingestion. This approach minimizes the risk of credential exposure while enabling centralized log collection from distributed workloads. This solution is particularly valuable for organizations managing complex infrastructures across multiple environments and looking to consolidate observability data in OpenSearch Service. For additional details, refer to the following resources:
If you have questions or feedback about this post, please leave them in the comments section.
About the Authors
Xiaoxue Xu is a Solutions Architect for AWS based in Toronto. She primarily works with financial services customers to help secure their workload and design scalable solutions on the AWS Cloud.
Simran Singh is a Senior Solutions Architect at AWS. In this role, he assists our large enterprise customers in meeting their key business objectives using AWS. His areas of expertise include artificial intelligence and machine learning, security, and improving the experience of developers building on AWS.
As organizations increasingly adopt Amazon Bedrock to build and deploy large-scale AI applications, it’s important that they understand and adopt critical network access controls to protect their data and workloads. These generative AI-enabled applications might have access to sensitive or confidential information within their knowledge bases, Retrieval Augmented Generation (RAG) data sources, or models themselves, which could pose a risk if exposed to unauthorized parties. Additionally, organizations might want to limit access to certain AI models to specific teams or services, making sure only authorized users can use the most powerful capabilities. Another important consideration is cost optimization, because organizations need to be able to monitor and control access to manage various aspects of their cloud spending.
In this post, we explore the Amazon Bedrock baseline architecture and how you can secure and control network access to your various Amazon Bedrock capabilities within AWS network services and tools. We discuss key design considerations, such as using Amazon VPC Latticeauth policies, Amazon Virtual Private Cloud (Amazon VPC) endpoints, and AWS Identity and Access Management (IAM) to restrict and monitor access to your Amazon Bedrock capabilities.
By the end of this post, you will have a better understanding of how to configure your AWS landing zone to establish secure and controlled network connectivity to Amazon Bedrock across your organization using VPC Lattice.
Solution overview
Addressing the aforementioned challenges requires a well-designed network architecture and security controls. For this, we use the standard AWS Landing Zone Accelerator networking configuration. It provides a good starting point for managing network communication across multiple accounts. On top of the AWS Landing Zone Accelerator network design, we add two shared accounts.
In this solution design, we create a centralized architecture for managing organization AI capabilities across different accounts. The architecture consists of three main parts that work together to provide secure and controlled access to AI services:
Service network account – This account serves as the central networking hub for the organization, managing network connectivity and access policies. Through this account, network administrators can centrally manage and control access to AI services across the organization. The account follows AWS Landing Zone Accelerator networking practices that scale with enterprise organizational needs.
Generative AI account – This account hosts the organization’s Amazon Bedrock capabilities and serves as the central point for AI/ML management. The organization’s AI/ML scientists and prompt engineers will centrally build and manage Amazon Bedrock capabilities. The account provides access to various large language models (LLMs) through Amazon Bedrock by using VPC interface endpoints, while also enabling centralized monitoring of cost consumption and access patterns.
Workload accounts (dev, test, prod) – These accounts represent different environments where teams develop and deploy applications that consume AI services. Through secure network connections established through the service network account, these workload accounts can access the AI capabilities hosted in the generative AI account. This separation enforces proper isolation between development, testing, and production workloads while maintaining secure access to AI services.
Amazon Bedrock baseline architecture in an AWS landing zone
The following diagram illustrates the solution architecture.
The service network account has its own VPC Lattice service network—a centralized networking construct that enables service-to-service communication across your organization, which is shared with workload accounts using AWS Resource Access Manager (AWS RAM) to enable VPC Lattice Service network sharing.
Workload accounts (dev, test, prod) establish VPC associations with the shared VPC Lattice service network by creating a service network association in their VPC. When an application in these accounts makes a request, it first queries the VPC resolver for DNS resolution. The resolver routes the traffic to the VPC Lattice service network.
Access control is implemented through an VPC Lattice auth policy. The service network policies determine which accounts can access the VPC Lattice service network, and service-level policies control access to specific AI services and define what actions each account can perform.
In the central AI services account, we find the proxy layer, we create a VPC Lattice service that points to a proxy layer, which acts as a single entry point, providing workload accounts access to Amazon Bedrock. This proxy layer then connects to Amazon Bedrock through VPC endpoints. Through this setup, the AI team can configure which foundation models (FMs) are available and manage access permissions for different workload accounts. After the necessary policies and connections are in place, workload accounts can access Amazon Bedrock capabilities through the established secure pathway. This setup enables secure, cross-account access to AI services while maintaining centralized control and monitoring.
Network components
We use VPC Lattice, which is a fully managed application networking service that helps you simplify network connectivity, security, and monitoring for service-to-service communication needs. With VPC Lattice, organizations can achieve a centralized connectivity pattern to control and monitor access to the services required for building generative AI applications.
For details about VPC Lattice, refer to the Amazon VPC Lattice User Guide. The following is an overview of the constructs you can use in setting up the centralized pattern in this solution:
VPC Lattice service network – You can use the VPC Lattice service network to provide central connectivity and security to the central AI services account. The service network is a logical grouping mechanism that simplifies how you can enable connectivity across VPCs or accounts, and apply common security policies for application communication patterns. You can create a service network in an account and share it with other accounts within or outside AWS Organizations using AWS RAM.
VPC Lattice service – In a service network, you can associate a VPC Lattice service, which consists of a listener (protocol and port number), routing rules that allow for control of the application flow (for example, path, method, header-based, or weighted routing), and target group, which defines the application infrastructure. A service can have multiple listeners to meet various client capabilities. Supported protocols include HTTP, HTTPS, gRPC, and TLS. The path-based routing allows control to various high-performing FMs and other capabilities you would need to build a generative AI application.
Proxy layer – You use a proxy layer for the VPC Lattice service target group. The proxy layer can be built based on your organization’s preference of AWS services, such as AWS Lambda, AWS Fargate, or Amazon Elastic Kubernetes Service (Amazon EKS). The purpose of the proxy layer is to provide a single entry point to access LLMs, knowledge bases, and other capabilities that are tested and approved according to your organization’s compliance requirements.
VPC Lattice auth policies – For security, you use VPC Lattice auth policies. VPC Lattice auth policies are specified using the same syntax as IAM policies. You can apply an auth policy to VPC Lattice service network as well as to the VPC Lattice service.
Fully Qualified Domain Names –To facilitate service discovery, VPC Lattice supports custom domain names for your services and resources, and maintains a Fully Qualified Domain Name (FQDN) for each VPC Lattice service and resource you define. You can use these FQDNs in your Amazon Route 53 private hosted zone configurations, and empower business units or teams to discover and access services and resources.
Service network VPC – Business units or teams can access generative AI services in a service network using service network VPC associations or a service network VPC endpoint.
Monitoring – You can choose to enable monitoring at the VPC Lattice service network level and VPC Lattice service level. VPC Lattice generates metrics and logs for requests and responses, making it more efficient to monitor and troubleshoot applications
The preceding guidance takes a “secure by default” approach—you must be explicit about which features, models, and so on should be accessed by which business unit. The setup also enables you to implement a defense-in-depth strategy at multiple layers of the network:
The first level of defense is that business team needs to connect to the service network in order to get access to the generative AI service through the central AI service account.
The second level includes network-level security protections in the business team’s VPC for the service network, such as security groups and network access control lists (ACLs). By using these, you can allow access to specific workloads or teams in a VPC.
The third level is through the VPC Lattice auth policy, which you can apply at two layers: at the service network level to allow authenticated requests within the organization, and at the service level to allow access to specific models and features.
VPC Lattice auth policy
This solution makes it possible to centrally manage access to Amazon Bedrock resources across your organization. This approach uses an VPC Lattice auth policy to centrally control Amazon Bedrock resources and manage it from one location across all the organization accounts.
Typically, the auth policy on the service network is operated by the network or cloud administrator. For example, allowing only authenticated requests from specific workloads or teams in your AWS organization. In the following example, access is granted to invoke the generated AI service for authenticated requests and to principals that are part of the o-123456example organization:
The auth policy at the service level is managed by the central AI service team to set fine-grained controls, which can be more restrictive than the coarse-grained authorization applied at the service network level. For example, the following policy restricts access to claude-3-haiku for only business-team1:
This design employs three monitoring approaches, using Amazon CloudWatch, AWS CloudTrail, and VPC Lattice access logs. This strategy provides a view of service usage, security, and performance.
CloudWatch metrics offer real-time monitoring of VPC Lattice service performance and usage. CloudWatch tracks metrics such as request counts and response times for Amazon Bedrock related endpoints, allowing for the setup of alarms for proactive management of service health and capacity. This enables monitoring of overall usage patterns of Amazon Bedrock models across different business units, facilitating capacity planning and resource allocation. CloudTrail provides detailed API-level auditing of Amazon Bedrock related actions. It logs cross-account access attempts and interactions with Amazon Bedrock services, providing a compliance and security audit trail. This tracking of who is accessing which Amazon Bedrock models, when, and from which accounts helps organizations adhere to their organizational policies.VPC Lattice access logs provide detailed insights into HTTP/HTTPS requests to Amazon Bedrock services, capturing specific usage patterns of AI models by different business teams. These logs contain client-specific information, which for example can be used to enable organizations to implement capabilities such as charge-back models. This allows for accurate attribution of AI service usage to specific teams or departments, facilitating fair cost allocation and responsible resource utilization across the organization. These services work together to enhance security, optimize performance, and provide valuable insights for managing cross-account Amazon Bedrock access.
Conclusion
In this post, we explored the importance of securing and controlling network access to Amazon Bedrock capabilities within an organization’s AWS landing zone. We discussed the key business challenges, such as the need to protect sensitive information in Amazon Bedrock knowledge bases, limit access to AI models, and optimize cloud costs by monitoring and controlling Amazon Bedrock capabilities. To address these challenges, we outlined a multi-layered network solution that uses AWS networking services, including a VPC Lattice auth policy to restrict and monitor access to Amazon Bedrock capabilities. Try out this solution for your own use case, and share your feedback in the comments.
Today, we’re announcing a new capability in AWS IAM Access Analyzer that helps security teams verify which AWS Identity and Access Management (IAM) roles and users have access to their critical AWS resources. This new feature provides comprehensive visibility into access granted from within your Amazon Web Services (AWS) organization, complementing the existing external access analysis.
Security teams in regulated industries, such as financial services and healthcare, need to verify access to sensitive data stores like Amazon Simple Storage Service (Amazon S3) buckets containing credit card information or healthcare records. Previously, teams had to invest considerable time and resources conducting manual reviews of AWS Identity and Access Management (IAM) policies or rely on pattern-matching tools to understand internal access patterns.
The new IAM Access Analyzer internal access findings identify who within your AWS organization has access to your critical AWS resources. It uses automated reasoning to collectively evaluate multiple policies, including service control policies (SCPs), resource control policies (RCPs), and identity-based policies, and generates findings when a user or role has access to your S3 buckets, Amazon DynamoDB tables, or Amazon Relational Database Service (Amazon RDS) snapshots. The findings are aggregated in a unified dashboard, simplifying access review and management. You can use Amazon EventBridge to automatically notify development teams of new findings to remove unintended access. Internal access findings provide security teams with the visibility to strengthen access controls on their critical resources and help compliance teams demonstrate access control audit requirements.
Let’s try it out
To begin using this new capability, you can enable IAM Access Analyzer to monitor specific resources using the AWS Management Console. Navigate to IAM and select Analyzer settings under the Access reports section of the left-hand navigation menu. From here, select Create analyzer.
From the Create analyzer page, select the option of Resource analysis – Internal access. Under Analyzer details, you can customize your analyzer’s name to whatever you prefer or use the automatically generated name. Next, you need to select your Zone of trust. If your account is the management account for an AWS organization, you can choose to monitor resources across all accounts within your organization or the current account you’re logged in to. If your account is a member account of an AWS organization or a standalone account, then you can monitor resources within your account.
The zone of trust also determines which IAM roles and users are considered in scope for analysis. An organization zone of trust analyzer evaluates all IAM roles and users in the organization for potential access to a resource, whereas an account zone of trust only evaluates the IAM roles and users in that account.
For this first example, we assume our account is the management account and create an analyzer with the organization as the zone of trust.
Next, we need to select the resources we wish to analyze. Selecting Add resources gives us three options. Let’s first examine how we can select resources by identifying the account and resource type for analysis.
You can use Add resources by account dialog to choose resource types through a new interface. Here, we select All supported resource types and select the accounts we wish to monitor. This will create an analyzer that monitors all supported resource types. You can either select accounts through the organization structure (shown in the following screenshot) or paste in account IDs using the Enter AWS account ID option.
You can also choose to use the Define specific resource types dialog, which you can use to pick from a list of supported resource types (as shown in the following screenshot). By creating an analyzer with this configuration, IAM Access Analyzer will continually monitor both existing and new resources of the selected type within the account, checking for internal access.
After you’ve completed your selections, choose Add resources.
Alternatively, you can use the Add resources by resource ARN option.
Or you can use the Add resources by uploading a CSV file option to configure monitoring a list of specific resources at scale.
After you’ve completed the creation of your analyzer, IAM Access Analyzer will analyze policies daily and generate findings that show access granted to IAM roles and users within your organization. The updated IAM Access Analyzer dashboard now provides a resource-centric view. The Active findings section summarizes access into three distinct categories: public access, external access outside of the organization (requires creation of a separate external access analyzer), and access within the organization. The Key resources section highlights the top resources with active findings across the three categories. You can see a list of all analyzed resources by selecting View all active findings or Resource analysis on the left-hand navigation menu.
On the Resource analysis page, you can filter the list of all analyzed resources for further analysis.
When you select a specific resource, any available external access and internal access findings are listed on the Resource details page. Use this feature to evaluate all possible access to your selected resource. For each finding, IAM Access Analyzer provides you with detailed information about allowed IAM actions and their conditions, including the impact of any applicable SCPs and RCPs. This means you can verify that access is appropriately restricted and meets least-privilege requirements.
Pricing and availability
This new IAM Access Analyzer capability is available today in all commercial Regions. Pricing is based on the number of critical AWS resources monitored per month. External access analysis remains available at no additional charge. Pricing for EventBridge applies separately.
To learn more about IAM Access Analyzer and get started with analyzing internal access to your critical resources, visit the IAM Access Analyzer documentation.
Join us at AWS re:Inforce 2025 from June 16 to 18 as we dive deep into identity and access management, where we’ll explore how organizations are securing identities at scale. As the traditional security perimeter continues to dissolve in our hybrid and multi-cloud world, this year’s sessions showcase how AWS customers are building comprehensive identity-centric security strategies that span workforce and customer identities. From authenticating and authorizing human and machine identities to implementing least privilege access controls and securing identities that help drive AI adoption, you’ll discover practical approaches to modernizing your identity architecture.
Whether you’re managing enterprise workforce identities across complex organizational structures or building customer-facing applications that require seamless and secure authentication experiences, the Identity and Access Management track offers insights for every security professional. We’ve carefully curated sessions that address today’s most pressing identity challenges, including zero trust implementation patterns, unified workforce identity management across cloud and on-premises environments, and scalable customer identity and access management (CIAM) solutions. Through technical deep-dives, hands-on workshops, and customer case studies, you’ll learn how to use AWS Identity and Access Management (IAM), AWS IAM Identity Center, AWS Directory Services, Amazon Cognito, and other AWS services to build robust identity foundations that support both security and business agility.
In this post, we highlight some of the key sessions. With over 30 sessions dedicated to identity management, we feature valuable learnings for executives and practitioners alike. Let AWS experts and partners share practical challenges and solutions with you. Let’s explore what you can expect at this year’s conference.
Zero trust and principle of least privilege
IAM304 | Breakout session | Empowering developers to implement least-privilege IAM permissions Wolters Kluwer, a global provider of professional information, software solutions, and services and GoTo Technologies (formerly LogMeIn Inc.), a U.S.-based software company that provides cloud-based remote work tools for collaboration and IT management use AWS IAM Access Analyzer to simplify and accelerate their journey to least privilege. Join this session to learn more about their use cases and their journey to empower their builders to refine IAM policies to remove excessive permissions. Gain insights into their strategies, best practices, and lessons learned for continuously monitoring unused permissions across their organization and building processes to streamline remediations.
IAM343 | Code talk | Scale Beyond RBAC: Transform App Access Control using AVP & Cedar This session focuses on transforming an existing application from role-based access control (RBAC) to policy-based access control (PBAC) using Amazon Verified Permissions (AVP) and Cedar policy. The drive for least privilege has led to role explosion in RBAC model and necessitates a shift towards PBAC, augmenting RBAC with attribute-based access control (ABAC). You will learn how to move authorization logic out of application code and implementing a centralized PBAC model. Attendees will also learn to define permissions as policies using Cedar and seamlessly migrate from RBAC to PBAC with minimal application logic changes, enabling more granular and scalable access control.
Securing Identities in the AI era
IAM373 | Workshop | Identity without barriers: user-aware access for AWS analytics services This hands-on workshop explores AWS IAM Identity Center’s Trusted Identity Propagation, teaching participants how to enable secure identity propagation across integrated applications. Through practical exercises, attendees will learn to configure identity propagation and use it with services such as Amazon Redshift, Amazon Athena, Amazon Q Business, and more. Participants will gain experience with cross-account scenarios, audit logging configuration, and troubleshooting common integration challenges. You must bring your laptop to participate.
IAM321 | Lightning talk | Building trust in Agentic AI through authentication and access control AI agents execute tasks for humans, operating independently with or without human presence, while collaborating seamlessly across on-premise and multi-cloud environments. This dynamic setup poses unique challenges in human/agent authentication, identity propagation/delegation, and resource authorization. Leverage Amazon Cognito, Verified Permissions, and Bedrock to master effective Identity and Access Management (IAM) for your AI agents. Through real-world examples using OAuth2-based identity management, machine-to-machine authentication, and policy-based access control, you’ll unlock the ability to scale complex agent interactions securely, empowering you to build robust, scalable Agentic AI solutions.
IAM441 | Code Talk | The Right Way to Secure AI Agents with Code Examples GenAI agents run tasks on behalf of human users with or without users being present, and often interact with each other across on-premise and different cloud providers. This brings new challenges in identity authentication, propagation, delegation, and resource authorization in the overall agentic AI solution. Learn how Amazon Cognito’s OAuth2-based identity management, machine-to-machine authentication, combined with Amazon Verified Permission’s fine-grained authorization can enable secure delegation patterns for AI agents, while preserving human identity and consent, agent machine identity, and other request context throughout the agent chain. We’ll walk through real-world examples with agents built on Amazon Bedrock or other frameworks.
Workforce identity management
IAM302 | Breakout session | Workforce identity for gen AI and analytics Managing secure, consistent workforce access for generative AI and analytics is critical for unlocking innovation while protecting sensitive data. In this demo-filled session, you’ll see how centralized identity management and trusted identity propagation can deliver a user-centric data access experience. You’ll also learn how AWS IAM Identity Center simplifies access to AWS services such as Amazon Redshift, Amazon Athena, and AWS Lake Formation, while enabling fine-grained access to data based on user identity to help meet your security and compliance needs.
IAM341 | Code Talk | Visualizing Workforce Identity: Graph-Based Analysis for Access Rights Discover how to gain deep insights into workforce identity relationships and resource access patterns by visualizing AWS IAM Identity Center data using graph databases. Learn how you can explore complex identity relationships, permission inheritance and resource access across your organization; get practical approaches to ingestion of identity data, creating graph queries for security analysis, and building visualization dashboards to help identify potential resource access risks. We’ll explore real-world scenarios for detecting excessive permissions, analyzing group memberships and resource access, and tracking resource access rights changes over time to strengthen your identity security posture.
Customer and Machine identity management
IAM332 | Chalk Talk | Securing and monitoring machine identities with Amazon Cognito Unlock the power of secure machine-to-machine (M2M) authorization using Amazon Cognito’s OAuth2 client credentials flow. This session dives deep into implementing M2M authorization, featuring real-world optimization strategies for both security and cost. Learn essential security best practices, multi-tenant reference architectures, and monitoring techniques that ensure your M2M usage remains efficient and secure. Whether you’re building microservices, handling API authorization, or scaling your distributed systems, this session will equip you with actionable insights and patterns for successful M2M implementations. Bring your challenges and questions for an interactive discussion on Cognito-powered M2M authorization.
IAM372 | Workshop | Building CIAM Solutions with Amazon Cognito Learn how to use Amazon Cognito for your solutions’ CIAM needs. Use hands on examples to build fully functional solutions and see some of the new features in action like the new Managed Login UI, Passwordless logins now supported natively and more.
AWS identity foundation
IAM305 | Breakout session | Establishing a data perimeter on AWS, featuring Block, Inc. Organizations are storing an unprecedented and increasing amount of data on AWS for a range of use cases including data lakes, analytics, machine learning, and enterprise applications. They want to make sure that sensitive non-public data is protected from unintended access. In this session, dive deep into the controls that you can use to create a data perimeter to help ensure that only your trusted identities are accessing trusted resources from expected networks. Hear from Block, Inc. a leading fintech company about how they use data perimeter controls in their AWS environment to meet their security objectives.
IAM451 | Builders session | Securing GenAI Apps: Fine-Grained Access Control for Amazon Bedrock Agents Want to secure GenAI applications accessing your organizational data? Learn how to implement intelligent access controls for Amazon Bedrock-powered applications accessing your organizational data. In this builder’s session, you’ll build a defense-in-depth approach that combines authentication using Amazon Cognito and fine-grained authorization with Amazon Verified Permissions to secure access for Bedrock AI Agents. Implement layered permissions that protect sensitive data without limiting your GenAI capabilities.
Conclusion
As organizations continue to navigate the complexities of modern identity architecture, implementing a robust IAM framework remains critical for maintaining security posture while enabling seamless access across hybrid environments. The disappearance of the identity perimeter and the shift towards identity-first security demands a more sophisticated approach to authentication and authorization workflows, making continuous validation and adaptive access policies paramount. The community at re:inforce, strives to provide you with solutions, tactics, and strategies that you can use to propel your business forward.
If you have feedback about this post, submit comments in the Comments section below.
Controlling access to your privileged and sensitive resources is critical for all AWS customers. Preventing direct human interaction with services and systems through automation is the primary means of accomplishing this. For those infrequent times when automation is not yet possible or implemented, providing a secure method for temporary elevated access is the next best option. In a privileged access management solution, there are several elements that should be included:
User access should follow the principle of least privileged
Users should be granted only the minimum amount of access required to perform their job duties
Access granted should persist only for the time necessary to perform the assigned tasks
The solution should include:
An eligibility process for granting access
An approval process for granting access
Auditing of the access grants and activities taken
Entra Privileged Identity Management (PIM) is a third-party solution that provides dynamic group management, access control, and audit capabilities that integrate with AWS IAM Identity Center.
In this post, we show you how to configure just-in-time access to AWS using Entra PIM’s integration with IAM Identity Center.
Just-in-time privileged access with Entra PIM and IAM Identity Center
Privileged Identity Management is a Microsoft Entra ID feature that enables management, control, and access monitoring of your important cloud resources. There are many different configuration options when it comes to eligibility and assignment to privileged security groups, including time-bound access with start and end dates, multi-factor authentication (MFA) enforcement, justification tracking, and so on. You can read more about those options in Microsoft’s product documentation.
Figure 1 shows the just-in-time access solution powered by Entra PIM group activation requests. In this solution, Entra PIM is integrated with IAM Identity Center to provide temporary, limited access to AWS resources based on user requests and approvals. Entra ID users can submit requests for specific access to specific AWS permissions sets, which are then automatically granted for a set duration.
Figure 1 – Entra PIM solution integrated with IAM Identity Center
Prerequisites
To try the solution described in this post, you need to have the following in place:
An AWS account with an organization instance of IAM Identity Center enabled. For more information, see What is IAM Identity Center.
An Azure account subscription with Entra ID P1 or P2 licensing.
In the following steps, you create configurations to enable Entra PIM for Groups to automatically assign users to groups based on approval criteria. The groups will be Entra ID security groups that use direct assignment. Note that, at the time of this writing, dynamic groups and groups that you have synchronized from a self-managed Active Directory cannot be used with Microsoft Entra PIM. While it might be possible to also populate these groups using a third-party synchronization tool, for the purposes of this exercise, we assume that administration is occurring solely within Entra ID.
In the example scenario, the role corresponds to a specific job function within your organization. We use a group called AWS – Amazon EC2 Admin, which corresponds to a DevOps on-call site reliability engineer (SRE) lead.
Step 1: Create a group representing a specific privilege level.
Create a group in Entra ID that represents a specific privilege level that your employees can request for access to the AWS Management Console.
When the initial sync completes, the AWS – Amazon EC2 Admin group will be ready for configuration in IAM Identity Center.
Step 3: Create permission sets in IAM Identity Center
As you prepare to configure your permission set, let’s consider session duration from both the AWS and Entra PIM perspectives. There are two session durations on the AWS side: AWS access portal session duration and permission set session duration. The AWS access portal session duration defines the maximum length of time that a user can be signed in to the AWS access portal without reauthenticating. The default session duration is 8 hours but can be configured anywhere between 15 minutes and 7 days.
Note: Entra does not pass the SessionNotOnOrAfter attribute to IAM Identity Center as part of the SAML assertion. Meaning the duration of the AWS access portal session is controlled by the duration set in IAM Identity Center.
The session duration defined within a permission set specifies the length of time that a user can have a session for an AWS account. The default and minimum value is 1 hour (with a maximum value of 12). Entra PIM allows you to configure an activationmaximum duration. The activation maximum duration is the length of time that the specified group will contain the activated user account. The activation maximum duration has a default value of 8 hours but can be configured between 30 minutes and 24 hours.
You should carefully consider the values that you provide for each of these durations. The AWS access portal will display permission sets that the user had access to at the time that they signed in for the duration of the active AWS access portal session.
When you set the permission set session duration, you need to keep in mind that active sessions are not terminated when the Entra PIM activation maximum duration has been reached. Let’s look at an example:
Session duration defined in the permission set: 1 hour
Entra PIM group activation maximum duration: 1 hour
You might be inclined to think that an hour after being added to the group in Entra, the user would no longer have access to AWS resources. This is not necessarily the case. A user could authenticate to the AWS access portal, wait up to 8 hours, and still successfully access AWS through the permission set link. Their session would be active for the duration of the session setting defined in the permission set, which is 1 hour in this case. In this example, we have a potential window of access of 10 hours, as shown in Figure 2 that follows.
Figure 2 – Calculating session duration
With this in mind, configure your test environment with the default setting of 8 hours for the AWS access portal and 1 hour for the permission set session duration value.
Under Multi-account permissions, choose Permission sets.
Choose Create permission set.
On the Select permission set type page, under Permission set type, select Custom permission set, and then choose Next.
On the Specify policies and permissions boundary page, expand AWS managed policies.
Search for and select AmazonEC2FullAccess policy, and then choose Next.
On the Specify permission set details page, enter EC2AdminAccess for the Permission set name and choose Next.
On the Review and create page, review the selections, and choose Create.
Step 4: Assign group access in your organization
At this point, you’re ready to assign the Microsoft Entra group to the corresponding permission set in IAM Identity Center. This allows users who are members of the group to be granted the appropriate access level in AWS.
In the navigation pane, under Multi-account permissions, choose AWS accounts.
On the AWS accounts page, select the check box next to one or more AWS accounts to which you want to assign access.
Choose Assign users or groups.
On the Groups tab, select AWS – Amazon EC2 Admin and choose Next
On the Assign permission sets to “<AWS-account-name>” page, select the EC2AdminAccess permission set.
Check that the correct permission set was selected and choose Next.
On the Review and submit page, verify that the correct group and permission set are selected, and choose Submit.
Step 5: Configure Entra PIM
To use this Microsoft Entra group with Entra PIM, you bring the group under the management of PIM by using the Entra admin console to activate the group. You can read more about group management with PIM in the Microsoft documentation. Begin by activating the Entra group that you created.
Select Privileged Identity Management under the Activity menu list.
Choose Enable PIM for this group.
Figure 4 – Enable PIM for this group
Now, you will configure the PIM settings for the group. These settings define Member or Owner properties and requirements. It’s here that you can establish MFA requirements, configure notifications, conditional access, approvals, durations, and so on. The Owner role can elevate their permissions using just-in-time access to manage a group, while the Member role is limited to requesting just-in-time membership within the group. In this example, you use the Member properties to demonstrate group membership level temporary elevated access and set a 1-hour duration for the group assignment.
Select Identity Governance, Privileged Identity Management, and then Groups.
Select the AWS – Amazon EC2 Admin group.
Figure 5 – Selecting groups for PIM configuration
From the Manage menu select Settings.
Choose Member to view the default role setting details.
Figure 6 – Settings option for the Member role
Review the default settings. The activation maximum duration should be set to 1 hour and require a justification from the user.
Close the Role setting details – Member blade.
Figure 7 – Closing the Role setting details – Member blade
From the Manage menu select Assignments and choose + Add assignments.
Figure 8 – Adding eligibility assignments to the PIM enabled groups
Select Member from the Select role dropdown menu and choose No member selected. Select the test account, Rich Roe in this example, and then choose Select.
Figure 9 – Adding the test user as an eligible identity for PIM activation to the group
Choose Next and leave the default setting of 1 year of eligibility. Duration eligibility defines the period that the user can request activation for the group. Depending on your use case, you will define this as permanent or for a set period. For testing purposes, keep the default setting. Choose Assign.
Figure 10 – Completing the eligibility assignment
Test the configuration
You should now have a test configuration of Entra PIM and IAM Identity Center. Use the test account to verify just-in-time access.
Select Identity Governance, Privileged Identity Management, and then My roles.
Figure 11 – Browsing to the My Roles section of the Entra admin center
From the Activate menu list, select Groups. Your eligible group assignments should be listed.
Choose Activate for the AWS – Amazon EC2 Admin group.
Figure 12 – Activating the just-in-time group membership
In the Activate – Member blade, enter a justification for the access request and choose Activate.
Figure 13 – Providing a justification for access
In this example, there are no approval workflow processes configured for the group, so Entra validates the eligibility requirements and adds the test account to the AWS – Amazon EC2 Admin group. If you want to dive deeper into the approval workflow process, you can read more about it on the Configure PIM for Groups settings page. Because the group is assigned to the enterprise application and configured for provisioning, the updated group membership is automatically synchronized using the SCIM protocol with the connected IAM Identity Center instance. The provisioning time can vary based on the number of PIM enabled users that are activating their memberships within a given 10-second period. In most situations, group memberships are synchronized within 2–10 minutes, but can revert to the standard 40-minute interval if activity runs up against Entra PIM throttling limits. IAM Identity Center responds to SCIM requests as they arrive from Entra ID.
To test access with the newly activated group assignment, use a separate browser or a private window.
Sign in to the My Apps portal with the test user credentials and select the IAM Identity Center app that you created for testing. If you experience an error or don’t see the expected permission set, wait a few minutes until the group membership has synchronized to IAM Identity Center and try again.
Figure 14 – Accessing IAM Identity Center through the My apps portal
Expand the associated AWS account and confirm the EC2ReadOnly permission set has been granted.
Close the AWS tab. Wait for the access to be revoked, which has been set to 60 minutes in this example.
Figure 15 – Just-in-time access to the EC2AdminAccess permission set
Sign back in to the My Apps portal and select the AWS IAM Identity Center app. Notice that the EC2ReadOnly permission set has been revoked.
Conclusion
The combination of AWS IAM Identity Center and Entra PIM provides a robust solution for managing just-in-time elevated access to AWS. By using security groups in Entra and mapping them to permission sets in IAM Identity Center, you can automate the provisioning and deprovisioning of privileged access based on defined policies and approval workflows. This approach helps to make sure the principle of least privilege is enforced, with access granted only for the duration required to complete a task. The detailed auditing capabilities of both services also provide comprehensive visibility into privileged access activities.
For AWS customers seeking a comprehensive, secure, and scalable privileged access management solution, the Entra PIM and IAM Identity Center integration is a common option that’s worth investigating to see if it’s a good fit for your use case.
If you have feedback about this post, submit comments in the Comments section below. If you have questions about this post, contact AWS Support.
Amazon SageMaker Lakehouse now supports attribute-based access control (ABAC) with AWS Lake Formation, using AWS Identity and Access Management (IAM) principals and session tags to simplify data access, grant creation, and maintenance. With ABAC, you can manage business attributes associated with user identities and enable organizations to create dynamic access control policies that adapt to the specific context.
SageMaker Lakehouse is a unified, open, and secure data lakehouse that now supports ABAC to provide unified access to general purpose Amazon S3 buckets, Amazon S3 Tables, Amazon Redshift data warehouses, and data sources such as Amazon DynamoDB or PostgreSQL. You can then query, analyze, and join the data using Redshift, Amazon Athena, Amazon EMR, and AWS Glue. You can secure and centrally manage your data in the lakehouse by defining fine-grained permissions with Lake Formation that are consistently applied across all analytics and machine learning(ML) tools and engines. In addition to its support for role-based and tag-based access control, Lake Formation extends support to attribute-based access to simplify data access management for SageMaker Lakehouse, with the following benefits:
Flexibility – ABAC policies are flexible and can be updated to meet changing business needs. Instead of creating new rigid roles, ABAC systems allow access rules to be modified by simply changing user or resource attributes.
Efficiency – Managing a smaller number of roles and policies is more straightforward than managing a large number of roles, reducing administrative overhead.
Scalability – ABAC systems are more scalable for larger enterprises because they can handle a large number of users and resources without requiring a large number of roles.
Attribute-based access control overview
Previously, within SageMaker Lakehouse, Lake Formation granted access to resources based on the identity of a requesting user. Our customers were requesting the capability to express the full complexity required for access control rules in organizations. ABAC allows for more flexible and nuanced access policies that can better reflect real-world needs. Organizations can now grant permissions on a resource based on user attribute and is context-driven. This allows administrators to grant permissions on a resource with conditions that specify user attribute keys and values. IAM principals with matching IAM or session tag key-value pairs will gain access to the resource.
Instead of creating a separate role for each team member’s access to a specific project, you can set up ABAC policies to grant access based on attributes like membership and user role, reducing the number of roles required. For instance, without ABAC, a company with an account manager role that covers five different geographical territories needs to create five different IAM roles and grant data access for only the specific territory for which the IAM role is meant. With ABAC, they can simply add those territory attributes as keys/values to the principal tag and provide data access grants based on those attributes. If the value of the attribute for a user changes, access to the dataset will automatically be invalidated.
With ABAC, you can use attributes such as department or country and use IAM or sessions tags to determine access to data, making it more straightforward to create and maintain data access grants. Administrators can define fine-grained access permissions with ABAC to limit access to databases, tables, rows, columns, or table cells.
In this post, we demonstrate how to get started with ABAC in SageMaker Lakehouse and use with various analytics services.
Solution overview
To illustrate the solution, we are going to consider a fictional company called Example Retail Corp. Example Retail’s leadership is interested in analyzing sales data in Amazon S3 to determine in-demand products, understand customer behavior, and identify trends, for better decision-making and increased profitability. The sales department sets up a team for sales analysis with the following data access requirements:
All data analysts in the Sales department in the US get access to only sales-specific data in only US regions
All BI analysts in the Sales department have full access to data in only US regions
All scientists in the Sales department get access to only sales-specific data across all regions
Anyone outside of Sales department have no access to sales data
For this post, we consider the database salesdb, which contains the store_sales table that has store sales details. The table store_sales has the following schema.
To demonstrate the product sales analysis use case, we will consider the following personas from the Example Retail Corp:
Ava is a data administrator in Example Retail Corp who is responsible for supporting team members with specific data permission policies
Alice is a data analyst who should be able to access sales specific US store data to perform product sales analysis
Bob is a BI analyst who should be able to access all data from US store sales to generate reports
Charlie is a data scientist who should be able to access sales specific across all regions to explore and find patterns for trend analysis
Ava decides to use SageMaker Lakehouse to unify data across various data sources while setting up fine-grained access control using ABAC. Alice is excited about this decision as she can now build daily reports using her expertise with Athena. Bob now knows that he can quickly build Amazon QuickSight dashboards with queries that are optimized using Redshift’s cost-based optimizer. Charlie, being an open source Apache Spark contributor, is excited that he can build Spark based processing with Amazon EMR to build ML forecasting models.
Ava defines the user attributes as static IAM tags that could also include attributes stored in the identity provider (IdP) or as session tags dynamically to represent the user metadata. These tags are assigned to IAM users or roles and can be used to define or restrict access to specific resources or data. For more details, refer to Tags for AWS Identity and Access Management resources and Pass session tags in AWS STS.
For this post, Ava assigns users with static IAM tags to represent the user attributes, including their department membership, Region assignment, and current role relationship. The following table summarizes the tags that represent user attributes and user assignment.
User
Persona
Attributes
Access
Alice
Data Analyst
Department=sales Region=US Role=Analyst
Sales specific data in US and no access to customer data
Bob
BI Analyst
Department=sales Region=US Role=BIAnalyst
All data in US
Charlie
Data Scientist
Department=sales Region=ALL Role=Scientist
Sales specific data in All regions and no access to customer data
Ava then defines access control policies in Lake Formation that grant or restrict access to certain resources based on predefined criteria (user attributes defined using IAM tags) being satisfied. This allows for flexible and context-aware security policies where access privileges can be adjusted dynamically by modifying the user attribute assignment without changing the policy rules. The following table summarizes the policies in the Sales department.
Access
User Attributes
Policy
All analysts (including Alice) in US get access to sales specific data in US regions
Have an existing AWS Glue database or table and Amazon Simple Storage Service (Amazon) S3 bucket that holds the table data. For this post, we use salesdb as our database, store_sales as our table, and data is stored in an S3 bucket.
Define attributes for the IAM principals Alice, Bob, Charlie
Ava completes the following steps to define the attributes for the IAM principal:
Log in as an admin user and navigate to the IAM console.
Choose Users under Access management in the navigation pane and search for the user Alice.
Choose the user and choose the Tags tab.
Choose Add new tag and provide the following key pairs:
Key: Department and value: sales
Key: Region and value: US
Key: Role and value: Analyst
Choose Save changes.
Repeat the process for the user Bob and provide the following key pairs:
Key: Department and value: sales
Key: Region and value: US
Key: Role and value: BIAnalyst
Repeat the process for the user Charlie and IAM role scientist_role and provide the following key pairs:
Key: Department and value: sales
Key: Region and value: ALL
Key: Role and value: Scientist
Grant permissions to Alice, Bob, Charlie using ABAC
Ava now grants database and table permissions to users with ABAC.
Grant database permissions
Complete the following steps:
Ava logs in as data lake admin and navigate to the Lake Formation console.
In the navigation pane, under Permissions, choose Data lake permissions.
Choose Grant.
On the Grant permissions page, choose Principals by attribute.
Specify the following attributes:
Key: Department and value: sales
Key: Role and value: Analyst,Scientist
Review the resulting policy expression.
For Permission scope, select This account.
Next, choose the catalog resources to grant access:
For Catalogs, enter the account ID.
For Databases, enter salesdb.
For Database permissions, select Describe.
Choose Grant.
Ava now verifies the database permission by navigating to the Databases tab under the Data Catalog and searching for salesdb. Select salesdb and choose View under Actions.
Grant table permissions to Alice
Complete the following steps to create a data filter to view sales specific columns in store_sales records whose country=US:
On the Lake Formation console, choose Data filters under Data Catalog in the navigation pane.
Choose Create new filter.
Provide the data filter name as us_sales_salesonlydata.
For Target catalog, enter the account ID.
For Target database, choose salesdb.
For Target table, choose store_sales.
For column-level access, choose Include columns: store_id, item_code, transaction_date, product_name, country, sales_price, and quantity.
For Row-level access, choose Filter rows and enter the row filter country='US'.
Choose Create data filter.
On the Grant permissions page, choose Principals by attribute.
Specify the attributes:
Key: Department and value: sales
Key: Role as value: Analyst
Key: Region and value: US
Review the resulting policy expression.
For Permission scope, select This account.
Choose the catalog resources to grant access:
Catalogs: Account ID
Databases: salesdb
Table: store_sales
Data filters: us_sales
For Data filter permissions, select Select.
Choose Grant.
Grant table permissions to Bob
Complete the following steps to create a data filter to view only store_sales records whose country=US:
On the Lake Formation console, choose Data filters under Data Catalog in the navigation pane.
Choose Create new filter.
Provide the data filter name as us_sales.
For Target catalog, enter the account ID.
For Target database, choose salesdb.
For Target table, choose store_sales.
Leave Column-level access as Access to all columns.
For Row-level access, enter the row filter country='US'.
Choose Create data filter.
Complete the following steps to grant table permissions to Bob:
On the Grant permissions page, choose Principals by attribute.
Specify the attributes:
Key: Department and value: sales
Key: Role as value: BIAnalyst
Key: Region and value: US
Review the resulting policy expression.
For Permission scope, select This account.
Choose the catalog resources to grant access:
Catalogs: Account ID
Databases: salesdb
Table: store_sales
For Data filter permissions, select Select.
Choose Grant.
Grant table permissions to Charlie
Complete the following steps to grant table permissions to Charlie:
On the Grant permissions page, choose Principals by attribute.
Specify the attributes:
Key: Department and value: sales
Key: Role as value: Scientist
Key: Region and value: ALL
Review the resulting policy expression.
For Permission scope, select This account
Choose the catalog resources to grant access:
Catalogs: Account ID
Databases: salesdb
Table: store_sales
For Table permissions, select Select.
For Data permissions, specify the following columns: store_id, transaction_date, product_name, country, sales_price, and quantity.
Choose Grant.
Alice now verifies the table permission by navigating to the Tables tab under the Data Catalog and searching for store_sales. Select store_sales and choose View under Actions. The following screenshots show the details for both sets of permissions.
Data Analyst uses Athena for building daily sales reports
Alice, the data analyst logs in to the Athena console and run the following query:
select * from "salesdb"."store_sales" limit 5
Alice has the user attributes as Department=sales, Role=Analyst, Region=US, and this attribute combination allows her access to US sales data to specific sales only column, without access to customer data as shown in the following screenshot.
BI Analyst uses Redshift for building sales dashboards
Bob, the BI Analyst, logs in to the Redshift console and run the following query:
select * from "salesdb"."store_sales" limit 10
Bob has the user attributes Department=sales, Role=BIAnalyst, Region=US, and this attribute combination allows him access to all columns including customer data for US sales data.
Data Scientist uses Amazon EMR to process sales data
Finally, Charlie logs in to the EMR console and submit the EMR job with runtime role as scientist_role. Charlie uses the script sales_analysis.py that is uploaded to s3 bucket created for the script. He chooses the EMR Serverless application created with Lake Formation enabled.
Charlie submits batch job runs by choosing the following values:
For spark properties, provide key as spark.emr-serverless.lakeformation.enabled and value as true.
Additional configurations: Under Metastore configuration select Use AWS Glue Data Catalog as metastore. Charlie keeps rest of the configuration as default.
Once the job run is completed, Charlie can view the output by selecting stdout under Driver log files.
Charlie uses scientist_role as job runtime role with the attributes Department=sales, Role=Scientist, Region=ALL, and this attribute combination allows him access to select columns of all sales data.
Clean up
Complete the following steps to delete the resources you created to avoid unexpected costs:
Delete the IAM users created.
Delete the AWS Glue database and table resources created for the post, if any.
Delete the Athena, Redshift and EMR resources created for the post.
Conclusion
In this post, we showcased how you can use SageMaker Lakehouse attribute-based access control, using IAM principals and session tags to simplify data access, grant creation, and maintenance. With attribute-based access control, you can manage permissions using dynamic business attributes associated with user identities and secure your data in the lakehouse by defining fine-grained permissions in the Lake Formation that are enforced across analytics and ML tools and engines.
For more information, refer to documentation. We encourage you to try out the SageMaker Lakehouse with ABAC and share your feedback with us.
About the authors
Sandeep Adwankar is a Senior Product Manager at AWS. Based in the California Bay Area, he works with customers around the globe to translate business and technical requirements into products that enable customers to improve how they manage, secure, and access data.
Srividya Parthasarathy is a Senior Big Data Architect on the AWS Lake Formation team. She enjoys building data mesh solutions and sharing them with the community.
Many AWS Organizations customers begin by creating and manually applying service control policies (SCPs) and resource control policies (RCPs) through the AWS Management Console or AWS Command Line Interface (AWS CLI) when they first set up their environments. However, as the organization grows and the number of policies increases, this manual approach can become cumbersome. It can result in limited visibility into all implemented SCPs and RCPs, the targets they’re attached to (such as accounts, organizational units (OUs), or nested OUs), and the ability to manage updates effectively. Without clear visibility and proper access controls, it becomes challenging to track who’s making changes and how they are being made.
Importing existing SCPs and RCPs into AWS CloudFormation can help streamline the management of your policies by enabling history tracking, policy validation through CloudFormation Hooks, and rollback capabilities. You can also sync stacks with source code stored in a Git repository with Git sync. With Git sync, you can use pull requests and version tracking to configure, deploy, and update your CloudFormation stacks from a centralized location. When you commit changes to the template or the deployment file, CloudFormation automatically updates the stack.
Important: Only existing policies are brought into CloudFormation; policies are not recreated.
Solution overview
The solution in this post includes a command line tool for discovering SCPs and RCPs in your organization and automating policy import into CloudFormation templates. The following figure shows the end-to-end flow:
Figure 1: Solution overview
The end-to-end flow shown in the preceding figure includes:
Run the tool: The tool automates the following steps and can be run in the management account or delegated administrator account.
Identify SCPs and RCPs in the organization: The tool begins by making API calls to the Organizations service to retrieve the policies in your environment. It then provides a count of the total number of SCPs and RCPs present.
Identify AWS Control Tower SCPs and RCPs and policies without targets:
SCPs are identified by the aws-guardrails- prefix in their policy names.
RCPs are identified by the AWSControlTower-Controls- prefix in their policy names.
Policies with no targets: The tool also identifies SCPs and RCPs that aren’t attached to an organizational unit (OU), account, or root and lists them. These policies might be redundant or need reassignment.
CloudFormation IaC generator scan: At this stage, you will be prompted to confirm whether you want to import the policies to the CloudFormation templates using CloudFormation resource scan. If you select yes, the tool will initiate a CloudFormation resource scan using IaC generator to get details about the policies including policy name, targets, policy tags, and so on.
Create template from scanned policy resources: The tool generates CloudFormation template with the policy resources. The template will include the policies without targets (if any).
Review process: After the template is generated, it’s recommended that you preview the template using IaC generator from the CloudFormation console. We recommend viewing the template resource section to verify and adjust the generated templates as needed (step 11 of the solution deployment).
Create CloudFormation stacks with the generated templates: After reviewing the templates, import them into CloudFormation stacks for deployment. It’s important to note that only existing policies are brought into CloudFormation—policies aren’t recreated. The templates reflect the current policies and policy attributes.
Consideration before implementing the solution
There are some considerations that you need to keep in mind before implementing the solution.
If you have enabled the AWS Organizations policy management delegation, you should run this solution from the delegated administrator account. Otherwise, you can run the solution using the management account.
AWS Control Tower SCPs and RCPs (with or without targets) won’t be imported to the CloudFormation templates because they should be managed using AWS Control Tower. Changes made to AWS Control Tower resources outside of AWS Control Tower can cause drift and affect AWS Control Tower functionality in unpredictable ways.
You might see multiple CloudFormation templates created if you exceed the CloudFormation template size quotas. To help ensure smooth creation, the tool is designed to automatically split the content into multiple templates if necessary, allowing you to stay within the quotas while still accommodating the imported content.
Note that the generated templates have the following attributes set by default.
Deletion policy: Set to Retain. This enables persisting the policies even when their related stack is deleted.
Update Replace policy: Set to Delete. This enables deletion of the physical ID associated with the policy when the policy is updated.
Solution deployment
Now that you understand the solution and know the considerations to keep in mind, you’re ready to deploy the solution.
You can run the tool specifying a profile name as a command line argument. Use the following command, replacing <profile_name> with the name of the profile you created in step 4. If you do not specify a profile, the default profile from the file ~./aws/config will be used.
policy-importer --profile <profile_name>
After the preceding command is executed, you will see an output displaying the total number of SCPs and RCPs found in the organization. The output will also list AWS Control Tower managed policies as INFO, in addition to policies without targets as a WARNING. At this point, you can enter Yes to proceed with scanning to import the policies, or enter No if you want to exit.
Note: If policies without targets are detected, we recommend stopping at this point. Either delete the policies without targets or assign appropriate targets to them. You can then rerun the tool from step 5. If you proceed without addressing the policies without targets, be aware that these policies will also be included in the CloudFormation template.
Figure 2: Terminal view with policies identified in the organization
If you enter Yes, the CloudFormation IaC resource scan will begin immediately. You will see the resource scan ID Amazon Resource Name (ARN) displayed.
Note: A scan can take up to 10 minutes for every 1,000 resources.
Figure 3: Terminal view with AWS CloudFormation resource scan details
You can also review the scan progress from the IaC generator page of the CloudFormation console as shown in the following figure. To get to the IaC generator page, go to the CloudFormation console and choose IaC generator from the navigation pane.
Figure 4: View the scan summary in the CloudFormation console to track progress
Upon completion of the scan, the template generation process will be initiated.
Figure 5: Terminal view showing CloudFormation template being created
After the template creation is finished, sign in to the AWS CloudFormation IaC console. Choose the Templates tab to review the generated templates and verify that they align with your requirements.
Figure 6: View CloudFormation templates in the console
You can review the policies added to a template by selecting a template name.
Figure 7: Review policies included in the template
When satisfied, you can proceed to import the templates into CloudFormation stacks for deployment by selecting Import to stack.
Figure 8: Import a template into the CloudFormation stack
Follow the prompts to create a stack.
Figure 9: AWS CloudFormation stack example
The tool automatically creates a folder named Policies in your current directory and downloads the generated templates.
As shown in the following figure, there are two recommended next steps.
Figure 10: Solution overview including recommended next steps
After the existing policies are imported into a CloudFormation stack, we recommend storing your CloudFormation templates in a private Git repository. You can use the Policies folder that was automatically created by the tool in the current local directory with the generated templates downloaded and set up a continuous integration and delivery (CI/CD) pipeline to efficiently manage the imported policies.
By using a Git repository, you can use version control features like pull requests, branch management, and history tracking. This approach allows your team to efficiently review, update, and deploy policies with better collaboration and control. You can also create a CI/CD pipeline to automate the deployment of changes to your CloudFormation stacks, helping to ensure that updates are consistent and reliable.
We also recommend incorporating CloudFormation Hooks in your environment. CloudFormation Hooks can help validate policies (and other resources) against best practices, to help ensure that they adhere to the correct syntax, follow security best practices, and minimize potential vulnerabilities.
Importing existing AWS Organizations service control policies (SCPs) and resource control policies (RCPs) into CloudFormation provides an efficient and scalable approach to managing and automating your AWS governance. After they’ve been imported, you can manage and update policies directly in CloudFormation, to help ensure consistency and version control across your organization. The tool also creates a Policies folder in your current directory, storing downloaded templates for use as a central repository and integration with a CI/CD pipeline.
By using CloudFormation Hooks, you can further improve your policy management by validating SCPs and RCPs against best practices and policy grammar. This approach centralizes your policy updates, making governance more automated and efficient while reducing the risk of misconfiguration.
Amazon SageMaker Lakehouse is a unified, open, and secure data lakehouse that now seamlessly integrates with Amazon S3 Tables, the first cloud object store with built-in Apache Iceberg support. With this integration, SageMaker Lakehouse provides unified access to S3 Tables, general purpose Amazon S3 buckets, Amazon Redshift data warehouses, and data sources such as Amazon DynamoDB or PostgreSQL. You can then query, analyze, and join the data using Redshift, Amazon Athena, Amazon EMR, and AWS Glue. In addition to your familiar AWS services, you can access and query your data in-place with your choice of Iceberg-compatible tools and engines, providing you the flexibility to use SQL or Spark-based tools and collaborate on this data the way you like. You can secure and centrally manage your data in the lakehouse by defining fine-grained permissions with AWS Lake Formation that are consistently applied across all analytics and machine learning(ML) tools and engines.
Organizations are becoming increasingly data driven, and as data becomes a differentiator in business, organizations need faster access to all their data in all locations, using preferred engines to support rapidly expanding analytics and AI/ML use cases. Let’s take an example of a retail company that started by storing their customer sales and churn data in their data warehouse for business intelligence reports. With massive growth in business, they need to manage a variety of data sources as well as exponential growth in data volume. The company builds a data lake using Apache Iceberg to store new data such as customer reviews and social media interactions.
This enables them to cater to their end customers with new personalized marketing campaigns and understand its impact on sales and churn. However, data distributed across data lakes and warehouses limits their ability to move quickly, as it may require them to set up specialized connectors, manage multiple access policies, and often resort to copying data, that can increase cost in both managing the separate datasets as well as redundant data stored. SageMaker Lakehouse addresses these challenges by providing secure and centralized management of data in data lakes, data warehouses, and data sources such as MySQL, and SQL Server by defining fine-grained permissions that are consistently applied across data in all analytics engines.
In this post, we guide you how to use various analytics services using the integration of SageMaker Lakehouse with S3 Tables. We begin by enabling integration of S3 Tables with AWS analytics services. We create S3 Tables and Redshift tables and populate them with data. We then set up SageMaker Unified Studio by creating a company specific domain, new project with users, and fine-grained permissions. This lets us unify data lakes and data warehouses and use them with analytics services such as Athena, Redshift, Glue, and EMR.
Solution overview
To illustrate the solution, we are going to consider a fictional company called Example Retail Corp. Example Retail’s leadership is interested in understanding customer and business insights across thousands of customer touchpoints for millions of their customers that will help them build sales, marketing, and investment plans. Leadership wants to conduct an analysis across all their data to identify at-risk customers, understand impact of personalized marketing campaigns on customer churn, and develop targeted retention and sales strategies.
Alice is a data administrator in Example Retail Corp who has embarked on an initiative to consolidate customer information from multiple touchpoints, including social media, sales, and support requests. She decides to use S3 Tables with Iceberg transactional capability to achieve scalability as updates are streamed across billions of customer interactions, while providing same durability, availability, and performance characteristics that S3 is known for. Alice already has built a large warehouse with Redshift, which contains historical and current data about sales, customers prospects, and churn information.
Alice supports an extended team of developers, engineers, and data scientists who require access to the data environment to develop business insights, dashboards, ML models, and knowledge bases. This team includes:
Bob, a data analyst who needs to access to S3 Tables and warehouse data to automate building customer interactions growth and churn across various customer touchpoints for daily reports sent to leadership.
Charlie, a Business Intelligence analyst who is tasked to build interactive dashboards for funnel of customer prospects and their conversions across multiple touchpoints and make those available to thousands of Sales team members.
Doug, a data engineer responsible for building ML forecasting models for sales growth using the pipeline and/or customer conversion across multiple touchpoints and make those available to finance and planning teams.
Alice decides to use SageMaker Lakehouse to unify data across S3 Tables and Redshift data warehouse. Bob is excited about this decision as he can now build daily reports using his expertise with Athena. Charlie now knows that he can quickly build Amazon QuickSight dashboards with queries that are optimized using Redshift’s cost-based optimizer. Doug, being an open source Apache Spark contributor, is excited that he can build Spark based processing with AWS Glue or Amazon EMR to build ML forecasting models.
The following diagram illustrates the solution architecture.
Implementing this solution consists of the following high-level steps. For Example Retail, Alice as a data Administrator performs these steps:
Create a table bucket. S3 Tables stores Apache Iceberg tables as S3 resources, and customer details are managed in S3 Tables. You can then enable integration with AWS analytics services, which automatically sets up the SageMaker Lakehouse integration so that the tables bucket is shown as a child catalog under the federated s3tablescatalog in the AWS Glue Data Catalog and is registered with AWS Lake Formation for access control. Next, you create a table namespace or database which is a logical construct that you group tables under and create a table using Athena SQL CREATE TABLE statement.
Publish your data warehouse to Glue Data Catalog. Churn data is managed in a Redshift data warehouse, which is published to the Data Catalog as a federated catalog and is available in SageMaker Lakehouse.
Create a SageMaker Unified Studio project. SageMaker Unified Studio integrates with SageMaker Lakehouse and simplifies analytics and AI with a unified experience. Start by creating a domain and adding all users (Bob, Charlie, Doug). Then create a project in the domain, choosing project profile that provisions various resources and the project AWS Identity and Access Management (IAM) role that manages resource access. Alice adds Bob, Charlie, and Doug to the project as members.
Onboard S3 Tables and Redshift tables to SageMaker Unified Studio. To onboard the S3 Tables to the project, in Lake Formation, you grant permission on the resource to the SageMaker Unified Studio project role. This enables the catalog to be discoverable within the lakehouse data explorer for users (Bob, Charlie, and Doug) to start querying tables .SageMaker Lakehouse resources can now be accessed from computes like Athena, Redshift, and Apache Spark based computes like Glue to derive churn analysis insights, with Lake Formation managing the data permissions.
Prerequisites
To follow the steps in this post, you must complete the following prerequisites:
Alice completes the following steps to create the S3 Table bucket for the new data she plans to add/import into an S3 Table.
AWS account with access to the following AWS services:
This is just an example of adding a few rows to the table, but generally for production use cases, customers use engines such as Spark to add data to the table.
S3 Tables customer is now created, populated with data and integrated with SageMaker Lakehouse.
Set up Redshift tables and publish to the Data Catalog
Alice completes the following steps to connect the data in Redshift to be published into the data catalog. We’ll also demonstrate how the Redshift table is created and populated, but in Alice’s case Redshift table already exists with all the historic data on sales revenue.
Sign in to the Redshift endpoint churnwg as an admin user.
Run the following script to create a table under the dev database under the public schema:
This is just an example of adding a few rows to the table, but generally for production use cases, customers use several ways to add data to the table as documented in Loading data in Amazon Redshift.
On the Redshift Serverless console, navigate to the namespace.
On the Action dropdown menu, choose Register with AWS Glue Data Catalog to integrate with SageMaker Lakehouse.
Choose Register.
Sign in to the Lake Formation console as the data lake administrator.
Under Data Catalog in the navigation pane, choose Catalogs and Pending catalog invitations.
Select the pending invitation and choose Approve and create catalog.
Provide a name for the catalog (for example, churn_lakehouse).
Under Access from engines, select Access this catalog from Iceberg-compatible engines and choose DataTransferRole for the IAM role.
Choose Next.
Choose Add permissions.
Under Principals, choose the datalakeadmin role for IAM users and roles, Super user for Catalog permissions, and choose Add.
Choose Create catalog.
Redshift Table customer_churn is now created, populated with data and integrated with SageMaker Lakehouse.
Create a SageMaker Unified Studio domain and project
Alice now sets up SageMaker Unified Studio domain and projects so that she can bring users (Bob, Charlie and Doug) together in the new project.
Complete the following steps to create a SageMaker domain and project using SageMaker Unified Studio:
On the SageMaker Unified Studio console, create a SageMaker Unified Studio domain and project using the All Capabilities profile template. For more details, refer to Setting up Amazon SageMaker Unified Studio. For this post, we create a project named churn_analysis.
Setup AWS Identity center with users Bob, Charlie and Doug, Add them to domain and project.
From SageMaker Unified Studio, navigate to the project overview and on the Project details tab, note the project role Amazon Resource Name (ARN).
SageMaker Unified Studio is now setup with domain, project and users.
Onboard S3 Tables and Redshift tables to the SageMaker Unified Studio project
Alice now configures SageMaker Unified Studio project role for fine-grained access control to determine who on her team gets to access what data sets.
Grant the project role full table access on customer dataset. For that, complete the following steps:
Sign in to the Lake Formation console as the data lake administrator.
In the navigation pane, choose Data lake permissions, then choose Grant.
In the Principals section, for IAM users and roles, choose the project role ARN noted earlier.
In the LF-Tags or catalog resources section, select Named Data Catalog resources:
Choose <account_id>:s3tablescatalog/blog-customer-bucket for Catalogs.
Choose customernamespace for Databases.
Choose customer for Tables.
In the Table permissions section, select Select and Describe for permissions.
Choose Grant.
Now grant the project role access to subset of columns from customer_churn dataset.
In the navigation pane, choose Data lake permissions, then choose Grant.
In the Principals section, for IAM users and roles, choose the project role ARN noted earlier.
In the LF-Tags or catalog resources section, select Named Data Catalog resources:
Choose <account_id>:churn_lakehouse/dev for Catalogs.
Choose public for Databases.
Choose customer_churn for Tables.
In the Table Permissions section, select Select.
In the Data Permissions section, select Column-based access.
For Choose permission filter, select Include columns and choose customer_id, internet_service, and is_churned.
Choose Grant.
All users in the project churn_analysis in SageMaker Unified Studio are now setup. They have access to all columns in the table and fine-grained access permissions for Redshift table where they have access to only three columns.
Verify data access in SageMaker Unified Studio
Alice can now do a final verification if the data is all available to ensure that each of her team members are set up to access the datasets.
Now you can verify data access for different users in SageMaker Unified Studio.
Sign in to SageMaker Unified Studio as Bob and choose the churn_analysis
Navigate to the Data explorer to view s3tablescatalog and churn_lakehouse under Lakehouse.
Data Analyst uses Athena for analyzing customer churn
Bob, the data analyst can now logs into to the SageMaker Unified Studio, chooses the churn_analysis project and navigates to the Build options and choose Query Editor under Data Analysis & Integration.
Bob chooses the connection as Athena (Lakehouse), the catalog as s3tablescatalog/blog-customer-bucket, and the database as customernamespace. And runs the following SQL to analyze the data for customer churn:
select * from "churn_lakehouse/dev"."public"."customer_churn" a,
"s3tablescatalog/blog-customer-bucket"."customernamespace"."customer" b
where a.customer_id=b.c_customer_sk limit 10;
Bob can now join the data across S3 Tables and Redshift in Athena and now can proceed to build full SQL analytics capability to automate building customer growth and churn leadership daily reports.
BI Analyst uses Redshift engine for analyzing customer data
Charlie, the BI Analyst can now logs into the SageMaker Unified Studio and chooses the churn_analysis project. He navigates to the Build options and choose Query Editor under Data Analysis & Integration. He chooses the connection as Redshift (Lakehouse), Databases as dev, Schemas as public.
He then runs the follow SQL to perform his specific analysis.
select * from "dev@churn_lakehouse"."public"."customer_churn" a,
"blog-customer-bucket@s3tablescatalog"."customernamespace"."customer" b
where a.customer_id=b.c_customer_sk limit 10;
Charlie can now further update the SQL query and use it to power QuickSight dashboards that can be shared with Sales team members.
Data engineer uses AWS Glue Spark engine to process customer data
Finally, Doug logs in to SageMaker Unified Studio as Doug and chooses the churn_analysis project to perform his analysis. He navigates to the Build options and choose JupyterLab under IDE & Applications. He downloads the churn_analysis.ipynb notebook and upload it into the explorer. He then runs the cells by selecting compute as project.spark.compatibility.
He runs the following SQL to analyze the data for customer churn:
Doug, now can use Spark SQL and start processing data from both S3 tables and Redshift tables and start building forecasting models for customer growth and churn
Cleaning up
If you implemented the example and want to remove the resources, complete the following steps:
On the Lake Formation console, choose Catalogs in the navigation pane.
Delete the churn_lakehouse catalog.
Delete SageMaker project, IAM roles, Glue resources, Athena workgroup, S3 buckets created for domain.
Delete SageMaker domain and VPC created for the setup.
Conclusion
In this post, we showed how you can use SageMaker Lakehouse to unify data across S3 Tables and Redshift data warehouses, which can help you build powerful analytics and AI/ML applications on a single copy of data. SageMaker Lakehouse gives you the flexibility to access and query your data in-place with Iceberg-compatible tools and engines. You can secure your data in the lakehouse by defining fine-grained permissions that are enforced across analytics and ML tools and engines.
Sandeep Adwankar is a Senior Technical Product Manager at AWS. Based in the California Bay Area, he works with customers around the globe to translate business and technical requirements into products that enable customers to improve how they manage, secure, and access data.
Srividya Parthasarathy is a Senior Big Data Architect on the AWS Lake Formation team. She works with the product team and customers to build robust features and solutions for their analytical data platform. She enjoys building data mesh solutions and sharing them with the community.
Aditya Kalyanakrishnan is a Senior Product Manager on the Amazon S3 team at AWS. He enjoys learning from customers about how they use Amazon S3 and helping them scale performance. Adi’s based in Seattle, and in his spare time enjoys hiking and occasionally brewing beer.
AWS Summit season starts this week! These free events are now rolling out worldwide, bringing our cloud computing community together to connect, collaborate, and learn. Whether you prefer joining us online or in-person, these gatherings offer valuable opportunities to expand your AWS knowledge. I will be attending the Summit in Paris this week, the biggest cloud conference in France, and the London Summit at the end of the month. We will have a small podcast recording studio where I will interview French and British customers to produce new episodes for the AWS Developers Podcast and le podcast AWS en .
Register today!
But for now, let’s look at last week’s new announcements.
Last week’s launches At KubeCon London, we introduced the EKS Community Add-Ons Catalog, making it simpler for Kubernetes users to enhance their Amazon EKS clusters with powerful open-source tools. This catalog streamlines the installation of essential add-ons like metrics-server, kube-state-metrics, prometheus-node-exporter, cert-manager, and external-dns. By integrating these community-driven add-ons directly into the EKS console and AWS command line interface (AWS CLI), customers can reduce operational complexity and accelerate deployment while maintaining flexibility and security. This launch reflects AWS’s commitment to the Kubernetes community, providing seamless access to trusted open-source solutions without the overhead of manual installation and maintenance.
Amazon Q Developer now integrates with Amazon OpenSearch Service to enhance operational analytics by enabling natural language exploration and AI-assisted data visualization. This integration simplifies the process of querying and visualizing operational data, reducing the learning curve associated with traditional query languages and tools. During incident responses, Amazon Q Developer offers contextual summaries and insights directly within the alerts interface, facilitating quicker analysis and resolution. This advancement allows engineers to focus more on innovation by streamlining troubleshooting processes and improving monitoring infrastructure.
Amazon SES has introduced support for email attachments in its v2 APIs, enabling users to include files like PDFs and images directly in their emails without manually constructing MIME messages. This enhancement simplifies the process of sending rich email content and reduces implementation complexity. Amazon Simple Email Service (Amazon SES) supports attachments in all AWS Regions where the service is available.
Other AWS events Check your calendar and sign up for upcoming AWS events.
AWS GenAI Lofts are collaborative spaces and immersive experiences that showcase AWS expertise in cloud computing and AI. They provide startups and developers with hands-on access to AI products and services, exclusive sessions with industry leaders, and valuable networking opportunities with investors and peers. Find a GenAI Loft location near you and don’t forget to register.
(This survey is hosted by an external company. AWS handles your information as described in the AWS Privacy Notice. AWS will own the data gathered via this survey and will not share the information collected with survey respondents.)
Before you start using IAM Roles Anywhere, it’s important to plan how you’ll integrate it with your PKI and with your applications running outside of AWS. In this blog post, we share considerations and best practices for integrating IAM Roles Anywhere with your PKI and applications.
Placing your trust anchor within your PKI
The first step when you configure IAM Roles Anywhere is to create a trust anchor. A trust anchor is a resource that represents your certificate authority (CA). A trust anchor can be a root CA or an intermediate or issuing CA.
The choice of which CA to use as your trust anchor within your PKI has implications for which end-entity certificates can be used with IAM Roles Anywhere and the security of your IAM Roles Anywhere deployment. Any valid end-entity certificate issued by your trust anchor, or a valid end-entity certificate issued by a CA that is beneath your trust anchor in your PKI’s hierarchy, can be used with IAM Roles Anywhere.
For example, in a three-level PKI where you select your root CA as your trust anchor, an end-entity certificate issued by your root, or an intermediate certificate authority below your root, can be used with this trust anchor for IAM Roles Anywhere, as shown in Figure 1.
Figure 1: The useable end-entity certificates if you select a root CA as a trust anchor
As shown in Figure 2, if you select Intermediate CA 2 (a CA two levels below the root) as your trust anchor for IAM Roles Anywhere, only end-entity certificates issued from Intermediate CA 2 could be used to get temporary AWS credentials with your IAM Roles Anywhere deployment.
Figure 2: The useable end entity certificates if you select a lower level or issuing certificate authority as a trust anchor
In Figure 2, we selected Intermediate CA as our trust anchor and only end-entity certificates issued by Intermediate CA 2 can be used with IAM Roles Anywhere.
Selecting a root or higher-level intermediate CA will give you more flexibility when it comes to rotation of lower-level CAs, but might allow for more certificates than you intend to be able to access your AWS resources. Using a lower-level issuing CA will not allow certificates issued by other CAs within your PKI to be able to use IAM Roles Anywhere, even if they have identical attributes.
To use the certificate revocation list (CRL) functionality of IAM Roles Anywhere, the certificate used as a trust anchor MUST also contain the CRL Sign for key usage.
The certificate must not be issued by a public CA, or be a public CA.
Choosing your trust anchor: AWS Private CA compared to a self-managed PKI
If you already have an existing PKI and the capability to distribute certificates to your workloads, it’s likely that your existing PKI (which you have experience managing) will be a good choice to use as your IAM Roles Anywhere trust anchor.
However, if you’re looking to establish a PKI without the investment and maintenance costs of operating an on-premises CA, consider using AWS Private Certificate Authority (AWS Private CA). When you use this service, AWS hosts your CAs and allows you to issue certificates by using AWS API requests.
Consider the following when deciding whether to use AWS Private CA for your PKI:
Automatic rotation of your trust anchor: AWS Private CA is designed to integrate quickly with IAM Roles Anywhere, so you don’t need additional rotation of trust anchor certificates within IAM Roles Anywhere—this will be entirely managed in AWS Private CA.
Cost: There’s a cost to using AWS Private CA, which can make reusing your existing PKI more cost effective, if you have one. However, there are benefits to using AWS Private CA, such as automatic rotation, scalability, and resiliency, which can offset the cost of the service.
Scalability and availability: AWS Private CA is a highly scalable and available service across many AWS Regions. AWS Private CA also integrates with AWS Certificate Manager, so that you can conveniently manage certificate issuance and automate certificate renewals.
Resiliency: You can configure an identical AWS Private CA setup in another supported Region.
AWS API integration: You can use AWS Private CA to manage and issue certificates with AWS credentials, using IAM roles and temporary security credentials that are subject to the relevant AWS policies.
Technology integrations: AWS Private CA can integrate with technologies such as third-party certificate management services.
For more information about implementing IAM Roles Anywhere with AWS Private CA, see this Security Blog post.
Working with end-entity certificates with IAM Roles Anywhere
In IAM Roles Anywhere, end-entity X.509 certificates are used to authenticate with the CreateSession API call. These end-entity certificates must meet the following constraints:
The certificates MUST be X.509v3.
Basic constraints MUST include CA: false.
The key usage MUST include Digital Signature.
The signing algorithm MUST include SHA256 or stronger. MD5 and SHA1 signing algorithms are rejected.
Most certificates issued today, such as those used to serve HTTPS requests or to perform mutual TLS (mTLS) authentication, meet these constraints. Those certificates could be used with IAM Roles Anywhere without changes.
Each end-entity’s certificate serial number doesn’t need to be unique, but it’s a best practice for each certificate issued by your certificate authority to have a unique serial number. The serial number of a certificate is used as the role session name of the IAM role session IAM Roles Anywhere creates, and this number can be used to associate events logged to AWS CloudTrail back to the end-entity certificate that was used to assume an IAM role.
IAM roles and workload identity
After you’ve planned for integration with your PKI, the next step when you set up IAM Roles Anywhere is to plan for how your workload identity will integrate with IAM Roles Anywhere and your PKI. The IAM role session that is created by calling CreateSession represents the identity and permissions of your external workloads within AWS.
To help you achieve least privilege, AWS recommends that you use a dedicated IAM role for each of your applications so that you can give each application only the permissions it requires to operate. For example, if you had two applications, Red and Blue, you would create a separate IAM role for each application and grant each role the IAM permissions it needs to do its job.
To make sure that the Red and Blue applications cannot access each other’s roles, you can restrict access by using X.509 attributes as tags in the trust policy for each IAM role. (See Certificate attribute mapping for more information on attributes.) For this example, we will use the Common Name (CN) attribute to restrict access for the Red application.
The following is a sample IAM role trust policy that lets the Red certificate from a trust anchor named ExampleCorpAnchor assume the role from IAM Roles Anywhere:
The role session created will have the SourceIdentity value in AWS set to be equal to the CN of the certificate. For example, the Red certificate would have a SourceIdentity value of CN=Red.
You can find a complete list of session tags and attributes used in IAM Roles Anywhere in the IAM Roles Anywhere documentation The session tags set on roles created with IAM Roles Anywhere are transitive and will be present on any further roles assumed by a role session that is created by IAM Roles Anywhere.
Rotating trust anchor certificates
When you’re using IAM Roles Anywhere with a self-hosted PKI for your trust anchor, you’re responsible for updating your trust anchor with the new CA certificate.
IAM Roles Anywhere supports up to two certificates configured within a trust anchor at a time. When it comes time to rotate the certificate authority used as your trust anchor, you can add your new certificate into the trust anchor so that certificates issued from either CA certificate can be used with IAM Roles Anywhere.
After you have both CA certificates in your trust anchor, you can migrate your workloads over to end-entity certificates issued by your new CA for a seamless migration without the need to update code or configurations on your workloads. After your workloads have migrated to your new certificate authority, you can remove the unused certificate from your trust anchor configuration.
IAM Roles Anywhere profiles and session policies
When you set up IAM Roles Anywhere, you create a profile to associate IAM roles with. A profile allows you to optionally apply a session policy.
Most customers deploy IAM Roles Anywhere by creating one profile for each IAM role that they configure. This gives you the flexibility to apply session policies to each application or IAM role in IAM Roles Anywhere without impacting other roles or applications. We recommend that customers use the one-profile-per-role approach to achieve more operational flexibility.
By using one profile across many different IAM roles, you can minimize configuration work and have a common session policy for the different IAM roles you have set up with IAM Roles Anywhere. This approach requires management of fewer AWS resources, but means that changes to the profile will impact a larger number of applications.
When you set a session policy on a profile, we recommend that you use a managed policy Amazon Resource Name (ARN), rather than the default in-line session policy ARN, because this allows you to have more IAM policy space. The most common use case we’ve seen for applying session policies with IAM Roles Anywhere profiles is restricting the IAM Roles Anywhere session to only expected IP address ranges, such as your on-premises data centers.
The role sessions created by IAM Roles Anywhere are subject to all relevant AWS policies, such as resource control policies (RCPs), service control policies (SCPs), resource policies, permissions boundaries, and VPC endpoint policies.
Working with distributed applications
If you have multiple deployments of an application, we recommend that, wherever possible, you use a unique certificate and key for each instance of that application. For example, this would apply if Blue is a distributed application, and each instance of the Blue application has a requirement to communicate with AWS resources. Sharing a key across distributed applications increases the risk a key could accidentally be made available to unauthorized parties when it’s copied and stored over a network.
By using a unique certificate and key for each instance, you can keep the private key on the server that is using IAM Roles Anywhere instead of needing to distribute the private key over the network, which is a best practice to help prevent exposure of a private key. IAM Roles Anywhere can use private keys and certificates that are stored in Trusted Platform Modules (TPMs), Windows and MacOS certificate stores, files on a file system, or in a hardware security module (HSM) that is accessible with the PKCS #11 protocol.
Because the certificates that are issued to each instance typically have different serial numbers, you can associate events in CloudTrail back to the actual instance of a workload that was issued a certificate. The IAM role session created by a certificate uses the certificate’s serial number as the role session name, which is visible in CloudTrail logs for actions taken by that role session.
Comparing short-lived and long-lived end entity certificates
X.509 certificates have an expiration date. The longer a credential is used, the greater the chance that it might come under the control of an unauthorized person.
We recommend that the certificates you issue to your workloads expire as quickly as your operational tolerances can withstand. For example, if you’re experienced in operating a PKI and can allow applications to request certificates through self-service, we recommend that the certificates issued have a relatively short expiration time so that new certificates must be requested frequently.
If your PKI certificates are issued or distributed manually, you might need to issue longer-lived certificates to ease your operational burden and give yourself longer periods of overlap in validity so that certificates can be rotated without disrupting your business.
It’s possible for multiple end-entity certificates to be valid at the same time with identical attributes. For example, if there were multiple non-expired, non-revoked CN=Red certificates, any of those CN=Red certificates can be used to access the CreateSessions API with IAM Roles Anywhere.
Certificate revocation
Traditionally, certificates are given a long validity period which helps reduce the operational burden for systems engineers who support certificates manually. However, sometimes you might need to revoke certificates for security reasons such as a compromised private key, a change in certificate fields, or a certificate that has been issued incorrectly. Certificate revocation helps maintain the trust and integrity of the PKI system.
A CRL is one of the primary mechanisms to help maintain the health of your PKI. The CRL contains information about the certificates that have been revoked due to security or other reasons.
IAM Roles Anywhere checks the validity of your certificates against your CRL. Using your PKI, after your certificate has been added to the CRL, you can import the CRL to IAM Roles Anywhere by using the using ImportCrl API operation or the import-crl CLI command. A copy of the CRL you import is hosted within IAM Roles Anywhere. After the CRL has been updated, IAM Roles Anywhere validates the certificate against your CRL before issuing credentials.
The fact that your CRL is hosted within IAM Roles Anywhere helps to mitigate a common scenario where the CRL is the target of a denial-of-service (DoS) attempt, causing applications to either deny all access because they’re unable to check the status of a cert against a CRL, or to let unauthorized users use revoked certificates to access services that are configured to ignore the CRL if it isn’t reachable.
Deployment patterns: centralized or decentralized
There are two approaches you can choose when deploying IAM Roles Anywhere: centralized or decentralized. We’ll look at the pros and cons of both.
Centralized trust anchor pattern
The following image describes how a centralized trust anchor would be deployed. First, a central trust anchor is deployed in a dedicated IAM account. Workloads then authenticate to IAM Roles Anywhere in a centralized account, and the workload performs role chaining to access the workload account.
In Figure 3, the workload running in the on-premises datacenter uses its certificate to get temporary AWS credentials from IAM Roles Anywhere in the IAM Roles Anywhere landing account. It then uses those credentials to assume a role into the workload account that hosts its AWS resources.
We recommend a centralized trust anchor pattern if you’re just getting started with IAM Roles Anywhere. This pattern simplifies the management and governance of IAM Roles Anywhere and allows you to scale with fewer resources to manage.
If you have more than one CA that you want to use with IAM Roles Anywhere, you can scale this pattern with multiple trust anchors in the same IAM Roles Anywhere landing account.
Pros of the centralized trust anchor pattern:
A simplified setup and fewer IAM Roles Anywhere resources to manage: Administrators only need to configure IAM Roles Anywhere profiles, roles, and trust anchors in one AWS account per Region.
Easier to manage CRLs: Because IAM Roles Anywhere is centralized, administrators only need to update the CRL in one account per Region.
Minimal application setup: Applications will need to set up role chaining to access their workloads accounts. Later in this post, we show you how to set up role chaining with IAM Roles Anywhere and the various AWS SDKs using a configuration that allows you to access other accounts without writing custom code.
Scaling: Based on the number of CAs you have, you can add additional trust anchors for additional CAs you want to use with IAM Roles Anywhere.
Cons of the centralized trust anchor pattern:
Cross-account access: The account that you’re creating for IAM Roles Anywhere will have access to other AWS accounts hosting your workloads. This might not meet your isolation requirements because it introduces cross-account access. However, remember that you can use certificate attributes in a role-trust policy to limit which workloads can access which AWS accounts.
Considerations of the centralized trust anchor pattern:
Multiple trust anchors: IAM Roles Anywhere supports two certificates per trust anchor, to help with rotation of certificates, so that you don’t have to update the ARNs during certificate rotation.
However, if there was a requirement to support multiple CAs, then it would be best to create separate trust anchors. For example, if you have a root CA and three issuing CAs, instead of creating a bundle of four certificates, you could create a trust anchor with a root CA, which would trust all certificates. Alternatively, you could create three different trust anchors per each issuing CA. So, it’s recommended to consider your PKI hierarchy during this process.
Auditing: If you have multiple trust anchors for different CAs deployed into the IAM Roles Anywhere account, you might need to use the aws:SourceARN condition key in role-trust policies to specify that that only a specific trust anchor can be used to assume a role with IAM Roles Anywhere.
When you use the centralized trust anchor pattern, you can use the certificate attributes to segregate access based on workloads, as described in the IAM roles and workload identity section earlier in this post.
Distributed trust anchor pattern
If you have more advanced security and compliance requirements, you can achieve greater isolation and granular access control by using a distributed (multi-trust-anchor, multi-account) approach with IAM Roles Anywhere.
In Figure 4, you see a distributed pattern where multiple trust anchors have been deployed based on which workloads and applications need access. In this model, the on-premises resource would call the respective trust anchor that has been mapped to each application to gain access to the AWS resource.
Based on your strategy, it’s possible to migrate from the centralized architecture to a distributed architecture as your organization grows or your operating model changes. Let’s looks at some of the considerations for this approach.
Pros of the distributed trust anchor pattern:
Better isolation: This pattern doesn’t require cross-account roles to be set up, and therefore AWS accounts and workloads are better isolated.
PKI flexibility: If you have different subordinate or issuing CAs that align with specific workloads or compliance requirements, you can have a distributed IAM Roles Anywhere setup for each workload in each AWS account.
Cons of the distributed trust anchor pattern:
Additional setup and AWS resources to manage: Trust anchors, profiles, and CRLs need to be set up in each AWS account that you want to use with IAM Roles Anywhere.
Additional configuration of applications: IAM Roles Anywhere ARNs will be different across accounts, and you will need to update the configuration of your applications that use IAM Roles Anywhere with the correct trust anchor and profile ARNs for each account.
Considerations of the distributed trust anchor pattern:
Scale: Infrastructure as code, such as AWS CloudFormation StackSets, can be used to scale the distributed pattern. Administrators can use AWS CloudFormation StackSets as a convenient way to implement trust anchors and profiles across accounts.
Working with IAM Roles Anywhere in your applications
Your applications integrate with IAM Roles Anywhere by using the aws signing helper (also known as the credential helper) with the AWS SDK. The signing helper is a lightweight executable written in Go that uses your private keys and certificate to authenticate to the IAM Roles Anywhere API and request temporary AWS credentials, and then delivers the credentials to your application.
The signing helper uses Go’s cryptographic libraries and doesn’t need specific versions of cryptographic software to be deployed into the environment where it runs, which helps it to run seamlessly and without conflict to other applications. The signing helper can use certificates and keys from OS certificate stores, TPMs, or locations on the file system.
In most cases, we recommend that customers use the signing helper with the credential_process setting because this allows you to use IAM Roles Anywhere without setting up environment variables and also allows you to configure role chaining seamlessly. The AWS SDK will automatically attempt to refresh credentials that are retrieved by the signing helper when the helper is used with the credential_process setting when the AWS credentials are nearing expiration.
If you set up the [default] profile in the AWS configuration file (~.aws/credentials on Linux and MacOS, C:\Users\ USERNAME \.aws\credentials on Windows), the AWS SDK default credentials provider chain will be used by IAM Roles Anywhere, provided that there are no other AWS credentials configured in that environment in a higher priority in the default credential providers chain.
Note: As described in the AWS SDK documentation, the default credential providers will vary slightly based on the language and AWS SDK used. However, many credential providers support using the credential_process setting in the default profile.
Here’s an example default profile that will use IAM Roles Anywhere:
You can also use a non-default profile and call that profile explicitly in your code when creating a credential providers or session object. How your application calls the AWS profile and IAM Roles Anywhere will vary depending on which AWS SDK you use, but we recommend checking the documentation for each SDK, and wherever possible, reuse clients, sessions, or credential providers to avoid unneeded calls to the IAM Roles Anywhere service to get new credentials. Otherwise, workloads may use up more CreateSession quota than expected or introduce unexpected latency to your application while making unnecessary calls to get AWS credentials when it already has some.
Note: AWS SDKs call the IAM Roles Anywhere credential_process to get credentials each time a new credential provider, session, or client is created, depending on the SDK.
Many applications that are written using the AWS SDK use the default credentials providers chain, and might be compatible with IAM Roles Anywhere without additional configuration or code change when using the default profile.
As a best practice, if you have multiple different applications running on the same host and accessing AWS that have totally different security requirements, you should have them run as separate users on that host and avoid sharing configuration files.
Configuring role chaining with IAM Roles Anywhere
Role chaining means to use a role to assume a second role through the AWS Command Line Interface (AWS CLI) or API. For example, RoleA has permission to assume RoleB. You can enable User1 to assume RoleA by using User1’s long-term user credentials in the AssumeRole API operation. This returns RoleA short-term credentials. With role chaining, you can use RoleA’s short-term credentials to enable User1 to assume RoleB.
You can set up role chaining with IAM Roles Anywhere by using profiles in the AWS configuration file, without writing code to manage role chaining or sessions. In the following example, there is a default profile that references the rolesanywhere profile. Applications that use the default profile will automatically use the credentials from the rolesanywhere profile to assume the role specified by the role_arn value, without writing code to manage credentials.
The diagram in Figure 5 describes what happens when the AWS SDK performs role chaining with SDK configuration.
Figure 5: A work sequence diagram detailing the interactions that happen when the AWS SDK reads the preceding config file
The flow in Figure 5 is as follows:
The AWS SDK reads the default profile and discovers it must get credentials from the specified source_profile.
The AWS SDK reads the source profile and uses the configuration to request credentials from IAM Roles Anywhere.
The AWS SDK then uses the credentials retrieved from the source_profile to call STS AssumeRole on the role workload role defined in the default profile.
The AWS SDK returned the temporary AWS credentials for workload role, which can now be used to access AWS resources in the workload account.
Logging and monitoring
Teams and security analysts typically prefer to have visibility into all actions taken. To help with this goal, logging and monitoring is available across different notification channels for IAM Roles Anywhere.
CA certificate expiry: Checks whether the certificate in the trust anchor is due for expiry.
End entity certificate expiry: Checks whether the certificate used for vending temporary security credentials is due for expiry.
Using such information, you can set up alarms and email notifications to remind administrators or developers to rotate the certificates before they expire. It’s especially important to monitor the expiry of the certificates for the trust anchor so that workloads that use IAM Roles Anywhere can continue operations without business disruption.
Using notification events to help with certificate revocation, you can use automations to help with other certificate expiry events. Note that if you’re using AWS Certificate Manager, rotation is automatically handled for you. For more information, see Managed certificate renewal in AWS Certificate Manager.
Tip: IAM Roles Anywhere logs also include the field SourceIdentity, which can help when you’re trying to trace back which workloads are taking what actions in AWS. The SourceIdentity field is usually the common name (CN) of the certificate.
IAM Roles Anywhere and AWS Regions
IAM Roles Anywhere is a regional AWS service. Meaning that configurations for resources like profiles and trust anchors exist in the Region in which you configure them.
As a best practice, we recommend setting up IAM Roles Anywhere in the same Region as the resources you will be accessing (for example, if you’re using IAM Roles Anywhere to access AWS resources in the us-west-2 Region, you should configure IAMRA in the us-west-2 Region).
Credentials issued by IAM Roles Anywhere, like other AWS credentials, can be used to access resources in other Regions (for example, credentials acquired from IAM Roles Anywhere in the us-west-2 Region can be used to access resources in the ca-central-1 Region).
If required, you can have your application introduce logic to try to use IAM Roles Anywhere in different Regions by having different profiles defined for your IAM Roles Anywhere deployment in different Regions. The following Python example will attempt to get credentials from the profile rolesanywhere-uswest2 for IAM roles anywhere in the us-west-2 Region, and if that fails, it will then attempt to get credentials with the rolesanywhere-cacentral1 profile for the ca-central-1 Region.
import boto3

def get_session():
    try:
        #tries to create a session using the profile “rolesanywhere-uswest2”
        #add additional logic and logging, per your requirements
        return boto3.Session(profile_name='rolesanywhere-uswest2')
    except:
        #tries to create a session using the profile “rolesanywhere-cacentral1”
        #add additional logic and logging, per your requirements
        return boto3.Session(profile_name='rolesanywhere-cacentral1')

session = get_session()
sts_client = session.client('sts')
print(sts_client.get_caller_identity())
Conclusion
In this blog post, we showed you the considerations for selecting a CA to use as your trust anchor, considerations for mapping your workload identity to IAM roles, patterns for deploying IAM Roles Anywhere, and how to integrate IAM Roles Anywhere with your applications.
IAM Roles Anywhere is a great solution for companies that have a PKI and want to access AWS resources from outside AWS, without needing to use long-lived credentials for IAM users.
To provide the best experiences, we use technologies like cookies to store and/or access device information. Consenting to these technologies will allow us to process data such as browsing behavior or unique IDs on this site. Not consenting or withdrawing consent, may adversely affect certain features and functions.
Functional
Always active
The technical storage or access is strictly necessary for the legitimate purpose of enabling the use of a specific service explicitly requested by the subscriber or user, or for the sole purpose of carrying out the transmission of a communication over an electronic communications network.
Preferences
The technical storage or access is necessary for the legitimate purpose of storing preferences that are not requested by the subscriber or user.
Statistics
The technical storage or access that is used exclusively for statistical purposes.The technical storage or access that is used exclusively for anonymous statistical purposes. Without a subpoena, voluntary compliance on the part of your Internet Service Provider, or additional records from a third party, information stored or retrieved for this purpose alone cannot usually be used to identify you.
Marketing
The technical storage or access is required to create user profiles to send advertising, or to track the user on a website or across several websites for similar marketing purposes.
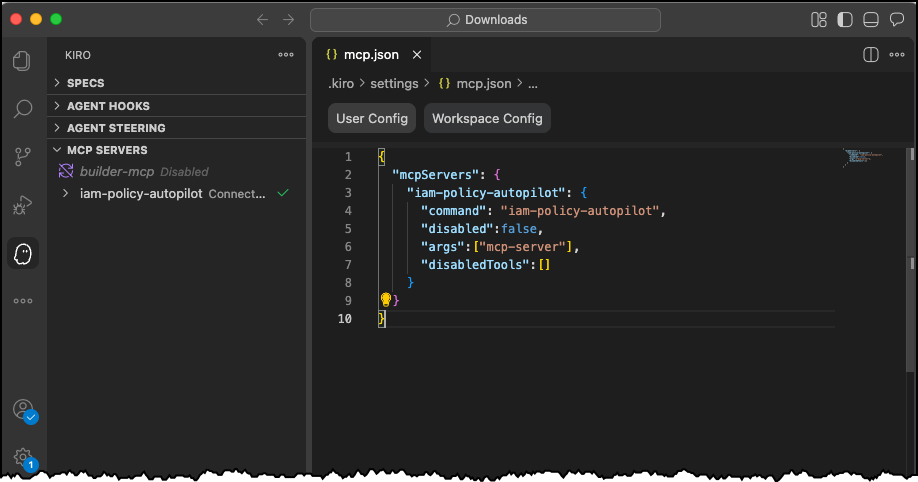
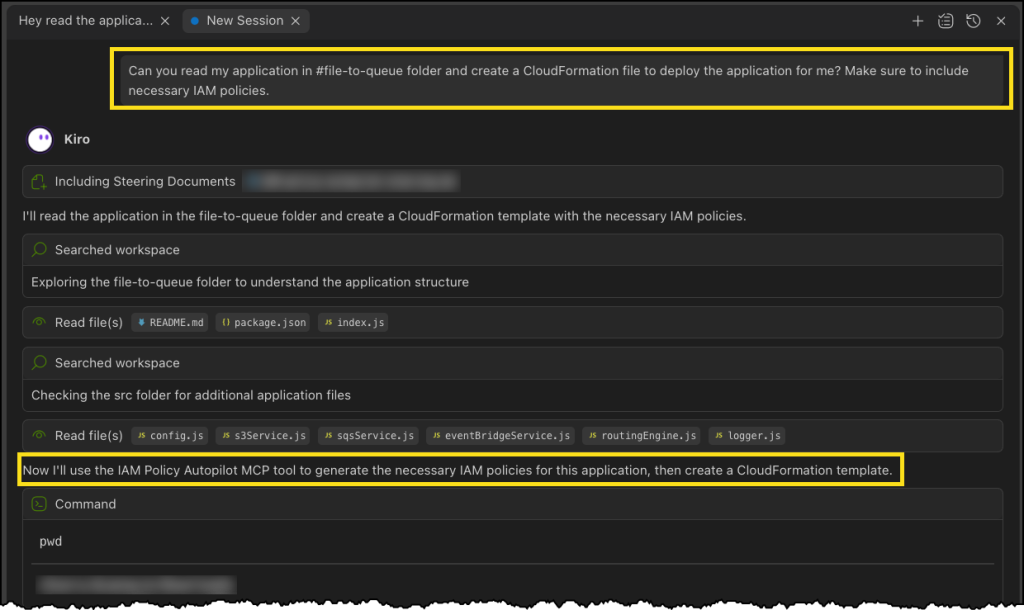

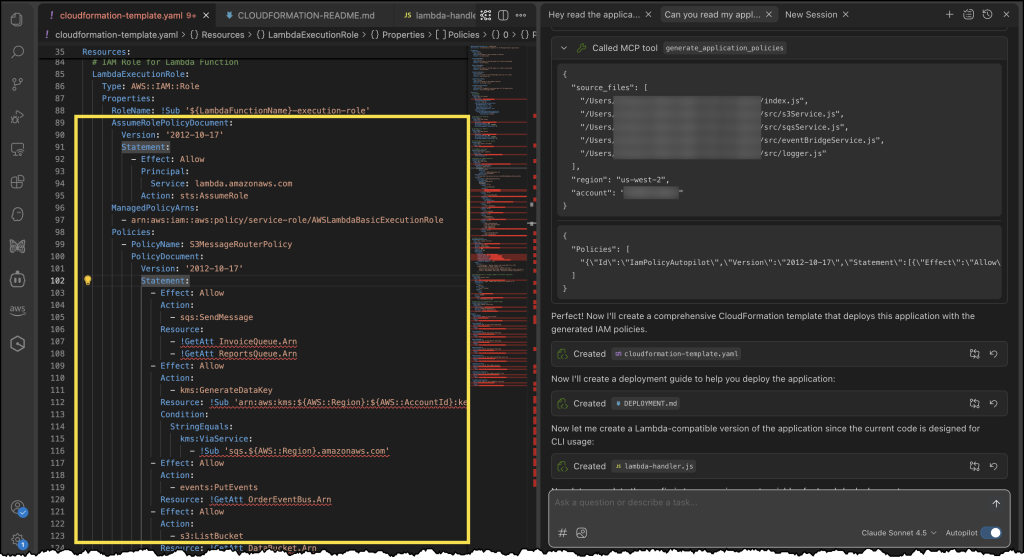
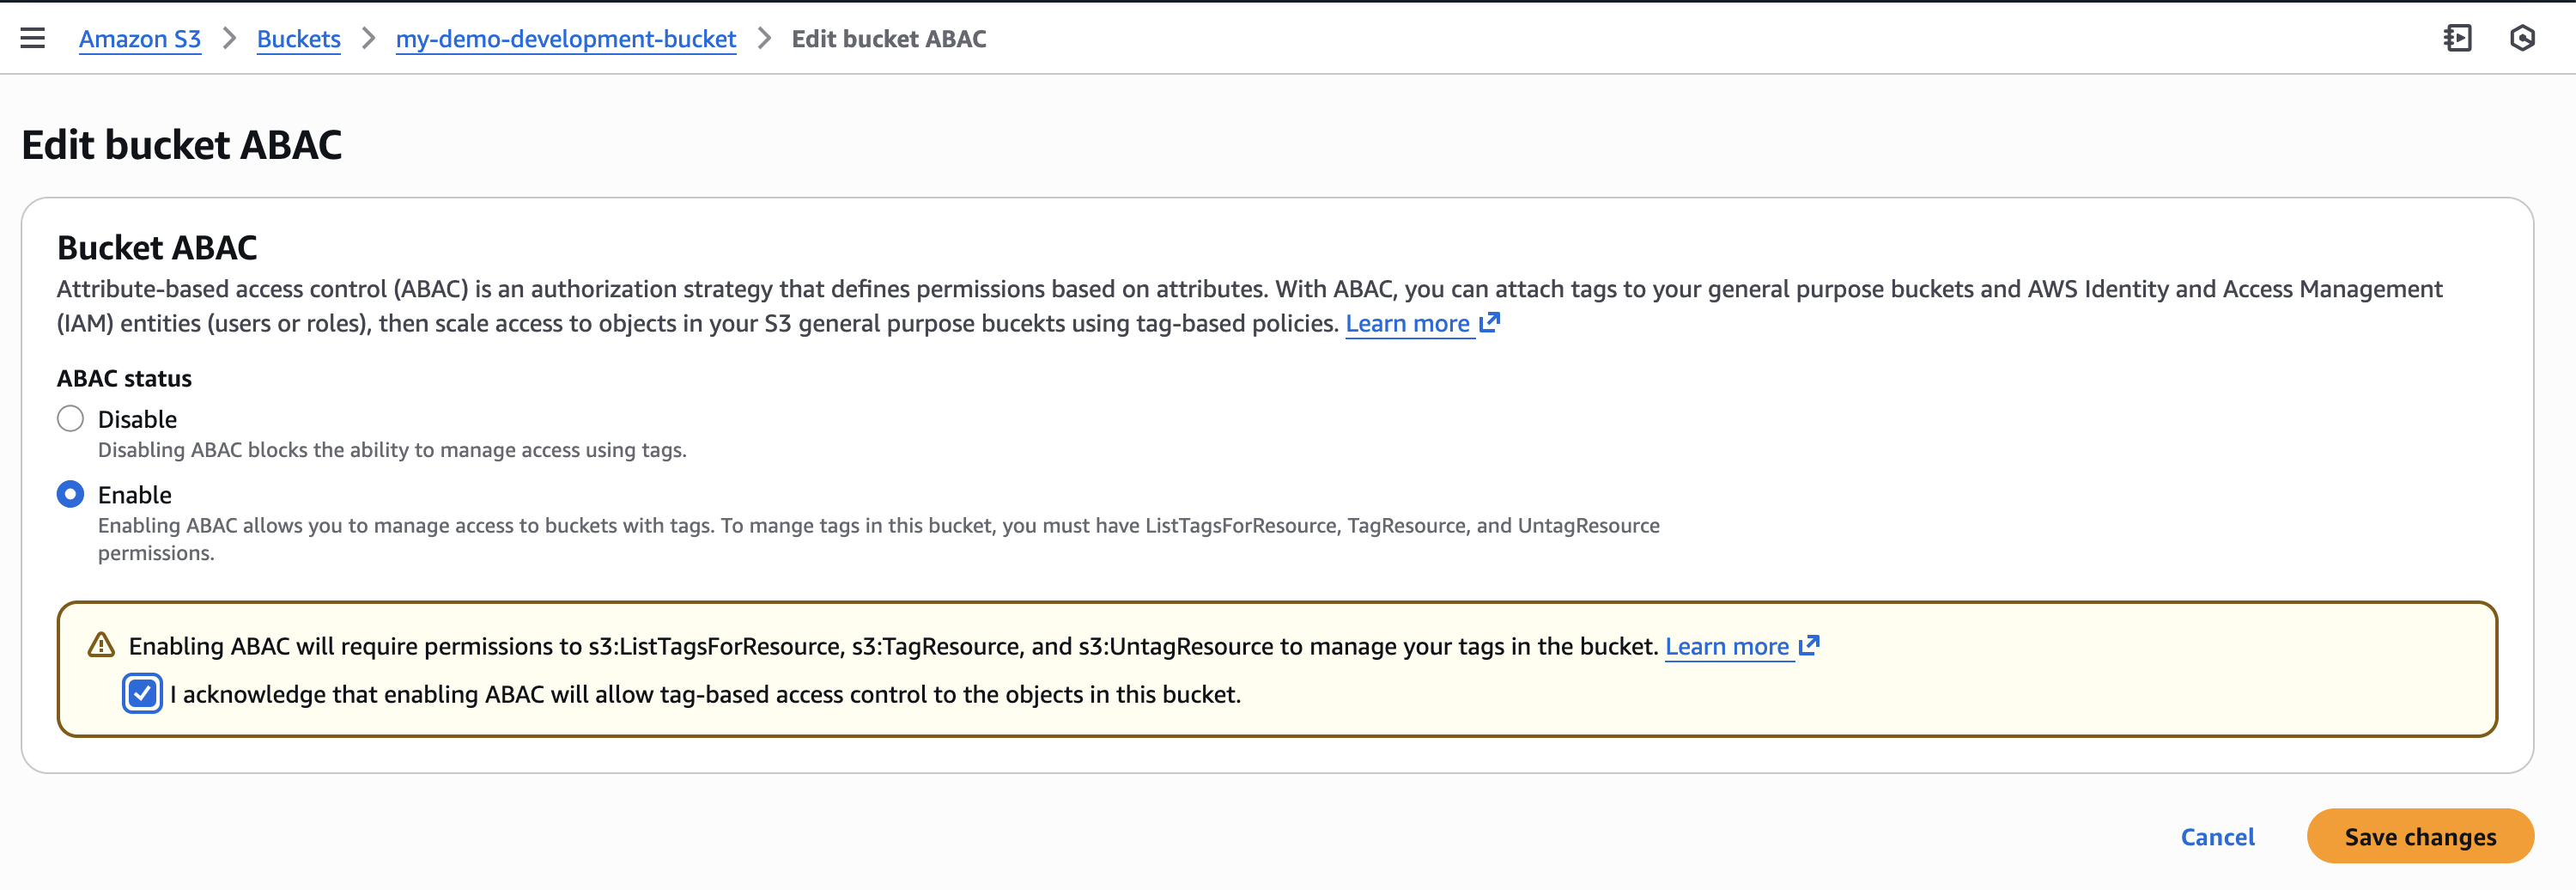
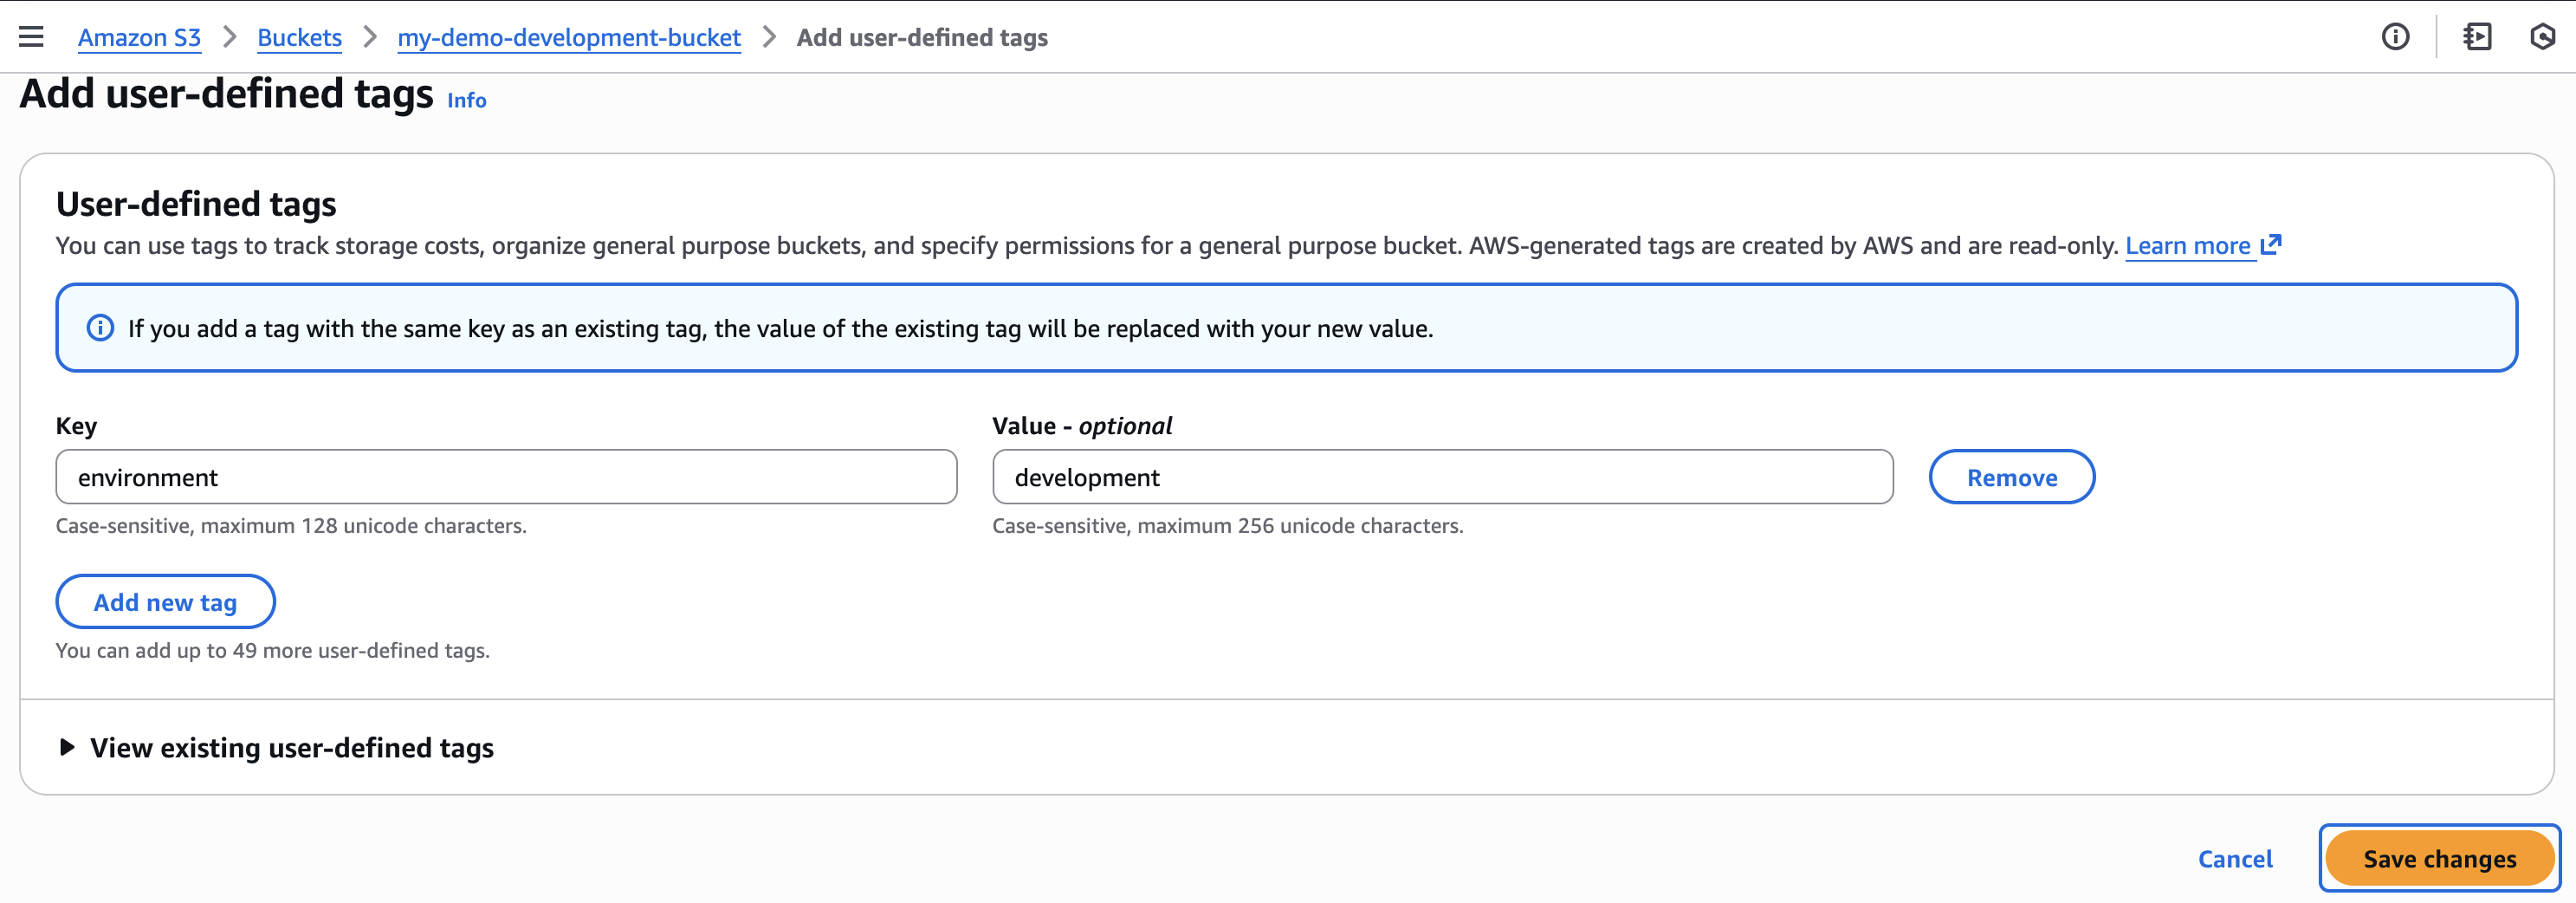

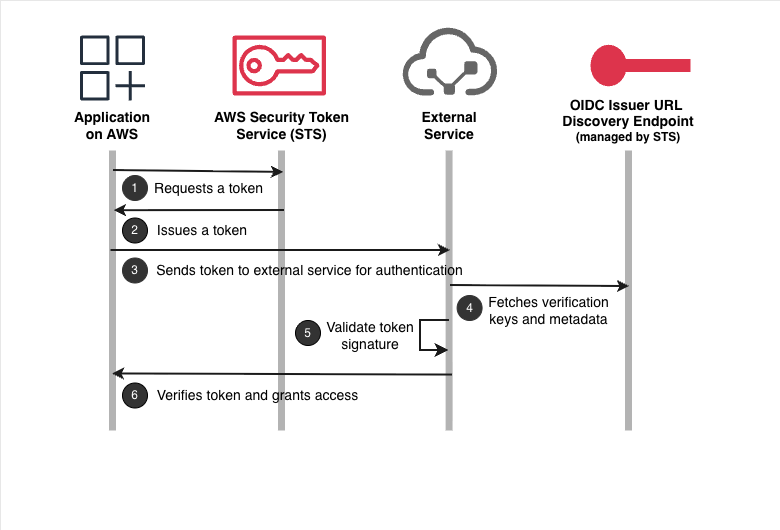
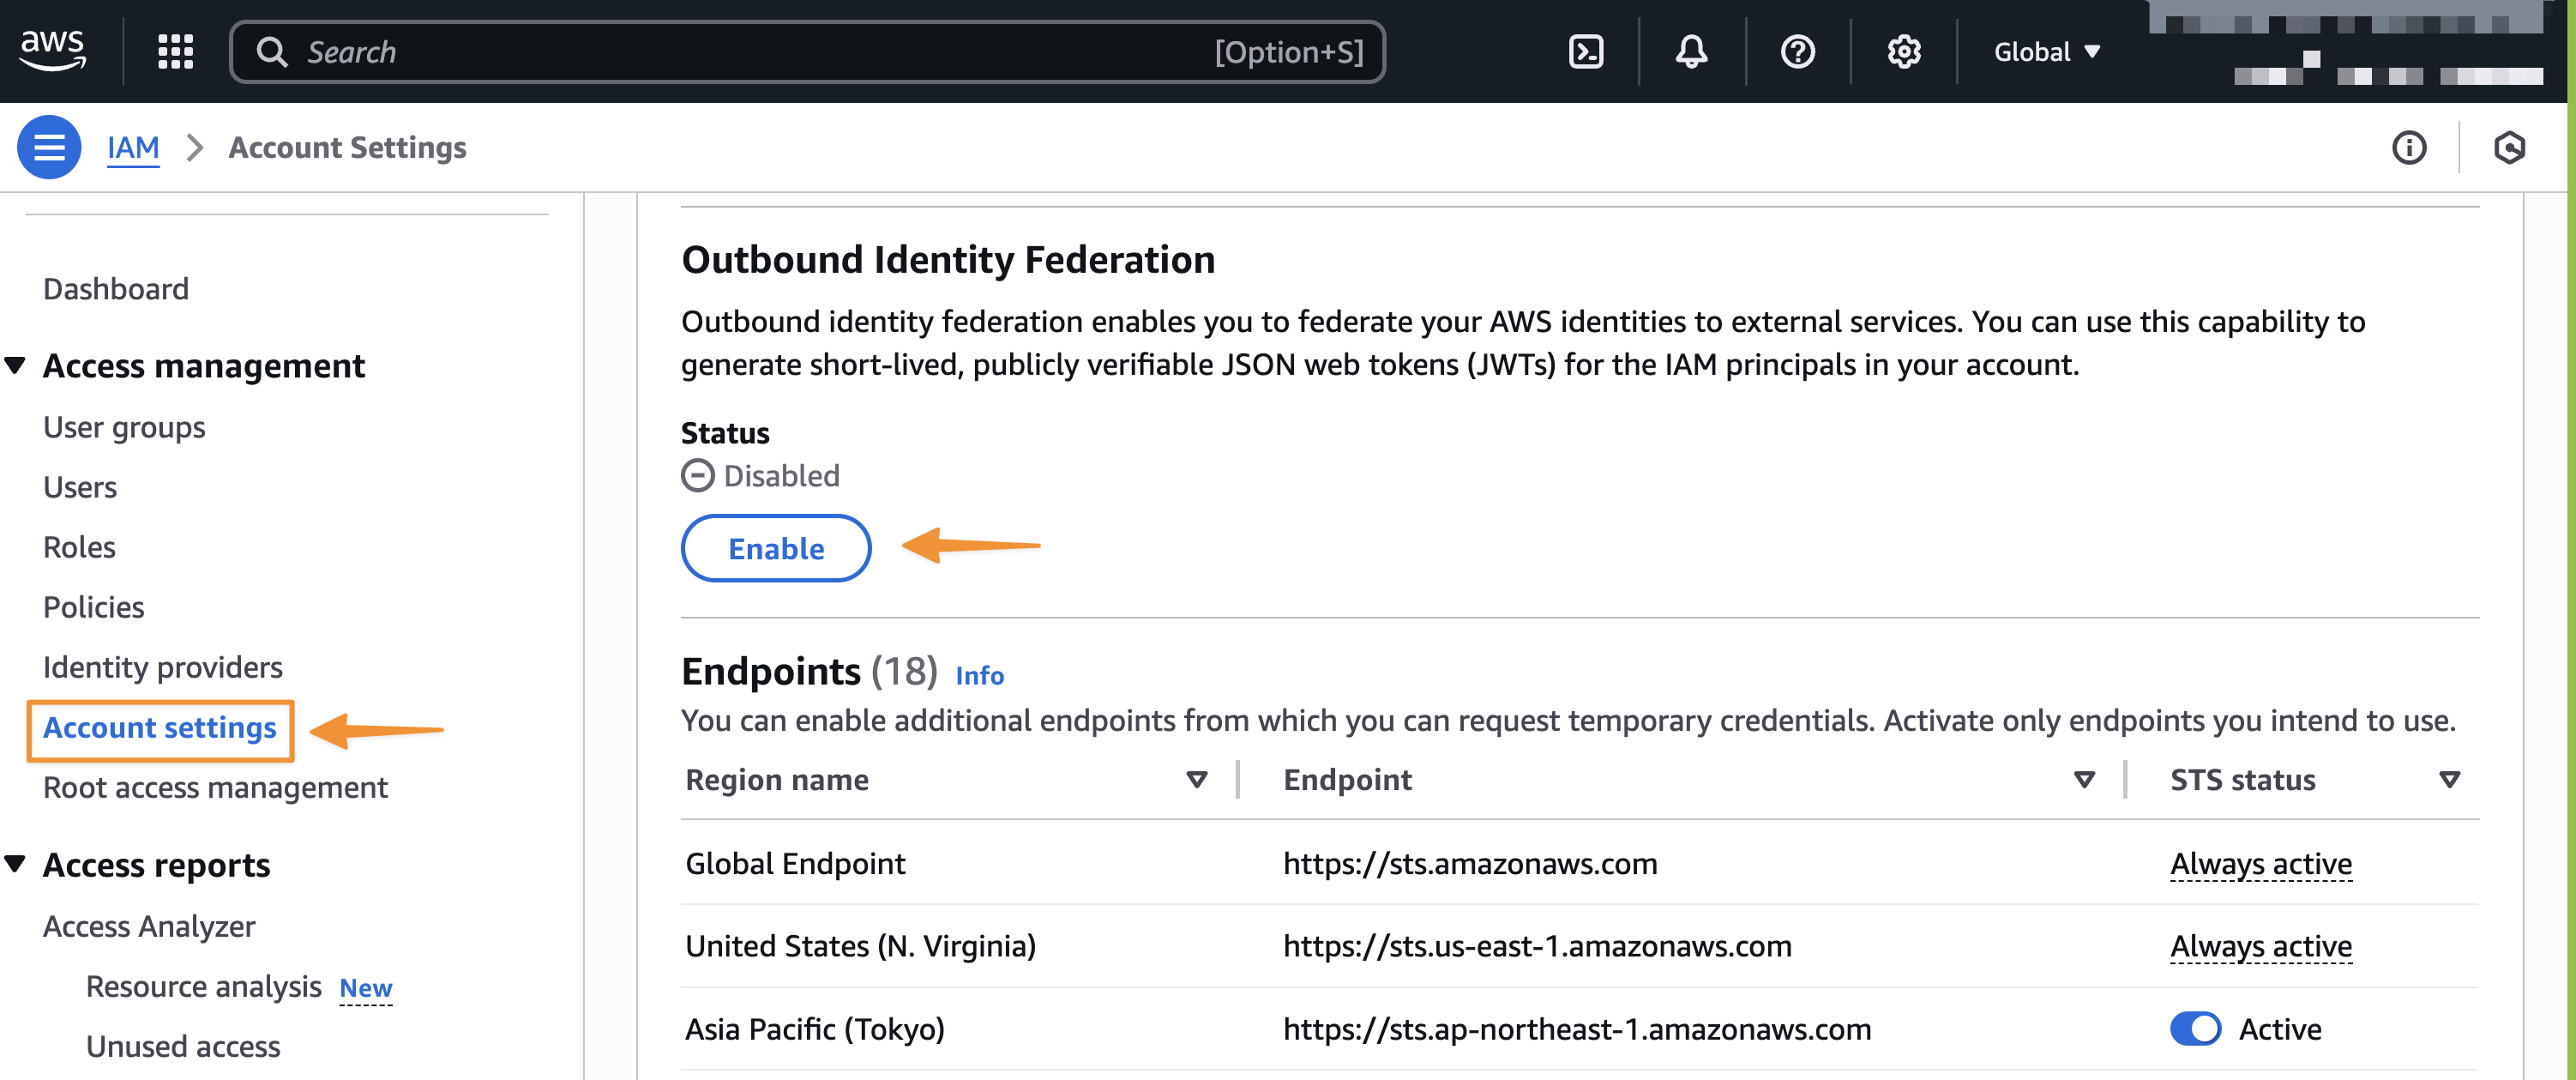
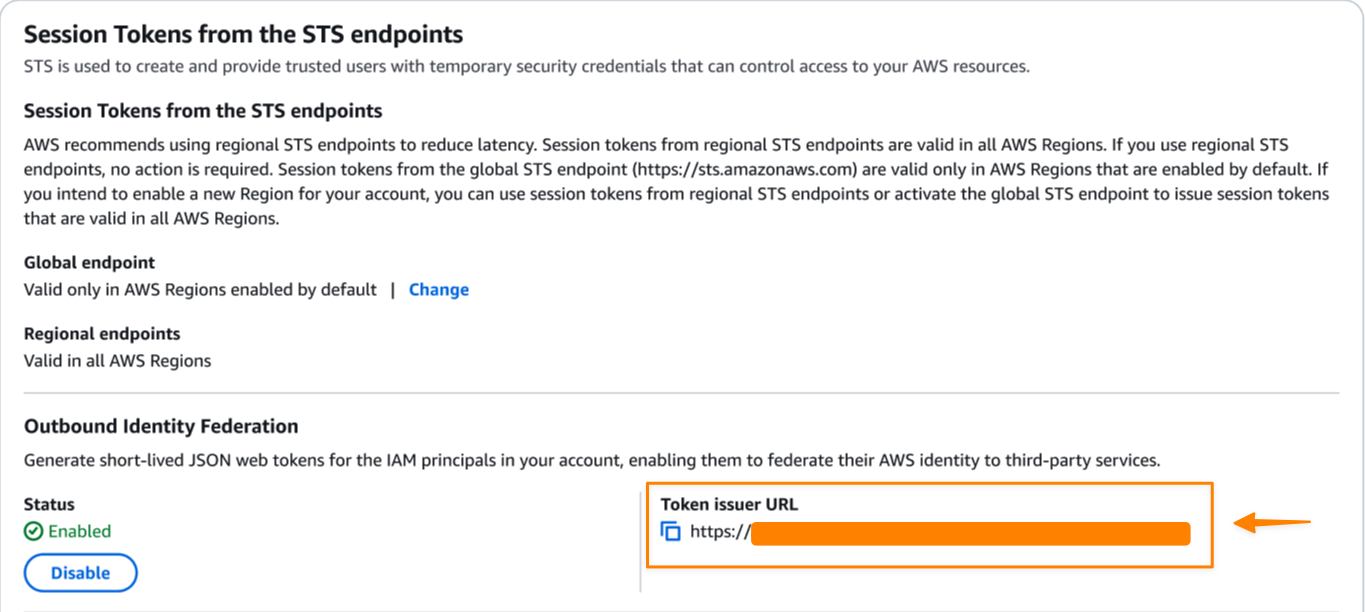


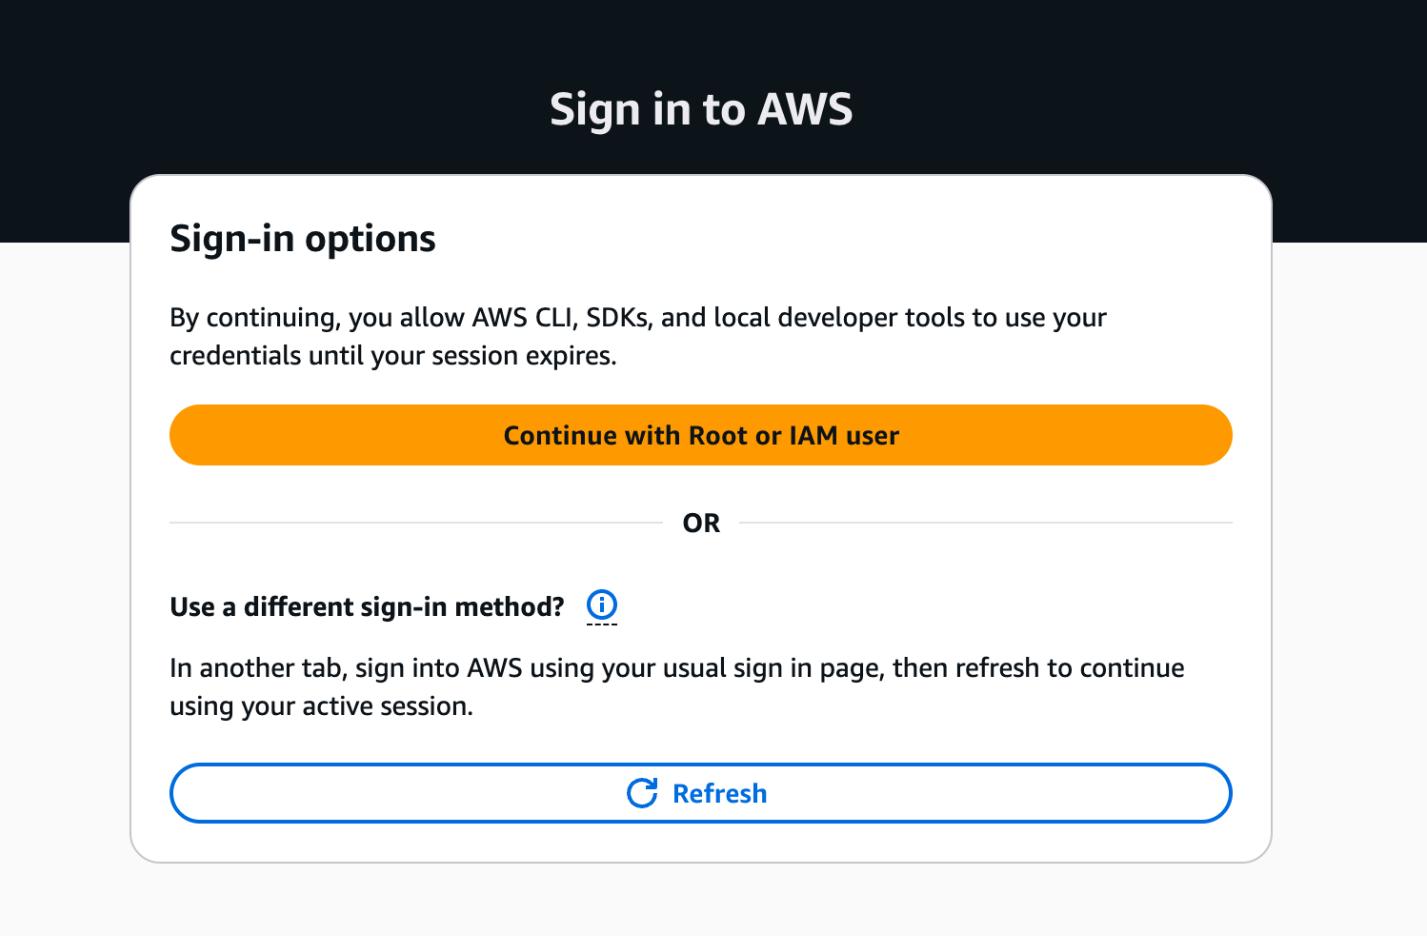


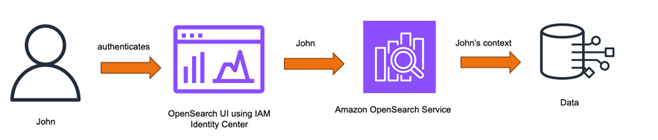
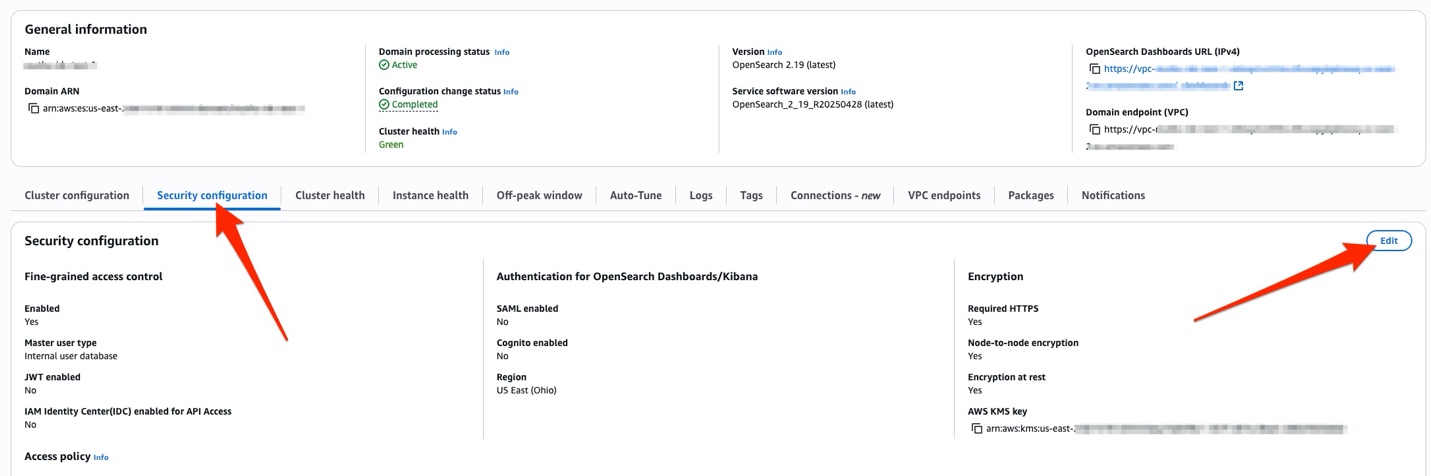


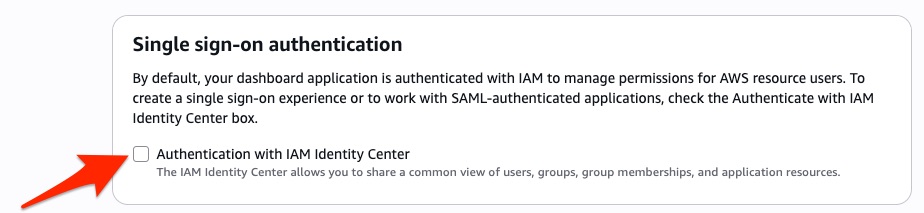


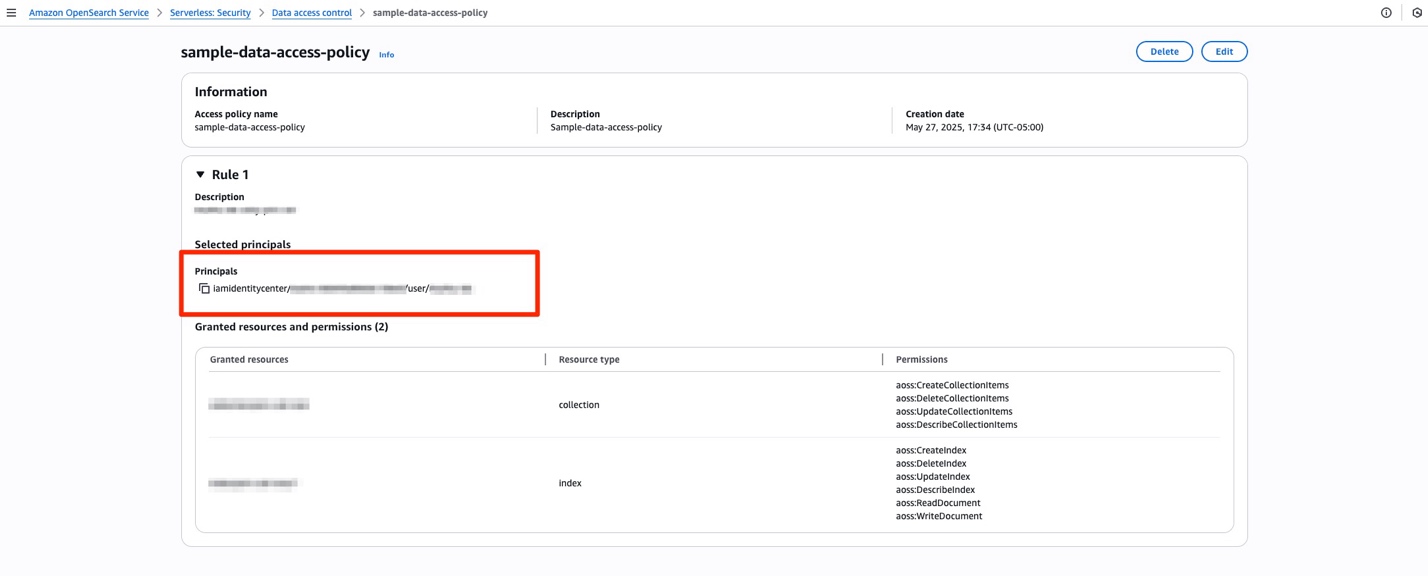
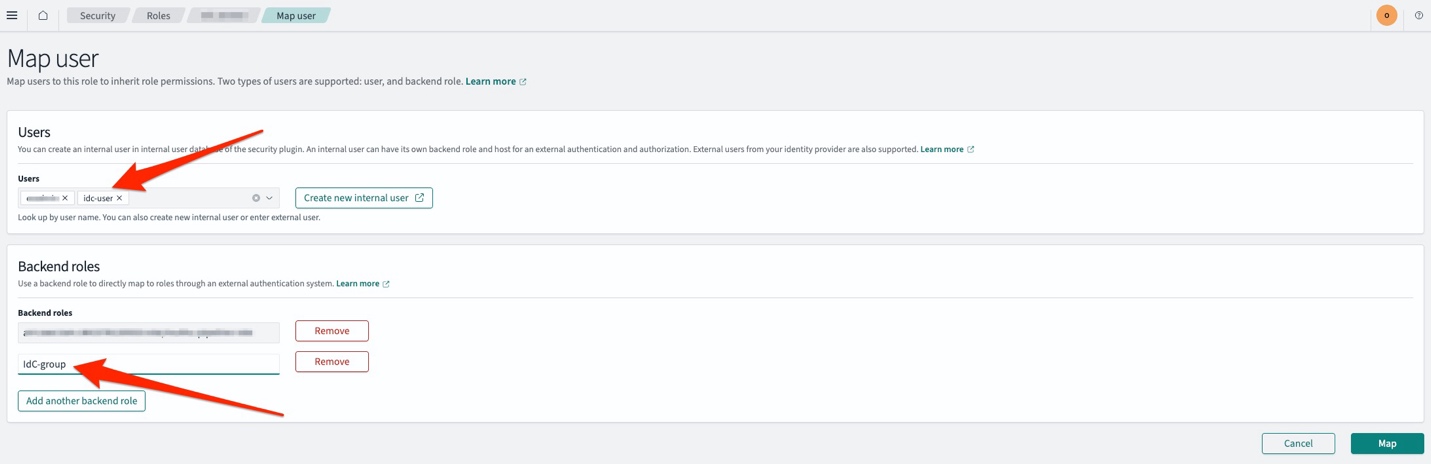
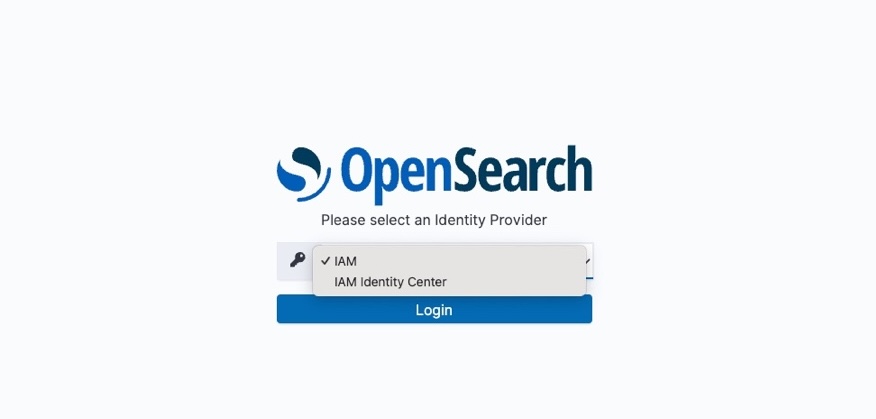
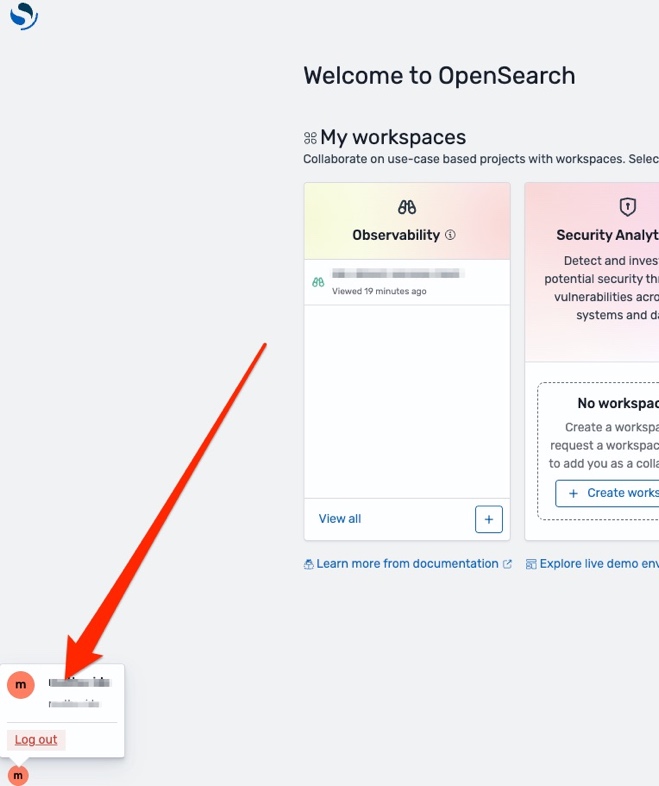
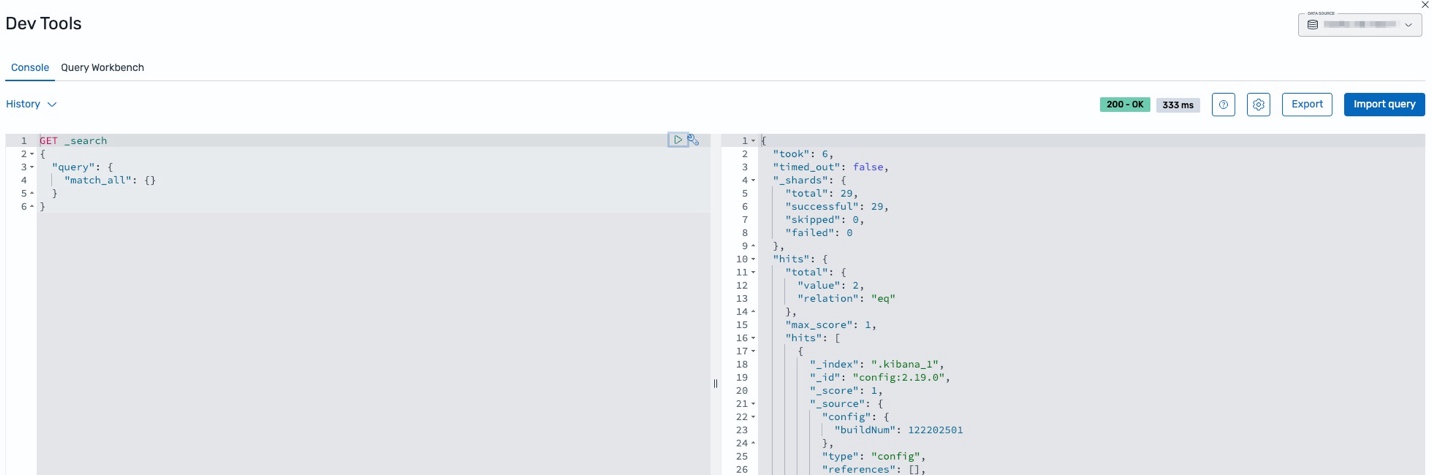


 Xiaoxue Xu is a Solutions Architect for AWS based in Toronto. She primarily works with financial services customers to help secure their workload and design scalable solutions on the AWS Cloud.
 Simran Singh is a Senior Solutions Architect at AWS. In this role, he assists our large enterprise customers in meeting their key business objectives using AWS. His areas of expertise include artificial intelligence and machine learning, security, and improving the experience of developers building on AWS.


 Sandeep Adwankar is a Senior Product Manager at AWS. Based in the California Bay Area, he works with customers around the globe to translate business and technical requirements into products that enable customers to improve how they manage, secure, and access data.
 Srividya Parthasarathy is a Senior Big Data Architect on the AWS Lake Formation team. She enjoys building data mesh solutions and sharing them with the community.


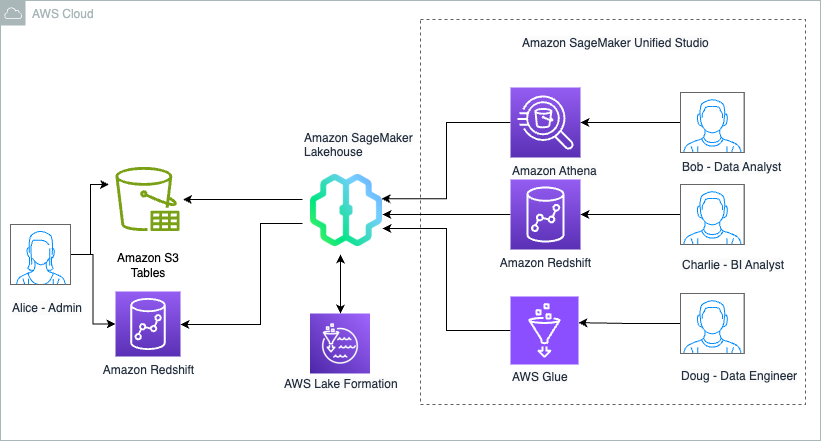


 Charlie can now further update the SQL query and use it to power QuickSight dashboards that can be shared with Sales team members.
 Sandeep Adwankar is a Senior Technical Product Manager at AWS. Based in the California Bay Area, he works with customers around the globe to translate business and technical requirements into products that enable customers to improve how they manage, secure, and access data.
 Srividya Parthasarathy is a Senior Big Data Architect on the AWS Lake Formation team. She works with the product team and customers to build robust features and solutions for their analytical data platform. She enjoys building data mesh solutions and sharing them with the community.
 AWS
AWS  en
en 


