All posts by Taylor Blau

Highlights from Git 2.42

Post Syndicated from Taylor Blau original https://github.blog/2023-08-21-highlights-from-git-2-42/

The open source Git project just released Git 2.42 with features and bug fixes from over 78 contributors, 17 of them new. We last caught up with you on the latest in Git back when 2.41 was released.

To celebrate this most recent release, here’s GitHub’s look at some of the most interesting features and changes introduced since last time.

Faster object traversals with bitmaps

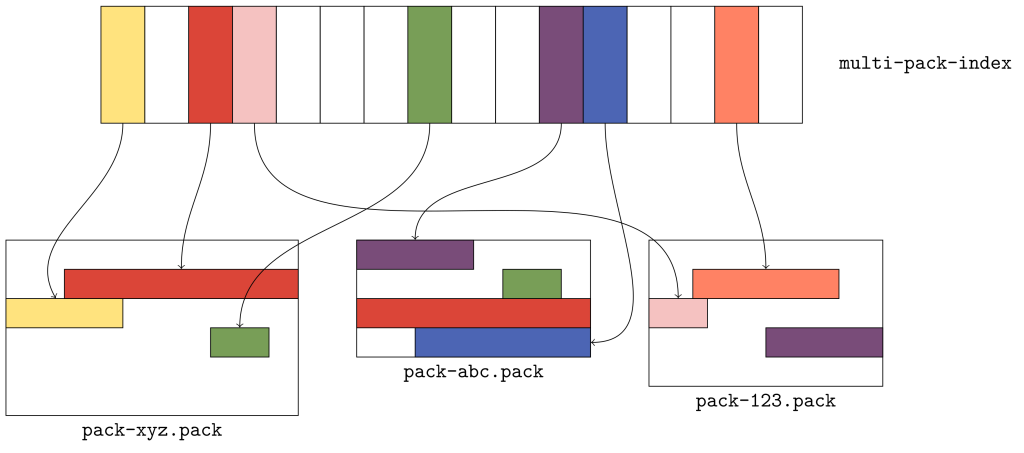
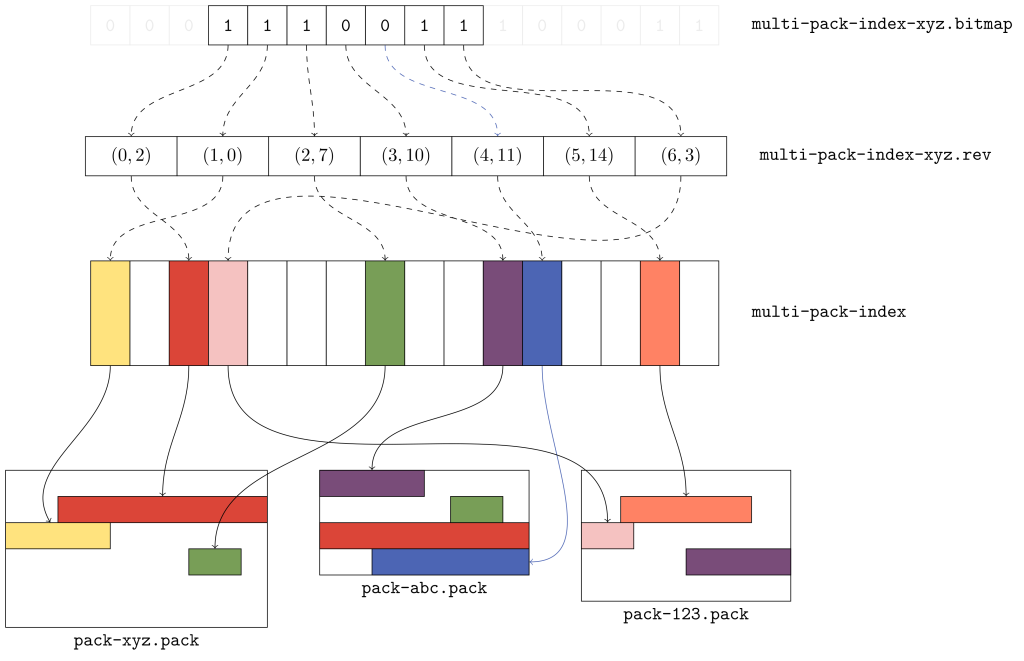
Many long-time readers of these blog posts will recall our coverage of reachability bitmaps. Most notably, we covered Git’s new multi-pack reachability bitmaps back in our coverage of the 2.34 release towards the end of 2021.

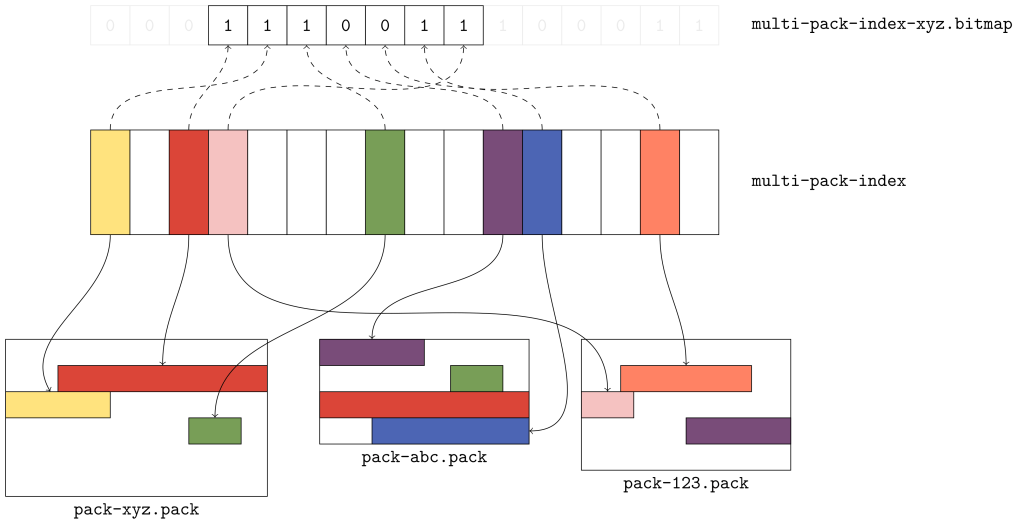
If this is your first time here, or you need a refresher on reachability bitmaps, don’t worry. Reachability bitmaps allow Git to quickly determine the result set of a reachability query, like when serving fetches or clones. Git stores a collection of bitmaps for a handful of commits. Each bit position is tied to a specific object, and the value of that bit indicates whether or not it is reachable from the given commit.

This often allows Git to compute the answers to reachability queries using bitmaps much more quickly than without, particularly for large repositories. For instance, if you want to know the set of objects unique to some branch relative to another, you can build up a bitmap for each endpoint (in this case, the branch we’re interested in, along with main), and compute the AND NOT between them. The resulting bitmap has bits set to “1” for exactly the set of objects unique to one side of the reachability query.

But what happens if one side doesn’t have bitmap coverage, or if the branch has moved on since the last time it was covered with a bitmap?

In previous versions of Git, the answer was that Git would build up a complete bitmap for all reachability tips relative to the query. It does so by walking backwards from each tip, assembling its own bitmap, and then stopping as soon as it finds an existing bitmap in history. Here’s an example of the existing traversal routine:

Figure 1: Bitmap-based traversal computing the set of objects unique to `main` in Git 2.41.0.

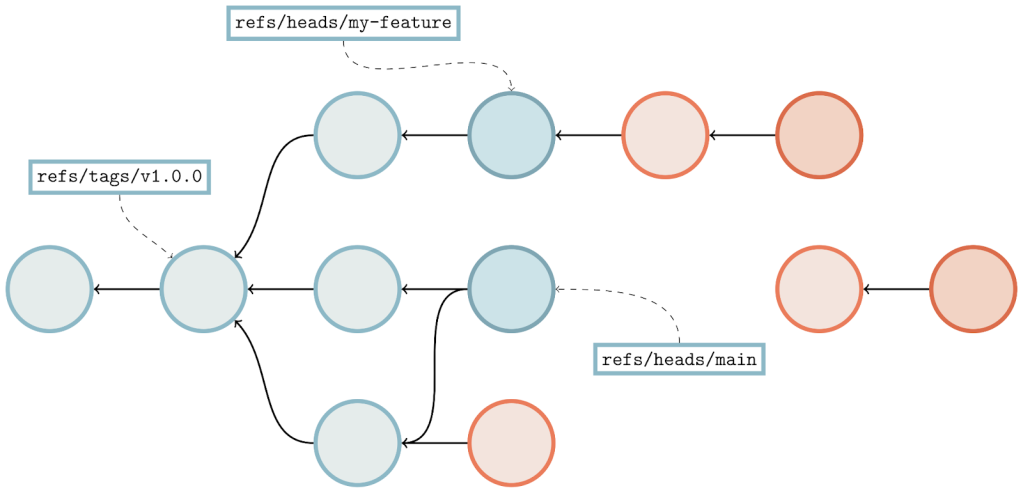
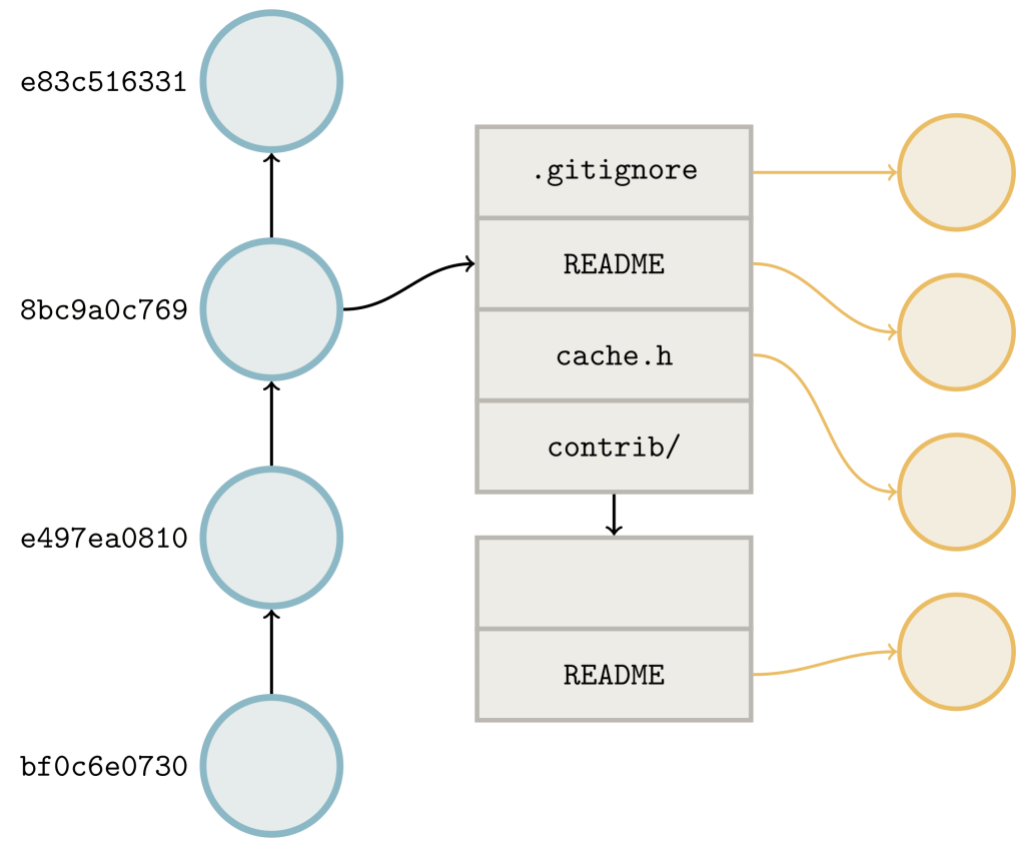
There’s a lot going on here, but let’s break it down. Above we have a commit graph, with five branches and one tag. Each of the commits are indicated by circles, and the references are indicated by squares pointing at their respective referents. Existing bitmaps can be found for both the v2.42.0 tag, and the branch bar.

In the above, we’re trying to compute the set of objects which are reachable from main, but aren’t reachable from any other branch. By inspection, it’s clear that the answer is {C₆, C₇}, but let’s step through how Git would arrive at the same result:

  • For each branch that we want to exclude from the result set (in this case, foo, bar, baz, and quux), we walk along the commit graph, marking each of the corresponding bits in our have‘s bitmap in the top-left.
  • If we happen to hit a portion of the graph that we’ve covered already, we can stop early. Likewise, if we find an existing bitmap (like what happens when we try to walk beginning at branch bar), we can OR in the bits from that commit’s bitmap into our have‘s set, and move on to the next branch.
  • Then, we repeat the same process for each branch we do want to keep (in this case, just main), this time marking or ORing bits into the have‘s bitmap.
  • Finally, once we have a complete bitmap representing each side of the reachability query, we can compute the result by AND NOTing the two bitmaps together, leaving us with the set of objects unique to main.

We can see that in the above, having existing bitmap coverage (as is the case with branch bar) is extremely beneficial, since they allow us to discover the set of objects reachable from a certain point in the graph immediately without having to open up and parse objects.

But what happens when bitmap coverage is sparse? In that case, we end up having to walk over many objects in order to find an existing bitmap. Oftentimes, the additional overhead of maintaining a series of bitmaps outweighs the benefits of using them in the first place, particularly when coverage is poor.

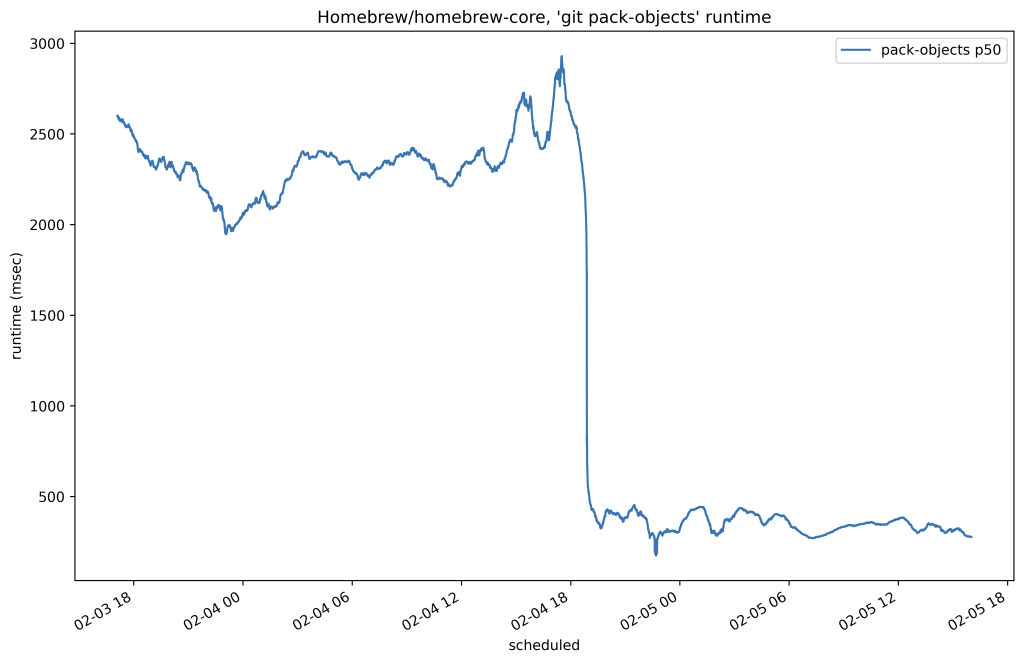
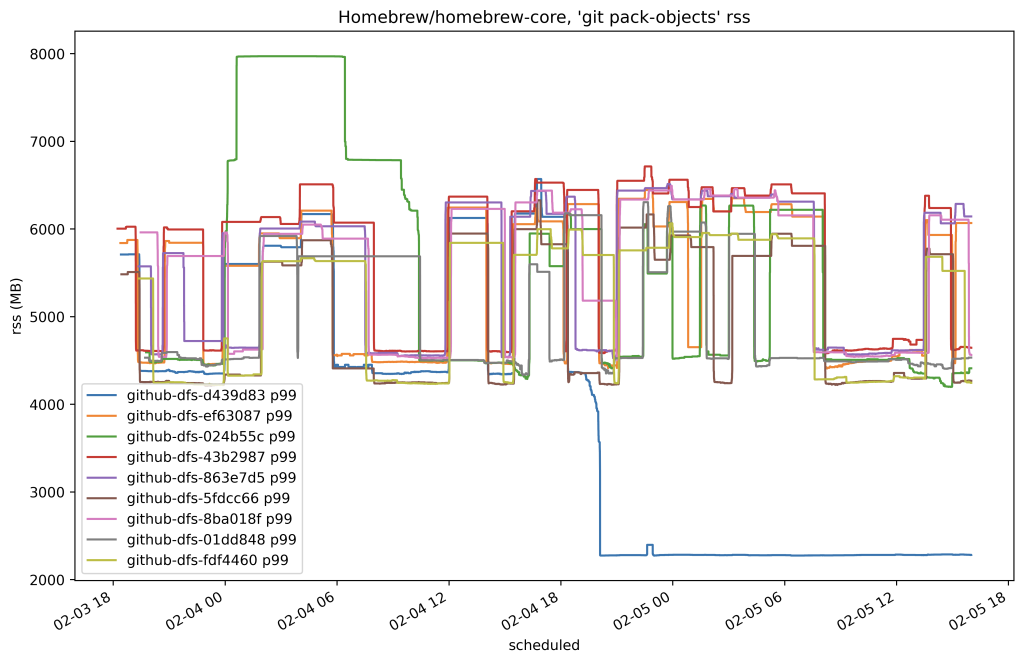
In this release, Git introduces a new variant of the bitmap traversal algorithm that often out performs the existing implementation, particularly when bitmap coverage is sparse.

The new algorithm represents the unwanted side of the reachability query as a bitmap from the query’s boundary, instead of the union of bitmap(s) from the individual tips on the unwanted side. The exact definition of what a query boundary is is slightly technical, but for our purposes you can think of it as the first commit in the wanted set of objects which is also reachable from at least one unwanted object.

In the above example, this is commit C₅, which is reachable from both main (which is in the wanted half of the reachability query) along with bar and baz (both of which are in the unwanted half). Let’s step through computing the same result using the boundary-based approach:

Figure 2: The same traversal as above, instead using the boundary commit-based approach.

The approach here is similar to the above, but not quite the same. Here’s the process:

  • We first discover the boundary commit(s), in this case C₅.
  • We then walk backwards from the set of boundary commit(s) we just discovered until we find a reachability bitmap (or reach the beginning of history). At each stage along the walk, we mark the corresponding bit in the have‘s bitmap.
  • Then, we build up a complete bitmap on the want‘s side by starting a walk from main until either we hit an existing bitmap, the beginning of history, or an object marked in the previous step.
  • Finally, as before, we compute the AND NOT between the two bitmaps, and return the results.

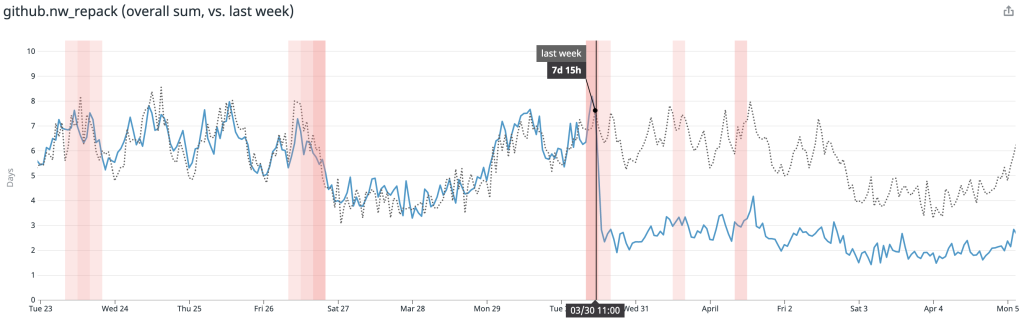
When there are bitmaps close to the boundary commit(s), or the unwanted half of the query is large, this algorithm often vastly outperforms the existing traversal. In the toy example above, you can see we compute the answer much more quickly when using the boundary-based approach. But in real-world examples, between a 2- and 15-fold improvement can be observed between the two algorithms.

You can try out the new algorithm by running:

$ git repack -ad --write-bitmap-index
$ git config pack.useBitmapBoundaryTraversal true

in your repository (using Git 2.42), and then using git rev-list with the --use-bitmap-index flag.

[source]

Exclude references by pattern in for-each-ref

If you’ve ever scripted around Git before, you are likely familiar with its for-each-ref command. If not, you likely won’t be surprised to learn that this command is used to enumerate references in your repository, like so:

$ git for-each-ref --sort='-*committerdate' refs/tags
264b9b3b04610cb4c25e01c78d9a022c2e2cdf19 tag    refs/tags/v2.42.0-rc2
570f1f74dee662d204b82407c99dcb0889e54117 tag    refs/tags/v2.42.0-rc1
e8f04c21fdad4551047395d0b5ff997c67aedd90 tag    refs/tags/v2.42.0-rc0
32d03a12c77c1c6e0bbd3f3cfe7f7c7deaf1dc5e tag    refs/tags/v2.41.0
[...]

for-each-ref is extremely useful for listing references, finding which references point at a given object (with --points-at), which references have been merged into a given branch (with --merged), or which references contain a given commit (with --contains).

Git relies on the same machinery used by for-each-ref across many different components, including the reference advertisement phase of pushes. During a push, the Git server first advertises a list of references that it wants the client to know about, and the client can then exclude those objects (and anything reachable from them) from the packfile they generate during the push.

Suppose that you have some references that you don’t want to advertise to clients during a push? For example, GitHub maintains a pair of references for each open pull request, like refs/pull/NNN/head and refs/pull/NNN/merge, which aren’t advertised to pushers. Luckily, Git has a mechanism that allows server operators to exclude groups of references from the push advertisement phase by configuring the transfer.hideRefs variable.

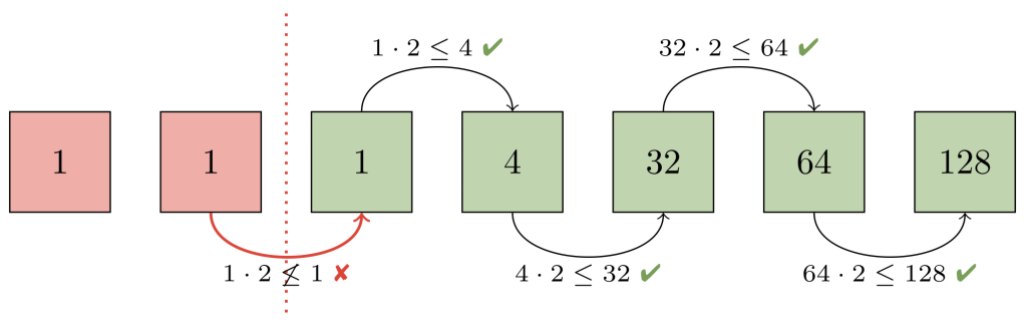
Git implements the functionality configured by transfer.hideRefs by enumerating all references, and then inspecting each one to see whether or not it should advertise that reference to pushers. Here’s a toy example of a similar process:

Figure 3: Running `for-each-ref` while excluding the `refs/pull/` hierarchy.

Here, we want to list every reference that doesn’t begin with refs/pull/. In order to do that, Git enumerates each reference one-by-one, and performs a prefix comparison to determine whether or not to include it in the set.

For repositories that have a small number of hidden references, this isn’t such a big deal. But what if you have thousands, tens of thousands, or even more hidden references? Performing that many prefix comparisons only to throw out a reference as hidden can easily become costly.

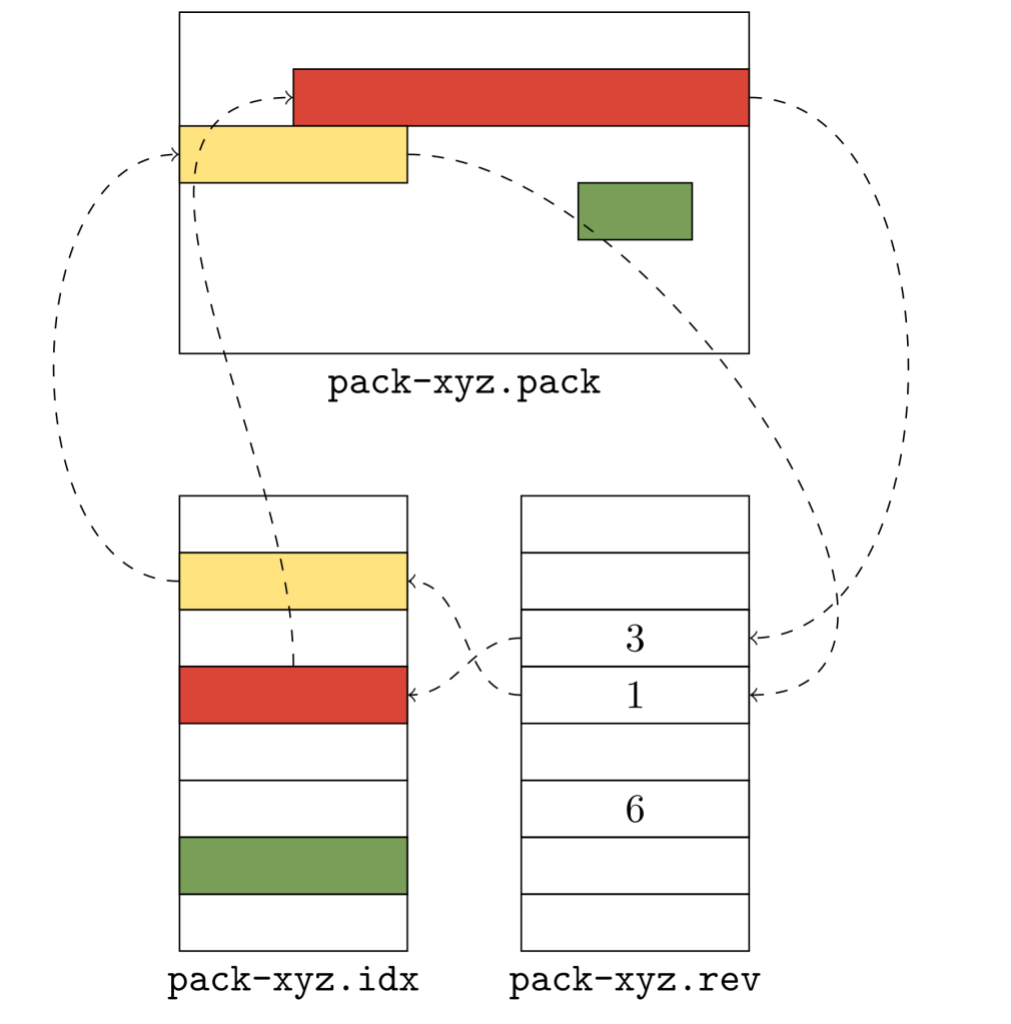
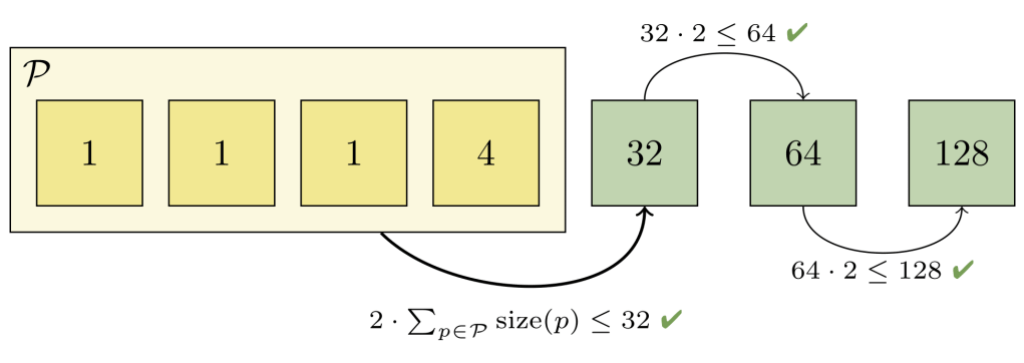
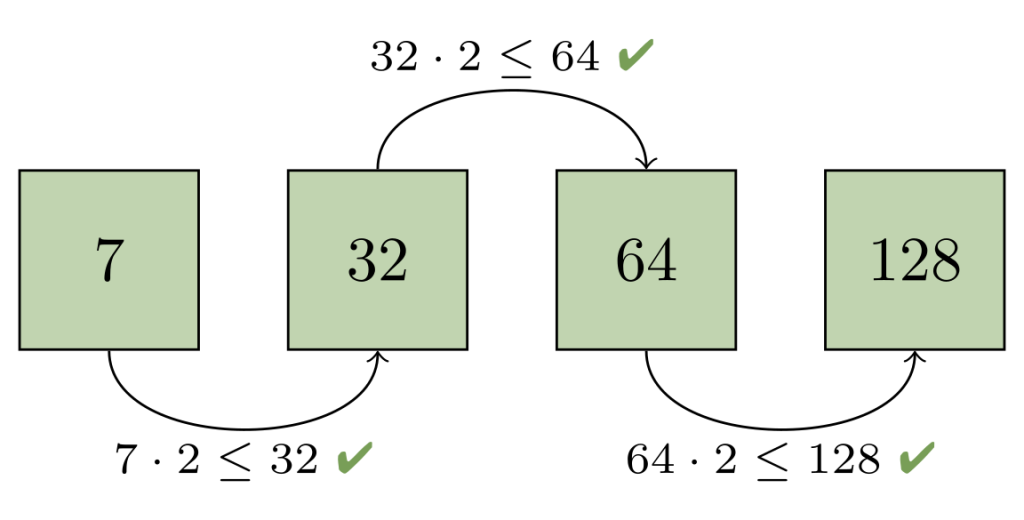
In Git 2.42, there is a new mechanism to more efficiently exclude references. Instead of inspecting each reference one-by-one, Git first locates the start and end of each excluded region in its packed-refs file. Once it has this information, it creates a jump list allowing it to skip over whole regions of excluded references in a single step, rather than discarding them one by one, like so:

Figure 4: The same `for-each-ref` invocation as above, this time using a jump list as in Git 2.42.

Like the previous example, we still want to discard all of the refs/pull references from the result set. To do so, Git finds the first reference beginning with refs/pull (if one exists), and then performs a modified binary search to find the location of the first reference after all of the ones beginning with refs/pull.

It can then use this information (indicated by the dotted yellow arrow) to avoid looking at the refs/pull hierarchy entirely, providing a measurable speed-up over inspecting and discarding each hidden reference individually.

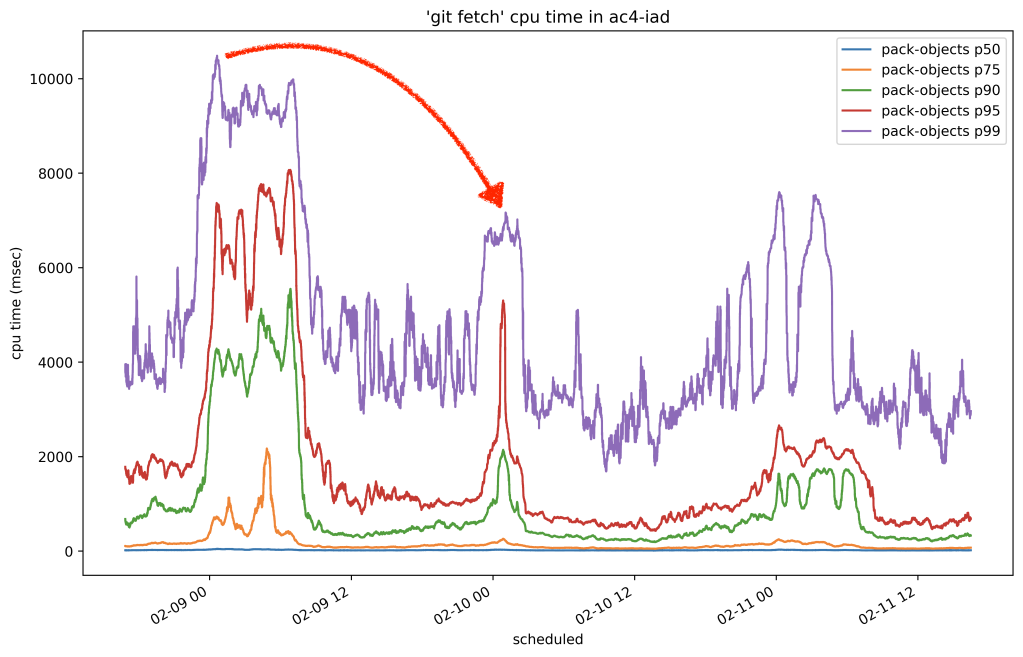
In Git 2.42, you can try out this new functionality with git for-each-ref‘s new --exclude option. This release also uses this new mechanism to improve the reference advertisement above, as well as analogous components for fetching. In extreme examples, this can provide a 20-fold improvement in the CPU cost of advertising references during a push.

Git 2.42 also comes with a pair of new options in the git pack-refs command, which is responsible for updating the packed-refs file with any new loose references that aren’t stored. In certain scenarios (such as a reference being frequently updated or deleted), it can be useful to exclude those references from ever entering the packed-refs file in the first place.

git pack-refs now understands how to tweak the set of references it packs using its new --include and --exclude flags.

[source, source]

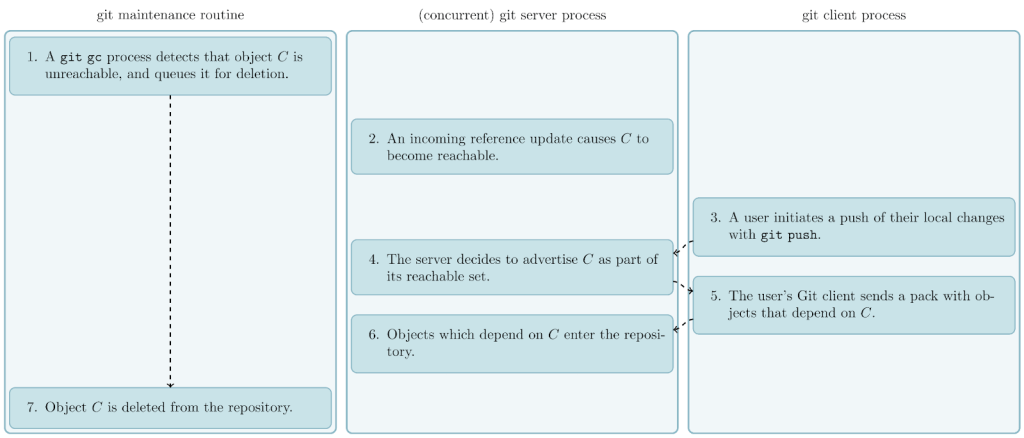
Preserving precious objects from garbage collection

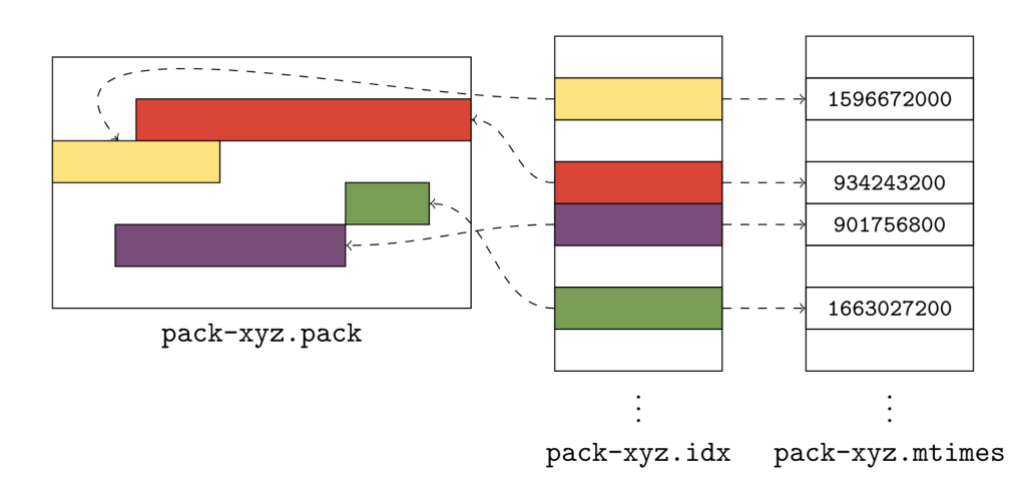
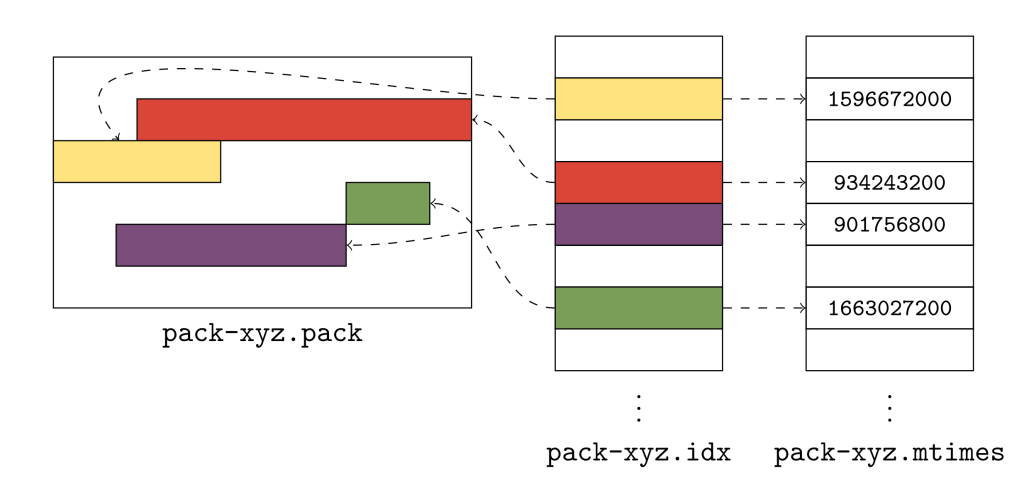
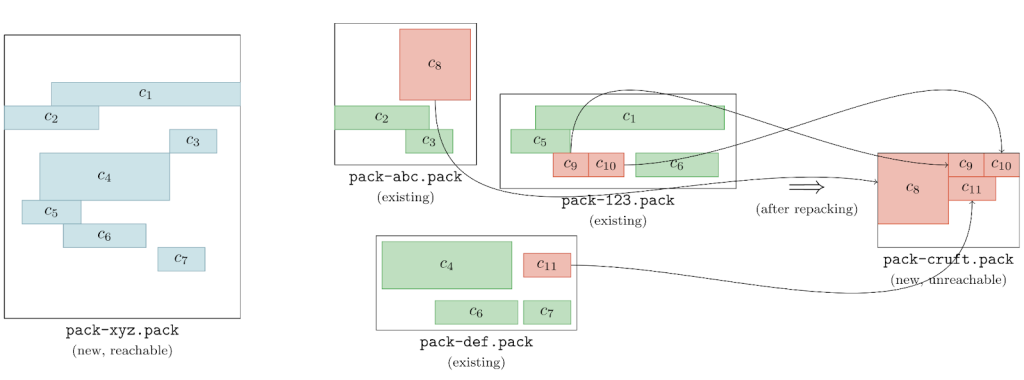
In our last set of release highlights, we talked about a new mechanism for collecting unreachable objects in Git known as cruft packs. Git uses cruft packs to collect and track the age of unreachable objects in your repository, gradually letting them age out before eventually being pruned from your repository.

But Git doesn’t simply delete every unreachable object (unless you tell it to with --prune=now). Instead, it will delete every object except those that meet one of the below criteria:

  1. The object is reachable, in which case it cannot be deleted ever.
  2. The object is unreachable, but was modified after the pruning cutoff.
  3. The object is unreachable, and hasn’t been modified since the pruning cutoff, but is reachable via some other unreachable object which has been modified recently.

But what do you do if you want to hold onto an object (or many objects) which are both unreachable and haven’t been modified since the pruning cutoff?

Historically, the only answer to this question was that you should point a reference at those object(s). That works if you have a relatively small set of objects you want to hold on to. But what if you have more precious objects than you could feasibly keep track of with references?

Git 2.42 introduces a new mechanism to preserve unreachable objects, regardless of whether or not they have been modified recently. Using the new gc.recentObjectsHook configuration, you can configure external program(s) that Git will run any time it is about to perform a pruning garbage collection. Each configured program is allowed to print out a line-delimited sequence of object IDs, each of which is immune to pruning, regardless of its age.

Even if you haven’t started using cruft packs yet, this new configuration option works even when using loose objects to hold unreachable objects which have not yet aged out of your repository.

This makes it possible to store a potentially large set of unreachable objects which you want to retain in your repository indefinitely using an external mechanism, like a SQLite database. To try out this new feature for yourself, you can run:

$ git config gc.recentObjectsHook /path/to/your/program
$ git gc --prune=<approxidate>

[source, source]


  • If you’ve read these blog posts before, you may recall our coverage of the sparse index feature, which allows you to check out a narrow cone of your repository instead of the whole thing.

    Over time, many commands have gained support for working with the sparse index. For commands that lacked support for the sparse index, invoking those commands would cause your repository to expand the index to cover the entire repository, which can be a potentially expensive operation.

    This release, the diff-tree command joined the group of commands with full support for the sparse index, meaning that you can now use diff-tree without expanding your index.

    This work was contributed by Shuqi Liang, one of the Git project’s Google Summer of Code (GSoC) students. You can read more about their project here, and follow along with their progress on their blog.

    [source]

  • If you’ve gotten this far in the blog post and thought that we were done talking about git for-each-ref, think again! This release enhances for-each-ref‘s --format option with a handful of new ways to format a reference.

    The first set of new options enables for-each-ref to show a handful of GPG-related information about commits at reference tips. You can ask for the GPG signature directly, or individual components of it, like its grade, the signer, key, fingerprint, and so on. For example,

    $ git for-each-ref --format='%(refname) %(signature:key)' \
        --sort=v:refname 'refs/remotes/origin/release-*' | tac
    refs/remotes/origin/release-3.1 4AEE18F83AFDEB23
    refs/remotes/origin/release-3.0 4AEE18F83AFDEB23
    refs/remotes/origin/release-2.13 4AEE18F83AFDEB23
    [...]
    

    This work was contributed by Kousik Sanagavarapu, another GSoC student working on Git! You can read more about their project here, and keep up to date with their work on their blog.

    [source, source]

  • Earlier in this post, we talked about git rev-list, a low-level utility for listing the set of objects contained in some query.

    In our early examples, we discussed a straightforward case of listing objects unique to one branch. But git rev-list supports much more complex modifiers, like --branches, --tags, --remotes, and more.

    In addition to specifying modifiers like these on the command-line, git rev-list has a --stdin mode which allows for reading a line-delimited sequence of commits (optionally prefixed with ^, indicating objects reachable from those commit(s) should be excluded) from the command’s standard input.

    Previously, support for --stdin extended only to referring to commits by their object ID, without support for more complex modifiers like the ones listed earlier. In Git 2.42, git rev-list --stdin can now accept the same set of modifiers given on the command line, making it much more useful when scripting.

    [source]

  • Picture this: you’re working away on your repository, typing up a tag message for a tag named foo. Suppose that in the background, you have some repeating task that fetches new commits from your remote repository. If you happen to fetch a tag foo/bar while writing the tag message for foo, Git will complain that you cannot have both tag foo and foo/bar.

    OK, so far so good: Git does not support this kind of tag hierarchy1. But what happened to your tag message? In previous versions of Git, you’d be out of luck, since your in-progress message at $GIT_DIR/TAG_EDITMSG is deleted before the error is displayed. In Git 2.42, Git delays deleting the TAG_EDITMSG until after the tag is successfully written, allowing you to recover your work later on.

    [source]

  • In other git tag-related news, this release comes with a fix for a subtle bug that appeared when listing tags. git tag can list existing tags with the -l option (or when invoked with no arguments). You can further refine those results to only show tags which point at a given object with the --points-at option.

    But what if you have one or more tags that point at the given object through one or more other tags instead of directly? Previous versions of Git would fail to report those tags. Git 2.42 addresses this by dereferencing tags through multiple layers before determining whether or not it points to a given object.

    [source]

  • Finally, back in Git 2.38, git cat-file --batch picked up a new -z flag, allowing you to specify NUL-delimited input instead of delimiting your input with a standard newline. This flag is useful when issuing queries which themselves contain newlines, like trying to read the contents of some blob by path, if the path contains newlines.

    But the new -z option only changed the rules for git cat-file‘s input, leaving the output still delimited by newlines. Ordinarily, this won’t cause any problems. But if git cat-file can’t locate an object, it will print out ” missing”, followed by a newline.

    If the given query itself contains a newline, the result is unparseable. To address this, git cat-file has a new mode, -Z (as opposed to its lowercase variant, -z) which changes both the input and output to be NUL-delimited.

    [source]

The rest of the iceberg

That’s just a sample of changes from the latest release. For more, check out the release notes for 2.42, or any previous version in the Git repository.

Notes


  1. Doing so would introduce a directory/file-conflict. Since Git stores loose tags at paths like $GIT_DIR/refs/tags/foo/bar, it would be impossible to store a tag foo, since it would need to live at $GIT_DIR/refs/tags/foo, which already exists as a directory. 

The post Highlights from Git 2.42 appeared first on The GitHub Blog.

Highlights from Git 2.41

Post Syndicated from Taylor Blau original https://github.blog/2023-06-01-highlights-from-git-2-41/

The open source Git project just released Git 2.41 with features and bug fixes from over 95 contributors, 29 of them new. We last caught up with you on the latest in Git back when 2.40 was released.

To celebrate this most recent release, here’s GitHub’s look at some of the most interesting features and changes introduced since last time.

Improved handling of unreachable objects

At the heart of every Git repository lies a set of objects. For the unfamiliar, you can learn about the intricacies of Git’s object model in this post. In general, objects are the building blocks of your repository. Blobs represent the contents of an individual file, and trees group many blobs (and other trees!) together, representing a directory. Commits tie everything together by pointing at a specific tree, representing the state of your repository at the time when the commit was written.

Git objects can be in one of two states, either “reachable” or “unreachable.” An object is reachable when you can start at some branch or tag in your repository and “walk” along history, eventually ending up at that object. Walking merely means looking at an individual object, and seeing what other objects are immediately related to it. A commit has zero or more other commits which it refers to as parents. Conversely, trees point to many blobs or other trees that make up their contents.

Objects are in the “unreachable” state when there is no branch or tag you could pick as a starting point where a walk like the one above would end up at that object. Every so often, Git decides to remove some of these unreachable objects in order to compress the size of your repository. If you’ve ever seen this message:

Auto packing the repository in background for optimum performance.
See "git help gc" for manual housekeeping.

or run git gc directly, then you have almost certainly removed unreachable objects from your repository.

But Git does not necessarily remove unreachable objects from your repository the first time git gc is run. Since removing objects from a live repository is inherently risky1, Git imposes a delay. An unreachable object won’t be eligible for deletion until it has not been written since a given (via the –prune argument) cutoff point. In other words, if you ran git gc --prune=2.weeks.ago, then:

  • All reachable objects will get collected together into a single pack.
  • Any unreachable objects which have been written in the last two weeks will be stored separately.
  • Any remaining unreachable objects will be discarded.

Until Git 2.37, Git kept track of the last write time of unreachable objects by storing them as loose copies of themselves, and using the object file’s mtime as a proxy for when the object was last written. However, storing unreachable objects as loose until they age out can have a number of negative side-effects. If there are many unreachable objects, they could cause your repository to balloon in size, and/or exhaust the available inodes on your system.

Git 2.37 introduced “cruft packs,” which store unreachable objects together in a packfile, and use an auxiliary *.mtimes file stored alongside the pack to keep track of object ages. By storing unreachable objects together, Git prevents inode exhaustion, and allows unreachable objects to be stored as deltas.

Diagram of a cruft pack, along with its corresponding *.idx and *.mtimes file.

The figure above shows a cruft pack, along with its corresponding *.idx and *.mtimes file. Storing unreachable objects together allows Git to store your unreachable data more efficiently, without worry that it will put strain on your system’s resources.

In Git 2.41, cruft pack generation is now on by default, meaning that a normal git gc will generate a cruft pack in your repository. To learn more about cruft packs, you can check out our previous post, “Scaling Git’s garbage collection.”

[source]

On-disk reverse indexes by default

Starting in Git 2.41, you may notice a new kind of file in your repository’s .git/objects/pack directory: the *.rev file.

This new file stores information similar to what’s in a packfile index. If you’ve seen a file in the pack directory above ending in *.idx, that is where the pack index is stored.

Pack indexes map between the positions of all objects in the corresponding pack among two orders. The first is name order, or the index at which you’d find a given object if you sorted those objects according to their object ID (OID). The other is pack order, or the index of a given object when sorting by its position within the packfile itself.

Git needs to translate between these two orders frequently. For example, say you want Git to print out the contents of a particular object, maybe with git cat-file -p. To do this, Git will look at all *.idx files it knows about, and use a binary search to find the position of the given object in each packfile’s name order. When it finds a match, it uses the *.idx to quickly locate the object within the packfile itself, at which point it can dump its contents.

But what about going the other way? How does Git take a position within a packfile and ask, “What object is this”? For this, it uses the reverse index, which maps objects from their pack order into the name order. True to its name, this data structure is the inverse of the packfile index mentioned above.

representation of the reverse index

The figure above shows a representation of the reverse index. To discover the lexical (index) position of, say, the yellow object, Git reads the corresponding entry in the reverse index, whose value is the lexical position. In this example, the yellow object is assumed to be the fourth object in the pack, so Git reads the fourth entry in the .rev file, whose value is 1. Reading the corresponding value in the *.idx file gives us back the yellow object.

In previous versions of Git, this reverse index was built on-the-fly by storing a list of pairs (one for each object, each pair contains that object’s position in name and packfile order). This approach has a couple of drawbacks, most notably that it takes time and memory in order to materialize and store this structure.

In Git 2.31, the on-disk reverse index was introduced. It stores the same contents as above, but generates it once and stores the result on disk alongside its corresponding packfile as a *.rev file. Pre-computing and storing reverse indexes can dramatically speed-up performance in large repositories, particularly for operations like pushing, or determining the on-disk size of an object.

In Git 2.41, Git will now generate these reverse indexes by default. This means that the next time you run git gc on your repository after upgrading, you should notice things get a little faster. When testing the new default behavior, the CPU-intensive portion of a git push operation saw a 1.49x speed-up when pushing the last 30 commits in torvalds/linux. Trivial operations, like computing the size of a single object with git cat-file --batch='%(objectsize:disk)' saw an even greater speed-up of nearly 77x.

To learn more about on-disk reverse indexes, you can check out another previous post, “Scaling monorepo maintenance,” which has a section on reverse indexes.

[source]


  • You may be familiar with Git’s credential helper mechanism, which is used to provide the required credentials when accessing repositories stored behind a credential. Credential helpers implement support for translating between Git’s credential helper protocol and a specific credential store, like Keychain.app, or libsecret. This allows users to store credentials using their preferred mechanism, by allowing Git to communicate transparently with different credential helper implementations over a common protocol.Traditionally, Git supports password-based authentication. For services that wish to authenticate with OAuth, credential helpers typically employ workarounds like passing the bearer token through basic authorization instead of authenticating directly using bearer authorization.

    Credential helpers haven’t had a mechanism to understand additional information necessary to generate a credential, like OAuth scopes, which are typically passed over the WWW-Authenticate header.

    In Git 2.41, the credential helper protocol is extended to support passing WWW-Authenticate headers between credential helpers and the services that they are trying to authenticate with. This can be used to allow services to support more fine-grained access to Git repositories by letting users scope their requests.

    [source]

  • If you’ve looked at a repository’s branches page on GitHub, you may have noticed the indicators showing how many commits ahead and behind a branch is relative to the repository’s default branch. If you haven’t noticed, no problem: here’s a quick primer. A branch is “ahead” of another when it has commits that the other side doesn’t. The amount ahead it is depends on the number of unique such commits. Likewise, a branch is “behind” another when it is missing commits that are unique to the other side.

    Previous versions of Git allowed this comparison by running two reachability queries: git rev-list --count main..my-feature (to count the number of commits unique to my-feature) and git rev-list --count my-feature..main (the opposite). This works fine, but involves two separate queries, which can be awkward. If comparing many branches against a common base (like on the /branches page above), Git may end up walking over the same commits many times.

    In Git 2.41, you can now ask for this information directly via a new for-each-ref formatting atom, %(ahead-behind:<base>). Git will compute its output using only a single walk, making it far more efficient than in previous versions.

    For example, suppose I wanted to list my unmerged topic branches along with how far ahead and behind they are relative to upstream’s mainline. Before, I would have had to write something like:

    $ git for-each-ref --format='%(refname:short)' --no-merged=origin/HEAD \
      refs/heads/tb |
      while read ref
      do
        ahead="$(git rev-list --count origin/HEAD..$ref)"
        behind="$(git rev-list --count $ref..origin/HEAD)"
        printf "%s %d %d\n" "$ref" "$ahead" "$behind"
      done | column -t
    tb/cruft-extra-tips 2 96
    tb/for-each-ref--exclude 16 96
    tb/roaring-bitmaps 47 3
    

    which takes more than 500 milliseconds to produce its results. Above, I first ask git for-each-ref to list all of my unmerged branches. Then, I loop over the results, computing their ahead and behind values manually, and finally format the output.

    In Git 2.41, the same can be accomplished using a much simpler invocation:

    $ git for-each-ref --no-merged=origin/HEAD \
      --format='%(refname:short) %(ahead-behind:origin/HEAD)' \
      refs/heads/tb/ | column -t
    tb/cruft-extra-tips 2 96
    tb/for-each-ref--exclude 16 96
    tb/roaring-bitmaps 47 3
    [...]
    

    That produces the same output (with far less scripting!), and performs a single walk instead of many. By contrast to earlier versions, the above takes only 28 milliseconds to produce output, a more than 17-fold improvement.

    [source]

  • When fetching from a remote with git fetch, Git’s output will contain information about which references were updated from the remote, like:
    + 4aaf690730..8cebd90810 my-feature -> origin/my-feature (forced update)
    

    While convenient for a human to read, it can be much more difficult for a machine to parse. Git will shorten the reference names included in the update, doesn’t print the full before and after values of the reference being updated, and columnates its output, all of which make it more difficult to script around.

    In Git 2.41, git fetch can now take a new --porcelain option, which changes its output to a form that is much easier to script around. In general, the --porcelain output looks like:

    <flag> <old-object-id> <new-object-id> <local-reference>
    

    When invoked with --porcelain, git fetch does away with the conveniences of its default human readable output, and instead emits data that is much easier to parse. There are four fields, each separated by a single space character. This should make it much easier to script around the output of git fetch.

    [source, source]

  • Speaking of git fetch, Git 2.41 has another new feature that can improve its performance: fetch.hideRefs. Before we get into it, it’s helpful to recall our previous coverage of git rev-list’s --exclude-hidden option. If you’re new around here, don’t worry: this option was originally introduced to improve the performance of Git’s connectivity check, the process that checks that an incoming push is fully connected, and doesn’t reference any objects that the remote doesn’t already have, or are included in the push itself.

    Git 2.39 sped-up the connectivity check by ignoring parts of the repository that weren’t advertised to the pusher: its hidden references. Since these references weren’t advertised to the pusher, it’s unlikely that any of these objects will terminate the connectivity check, so keeping track of them is usually just extra bookkeeping.

    Git 2.41 introduces a similar option for git fetch on the client side. By setting fetch.hideRefs appropriately, you can exclude parts of the references in your local repository from the connectivity check that your client performs to make sure the server didn’t send you an incomplete set of objects.

    When checking the connectedness of a fetch, the search terminates at the branches and tags from any remote, not just the one you’re fetching from. If you have a large number of remotes, this can take a significant amount of time, especially on resource-constrained systems.

    In Git 2.41, you can narrow the endpoints of the connectivity check to focus just on the remote you’re fetching from. (Note that transfer.hideRefs values that start with ! are interpreted as un-hiding those references, and are applied in reverse order.) If you’re fetching from a remote called $remote, you can do this like so:

    $ git -c fetch.hideRefs=refs -c fetch.hideRefs=!refs/remotes/$remote \
    fetch $remote
    

    The above first hides every reference from the connectivity check (fetch.hideRefs=refs) and then un-hides just the ones pertaining to that specific remote (fetch.hideRefs=!refs/remotes/$remote). On a resource constrained machine with repositories that have many remote tracking references, this takes the time to complete a no-op fetch from 20 minutes to roughly 30 seconds.

    [source]

  • If you’ve ever been on the hunt for corruption in your repository, you are undoubtedly aware of git fsck. This tool is used to check that the objects in your repository are intact and connected. In other words, that your repository doesn’t have any corrupt or missing objects.git fsck can also check for more subtle forms of repository corruption, like malicious looking .gitattributes or .gitmodules files, along with malformed objects (like trees that are out of order, or commits with a missing author). The full suite of checks it performs can be found under the fsck. configuration.

    In Git 2.41, git fsck learned how to check for corruption in reachability bitmaps and on-disk reverse indexes. These checks detect and warn about incorrect trailing checksums, which indicate that the preceding data has been mangled. When examining on-disk reverse indexes, git fsck will also check that the *.rev file holds the correct values.

    To learn more about the new kinds of fsck checks implemented, see the git fsck documentation.

    [source, source]

The whole shebang

That’s just a sample of changes from the latest release. For more, check out the release notes for 2.41, or any previous version in the Git repository.

Notes


  1. The risk is based on a number of factors, most notably that a concurrent writer will write an object that is either based on or refers to an unreachable object. This can happen when receiving push whose content depends on an object that git gc is about to remove. If a new object is written which references the deleted one, the repository can become corrupt. If you’re curious to learn more, this section is a good place to start. 

Highlights from Git 2.40

Post Syndicated from Taylor Blau original https://github.blog/2023-03-13-highlights-from-git-2-40/

The open source Git project just released Git 2.40 with features and bug fixes from over 88 contributors, 30 of them new.

We last caught up with you on the latest in Git when 2.39 was released. To celebrate this most recent release, here’s GitHub’s look at some of the most interesting features and changes introduced since last time.


  • Longtime readers will recall our coverage of git jump from way back in our Highlights from Git 2.19 post. If you’re new around here, don’t worry: here’s a brief refresher.

    git jump is an optional tool that ships with Git in its contrib directory. git jump wraps other Git commands, like git grep and feeds their results into Vim’s quickfix list. This makes it possible to write something like git jump grep foo and have Vim be able to quickly navigate between all matches of “foo” in your project.

    git jump also works with diff and merge. When invoked in diff mode, the quickfix list is populated with the beginning of each changed hunk in your repository, allowing you to quickly scan your changes in your editor before committing them. git jump merge, on the other hand, opens Vim to the list of merge conflicts.

    In Git 2.40, git jump now supports Emacs in addition to Vim, allowing you to use git jump to populate a list of locations to your Emacs client. If you’re an Emacs user, you can try out git jump by running:

    M-x grepgit jump --stdout grep foo

    [source]

  • If you’ve ever scripted around a Git repository, you may be familiar with Git’s cat-file tool, which can be used to print out the contents of arbitrary objects.

    Back when v2.38.0 was released, we talked about how cat-file gained support to apply Git’s mailmap rules when printing out the contents of a commit. To summarize, Git allows rewriting name and email pairs according to a repository’s mailmap. In v2.38.0, git cat-file learned how to apply those transformations before printing out object contents with the new --use-mailmap option.

    But what if you don’t care about the contents of a particular object, and instead want to know the size? For that, you might turn to something like --batch-check=%(objectsize), or -s if you’re just checking a single object.

    But you’d be mistaken! In previous versions of Git, both the --batch-check and -s options to git cat-file ignored the presence of --use-mailmap, leading to potentially incorrect results when the name/email pairs on either side of a mailmap rewrite were different lengths.

    In Git 2.40, this has been corrected, and git cat-file -s and --batch-check with will faithfully report the object size as if it had been written using the replacement identities when invoked with --use-mailmap.

    [source]

  • While we’re talking about scripting, here’s a lesser-known Git command that you might not have used: git check-attr. check-attr is used to determine which gitattributes are set for a given path.

    These attributes are defined and set by one or more .gitattributes file(s) in your repository. For simple examples, it’s easy enough to read them off from a .gitattributes file, like this:

    $ head -n 2 .gitattributes 
    * whitespace=!indent,trail,space 
    *.[ch] whitespace=indent,trail,space diff=cpp
    

    Here, it’s relatively easy to see that any file ending in *.c or *.h will have the attributes set above. But what happens when there are more complex rules at play, or your project is using multiple .gitattributes files? For those tasks, we can use check-attr:

    $ git check-attr -a git.c 
    git.c: diff: cpp 
    git.c: whitespace: indent,trail,space
    

    In the past, one crucial limitation of check-attr is that it required an index, meaning that if you wanted to use check-attr in a bare repository, you had to resort to temporarily reading in the index, like so:

    TEMP_INDEX="$(mktemp ...)" 
    
    git read-tree --index-output="$TEMP_INDEX" HEAD 
    GIT_INDEX_FILE="$TEMP_INDEX" git check-attr ... 
    

    This kind of workaround is no longer required in Git 2.40 and newer. In Git 2.40, check-attr supports a new --source= to scan for .gitattributes in, meaning that the following will work as an alternative to the above, even in a bare repository:

    $ git check-attr -a --source=HEAD^{tree} git.c 
    git.c: diff: cpp 
    git.c: whitespace: indent,trail,space
    

    [source]

  • Over the years, there has been a long-running effort to rewrite old parts of Git from their original Perl or Shell implementations into more modern C equivalents. Aside from being able to use Git’s own APIs natively, consolidating Git commands into a single process means that they are able to run much more quickly on platforms that have a high process start-up cost, such as Windows.

    On that front, there are a couple of highlights worth mentioning in this release:

    In Git 2.40, git bisect is now fully implemented in C as a native builtin. This is the result of years of effort from many Git contributors, including a large handful of Google Summer of Code and Outreachy students.

    Similarly, Git 2.40 retired the legacy implementation of git add --interactive, which also began as a Shell script and was re-introduced as a native builtin back in version 2.26, supporting both the new and old implementation behind an experimental add.interactive.useBuiltin configuration.

    Since that default has been “true” since version 2.37, the Git project has decided that it is time to get rid of the now-legacy implementation entirely, marking the end of another years-long effort to improve Git’s performance and reduce the footprint of legacy scripts.

    [source, source]

  • Last but not least, there are a few under-the-hood improvements to Git’s CI infrastructure. Git has a handful of long-running Windows-specific CI builds that have been disabled in this release (outside of the git-for-windows repository). If you’re a Git developer, this means that your CI runs should complete more quickly, and consume fewer resources per push.

    On a similar front, you can now configure whether or not pushes to branches that already have active CI jobs running should cancel those jobs or not. This may be useful when pushing to the same branch multiple times while working on a topic.

    This can be configured using Git’s ci-config mechanism, by adding a special script called skip-concurrent to a branch called ci-config. If your fork of Git has that branch then Git will consult the relevant scripts there to determine whether CI should be run concurrently or not based on which branch you’re working on.

    [source, source]

The rest of the iceberg

That’s just a sample of changes from the latest release. For more, check out the release notes for 2.40, or any previous version in the Git repository.

Highlights from Git 2.39

Post Syndicated from Taylor Blau original https://github.blog/2022-12-12-highlights-from-git-2-39/

The open source Git project just released Git 2.39, with features and bug fixes from over 86 contributors, 31 of them new. We last caught up with you on the latest in Git back when 2.38 was released.

To celebrate this most recent release, here’s GitHub’s look at some of the most interesting features and changes introduced since last time.


If you use Git on the command-line, you have almost certainly used git log to peruse your project’s history. But you may not be as familiar with its cousin, git shortlog.

git shortlog is used to summarize the output produced by git log. For example, many projects (including Git1) use git shortlog -ns to produce a list of unique contributors in a release, along with the number of commits they authored, like this:

$ git shortlog -ns v2.38.0.. | head -10
   166  Junio C Hamano
   118  Taylor Blau
   115  Ævar Arnfjörð Bjarmason
    43  Jeff King
    26  Phillip Wood
    21  René Scharfe
    15  Derrick Stolee
    11  Johannes Schindelin
     9  Eric Sunshine
     9  Jeff Hostetler
  [...]

We’ve talked about git shortlog in the past, most recently when 2.29 was released to show off its more flexible --group option, which allows you to group commits by fields other than their author or committer. For example, something like:

$ git shortlog -ns --group=author --group=trailer:co-authored-by

would count each commit to its author as well as any individuals in the Co-authored-by trailer.

This release, git shortlog became even more flexible by learning how to aggregate commits based on arbitrary formatting specifiers, like the ones mentioned in the pretty formats section of Git’s documentation.

One neat use is being able to get a view of how many commits were committed each month during a release cycle. Before, you might have written something like this monstrosity:

$ git log v2.38.0.. --date='format:%Y-%m' --format='%cd' | sort | uniq -c

There, --date='format:%Y-%m' tells Git to output each date field like YYYY-MM, and --format='%cd' tells Git to output only the committer date (using the aforementioned format) when printing each commit. Then, we sort the output, and count the number of unique values.

Now, you can ask Git to do all of that for you, by writing:

$ git shortlog v2.38.0.. --date='format:%Y-%m' --group='%cd' -s
     2  2022-08
    47  2022-09
   405  2022-10
   194  2022-11
     5  2022-12

Where -s tells git shortlog output a summary where the left-hand column is the number of commits attributed to each unique group (in this case, the year and month combo), and the right-hand column is the identity of each group itself.

Since you can pass any format specifier to the --group option, the flexibility here is limited only by the pretty formats available, and your own creativity.

[source]


Returning readers may remember our discussion on Git’s new object pruning mechanism, cruft packs. In case you’re new around here, no problem: here’s a refresher.

When you want to tell Git to remove unreachable objects (those which can’t be found by walking along the history of any branch or tag), you might run something like:

$ git gc --cruft --prune=5.minutes.ago

That instructs Git to divvy your repository’s objects into two packs: one containing reachable objects, and another2 containing unreachable objects modified within the last five minutes. This makes sure that a git gc process doesn’t race with incoming reference updates that might leave the repository in a corrupt state. As those objects continue to age, they will be removed from the repository via subsequent git gc invocations. For (many) more details, see our post, Scaling Git’s garbage collection.

Even though the --prune=<date> mechanism of adding a grace period before permanently removing objects from the repository is relatively effective at avoiding corruption in practice, it is not completely fool-proof. And when we do encounter repository corruption, it is useful to have the missing objects close by to allow us to recover a corrupted repository.

In Git 2.39, git repack learned a new option to create an external copy of any objects removed from the repository: --expire-to. When combined with --cruft options like so:

$ git repack --cruft --cruft-expiration=5.minutes.ago -d --expire-to=../backup.git

any unreachable objects which haven’t been modified in the last five minutes are collected together and stored in a packfile that is written to ../backup.git. Then, objects you may be missing after garbage collection are readily available in the pack stored in ../backup.git.

These ideas are identical to the ones described in the “limbo repository” section of our Scaling Git’s garbage collection blog post. At the time of writing that post, those patches were still under review. Thanks to careful feedback from the Git community, the same tools that power GitHub’s own garbage collection are now available to you via Git 2.39.

On a related note, careful readers may have noticed that in order to write a cruft pack, you have to explicitly pass --cruft to both git gc and git repack. This is still the case. But in Git 2.39, users who enable the feature.experimental configuration and are running the bleeding edge of Git will now use cruft packs by default when running git gc.

[source, source]


If you’ve been following along with the gradual introduction of sparse index compatibility in Git commands, this one’s for you.

In previous versions of Git, using git grep --cached (to search through the index instead of the blobs in your working copy) you might have noticed that Git first has to expand your index when using the sparse index feature.

In large repositories where the sparse portion of the repository is significantly smaller than the repository as a whole, this adds a substantial delay before git grep --cached outputs any matches.

Thanks to the work of Google Summer of Code student, Shaoxuan Yuan, this is no longer the case. This can lead to some dramatic performance enhancements: when searching in a location within your sparse cone (for example., git grep --cached $pattern -- 'path/in/sparse/cone'), Git 2.39 outperforms the previous version by nearly 70%.

[source]


This one is a little bit technical, but bear with us, since it ends with a nifty performance optimization that may be coming to a Git server near you.

Before receiving a push, a Git server must first tell the pusher about all of the branches and tags it already knows about. This lets the client omit any objects that it knows the server already has, and results in less data being transferred overall.

Once the server has all of the new objects, it ensures that they are “connected” before entering them into the repository. Generally speaking, this “connectivity check” ensures that none of the new objects mention nonexistent objects; in other words, that the push will not corrupt the repository.

One additional factor worth noting is that some Git servers are configured to avoid advertising certain references. But those references are still used as part of the connectivity check. Taking into account the extra work necessary to incorporate those hidden references into the connectivity check, the additional runtime adds up, especially if there are a large number of hidden references.

In Git 2.39, the connectivity check was enhanced to only consider the references that were advertised, in addition to those that were pushed. In a test repository with nearly 7 million references (only ~3% of which are advertised), the resulting speed-up makes Git 2.39 outperform the previous version by roughly a factor of 4.5.

As your server operators upgrade to the latest version of Git, you should notice an improvement in how fast they are able to process incoming pushes.

[source]


Last but not least, let’s round out our recap of some of the highlights from Git 2.39 with a look at a handful of new security measures.

Git added two new “defense-in-depth” changes in the latest release. First, git apply was updated to refuse to apply patches larger than ~1 GiB in size to avoid potential integer overflows in the apply code. Git was also updated to correctly redact sensitive header information with GIT_TRACE_CURL=1 or GIT_CURL_VERBOSE=1 when using HTTP/2.

If you happen to notice a security vulnerability in Git, you can follow Git’s own documentation on how to responsibly report the issue. Most importantly, if you’ve ever been curious about how Git handles coordinating and disclosing embargoed releases, this release cycle saw a significant effort to codify and write down exactly how Git handles these types of issues.

To read more about Git’s disclosure policy (and learn about how to participate yourself!), you can find more in the repository.

[source, source, source]

The rest of the iceberg

That’s just a sample of changes from the latest release. For more, check out the release notes for 2.39, or any previous version in the Git repository.

Notes


  1. It’s true. In fact, the list at the bottom of the release announcement is generated by running git shortlog on the git log --no-merges between the last and current release. Calculating the number of new and existing contributors in each release is also powered by git shortlog
  2. This is a bit of an oversimplification. In addition to storing the object modification times in an adjacent *.mtimes file, the cruft pack also contains unreachable objects that are reachable from anything modified within the last five minutes, regardless of its age. See the “mitigating object deletion raciness” section for more. 

Highlights from Git 2.38

Post Syndicated from Taylor Blau original https://github.blog/2022-10-03-highlights-from-git-2-38/

The open source Git project just released Git 2.38, with features and bug fixes from over 92 contributors, 24 of them new. We last caught up with you on the latest in Git back when 2.37 was released.

To celebrate this most recent release, here’s GitHub’s look at some of the most interesting features and changes introduced since last time.

A repository management tool for large repositories

We talk a lot about performance in Git, especially in the context of large repositories. Returning readers of these blog posts will no doubt be familiar with the dozens of performance optimizations that have landed in Git over the years.

But with so many features to keep track of, it can be easy to miss out some every now and then (along with their corresponding performance gains).

Git’s new built-in repository management tool, Scalar, attempts to solve that problem by curating and configuring a uniform set of features with the biggest impact on large repositories. To start using it, you can either clone a new repository with scalar clone:

$ scalar clone /path/to/repo

Or, you can use the --full-clone option if you don’t want to start out with a sparse checkout. To apply Scalar’s recommended configuration to a clone you already have, you can instead run:

$ cd /path/to/repo
$ scalar register

At the time of writing, Scalar’s default configured features include:

Scalar’s configuration is updated as new (even experimental!) features are introduced to Git. To make sure you’re always using the latest and greatest, be sure to run scalar reconfigure /path/to/repo after a new release to update your repository’s config (or scalar reconfigure -a to update all of your Scalar-registered repositories at once).

Git 2.38 is the first time Scalar has been included in the release, but it has actually existed for much longer. Check back soon for a blog post on how Scalar came to be—from its early days as a standalone .NET application to its journey into core Git!

[source]

Rebase dependent branches with –update-refs

When working on a large feature, it’s often helpful to break up the work across multiple branches that build on each other.

But these branches can become cumbersome to manage when you need to rewrite history in an earlier branch. Since each branch depends on the previous ones, rewriting commits in one branch will leave the subsequent branches disconnected from history after rewriting.

In case that didn’t quite make sense, let’s walk through an example.

Suppose that you are working on a feature (my-feature), but want to break it down into a few distinct parts (maybe for ease of review, or to ensure you’re deploying it safely, etc.). Before you share your work with your colleagues, you build the entire feature up front to make sure that the end-result is feasible, like so.

$ git log --oneline origin/main..HEAD
741a3174683 (HEAD -> my-feature/part-three) Part 3: all done!
1ff073007eb Part 3: step two
880c07e326f Part 3: step one
40529bd11dc (my-feature/part-two) Part 2: step two
0a92cc3acd8 Part 2: step one
eed018043ba (my-feature/part-one) Part 1: step three
646c870d69e Part 1: step two
9147f6d2eb4 Part 1: step one

In the example below, the my-feature/part-three branch resembles what you imagine the final state will look like. But the intermediate check-points (my-feature/part-one, and so on) represent the chunks you intend to submit for code review.

After you submit everything, what happens if you want to make a change to one of the patches in part one?

You might create a fixup! commit on top, but squashing that patch into the one you wanted to change from part one will cause parts two and three to become disconnected:

Creating a fixup commit that causes parts two and three to become disconnected

Notice that after we squashed our fix into “Part 1: step one,” the subsequent branches vanished from history. That’s because they didn’t get updated to depend on the updated tip of my-feature/part-one after rebasing.

You could go through and manually checkout each branch, resetting each to the right commit. But this can get cumbersome quickly if you have a lot of branches, are making frequent changes, or both.

Git 2.38 ships with a new option to git rebase called --update-refs that knows how to perform these updates for you. Let’s try that same example again with the new version of Git.

Rebasing with the new viersion of Git, which updates each branch for you.

Because we used --update-refs, git rebase knew to update our dependent branches, so our history remains intact without having to manually update each individual branch.

If you want to use this option every time you rebase, you can run git config --global rebase.updateRefs true to have Git act as if the --update-refs option is always given.

[source]

Tidbits

This release coincides with the Git project’s participation in the annual Google Summer of Code program. This year, the Git project mentored two students, Shaoxuan Yuan, and Abhradeep Chakraborty, working on sparse index integration and various improvements to reachability bitmaps, respectively.

  • Shaoxuan’s first contribution was integrating the git rm command with the sparse index. The sparse index is a relatively new Git feature that enables Git to shrink the size of its index data structure to only track the contents of your sparse checkout, instead of the entire repository. Long-time readers will remember that Git commands have been converted to be compatible with the sparse-index one-by-one. Commands that aren’t compatible with the sparse index need to temporarily expand the index to cover the entire repository, leading to slow-downs when working in a large repository.

    Shaoxuan’s work made the git rm command compatible with the sparse index, causing it to only expand the index when necessary, bringing Git closer to having all commands be compatible with the sparse index by default.

    [source]

  • Shaoxuan also worked on improving git mv‘s behavior when moving a path from within the sparse checkout definition (sometimes called a “cone”) to outside of the sparse checkout. There were a number of corner cases that required careful reasoning, and curious readers can learn more about exactly how this was implemented in the patches linked below.

    [source]

  • Abhradeep worked on adding a new “lookup table” extension to Git’s reachability bitmap index. For those unfamiliar, this index (stored in a .bitmap file) associates a set of commits to a set of bitmaps, where each bit position corresponds to an object. A 1 bit indicates that a commit can reach the object specified by that bit position, and a 0 indicates that it cannot.

    But .bitmap files do not list their selected commits in a single location. Instead, they prefix each bitmap with the object ID of the commit it corresponds to. That means that in order to know what set of commits are covered by a .bitmap, Git must read the entire contents of the file to discover the set of bitmapped commits.

    Abhradeep addressed this shortcoming by adding an optional “lookup table” at the end of the .bitmap format, which provides a concise list of selected commits, as well as the offset of their corresponding bitmaps within the file. This provided some speed-ups across a handful of benchmarks, making bitmaps faster to load and use, especially for large repositories.

    [source]

  • Abhradeep also worked on sprucing up the technical documentation for the .bitmap format. So if you have ever been curious about or want to hack on Git’s bitmap internals, now is the time!

    [source]

For more about these projects, you can check out each contributor’s final blog posts here and here. Thank you, Shaoxuan, and Abhradeep!

Now that we’ve covered a handful of changes contributed by Google Summer of Code students, let’s take a look at some changes in this release of Git from other Git contributors.

  • You may not be familiar with Git’s merge-tree command, which historically was used to compute trivial three-way merges using Git’s recursive merge strategy. In Git 2.38, this command now knows how to integrate with the new ort merge strategy, allowing it to compute non-trivial merges without touching the index or working copy.

    The existing mode is still available behind a (deprecated) --trivial-merge option. When the new --write-tree mode is used, merge-tree takes two branches to merge, and computes the result using the ort strategy, all without touching the working copy or index. It outputs the resulting tree’s object ID, along with some information about any conflicts it encountered.

    As an aside, we at GitHub recently started using merge-ort to compute merges on GitHub.com more than an order of magnitude faster than before. We had previously used the implementation in libgit2 in order to compute merges without requiring a worktree, since GitHub stores repositories as bare, meaning we do not have a worktree to rely on. These changes will make their way to GitHub Enterprise beginning with verion 3.7.

    [source]

  • Bare Git repositories can be stored in and distributed with other Git repositories. This is often convenient, for example, as an easy mechanism to distribute Git repositories for use as test fixtures.

    When using repositories from less-than-trustworthy sources, this can also present a security risk. Git repositories often execute user-defined programs specified via the $GIT_DIR/config file. For example, core.pager defines which pager program Git uses, and core.editor defines which editor Git opens when you want to write a commit message (among other things).

    There are other examples, but an often-discussed one is the core.fsmonitor configuration, which can be used to specify a path to a filesystem monitoring hook. Because Git often needs to query the state of the filesystem, this hook (when configured) is invoked many times, including from git status, which people commonly script around in their shell prompt.

    This means that it’s possible to convince a victim to run arbitrary code by convincing them to clone a repository with a malicious bare repository embedded inside of it. If they change their working directory into the malicious repository within (since you cannot embed a bare repository at the top-level directory of a repository) and run some Git command, then they are likely to execute the script specified by core.fsmonitor (or any other configuration that specifies a command to execute).

    For this reason, the new safe.bareRepository configuration was introduced. When set to “explicit,” Git will only work with bare repositories specified by the top-level --git-dir argument. Otherwise, when set to “all” (which is the default), Git will continue to work with all bare repositories, embedded or not.

    It is worth noting that setting safe.bareRepository to “explicit” is only required if you worry that you may be cloning malicious repositories and executing Git commands in them.

    [source]

  • git grep learned a new -m option (short for --max-count), which behaves like GNU grep‘s options of the same name. This new option limits the number of matches shown per file. This can be especially useful when combined with other options, like -C or -p (which show code context, or the name of the function which contains each match).

    You could, for example, combine all three of these options to show a summary of how some function is called by many different files in your project. Git has a handful of objects that contain the substring oid_object_info. If you want to look at how callers across different files are structured without seeing more than one example from the same file, you can now run:

    $ git grep -C3 -p -m1 oid_object_info

    [source]

  • If you’ve ever scripted around the directory contents of your Git repository, there’s no doubt that you’ve encountered the git ls-files command. Unlike ls-tree (which lists the contents of a tree object), ls-files lists the contents of the index, the working directory, or both.

    There are already lots of options which can further specify what does or doesn’t get printed in ls-files‘s output. But its output was not easily customizable without additional scripting.

    In Git 2.38, that is no longer the case, with ls-files‘s new --format option. You can now customize how each entry is printed, with fields to print an object’s name and mode, as well as more esoteric options, like its stage in the index, or end-of-line (EOL) behavior.

    [source]

  • git cat-file also learned a new option to respect the mailmap when printing the contents of objects with identifiers in them. This feature was contributed by another Google Summer of Code student, this time working on behalf of GitLab!

    For the uninitiated, the mailmap is a feature which allows mapping name and email pairs to their canonical values, which can be useful if you change your name or email and want to retain authorship over historical commits without rewriting history.

    git show, and many other tools already understand how to remap identities under the mailmap (for example, git show‘s %aN and %aE format placeholders print the mailmapped author name and email, respectively, as opposed to %an and %ae, which don’t respect the mailmap). But git cat-file, which is a low-level command which prints the contents of objects, did not know how to perform this conversion.

    That meant that if you wanted to print a stream of objects, but transform any author, committer, or tagger identities according to the mailmap, you would have to pipe their contents through git show or similar. This is no longer the case, since git cat-file now understands the --[no]-use-mailmap option, meaning this transformation can be done before printing out object contents.

    [source]

  • Finally, Git’s developer documentation got an improvement in this most recent release, by adding a codified version of the Git community’s guidelines for code review. This document is a helpful resource for new and existing contributors to learn about the cultural norms around reviewing patches on the Git mailing list.

    If you’ve ever had the itch to contribute to the Git project, I highly encourage you to read the new reviewing guidelines (as well as the coding guidelines, and the “My First Contribution” document) and get started!

    [source]

The rest of the iceberg

That’s just a sample of changes from the latest release. For more, check out the release notes for 2.38, or any previous version in the Git repository.

Scaling Git’s garbage collection

Post Syndicated from Taylor Blau original https://github.blog/2022-09-13-scaling-gits-garbage-collection/

At GitHub, we store a lot of Git data: more than 18.6 petabytes of it, to be precise. That’s more than six times the size of the Library of Congress’s digital collections1. Most of that data comes from the contents of your repositories: your READMEs, source files, tests, licenses, and so on.

But some of that data is just junk: some bit of your repository that is no longer important. It could be a file that you force-pushed over, or the contents of a branch you deleted without merging. In general, this slice of repository data is anything that isn’t contained in at least one of your repository’s branches or tags. Normally, we don’t remove any unreachable data from repositories. But occasionally we do, usually to remove sensitive data, like passwords or SSH keys from your repository’s history.

The process for permanently removing unreachable objects from a repository’s history has a history of causing problems within GitHub, especially in busy repositories or ones with lots of objects. In this post, we’ll talk about what those problems were, why we had them, the tools we built to address them, and some interesting ways we’ve built on top of them. All of this work was contributed upstream to the open-source Git project. Let’s dive in.

Object reachability

In this post, we’re going to talk a lot about “reachable” and “unreachable” objects. You may have heard these terms before, but perhaps only casually. Since we’re going to use them a lot, it will help to have more concrete definitions of the two. An object is reachable when there is at least one branch or tag along which you can reach the object in question. An object is “reached” by crawling through history—from commits to their parents, commits to their root trees, and trees to their sub-trees and blobs. An object is unreachable when no such branch or tag exists.

Sample object graph showing commits, with arrows connecting them to their parents. A few commits have boxes that are connected to them, which represent the tips of branches and tags.

Here, we’re looking at a sample object graph. For simplicity, I’m only showing commits (identified here as circles). Arrows point from commits to their parent(s). A few commits have boxes that are connected to them, which represent the tips of branches and tags.

The parts of the graph that are colored blue are reachable, and the red parts are considered unreachable. You’ll find that if you start at any branch or tag, and follow its arrows, that all commits along that path are considered reachable. Note that unreachable commits which have reachable ones as parents (in our diagram above, anytime an arrow points from a red commit to a blue one) are still considered unreachable, since they are not contained within any branch or tag.

Unreachable objects can also appear in clusters that are totally disconnected from the main object graph, as indicated by the two lone red commits towards the right-hand side of the image.

Pruning unreachable objects

Normally, unreachable objects stick around in your repository until they are either automatically or manually cleaned up. If you’ve ever seen the message, “Auto packing the repository for optimum performance,” in your terminal, Git is doing this for you in the background. You can also trigger garbage collection manually by running:

$ git gc --prune=<date>

That tells Git to trigger a garbage collection and remove unreachable objects. But observant readers might notice the optional <date> parameter to the --prune flag. What is that? The short answer is that Git allows you to restrict which objects get permanently deleted based on the last time they were written. But to fully explain, we first need to talk a little bit about a race condition that can occur when removing objects from a Git repository.

Object deletion raciness

Normally, deleting an unreachable object from a Git repository should not be a notable event. Since the object is unreachable, it’s not part of any branch or tag, and so deleting it doesn’t change the repository’s reachable state. In other words, removing an unreachable object from a repository should be as simple as:

  1. Repacking the repository to remove any copies of the object in question (and recomputing any deltas that are based on that object).
  2. Removing any loose copies of the object that happen to exist.
  3. Updating any additional indexes (like the multi-pack index, or commit-graph) that depend on the (now stale) packs that were removed.

The racy behavior occurs when a repository receives one or more pushes during this process. The main culprit is that the server advertises its objects at a different point in time from processing the objects that the client sent based on that advertisement.

Consider what happens if Git decides (as part of running a git gc operation) that it wants to delete some unreachable object C. If C becomes reachable by some background reference update (e.g., an incoming push that creates a new branch pointing at C), it will then be advertised to any incoming pushes. If one of these pushes happens before C is actually removed, then the repository can end up in a corrupt state. Since the pusher will assume C is reachable (since it was part of the object advertisement), it is allowed to include objects that either reference or depend on C, without sending C itself. If C is then deleted while other reachable parts of the repository depend on it, then the repository will be left in a corrupt state.

Suppose the server receives that push before proceeding to delete C. Then, any objects from the incoming push that are related to it would be immediately corrupt. Reachable parts of the repository that reference C are no longer closed2 over reachability since C is missing. And any objects that are stored as a delta against C can no longer be inflated for the same reason.

Figure demonstrating that one side (responsible for garbage collecting the repository) decides that a certain object is unreachable, while another side makes that object reachable and accepts an incoming push based on that object—before the original side ultimately deletes that (now-reachable) object—leaving the repository in a corrupt state.

In case that was confusing, the above figure should help clear things up. The general idea is that one side (responsible for garbage collecting the repository) decides that a certain object is unreachable, while another side makes that object reachable and accepts an incoming push based on that object—before the original side ultimately deletes that (now-reachable) object—leaving the repository in a corrupt state.

Mitigating object deletion raciness

Git does not completely prevent this race from happening. Instead, it works around the race by gradually expiring unreachable objects based on the last time they were written. This explains the mysterious --prune=<date> option from a few sections ago: when garbage collecting a repository, only unreachable objects which haven’t been written since <date> are removed. Anything else (that is, the set of objects that have been written at least once since <date>) are left around.

The idea is that objects which have been written recently are more likely to become reachable again in the future, and would thus be more likely to be susceptible to the kind of race we talked about above if they were to be pruned. Objects which haven’t been written recently, on the other hand, are proportionally less likely to become reachable again, and so they are safe (or, at least, safer) to remove.

This idea isn’t foolproof, and it is certainly possible to run into the race we talked about earlier. We’ll discuss one such scenario towards the end of this post (along with the way we worked around it). But in practice, this strategy is simple and effective, preventing most instances of potential repository corruption.

Storing loose unreachable objects

But one question remains: how does Git keep track of the age of unreachable objects which haven’t yet aged out of the repository?

The answer, though simple, is at the heart of the problem we’re trying to solve here. Unreachable objects which have been written too recently to be removed from the repository are stored as loose objects, the individual object files stored in .git/objects. Storing these unreachable objects individually means that we can rely on their stat() modification time (hereafter, mtime) to tell us how recently they were written.

But this leads to an unfortunate problem: if a repository has many unreachable objects, and a large number of them were written recently, they must all be stored individually as loose objects. This is undesirable for a number of reasons:

  • Pairs of unreachable objects that share a vast majority of their contents must be stored separately, and can’t benefit from the kind of deduplication offered by packfiles. This can cause your repository to take up much more space than it otherwise would.
  • Having too many files (especially too many in a single directory) can lead to performance problems, including exhausting your system’s available inodes in the extreme case, leaving you unable to create new files, even if there may be space available for them.
  • Any Git operation which has to scan through all loose objects (for example, git repack -d, which creates a new pack containing just your repository’s unpacked objects) will slow down as there are more files to process.

It’s tempting to want to store all of a repository’s unreachable objects into a single pack. But there’s a problem there, too. Since all of the objects in a single pack share the same mtime (the mtime of the *.pack file itself), rewriting any single unreachable object has the effect of updating the mtimes of all of a repository’s unreachable objects. This is because Git optimizes out object writes for packed objects by simply updating the mtime of any pack(s) which contain that object. This makes it nearly impossible to expire any objects out of the repository permanently.

Cruft packs

To solve this problem, we turned to a long-discussed idea on the Git mailing list: cruft packs. The idea is simple: store an auxiliary list of mtime data alongside a pack containing just unreachable objects. To garbage collect a repository, Git places the unreachable objects in a pack. That pack is designated as a “cruft pack” because Git also writes the mtime data corresponding to each object in a separate file alongside that pack. This makes it possible to update the mtime of a single unreachable object without changing the mtimes of any other unreachable object.

To give you a sense of what this looks like in practice, here’s a small example:

a pack of Git objects (represented by rectangles of different colors)

The above figure shows a pack of Git objects (represented by rectangles of different colors), its pack index, and the new .mtimes file. Together, these three files make up what Git calls a “cruft pack,” and it’s what allows Git to store unreachable objects together, without needing a single file for each object.

So, how do they work? Git uses the cruft pack to store a collection of object mtimes together in an array stored in the *.mtimes file. In order to discover the mtime for an individual object in a pack, Git first does a binary search on the pack’s index to discover that object’s lexicographic index. Git can then use that offset to read a 4-byte, unsigned integer in the .mtimes file. The .mtimes file contains a table of integers (one for each object in the associated *.pack file), each representing an epoch timestamp containing that object’s mtime. In other words, the *.mtimes file has a table of numbers, where each number represents an individual object’s mtime, encoded as a number of seconds since the Unix epoch.

Crucially, this makes it possible to store all of a repository’s unreachable objects together in a single pack, without having to store them as individual loose objects, bypassing all of the drawbacks we discussed in the last section. Moreover, it allows Git to update the mtime of a single unreachable object, without inadvertently triggering the same update across all unreachable objects.

Since Git doesn’t portably support updating a file in place, updating an object’s mtime (a process which Git calls “freshening”) takes place by writing a separate copy of that object out as a loose file. Of course, if we had to freshen all objects in a cruft pack, we would end up in a situation no better than before. But such updates tend to be unlikely in practice, and so writing individual copies of a small handful of unreachable objects ends up being a reasonable trade off most of the time.

Generating cruft packs

Now that we have introduced the concept of cruft packs, the question remains: how does Git generate them?

Despite being called git gc (short for “garbage collection”), running git gc does not always result in deleting unreachable objects. If you run git gc --prune=never, then Git will repack all reachable objects and move all unreachable objects to the cruft pack. If, however, you run git gc --prune=1.day.ago, then Git will repack all reachable objects, delete any unreachable objects that are older than one day, and repack the remaining unreachable objects into the cruft pack.

This is because of Git’s treatment of unreachable parts of the repository. While Git only relies on having a reachability closure over reachable objects, Git’s garbage collection routine tries to leave unreachable parts of the repository intact to the extent possible. That means if Git encounters some unreachable cluster of objects in your repository, it will either expire all or none of those objects, but never some subset of them.

We’ll discuss how cruft packs are generated with and without object expiration in the two sections below.

Cruft packs without object expiration

When generating a cruft pack with an object expiration of --date=never, our only goal is to collect all unreachable objects together into a single cruft pack. Broadly speaking, this occurs in three steps:

  1. Starting at all of the branches and tags, generate a pack containing only reachable objects.
  2. Looking at all other existing packs, enumerate the list of objects which don’t appear in the new pack of reachable objects. Create a new pack containing just these objects, which are unreachable.
  3. Delete the existing packs.

If any of that was confusing, don’t worry: we’ll break it down here step by step. The first step to collecting a repository’s unreachable objects is to figure out the parts of it that are reachable. If you’ve ever run git repack -A, this is exactly how that command works. Git starts a reachability traversal beginning at each of the branches and tags in your repository. Then it traverses back through history by walking from commits to their parents, trees to their sub-trees, and so on, marking every object that it sees along the way as reachable.

Demonstration of how Git walks through a commit graph, from commit to parent

Here, we’re showing the same commit graph from earlier in the post. Git’s goal at this point is simply to mark every reachable object that it sees, and it’s those objects that will become the contents of a new pack containing just reachable objects. Git starts by examining each reference, and walking from a commit to its parents until it either finds a commit with no parents (indicating the beginning of history), or a commit that it has already marked as reachable.

In the above, the commit being walked is highlighted in dark blue, and any commits marked as reachable are marked in green. At each step, the commit currently being visited gets marked as reachable, and its parent(s) are visited in the next step. By repeating this process among all branches and tags, Git will mark all reachable objects in the repository.

We can then use this set of objects to produce a new pack containing all reachable objects in a repository. Next, Git needs to discover the set of objects that it didn’t mark in the previous stage. A reasonable first approach might be to store the IDs of all of a repository’s objects in a set, and then remove them one by one as we mark objects reachable along our walk.

But this approach tends to be impractical, since each object will require a minimum of 20 bytes of memory in order to insert into this set. At the time of writing, the linux.git repository contains nearly nine million objects, which would require nearly 180 MB of memory just to write out all of their object IDs.

Instead, Git looks through all of the objects in all of the existing packs, checking whether or not each is contained in the new pack of reachable objects. Any object found in an existing pack which doesn’t appear in the reachable pack is automatically included in the cruft pack.

Animation demonstrating how  Git looks through all of the objects in all of the existing packs, checking whether or not each is contained in the new pack of reachable objects.

Here, we’re going one by one among all of the pre-existing packs (here, labeled as pack-abc.pack, pack-def.pack, and pack-123.pack) and inspecting their objects one at a time. We first start with object c8, looking through the reachable pack (denoted as pack-xyz.pack) to see if any of its objects match c8. Since none do, c8 is marked unreachable (which we represent by filling the object with a red background).

This process is repeated for each object in each existing pack. Once this process is complete, all objects that existed in the repository before starting a garbage collection are marked either green, or red (indicating that they are either reachable, or unreachable, respectively).

Git can then use the set of unreachable objects to generate a new pack, like below:

A set of labeled Git packs

This pack (on the far right of the above image, denoted pack-cruft.pack) contains exactly the set of unreachable objects present in the repository at the beginning of garbage collection. By keeping track of each unreachable object’s mtime while marking existing objects, Git has enough data to write out a *.mtimes file in addition to the new pack, leaving us with a cruft pack containing just the repository’s unreachable objects.

Here, we’re eliding some technical details about keeping track of each object’s mtime along the way, for brevity and simplicity. The routine is straightforward, though: each time we discover an object, we mark its mtime based on how we discovered the object.

  • If an object is found in a packfile, it inherits its mtime from the packfile itself.
  • If an object is found as a loose object, its mtime comes from the loose object file.
  • And if an object is found in an existing cruft pack, its mtime comes from reading the cruft pack’s *.mtimes file at the appropriate index.

If an object is seen more than once (e.g., an unreachable object stored in a cruft pack was freshened, resulting in another loose copy of the object), the mtime which is ultimately recorded in the new cruft pack is the most recent mtime of all of the above.

Cruft packs with object expiration

Generating cruft packs where some objects are going to expire out of the repository follows a similar, but slightly trickier approach than in the non-expiring case.

Doing a garbage collection with a fixed expiration is known as “pruning.” This essentially boils down to asking Git to pack the contents of a repository into two packfiles: one containing reachable objects, and another containing any unreachable objects. But, it also means that for some fixed expiration date, any unreachable objects which have an mtime older than the expiration date are removed from the repository entirely.

The difficulty in this case stems from a fact briefly mentioned earlier in this post, which is that Git attempts to prevent connected clusters of unreachable objects from leaving the repository if some, but not all, of their objects have aged out.

To make things clearer, here’s an example. Suppose that a repository has a handful of blob objects, all connected to some tree object, and all of these objects are unreachable. Assuming that they’re all old enough, then they will all expire together: no big deal. But what if the tree isn’t old enough to be expired? In this case, even though the blobs connected to it could be expired on their own, Git will keep them around since they’re connected to a tree with a sufficiently recent mtime. Git does this to preserve the repository’s reachability closure in case that tree were to become reachable again (in which case, having the tree and its blobs becomes important).

To ensure that Git preserves any unreachable objects which are reachable from recent objects Git handles this case of cruft pack generation slightly differently. At a high level, it:

  1. Generates a candidate list of cruft objects, using the same process as outlined in the previous section.
  2. Then, to determine the actual list of cruft objects to keep around, it performs a reachability traversal using all of the candidate cruft objects, adding any object it sees along the way to the cruft pack.

To make things a little clearer, here’s an example:

Animation of Git performing  a reachability traversal

After determining the set of unreachable objects (represented above as colored red) Git does a reachability traversal from each entry point into the graph of unreachable objects. Above, commits are represented by circles, trees by rectangles, and tree entries as rows within the larger rectangles. The mtimes are written below each commit.

For now, let’s assume our expiration date is d, so any object whose mtime is greater than d must stay (despite being unreachable), and anything older than d can be pruned. Git traverses through each entry and asks, “Is this object old enough to be pruned?” When the answer is “yes” Git leaves the object alone and moves on to the next entry point. When the answer is “no,” however, (ie., Git is looking at an unreachable object whose mtime is too recent to prune), Git marks that object as “rescued” (indicated by turning it green) and then continues its traversal, marking any reachable objects as rescued.

Objects that are rescued during this pass are written to the cruft pack, preserving their existence in the repository, leaving them to either continue to age, or have their mtimes updated before the next garbage collection.

Let’s take a closer look at the example above. Git starts by looking at object C(1,1), and notice that its mtime is d+5, meaning that (since it happens after our expiration time, d) it is too new to expire. That causes Git to start a reachability traversal beginning at C(1,1), rescuing every object it encounters along the way. Since many objects are shared between multiple commits, rescuing an object from a more recent part of the graph often ends up marking older objects as rescued, too.

After finishing the rescuing pass focused on C(1,1), Git moves on to look at C(0,2). But this commit’s mtime is d-10, which is before our expiration cutoff of d, meaning that it is safe to remove. Git can skip looking at any objects reachable from this commit, since none of them will be rescued.

Finally, Git looks at another connected cluster of the unreachable object graph, beginning at C(3,1). Since this object has an mtime of d+10, it is too new to expire, so Git performs another reachability traversal, rescuing it and any objects reachable from it.

Notice that in the final graph state that the main cluster of commits (the one beginning with C(0,2)) is only partially rescued. In fact, only the objects necessary to retain a reachability closure over the rescued objects among that cluster are saved from being pruned. So even though, for example, commit C(2,1) has only part of its tree entries rescued, that is OK since C(2,1) itself will be pruned (hence any non-rescued tree entries connected to it are unimportant and will also be pruned).

Putting it all together

Now that Git can generate a cruft pack and perform garbage collection on a repository with or without pruning objects, it was time to put all of the pieces together and submit the patches to the open-source Git project.

Other Git sub-commands, like repack, and gc needed to learn about cruft packs, and gain command-line flags and configuration knobs in order to opt-in to the new behavior. With all of the pieces in place, you can now trigger a garbage collection by running either:

$ git gc --prune=1.day.ago --cruft

or

$ git repack -d --cruft --cruft-expiration=1.day.ago

to repack your repository into a reachable pack, and a cruft pack containing unreachable objects whose mtimes are within the past day. More details on the new command-line options and configuration can be found here, here, here, and here.

GitHub submitted the entirety of the patches that comprise cruft packs to the open-source Git project, and the results were released in v2.37.0. That means that you can use the same tools as what we run at GitHub on your own laptop, to run garbage collection on your own repositories.

For those curious about the details, you can read the complete thread on the mailing list archive here.

Cruft packs at GitHub

After a lengthy process of testing to ensure that using cruft packs was safe to carry out across all repositories on GitHub, we deployed and enabled the feature across all repositories. We kept a close eye on repositories with large numbers of unreachable objects, since the process of breaking any deltas between reachable and unreachable objects (since the two are now stored in separate packs, and object deltas cannot cross pack boundaries) can cause the initial cruft pack generation to take a long time. A small handful of repositories with many unreachable objects needed more time to generate their very first cruft pack. In those instances, we generated their cruft packs outside of our normal repository maintenance jobs to avoid triggering any timeouts.

Now, every repository on GitHub and in GitHub Enterprise (in version 3.3 and newer) uses cruft packs to store their unreachable objects. This has made garbage collecting repositories (especially busy ones with many unreachable objects) tractable where it often required significant human intervention before. Before cruft packs, many repositories which required clean up were simply out of our reach because of the possibility of creating an explosion of loose objects which could derail performance for all repositories stored on a fileserver. Now, garbage collecting a repository is a simple task, no matter its size or scale.

During our testing, we ran garbage collection on a handful of repositories, and got some exciting results. For repositories that regularly force-push a single commit to their main branch (leaving a majority of their objects unreachable), their on-disk size dropped significantly. The most extreme example we found during testing caused a repository which used to take 186 gigabytes to store shrink to only take 2 gigabytes of space.

On github/github, GitHub’s main codebase, we were able to shrink the repository from around 57 gigabytes to 27 gigabytes. Even though these savings are more modest, the real payoff is in the objects we no longer have to store. Before garbage collecting, each replica of this repository had nearly 60 million objects, including years of test-merges, force-pushes, and all kinds of sources of unreachable objects. Each of these objects contributed to the I/O cost of repacking this repository. After garbage collecting, only 11.8 million objects remained. Since each object in a repository requires around 150 bytes of memory during repacking, we save around 7 gigabytes of RAM during each maintenance routine.

Limbo repositories

Even though we can easily garbage collect a repository of any size, we still have to navigate the inherent raciness that we described at the beginning of this post.

At GitHub, our approach has been to make this situation easy to recover from automatically instead of preventing it entirely (which would require significant surgery to much of Git’s code). To do this, our approach is to create a “limbo” repository whenever a pruning garbage collection is done. Any objects which get expired from the main repository are stored in a separate pack in the limbo repository. Then, the process to garbage collect a repository looks something like:

  1. Generate a cruft pack of recent unreachable objects in the main repository.
  2. Generate a second cruft pack of expired unreachable objects, stored outside of the main repository, in the “limbo” repository.
  3. After garbage collection has completed, run a git fsck in the main repository to detect any object corruption.
  4. If any objects are missing, recover them by copying them over from the limbo repository.

The process for generating a cruft pack of expired unreachable objects boils down to creating another cruft pack (using exactly the same process we described earlier in this post), with two caveats:

  • The expiration cutoff is set to “never” since we want to keep around any objects which we did expire in the previous step.
  • The original cruft pack is treated as a pack containing reachable objects since we want to ignore any unreachable objects which were too recent to expire (and, thus, are stored in the cruft pack in the main repository).

We have used this idea at GitHub with great success, and now treat garbage collection as a hands-off process from start to finish. The patches to implement this approach are available as a preliminary RFC on the Git mailing list here.

Thank you

This work would not have been possible without generous review and collaboration from engineers from within and outside of GitHub. The Git Systems team at GitHub were great to work with while we developed and deployed cruft packs. Special thanks to Torsten Walter, and Michael Haggerty, who played substantial roles in developing limbo repositories.

Outside of GitHub, this work would not have been possible without careful review from the open-source Git community, especially Derrick Stolee, Jeff King, Jonathan Tan, Jonathan Nieder, and Junio C Hamano. In particular, Jeff King contributed significantly to the original development of many of the ideas discussed above.

Notes


  1. It’s true. According to the Library of Congress themselves, their digital collection amounts to more than 3 petabytes in size [source]. The 18.6 petabytes we store at GitHub actually overcounts by a factor of five, since we store a handful of copies of each repository. In reality, it’s hard to provide an exact number, since data is de-duplicated within a fork network, and is stored compressed on disk. Either way you slice it, it’s a lot of data: you get the point. 
  2. Meaning that for any reachable object part of some repository, any objects reachable from it are also contained in that repository. 

Highlights from Git 2.37

Post Syndicated from Taylor Blau original https://github.blog/2022-06-27-highlights-from-git-2-37/

The open source Git project just released Git 2.37, with features and bug fixes from over 75 contributors, 20 of them new. We last caught up with you on the latest in Git back when 2.36 was released.

To celebrate this most recent release, here’s GitHub’s look at some of the most interesting features and changes introduced since last time.

Before we get into the details of Git 2.37.0, we first wanted to let you know that Git Merge is returning this September. The conference features talks, workshops, and more all about Git and the Git ecosystem. There is still time to submit a proposal to speak. We look forward to seeing you there!

A new mechanism for pruning unreachable objects

In Git, we often talk about classifying objects as either “reachable” or “unreachable”. An object is “reachable” when there is at least one reference (a branch or a tag) from which you can start an object walk (traversing from commits to their parents, from trees into their sub-trees, and so on) and end up at your destination. Similarly, an object is “unreachable” when no such reference exists.

A Git repository needs all of its reachable objects to ensure that the repository is intact. But it is free to discard unreachable objects at any time. And it is often desirable to do just that, particularly when many unreachable objects have piled up, you’re running low on disk space, or similar. In fact, Git does this automatically when running garbage collection.

But observant readers will notice the gc.pruneExpire configuration. This setting defines a “grace period” during which unreachable objects which are not yet old enough to be removed from the repository completely are left alone. This is done in order to mitigate a race condition where an unreachable object that is about to be deleted becomes reachable by some other process (like an incoming reference update or a push) before then being deleted, leaving the repository in a corrupt state.

Setting a small, non-zero grace period makes it much less likely to encounter this race in practice. But it leads us to another problem: how do we keep track of the age of the unreachable objects which didn’t leave the repository? We can’t pack them together into a single packfile; since all objects in a pack share the same modification time, updating any object drags them all forward. Instead, prior to Git 2.37, each surviving unreachable object was written out as a loose object, and the mtime of the individual objects was used to store their age. This can lead to serious problems when there are many unreachable objects which are too new and can’t be pruned.

Git 2.37 introduces a new concept, cruft packs, which allow unreachable objects to be stored together in a single packfile by writing the ages of individual objects in an auxiliary table stored in an *.mtimes file alongside the pack.

While cruft packs don’t eliminate the data race we described earlier, in practice they can help make it much less likely by allowing repositories to prune with a much longer grace period, without worrying about the potential to create many loose objects. To try it out yourself, you can run:

$ git gc --cruft --prune=1.day.ago

and notice that your $GIT_DIR/objects/pack directory will have an additional .mtimes file, storing the ages of each unreachable object written within the last 24 hours

$ ls -1 .git/objects/pack
pack-243103d0f640e0096edb3ef0c842bc5534a9f9a4.idx
pack-243103d0f640e0096edb3ef0c842bc5534a9f9a4.mtimes
pack-243103d0f640e0096edb3ef0c842bc5534a9f9a4.pack
pack-5a827af6f1a793a45c816b05d40dfd4d5f5edf28.idx
pack-5a827af6f1a793a45c816b05d40dfd4d5f5edf28.pack

There’s a lot of detail we haven’t yet covered on cruft packs, so expect a more comprehensive technical overview in a separate blog post soon.

[source]

A builtin filesystem monitor for Windows and macOS

As we have discussed often before, one of the factors that significantly impact Git’s performance is the size of your working directory. When you run git status, for example, Git has to crawl your entire working directory (in the worst case) in order to figure out which files have been modified.

Git has its own cached understanding of the filesystem to avoid this whole-directory traversal in many cases. But it can be expensive for Git to update its cached understanding of the filesystem with the actual state of the disk while you work.

In the past, Git has made it possible to integrate with tools like Watchman via a hook, making it possible to replace Git’s expensive refreshing process with a long-running daemon which tracks the filesystem state more directly.

But setting up this hook and installing a third-party tool can be cumbersome. In Git 2.37, this functionality is built into Git itself on Windows and macOS, removing the need to install an external tool and configure the hook.

You can enable this for your repository by enabling the core.fsmonitor config setting.

$ git config core.fsmonitor true

After setting up the config, an initial git status will take the normal amount of time, but subsequent commands will take advantage of the monitored data and run significantly faster.

The full implementation is impossible to describe completely in this post. Interested readers can follow along later this week with a blog post written by Jeff Hostetler for more information. We’ll be sure to add a link here when that post is published.

[source, source, source, source]

The sparse index is ready for wide use

We previously announced Git’s sparse index feature, which helps speed up Git commands when using the sparse-checkout feature in a large repository.

In case you haven’t seen our earlier post, here’s a brief refresher. Often when working in an extremely large repository, you don’t need the entire contents of your repository present locally in order to contribute. For example, if your company uses a single monorepo, you may only be interested in the parts of that repository that correspond to the handful of products you work on.

Partial clones make it possible for Git to only download the objects that you care about. The sparse index is an equally important component of the equation. The sparse index makes it possible for the index (a key data structure which tracks the content of your next commit, which files have been modified, and more) to only keep track of the parts of your repository that you’re interested in.

When we originally announced the sparse index, we explained how different Git subcommands would have to be updated individually to take advantage of the sparse index. With Git 2.37.0, all of those integrations are now included in the core Git project and available to all users.

In this release, the final integrations were for git show, git sparse-checkout, and git stash. In particular, git stash has the largest performance boost of all of the integrations so far because of how the command reads and writes indexes multiple times in a single process, achieving a near 80% speed-up in certain cases (though see this thread for all of the details).

[source, source, source]

That’s just a sample of changes from the latest release. For more, check out the release notes for 2.37, or any previous version in the Git repository.

Tidbits

Now that we have looked at some of the bigger features in detail, let’s turn to a handful of smaller topics from this release.

  • Speaking of sparse checkouts, this release deprecates the non---cone-mode style of sparse checkout definitions.

    For the uninitiated, the git sparse-checkout command supports two kinds of patterns which dictate which parts of your repository should be checked out: “cone” mode, and “non-cone” mode. The latter, which allows specifying individual files with a .gitignore-style syntax, can be confusing to use correctly, and has performance problems (namely that in the worst case all patterns must try to be matched with all files, leading to slow-downs). Most importantly, it is incompatible with the sparse-index, which brings the performance enhancements of using a sparse checkout to all of the Git commands you’re familiar with.

    For these reasons (and more!), the non---cone mode style of patterns is discouraged, and users are instead encouraged to use --cone mode.

    [source]

  • In our highlights from the last Git release, we talked about more flexible fsync configuration, which made it possible to more precisely define what files Git would explicitly synchronize with fsync() and what strategy it would use to do that synchronization.

    This release brings a new strategy to the list supported by core.fsyncMethod: “batch”, which can provide significant speed-ups on supported filesystems when writing many individual files. This new mode works by staging many updates to the disk’s writeback cache before preforming a single fsync() causing the disk to flush its writeback cache. Files are then atomically moved into place, guaranteeing that they are fsync()-durable by the time they enter the object directory.

    For now, this mode only supports batching loose object writes, and will only be enabled when core.fsync includes the loose-objects value. On a synthetic test of adding 500 files to the repository with git add (each resulting in a new loose object), the new batch mode imposes only a modest penalty over not fsyncing at all.

    On Linux, for example, adding 500 files takes .06 seconds without any fsync() calls, 1.88 seconds with an fsync() after each loose object write, and only .15 seconds with the new batched fsync(). Other platforms display similar speed-ups, with a notable example being Windows, where the numbers are .35 seconds, 11.18 seconds, and just .41 seconds, respectively.

    [source]

  • If you’ve ever wondered, “what’s changed in my repository since yesterday?”, one way you can figure that out is with the --since option, which is supported by all standard revision-walking commands, like log and rev-list.

    This option works by starting with the specified commits, and walking recursively along each commit’s parents, stopping the traversal as soon as it encounters a commit older than the --since date. But in occasional circumstances (particularly when there is) clock skew this can produce confusing results.

    For example, suppose you have three commits, C1, C2, and C3, where C2 is the parent of C3, and C1 is the parent of C2. If both C1 and C3 were written in the last hour, but C2 is a day old (perhaps because the committer’s clock is running slow), then a traversal with --since=1.hour.ago will only show C3, since seeing C2 causes Git to halt its traversal.

    If you expect your repository’s history has some amount of clock skew, then you can use --since-as-filter in place of --since, which only prints commits newer than the specified date, but does not halt its traversal upon seeing an older one.

    [source]

  • If you work with partial clones, and have a variety of different Git remotes, it can be confusing to remember which partial clone filter is attached to which remote.

    Even in a simple example, trying to remember what object filter was used to clone your repository requires this incantation:

    $ git config remote.origin.partialCloneFilter
    

    In Git 2.37, you can now access this information much more readily behind the -v flag of git remote, like so:

    $ git remote -v
    origin    [email protected]:git/git.git (fetch) [tree:0]
    origin    [email protected]:git/git.git (push)
    

    Here, you can easily see between the square-brackets that the remote origin uses a tree:0 filter.

    This work was contributed by Abhradeep Chakraborty, a Google Summer of Code student, who is one of three students participating this year and working on Git.

    [source]

  • Speaking of remote configuration, Git 2.37 ships with support for warning or exiting when it encounters plain-text credentials stored in your configuration with the new transfer.credentialsInUrl setting.

    Storing credentials in plain-text in your repository’s configuration is discouraged, since it forces you to ensure you have appropriately restrictive permissions on the configuration file. Aside from storing the data unencrypted at rest, Git often passes the full URL (including credentials) to other programs, exposing them on systems where other processes have access to arguments list of sensitive processes. In most cases, it is encouraged to use Git’s credential mechanism, or tools like GCM.

    This new setting allows Git to either ignore or halt execution when it sees one of these credentials by setting the transfer.credentialsInUrl to “warn” or “die” respectively. The default, “allow”, does nothing.

    [source, source]

  • If you’ve ever used git add -p to stage the contents of your working tree incrementally, then you may be familiar with git add‘s “interactive mode”, or git add -i, of which git add -p is a sub-mode.

    In addition to “patch” mode, git add -i supports “status”, “update”, “revert”, “add untracked”, “patch”, and “diff”. Until recently, this mode of git add -i was actually written in Perl. This command has been the most recent subject of a long-running effort to port Git commands written in Perl into C. This makes it possible to use Git’s libraries without spawning sub-processes, which can be prohibitively expensive on certain platforms.

    The C reimplementation of git add -i has shipped in releases of Git as early as v2.25.0. In more recent versions, this reimplementation has been in “testing” mode behind an opt-in configuration. Git 2.37 promotes the C reimplementation by default, so Windows users should notice a speed-up when using git add -p.

    [source, source, source, source, source, source, source]

  • Last but not least, there is a lot of exciting work going on for Git developers, too, like improving the localization workflow, improving CI output with GitHub Actions, and reducing memory leaks in internal APIs.

    If you’re interested in contributing to Git, now is a more exciting time than ever to start. Check out this guide for some tips on getting started.

The rest of the iceberg

That’s just a sample of changes from the latest release. For more, check out the release notes for 2.37 or any previous version in the Git repository.

Highlights from Git 2.36

Post Syndicated from Taylor Blau original https://github.blog/2022-04-18-highlights-from-git-2-36/

The open source Git project just released Git 2.36, with features and bug fixes from over 96 contributors, 26 of them new. We last caught up with you on the latest in Git back when 2.35 was released.

To celebrate this most recent release, here’s GitHub’s look at some of the most interesting features and changes introduced since last time.

Review merge conflict resolution with –remerge-diff

Returning readers may remember our coverage of merge ort, the from-scratch rewrite of Git’s recursive merge engine.

This release brings another new feature powered by ort, which is the --remerge-diff option. To explain what --remerge-diff is and why you might be excited about it, let’s take a step back and talk about git show.

When given a commit git show will print out that commit’s log message as well as its diff. But it has slightly different behavior when given a merge commit, especially one that had merge conflicts. If you’ve ever passed a conflicted merge to git show, you might be familiar with this output:

If you look closely, you might notice that there are actually two columns of diff markers (the + and - characters to indicate lines added and removed). These come from the output of git diff-tree -cc, which is showing us the diff between each parent and the post-image of the given commit simultaneously.

In this particular example, the conflict occurs because one side has an extra argument in the dwim_ref() call, and the other includes an updated comment to use reflect renaming a variable from sha1 to oid. The left-most markers show the latter resolution, and the right-most markers show the former.

But this output can be understandably difficult to interpret. In Git 2.36, --remerge-diff takes a different approach. Instead of showing you the diffs between the merge resolution and each parent simultaneously, --remerge-diff shows you the diff between the file with merge conflicts, and the resolution.

The above shows the output of git show with --remerge-diff on the same conflicted merge commit as before. Here, we can see the diff3-style conflicts (shown in red, since the merge commit removes the conflict markers during resolution) along with the resolution. By more clearly indicating which parts of the conflict were left as-is, we can more easily see how the given commit resolved its conflicts, instead of trying to weave-together the simultaneous diff output from git diff-tree -cc.

Reconstructing these merges is made possible using ort. The ort engine is significantly faster than its predecessor, recursive, and can reconstruct all conflicted merge in linux.git in about 3 seconds (as compared to diff-tree -cc, which takes more than 30 seconds to perform the same operation
[source]).

Give it a whirl in your Git repositories on 2.36 by running git show --remerge-diff on some merge conflicts in your history.

[source]

More flexible fsync configuration

If you have ever looked around in your repository’s .git directory, you’ll notice a variety of files: objects, references, reflogs, packfiles, configuration, and the like. Git writes these objects to keep track of the state of your repository, creating new object files when you make new commits, update references, repack your repository, and so on.

Most likely, you haven’t had to think too hard about how these files are written and updated. If you’re curious about these details, then read on! When any application writes changes to your filesystem, those changes aren’t immediately persisted, since writing to the external storage medium is significantly slower than updating your filesystem’s in-memory caches.

Instead, changes are staged in memory and periodically flushed to disk at which point the changes are (usually, though disks and controllers can have their own write caches, too) written to the physical storage medium.

Aside from following standard best-practices (like writing new files to a temporary location and then atomically moving them into place), Git has had a somewhat limited set of configuration available to tune how and when it calls fsync, mostly limited to core.fsyncObjectFiles, which, when set, causes Git to call fsync() when creating new loose object files. (Git has had non-configurable fsync() calls scattered throughout its codebase for things like writing packfiles, the commit-graph, multi-pack index, and so on).

Git 2.36 introduces a significantly more flexible set of configuration options to tune how and when Git will explicitly fsync lots of different kinds of files, not just if it fsyncs loose objects.

At the heart of this new change are two new configuration variables:
core.fsync and core.fsyncMethod. The former lets you pick a comma-separated list of which parts of Git’s internal data structures you want to be explicitly flushed after writing. The full list can be found in the documentation, but you can pick from things like pack (to fsync files in $GIT_DIR/objects/pack) or loose-object (to fsync loose objects), to reference (to fsync references in the $GIT_DIR/refs directory). There are also aggregate options like objects (which implies both loose-object and pack), along with others like derived-metadata, committed, and all.

You can also tune how Git ensures the durability of components included in your core.fsync configuration by setting the core.fsyncMethod to either fsync (which calls fsync(), or issues a special fcntl() on macOS), or writeout-only, which schedules the written data for flushing, though does not guarantee that metadata like directory entries are updated as part of the flush operation.

Most users won’t need to change these defaults. But for server operators who have many Git repositories living on hardware that may suddenly lose power, having these new knobs to tune will provide new opportunities to enhance the durability of written data.

[source, source, source]

Stricter repository ownership checks

If you haven’t seen our blog post from last week announcing the security patches for versions 2.35 and earlier, let me give you a brief recap.

Beginning in Git 2.35.2, Git changed its default behavior to prevent you from executing git commands in a repository owned by a different user than the current one. This is designed to prevent git invocations from unintentionally executing commands which the repository owner configured.

You can bypass this check by setting the new safe.directory configuration to include trusted repositories owned by other users. If you can’t upgrade immediately, our blog post outlines some steps you can take to mitigate your risk, though the safest thing you can do is upgrade to the latest version of Git.

Since publishing that blog post, the safe.directory option now interprets the value * to consider all Git repositories as safe, regardless of their owner. You can set this in your --global config to opt-out of the new behavior in situations where it makes sense.

[source]

Tidbits

Now that we have looked at some of the bigger features in detail, let’s turn to a handful of smaller topics from this release.

  • If you’ve ever spent time poking around in the internals of one of your Git repositories, you may have come across the git cat-file command. Reminiscent of cat, this command is useful for printing out the raw contents of Git objects in your repository. cat-file has a handful of other modes that go beyond just printing the contents of an object. Instead of printing out one object at a time, it can accept a stream of objects (via stdin) when passed the --batch or --batch-check command-line arguments. These two similarly-named options have slightly different outputs: --batch instructs cat-file to just print out each object’s contents, while --batch-check is used to print out information about the object itself, like its type and size1.

    But what if you want to dynamically switch between the two? Before, the only way was to run two separate copies of the cat-file command in the same repository, one in --batch mode and the other in --batch-check mode. In Git 2.36, you no longer need to do this. You can instead run a single git cat-file command with the new --batch-command mode. This mode lets you ask for the type of output you want for each object. Its input looks either like contents <object>, or info <object>, which correspond to the output you’d get from --batch, or --batch-check, respectively.

    For server operators who may have long-running cat-file commands intended to service multiple requests, --batch-command accepts a new flush command, which flushes the output buffer upon receipt.

    [source, source]

  • Speaking of Git internals, if you’ve ever needed to script around the contents of a tree object in your repository, then there’s no doubt that git ls-tree has come in handy.

    If you aren’t familiar with ls-tree, the gist is that it allows you to list the contents of a tree objects, optionally recursing through nested sub-trees. Its output looks something like this:

    $ git ls-tree HEAD -- builtin/
    100644 blob 3ffb86a43384f21cad4fdcc0d8549e37dba12227  builtin/add.c
    100644 blob 0f4111bafa0b0810ae29903509a0af74073013ff  builtin/am.c
    100644 blob 58ff977a2314e2878ee0c7d3bcd9874b71bfdeef  builtin/annotate.c
    100644 blob 3f099b960565ff2944209ba514ea7274dad852f5  builtin/apply.c
    100644 blob 7176b041b6d85b5760c91f94fcdde551a38d147f  builtin/archive.c
    [...]
    

    Previously, the customizability of ls-tree‘s output was somewhat limited. You could restrict the output to just the filenames with --name-only, print absolute paths with --full-name, or abbreviate the object IDs with --abbrev, but that was about it.

    In Git 2.36, you have a lot more control about how ls-tree‘s should look. There’s a new --object-only option to complement --name-only. But if you really want to customize its output, the new --format option is your best bet. You can select from any combination and order of the each entry’s mode, type, name, and size.

    Here’s a fun example of where something like this might come in handy. Let’s say you’re interested in the distribution of file-sizes of blobs in your repository. Before, to get a list of object sizes, you would have had to do either:

    $ git ls-tree ... | awk '{ print $3 }' | git cat-file --batch-check='%(objectsize)'
    

    or (ab)use the --long format and pull out the file sizes of blobs:

    $ git ls-tree -l | awk '{ print $4 }'
    

    but now you can ask for just the file sizes directly, making it much more convenient to script around them:

    $ dist () {
     ruby -lne 'print 10 ** (Math.log10($_.to_i).ceil)' | sort -n | uniq -c
    }
    $ git ls-tree --format='%(objectsize)' HEAD:builtin/ | dist
      8 1000
     59 10000
     53 100000
      2 1000000
    

    …showing us that we have 8 files that are between 1-10 KiB in size, 59 files between 10-100 KiB, 53 files between 100 KiB and 1 MiB, and 2 files larger than 1 MiB.

    [source, source, source, source]

  • If you’ve ever tried to track down a bug using Git, then you’re familiar with the git bisect command. If you haven’t, here’s a quick primer. git bisect takes two revisions of your repository, one corresponding to a known “good” state, and another corresponding to some broken state. The idea is then to run a binary search between those two points in history to find the first commit which transitioned the good state to the broken state.

    If you aren’t a frequent bisect user, you may not have heard of the git bisect run command. Instead of requiring you to classify whether each point along the search is good or bad, you can supply a script which Git will execute for you, using its exit status to classify each revision for you.

    This can be useful when trying to figure out which commit broke the build, which you can do by running:

    $ git bisect start <bad> <good>
    $ git bisect run make
    

    which will run make along the binary search between <bad> and <good>, outputting the first commit which broke compilation.

    But what about automating more complicated tests? It can often be useful to write a one-off shell script which runs some test for you, and then hand that off to git bisect. Here, you might do something like:

    $ vi test.sh
    # type type type
    $ git bisect run test.sh
    

    See the problem? We forgot to mark test.sh as executable! In previous versions of Git, git bisect would incorrectly carry on the search, classifying each revision as broken. In Git 2.36, git bisect will detect that you forgot to mark the script as executable, and halt the search early.

    [source]

  • When you run git fetch, your Git client communicates with the remote to carry out a process called negotiation to determine which objects the server needs to send to complete your request. Roughly speaking, your client and the server mutually advertise what they have at the tips of each reference, then your client lists which objects it wants, and the server sends back all objects between the requested objects and the ones you already have.

    This works well because Git always expects to maintain closure over reachable objects2, meaning that if you have some reachable object in your repository, you also have all of its ancestors.

    In other words, it’s fine for the Git server to omit objects you already have, since the combination of the objects it sends along with the ones you already have should be sufficient to assemble the branches and tags your client asked for.

    But if your repository is corrupt, then you may need the server to send you objects which are reachable from ones you already have, in which case it isn’t good enough for the server to just send you the objects between what you have and want. In the past, getting into a situation like this may have led you to re-clone your entire repository.

    Git 2.36 ships with a new option to git fetch which makes it easier to recover from certain kinds of repository corruption. By passing the new --refetch option, you can instruct git fetch to fetch all objects from the remote, regardless of which objects you already have, which is useful when the contents of your objects directory are suspect.

    [source]

  • Returning readers may remember our earlier discussions about the sparse index and sparse checkouts, which make it possible to only have part of your repository checked out at a time.

    Over the last handful of releases, more and more commands have become compatible with the sparse index. This release is no exception, with four more Git commands joining the pack. Git 2.36 brings sparse index support to git clean, git checkout-index, git update-index, and git read-tree.

    If you haven’t used these commands, there’s no need to worry: adding support to these plumbing commands is designed to lay the ground work for building a sparse index-aware git stash. In the meantime, sparse index support already exists in the commands that you are most likely already familiar with, like git status, git commit, git checkout, and more.

    As an added bonus, git sparse-checkout (which is used to enable the sparse checkout feature and dictate which parts of your repository you want checked out) gained support for the command-line completion Git ships in its contrib directory.

    [source, source, source]

  • Returning readers may remember our previous coverage on partial clones, a relatively new feature in Git which allows you to initialize your clones by downloading just some of the objects in your repository.

    If you used this feature in the past with git clone‘s --recurse-submodules flag, the partial clone filter was only applied to the top-level repository, cloning all of the objects in the submodules.

    This has been fixed in the latest release, where the --filter specification you use in your top-level clone is applied recursively to any submodules your repository might contain, too.

    [source, source]

  • While we’re talking about partial clones, now is a good time to mention partial bundles, which are new in Git 2.36. You may not have heard of Git bundles, which is a different way of transferring around parts of your repository.

    Roughly speaking, a bundle combines the data in a packfile, along with a list of references that are contained in the bundle. This allows you to capture information about the state of your repository into a single file that you can share. For example, the Git project uses bundles to share embargoed security releases with various Linux distribution maintainers. This allows us to send all of the objects which comprise a new release, along with the tags that point at them in a single file over email.

    In previous releases of Git, it was impossible to prepare a filtered bundle which you could apply to a partial clone. In Git 2.36, you can now prepare filtered bundles, whose contents are unpacked as if they arrived during a partial clone3. You can’t yet initialize a new clone from a partial bundle, but you can use it to fetch objects into a bare repository:

    $ git bundle create --filter=blob:none ../partial.bundle v2.36.0
    $ cd ..
    $ git init --bare example.repo
    $ git fetch --filter=blob:none ../partial.bundle 'refs/tags/*:refs/tags/*'
    [ ... ]
    From ../example.bundle
    * [new tag]             v2.36.0 -> v2.36.0
    

    [source, source]

  • Lastly, let’s discuss a bug fix concerning Git’s multi-pack reachability bitmaps. If you have started to use this new feature, you may have noticed a handful of new files in your .git/objects/pack directory:

    $ ls .git/objects/pack/multi-pack-index*
    .git/objects/pack/multi-pack-index
    .git/objects/pack/multi-pack-index-33cd13fb5d4166389dbbd51cabdb04b9df882582.bitmap
    .git/objects/pack/multi-pack-index-33cd13fb5d4166389dbbd51cabdb04b9df882582.rev
    

    In order, these are: the multi-pack index (MIDX) itself, the reachability bitmap data, and the reverse-index which tells Git which bits correspond to what objects in your repository.

    These are all associated back to the MIDX via the MIDX’s checksum, which is how Git knows that the three belong together. This release fixes a bug where the .rev file could fall out-of-sync with the MIDX and its bitmap, leading Git to report incorrect results when using a multi-pack bitmap. This happens when changing the object order of the MIDX without changing the set of objects tracked by the MIDX.

    If your .rev file has a modification time that is significantly older than the MIDX and .bitmap, you may have been bitten by this bug4. Luckily this bug can be resolved by dropping and regenerating your bitmaps5. To prevent a MIDX bitmap and its .rev file from falling out of sync again, the contents of the .rev are now included in the MIDX itself, forcing the MIDX’s checksum to change whenever the object order changes.

    [source]

The rest of the iceberg

That’s just a sample of changes from the latest release. For more, check out the release notes for 2.36, or any previous version in the Git repository.


  1. You can ask for other attributes, too, like %(objectsize:disk) which shows how many bytes it takes Git to store the object on disk (which can be smaller than %(objectsize) if, for example, the object is stored as a delta against some other, similar object). 
  2. This isn’t quite true, because of things like shallow and partial clones, along with grafts, but the assumption is good enough for our purposes here. What matters it that outside of scenarios where we expect to be missing objects, the only time we don’t have a reachability closure is when the repository itself is corrupt. 
  3. In Git parlance, this would be a packfile from a promisor remote
  4. This isn’t entirely fool-proof, since it’s possible way of detecting that this bug occurred, since it’s possible your bitmaps were rewritten after first falling out-of-sync. When this happens, it’s possible that the corrupt bitmaps are propagated forward when generating new bitmaps. You can use git rev-list --test-bitmap HEAD to check if your bitmaps are OK. 
  5. By first running rm -f .git/objects/pack/multi-pack-index*, and then
    git repack -d --write-midx --write-bitmap-index

Git security vulnerability announced

Post Syndicated from Taylor Blau original https://github.blog/2022-04-12-git-security-vulnerability-announced/

Today, the Git project released new versions which address a pair of security vulnerabilities.

GitHub is unaffected by these vulnerabilities1. However, you should be aware of them and upgrade your local installation of Git, especially if you are using Git for Windows, or you use Git on a multi-user machine.

CVE-2022-24765

This vulnerability affects users working on multi-user machines where a malicious actor could create a .git directory in a shared location above a victim’s current working directory. On Windows, for example, an attacker could create C:\.git\config, which would cause all git invocations that occur outside of a repository to read its configured values.

Since some configuration variables (such as core.fsmonitor) cause Git to execute arbitrary commands, this can lead to arbitrary command
execution when working on a shared machine.

The most effective way to protect against this vulnerability is to upgrade to Git v2.35.2. This version changes Git’s behavior when looking for a top-level .git directory to stop when its directory traversal changes ownership from the current user. (If you wish to make an exception to this behavior, you can use the new multi-valued safe.directory configuration).

If you can’t upgrade immediately, the most effective ways to reduce your risk are the following:

  • Define the GIT_CEILING_DIRECTORIES environment variable to contain the parent directory of your user profile (i.e., /Users on macOS,
    /home on Linux, and C:\Users on Windows).
  • Avoid running Git on multi-user machines when your current working directory is not within a trusted repository.

Note that many tools (such as the Git for Windows installation of Git Bash, posh-git, and Visual Studio) run Git commands under the hood. If you are on a multi-user machine, avoid using these tools until you have upgraded to the latest release.

Credit for finding this vulnerability goes to 俞晨东.

[source]

CVE-2022-24767

This vulnerability affects the Git for Windows uninstaller, which runs in the user’s temporary directory. Because the SYSTEM user account inherits the
default permissions of C:\Windows\Temp (which is world-writable), any authenticated user can place malicious .dll files which are loaded when
running the Git for Windows uninstaller when run via the SYSTEM account.

The most effective way to protect against this vulnerability is to upgrade to Git for Windows v2.35.2. If you can’t upgrade
immediately, reduce your risk with the following:

  • Avoid running the uninstaller until after upgrading
  • Override the SYSTEM user’s TMP environment variable to a directory which can only be written to by the SYSTEM user
  • Remove unknown .dll files from C:\Windows\Temp before running the
    uninstaller
  • Run the uninstaller under an administrator account rather than as the
    SYSTEM user

Credit for finding this vulnerability goes to the Lockheed Martin Red Team.

[source]

Download Git 2.35.2


  1. GitHub does not run git outside of known repositories, so is not susceptible to the attack described by CVE-2022-24765. Likewise, GitHub does not use Git for Windows, and so is unaffected by CVE-2022-24767 entirely. 

Highlights from Git 2.35

Post Syndicated from Taylor Blau original https://github.blog/2022-01-24-highlights-from-git-2-35/

The open source Git project just released Git 2.35, with features and bug fixes from over 93 contributors, 35 of them new. We last caught up with you on the latest in Git back when 2.34 was released. To celebrate this most recent release, here’s GitHub’s look at some of the most interesting features and changes introduced since last time.

  • When working on a complicated change, it can be useful to temporarily discard parts of your work in order to deal with them separately. To do this, we use the git stash tool, which stores away any changes to files tracked in your Git repository.

    Using git stash this way makes it really easy to store all accumulated changes for later use. But what if you only want to store part of your changes in the stash? You could use git stash -p and interactively select hunks to stash or keep. But what if you already did that via an earlier git add -p? Perhaps when you started, you thought you were ready to commit something, but by the time you finished staging everything, you realized that you actually needed to stash it all away and work on something else.

    git stash‘s new --staged mode makes it easy to stash away what you already have in the staging area, and nothing else. You can think of it like git commit (which only writes staged changes), but instead of creating a new commit, it writes a new entry to the stash. Then, when you’re ready, you can recover your changes (with git stash pop) and keep working.

    [source]

  • git log has a rich set of --format options that you can use to customize the output of git log. These can be handy when sprucing up your terminal, but they are especially useful for making it easier to script around the output of git log.

    In our blog post covering Git 2.33, we talked about a new --format specifier called %(describe). This made it possible to include the output of git describe alongside the output of git log. When it was first released, you could pass additional options down through the %(describe) specifier, like matching or excluding certain tags by writing --format=%(describe:match=<foo>,exclude=<bar>).

    In 2.35, Git includes a couple of new ways to tweak the output of git describe. You can now control whether to use lightweight tags, and how many hexadecimal characters to use when abbreviating an object identifier.

    You can try these out with %(describe:tags=<bool>) and %(describe:abbrev=<n>), respectively. Here’s a goofy example that gives me the git describe output for the last 8 commits in my copy of git.git, using only non-release-candidate tags, and uses 13 characters to abbreviate their hashes:

    $ git log -8 --format='%(describe:exclude=*-rc*,abbrev=13)'
    v2.34.1-646-gaf4e5f569bc89
    v2.34.1-644-g0330edb239c24
    v2.33.1-641-g15f002812f858
    v2.34.1-643-g2b95d94b056ab
    v2.34.1-642-gb56bd95bbc8f7
    v2.34.1-203-gffb9f2980902d
    v2.34.1-640-gdf3c41adeb212
    v2.34.1-639-g36b65715a4132
    

    Which is much cleaner than this alternative way to combine git log and git describe:

    $ git log -8 --format='%H' | xargs git describe --exclude='*-rc*' --abbrev=13
    

    [source]

  • In our last post, we talked about SSH signing: a new feature in Git that allows you to use the SSH key you likely already have in order to sign certain kinds of objects in Git.

    This release includes a couple of new additions to SSH signing. Suppose you use SSH keys to sign objects in a project you work on. To track which SSH keys you trust, you use the allowed signers file to store the identities and public keys of signers you trust.

    Now suppose that one of your collaborators rotates their key. What do you do? You could update their entry in the allowed signers file to point at their new key, but that would make it impossible to validate objects signed with the older key. You could store both keys, but that would mean that you would accept new objects signed with the old key.

    Git 2.35 lets you take advantage of OpenSSH’s valid-before and valid-after directives by making sure that the object you’re verifying was signed using a signature that was valid when it was created. This allows individuals to rotate their SSH keys by keeping track of when each key was valid without invalidating any objects previously signed using an older key.

    Git 2.35 also supports new key types in the user.signingKey configuration when you include the key verbatim (instead of storing the path of a file that contains the signing key). Previously, the rule for interpreting user.signingKey was to treat its value as a literal SSH key if it began with “ssh-“, and to treat it as filepath otherwise. You can now specify literal SSH keys with keytypes that don’t begin with “ssh-” (like ECDSA keys).

    [source, source]

  • If you’ve ever dealt with a merge conflict, you know that accurately resolving conflicts takes some careful thinking. You may not have heard of Git’s merge.conflictStyle setting, which makes resolving conflicts just a little bit easier.

    The default value for this configuration is “merge”, which produces the merge conflict markers that you are likely familiar with. But there is a different mode, “diff3”, which shows the merge base in addition to the changes on either side.

    Git 2.35 introduces a new mode, “zdiff3”, which zealously moves any lines in common at the beginning or end of a conflict outside of the conflicted area, which makes the conflict you have to resolve a little bit smaller.

    For example, say I have a list with a placeholder comment, and I merge two branches that each add different content to fill in the placeholder. The usual merge conflict might look something like this:

    1,
    foo,
    bar,
    <<<<<<< HEAD
    =======
    quux,
    woot,
    >>>>>>> side
    baz,
    3,
    

    Trying again with diff3-style conflict markers shows me the merge base (revealing a comment that I didn’t know was previously there) along with the full contents of either side, like so:

    1,
    <<<<<<< HEAD
    foo,
    bar,
    baz,
    ||||||| 60c6bd0
    # add more here
    =======
    foo,
    bar,
    quux,
    woot,
    baz,
    >>>>>>> side
    3,
    

    The above gives us more detail, but notice that both sides add “foo” and, “bar” at the beginning and “baz” at the end. Trying one last time with zdiff3-style conflict markers moves the “foo” and “bar” outside of the conflicted region altogether. The result is both more accurate (since it includes the merge base) and more concise (since it handles redundant parts of the conflict for us).

    1,
    foo,
    bar,
    <<<<<<< HEAD
    ||||||| 60c6bd0
    # add more here
    =======
    quux,
    woot,
    >>>>>>> side
    baz,
    3,
    

    [source]

  • You may (or may not!) know that Git supports a handful of different algorithms for generating a diff. The usual algorithm (and the one you are likely already familiar with) is the Myers diff algorithm. Another is the --patience diff algorithm and its cousin --histogram. These can often lead to more human-readable diffs (for example, by avoiding a common issue where adding a new function starts the diff by adding a closing brace to the function immediately preceding the new one).

    In Git 2.35, --histogram got a nice performance boost, which should make it faster in many cases. The details are too complicated to include in full here, but you can check out the reference below and see all of the improvements and juicy performance numbers.

    [source]

  • If you’re a fan of performance improvements (and diff options!), here’s another one you might like. You may have heard of git diff‘s --color-moved option (if you haven’t, we talked about it back in our Highlights from Git 2.17). You may not have heard of the related --color-moved-ws, which controls how whitespace is or isn’t ignored when colorizing diffs. You can think of it like the other space-ignoring options (like --ignore-space-at-eol, --ignore-space-change, or --ignore-all-space), but specifically for when you’re running diff in the --color-moved mode.

    Like the above, Git 2.35 also includes a variety of performance improvement for --color-moved-ws. If you haven’t tried --color-moved yet, give it a try! If you already use it in your workflow, it should get faster just by upgrading to Git 2.35.

    [source]

  • Way back in our Highlights from Git 2.19, we talked about how a new feature in git grep allowed the git jump addon to populate your editor with the exact locations of git grep matches.

    In case you aren’t familiar with git jump, here’s a quick refresher. git jump populates Vim’s quickfix list with the locations of merge conflicts, grep matches, or diff hunks (by running git jump merge, git jump grep, or git jump diff, respectively).

    In Git 2.35, git jump merge learned how to narrow the set of merge conflicts using a pathspec. So if you’re working on resolving a big merge conflict, but you only want to work on a specific section, you can run:

    $ git jump merge -- foo
    

    to only focus on conflicts in the foo directory. Alternatively, if you want to skip conflicts in a certain directory, you can use the special negative pathspec like so:

    # Skip any conflicts in the Documentation directory for now.
    $ git jump merge -- ':^Documentation'
    

    [source]

  • You might have heard of Git’s “clean” and “smudge” filters, which allow users to specify how to “clean” files when staging, or “smudge” them when populating the working copy. Git LFS makes extensive use of these filters to represent large files with stand-in “pointers.” Large files are converted to pointers when staging with the clean filter, and then back to large files when populating the working copy with the smudge filter.

    Git has historically used the size_t and unsigned long types relatively interchangeably. This is understandable, since Git was originally written on Linux where these two types have the same width (and therefore, the same representable range of values).

    But on Windows, which uses the LLP64 data model, the unsigned long type is only 4 bytes wide, whereas size_t is 8 bytes wide. Because the clean and smudge filters had previously used unsigned long, this meant that they were unable to process files larger than 4GB in size on platforms conforming to LLP64.

    The effort to standardize on the correct size_t type to represent object length continues in Git 2.35, which makes it possible for filters to handle files larger than 4GB, even on LLP64 platforms like Windows1.

    [source]

  • If you haven’t used Git in a patch-based workflow where patches are emailed back and forth, you may be unaware of the git am command, which extracts patches from a mailbox and applies them to your repository.

    Previously, if you tried to git am an email which did not contain a patch, you would get dropped into a state like this:

    $ git am /path/to/mailbox
    Applying: [...]
    Patch is empty.
    When you have resolved this problem, run "git am --continue".
    If you prefer to skip this patch, run "git am --skip" instead.
    To restore the original branch and stop patching, run "git am --abort".
    

    This can often happen when you save the entire contents of a patch series, including its cover letter (the customary first email in a series, which contains a description of the patches to come but does not itself contain a patch) and try to apply it.

    In Git 2.35, you can specify how git am will behave should it encounter an empty commit with --empty=<stop|drop|keep>. These options instruct am to either halt applying patches entirely, drop any empty patches, or apply them as-is (creating an empty commit, but retaining the log message). If you forgot to specify an --empty behavior but tried to apply an empty patch, you can run git am --allow-empty to apply the current patch as-is and continue.

    [source]

  • Returning readers may remember our discussion of the sparse index, a Git features that improves performance in repositories that use sparse-checkout. The aforementioned link describes the feature in detail, but the high-level gist is that it stores a compacted form of the index that grows along with the size of your checkout rather than the size of your repository.

    In 2.34, the sparse index was integrated into a handful of commands, including git status, git add, and git commit. In 2.35, command support for the sparse index grew to include integrations with git reset, git diff, git blame, git fetch, git pull, and a new mode of git ls-files.

    [source, source, source]

  • Speaking of sparse-checkout, the git sparse-checkout builtin has deprecated the git sparse-checkout init subcommand in favor of using git sparse-checkout set. All of the options that were previously available in the init subcommand are still available in the set subcommand. For example, you can enable cone-mode sparse-checkout and include the directory foo with this command:

    $ git sparse-checkout set --cone foo
    

    [source]

  • Git stores references (such as branches and tags) in your repository in one of two ways: either “loose” as a file inside of .git/refs (like .git/refs/heads/main) or “packed” as an entry inside of the file at .git/packed_refs.

    But for repositories with truly gigantic numbers of references, it can be inefficient to store them all together in a single file. The reftable proposal outlines the alternative way that JGit stores references in a block-oriented fashion. JGit has been using reftable for many years, but Git has not had its own implementation.

    Reftable promises to improve reading and writing performance for repositories with a large number of references. Work has been underway for quite some time to bring an implementation of reftable to Git, and Git 2.35 comes with an initial import of the reftable backend. This new backend isn’t yet integrated with the refs, so you can’t start using reftable just yet, but we’ll keep you posted about any new developments in the future.

    [source]

The rest of the iceberg

That’s just a sample of changes from the latest release. For more, check out the release notes for 2.35, or any previous version in the Git repository.


  1. Note that these patches shipped to Git for Windows via its 2.34 release, so technically this is old news! But we’ll still mention it anyway. 

Highlights from Git 2.34

Post Syndicated from Taylor Blau original https://github.blog/2021-11-15-highlights-from-git-2-34/

The open source Git project just released Git 2.34 with features and bug fixes from over 109 contributors, 29 of them new. We last caught up with you on the latest in Git back when 2.33 was released. To celebrate this most recent release, here’s GitHub’s look at some of the most interesting features and changes introduced since last time.

Sparse index

In the past, we’ve talked about new Git features to make it possible to work with large repositories, like partial clones and sparse-checkout. For a complete description, check out the linked blog posts. But as a refresher, these two features work together to allow you to:

  • Fetch or clone only part of a repository’s objects, and
  • Only populate part of your working copy, typically scoped to a set of
    sub-directories.

This pair of features is designed to create the illusion that you are working in a much smaller repository than you actually are. For instance, if your work takes place in an all-encompassing monorepo, your local copy only needs to contain the parts of the repository that you frequently work in.

But often, this illusion falls short. Why? The answer is the index. The index is the data structure Git uses to track what will be written the next time you run git commit, as well as to track the state of every file in your repository at the current point in history.

As you can imagine, even if you are working in a small corner of a large repository, the index still has to keep track of the repository’s entire contents, not just the parts that you are working in. Unfortunately, that overhead adds up: every time Git needs work with the index, it needs to parse and write out a lot of data that doesn’t affect the parts of your repository outside of your sparse checkout.

That’s changing in this release with the addition of a sparse-enabled index. Unlike the index of previous versions, this release enables the index to only track the parts of your repository that you care about. Specifically, it only contains entries for parts of your repository that are either in your sparse checkout, or at the boundary between your sparse checkout and the rest of the repository.

Collapsing to a sparse index

Triangles represent trees and boxes represent blobs. Left: a representation of a non-sparse index’s contents. Right: a sparse-ified index.

The high-level details here are that the index format now understands that specially marked directories indicate the boundary between the contents of your sparse checkout and the parts of your repository that you don’t have checked out. But the process of implementing this new format, teaching sub-commands how to use it, and making sure that the sparse index can be expanded to a full index is much more detailed.

For all of the details behind this exciting new feature, check out a comprehensive blog post published by Derrick Stolee last week: Making your monorepo feel small with Git’s sparse index.

[source, source, source, source, source, source, source, source]

Multi-pack reachability bitmaps

In a previous blog post, we talked about a new feature to enable reachability bitmaps to keep track of objects stored in multiple packs within your object store.

This release of Git contains the remaining components described in that blog post. If you haven’t read it, here’s a summary. When serving a fetch, a Git server needs to send the client everything reachable from the set of objects they want, less anything reachable from the set that they already have. (You can think of a clone as a “special case” fetch where the client wants everything and has nothing).

In order to compute this set efficiently, Git can use reachability bitmaps. One of these .bitmap files stores a set of bitmaps, each corresponding to some commit. The contents of an individual bitmap is a string of bits, one per object, indicating which objects are reachable from each commit.

In the past, the contents of a reachability bitmap were tied to the order of objects within a single packfile. This meant that a bitmap could only cover objects in one packfile. In other words, bitmaps were only useful if you could efficiently pack the entire contents of your repository down into a single packfile.

For many repositories, writing all objects into the same pack is completely feasible. But the effort it takes to write a pack (including searching for deltas between objects, compressing individual objects, and I/O cost) scales with the size of the pack you’re writing.

Git 2.34 introduces a new bitmap format that is instead tied to the contents of the multi-pack index file. This means that a bitmap can now flexibly represent objects in multiple packs, and server operators no longer need to repack their biggest repositories into a single pack in order to take full advantage of reachability bitmaps.

For more details, including some of the steps required to make this new feature work, see the aforementioned blog post.

[source, source, source]

A new default merge strategy

In an earlier blog post, we explained Git’s newest merge strategy: ort. Here are some of the basics:

When Git needs to merge two branches, it uses one of several “strategy” backends in order to resolve the changes or emit conflicts when two changes cannot be reconciled.

For years, Git has used a strategy called “recursive”. If you have ever done a merge in Git without passing -s <strategy>, then you have almost certainly used the recursive engine. Recursive behaves mostly like a standard three-way merge, with one exception. In the case of “criss-cross” merges (where there isn’t a single merge base), recursive merges multiple bases together in pairs (recursively) in order to produce a single tree which is then treated as the new merge base. This makes it possible to resolve cases where a traditional three-way merge might produce a conflict.

In recent versions of Git, there has been an ongoing effort to replace the recursive strategy with a new one called ort (short for “ostensibly recursive‘s twin”). Why do this? There are a few reasons, but perhaps the most compelling is that a rewrite allowed Git to implement a merge strategy that doesn’t operate on the index (that same one we talked about a couple of sections ago)!

ort does just that: it’s a full-blown rewrite of the merge strategy that aims to emulate the same concepts behind recursive while avoiding many of its long-standing performance and correctness problems. In a merge containing many renames, ort outperforms recursive by 500x. For a series of similar merges (like in a rebase operation), the speedup is over 9000x, in part due to ort’s ability to cache and reuse results from previous merges.

These numbers show off some of the worst-case scenarios for recursive, but in testing, ort consistently outperforms recursive with much less variance. In Git 2.34, ort is now the default merge strategy, so you should notice faster merges with fewer bugs just by upgrading.

For more details about the ort merge strategy, see our earlier blog post, or any one of a six-part series of posts written by ort‘s creator, Elijah Newren: part one, part two, part three, part four, part five, and part six.

[source]

Tidbits

Now that we have looked at some of the bigger features in detail, let’s turn to a handful of smaller topics from this release.

  • You might be aware that Git allows you to sign your work by attaching your PGP signature to certain objects. For example, the Git project itself publishes tags signed by the maintainer in order to verify that each release comes from someone trustworthy.

    But the experience of using GPG and maintaining keys can be somewhat
    cumbersome. One alternative is to use a new feature of OpenSSH (released
    back in OpenSSH 8.0) that allows using the SSH key you likely already have as a signing key.

    Git 2.34 includes support to take advantage of this feature and allows you to sign your work using SSH keys. To try it out, you can either set user.signingKey to the SSH key you want to use (for example, by asking your ssh-agent for a list with ssh-add -L), or set gpg.format to ssh and gpg.ssh.defaultKeyCommand to ssh-add -L in order to automatically use the first SSH key available.

    After configuring Git to sign objects using your SSH keys, you can use git
    commit -S
    , git merge -S, and git tag -s as usual, and they will automatically use your SSH key.

    For more information about the new configuration options, including information about how to verify SSH signatures with an “allowed signers” file, check out the documentation.

    [source, source, source]

  • If you’ve ever accidentally typed git psuh when you meant push, you
    might have seen this message:

    $ git psuh
    git: 'psuh' is not a git command. See 'git --help'.
    
    The most similar command is
      push
    

    You have always been able to control this behavior by setting the
    help.autoCorrect configuration. You can hide this advice by setting that
    configuration to never, or let Git automatically rerun the most similar
    command for you immediately or with a delay (by setting immediate, or a
    real number of seconds to wait before rerunning your command).

    In Git 2.34, you can now configure Git to ask you interactively whether you
    want to rerun your last operation with the suggested command by setting
    help.autoCorrect to prompt.

    [source]

In Git 2.34, a handful of patch series were focused on improving the performance of interacting with other repositories. Here’s a pair of tidbits that improves the performance of git fetch and git push:

  • When fetching from a remote, your client needs to do some bookkeeping before
    and after it receives a set of objects from the remote.

    Before anything happens, your client needs to figure out what it has in common with the remote it’s fetching from, and what commits it wants as a result. Previously, this process was somewhat wasteful: Git used to load commit objects directly when they could instead have been read from the commit-graph, resulting in much improved performance. In Git 2.34, commits loaded in this code path use the commit-graph when possible. The effect of this scales with the number of references in your repository: in an example repository with over 2 million references, it cuts the time it takes to fetch a single commit by more than half.

    [source]

  • Another patch series made a handful of improvements to updating local references when fetching, along with some changes to improve fetch negotiation, as well as skipping the connectivity check (which I’ll talk about in more detail in the next tidbit) when the receiving end had already verified the connectedness of the new objects. These changes together contributed similarly impressive performance improvements to the git fetch command.

    [source]

You might have heard of “submodules,” the Git feature that allows combining multiple repositories by storing links to other repositories. Submodules have been somewhat neglected over the years, but this release brought renewed attention to the feature. Here are just some of the changes that enhance submodules:

  • It might be a surprise to learn that, though the majority of Git is written in C, the original git submodule command is actually a shell script!

    The Git project has been converting many of its subcommands written in other languages into C. Reimplementing subcommands as C programs means that
    they can be read and written more easily, take advantage of Git’s comprehensive libraries, and avoid the overhead of spawning many processes, especially on platforms where the new process overhead is rather costly.

    In Git 2.34, many parts of the git submodule command were rewritten in C.
    This project was completed by Atharva Raykar, who is a Google Summer of Code
    student. You can check out their final report here, along with Git’s other GSoC participant ZheNing Hu’s report here.

    [source, source, source]

  • While we’re on the topic of submodules, one thing you might not know is that
    when using commands that deal with objects from both the submodule and the
    repository containing it, the submodule is temporarily added as an alternate
    object store of the other repository!

    Alternates are Git’s object borrowing mechanism, which allow you to in effect link multiple object stores together. When using a repository with alternates, any object lookups that fail to find an object are retried in that repository’s alternate.

    In order to make both the objects in a submodule and the objects in the repository that contains that submodule available to git grep (among a select set of
    other commands), the submodule would temporarily be added as an alternate for the duration of that command.

    If you’re thinking to yourself, “this is a hack”, then you’re not alone. Git has made internal changes to parameterize many functions in terms of a repository (which is usually the global the_repository). This allowed Git to avoid combining multiple repositories via alternates and instead make function calls by passing two (or more) separate repository instances. This enables Git to avoid hackily relying on the alternates mechanism, which produced less confusing and error-prone code as a result.

    [source, source, source]

  • One last submodule-related topic (though there are more we couldn’t fit here!). If you are cloning a repository that you know to contain submodules, it is often useful to pass the --recurse-submodules, which will cause that repository’s submodules to be cloned and initialized, too.

    But other commands that can optionally recurse into submodules (like git diff, for example) don’t themselves recurse into submodules by default, even when you cloned with --recurse-submodules. In Git 2.34, this is no longer the case, with one caveat: when cloning with --recurse-submodules, other commands only recurse into submodules if the submodule.stickyRecursiveClone configuration is set, to prevent commands from unintentionally running in submodules.

    [source]

Now that I’ve listed out a few of the submodule-related changes, let’s get back
to the rest of the tidbits:

  • If you’ve ever scripted around Git, you have almost certainly run into Git’s cat-file plumbing command. This tool can be used to print out a single object (by providing the object name as an argument), a stream of objects (by providing line-delimited object names over stdin), or all objects in your repository (with --batch-all-objects).

    This low-level command accidentally took into account replace refs, which produced confusing results when combined with --batch-all-objects, resulting in it not actually showing all objects in your repository if some were hidden by refs/replace.

    Dropping support for replacement refs made it possible for cat-file to reuse some information when it is given --batch-all-objects. Namely, to populate the list of objects, it iterates each object in each pack and therefore knows the byte offset within each pack where each object can be found. Previous versions of Git did not reuse this information when looking up objects to parse them, but Git 2.34 retains this information.

    This makes it possible to process an object’s metadata much more quickly by avoiding having to locate it twice. In a copy of torvalds/linux, the time it takes to print the name and type of each object (for the curious, that’s git cat-file --batch-check='%(objectname) %(objecttype)' --batch-all-objects --unordered) dropped from 8.1 seconds to just 4.3 seconds.

    [source]

  • There has been a recent concerted effort to remove some memory leaks from Git’s code. Unlike library code, Git typically has a very short runtime. This makes the need to free allocated memory much less urgent, since if a process is about to exit, all memory allocated to it will be “freed” by the operating system.

    A recent patch has made it so that Git’s integration tests can be run in a mode that ensures no memory is leaked (by setting GIT_TEST_PASSING_SANITIZE_LEAK=true in the environment). Since Git’s test suite still contains memory leaks in some tests, a new mode was added to run only tests that have been specifically marked as being leak-free. That way, when Git is compiled with leak detection (by running make SANITIZE=leak), you can easily spot regressions in tests that were supposedly leak-free.

    Building off this new infrastructure, there have been many patch series that remove leaks from the code in various places.

    [source, source, source, source, source, source, source, source, source, source, source]

  • When you need to get some debugging information out of a Git process, like what version you’re running, or how much time it spent in a particular region, the trace2 mechanism is a good choice. Often, looking at these logs is like looking at a piece of a puzzle. For example, when you run git fetch, you actually run git fetch-pack, which then invokes git upload-pack on the remote, which itself invokes git pack-objects.

    Trace2 output includes information about when child processes are started and stopped (and consequently, how long they took to run), but what if you’re trying to figure out something more basic than that, like what process you were started by? In other words, if you’re stuck looking at output from a slow git pack-objects, how do you figure out whether it was a fetch (in which case it would have been started by upload-pack) or part of a repository repack (which here would be started by git repack)?

    Git 2.34 includes additional debugging information in trace2 output to indicate the full ancestry of a process, so you can easily read out the name of the program a process was started by, like so:

    $ cat trace2.log
    21:14:38.170730 common-main.c:48                  version 2.34.0.rc1.14.g88d915a634
    21:14:38.170810 common-main.c:49                  start /home/ttaylorr/src/git/git pack-objects git pack-objects --revs --thin --stdout --progress --delta-base-offset
    21:14:38.174325 compat/linux/procinfo.c:170       cmd_ancestry sh <- git-upload-pack <- sh <- git <- zsh <- sshd <- systemd
    

    (Above, you can see that pack-objects was run by git upload-pack, which was run by sh–that’s where we inserted the trace point via uploadpack.packObjectsHook, which was run by git, in my shell, over sshd, which was started by systemd.)

    [source, source]

  • In a previous post, we talked about the background maintenance daemon, which can be used to perform routine repository maintenance in the background (like pre-fetching, or repacking the objects in your repository).

    When this feature was first released back in Git 2.31, it had support for cron on Linux, launchctl on macOS, and schtasks on Windows. Git 2.34 brings support for systemd-based timers on Linux. This has a few benefits over cron: cron may not be available everywhere, and using systemd isolates each service into its own cgroup and writes its logs separately.

    If you want to use systemd instead of the default scheduler, you can run:

    $ git maintenance start --scheduler=systemd
    

    [source]

  • In a previous blog post, we talked about how git rebase works, and how to move a complicated branching structure elsewhere in your repository’s history.

    The brief history is that this used to be done with the --preserve-merges option, which attempted to replay merges elsewhere in history. Confusingly, this mode uses rebase’s interactive machinery internally, so attempting to manually edit the rebase sequence (with git rebase -i) often produced counterintuitive results.

    The --rebase-merges option fixed many of these issues and has been the recommended replacement of --preserve-merges for some time now. In Git 2.34, the --preserve-merges option is now gone for good.

    [source]

  • You might have used git grep to quickly search through your code. But you might not have known that git log has a --grep=<expression> option, which allows you to filter through commits produced by git log to only show ones whose commit messages match the provided expression.

    In previous versions, the --grep option only filtered down which results were presented in the output of git log. But in Git 2.34, git log now knows how to colorize the parts of its output that matched the provided expression, like so:

    [source]

  • Last but not least, if you’re using Git in a terminal on Windows, you might have noticed that your terminal is left in a weird state after running git commit, or git rebase, like in this issue.

    This was because Git shares its terminal with any child processes it spawns, including your $EDITOR. If your editor sets special terminal settings but does not clear them upon exiting, it can leave your terminal in a broken state.

    Git 2.34 introduces functionality to save and restore the terminal settings before and after launching your editor. That means that even misbehaving editors cannot corrupt your terminal since it will always be restored to the state it was in before launching the editor.

    [source]

The rest of the iceberg

That’s just a sample of changes from the latest release. For more, check out the release notes for 2.34, or any previous version in the Git repository.

Scaling monorepo maintenance

Post Syndicated from Taylor Blau original https://github.blog/2021-04-29-scaling-monorepo-maintenance/

At GitHub, we serve some of the largest Git repositories on the planet. We also serve some of the fastest-growing repositories. Each day, the largest repositories we host become even larger.

About a year ago, we noticed that the job we use to repack Git repositories began hitting our self-imposed timeouts on larger repositories. Even when expanding these timeouts, failing maintenance on these repositories has generally been the cause of degraded performance that is hard to mitigate.

Today, these problems do not exist. GitHub can repack even the largest repositories we host in a fraction of the time it used to take. In this post, we’ll talk about what problems we were encountering, the solutions we built, how we deployed them safely, and describe some possible future directions.

All of our work here is being contributed to the open source Git project, and will be available in an upcoming release.

The problem

Why is GitHub’s maintenance job so expensive in the first place? It’s because we chose to have maintenance repack the entire contents of each repository into a single packfile. Doing so is expensive, but having just one packfile carries some benefits, too. With only one packfile, looking up objects doesn’t require opening and searching through multiple packs to find it. It also means that all objects can be compressed as a delta relative to all other objects (Git’s packfile format supports cross-pack deltas, but currently Git will never store them on disk). But, the most important reason is that reachability bitmaps, a performance-critical data structure, are only compatible with a single pack.

A new feature in Git, multi-pack indexes solves the former problem by making all object lookups go through a single index, but didn’t yet solve the latter. So, we set out to fill in the gaps by bringing bitmap support to multi-pack indexes in order to remove the single-pack limitation on reachability bitmaps.

But in order to build multi-pack bitmaps, we had to solve a number of other interesting problems along the way. First, we had to decide how to arrange the objects in a multi-pack index to achieve good bitmap compression. We also had to figure out how to quickly invert that ordering to translate between bit positions back to the objects they refer to. Some of these steps also yielded notable performance improvements on single-pack repositories, too. Finally, we had to figure out a new repacking strategy that scaled with the size of recent pushes, rather than with the size of the entire repository.

But before we get into all of that, let’s start from the very beginning.

Objects, packs, and fetching

You might be aware that Git stores the contents of your repositories as a set of objects. Each object represents an individual piece of your repository: a single file, tree, commit, or tag. These objects may be stored individually as “loose” objects, or together in a packfile.

If you’ve ever heard that a Git repository is “nothing more than a directed acyclic graph,” then you know that these objects can refer to one another. A tree refers to a set of blobs (which correspond to files) and other trees (which correspond to sub-directories). A commit refers to a single tree (the repository root), and zero or more other commits which are its parents.

These links help Git figure out which objects it needs to transfer to fulfill a fetch or clone request. When you fetch a repository from GitHub, Git performs a negotiation to figure out which objects to send. The server advertises the objects at the tip of its references (basically the tips of branches and tags). The client does the same, along with the set of references that it wants from the server. Then, the server walks the links between the requested objects and the objects that the client already has in order to figure out what to send.

Above is an object graph. The client advertises its ref tips (indicated by the darker blue commits). The server’s advertised references are colored dark red. The blue shaded area represents the result of walking along the edges to obtain the reachability closure of the objects the client already has. The red shaded area represents the same closure from the server’s perspective, excluding objects that the client already has. Objects in this region are the ones which need to be sent to the client.

During a fetch, Git needs to send not just the commits in between what the client has and wants, but also all of the objects that are reachable from those commits. Because Git doesn’t store the list of every reachable object, this may be expensive, especially in the case of a clone. When cloning, the client doesn’t have any objects, so it asks the server for all of the objects reachable from any reference.

In an earlier blog post, we talked about how we use reachability bitmaps to accelerate this negotiation. In case you haven’t read that post, below is a quick primer.

Reachability bitmaps

How does Git handle this special case where the client has nothing and wants everything? Ultimately, the server needs to determine the reachability closure of all of the reference tips. In other words, it needs a list of all of the objects at the reference tips, and all of the ancestors of those objects in order to assemble a complete copy of the repository at the other end.

Unfortunately for us, the larger the repository is, the longer it takes Git to compute the list of objects to send. This isn’t feasible even for medium-sized repositories. Git could handle our case specially by just sending every object it has, but that might result in many unwanted objects being sent, too. (For example, GitHub stores the outcome of “test merges” in special refs which aren’t ordinarily sent during fetches, but whose objects are stored in the same object directory nonetheless.)

Instead, Git stores a set of reachability bitmaps corresponding to some of the commits in a packfile. The idea is rather simple: arrange the objects in a pack in some order (the particular order used is something we’ll discuss shortly in detail). Then, the ith bit in the bitmap corresponding to commit C is 1 if C can reach the ith object, and 0 otherwise.

Having a one-to-one correspondence between objects and bit positions has a couple of appealing properties: taking the union of reachable objects between commits is as simple as ORing their bitmaps together, and taking the difference is as simple as combining AND and NOT. So, when a bitmap exists, Git can dramatically speed up the object negotiation phase:

  • First, OR all of the bitmaps corresponding to the reference tips that the client wants. Call this new bitmap W.
  • Then, do the same with the bitmaps corresponding to the reference tips that the client advertised as already having. Call this bitmap H.
  • Finally, compute W AND NOT H to produce the set of objects the client needs (in other words, everything it wants but does not already have). Then, send those objects.

Because all of the reachability information is encoded directly into the bitmaps, Git saves time by avoiding the need to open up and parse objects, allowing it to produce the same result in a fraction of the time.

This idea has been used since at least the 1970s to speed up queries in relational databases. In Git, reachability bitmaps can provide dramatic speed-ups when walking objects that reside in the same pack: walking all of the objects in the Linux kernel repository took more than 33 seconds without bitmaps, but only 1.57 seconds to perform the same traversal with bitmaps.

The object order

How does Git turn a set of objects into a sequence of bit positions? One way you might imagine to do this is assign bit positions in lexicographic order. The first bit corresponds to 000023961a, the second to 0000d6543f, the third to 000182eacf, and so on in lexical order.

Why not do this? Recall that an object’s ID is determined by a SHA-1 of its contents, which means that reachability of any object in this order is only reachable to nearby objects by chance. And reachability of nearby objects matters: Git compresses the bitmaps using EWAH compression, which relies on having long runs of identical bits. If the object order makes reachability look essentially random from bit to bit, Git won’t be able to efficiently compress the bitmaps.

Pack order—that is, the physical arrangement of objects in a packfile—produces a sequence of bit positions that tends to place reachable objects next to each other. And this produces exactly the kind of long runs of identical bits that make EWAH compression perform well.

The problem

But, all of this creates a problem for us: if the order of bit positions is dictated by a pack, then bitmaps are coupled in implementation and in concept to the existence of a single packfile. So, any objects that accumulate outside of the bitmapped pack won’t benefit from the same speed-ups.

To address this, we periodically repack the repository’s entire contents into a single pack, and then generate a new reachability bitmap. This makes reachability queries in more recent parts of the repository’s history faster.

But generating that new pack takes time; in fact, it’s quadratic. Bigger repositories take longer to repack, but also grow at a faster rate, which means they run maintenance more often. This compounding effect sometimes makes it such that some repositories are constantly undergoing maintenance: by the time one maintenance job has finished, another is already sitting in the queue, waiting to be run.

Since the bottleneck for maintenance is the compression of an entire repository’s contents into a single packfile, what would it take to be able to repack the contents into multiple packfiles instead?

Multi-pack indexes

To order a set of objects spanning multiple packs, we looked to a recent Git feature: multi-pack indexes.

When Git wants to locate an object by name in a single pack, it uses that pack’s index (.idx) file, which provides a binary-searchable list of object locations. Multi-pack indexes work similarly to .idx files, but the location they indicate is a pair containing both the pack containing the object, as well as where in that pack the object can be found.

The figure above gives a flavor for what kind of data is organized in a multi-pack index. Here, there are three packs, each with a handful of objects. The multi-pack index stores the location of each unique object among the set of packs. When multiple copies of an object exist (like the green or red objects in packs xyz and abc), ties are broken in favor of the copy in the pack with the earliest modification time.

The order of objects in the multi-pack index differs from the order in each individual pack. Since a pack is free to store objects in any order it wants, the multi-pack index stores objects in lexicographic order so that an object can be found quickly by name using a binary search.

Ordering objects

Given a multi-pack index, how should we order the objects in the packs it contains? We discussed earlier that ordering objects lexicographically results in poor compression. We also noted that objects in packs are ordered topologically, which for our purposes we can consider to imply that individual objects tend to appear near other objects which they reach in this order.

So, any ordering of the objects in a multi-pack index should capture as much of those two properties as possible. With that in mind, we decided on the following order:

  • Objects are first grouped according to which packfile they appear in, and packs are ordered according to the multi-pack index.
  • Objects within the same pack should be ordered according to their locations within that pack.

This effectively concatenates the pack-order of multiple packs together, according to some other ordering defined on the packs themselves.

To see what this looks like, let’s overlay a portion of a bitmap that covers the objects in our earlier example:

The first three bits correspond to the red, yellow, and green objects, respectively. Each one of those objects comes from the xyz pack, which means that the xyz pack has the oldest modification among the three. Scanning the bitmap from left to right, these objects appear in pack order; that is, the byte offset of the red object is less than the byte offsets of the yellow and green objects that follow it.

The purple and blue objects come next, since they are in the pack that follows. But note that the copies of the red and green objects in the abc pack don’t correspond to any bits highlighted. Why? Because the multi-pack index selected the copy of those objects in the earlier pack.

Finally, the orange and pink objects appear, also in pack order. And, as we expect, the copy of the purple object that appears in pack 123 isn’t included in the bitmap, because the copy in pack abc was.

This ordering gives us great locality, but we still need to address how to map bit positions back to the objects they represent. For example, let’s look at the fifth bit position, which we know refers to the blue object: how could Git discover this same fact?

You could reasonably imagine that knowing how many total objects are in each pack would be good enough to figure out which objects each bit corresponds to. But that isn’t enough information; we don’t know how many unique objects selected by the multi-pack index appear in each pack, and we also don’t know which non-unique objects are missing. So it’s not good enough to count past the three bits corresponding to objects in pack xyz and then count two more bits up to the fifth bit, because that would point at the copy of the green object in pack abc.

Reverse indexes

To solve this problem, we introduced reverse indexes. In the same way that the pack index provides a mapping from object name to object location, the reverse index maps an object’s location back to its name.

The idea is simple: in addition to the pack’s contents (stored in a .pack file) and index (stored in an .idx file), we’ll write an array of numbers (which comprise the reverse index, and are stored in a new .rev file). These numbers provide a mapping between an object’s position in pack order and its position in lexicographic order.

To better understand this, let’s take a look at an example on a single pack.

The .idx file (shown in the lower left) lists objects in lexicographic order: the yellow object comes before the red one, and the red one comes before the green one. But their pack order is different: there, the red object comes before the yellow one instead of the other way around. The reverse index helps us unwind the two: it tells us that the red object is in the position 3 in lexicographic order, and the yellow object is in position 1.

The reverse index allows us to map quickly from offsets into the packfile to object positions they correspond to. That allows us to quickly determine the size of a packed object. For example, say that you want to figure out how large the red object is. Because Git doesn’t store that information directly, you have one of two options: either scan linearly through the packed data (inflating its contents until you locate the stream end), or locate the adjacent object (in this case, the yellow one) by name, and measure the difference of their offsets.

Without the reverse index, there is no way to figure out where the adjacent object starts. But with a reverse index, locating the red object is as simple as reading the adjacent entry in the reverse index to discover the offset. Here, that value is 1, which points at an entry in the .idx file, which in turn points at the location in the pack.

Before the on-disk reverse index, Git computed this table on the fly and stored the results in an array in memory. This had a couple of major downsides. To build a reverse index on the fly, Git has to allocate a pair of pack offset and index position. This requires memory and runtime, which both scale relative to the size of the pack. Even though this processes using radix sort, sorting the reverse index entries can be noticeably slow when done once per process.

Some initial testing of these reverse indexes showed that they could enable rather dramatic speed-ups when serving fetches on real-world repositories. To verify our early results, we gradually rolled out reverse indexes on a handful of repositories.

Below is the 50th percentile of CPU time for fetches to Homebrew/homebrew-core on our testing host before and after the change:

In this case, we reduced the amount of time it took to serve any fetch of that repository by around 80%. Here’s another plot from the same time which shows the resident set size of the program used to serve fetches by replicas of that same repository:

Encouraged by our first results in production, we proceeded to cautiously roll out on-disk reverse indexes to all other replicas. Once we completed the roll-out, we let a couple of days pass in order for replicas to have enough time to generate reverse indexes. Then, we sampled the overall CPU time it took to serve fetches across all repositories and observed the drop we were hoping for:

In the graph above, you can see three 24-hour cycles. The first day was before we rolled out .rev files, and the second two peaks are after. The per-day peaks dropped from around 10.8 seconds to 7 seconds, for a collective savings of around 35% on all repositories.

Multi-pack bitmaps

Now that we have a format for .rev files, we can reuse it as the missing piece we need to build multi-pack bitmaps. Instead of writing positions relative to a pack .idx file, a multi-pack reverse index writes positions which are relative to a multi-pack-index file.

This provides exactly the information we need to rediscover the mapping between bit positions and the objects they refer to in the multi-pack index. To see why, let’s take a look at another example:

To figure out that the fifth bit corresponds to the blue object in the above diagram, we read the fifth entry in the multi-pack reverse index and get back that the fifth bit maps to the eleventh object in the multi-pack index. And, sure enough, the 11th object points back to the blue object that we were looking for in pack abc.

Putting it all together, this gives us a bitmap which can refer to objects in multiple packs. Based on its filename, each bitmap knows whether or not it belongs to a pack (and if so, which one) or to a multi-pack index. And based on that information, it can translate its object lookups to be relative to a packfile, or to the multi-pack index via its reverse index.

Since we chose the ordering carefully, these multi-pack bitmaps compress exactly as well as their single-pack counterparts. And they decouple bitmaps from individual packs. So, a repository can still have at most one bitmap, but that bitmap can now correspond to multiple packs.

Geometric repacking

Now that we can include multiple packs in a single bitmap, what’s the best way to repack a repository during maintenance?

With single-pack bitmaps, the only option was to pack everything together into one enormous pack. But now that this restriction no longer exists, we have to figure out the best way to repack the objects. When deciding on a new repacking strategy, we wanted something that struck a balance between two properties:

  • On average, there is a relatively small number of packs in the repository.
  • On average, we create a pack that collects objects that were pushed since the last maintenance run.

We decided on an invariant to ensure that the packs in a repository form a geometric progression by object size. In particular, if you sort the packs by number of objects, with the first pack having the most and the final pack having the least, then each pack will contain at least twice as many objects as the next one.

We taught git repack a new --geometric= mode, which creates exactly this geometric progression. Soon (at the time of writing, these patches are still being submitted and reviewed), you’ll be able to try this yourself on your own repository by running:

$ packsizes() {
    find .git/objects/pack -type f -name '*.pack' |
    while read pack; do
      printf "%7d %s\n" \
        "$(git show-index < ${pack%.pack}.idx | wc -l)" "$pack"
    done | sort -rn
  }
$ packsizes # before
$ git repack --write-midx --write-bitmap-index -d --geometric=2
$ packsizes # after

How does this command work? We select a set of packs and combine their objects into one new pack that replaces the set. But picking this set optimally is NP-hard, so we have to approximate it.

To see how we perform that approximation, let's walk through an example. The first step is to figure out how many packs already form a geometric progression. To do this, imagine ordering packs by how many objects they contain. Then, consider each adjacent pair of packs from largest to smallest. At each step, ask: "is the larger pack at least twice the size of the smaller one?". If so, then every pack from that pair onwards already forms a geometric progression.

In this example, the second and third packs (each containing one object) violate our progression. At that point, we know that the second pack, and any packs below it must be repacked together in order to restore the progression.

But we can't just repack the first two packs together, since the combined pack would still be too big (it would contain two objects, and the third pack only contains one). So we grow the set of packs to combine until the invariant is restored:

Here, we had to combine the first four packs together in order to restore a geometric progression. Those packs together contain 7 objects, which is less than half of the next-largest pack (which contains 32 objects). And we can't combine any more packs, since doing so would violate the remainder of the progression.

At this point, we can write a new pack containing just the objects in the set of packs we combined in the previous step. After discarding the now-redundant packs, the remaining packs again form a geometric progression:

This means that the number of packs grow logarithmically over time, so a repository will never have too many packs at any one point in time. It also has the appealing property that older objects tend to get pushed into the larger packs, meaning they get repacked less frequently as time passes. An important corollary of this is that each repack tends to focus on the most recently pushed objects. In other words, this strategy tends to make repacking take time proportional to the number of new objects, not the number of overall objects.

In order to keep the repository performing well over many geometric repacks, we intersperse an all-into-one repack once for every eight geometric repacks.

Importantly, this means that even though the classically-slow repacks are still slow, we aren't forced to run them every time we want to repack a repository.

Deploying to production

Now that we have a way to write a bitmap that covers the objects in multiple packs, a way to quickly map between bit positions and the objects they refer to in a multi-pack index, and a repacking strategy which only requires modifying recent additions to the repository, we are ready to put everything together.

Before rolling out a change as large as this one, we performed extensive local testing to ensure that writing bitmaps worked correctly, and that our new repacking strategy wasn't silently corrupting repositories. But our local testing can only go so far: there are endless corner cases when serving fetches and clones, so the real test occurs only after putting real traffic in front of these new paths. Our goal was to design a deployment strategy that simultaneously exercised enough of those cases, while also ensuring that any potential corruption could never occur on a majority of repository replicas.

Our first test cases were internal repositories. We broke our original tests into two phases. In the first phase, we wrote "multi-pack bitmaps" which contained only a single pack. This allowed us to exercise the most basic case of multi-pack bitmaps (having only one pack) without running our new repack code. Once we had built confidence in that approach, we expanded our test to alternate between geometric and full repacks.

After a couple of weeks without any issues, we were confident enough in our change to start testing it on other repositories external to GitHub. We selected first an individual host, and then a whole rack of hosts on which every repack would alternate between geometric and full. At this stage, results were encouraging: the average time to repack had dropped significantly, as had the overall amount of time spent repacking.

By this stage, our roll-out proceeded for several weeks in only one of three data centers. Because we never place a majority of repository replicas in any single datacenter, this configuration made it impossible for our changes to corrupt a majority set of replicas in an unrecoverable fashion, while still putting our changes in the request path for a large amount of traffic.

Finally, after adopting this configuration for a week, we proceeded to enroll percentages of replicas hosted in other datacenters to also use multi-pack bitmaps until all repositories were using multi-pack reachability bitmaps.

After rolling out our new repacking strategy with multi-pack bitmaps, we saved on average 5.67 CPU days every hour compared to the old strategy.

Likewise, the average time spent repacking any single repository also dropped considerably. Below, the plot is broken out per-site, and you can see when we began testing in a single site, as well as when we expanded our deployment to all sites.

There, the average dropped from around 1 minute to repack a repository to just 15 seconds.

Future directions

There are two major open areas we're considering for the future that will make it possible for further performance improvements:

One open area is the bitmap computation itself. Git's bitmap generation code can reuse existing bitmaps by permuting their bits into a new order, but this operation can still take time proportional to the size of the repository. One way to solve this would be to write bitmaps incrementally, only walking the new objects introduced since the last time a bitmap was written. This problem is tricky because it requires not only that the bitmap file be able to be written incrementally, but also that the object ordering we select is stable: that is, that introducing new bitmaps won't render the existing ones meaningless.

Another open area is the pack structure. Creating packs that form a geometric sequence is a promising step forward that allows us to trade off between full and partial repacks. But some repositories are so large that repacking the whole repository isn't feasible, much less desirable. Designing a strategy which freezes the packs containing the oldest objects in a repository's history will allow us to grow to support even larger repositories in the future.

Thank you

This project would not have been possible without help from the upstream Git community, as well as many engineering teams within GitHub. Each of these changes required extensive review, both to the Git project, as well as to internal GitHub services. Special thanks to Jeff King, Derrick Stolee, Jonathan Tan, Junio Hamano, and others for making this possible.