Post Syndicated from Grab Tech original https://engineering.grab.com/taming-monorepo-beast
At Grab, our engineering teams rely on a massive Go monorepo that serves as the backbone for a large portion of our backend services. This repository has been our development foundation for over a decade, but age brought complexity, and size brought sluggishness. What was once a source of unified code became a bottleneck that was slowing down our developers and straining our infrastructure.
A primer on GitLab, Gitaly, and replication
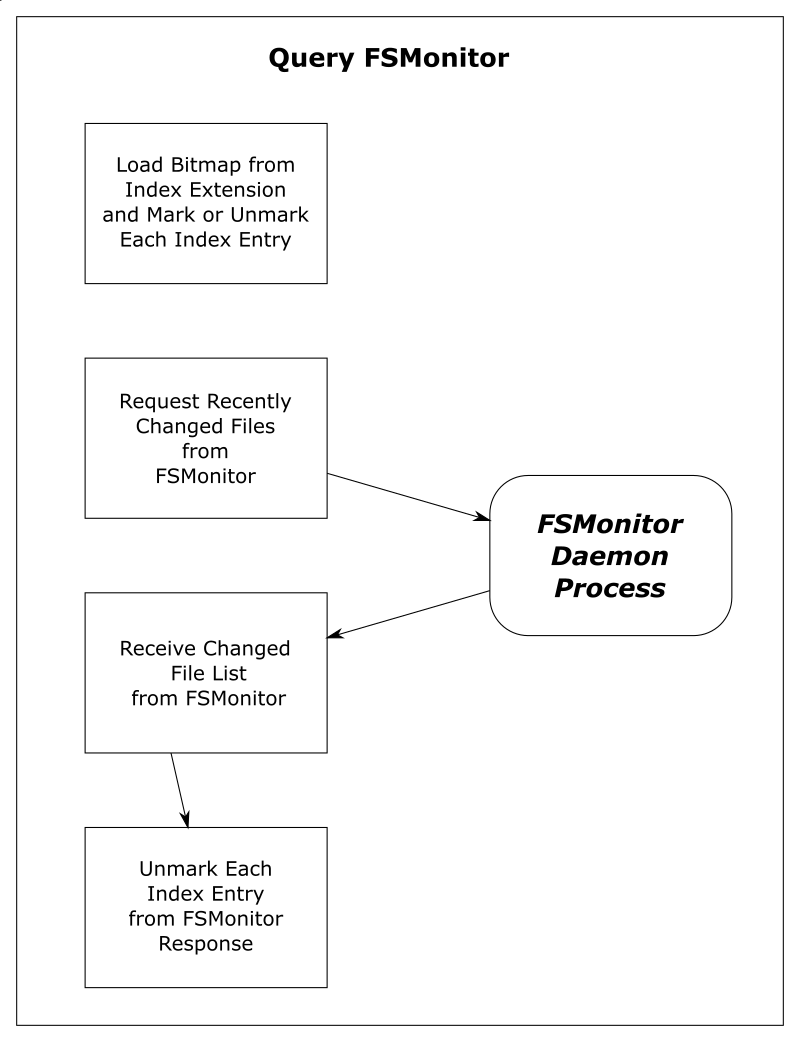
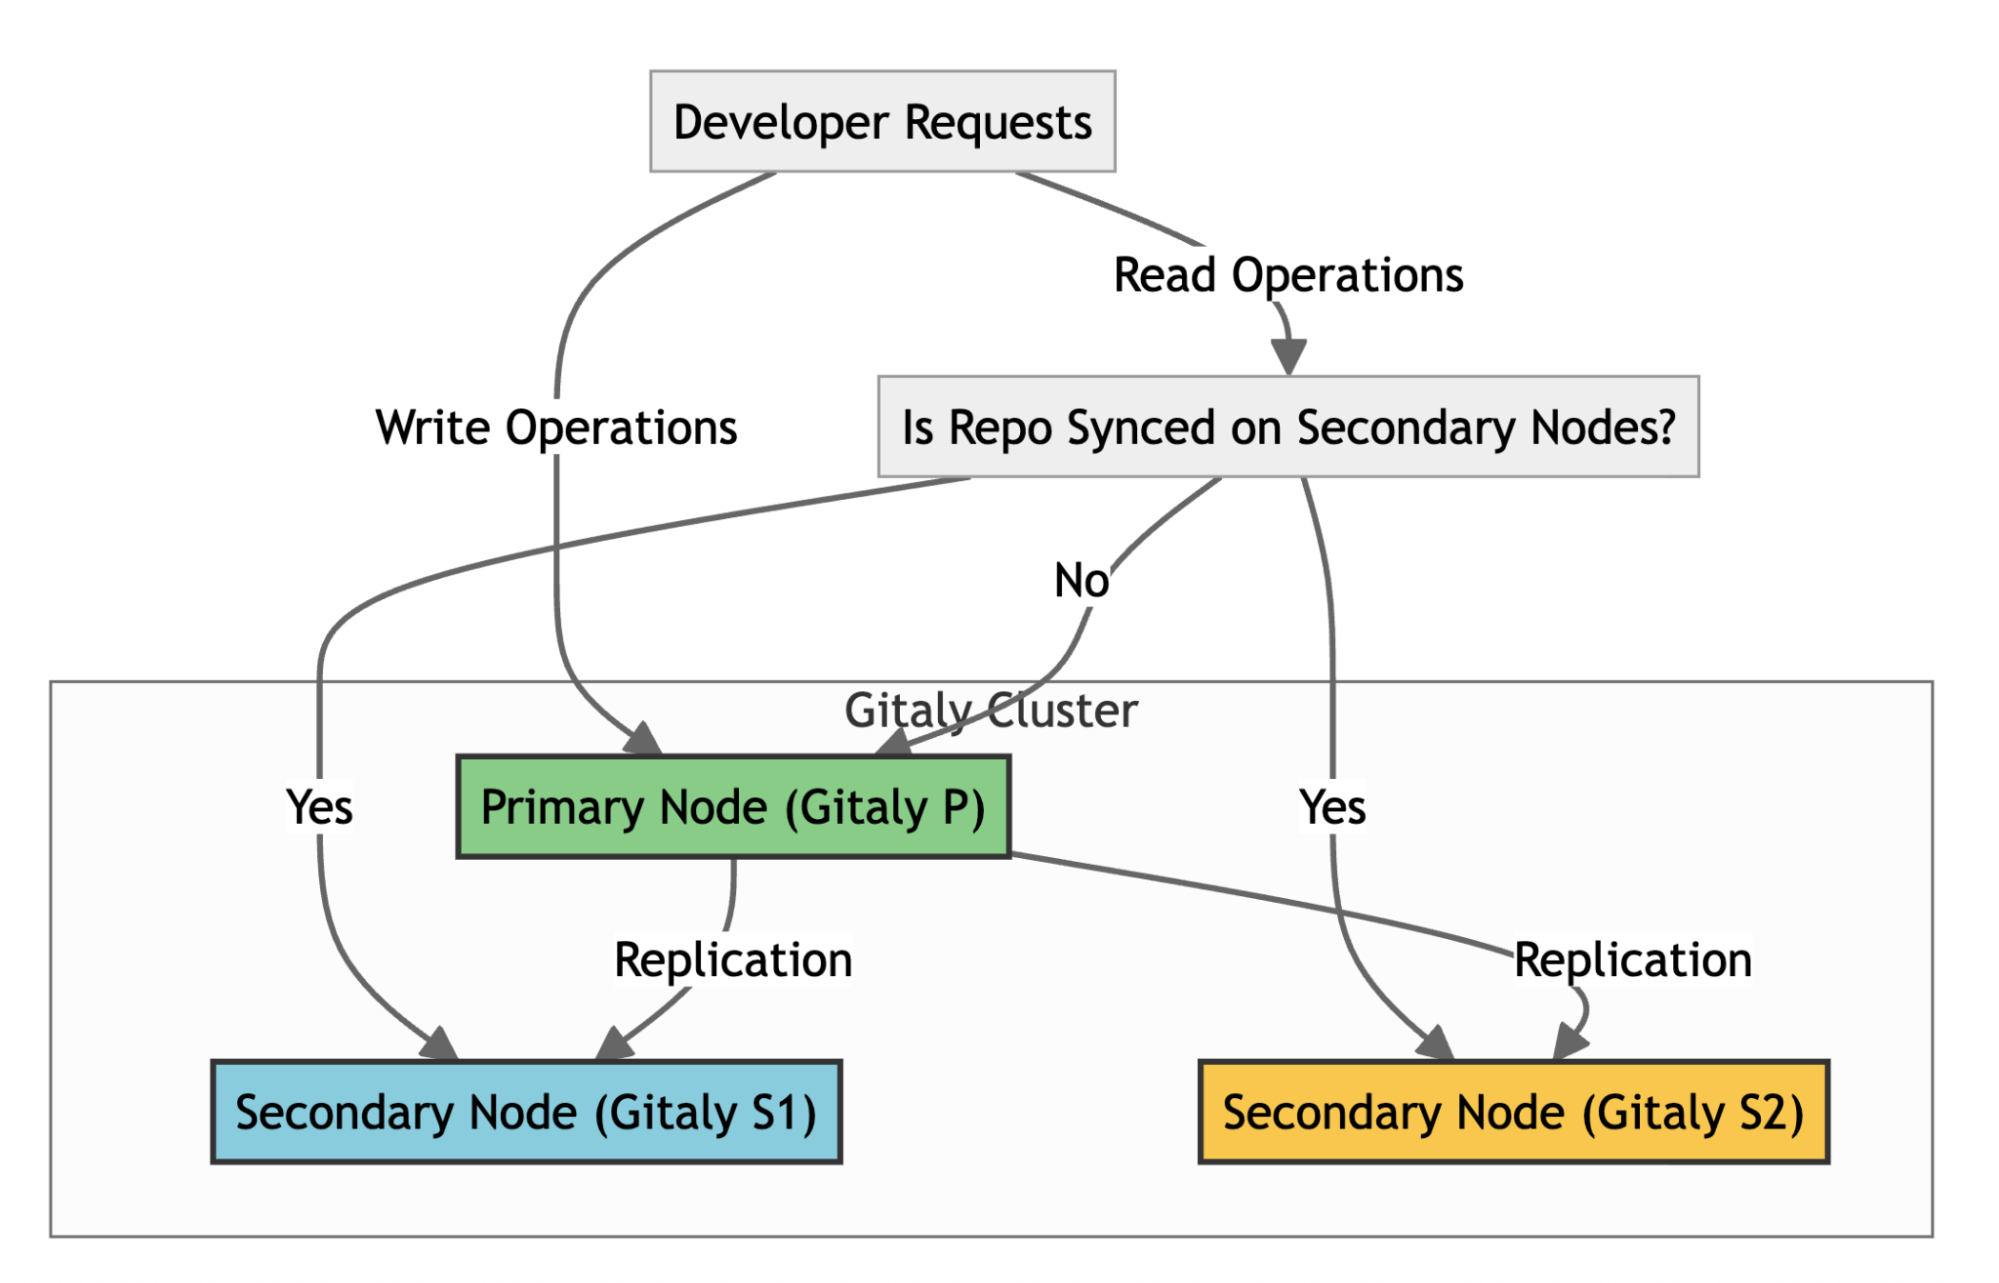
To understand our core problem, it’s helpful to know how GitLab handles repositories at scale. GitLab uses Gitaly, its Git RPC service, to manage all Git operations. In a high-availability setup like ours, we use a Gitaly Cluster with multiple nodes.
Here’s how it works:
- Write operations: A primary Gitaly node handles all write operations.
- Replication: Data is replicated to secondary nodes.
- Read operations: Secondary nodes handle read operations, such as clones and fetches, effectively distributing the load across the cluster.
- Failover: If the primary node fails, a secondary node can take over.
For the system to function effectively, replication must be nearly instantaneous. When secondary nodes experience significant delays syncing with the primary—a condition called replication lag—GitLab stops routing read requests to the secondary nodes to ensure data consistency. This forces all traffic back to the primary node, eliminating the benefits of our distributed setup. Figure 1 illustrates the replication architecture of Gitaly nodes.
The scale of our problem
Our Go monorepo started as a simple repository 11 years ago but ballooned as Grab grew. A Git analysis using the git-sizer utility in early 2025 revealed the shocking scale:
- 12.7 million commits accumulated over a decade.
- 22.1 million Git trees consuming 73GB of metadata.
- 5.16 million blob objects totaling 176GB.
- 12 million references, mostly leftovers from automated processes.
- 429,000 commits deep on some branches.
- 444,000 files in the latest checkout.
This massive size wasn’t just a number—it was crippling our daily operations.
Infrastructure problems
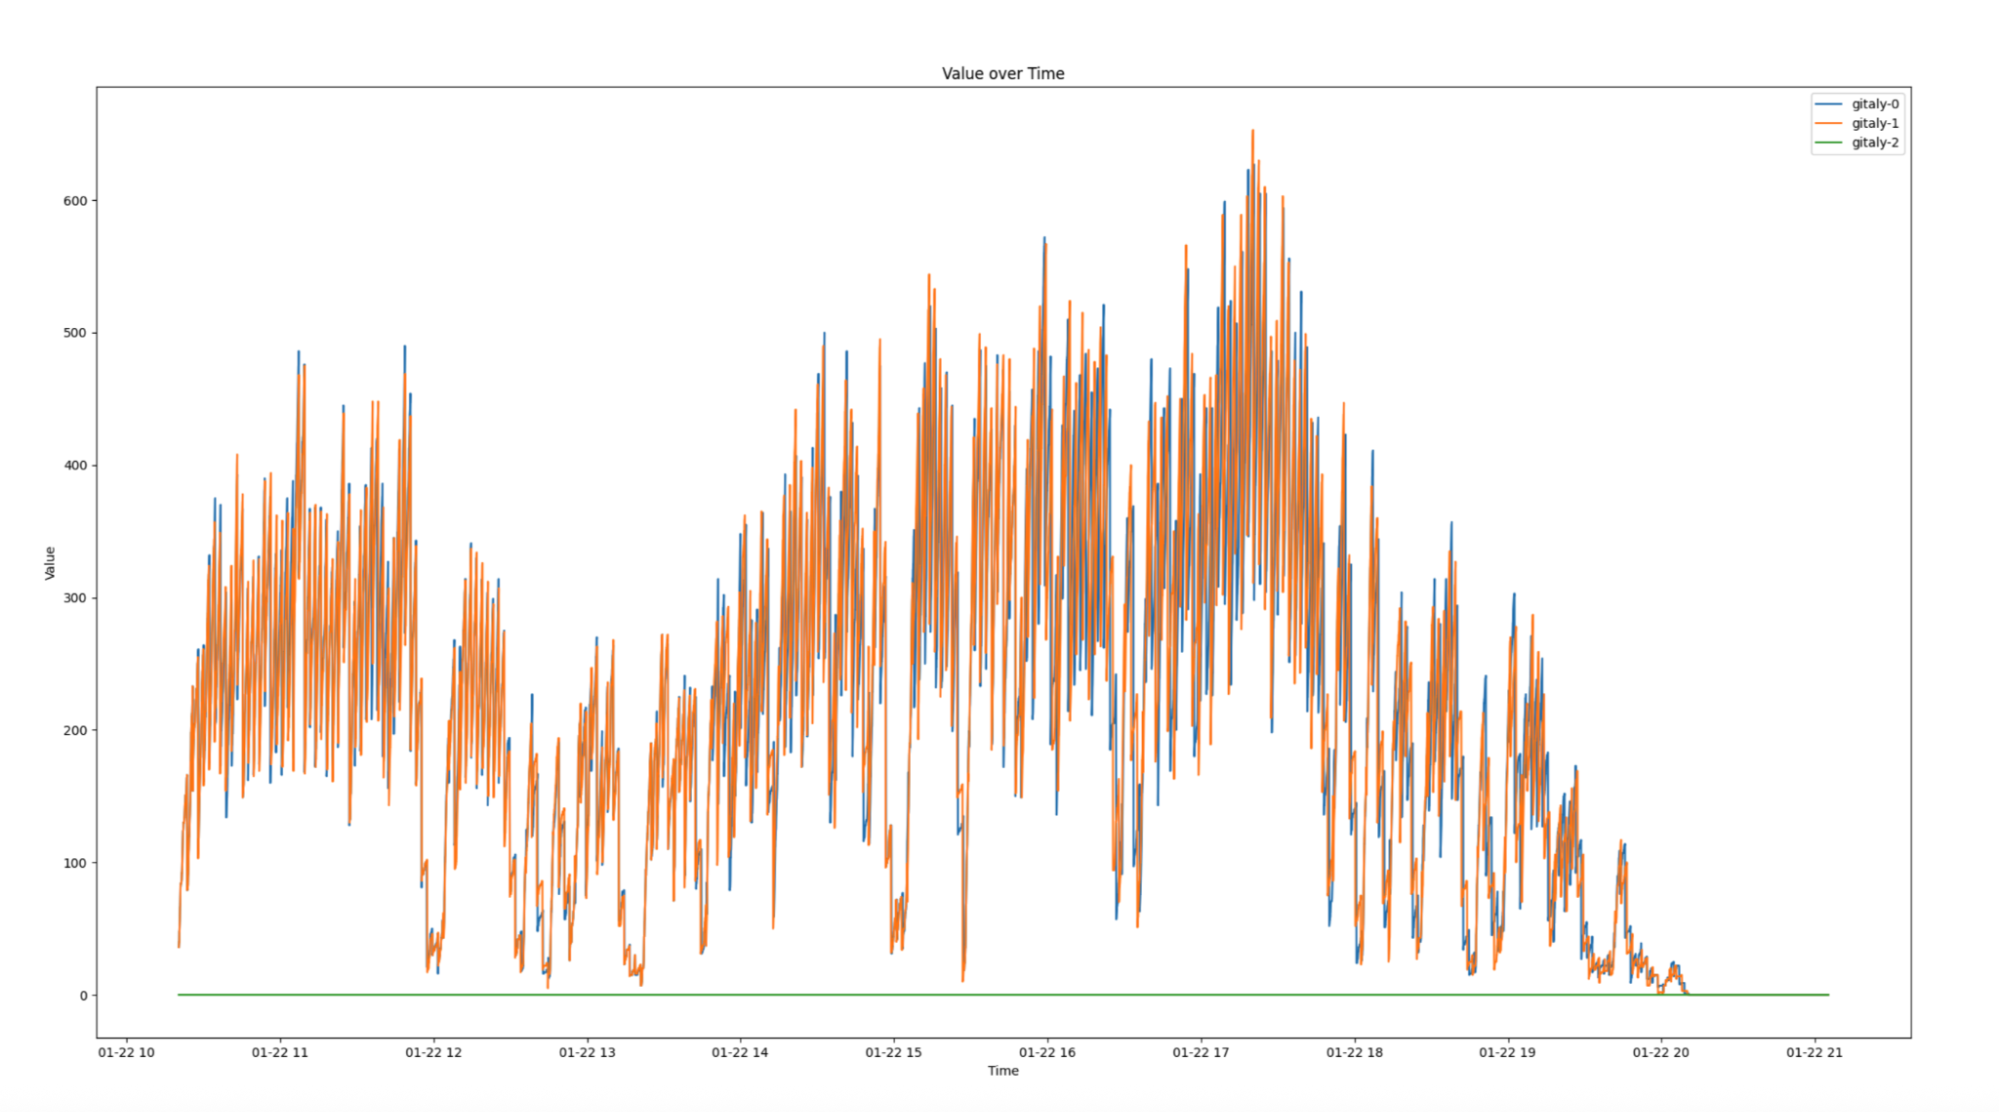
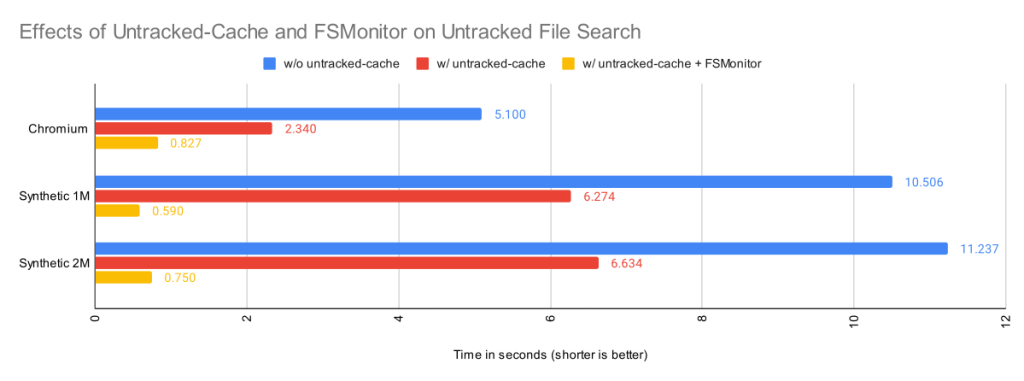
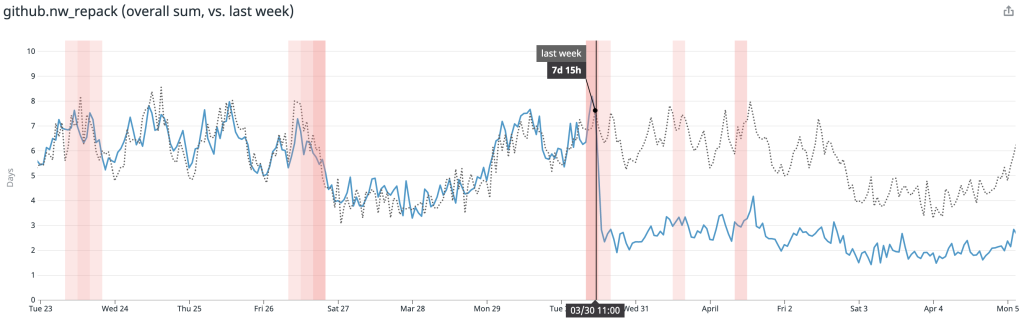
In high-availability setups, replication is critical for distributing workloads and ensuring system reliability. However, when replication delays occur, they can severely impact infrastructure performance and create bottlenecks. Figure 2 illustrates replication delays of up to four minutes which caused both secondary nodes, Gitaly S1 (orange) and Gitaly S2 (blue), to lag behind the primary node, Gitaly P (green). As a result, all requests were routed exclusively to the primary node, creating significant performance challenges.
The key issues here are:
- Single point of failure: Only one of our three Gitaly nodes could handle the load, creating a bottleneck.
- Throttled throughput: The system limits the read capacity to just one-third of the cluster’s potential.
Developer experience issues
The growing size of the monorepo directly impacted developer workflows:
- Slow clones: 8+ minutes even on fast networks.
- Painful Git operations: Every commit, diff, and blame had to process millions of objects.
- CI pipeline overhead: Repository cloning added up 5-8 minutes to every CI job.
- Frustrated developers: “Why is this repo so slow?” became a common question.
Operational challenges
The repository’s scale introduced significant operational hurdles:
- Storage issues: 250GB of Git data made backups and maintenance cumbersome.
- GitLab UI timeouts: The web interface struggled to handle millions of commits and refs, frequently timing out.
- Limited CI scalability: Adding more CI runners overloaded the single working node.
All these factors were dragging down developer productivity. It was clear that continuing to let the monorepo grow unchecked wasn’t sustainable. We needed to make the repository leaner and faster, without losing the important history that teams relied on.
Our solution journey
Proof of concept: Validating the theory
Before making any changes, we needed to answer a critical question: “Would trimming repository history solve our replication issues?” Without proof, committing to such a major change felt risky. So we set out to test the idea.
The test setup:
We designed a simple experiment. In our staging environment, we created two repositories:
- Full history repository: This repository mirrored the original repository with full history.
- Shallow history repository: This repository contained only a single commit history.
Both repositories contained the same number of files and directories. We then simulated production-like load on both of the repositories.
The results:
- Full history repository: 160-240 seconds replication delay.
- Shallow history repository: 1-2.5 seconds replication delay.
This was nearly a 100x improvement in replication performance.
This proof of concept gave us confidence that history trimming was the right approach and provided baseline performance expectations.
Content preservation strategies: What to keep
Initial strategy: Time-based approach (1-2 years)
Initially, we wanted to keep commits from the last 1-2 years and archive everything else, as this seemed like a reasonable balance between recent history and size reduction. However, when we developed our custom migration script, we discovered it could only process 100 commits per hour, approximately 2,400 commits per day. With millions of commits in the original repository, even keeping 1-2 years of history would take months.
- We can only process ~100 commits per hour in batches of 20 to avoid memory limits on GitLab runners.
- Each batch takes 2 minutes to process, but requires 10 minutes of cleanup (
git gc,git reflog expire) to prevent local disk and memory exhaustion. - This means each batch takes 12 minutes, allowing only 5 batches per hour (60 ÷ 12 = 5), totaling to 100 commits per hour (5 × 20 = 100).
- Larger batches increased cleanup time and skipping cleanup caused jobs to crash after 200-300 commits.
The bottleneck wasn’t just the number of commits, it was the 10-minute cleanup process.
Additional constraints discovered:
As we dug deeper, we discovered more obstacles.
- Critical dependencies extended beyond two years. Some Go module tags from six years ago were still actively used.
- A pure time-based cut would break existing build pipelines.
- Development teams needed some recent history for troubleshooting and daily operations.
Revised strategy: Tag-based + recent history
Given the processing speed constraint of 100 commits per hour, we needed to drastically reduce the number of commits while preserving essential functionality. After careful evaluation, we settled on a tag-based approach combined with recent history.
What we decided to keep:
- Critical tags: All commits reachable by 2,000+ identified tags, ensuring semantic importance for releases and dependencies.
- Recent history: Complete commit history for the last month only addressing stakeholder needs within processing constraints.
- Simplified merge commits: Converted complex merge commits into single commits to further reduce processing time.
Why this approach worked:
- Time-feasible: Reduced processing time from months to weeks.
- Functionally complete: Preserved all tagged releases and recent development context.
- Stakeholder satisfaction: Met development teams’ need for recent history.
- Massive size reduction: Achieved 99.9% fewer commits while keeping what matters.
The trade-off:
We sacrificed deep historical browsing of 1 to 2 years for practical migration feasibility, while ensuring no critical functionality was lost.
Technical implementation methods: How to execute
Method 1: git filter-repo (Failed)
The approach: Use Git’s filter-repo tool with git replace --graft to remove commits older than a specified criteria.
Why it failed:
- Complex history: Our repository’s highly non-linear history, with multiple branches and merges, made this approach impractical.
- Workflow complexity: The process required numerous
git replace --graftcommands to account for various branches and dependencies, significantly complicating the workflow. - Risk of inconsistencies: The complexity introduced a high risk of errors and inconsistencies, making this method unsuitable.
Method 2: git rebase –onto (Failed)
The approach: Use git rebase --onto to preserve selected commits while pruning unwanted history.
Why it failed:
- Scale issues: The repository size overwhelmed the rebase process.
- Conflict resolution: High number of unexpected conflicts that couldn’t be resolved automatically.
- Technical limitations: Batch processing couldn’t solve the performance issues; Git’s internal mechanisms struggled with the scale.
Method 3: Patch-based implementation (Failed)
The approach: Create and apply patches for each commit individually to preserve repository history.
Why it failed:
- Merge commit complexity: Couldn’t maintain correct parent-child relationships for merge commits.
- History integrity: Resulted in linear sequence instead of preserving original merge structure.
- Missing commits: Important merge commits were lost or incorrectly applied.
Method 4: Custom migration script (Success!)
The breakthrough: A sophisticated custom script that could handle our specific requirements and processing constraints. Unlike traditional Git history rewriting tools, our script implements a two-phase chronological processing approach that efficiently handles large-scale repositories.
Phase 1: Bulk migration
In this phase, the script focuses on reconstructing history based on critical tags.
- Fetch tags chronologically: Retrieve all tags in the order they were created.
- Pre-fetch Large File Storage (LFS) objects: Collect LFS objects for tag-related commits before processing.
- Batch processing: Process tags in batches of 20 to optimize memory and network usage. For each tag:
- Check for associated LFS objects.
- Perform selective LFS fetch if required.
- Create a new commit using the original tree hash and metadata.
- Embed the original commit hash in the commit message for traceability.
- Gracefully handle LFS checkout failures.
Then, push the processed batch of 20 commits to the destination repository, with LFS tolerance.
- Cleanup and continue: Perform cleanup operations after each batch and proceed to the next.
Phase 2: Delta migration
This phase integrates recent commits after the cutoff date.
- Fetch recent commits: Retrieve all commits created after the cutoff date in chronological order.
- Batch processing: Process commits in batches of 20 for efficiency. For each commit:
- Check for associated LFS objects.
- Perform selective LFS fetch if required.
- Recreate the commit with its original metadata.
- Embed the original commit hash for resumption tracking in case of interruptions.
- Gracefully handle LFS checkout failures.
Then, push the processed batch of commits to the destination repository, with LFS tolerance.
- Tag mapping: Map tags to their corresponding new commit hashes.
- Push tags: Push related tags pointing to the correct new commits.
- Final validation: Validate all LFS objects to ensure completeness.
LFS handling
The script incorporates robust mechanisms to handle Git LFS efficiently.
- Configure LFS for incomplete pushes.
- Skip LFS download errors when possible.
- Retry checkout with LFS smudge skip.
- Perform selective LFS object fetching.
- Gracefully degrade processing for missing LFS objects.
Key features:
- Sequential processing of tags and commits in chronological order.
- Resumable operations that could restart from the last processed item if interrupted.
- Batch processing to manage memory and network resources efficiently.
- Robust error handling for network issues and Git complications.
- Maintains repository integrity while simplifying complex merge structures.
- Optimized for our specific preservation strategy (tags + recent history).
Implementation: Executing the migration
With our strategy defined (tags + last month), we executed the migration using our custom script. This process involved careful planning, smart processing techniques, and overcoming technical challenges.
Smart processing approach
Our custom script employed several key strategies to ensure efficient and reliable migration:
- Sequential tag processing: Replay tags chronologically to maintain logical history.
- Resumable operations: The migration could restart from the last processed item if interrupted.
- Batch processing: Handle items in manageable groups to prevent resource exhaustion.
- Progress tracking: Monitor processing rate and estimated completion time.
Technical challenges solved
The migration addressed several critical technical hurdles.
- Large file support: Handled Git LFS objects with incomplete push allowances.
- Error handling: Robust retry logic for network issues and Git errors.
- Merge commit simplification: Converted complex merge structures to linear commits.
Two-phase migration strategy
The migration was executed in two carefully planned phases.
- Phase 1 – Bulk migration: Migrated 95% of tags while keeping the old repo live.
- Phase 2 – Delta migration: Performed final synchronization during a maintenance window to migrate recent changes.
Results and impact
Infrastructure transformation
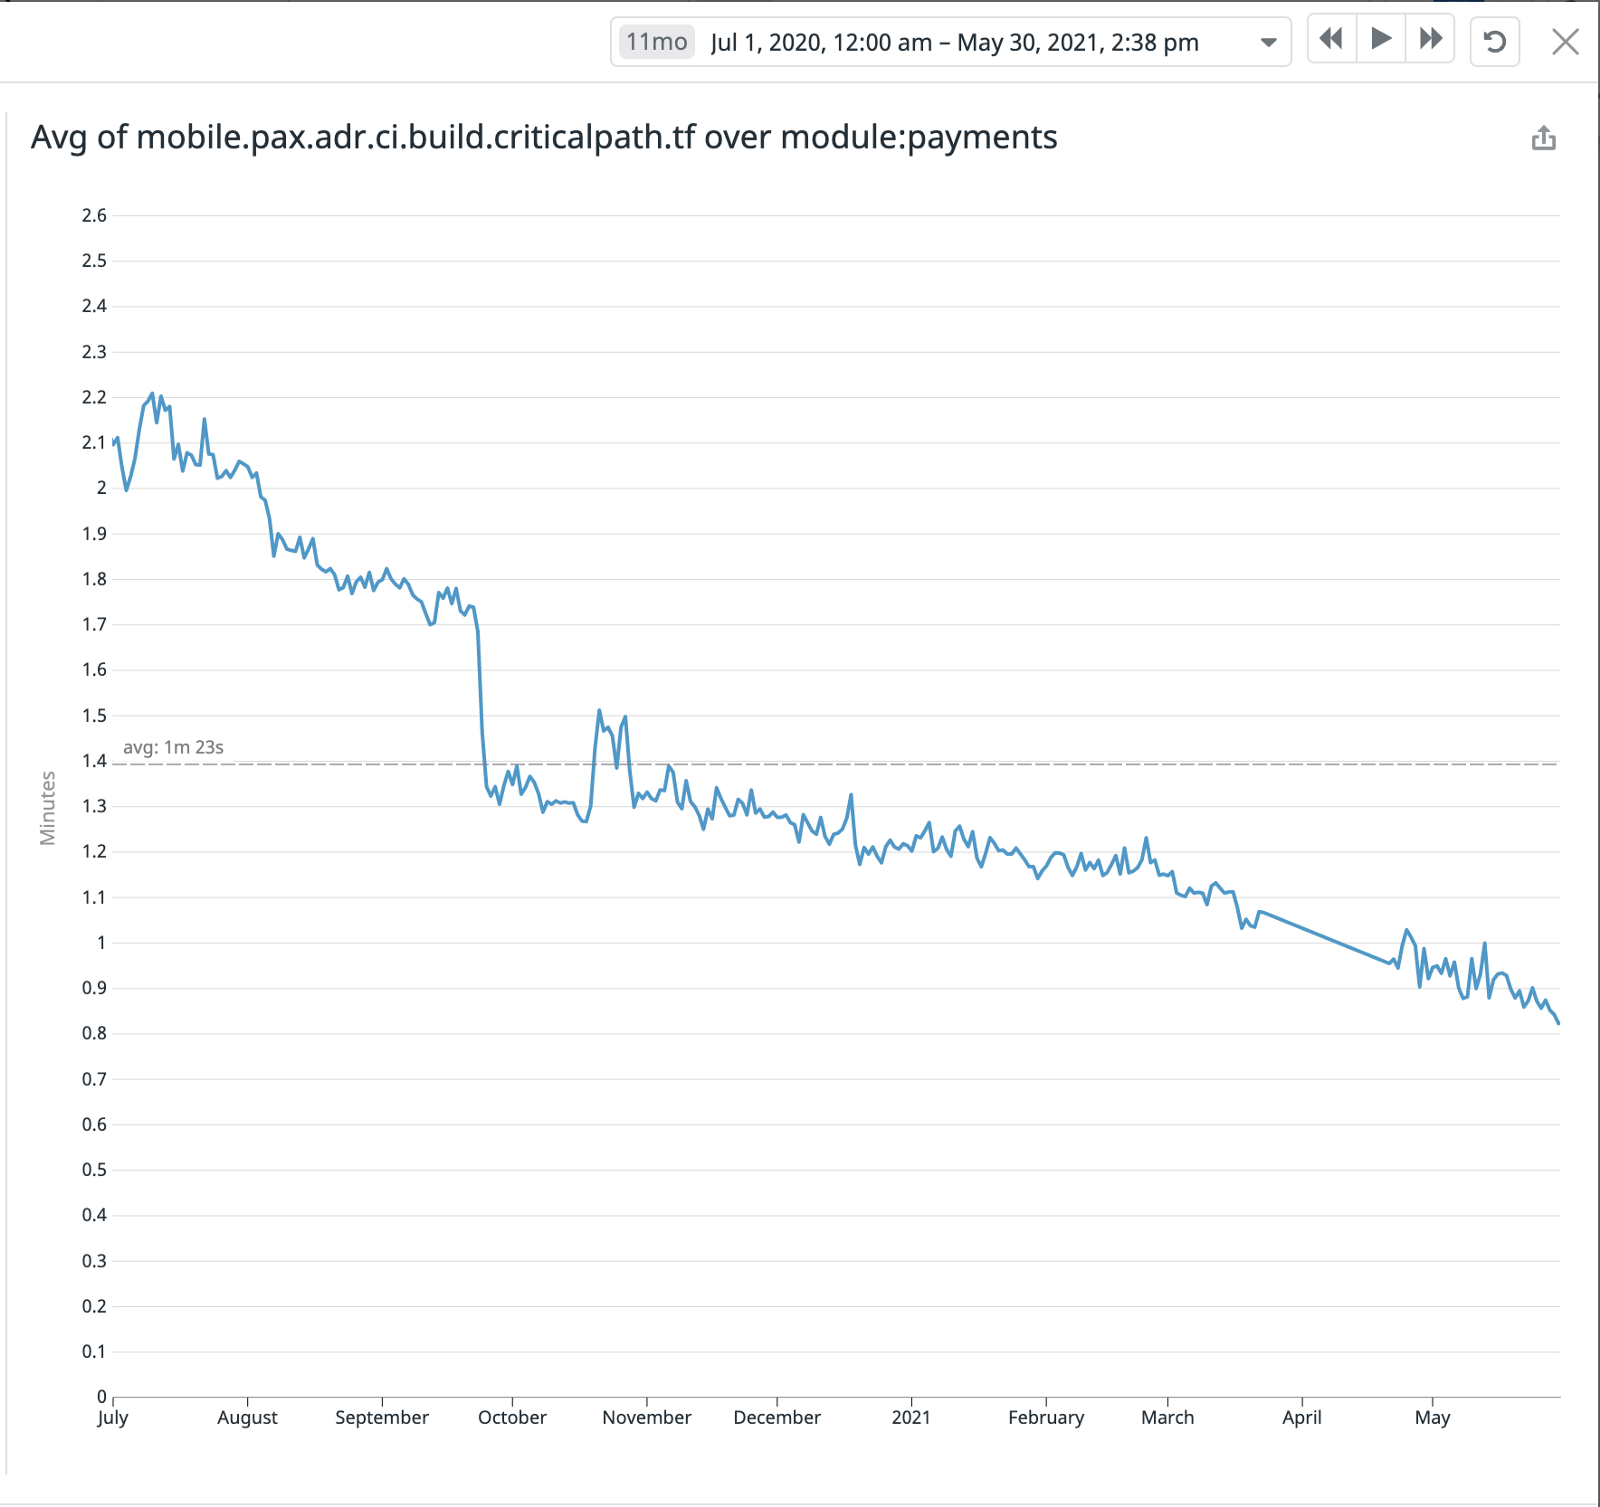
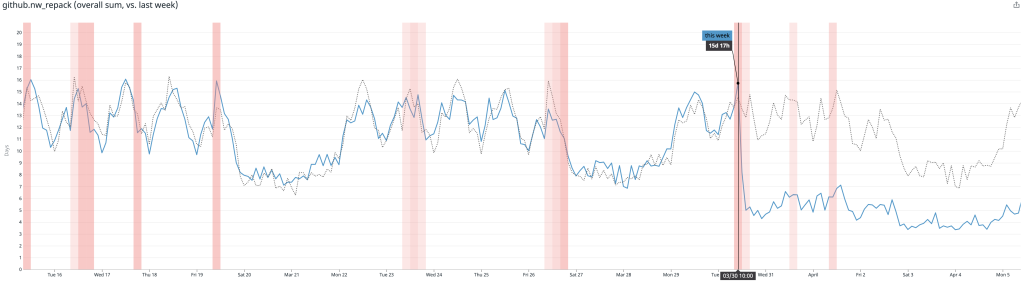
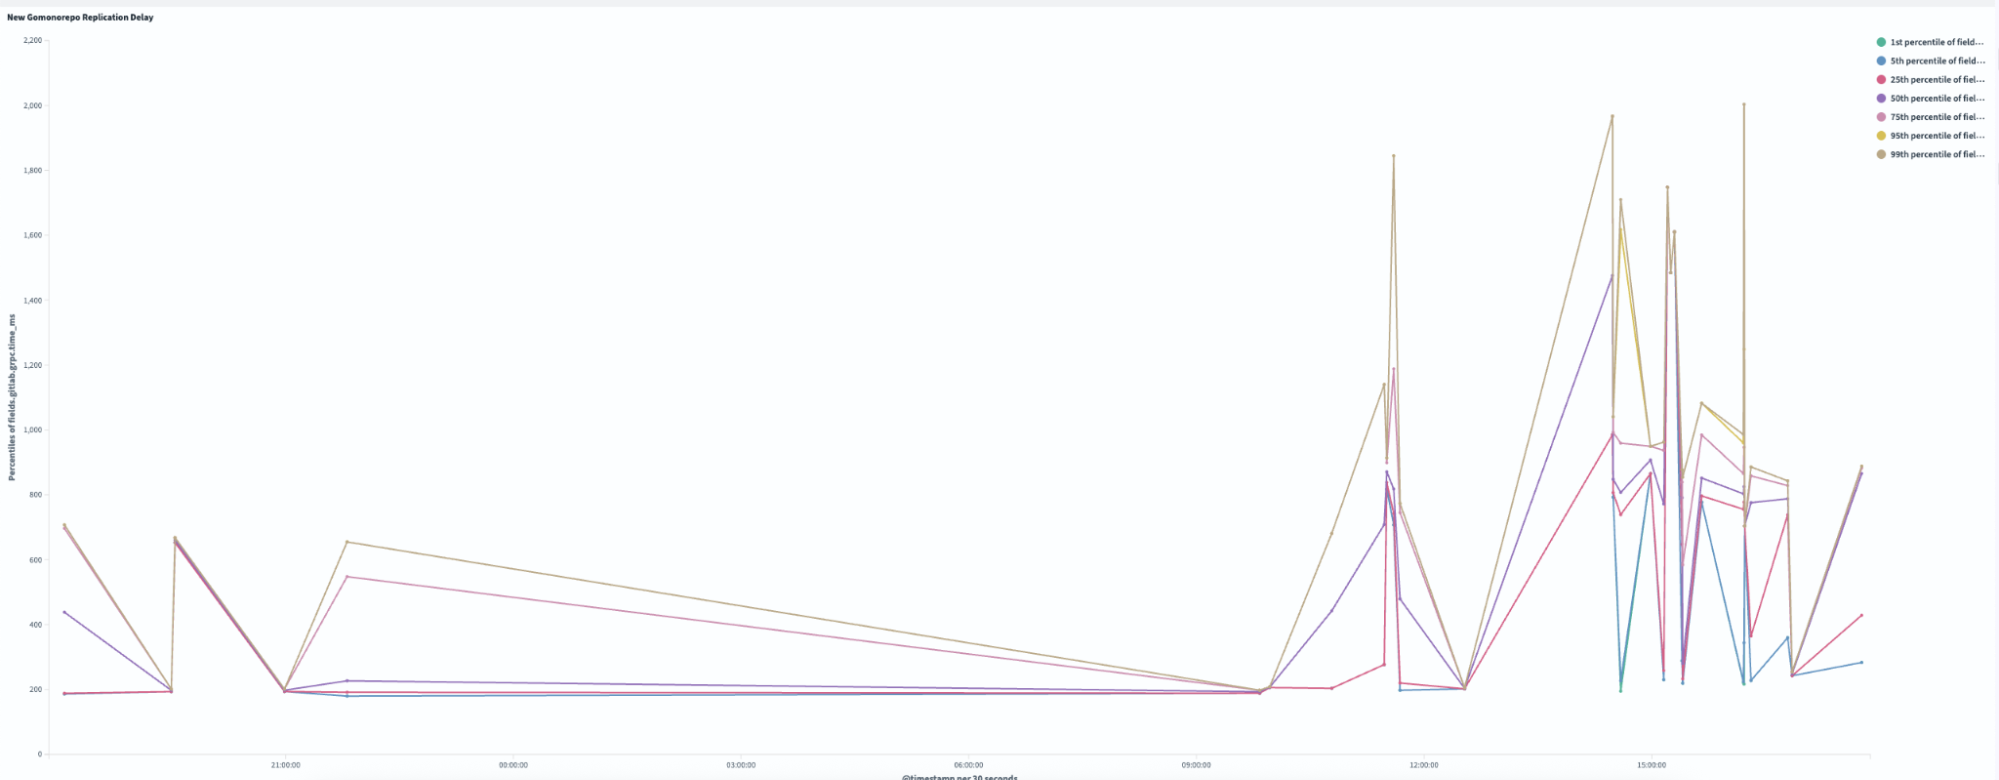
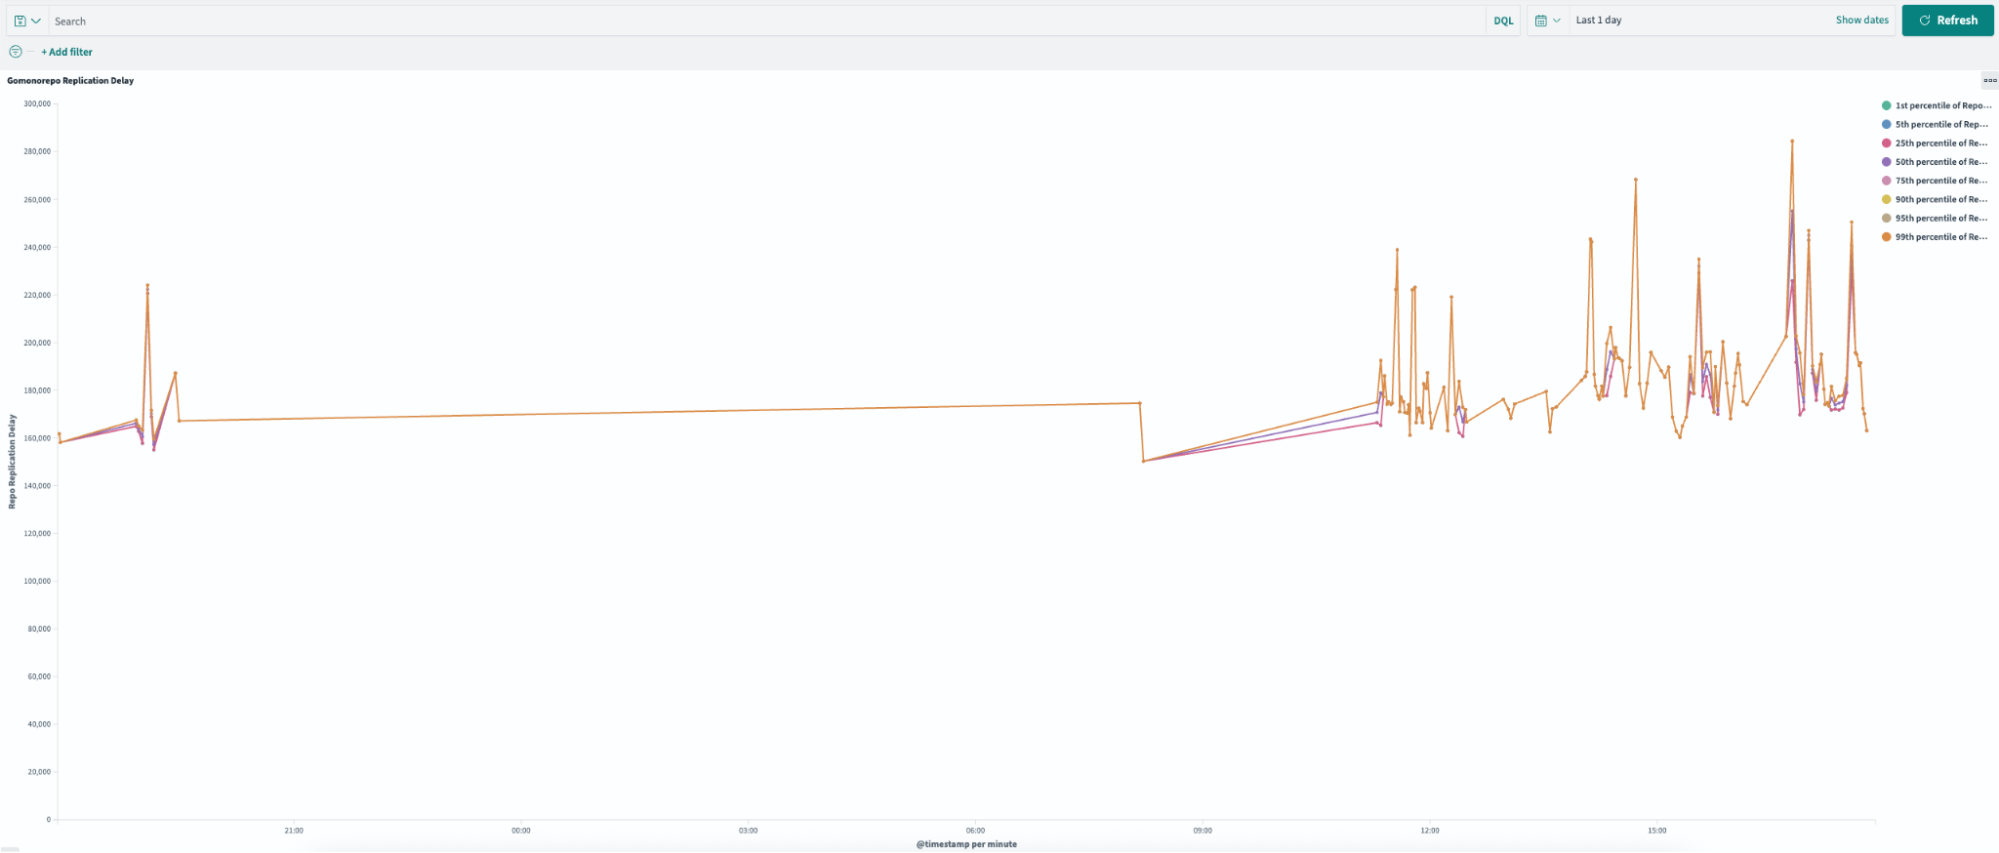
Replication delay, or the time required to sync across all Gitaly nodes, improved by 99.4% following the pruning process. As illustrated in Figures 3 and 4, the new pruned monorepo achieves replication in under ~1.5 seconds on average, compared to ~240 seconds for the old repository. This transformation eliminated the previous single-node bottleneck, enabling read requests to be distributed evenly across all three storage nodes, significantly enhancing system reliability and performance.
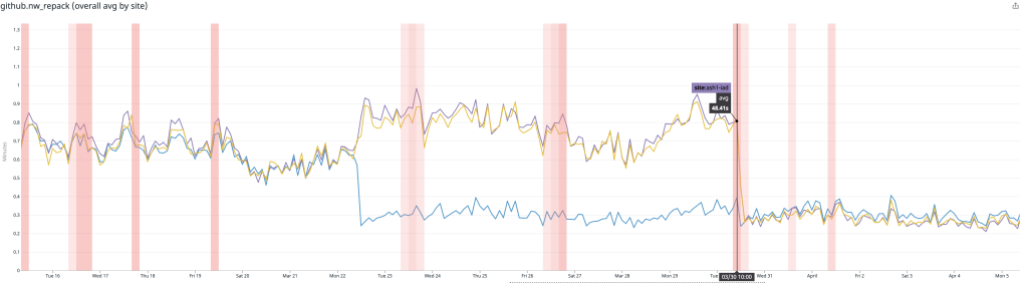
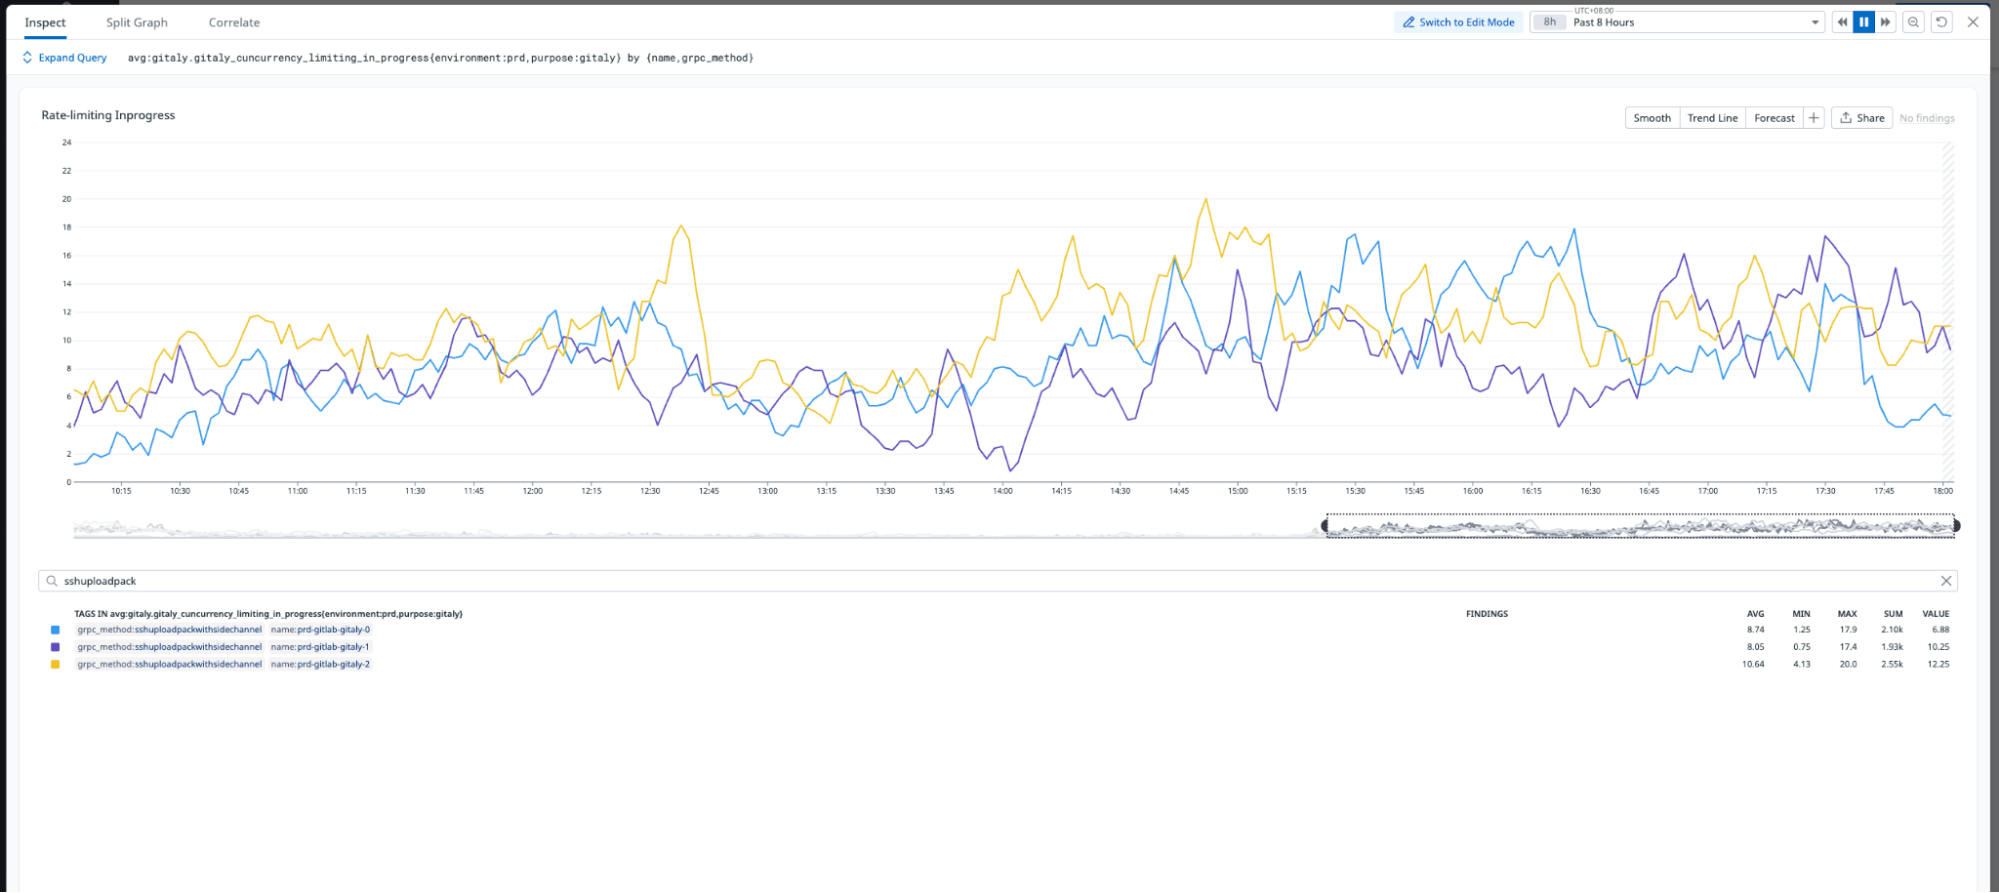
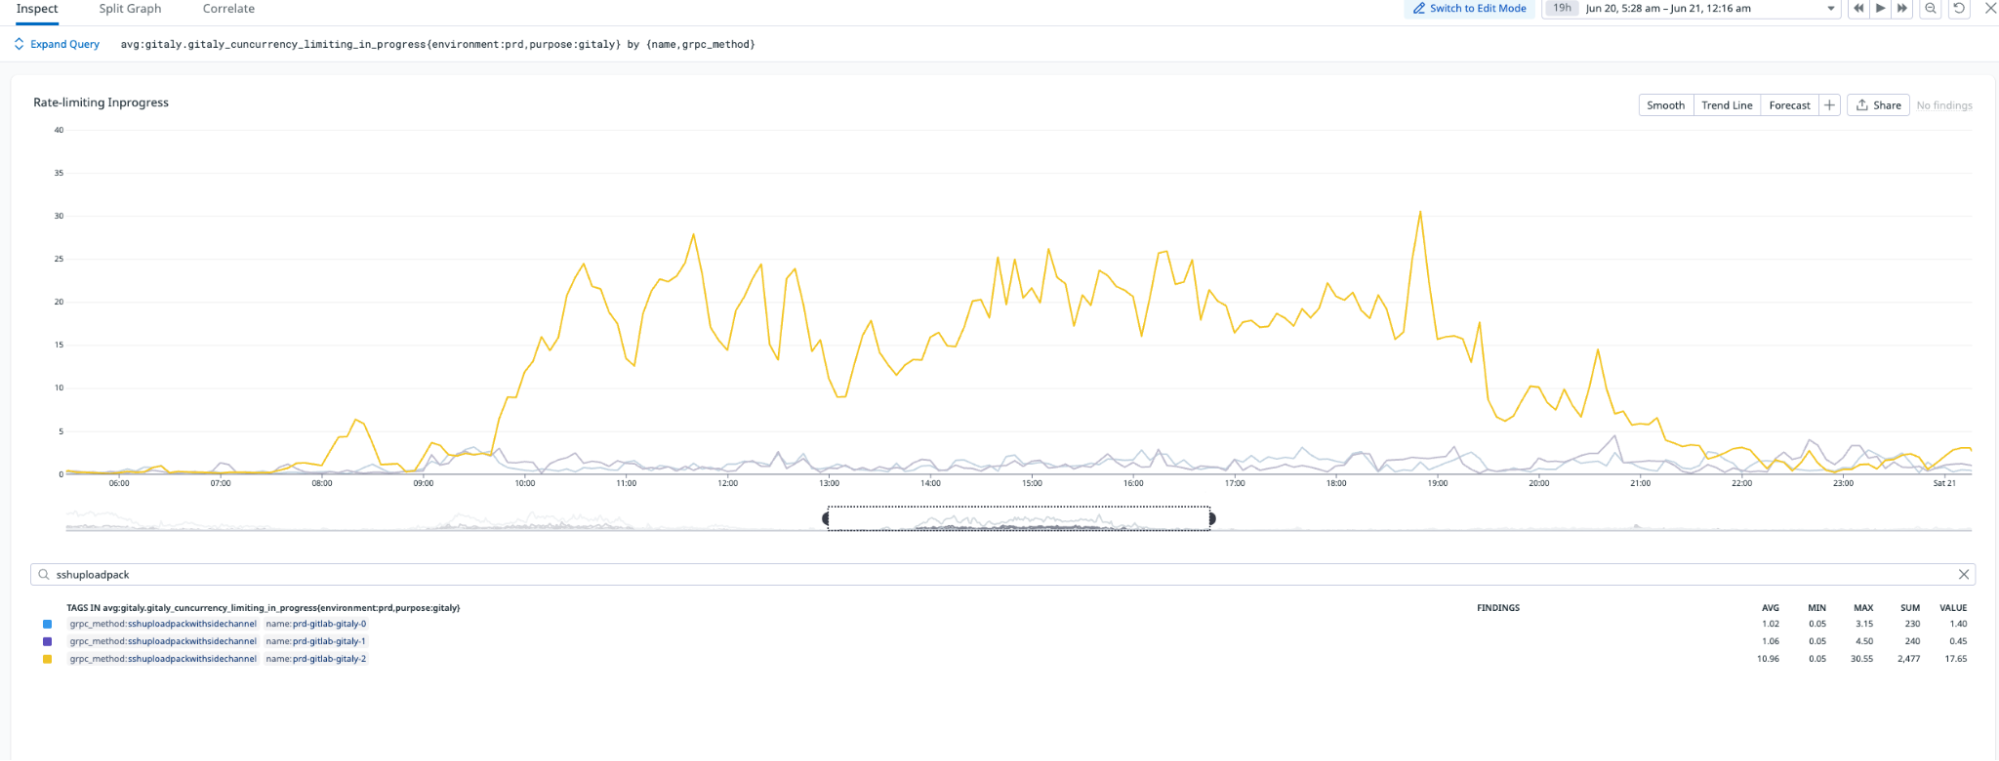
The migration significantly improved load distribution across Gitaly nodes. As shown in Figure 5, the new monorepo leverages all three Gitaly nodes to serve requests, effectively tripling read capacity. Additionally, the migration eliminated the single point of failure that existed in the old monorepo, ensuring greater reliability and scalability.
Performance improvements
The migration resulted in significant improvements across multiple areas.
- Clone time: Reduced from 7.9 minutes to 5.1 minutes, achieving a 36% improvement, making repository cloning faster and more efficient.
- Commit count: Achieved a 99.9% reduction, trimming the repository from 13 million commits to just 15.8 thousand commits, drastically simplifying its structure.
- References: Reduced by 99.9%, going from 12 million to 9.8 thousand refs, streamlining repository metadata.
- Storage: Reduced by 59%, shrinking storage requirements from 214GB to 87GB, optimizing resource usage.
Developer experience
The migration also transformed the developer experience.
- Faster Git operations: Commits, diffs, and history commands are noticeably snappier.
- Responsive GitLab UI: Web interface no longer times out.
- Scalable CI: The system can now safely run 3x more concurrent jobs.
The following table summarizes the key repository metrics, comparing the state of the repository before and after the migration:
| Metric | Old Monorepo | New Monorepo | Reduction |
|---|---|---|---|
| Commits | ~13,000,000 | ~15,800 | −99.9% (histories squashed) |
| Git trees | ~23,600,000 | ~2,080,000 | −91% (pruned) |
| Git references | ~12,200,000 | 9,860 | −99.9% (cleaned) |
| Blob storage | 214 GiB | 86.8 GiB | −59% (smaller packs) |
| Files in checkout | ~444,000 | ~444,000 | ~0% (no change) |
| Latest code size | ~9.9 GiB | ~8.4 GiB | ~−15% (slightly leaner) |
Key challenges and lessons learned
Such a large-scale migration wasn’t without its hiccups and lessons. Here are some challenges we faced and what we learned:
Git LFS woes
Initially, GitLab rejected some commits due to missing LFS objects, even old commits that we weren’t keeping. This happened because GitLab’s push hook expected the content of LFS pointers, even if the files weren’t required. To fix this, we had to allow incomplete pushes and skip LFS download errors. We also wrote logic to selectively fetch LFS objects for commits we were keeping. This ensured that any binary assets needed by tagged commits were present in the new repo. The takeaway is that LFS adds complexity to history rewrites – plan for it by adjusting Git LFS settings (e.g., lfs.allowincompletepush) and verifying important large files are carried over.
Pipeline token scoping
Right after the cutover, some CI pipelines failed to access resources. We discovered a GitLab CI/CD pipeline token issue – our new repo’s ID wasn’t in the allowed list for certain secure token scopes. We quickly updated the settings to include the new project, resolving the authorization error. If your CI jobs interact with other projects or use project-scoped tokens, remember to update those references when you migrate repositories.
Commit hash references broke
One of our internal tools was using commit SHA-1 hashes to track deployed versions. Since rewriting history means changing all commit hashes, the tool couldn’t find the expected commits. The solution was to map old hashes to new ones for the tagged releases, or better, to modify the tool to use tag names instead of raw hashes going forward. We learned to communicate early with teams that have any dependency on Git commit IDs or history assumptions. In our case, providing a mapping of old tag→new tag (which were mostly 1-to-1 except for the commit SHA) helped them adjust. In hindsight, using stable identifiers like semantic version tags, is much more robust than relying on commit hashes, which are ephemeral in a rewritten history.
Developer concerns: “Where’s my history?”
A few engineers were concerned when they noticed that the git log in the new repo only showed two years of history. From their perspective, useful historical context seemed gone. We addressed this by pointing them to the archived full-history repo. In fact, we kept the old repository read-only in our GitLab, so anyone can still search the old history if needed (just not in the main repo). Additionally, we received suggestions on making the archive easily accessible or even automate a way to query old commits on demand. From this we learned, if you prune history, ensure there’s a plan to access legacy information for those rare times it’s needed – whether that’s an archive repo, a Git bundle, or a read-only mirror.
Office network bottleneck
Interestingly, after the migration, a few developers in certain offices didn’t feel a huge speed improvement in clones. It turned out their corporate network/VPN was the limiting factor – cloning 8 GiB vs 10 GiB over a slow link is not a night and day difference. This highlighted that we should continue to work with the IT team on improving network performance. The repo is faster, but the environment matters too. We’re using this as an opportunity to improve our office VPN throughput so that the 36% clone improvement is realized by everyone, not just CI machines.
Automation and hardcoded IDs
We had a lot of automation around the monorepo (scripts, webhooks, integrations). Most of these referenced the project by name, which remained the same, so they were fine. However, a few used the project’s numeric ID in the GitLab API, which changed when we created a new repo. Those broke. We had to scan and update some configs to use the new project ID. Our learning here is to audit all external references such as CI configs, deploy scripts, and monitor jobs when migrating repositories. Ideally, use identifiable names instead of IDs, or ensure you’re prepared to update them during the cutover.
Adjusting to new boundaries
Some teams had to adjust their workflows after the prune. For instance, one team was in the habit of digging into 3 to 5 year old commit logs to debug issues. Post-migration, git log doesn’t go back that far in the main repo; they have to consult the archive for that. It’s a cultural shift to not have all history at your fingertips. We held a short information session to explain how to access the archived repo and emphasized the benefits (faster operations) that come with the lean history. After a while, teams embraced the new normal, appreciating the speed and rarely needing the older commits anyway.
In the end, we had zero data loss – all actual code and tags were preserved – and only some minor inconveniences that were resolved within a day or two. The challenges reinforced the importance of thorough testing (our staging dry-runs caught many issues) and cross-team communication when making such a change.
Impact and next steps
This migration transformed our development infrastructure from a bottleneck into a performance enabler. We eliminated the single point of failure, restored confidence in our Git operations, and created a foundation that can support our growing engineering team.
As the next step, we plan to generalize our pruning script to apply the same optimization techniques to other repositories, ensuring consistency and scalability across our infrastructure. Additionally, we will implement continuous performance monitoring to track repository health and proactively address any emerging issues. To prevent future repository bloat, we aim to establish clear best practices and guidelines, empowering teams to maintain efficiency while supporting the growth of our engineering operations.
Conclusion
What started as a performance crisis became one of our most successful infrastructure projects. By focusing on the right problems—infrastructure reliability and performance rather than just size—we achieved dramatic improvements that benefit every developer daily.
The key takeaway is that sometimes the biggest technical challenges require custom solutions, careful planning, and willingness to iterate until you find what works. Our 99% improvement in replication performance is just the beginning of what’s possible when you tackle infrastructure problems systematically.
This migration was completed by Grab Tech Infra DevTools team, involving months of analysis, custom tooling development, and careful production migration of critical infrastructure serving thousands of developers across multiple time zones.
Join us
Grab is a leading superapp in Southeast Asia, operating across the deliveries, mobility and digital financial services sectors. Serving over 800 cities in eight Southeast Asian countries, Grab enables millions of people everyday to order food or groceries, send packages, hail a ride or taxi, pay for online purchases or access services such as lending and insurance, all through a single app. Grab was founded in 2012 with the mission to drive Southeast Asia forward by creating economic empowerment for everyone. Grab strives to serve a triple bottom line – we aim to simultaneously deliver financial performance for our shareholders and have a positive social impact, which includes economic empowerment for millions of people in the region, while mitigating our environmental footprint.
Powered by technology and driven by heart, our mission is to drive Southeast Asia forward by creating economic empowerment for everyone. If this mission speaks to you, join our team today!