Tag Archives: Amazon CodeCatalyst

Implementing GitFlow with Amazon CodeCatalyst

Post Syndicated from Michael Ohde original https://aws.amazon.com/blogs/devops/implementing-gitflow-with-amazon-codecatalyst/

Amazon CodeCatalyst is a unified software development service for building and delivering applications on AWS. With CodeCatalyst, you can implement your team’s preferred branching strategy. Whether you follow popular models like GitFlow or have your own approach, CodeCatalyst Workflows allow you to design your development process and deploy to multiple environments.

Introduction

In a previous post in this series, Using Workflows to Build, Test, and Deploy with Amazon CodeCatalyst, we discussed creating a continuous integration and continuous delivery (CI/CD) pipeline in CodeCatalyst and how you can continually deliver high-quality updates through the use of one workflow. I will build on these concepts by focusing on how you collaborate across your codebase by using multiple CodeCatalyst Workflows to model your team’s branching strategy.

Having a standardized process for managing changes to the codebase allows developers to collaborate predictably and focus on delivering software. Some popular branching models include GitFlow, GitHub flow, and trunk-based development.

  • GitFlow is designed to manage large projects with parallel development and releases, featuring multiple long-running branches.
  • GitHub flow is a lightweight, branch-based workflow that involves creating feature branches and merging changes into the main branch.
  • Trunk-based development is focused on keeping the main branch always stable and deployable. All changes are made directly to the main branch, and issues are identified and fixed using automated testing and deployment tools.

In this post, I am going to demonstrate how to implement GitFlow with CodeCatalyst. GitFlow uses two permanent branches, main and develop, with supporting branches. The prefix names of the supporting branches give the function they serve — feature, release, and hotfix. I will apply this strategy by separating these branches into production and integration, both with their own workflow and environment. The main branch will deploy to production and the develop branch plus the supporting branches will deploy to integration.

Implementing GitFlow with CodeCatalyst
Figure 1. Implementing GitFlow with CodeCatalyst.

Upon completing the walkthrough, you will have the ability to utilize these techniques to implement any of the popular models or even your own.

Prerequisites

If you would like to follow along with the walkthrough, you will need to:

Walkthrough

For this walkthrough, I am going use the Static Website blueprint with the default configuration. A CodeCatalyst blueprint creates new project with everything you need to get started. To try this out yourself, launch the blueprint by following the steps outlined in the Creating a project in Amazon CodeCatalyst.

Once the new project is launched, I navigate to CI/CD > Environments. I see one environment called production. This environment was setup when the project was created by the blueprint. I will now add my integration environment. To do this, I click the Create environment above the list of environments.

Initial environment list with only production.
Figure 2. Initial environment list with only production.

A CodeCatalyst environment is where code is deployed and are configured to be associated with your AWS account using AWS account connections. Multiple CodeCatalyst environments can be associated with a single AWS account, allowing you to have environments in CodeCatalyst for development, test, and staging associated with one AWS account.

In the next screen, I enter the environment name as integration, select Non-production for the environment type, provide a brief description of the environment, and select the connection of the AWS account I want to deploy to. To learn more about connecting AWS accounts review Working with AWS accounts in Amazon CodeCatalyst. I will make note of my connection Name and Role, as I will need it later in my workflow. After I have entered all the details for the integration environment, I click Create environment on the bottom of the form. When I navigate back to CI/CD > Environments I now see both environments listed.

Environment list with integration and production.
Figure 3. Environment list with integration and production.

Now that I have my production and integration environment, I want to setup my workflows to deploy my branches into each separate environment. Next, I navigate to CI/CD > Workflows. Just like with the environments, there is already a workflow setup by the blueprint created called OnPushBuildTestAndDeploy. In order to review the workflow, I select Edit under the Actions menu.

OnPushBuildTestAndDeploy workflow Actions menu.
Figure 4. OnPushBuildTestAndDeploy workflow Actions menu.

By reviewing the workflow YAML, I see the OnPushBuildTestAndDeploy workflow is triggered by the main branch and deploys to production. Below I have highlighted the parts of the YAML that define each of these. The Triggers in the definition determine when a workflow run should start and Environment where code is deployed to.

Name: OnPushBuildTestAndDeploy
...
Triggers:
  - Type: PUSH
    Branches:
      - main
...
  Deploy:
...
    Environment:
      Name: production
      Connections:
        - Name: ****
          Role: ****

Since this confirms the production workflow is already done, I will copy this YAML and use it to create my integration workflow. After copying the entire OnPushBuildTestAndDeploy YAML to my clipboard (not just the highlights above), I navigate back to CI/CD > Workflows and click Create Workflow. Then in the Create workflow dialog window click Create.

Create workflow dialog window.
Figure 5. Create workflow dialog window.

Inside the workflow YAML editor, I replace all the existing content by pasting the OnPushBuildTestAndDeploy YAML from my clipboard. The first thing I edit in the YAML is the name of the workflow. I do this by finding the property called Name and replacing OnPushBuildTestAndDeploy to OnIntegrationPushBuildTestAndDeploy.

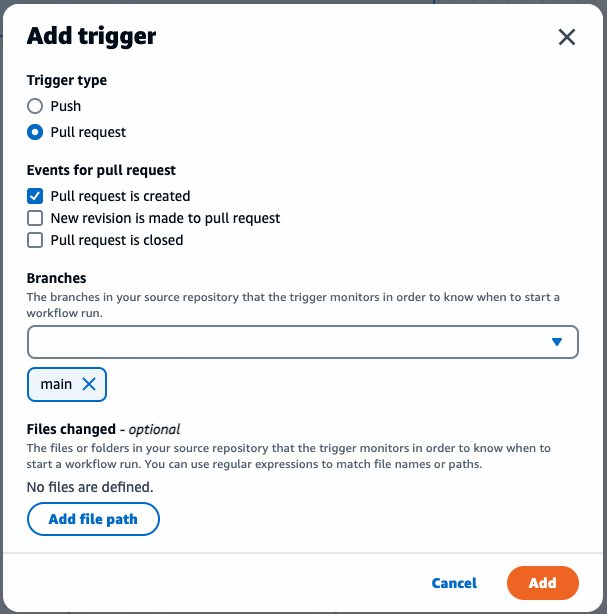
Next, I want to change the triggers to the develop branch and match the supporting branches by their prefixes. Triggers allow you to specify multiple branches and you can use regex to define your branch names to match multiple branches. To explore triggers further read Working with triggers.

Triggers:
  - Type: PUSH
    Branches:
      - develop
      - "feature/.*"
      - "release/.*"
      - "hotfix/.*"

After my triggers are updated, I need to update the Environment property with my integration environment. I replace both the Name and the Connections properties with the correct values for my integration environment. I use the Name and Role from the integration environment connection I made note of earlier. For additional details about environments in workflows review Working with environments.

  Deploy:
...
    Environment:
      Name: integration
      Connections:
        - Name: ****
          Role: ****

Before finishing the integration workflow, I have highlighted the use of ${WorkflowSource.BranchName} in the Deploy action. The workflow uses the BranchName variable to prevent different branch deployments from overwriting one another. This is important to verify as all integration branches use the same environment. The WorkflowSource action outputs both CommitId and BranchName to workflow variables automatically. To learn more about variables in workflows review Working with variables.

  Deploy:
...	
    Configuration:
      AmplifyBranchName: ${WorkflowSource.BranchName}

I have included the complete sample OnIntegrationPushBuildTestAndDeploy workflow below. It is the developer’s responsibility to delete resources their branches create even after merging and deleting branches as there is no automated cleanup.

Entire sample integration workflow.
Figure 6. Entire sample integration workflow.

After I have validated the syntax of my workflow by clicking Validate, I then click Commit. Confirm this action by clicking Commit in the Commit workflow modal window.

Commit workflow dialog window.
Figure 7. Commit workflow dialog window.

Immediately after committing the workflow, I can see the new OnIntegrationPushBuildTestAndDeploy workflow in my list of workflows. I see that the workflow shows the “Workflow is inactive”. This is expected as I am looking at the main branch and the trigger is not invoked from main.

Now that I have finished the implementation details of GitFlow, I am now going to create the permanent develop branch and a feature branch to test my integration workflow. To add a new branch, I go to Code > Source repositories > static-website-content, select Create branch under the More menu.

Source repository Actions menu.
Figure 8. Source repository Actions menu.

Enter develop as my branch name, create the branch from main, and then click Create.

Create the develop branch from main.
Figure 9. Create the develop branch from main.

I now add a feature branch by navigating back to the create branch screen. This time, I enter feature/gitflow-demo as my branch name, create the branch from develop, and then click Create.

Create a feature branch from develop.
Figure 10. Create a feature branch from develop.

To confirm that I have successfully implemented GitFlow, I need to verify that the feature branch workflow is running. I return to CI/CD > Workflows, select feature/gitflow-demo from the branch dropdown, and see the integration workflow is running.

Feature branch running integration workflow.
Figure 11. Feature branch running integration workflow.

To complete my testing of my implementation of GitFlow, I wait for the workflow to succeed. Then I view the newly deployed branch by navigating to the workflow and clicking on the View app link located on the last workflow action.

Lastly, now that GitFlow is implemented and tested, I will step through getting the feature branch to production. After I make my code changes to the feature branch, I create a pull request to merge feature/gitflow-demo into develop. Note that pull requests were covered in the prior post in this series. When merging the pull request select Delete the source branch after merging this pull request, as the feature branch is not a permanent branch.

Deleting the feature branch when merging.
Figure 12. Deleting the feature branch when merging.

Now that my changes are in the develop branch, I create a release branch. I navigate back to the create branch screen. This time I enter release/v1 as my branch name, create the branch from develop, and then click Create.

Create the release branch from main.
Figure 13. Create the release branch from main.

I am ready to release to production, so I create a pull request to merge release/v1 into main. The release branch is not a permanent branch, so it can also be deleted on merge. When the pull request is merged to main, the OnPushBuildTestAndDeploy workflow runs. After the workflow finishes running, I can verify my changes are in production.

Cleanup

If you have been following along with this workflow, you should delete the resources you deployed so you do not continue to incur charges. First, delete the two stacks that deployed using the AWS CloudFormation console in the AWS account(s) you associated when you launched the blueprint and configured the new environment. These stacks will have names like static-web-XXXXX. Second, delete the project from CodeCatalyst by navigating to Project settings and choosing Delete project.

Conclusion

In this post, you learned how to use triggers and environments in multiple workflows to implement GitFlow with Amazon CodeCatalyst. By consuming variables inside workflows, I was able to further customize my deployment design. Using these concepts, you can now implement your team’s branching strategy with CodeCatalyst. Learn more about Amazon CodeCatalyst and get started today!

Michael Ohde

Michael Ohde is a Senior Solutions Architect from Long Beach, CA. As a Product Acceleration Solution Architect at AWS, he currently assists Independent Software Vendor (ISVs) in the GovTech and EdTech sectors, by building modern applications using practices like serverless, DevOps, and AI/ML.

Deploy serverless applications in a multicloud environment using Amazon CodeCatalyst

Post Syndicated from Deepak Kovvuri original https://aws.amazon.com/blogs/devops/deploy-serverless-applications-in-a-multicloud-environment-using-amazon-codecatalyst/

Amazon CodeCatalyst is an integrated service for software development teams adopting continuous integration and deployment practices into their software development process. CodeCatalyst puts the tools you need all in one place. You can plan work, collaborate on code, and build, test, and deploy applications by leveraging CodeCatalyst Workflows.

Introduction

In the first post of the blog series, we showed you how organizations can deploy workloads to instances, and virtual machines (VMs), across hybrid and multicloud environment. The second post of the series covered deploying containerized application in a multicloud environment. Finally, in this post, we explore how organizations can deploy modern, cloud-native, serverless application across multiple cloud platforms. Figure 1 shows the solution which we walk through in the post.

Figure 1 – Architecture diagram

The post walks through how to develop, deploy and test a HTTP RESTful API to Azure Functions using Amazon CodeCatalyst. The solution covers the following steps:

  • Set up CodeCatalyst development environment and develop your application using the Serverless Framework.
  • Build a CodeCatalyst workflow to test and then deploy to Azure Functions using GitHub Actions in Amazon CodeCatalyst.

An Amazon CodeCatalyst workflow is an automated procedure that describes how to build, test, and deploy your code as part of a continuous integration and continuous delivery (CI/CD) system. You can use GitHub Actions alongside native CodeCatalyst actions in a CodeCatalyst workflow.

Pre-requisites

Walkthrough

In this post, we will create a hello world RESTful API using the Serverless Framework. As we progress through the solution, we will focus on building a CodeCatalyst workflow that deploys and tests the functionality of the application. At the end of the post, the workflow will look similar to the one shown in Figure 2.

 CodeCatalyst CI/CD workflow

Figure 2 – CodeCatalyst CI/CD workflow

Environment Setup

Before we start developing the application, we need to setup a CodeCatalyst project and then link a code repository to the project. The code repository can be CodeCatalyst Repo or GitHub. In this scenario, we’ve used GitHub repository. By the time we develop the solution, the repository should look as shown below.

Files in solution's GitHub repository

Figure 3 – Files in GitHub repository

In Amazon CodeCatalyst, there’s an option to create Dev Environments, which can used to work on the code stored in the source repositories of a project. In the post, we create a Dev Environment, and associate it with the source repository created above and work off it. But you may choose not to use a Dev Environment, and can run the following commands, and commit to the repository. The /projects directory of a Dev Environment stores the files that are pulled from the source repository. In the dev environment, install the Serverless Framework using this command:

npm install -g serverless

and then initialize a serverless project in the source repository folder:

├── README.md
├── host.json
├── package.json
├── serverless.yml
└── src
    └── handlers
        ├── goodbye.js
        └── hello.js

We can push the code to the CodeCatalyst project using git. Now, that we have the code in CodeCatalyst, we can turn our focus to building the workflow using the CodeCatalyst console.

CI/CD Setup in CodeCatalyst

Configure access to the Azure Environment

We’ll use the GitHub action for Serverless to create and manage Azure Function. For the action to be able to access the Azure environment, it requires credentials associated with a Service Principal passed to the action as environment variables.

Service Principals in Azure are identified by the CLIENT_ID, CLIENT_SECRET, SUBSCRIPTION_ID, and TENANT_ID properties. Storing these values in plaintext anywhere in your repository should be avoided because anyone with access to the repository which contains the secret can see them. Similarly, these values shouldn’t be used directly in any workflow definitions because they will be visible as files in your repository. With CodeCatalyst, we can protect these values by storing them as secrets within the project, and then reference the secret in the CI\CD workflow.

We can create a secret by choosing Secrets (1) under CI\CD and then selecting ‘Create Secret’ (2) as shown in Figure 4. Now, we can key in the secret name and value of each of the identifiers described above.

Figure 4 – CodeCatalyst Secrets

Building the workflow

To create a new workflow, select CI/CD from navigation on the left and then select Workflows (1). Then, select Create workflow (2), leave the default options, and select Create (3) as shown in Figure 5.

Create CodeCatalyst CI/CD workflow

Figure 5 – Create CI/CD workflow

If the workflow editor opens in YAML mode, select Visual to open the visual designer. Now, we can start adding actions to the workflow.

Configure the Deploy action

We’ll begin by adding a GitHub action for deploying to Azure. Select “+ Actions” to open the actions list and choose GitHub from the dropdown menu. Find the Build action and click “+” to add a new GitHub action to the workflow.

Next, configure the GitHub action from the configurations tab by adding the following snippet to the GitHub Actions YAML property:

- name: Deploy to Azure Functions
  uses: serverless/[email protected]
  with:
    args: -c "serverless plugin install --name serverless-azure-functions && serverless deploy"
    entrypoint: /bin/sh
  env:
    AZURE_SUBSCRIPTION_ID: ${Secrets.SUBSCRIPTION_ID}
    AZURE_TENANT_ID: ${Secrets.TENANT_ID}
    AZURE_CLIENT_ID: ${Secrets.CLIENT_ID}
    AZURE_CLIENT_SECRET: ${Secrets.CLIENT_SECRET}

The above workflow configuration makes use of Serverless GitHub Action that wraps the Serverless Framework to run serverless commands. The action is configured to package and deploy the source code to Azure Functions using the serverless deploy command.

Please note how we were able to pass the secrets to GitHub action by referencing the secret identifiers in the above configuration.

Configure the Test action

Similar to the previous step, we add another GitHub action which will use the serverless framework’s serverless invoke command to test the API deployed on to Azure Functions.

- name: Test Function
  uses: serverless/[email protected]
  with:
    args: |
      -c "serverless plugin install --name serverless-azure-functions && \
          serverless invoke -f hello -d '{\"name\": \"CodeCatalyst\"}' && \
          serverless invoke -f goodbye -d '{\"name\": \"CodeCatalyst\"}'"
    entrypoint: /bin/sh
  env:
    AZURE_SUBSCRIPTION_ID: ${Secrets.SUBSCRIPTION_ID}
    AZURE_TENANT_ID: ${Secrets.TENANT_ID}
    AZURE_CLIENT_ID: ${Secrets.CLIENT_ID}
    AZURE_CLIENT_SECRET: ${Secrets.CLIENT_SECRET}

The workflow is now ready and can be validated by choosing ‘Validate’ and then saved to the repository by choosing ‘Commit’. The workflow should automatically kick-off after commit and the application is automatically deployed to Azure Functions.

The functionality of the API can now be verified from the logs of the test action of the workflow as shown in Figure 6.

Test action in CodeCatalyst CI/CD workfl

Figure 6 – CI/CD workflow Test action

Cleanup

If you have been following along with this workflow, you should delete the resources you deployed so you do not continue to incur charges. First, delete the Azure Function App (usually prefixed ‘sls’) using the Azure console. Second, delete the project from CodeCatalyst by navigating to Project settings and choosing Delete project. There’s no cost associated with the CodeCatalyst project and you can continue using it.

Conclusion

In summary, this post highlighted how Amazon CodeCatalyst can help organizations deploy cloud-native, serverless workload into multi-cloud environment. The post also walked through the solution detailing the process of setting up Amazon CodeCatalyst to deploy a serverless application to Azure Functions by leveraging GitHub Actions. Though we showed an application deployment to Azure Functions, you can follow a similar process and leverage CodeCatalyst to deploy any type of application to almost any cloud platform. Learn more and get started with your Amazon CodeCatalyst journey!

We would love to hear your thoughts, and experiences, on deploying serverless applications to multiple cloud platforms. Reach out to us if you’ve any questions, or provide your feedback in the comments section.

About Authors

Picture of Deepak

Deepak Kovvuri

Deepak Kovvuri is a Senior Solutions Architect at supporting Enterprise Customers at AWS in the US East area. He has over 6 years of experience in helping customers architecting a DevOps strategy for their cloud workloads. Deepak specializes in CI/CD, Systems Administration, Infrastructure as Code and Container Services. He holds an Masters in Computer Engineering from University of Illinois at Chicago.

Picture of Amandeep

Amandeep Bajwa

Amandeep Bajwa is a Senior Solutions Architect at AWS supporting Financial Services enterprises. He helps organizations achieve their business outcomes by identifying the appropriate cloud transformation strategy based on industry trends, and organizational priorities. Some of the areas Amandeep consults on are cloud migration, cloud strategy (including hybrid & multicloud), digital transformation, data & analytics, and technology in general.

Picture of Brian

Brian Beach

Brian Beach has over 20 years of experience as a Developer and Architect. He is currently a Principal Solutions Architect at Amazon Web Services. He holds a Computer Engineering degree from NYU Poly and an MBA from Rutgers Business School. He is the author of “Pro PowerShell for Amazon Web Services” from Apress. He is a regular author and has spoken at numerous events. Brian lives in North Carolina with his wife and three kids.

Picture of Pawan

Pawan Shrivastava

Pawan Shrivastava is a Partner Solution Architect at AWS in the WWPS team. He focusses on working with partners to provide technical guidance on AWS, collaborate with them to understand their technical requirements, and designing solutions to meet their specific needs. Pawan is passionate about DevOps, automation and CI CD pipelines. He enjoys watching MMA, playing cricket and working out in the Gym.

Deploy container applications in a multicloud environment using Amazon CodeCatalyst

Post Syndicated from Pawan Shrivastava original https://aws.amazon.com/blogs/devops/deploy-container-applications-in-a-multicloud-environment-using-amazon-codecatalyst/

In the previous post of this blog series, we saw how organizations can deploy workloads to virtual machines (VMs) in a hybrid and multicloud environment. This post shows how organizations can address the requirement of deploying containers, and containerized applications to hybrid and multicloud platforms using Amazon CodeCatalyst. CodeCatalyst is an integrated DevOps service which enables development teams to collaborate on code, and build, test, and deploy applications with continuous integration and continuous delivery (CI/CD) tools.

One prominent scenario where multicloud container deployment is useful is when organizations want to leverage AWS’ broadest and deepest set of Artificial Intelligence (AI) and Machine Learning (ML) capabilities by developing and training AI/ML models in AWS using Amazon SageMaker, and deploying the model package to a Kubernetes platform on other cloud platforms, such as Azure Kubernetes Service (AKS) for inference. As shown in this workshop for operationalizing the machine learning pipeline, we can train an AI/ML model, push it to Amazon Elastic Container Registry (ECR) as an image, and later deploy the model as a container application.

Scenario description

The solution described in the post covers the following steps:

  • Setup Amazon CodeCatalyst environment.
  • Create a Dockerfile along with a manifest for the application, and a repository in Amazon ECR.
  • Create an Azure service principal which has permissions to deploy resources to Azure Kubernetes Service (AKS), and store the credentials securely in Amazon CodeCatalyst secret.
  • Create a CodeCatalyst workflow to build, test, and deploy the containerized application to AKS cluster using Github Actions.

The architecture diagram for the scenario is shown in Figure 1.

Solution architecture diagram

Figure 1 – Solution Architecture

Solution Walkthrough

This section shows how to set up the environment, and deploy a HTML application to an AKS cluster.

Setup Amazon ECR and GitHub code repository

Create a new Amazon ECR and a code repository. In this case we’re using GitHub as the repository but you can create a source repository in CodeCatalyst or you can choose to link an existing source repository hosted by another service if that service is supported by an installed extension. Then follow the application and Docker image creation steps outlined in Step 1 in the environment creation process in exposing Multiple Applications on Amazon EKS. Create a file named manifest.yaml as shown, and map the “image” parameter to the URL of the Amazon ECR repository created above.

apiVersion: apps/v1
kind: Deployment
metadata:
  name: multicloud-container-deployment-app
  labels:
    app: multicloud-container-deployment-app
spec:
  selector:
    matchLabels:
      app: multicloud-container-deployment-app
  replicas: 2
  template:
    metadata:
      labels:
        app: multicloud-container-deployment-app
    spec:
      nodeSelector:
        "beta.kubernetes.io/os": linux
      containers:
      - name: ecs-web-page-container
        image: <aws_account_id>.dkr.ecr.us-west-2.amazonaws.com/<my_repository>
        imagePullPolicy: Always
        ports:
            - containerPort: 80
        resources:
          limits:
            memory: "100Mi"
            cpu: "200m"
      imagePullSecrets:
          - name: ecrsecret
---
apiVersion: v1
kind: Service
metadata:
  name: multicloud-container-deployment-service
spec:
  type: LoadBalancer
  ports:
  - port: 80
    targetPort: 80
  selector:
    app: multicloud-container-deployment-app

Push the files to Github code repository. The multicloud-container-app github repository should look similar to Figure 2 below

Files in multicloud container app github repository 

Figure 2 – Files in Github repository

Configure Azure Kubernetes Service (AKS) cluster to pull private images from ECR repository

Pull the docker images from a private ECR repository to your AKS cluster by running the following command. This setup is required during the azure/k8s-deploy Github Actions in the CI/CD workflow. Authenticate Docker to an Amazon ECR registry with get-login-password by using aws ecr get-login-password. Run the following command in a shell where AWS CLI is configured, and is used to connect to the AKS cluster. This creates a secret called ecrsecret, which is used to pull an image from the private ECR repository.

kubectl create secret docker-registry ecrsecret\
 --docker-server=<aws_account_id>.dkr.ecr.us-west-2.amazonaws.com/<my_repository>\
 --docker-username=AWS\
 --docker-password= $(aws ecr get-login-password --region us-west-2)

Provide ECR URI in the variable “–docker-server =”.

CodeCatalyst setup

Follow these steps to set up CodeCatalyst environment:

Configure access to the AKS cluster

In this solution, we use three GitHub Actions – azure/login, azure/aks-set-context and azure/k8s-deploy – to login, set the AKS cluster, and deploy the manifest file to the AKS cluster respectively. For the Github Actions to access the Azure environment, they require credentials associated with an Azure Service Principal.

Service Principals in Azure are identified by the CLIENT_ID, CLIENT_SECRET, SUBSCRIPTION_ID, and TENANT_ID properties. Create the Service principal by running the following command in the azure cloud shell:

az ad sp create-for-rbac \
    --name "ghActionHTMLapplication" \
    --scope /subscriptions/<SUBSCRIPTION_ID>/resourceGroups/<RESOURCE_GROUP> \
    --role Contributor \
    --sdk-auth

The command generates a JSON output (shown in Figure 3), which is stored in CodeCatalyst secret called AZURE_CREDENTIALS. This credential is used by azure/login Github Actions.

JSON output stored in AZURE-CREDENTIALS secret

Figure 3 – JSON output

Configure secrets inside CodeCatalyst Project

Create three secrets CLUSTER_NAME (Name of AKS cluster), RESOURCE_GROUP(Name of Azure resource group) and AZURE_CREDENTIALS(described in the previous step) as described in the working with secret document. The secrets are shown in Figure 4.

Secrets in CodeCatalyst

Figure 4 – CodeCatalyst Secrets

CodeCatalyst CI/CD Workflow

To create a new CodeCatalyst workflow, select CI/CD from the navigation on the left and select Workflows (1). Then, select Create workflow (2), leave the default options, and select Create (3) as shown in Figure 5.

Create CodeCatalyst CI/CD workflow

Figure 5 – Create CodeCatalyst CI/CD workflow

Add “Push to Amazon ECR” Action

Add the Push to Amazon ECR action, and configure the environment where you created the ECR repository as shown in Figure 6. Refer to adding an action to learn how to add CodeCatalyst action.

Create ‘Push to ECR’ CodeCatalyst Action

Figure 6 – Create ‘Push to ECR’ Action

Select the Configuration tab and specify the configurations as shown in Figure7.

Configure ‘Push to ECR’ CodeCatalyst Action

Figure 7 – Configure ‘Push to ECR’ Action

Configure the Deploy action

1. Add a GitHub action for deploying to AKS as shown in Figure 8.

Github action to deploy to AKS

Figure 8 – Github action to deploy to AKS

2. Configure the GitHub action from the configurations tab by adding the following snippet to the GitHub Actions YAML property:

- name: Install Azure CLI
  run: pip install azure-cli
- name: Azure login
  id: login
  uses: azure/[email protected]
  with:
    creds: ${Secrets.AZURE_CREDENTIALS}
- name: Set AKS context
  id: set-context
  uses: azure/aks-set-context@v3
  with:
    resource-group: ${Secrets.RESOURCE_GROUP}
    cluster-name: ${Secrets.CLUSTER_NAME}
- name: Setup kubectl
  id: install-kubectl
  uses: azure/setup-kubectl@v3
- name: Deploy to AKS
  id: deploy-aks
  uses: Azure/k8s-deploy@v4
  with:
    namespace: default
    manifests: manifest.yaml
    pull-images: true

Github action configuration for deploying application to AKS

Figure 9 – Github action configuration

3. The workflow is now ready and can be validated by choosing ‘Validate’ and then saved to the repository by choosing ‘Commit’.
We have implemented an automated CI/CD workflow that builds the container image of the application (refer Figure 10), pushes the image to ECR, and deploys the application to AKS cluster. This CI/CD workflow is triggered as application code is pushed to the repository.

Automated CI/CD workflow

Figure 10 – Automated CI/CD workflow

Test the deployment

When the HTML application runs, Kubernetes exposes the application using a public facing load balancer. To find the external IP of the load balancer, connect to the AKS cluster and run the following command:

kubectl get service multicloud-container-deployment-service

The output of the above command should look like the image in Figure 11.

Output of kubectl get service command

Figure 11 – Output of kubectl get service

Paste the External IP into a browser to see the running HTML application as shown in Figure 12.

HTML application running successfully in AKS

Figure 12 – Application running in AKS

Cleanup

If you have been following along with the workflow described in the post, you should delete the resources you deployed so you do not continue to incur charges. First, delete the Amazon ECR repository using the AWS console. Second, delete the project from CodeCatalyst by navigating to Project settings and choosing Delete project. There’s no cost associated with the CodeCatalyst project and you can continue using it. Finally, if you deployed the application on a new AKS cluster, delete the cluster from the Azure console. In case you deployed the application to an existing AKS cluster, run the following commands to delete the application resources.

kubectl delete deployment multicloud-container-deployment-app
kubectl delete services multicloud-container-deployment-service

Conclusion

In summary, this post showed how Amazon CodeCatalyst can help organizations deploy containerized workloads in a hybrid and multicloud environment. It demonstrated in detail how to set up and configure Amazon CodeCatalyst to deploy a containerized application to Azure Kubernetes Service, leveraging a CodeCatalyst workflow, and GitHub Actions. Learn more and get started with your Amazon CodeCatalyst journey!

If you have any questions or feedback, leave them in the comments section.

About Authors

Picture of Pawan

Pawan Shrivastava

Pawan Shrivastava is a Partner Solution Architect at AWS in the WWPS team. He focusses on working with partners to provide technical guidance on AWS, collaborate with them to understand their technical requirements, and designing solutions to meet their specific needs. Pawan is passionate about DevOps, automation and CI CD pipelines. He enjoys watching MMA, playing cricket and working out in the gym.

Picture of Brent

Brent Van Wynsberge

Brent Van Wynsberge is a Solutions Architect at AWS supporting enterprise customers. He accelerates the cloud adoption journey for organizations by aligning technical objectives to business outcomes and strategic goals, and defining them where needed. Brent is an IoT enthusiast, specifically in the application of IoT in manufacturing, he is also interested in DevOps, data analytics and containers.

Picture of Amandeep

Amandeep Bajwa

Amandeep Bajwa is a Senior Solutions Architect at AWS supporting Financial Services enterprises. He helps organizations achieve their business outcomes by identifying the appropriate cloud transformation strategy based on industry trends, and organizational priorities. Some of the areas Amandeep consults on are cloud migration, cloud strategy (including hybrid & multicloud), digital transformation, data & analytics, and technology in general.

Picture of Brian

Brian Beach

Brian Beach has over 20 years of experience as a Developer and Architect. He is currently a Principal Solutions Architect at Amazon Web Services. He holds a Computer Engineering degree from NYU Poly and an MBA from Rutgers Business School. He is the author of “Pro PowerShell for Amazon Web Services” from Apress. He is a regular author and has spoken at numerous events. Brian lives in North Carolina with his wife and three kids.

AWS Week in Review – April 24, 2023: Amazon CodeCatalyst, Amazon S3 on Snowball Edge, and More…

Post Syndicated from Jeff Barr original https://aws.amazon.com/blogs/aws/aws-week-in-review-april-24-2023-amazon-codecatalyst-amazon-s3-on-snowball-edge-and-more/

As always, there’s plenty to share this week: Amazon CodeCatalyst is now generally available, Amazon S3 is now available on Snowball Edge devices, version 1.0.0 of AWS Amplify Flutter is here, and a lot more. Let’s dive in!

Last Week’s Launches
Here are some of the launches that caught my eye this past week:

Amazon CodeCatalyst – First announced at re:Invent in preview form (Announcing Amazon CodeCatalyst, a Unified Software Development Service), this unified software development and delivery service is now generally available. As Steve notes in the post that he wrote for the preview, “Amazon CodeCatalyst enables software development teams to quickly and easily plan, develop, collaborate on, build, and deliver applications on AWS, reducing friction throughout the development lifecycle.” During the preview we added the ability to use AWS Graviton2 for CI/CD workflows and deployment environments, along with other new features, as detailed in the What’s New.

Amazon S3 on Snowball Edge – You have had the power to create S3 buckets on AWS Snow Family devices for a couple of years, and to PUT and GET object. With this new launch you can, as Channy says, “…use an expanded set of Amazon S3 APIs to easily build applications on AWS and deploy them on Snowball Edge Compute Optimized devices.” This launch allows you to manage the storage using AWS OpsHub, and to address multiple Denied, Disrupted, Intermittent, and Limited Impact (DDIL) use cases. To learn more, read Amazon S3 Compatible Storage on AWS Snowball Edge Compute Optimized Devices Now Generally Available.

Amazon Redshift Updates – We announced multiple updates to Amazon Redshift including the MERGE SQL command so that you can combine a series of DML statements into a single statement, dynamic data masking to simplify the process of protecting sensitive data in your Amazon Redshift data warehouse, and centralized access control for data sharing with AWS Lake Formation.

AWS Amplify – You can now build cross-platform Flutter apps that target iOS, Android, Web, and desktop using a single codebase and with a consistent user experience. To learn more and to see how to get started, read Amplify Flutter announces general availability for web and desktop support. In addition to the GA, we also announced that AWS Amplify supports Push Notifications for Android, Swift, React Native, and Flutter apps.

X in Y – We made existing services available in additional regions and locations:

For a full list of AWS announcements, take a look at the What’s New at AWS page and consider subscribing to the page’s RSS feed. If you want even more detail, you can Subscribe to AWS Daily Feature Updates via Amazon SNS.

Interesting Blog Posts

Other AWS Blogs – Here are some fresh posts from a few of the other AWS Blogs:

AWS Open Source – My colleague Ricardo writes a weekly newsletter to highlight new open source projects, tools, and demos from the AWS Community. Read edition 154 to learn more.

AWS Graviton Weekly – Marcos Ortiz writes a weekly newsletter to highlight the latest developments in AWS custom silicon. Read AWS Graviton weekly #33 to see what’s up.

Upcoming Events
Here are some upcoming live and online events that may be of interest to you:

AWS Community Day Turkey will take place in Istanbul on May 6, and I will be there to deliver the keynote. Get your tickets and I will see you there!

AWS Summits are coming to Berlin (May 4), Washington, DC (June 7 and 8), London (June 7), and Toronto (June 14). These events are free but I highly recommend that you register ahead of time.

.NET Enterprise Developer Day EMEA is a free one-day virtual conference on April 25; register now.

AWS Developer Innovation Day is also virtual, and takes place on April 26 (read Discover Building without Limits at AWS Developer Innovation Day for more info). I’ll be watching all day and sharing a live recap at the end; learn more and see you there.

And that’s all for today!

Jeff;

Multi-Architecture Container Builds with CodeCatalyst

Post Syndicated from original https://aws.amazon.com/blogs/devops/multi-architecture-container-builds-with-codecatalyst/

AWS Graviton Processors are designed by AWS to deliver the best price performance for your cloud workloads running in Amazon Elastic Compute Cloud (Amazon EC2). Amazon CodeCatalyst recently added support to run workflow actions using on-demand or pre-provisioned compute powered by AWS Graviton processors. Customers can now access high performance AWS Graviton processors to build artifacts for Arm, or improve their price performance. In this post I will show you how to create a multi-architecture docker image using CodeCatalyst that can run on both amd64 and arm64 processors.

Background

Container images only run on a system with the same CPU architecture for which they were targeted. For example, an amd64 image runs on Intel and AMD processors, while an arm64 image runs on AWS Graviton. Note that amd64 and x86_64 are often used interchangeable, and I have chosen to use amd64 in this post. Rather than maintaining multiple repositories for each image type, you can combine variants for multiple architectures in the same repository. In addition, you can create a manifest describing which image to use for each architecture. This is known as multi-architecture, or multi-platform images.

Let us look at an example to further understand multi-arch images. In this screenshot from Amazon Elastic Container Registry (Amazon ECR), I have created two images for a simple hello-world application. One image is tagged latest-amd64 for AMD architectures and one tagged latest-arm64 for ARM architectures.

In addition, I have created an Image Index tagged latest. The image index is a map describing which image to use for each architecture. This allows my users to simply pull hello-world:latest and the index will identify the correct image based on the target platform. The image index contains the following manifest.

{
  "schemaVersion": 2, 
  "mediaType": "application/vnd.docker.distribution.manifest.list.v2+json", 
  "manifests": [ 
    { 
	  "mediaType": "application/vnd.docker.distribution.manifest.v2+json", 
	  "size": 1573, 
	  "digest": "sha256:eccb6dd2c2dbfc9...", 
	  "platform": { 
	    "architecture": "amd64", 
		"os": "linux" 
	  } 
	}, 
	{ 
	  "mediaType": "application/vnd.docker.distribution.manifest.v2+json", 
	  "size": 1573, 
	  "digest": "sha256:c64812837fbd43...", 
	  "platform": { 
	    "architecture": "arm64", 
		"os": "linux" 
	  } 
	}
  ]
} 

Now that I have explained what a multi-arch image is, I will explain how to create one in a CodeCatalyst workflow. A CodeCatalyst workflow is an automated procedure that describes how to build, test, and deploy your code as part of a continuous integration and continuous delivery (CI/CD) system. A workflow defines a series of steps, or actions, to take during a workflow run. Let’s get started.

Prerequisites

If you would like to follow along with this walkthrough, you will need:

Walkthrough

In this walkthrough I will create a simple application using an Apache HTTP Server serving a static hello world page. The workload is inconsequential. I will focus on the process of building the container image using a CodeCatalyst workflow. The Workflow will build two container images, one for amd64 and one for arm64. The two build tasks will run in parallel on different compute architectures. When both builds are complete, the workflow will build the docker manifest. At the end of this post, my workflow will look like this.

Note that docker also offers a plugin called buildx that will allow you to build a multi-architecture image with a single command. In a real-world application, the workflow would also build the source code, run unit tests, etc. on each architecture. The sample application used in this post is so simple that there is no need to build and test the source code. Let’s examine the sample application now.

Sample Application

Initially the empty repository will only have a README.md file. By the end of this post, my repository will look like this.

I’ll begin by creating the file named index.html. I used the Create file button in CodeCatalyst console shown previously. My index.html file has the following content:

<html>
    <head>
        <title>Hello World!</title>
    </head>
    <body>
        <h1>Hello World!</h1>
        <p>Hello from a multi-architecture container created in CodeCatalyst.</p>
    </body>
</html>

I’ll also create a Dockerfile that contains two commands. The first command instructs Docker to build a new image from the Apache HTTP Server Project image called httpd. It is important to note that the httpd image already supports multiple architectures including amd64 and arm64. When creating a multi-architecture image, the base image must also support these architectures. The second command simply copies the index.html file above into the new image. My Dockerfile file has the following content.

FROM httpd
COPY ./index.html /usr/local/apache2/htdocs/

With the source code for my sample application complete, I can turn my attention to the workflow.

CI/CD Workflow

To create a new workflow, select CI/CD from navigation on the left and then select Workflows (1). Then, select Create workflow (2), leave the default options, and select Create (3).

If the workflow editor opens in YAML mode, select Visual to open the visual designer. Now, I can start adding actions to the workflow.

Build Action for the AMD64 Variant

I’ll begin by adding a build action for the amd64 container. Select “+ Actions” to open the actions list. Find the Build action and click “+” to add a new build action to the workflow.

On the Inputs tab, create three variable named AWS_DEFAULT_REGION, IMAGE_REPO_NAME, and IMAGE_TAG. Set the first two values equal to the region and **** name of your Amazon ECR repository**.** Set the third to latest-amd64. For example:

Now select the Configuration tab and rename the action docker_build_amd64. Select the Environment, AWS account connection, and Role for the associated AWS account where you created the Amazon ECR repository. For example:

Then, copy and paste the following code into the Shell commands. This code will build the image using the Dockerfile you created previously. Then, it logs into Amazon ECR, and finally, pushes the new image to ECR.

- Run: AWS_ACCOUNT_ID=`aws sts get-caller-identity --query "Account" --output text` 
- Run: docker build -t $AWS_ACCOUNT_ID.dkr.ecr.$AWS_DEFAULT_REGION.amazonaws.com/$IMAGE_REPO_NAME:$IMAGE_TAG . 
- Run: aws ecr get-login-password | docker login --username AWS --password-stdin $AWS_ACCOUNT_ID.dkr.ecr.$AWS_DEFAULT_REGION.amazonaws.com 
- Run: docker push $AWS_ACCOUNT_ID.dkr.ecr.$AWS_DEFAULT_REGION.amazonaws.com/$IMAGE_REPO_NAME:$IMAGE_TAG

If you switch back to the YAML view, you can see that the designer has added the following action to the workflow definition.

  docker_build_amd64:
    Identifier: aws/build@v1
    Compute:
      Type: EC2
    Inputs:
      Sources:
        - WorkflowSource
      Variables:
        - Name: AWS_DEFAULT_REGION
          Value: us-west-2
        - Name: IMAGE_REPO_NAME
          Value: hello-world
        - Name: IMAGE_TAG
          Value: latest-amd64
    Environment:
      Name: demo
      Connections:
        - Role: CodeCatalystPreviewDevelopmentAdministrator
          Name: development
    Configuration:
      Steps:
        - Run: AWS_ACCOUNT_ID=`aws sts get-caller-identity --query "Account" --output text`
        - Run: docker build -t $AWS_ACCOUNT_ID.dkr.ecr.$AWS_DEFAULT_REGION.amazonaws.com/$IMAGE_REPO_NAME:$IMAGE_TAG .
        - Run: aws ecr get-login-password | docker login --username AWS --password-stdin $AWS_ACCOUNT_ID.dkr.ecr.$AWS_DEFAULT_REGION.amazonaws.com
        - Run: docker push $AWS_ACCOUNT_ID.dkr.ecr.$AWS_DEFAULT_REGION.amazonaws.com/$IMAGE_REPO_NAME:$IMAGE_TAG

With the amd64 image complete, you can move on to the arm64 image.

Build Action for the ARM64 Variant

Add a second build action named docker_build_arm64 for the arm64 container. The configuration is nearly identical to the previous action with two minor changes. First, on the Inputs tab, I set the IMAGE_TAG to latest-arm64.

Second, on the Configuration tab, change the compute fleet to Linux.Arm64.Large. That is all you need to do to run your action on AWS Graviton. For example:

The Shell commands are identical to the arm64 build action. In addition, don’t forget to select the Environment, AWS account connection, and Role on the configuration tab. The complete configuration for the second action looks like this:

  docker_build_arm64:
    Identifier: aws/build@v1
    Compute:
      Type: EC2
      Fleet: Linux.Arm64.Large
    Inputs:
      Sources:
        - WorkflowSource
      Variables:
        - Name: AWS_DEFAULT_REGION
          Value: us-west-2
        - Name: IMAGE_REPO_NAME
          Value: hello-world
        - Name: IMAGE_TAG
          Value: latest-arm64
    Environment:
      Name: demo
      Connections:
        - Role: CodeCatalystPreviewDevelopmentAdministrator
          Name: development
    Configuration:
      Steps:
        - Run: AWS_ACCOUNT_ID=`aws sts get-caller-identity --query "Account" --output text`
        - Run: docker build -t $AWS_ACCOUNT_ID.dkr.ecr.$AWS_DEFAULT_REGION.amazonaws.com/$IMAGE_REPO_NAME:$IMAGE_TAG .
        - Run: aws ecr get-login-password | docker login --username AWS --password-stdin $AWS_ACCOUNT_ID.dkr.ecr.$AWS_DEFAULT_REGION.amazonaws.com
        - Run: docker push $AWS_ACCOUNT_ID.dkr.ecr.$AWS_DEFAULT_REGION.amazonaws.com/$IMAGE_REPO_NAME:$IMAGE_TAG

Now that you have a build action for the amd64 and arm64 images, you simply need to create a manifest file describing which image to use for each architecture.

Build Action for the Manifest

The final step in the workflow is to create the Docker manifest. Create a third build action named docker_manifest. You want this action to wait for the prior two actions to complete. Therefore, select the prior two actions from the Depends on drop down, like this:

Also configure four variables. AWS_DEFAULT_REGION and IMAGE_REPO_NAME are identical to the prior actions. In addition, IMAGE_TAG_AMD64 and IMAGE_TAG_ARM64 include the tags you created in the prior actions.

On the configuration tab, select the Environment, AWS account connection, and Role as you did in the prior actions. Then, copy and paste the following Shell commands.

- Run: AWS_ACCOUNT_ID=`aws sts get-caller-identity --query "Account" --output text`
- Run: aws ecr get-login-password | docker login --username AWS --password-stdin $AWS_ACCOUNT_ID.dkr.ecr.$AWS_DEFAULT_REGION.amazonaws.com
- Run: docker manifest create $AWS_ACCOUNT_ID.dkr.ecr.$AWS_DEFAULT_REGION.amazonaws.com/$IMAGE_REPO_NAME $AWS_ACCOUNT_ID.dkr.ecr.$AWS_DEFAULT_REGION.amazonaws.com/$IMAGE_REPO_NAME:$IMAGE_TAG_ARM64 $AWS_ACCOUNT_ID.dkr.ecr.$AWS_DEFAULT_REGION.amazonaws.com/$IMAGE_REPO_NAME:$IMAGE_TAG_AMD64
- Run: docker manifest annotate --arch amd64 $AWS_ACCOUNT_ID.dkr.ecr.$AWS_DEFAULT_REGION.amazonaws.com/$IMAGE_REPO_NAME $AWS_ACCOUNT_ID.dkr.ecr.$AWS_DEFAULT_REGION.amazonaws.com/$IMAGE_REPO_NAME:$IMAGE_TAG_AMD64
- Run: docker manifest annotate --arch arm64 $AWS_ACCOUNT_ID.dkr.ecr.$AWS_DEFAULT_REGION.amazonaws.com/$IMAGE_REPO_NAME $AWS_ACCOUNT_ID.dkr.ecr.$AWS_DEFAULT_REGION.amazonaws.com/$IMAGE_REPO_NAME:$IMAGE_TAG_ARM64
- Run: docker manifest push $AWS_ACCOUNT_ID.dkr.ecr.us-west-2.amazonaws.com/$IMAGE_REPO_NAME

The shell commands create a manifest and then annotate it with the correct image for both amd64 and arm64. The final action looks like this.

  docker_manifest:
    Identifier: aws/build@v1
    DependsOn:
      - docker_build_arm64
      - docker_build_amd64
    Compute:
      Type: EC2
    Inputs:
      Sources:
        - WorkflowSource
      Variables:
        - Name: AWS_DEFAULT_REGION
          Value: us-west-2
        - Name: IMAGE_REPO_NAME
          Value: hello-world
        - Name: IMAGE_TAG_AMD64
          Value: latest-amd64
        - Name: IMAGE_TAG_ARM64
          Value: latest-arm64
    Environment:
      Name: demo
      Connections:
        - Role: CodeCatalystPreviewDevelopmentAdministrator
          Name: development
    Configuration:
      Steps:
        - Run: AWS_ACCOUNT_ID=`aws sts get-caller-identity --query "Account" --output
            text`
        - Run: aws ecr get-login-password | docker login --username AWS
            --password-stdin $AWS_ACCOUNT_ID.dkr.ecr.$AWS_DEFAULT_REGION.amazonaws.com
        - Run: docker manifest create
            $AWS_ACCOUNT_ID.dkr.ecr.$AWS_DEFAULT_REGION.amazonaws.com/$IMAGE_REPO_NAME
            $AWS_ACCOUNT_ID.dkr.ecr.$AWS_DEFAULT_REGION.amazonaws.com/$IMAGE_REPO_NAME:$IMAGE_TAG_ARM64
            $AWS_ACCOUNT_ID.dkr.ecr.$AWS_DEFAULT_REGION.amazonaws.com/$IMAGE_REPO_NAME:$IMAGE_TAG_AMD64
        - Run: docker manifest annotate --arch amd64
            $AWS_ACCOUNT_ID.dkr.ecr.$AWS_DEFAULT_REGION.amazonaws.com/$IMAGE_REPO_NAME
            $AWS_ACCOUNT_ID.dkr.ecr.$AWS_DEFAULT_REGION.amazonaws.com/$IMAGE_REPO_NAME:$IMAGE_TAG_AMD64
        - Run: docker manifest annotate --arch arm64
            $AWS_ACCOUNT_ID.dkr.ecr.$AWS_DEFAULT_REGION.amazonaws.com/$IMAGE_REPO_NAME
            $AWS_ACCOUNT_ID.dkr.ecr.$AWS_DEFAULT_REGION.amazonaws.com/$IMAGE_REPO_NAME:$IMAGE_TAG_ARM64
        - Run: docker manifest push
            $AWS_ACCOUNT_ID.dkr.ecr.us-west-2.amazonaws.com/$IMAGE_REPO_NAME

I now have a complete CI/CD workflow that creates a container images for both amd64 and arm64. When I commit the changes, CodeCatalyst will execute my workflow, build the images, and push to ECR.

Cleanup

If you have been following along with this workflow, you should delete the resources you deployed so you do not continue to incur charges. First, delete the Amazon ECR repository using the AWS console. Second, delete the project from CodeCatalyst by navigating to Project settings and choosing Delete project.

Conclusion

AWS Graviton processors are custom-built by AWS to deliver the best price performance for cloud workloads. In this post I explained how to configure CodeCatalyst workflow actions to run on AWS Graviton. I used CodeCatalyst to create a workflow that builds a multi-architecture container image that can run on both amd64 and arm64 architectures. Get started building your multi-arch containers in Amazon CodeCatalyst today! You can read more about CodeCatalyst workflows in the documentation.

Enabling DevSecOps with Amazon CodeCatalyst

Post Syndicated from Imtranur Rahman original https://aws.amazon.com/blogs/devops/enabling-devsecops-with-amazon-codecatalyst/

DevSecOps is the practice of integrating security testing at every stage of the software development process. Amazon CodeCatalyst includes tools that encourage collaboration between developers, security specialists, and operations teams to build software that is both efficient and secure. DevSecOps brings cultural transformation that makes security a shared responsibility for everyone who is building the software.

Introduction

In a prior post in this series, Maintaining Code Quality with Amazon CodeCatalyst Reports, I discussed how developers can quickly configure test cases, run unit tests, set up code coverage, and generate reports using CodeCatalyst’s workflow actions. This was done through the lens of Maxine, the main character of Gene Kim’s The Unicorn Project. In the story, Maxine meets Purna – the QA and Release Manager and Shannon – a Security Engineer. Everyone has the same common goal to integrate security into every stage of the Software Development Lifecycle (SDLC) to ensure secure code deployments. The issue Maxine faces is that security testing is not automated and the separation of responsibilities by role leads to project stagnation.

In this post, I will focus on how DevSecOps teams can use Amazon CodeCatalyst to easily integrate and automate security using CodeCatalyst workflows. I’ll start by checking for vulnerabilities using OWASP dependency checker and Mend SCA. Then, I’ll conduct Static Analysis (SA) of source code using Pylint. I will also outline how DevSecOps teams can influence the outcome of a build by defining success criteria for Software Composition Analysis (SCA) and Static Analysis actions in the workflow. Last, I’ll show you how to gain insights from CodeCatalyst reports and surface potential issues to development teams through CodeCatalyst Issues for faster remediation.

Prerequisites

If you would like to follow along with this walkthrough, you will need to:

Walkthrough

To follow along, you can re-use a project you created previously, or you can refer to a previous post that walks through creating a project using the Modern Three-tier Web Application blueprint. Blueprints provide sample code and CI/CD workflows to help you get started easily across different combinations of programming languages and architectures. The back-end code for this project is written in Python and the front-end code is written in JavaScript.

Modern Three-tier Web Application architecture including a presentation, application and data layer

Figure 1. Modern Three-tier Web Application architecture including a presentation, application and data layer

Once the project is deployed, CodeCatalyst opens the project overview. Select CI/CD → Workflows → ApplicationDeploymentPipeline to view the current workflow.

Six step Workflow described in the prior paragraph

Figure 2. ApplicationDeploymentPipeline

Modern applications use a wide array of open-source dependencies to speed up feature development, but sometimes these dependencies have unknown exploits within them. As a DevSecOps engineer, I can easily edit this workflow to scan for those vulnerable dependencies to ensure I’m delivering secure code.

Software Composition Analysis (SCA)

Software composition analysis (SCA) is a practice in the fields of Information technology and software engineering for analyzing custom-built software applications to detect embedded open-source software and analyzes whether they are up-to-date, contain security flaws, or have licensing requirements. For this walkthrough, I’ll highlight two SCA methods:

Note that developers can replace either of these with a tool of their choice so long as that tool outputs an SCA report format supported by CodeCatalyst.

Software Composition Analysis using OWASP Dependency Checker

To get started, I select Edit at the top-right of the workflows tab. By default, CodeCatalyst opens the YAML tab. I change to the Visual tab to visually edit the workflow and add a CodeCatalyst Action by selecting “+Actions” (1) and then “+” (2). Next select the Configuration (3) tab and edit the Action Name (4). Make sure to select the check mark after you’re done.

New action configuration showing steps to add a build action

Figure 3. New Action Initial Configuration

Scroll down in the Configuration tab to Shell commands. Here, copy and paste the following command snippets that runs when action is invoked.

#Set Source Repo Directory to variable
- Run: sourceRepositoryDirectory=$(pwd)
#Install Node Dependencies
- Run: cd web &amp;&amp; npm install
#Install known vulnerable dependency (This is for Demonstrative Purposes Only)
- Run: npm install [email protected]
#Go to parent directory and download OWASP dependency-check CLI tool
- Run: cd .. && wget https://github.com/jeremylong/DependencyCheck/releases/download/v8.1.2/dependency-check-8.1.2-release.zip
#Unzip file - Run: unzip dependency-check-8.1.2-release.zip
#Navigate to dependency-check script location
- Run: cd dependency-check/bin
#Execute dependency-check shell script. Outputs in SARIF format
- Run: ./dependency-check.sh --scan $sourceRepositoryDirectory/web -o $sourceRepositoryDirectory/web/vulnerabilities -f SARIF --disableYarnAudit

These commands will install the node dependencies, download the OWASP dependency-check tool, and run it to generate findings in a SARIF file. Note the third command, which installs a module with known vulnerabilities (This is for demonstrative purposes only).

On the Outputs (1) tab, I change the Report prefix (2) to owasp-frontend. Then I set the Success criteria (3) for Vulnerabilities to 0 – Critical (4). This configuration will stop the workflow if any critical vulnerabilities are found.

Report configuration showing SCA configuration

Figure 4: owasp-dependecy-check-frontend

It is a best practice to scan for vulnerable dependencies before deploying resources so I’ll set my owasp-dependency-check-frontend action as the first step in the workflow. Otherwise, I might accidentally deploy vulnerable code. To do this, I select the Build (1) action group and set the Depends on (2) dropdown to my owasp-dependency-check-frontend action. Now, my action will run before any resources are built and deployed to my AWS environment. To save my changes and run the workflow, I select Commit (3) and provide a commit message.

Setting OWASP as the First Action

Figure 5: Setting OWASP as the First Workflow Action

Amazon CodeCatalyst shows me the state of the workflow run in real-time. After the workflow completes, I see that the action has entered a failed state. If I were a QA Manager like Purna from the Unicorn Project, I would want to see why the action failed. On the lefthand navigation bar, I select the Reports owasp-frontend-web/vulnerabilities/dependency-check-report.sarif for more details.

SCA report showing 1 critical and 7 medium findings

Figure 6: SCA Report Overview

This report view provides metadata such as the workflow name, run ID, action name, repository, and the commit ID. I can also see the report status, a bar graph of vulnerabilities grouped by severity, the number of libraries scanned, and a Findings panel. I had set the success criteria for this report to 0 – Critical so it failed because 1 Critical vulnerability was found. If I select a specific finding ID, I can learn more about that specific finding and even view it on the National Vulnerability Database website.

Dialog showing CVE details for the critical vulnerability

Figure 7: Critical Vulnerability CVE Finding

Now I can raise this issue with the development team through the Issues board on the left-hand navigation panel. See this previous post to learn more about how teams can collaborate in CodeCatalyst.

Note: Let’s remove [email protected] install from owasp-dependency-check-frontend action’s list of commands to allow the workflow to proceed and finish successfully.

Software Composition Analysis using Mend

Mend, formerly known as WhiteSource, is an application security company built to secure today’s digital world. Mend secures all aspects of software, providing automated remediation, prevention, and protection from problem to solution versus only detection and suggested fixes. Find more information about Mend here.

Mend Software Composition Analysis (SCA) can be run as an action within Amazon CodeCatalyst CI/CD workflows, making it easy for developers to perform open-source software vulnerability detection when building and deploying their software projects. This makes it easier for development teams to quickly build and deliver secure applications on AWS.

Getting started with CodeCatalyst and Mend is very easy. After logging in to my Mend Account, I need to create a new Mend Product named Amazon-CodeCatalyst and a Project named mythical-misfits.

Next, I navigate back to my existing workflow in CodeCatalyst and add a new action. However, this time I’ll select the Mend SCA action.

Adding the Mend action

Figure 8: Mend Action

All I need to do now is go to the Configuration tab and set the following values:

  • Mend Project Name: mythical-misfits
  • Mend Product Name: Amazon-CodeCatalyst
  • Mend License Key: You can get the License Key from your Mend account in the CI/CD Integration section. You can get more information from here.

Mend Action Configuration

Figure 9: Mend Action Configuration

Then I commit the changes and return to Mend.

Mend console showing analysis of the Mythical Mysfits app

Figure 10: Mend Console

After successful execution, Mend will automatically update and show a report similar to the screenshot above. It contains useful information about this project like vulnerabilities, licenses, policy violations, etc. To learn more about the various capabilities of Mend SCA, see the documentation here.

Static Analysis (SA)

Static analysis, also called static code analysis, is a method of debugging that is done by examining the code without executing the program. The process provides an understanding of the code structure and can help ensure that the code adheres to industry standards. Static analysis is used in software engineering by software development and quality assurance teams.

Currently, my workflow does not do static analysis. As a DevSecOps engineer, I can add this as a step to the workflow. For this walkthrough, I’ll create an action that uses Pylint to scan my Python source code for Static Analysis. Note that you can also use other static analysis tools or a GitHub Action like SuperLinter, as covered in this previous post.

Static Analysis using Pylint

After navigating back to CI/CD → Workflows → ApplicationDeploymentPipeline and selecting Edit, I create a new test action. I change the action name to pylint and set the Configuration tab to run the following shell commands:

- Run: pip install pylint 
- Run: pylint $PWD --recursive=y --output-format=json:pylint-report.json --exit-zero

On the Outputs tab, I change the Report prefix to pylint. Then I set the Success criteria for Static analysis as shown in the figure below:

Report configuration tab showing static analysis configuration

Figure 11: Static Analysis Report Configuration

Being that Static Analysis is typically run before any execution, the pylint or OWASP action should be the very first action in the workflow. For the sake of this blog we will use pylint. I select the OWASP or Mend actions I created before, set the Depends on dropdown to my pylint action, and commit the changes. Once the workflow finishes, I can go to Reports > pylint-pylint-report.json for more details.

Static analysis report showing 7 high findings

Figure 12: Pylint Static Analysis Report

The Report status is Failed because more than 1 high-severity or above bug was detected. On the Results tab I can view each finding in greater detail, including the severity, type of finding, message from the linter, and which specific line the error originates from.

Cleanup

If you have been following along with this workflow, you should delete the resources you deployed so you do not continue to incur charges. First, delete the two stacks that AWS Cloud Development Kit (CDK) deployed using the AWS CloudFormation console in the AWS account you associated when you launched the blueprint. These stacks will have names like mysfitsXXXXXWebStack and mysfitsXXXXXAppStack. Second, delete the project from CodeCatalyst by navigating to Project settings and choosing Delete project.

Conclusion

In this post, I demonstrated how DevSecOps teams can easily integrate security into Amazon CodeCatalyst workflows to automate security testing by checking for vulnerabilities using OWASP dependency checker or Mend through Software Composition Analysis (SCA) of dependencies. I also outlined how DevSecOps teams can configure Static Analysis (SA) reports and use success criteria to influence the outcome of a workflow action.

Imtranur Rahman

Imtranur Rahman is an experienced Sr. Solutions Architect in WWPS team with 14+ years of experience. Imtranur works with large AWS Global SI partners and helps them build their cloud strategy and broad adoption of Amazon’s cloud computing platform.Imtranur specializes in Containers, Dev/SecOps, GitOps, microservices based applications, hybrid application solutions, application modernization and loves innovating on behalf of his customers. He is highly customer obsessed and takes pride in providing the best solutions through his extensive expertise.

Wasay Mabood

Wasay is a Partner Solutions Architect based out of New York. He works primarily with AWS Partners on migration, training, and compliance efforts but also dabbles in web development. When he’s not working with customers, he enjoys window-shopping, lounging around at home, and experimenting with new ideas.

Managing Dev Environments with Amazon CodeCatalyst

Post Syndicated from Ryan Bachman original https://aws.amazon.com/blogs/devops/managing-dev-environments-with-amazon-codecatalyst/

An Amazon CodeCatalyst Dev Environment is a cloud-based development environment that you can use in CodeCatalyst to quickly work on the code stored in the source repositories of your project. The project tools and application libraries included in your Dev Environment are defined by a devfile in the source repository of your project.

Introduction

In the previous CodeCatalyst post, Team Collaboration with Amazon CodeCatalyst, I focused on CodeCatalyst’s collaboration capabilities and how that related to The Unicorn Project’s main protaganist. At the beginning of Chapter 2, Maxine is struggling to configure her development environment. She is two days into her new job and still cannot build the application code. She has identified over 100 dependencies she is missing. The documentation is out of date and nobody seems to know where the dependencies are stored. I can sympathize with Maxine. In this post, I will focus on managing development environments to show how CodeCatalyst removes the burden of managing workload specific configurations and produces reliable on-demand development environments.

Prerequisites

If you would like to follow along with this walkthrough, you will need to:

Have an AWS Builder ID for signing in to CodeCatalyst.

Belong to a space and have the space administrator role assigned to you in that space. For more information, see Creating a space in CodeCatalystManaging members of your space, and Space administrator role.

Have an AWS account associated with your space and have the IAM role in that account. For more information about the role and role policy, see Creating a CodeCatalyst service role.

Walkthrough

As with the previous posts in our CodeCatalyst series, I am going to use the Modern Three-tier Web Application blueprint.  Blueprints provide sample code and CI/CD workflows to help make getting started easier across different combinations of programming languages and architectures. To follow along, you can re-use a project you created previously, or you can refer to a previous post that walks through creating a project using the blueprint.

One of the most difficult aspects of my time spent as a developer was finding ways to quickly contribute to a new project. Whenever I found myself working on a new project, getting to the point where I could meaningfully contribute to a project’s code base was always more difficult than writing the actual code. A major contributor to this inefficiency, was the lack of process managing my local development environment. I will be exploring how CodeCatalyst can help solve this challenge.  For this walkthrough, I want to add a new test that will allow local testing of Amazon DynamoDB. To achieve this, I will use a CodeCatalyst dev environment.

CodeCatalyst Dev Environments are managed cloud-based development environments that you can use to access and modify code stored in a source repository. You can launch a project specific dev environment that will automate check-out of your project’s repo or you can launch an empty environment to use for accessing third-party source providers.  You can learn more about CodeCatalyst Dev Environments in the CodeCatalyst User Guide.

CodeCatalyst user interface showing Create Dev Environment

Figure 1. Creating a new Dev Environment

To begin, I navigate to the Dev Environments page under the Code section of the navigaiton menu.  I then use the Create Dev Environment to launch my environment.  For this post, I am using the AWS Cloud9 IDE, but you can follow along with the IDE you are most comfortable using.  In the next screen, I select Work in New Branch and assign local_testing for the new branch name, and I am branching from main.  I leave the remaining default options and Create.

Create Dev Environment user interface with work in a new branch selected

Figure 2. Dev Environment Create Options

After waiting less than a minute, my IDE is ready in a new tab and I am ready to begin work.  The first thing I see in my dev environment is an information window asking me if I want to navigate to the Dev Environment Settings.  Because I need to enable local testing of Dynamodb, not only for myself, but other developers that will collaborate on this project, I need to update the project’s devfile.  I select to navigate to the settings tab because I know that contains information on the project’s devfile and allows me to access the file to edit.

AWS Toolkit prompting to Open Dev Environment Settings.

Figure 3. Toolkit Welcome Banner

Devfiles allow you to model a Dev Environment’s configuration and dependencies so that you can re-produce consisent Dev Environments and reduce the manual effort in setting up future environments.  The tools and application libraries included in your Dev Environment are defined by the devfile in the source repository of your project.  Since this project was created from a blueprint, there is one provided.  For blank projects, a default CodeCatalyst devfile is created when you first launch an environment.  To learn more about the devfile, see https://devfile.io.

In the settings tab, I find a link to the devfile that is configured.  When I click the edit button, a new file tab launches and I can now make changes.  I first add an env section to the container that hosts our dev environment.  By adding an environment variable and value, anytime a new dev environment is created from this project’s repository, that value will be included.  Next, I add a second container to the dev environment that will run DynamoDB locally.  I can do this by adding a new container component.  I use Amazon’s verified DynamoDB docker image for my environment. Attaching additional images allow you to extend the dev environment and include tools or services that can be made available locally.  My updates are highlighted in the green sections below.

Devfile.yaml with environment variable and DynamoDB container added

Figure 4. Example Devfile

I save my changes and navigate back to the Dev Environment Settings tab. I notice that my changes were automatically detected and I am prompted to restart my development environment for the changes to take effect.  Modifications to the devfile requires a restart. You can restart a dev environment using the toolkit, or from the CodeCatalyst UI.

AWS Toolkit prompt asking to restart the dev environment

Figure 5. Dev Environment Settings

After waiting a few seconds for my dev environment to restart, I am ready to write my test.  I use the IDE’s file explorer, expand the repo’s ./tests/unit folder, and create a new file named test_dynamodb.py.  Using the IS_LOCAL environment variable I configured in the devfile, I can include a conditional in my test that sets the endpoint that Amazon’s python SDK ( Boto3 ) will use to connect to the Dynamodb service.  This way, I can run tests locally before pushing my changes and still have tests complete successfully in my project’s workflow.  My full test file is included below.

Python unit test with local code added

Figure 6. Dynamodb test file

Now that I have completed my changes to the dev environment using the devfile and added a test, I am ready to run my test locally to verify.  I will use pytest to ensure the tests are passing before pushing any changes.  From the repo’s root folder, I run the command pip install -r requirements-dev.txt.  Once my dependencies are installed, I then issue the command pytest -k unit.  All tests pass as I expect.

Result of the pytest shown at the command line

Figure 7. Pytest test results

Rather than manually installing my development dependencies in each environment, I could also use the devfile to include commands and automate the execution of those commands during the dev environment lifecycle events.  You can refer to the links for commands and events for more information.

Finally, I am ready to push my changes back to my CodeCatalyst source repository.  I use the git extension of Cloud9 to review my changes.  After reviewing my changes are what I expect, I use the git extension to stage, commit, and push the new test file and the modified devfile so other collaborators can adopt the improvements I made.

Figure 8.  Changes reviewed in CodeCatalyst Cloud9 git extension.

Figure 8.  Changes reviewed in CodeCatalyst Cloud9 git extension.

Cleanup

If you have been following along with this workflow, you  should delete the resources you deployed so you do not continue to incur  charges. First, delete the two stacks that CDK deployed using the AWS CloudFormation console in the AWS account you associated when you launched the blueprint. These stacks will have names like mysfitsXXXXXWebStack and mysfitsXXXXXAppStack. Second, delete the project from CodeCatalyst by navigating to Project settings and choosing Delete project.

Conclusion

In this post, you learned how CodeCatalyst provides configurable on-demand dev environments.  You also learned how devfiles help you define a consistent experience for developing within a CodeCatalyst project.  Please follow our DevOps blog channel as I continue to explore how CodeCatalyst solve Maxine’s and other builders’ challenges.

About the author:

Ryan Bachman

Ryan Bachman is a Sr. Specialist Solutions Architect at AWS, and specializes in working with customers to improve their DevOps practices. Ryan has over 20 years of professional experience as a technologist, and has held roles in many different domains to include development, networking architecture, and technical product management. He is passionate about automation and helping customers increase software development productivity.

Team Collaboration with Amazon CodeCatalyst

Post Syndicated from original https://aws.amazon.com/blogs/devops/team-collaboration-with-amazon-codecatalyst/

Amazon CodeCatalyst enables teams to collaborate on features, tasks, bugs, and any other work involved when building software. CodeCatalyst was announced at re:Invent 2022 and is currently in preview.

Introduction:

In a prior post in this series, Using Workflows to Build, Test, and Deploy with Amazon CodeCatalyst, I discussed reading The Unicorn Project, by Gene Kim, and how the main character, Maxine, struggles with a complicated software development lifecycle (SLDC) after joining a new team. Some of the challenges she encounters include:

  • Continually delivering high-quality updates is complicated and slow
  • Collaborating efficiently with others is challenging
  • Managing application environments is increasingly complex
  • Setting up a new project is a time-consuming chore

In this post, I will focus on the second bullet, and how CodeCatalyst helps you collaborate from anywhere with anyone.

Prerequisites

If you would like to follow along with this walkthrough, you will need to:

Walkthrough

Similar to the prior post, I am going to use the Modern Three-tier Web Application blueprint in this walkthrough. A CodeCatalyst blueprint provides a template for a new project. If you would like to follow along, you can launch the blueprint as described in Creating a project in Amazon CodeCatalyst.  This will deploy the Mythical Mysfits sample application shown in the following image.

The Mythical Mysfits user interface showing header and three Mysfits

Figure 1. The Mythical Mysfits user interface showing header and three Mysfits

For this Walkthrough, let us assume that I need to make a simple change to the application. The legal department would like to add a footer that includes the text “© 2023 Demo Organization.” I will create an issue in CodeCatalyst to track this work and use CodeCatalyst to track the change throughout the entire Software Development Life Cycle (SDLC).

CodeCatalyst organizes projects into Spaces. A space represents your company, department, or group; and contains projects, members, and the associated cloud resources you create in CodeCatalyst. In this walkthrough, my Space currently includes two members, Brian Beach and Panna Shetty, as shown in the following screenshot.  Note that both users are administrators, but CodeCatalyst supports multiple roles. You can read more about roles in members of your space.

The space members configuration page showing two users

Figure 2. The space members configuration page showing two users

To begin, Brian creates a new issue to track the request from legal. He assigns the issue to Panna, but leaves it in the backlog for now. Note that CodeCatalyst supports multiple metadata fields to organize your work. This issue is not impacting users and is relatively simple to fix. Therefore, Brian has categorized it as low priority and estimated the effort as extra small (XS). Brian has also added a label, so all the requests from legal can be tracked together. Note that these metadata fields are customizable. You can read more in configuring issue settings.

Create issue dialog box with name, description and metadata

Figure 3. Create issue dialog box with name, description and metadata

CodeCatalyst supports rich markdown in the description field. You can read about this in Markdown tips and tricks. In the following screenshot, Brian types “@app.vue” which brings up an inline search for people, issues, and code to help Panna find the relevant bit of code that needs changing later.

Create issue dialog box with type-ahead overlay

Figure 4. Create issue dialog box with type-ahead overlay

When Panna is ready to begin work on the new feature, she moves the issue from the “Backlog“ to ”In progress.“ CodeCatalyst allows users to manage their work using a Kanban style board. Panna can simply drag-and-drop issues on the board to move the issue from one state to another. Given the small team, Brian and Panna use a single board. However, CodeCatalyst allows you to create multiple views filtered by the metadata fields discussed earlier. For example, you might create a label called Sprint-001, and use that to create a board for the sprint.

Kanban board showing to do, in progress and in review columns

Figure 5. Kanban board showing to do, in progress and in review columns

Panna creates a new branch for the change called feature_add_copyright and uses the link in the issue description to navigate to the source code repository. This change is so simple that she decides to edit the file in the browser and commits the change. Note that for more complex changes, CodeCatalyst supports Dev Environments. The next post in this series will be dedicated to Dev Environments. For now, you just need to know that a Dev Environment is a cloud-based development environment that you can use to quickly work on the code stored in the source repositories of your project.

Editor with new lines highlighted

Figure 6. Editor with new lines highlighted

Panna also creates a pull request to merge the feature branch in to the main branch. She identifies Brian as a required reviewer. Panna then moves the issue to the “In review” column on the Kanban board so the rest of the team can track the progress. Once Brian reviews the change, he approves and merges the pull request.

Pull request details with title, description, and reviewed assigned

Figure 7. Pull request details with title, description, and reviewed assigned

When the pull request is merged, a workflow is configured to run automatically on code changes to build, test, and deploy the change. Note that Workflows were covered in the prior post in this series. Once the workflow is complete, Panna is notified in the team’s Slack channel. You can read more about notifications in working with notifications in CodeCatalyst. She verifies the change in production and moves the issue to the done column on the Kanban board.

Kanban board showing in progress, in review, and done columns

Figure 8. Kanban board showing in progress, in review, and done columns

Once the deployment completes, you will see the footer added at the bottom of the page.

Figure 9. The Mythical Mysfits user interface showing footer and three Mysfits

At this point the issue is complete and you have seen how this small team collaborated to progress through the entire software development lifecycle (SDLC).

Cleanup

If you have been following along with this workflow, you should delete the resources you deployed so you do not continue to incur charges. First, delete the two stacks that CDK deployed using the AWS CloudFormation console in the AWS account you associated when you launched the blueprint. These stacks will have names like mysfitsXXXXXWebStack and mysfitsXXXXXAppStack. Second, delete the project from CodeCatalyst by navigating to Project settings and choosing Delete project.

Conclusion

In this post, you learned how CodeCatalyst can help you rapidly collaborate with other developers. I used issues to track feature and bugs, assigned code reviews, and managed pull requests. In future posts I will continue to discuss how CodeCatalyst can address the rest of the challenges Maxine encountered in The Unicorn Project.

About the authors:

Brian Beach

Brian Beach has over 20 years of experience as a Developer and Architect. He is currently a Principal Solutions Architect at Amazon Web Services. He holds a Computer Engineering degree from NYU Poly and an MBA from Rutgers Business School. He is the author of “Pro PowerShell for Amazon Web Services” from Apress. He is a regular author and has spoken at numerous events. Brian lives in North Carolina with his wife and three kids.

Panna Shetty

Panna Shetty is a Sr. Solutions Architect with Amazon Web Services (AWS), working with public sector customers. She enjoys helping customers architect and build scalable and
reliable modern applications using cloud-native technologies.

How Contino improved collaboration with Amazon CodeCatalyst

Post Syndicated from Chetan Makvana original https://aws.amazon.com/blogs/devops/how-contino-improved-collaboration-with-amazon-codecatalyst/

Amazon CodeCatalyst is a modern software development service that empowers teams to deliver software on AWS easily and quickly. CodeCatalyst provides one place where you can plan, code, and build, test, and deploy applications with continuous integration/continuous delivery (CI/CD) tools. It also helps streamlined team collaboration. Developers on modern software teams are usually distributed, work independently, and use disparate tools. Often, ad hoc collaboration is necessary to resolve problems. Today, developers are forced to do this across many tools, which distract developers from their primary task—adding business critical features and enhancing their quality and completeness.

In this post, we explain how Contino uses CodeCatalyst to on-board their engineering team onto new projects, eliminates the overhead of managing disparate tools, and streamlines collaboration among different stakeholders.

The Problem

Contino helps customers migrate their applications to the cloud, and then improves their architecture by taking full advantage of cloud-native features to improve agility, performance, and scalability. This usually involves the build out of a central landing zone platform. A landing zone is a set of standard building blocks that allows customers to automatically create accounts, infrastructure and environments that are pre-configured in line with security policies, compliance guidelines and cloud native best practices. Some features are common to most landing zones, for example creating secure container images, AMIs, and environment setup boilerplate. In order to provide maximum value to the customers, Contino develops in-house versions of such features, incorporating AWS best practices, and later rolls out to the customer’s environment with some customization. Contino’s technical consultants, who are not currently assigned to customer work, collectively known as ‘Squad 0’ work on these features. Squad 0 builds the foundation for the work that will be re-used by other squads that work directly with Contino’s customers. As the technical consultants are typically on Squad 0 for a short period, it is critical that they can be productive in this short time, without spending too much time getting set up.

To build these foundational services, Contino was looking for something more integrated that would allow them to quickly setup development environments, enable collaboration between Squad 0 members, invite other squads to validate foundations services usage for their respective customers, and provide access to different AWS accounts and git repos centrally from one place. Historically, Contino has used disparate tools to achieve this, which meant having to grant/revoke access to the various AWS accounts individually on a continual basis. With these disparate tools, granting access to the tools needed for squads to be productive was non-trivial.

The Solution

It was at this point Contino participated in the private beta for CodeCatalyst prior to the public preview. CodeCatalyst has allowed Contino to move to a structure, as shown in Figure 1 below. A Project Manager at Contino creates a different project for each foundational service and invites Squad 0 members to join the relevant project. With CodeCatalyst, Squad 0 technical consultants use features like CI/CD, source repositories, and issue trackers to build foundational services. This helps eliminate the overhead of managing and integrating developer tools and provides more time to focus on developing code. Once Squad 0 is ready with the foundational services, they invite customer squads using their email address to validate the readiness of the project for use with their customers. Finally, members of Squad 0 use Cloud 9 Dev Environments from within CodeCatalyst to rapidly create consistent cloud development environments, without manual configuration, so they can work on new or multiple projects simultaneously, without conflict.

With CodeCatalyst, Squad 0 technical consultants use features like CI/CD, source repositories, and issue trackers to build foundational services. This helps eliminate the overhead of managing and integrating developer tools and provides more time to focus on developing code.

Figure 1: CodeCatalyst with multiple account connections

Contino uses CI/CD to conduct multi-account deployments. Contino typically does one of two types of deployments: 1. Traditional sequential application deployment that is promoted from one environment to another, for example dev -> test -> prod, and 2. Parallel deployment, for example, a security control that is required to be deployed out into multiple AWS accounts at the same time. CodeCatalyst solves this problem by making it easier to construct workflows using a workflow definition file that can deploy either sequentially or in parallel to multiple AWS accounts. Figure 2 shows parallel deployment.

CodeCatalyst provides a feature to add CI/CD pipeline for Dev, Test and Production accounts

Figure 2: CI/CD with CodeCatalyst

The Value

CodeCatalyst has reduced the time it takes for members of Squad 0 to complete the necessary on-boarding to work on foundational services from 1.5 days to about 1 hour. These tasks include setting up connections to source repositories, setting up development environments, configuring IAM roles and trust relationships, etc. With support for integrated tools and better collaboration, CodeCatalyst minimized overhead for ad hoc collaboration. Squad 0 could spend more time on writing code to build foundation services. This has led to tasks being completed, on average, 20% faster. This increased productivity led to increased value delivered to Contino’s customers. As Squad 0 is more productive, more foundation services are available for other squads to reuse for their respective customers. Now, Contino’s teams on the ground working directly with customers can re-use these services with some customization for the specific needs of the customer.

Conclusion

Amazon CodeCatalyst brings together everything software development teams need to plan, code, build, test, and deploy applications on AWS into a streamlined, integrated experience. With CodeCatalyst, developers can spend more time developing application features and less time setting up project tools, creating and managing CI/CD pipelines, provisioning and configuring various development environments or coordinating with team members. With CodeCatalyst, the Contino engineers can improve productivity and focus on rapidly developing application code which captures business value for their customers.

About the authors:

Mark Faiers

Mark Faiers started out as a software engineer and later transitioned into DevOps, and Cloud. He has worked across numerous technology stacks and industries, including Healthcare, FinTech, and Logistics. Mark is currently working as an AWS consultant to some of the biggest Financial and Insurance firms in the U.K., as well as running the AWS Practice at Contino. He is especially passionate about serverless, and sustainability.

Chetan Makvana

Chetan Makvana is a senior solutions architect working with global systems integrators at AWS. He works with AWS partners and customers to provide them with architectural guidance for building scalable architecture and execute strategies to drive adoption of AWS services. He is a technology enthusiast and a builder with a core area of interest on serverless and DevOps. Outside of work, he enjoys binge-watching, traveling and music.

Using Workflows to Build, Test, and Deploy with Amazon CodeCatalyst

Post Syndicated from Kumar Karra original https://aws.amazon.com/blogs/devops/using-workflows-to-build-test-and-deploy-with-amazon-codecatalyst/

Amazon CodeCatalyst workflows are continuous integration and continuous delivery (CI/CD) pipelines that enable you to easily build, test and deploy applications. CodeCatalyst was announced at re:Invent 2022 and is currently in preview.

Introduction:

I recently read The Unicorn Project, the follow-up to the bestselling title The Phoenix Project from Gene Kim. After a few years at Amazon, I had forgotten how some companies write software, but it all came back to me as I read. In the book, the main character, Maxine, struggles with a complicated software development lifecycle (SLDC) after joining a new team. Some of the challenges she encounters include:

  • Continually delivering high-quality updates is complicated and slow
  • Collaborating efficiently with others is challenging
  • Managing application environments is increasingly complex
  • Setting up a new project is a time consuming chore

Amazon CodeCatalyst can help address all of these issues. CodeCatalyst is an integrated DevOps service that makes it easy for development teams to quickly build and deliver applications on AWS. Over the next few weeks, my colleagues and I will release a series of blog posts describing the individual features of CodeCatalyst and how they will help you overcome the challenges that Maxine encountered in The Unicorn Project. In this first post, I focus on Workflows and address the first bullet above, “continually delivering high-quality updates is complicated and slow”.

CodeCatalyst Workflows help you reliably deliver high-quality application updates frequently, quickly and securely. CodeCatalyst uses a visual editor — or if you prefer YAML — to quickly assemble and configure actions to compose workflows that automate your CI/CD pipeline, test reporting and other manual processes. Workflows use provisioned compute, lambda compute, custom container images and a managed build infrastructure to scale execution easily without sacrificing flexibility

Prerequisites

If you would like to follow along with this walkthrough, you will need to:

Walkthrough

For this walkthrough, I am going use the Modern Three-tier Web Application blueprint. A CodeCatalyst blueprint provides a template for a new project. If you would like to follow along, you can launch the blueprint as described in Creating a project in Amazon CodeCatalyst.  This will deploy the architecture shown below.

Modern Three-tier Web Application architecture including a presentation, application and data layer

Figure 1. Modern Three-tier Web Application architecture including a presentation, application and data layer

Once the new project is launched, navigate to CI/CD > Workflows. You will see two workflows listed. Click on  ApplicationDeploymentPipeline and you will be presented with the workflow pictured below. The workflow consists of six actions: 1) ensures that CDK is configured in the account; 2) builds the backend, written in Python, including unit tests; 3) deploys the backend to either AWS Lambda or AWS Fargate depending on which you selected when you launched the project; 4) runs a series of integration tests on the deployed backend; 5) builds the frontend, written with Vue, including unit tests; and finally, 6) deploys the frontend to Amazon Simple Storage Service (Amazon S3) and Amazon CloudFront.

Six step Workflow described in the prior paragraph

Figure 2. Six step Workflow described in the prior paragraph

Let’s look at a few of these actions. If you click on each action you will see details about the workflow execution. For example, I clicked on build_backend. On the logs tab, I can see the build action executes a series of steps. In this example,  pip installs requirements and then pytest and coverage run a series of unit test. If this had been a compiled language — like Java or .NET — there would have been a build step as well.

Logs from the build action including pip, pytest, and coverage

Figure 3. Logs from the build action including pip, pytest, and coverage

If I switch to the Reports tab, I see the result of the unit tests as well as code and branch coverage. In each case the test has exceeded the pass rate, indicated by the black bar on the graph. If they had not, the build would have failed.

Results of the unit tests including code and branch coverage

Figure 4. Results of the unit tests including code and branch coverage

Next, let’s examine how the workflow is defined by clicking on the Edit button in the top right corner of the screen. If the editor opens in YAML mode, switch to Visual mode using the toggle above the code. If I click on WorkflowSource, I see that the Workflow is triggered by a push to the main branch. I could add additional triggers. CodeCatalyst supports triggering on Push or Pull Request. In addition, I can trigger off multiple branches, including wildcards (e.g. “release-.*”).  Finally, I can trigger branches when only some files in a repository change (e.g. "src/.*")

Trigger configuration showing various options

Figure 5. Trigger configuration showing various options

Now, let’s look at the build_frontend action. This is a build action, similar to the build_backend action you looked at earlier. On the Configure tab I can see the Shell commands that will be executed during the build. Remember that the frontend is written using Vue. Here I can see  npm install used to install dependencies, npm run test:unit used to run tests, and finally npm run build-only to build the Single Page App (SPA). The resulting artifacts are passed to subsequent actions in the Workflow.

Shell commands run in the build action

Figure 6. Shell commands run in the build action

Next, let’s look at the integration_test action. A managed test action is very similar to a build action, defining a series of commands to execute. On the configuration tab (not shown), I can see that this action is again running pytest. Switching to the Outputs tab, I see that CodeCatalyst is configured to automatically discover the test reports generated by pytest and other test frameworks. In addition, I have defined a minimum pass rate of 100%. This means that the workflow should fail if any of the integration tests fail.

Test report configuration dialog including success criteria

Figure 7. Test report configuration dialog including success criteria

Finally, let’s examine the deploy_frontend action. Note that all of the actions you have looked at so far include a series of commands to run in their configuration. While these actions are highly flexible, CodeCatalyst also supports purpose built actions. The cdk-deploy action is an example of this. As the name implies, this action deploys AWS Cloud Development Kit (CDK) resources. I could have called cdk deploy from the shell commands in a build action. However, using the purpose built action is easier. CodeCatalyst supports many purpose build actions developed by AWS as well as third parties. Click on the + sign in the top left corner of the screen to see a few examples.  In addition, CodeCatalyst supports GitHub actions, but that is a topic for another post.

Cleanup

If you have been following along with this workflow, you should delete the resources you deployed so you do not continue to incur charges (See pricing page for more details). First, delete the two stacks that CDK deployed using the AWS CloudFormation console in the AWS account you associated when you launched the blueprint. These stacks will have names like mysfitsXXXXXWebStack and mysfitsXXXXXAppStack. Second, delete the project from CodeCatalyst by navigating to Project settings and clicking the Delete project button.

Conclusion

In this post, you learned how CodeCatalyst can help you rapidly assemble automation workflows by configuring composable, pre-built actions into CI/CD pipelines. I examined actions to build, test and deploy both frontend and backend applications. In future posts, I will discuss how CodeCatalyst can address the rest of the challenges Maxine encountered in The Unicorn Project.

About the authors:

Kumar Karra

Kumar Karra is a Field Solutions Architect for AWS Small and Medium Business Customers. He has a strong background in designing and developing applications for small consumer facing customers to large mission critical applications for enterprises. He specialized in Builder’s Experience tools and enjoys helping customer shorten their time to value by guiding them on strategies to implement fast, repeatable, testable, and scalable tools and architectures.

Kawshik Sarkar

Kawshik Sarkar is a Field Solutions Architect for AWS Small Medium Business customers . He helps customers by designing solutions using AWS cloud services , to enhance their user experience ,maximize outcomes and improve business agility . He enjoys music , podcasts ,tennis  and being outdoors

Divya Konaka Satyapal

Divya Konaka Satyapal is a Sr.Technical Account Manager for WWPS Edtech/EDU customers. Her expertise lies in DevOps and Serverless architectures. She works with customers heavily on cost optimization and overall operational excellence to accelerate their cloud journey. Outside of work, she enjoys traveling and playing tennis.