All posts by Chetan Makvana

How to export to Amazon S3 Tables by using AWS Step Functions Distributed Map

Post Syndicated from Chetan Makvana original https://aws.amazon.com/blogs/compute/how-to-export-to-amazon-s3-tables-by-using-aws-step-functions-distributed-map/

Companies running serverless workloads often need to perform extract, transform, and load (ETL) operations on data files stored in Amazon Simple Storage Service (Amazon S3) buckets. Though traditional approaches such as an AWS Lambda trigger for Amazon S3 or Amazon S3 Event Notifications can handle these operations, they might fall short when workflows require enhanced visibility, control, or human intervention. For example, some processes might need manual review of failed records or explicit approval before proceeding to subsequent stages. Customer orchestration solutions to these issues can prove to be complex and error prone.

AWS Step Functions address these challenges by providing built-in workflow management and monitoring capabilities. The Step Functions Distributed Map feature is designed for high-throughput, parallel data processing workflows so that companies can handle complex ETL jobs, fan-out processing, and data visualization at scale. Distributed Map handles each dataset item as an independent child workflow, processing millions of records while maintaining built-in concurrency controls, fault tolerance, and progress tracking. The processed data can be seamlessly exported to various destinations, including Amazon S3 Tables with Apache Iceberg support.

In this post, we show how to use Step Functions Distributed Map to process Amazon S3 objects and export results to Amazon S3 Tables, creating a scalable and maintainable data processing pipeline.

See the associated GitHub repository for detailed instructions about deploying this solution as well as sample code.

Solution overview

Consider a consumer electronics company that regularly participates in industry trade shows and conferences. During these events, interested attendees fill out paper sign-up forms to request product demos, receive newsletters, or join early access programs. After the events, the company’s team scans hundreds of thousands of these forms and uploads them to Amazon S3.Rather than manually reviewing each form, the company wants to automate the extraction of key customer details such as name, email address, mailing address, and interest areas. They’d like to store this structured data in S3 Tables with Apache Iceberg format for downstream analytics and marketing campaign targeting.

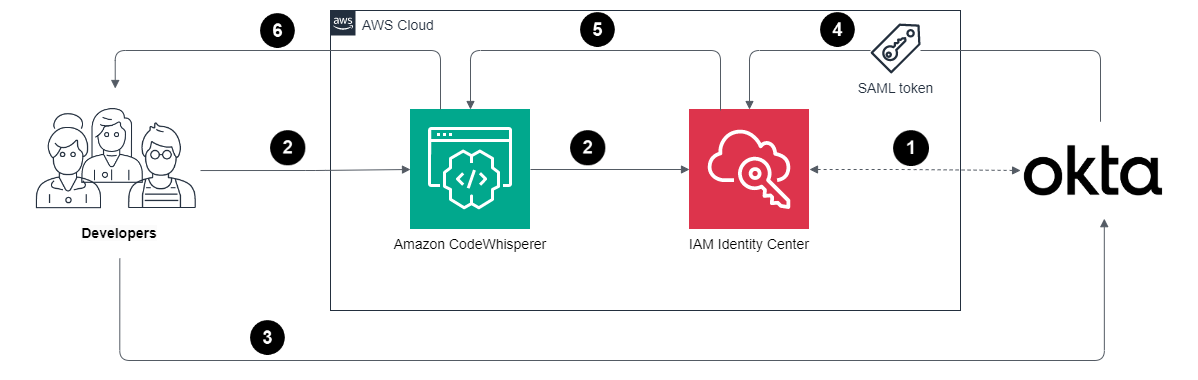
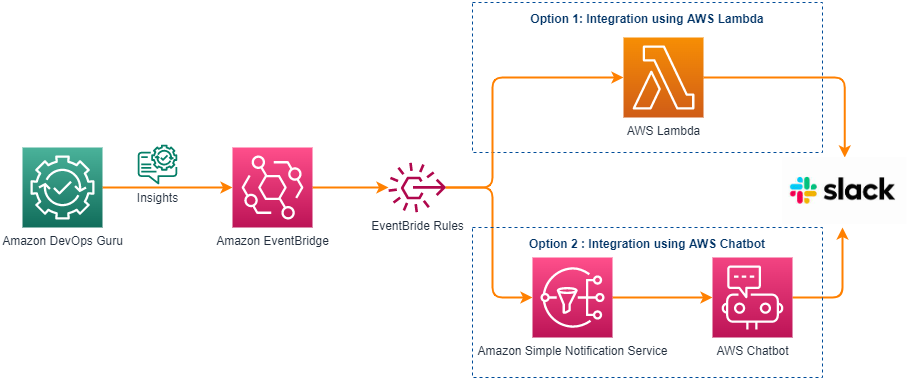
Let’s look at how this post’s solution uses Distributed Map to process PDFs in parallel, extract data using Amazon Textract, and write the cleaned output directly to S3 Tables. The result is scalable, serverless post-event data onboarding, as shown in the following figure.

Solution architecture for automated PDF processing workflow with S3 Tables, EventBridge scheduling, Step Functions Distributed Map

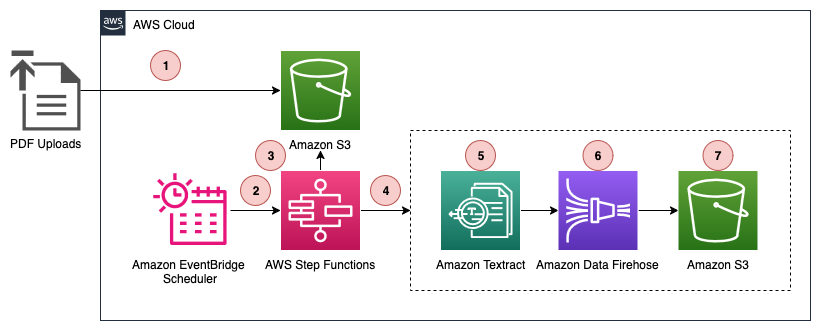
The data processing workflow as shown in the preceding diagram includes the following steps:

  1. A user uploads customer interest forms as scanned PDFs to an Amazon S3 bucket.
  2. An Amazon EventBridge Scheduler rule triggers at regular intervals, initiating a Step Functions workflow execution.
  3. The workflow execution activates a Step Functions Distributed Map state, which lists all PDF files uploaded to Amazon S3 since the previous run.
  4. The Distributed Map iterates over the list of objects and passes each object’s metadata (bucket, key, size, entity tag [ETag]) to a child workflow execution.
  5. For each object, the child workflow calls Amazon Textract with the provided bucket and key to extract raw text and relevant fields (name, email address, mailing address, interest area) from the PDF.
  6. The child workflow sends the extracted data to Amazon Data Firehose, which is configured to forward data to S3 Tables.
  7. Firehose batches the incoming data from the child workflow and writes it to S3 Tables at a preconfigured time interval of your choosing.

With data now structured and accessible in S3 Tables, users can easily analyze them using standard SQL queries with Amazon Athena or business intelligence like Amazon QuickSight.

The data-processing workflow

EventBridge Scheduler starts new Step Functions workflows at regular intervals. The timeline for this schedule is flexible. However, When setting up your schedule, make sure the frequency aligns with how far back your state machine is configured to look for PDFs. For example, if your state machine checks for PDFs from the past week, you’d want to schedule it to run weekly. The Step Functions workflow subsequently performs the following three steps (note that these steps are steps 4, 5, 6, and 7 in the preceding workflow diagram:

  1. Extract relevant user data from the PDFs.
  2. Send the extracted user data to Firehose.
  3. Write the data to S3 Tables in Apache Iceberg table format.

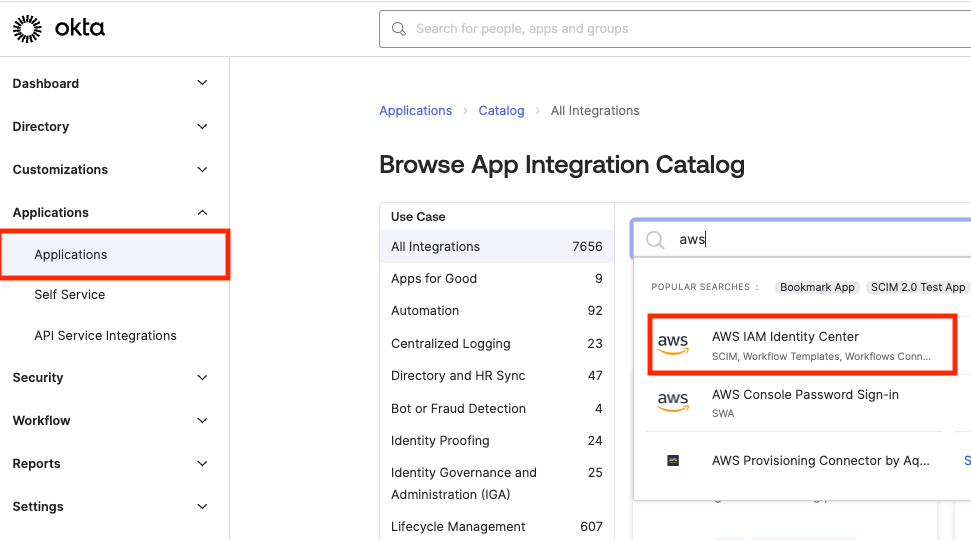
The following diagram illustrates this workflow.

Screenshot of AWS Step Function workflow execution showing processing pipeline from S3 ingenstion through Kinesis batch output

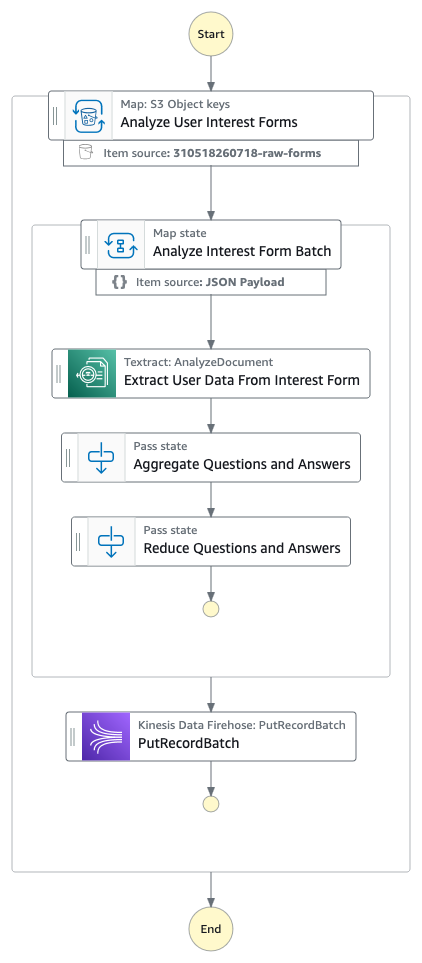
Let’s look at each step of the preceding workflow in more detail.

Extract relevant user data from PDF documents

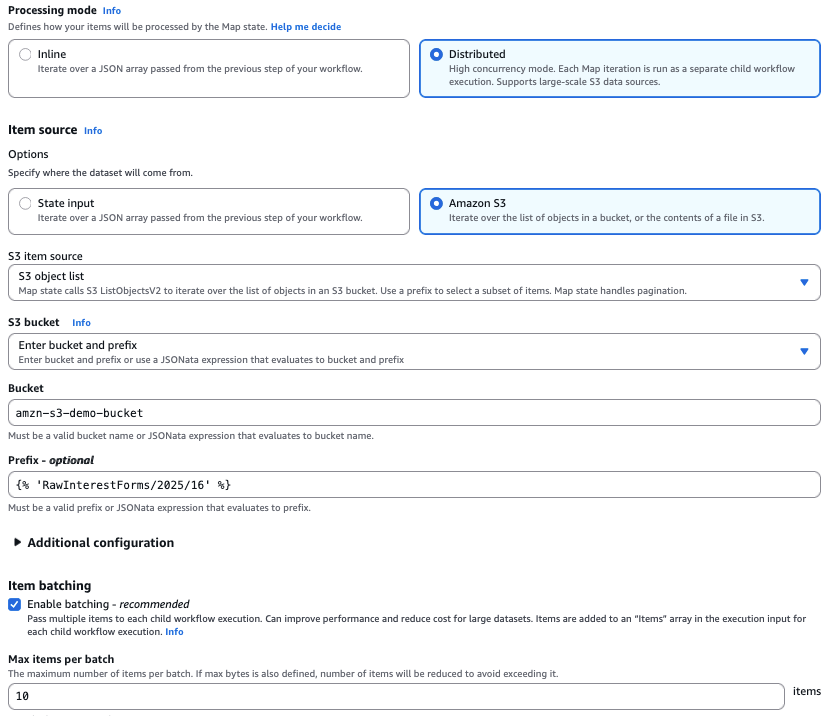
Step Functions uses Distributed Map to process PDFs concurrently in parallel child workflows. It accepts input from JSON, JSONL, CSV, Parquet files, Amazon S3 manifest files stored in Amazon S3 (used to specify particular files for processing), or an Amazon S3 bucket prefix (allows iteration over file metadata for all objects under that prefix). The Step Functions automatically handles parallelization by splitting the dataset and running child workflows for each item, with the ItemBatcher field allowing to group multiple PDFs into a single child workflow execution (e.g., 10 PDFs per batch) to optimize performance and cost.

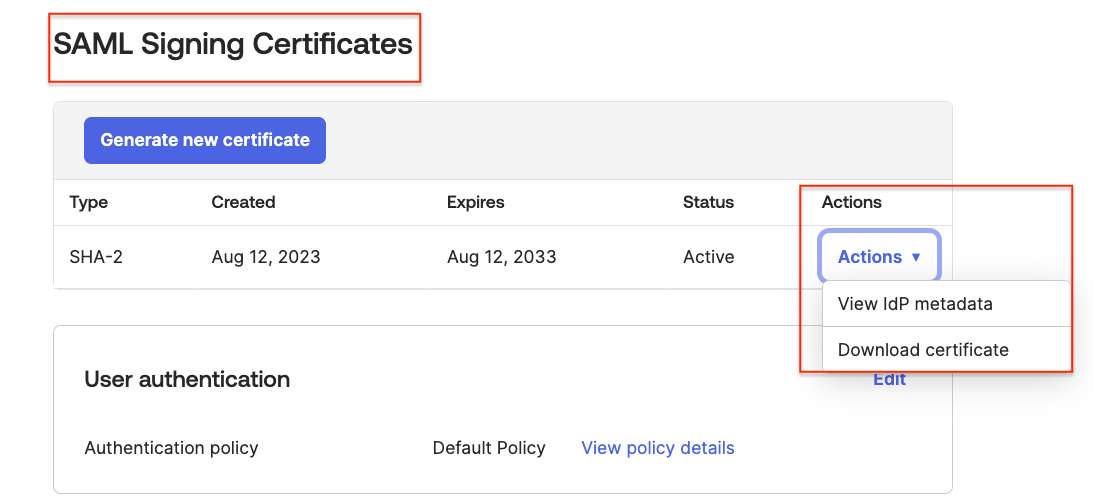
The following screenshot of the Step Functions console shows the configuration for Distributed Map. For example, we have configured Distributed Map to process 10 customer interest PDFs in a single child workflow.

A screenshot of AWS Step Functions console showing Distributed Map state configuration

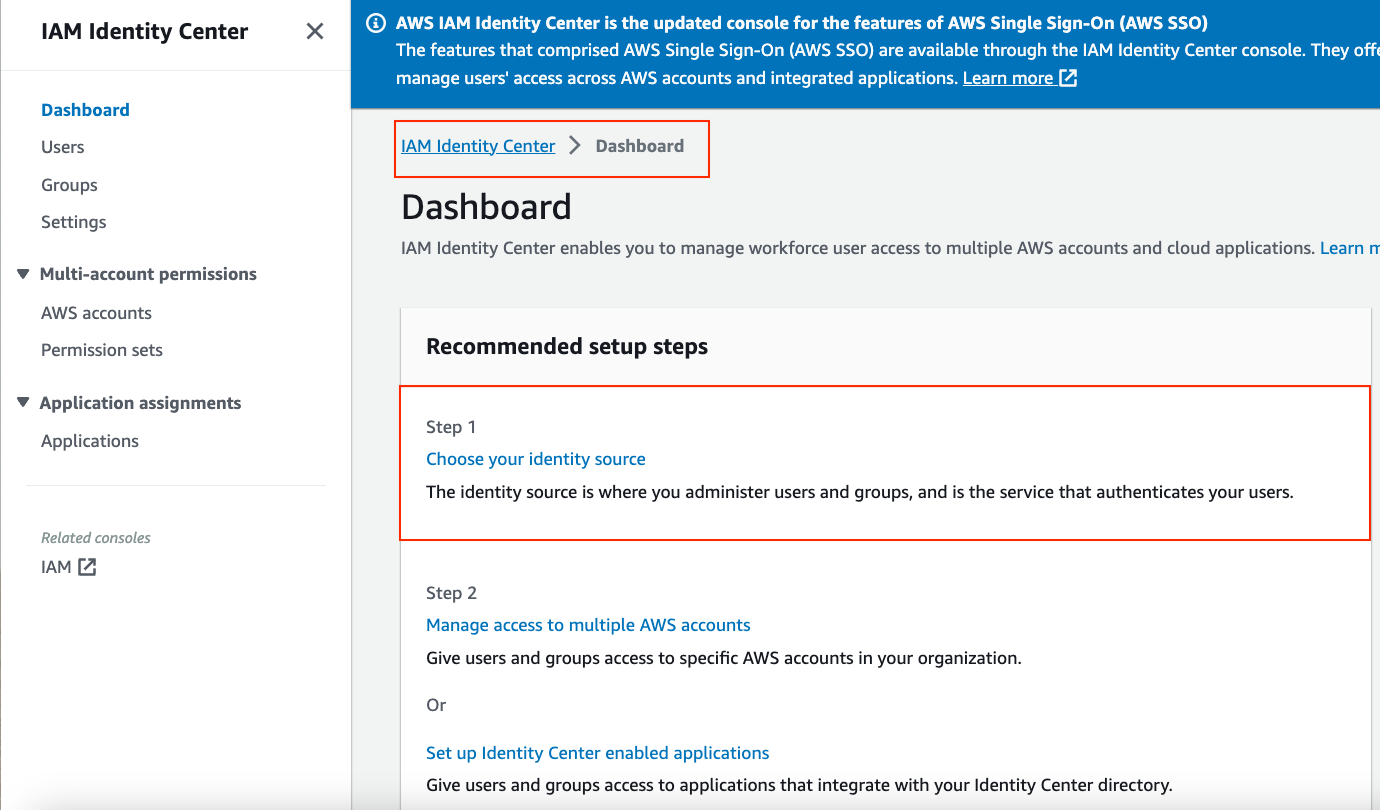
The following image shows one example of these scanned PDFs, which includes the customer information that this post’s solution processes.

A screenshot showing sample PDF

Each child workflow then calls the Amazon Textract AnalyzeDocument API with specific queries to extract customer information.

{
  "Document": {
    "S3Object": {
      "Bucket": "<input PDFs bucket>",
      "Name": "{% $states.input.Key %}"
    }
  },
  "FeatureTypes": [
    "QUERIES"
  ],
  "QueriesConfig": {
    "Queries": [
      {
        "Alias": "full_name",
        "Text": "What is the customer's name?"
      },
      {
        "Alias": "phone_number",
        "Text": "What is the customer’s phone number?"
      },
      {
        "Alias": "mailing_address",
        "Text": "What is the customer’s mailing address?"
      },
      {
        "Alias": "interest",
        "Text": "What is the customer’s interest?"
      }
    ]
  }
}

The API analyzes each scanned PDF and returns a JSON structure containing the extracted customer information.

Send the extracted user data to Firehose

The child workflow then uses a Firehose PutRecordBatch API action with service integrations to queue the extracted customer information for further processing. The PutRecordBatch action request includes the Firehose stream name and the data records. The data records include a data blob from step 1 that contains extracted customer information, as shown in the following example.

{
  "DeliveryStreamName": "put_raw_form_data_100",
  "Records": [
    {
      "Data": "{\"full_name\":\"Anthony Ayala\",\"phone_number\":\"001-384-925-0701\",\"mailing_address\":\"38548 Joshua Wall Suite 974, East Heatherfort, OH 32669\",\"interest\":\"Fitness Trackers\",\"processed_date\":\"2025-05-01\"}"
    },
    {
      "Data": "{\"full_name\":\"Becky Williams\",\"phone_number\":\"+1-283-499-2466\",\"mailing_address\":\"227 King Forge Suite 241, East Nathanland, PR 05687\",\"interest\":\"Al Assistants\",\"processed_date\":\"2025-05-01\"}"
    }
  ]
}

Write the data to S3 Tables in Apache Iceberg table format

Firehose efficiently manages data buffering, format conversion, and reliable delivery to various destinations, including Apache Iceberg, raw files in Amazon S3, Amazon OpenSearch Service, or any of the other supported destinations. Apache Iceberg tables can be either self-managed in Amazon S3 or hosted in S3 Tables. Though self-managed Iceberg tables require manual optimization—such as compaction and snapshot expiration—S3 Tables automatically optimize storage for large-scale analytics workloads, improving query performance and reducing storage costs.

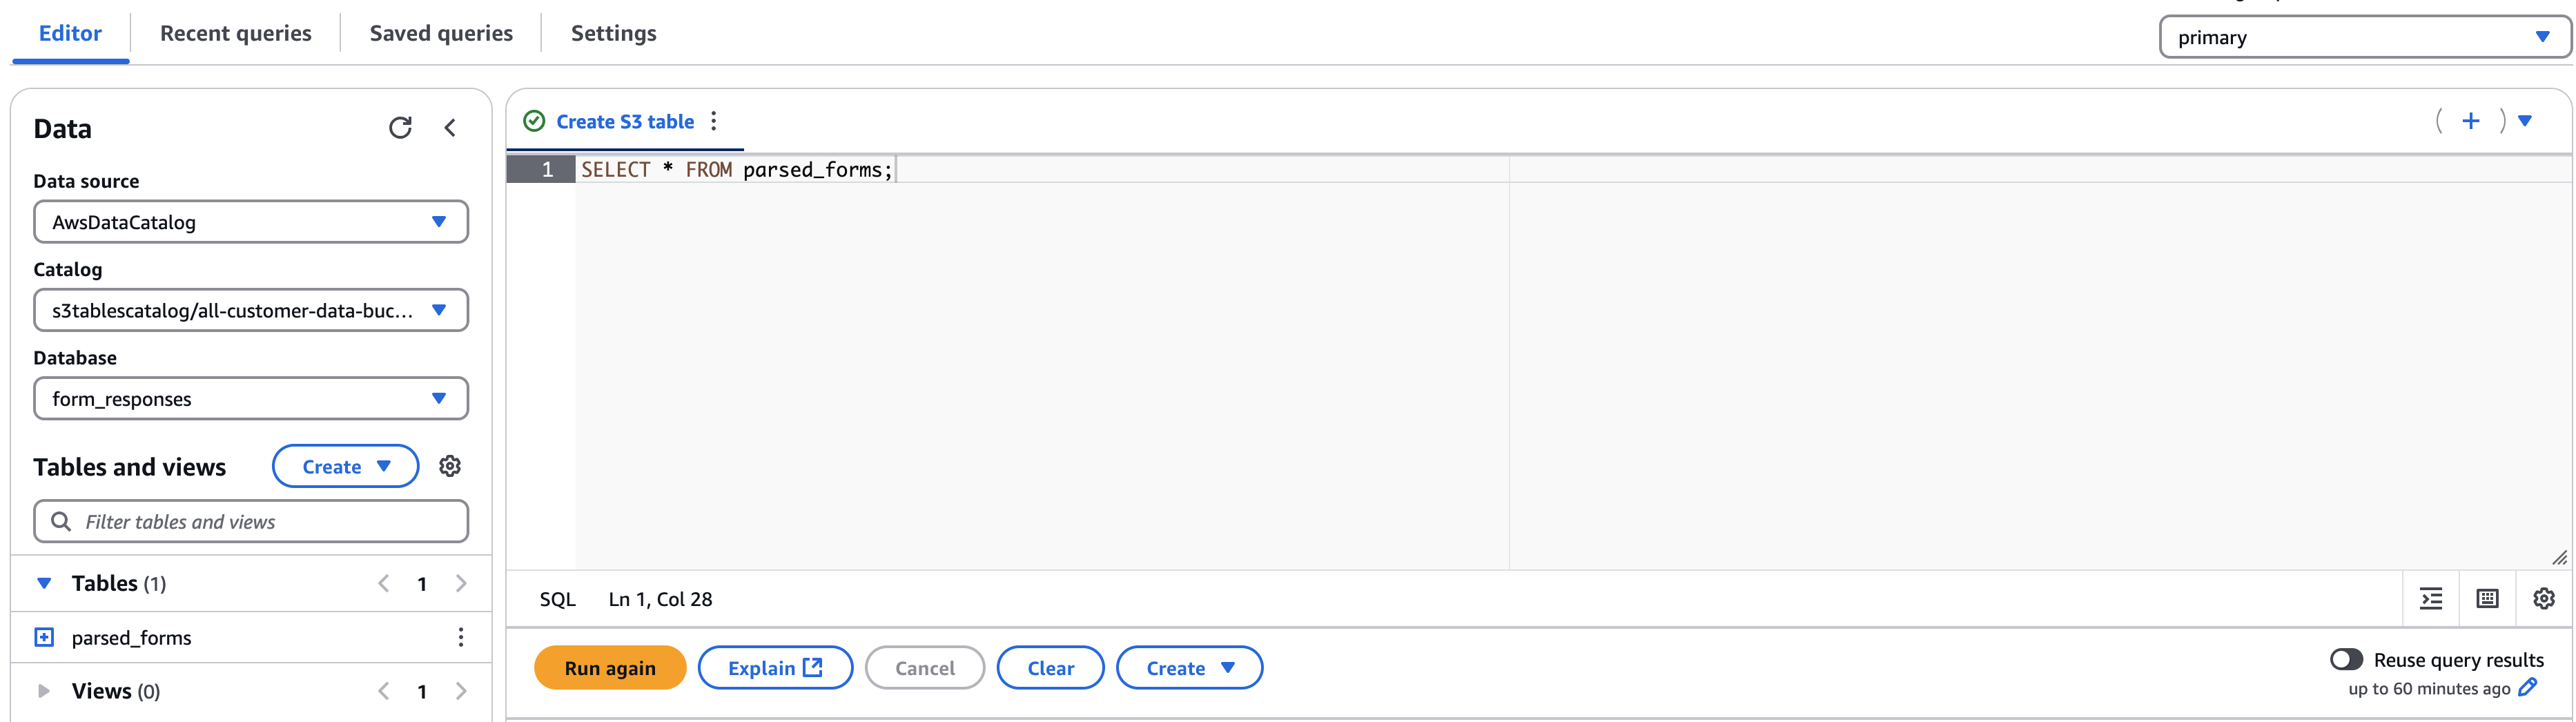
Firehose simplifies the process of streaming data by configuring a delivery stream, selecting a data source, and setting an Iceberg table as the destination. After you’ve set it up, the Firehose stream is ready to deliver data. The delivered data can be queried from S3 Tables by using Athena, as shown in the following screenshot of the Athena console.

A screenshot of the Athena console showing a query to select the data we just uploaded

The query results include all processed customer data from the PDFs, as shown in the following screenshot.

A screenshot of the Athena console showing the results of the query we just ran

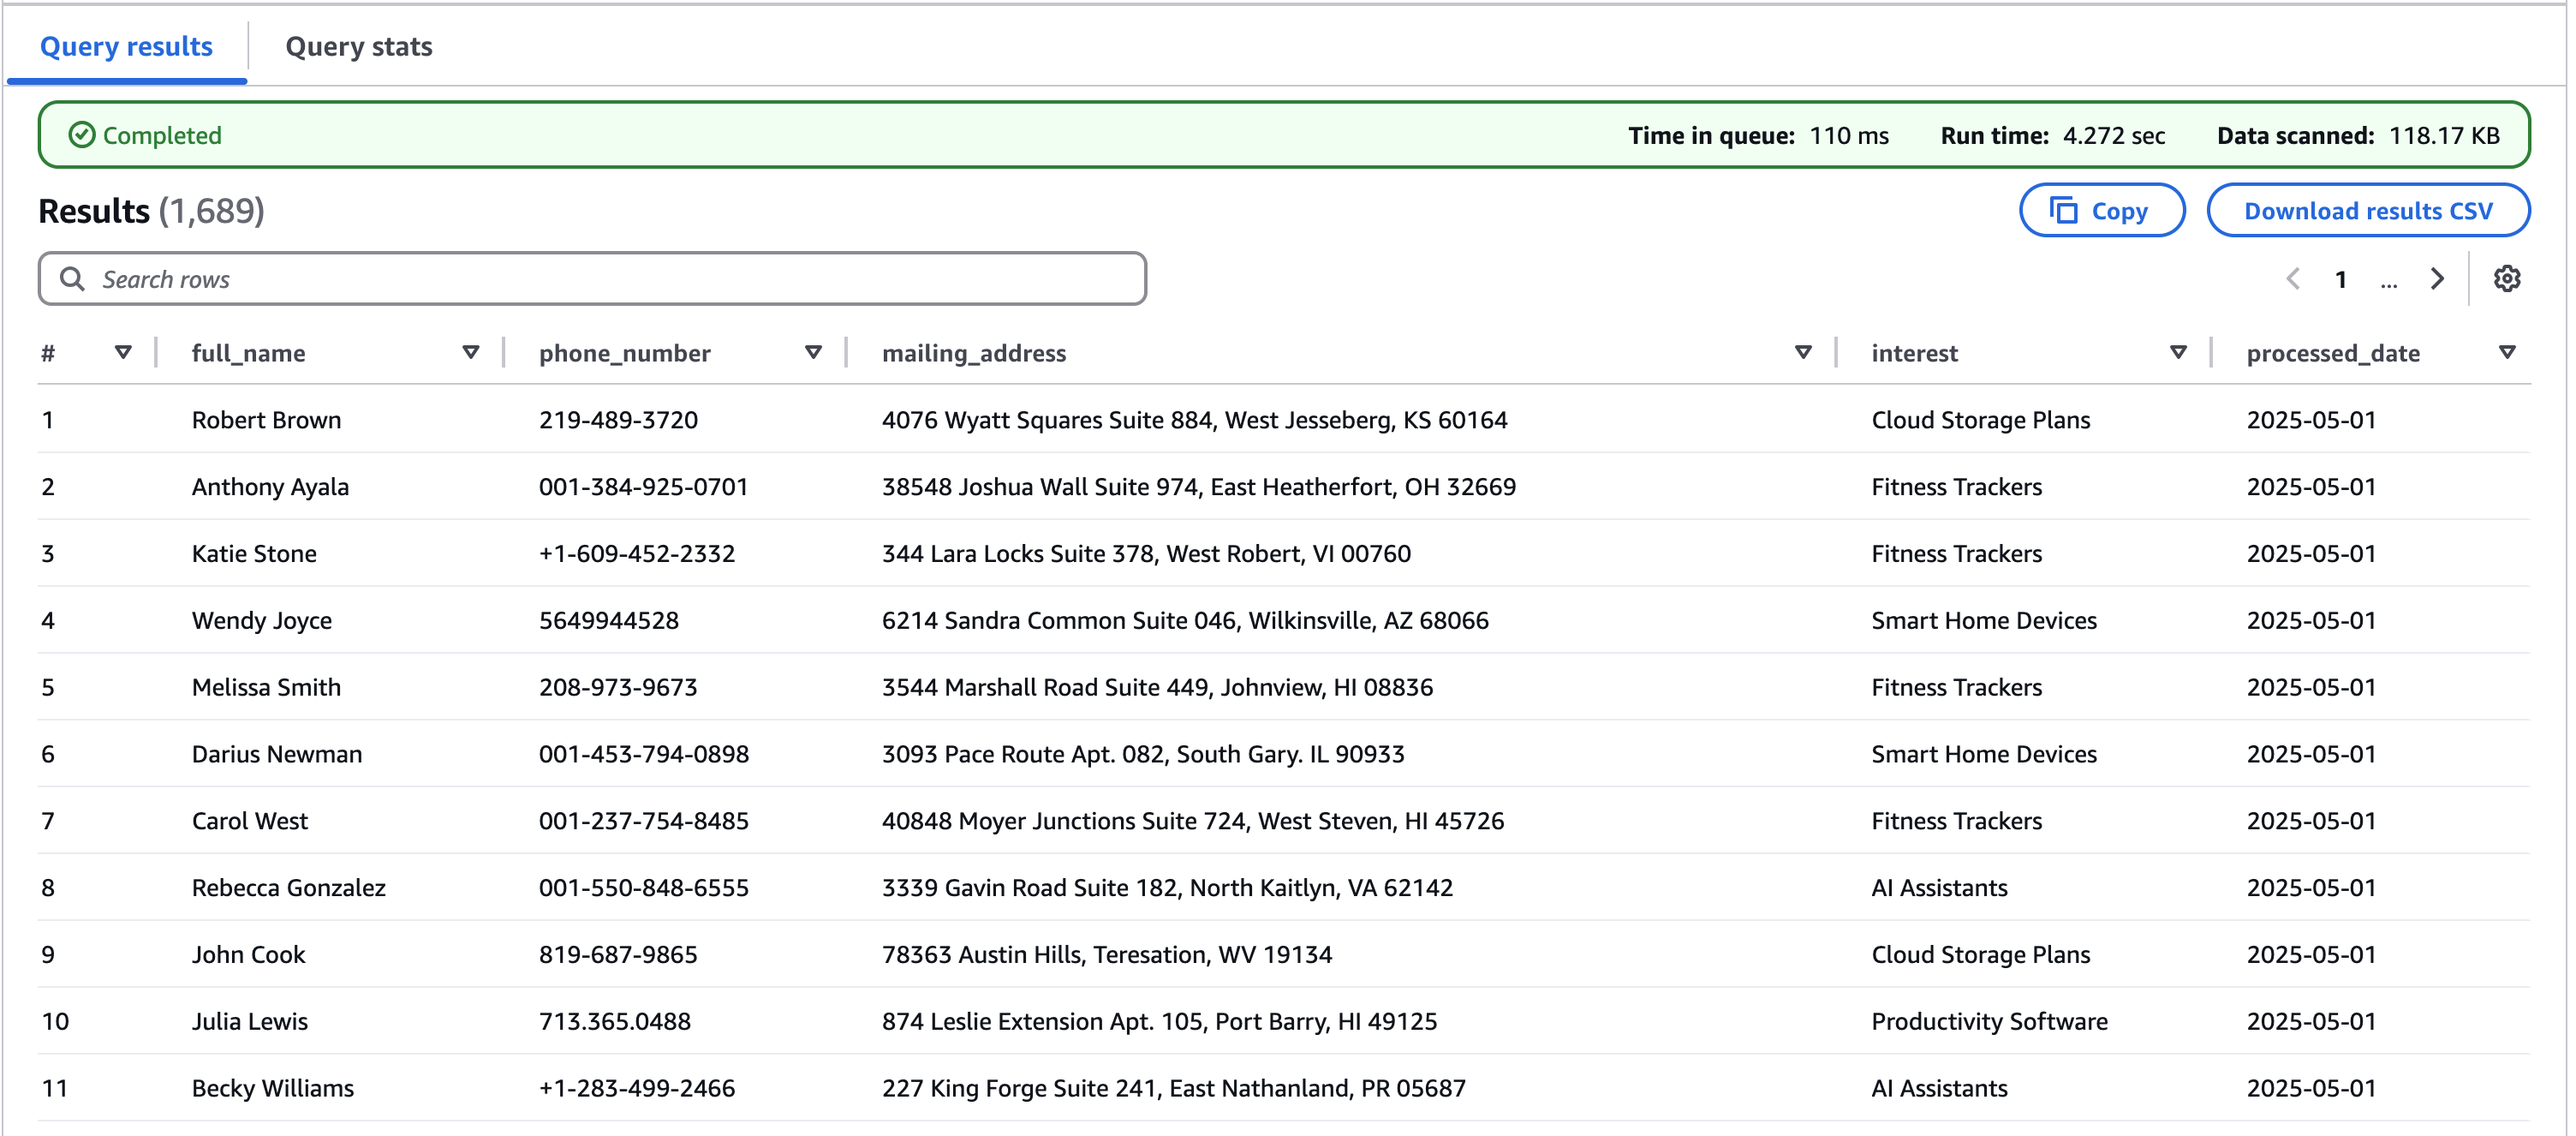
This integration demonstrates a powerful, code-free solution for transforming raw PDF forms into enriched, queryable data in an Iceberg table. You can use these data for further analysis.

Conclusion

In this post, we showed how to build a scalable, serverless solution for processing PDF documents and exporting the extracted data to S3 Tables by using Step Functions Distributed Map. This architecture offers several key benefits such as reliability, cost-effectiveness, visibility, and maintainability. By leveraging AWS services such as Step Functions, Amazon Textract, Firehose, and S3 Tables, companies can automate their document processing workflows while ensuring optimal performance and operational excellence. This solution can be adapted for various use cases beyond customer interest forms, such as invoice processing, application forms, or any scenario requiring structured data extraction from documents at scale.

Though this example focuses on processing PDF data and writing to S3 Tables, Distributed Map can handle various input sources including JSON, JSONL, CSV, and Parquet files in Amazon S3; items in Amazon DynamoDB tables; Athena query results; and all paginated AWS List APIs. Similarly, through Step Functions service integrations, you can write results to multiple destinations such as DynamoDB tables by using the PutItem service integration.

To get started with this solution, see the associated GitHub repository for deployment instructions and sample code.

Modernize your Java application with Amazon Q Developer

Post Syndicated from Chetan Makvana original https://aws.amazon.com/blogs/devops/modernize-your-java-application-with-amazon-q-developer/

Many organizations have critical legacy Java applications that are increasingly difficult to maintain. Modernizing these applications is a necessary, daunting, and risky task that takes the focus off of creating new value or features. This includes undocumented code, outdated frameworks and libraries, security vulnerabilities, a lack of logging and error handling, and a lack of input validation. Amazon Q Developer simplifies and accelerates the modernization of existing Java applications. It can analyze code to highlight areas for potential improvements, assist with resolving technical debt, suggest code optimizations, and facilitate the transition to current frameworks and libraries.

This blog post explores how to modernize legacy Java applications using Amazon Q Developer. We will take an example of Unicorn Store API, a Java application with Java 8 running on Amazon Elastic Compute Cloud (Amazon EC2). First, we will upgrade the underlying runtime from Java 8 to Java 17 and other common dependencies, including Spring. Then, we will reduce technical debt within the code by improving modularity and logging. Finally, we will redeploy this application in a container image using a modern computing option, AWS Fargate.

The Unicorn Store API provides CRUD operations to manage Unicorn records in a database. It is built with Maven.

You will follow the below steps to modernize this application and bring it to Fargate using Amazon Q Developer.

  1. Upgrade the application to Java 17 to leverage the latest features.
  2. Reduce existing technical debt in the codebase.
  3. Make the application cloud native and deploy it to AWS.

In this walkthrough, we are using IntelliJ IDEA IDE with the latest version of Amazon Q Developer plugin for IntelliJ IDEA

Upgrade from Java 8 to Java 17

Outdated applications require increased effort to maintain security and stability. As a developer, you must continually relearn framework changes and optimizations that others have discovered in previous upgrades. The effort required to maintain the application makes it difficult to balance necessary updates with adding new features.

With Amazon Q Developer agent for code transformation, you can keep applications updated and supported in just a few steps. This removes vulnerabilities from unsupported versions, improves performance, and frees up time to focus on adding new features. Amazon Q Developer agent for code transformation accelerates application maintenance, upgrades, and migration in minutes. It enables developers to remove much of the undifferentiated work out of the tedious task of maintaining, upgrading and migrating existing application workloads, saving up to days’ or months’ worth of the undifferentiated work involved in moving from older language versions.

Let’s upgrade our Unicorn Store API from Java 8 to Java 17 using Amazon Q Developer agent for code transformation to leverage the latest features and optimization. In IntelliJ IDE, you enter /transform in the Amazon Q chat panel and provide the necessary details for Amazon Q Developer to start upgrading the project.

IntelliJ IDE showing the Amazon Q chat panel open with the /transform command entered and details provided about the project to upgrade. This triggers the Amazon Q Developer agent for code transformation to analyze the code, generate a transformation plan, and upgrade frameworks and libraries like Spring, Spring Boot, JUnit, and Log4j to be compatible with Java 17.

Amazon Q Developer agent for code transformation automatically analyzes the existing code, generates a transformation plan, and completes the transformation tasks suggested by the plan. While doing so, it upgrades popular libraries and frameworks to a version compatible with Java 17, including Spring, Spring Boot, JUnit, JakartaEE, Mockito, Hibernate, and Log4j to their latest available major versions. It also updates deprecated code components according to Java 17 recommendations. To start with the Amazon Q Developer agent for code transformation capability, you can read and follow the steps at Upgrade language versions with Amazon Q Developer agent for Code Transformation.

Once complete, you can review the transformed code, complete with build and test results, before accepting the changes.

In the IntelliJ IDE, Amazon Q Developer agent for code transformation summarizes all the changes it made after the transformation of the current project to Java 17 is complete. User clicks on the View diff button. The list of all the files that have been modified or added is displayed. User has the option to review the diff, and then accept or reject them.

Reduce technical debt in the codebase

Technical debt accumulates in any codebase over time. Some technical debt may be unavoidable to meet deadlines, but must be tracked and prioritized to pay back later. If left unmanaged, compounding technical debt will make development slower and expensive. Reducing technical debt should be an ongoing team effort, but often falls behind other priorities. Amazon Q Developer streamlines modernizing legacy Java code by identifying and remediating technical debt. Amazon Q Developer reduces the time and resources it takes to analyze the code by providing a list of issues that contribute to technical debt in a codebase. This makes it easy for software development teams to prioritize technical debt items and make informed decisions about which technical debt to address first.

Let’s find the list of technical debt in our Unicorn Store API. In IntelliJ IDE, use Send to Prompt option to send the highlighted code to the Amazon Q chat panel and prompt to provide a list of all technical debt. Amazon Q Developer lists all technical debt in detail.

In the IntelliJ IDE, user has opened the code for one of the classes (UnicornController.java in this case). User right-clicks inside this file. This opens a context window. User selects Amazon Q, then selects Send to Prompt. The code is now displayed in the Amazon Q Chat panel. The user enters this message in the chat window: “Analyze the selected code and list all technical debt”. Amazon Q Developer generates a list of all potential technical debt or areas of improvement. It explains the impact of each technical debt.

Once you identify the technical debt, the next step is to gradually remediate them. Amazon Q Developer reduces the time it takes to implement the code to remediate the technical debt. As a developer, you can interact with Amazon Q Developer agent for software development within your IDE to get help with code suggestions for a specific task that you are trying to accomplish. It uses the code in whole project as context and provides an implementation plan that includes code updates it plans to make across all the files in the project. You can review the plan, and once you are satisfied with the plan, you can ask Amazon Q Developer to generate the code based on the proposed plan. This saves developers’ effort compared to manual updates.

For the technical debt identified for Unicorn Store API in the above step, let’s use Amazon Q Developer to address the missing logging technical debt. In IntelliJ IDE, enter /dev in the Amazon Q chat panel with the details on the logging technical debt. Amazon Q Developer generates an implementation plan and code to add logging based on the full project context. To get started with Amazon Q Developer agent for software development, you can refer to the steps at Develop software with the Amazon Q Developer agent for software development.

In the IntelliJ IDE, the user opens Amazon Q Chat panel, enters /dev and provides input about the task detail “Implement logging for critical REST endpoints. Log relevant error details such as request parameters and stack traces to facilitate debugging and troubleshooting”. The Amazon Q Developer agent for software development generates the steps to implement this task, including changes that will be made to existing files and any new files that will be created. User reviews all the changes, then clicks on Generate code button. Amazon Q generates a list of code suggestions. User clicks on a file from the list, and reviews the diff between the existing code in that file, and the new code generated by Amazon Q Developer. User then clicks on Insert Code button.

Modernizing legacy Java code requires continuous refactoring to incrementally enhance quality and avoid accumulating technical debt over time. Amazon Q Developer simplifies this iterative process through its Refactor capability. Amazon Q Developer provides a refactored version of the selected code, alongside explanations of each change and its coding benefit. It helps you to understand the changes by explaining each change and the benefit of making the change in the existing code. You can read further about this capability at Explain and update code with Amazon Q Developer.

Let’s leverage this feature to refine methods in the UnicornController class in our Unicorn Store API project. Amazon Q Developer furnishes the updated code with better code readability or efficiency, among other improvements, for you to review.

In the IntelliJ IDE, user highlights a section of code (createUnicorn and updateUnicorn methods in the UnicornController class in this case), and right-clicks on the highlighted code. This opens a context window. User selects Amazon Q, and then selects Refactor code. The code is now displayed in the Amazon Q Chat panel. Amazon Q Developer generates a refactored version of the selected code. It also provides a list of all the changes made and the benefit of changing the code.

Make the application cloud native and deploy to AWS

The final step in the modernization journey is to make the application cloud-native and deploy to AWS. Cloud native is the software approach of building, deploying, and managing modern applications in cloud computing environments. These cloud native technologies support fast and frequent changes to applications without impacting service delivery, providing adopters with an innovative, competitive advantage. Let’s see how Amazon Q Developer can assist in making our Unicorn Store API project cloud native.

In IntelliJ IDE, open the Amazon Q Chat, and prompt Amazon Q Developer to provide a recommended approach to make the project cloud native and deploy to AWS.

In the IntelliJ IDE, user sends the content of the pom.xml file to Amazon Q Chat window, and asks Amazon Q Developer “What is the recommended way to make this micro service, cloud native and deploy to AWS?” Amazon Q generates the steps and a high-level implementation guide. In this case, it includes suggestions to containerize the application, use Amazon Elastic Container Registry, deploy to Amazon Elastic Container Service (ECS), implement a load balancer, leverage AWS Fargate, implement monitoring and logging, implement CI/CD, leverage other AWS managed services, implement security best practices, monitor and optimize the deployment.

Amazon Q Developer analyzes the code and details the steps involved in making this application cloud native. The detailed steps involve containerizing the application, deploying the container application to AWS services such as Amazon Elastic Container Service (Amazon ECS), Fargate for running containers in a serverless manner, Amazon Elastic Container Registry (Amazon ECR) for pushing the container image, accessing the application through AWS Application Load Balancer (ALB), Amazon CloudWatch for monitoring and associated services like Amazon Virtual Private Cloud (VPC) and Subnets.

Let’s ask Amazon Q Developer to implement the steps outlined in the previous chat conversation. First, ask Amazon Q Developer to create a docker file to containerize the application. The containerization process streamlines application development by decoupling the software from the underlying hardware and other dependencies. This approach enhances speed, efficiency, and security by isolating different components within the containerized environment.

In the IntelliJ IDE, user continues the conversation in the previous chat window. User asks Amazon Q Developer to provide implementation for the step 1 (containerize the application) and create a Dockefile for the application. Amazon Q generates a Dockerfile that includes all the necessary steps. User creates a new file named Dockerfile, and copies the contents from the chat window to the new file. Next, user opens the terminal within the IntelliJ IDE. User copies the build and run commands from the chat and pastes it in the terminal window. The application successfully builds in the docker container. Finally, application runs successfully as a docker container.

Having successfully developed a container-based application, let’s leverage Amazon Q Developer’s capabilities to generate an AWS CloudFormation template. This template will enable us to deploy the required resources to AWS using Infrastructure as Code (IaC). IaC allows us to programmatically provision and manage our computing infrastructure, eliminating the need for manual processes and configurations. Manual infrastructure management can be time-consuming and error-prone, especially when dealing with large-scale applications.

To facilitate the creation of the CloudFormation template, let’s revisit the suggestions from our previous conversation and compile a list of the resources that need to be provisioned in AWS. Once you have this list, you can ask Amazon Q Developer to generate the CloudFormation template based on these resource requirements.

In the IntelliJ IDE, user copies the steps outlined in the previous conversation, and asks Amazon Q Developer to create a CloudFormation template to deploy this application to AWS. Amazon Q Developer creates the full CloudFormation template to deploy all resources. User creates a new YAML file, and copies the contents from the chat window to the new file. The generated CloudFormation contains the steps to deploy VPCs, subnets, ECR, ECS cluster, Tasks, LoadBalancer, CloudWatch logs, etc. User reviews the generated code for accuracy before deployment.

Amazon Q Developer can generate the CloudFormation template with all the required resources as outlined in the steps to deploy the container in AWS in a secure, reliable, and scalable manner.

Now that we have the CloudFormation template, once CloudFormation is deployed, let’s push the local docker image of our Unicorn Store API to Amazon ECR and start the Fargate tasks required to run the application in AWS.

In the IntelliJ IDE, user runs the commands to push the docker image of the application created using Amazon Q Developer.

In this way, you can use Amazon Q Developer to make your application cloud native by designing the steps to deploy to the cloud, helping migrate your application to container-based solution and even writes Infrastructure as code scripts to deploy your application to AWS.

Conclusion

Amazon Q Developer empowers developers to simplify and accelerate the modernization of legacy Java applications. By leveraging Amazon Q Developer, developers can bring outdated applications up to current frameworks and deploy them to AWS in a cloud-native architecture. This streamlines the process, reducing the effort, risk, and maintenance required. Developers save significant time and resources, which can now be used to focus on building new features and enhancing modernized applications rather than managing technical debt.

To learn more about Amazon Q Developer, see the following resources:

Chetan Makvana

Chetan Makvana is a Senior Solutions Architect with Amazon Web Services. He works with AWS partners and customers to provide them with architectural guidance for building scalable architecture and implementing strategies to drive adoption of AWS services. He is a technology enthusiast and a builder with a core area of interest on generative AI, serverless, and DevOps. Outside of work, he enjoys watching shows, traveling, and music.

Venugopalan Vasudevan

Venugopalan Vasudevan is a Senior Specialist Solutions Architect at Amazon Web Services (AWS), where he specializes in AWS Generative AI services. His expertise lies in helping customers leverage cutting-edge services like Amazon Q, and Amazon Bedrock to streamline development processes, accelerate innovation, and drive digital transformation. Venugopalan is dedicated to facilitating the Next Generation Developer experience, enabling developers to work more efficiently and creatively through the integration of Generative AI into their workflows.

Surabhi Tandon

Surabhi Tandon is a Senior Technical Account Manager at Amazon Web Services (AWS). She supports enterprise customers achieve operational excellence and help them with their cloud journey on AWS by providing strategic technical guidance. Surabhi is a builder with interest in Generative AI, automation, and DevOps. Outside of work, she enjoys hiking, reading and spending time with family and friends.

Accelerate your Software Development Lifecycle with Amazon Q

Post Syndicated from Chetan Makvana original https://aws.amazon.com/blogs/devops/accelerate-your-software-development-lifecycle-with-amazon-q/

Software development teams are constantly looking for ways to accelerate their software development lifecycle (SDLC) to release quality software faster. Amazon Q, a generative AI–powered assistant, can help software development teams work more efficiently throughout the SDLC—from research to maintenance.

Software development teams spend significant time on undifferentiated tasks while analyzing requirements, building, testing, and operating applications. Trained on 17 years’ worth of AWS expertise, Amazon Q can transform how you build, deploy, and operate applications and workloads on AWS. By automating mundane tasks, Amazon Q enables development teams to spend more innovating and building. Amazon Q can speed up on-boarding, reduce context switching, and accelerate development of applications on AWS.

This blog post explores how Amazon Q can accelerate development tasks across the SDLC using an example To-Do API project. Throughout this blog, we will navigate through the various phases of the SDLC while implementing To-Do API by leveraging Amazon Q Business and Amazon Q Developer. We will walk through common use cases for Amazon Q Business in the planning and research phases, and Amazon Q Developer in the research, design, development, testing, and maintenance phases.

Planning

As a product owner, you spend significant time on requirements analysis and user story development. You research internal documents like functional specifications and business requirements to understand the desired functionalities and objectives. Manually sifting through documentation is time consuming. You can leverage Amazon Q Business to quickly extract relevant information from your internal documents or wikis, such as Confluence. Amazon Q Business quickly connects to your business data, information, and systems so that you can have tailored conversations, solve problems, generate content, and take actions relevant to your business. Amazon Q Business offers over 40 built-in connectors to popular enterprise applications and document repositories, including Amazon Simple Storage Service (Amazon S3), Confluence, Salesforce and more, enabling you to create a generative AI solution with minimal configuration. Amazon Q Business also provides plugins to interact with third-party applications. These plugins support read and write actions that can help boost end user productivity.

So, instead of digging through the internal documentations, you can simply ask Amazon Q Business about requirements using natural language and it will provide immediate and relevant information to the users, and helps streamline tasks and accelerate problem solving.

For our To-Do API example, let’s consider the business requirements are documented in Confluence, and Jira is utilized for issue management. You can configure Amazon Q Business with Confluence and Jira through the Confluence connector and Jira plugin, respectively. To understand requirements, you may ask Amazon Q Business for an overview of the use case, business drivers, non-functional requirements, and other related questions. Amazon Q Business then pulls the relevant details from the Confluence documents and presents them to you in a clear and concise manner. This allows you to save time gathering requirements and focus more on developing user stories.

Ask Amazon Q Business to understand requirements from the requirement document available on Confluence

Once you have a good understanding of the requirements, you can ask Amazon Q Business to write a user story and even create a Jira issue for you. For the To-Do API use case, Amazon Q Business generates the user stories tailored to the requirements and creates the corresponding Jira ticket ready for your team, saving you time and ensuring efficiency in the project workflow.

Ask Amazon Q Business to create issue in Jira

Research and Design

Let’s consider a scenario where the above mentioned user story is assigned to you and you have to implement it based on the technology stacks described in the confluence page.

First, you ask Amazon Q Business to gain insights into the technology stacks aligning with the organization’s development guidelines. Amazon Q Business promptly provides you with details sourced from the internal development guidelines document hosted on Confluence along with references and citations.

Ask Amazon Q Business to gain insight in technology stack detail from Confluence.

As a developer, you can use Amazon Q Developer in your integrated development environment (IDE) to get software development assistance, including code explanation, code generation, and code improvements such as debugging and optimization. Amazon Q Developer can help by analyzing the requirements, assessing different approaches, and creating an implementation plan and sample code. It can investigate options, weigh tradeoffs, recommend best practices, and even brainstorm with you to optimize the design.

Let’s see how Amazon Q Developer can help analyze the user story, design, and brainstorm with you arrive at an implementation plan.

Ask Amazon Q Developer to design To-Do API.

Let us further refine the design with adding non-functional requirements such as security and performance.

Ask Amazon Q Developer to design with non-functional requirements.

Develop and Test

Amazon Q Developer can generate code snippets that meet your specified business and technical needs. You can review the auto-generated code, manually copy, and paste it into your editor, or use the Insert at cursor option to directly incorporate it into your source code. This allows you to rapidly prototype and iterate on new capabilities for your application. Amazon Q Developer uses the context of your conversation to inform future responses for the duration of your conversation. This makes it easy to help you focus on building applications because you don’t have to leave your IDE to get answers and context-specific coding guidance.

Amazon Q Developer is particularly useful for answering questions related to the following areas:

  • Building on AWS, including AWS service selection, limits, and best practices.
  • General software development concepts, including programming language syntax and application development.
  • Writing code, including explaining code, debugging code, and writing unit tests.
  • Upgrading and modernizing existing application code using Amazon Q Developer Agent for Code Transformation.

Expanding on the same user story design generated by Amazon Q Developer, you can ask Amazon Q Developer to implement the API and refine based on additional requirements and parameters. Let’s collaborate with Amazon Q Developer, to expand our design to implementation. You can leverage Amazon Q Developer’s expertise to ideate, evaluate options, and arrive at an optimal solution. Amazon Q Developer can have an intelligent discussion to brainstorm creative new test cases based on the requirements. It can then help construct an implementation plan, suggesting ways to efficiently add robust, comprehensive tests that cover edge cases.

Let’s ask Amazon Q Developer to generate code based on the design.

Ask Amazon Q Developer to generate code

Now, let’s ask Amazon Q Developer to implement the AWS Lambda function.

Ask Amazon Q Developer to generate AWS Lambda function.

Amazon Q Developer can provide code examples and snippets that show how to implement the design. You can review the code, get Amazon Q Developer’s feedback, and seamlessly integrate it into the project. Collaborating with Amazon Q Developer allows you to amplify your productivity by leveraging its knowledge to quickly iterate and enrich our application capabilities.

Amazon Q Developer can also review the code and find opportunities for improvements, optimization based on performance and other parameters. Let us ask Amazon Q Developer to find any opportunities for improvements on the code for our To-do API.

Ask Amazon Q Developer for code improvements

Debugging and Troubleshooting

Amazon Q Developer can assist you with troubleshooting and debugging your code. For unfamiliar error codes or exception types, you can ask Amazon Q Developer to research their meaning and common resolutions. Amazon Q Developer can also help by analyzing your applications’ debug logs, highlighting any anomalies, errors, or warnings that could indicate potential issues.

Amazon Q Developer can troubleshoot network connectivity issues caused by misconfiguration, providing concise problem analysis and resolution suggestions. Amazon Q Developer can also research AWS best practices to identify areas not aligned with recommendations. For code issues, it can answer questions and debug problems within supported IDEs. Leveraging its knowledge of AWS services and their interactions, Amazon Q Developer can provide service-specific guidance. In the AWS Management Console, Amazon Q Developer can troubleshoot errors you receive while working with AWS services such as insufficient permissions, incorrect configuration, and exceeding service limits.

Let’s test our To-Do API by hitting the Amazon API Gateway endpoint using cURL.

Test To-Do API in IDE.

The API Gateway endpoint invokes the Lambda function to insert records in the Amazon DynamoDB table. Since it throws Internal Server Error, let’s go to the Lambda console to troubleshoot this further and test the function directly by creating a test event for the POST method. You can troubleshoot different console errors with Amazon Q Developer, directly in the AWS Management Console. For the above error, Amazon Q analyzes the issue and helps find the resolution. Amazon Q explains how to fix this error directly on the console by adding an environment variable for DynamoDB table name.

Ask Amazon Q to troubleshoot issue in the AWS Management Console.

Now, let’s ask Amazon Q Developer in IDE to generate code to fix this error. Amazon Q Developer then generates a code snippet to set the desired environment variable in the AWS Cloud Development Kit (AWS CDK) code for Lambda function.

Ask Amazon Q Developer to generate CDK.

Conclusion

In this post, you learned how to leverage Amazon Q Business and Amazon Q Developer to streamline SDLC and accelerate time-to-market. With its deep understanding of code and AWS resources, Amazon Q Developer enables development teams to work efficiently throughout the research, design, development, testing, and review phases. By automating mundane tasks, offering expert guidance, generating code snippets, optimizing implementations, and troubleshooting issues, Amazon Q Developer allows developers to redirect their focus towards higher-value activities that drive innovation. Moreover, through Amazon Q Business, teams can leverage the power of generative AI to expedite the requirements planning and research phases.

Chetan Makvana

Chetan Makvana is a Senior Solutions Architect with Amazon Web Services. He works with AWS partners and customers to provide them with architectural guidance for building scalable architecture and implementing strategies to drive adoption of AWS services. He is a technology enthusiast and a builder with a core area of interest on generative AI, serverless, and DevOps. Outside of work, he enjoys watching shows, traveling, and music.

Suruchi Saxena

Suruchi Saxena is a Cloud/DevOps Engineer working at Amazon Web Services. She has a background in Generative AI and DevOps, leveraging years of IT experience to drive transformational changes for AWS customers. She specializes in architecting and managing cloud-based solutions, automation, code delivery and analysis, infrastructure as code, and continuous integration/delivery. In her free time, she enjoys traveling and reading.

Venugopalan Vasudevan

Venugopalan Vasudevan is a Senior Specialist Solutions Architect at Amazon Web Services (AWS), where he specializes in AWS Generative AI services. His expertise lies in helping customers leverage cutting-edge services like Amazon Q, and Amazon Bedrock to streamline development processes, accelerate innovation, and drive digital transformation. Venugopalan is dedicated to facilitating the Next Generation Developer experience, enabling developers to work more efficiently and creatively through the integration of Generative AI into their workflows.

How to use Amazon CodeWhisperer using Okta as an external IdP

Post Syndicated from Chetan Makvana original https://aws.amazon.com/blogs/devops/how-to-use-amazon-codewhisperer-using-okta-as-an-external-idp/

Customers using Amazon CodeWhisperer often want to enable their developers to sign in using existing identity providers (IdP), such as Okta. CodeWhisperer provides support for authentication either through AWS Builder Id or AWS IAM Identity Center. AWS Builder ID is a personal profile for builders. It is designed for individual developers, particularly when working on personal projects or in cases when organization does not authenticate to AWS using the IAM Identity Center. IAM Identity Center is better suited for enterprise developers who use CodeWhisperer as employees of organizations that have an AWS account. The IAM Identity Center authentication method expands the capabilities of IAM by centralizing user administration and access control. Many customers prefer using Okta as their external IdP for Single Sign-On (SSO). They aim to leverage their existing Okta credentials to seamlessly access CodeWhisperer. To achieve this, customers utilize the IAM Identity Center authentication method.

Trained on billions of lines of Amazon and open-source code, CodeWhisperer is an AI coding companion that helps developers write code by generating real-time whole-line and full-function code suggestions in their Integrated Development Environments (IDEs). CodeWhisperer comes in two tiers—the Individual Tier is free for individual use, and the Professional Tier offers administrative features, like SSO and IAM Identity Center integration, policy control for referenced code suggestions, and higher limits on security scanning. Customers enable the professional tier of CodeWhisperer for their developers for a business use. When using CodeWhisperer with the professional tier, developers should authenticate with the IAM Identity Center. We will also soon introduce the Enterprise Tier, offering the additional capability to customize CodeWhisperer to generate more relevant recommendations by making it aware of your internal libraries, APIs, best practices, and architectural patterns.

In this blog, we will show you how to set up Okta as an external IdP for IAM Identity Center and enable access to CodeWhisperer using existing Okta credentials.

How it works

The flow for accessing CodeWhisperer through the IAM Identity Center involves the authentication of Okta users using Security Assertion Markup Language (SAML) 2.0 authentication.

Architecture Diagram for sign-in process

Figure 1: Architecture diagram for sign-in process

The sign-in process follows these steps:

  1. IAM Identity Center synchronizes users and groups information from Okta into IAM Identity Center using the System for Cross-domain Identity Management (SCIM) v2.0 protocol.
  2. Developer with an Okta account connects to CodeWhisperer through IAM Identity Center.
  3. If the developer isn’t already authenticated, they will be redirected to the Okta account login. The developer will sign in using their Okta credentials.
  4. If the sign-in is successful, Okta processes the request and sends a SAML response containing the developer’s identity and authentication status to IAM Identity Center.
  5. If the SAML response is valid and the developer is authenticated, IAM Identity Center grants access to CodeWhisperer.
  6. The developer can now securely access and use CodeWhisperer.

Prerequisites

For this walkthrough, you should have the following prerequisites:

Configure Okta as an external IdP with IAM Identity Center

Step 1: Enable IAM Identity Center in Okta

  1. In the Okta Admin Console, Navigate to the Applications Tab > Applications.
  2. Browse App Catalog for the AWS IAM Identity Center app and Select Add Integration.
In Okta’s App Integration Catalog, the option to select the AWS IAM Identity Center App

Figure 2: Okta’s App Integration Catalog

  1. Provide a name for the App Integration, using the Application label. Example: “Demo_AWS IAM Identity Center”.
  2. Navigate to the Sign On tab for the “Demo_AWS IAM Identity Center” app .
  3. Under SAML Signing Certificates, select View IdP Metadata from the Actions drop-down menu and Save the contents as metadata.xml
Under SAML Signing Certificates, the option to select View IdP Metadata from the Actions drop-down menu and Save the contents as metadata.xml.

Figure 3: SAML Signing Certificates Page

Step 2: Configure Okta as an external IdP in IAM Identity Center

  1. In IAM Identity Center Console, navigate to Dashboard.
  2. Select Choose your identity source.
In IAM Identity Center Console, Dashboard tab displays the option to select Recommended setup steps with Choose your Identity source as Step 1

Figure 4: IAM Identity Center Console

  1. Under Identity source, select Change identity source from the Actions drop-down menu
  2. On the next page, select External identity provider, then click Next.
  3. Configure the external identity provider:
    • IdP SAML metadata: Click Choose file to upload Okta’s IdP SAML metadata you saved in the previous section Step 6.
    • Make a copy of the AWS access portal sign-in URL, IAM Identity Center ACS URL, and IAM Identity Center issuer URL values. You’ll need these values later on.
    • Click Next.
  1. Review the list of changes. Once you are ready to proceed, type ACCEPT, then click Change identity source.

Step 3: Configure Okta with IAM Identity Center Sign On details

  1. In Okta, select the Sign On tab IAM Identity Center SAML app, then click Edit:
    • Enter AWS IAM Identity Center SSO ACS URL and AWS IAM Identity Center SSO issuer URL values that you copied in previous section step 5b into the corresponding fields.
    • Application username format: Select one of the options from the drop-down menu.
  1. Click Save.

Step 4: Enable provisioning in IAM Identity Center

  1. In IAM Identity Center Console, choose Settings in the left navigation pane.
  2. On the Settings page, locate the Automatic provisioning information box, and then choose Enable. This immediately enables automatic provisioning in IAM Identity Center and displays the necessary SCIM endpoint and access token information.
Under IAM Identity Center settings, the option to enable automatic provisioning.

Figure 5: IAM Identity Center Settings for Automatic provisioning

  1. In the Inbound automatic provisioning dialog box, copy each of the values for the following options. You will need to paste these in later when you configure provisioning in Okta.
    • SCIM endpoint
    • Access token
  2. Choose Close.

Step 5: Configure provisioning in Okta

  1. In a separate browser window, log in to the Okta admin portal and navigate to the IAM Identity Center app.
  2. On the IAM Identity Center app page, choose the Provisioning tab, and then choose Integration.
  3. Choose Configure API Integration and then select the check box next to Enable API integration to enable provisioning.
  4. Paste SCIM endpoint copied in previous step into the Base URL field. Make sure that you remove the trailing forward slash at the end of the URL.
  5. Paste Access token copied in previous step into the API Token field.
  6. Choose Test API Credentials to verify the credentials entered are valid.
  7. Choose Save.
  8. Under Settings, choose To App, choose Edit, and then select the Enable check box for each of the Provisioning Features you want to enable.
  9. Choose Save.

Step 6: Assign access for groups in Okta

  1. In the Okta admin console, navigate to the IAM Identity Center app page, choose the Assignments tab.
  2. In the Assignments page, choose Assign, and then choose Assign to Groups.
  3. Choose the Okta group or groups that you want to assign access to the IAM Identity Center app. Choose Assign, choose Save and Go Back, and then choose Done. This starts provisioning the users in the group into the IAM Identity Center.
  4. Repeat step 3 for all groups that you want to provide access.
  5. Choose the Push Groups tab. Choose the Okta group or groups that you chose in the previous step.
  6. Then choose Save. The group status changes to Active after the group and its members have successfully been pushed to IAM Identity Center.

    CodeWhisperer Settings page displays option to add groups with access.

    Figure 7: Amazon CodeWhisperer Settings Page

Step 7: Provide access to CodeWhisperer

  1. In the CodeWhisperer Console, under Settings add the groups which require access to CodeWhisperer.

    CodeWhisperer Settings page displays option to add groups with access.

    Figure 7: Amazon CodeWhisperer Settings Page

Set up AWS Toolkit with IAM Identity Center

To use CodeWhisperer, you will now set up the AWS Toolkit within integrated development environments (IDE) to establish authentication with the IAM Identity Center.

In IDE, steps to set up AWS Toolkit with IAM Identity Center

Figure 8: Set up AWS Toolkit with IAM Identity Center

  1. In the IDE, open the AWS extension panel and click Start button under Developer Tools > CodeWhisperer.
  2. In the resulting pane, expand the section titled Have a Professional Tier subscription? Sign in with IAM Identity Center.
  3. Enter the IAM Identity Center URL you previously copied into the Start URL field.
  4. Set the region to us-east-1 and click Sign in button.
  5. Click Copy Code and Proceed to copy the code from the resulting pop-up.
  6. When prompted by the Do you want Code to open the external website? pop-up, click Open.
  7. Paste the code copied in Step 5 and click Next.
  8. Enter your Okta credentials and click Sign in.
  9. Click Allow to grant AWS Toolkit to access your data.
  10. When the connection is complete, a notification indicates that it is safe to close your browser. Close the browser tab and return to IDE.
  11. Depending on your preference, select Yes if you wish to continue using IAM Identity Center with CodeWhisperer while using current AWS profile, else select No.
  12. You are now all set to use CodeWhisperer from within IDE, authenticated with your Okta credentials.

Test Configuration

If you have successfully completed the previous step, you will see the code suggested by CodeWhisperer.

 In IDE, steps to test CodeWhisperer configuration

Figure 9: Test Step Configurations

Conclusion

In this post, you learned how to leverage existing Okta credential to access Amazon CodeWhisperer via the IAM Identity Center integration. The post walked through the steps detailing the process of setting up Okta as an external IdP with the IAM Identity Center. You then configured the AWS Toolkit to establish an authenticated connection to AWS using Okta credentials, enabling you to access the CodeWhisperer Professional Tier.

About the authors:

Chetan Makvana

Chetan Makvana is a senior solutions architect working with global systems integrators at AWS. He works with AWS partners and customers to provide them with architectural guidance for building scalable architecture and execute strategies to drive adoption of AWS services. He is a technology enthusiast and a builder with a core area of interest on serverless and DevOps. Outside of work, he enjoys binge-watching, traveling and music.

Balachander Keelapudi

Balachander Keelapudi is a senior solutions architect working with AWS customers to provide them with architectural guidance for building scalable architecture and execute strategies to drive adoption of AWS services. He is a technology enthusiast and a builder with a core area of interest on DevSecOps and Observability. Outside of work, he enjoys biking and going on hiking with his family.

How Contino improved collaboration with Amazon CodeCatalyst

Post Syndicated from Chetan Makvana original https://aws.amazon.com/blogs/devops/how-contino-improved-collaboration-with-amazon-codecatalyst/

Amazon CodeCatalyst is a modern software development service that empowers teams to deliver software on AWS easily and quickly. CodeCatalyst provides one place where you can plan, code, and build, test, and deploy applications with continuous integration/continuous delivery (CI/CD) tools. It also helps streamlined team collaboration. Developers on modern software teams are usually distributed, work independently, and use disparate tools. Often, ad hoc collaboration is necessary to resolve problems. Today, developers are forced to do this across many tools, which distract developers from their primary task—adding business critical features and enhancing their quality and completeness.

In this post, we explain how Contino uses CodeCatalyst to on-board their engineering team onto new projects, eliminates the overhead of managing disparate tools, and streamlines collaboration among different stakeholders.

The Problem

Contino helps customers migrate their applications to the cloud, and then improves their architecture by taking full advantage of cloud-native features to improve agility, performance, and scalability. This usually involves the build out of a central landing zone platform. A landing zone is a set of standard building blocks that allows customers to automatically create accounts, infrastructure and environments that are pre-configured in line with security policies, compliance guidelines and cloud native best practices. Some features are common to most landing zones, for example creating secure container images, AMIs, and environment setup boilerplate. In order to provide maximum value to the customers, Contino develops in-house versions of such features, incorporating AWS best practices, and later rolls out to the customer’s environment with some customization. Contino’s technical consultants, who are not currently assigned to customer work, collectively known as ‘Squad 0’ work on these features. Squad 0 builds the foundation for the work that will be re-used by other squads that work directly with Contino’s customers. As the technical consultants are typically on Squad 0 for a short period, it is critical that they can be productive in this short time, without spending too much time getting set up.

To build these foundational services, Contino was looking for something more integrated that would allow them to quickly setup development environments, enable collaboration between Squad 0 members, invite other squads to validate foundations services usage for their respective customers, and provide access to different AWS accounts and git repos centrally from one place. Historically, Contino has used disparate tools to achieve this, which meant having to grant/revoke access to the various AWS accounts individually on a continual basis. With these disparate tools, granting access to the tools needed for squads to be productive was non-trivial.

The Solution

It was at this point Contino participated in the private beta for CodeCatalyst prior to the public preview. CodeCatalyst has allowed Contino to move to a structure, as shown in Figure 1 below. A Project Manager at Contino creates a different project for each foundational service and invites Squad 0 members to join the relevant project. With CodeCatalyst, Squad 0 technical consultants use features like CI/CD, source repositories, and issue trackers to build foundational services. This helps eliminate the overhead of managing and integrating developer tools and provides more time to focus on developing code. Once Squad 0 is ready with the foundational services, they invite customer squads using their email address to validate the readiness of the project for use with their customers. Finally, members of Squad 0 use Cloud 9 Dev Environments from within CodeCatalyst to rapidly create consistent cloud development environments, without manual configuration, so they can work on new or multiple projects simultaneously, without conflict.

With CodeCatalyst, Squad 0 technical consultants use features like CI/CD, source repositories, and issue trackers to build foundational services. This helps eliminate the overhead of managing and integrating developer tools and provides more time to focus on developing code.

Figure 1: CodeCatalyst with multiple account connections

Contino uses CI/CD to conduct multi-account deployments. Contino typically does one of two types of deployments: 1. Traditional sequential application deployment that is promoted from one environment to another, for example dev -> test -> prod, and 2. Parallel deployment, for example, a security control that is required to be deployed out into multiple AWS accounts at the same time. CodeCatalyst solves this problem by making it easier to construct workflows using a workflow definition file that can deploy either sequentially or in parallel to multiple AWS accounts. Figure 2 shows parallel deployment.

CodeCatalyst provides a feature to add CI/CD pipeline for Dev, Test and Production accounts

Figure 2: CI/CD with CodeCatalyst

The Value

CodeCatalyst has reduced the time it takes for members of Squad 0 to complete the necessary on-boarding to work on foundational services from 1.5 days to about 1 hour. These tasks include setting up connections to source repositories, setting up development environments, configuring IAM roles and trust relationships, etc. With support for integrated tools and better collaboration, CodeCatalyst minimized overhead for ad hoc collaboration. Squad 0 could spend more time on writing code to build foundation services. This has led to tasks being completed, on average, 20% faster. This increased productivity led to increased value delivered to Contino’s customers. As Squad 0 is more productive, more foundation services are available for other squads to reuse for their respective customers. Now, Contino’s teams on the ground working directly with customers can re-use these services with some customization for the specific needs of the customer.

Conclusion

Amazon CodeCatalyst brings together everything software development teams need to plan, code, build, test, and deploy applications on AWS into a streamlined, integrated experience. With CodeCatalyst, developers can spend more time developing application features and less time setting up project tools, creating and managing CI/CD pipelines, provisioning and configuring various development environments or coordinating with team members. With CodeCatalyst, the Contino engineers can improve productivity and focus on rapidly developing application code which captures business value for their customers.

About the authors:

Mark Faiers

Mark Faiers started out as a software engineer and later transitioned into DevOps, and Cloud. He has worked across numerous technology stacks and industries, including Healthcare, FinTech, and Logistics. Mark is currently working as an AWS consultant to some of the biggest Financial and Insurance firms in the U.K., as well as running the AWS Practice at Contino. He is especially passionate about serverless, and sustainability.

Chetan Makvana

Chetan Makvana is a senior solutions architect working with global systems integrators at AWS. He works with AWS partners and customers to provide them with architectural guidance for building scalable architecture and execute strategies to drive adoption of AWS services. He is a technology enthusiast and a builder with a core area of interest on serverless and DevOps. Outside of work, he enjoys binge-watching, traveling and music.

Publish Amazon DevOps Guru Insights to Slack Channel

Post Syndicated from Chetan Makvana original https://aws.amazon.com/blogs/devops/publish-amazon-devops-guru-insights-to-slack-channel/

Customers using Amazon DevOps Guru often wants to publish operational insights to chat collaboration platforms, such as Slack and Amazon Chime. Amazon DevOps Guru offers a fully managed AIOps platform service that enables developers and operators to improve application availability and resolve operational issues faster. It minimizes manual effort by leveraging machine learning (ML) powered recommendations. DevOps Guru automatically detects operational insights, predicts impending resource exhaustion, details likely cause, and recommends remediation actions. For customers running critical applications, having access to these operational insights and real-time alerts are key aspects to improve their overall incident remediation processes and maintain operational excellence. Customers use chat collaboration platforms to monitor operational insights and respond to events, which reduces context switching between applications and provides opportunities to respond faster.

This post walks you through how to integrate DevOps Guru with Slack channel to receive notifications for new operational insights detected by DevOps Guru. It doesn’t talk about enabling Amazon DevOps Guru and generating operational insights. You can refer to Gaining operational insights with AIOps using Amazon DevOps Guru to know more about this.

Solution overview

Amazon DevOps Guru integrates with Amazon EventBridge to notify you of events relating to insights and corresponding insight updates. To receive operational insight notifications in Slack channels, you configure routing rules to determine where to send notifications and use pre-defined DevOps Guru patterns to only send notifications or trigger actions that match that pattern. You can select any of the following pre-defined patterns to filter events to trigger actions in a supported AWS resource. For this post, we will send events only for “New Insights Open”.

  • DevOps Guru New Insight Open
  • DevOps Guru New Anomaly Association
  • DevOps Guru Insight Severity Upgraded
  • DevOps Guru New Recommendation Created
  • DevOps Guru Insight Closed

When EventBridge receives an event from DevOps Guru, the event rule fires and the event notification is sent to Slack channel by using AWS Lambda or AWS Chatbot. Chatbot is easier to configure and deploy. However, if you want more customization, we have also written a Lambda function that allows additional formatting options.

Amazon EventBridge receives an event from Amazon DevOps Guru, and fires event rule. A rule matches incoming events and sends them to AWS Lambda or AWS Chatbot. With AWS Lambda, you write code to customize the message and send formatted message to the Slack channel. To receive event notifications in chat channels, you configure an SNS topic as a target in the Amazon EventBridge rule and then associate the topic with a chat channel in the AWS Chatbot console. AWS Chatbot then sends event to the configured Slack channel.

Figure 1: Amazon EventBridge Integration with Slack using AWS Lambda or AWS Chatbot

The goal of this tutorial is to show a technical walkthrough of integration of DevOps Guru with Slack using the following options:

  1. Publish using AWS Lambda
  2. Publish using AWS Chatbot

Prerequisites

For this walkthrough, you should have the following prerequisites:

Publish using AWS Lambda

In this tutorial, you will perform the following steps:

  • Create a Slack Webhook URL
  • Launch SAM template to deploy the solution
  • Test the solution

Create a Slack Webhook URL

This step configures Slack workflow and creates a Webhook URL used for API call. You will need to have access to add a new channel and app to your Slack Workspace.

  1. Create a new channel for events (i.e. devopsguru_events).
  2. Within Slack, click on your workspace name drop-down arrow in the upper left.
  3. Choose Tools > Workflow Builder.
  4. Click Create in the upper right-hand corner of the Workflow Builder and give your workflow a name.
  5. Click Next.
  6. Click Select next to Webhook.
  7. Click Add variable and add the following variables one at a time in the Key section. All data types will be text.
    • text
    • account
    • region
    • startTime
    • insightType
    • severity
    • description
    • insightUrl
    • numOfAnomalies
  1. When done, you should have 9 variables, double check them as they are case sensitive and will be referenced.
  2. Click Add Step.
  3. On the Add a workflow step window, click Add next to send a message.
  4. Under Send this message to select the channel you created in earlier step.
  5. In Message text, create the following.
Final message is with placeholder as corresponding variables created in Step #7

Figure 2: Message text configuration in Slack

  1. Click Save.
  2. Click Publish.
  3. For the deployment, we will need the Webhook URL. Copy it in the notepad.

Launch SAM template to deploy the solution

In this step, you will launch the SAM template. This template deploys an AWS Lambda function that is triggered by an Amazon EventBridge rule when Amazon DevOps Guru notifies event relating to “DevOps Guru New Insight Open”. It also deploys AWS Secret Manager, Amazon EventBridge Rule and required permission to invoke this specific function. The AWS Lambda function retrieves the Slack Webhook URL from AWS Secret Manager and posts a message to Slack using webhook API call.

  1. Create a new directory, navigate to that directory in a terminal and clone the GitHub repository using the below command.
  1. Change directory to the directory where you cloned the GitHub repository.
cd devops-guru-integration-with-slack
  1. From the command line, use AWS SAM to build the serverless application with its dependencies.
sam build
  1. From the command line, use AWS SAM to deploy the AWS resources for the pattern as specified in the template.yml file.
sam deploy --guided
  1. During the prompts.
    • enter a stack name.
    • enter the desired AWS Region.
    • enter the Secret name to store Slack Channel Webhook URL.
    • enter the Slack Channel Webhook URL that you copied in an earlier step.
    • allow SAM CLI to create IAM roles with the required permissions.

Once you have run sam deploy --guided mode once and saved arguments to a configuration file (samconfig.toml), you can use sam deploy in future to use these defaults.

Test the solution

  1. Follow this blog to enable DevOps Guru and generate operational insights.
  2. When DevOps Guru detects a new insight, it generates events in EventBridge. EventBridge then triggers Lambda that sends it to a Slack channel as below.
Slack channel shows message with details like Account, Region, Start Time, Insight Type, Severity, Description, Insight URL and Number of anomalies found.

Figure 3. Message published to Slack

Cleaning up

To avoid incurring future charges, delete the resources.

  1. Delete resources deployed from this blog.
  2. From the command line, use AWS SAM to delete the serverless application with its dependencies.
sam delete

Publish using AWS Chatbot

In this tutorial, you will perform the following steps:

  • Configure Amazon Simple Notification Service (SNS) and Amazon EventBridge using the AWS Command Line Interface (CLI)
  • Configure AWS Chatbot to a Slack workspace
  • Test the solution

Configure Amazon SNS and Amazon Eventbridge

We will now configure and deploy an SNS topic and an Eventbridge rule. This EventBridge rule will be triggered by DevOps Guru when “DevOps Guru New Insight Open” events are generated. The event will then be sent to the SNS topic which we will configure as a target for the Eventbridge rule.

  1. Using CLI, create an SNS topic running the following command in the CLI. Alternatively, you can configure and create an SNS topic in the AWS management console.
aws sns create-topic --name devops-guru-insights-chatbot-topic
  1. Save the SNS topic ARN that is generated in the CLI for a later step in this walkthrough.
  2. Now we will create the Eventbridge rule. Run the following command to create the Eventbridge rule. Alternatively, you can configure and create the rule in the AWS management console.
aws events put-rule --name "devops-guru-insights-chatbot-rule" -
-event-pattern "{\"source\":[\"aws.devops-guru\"],\"detail-type\":[\"DevOps
 Guru New Insight Open\"]}"
  1. We now want to add targets to the rule we just created. Use the ARN of the SNS topic we created in step one.
aws events put-targets --rule devops-guru-insights-chatbot-rule --targets "Id"="1","Arn"=""
  1. We now have created an SNS topic, and an Eventbridge rule to send “DevOps Guru New Insight Open” events to that SNS topic.

Create and Add AWS Chatbot to a Slack workspace

In this step, we will configure AWS Chatbot and our Slack channel to receive the SNS Notifications we configured in the previous step.

  1. Sign into the AWS management console and open AWS Chatbot at https://console.aws.amazon.com/Chatbot/.
  2. Under Configure a chat client, select Slack from the dropdown and click Configure Client.
  3. You will then need to give AWS Chatbot permission to access your workspace, click Allow.
AWS Chatbot is requesting permission to access the Slack workspace

Figure 4.  AWS Chatbot requesting permission

  1. Once configured, you’ll be redirected to the AWS management console. You’ll now want to click Configure new channel.
  2. Use the follow configurations for the setup of the Slack channel.
    • Configuration Name: aws-chatbot-devops-guru
    • Channel Type: Public or Private
      • If adding Chatbot to a private channel, you will need the Channel ID. One way you can get this is by going to your slack channel and copying the link, the last set of unique characters will be your Channel ID.
    • Channel Role: Create an IAM role using a template
    • Role name: awschatbot-devops-guru-role
    • Policy templates: Notification permissions
    • Guardrail Policies: AWS-Chatbot-NotificationsOnly-Policy-5f5dfd95-d198-49b0-8594-68d08aba8ba1
    • SNS Topics:
      • Region: us-east-1 (Select the region you created the SNS topic in)
      • Topics: devops-guru-insights-chatbot-topic
  1.  Click Configure.
  2.  You should now have your slack channel configured for AWS Chatbot.
  3. Finally, we just need to invite AWS Chatbot to our slack channel.
    • Type /invite in your slack channel and it will show different options.
    • Select Add apps to this channel and invite AWS Chatbot to the channel.
  1. Now your solution is fully integrated and ready for testing.

Test the solution

  1. Follow this blog to enable DevOps Guru and generate operational insights.
  2. When DevOps Guru detects a new insight, it generates events in EventBridge, it will send those events to SNS. AWS Chatbot receives the notification from SNS and publishes the notification to your slack channel.
Slack channel shows message with “DevOps Guru New Insight Open”

Figure 5. Message published to Slack

Cleaning up

To avoid incurring future charges, delete the resources.

  1. Delete resources deployed from this blog.
  2. When ready, delete the EventBridge rule, SNS topic, and channel configuration on Chatbot.

Conclusion

In this post, you learned how Amazon DevOps Guru integrates with Amazon EventBridge and publishes insights into Slack channel using AWS Lambda or AWS Chatbot. “Publish using AWS Lambda” option gives more flexibility to customize the message that you want to publish to Slack channel. Using “Publish using AWS Chabot”, you can add AWS Chatbot to your Slack channel in just a few clicks. However, the message is not customizable, unlike the first option. DevOps users can now monitor all reactive and proactive insights into Slack channels. This post talked about publishing new DevOps Guru insight to Slack. However, you can expand it to publish other events like new recommendations created, new anomaly associated, insight severity upgraded or insight closed.

About the authors:

Chetan Makvana

Chetan Makvana is a senior solutions architect working with global systems integrators at AWS. He works with AWS partners and customers to provide them with architectural guidance for building scalable architecture and execute strategies to drive adoption of AWS services. He is a technology enthusiast and a builder with a core area of interest on serverless and DevOps. Outside of work, he enjoys binge-watching, traveling and music.

Brendan Jenkins

Brendan Jenkins is a solutions architect working with new AWS customers coming to the cloud providing them with technical guidance and helping achieve their business goals. He has an area of interest around DevOps and Machine Learning technology. He enjoys building solutions for customers whenever he can in his spare time.