Post Syndicated from Nicolas Malaval original https://aws.amazon.com/blogs/security/how-to-record-video-of-amazon-appstream-2-0-streaming-sessions/
Amazon AppStream 2.0 is a fully managed service that lets you stream applications and desktops to your users. In this post, I’ll show you how to record a video of AppStream 2.0 streaming sessions by using FFmpeg, a popular media framework.
There are many use cases for session recording, such as auditing administrative access, troubleshooting user issues, or quality assurance. For example, you could publish administrative tools with AppStream 2.0, such as a Remote Desktop Protocol (RDP) client, to protect access to your backend systems (see How to use Amazon AppStream 2.0 to reduce your bastion host attack surface) and you may want to record a video of what your administrators do when accessing and operating backend systems. You may also want to see what a user did to reproduce an issue, or view activities in a call center setting, such as call handling or customer support, for review and training.
This solution is not designed or intended for people surveillance, or for the collection of evidence for legal proceedings. You are responsible for complying with all applicable laws and regulations when using this solution.
Overview and architecture
In this section, you can learn about the steps for recording AppStream 2.0 streaming sessions and see an overview of the solution architecture. Later in this post, you can find instructions about how to implement and test the solution.
AppStream 2.0 enables you to run custom scripts to prepare the streaming instance before the applications launch or after the streaming session has completed. Figure 1 shows a simplified description of what happens before, during and after a streaming session.
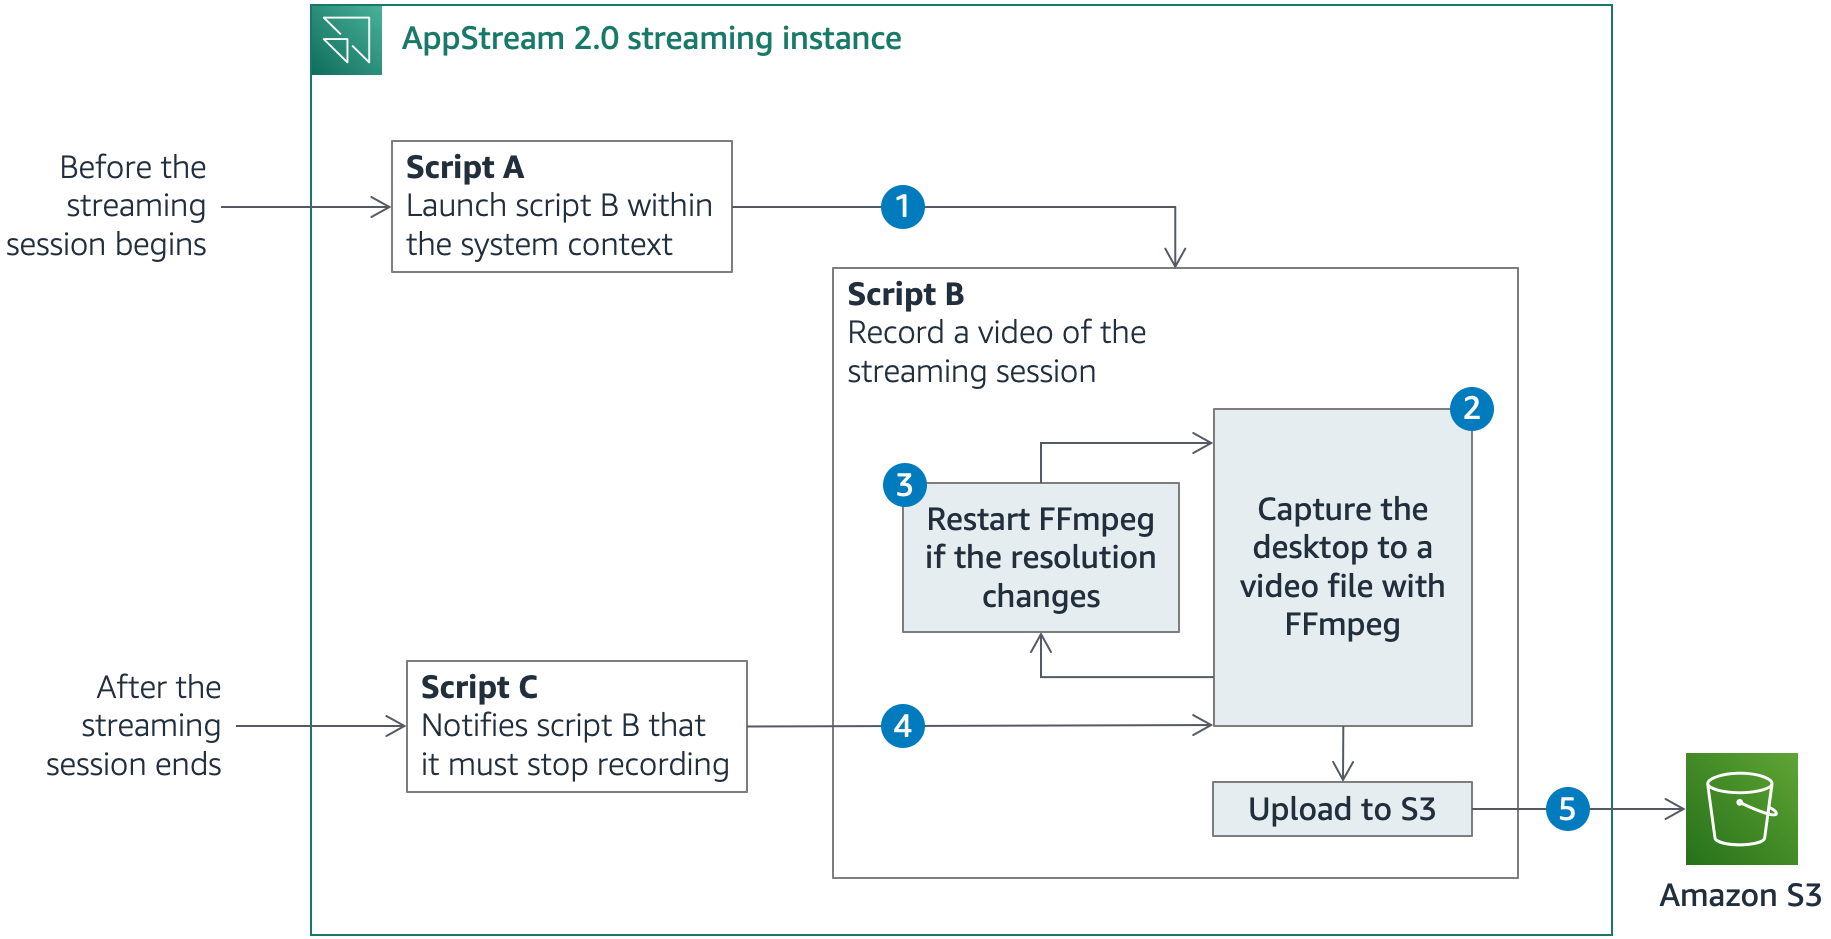
Figure 1: Solution architecture
- Before the streaming session starts, AppStream 2.0 runs script A, which uses PsExec, a utility that enables administrators to run commands on local or remote computers, to launch script B. Script B then runs during the entire streaming session. PsExec can run the script as the LocalSystem account, a service account that has extensive privileges on a local system, while it interacts with the desktop of another session. Using the LocalSystem account, you can use FFmpeg to record the session screen and prevent AppStream 2.0 users from stopping or tampering with the solution, as long as they aren’t granted local administrator rights.
- Script B launches FFmpeg and starts recording the desktop. The solution uses the FFmpeg built-in screen-grabber to capture the desktop across all the available screens.
- When FFmpeg starts recording, it captures the area covered by the desktop at that time. If the number of screens or the resolution changes, a portion of the desktop might be outside the recorded area. In that case, script B stops the recording and starts FFmpeg again.
- After the streaming session ends, AppStream 2.0 runs script C, which notifies script B that it must end the recording and close. Script B stops FFmpeg.
- Before exiting, script B uploads the video files that FFmpeg generated to Amazon Simple Storage Service (Amazon S3). It also stores user and session metadata in Amazon S3, along with the video files, for easy retrieval of session recordings.
For a more comprehensive understanding of how the session scripts works, you can refer to the GitHub repository that contains the solution artifacts, where I go into the details of each script.
Implementing and testing the solution
Now that you understand the architecture of this solution, you can follow the instructions in this section to implement this blog post’s solution in your AWS account. You will:
- Create a virtual private cloud (VPC), an S3 bucket and an AWS Identity and Access Management (IAM) role with AWS CloudFormation.
- Create an AppStream 2.0 image builder.
- Configure the solution scripts on the image builder.
- Specify an application to publish and create an image.
- Create an AppStream 2.0 fleet.
- Create an AppStream 2.0 stack.
- Create a user in the AppStream 2.0 user pool.
- Launch a streaming session and test the solution.
Step 1: Create a VPC, an S3 bucket, and an IAM role with AWS CloudFormation
For the first step in the solution, you create a new VPC where AppStream 2.0 will be deployed, or choose an existing VPC, a new S3 bucket to store the session recordings, and a new IAM role to grant AppStream 2.0 the necessary IAM permissions.
To create the VPC, the S3 bucket, and the IAM role with AWS CloudFormation
- Select the following Launch Stack button to open the CloudFormation console and create a CloudFormation stack from the template. You can change the Region where resources are deployed in the navigation bar.

The latest template can also be downloaded on GitHub.
- Choose Next. For VPC ID, Subnet 1 ID and Subnet 2 ID, you can optionally select a VPC and two subnets, if you want to deploy the solution in an existing VPC, or leave these fields blank to create a new VPC. Then follow the on-screen instructions. AWS CloudFormation creates the following resources:
- (If you chose to create a new VPC) An Amazon Virtual Private Cloud (Amazon VPC) with an internet gateway attached.
- (If you chose to create a new VPC) Two public subnets on this Amazon VPC with a new route table to make them publicly accessible.
- An S3 bucket to store the session recordings.
- An IAM role to grant AppStream 2.0 permissions to upload video and metadata files to Amazon S3.
- After the stack creation has completed, choose the Outputs tab in the CloudFormation console and note the values that the process returned: the name and Region of the S3 bucket, the name of the IAM role, the ID of the VPC, and the two subnets.

Step 2: Create an AppStream 2.0 image builder
The next step is to create a new AppStream 2.0 image builder. An image builder is a virtual machine that you can use to install and configure applications for streaming, and then create a custom image.
To create the AppStream 2.0 image builder
- Open the AppStream 2.0 console and select the Region in the navigation bar. Choose Get Started then Skip if you are new to the console.
- Choose Images in the left pane, and then choose Image Builder. Choose Launch Image Builder.
- In Step 1: Choose Image:
- Select the name of the latest AppStream 2.0 base image for the Windows Server version of your choice. You can find its name in the AppStream 2.0 base image version history. For example, at the time of writing, the name of the latest Windows Server 2019 base image is AppStream-WinServer2019-07-16-2020.
- Choose Next.
- In Step 2: Configure Image Builder:
- For Name, enter session-recording.
- For Instance Type, choose stream.standard.medium.
- For IAM role, select the IAM role that AWS CloudFormation created.
- Choose Next.
- In Step 3: Configure Network:
- Choose Default Internet Access to provide internet access to your image builder.
- For VPC, select the ID of the VPC, and for Subnet 1, select the ID of Subnet 1.
- For Security group(s), select the ID of the security group. Refer back to the Outputs tab of the CloudFormation stack if you are unsure which VPC, subnet and security group to select.
- Choose Review.
- In Step 4: Review, choose Launch.
Step 3: Configure the solution scripts on the image builder
The session scripts to run before streaming sessions start or after sessions end are specified within an AppStream 2.0 image. In this step, you install the solution scripts on your image builder and specify the scripts to run in the session scripts configuration file.
To configure the solution scripts on the image builder
- Wait until the image builder is in the Running state, and then choose Connect.
- Within the AppStream 2.0 streaming session, on the Local User tab, choose Administrator.
- To install the solution scripts:
- From the image builder desktop, choose Start in the Windows taskbar.
- Open the context (right-click) menu for Windows PowerShell, and then choose Run as Administrator.
- Run the following commands in the PowerShell terminal to create the required folders, and to copy the solution scripts and the session scripts configuration file from public objects in GitHub to the local disk. If you aren’t using Google Chrome or the AppStream 2.0 client, you need to choose the Clipboard icon in the AppStream 2.0 navigation bar, and then select Paste to remote session.
- Close the PowerShell terminal.
- To edit the variables.ps1 file with your own values:
- From the image builder desktop, choose Start in the Windows taskbar.
- Open the context (right-click) menu for Windows PowerShell ISE, and then choose Run as Administrator.
- Choose File, then Open. Navigate to the folder C:\SessionRecording\Scripts\ and open the file variables.ps1.
- Edit the name and the Region of the S3 bucket with the values returned by AWS CloudFormation in the Outputs tab. You can also customize the number of frames per second, and the maximum duration in seconds of each video file. Save the file.
- Save and close the file.
- To download the latest FFmpeg and PsExec executables to the image builder:
- From the image builder desktop, open the Firefox desktop icon.
- Navigate to the URL https://www.gyan.dev/ffmpeg/builds/ffmpeg-release-github and choose the link that contains essentials_build.zip to download FFmpeg. Choose Open to download and extract the ZIP archive. Copy the file ffmpeg.exe in the bin folder of the ZIP archive to C:\SessionRecording\Bin\.
Note: FFmpeg only provides source code and compiled packages are available at third-party locations. If the link above is invalid, go to the FFmpeg download page and follow the instructions to download the latest release build for Windows.
- Navigate to the URL https://download.sysinternals.com/files/PSTools.zip to download PsExec. Choose Open to download and extract the ZIP archive. Copy the file PsExec64.exe to C:\SessionRecording\Bin\. You must agree with the license terms, because the solution in this blog post automatically accepts them.
- Close Firefox.
Step 4: Specify an application to publish and create an image
In this step, you publish Firefox on your image builder and create an AppStream 2.0 custom image. I chose Firefox because it’s easy to test later in the procedure. You can choose other or additional applications to publish, if needed.
To specify the application to publish and create the image
- From the image builder desktop, open the Image Assistant icon available on the desktop. Image Assistant guides you through the image creation process.
- In 1. Add Apps:
- Choose + Add App.
- Enter the location C:\Program Files (x86)\Mozilla Firefox\firefox.exe to add Firefox.
- Choose Open. Keep the default settings and choose Save.
- Choose Next multiple times until you see 4. Optimize.
- In 4. Optimize:
- Choose Launch.
- Choose Continue until you can see 5. Configure Image.
- In 5. Configure Image:
- For Name, enter session-recording for your image name.
- Choose Next.
- In 6. Review:
- Choose Disconnect and Create Image.
- Back in the AppStream 2.0 console:
- Choose Images in the left pane, and then choose the Image Registry tab.
- Change All Images to Private and shared with others. You will see your new AppStream 2.0 image.
- Wait until the image is in the Available state. This can take more than 30 minutes.
Step 5: Create an AppStream 2.0 fleet
Next, create an AppStream 2.0 fleet that consists of streaming instances that run your custom image.
To create the AppStream 2.0 fleet
- In the left pane of the AppStream 2.0 console, choose Fleets, and then choose Create Fleet.
- In Step 1: Provide Fleet Details:
- For Name, enter session-recording-fleet.
- Choose Next.
- In Step 2: Choose an Image:
- Select the name of the custom image that you created with the image builder.
- Choose Next.
- In Step 3: Configure Fleet:
- For Instance Type, select stream.standard.medium.
- For Fleet Type, choose Always-on.
- For Stream view, you can choose to stream either the applications or the entire desktop.
- For IAM role, select the IAM role.
- Keep the defaults for all other parameters, and choose Next.
- In Step 4: Configure Network:
- Choose Default Internet Access to provide internet access to your image builder.
- Select the VPC, the two subnets, and the security group.
- Choose Next.
- In Step 5: Review, choose Create.
- Wait until the fleet is in the Running state.
Step 6: Create an AppStream 2.0 stack
Create an AppStream 2.0 stack and associate it with the fleet that you just created.
To create the AppStream 2.0 stack
- In the left pane of the AppStream 2.0 console, choose Stacks, and then choose Create Stack.
- In Step 1: Stack Details:
- For Name, enter session-recording-stack.
- For Fleet, select the fleet that you created.
- Then follow the on-screen instructions and keep the defaults for all other parameters until the stack is created.
Step 7: Create a user in the AppStream 2.0 user pool
The AppStream 2.0 user pool provides a simplified way to manage access to applications for your users. In this step, you create a user in the user pool that you will use later in the procedure to test the solution.
To create the user in the AppStream 2.0 user pool
- In the left pane of the AppStream 2.0 console, choose User Pool, and then choose Create User.
- Enter your email address, first name, and last name. Choose Create User.
- Select the user you just created. Choose Actions, and then choose Assign stack.
- Select the stack, and then choose Assign stack.
Step 8: Test the solution
Now, sign in to AppStream 2.0 with the user that you just created, launch a streaming session, and check that the session recordings are delivered to Amazon S3.
To launch a streaming session and test the solution
- AppStream 2.0 sends you a notification email. Connect to the sign in portal by entering the information included in the notification email, and set a permanent password.
- Sign in to AppStream 2.0 by entering your email address and the permanent password.
- After you sign in, you can view the application catalog. Choose Firefox to launch a Firefox window and browse any websites you’d like.
- Choose the user icon at the top-right corner, and then choose Logout to end the session.
In the Amazon S3 console, navigate to the S3 bucket to browse the session recordings. For the session you just terminated, you can find one text file that contains user and instance metadata, and one or more video files that you can download and play with a media player like VLC.
Step 9: Clean up resources
You can now delete the two CloudFormation stacks to clean up the resources that were just created.
To clean up resources
- To delete the image builder:
- In the left pane of the AppStream 2.0 console, choose Images, and then choose Image Builder.
- Select the image builder. Choose Actions, then choose Delete.
- To delete the stack:
- In the left pane of the AppStream 2.0 console, choose Stacks.
- Select the image builder. Choose Actions, then choose Disassociate Fleet. Choose Disassociate to confirm.
- Choose Actions, then choose Delete.
- To delete the fleet:
- In the left pane of the AppStream 2.0 console, choose Fleets.
- Select the fleet. Choose Actions, then choose Stop. Choose Stop to confirm.
- Wait until the fleet is in the Stopped state.
- Choose Actions, then choose Delete.
- To disable the user in the user pool:
- In the left pane of the AppStream 2.0 console, choose User Pool.
- Select the user. Choose Actions, then choose Disable user. Choose Disable User to confirm.
- Empty the S3 bucket that CloudFormation created (see How do I empty an S3 bucket?). Repeat the same operation with the buckets that AppStream 2.0 created, whose names start with appstream-settings, appstream-logs and appstream2.
- Delete the CloudFormation stack on the AWS CloudFormation console (see Deleting a stack on the AWS CloudFormation console).
Conclusion
In this blog post, I showed you a way to record AppStream 2.0 sessions to video files for administrative access auditing, troubleshooting, or quality assurance. While this blog post focuses on Amazon AppStream 2.0, you could adapt and deploy the solution in Amazon Workspaces or in Amazon Elastic Compute Cloud (Amazon EC2) Windows instances.
For a deep-dive explanation of how the solution scripts function, you can refer to the GitHub repository that contains the solution artifacts.
If you have feedback about this post, submit comments in the Comments section below. If you have questions about this post, start a new thread on the Amazon AppStream 2.0 forum or contact AWS Support.
Want more AWS Security how-to content, news, and feature announcements? Follow us on Twitter.