Post Syndicated from Alexandra Moraru original https://blog.cloudflare.com/threat-events-platform/
Today, one of the greatest challenges that cyber defenders face is analyzing detection hits from indicator feeds, which provide metadata about specific indicators of compromise (IOCs), like IP addresses, ASNs, domains, URLs, and hashes. While indicator feeds have proliferated across the threat intelligence industry, most feeds contain no contextual information about why an indicator was placed on the feed. Another limitation of most feeds today is that they focus solely on blockable indicators and cannot easily accommodate more complex cases, such as a threat actor exploiting a CVE or an insider threat. Instead, this sort of complex threat intelligence is left for long form reporting. However, long-form reporting comes with its own challenges, such as the time required for writing and editing, which can lead to significant delays in releasing timely threat intelligence.
To help address these challenges, we are excited to launch our threat events platform for Cloudforce One customers. Every day, Cloudflare blocks billions of cyber threats. This new platform contains contextual data about the threats we monitor and mitigate on the Cloudflare network and is designed to empower security practitioners and decision makers with actionable insights from a global perspective.
On average, we process 71 million HTTP requests per second and 44 million DNS queries per second. This volume of traffic provides us with valuable insights and a comprehensive view of current (real-time) threats. The new threat events platform leverages the insights from this traffic to offer a comprehensive, real-time view of threat activity occurring on the Internet, enabling Cloudforce One customers to better protect their assets and respond to emerging threats.
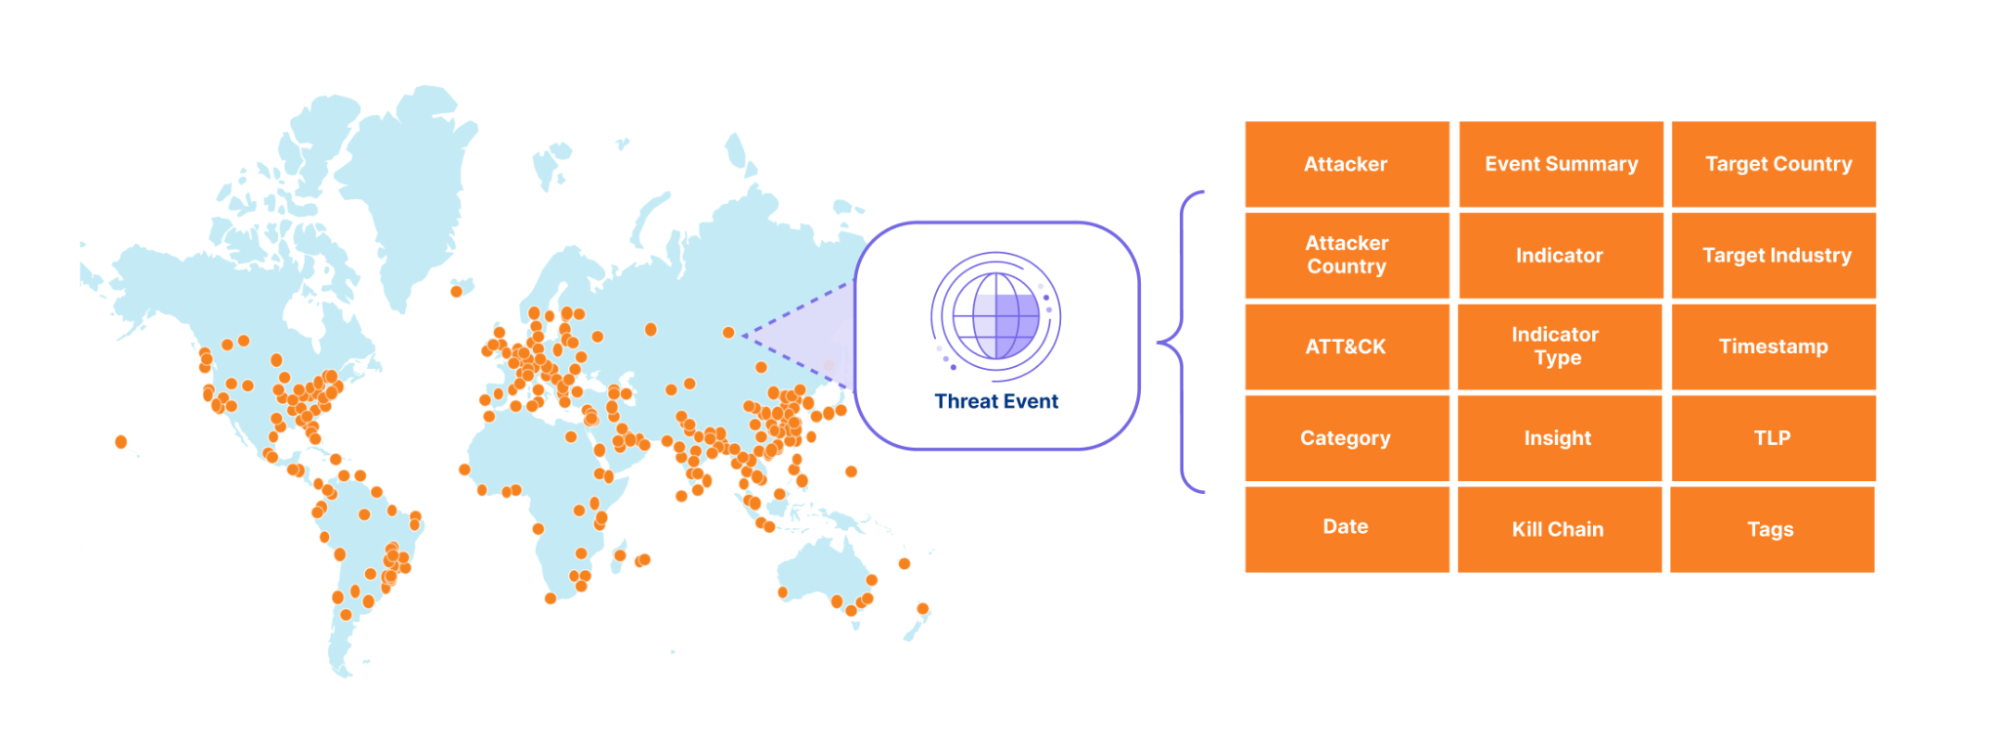
The sheer volume of threat activity observed across Cloudflare’s network would overwhelm any system or SOC analyst. So instead, we curate this activity into a stream of events that include not only indicators of compromise (IOCs) but also context, making it easier to take action based on Cloudflare’s unique data. To start off, we expose events related to denial of service (DOS) attacks observed across our network, along with the advanced threat operations tracked by our Cloudforce One Intelligence team, like the various tools, techniques, and procedures used by the threat actors we are tracking. We mapped the events to the MITRE ATT&CK framework and to the cyber kill chain stages. In the future, we will add events related to traffic blocked by our Web Application Firewall (WAF), Zero Trust Gateway, Zero Trust Email Security Business Email Compromise, and many other Cloudflare-proprietary datasets. Together, these events will provide our customers with a detailed view of threat activity occurring across the Internet.
Each event in our threat events summarizes specific threat activity we have observed, similar to a STIX2 sighting object and provides contextual information in its summary, detailed view and via the mapping to the MITRE ATT&Ck and KillChain stages. For an example entry, please see the API documentation.
Our goal is to empower customers to better understand the threat landscape by providing key information that allows them to investigate and address both broad and specific questions about threats targeting their organization. For example:
-
Who is targeting my industry vertical?
-
Who is targeting my country?
-
What indicators can I use to block attacks targeting my verticals?
-
What has an adversary done across the kill chain over some period of time?
Each event has a unique identifier that links it to the identified threat activity, enabling our Cloudforce One threat intelligence analysts to provide additional context in follow-on investigations.
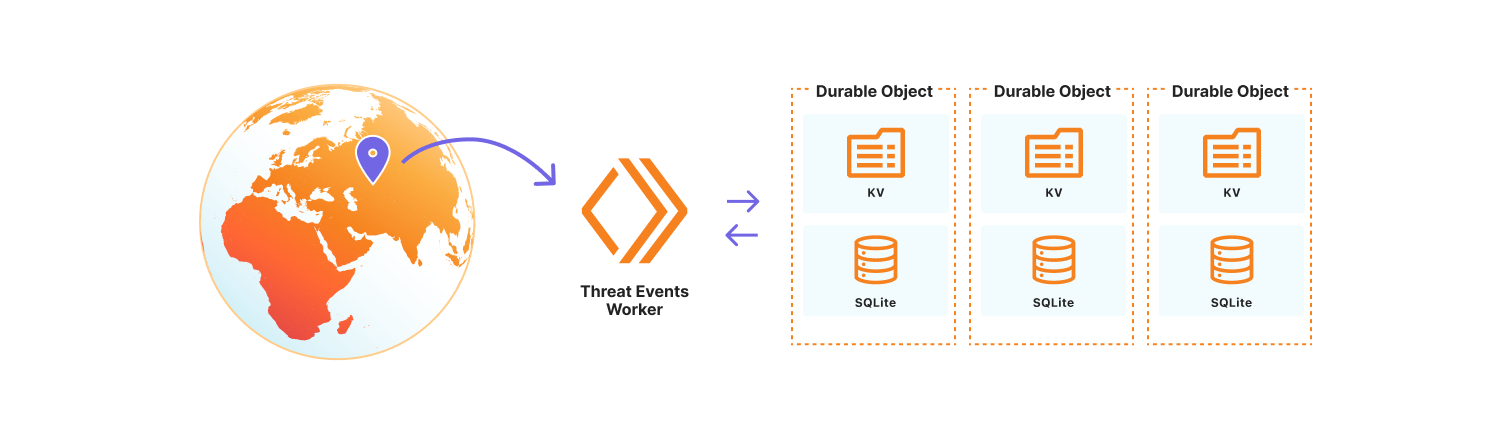
We chose to use the Cloudflare Developer Platform to build out the threat events platform, as it allowed us to leverage the versatility and seamless integration of Cloudflare Workers. At its core, the platform is a Cloudflare Worker that uses SQLite-backed Durable Objects to store events observed on the Cloudflare network. We opted to use Durable Objects over D1, Cloudflare’s serverless SQL database solution, because it permits us to dynamically create SQL tables to store uniquely customizable datasets. Storing datasets this way allows threat events to scale across our network, so we are resilient to surges in data that might correlate with the unpredictable nature of attacks on the Internet. It also permits us to control events by data source, share a subset of datasets with trusted partners, or restrict access to only authorized users. Lastly, the metadata for each individual threat event is stored in the Durable Object KV so that we may store contextual data beyond our fixed, searchable fields. This data may be in the form of requests-per-second for our denial of service events, or sourcing information so Cloudforce One analysts can tie the event to the exact threat activity for further investigation.
Cloudforce One customers can access threat events through the Cloudflare Dashboard in Security Center or via the Cloudforce One threat events API. Each exposes the stream of threat activity occurring across the Internet as seen by Cloudflare, and are customizable by user-defined filters.
In the Cloudflare Dashboard, users have access to an Attacker Timelapse view, designed to answer strategic questions, as well as a more granular events table for drilling down into attack details. This approach ensures that users have the most relevant information at their fingertips.
Events Table
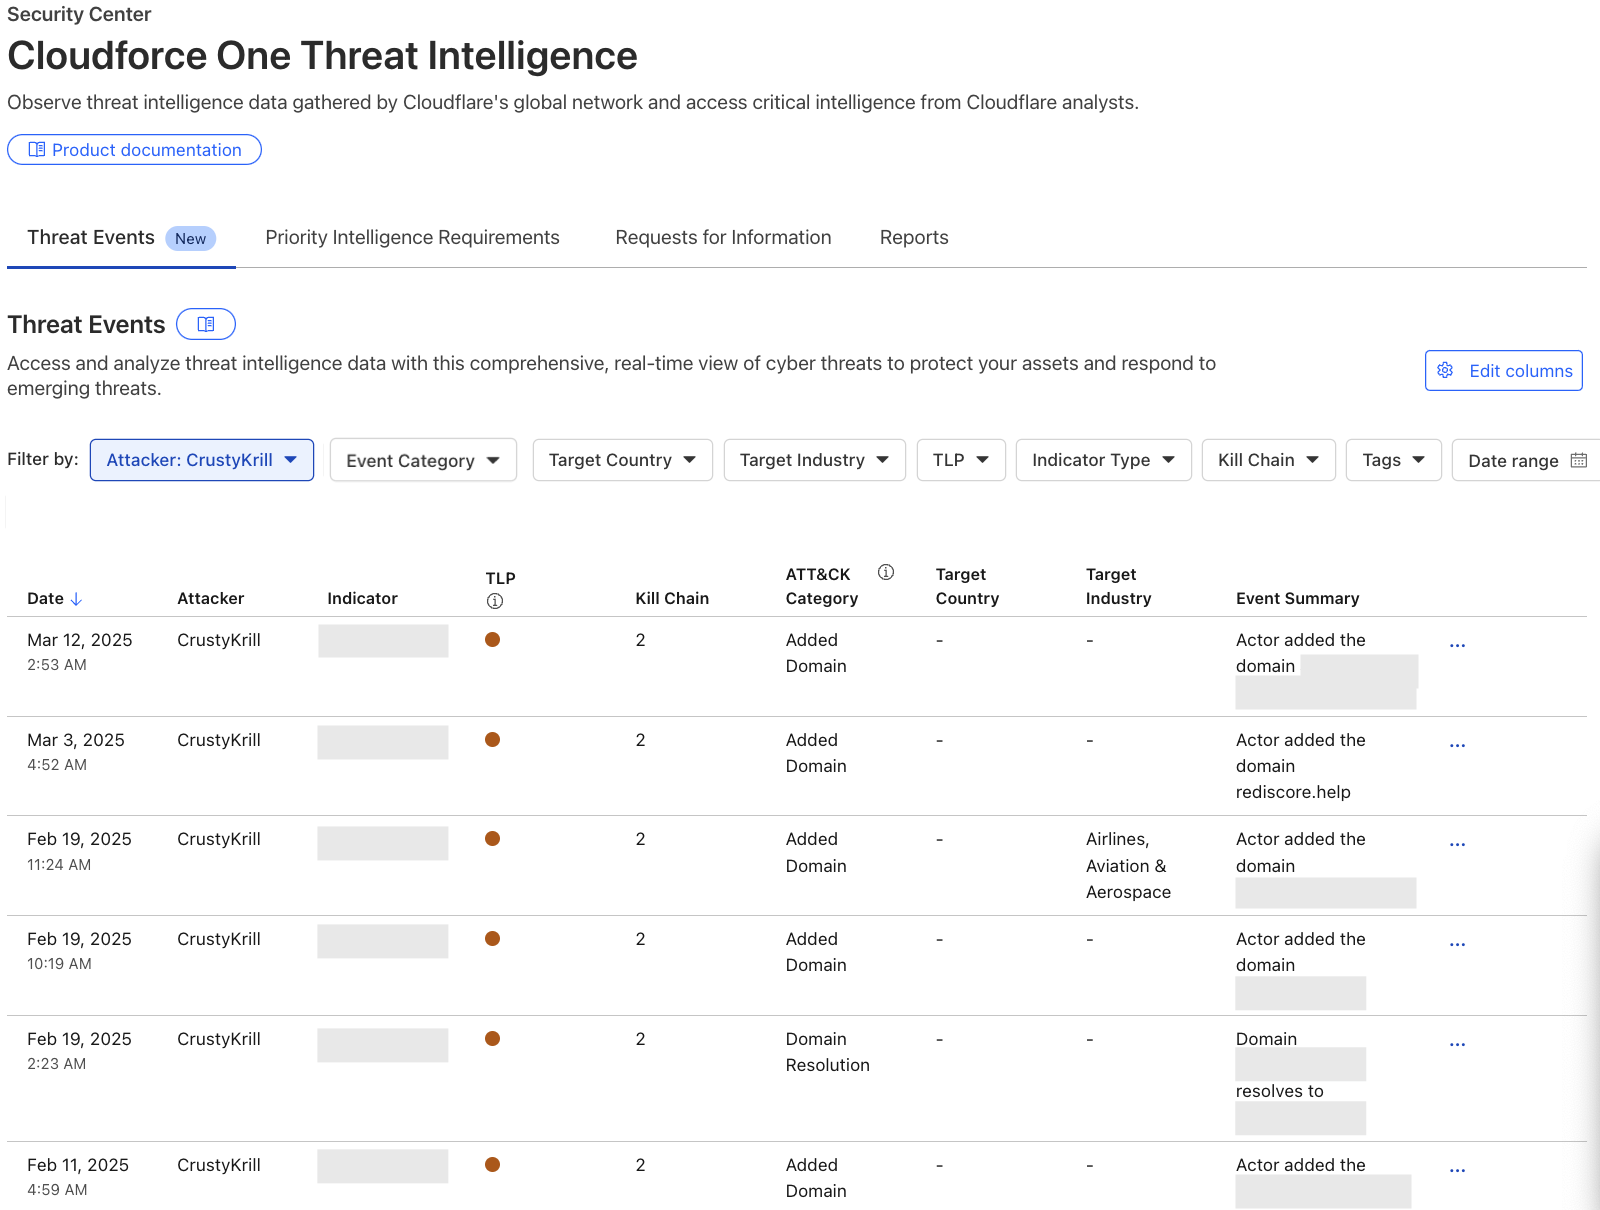
The events table is a detailed view in the Security Center where users can drill down into specific threat activity filtered by various criteria. It is here that users can explore specific threat events and adversary campaigns using Cloudflare’s traffic insights. Most importantly, this table will provide our users with actionable Indicators of Compromise and an event summary so that they can properly defend their services. All of the data available in our events table is equally accessible via the Cloudforce One threat events API.
To showcase the power of threat events, let’s explore a real-world case:
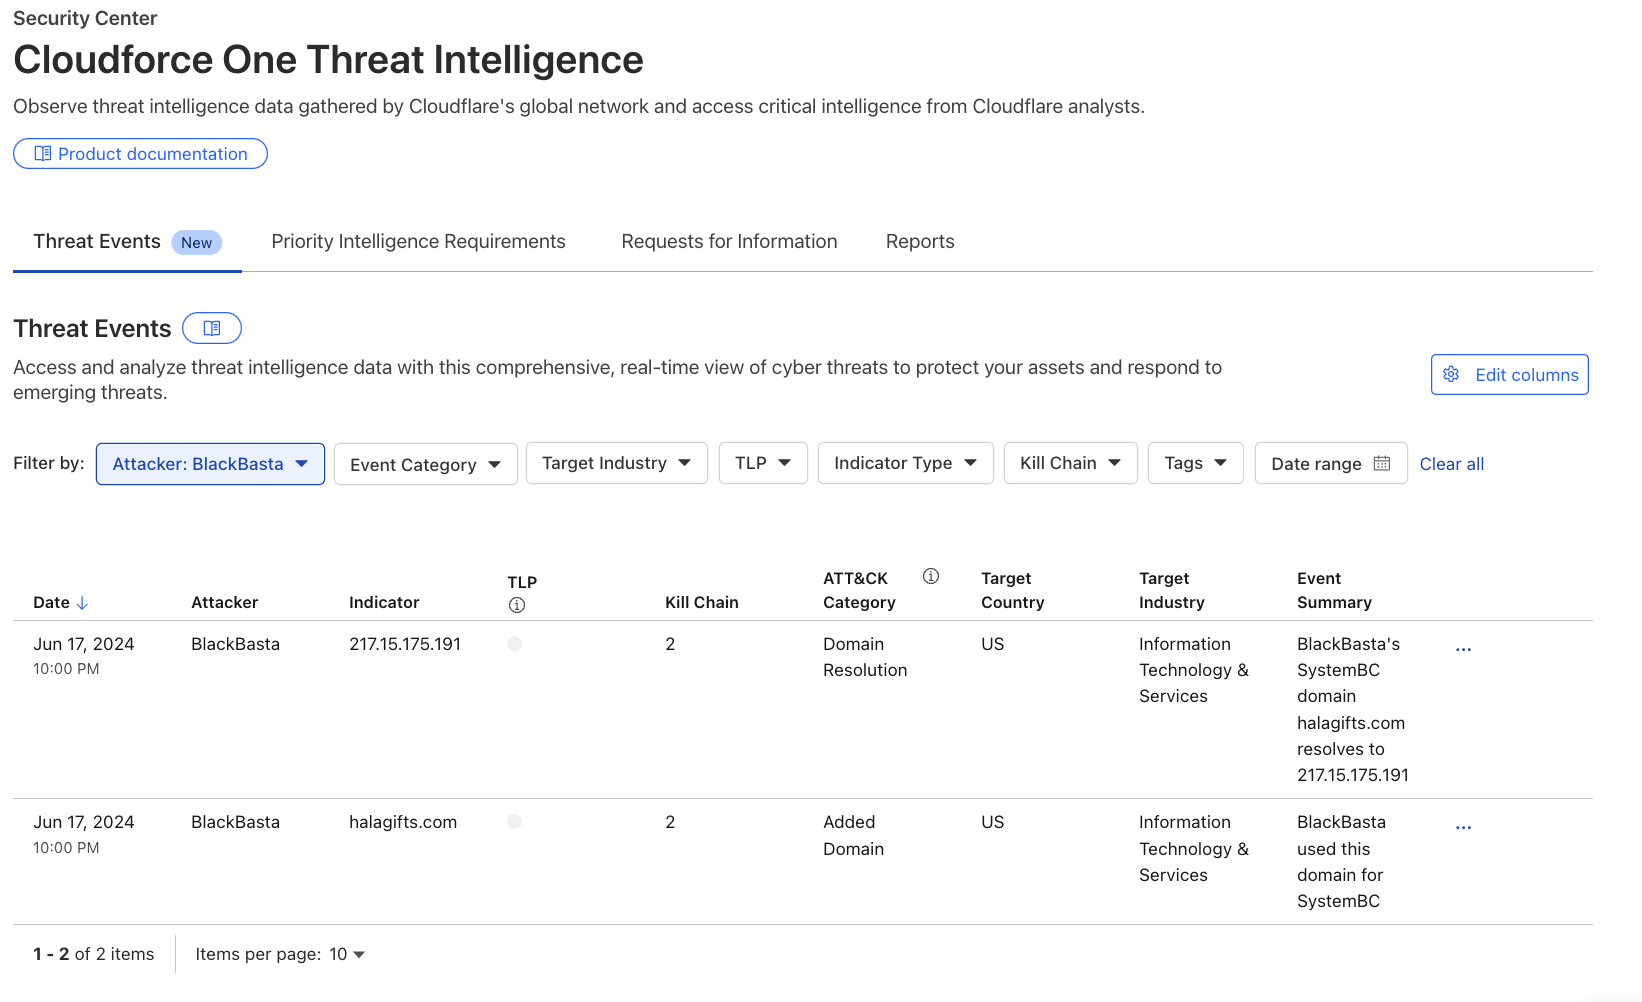
Recently leaked chats of the Black Basta criminal enterprise exposed details about their victims, methods, and infrastructure purchases. Although we can’t confirm whether the leaked chats were manipulated in any way, the infrastructure discussed in the chats was simple to verify. As a result, this threat intelligence is now available as events in the threat events, along with additional unique Cloudflare context.
Analysts searching for domains, hosts, and file samples used by Black Basta can leverage the threat events to gain valuable insight into this threat actor’s operations. For example, in the threat events UI, a user can filter the “Attacker” column by selecting ‘BlackBasta’ in the dropdown, as shown in the image below. This provides a curated list of verified IP addresses, domains, and file hashes for further investigation. For more detailed information on Cloudflare’s unique visibility into Black Basta threat activity see Black Basta’s blunder: exploiting the gang’s leaked chats.
Our customers face a myriad of cyber threats that can disrupt operations and compromise sensitive data. As adversaries become increasingly sophisticated, the need for timely and relevant threat intelligence has never been more critical. This is why we are introducing threat events, which provides deeper insights into these threats.
The threat events platform aims to fill this gap by offering a more detailed and contextualized view of ongoing threat activity. This feature allows analysts to self-serve and explore incidents through customizable filters, enabling them to identify patterns and respond effectively. By providing access to real-time threat data, we empower organizations to make informed decisions about their security strategies.
To validate the value of our threat events platform, we had a Fortune 20 threat intelligence team put it to the test. They conducted an analysis against 110 other sources, and we ranked as their #1 threat intelligence source. They found us “very much a unicorn” in the threat intelligence space. It’s early days, but the initial feedback confirms that our intelligence is not only unique but also delivering exceptional value to defenders.
While Cloudforce One customers now have access to our API and dashboard, allowing for seamless integration of threat intelligence into their existing systems, they will also soon have access to more visualisations and analytics for the threat events in order to better understand and report back on their findings. This upcoming UI will include enhanced visualizations of attacker timelines, campaign overviews, and attack graphs, providing even deeper insights into the threats facing your organization. Moreover, we’ll add the ability to integrate with existing SIEM platforms and share indicators across systems.
Read more about the threat intelligence research our team publishes here or reach out to your account team about how to leverage our new threat events to enhance your cybersecurity posture.