Earlier today the document describing Network Time Security for NTP officially became RFC 8915. This means that Network Time Security (NTS) is officially part of the collection of protocols that makes the Internet work. We’ve changed our time service to use the officially assigned port of 4460 for NTS key exchange, so you can use our service with ease. This is big progress towards securing a ubiquitous Internet protocol.
Over the past months we’ve seen many users of our time service, but very few using Network Time Security. This leaves computers vulnerable to attacks that imitate the server they use to obtain NTP. Part of the problem was the lack of available NTP daemons that supported NTS. That problem is now solved: chrony and ntpsec both support NTS.
Time underlies the security of many of the protocols such as TLS that we rely on to secure our online lives. Without accurate time, there is no way to determine whether or not credentials have expired. The absence of an easily deployed secure time protocol has been a problem for Internet security.
Without NTS or symmetric key authentication there is no guarantee that your computer is actually talking NTP with the computer you think it is. Symmetric key authentication is difficult and painful to set up, but until recently has been the only secure and standardized mechanism for authenticating NTP. NTS uses the work that goes into the Web Public Key Infrastructure to authenticate NTP servers and ensure that when you set up your computer to talk to time.cloudflare.com, that’s the server your computer gets the time from.
Our involvement in developing and promoting NTS included making a specialized server and releasing the source code, participation in the standardization process, and much working with implementers to hunt down bugs. We also set up our time service with support for NTS from the beginning, and it was a useful resource for implementers to test interoperability.
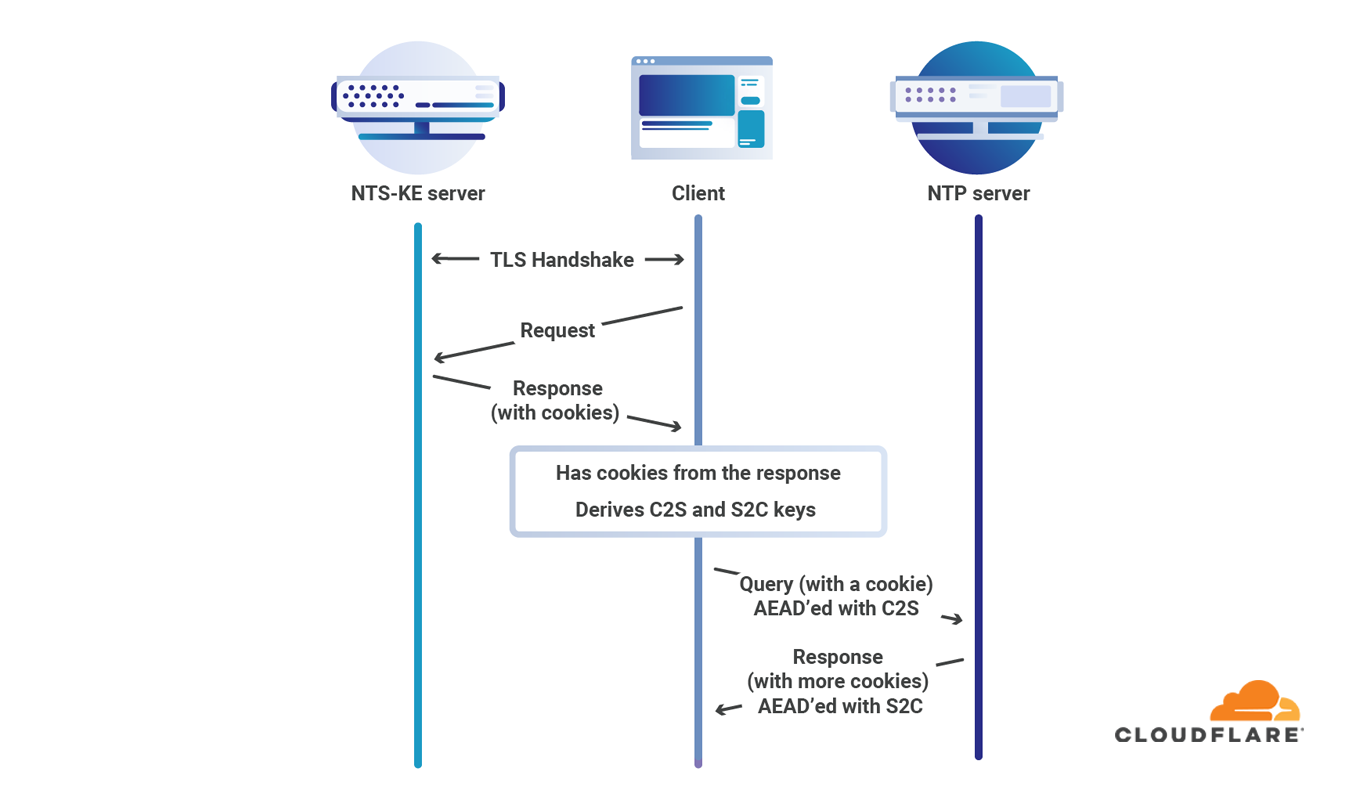
NTS operation diagram
When Cloudflare supported TLS 1.3 browsers were actively updating, and so deployment quickly took hold. However, the long tail of legacy installs and extended support releases slowed adoption. Similarly until Let’s Encrypt made encryption easy for webservers most web traffic was not encrypted.
By contrast ssh quickly displaced telnet as the way to access remote systems: the security benefits were substantial, and the experience was better. Adoption of protocols is slow, but when there is a real security need it can be much faster. NTS is a real security improvement that is vital to adopt. We’re proud to continue making the Internet a better place by supporting secure protocols.
We hope that operating systems will incorporate NTS support and TLS 1.3 in their supplied NTP daemons. We also urge administrators to deploy NTS as quickly as possible, and NTP server operators to adopt NTS. With Let’s Encrypt provided certificates this is simpler than it has been in the past
We’re continuing our work in this area with the continued development of the Roughtime protocol for even better security as well as engagement with the standardization process to help develop the future of Internet time.
Cloudflare is willing to allow any device to point to time.cloudflare.com and supports NTS. Just as our Universal SSL made it easy for any website to get the security benefits of TLS, our time service makes it easy for any computer to get the benefits of secure time.
През последния месец Джовани Сартори изгуби чувството си за време. Той не помни точно кога по-малкият му брат, силен и здрав 53-годишен мъж, вдига висока температура и получава проблеми с дишането. Казва, че след около седмица в това състояние с лечението с предписания от личния му лекар парацетамол, е бил отведен в болницата. Десет дни по-късно той е мъртъв. Шейсетгодишният Сартори остава сам с 90-годишната си майка в Кастана ди Прадело, село в Емилия Романя, Италия, където има повече крави и овце, отколкото хора. Домът им е на повече от 5 мили от най-близките аптека и магазин за хранителни стоки, и на 30 мили от болницата в Кодоньо, където е регистрирано първото огнище на COVID-19 в Италия. Майката на Сартори е със симптомите на вируса. “Тя беше така няколко седмици и не искаше да постъпи в болница. За щастие д-р Кавана дойде у нас един ден. Когато го видях да влиза, се почувствах прероден“, казва той в телефонно интервю.
Луиджи Кавана е ръководител на онкологичното отделение в близката болница в Пиаченца. През втората седмица на март, когато Италия влиза в локдаун, той си дава сметка, че твърде много тежко болни пациенти с COVID-19 пристигат в спешното отделение, докато повечето от тях е можело да бъдат лекувани у дома по-рано, преди симптомите им да станат твърде тежки. Затова заедно с няколко колеги всеки ден пътува из районите около Пиаченца всеки ден. Неговите три екипа са посетили повече от 300 души със симптомите на COVID-19. Те носят лекарства за пациентите и устройство, което следи нивата на кислорода в кръвта, което се връща след възстановяването им. За по-критичните случаи д-р Кавана оставя резервоари с кислород и, както на майката на Сартори, торбички с хранителни течности за вливане. „Майка ми вече е по-добре. Да си в своето леглото, а не в претъпкана болница е това, което е от значение“, казва Сартори.
“Когато разбрах, че спешното отделение е препълнено с хора, които вече са в сериозно състояние, знаех, че нещо не е наред. Това не е удар или инфаркт, а вирус, който може да удари по различни начини и да следва курса си. Трябва да се опитаме да го спрем, преди да увреди белите дробове по начин, който понякога е необратим“, казва д-р Кавана. Според данните, които е събрал през първия месец, по-малко от 10% от пациентите, които той лекува у дома, се влошават до степен, в която трябва да бъдат хоспитализирани.
До миналата седмица Кавана е давал на повечето от пациентите си Хидроксихлороквин /използван често при малария и някои възпалителни заболявания като ревматоиден артрит/ и антивирусен медикамент, който обикновено се предписва за HIV. Тогава AIFA, еквивалент на Агенцията по храните и лекарствата на САЩ, излиза с препоръката за много внимателно предписване на двата препарата заедно. Така, че сега, освен в редки случаи, той прилага Хидроксихлороквина самостоятелно. Въпреки, че лекарството не е тествано за коронавируса, той казва, че това е „най-ефективното лечение засега“.
Белият дом също ентусиазирано препоръчва лекарството за лечение на коронавирус, президентът Доналд Тръмп го описва като „чудодеен лек“. Кавана подчертава важността на това, че когато лекар го предписва, трябва да следи бдително за въздействието му. „Всеки ден получавам десетки телефонни обаждания и отговарям на всички тях. Предпочитам да отговарям на телефона в 2 ч. следобед“, уточнява той.
Сега, когато процентът на заразените с коронавируса в Италия расте, медиците анализират какво работи и какво не – и все повече се обръщат към нови инициативи като тази, която е създадена от Кавана. Местни администрации в други региони и организации с нестопанска цел като Лекари без граници организират медицински екипи, за да предоставят грижа у дома и в най-рисковите места, като например старческите домове.
„Ние допуснахме грешка, особено в Ломбардия. Бяхме изцяло фокусирани върху увеличаването на броя на леглата в отделенията за интензивно лечение, без да имаме достатъчно анестезиолози“, обяснява Иван Кавичи, професор по социология на здравеопазването в университета Тор Вергата в Рим. И допълва, че „в такива ситуации укрепването на цялата система е от съществено значение, само тогава болниците могат да функционират правилно“. Според него, вместо това общопрактикуващите лекари и екипите за първична медицинска помощ са били “изоставени” и “оставени без защита”. Досега близо 100 лекари са загинали в Италия, около половината от тях са общопрактикуващи.
Кавана и неговите екипи могат да влизат в домовете на пациентите, защото разполагат с необходимите предпазни средства, осигурени както от болницата, където работят, така и от частни донори. По време на посещенията си те обличат защитен костюм, който д-р Кавана шеговито описва като скафандрите на пилотите от филмите. Освен това, при всяко посещение те носят допълнителен халат за еднократна употреба, както шлемове, две маски, два чифта ръкавици, две шапки и покривала за обувките.
Властите също се опитват да подготвят мерки за евентуално възраждане на коронавируса. „Освен да реорганизираме болниците, трябва да реорганизираме медицинските кабинети в целия регион“, обяснява Пиер Луиджи Бартолети, заместник-секретар на FIMMG, италианската федерация на семейните лекари. Бартолети и неговите сътрудници вече мислят за следващата зима, когато в най-лошия случай вирусът може да удари отново със сила.
„Още през октомври чакалните пред лекарските кабинети трябва да бъдат преустроени, с отделни коридори за тези с грипни симптоми. Освен това, ние трябва да предложим на лекарите защитни средства и да ги обучим да ги използват правилно, заедно с подходящи инструменти за диагностика“, уточнява той. Бартолети работи с лекари в болницата Спаландзани в Рим, за да създадат методика, която да позволи бързо тестване за COVID-19, като се използва само капка кръв, взета от пръста.
Днес тестовете за коронавирус отнемат 4 или дори 5 дни, за да се получи резултат. Това е твърде дълго, ако се следват превантивните стратегии. Вместо да чака тестовете, д-р Кавана използва устройство с размера на мобилен телефон за ултразвукови скенери на гърдите. „Знаем, че в тази засегната област хората с признаци на бронхит или пневмония са почти сигурно положителни. Пазя тампона в случай на съмнение или за последващо лечение, за да се уверя, че след като се излекуват, не носят заразата“, казва той.
Лекарите и експертите са наясно, че пандемията е била като отварачка за очи – не само за италианците, но и за останалата част от света – по отношение на силните и слабите страни на различните здравни системи. Но никоя система не е доказала, че е достатъчно добре подготвена и оборудвана да се справи с изключителна ситуация като сегашната пандемия.
„Бяхме изненадани в момент, когато се чувствахме безсмъртни, но сега е ясно на всички, че това не е така. Ако повторим същите грешки, вината ще е и наша“, казва Пиер Луиджи Бартолети.
Автор: Франческа Берарди, Италия, за в. „Тайм“ Превод: Екип на Биволъ, Снимка: Gabriele Micalizzi—Cesura
Earlier this month we launched the C5 Instances with Local NVMe Storage and I told you that we would be doing the same for additional instance types in the near future!
Today we are introducing M5 instances equipped with local NVMe storage. Available for immediate use in 5 regions, these instances are a great fit for workloads that require a balance of compute and memory resources. Here are the specs:
Instance Name
vCPUs
RAM
Local Storage
EBS-Optimized Bandwidth
Network Bandwidth
m5d.large
2
8 GiB
1 x 75 GB NVMe SSD
Up to 2.120 Gbps
Up to 10 Gbps
m5d.xlarge
4
16 GiB
1 x 150 GB NVMe SSD
Up to 2.120 Gbps
Up to 10 Gbps
m5d.2xlarge
8
32 GiB
1 x 300 GB NVMe SSD
Up to 2.120 Gbps
Up to 10 Gbps
m5d.4xlarge
16
64 GiB
1 x 600 GB NVMe SSD
2.210 Gbps
Up to 10 Gbps
m5d.12xlarge
48
192 GiB
2 x 900 GB NVMe SSD
5.0 Gbps
10 Gbps
m5d.24xlarge
96
384 GiB
4 x 900 GB NVMe SSD
10.0 Gbps
25 Gbps
The M5d instances are powered by Custom Intel® Xeon® Platinum 8175M series processors running at 2.5 GHz, including support for AVX-512.
You can use any AMI that includes drivers for the Elastic Network Adapter (ENA) and NVMe; this includes the latest Amazon Linux, Microsoft Windows (Server 2008 R2, Server 2012, Server 2012 R2 and Server 2016), Ubuntu, RHEL, SUSE, and CentOS AMIs.
Here are a couple of things to keep in mind about the local NVMe storage on the M5d instances:
Naming – You don’t have to specify a block device mapping in your AMI or during the instance launch; the local storage will show up as one or more devices (/dev/nvme*1 on Linux) after the guest operating system has booted.
Encryption – Each local NVMe device is hardware encrypted using the XTS-AES-256 block cipher and a unique key. Each key is destroyed when the instance is stopped or terminated.
Lifetime – Local NVMe devices have the same lifetime as the instance they are attached to, and do not stick around after the instance has been stopped or terminated.
Available Now M5d instances are available in On-Demand, Reserved Instance, and Spot form in the US East (N. Virginia), US West (Oregon), EU (Ireland), US East (Ohio), and Canada (Central) Regions. Prices vary by Region, and are just a bit higher than for the equivalent M5 instances.
Join us this month to learn about AWS services and solutions. New this month, we have a fireside chat with the GM of Amazon WorkSpaces and our 2nd episode of the “How to re:Invent” series. We’ll also cover best practices, deep dives, use cases and more! Join us and register today!
AWS re:Invent June 13, 2018 | 05:00 PM – 05:30 PM PT – Episode 2: AWS re:Invent Breakout Content Secret Sauce – Hear from one of our own AWS content experts as we dive deep into the re:Invent content strategy and how we maintain a high bar. Compute
Containers June 25, 2018 | 09:00 AM – 09:45 AM PT – Running Kubernetes on AWS – Learn about the basics of running Kubernetes on AWS including how setup masters, networking, security, and add auto-scaling to your cluster.
June 19, 2018 | 11:00 AM – 11:45 AM PT – Launch AWS Faster using Automated Landing Zones – Learn how the AWS Landing Zone can automate the set up of best practice baselines when setting up new
June 21, 2018 | 01:00 PM – 01:45 PM PT – Enabling New Retail Customer Experiences with Big Data – Learn how AWS can help retailers realize actual value from their big data and deliver on differentiated retail customer experiences.
June 28, 2018 | 01:00 PM – 01:45 PM PT – Fireside Chat: End User Collaboration on AWS – Learn how End User Compute services can help you deliver access to desktops and applications anywhere, anytime, using any device. IoT
June 27, 2018 | 11:00 AM – 11:45 AM PT – AWS IoT in the Connected Home – Learn how to use AWS IoT to build innovative Connected Home products.
Mobile June 25, 2018 | 11:00 AM – 11:45 AM PT – Drive User Engagement with Amazon Pinpoint – Learn how Amazon Pinpoint simplifies and streamlines effective user engagement.
June 26, 2018 | 11:00 AM – 11:45 AM PT – Deep Dive: Hybrid Cloud Storage with AWS Storage Gateway – Learn how you can reduce your on-premises infrastructure by using the AWS Storage Gateway to connecting your applications to the scalable and reliable AWS storage services. June 27, 2018 | 01:00 PM – 01:45 PM PT – Changing the Game: Extending Compute Capabilities to the Edge – Discover how to change the game for IIoT and edge analytics applications with AWS Snowball Edge plus enhanced Compute instances. June 28, 2018 | 11:00 AM – 11:45 AM PT – Big Data and Analytics Workloads on Amazon EFS – Get best practices and deployment advice for running big data and analytics workloads on Amazon EFS.
Linus has released the 4.17 kernel, which will indeed be called “4.17”. “No, I didn’t call it 5.0, even though all the git object count numerology was in place for that. It will happen in the not _too_ distant future, and I’m told all the release scripts on kernel.org are ready for it, but I didn’t feel there was any real reason for it.”
Headline features in this release include improved load estimation in the CPU scheduler, raw BPF tracepoints, lazytime support in the XFS filesystem, full in-kernel TLS protocol support, histogram triggers for tracing, mitigations for the latest Spectre variants, and, of course, the removal of support for eight unloved processor architectures.
We all know that we should not commit any passwords or keys to the repo with our code (no matter if public or private). Yet, thousands of production passwords can be found on GitHub (and probably thousands more in internal company repositories). Some have tried to fix that by removing the passwords (once they learned it’s not a good idea to store them publicly), but passwords have remained in the git history.
Knowing what not to do is the first and very important step. But how do we store production credentials. Database credentials, system secrets (e.g. for HMACs), access keys for 3rd party services like payment providers or social networks. There doesn’t seem to be an agreed upon solution.
I’ve previously argued with the 12-factor app recommendation to use environment variables – if you have a few that might be okay, but when the number of variables grow (as in any real application), it becomes impractical. And you can set environment variables via a bash script, but you’d have to store it somewhere. And in fact, even separate environment variables should be stored somewhere.
This somewhere could be a local directory (risky), a shared storage, e.g. FTP or S3 bucket with limited access, or a separate git repository. I think I prefer the git repository as it allows versioning (Note: S3 also does, but is provider-specific). So you can store all your environment-specific properties files with all their credentials and environment-specific configurations in a git repo with limited access (only Ops people). And that’s not bad, as long as it’s not the same repo as the source code.
Since many companies are using GitHub or BitBucket for their repositories, storing production credentials on a public provider may still be risky. That’s why it’s a good idea to encrypt the files in the repository. A good way to do it is via git-crypt. It is “transparent” encryption because it supports diff and encryption and decryption on the fly. Once you set it up, you continue working with the repo as if it’s not encrypted. There’s even a fork that works on Windows.
You simply run git-crypt init (after you’ve put the git-crypt binary on your OS Path), which generates a key. Then you specify your .gitattributes, e.g. like that:
And you’re done. Well, almost. If this is a fresh repo, everything is good. If it is an existing repo, you’d have to clean up your history which contains the unencrypted files. Following these steps will get you there, with one addition – before calling git commit, you should call git-crypt status -f so that the existing files are actually encrypted.
You’re almost done. We should somehow share and backup the keys. For the sharing part, it’s not a big issue to have a team of 2-3 Ops people share the same key, but you could also use the GPG option of git-crypt (as documented in the README). What’s left is to backup your secret key (that’s generated in the .git/git-crypt directory). You can store it (password-protected) in some other storage, be it a company shared folder, Dropbox/Google Drive, or even your email. Just make sure your computer is not the only place where it’s present and that it’s protected. I don’t think key rotation is necessary, but you can devise some rotation procedure.
git-crypt authors claim to shine when it comes to encrypting just a few files in an otherwise public repo. And recommend looking at git-remote-gcrypt. But as often there are non-sensitive parts of environment-specific configurations, you may not want to encrypt everything. And I think it’s perfectly fine to use git-crypt even in a separate repo scenario. And even though encryption is an okay approach to protect credentials in your source code repo, it’s still not necessarily a good idea to have the environment configurations in the same repo. Especially given that different people/teams manage these credentials. Even in small companies, maybe not all members have production access.
The outstanding questions in this case is – how do you sync the properties with code changes. Sometimes the code adds new properties that should be reflected in the environment configurations. There are two scenarios here – first, properties that could vary across environments, but can have default values (e.g. scheduled job periods), and second, properties that require explicit configuration (e.g. database credentials). The former can have the default values bundled in the code repo and therefore in the release artifact, allowing external files to override them. The latter should be announced to the people who do the deployment so that they can set the proper values.
The whole process of having versioned environment-speific configurations is actually quite simple and logical, even with the encryption added to the picture. And I think it’s a good security practice we should try to follow.
There has been a lot of work in recent years to use BPF to push policy decisions into the kernel. But sometimes, it seems, what is really wanted is a way for a BPF program to punt a decision back to user space. That is the objective behind this patch set giving the secure computing (seccomp) mechanism a way to pass complex decisions to a user-space helper program.
Last year, we released Amazon Connect, a cloud-based contact center service that enables any business to deliver better customer service at low cost. This service is built based on the same technology that empowers Amazon customer service associates. Using this system, associates have millions of conversations with customers when they inquire about their shipping or order information. Because we made it available as an AWS service, you can now enable your contact center agents to make or receive calls in a matter of minutes. You can do this without having to provision any kind of hardware. 2
There are several advantages of building your contact center in the AWS Cloud, as described in our documentation. In addition, customers can extend Amazon Connect capabilities by using AWS products and the breadth of AWS services. In this blog post, we focus on how to get analytics out of the rich set of data published by Amazon Connect. We make use of an Amazon Connect data stream and create an end-to-end workflow to offer an analytical solution that can be customized based on need.
Solution overview
The following diagram illustrates the solution.
In this solution, Amazon Connect exports its contact trace records (CTRs) using Amazon Kinesis. CTRs are data streams in JSON format, and each has information about individual contacts. For example, this information might include the start and end time of a call, which agent handled the call, which queue the user chose, queue wait times, number of holds, and so on. You can enable this feature by reviewing our documentation.
In this architecture, we use Kinesis Firehose to capture Amazon Connect CTRs as raw data in an Amazon S3 bucket. We don’t use the recent feature added by Kinesis Firehose to save the data in S3 as Apache Parquet format. We use AWS Glue functionality to automatically detect the schema on the fly from an Amazon Connect data stream.
The primary reason for this approach is that it allows us to use attributes and enables an Amazon Connect administrator to dynamically add more fields as needed. Also by converting data to parquet in batch (every couple of hours) compression can be higher. However, if your requirement is to ingest the data in Parquet format on realtime, we recoment using Kinesis Firehose recently launched feature. You can review this blog post for further information.
By default, Firehose puts these records in time-series format. To make it easy for AWS Glue crawlers to capture information from new records, we use AWS Lambda to move all new records to a single S3 prefix called flatfiles. Our Lambda function is configured using S3 event notification. To comply with AWS Glue and Athena best practices, the Lambda function also converts all column names to lowercase. Finally, we also use the Lambda function to start AWS Glue crawlers. AWS Glue crawlers identify the data schema and update the AWS Glue Data Catalog, which is used by extract, transform, load (ETL) jobs in AWS Glue in the latter half of the workflow.
You can see our approach in the Lambda code following.
from __future__ import print_function
import json
import urllib
import boto3
import os
import re
s3 = boto3.resource('s3')
client = boto3.client('s3')
def convertColumntoLowwerCaps(obj):
for key in obj.keys():
new_key = re.sub(r'[\W]+', '', key.lower())
v = obj[key]
if isinstance(v, dict):
if len(v) > 0:
convertColumntoLowwerCaps(v)
if new_key != key:
obj[new_key] = obj[key]
del obj[key]
return obj
def lambda_handler(event, context):
bucket = event['Records'][0]['s3']['bucket']['name']
key = urllib.unquote_plus(event['Records'][0]['s3']['object']['key'].encode('utf8'))
try:
client.download_file(bucket, key, '/tmp/file.json')
with open('/tmp/out.json', 'w') as output, open('/tmp/file.json', 'rb') as file:
i = 0
for line in file:
for object in line.replace("}{","}\n{").split("\n"):
record = json.loads(object,object_hook=convertColumntoLowwerCaps)
if i != 0:
output.write("\n")
output.write(json.dumps(record))
i += 1
newkey = 'flatfiles/' + key.replace("/", "")
client.upload_file('/tmp/out.json', bucket,newkey)
s3.Object(bucket,key).delete()
return "success"
except Exception as e:
print(e)
print('Error coping object {} from bucket {}'.format(key, bucket))
raise e
We trigger AWS Glue crawlers based on events because this approach lets us capture any new data frame that we want to be dynamic in nature. CTR attributes are designed to offer multiple custom options based on a particular call flow. Attributes are essentially key-value pairs in nested JSON format. With the help of event-based AWS Glue crawlers, you can easily identify newer attributes automatically.
We recommend setting up an S3 lifecycle policy on the flatfiles folder that keeps records only for 24 hours. Doing this optimizes AWS Glue ETL jobs to process a subset of files rather than the entire set of records.
After we have data in the flatfiles folder, we use AWS Glue to catalog the data and transform it into Parquet format inside a folder called parquet/ctr/. The AWS Glue job performs the ETL that transforms the data from JSON to Parquet format. We use AWS Glue crawlers to capture any new data frame inside the JSON code that we want to be dynamic in nature. What this means is that when you add new attributes to an Amazon Connect instance, the solution automatically recognizes them and incorporates them in the schema of the results.
After AWS Glue stores the results in Parquet format, you can perform analytics using Amazon Redshift Spectrum, Amazon Athena, or any third-party data warehouse platform. To keep this solution simple, we have used Amazon Athena for analytics. Amazon Athena allows us to query data without having to set up and manage any servers or data warehouse platforms. Additionally, we only pay for the queries that are executed.
Try it out!
You can get started with our sample AWS CloudFormation template. This template creates the components starting from the Kinesis stream and finishes up with S3 buckets, the AWS Glue job, and crawlers. To deploy the template, open the AWS Management Console by clicking the following link.
In the console, specify the following parameters:
BucketName: The name for the bucket to store all the solution files. This name must be unique; if it’s not, template creation fails.
etlJobSchedule: The schedule in cron format indicating how often the AWS Glue job runs. The default value is every hour.
KinesisStreamName: The name of the Kinesis stream to receive data from Amazon Connect. This name must be different from any other Kinesis stream created in your AWS account.
s3interval: The interval in seconds for Kinesis Firehose to save data inside the flatfiles folder on S3. The value must between 60 and 900 seconds.
sampledata: When this parameter is set to true, sample CTR records are used. Doing this lets you try this solution without setting up an Amazon Connect instance. All examples in this walkthrough use this sample data.
Select the “I acknowledge that AWS CloudFormation might create IAM resources.” check box, and then choose Create. After the template finishes creating resources, you can see the stream name on the stack Outputs tab.
If you haven’t created your Amazon Connect instance, you can do so by following the Getting Started Guide. When you are done creating, choose your Amazon Connect instance in the console, which takes you to instance settings. Choose Data streaming to enable streaming for CTR records. Here, you can choose the Kinesis stream (defined in the KinesisStreamName parameter) that was created by the CloudFormation template.
Now it’s time to generate the data by making or receiving calls by using Amazon Connect. You can go to Amazon Connect Cloud Control Panel (CCP) to make or receive calls using a software phone or desktop phone. After a few minutes, we should see data inside the flatfiles folder. To make it easier to try this solution, we provide sample data that you can enable by setting the sampledata parameter to true in your CloudFormation template.
You can navigate to the AWS Glue console by choosing Jobs on the left navigation pane of the console. We can select our job here. In my case, the job created by CloudFormation is called glueJob-i3TULzVtP1W0; yours should be similar. You run the job by choosing Run job for Action.
After that, we wait for the AWS Glue job to run and to finish successfully. We can track the status of the job by checking the History tab.
When the job finishes running, we can check the Database section. There should be a new table created called ctr in Parquet format.
To query the data with Athena, we can select the ctr table, and for Action choose View data.
Doing this takes us to the Athena console. If you run a query, Athena shows a preview of the data.
When we can query the data using Athena, we can visualize it using Amazon QuickSight. Before connecting Amazon QuickSight to Athena, we must make sure to grant Amazon QuickSight access to Athena and the associated S3 buckets in the account. For more information on doing this, see Managing Amazon QuickSight Permissions to AWS Resources in the Amazon QuickSight User Guide. We can then create a new data set in Amazon QuickSight based on the Athena table that was created.
After setting up permissions, we can create a new analysis in Amazon QuickSight by choosing New analysis.
Then we add a new data set.
We choose Athena as the source and give the data source a name (in this case, I named it connectctr).
Choose the name of the database and the table referencing the Parquet results.
Then choose Visualize.
After that, we should see the following screen.
Now we can create some visualizations. First, search for the agent.username column, and drag it to the AutoGraph section.
We can see the agents and the number of calls for each, so we can easily see which agents have taken the largest amount of calls. If we want to see from what queues the calls came for each agent, we can add the queue.arn column to the visual.
After following all these steps, you can use Amazon QuickSight to add different columns from the call records and perform different types of visualizations. You can build dashboards that continuously monitor your connect instance. You can share those dashboards with others in your organization who might need to see this data.
Conclusion
In this post, you see how you can use services like AWS Lambda, AWS Glue, and Amazon Athena to process Amazon Connect call records. The post also demonstrates how to use AWS Lambda to preprocess files in Amazon S3 and transform them into a format that recognized by AWS Glue crawlers. Finally, the post shows how to used Amazon QuickSight to perform visualizations.
You can use the provided template to analyze your own contact center instance. Or you can take the CloudFormation template and modify it to process other data streams that can be ingested using Amazon Kinesis or stored on Amazon S3.
Luis Caro is a Big Data Consultant for AWS Professional Services. He works with our customers to provide guidance and technical assistance on big data projects, helping them improving the value of their solutions when using AWS.
Peter Dalbhanjan is a Solutions Architect for AWS based in Herndon, VA. Peter has a keen interest in evangelizing AWS solutions and has written multiple blog posts that focus on simplifying complex use cases. At AWS, Peter helps with designing and architecting variety of customer workloads.
Amazon QuickSight is a fully managed cloud business intelligence system that gives you Fast & Easy to Use Business Analytics for Big Data. QuickSight makes business analytics available to organizations of all shapes and sizes, with the ability to access data that is stored in your Amazon Redshift data warehouse, your Amazon Relational Database Service (RDS) relational databases, flat files in S3, and (via connectors) data stored in on-premises MySQL, PostgreSQL, and SQL Server databases. QuickSight scales to accommodate tens, hundreds, or thousands of users per organization.
Today we are launching a new, session-based pricing option for QuickSight, along with additional region support and other important new features. Let’s take a look at each one:
Pay-per-Session Pricing Our customers are making great use of QuickSight and take full advantage of the power it gives them to connect to data sources, create reports, and and explore visualizations.
However, not everyone in an organization needs or wants such powerful authoring capabilities. Having access to curated data in dashboards and being able to interact with the data by drilling down, filtering, or slicing-and-dicing is more than adequate for their needs. Subscribing them to a monthly or annual plan can be seen as an unwarranted expense, so a lot of such casual users end up not having access to interactive data or BI.
In order to allow customers to provide all of their users with interactive dashboards and reports, the Enterprise Edition of Amazon QuickSight now allows Reader access to dashboards on a Pay-per-Session basis. QuickSight users are now classified as Admins, Authors, or Readers, with distinct capabilities and prices:
Authors have access to the full power of QuickSight; they can establish database connections, upload new data, create ad hoc visualizations, and publish dashboards, all for $9 per month (Standard Edition) or $18 per month (Enterprise Edition).
Readers can view dashboards, slice and dice data using drill downs, filters and on-screen controls, and download data in CSV format, all within the secure QuickSight environment. Readers pay $0.30 for 30 minutes of access, with a monthly maximum of $5 per reader.
Admins have all authoring capabilities, and can manage users and purchase SPICE capacity in the account. The QuickSight admin now has the ability to set the desired option (Author or Reader) when they invite members of their organization to use QuickSight. They can extend Reader invites to their entire user base without incurring any up-front or monthly costs, paying only for the actual usage.
A New Region QuickSight is now available in the Asia Pacific (Tokyo) Region:
The UI is in English, with a localized version in the works.
Hourly Data Refresh Enterprise Edition SPICE data sets can now be set to refresh as frequently as every hour. In the past, each data set could be refreshed up to 5 times a day. To learn more, read Refreshing Imported Data.
Access to Data in Private VPCs This feature was launched in preview form late last year, and is now available in production form to users of the Enterprise Edition. As I noted at the time, you can use it to implement secure, private communication with data sources that do not have public connectivity, including on-premises data in Teradata or SQL Server, accessed over an AWS Direct Connect link. To learn more, read Working with AWS VPC.
Parameters with On-Screen Controls QuickSight dashboards can now include parameters that are set using on-screen dropdown, text box, numeric slider or date picker controls. The default value for each parameter can be set based on the user name (QuickSight calls this a dynamic default). You could, for example, set an appropriate default based on each user’s office location, department, or sales territory. Here’s an example:
URL Actions for Linked Dashboards You can now connect your QuickSight dashboards to external applications by defining URL actions on visuals. The actions can include parameters, and become available in the Details menu for the visual. URL actions are defined like this:
You can use this feature to link QuickSight dashboards to third party applications (e.g. Salesforce) or to your own internal applications. Read Custom URL Actions to learn how to use this feature.
Dashboard Sharing You can now share QuickSight dashboards across every user in an account.
Larger SPICE Tables The per-data set limit for SPICE tables has been raised from 10 GB to 25 GB.
Upgrade to Enterprise Edition The QuickSight administrator can now upgrade an account from Standard Edition to Enterprise Edition with a click. This enables provisioning of Readers with pay-per-session pricing, private VPC access, row-level security for dashboards and data sets, and hourly refresh of data sets. Enterprise Edition pricing applies after the upgrade.
Available Now Everything I listed above is available now and you can start using it today!
The 4.17 kernel appears to be on track for a June 3 release, barring an unlikely last-minute surprise. So the time has come for the usual look at some development statistics for this cycle. While 4.17 is a normal cycle for the most part, it does have one characteristic of note: it is the third kernel release ever to be smaller (in terms of lines of code) than its predecessor.
Previously, I showed you how to rotate Amazon RDS database credentials automatically with AWS Secrets Manager. In addition to database credentials, AWS Secrets Manager makes it easier to rotate, manage, and retrieve API keys, OAuth tokens, and other secrets throughout their lifecycle. You can configure Secrets Manager to rotate these secrets automatically, which can help you meet your compliance needs. You can also use Secrets Manager to rotate secrets on demand, which can help you respond quickly to security events. In this post, I show you how to store an API key in Secrets Manager and use a custom Lambda function to rotate the key automatically. I’ll use a Twitter API key and bearer token as an example; you can reference this example to rotate other types of API keys.
The instructions are divided into four main phases:
Store a Twitter API key and bearer token in Secrets Manager.
Create a custom Lambda function to rotate the bearer token.
Configure your application to retrieve the bearer token from Secrets Manager.
Configure Secrets Manager to use the custom Lambda function to rotate the bearer token automatically.
For the purpose of this post, I use the placeholder Demo/Twitter_Api_Key to denote the API key, the placeholder Demo/Twitter_bearer_token to denote the bearer token, and placeholder Lambda_Rotate_Bearer_Token to denote the custom Lambda function. Be sure to replace these placeholders with the resource names from your account.
Phase 1: Store a Twitter API key and bearer token in Secrets Manager
Twitter enables developers to register their applications and retrieve an API key, which includes a consumer_key and consumer_secret. Developers use these to generate a bearer token that applications can then use to authenticate and retrieve information from Twitter. At any given point of time, you can use an API key to create only one valid bearer token.
Start by storing the API key in Secrets Manager. Here’s how:
Figure 1: The “Store a new secret” button in the AWS Secrets Manager console
Select Other type of secrets (because you’re storing an API key).
Input the consumer_key and consumer_secret, and then select Next.
Figure 2: Select the consumer_key and the consumer_secret
Specify values for Secret Name and Description, then select Next. For this example, I use Demo/Twitter_API_Key.
Figure 3: Set values for “Secret Name” and “Description”
On the next screen, keep the default setting, Disable automatic rotation, because you’ll use the same API key to rotate bearer tokens programmatically and automatically. Applications and employees will not retrieve this API key. Select Next.
Figure 4: Keep the default “Disable automatic rotation” setting
Review the information on the next screen and, if everything looks correct, select Store. You’ve now successfully stored a Twitter API key in Secrets Manager.
Next, store the bearer token in Secrets Manager. Here’s how:
From the Secrets Manager console, select Store a new secret, select Other type of secrets, input details (access_token, token_type, and ARN of the API key) about the bearer token, and then select Next.
Figure 5: Add details about the bearer token
Specify values for Secret Name and Description, and then select Next. For this example, I use Demo/Twitter_bearer_token.
Figure 6: Again set values for “Secret Name” and “Description”
Keep the default rotation setting, Disable automatic rotation, and then select Next. You’ll enable rotation after you’ve updated the application to use Secrets Manager APIs to retrieve secrets.
Review the information and select Store. You’ve now completed storing the bearer token in Secrets Manager. I take note of the sample code provided on the review page. I’ll use this code to update my application to retrieve the bearer token using Secrets Manager APIs.
Figure 7: The sample code you can use in your app
Phase 2: Create a custom Lambda function to rotate the bearer token
While Secrets Manager supports rotating credentials for databases hosted on Amazon RDS natively, it also enables you to meet your unique rotation-related use cases by authoring custom Lambda functions. Now that you’ve stored the API key and bearer token, you’ll create a Lambda function to rotate the bearer token. For this example, I’ll create my Lambda function using Python 3.6.
Figure 8: In the Lambda console, select “Create function”
Select Author from scratch. For this example, I use the name Lambda_Rotate_Bearer_Token for my Lambda function. I also set the Runtime environment as Python 3.6.
Figure 9: Create a new function from scratch
This Lambda function requires permissions to call AWS resources on your behalf. To grant these permissions, select Create a custom role. This opens a console tab.
Select Create a new IAM Role and specify the value for Role Name. For this example, I use Role_Lambda_Rotate_Twitter_Bearer_Token.
Figure 10: For “IAM Role,” select “Create a new IAM role”
Next, to define the IAM permissions, copy and paste the following IAM policy in the View Policy Document text-entry field. Be sure to replace the placeholder ARN-OF-Demo/Twitter_API_Key with the ARN of your secret.
Figure 11: The IAM policy pasted in the “View Policy Document” text-entry field
Now, select Allow. This brings me back to the Lambda console with the appropriate Role selected.
Select Create function.
Figure 12: Select the “Create function” button in the lower-right corner
Copy the following Python code and paste it in the Function code section.
import base64
import json
import logging
import os
import boto3
from botocore.vendored import requests
logger = logging.getLogger()
logger.setLevel(logging.INFO)
def lambda_handler(event, context):
"""Secrets Manager Twitter Bearer Token Handler
This handler uses the master-user rotation scheme to rotate a bearer token of a Twitter app.
The Secret PlaintextString is expected to be a JSON string with the following format:
{
'access_token': ,
'token_type': ,
'masterarn':
}
Args:
event (dict): Lambda dictionary of event parameters. These keys must include the following:
- SecretId: The secret ARN or identifier
- ClientRequestToken: The ClientRequestToken of the secret version
- Step: The rotation step (one of createSecret, setSecret, testSecret, or finishSecret)
context (LambdaContext): The Lambda runtime information
Raises:
ResourceNotFoundException: If the secret with the specified arn and stage does not exist
ValueError: If the secret is not properly configured for rotation
KeyError: If the secret json does not contain the expected keys
"""
arn = event['SecretId']
token = event['ClientRequestToken']
step = event['Step']
# Setup the client and environment variables
service_client = boto3.client('secretsmanager', endpoint_url=os.environ['SECRETS_MANAGER_ENDPOINT'])
oauth2_token_url = os.environ['TWITTER_OAUTH2_TOKEN_URL']
oauth2_invalid_token_url = os.environ['TWITTER_OAUTH2_INVALID_TOKEN_URL']
tweet_search_url = os.environ['TWITTER_SEARCH_URL']
# Make sure the version is staged correctly
metadata = service_client.describe_secret(SecretId=arn)
if not metadata['RotationEnabled']:
logger.error("Secret %s is not enabled for rotation" % arn)
raise ValueError("Secret %s is not enabled for rotation" % arn)
versions = metadata['VersionIdsToStages']
if token not in versions:
logger.error("Secret version %s has no stage for rotation of secret %s." % (token, arn))
raise ValueError("Secret version %s has no stage for rotation of secret %s." % (token, arn))
if "AWSCURRENT" in versions[token]:
logger.info("Secret version %s already set as AWSCURRENT for secret %s." % (token, arn))
return
elif "AWSPENDING" not in versions[token]:
logger.error("Secret version %s not set as AWSPENDING for rotation of secret %s." % (token, arn))
raise ValueError("Secret version %s not set as AWSPENDING for rotation of secret %s." % (token, arn))
# Call the appropriate step
if step == "createSecret":
create_secret(service_client, arn, token, oauth2_token_url, oauth2_invalid_token_url)
elif step == "setSecret":
set_secret(service_client, arn, token, oauth2_token_url)
elif step == "testSecret":
test_secret(service_client, arn, token, tweet_search_url)
elif step == "finishSecret":
finish_secret(service_client, arn, token)
else:
logger.error("lambda_handler: Invalid step parameter %s for secret %s" % (step, arn))
raise ValueError("Invalid step parameter %s for secret %s" % (step, arn))
def create_secret(service_client, arn, token, oauth2_token_url, oauth2_invalid_token_url):
"""Get a new bearer token from Twitter
This method invalidates existing bearer token for the Twitter app and retrieves a new one from Twitter.
If a secret version with AWSPENDING stage exists, updates it with the newly retrieved bearer token and if
the AWSPENDING stage does not exist, creates a new version of the secret with that stage label.
Args:
service_client (client): The secrets manager service client
arn (string): The secret ARN or other identifier
token (string): The ClientRequestToken associated with the secret version
oauth2_token_url (string): The Twitter API endpoint to request a bearer token
oauth2_invalid_token_url (string): The Twitter API endpoint to invalidate a bearer token
Raises:
ValueError: If the current secret is not valid JSON
KeyError: If the secret json does not contain the expected keys
ResourceNotFoundException: If the current secret is not found
"""
# Make sure the current secret exists and try to get the master arn from the secret
try:
current_secret_dict = get_secret_dict(service_client, arn, "AWSCURRENT")
master_arn = current_secret_dict['masterarn']
logger.info("createSecret: Successfully retrieved secret for %s." % arn)
except service_client.exceptions.ResourceNotFoundException:
return
# create bearer token credentials to be passed as authorization string to Twitter
bearer_token_credentials = encode_credentials(service_client, master_arn, "AWSCURRENT")
# get the bearer token from Twitter
bearer_token_from_twitter = get_bearer_token(bearer_token_credentials,oauth2_token_url)
# invalidate the current bearer token
invalidate_bearer_token(oauth2_invalid_token_url,bearer_token_credentials,bearer_token_from_twitter)
# get a new bearer token from Twitter
new_bearer_token = get_bearer_token(bearer_token_credentials, oauth2_token_url)
# if a secret version with AWSPENDING stage exists, update it with the lastest bearer token
# if the AWSPENDING stage does not exist, then create the version with AWSPENDING stage
try:
pending_secret_dict = get_secret_dict(service_client, arn, "AWSPENDING", token)
pending_secret_dict['access_token'] = new_bearer_token
service_client.put_secret_value(SecretId=arn, ClientRequestToken=token, SecretString=json.dumps(pending_secret_dict), VersionStages=['AWSPENDING'])
logger.info("createSecret: Successfully invalidated the bearer token of the secret %s and updated the pending version" % arn)
except service_client.exceptions.ResourceNotFoundException:
current_secret_dict['access_token'] = new_bearer_token
service_client.put_secret_value(SecretId=arn, ClientRequestToken=token, SecretString=json.dumps(current_secret_dict), VersionStages=['AWSPENDING'])
logger.info("createSecret: Successfully invalidated the bearer token of the secret %s and and created the pending version." % arn)
def set_secret(service_client, arn, token, oauth2_token_url):
"""Validate the pending secret with that in Twitter
This method checks wether the bearer token in Twitter is the same as the one in the version with AWSPENDING stage.
Args:
service_client (client): The secrets manager service client
arn (string): The secret ARN or other identifier
token (string): The ClientRequestToken associated with the secret version
oauth2_token_url (string): The Twitter API endopoint to get a bearer token
Raises:
ResourceNotFoundException: If the secret with the specified arn and stage does not exist
ValueError: If the secret is not valid JSON or master credentials could not be used to login to DB
KeyError: If the secret json does not contain the expected keys
"""
# First get the pending version of the bearer token and compare it with that in Twitter
pending_secret_dict = get_secret_dict(service_client, arn, "AWSPENDING")
master_arn = pending_secret_dict['masterarn']
# create bearer token credentials to be passed as authorization string to Twitter
bearer_token_credentials = encode_credentials(service_client, master_arn, "AWSCURRENT")
# get the bearer token from Twitter
bearer_token_from_twitter = get_bearer_token(bearer_token_credentials, oauth2_token_url)
# if the bearer tokens are same, invalidate the bearer token in Twitter
# if not, raise an exception that bearer token in Twitter was changed outside Secrets Manager
if pending_secret_dict['access_token'] == bearer_token_from_twitter:
logger.info("createSecret: Successfully verified the bearer token of arn %s" % arn)
else:
raise ValueError("The bearer token of the Twitter app was changed outside Secrets Manager. Please check.")
def test_secret(service_client, arn, token, tweet_search_url):
"""Test the pending secret by calling a Twitter API
This method tries to use the bearer token in the secret version with AWSPENDING stage and search for tweets
with 'aws secrets manager' string.
Args:
service_client (client): The secrets manager service client
arn (string): The secret ARN or other identifier
token (string): The ClientRequestToken associated with the secret version
Raises:
ResourceNotFoundException: If the secret with the specified arn and stage does not exist
ValueError: If the secret is not valid JSON or pending credentials could not be used to login to the database
KeyError: If the secret json does not contain the expected keys
"""
# First get the pending version of the bearer token and compare it with that in Twitter
pending_secret_dict = get_secret_dict(service_client, arn, "AWSPENDING", token)
# Now verify you can search for tweets using the bearer token
if verify_bearer_token(pending_secret_dict['access_token'], tweet_search_url):
logger.info("testSecret: Successfully authorized with the pending secret in %s." % arn)
return
else:
logger.error("testSecret: Unable to authorize with the pending secret of secret ARN %s" % arn)
raise ValueError("Unable to connect to Twitter with pending secret of secret ARN %s" % arn)
def finish_secret(service_client, arn, token):
"""Finish the rotation by marking the pending secret as current
This method moves the secret from the AWSPENDING stage to the AWSCURRENT stage.
Args:
service_client (client): The secrets manager service client
arn (string): The secret ARN or other identifier
token (string): The ClientRequestToken associated with the secret version
Raises:
ResourceNotFoundException: If the secret with the specified arn and stage does not exist
"""
# First describe the secret to get the current version
metadata = service_client.describe_secret(SecretId=arn)
current_version = None
for version in metadata["VersionIdsToStages"]:
if "AWSCURRENT" in metadata["VersionIdsToStages"][version]:
if version == token:
# The correct version is already marked as current, return
logger.info("finishSecret: Version %s already marked as AWSCURRENT for %s" % (version, arn))
return
current_version = version
break
# Finalize by staging the secret version current
service_client.update_secret_version_stage(SecretId=arn, VersionStage="AWSCURRENT", MoveToVersionId=token, RemoveFromVersionId=current_version)
logger.info("finishSecret: Successfully set AWSCURRENT stage to version %s for secret %s." % (version, arn))
def encode_credentials(service_client, arn, stage):
"""Encodes the Twitter credentials
This helper function encodes the Twitter credentials (consumer_key and consumer_secret)
Args:
service_client (client):The secrets manager service client
arn (string): The secret ARN or other identifier
stage (stage): The stage identifying the secret version
Returns:
encoded_credentials (string): base64 encoded authorization string for Twitter
Raises:
KeyError: If the secret json does not contain the expected keys
"""
required_fields = ['consumer_key','consumer_secret']
master_secret_dict = get_secret_dict(service_client, arn, stage)
for field in required_fields:
if field not in master_secret_dict:
raise KeyError("%s key is missing from the secret JSON" % field)
encoded_credentials = base64.urlsafe_b64encode(
'{}:{}'.format(master_secret_dict['consumer_key'], master_secret_dict['consumer_secret']).encode('ascii')).decode('ascii')
return encoded_credentials
def get_bearer_token(encoded_credentials, oauth2_token_url):
"""Gets a bearer token from Twitter
This helper function retrieves the current bearer token from Twitter, given a set of credentials.
Args:
encoded_credentials (string): Twitter credentials for authentication
oauth2_token_url (string): REST API endpoint to request a bearer token from Twitter
Raises:
KeyError: If the secret json does not contain the expected keys
"""
headers = {
'Authorization': 'Basic {}'.format(encoded_credentials),
'Content-Type': 'application/x-www-form-urlencoded;charset=UTF-8',
}
data = 'grant_type=client_credentials'
response = requests.post(oauth2_token_url, headers=headers, data=data)
response_data = response.json()
if response_data['token_type'] == 'bearer':
bearer_token = response_data['access_token']
return bearer_token
else:
raise RuntimeError('unexpected token type: {}'.format(response_data['token_type']))
def invalidate_bearer_token(oauth2_invalid_token_url, bearer_token_credentials, bearer_token):
"""Invalidates a Bearer Token of a Twitter App
This helper function invalidates a bearer token of a Twitter app.
If successful, it returns the invalidated bearer token, else None
Args:
oauth2_invalid_token_url (string): The Twitter API endpoint to invalidate a bearer token
bearer_token_credentials (string): encoded consumer key and consumer secret to authenticate with Twitter
bearer_token (string): The bearer token to be invalidated
Returns:
invalidated_bearer_token: The invalidated bearer token
Raises:
ResourceNotFoundException: If the secret with the specified arn and stage does not exist
ValueError: If the secret is not valid JSON
KeyError: If the secret json does not contain the expected keys
"""
headers = {
'Authorization': 'Basic {}'.format(bearer_token_credentials),
'Content-Type': 'application/x-www-form-urlencoded;charset=UTF-8',
}
data = 'access_token=' + bearer_token
invalidate_response = requests.post(oauth2_invalid_token_url, headers=headers, data=data)
invalidate_response_data = invalidate_response.json()
if invalidate_response_data:
return
else:
raise RuntimeError('Invalidate bearer token request failed')
def verify_bearer_token(bearer_token, tweet_search_url):
"""Verifies access to Twitter APIs using a bearer token
This helper function verifies that the bearer token is valid by calling Twitter's search/tweets API endpoint
Args:
bearer_token (string): The current bearer token for the application
Returns:
True or False
Raises:
KeyError: If the response of search tweets API call fails
"""
headers = {
'Authorization' : 'Bearer {}'.format(bearer_token),
'Content-Type': 'application/x-www-form-urlencoded;charset=UTF-8',
}
search_results = requests.get(tweet_search_url, headers=headers)
try:
search_results.json()['statuses']
return True
except:
return False
def get_secret_dict(service_client, arn, stage, token=None):
"""Gets the secret dictionary corresponding for the secret arn, stage, and token
This helper function gets credentials for the arn and stage passed in and returns the dictionary by parsing the JSON string
Args:
service_client (client): The secrets manager service client
arn (string): The secret ARN or other identifier
token (string): The ClientRequestToken associated with the secret version, or None if no validation is desired
stage (string): The stage identifying the secret version
Returns:
SecretDictionary: Secret dictionary
Raises:
ResourceNotFoundException: If the secret with the specified arn and stage does not exist
ValueError: If the secret is not valid JSON
"""
# Only do VersionId validation against the stage if a token is passed in
if token:
secret = service_client.get_secret_value(SecretId=arn, VersionId=token, VersionStage=stage)
else:
secret = service_client.get_secret_value(SecretId=arn, VersionStage=stage)
plaintext = secret['SecretString']
# Parse and return the secret JSON string
return json.loads(plaintext)
Here’s what it will look like:
Figure 13: The Python code pasted in the “Function code” section
On the same page, provide the following environment variables:
Note: Resources used in this example are in US East (Ohio) region. If you intend to use another AWS Region, change the SECRETS_MANAGER_ENDPOINT set in the Environment variables to the appropriate region.
You’ve now created a Lambda function that can rotate the bearer token:
Figure 15: The new Lambda function
Before you can configure Secrets Manager to use this Lambda function, you need to update the function policy of the Lambda function. A function policy permits AWS services, such as Secrets Manager, to invoke a Lambda function on behalf of your application. You can attach a Lambda function policy from the AWS Command Line Interface (AWS CLI) or SDK. To attach a function policy, call the add-permission Lambda API from the AWS CLI.
Phase 3: Configure your application to retrieve the bearer token from Secrets Manager
Now that you’ve stored the bearer token in Secrets Manager, update the application to retrieve the bearer token from Secrets Manager instead of hard-coding this information in a configuration file or source code. For this example, I show you how to configure a Python application to retrieve this secret from Secrets Manager.
import config
def no_secrets_manager_sample()
# Get the bearer token from a config file.
Bearer_token = config.bearer_token
# Use the bearer token to authenticate requests to Twitter
Use the sample code from section titled Phase 1 and update the application to retrieve the bearer token from Secrets Manager. The following code sets up the client and retrieves and decrypts the secret Demo/Twitter_bearer_token.
# Use this code snippet in your app.
import boto3
from botocore.exceptions import ClientError
def get_secret():
secret_name = "Demo/Twitter_bearer_token"
endpoint_url = "https://secretsmanager.us-east-2.amazonaws.com"
region_name = "us-east-2"
session = boto3.session.Session()
client = session.client(
service_name='secretsmanager',
region_name=region_name,
endpoint_url=endpoint_url
)
try:
get_secret_value_response = client.get_secret_value(
SecretId=secret_name
)
except ClientError as e:
if e.response['Error']['Code'] == 'ResourceNotFoundException':
print("The requested secret " + secret_name + " was not found")
elif e.response['Error']['Code'] == 'InvalidRequestException':
print("The request was invalid due to:", e)
elif e.response['Error']['Code'] == 'InvalidParameterException':
print("The request had invalid params:", e)
else:
# Decrypted secret using the associated KMS CMK
# Depending on whether the secret was a string or binary, one of these fields will be populated
if 'SecretString' in get_secret_value_response:
secret = get_secret_value_response['SecretString']
else:
binary_secret_data = get_secret_value_response['SecretBinary']
# Your code goes here.
Applications require permissions to access Secrets Manager. My application runs on Amazon EC2 and uses an IAM role to get access to AWS services. I’ll attach the following policy to my IAM role, and you should take a similar action with your IAM role. This policy uses the GetSecretValue action to grant my application permissions to read secrets from Secrets Manager. This policy also uses the resource element to limit my application to read only the Demo/Twitter_bearer_token secret from Secrets Manager. Read the AWS Secrets Manager documentation to understand the minimum IAM permissions required to retrieve a secret.
{
"Version": "2012-10-17",
"Statement": {
"Sid": "RetrieveBearerToken",
"Effect": "Allow",
"Action": "secretsmanager:GetSecretValue",
"Resource": Input ARN of the secret Demo/Twitter_bearer_token here
}
}
Note: To improve the resiliency of your applications, associate your application with two API keys/bearer tokens. This is a higher availability option because you can continue to use one bearer token while Secrets Manager rotates the other token. Read the AWS documentation to learn how AWS Secrets Manager rotates your secrets.
Phase 4: Enable and verify rotation
Now that you’ve stored the secret in Secrets Manager and created a Lambda function to rotate this secret, configure Secrets Manager to rotate the secret Demo/Twitter_bearer_token.
From the Secrets Manager console, go to the list of secrets and choose the secret you created in the first step (in my example, this is named Demo/Twitter_bearer_token).
Scroll to Rotation configuration, and then select Edit rotation.
Figure 16: Select the “Edit rotation” button
To enable rotation, select Enable automatic rotation, and then choose how frequently you want Secrets Manager to rotate this secret. For this example, I set the rotation interval to 30 days. I also choose the rotation Lambda function, Lambda_Rotate_Bearer_Token, from the drop-down list.
Figure 17: “Edit rotation configuration” options
The banner on the next screen confirms that I have successfully configured rotation and the first rotation is in progress, which enables you to verify that rotation is functioning as expected. Secrets Manager will rotate this credential automatically every 30 days.
Figure 18: Confirmation notice
Summary
In this post, I showed you how to configure Secrets Manager to manage and rotate an API key and bearer token used by applications to authenticate and retrieve information from Twitter. You can use the steps described in this blog to manage and rotate other API keys, as well.
Secrets Manager helps you protect access to your applications, services, and IT resources without the upfront investment and on-going maintenance costs of operating your own secrets management infrastructure. To get started, open the Secrets Manager console. To learn more, read the Secrets Manager documentation.
If you have comments about this post, submit them in the Comments section below. If you have questions about anything in this post, start a new thread on the Secrets Manager forum or contact AWS Support.
Want more AWS Security news? Follow us on Twitter.
Hey folks, Rob here! It’s the last Thursday of the month, and that means it’s time for a brand-new The MagPi. Issue 70 is all about home automation using your favourite microcomputer, the Raspberry Pi.
Home automation in this month’s The MagPi!
Raspberry Pi home automation
We think home automation is an excellent use of the Raspberry Pi, hiding it around your house and letting it power your lights and doorbells and…fish tanks? We show you how to do all of that, and give you some excellent tips on how to add even more automation to your home in our ten-page cover feature.
Upcycle your life
Our other big feature this issue covers upcycling, the hot trend of taking old electronics and making them better than new with some custom code and a tactically placed Raspberry Pi. For this feature, we had a chat with Martin Mander, upcycler extraordinaire, to find out his top tips for hacking your old hardware.
Upcycling is a lot of fun
But wait, there’s more!
If for some reason you want even more content, you’re in luck! We have some fun tutorials for you to try, like creating a theremin and turning a Babbage into an IoT nanny cam. We also continue our quest to make a video game in C++. Our project showcase is headlined by the Teslonda on page 28, a Honda/Tesla car hybrid that is just wonderful.
We review PiBorg’s latest robot
All this comes with our definitive reviews and the community section where we celebrate you, our amazing community! You’re all good beans
An amazing, and practical, Raspberry Pi project
Get The MagPi 70
Issue 70 is available today from WHSmith, Tesco, Sainsbury’s, and Asda. If you live in the US, head over to your local Barnes & Noble or Micro Center in the next few days for a print copy. You can also get the new issue online from our store, or digitally via our Android and iOS apps. And don’t forget, there’s always the free PDF as well.
New subscription offer!
Want to support the Raspberry Pi Foundation and the magazine? We’ve launched a new way to subscribe to the print version of The MagPi: you can now take out a monthly £4 subscription to the magazine, effectively creating a rolling pre-order system that saves you money on each issue.
You can also take out a twelve-month print subscription and get a Pi Zero W plus case and adapter cables absolutely free! This offer does not currently have an end date.
Backblaze is hiring a Director of Sales. This is a critical role for Backblaze as we continue to grow the team. We need a strong leader who has experience in scaling a sales team and who has an excellent track record for exceeding goals by selling Software as a Service (SaaS) solutions. In addition, this leader will need to be highly motivated, as well as able to create and develop a highly-motivated, success oriented sales team that has fun and enjoys what they do.
The History of Backblaze from our CEO In 2007, after a friend’s computer crash caused her some suffering, we realized that with every photo, video, song, and document going digital, everyone would eventually lose all of their information. Five of us quit our jobs to start a company with the goal of making it easy for people to back up their data.
Like many startups, for a while we worked out of a co-founder’s one-bedroom apartment. Unlike most startups, we made an explicit agreement not to raise funding during the first year. We would then touch base every six months and decide whether to raise or not. We wanted to focus on building the company and the product, not on pitching and slide decks. And critically, we wanted to build a culture that understood money comes from customers, not the magical VC giving tree. Over the course of 5 years we built a profitable, multi-million dollar revenue business — and only then did we raise a VC round.
Fast forward 10 years later and our world looks quite different. You’ll have some fantastic assets to work with:
A brand millions recognize for openness, ease-of-use, and affordability.
A computer backup service that stores over 500 petabytes of data, has recovered over 30 billion files for hundreds of thousands of paying customers — most of whom self-identify as being the people that find and recommend technology products to their friends.
Our B2 service that provides the lowest cost cloud storage on the planet at 1/4th the price Amazon, Google or Microsoft charges. While being a newer product on the market, it already has over 100,000 IT and developers signed up as well as an ecosystem building up around it.
A growing, profitable and cash-flow positive company.
And last, but most definitely not least: a great sales team.
You might be saying, “sounds like you’ve got this under control — why do you need me?” Don’t be misled. We need you. Here’s why:
We have a great team, but we are in the process of expanding and we need to develop a structure that will easily scale and provide the most success to drive revenue.
We just launched our outbound sales efforts and we need someone to help develop that into a fully successful program that’s building a strong pipeline and closing business.
We need someone to work with the marketing department and figure out how to generate more inbound opportunities that the sales team can follow up on and close.
We need someone who will work closely in developing the skills of our current sales team and build a path for career growth and advancement.
We want someone to manage our Customer Success program.
So that’s a bit about us. What are we looking for in you?
Experience: As a sales leader, you will strategically build and drive the territory’s sales pipeline by assembling and leading a skilled team of sales professionals. This leader should be familiar with generating, developing and closing software subscription (SaaS) opportunities. We are looking for a self-starter who can manage a team and make an immediate impact of selling our Backup and Cloud Storage solutions. In this role, the sales leader will work closely with the VP of Sales, marketing staff, and service staff to develop and implement specific strategic plans to achieve and exceed revenue targets, including new business acquisition as well as build out our customer success program.
Leadership: We have an experienced team who’s brought us to where we are today. You need to have the people and management skills to get them excited about working with you. You need to be a strong leader and compassionate about developing and supporting your team.
Data driven and creative: The data has to show something makes sense before we scale it up. However, without creativity, it’s easy to say “the data shows it’s impossible” or to find a local maximum. Whether it’s deciding how to scale the team, figuring out what our outbound sales efforts should look like or putting a plan in place to develop the team for career growth, we’ve seen a bit of creativity get us places a few extra dollars couldn’t.
Jive with our culture: Strong leaders affect culture and the person we hire for this role may well shape, not only fit into, ours. But to shape the culture you have to be accepted by the organism, which means a certain set of shared values. We default to openness with our team, our customers, and everyone if possible. We love initiative — without arrogance or dictatorship. We work to create a place people enjoy showing up to work. That doesn’t mean ping pong tables and foosball (though we do try to have perks & fun), but it means people are friendly, non-political, working to build a good service but also a good place to work.
Do the work: Ideas and strategy are critical, but good execution makes them happen. We’re looking for someone who can help the team execute both from the perspective of being capable of guiding and organizing, but also someone who is hands-on themselves.
Additional Responsibilities needed for this role:
Recruit, coach, mentor, manage and lead a team of sales professionals to achieve yearly sales targets. This includes closing new business and expanding upon existing clientele.
Expand the customer success program to provide the best customer experience possible resulting in upsell opportunities and a high retention rate.
Develop effective sales strategies and deliver compelling product demonstrations and sales pitches.
Acquire and develop the appropriate sales tools to make the team efficient in their daily work flow.
Apply a thorough understanding of the marketplace, industry trends, funding developments, and products to all management activities and strategic sales decisions.
Ensure that sales department operations function smoothly, with the goal of facilitating sales and/or closings; operational responsibilities include accurate pipeline reporting and sales forecasts.
This position will report directly to the VP of Sales and will be staffed in our headquarters in San Mateo, CA.
Requirements:
7 – 10+ years of successful sales leadership experience as measured by sales performance against goals. Experience in developing skill sets and providing career growth and opportunities through advancement of team members.
Background in selling SaaS technologies with a strong track record of success.
Strong presentation and communication skills.
Must be able to travel occasionally nationwide.
BA/BS degree required
Think you want to join us on this adventure? Send an email to jobscontact@backblaze.com with the subject “Director of Sales.” (Recruiters and agencies, please don’t email us.) Include a resume and answer these two questions:
How would you approach evaluating the current sales team and what is your process for developing a growth strategy to scale the team?
What are the goals you would set for yourself in the 3 month and 1-year timeframes?
Thank you for taking the time to read this and I hope that this sounds like the opportunity for which you’ve been waiting.
Today I’m excited to announce built-in authentication support in Application Load Balancers (ALB). ALB can now securely authenticate users as they access applications, letting developers eliminate the code they have to write to support authentication and offload the responsibility of authentication from the backend. The team built a great live example where you can try out the authentication functionality.
Identity-based security is a crucial component of modern applications and as customers continue to move mission critical applications into the cloud, developers are asked to write the same authentication code again and again. Enterprises want to use their on-premises identities with their cloud applications. Web developers want to use federated identities from social networks to allow their users to sign-in. ALB’s new authentication action provides authentication through social Identity Providers (IdP) like Google, Facebook, and Amazon through Amazon Cognito. It also natively integrates with any OpenID Connect protocol compliant IdP, providing secure authentication and a single sign-on experience across your applications.
How Does ALB Authentication Work?
Authentication is a complicated topic and our readers may have differing levels of expertise with it. I want to cover a few key concepts to make sure we’re all on the same page. If you’re already an authentication expert and you just want to see how ALB authentication works feel free to skip to the next section!
Authentication verifies identity.
Authorization verifies permissions, the things an identity is allowed to do.
OpenID Connect (OIDC) is a simple identity, or authentication, layer built on top on top of the OAuth 2.0 protocol. The OIDC specification document is pretty well written and worth a casual read.
Identity Providers (IdPs) manage identity information and provide authentication services. ALB supports any OIDC compliant IdP and you can use a service like Amazon Cognito or Auth0 to aggregate different identities from various IdPs like Active Directory, LDAP, Google, Facebook, Amazon, or others deployed in AWS or on premises.
When we get away from the terminology for a bit, all of this boils down to figuring out who a user is and what they’re allowed to do. Doing this securely and efficiently is hard. Traditionally, enterprises have used a protocol called SAML with their IdPs, to provide a single sign-on (SSO) experience for their internal users. SAML is XML heavy and modern applications have started using OIDC with JSON mechanism to share claims. Developers can use SAML in ALB with Amazon Cognito’s SAML support. Web app or mobile developers typically use federated identities via social IdPs like Facebook, Amazon, or Google which, conveniently, are also supported by Amazon Cognito.
ALB Authentication works by defining an authentication action in a listener rule. The ALB’s authentication action will check if a session cookie exists on incoming requests, then check that it’s valid. If the session cookie is set and valid then the ALB will route the request to the target group with X-AMZN-OIDC-* headers set. The headers contain identity information in JSON Web Token (JWT) format, that a backend can use to identify a user. If the session cookie is not set or invalid then ALB will follow the OIDC protocol and issue an HTTP 302 redirect to the identity provider. The protocol is a lot to unpack and is covered more thoroughly in the documentation for those curious.
ALB Authentication Walkthrough
I have a simple Python flask app in an Amazon ECS cluster running in some AWS Fargate containers. The containers are in a target group routed to by an ALB. I want to make sure users of my application are logged in before accessing the authenticated portions of my application. First, I’ll navigate to the ALB in the console and edit the rules.
I want to make sure all access to /account* endpoints is authenticated so I’ll add new rule with a condition to match those endpoints.
Now, I’ll add a new rule and create an Authenticate action in that rule.
I’ll have ALB create a new Amazon Cognito user pool for me by providing some configuration details.
After creating the Amazon Cognito pool, I can make some additional configuration in the advanced settings.
I can change the default cookie name, adjust the timeout, adjust the scope, and choose the action for unauthenticated requests.
I can pick Deny to serve a 401 for all unauthenticated requests or I can pick Allow which will pass through to the application if unauthenticated. This is useful for Single Page Apps (SPAs). For now, I’ll choose Authenticate, which will prompt the IdP, in this case Amazon Cognito, to authenticate the user and reload the existing page.
Now I’ll add a forwarding action for my target group and save the rule.
Over on the Facebook side I just need to add my Amazon Cognito User Pool Domain to the whitelisted OAuth redirect URLs.
I would follow similar steps for other authentication providers.
Now, when I navigate to an authenticated page my Fargate containers receive the originating request with the X-Amzn-Oidc-* headers set by ALB. Using the information in those headers (claims-data, identity, access-token) my application can implement authorization.
All of this was possible without having to write a single line of code to deal with each of the IdPs. However, it’s still important for the implementing applications to verify the signature on the JWT header to ensure the request hasn’t been tampered with.
Additional Resources
Of course everything we’ve seen today is also available in the the API and AWS Command Line Interface (CLI). You can find additional information on the feature in the documentation. This feature is provided at no additional charge.
With authentication built-in to ALB, developers can focus on building their applications instead of rebuilding authentication for every application, all the while maintaining the scale, availability, and reliability of ALB. I think this feature is a pretty big deal and I can’t wait to see what customers build with it. Let us know what you think of this feature in the comments or on twitter!
This post is courtesy of Otavio Ferreira, Manager, Amazon SNS, AWS Messaging.
Amazon SNS message filtering provides a set of string and numeric matching operators that allow each subscription to receive only the messages of interest. Hence, SNS message filtering can simplify your pub/sub messaging architecture by offloading the message filtering logic from your subscriber systems, as well as the message routing logic from your publisher systems.
After you set the subscription attribute that defines a filter policy, the subscribing endpoint receives only the messages that carry attributes matching this filter policy. Other messages published to the topic are filtered out for this subscription. In this way, the native integration between SNS and Amazon CloudWatch provides visibility into the number of messages delivered, as well as the number of messages filtered out.
CloudWatch metrics are captured automatically for you. To get started with SNS message filtering, see Filtering Messages with Amazon SNS.
Message Filtering Metrics
The following six CloudWatch metrics are relevant to understanding your SNS message filtering activity:
NumberOfMessagesPublished – Inbound traffic to SNS. This metric tracks all the messages that have been published to the topic.
NumberOfNotificationsDelivered – Outbound traffic from SNS. This metric tracks all the messages that have been successfully delivered to endpoints subscribed to the topic. A delivery takes place either when the incoming message attributes match a subscription filter policy, or when the subscription has no filter policy at all, which results in a catch-all behavior.
NumberOfNotificationsFilteredOut – This metric tracks all the messages that were filtered out because they carried attributes that didn’t match the subscription filter policy.
NumberOfNotificationsFilteredOut-NoMessageAttributes – This metric tracks all the messages that were filtered out because they didn’t carry any attributes at all and, consequently, didn’t match the subscription filter policy.
NumberOfNotificationsFilteredOut-InvalidAttributes – This metric keeps track of messages that were filtered out because they carried invalid or malformed attributes and, thus, didn’t match the subscription filter policy.
NumberOfNotificationsFailed – This last metric tracks all the messages that failed to be delivered to subscribing endpoints, regardless of whether a filter policy had been set for the endpoint. This metric is emitted after the message delivery retry policy is exhausted, and SNS stops attempting to deliver the message. At that moment, the subscribing endpoint is likely no longer reachable. For example, the subscribing SQS queue or Lambda function has been deleted by its owner. You may want to closely monitor this metric to address message delivery issues quickly.
Message filtering graphs
Through the AWS Management Console, you can compose graphs to display your SNS message filtering activity. The graph shows the number of messages published, delivered, and filtered out within the timeframe you specify (1h, 3h, 12h, 1d, 3d, 1w, or custom).
To compose an SNS message filtering graph with CloudWatch:
Open the CloudWatch console.
Choose Metrics, SNS, All Metrics, and Topic Metrics.
Select all metrics to add to the graph, such as:
NumberOfMessagesPublished
NumberOfNotificationsDelivered
NumberOfNotificationsFilteredOut
Choose Graphed metrics.
In the Statistic column, switch from Average to Sum.
Title your graph with a descriptive name, such as “SNS Message Filtering”
After you have your graph set up, you may want to copy the graph link for bookmarking, emailing, or sharing with co-workers. You may also want to add your graph to a CloudWatch dashboard for easy access in the future. Both actions are available to you on the Actions menu, which is found above the graph.
Summary
SNS message filtering defines how SNS topics behave in terms of message delivery. By using CloudWatch metrics, you gain visibility into the number of messages published, delivered, and filtered out. This enables you to validate the operation of filter policies and more easily troubleshoot during development phases.
SNS message filtering can be implemented easily with existing AWS SDKs by applying message and subscription attributes across all SNS supported protocols (Amazon SQS, AWS Lambda, HTTP, SMS, email, and mobile push). CloudWatch metrics for SNS message filtering is available now, in all AWS Regions.
What do I do with a Mac that still has personal data on it? Do I take out the disk drive and smash it? Do I sweep it with a really strong magnet? Is there a difference in how I handle a hard drive (HDD) versus a solid-state drive (SSD)? Well, taking a sledgehammer or projectile weapon to your old machine is certainly one way to make the data irretrievable, and it can be enormously cathartic as long as you follow appropriate safety and disposal protocols. But there are far less destructive ways to make sure your data is gone for good. Let me introduce you to secure erasing.
Which Type of Drive Do You Have?
Before we start, you need to know whether you have a HDD or a SSD. To find out, or at least to make sure, you click on the Apple menu and select “About this Mac.” Once there, select the “Storage” tab to see which type of drive is in your system.
The first example, below, shows a SATA Disk (HDD) in the system.
In the next case, we see we have a Solid State SATA Drive (SSD), plus a Mac SuperDrive.
The third screen shot shows an SSD, as well. In this case it’s called “Flash Storage.”
Make Sure You Have a Backup
Before you get started, you’ll want to make sure that any important data on your hard drive has moved somewhere else. OS X’s built-in Time Machine backup software is a good start, especially when paired with Backblaze. You can learn more about using Time Machine in our Mac Backup Guide.
With a local backup copy in hand and secure cloud storage, you know your data is always safe no matter what happens.
Once you’ve verified your data is backed up, roll up your sleeves and get to work. The key is OS X Recovery — a special part of the Mac operating system since OS X 10.7 “Lion.”
How to Wipe a Mac Hard Disk Drive (HDD)
NOTE: If you’re interested in wiping an SSD, see below.
Make sure your Mac is turned off.
Press the power button.
Immediately hold down the command and R keys.
Wait until the Apple logo appears.
Select “Disk Utility” from the OS X Utilities list. Click Continue.
Select the disk you’d like to erase by clicking on it in the sidebar.
Click the Erase button.
Click the Security Options button.
The Security Options window includes a slider that enables you to determine how thoroughly you want to erase your hard drive.
There are four notches to that Security Options slider. “Fastest” is quick but insecure — data could potentially be rebuilt using a file recovery app. Moving that slider to the right introduces progressively more secure erasing. Disk Utility’s most secure level erases the information used to access the files on your disk, then writes zeroes across the disk surface seven times to help remove any trace of what was there. This setting conforms to the DoD 5220.22-M specification.
Once you’ve selected the level of secure erasing you’re comfortable with, click the OK button.
Click the Erase button to begin. Bear in mind that the more secure method you select, the longer it will take. The most secure methods can add hours to the process.
Once it’s done, the Mac’s hard drive will be clean as a whistle and ready for its next adventure: a fresh installation of OS X, being donated to a relative or a local charity, or just sent to an e-waste facility. Of course you can still drill a hole in your disk or smash it with a sledgehammer if it makes you happy, but now you know how to wipe the data from your old computer with much less ruckus.
The above instructions apply to older Macintoshes with HDDs. What do you do if you have an SSD?
Securely Erasing SSDs, and Why Not To
Most new Macs ship with solid state drives (SSDs). Only the iMac and Mac mini ship with regular hard drives anymore, and even those are available in pure SSD variants if you want.
If your Mac comes equipped with an SSD, Apple’s Disk Utility software won’t actually let you zero the hard drive.
Wait, what?
In a tech note posted to Apple’s own online knowledgebase, Apple explains that you don’t need to securely erase your Mac’s SSD:
With an SSD drive, Secure Erase and Erasing Free Space are not available in Disk Utility. These options are not needed for an SSD drive because a standard erase makes it difficult to recover data from an SSD.
In fact, some folks will tell you not to zero out the data on an SSD, since it can cause wear and tear on the memory cells that, over time, can affect its reliability. I don’t think that’s nearly as big an issue as it used to be — SSD reliability and longevity has improved.
If “Standard Erase” doesn’t quite make you feel comfortable that your data can’t be recovered, there are a couple of options.
FileVault Keeps Your Data Safe
One way to make sure that your SSD’s data remains secure is to use FileVault. FileVault is whole-disk encryption for the Mac. With FileVault engaged, you need a password to access the information on your hard drive. Without it, that data is encrypted.
There’s one potential downside of FileVault — if you lose your password or the encryption key, you’re screwed: You’re not getting your data back any time soon. Based on my experience working at a Mac repair shop, losing a FileVault key happens more frequently than it should.
When you first set up a new Mac, you’re given the option of turning FileVault on. If you don’t do it then, you can turn on FileVault at any time by clicking on your Mac’s System Preferences, clicking on Security & Privacy, and clicking on the FileVault tab. Be warned, however, that the initial encryption process can take hours, as will decryption if you ever need to turn FileVault off.
With FileVault turned on, you can restart your Mac into its Recovery System (by restarting the Mac while holding down the command and R keys) and erase the hard drive using Disk Utility, once you’ve unlocked it (by selecting the disk, clicking the File menu, and clicking Unlock). That deletes the FileVault key, which means any data on the drive is useless.
FileVault doesn’t impact the performance of most modern Macs, though I’d suggest only using it if your Mac has an SSD, not a conventional hard disk drive.
Securely Erasing Free Space on Your SSD
If you don’t want to take Apple’s word for it, if you’re not using FileVault, or if you just want to, there is a way to securely erase free space on your SSD. It’s a little more involved but it works.
Before we get into the nitty-gritty, let me state for the record that this really isn’t necessary to do, which is why Apple’s made it so hard to do. But if you’re set on it, you’ll need to use Apple’s Terminal app. Terminal provides you with command line interface access to the OS X operating system. Terminal lives in the Utilities folder, but you can access Terminal from the Mac’s Recovery System, as well. Once your Mac has booted into the Recovery partition, click the Utilities menu and select Terminal to launch it.
From a Terminal command line, type:
diskutil secureErase freespace VALUE /Volumes/DRIVE
That tells your Mac to securely erase the free space on your SSD. You’ll need to change VALUE to a number between 0 and 4. 0 is a single-pass run of zeroes; 1 is a single-pass run of random numbers; 2 is a 7-pass erase; 3 is a 35-pass erase; and 4 is a 3-pass erase. DRIVE should be changed to the name of your hard drive. To run a 7-pass erase of your SSD drive in “JohnB-Macbook”, you would enter the following:
And remember, if you used a space in the name of your Mac’s hard drive, you need to insert a leading backslash before the space. For example, to run a 35-pass erase on a hard drive called “Macintosh HD” you enter the following:
diskutil secureErase freespace 3 /Volumes/Macintosh\ HD
Something to remember is that the more extensive the erase procedure, the longer it will take.
When Erasing is Not Enough — How to Destroy a Drive
If you absolutely, positively need to be sure that all the data on a drive is irretrievable, see this Scientific American article (with contributions by Gleb Budman, Backblaze CEO), How to Destroy a Hard Drive — Permanently.
Stratis is a new local storage-management solution for Linux. It can be compared to ZFS, Btrfs, or LVM. Its focus is on simplicity of concepts and ease of use, while giving users access to advanced storage features. Internally, Stratis’s implementation favors tight integration of existing components instead of the fully-integrated, in-kernel approach that ZFS and Btrfs use. This has benefits and drawbacks for Stratis, but also greatly decreases the overall time needed to develop a useful and stable initial version, which can then be a base for further improvement in later versions. Subscribers can read on for an introduction to Stratis, by guest author (and Stratis team lead at Red Hat) Andy Grover.
Warning: a GIF used in today’s blog contains flashing images.
Students at the University of Bremen, Germany, have built a wearable camera that records the seconds of vision lost when you blink. Augenblick uses a Raspberry Pi Zero and Camera Module alongside muscle sensors to record footage whenever you close your eyes, producing a rather disjointed film of the sights you miss out on.
Blink and you’ll miss it
The average person blinks up to five times a minute, with each blink lasting 0.5 to 0.8 seconds. These half-seconds add up to about 30 minutes a day. What sights are we losing during these minutes? That is the question asked by students Manasse Pinsuwan and René Henrich when they set out to design Augenblick.
Blinking is a highly invasive mechanism for our eyesight. Every day we close our eyes thousands of times without noticing it. Our mind manages to never let us wonder what exactly happens in the moments that we miss.
Capturing lost moments
For Augenblick, the wearer sticks MyoWare Muscle Sensor pads to their face, and these detect the electrical impulses that trigger blinking.
Two pads are applied over the orbicularis oculi muscle that forms a ring around the eye socket, while the third pad is attached to the cheek as a neutral point.
Biology fact: there are two muscles responsible for blinking. The orbicularis oculi muscle closes the eye, while the levator palpebrae superioris muscle opens it — and yes, they both sound like the names of Harry Potter spells.
The sensor is read 25 times a second. Whenever it detects that the orbicularis oculi is active, the Camera Module records video footage.
Pressing a button on the side of the Augenblick glasses set the code running. An LED lights up whenever the camera is recording and also serves to confirm the correct placement of the sensor pads.
The Pi Zero saves the footage so that it can be stitched together later to form a continuous, if disjointed, film.
Learn more about the Augenblick blink camera
You can find more information on the conception, design, and build process of Augenblickhere in German, with a shorter explanation including lots of photos here in English.
And if you’re keen to recreate this project, our free project resource for a wearable Pi Zero time-lapse camera will come in handy as a starting point.
This post is courtesy of Alan Protasio, Software Development Engineer, Amazon Web Services
Just like compute and storage, messaging is a fundamental building block of enterprise applications. Message brokers (aka “message-oriented middleware”) enable different software systems, often written in different languages, on different platforms, running in different locations, to communicate and exchange information. Mission-critical applications, such as CRM and ERP, rely on message brokers to work.
A common performance consideration for customers deploying a message broker in a production environment is the throughput of the system, measured as messages per second. This is important to know so that application environments (hosts, threads, memory, etc.) can be configured correctly.
In this post, we demonstrate how to measure the throughput for Amazon MQ, a new managed message broker service for ActiveMQ, using JMS Benchmark. It should take between 15–20 minutes to set up the environment and an hour to run the benchmark. We also provide some tips on how to configure Amazon MQ for optimal throughput.
Benchmarking throughput for Amazon MQ
ActiveMQ can be used for a number of use cases. These use cases can range from simple fire and forget tasks (that is, asynchronous processing), low-latency request-reply patterns, to buffering requests before they are persisted to a database.
The throughput of Amazon MQ is largely dependent on the use case. For example, if you have non-critical workloads such as gathering click events for a non-business-critical portal, you can use ActiveMQ in a non-persistent mode and get extremely high throughput with Amazon MQ.
On the flip side, if you have a critical workload where durability is extremely important (meaning that you can’t lose a message), then you are bound by the I/O capacity of your underlying persistence store. We recommend using mq.m4.large for the best results. The mq.t2.micro instance type is intended for product evaluation. Performance is limited, due to the lower memory and burstable CPU performance.
Tip: To improve your throughput with Amazon MQ, make sure that you have consumers processing messaging as fast as (or faster than) your producers are pushing messages.
Because it’s impossible to talk about how the broker (ActiveMQ) behaves for each and every use case, we walk through how to set up your own benchmark for Amazon MQ using our favorite open-source benchmarking tool: JMS Benchmark. We are fans of the JMS Benchmark suite because it’s easy to set up and deploy, and comes with a built-in visualizer of the results.
Non-Persistent Scenarios – Queue latency as you scale producer throughput
Getting started
At the time of publication, you can create an mq.m4.large single-instance broker for testing for $0.30 per hour (US pricing).
Step 2 – Create an EC2 instance to run your benchmark Launch the EC2 instance using Step 1: Launch an Instance. We recommend choosing the m5.large instance type.
Step 3 – Configure the security groups Make sure that all the security groups are correctly configured to let the traffic flow between the EC2 instance and your broker.
From the broker list, choose the name of your broker (for example, MyBroker)
In the Details section, under Security and network, choose the name of your security group or choose the expand icon ( ).
From the security group list, choose your security group.
At the bottom of the page, choose Inbound, Edit.
In the Edit inbound rules dialog box, add a role to allow traffic between your instance and the broker: • Choose Add Rule. • For Type, choose Custom TCP. • For Port Range, type the ActiveMQ SSL port (61617). • For Source, leave Custom selected and then type the security group of your EC2 instance. • Choose Save.
Your broker can now accept the connection from your EC2 instance.
Step 4 – Run the benchmark Connect to your EC2 instance using SSH and run the following commands:
After the benchmark finishes, you can find the results in the ~/reports directory. As you may notice, the performance of ActiveMQ varies based on the number of consumers, producers, destinations, and message size.
Amazon MQ architecture
The last bit that’s important to know so that you can better understand the results of the benchmark is how Amazon MQ is architected.
Amazon MQ is architected to be highly available (HA) and durable. For HA, we recommend using the multi-AZ option. After a message is sent to Amazon MQ in persistent mode, the message is written to the highly durable message store that replicates the data across multiple nodes in multiple Availability Zones. Because of this replication, for some use cases you may see a reduction in throughput as you migrate to Amazon MQ. Customers have told us they appreciate the benefits of message replication as it helps protect durability even in the face of the loss of an Availability Zone.
Conclusion
We hope this gives you an idea of how Amazon MQ performs. We encourage you to run tests to simulate your own use cases.
To learn more, see the Amazon MQ website. You can try Amazon MQ for free with the AWS Free Tier, which includes up to 750 hours of a single-instance mq.t2.micro broker and up to 1 GB of storage per month for one year.
It’s a public holiday here today (yes, again). So, while we indulge in the traditional pastime of barbecuing stuff (ourselves, mainly), here’s a little trove of Pi projects that cater for our various furry friends.
Project Floofball
Nicole Horward created Project Floofball for her hamster, Harold. It’s an IoT hamster wheel that uses a Raspberry Pi and a magnetic door sensor to log how far Harold runs.
JaganK3 used to work long hours that meant he couldn’t be there to feed his dog on time. He found that he couldn’t buy an automated feeder in India without paying a lot to import one, so he made one himself. It uses a Raspberry Pi to control a motor that turns a dispensing valve in a hopper full of dry food, giving his dog a portion of food at set times.
He also added a web cam for live video streaming, because he could. Find out more in JaganK3’s Instructable for his pet feeder.
Shark laser cat toy
Sam Storino, meanwhile, is using a Raspberry Pi to control a laser-pointer cat toy with a goshdarned SHARK (which is kind of what I’d expect from the guy who made the steampunk-looking cat feeder a few weeks ago). The idea is to keep his cats interested and active within the confines of a compact city apartment.
Post with 52 votes and 7004 views. Tagged with cat, shark, lasers, austin powers, raspberry pi; Shared by JeorgeLeatherly. Raspberry Pi Automatic Cat Laser Pointer Toy
If I were a cat, I would definitely be entirely happy with this. Find out more on Sam’s website.
All of these makers are generous in acknowledging the tutorials and build logs that helped them with their projects. It’s lovely to see the Raspberry Pi and maker community working like this, and I bet their projects will inspire others too.
Now, if you’ll excuse me. I’m late for a barbecue.
By continuing to use the site, you agree to the use of cookies. more information
The cookie settings on this website are set to "allow cookies" to give you the best browsing experience possible. If you continue to use this website without changing your cookie settings or you click "Accept" below then you are consenting to this.