Post Syndicated from Herbert Guerrero original https://aws.amazon.com/blogs/security/how-to-encrypt-sensitive-caller-authentication-voice-input-in-amazon-lex/
In the telecommunications industry, sensitive authentication and user data are typically received through mobile voice and keypads, and companies are responsible for protecting the data obtained through these channels. The increasing use of voice-driven interactive voice response (IVR) has resulted in a need to provide solutions that can protect user data that is gathered from mobile voice inputs. In this blog post, you’ll see how to protect a caller’s sensitive voice data that was captured through Amazon Lex by using data encryption implemented through AWS Lambda functions. The solution described in this post helps you to protect customer data received through voice channels from inadvertent or unknown access. The solution also includes decryption capabilities, which give an authorized administrator or operator the ability to decrypt user data from a Lambda console.
Solution overview
To demonstrate the IVR solution described in this post, a caller speaks two sensitive pieces of data—credit card number and zip code—from an Amazon Connect contact flow. The spoken values are encrypted and returned to the contact flow to be stored in contact attributes. The encrypted ciphertext is retained as a contact attribute for decryption purposes. Amazon CloudWatch Logs is enabled in the contact flow, but only the encrypted values are logged in log streams.
For this solution, conversation logs for this Amazon Lex bot are not enabled. An operator with assigned AWS Identity and Access Management (IAM) permissions can monitor the logged encrypted entries from CloudWatch Logs. For more information, see Working with log groups and log streams in the Amazon CloudWatch Logs User Guide.
Solution architecture
Figure 1 shows the overview of the solution described in this blog post.
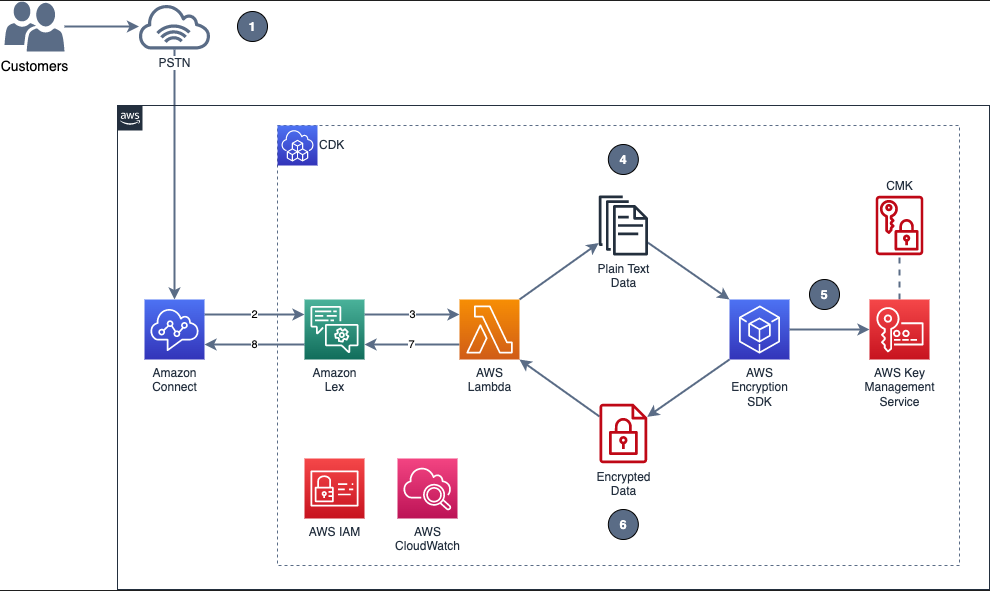
Figure 1: Example of solution architecture
Figure 1 shows the following high-level steps of the solution, and the number labels correspond to the following steps.
- A caller places an inbound call.
- An Amazon Connect contact flow leverages a Get customer input block, backed by an Amazon Lex bot, to prompt the caller for numerical data.
- The Amazon Lex bot invokes the Lambda function dev-encryption-core-EncryptFn.
- The Lambda function uses the AWS Encryption SDK to encrypt the caller’s plain text data.
- The AWS Encryption SDK obtains encryption keys from AWS Key Management Service (AWS KMS).
- The caller’s data is encrypted by using the AWS KMS keys obtained from AWS KMS.
- The Lambda function appends the encrypted data to the Amazon Lex bot session attributes.
- Amazon Lex returns the fully encrypted data back to Amazon Connect.
Overview of a contact flow
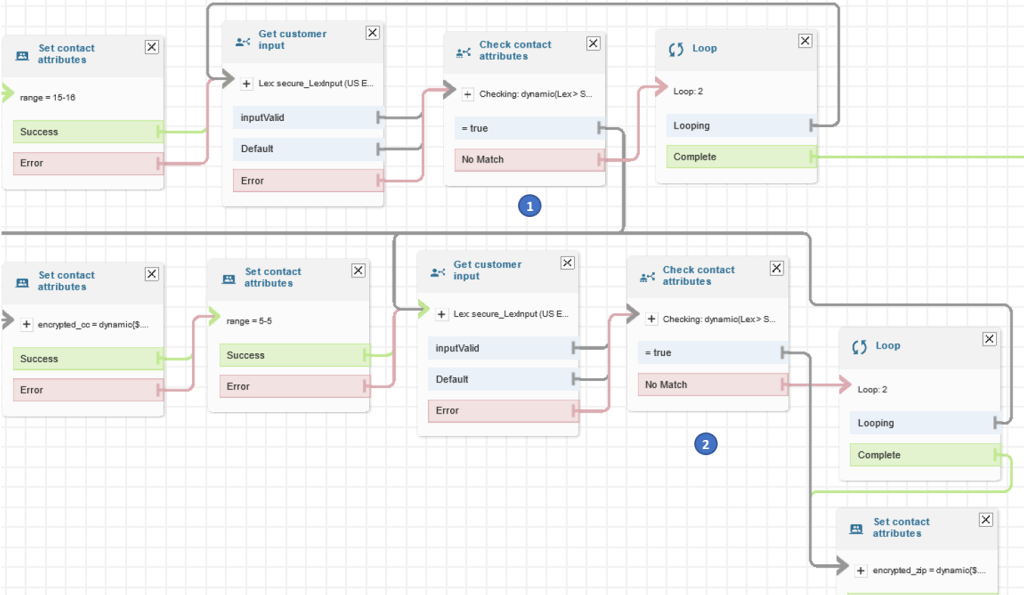
Figure 2: Contact flow captures input values using Amazon Lex and returns their encrypted values
Figure 2 shows an overview of the contact flow, which has two main steps:
- The first numerical data (in this example, an encrypted credit card number value) is stored in contact attributes.
- The second numerical data (in this example, an encrypted zip code value) is stored in contact attributes.
Prerequisites
This solution uses the following AWS services:
- Amazon Connect
- AWS Identity and Access Management (IAM)
- AWS Key Management Service (AWS KMS)
- AWS Lambda
- Amazon Lex
The following need to be installed in your local machine:
To implement the solution in this post, you first need the Amazon Connect instance prerequisite in place.
To set up the Amazon Connect instance (if none exists)
- Create an Amazon Connect instance with a claimed phone number and a configured Amazon Connect user linked to a basic routing profile. For more information about setting up a contact center, see Set up your contact center in the Amazon Connect Administrator Guide.
- Assign the CallCenterManager or Admin security profile to an Amazon Connect user.
- In the newly created Amazon Connect instance, under the Overview section, find the access URL with the format
https://<aliasname>.awsapps.com/connect/login- Make note of the access URL, which you will use later to log in to the Amazon Connect Dashboard.
- Log in to your Amazon Connect instance with a Connect user that has Admin or CallCenterManager permissions.
Solution procedures
This solution includes the following procedures:
- Clone the project or download the solution zip file.
- Create AWS resources needed for encryption and decryption.
- Configure the Amazon Lex bot in Amazon Connect.
- Create the contact flow in Amazon Connect.
- Validate the solution.
- Decrypt the collected data.
To clone or download the solution
- Log in to the GitHub repo.
- Clone or download the solution files to your local machine.
The downloaded file contains the artifacts needed for the deployment.
To create AWS resources needed for encryption and decryption
- From the command line, change directory to the project’s root directory.
- Run npm install.
- Run npm run build to transpile TypeScript to JavaScript and package code and its dependencies before deploying to AWS.
- Run cdk deploy CoreStack.
To configure the Amazon Lex bot in your Amazon Connect instance
- In the Amazon Connect console, choose Contact flows and scroll to the Amazon Lex section.

Figure 3: Select Contact flows
- From the Bot menu, select secure_LexInput(Classic). Then select +Add Amazon Lex Bot.

Figure 4: Configure the Amazon Lex bot to Amazon Connect


To import contact flow into Amazon Connect
- In the Amazon Connect console, choose Overview, and then choose Login as administrator.
- From the Routing menu on the left side, choose Contact flows to show the list of contact flows.
- Choose Create Contact flow.
- Choose the arrow to the right of the Save button and choose Import flow (beta). This imports the contact flow that you previously downloaded in the procedure To clone or download the solution.
The contact flow already has the Amazon Lex bot configured.

Figure 5: Select Import flow (beta)
- In the upper right corner of the contact flow, choose Save, and then choose OK to save the changes.
- Choose Publish to make the contact flow ready for use during the validation steps.
- (Optional) Claim a phone number (if none is available), using the following steps:
- In the Connect Dashboard, on the navigation menu, choose Channels, and then choose Phone numbers.
- On the right side of the page, choose Claim a number.
- Select the DID (Direct Inward Dialing) tab. Use the drop-down arrow to choose your country/region. When numbers are returned, choose one.
- Write down the phone number. You call it later in this post.
- (Optional) On the Edit Phone number page, in the Description box, you can type a note if desired.
- To assign the contact flow to your claimed phone number, for Contact flow / IVR, choose the drop-down arrow, and then choose Secure_Lex_Input.
- Choose Save.

Figure 6: Under Contact flow / IVR, select the imported contact flow


For more information, see Set up phone numbers for your contact center in the Amazon Connect Administrator Guide.
To validate the solution
- Dial the test phone number to go through the voice prompt flow.
- When prompted, speak a 16-digit credit card number (you have a maximum of two retries), then speak a 5-digit zip code (also a maximum of two retries).
- After you complete your test call, review the log streams in Amazon CloudWatch Logs to confirm that the digits that you entered are now encrypted and stored as a contact attribute. The two entered values zipcode and creditcard are stored in contact attributes. Both are encrypted.

Figure 7: Sample log showing encrypted values for zipcode and creditcard
- Log in to your Amazon Connect Dashboard as a Supervisor. The URL is provided after the connect instance has been created. In the navigation menu, choose Contact search.

Figure 8: Choose Contact search to look for the call information
- Locate your inbound call on the Contact search list. Note that it can take up to 60 seconds for data to appear in the Contact search list.
- Select the Contact ID for your call.
Figure 9: The Contact search showing the contact details for your test call
- Copy the encrypted values for creditcard and zipcode and make note of them; you will use these values in the next procedure.
Figure 10: Contact attributes stored in a contact flow are registered as part of the contact details


To decrypt the collected data
- In the AWS Lambda console, choose Functions.
- Use the Search bar to look for the dev-encryption-core-DecryptFn Lambda function, and then select the name link to open it.
- Under folder encryption-master, open the test folder. Under the tab \events, locate the file decrypt.json.
- Use the following steps to create a sample test event in the console by using the contents from decrypt.json. For more details, see Testing Lambda functions in the console.
- Choose the down arrow on the right side of Test.
- Choose Configure test event.
- Choose Create new test event.
- For Event name, enter decryptTest.
- Paste the contents from decrypt.json.
- Choose Save.
- Use the encrypted values saved in the Validate a solution procedure and replace the ones in the recently created test event.

Figure 11: Replace the creditcard or zipCode values with the ones from the Contact Search page
- Choose Test. The output from the test shows the values decrypted by the Lambda function. This is shown in Figure 12 under the Execution result tab.

Figure 12: Result from the decryption operation


Note: Make sure that only the appropriate authorized administrator or operator, application, or AWS service is able to invoke the decryption Lambda function.
You have now successfully implemented the solution by encrypting and decrypting the voice input of your test call, which you collected through Amazon Lex.
Cleanup
To avoid incurring future charges, follow these steps to clean up the deployed resources that you created when implementing this solution.
To delete the Amazon Connect instance
- In the Amazon Connect console, under Instance alias, select the name of the Amazon Connect instance, and choose Delete.
- When prompted, type the name of the instance, and then choose Delete.
To delete the Amazon Lex bot
- In the Amazon Lex console, choose the bot that you created in the To configure the Amazon Lex bot procedure.
- Choose Delete, and then choose Continue.
To delete the AWS CloudFormation stack
- In the AWS CloudFormation console, on the Stacks page, select the stack you created in the procedure To create AWS resources needed for encryption and decryption.
- In the stack details pane, choose Delete.
- Choose Delete stack when prompted. This deletes the Amazon S3 bucket, IAM roles and AWS Lambda functions you created for testing. This will also schedule a deletion date on the AWS KMS key.
Conclusion
In this post, you learned how an Amazon Connect contact flow can collect voice inputs from a caller by using Amazon Lex, and how you can encrypt these inputs by using your own AWS KMS key. This solution can help improve the security of voice input that is collected through Amazon Connect. For cost information, see the Amazon Connect pricing page.
For more information, see the blog post Creating a secure IVR solution with Amazon Connect and the topic Encrypt customer input (using OpenSSL) in the Amazon Connect Administrator Guide. As previously mentioned, the increasing use of voice-driven IVR has resulted in a need to provide solutions that can protect user data gathered from mobile voice inputs.
Additional resources include the AWS Lambda Developer Guide, the Amazon Lex Developer Guide, the Amazon Connect Administrator Guide, the AWS Nodejs SDK, and the AWS SDK for Python (Boto3).
If you need help with setting up this solution, you can get assistance from AWS Professional Services. You can also seek assistance from Amazon Connect partners available worldwide.
If you have feedback about this post, submit comments in the Comments section below. If you have questions about this post, contact AWS Support.
Want more AWS Security news? Follow us on Twitter.