OPKSSH makes it easy to SSH with single sign-on technologies like OpenID Connect, thereby removing the need to manually manage and configure SSH keys. It does this without adding a trusted party other than your identity provider (IdP).
In this post, we describe what OPKSSH is, how it simplifies SSH management, and what OPKSSH being open source means for you.
Background
A cornerstone of modern access control is single sign-on (SSO), where a user authenticates to an identity provider (IdP), and in response the IdP issues the user a token. The user can present this token to prove their identity, such as “Google says I am Alice”. SSO is the rare security technology that both increases convenience — users only need to sign in once to get access to many different systems — and increases security.
OpenID Connect
OpenID Connect (OIDC) is the main protocol used for SSO. As shown below, in OIDC the IdP, called an OpenID Provider (OP), issues the user an ID Token which contains identity claims about the user, such as “email is [email protected]”. These claims are digitally signed by the OP, so anyone who receives the ID Token can check that it really was issued by the OP.
Unfortunately, while ID Tokens do include identity claims like name, organization, and email address, they do not include the user’s public key. This prevents them from being used to directly secure protocols like SSH or End-to-End Encrypted messaging.
Note that throughout this post we use the term OpenID Provider (OP) rather than IdP, as OP specifies the exact type of IdP we are using, i.e., an OpenID IdP. We use Google as an example OP, but OpenID Connect works with Google, Azure, Okta, etc.
Shows a user Alice signing in to Google using OpenID Connect and receiving an ID Token
OpenPubkey
OpenPubkey, shown below, adds public keys to ID Tokens. This enables ID Tokens to be used like certificates, e.g. “Google says [email protected] is using public key 0x123.” We call an ID token that contains a public key a PK Token. The beauty of OpenPubkey is that, unlike other approaches, OpenPubkey does not require any changes to existing SSO protocols and supports any OpenID Connect compliant OP.
Shows a user Alice signing in to Google using OpenID Connect/OpenPubkey and then producing a PK Token
While OpenPubkey enables ID Tokens to be used as certificates, OPKSSH extends this functionality so that these ID Tokens can be used as SSH keys in the SSH protocol. This adds SSO authentication to SSH without requiring changes to the SSH protocol.
Why this matters
OPKSSH frees users and administrators from the need to manage long-lived SSH keys, making SSH more secure and more convenient.
“In many organizations – even very security-conscious organizations – there are many times more obsolete authorized keys than they have employees. Worse, authorized keys generally grant command-line shell access, which in itself is often considered privileged. We have found that in many organizations about 10% of the authorized keys grant root or administrator access. SSH keys never expire.”
– Challenges in Managing SSH Keys – and a Call for Solutions by Tatu Ylonen (Inventor of SSH)
In SSH, users generate a long-lived SSH public key and SSH private key. To enable a user to access a server, the user or the administrator of that server configures that server to trust that user’s public key. Users must protect the file containing their SSH private key. If the user loses this file, they are locked out. If they copy their SSH private key to multiple computers or back up the key, they increase the risk that the key will be compromised. When a private key is compromised or a user no longer needs access, the user or administrator must remove that public key from any servers it currently trusts. All of these problems create headaches for users and administrators.
OPKSSH overcomes these issues:
Improved security: OPKSSH replaces long-lived SSH keys with ephemeral SSH keys that are created on-demand by OPKSSH and expire when they are no longer needed. This reduces the risk a private key is compromised, and limits the time period where an attacker can use a compromised private key. By default, these OPKSSH public keys expire every 24 hours, but the expiration policy can be set in a configuration file.
Improved usability: Creating an SSH key is as easy as signing in to an OP. This means that a user can SSH from any computer with opkssh installed, even if they haven’t copied their SSH private key to that computer.
To generate their SSH key, the user simply runs opkssh login, and they can use ssh as they typically do.
Improved visibility: OPKSSH moves SSH from authorization by public key to authorization by identity. If Alice wants to give Bob access to a server, she doesn’t need to ask for his public key, she can just add Bob’s email address [email protected] to the OPKSSH authorized users file, and he can sign in. This makes tracking who has access much easier, since administrators can see the email addresses of the authorized users.
OPKSSH does not require any code changes to the SSH server or client. The only change needed to SSH on the SSH server is to add two lines to the SSH config file. For convenience, we provide an installation script that does this automatically, as seen in the video below.
How it works
Shows a user Alice SSHing into a server with her PK Token inside her SSH public key. The server then verifies her SSH public key using the OpenPubkey verifier.
Let’s look at an example of Alice ([email protected]) using OPKSSH to SSH into a server:
Alice runs opkssh login. This command automatically generates an ephemeral public key and private key for Alice. Then it runs the OpenPubkey protocol by opening a browser window and having Alice log in through their SSO provider, e.g., Google.
If Alice SSOs successfully, OPKSSH will now have a PK Token that commits to Alice’s ephemeral public key and Alice’s identity. Essentially, this PK Token says “[email protected] authenticated her identity and her public key is 0x123…”.
OPKSSH then saves to Alice’s .ssh directory:
an SSH public key file that contains Alice’s PK Token
and an SSH private key set to Alice’s ephemeral private key.
When Alice attempts to SSH into a server, the SSH client will find the SSH public key file containing the PK Token in Alice’s .ssh directory, and it will send it to the SSH server to authenticate.
The SSH server forwards the received SSH public key to the OpenPubkey verifier installed on the SSH server. This is because the SSH server has been configured to use the OpenPubkey verifier via the AuthorizedKeysCommand.
The OpenPubkey verifier receives the SSH public key file and extracts the PK Token from it. It then verifies that the PK Token is unexpired, valid, signed by the OP and that the public key in the PK Token matches the public key field in the SSH public key file. Finally, it extracts the email address from the PK Token and checks if [email protected] is allowed to SSH into this server.
Consider the problems we face in getting OpenPubkey to work with SSH without requiring any changes to the SSH protocol or software:
How do we get the PK Token from the user’s machine to the SSH server inside the SSH protocol?
We use the fact that SSH public keys can be SSH certificates, and that SSH certificates have an extension field that allows arbitrary data to be included in the certificate. Thus, we package the PK Token into an SSH certificate extension so that the PK Token will be transmitted inside the SSH public key as a normal part of the SSH protocol. This enables us to send the PK Token to the SSH server as additional data in the SSH certificate, and allows OPKSSH to work without any changes to the SSH client.
How do we check that the PK Token is valid once it arrives at the SSH server? SSH servers support a configuration parameter called the AuthorizedKeysCommandthat allows us to use a custom program to determine if an SSH public key is authorized or not. Thus, we change the SSH server’s config file to use the OpenPubkey verifier instead of the SSH verifier by making the following two line change to sshd_config:
The OpenPubkey verifier will check that the PK Token is unexpired, valid and signed by the OP. It checks the user’s email address in the PK Token to determine if the user is authorized to access the server.
How do we ensure that the public key in the PK Token is actually the public key that secures the SSH session?
The OpenPubkey verifier also checks that the public key in the public key field in the SSH public key matches the user’s public key inside the PK Token. This works because the public key field in the SSH public key is the actual public key that secures the SSH session.
What is happening
We have open sourced OPKSSH under the Apache 2.0 license, and released it as openpubkey/opkssh on GitHub. While the OpenPubkey project has had code for using SSH with OpenPubkey since the early days of the project, this code was intended as a prototype and was missing many important features. With OPKSSH, SSH support in OpenPubkey is no longer a prototype and is now a complete feature. Cloudflare is not endorsing OPKSSH, but simply donating code to OPKSSH.
OPKSSH provides the following improvements to OpenPubkey:
Production ready SSH in OpenPubkey
Automated installation
Better configuration tools
To learn more
See the OPKSSH readme for documentation on how to install and connect using OPKSSH.
How to get involved
There are a number of ways to get involved in OpenPubkey or OPKSSH. The project is organized through the OPKSSH GitHub. We are building an open and friendly community and welcome pull requests from anyone. If you are interested in contributing, see our contribution guide.
We run a community meeting every month which is open to everyone, and you can also find us over on the OpenSSF Slack in the #openpubkey channel.
Accessing private content online, whether it’s checking email or streaming your favorite show, almost always starts with a “login” step. Beneath this everyday task lies a widespread human mistake we still have not resolved: password reuse. Many users recycle passwords across multiple services, creating a ripple effect of risk when their credentials are leaked.
Based on Cloudflare’s observed traffic between September – November 2024, 41% of successful logins across websites protected by Cloudflare involve compromised passwords. In this post, we’ll explore the widespread impact of password reuse, focusing on how it affects popular Content Management Systems (CMS), the behavior of bots versus humans in login attempts, and how attackers exploit stolen credentials to take over accounts at scale.
Scope of the analysis
Our data analysis focuses on traffic from Internet properties on Cloudflare’s free plan, which includes leaked credentials detection as a built-in feature. Leaked credentials refer to usernames and passwords exposed in known data breaches or credential dumps — for this analysis, our focus is specifically on leaked passwords. With 30 million Internet properties, comprising some 20% of the web, behind Cloudflare, this analysis provides significant insights. The data primarily reflects trends observed after the detection system was launched during Birthday Week in September 2024.
Nearly 41% of logins are at risk
One of the biggest challenges in authentication is distinguishing between legitimate human users and malicious actors. To understand human behavior, we focus on successful login attempts (those returning a 200 OK status code), as this provides the clearest indication of user activity and real account risk. Our data reveals that approximately 41% of successful human authentication attempts involve leaked credentials.
Despite growing awareness about online security, a significant portion of users continue to reuse passwords across multiple accounts. And according to a recent study by Forbes, users will, on average, reuse their password across four different accounts. Even after major breaches, many individuals don’t change their compromised passwords, or still use variations of them across different services. For these users, it’s not a matter of “if” attackers will use their compromised passwords, it’s a matter of “when”.
When we expand to include bot-driven traffic in this analysis, the problem of leaked credentials becomes even more noticeable. Our data reveals that 52% of all detected authentication requests contain leaked passwords found in our database of over 15 billion records, including the Have I Been Pwned (HIBP) leaked password dataset.
This percentage represents hundreds of millions of daily authentication requests, originating from both bots and humans. While not every attempt succeeds, the sheer volume of leaked credentials in real-world traffic illustrates how common password reuse is. Many of these leaked credentials still grant valid access, amplifying the risk of account takeovers.
Attackers heavily use leaked password datasets
Bots are the driving force behind credential-stuffing attacks, the data indicates that95% of login attempts involving leaked passwords are coming from bots,indicating that they are part of credential stuffing attacks.
Equipped with credentials stolen from breaches, bots systematically target websites at scale, testing thousands of login combinations in seconds.
Data from the Cloudflare network exposes this trend, showing that bot-driven attacks remain alarmingly high over time. Popular platforms like WordPress, Joomla, and Drupal are frequent targets, due to their widespread use and exploitable vulnerabilities, as we will explore in the upcoming section.
Once bots successfully breach one account, attackers reuse the same credentials across other services to amplify their reach. They even sometimes try to evade detection by using sophisticated evasion tactics, such as spreading login attempts across different source IP addresses or mimicking human behavior, attempting to blend into legitimate traffic.
The result is a constant, automated threat vector that challenges traditional security measures and exploits the weakest link: password reuse.
Brute force attacks against WordPress
Content Management Systems (CMS) are used to build websites, and often rely on simple authentication and login plugins. This is convenient, but also makes them frequent targets of credential stuffing attacks due to their widespread adoption. WordPress is a very popular content management system with a well known user login page format. Because of this, websites built on WordPress often become common targets for attackers.
Across our network, WordPress accounts for a significant portion of authentication requests. This is unsurprising given its market share. However, what stands out is the alarming number of successful logins using leaked passwords, especially by bots.
76% of leaked password login attempts for websites built on WordPress are successful.
Of these, 48% of successful logins are bot-driven.This is a shocking figure that indicates nearly half of all successful logins are executed by unauthorized systems designed to exploit stolen credentials. Successful unauthorized access is often the first step in account takeover (ATO) attacks.
The remaining 52% of successful logins originate from legitimate, non-bot users. This figure, higher than the average of 41% across all platforms, highlights how pervasive password reuse is among real users, putting their accounts at significant risk.
Only 5% of leaked password login attempts result in access being denied.
This is a low number compared to the successful bot-driven login attempts, and could be tied to a lack of security measures like rate-limiting or multi-factor authentication (MFA). If such measures were in place, we would expect the share of denied attempts to be higher. Notably, 90% of these denied requests are bot-driven, reinforcing the idea that while some security measures are blocking automated logins, many still slip through.
The overwhelming presence of bot traffic in this category points to ongoing automated attempts to brute-force access.
The remaining 19% of login attempts fall under other outcomes, such as timeouts, incomplete logins, or users who changed their passwords, so they neither count as direct “successes” nor do they register as “denials”.
Keeping user accounts safe with Cloudflare
If you’re a user, start with changing reused or weak passwords and use unique, strong ones for each website or application. Enable multi-factor authentication (MFA) on all of your accounts that support it, and start exploring passkeys as a more secure, phishing-resistant alternative to traditional passwords.
For website owners, activate leaked credentials detection to monitor and address these threats in real time and issue password reset flows on leaked credential matches.
Additionally, enable features like Rate Limiting and Bot Management tools to minimize the impact of automated attacks. Audit password reuse patterns, identify leaked credentials within your systems, and enforce robust password hygiene policies to strengthen overall security.
By adopting these measures, both individuals and organizations can stay ahead of attackers and build stronger defenses.
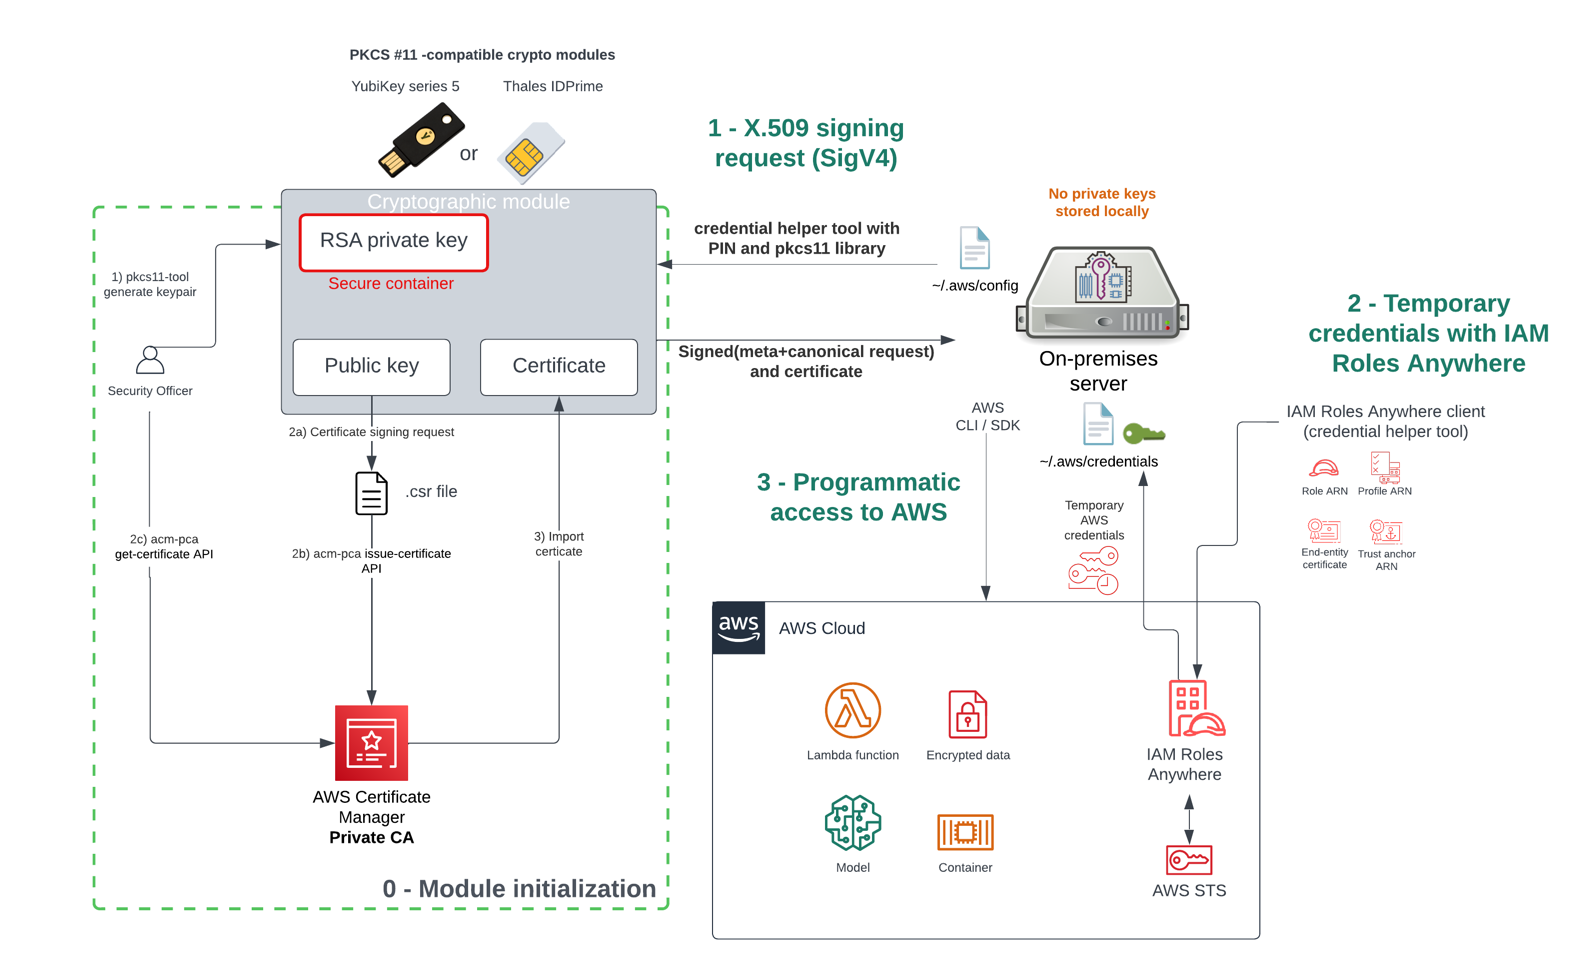
Many customers want to seamlessly integrate their on-premises Kubernetes workloads with AWS services, implement hybrid workloads, or migrate to AWS. Previously, a common approach involved creating long-term access keys, which posed security risks and is no longer recommended. While solutions such as Kubernetes secrets vault and third-party options exist, they fail to address the underlying issue effectively.
One option to connect your on-premises Kubernetes workloads to AWS APIs is to use the service account issuer discovery feature. This allows the Kubernetes API server to act as an OpenID Connect (OIDC) identity provider and be federated with AWS Identity and Access Management (IAM). However, this approach requires public internet access to the Kubernetes API server, which might not be desirable for some customers.
To help eliminate the need for long-term access keys or exposing the Kubernetes API server to the public internet, AWS has introduced AWS IAM Roles Anywhere. This feature enables secure, seamless integration of on-premises Kubernetes workloads with AWS services, promoting robust security practices and minimizing potential risks associated with long-term credentials or public exposure.
IAM Roles Anywhere enables workloads outside of AWS to access AWS resources by exchanging X.509 bound identities for temporary AWS credentials. With IAM Roles Anywhere, you can use the same IAM roles and policies as your AWS workloads to access AWS resources, promoting consistency.
IAM Roles Anywhere can be combined with a standard public key infrastructure solution. In this blog post, we use AWS Private Certificate Authority, which has several advantages over using a self-signed certificate authority (CA). First, it reduces operational and management overhead, because AWS manages the CA for you. Second, the cryptographic key material can be stored in hardware security modules or at least vaulted, which helps you protect your private CA against key compromises. Additionally, certificates can be short-lived, which aligns with dynamic Kubernetes environments where pod lifetimes are typically shorter than traditional servers.
We also demonstrate how to integrate IAM Roles Anywhere without modifying your existing workload Docker files, and how to automate the X.509 certificate lifecycle with cert-manager and an AWS Private CA backend in short-lived certificate mode. By using these capabilities, you can seamlessly integrate your on-premises Kubernetes workloads with AWS services, promoting robust security practices, minimizing risks associated with long-term credentials, and helping to ensure a streamlined, consistent access management experience.
“Why should I prefer X.509 certificates over IAM access keys?” Access keys are long-term credentials that must be rotated regularly to minimize the risk of unauthorized access. They need to be securely deployed onto servers hosting applications that use them, requiring procedures for secure transfer and deletion of transient copies. As the number of applications and access keys grows, tracking and managing them becomes operationally challenging.
In contrast, X.509 certificates use public key infrastructure (PKI). The private key is generated directly on the application server and doesn’t leave it. Only a certificate signing request, which doesn’t contain secrets, is sent to the CA for signing and returning the certificate. This alleviates the need for securely transmitting secret keys.
However, you can argue that X.509 certificates are also long-lived credentials. This concern is valid, but not necessarily true. As demonstrated by projects such as Let’s Encrypt, it’s possible to reduce certificate lifetimes from years to months by implementing automation for certificate renewal. After such a mechanism is in place, certificate lifetimes can be further limited to days or even hours.
In this post, we introduce mutually authenticated Transport Layer Security (mTLS), which uses certificates for high-assurance bidirectional authentication. Certificates are used to establish trust between the client and server, making sure that both parties are authenticated and authorized to communicate securely. By implementing mTLS, you can achieve a higher level of security and trust in your communication channels, mitigating potential risks associated with unauthorized access or man-in-the-middle attacks. Here, we implement ephemeral certificates that are tied to the lifecycle of pods. When a pod is started, a certificate is automatically created, and it expires after a short period of time unless it’s actively in use by the pod, in which case it’s automatically renewed by the cert-manager. This approach verifies that certificates are only valid for the duration of the pod’s lifetime, minimizing the potential risk associated with long-lived credentials. Additionally, IAM Roles Anywhere supports certificate revocation list (CRL) checks, allowing you to perform explicit revocation of certificates if required. This feature provides an additional layer of security, enabling you to revoke access promptly in case of compromised credentials or other security concerns.
Throughout this post, we assume that you have a basic understanding of IAM Roles Anywhere. For more information you can see this blog post. Furthermore, we assume that you are familiar with Kubernetes, kubectl,Helm, and cert-manager.
Solution overview
This solution assumes that you have an existing Kubernetes cluster running outside of AWS.
Figure 1 shows the high-level architecture of our solution. An on-premises Kubernetes cluster accessing AWS APIs using IAM Roles Anywhere with X.509 certificates issued by AWS Private CA in short-lived-certificate mode.
Figure 1: High level architecture of on-premises Kubernetes accessing AWS APIs
Here’s how the solution works, as shown in Figure 1:
When you set up your AWS Private CA as a trusted source and establish a specific profile, IAM Roles Anywhere will validate and accept authentication requests that use certificates issued by your AWS Private CA.
cert-manager, deployed into your Kubernetes cluster, orchestrates the issuance of AWS Private CA certificates to authorized pods.
Each pod uses IAM Roles Anywhere to create an AWS session using its private key and X.509 certificate obtained from cert-manager.
Let’s explore the different parts of the architecture in more detail.
AWS Private CA short lived credentials
AWS Private CA offers a short-lived certificate, where the validity period is limited to 7 days or fewer. You can see this AWS Blog to learn how to use AWS Private CA short-lived certificates. This new mode can be used to issue certificates for your Kubernetes pods and benefit from lower costs of operations. By synchronizing the certificate lifecycle with the lifecycle of the pod, you can minimize the operational overhead for this solution. To help meet requirements for auditability and transparency, you can use the audit report feature to list the issued certificates in a machine readable format.
IAM Roles Anywhere
Figure 2 shows a detailed overview of the components involved in authentication with IAM Roles Anywhere.
Figure 2: Components of IAM Roles Anywhere
IAM Roles Anywhere allows you to obtain temporary security credentials for workloads that run outside of AWS. Your workloads must use a certificate issued by a trusted PKI CA to authenticate with IAM Roles Anywhere. You establish trust between IAM Roles Anywhere and your CA by creating a trust anchor that points to the root of the CA.
cert-manager
Figure 3 shows a detailed overview of the cert-manager setup used in this post, including the aws-privateca-issuer add-on for the integration of AWS Private CA.
Figure 3: Detailed overview of cert-manager setup
cert-manager is a tool for managing X.509 certificates in Kubernetes. As shown in Figure 3, cert-manager will make sure that certificates are valid and up-to-date and attempt to renew them before they expire. By using add-ons, you can configure different backends for issuing X.509 certificates. In this post, we explore how to integrate cert-manager with AWS Private CA using the aws-privateca-issuer add-on. The aws-privateca-issuer add-on defines two custom resources, AWSPCAIssuer and AWSPCAClusterIssuer, which are used to configure the link to AWS Private CA. They are similar to the Issuer and ClusterIssuer resources that come with cert-manager, but specific to aws-privateca-issuer.
After the AWSPCAIssuer or AWSPCAClusterIssuer is available, aws-privateca-issuer authenticates towards AWS APIs using temporary security credentials obtained from IAM Roles Anywhere. cert-manager watches for the certificate resource, which references to an AWSPCAIssuer, which in turn references to AWS Private CA. aws-privatca-issuer requests a certificate from AWS Private CA. The auto-generated private key and the signed certificate are stored in Kubernetes secrets.
Using certificates and secrets
cert-manager supports multiple ways of integrating into your Kubernetes workloads. You can use certificate resources, which represent a human-readable definition of a certificate signing request (CSR) and contain information on certificate lifespan and renewal time. When using a certificate, the auto-generated private key and the signed certificate are stored in Kubernetes secrets.
With this option, an X.509 certificate is issued manually and saved as a secret. After a PKI is configured as an issuer, a certificate resource is created to automate the renewal of the certificate. With the certificate resource, the lifecycle of certificates is decoupled from the lifecycle of the pods that use them. This allows you to bootstrap the X.509 certificate even before the trusted PKI is deployed.
Using the CSI driver
Another way of integrating cert-manager is by using a CSI driver. In this case, the certificate lifecycle is bound to the lifecycle of the pod. An X.509 certificate and private key are mounted into a predefined folder where your workloads can read them. On pod creation, cert-manager automatically creates a private key and requests a certificate for the configured trusted PKI. When the pod is deleted, the private key and certificate are also deleted and become invalid because they aren’t renewed by cert-manager.
In this post, we use the CSI driver approach for workloads to create ephemeral certificates for IAM Roles Anywhere.
Workload configuration
Figure 4 shows a detailed view of how pods can be configured to use IAM Roles Anywhere without needing to change the underlying Docker images by using a sidecar that provides an IMDSv2 endpoint that mimics the behavior in the Amazon Elastic Compute Cloud (Amazon EC2) instance metadata endpoint.
Figure 4: Pod configuration using a sidecar
As shown in Figure 4, when using a certificate resource, the auto-generated private key and the signed certificate are stored in Kubernetes secrets and mounted into the pod. When using the CSI driver, a private key is generated locally (for the pod), a certificate is requested from cert-manager based on the given attributes and is issued by AWSPCAIssuer, and the certificates are mounted directly into the pod with no intermediate secret being created.
IAM Roles Anywhere uses the CreateSession API to authenticate requests with a SigV4a signature using the private key and its associated X.509 certificate. This exchange provides a IAM role session credential, as if you had assumed the IAM role. The aws_signing_helper binary is provided to call the CreateSession API from the command line. In this post, a sidecar container that provides an IMDSv2 endpoint to the workload container is used. This container uses the aws_signing_helper binary and uses its serve command.
This way, applications using AWS SDKs can use the AWS_EC2_METADATA_SERVICE_ENDPOINT environment variable to set the instance metadata endpoint to the correct port on the localhost interface. The X.509 certificate and private key are provided as files to the sidecar container.
Solution deployment
In this section, we show the steps needed to deploy the solution in your AWS account.
Prerequisites
To deploy the solution in this post, make sure that you have the following in place:
An AWS account and IAM permissions for IAM, IAM Roles Anywhere, and AWS Private CA
Latest stable Kubernetes
kubectl (matching your Kubernetes version)
Helm 3
jq
Note: As an alternative to using the AWS CLI, you can use the AWS Controllers for Kubernetes (ACK) service controller for AWS Private CA for creating and managing CertificateAuthority, Certificate, and CertificateAuthorityActivation resources directly within your Kubernetes cluster. After establishing your CA hierarchy using the ACK controller, you can proceed with the subsequent steps involving IAM Roles Anywhere integration, aws-privateca-issuer, and cert-manager as described in this post.
Step 1 – AWS Private CA
Set up a root CA in AWS Private CA, which will issue short lived certificates for your pods. In this example you use only one CA; for production environments, you should check the considerations for designing CA hierarchies. Start by using the AWS CLI to create a configuration.
The command will return a CertificateAuthorityArn, which you will need for further commands, so export it for later use. Replace <region> with your AWS Region.
At this point your root CA is set up and ready to use. The next step is to configure IAM Roles Anywhere.
Start by defining a trust anchor that will refer to your newly created AWS Private CA and export the trustAnchorArn. Replace <value-of-trustAnchorArn> with the Amazon Resource Name (ARN) value of your IAM Roles Anywhere trust anchor.
Create an IAM role to be used by the aws-privateca-issuer cert-manager plugin. This role needs to include the actions sts:AssumeRole, sts:SetSourceIdentity and sts:TagSession, which are required by IAMRA. Replace <TA_ID> with your trust anchor.
Note: You should specify a PrincipalTag with the CN. Furthermore, it should be scoped to the IAMRA service principal. This further restricts authorization based on attributes that are extracted from the X.509 certificate and provides an additional layer of security by helping to ensure that even if an unauthorized party gains access to a valid certificate, they cannot assume the role unless the certificate’s CN matches the specified value.
Attach an inline policy that allows the role request certificates from your PCA and retrieve these. Note that there is a condition limiting the AWS Private CA templates to only allow EndEntityCertificate.
The created role iamra-issuer will only be used by the aws-privateca-issuer to integrate with AWS Private CA. You should repeat the process of creating IAM roles and IAMRA profiles for your workloads. it’s recommended to create a separate IAM role for each workload and limit its use with condition statements in the trust policy, checking for the workload identity and trust anchor (for example, matching the common name). Furthermore, it’s important that you add IAMRA to the trust policy and allow the aforementioned actions. Best practice with IAM roles is to apply least-privilege permissions.
Step 3 – Create the init container
To integrate IAM Roles Anywhere within your Kubernetes environment, you need to provide an IMDSv2 endpoint to your application containers by running the aws_signing_helper binary as a sidecar. You also need to configure your applications using an environment variable to use the new instance metadata endpoint. To do so, build a Docker image that works as a sidecar.
In this step, create a basic image that fulfills the preceding requirements. In your environment, you might want to adapt this example to use your own base image and implement your image hardening processes.
Copy the following script and save it as init.sh.
#!/bin/sh

if [[ -z "$TRUST_ANCHOR_ARN" ]]; then
  echo "Must provide TRUST_ANCHOR_ARN environment variable." 1>&2
  exit 1
fi

if [[ -z "$PROFILE_ARN" ]]; then
  echo "Must provide PROFILE_ARN environment variable." 1>&2
  exit 1
fi

if [[ -z "$ROLE_ARN" ]]; then
  echo "Must provide ROLE_ARN environment variable." 1>&2
  exit 1
fi

echo "starting IMDSv2 endpoint with aws_signing_helper ..."
/aws_signing_helper serve \
  --certificate /iamra/tls.crt         \
  --private-key /iamra/tls.key         \
  --trust-anchor-arn $TRUST_ANCHOR_ARN \
  --profile-arn $PROFILE_ARN           \
  --role-arn $ROLE_ARN
This script is the entry point of the sidecar container. It expects the environment variables TRUST_ANCHOR_ARN, PROFILE_ARN, and ROLE_ARN, which are required by aws_signing_helper. It also expects an X.509 certificate and its private key in the folder /iamra, which will be mounted in a later stage during pod initialization. Finally, it invokes the aws_signing_helper with the serve directive which creates an IMDSv2 endpoint listening on 9911 by default. This can be customized using the --port parameter.
Now let’s inspect the Docker file.
Note: At the time of writing, we used the alpine3.17.0 image. Use a hardened base image that’s designed to be secure and aligns with the requirements of your environment.
FROM alpine:3.17.0

COPY init.sh .
RUN apk add --no-cache libc6-compat libgcc wget
RUN wget https://rolesanywhere.amazonaws.com/releases/1.3.0/X86_64/Linux/aws_signing_helper
RUN chmod +x /aws_signing_helper /init.sh
RUN ln -s /lib/libc.musl-x86_64.so.1 /lib/libresolv.so.2
ENTRYPOINT ["/bin/sh", "-c", "/init.sh"]
This Docker file copies the init.sh and downloads the aws_signing_helper binary. The init.sh script is defined as an entry point to the container. Dynamic libraries required by aws_signing_helper are installed using Alpine Linux package manager (Apk).
Now build the docker image, sign in to it, and push it for later use. For the following commands replace <my-docker-registry> with the hostname of your local registry or use an ECR Repository.
In this step, install cert-manager into your cluster and configure aws-privateca-issuer using a manually bootstrapped certificate. cert-manager-approver-policy is used to control which certificates can be requested by the workloads. Then, set up the cert-manager CSI driver to automatically provision X.509 certificates for your workload pods.
Start with the cert-manager setup:
Add the cert-manager repository to Helm and install the chart.
Note: At the time of writing, we used cert-manager version 1.16.2. Check for the latest stable version.
Now, install the cert-manager aws-privateca-issuer plugin. This integration connects cert-manager with AWS Private CA and lets you issue short-lived certificates automatically. Currently, aws-privateca-issuer Helm chart doesn’t support IAMRA natively. So, you’re going to use the same init-container to set up IAMRA as for the workload pods.
You need to issue the first X.509 certificate for aws-privateca-issuer IAMRA manually. Later, cert-manager will renew it automatically.
Create the bootstrap certificate. When asked for a common name, enter iamra-issuer.
The previous command will create an RSA private key named iamra.key and a certificate signing request name iamra.csr. Now you need to call AWS Private CA to issue the bootstrap certificate.
Set the validity period of the certificate to 1 day so that cert-manager will replace it after it’s set up. The IAM role that’s performing this action must have permissions to AWS Certificate Manager (ACM), IAM, and IAM Roles Anywhere to complete the setup.
You’re ready to install the aws-privateca-issuer. You need to modify the Helm chart because it doesn’t currently support IAMRA. You will render the Helm chart into YAML manifests, which are then adapted for IAMRA.
Install the Helm repository and render the charts into a file.
Add your previously built image as a sidecar and replace the environment variables with your exported values. Search for the deployment definition and add the following section:
Apply your modified manifest to install aws-privateca-issuer and verify the deployment you have modified. It should show that one pod is ready and available.
kubectl apply -f privateca-issuer.yaml

kubectl get deployment -n cert-manager -l app.kubernetes.io/name=aws-privateca-issuer

NAME                         READY   UP-TO-DATE   AVAILABLE   AGE
iamra-aws-privateca-issuer   1/1     1            1           4d10h
Define an AWSPCAIssuer, which will be used for renewal of the manually bootstrapped certificate for the aws-privateca-issuer add-on.
Note: At the time of writing, we used awspca cert-manager API version v1beta1. Check for the latest stable version.
After at least one AWSPCAIssuer or AWSPCAClusterIssuer is available, aws-privateca-issuer is going to authenticate towards AWS APIs by calling sts.get-caller-identity and verify the authentication method. You can verify this using its log files. It should print the assumed role.
Now, you can create a cert-manager Certificate resource that represents a desired certificate that should be issued by the referenced cert-manager Issuer. It combines information of a CSR with details on the validity period and renewal.
In Step 4, sub-step 9, you created an AWSPCAIssuer named iamra-cm-issuer. You then used this AWSPCAIssuer to renew the manually bootstrapped certificate for the aws-privateca-issuer.
In Step 4, sub-step 11, you created the certificate iamra-privateca-issuer-cert, which is used by the aws-privateca-issuer.
In this step, you will deploy the sample workload. When deploying the sample workload, make sure to repeat the process of creating IAM roles and IAMRA profiles (from Step 2), the AWSPCAIssuer (Step 4, sub-step 9), and the CertificateRequestPolicy (Step 4, sub-step 11) for the certificate request.
To test the deployment, you can use kubectl exec to access the iamra-sidecar container. Navigate to the iamra directory and check if the certificate and key are mounted.
Command: kubectl exec -it acmpca-csi-test – sh ls | grep iamra
Output: You should see iam-roles-anywhere-s3-full-access in caller-identity.
Command: $aws s3 ls
Output: You should be able to list the S3 bucket based on the permissions associated with the assumed role.
Summary
In this post, you learned about a solution for securely connecting on-premises Kubernetes workloads to AWS services using IAM Roles Anywhere. The approach alleviates the need for long-term access keys or public internet exposure of the Kubernetes API server. By using this solution for containerized and full stack applications, you can benefit from:
Enhanced security: Use short-lived X.509 certificates instead of long-term credentials.
Simplified management: Automate the certificate lifecycle with cert-manager and AWS Private CA.
Seamless integration: No modifications are required to existing workload Docker files.
Consistent policies: Use the same IAM roles and policies across AWS and on premises.
If you have feedback about this post, submit comments in the Comments section below. If you have questions about this post, contact AWS Support.
The technique is known as device code phishing. It exploits “device code flow,” a form of authentication formalized in the industry-wide OAuth standard. Authentication through device code flow is designed for logging printers, smart TVs, and similar devices into accounts. These devices typically don’t support browsers, making it difficult to sign in using more standard forms of authentication, such as entering user names, passwords, and two-factor mechanisms.
Rather than authenticating the user directly, the input-constrained device displays an alphabetic or alphanumeric device code along with a link associated with the user account. The user opens the link on a computer or other device that’s easier to sign in with and enters the code. The remote server then sends a token to the input-constrained device that logs it into the account.
Device authorization relies on two paths: one from an app or code running on the input-constrained device seeking permission to log in and the other from the browser of the device the user normally uses for signing in.
Here’s an easy system for two humans to remotely authenticate to each other, so they can be sure that neither are digital impersonations.
To mitigate that risk, I have developed this simple solution where you can setup a unique time-based one-time passcode (TOTP) between any pair of persons.
This is how it works:
Two people, Person A and Person B, sit in front of the same computer and open this page;
They input their respective names (e.g. Alice and Bob) onto the same page, and click “Generate”;
The page will generate two TOTP QR codes, one for Alice and one for Bob;
Alice and Bob scan the respective QR code into a TOTP mobile app (such as Authy or Google Authenticator) on their respective mobile phones;
In the future, when Alice speaks with Bob over the phone or over video call, and wants to verify the identity of Bob, Alice asks Bob to provide the 6-digit TOTP code from the mobile app. If the code matches what Alice has on her own phone, then Alice has more confidence that she is speaking with the real Bob.
Customers are finding several advantages to using generative AI within their applications. However, using generative AI adds new considerations when reviewing the threat model of an application, whether you’re using it to improve the customer experience for operational efficiency, to generate more tailored or specific results, or for other reasons.
Generative AI models are inherently non-deterministic, meaning that even when given the same input, the output they generate can vary because of the probabilistic nature of the models. When using managed services such as Amazon Bedrock in your workloads, there are additional security considerations to help ensure protection of data that’s accessed by Amazon Bedrock.
In this blog post, we discuss the current challenges that you may face regarding data controls when using generative AI services and how to overcome them using native solutions within Amazon Bedrock and layered authorization.
Definitions
Before we get started, let’s review some definitions.
Amazon Bedrock Agents: You can use Amazon Bedrock Agents to autonomously complete multistep tasks across company systems and data sources. Agents can be used to enrich entry data to provide more accurate results or to automate repetitive tasks. Generative AI agents can make decisions based on input and the environmental data they have access to.
Layered authorization: Layered authorization is the practice of implementing multiple authorization checks between the application components beyond the initial point of ingress. This includes service-to-service authorization, carrying the true end-user identity through application components, and adding end-user authorization for each operation in addition to the service authorization.
Trusted identity propagation: Trusted identity propagation provides more simply defined, granted, and logged user access to AWS resources. Trusted identity propagation is built on the OAuth 2.0 authorization framework, which allows applications to access and share user data securely without the need to share passwords.
Amazon Verified Permissions: Amazon Verified Permissions is a fully managed authorization service that uses the provably correct Cedar policy language, so you can build more secure applications.
Challenge
As you build on AWS, there are several services and features that you can use to help ensure your data or your customers’ data is secure. This might include encryption at-rest with Amazon Simple Storage Service (Amazon S3) default encryption or AWS Key Management Service (AWS KMS) keys, or the use of prefixes in Amazon S3 or partition keys in Amazon DynamoDB to separate tenants’ data. These mechanisms are great for dealing with data at-rest and separation of data partitions, but after a generative AI powered application enables customers to access a variety of data (different sensitivity types of data, multiple tenants’ data, and so on) based on user input, the risk of disclosure of sensitive data increases (see the data privacy FAQ for more information about data privacy at AWS). This is because access to data is now being passed to an untrusted identity (the model) within the workload operating on behalf of the calling principal.
Many customers are using Amazon Bedrock Agents in their architecture to augment user input with additional information to improve responses. Agents might also be used to automate repetitive tasks and streamline workflows. For example, chatbots can be useful tools for improving user experiences, such as summarizing patient test results for healthcare providers. However, it’s important to understand the potential security risks and mitigation strategies when implementing chatbot solutions.
A common architecture involves invoking a chatbot agent through an Amazon API Gateway. The API gateway validates the API call using an Amazon Cognito or AWS Lambda authorizer and then passes the request to the chatbot agent to perform its function.
A potential risk arises when users can provide input prompts to the chatbot agent. This input could lead to prompt injection (OWASP LLM:01) or sensitive data disclosure (OWASP LLM:06) vulnerabilities. The root cause is that the chatbot agent often requires broad access permissions through an AWS Identity and Access Management (IAM) service role with access to various data stores (such as S3 buckets or databases), to fulfill its function. Without proper security controls, a threat actor from one tenant could potentially access or manipulate data belonging to another tenant.
Solution
While there is no single solution that can mitigate all risks, having a proper threat model of your consumer application to identify risks (such unauthorized access to data) is critical. AWS offers several generative AI security strategies to assist you in generating appropriate threat models. In this post, we focus on layered authorization throughout the application, focusing on a solution to support a consumer application.
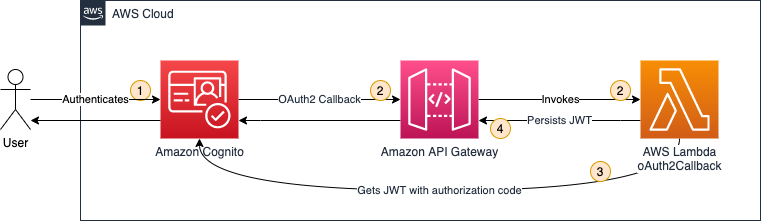
By using a strong authentication process such as an OpenID Connect (OIDC) identity provider (IdP) for your consumers enhanced with multi-factor authentication (MFA), you can govern access to invoke the agents at the API gateway. We recommend that you also pass custom parameters to the agent—as shown in Figure 1, using the JWT token from the header of the request. With such a configuration, the agent will evaluate an isAuthorized request with Amazon Verified Permissions to confirm that the calling user has access to the data requested prior to the agent running its described function. This architecture is shown in Figure 1:
Figure 1: Authorization architecture
The steps of the architecture are as follows:
The client connects to the application frontend.
The client is redirected to the Amazon Cognito user pool UI for authentication.
The client receives a JWT token from Amazon Cognito.
The application frontend uses the JWT token presented by the client to authorize a request to the Amazon Bedrock agent. The application frontend adds the JWT token to the InvokeAgent API call.
The agent reviews the request, calls the knowledge base if required, and calls the Lambda function. The agent includes the JWT token provided by the application frontend into the Lambda invocation context.
The Lambda function uses the JWT token details to authorize subsequent calls to DynamoDB tables using Verified Permissions (6a), and calls the DynamoDB table only if the call is authorized (6b).
Deep dive
When you design an application behind an API gateway that triggers Amazon Bedrock agents, you must create an IAM service role for your agent with a trust policy that grants AssumeRole access to Amazon Bedrock. This role should allow Amazon Bedrock to get the OpenAPI schema for your agent Action Group Lambda function from the S3 bucket and allow for the bedrock:InvokeModel action to the specified model. If you did not select the default KMS key to encrypt your agent session data, you must grant access in the IAM service role to access the customer managed KMS key. Example policies and trust relationship are shown in the following examples.
The following policy grants permission to invoke an Amazon Bedrock model. This will be granted to the agent. In the resource, we are specifically targeting an approved foundational model (FM).
Next, we add a policy statement that allows the Amazon Bedrock agent access to S3:GetObject and targets a specific S3 bucket with a condition that the account number matches one within our organization.
Finally, we add a trust policy that grants Amazon Bedrock permissions to assume the defined role. We have also added conditional statements to make sure that the service is calling on behalf of our account to help prevent the confused deputy problem.
Amazon Bedrock agents use a service role and don’t propagate the consumer’s identity natively. This is where the underlying problem of protecting tenants’ data might exist. If the agent is accessing unclassified data, then there’s no need to add layered authorization because there’s no additional segregation of access needed based on the authorization caller. But if the application has access to sensitive data, you must carry authorization into processing the agent’s function.
You can do this by adding an additional layer to the Lambda function triggered by invoking the agent. First, initialize the agent to make an isAuthorized call to Verified Permissions. Only upon an Allow response will the agent perform the rest of its function. If the response from Verified Permissions is Deny, then the agent should return a status 403 or a friendly error message to the user.
Verified Permissions must have pre-built policies to dictate how authorization should occur when data is being accessed. For example, you might have a policy like the following to grant access to patient records if the calling principal is a doctor.
permit(
  principal in Group::"doctor",
  action == Action::"view",
  resource
 )
 when {
 resource.fileType == Sensitive &&
 resource.patient == doctor.patient
};
In this example, the authorization logic to handle this decision is within the agent Lambda. To do so, the Lambda function first builds the entities structure by decoding the JWT passed as a custom parameter to the Amazon Bedrock agent to assess the calling principal’s access. The requested data should also be included in the isAuthorized call. After this data is passed to Verified Permissions, it will assess the access decision based on the context provided and the policies within the policy store. As a policy decision point (PDP), it’s important to note that the allow or deny decision must be enforced at the application level. Based on this decision, access to the data will be allowed or denied. The resources being accessed should be categorized to help the application evaluate access control. For example, if the data is stored in DynamoDB, then patients might be separated by partition keys that are defined in the Verified Permissions schema and referenced in a hierarchal sense.
Conclusion
In this post, you learned how you can improve data protection by using AWS native services to enforce layered authorization throughout a consumer application that uses Amazon Bedrock Agents. This post has shown you the steps to improve enforcement of access controls through identity processes. This can help you build applications using Amazon Bedrock Agents and maintain strong isolation of data to mitigate unintended sensitive data disclosure.
We recommend the Secure Generative AI Solutions using OWASP Framework workshop to learn more about using Verified Permissions and Amazon Bedrock Agents to enforce layered authorization throughout an application.
If you have feedback about this post, submit comments in the Comments section below. If you have questions about this post, contact AWS Support.
New attack against the RADIUS authentication protocol:
The Blast-RADIUS attack allows a man-in-the-middle attacker between the RADIUS client and server to forge a valid protocol accept message in response to a failed authentication request. This forgery could give the attacker access to network devices and services without the attacker guessing or brute forcing passwords or shared secrets. The attacker does not learn user credentials.
This is one of those vulnerabilities that comes with a cool name, its own website, and a logo.
When an identity provider (IdP) serves multiple service providers (SPs), IdP-initiated single sign-on provides a consistent sign-in experience that allows users to start the authentication process from one centralized portal or dashboard. It helps administrators have more control over the authentication process and simplifies the management.
However, when you support IdP-initiated authentication, the SP (Amazon Cognito in this case) can’t verify that it has solicited the SAML response that it receives from IdP because there is no SAML request initiated from the SP. To accept unsolicited SAML assertions in your user pool, you must consider its effect on your app security. Although your user pool can’t verify an IdP-initiated sign-in session, Amazon Cognito validates your request parameters and SAML assertions.
Amazon Cognito has recently enhanced support for the SAML 2.0 protocol by adding support to IdP-initiated single sign-on (SSO), SAML request signing and accepting encrypted SAML responses.
Amazon Cognito acts as the SP representing your application and generates a token after federation that can be used by the application to access protected backends. The SAML provider acts as an IdP, where the user identities and credentials are stored, and is responsible for authenticating the user.
This post describes the steps to integrate a SAML IdP, Microsoft Entra ID, with an Amazon Cognito user pool and use SAML IdP-initiated SSO flow. It also describes steps to enable signing authentication requests and accepting encrypted SAML responses.
IdP-initiated authentication flow using SAML federation
Figure 1: High-level diagram for SAML IdP-initiated authentication flow in a web or mobile app
As shown in Figure 1, the high-level flow diagram of an application with federated authentication typically involves the following steps:
An enterprise user opens their SSO portal and signs in. This usually opens a portal with several applications that the user has access to. When the user selects an Amazon Cognito protected application from their SSO portal, an IdP-initiated SSO flow is initiated.
When the user launches an application from the SSO portal, Entra ID sends a SAML assertion to the Cognito endpoint to federate the user.
Amazon Cognito validates the SAML assertion and creates the user in Cognito if this is first-time federation for the user or updates the user’s record if user has signed in before from this IdP. Cognito then generates an authorization code and redirects the user to the application URL with this authorization code. The application exchanges the authorization code for tokens from the Cognito token endpoint.
After the application has tokens, it uses them to authorize access within the application stack as needed.
The SAML response contains claims or assertions that contain user-specific data. The SAML response is transferred over HTTPS to protect confidentiality of the data, but you can also enable encryption to further protect the confidentiality of transferred user information. This enables trusted parties who have the decryption key to decrypt the data. It protects the confidentiality of the data after it’s received by the SP.
Setting up SAML federation between Amazon Cognito and Entra ID
To set up SAML federation and use IdP-initiated SSO, you will complete the following steps:
Create an Amazon Cognito user pool.
Create an app client in the Cognito user pool.
Add Cognito as an enterprise application in Entra ID.
Add Entra ID as the SAML IdP and enable IdP-initiated SSO in Cognito.
Add the newly created SAML IdP to your user pool app client.
Enable encrypting the SAML response.
Add RelayState in Entra ID SAML SSO.
Prerequisites
To implement the solution, you must have the necessary permissions to perform these tasks in Azure portal and in your AWS account.
Step 1: Create an Amazon Cognito user pool
Create a new user pool in Amazon Cognito with the default settings. Make a note of the user pool ID, for example, us-east-1_abcd1234. You will need this value for the next steps.
Add a domain name to user pool
The Cognito user pool’s hosted UI can be used as the OAuth 2.0 authorization server with a customizable web interface for sign-up and sign-in. Cognito OAuth 2.0 endpoints are accessible from a domain name that must be added to the user pool. There are two options for adding a domain name to a user pool. You can either use a Cognito domain or a domain name that you own. This solution uses a Cognito domain, which will look like the following:
In the AWS Management Console for Amazon Cognito, navigate to the App integration tab for your user pool.
On the right side of the pane, choose Actions and select Create Cognito domain.
Figure 2: Create a Cognito domain
Enter an available domain prefix (for example example-corp-prd) to use with the Cognito domain.
Figure 3: Add a domain prefix
Choose Create Cognito domain.
Step 2: Create an app client in the Cognito user pool
Before you can use Amazon Cognito in your web application, you must register your app with Amazon Cognito as an app client. The IdP-initiated SAML flow can’t be enabled on one app client with the other SP-initiated authentication SAML IdPs or social IdPs. IdP-initiated SAML introduces additional risks that other SSO providers aren’t subject to. For example, it’s not possible to add a state parameter, which is usually used for cross-site request forgery (CSRF) mitigation. Because of this, you can’t add IdPs that aren’t SAML, including the user pool itself, to an app client that uses a SAML provider with IdP-initiated SSO.
To create an app client:
In the Amazon Cognito console, navigate to the App integration tab for the same user pool and locate App clients. Choose Create an app client.
Select an Application type. For this example, create a public client.
Enter an App client name.
Choose Don’t generate client secret.
Keep the rest of the settings as default.
Under Hosted UI settings, add Allowed callback URLs for your app client. This is where you will be directed after authentication.
Choose Authorization code grant for OAuth 2.0 grant types.
You can keep the remaining configuration as default and choose Create app client.
After the app client is successfully created, capture the app client ID from the App integration tab of the user pool.
Prepare information for the Entra ID setup
Prepare the Identifier (Entity ID) and Reply URL, which are required to add Amazon Cognito as an enterprise application in Entra ID (Step 3).
Create values for Identifier (Entity ID) and Reply URL according to the following formats:
For Identifier (Entity ID), the format is: urn:amazon:cognito:sp:<yourUserPoolID>
For example: urn:amazon:cognito:sp:us-east-1_abcd1234
For Reply URL, the format is: https://<yourDomainPrefix>.auth.<aws-region>.amazoncognito.com/saml2/idpresponse
For example: https://example-corp-prd.auth.us-east-1.amazoncognito.com/saml2/idpresponse
The reply URL is the endpoint where Entra ID will send the SAML assertion to Amazon Cognito during user authentication.
Step 3: Add Amazon Cognito as an enterprise application in Entra ID
With the user pool and app client created and the information for Entra ID prepared, you can add Amazon Cognito as an application in Entra ID. To complete this step, you will add Cognito as an enterprise application and set up SSO.
To add Cognito as an enterprise application
Sign in to the Azure portal.
In the search box, search for the service Microsoft Entra ID.
In the left sidebar, select Enterprise applications.
Choose New application.
On the Browse Microsoft Entra Gallery page, choose Create your own application.
Figure 4: Create an application in Entra ID
Under What’s the name of your app?, enter a name for your application and select Integrate any other application you don’t find in the gallery (Non-gallery), as shown in Figure 4. Choose Create.
It will take few seconds for the application to be created in Entra ID, and then you should be redirected to the Overview page for the newly added application.
To set up SSO using SAML:
On the Getting started page, in the Set up single sign on tile, choose Get started, as shown in Figure 5.
Figure 5: Choose Set up single sign-on in Getting Started
On the next screen, select SAML.
In the middle pane under Set up Single Sign-On with SAML, in the Basic SAML Configuration section, choose the edit icon.
In the right pane under Basic SAML Configuration, replace the default Identifier ID (Entity ID) with the identifier (entity ID) you created in Step 2. Replace Reply URL (Assertion Consumer Service URL) with the reply URL you created in Step 2.
Figure 6: Add the identifier (entity ID) and reply URL
Now go to Attributes & Claims and note the claims, as shown in Figure 7. You’ll need these when creating attribute mapping in Amazon Cognito.
Figure 7: Entra ID Attributes & Claims
Scroll down to the SAML Certificates section and copy the App Federation Metadata Url by choosing the copy into clipboard icon. Make a note of this URL to use in the next step.
Figure 8: Copy SAML metadata URL from Entra ID
Step 4: Add Entra ID as SAML IdP in Amazon Cognito
In this step, you’ll add Entra ID as a SAML IdP to your user pool and download the signing and encryption certificates.
To add the SAML IdP:
In the Amazon Cognito console, navigate to the Sign-in experience tab of the same user pool. Locate Federated identity provider sign-in and choose Add an Identity provider.
Choose a SAML IdP.
Enter a Provider name, for example, EntraID.
Under IdP-initiated SAML sign-in, choose Accept SP-initiated and IdP-initiated SAML assertions.
Under Metadata document source, enter the metadata document endpoint URL you captured in Step 3.
(Optional) Under SAML signing and encryption, select Require encrypted SAML assertion from this provider.
Enable Required encrypted SAML assertion from this provider only if you can turn on token encryption in the Entra ID application. See Step 6.
Under Map attributes between your SAML provider and your user pool to map SAML provider attributes to the user profile in your user pool. Include your user pool required attributes in your attribute map.
After the IdP has been created, you can navigate to the recently added EntraID IdP in the user pool for downloading the SAML signing and encryption certificate. These certificates must be imported into the Entra ID enterprise application.
To download the certificates
To download the SAML signing certificate, Choose View signing certificate and Download as .crt
To download the SAML encryption certificate, Choose View encryption certificate and Download as .crt.
Step 5: Add the newly created SAML IdP to your user pool app client
Before you can use Amazon Cognito in your web application, you must add the SAML IdP created in Step 4 to your app client.
To add the SAML IdP:
In the Amazon Cognito console, navigate to the App integration tab for the same user pool and locate App clients.
Choose the app client you created in Step 2.
Locate the Hosted UI section and choose Edit.
Under Identity providers, select the identity provider you created in Step 4 and choose Save changes.
Figure 10: Enabling the Entra ID SAML identity provider in the Cognito app client
At this stage, the Amazon Cognito OAuth 2.0 server is up and running and the web interface is accessible and ready to use. You can access the Cognito hosted UI from your app client using the Cognito console to test it further.
Step 6: Enable encrypting the SAML response in EntraID
For additional security and privacy of user data, enable encrypting the SAML response. Amazon Cognito and your IdP can establish confidentiality in SAML responses when users sign in and sign out. Cognito assigns a public-private RSA key pair and a certificate to each external SAML provider that you configure in your user pool. You will use the SAML encryption certificate downloaded in step 4.
To enable encrypting the SAML response:
Navigate to your Enterprise application in Entra ID and in the left menu, under Security, select Token encryption.
Import the SAML encryption certificate you have already downloaded in step 4.
Figure 11: Import the Cognito encryption certificate to Entra ID
After the certificate is imported, it’s inactive by default. To activate it, right-click on the certificate and select Activate token encryption certificate. This enables the encrypted SAML response.
Figure 12: Activate the token encryption certificate in Entra ID
Step 7: Add RelayState in Entra ID SAML SSO
A RelayState parameter is required when using SAML IdP-initiated authentication flow. Set this up in Entra ID for the Amazon Cognito user pool and the enabled app client ID.
To add RelayState in Entra ID SAML SSO:
Sign in to the Azure portal and open the enterprise application created in Step 3.
In the left sidebar, choose Single sign-on.
In the middle pane under Set up Single Sign-On with SAML, in the Basic SAML Configuration section, choose the edit icon.
In the right pane under Basic SAML Configuration, apply the value as the format below to the Relay State (Optional) field.
Replace <IDProviderName> with the name you previously used for ID provider.
Replace <ClientId> with the app client’s ClientID created in Step 2.
Replace <ecallbackURL> with the URL of your web application that will receive the authorization code. It must be an HTTPS endpoint, except for in a local development environment where you can use http://localhost:PORT_NUMBER.
After you are signed in, choose the application icon registered as the IdP-initiated SSO.
Figure 14: Testing IdP-initiated SSO from an Office 365 application
The application will start the IdP-initiated authentication flow and the user will be redirected to the application as a signed-in user.
Signing an authentication request in case of SP-initiated flow
The preceding authentication flow that you tested uses IdP-initiated SSO. If you’re using an SP-initiated flow, you can enable signing of the SAML request that is sent from the SP (Amazon Cognito) to the IdP (Entra ID) for additional security and integrity of communication between them.
You can enable the authentication request signing in Cognito while creating the IdP or by updating your existing IdP.
To enable signing of the SAML request:
In the Amazon Cognito console, when you create or edit your SAML identity provider, under SAML signing and encryption, select the box Sign SAML requests to this provider and choose Save changes.
Figure 15: Enabling signing SAML request
Sign in to the Azure portal and access your Entra ID enterprise application. Go to Set up single sign on and edit Verification certificates (optional).
Select the checkbox Require verification certificates and upload the Cognito user pool SAML signing certificate already downloaded in Step 4 with a .cer file extension. You must convert the .crt file to a .cer file because Entra ID requires a verification certificate in a .cer extension.
To convert the .crt certificate extension to .cer:
Right-click the .crt file and choose Open.
Navigate to the Details tab.
Select Copy to File… and choose Next.
Select Base-64 encoded X.509 (.CER) and choose Next.
Give your export file a name (for example, Entra ID.cer) and choose Save.
Choose Next.
Confirm the details and choose Finish.
Test the SP-initiated flow
Next, do a quick test to check if everything is configured properly.
In the Amazon Cognito console, navigate to the App integration tab for the same user pool and locate App clients.
Choose the app client you created in Step 2.
Locate the Hosted UI section and choose View Hosted UI.
From the hosted UI, authenticate yourself using Entra ID as the identity provider.
After authentication is completed successfully, you will be redirected to the callback URL you configured in your app client with the authorization code.
If you capture the SAML request, you will see that Amazon Cognito is sending a cryptographic signature with the signing certificate in the SAML request to the IdP, and the IdP will match the cryptographic signature with the uploaded certificate to ensure the integrity of the request.
Conclusion
In this post, you learned the benefits of using IdP-initiated single sign-on. It helps centralize administration and lowers dependency on service provider applications. Also, you learned how to integrate an Amazon Cognito user pool with Microsoft Entra ID as an external SAML IdP using IdP-initiated SSO so your users can use their corporate ID to sign in to web or mobile applications. Also, you learned about how to enable signed authentication requests when using an SP-initiated flow and encrypting SAML responses for additional security between Cognito and the SAML IdP.
If you have feedback about this post, submit comments in the Comments section below. If you have questions about this post, contact AWS Support.
Want more AWS Security news? Follow us on Twitter.
While traditional channels like email and SMS remain important, businesses are increasingly exploring alternative messaging services to reach their customers more effectively. In recent years, WhatsApp has emerged as a simple and effective way to engage with users. According to statista, as of 2024, WhatsApp is the most popular mobile messenger app worldwide and has reached over two billion monthly active users in January 2024.
Amazon Cognito lets you add user sign-up and authentication to your mobile and web applications. Among many other features, Cognito provides a custom SMS sender AWS Lambda trigger for using third-party providers to send notifications. In this post, we’ll be using WhatsApp as the third-party provider to send verification codes or multi-factor authentication (MFA) codes instead of SMS during Cognito user pool sign up.
Note: WhatsApp is a third-party service subject to additional terms and charges. Amazon Web Services (AWS) isn’t responsible for third-party services that you use to send messages with a custom SMS sender in Amazon Cognito.
Overview
By default, Amazon Cognito uses Amazon Simple Notification Service (Amazon SNS) for delivery of SMS text messages. Cognito also supports custom triggers that will allow you to invoke an AWS Lambda function to support additional providers such as WhatsApp.
The architecture shown in Figure 1 depicts how to use a custom SMS sender trigger and WhatsApp to send notifications. The steps are as follows:
A user signs up to an Amazon Cognito user pool.
Cognito invokes the custom SMS sender Lambda function and sends the user’s attributes, including the phone number and a one-time code to the Lambda function. This one-time code is encrypted using a custom symmetric encryption AWS Key Management Service (AWS KMS) key that you create.
The Lambda function decrypts the one-time code using a Decrypt API call to your AWS KMS key.
The Lambda function then obtains the WhatsApp access token from AWS Secrets Manager. The WhatsApp access token needs to be generated through Meta Business Settings (which are covered in the next section) and added to Secrets Manager. Lambda also parses the phone number, user attributes, and encrypted secrets.
Lambda sends a POST API call to the WhatsApp API and WhatsApp delivers the verification code to the user as a message. The user can then use the verification code to verify their contact information and confirm the sign-up.
Figure 1: Custom SMS sender trigger flow
Prerequisites
Create an AWS account if you don’t already have one and sign in. The AWS Identity and Access Management (IAM) role that you use must have sufficient permissions to make the necessary AWS service calls and manage AWS resources such as creating and updating Lambda functions, Amazon Cognito user pools, Secrets Manager, AWS KMS keys, and IAM roles.
In the next steps, we look at how to create a Meta app, create a new system user, get the WhatsApp access token and create the template to send the WhatsApp token.
Create and configure an app for WhatsApp communication
To get started, create a Meta app with WhatsApp added to it, along with the customer phone number that will be used to test.
To create and configure an app
Open the Meta for Developers console, choose My Apps and then choose Create App (or choose an existing Business type app and skip to step 4).
Select Other choose Next and then select Business as the app type and choose Next.
Enter an App name, App contact email, choose whether or not to attach a Business portfolio and choose Create app.
Open the app Dashboard and in the Add product to your app section, under WhatsApp, choose Set up.
Create or select an existing Meta business portfolio and choose Continue.
In the left navigation pane, under WhatsApp,choose API Setup.
Under Send and receive messages, take a note of the Phone number ID, which will be needed in the AWS CDK template later.
Under To, add the customer phone number you want to use for testing. Follow the instructions to add and verify the phone number.
Note: You must have WhatsApp registered with the number and the WhatsApp client installed on your mobile device.
Create a user for accessing WhatsApp
Create a system user in Meta’s Business Manager and assign it to the app created in the previous step. The access tokens generated for this user will be used to make the WhatsApp API calls.
To create a user
Open Meta’s Business Manager and select the business you created or associated your application with earlier from the dropdown menu under Business settings.
Under Users, select System users and then choose Add to create a new system user.
Enter a name for the System Username and set their role as Admin and choose Create system user.
Choose Assign assets.
From the Select asset type list, select Apps. Under Select assets, select your WhatsApp application’s name. Under Partial access, turn on the Test app option for the user. Choose Save Changes and then choose Done.
Choose Generate New Token, select the WhatsApp application created earlier, and leave the default 60 days as the token expiration. Under Permissions select WhatsApp_business_messaging and WhatsApp_business_management and choose Generate Token at the bottom.
Use the Secrets Manager console to create a Secrets Manager secret and set the secret to the WhatsApp access token.
To create a secret
Open the AWS Management Console and go to Secrets Manager.
Figure 2: Open the Secrets Manager console
Choose Store a new secret.
Figure 3: Store a new secret
Under Choose a secret type, choose Other type of secret and under Key/value pairs, select the Plaintext tab and enter Bearer followed by the WhatsApp access token (Bearer<WhatsApp access token>).
Figure 4: Add the secret
For the encryption key, you can use either the AWS KMS key that Secrets Manager creates or a customer managed AWS KMS key that you create and then choose Next.
Provide the secret name as the WhatsAppAccessToken, choose Next, and then choose Store to create the secret.
Note the secret Amazon Resource Name (ARN) to use in later steps.
Deploy the solution
In this section, you clone the GitHub repository and deploy the stack to create the resources in your account.
To clone the repository
Create a new directory, navigate to that directory in a terminal and use the following command to clone the GitHub repository that has the Lambda and AWS CDK code:
Open the lib/constants.ts file and edit the fields. The SELF_SIGNUP value must be set to true for the purpose of this proof of concept. The SELF_SIGNUP value represents the Boolean value for the Amazon Cognito user pool sign-up option, which when set to true allows public users to sign up.
Warning: If you activate user sign-up (enable self-registration) in your user pool, anyone on the internet can sign up for an account and sign in to your applications.
Install the AWS CDK required dependencies by running the following command:
npm install
This project uses typescript as the client language for AWS CDK. Run the following command to compile typescript to JavaScript:
npm run build
From the command line, configure AWS CDK (if you have not already done so):
cdk bootstrap <account number>/<AWS Region>
Install and run Docker. We’re using the aws-lambda-python-alpha package in the AWS CDK code to build the Lambda deployment package. The deployment package installs the required modules in a Lambda compatible Docker container.
Deploy the stack:
cdk synth
cdk deploy --all
Test the solution
Now that you’ve completed implementation, it’s time to test the solution by signing up a user on Amazon Cognito and confirming that the Lambda function is invoked and sends the verification code.
Select the WhatsappOtpStack that was deployed through AWS CDK.
On the Outputs tab, copy the value of cognitocustomotpsenderclientappid.
Run the following AWS Command Line Interface (AWS CLI) command, replacing the client ID with the output of cognitocustomotpsenderclientappid, username, password, email address, name, phone number, and AWS Region to sign up a new Amazon Cognito user.
Note: Password requirements are a minimum length of eight characters with at least one number, one lowercase letter, and one special character.
The new user should receive a message on WhatsApp with a verification code that they can use to complete their sign-up.
Cleanup
Run the following command to delete the resources that were created. It might take a few minutes for the CloudFormation stack to be deleted.
cdk destroy --all
Delete the secret WhatsAppAccessToken that was created from the Secrets Manager console.
Conclusion
In this post, we showed you how to use an alternative messaging platform such as WhatsApp to send notification messages from Amazon Cognito. This functionality is enabled through the Amazon Cognito custom SMS sender trigger, which invokes a Lambda function that has the custom code to send messages through the WhatsApp API. You can use the same method to use other third-party providers to send messages.
If you have feedback about this post, submit comments in the Comments section below. If you have questions about this post, start a new thread on the Amazon Cognito re:Post or contact AWS Support.
BLUFFS is a series of exploits targeting Bluetooth, aiming to break Bluetooth sessions’ forward and future secrecy, compromising the confidentiality of past and future communications between devices.
This is achieved by exploiting four flaws in the session key derivation process, two of which are new, to force the derivation of a short, thus weak and predictable session key (SKC).
Next, the attacker brute-forces the key, enabling them to decrypt past communication and decrypt or manipulate future communications.
The vulnerability has been around for at least a decade.
Security researchers Jesse D’Aguanno and Timo Teräs write that, with varying degrees of reverse-engineering and using some external hardware, they were able to fool the Goodix fingerprint sensor in a Dell Inspiron 15, the Synaptic sensor in a Lenovo ThinkPad T14, and the ELAN sensor in one of Microsoft’s own Surface Pro Type Covers. These are just three laptop models from the wide universe of PCs, but one of these three companies usually does make the fingerprint sensor in every laptop we’ve reviewed in the last few years. It’s likely that most Windows PCs with fingerprint readers will be vulnerable to similar exploits.
Signal has had the ability to manually authenticate another account for years. iMessage is getting it:
The feature is called Contact Key Verification, and it does just what its name says: it lets you add a manual verification step in an iMessage conversation to confirm that the other person is who their device says they are. (SMS conversations lack any reliable method for verification—sorry, green-bubble friends.) Instead of relying on Apple to verify the other person’s identity using information stored securely on Apple’s servers, you and the other party read a short verification code to each other, either in person or on a phone call. Once you’ve validated the conversation, your devices maintain a chain of trust in which neither you nor the other person has given any private encryption information to each other or Apple. If anything changes in the encryption keys each of you verified, the Messages app will notice and provide an alert or warning.
Amazon SES: Email Authentication and Getting Value out of Your DMARC Policy
Introduction
For enterprises of all sizes, email is a critical piece of infrastructure that supports large volumes of communication. To enhance the security and trustworthiness of email communication, many organizations turn to email sending providers (ESPs) like Amazon Simple Email Service (Amazon SES). These ESPs allow users to send authenticated emails from their domains, employing industry-standard protocols such as the Sender Policy Framework (SPF) and DomainKeys Identified Mail (DKIM). Messages authenticated with SPF or DKIM will successfully pass your domain’s Domain-based Message Authentication, Reporting, and Conformance (DMARC) policy. This blog post will focus on the DMARC policy enforcement mechanism. The blog will explore some of the reasons why email may fail DMARC policy evaluation and propose solutions to fix any failures that you identify. For an introduction to DMARC and how to carefully choose your email sending domain identity, you can refer to Choosing the Right Domain for Optimal Deliverability with Amazon SES The relationship between DMARC compliance and email deliverability rates is crucial for organizations aiming to maintain a positive sender reputation and ensure successful email delivery. There are many advantages when organizations have this correctly setup, these include:
Improved Email Deliverability
Reduction in Email Spoofing and Phishing
Positive Sender Reputation
Reduced Risk of Email Marked as Spam
Better Email Engagement Metrics
Enhanced Brand Reputation
With this foundation, let’s explore the intricacies of DMARC and how it can benefit your organization’s email communication.
What is DMARC?
DMARC is a mechanism for domain owners to advertise SPF and DKIM protection and to tell receivers how to act if those authentication methods fail. The domain’s DMARC policy protects your domain from third parties attempting to spoof the domain in the “From” header of emails. Malicious email messages that aim to send phishing attempts using your domain will be subject to DMARC policy evaluation, which may result in their quarantine or rejection by the email receiving organization. This stringent policy ensures that emails received by email recipients are genuinely from the claimed sending domain, thereby minimizing the risk of people falling victim to email-based scams. Domain owners publish DMARC policies as a TXT record in the domain’s _dmarc.<domain> DNS record. For example, if the domain used in the “From” header is example.com, then the domain’s DMARC policy would be located in a DNS TXT record named _dmarc.example.com. The DMARC policy can have one of three policy modes:
A typical DMARC deployment of an existing domain will start with publishing "p=none". A none policy means that the domain owner is in a monitoring phase; the domain owner is monitoring for messages that aren’t authenticated with SPF and DKIM and seeks to ensure all email is properly authenticated
When the domain owner is comfortable that all legitimate use cases are properly authenticated with SPF and/or DKIM, they may change the DMARC policy to "p=quarantine". A quarantine policy means that messages which fail to produce a domain-aligned authenticated identifier via SPF or DKIM will be quarantined by the mail receiving organization. The mail receiving organization may filter these messages into Junk folders, or take another action that they feel best protects their recipients.
Finally, domain owners who are confident that all of the legitimate messages using their domain are authenticated with SPF or DKIM, may change the DMARC policy to "p=reject". A reject policy means that messages which fail to produce a domain-aligned authenticated identifier via SPF or DKIM will be rejected by the mail receiving organization.
The following are examples of a TXT record that contains a DMARC policy, depending on the desired policy (the ‘p’ tag):
This policy tells email providers to apply the DMARC policy to messages that fail to produce a DKIM or SPF authenticated identifier that is aligned to the domain in the “From” header. Alignment means that one or both of the following occurs:
The messages pass the SPF policy for the MAIL FROM domain and the MAIL FROM domain is the same as the domain in the “From” header, or a subdomain. Reference Using a custom MAIL FROM domain to learn more about how to send SPF aligned messages with SES.
The messages have a DKIM signature signed by a public key in DNS at a location within the domain of the “From” header. Reference Authenticating Email with DKIM in Amazon SES to learn more about how to send DKIM aligned messages with SES.
DMARC reporting
The rua tag in the domain’s DMARC policy indicates the location to which mail receiving organizations should send aggregate reports about messages that pass or fail SPF and DKIM alignment. Domain owners analyze these reports to discover messages which are using the domain in the “From” header but are not properly authenticated with SPF or DKIM. The domain owner will attempt to ensure that all legitimate messages are authenticated through analysis of the DMARC aggregate reports over time. Mail receiving organizations which support sending DMARC reports typically send these aggregated reports once per day, although these practices differ from provider to provider.
What does a typical DMARC deployment look like?
A DMARC deployment is the process of:
Ensuring that all emails using the domain in the “From” header are authenticated with DKIM and SPF domain-aligned identifiers. Focus on DKIM as the primary means of authentication.
Publishing a DMARC policy (none, quarantine, or reject) for the domain that reflects how the domain owner would like mail receiving organizations to handle unauthenticated email claiming to be from their domain.
New domains and subdomains
Deploying a DMARC policy is easy for organizations that have created a new domain or subdomain for the purpose of a new email sending use case on SES; for example email marketing, transaction emails, or one-time pass codes (OTP). These domains can start with the "p=reject" DMARC enforcement policy because the policy will not affect existing email sending programs. This strict enforcement is to ensure that there is no unauthenticated use of the domain and its subdomains.
Existing domains
For existing domains, a DMARC deployment is an iterative process because the domain may have a history of email sending by one or multiple email sending programs. It is important to gain a complete understanding of how the domain and its subdomains are being used for email sending before publishing a restrictive DMARC policy (p=quarantine or p=reject) because doing so would affect any unauthenticated email sending programs using the domain in the “From” header of messages. To get started with the DMARC implementation, these are a few actions to take:
Publish a p=none DMARC policy (sometimes referred to as monitoring mode), and set the rua tag to the location in which you would like to receive aggregate reports.
Analyze the aggregate reports. Mail receiving organizations will send reports which contain information to determine if the domain, and its subdomains, are being used for sending email, and how the messages are (or are not) being authenticated with a DKIM or SPF domain-aligned identifier. An easy to use analysis tool is the Dmarcian XML to Human Converter.
Avoid prematurely publishing a “p=quarantine” or “p=reject” policy. Doing so may result in blocked or reduced delivery of legitimate messages of existing email sending programs.
The image below illustrates how DMARC will be applied to an email received by the email receiving server and actions taken based on the enforcement policy:
Figure 1 – DMARC Flow
How do SPF and DKIM cause DMARC policies to pass
When you start sending emails using Amazon SES, messages that you send through Amazon SES automatically use a subdomain of amazonses.com as the default MAIL FROM domain. SPF evaluators will see that these messages pass the SPF policy evaluation because the default MAIL FROM domain has a SPF policy which includes the IP addresses of the SES infrastructure that sent the message. SPF authentication will result in an “SPF=PASS” and the authenticated identifier is the domain of the MAIL FROM address. The published SPF record applies to every message that is sent using SES regardless of whether you are using a shared or dedicated IP address. The amazonses.com SPF record lists all shared and dedicated IP addresses, so it is inclusive of all potential IP addresses that may be involved with sending email as the MAIL FROM domain. You can use ‘dig’ to look up the IP addresses that SES will use to send email:
It is best practice for customers to configure a custom MAIL FROM domain, and not use the default amazonses.com MAIL FROM domain. The custom MAIL FROM domain will always be a subdomain of the customer’s verified domain identity. Once you configure the MAIL FROM domain, messages sent using SES will continue to result in an “SPF=PASS” as it does with the default MAIL FROM domain. Additionally, DMARC authentication will result in “DMARC=PASS” because the MAIL FROM domain and the domain in the “From” header are in alignment. It’s important to understand that customers must use a custom MAIL FROM domain if they want “SPF=PASS” to result in a “DMARC=PASS”.
For example, an Amazon SES-verified example.com domain will have the custom MAIL FROM domain “bounce.example.com”. The configured SPF record will be:
Note: The chosen MAIL FROM domain could be any sub-domain of your choice. If you have the same domain identity configured in multiple regions, then you should create region-specific custom MAIL FROM domains for each region. e.g. bounce-us-east-1.example.com and bounce-eu-west-2.example.com so that asynchronously bounced messages are delivered directly to the region from which the messages were sent.
DKIM results in DMARC pass
For customers that establish Amazon SES Domain verification using DKIM signatures, DKIM authentication will result in a DKIM=PASS, and DMARC authentication will result in “DMARC=PASS” because the domain that publishes the DKIM signature is aligned to the domain in the “From” header (the SES domain identity).
DKIM and SPF together
Email messages are fully authenticated when the messages pass both DKIM and SPF, and both DKIM and SPF authenticated identifiers are domain-aligned. If only DKIM is domain-aligned, then the messages will still pass the DMARC policy, even if the SPF “pass” is unaligned. Mail receivers will consider the full context of SPF and DKIM when determining how they will handle the disposition of the messages you send, so it is best to fully authenticate your messages whenever possible. Amazon SES has taken care of the heavy lifting of the email authentication process away from our customers, and so, establishing SPF, DKIM and DMARC authentication has been reduced to a few clicks which allows SES customers to get started easily and scale fast.
Why is DMARC failing?
There are scenarios when you may notice that messages fail DMARC, whether your messages are fully authenticated, or partially authenticated. The following are things that you should look out for:
Email Content Modification
Sometimes email content is modified during the delivery to the recipients’ mail servers. This modification could be as a result of a security device or anti-spam agent along the delivery path (for example: the message Subject may be modified with an “[EXTERNAL]” warning to recipients). The modified message invalidates the DKIM signature which causes a DKIM failure. Remember, the purpose of DKIM is to ensure that the content of an email has not been tampered with during the delivery process. If this happens, the DKIM authentication will fail with an authentication error similar to “DKIM-signature body hash not verified“.
Solutions:
If you control the full path that the email message will traverse from sender to recipient, ensure that no intermediary mail servers modify the email content in transit.
Ensure that you configure a custom MAIL FROM domain so that the messages have a domain-aligned SPF identifier.
Keep the DMARC policy in monitoring mode (p=none) until these issues are identified/solved.
Email Forwarding
Email Forwarding There are multiple scenarios in which a message may be forwarded, and they may result in both/either SPF and DKIM failing to produce a domain-aligned authenticated identifier. For SPF, it means that the forwarding mail server is not listed in the MAIL FROM domain’s SPF policy. It is best practice for a forwarding mail server to avoid SPF failures and assume responsibility of mail handling for the messages it forwards by rewriting the MAIL FROM address to be in the domain controlled by the forwarding server. Forwarding servers that do not rewrite the MAIL FROM address pose a risk of impersonation attacks and phishing. Do not add the IP addresses of forwarding servers to your MAIL FROM domain’s SPF policy unless you are in complete control of all sources of mail being forwarded through this infrastructure. For DKIM, it means that the messages are being modified in some way that causes DKIM signature validation failure (see Email Content Modification section above). A responsible forwarding server will rewrite the MAIL FROM domain so that the messages pass SPF with a non-aligned authenticated identifier. These servers will attempt to forward the message without alteration in order to preserve DKIM signatures, but that is sometimes challenging to do in practice. In this scenario, since the messages carry no domain-aligned authenticated identifier, the messages will fail the DMARC policy.
Solution:
Email forwarding is an expected type of failure of which you will see in the DMARC aggregate reports. The domain owner must weigh the risk of causing forwarded messages to be rejected against the risk of not publishing a reject DMARC policy. Reference 8.6. Interoperability Considerations. Forwarding servers that wish to forward messages that they know will result in a DMARC failure will commonly rewrite the “From” header address of messages it forwards so that the messages pass a DMARC policy for a domain that the forwarding server is responsible for. The way to identify forwarding servers that rewrite the “From” header in this situation is to publish “p=quarantine pct=0 t=y” in your domain’s DMARC policy before publishing “p=reject”.
Multiple email sending providers are sending using the same domain
Multiple email sending providers: There are situations where an organization will have multiple business units sending email using the same domain, and these business units may be using an email sending provider other than SES. If neither SPF nor DKIM is configured with domain-alignment for these email sending providers, you will see DMARC failures in the DMARC aggregate report.
Solution:
Analyze the DMARC aggregate reports to identify other email sending providers, track down the business units responsible for each email sending program, and follow the instructions offered by the email sending provider about how to configure SPF and DKIM to produce a domain-aligned authenticated identifier.
What does a DMARC aggregate report look like?
The following XML example shows the general format of a DMARC aggregate report that you will receive from participating email service providers.
How to address DMARC deployment for domains confirmed to be unused for email (dangling or otherwise)
Deploying DMARC for unused or dangling domains is a proactive step to prevent abuse or unauthorized use of your domain. Once you have confirmed that all subdomains being used for sending email have the desired DMARC policies, you can publish a ‘p=reject’ tag on the organizational domain, which will prevent unauthorized usage of unused subdomains without the need to publish DMARC policies for every conceivable subdomain. For more advanced subdomain policy scenarios, read the “tree walk” definitions in https://datatracker.ietf.org/doc/draft-ietf-dmarc-dmarcbis/
Conclusion:
In conclusion, DMARC is not only a technology but also a commitment to email security, integrity, and trust. By embracing DMARC best practices, organizations can protect their users, maintain a positive brand reputation, and ensure seamless email deliverability. Every message from SES passes SPF and DKIM for “amazonses.com”, but the authenticated identifiers are not always in alignment with the domain in the “From” header which carries the DMARC policy. If email authentication is not fully configured, your messages are susceptible to delivery issues like spam filtering, or being rejected or blocked by the recipient ESP. As a best practice, you can configure both DKIM and SPF to attain optimum deliverability while sending email with SES.
About the Authors
Bruno Giorgini is a Senior Solutions Architect specializing in Pinpoint and SES. With over two decades of experience in the IT industry, Bruno has been dedicated to assisting customers of all sizes in achieving their objectives. When he is not crafting innovative solutions for clients, Bruno enjoys spending quality time with his wife and son, exploring the scenic hiking trails around the SF Bay Area.
Jesse Thompson is an Email Deliverability Manager with the Amazon Simple Email Service team. His background is in enterprise IT development and operations, with a focus on email abuse mitigation and encouragement of authenticity practices with open standard protocols. Jesse’s favorite activity outside of technology is recreational curling.
Sesan Komaiya is a Solutions Architect at Amazon Web Services. He works with a variety of customers, helping them with cloud adoption, cost optimization and emerging technologies. Sesan has over 15 year’s experience in Enterprise IT and has been at AWS for 5 years. In his free time, Sesan enjoys watching various sporting activities like Soccer, Tennis and Moto sport. He has 2 kids that also keeps him busy at home.
Mudassar Bashir is a Solutions Architect at Amazon Web Services. He has over ten years of experience in enterprise software engineering. His interests include web applications, containerization, and serverless technologies. He works with different customers, helping them with cloud adoption strategies.
Priya Singh is a Cloud Support Engineer at AWS and subject matter expert in Amazon Simple Email Service. She has a 6 years of diverse experience in supporting enterprise customers across different industries. Along with Amazon SES, she is a Cloudfront enthusiast. She loves helping customers in solving issues related to Cloudfront and SES in their environment.
AWS Identity and Access Management (IAM) Roles Anywhere enables workloads that run outside of Amazon Web Services (AWS), such as servers, containers, and applications, to use X.509 digital certificates to obtain temporary AWS credentials and access AWS resources, the same way that you use IAM roles for workloads on AWS. Now, IAM Roles Anywhere allows you to use PKCS #11–compatible cryptographic modules to help you securely store private keys associated with your end-entity X.509 certificates.
Cryptographic modules allow you to generate non-exportable asymmetric keys in the module hardware. The cryptographic module exposes high-level functions, such as encrypt, decrypt, and sign, through an interface such as PKCS #11. Using a cryptographic module with IAM Roles Anywhere helps to ensure that the private keys associated with your end-identity X.509 certificates remain in the module and cannot be accessed or copied to the system.
In this post, I will show how you can use PKCS #11–compatible cryptographic modules, such as YubiKey 5 Series and Thales ID smart cards, with your on-premises servers to securely store private keys. I’ll also show how to use those private keys and certificates to obtain temporary credentials for the AWS Command Line Interface (AWS CLI) and AWS SDKs.
Cryptographic modules use cases
IAM Roles Anywhere reduces the need to manage long-term AWS credentials for workloads running outside of AWS, to help improve your security posture. Now IAM Roles Anywhere has added support for compatible PKCS #11 cryptographic modules to the credential helper tool so that organizations that are currently using these (such as defense, government, or large enterprises) can benefit from storing their private keys on their security devices. This mitigates the risk of storing the private keys as files on servers where they can be accessed or copied by unauthorized users.
Note: If your organization does not implement PKCS #11–compatible modules, IAM Roles Anywhere credential helper supports OS certificate stores (Keychain Access for macOS and Cryptography API: Next Generation (CNG) for Windows) to help protect your certificates and private keys.
Solution overview
This authentication flow is shown in Figure 1 and is described in the following sections.
Figure 1: Authentication flow using crypto modules with IAM Roles Anywhere
How it works
As a prerequisite, you must first create a trust anchor and profile within IAM Roles Anywhere. The trust anchor will establish trust between your public key infrastructure (PKI) and IAM Roles Anywhere, and the profile allows you to specify which roles IAM Roles Anywhere assumes and what your workloads can do with the temporary credentials. You establish trust between IAM Roles Anywhere and your certificate authority (CA) by creating a trust anchor. A trust anchor is a reference to either AWS Private Certificate Authority (AWS Private CA) or an external CA certificate. For this walkthrough, you will use the AWS Private CA.
The one-time initialization process (step “0 – Module initialization” in Figure 1) works as follows:
You first generate the non-exportable private key within the secure container of the cryptographic module.
You then create the X.509 certificate that will bind an identity to a public key:
Create a certificate signing request (CSR).
Submit the CSR to the AWS Private CA.
Obtain the certificate signed by the CA in order to establish trust.
The certificate is then imported into the cryptographic module for mobility purposes, to make it available and simple to locate when the module is connected to the server.
After initialization is done, the module is connected to the server, which can then interact with the AWS CLI and AWS SDK without long-term credentials stored on a disk.
To obtain temporary security credentials from IAM Roles Anywhere:
The server will use the credential helper tool that IAM Roles Anywhere provides. The credential helper works with the credential_process feature of the AWS CLI to provide credentials that can be used by the CLI and the language SDKs. The helper manages the process of creating a signature with the private key.
The credential helper tool calls the IAM Roles Anywhere endpoint to obtain temporary credentials that are issued in a standard JSON format to IAM Roles Anywhere clients via the API method CreateSession action.
The server uses the temporary credentials for programmatic access to AWS services.
Alternatively, you can use the update or serve commands instead of credential-process. The update command will be used as a long-running process that will renew the temporary credentials 5 minutes before the expiration time and replace them in the AWS credentials file. The serve command will be used to vend temporary credentials through an endpoint running on the local host using the same URIs and request headers as IMDSv2 (Instance Metadata Service Version 2).
Supported modules
The credential helper tool for IAM Roles Anywhere supports most devices that are compatible with PKCS #11. The PKCS #11 standard specifies an API for devices that hold cryptographic information and perform cryptographic functions such as signature and encryption.
I will showcase how to use a YubiKey 5 Series device that is a multi-protocol security key that supports Personal Identity Verification (PIV) through PKCS #11. I am using YubiKey 5 Series for the purpose of demonstration, as it is commonly accessible (you can purchase it at the Yubico store or Amazon.com) and is used by some of the world’s largest companies as a means of providing a one-time password (OTP), Fast IDentity Online (FIDO) and PIV for smart card interface for multi-factor authentication. For a production server, we recommend using server-specific PKCS #11–compatible hardware security modules (HSMs) such as the YubiHSM 2, Luna PCIe HSM, or Trusted Platform Modules (TPMs) available on your servers.
Note: The implementation might differ with other modules, because some of these come with their own proprietary tools and drivers.
Implement the solution: Module initialization
You need to have the following prerequisites in order to initialize the module:
The Security Officer (SO) should have permissions to use the AWS Private CA service
Following are the high-level steps for initializing the YubiKey device and generating the certificate that is signed by AWS Private Certificate Authority (AWS Private CA). Note that you could also use your own public key infrastructure (PKI) and register it with IAM Roles Anywhere.
To initialize the module and generate a certificate
Verify that the YubiKey PIV interface is enabled, because some organizations might disable interfaces that are not being used. To do so, run the YubiKey Manager CLI, as follows:
ykman info
The output should look like the following, with the PIV interface enabled for USB.
Figure 2:YubiKey Manager CLI showing that the PIV interface is enabled
Use the YubiKey Manager CLI to generate a new RSA2048 private key on the security module in slot 9a and store the associated public key in a file. Different slots are available on YubiKey, and we will use the slot 9a that is for PIV authentication purpose. Use the following command to generate an asymmetric key pair. The private key is generated on the YubiKey, and the generated public key is saved as a file. Enter the YubiKey management key to proceed:
Create a certificate request (CSR) based on the public key and specify the subject that will identify your server. Enter the user PIN code when prompted.
Import the certificate file on the module by using the YubiKey Manager CLI or through the YubiKey Manager UI. Enter the YubiKey management key to proceed.
The security module is now initialized and can be plugged into the server.
Configuration to use the security module for programmatic access
The following steps will demonstrate how to configure the server to interact with the AWS CLI and AWS SDKs by using the private key stored on the YubiKey or PKCS #11–compatible device.
Install the p11-kit package. Most providers (including opensc) will ship with a p11-kit “module” file that makes them discoverable. Users shouldn’t need to specify the PKCS #11 “provider” library when using the credential helper, because we use p11-kit by default.
If your device library is not supported by p11-kit, you can install that library separately.
Verify the content of the YubiKey by using the following command:
ykman --device 123456 piv info
The output should look like the following.
Figure 3: YubiKey Manager CLI output for the PIV information
This command provides the general status of the PIV application and content in the different slots such as the certificates installed.
Use the credential helper command with the security module. The command will require at least:
The ARN of the trust anchor
The ARN of the target role to assume
The ARN of the profile to pull policies from
The certificate and/or key identifiers in the form of a PKCS #11 URI
You can use the certificate flag to search which slot on the security module contains the private key associated with the user certificate.
To specify an object stored in a cryptographic module, you should use the PKCS #11 URI that is defined in RFC7512. The attributes in the identifier string are a set of search criteria used to filter a set of objects. See a recommended method of locating objects in PKCS #11.
In the following example, we search for an object of type certificate, with the object label as “Certificate for Digital Signature”, in slot 1. The pin-value attribute allows you to directly use the pin to log into the cryptographic device.
From the folder where you have installed the credential helper tool, use the following command. Because we only have one certificate on the device, we can limit the filter to the certificate type in our PKCS #11 URI.
If everything is configured correctly, the credential helper tool will return a JSON that contains the credentials, as follows. The PIN code will be requested if you haven’t specified it in the command.
Please enter your user PIN:
  			{
                    "Version":1,
                    "AccessKeyId": <String>,
                    "SecretAccessKey": <String>,
                    "SessionToken": <String>,
                    "Expiration": <Timestamp>
                 }
To use temporary security credentials with AWS SDKs and the AWS CLI, you can configure the credential helper tool as a credential process. For more information, see Source credentials with an external process. The following example shows a config file (usually in ~/.aws/config) that sets the helper tool as the credential process.
You can provide the PIN as part of the credential command with the option pin-value=<PIN> so that the user input is not required.
If you prefer not to store your PIN in the config file, you can remove the attribute pin-value. In that case, you will be prompted to enter the PIN for every CLI command.
You can use the serve and update commands of the credential helper mentioned in the solution overview to manage credential rotation for unattended workloads. After the successful use of the PIN, the credential helper will store it in memory for the duration of the process and not ask for it anymore.
Auditability and fine-grained access
You can audit the activity of servers that are assuming roles through IAM Roles Anywhere. IAM Roles Anywhere is integrated with AWS CloudTrail, a service that provides a record of actions taken by a user, role, or an AWS service in IAM Roles Anywhere.
For Lookup attributes, filter by Event source and enter rolesanywhere.amazonaws.com in the textbox. You will find all the API calls that relate to IAM Roles Anywhere, including the CreateSession API call that returns temporary security credentials for workloads that have been authenticated with IAM Roles Anywhere to access AWS resources.
Figure 4: CloudTrail Events filtered on the “IAM Roles Anywhere” event source
When you review the CreateSession event record details, you can find the assumed role ID in the form of <PrincipalID>:<serverCertificateSerial>, as in the following example:
Figure 5: Details of the CreateSession event in the CloudTrail console showing which role is being assumed
If you want to identify API calls made by a server, for Lookup attributes, filter by User name, and enter the serverCertificateSerial value from the previous step in the textbox.
Figure 6: CloudTrail console events filtered by the username associated to our certificate on the security module
The API calls to AWS services made with the temporary credentials acquired through IAM Roles Anywhere will contain the identity of the server that made the call in the SourceIdentity field. For example, the EC2 DescribeInstances API call provides the following details:
Figure 7: The event record in the CloudTrail console for the EC2 describe instances call, with details on the assumed role and certificate CN.
Additionally, you can include conditions in the identity policy for the IAM role to apply fine-grained access control. This will allow you to apply a fine-grained access control filter to specify which server in the group of servers can perform the action.
To apply access control per server within the same IAM Roles Anywhere profile
In the IAM Roles Anywhere console, select the profile used by the group of servers, then select one of the roles that is being assumed.
Apply the following policy, which will allow only the server with CN=server1-demo to list all buckets by using the condition on aws:SourceIdentity.
In this blog post, I’ve demonstrated how you can use the YubiKey 5 Series (or any PKCS #11 cryptographic module) to securely store the private keys for the X.509 certificates used with IAM Roles Anywhere. I’ve also highlighted how you can use AWS CloudTrail to audit API actions performed by the roles assumed by the servers.
A bunch of networks, including US Government networks, have been hacked by the Chinese. The hackers used forged authentication tokens to access user email, using a stolenMicrosoft Azure account consumer signing key. Congress wantsanswers. The phrase “negligent security practices” is being tossed about—and with good reason. Master signing keys are not supposed to be left around, waiting to be stolen.
Actually, two things went badly wrong here. The first is that Azure accepted an expired signing key, implying a vulnerability in whatever is supposed to check key validity. The second is that this key was supposed to remain in the the system’s Hardware Security Module—and not be in software. This implies a really serious breach of good security practice. The fact that Microsoft has not been forthcoming about the details of what happened tell me that the details are really bad.
I believe this all traces back to SolarWinds. In addition to Russia inserting malware into a SolarWinds update, China used a different SolarWinds vulnerability to break into networks. We know that Russia accessed Microsoft source code in that attack. I have heard from informed government officials that China used their SolarWinds vulnerability to break into Microsoft and access source code, including Azure’s.
I think we are grossly underestimating the long-term results of the SolarWinds attacks. That backdoored update was downloaded by over 14,000 networks worldwide. Organizations patched their networks, but not before Russia—and others—used the vulnerability to enter those networks. And once someone is in a network, it’s really hard to be sure that you’ve kicked them out.
Sophisticated threat actors are realizing that stealing source code of infrastructure providers, and then combing that code for vulnerabilities, is an excellent way to break into organizations who use those infrastructure providers. Attackers like Russia and China—and presumably the US as well—are prioritizing going after those providers.
This is from Microsoft’s explanation. The China attackers “acquired an inactive MSA consumer signing key and used it to forge authentication tokens for Azure AD enterprise and MSA consumer to access OWA and Outlook.com. All MSA keys active prior to the incident—including the actor-acquired MSA signing key—have been invalidated. Azure AD keys were not impacted. Though the key was intended only for MSA accounts, a validation issue allowed this key to be trusted for signing Azure AD tokens. The actor was able to obtain new access tokens by presenting one previously issued from this API due to a design flaw. This flaw in the GetAccessTokenForResourceAPI has since been fixed to only accept tokens issued from Azure AD or MSA respectively. The actor used these tokens to retrieve mail messages from the OWA API.”
Unlike password authentication, which requires a direct match between what is inputted and what’s stored in a database, fingerprint authentication determines a match using a reference threshold. As a result, a successful fingerprint brute-force attack requires only that an inputted image provides an acceptable approximation of an image in the fingerprint database. BrutePrint manipulates the false acceptance rate (FAR) to increase the threshold so fewer approximate images are accepted.
BrutePrint acts as an adversary in the middle between the fingerprint sensor and the trusted execution environment and exploits vulnerabilities that allow for unlimited guesses.
In a BrutePrint attack, the adversary removes the back cover of the device and attaches the $15 circuit board that has the fingerprint database loaded in the flash storage. The adversary then must convert the database into a fingerprint dictionary that’s formatted to work with the specific sensor used by the targeted phone. The process uses a neural-style transfer when converting the database into the usable dictionary. This process increases the chances of a match.
With the fingerprint dictionary in place, the adversary device is now in a position to input each entry into the targeted phone. Normally, a protection known as attempt limiting effectively locks a phone after a set number of failed login attempts are reached. BrutePrint can fully bypass this limit in the eight tested Android models, meaning the adversary device can try an infinite number of guesses. (On the two iPhones, the attack can expand the number of guesses to 15, three times higher than the five permitted.)
The bypasses result from exploiting what the researchers said are two zero-day vulnerabilities in the smartphone fingerprint authentication framework of virtually all smartphones. The vulnerabilities—one known as CAMF (cancel-after-match fail) and the other MAL (match-after-lock)—result from logic bugs in the authentication framework. CAMF exploits invalidate the checksum of transmitted fingerprint data, and MAL exploits infer matching results through side-channel attacks.
Depending on the model, the attack takes between 40 minutes and 14 hours.
Also:
The ability of BrutePrint to successfully hijack fingerprints stored on Android devices but not iPhones is the result of one simple design difference: iOS encrypts the data, and Android does not.
Jenny Blessing and Ross Anderson have evaluated the security of systems designed to allow the various Internet messaging platforms to interoperate with each other:
The Digital Markets Act ruled that users on different platforms should be able to exchange messages with each other. This opens up a real Pandora’s box. How will the networks manage keys, authenticate users, and moderate content? How much metadata will have to be shared, and how?
Interoperability will vastly increase the attack surface at every level in the stack from the cryptography up through usability to commercial incentives and the opportunities for government interference.
It’s a good idea in theory, but will likely result in the overall security being the worst of each platform’s security.
Some web applications need to protect their authentication tokens or session IDs from cross-site scripting (XSS). It’s an Open Web Application Security Project (OWASP) best practice for session management to store secrets in the browsers’ cookie store with the HttpOnly attribute enabled. When cookies have the HttpOnly attribute set, the browser will prevent client-side JavaScript code from accessing the value. This reduces the risk of secrets being compromised.
In this blog post, you’ll learn how to store access tokens and authenticate with HttpOnly cookies in your own workloads when using Amazon API Gateway as the client-facing endpoint. The tutorial in this post will show you a solution to store OAuth2 access tokens in the browser cookie store, and verify user authentication through Amazon API Gateway. This post describes how to use Amazon Cognito to issue OAuth2 access tokens, but the solution is not limited to OAuth2. You can use other kinds of tokens or session IDs.
The solution consists of two decoupled parts:
OAuth2 flow
Authentication check
Note: This tutorial takes you through detailed step-by-step instructions to deploy an example solution. If you prefer to deploy the solution with a script, see the api-gw-http-only-cookie-auth GitHub repository.
No costs should incur when you deploy the application from this tutorial because the services you’re going to use are included in the AWS Free Tier. However, be aware that small charges may apply if you have other workloads running in your AWS account and exceed the free tier. Make sure to clean up your resources from this tutorial after deployment.
Solution architecture
This solution uses Amazon Cognito, Amazon API Gateway, and AWS Lambda to build a solution that persists OAuth2 access tokens in the browser cookie store. Figure 1 illustrates the solution architecture for the OAuth2 flow.
Figure 1: OAuth2 flow solution architecture
A user authenticates by using Amazon Cognito.
Amazon Cognito has an OAuth2 redirect URI pointing to your API Gateway endpoint and invokes the integrated Lambda function oAuth2Callback.
The oAuth2Callback Lambda function makes a request to the Amazon Cognito token endpoint with the OAuth2 authorization code to get the access token.
The Lambda function returns a response with the Set-Cookie header, instructing the web browser to persist the access token as an HttpOnly cookie. The browser will automatically interpret the Set-Cookie header, because it’s a web standard. HttpOnly cookies can’t be accessed through JavaScript—they can only be set through the Set-Cookie header.
After the OAuth2 flow, you are set up to issue and store access tokens. Next, you need to verify that users are authenticated before they are allowed to access your protected backend. Figure 2 illustrates how the authentication check is handled.
A user requests a protected backend resource. The browser automatically attaches HttpOnly cookies to every request, as defined in the web standard.
The Lambda function oAuth2Authorizer acts as the Lambda authorizer for HTTP APIs. It validates whether requests are authenticated. If requests include the proper access token in the request cookie header, then it allows the request.
API Gateway only passes through requests that are authenticated.
Amazon Cognito is not involved in the authentication check, because the Lambda function can validate the OAuth2 access tokens by using a JSON Web Token (JWT) validation check.
1. Deploying the OAuth2 flow
In this section, you’ll deploy the first part of the solution, which is the OAuth2 flow. The OAuth2 flow is responsible for issuing and persisting OAuth2 access tokens in the browser’s cookie store.
1.1. Create a mock protected backend
As shown in in Figure 2, you need to protect a backend. For the purposes of this post, you create a mock backend by creating a simple Lambda function with a default response.
Figure 3: Configuring the getProtectedResource Lambda function
The default Lambda function code returns a simple Hello from Lambda message, which is sufficient to demonstrate the concept of this solution.
1.2. Create an HTTP API in Amazon API Gateway
Next, you create an HTTP API by using API Gateway. Either an HTTP API or a REST API will work. In this example, choose HTTP API because it’s offered at a lower price point (for this tutorial you will stay within the free tier).
On the Create and configure integrations page, as shown in Figure 4, choose Add integration, then enter or select the following values:
Select Lambda.
For Lambda function, select the getProtectedResource Lambda function that you created in the previous section.
For API name, enter a name. In this example, I used MyApp.
Choose Next.
Figure 4: Configuring API Gateway integrations and API name
On the Configure routes page, as shown in Figure 5, enter or select the following values:
For Method, select GET.
For Resource path, enter / (a single forward slash).
For Integration target, select the getProtectedResource Lambda function.
Choose Next.
Figure 5: Configuring API Gateway routes
On the Configure stages page, keep all the default options, and choose Next.
On the Review and create page, choose Create.
Note down the value of Invoke URL, as shown in Figure 6.
Figure 6: Note down the invoke URL
Now it’s time to test your API Gateway API. Paste the value of Invoke URL into your browser. You’ll see the following message from your Lambda function: Hello from Lambda.
1.3. Use Amazon Cognito
You’ll use Amazon Cognito user pools to create and maintain a user directory, and add sign-up and sign-in to your web application.
On the Authentication providers page, as shown in Figure 7, for Cognito user pool sign-in options, select Email, then choose Next.
Figure 7: Configuring authentication providers
In the Multi-factor authentication pane of the Configure Security requirements page, as shown in Figure 8, choose your MFA enforcement. For this example, choose No MFA to make it simpler for you to test your solution. However, in production for data sensitive workloads you should choose Require MFA – Recommended. Choose Next.
Figure 8: Configuring MFA
On the Configure sign-up experience page, keep all the default options and choose Next.
On the Configure message delivery page, as shown in Figure 9, choose your email provider. For this example, choose Send email with Cognito to make it simple to test your solution. In production workloads, you should choose Send email with Amazon SES – Recommended. Choose Next.
Figure 9: Configuring email
In the User pool name section of the Integrate your app page, as shown in Figure 10, enter or select the following values:
For User pool name, enter a name. In this example, I used MyUserPool.
Figure 10: Configuring user pool name
In the Hosted authentication pages section, as shown in Figure 11, select Use the Cognito Hosted UI.
In the Domain section, as shown in Figure 12, for Domain type, choose Use a Cognito domain. For Cognito domain, enter a domain name. Note that domains in Cognito must be unique. Make sure to enter a unique name, for example by appending random numbers at the end of your domain name. For this example, I used https://http-only-cookie-secured-app.
Figure 12: Configuring an Amazon Cognito domain
In the Initial app client section, as shown in Figure 13, enter or select the following values:
For App type, keep the default setting Public client.
For App client name, enter a friendly name. In this example, I used MyAppClient.
For Client secret, keep the default setting Don’t generate a client secret.
For Allowed callback URLs, enter <API_GW_INVOKE_URL>/oauth2/callback, replacing <API_GW_INVOKE_URL> with the invoke URL you noted down from API Gateway in the previous section.
Figure 13: Configuring the initial app client
Choose Next.
Choose Create user pool.
Next, you need to retrieve some Amazon Cognito information for later use.
For Email address, enter [email protected]. For this tutorial, you don’t need to send out actual emails, so the email address does not need to actually exist.
Choose Mark email address as verified.
For password, enter a password you can remember (or even better: use a password generator).
Remember the email and password for later use.
Choose Create user.
1.4. Create the Lambda function oAuth2Callback
Next, you create the Lambda function oAuth2Callback, which is responsible for issuing and persisting the OAuth2 access tokens.
After you create the Lambda function, you need to add the code. Create a new folder on your local machine and open it with your preferred integrated development environment (IDE). Add the package.json and index.js files, as shown in the following examples.
In a terminal at the root of your created folder, run the following command.
$ npm install
In the index.js example code that follows, be sure to replace the placeholders with your values.
index.js
const qs = require("qs");
const axios = require("axios").default;
exports.handler = async function (event) {
  const code = event.queryStringParameters?.code;
  if (code == null) {
    return {
      statusCode: 400,
      body: "code query param required",
    };
  }
  const data = {
    grant_type: "authorization_code",
    client_id: "<your client ID from Cognito>",
    // The redirect has already happened, but you still need to pass the URI for validation, so a valid oAuth2 access token can be generated
    redirect_uri: encodeURI("<your callback URL from Cognito>"),
    code: code,
  };
  // Every Cognito instance has its own token endpoints. For more information check the documentation: https://docs.aws.amazon.com/cognito/latest/developerguide/token-endpoint.html
  const res = await axios.post(
    "<your App Client Cognito domain>/oauth2/token",
    qs.stringify(data),
    {
      headers: {
        "Content-Type": "application/x-www-form-urlencoded",
      },
    }
  );
  return {
    statusCode: 302,
    // These headers are returned as part of the response to the browser.
    headers: {
      // The Location header tells the browser it should redirect to the root of the URL
      Location: "/",
      // The Set-Cookie header tells the browser to persist the access token in the cookie store
      "Set-Cookie": `accessToken=${res.data.access_token}; Secure; HttpOnly; SameSite=Lax; Path=/`,
    },
  };
};
Along with the HttpOnly attribute, you pass along two additional cookie attributes:
Secure – Indicates that cookies are only sent by the browser to the server when a request is made with the https: scheme.
SameSite – Controls whether or not a cookie is sent with cross-site requests, providing protection against cross-site request forgery attacks. You set the value to Lax because you want the cookie to be set when the user is forwarded from Amazon Cognito to your web application (which runs under a different URL).
Afterwards, upload the code to the oAuth2Callback Lambda function as described in Upload a Lambda Function in the AWS Toolkit for VS Code User Guide.
1.5. Configure an OAuth2 callback route in API Gateway
Now, you configure API Gateway to use your new Lambda function through a Lambda proxy integration.
To configure API Gateway to use your Lambda function
In the API Gateway console, under APIs, choose your API name. For me, the name is MyApp.
Under Develop, choose Routes.
Choose Create.
Enter or select the following values:
For method, select GET.
For path, enter /oauth2/callback.
Choose Create.
Choose GET under /oauth2/callback, and then choose Attach integration.
Choose Create and attach an integration.
For Integration type, choose Lambda function.
For Lambda function, choose oAuth2Callback from the last step.
Choose Create.
Your route configuration in API Gateway should now look like Figure 14.
Figure 14: Routes for API Gateway
2. Testing the OAuth2 flow
Now that you have the components in place, you can test your OAuth2 flow. You test the OAuth2 flow by invoking the login on your browser.
To test the OAuth2 flow
In the Amazon Cognito console, choose your user pool name. For me, the name is MyUserPool.
Under the navigation tabs, choose App integration.
Under App client list, choose your app client name. For me, the name is MyAppClient.
Choose View Hosted UI.
In the newly opened browser tab, open your developer tools, so you can inspect the network requests.
Log in with the email address and password you set in the previous section. Change your password, if you’re asked to do so. You can also choose the same password as you set in the previous section.
You should see your Hello from Lambda message.
To test that the cookie was accurately set
Check your browser network tab in the browser developer settings. You’ll see the /oauth2/callback request, as shown in Figure 15.
Figure 15: Callback network request
The response headers should include a set-cookie header, as you specified in your Lambda function. With the set-cookie header, your OAuth2 access token is set as an HttpOnly cookie in the browser, and access is prohibited from any client-side code.
Alternatively, you can inspect the cookie in the browser cookie storage, as shown in Figure 16.
If you want to retry the authentication, navigate in your browser to your Amazon Cognito domain that you chose in the previous section and clear all site data in the browser developer tools. Do the same with your API Gateway invoke URL. Now you can restart the test with a clean state.
3. Deploying the authentication check
In this section, you’ll deploy the second part of your application: the authentication check. The authentication check makes it so that only authenticated users can access your protected backend. The authentication check works with the HttpOnly cookie, which is stored in the user’s cookie store.
3.1. Create the Lambda function oAuth2Authorizer
This Lambda function checks that requests are authenticated.
After you create the Lambda function, you need to add the code. Create a new folder on your local machine and open it with your preferred IDE. Add the package.json and index.js files as shown in the following examples.
In a terminal at the root of your created folder, run the following command.
$ npm install
In the index.js example code, be sure to replace the placeholders with your values.
index.js
const { CognitoJwtVerifier } = require("aws-jwt-verify");
function getAccessTokenFromCookies(cookiesArray) {
  // cookieStr contains the full cookie definition string: "accessToken=abc"
  for (const cookieStr of cookiesArray) {
    const cookieArr = cookieStr.split("accessToken=");
    // After splitting you should get an array with 2 entries: ["", "abc"] - Or only 1 entry in case it was a different cookie string: ["test=test"]
    if (cookieArr[1] != null) {
      return cookieArr[1]; // Returning only the value of the access token without cookie name
    }
  }
  return null;
}
// Create the verifier outside the Lambda handler (= during cold start),
// so the cache can be reused for subsequent invocations. Then, only during the
// first invocation, will the verifier actually need to fetch the JWKS.
const verifier = CognitoJwtVerifier.create({
  userPoolId: "<your user pool ID from Cognito>",
  tokenUse: "access",
  clientId: "<your client ID from Cognito>",
});
exports.handler = async (event) => {
  if (event.cookies == null) {
    console.log("No cookies found");
    return {
      isAuthorized: false,
    };
  }
  // Cookies array looks something like this: ["accessToken=abc", "otherCookie=Random Value"]
  const accessToken = getAccessTokenFromCookies(event.cookies);
  if (accessToken == null) {
    console.log("Access token not found in cookies");
    return {
      isAuthorized: false,
    };
  }
  try {
    await verifier.verify(accessToken);
    return {
      isAuthorized: true,
    };
  } catch (e) {
    console.error(e);
    return {
      isAuthorized: false,
    };
  }
};
After you add the package.json and index.js files, upload the code to the oAuth2Authorizer Lambda function as described in Upload a Lambda Function in the AWS Toolkit for VS Code User Guide.
3.2. Configure the Lambda authorizer in API Gateway
Next, you configure your authorizer Lambda function to protect your backend. This way you control access to your HTTP API.
To configure the authorizer Lambda function
In the API Gateway console, under APIs, choose your API name. For me, the name is MyApp.
Under Develop, choose Routes.
Under / (a single forward slash) GET, choose Attach authorization.
Choose Create and attach an authorizer.
Choose Lambda.
Enter or select the following values:
For Name, enter oAuth2Authorizer.
For Lambda function, choose oAuth2Authorizer.
Clear Authorizer caching. For this tutorial, you disable authorizer caching to make testing simpler. See the section Bonus: Enabling authorizer caching for more information about enabling caching to increase performance.
Under Identity sources, choose Remove.
Note: Identity sources are ignored for your Lambda authorizer. These are only used for caching.
Choose Create and attach.
Under Develop, choose Routes to inspect all routes.
Now your API Gateway route /oauth2/callback should be configured as shown in Figure 17.
Figure 17: API Gateway route configuration
4. Testing the OAuth2 authorizer
You did it! From your last test, you should still be authenticated. So, if you open the API Gateway Invoke URL in your browser, you’ll be greeted from your protected backend.
In case you are not authenticated anymore, you’ll have to follow the steps again from the section Testing the OAuth2 flow to authenticate.
When you inspect the HTTP request that your browser makes in the developer tools as shown in Figure 18, you can see that authentication works because the HttpOnly cookie is automatically attached to every request.
Figure 18: Browser requests include HttpOnly cookies
To verify that your authorizer Lambda function works correctly, paste the same Invoke URL you noted previously in an incognito window. Incognito windows do not share the cookie store with your browser session, so you see a {"message":"Forbidden"} error message with HTTP response code 403 – Forbidden.
Cleanup
Delete all unwanted resources to avoid incurring costs.
To delete the Amazon Cognito domain and user pool
In the Amazon Cognito console, choose your user pool name. For me, the name is MyUserPool.
Under the navigation tabs, choose App integration.
Under Domain, choose Actions, then choose Delete Cognito domain.
Confirm by entering your custom Amazon Cognito domain, and choose Delete.
Choose Delete user pool.
Confirm by entering your user pool name (in my case, MyUserPool), and then choose Delete.
To delete your API Gateway resource
In the API Gateway console, select your API name. For me, the name is MyApp.
Under Actions, choose Delete and confirm your deletion.
To delete the AWS Lambda functions
In the Lambda console, select all three of the Lambda functions you created.
Under Actions, choose Delete and confirm your deletion.
Bonus: Enabling authorizer caching
As mentioned earlier, you can enable authorizer caching to help improve your performance. When caching is enabled for an authorizer, API Gateway uses the authorizer’s identity sources as the cache key. If a client specifies the same parameters in identity sources within the configured Time to Live (TTL), then API Gateway uses the cached authorizer result, rather than invoking your Lambda function.
To enable caching, your authorizer must have at least one identity source. To cache by the cookie request header, you specify $request.header.cookie as the identity source. Be aware that caching will be affected if you pass along additional HttpOnly cookies apart from the access token.
In this blog post, you learned how to implement authentication by using HttpOnly cookies. You used Amazon API Gateway and AWS Lambda to persist and validate the HttpOnly cookies, and you used Amazon Cognito to issue OAuth2 access tokens. If you want to try an automated deployment of this solution with a script, see the api-gw-http-only-cookie-auth GitHub repository.
In this solution, you used NodeJS for your Lambda functions to implement authentication. But HttpOnly cookies are widely supported by many programing frameworks. You can find more implementation options on the OWASP Secure Cookie Attribute page.
Although this blog post gives you a tutorial on how to implement HttpOnly cookie authentication in API Gateway, it may not meet all your security and functional requirements. Make sure to check your business requirements and talk to your stakeholders before you adopt techniques from this blog post.
Furthermore, it’s a good idea to continuously test your web application, so that cookies are only set with your approved security attributes. For more information, see the OWASP Testing for Cookies Attributes page.
If you have feedback about this post, submit comments in the Comments section below. If you have questions about this post, start a new thread on the Amazon API Gateway re:Post or contact AWS Support.
Want more AWS Security news? Follow us on Twitter.
The collective thoughts of the interwebz
Manage Consent
To provide the best experiences, we use technologies like cookies to store and/or access device information. Consenting to these technologies will allow us to process data such as browsing behavior or unique IDs on this site. Not consenting or withdrawing consent, may adversely affect certain features and functions.
Functional
Always active
The technical storage or access is strictly necessary for the legitimate purpose of enabling the use of a specific service explicitly requested by the subscriber or user, or for the sole purpose of carrying out the transmission of a communication over an electronic communications network.
Preferences
The technical storage or access is necessary for the legitimate purpose of storing preferences that are not requested by the subscriber or user.
Statistics
The technical storage or access that is used exclusively for statistical purposes.The technical storage or access that is used exclusively for anonymous statistical purposes. Without a subpoena, voluntary compliance on the part of your Internet Service Provider, or additional records from a third party, information stored or retrieved for this purpose alone cannot usually be used to identify you.
Marketing
The technical storage or access is required to create user profiles to send advertising, or to track the user on a website or across several websites for similar marketing purposes.
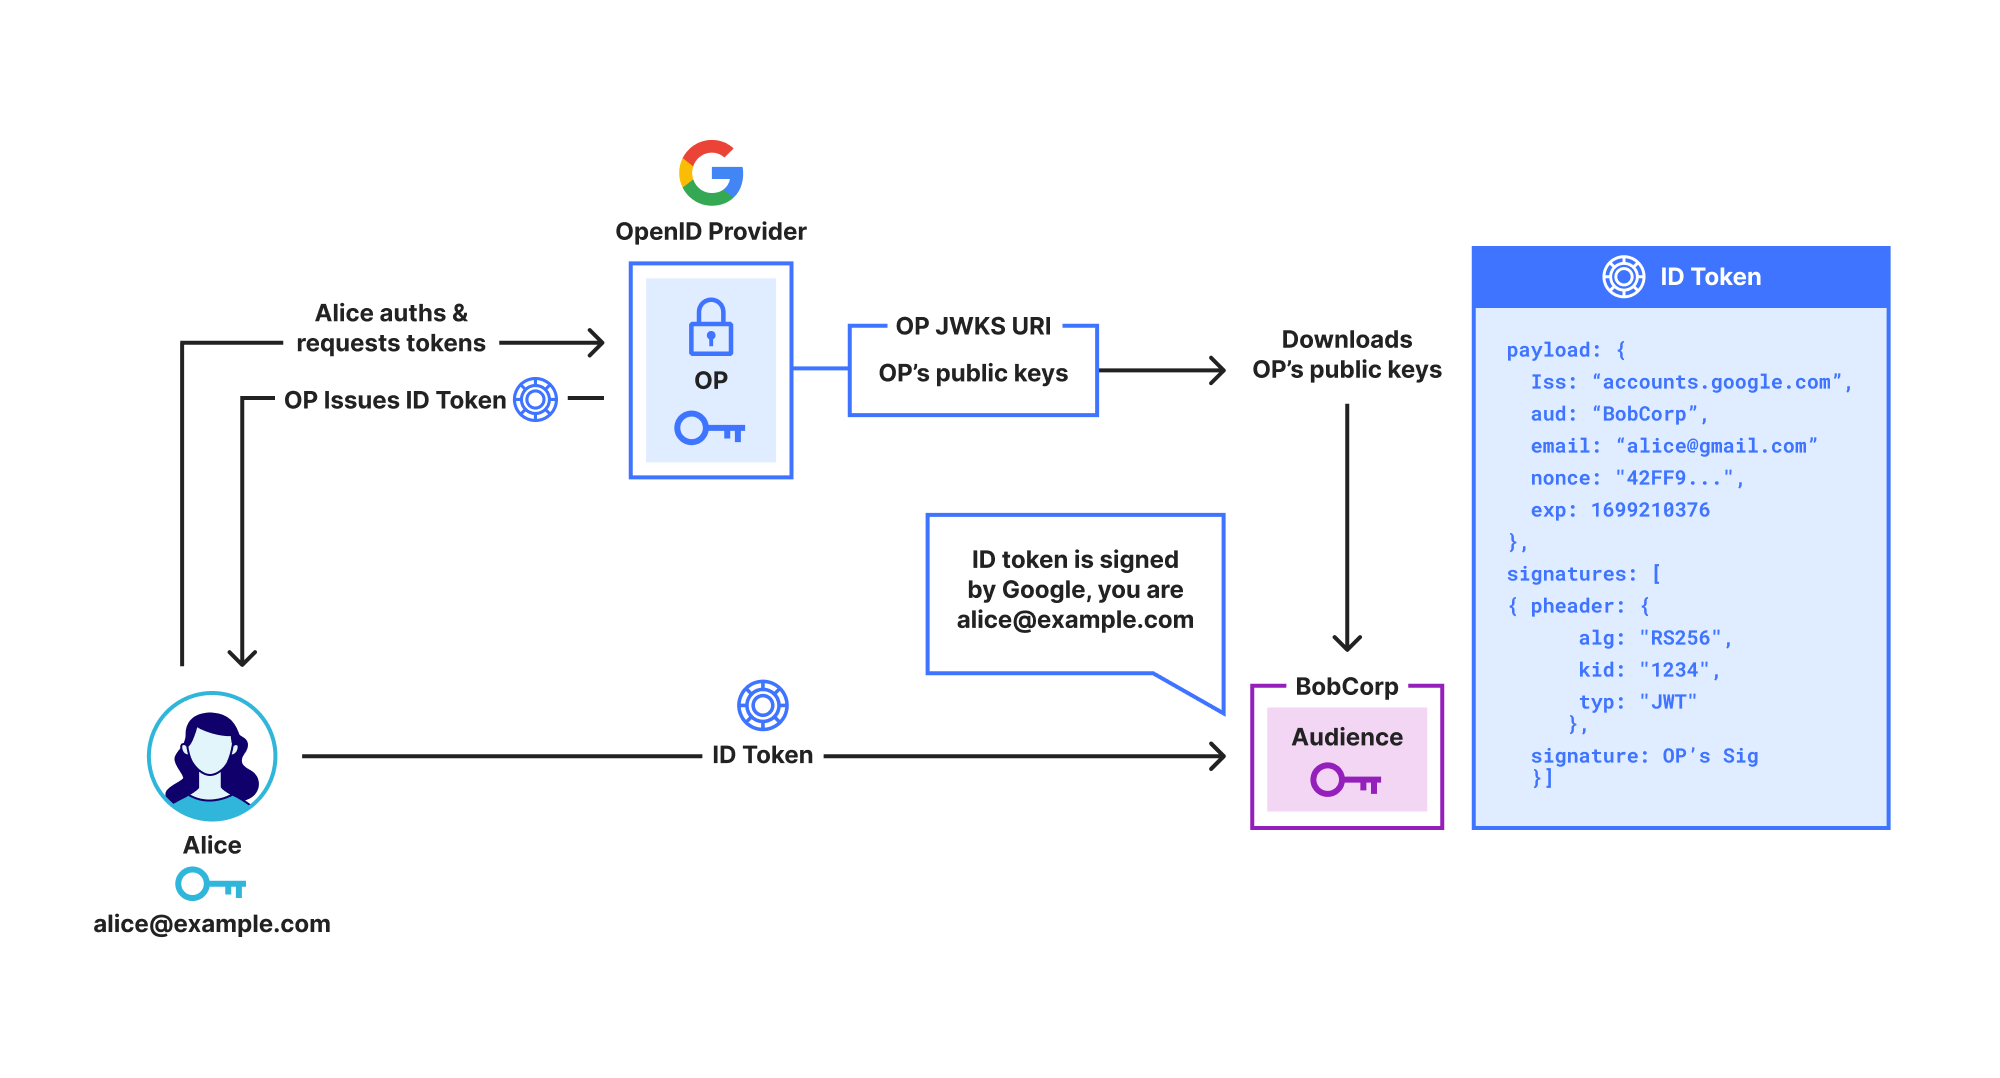
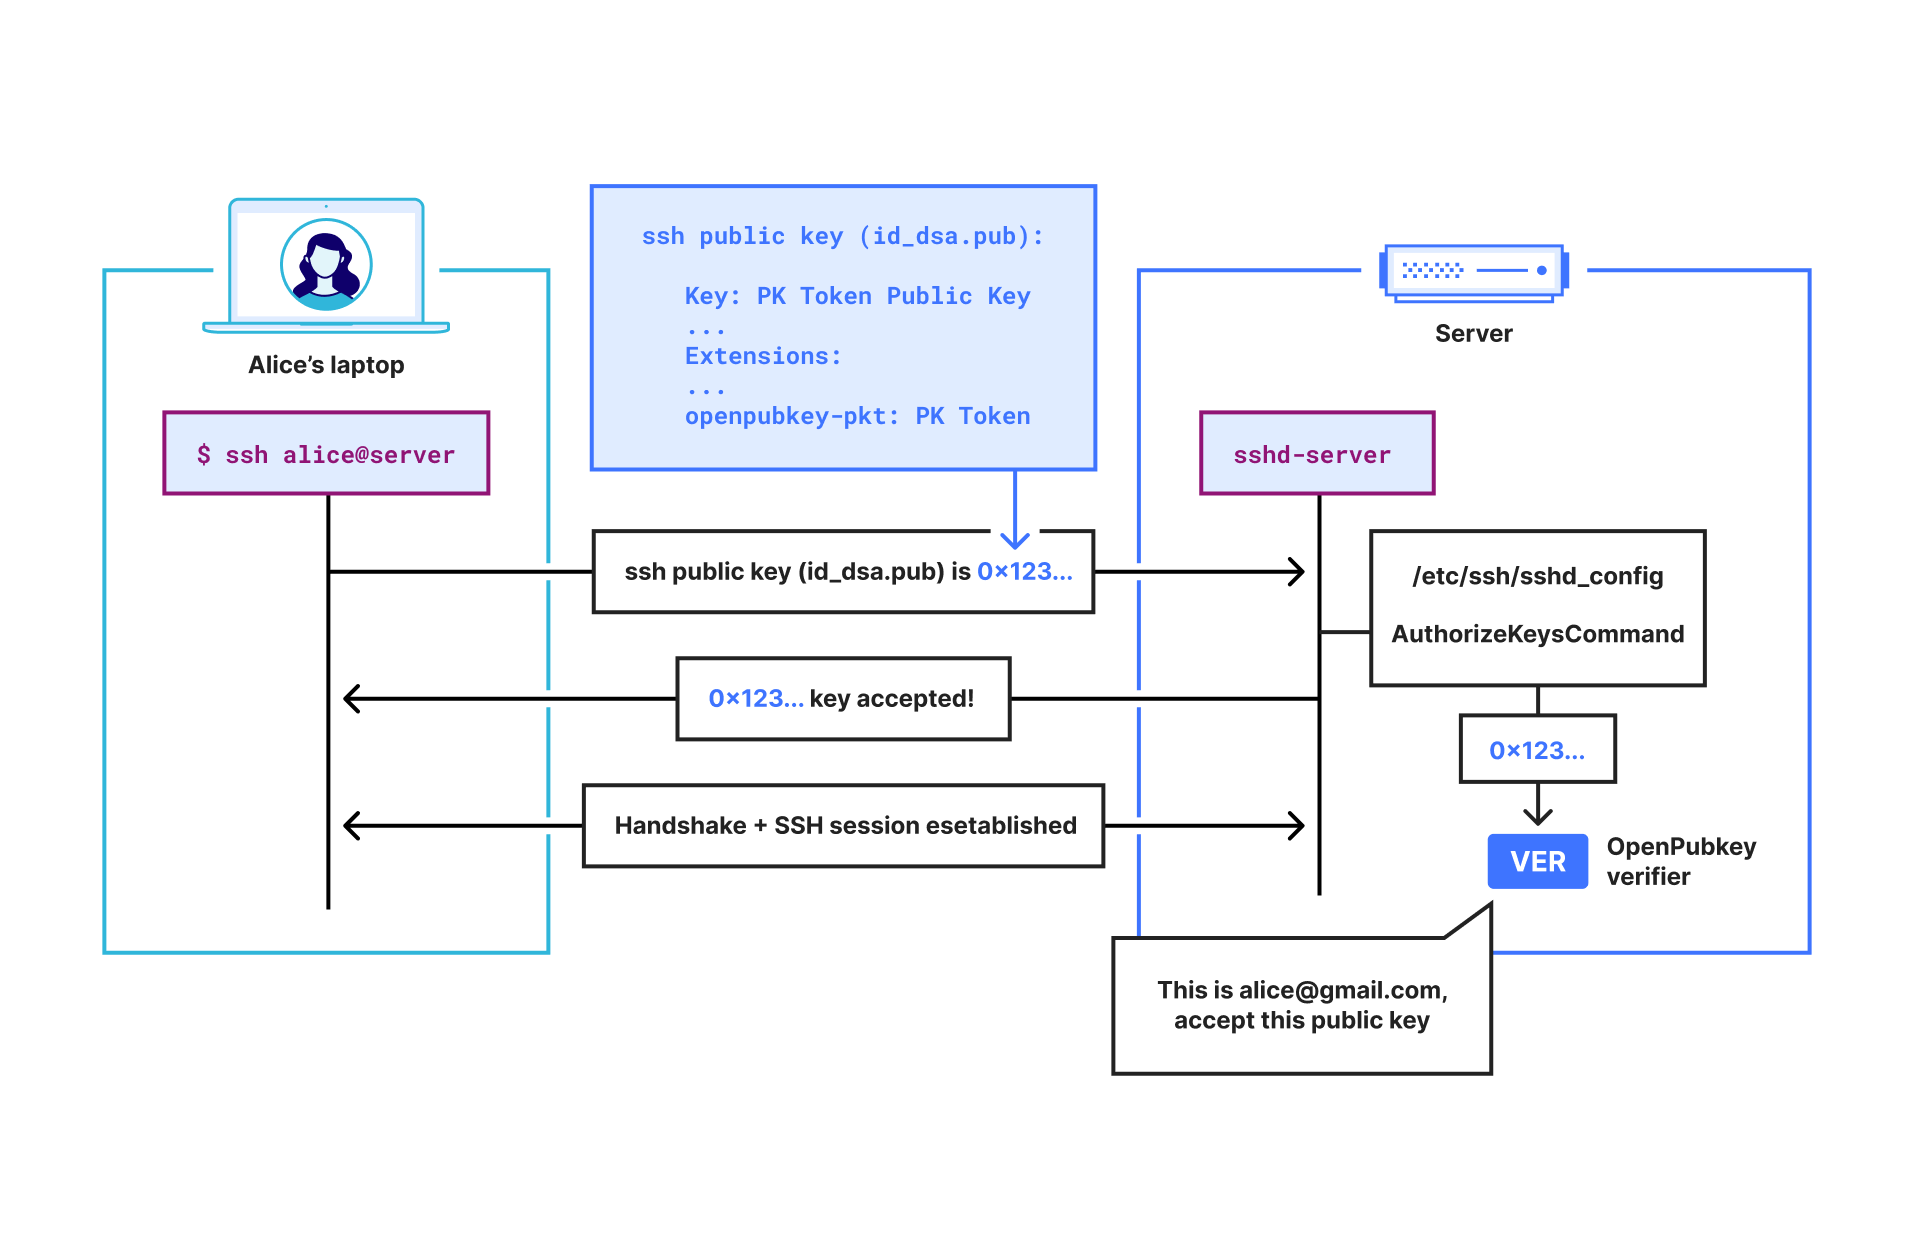
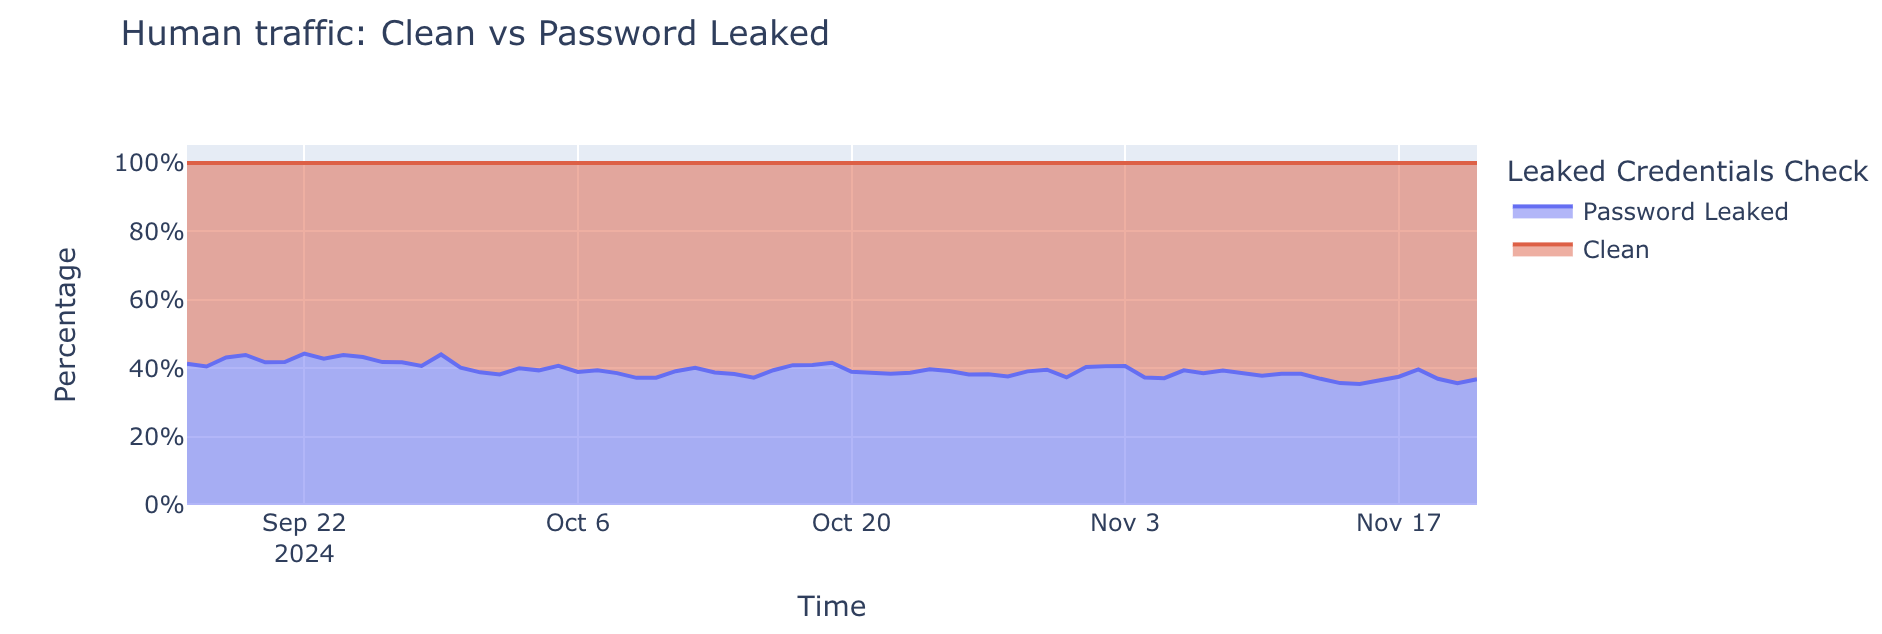
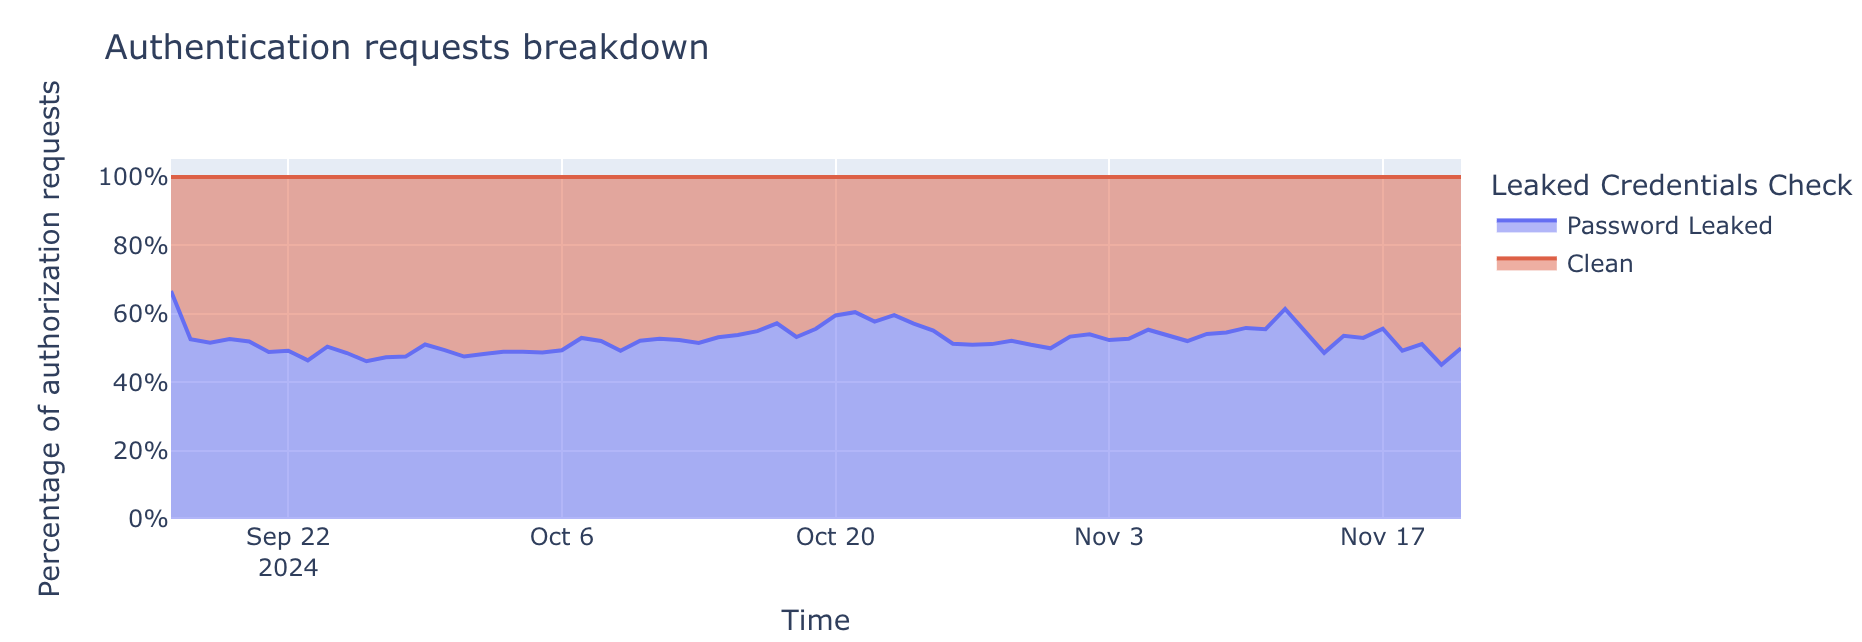
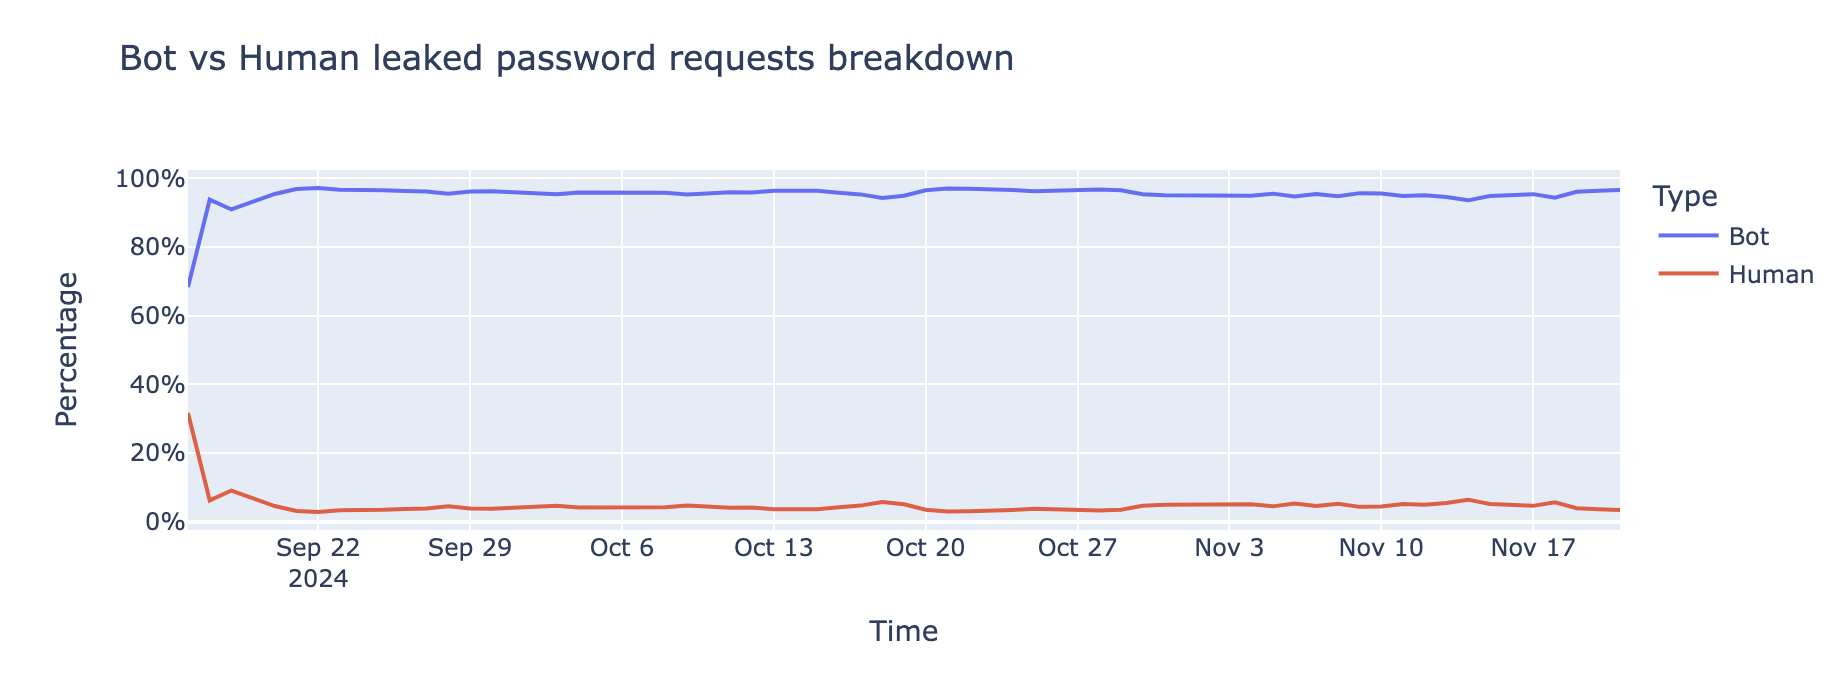


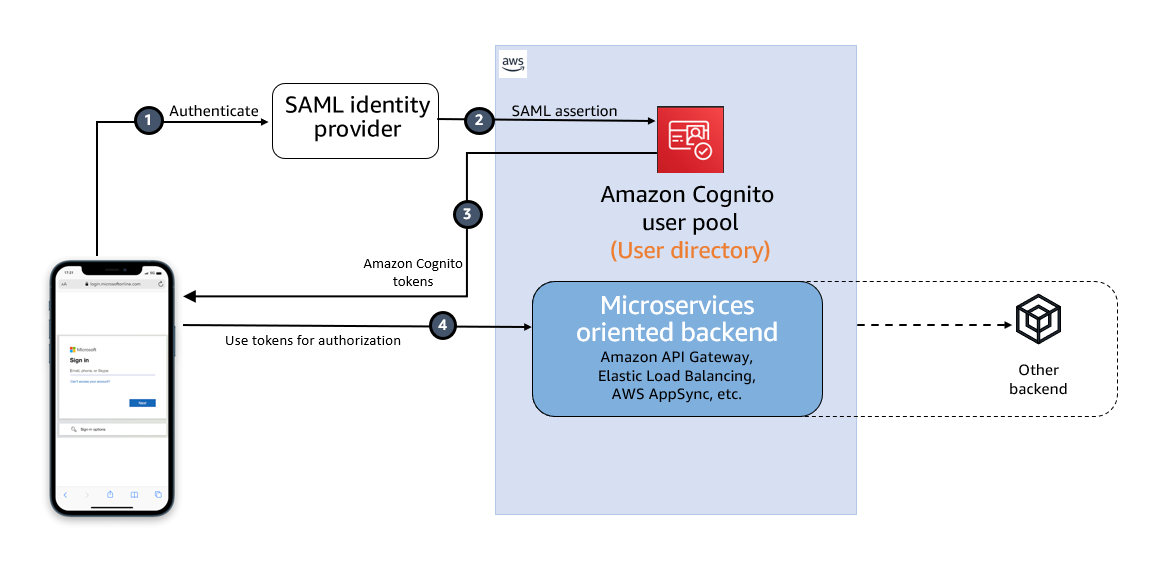


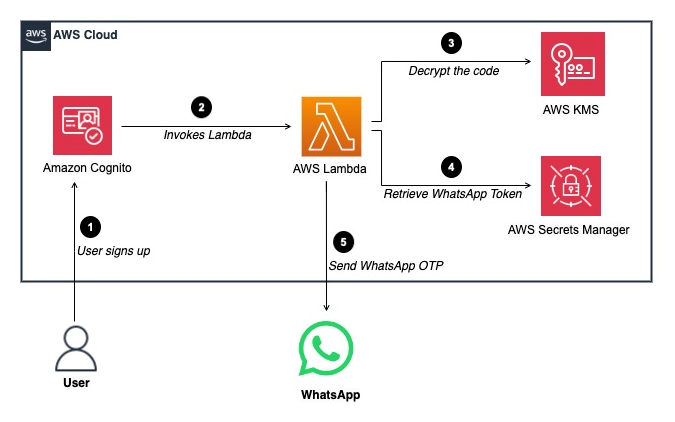


 Figure 1 – DMARC Flow