Post Syndicated from Brandon Wu original https://aws.amazon.com/blogs/security/isolating-network-access-to-your-aws-cloud9-environments/
In this post, I show you how to create isolated AWS Cloud9 environments for your developers without requiring ingress (inbound) access from the internet. I also walk you through optional steps to further isolate your AWS Cloud9 environment by removing egress (outbound) access. Until recently, AWS Cloud9 required you to allow ingress Secure Shell (SSH) access from authorized AWS Cloud9 IP addresses. Now AWS Cloud 9 allows you to create and run your development environments within your isolated Amazon Virtual Private Cloud (Amazon VPC), without direct connectivity from the internet, adding an additional layer of security.
AWS Cloud9 is an integrated development environment (IDE) that lets you write, run, edit, and debug code using only a web browser. Developers who use AWS Cloud9 have access to an isolated environment where they can innovate, experiment, develop, and perform early testing without impacting the overall security and stability of other environments. By using AWS Cloud9, you can store your code securely in a version control system (like AWS CodeCommit), configure your AWS Cloud9 EC2 development environments to use encrypted Amazon Elastic Block Store (Amazon EBS) volumes, and share your environments within the same account.
Solution overview
Before enhanced virtual private cloud (VPC) support was available, AWS Cloud9 required you to allow ingress Secure Shell (SSH) access from authorized AWS Cloud9 IP addresses in order to use the IDE. The addition of private VPC support enables you to create and run AWS Cloud9 environments in private subnets without direct connectivity from the internet. You can use VPC security groups to configure the ingress and egress traffic that you allow, or choose to disallow all traffic.
Since this feature uses AWS Systems Manager to support using AWS Cloud9 in private subnets, it’s worth taking a minute to read and understand a bit about it before you continue. Systems Manager Session Manager provides an interactive shell connection between AWS Cloud9 and its associated Amazon Elastic Compute Cloud (Amazon EC2) instance in the Amazon Virtual Private Cloud (Amazon VPC). The AWS Cloud9 instance initiates an egress connection to the Session Manager service using the pre-installed Systems Manager agent. In order to use this feature, your developers must have access to instances managed by Session Manager in their IAM policy.
When you create an AWS Cloud9 no-ingress EC2 instance (with access via Systems Manager) into a private subnet, its security group doesn’t have an ingress rule to allow incoming network traffic. The security group does, however, have an egress rule that permits egress traffic from the instance. AWS Cloud9 requires this to download packages and libraries to keep the AWS Cloud9 IDE up to date.
If you want to prevent egress connectivity in addition to ingress traffic for the instance, you can configure Systems Manager to use an interface VPC endpoint. This allows you to restrict egress connections from your environment and ensure the encrypted connections between the AWS Cloud9 EC2 instance and Systems Manager are carried over the AWS global network. The architecture of accessing your AWS Cloud9 instance using Systems Manager and interface VPC endpoints is shown in Figure 1.
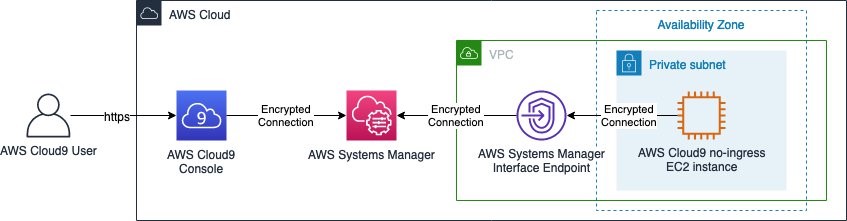
Figure 1: Accessing AWS Cloud9 environment via AWS Systems Manager and Interface VPC Endpoints
Note: The use of interface VPC endpoints incurs an additional charge for each hour your VPC endpoints remain provisioned. This is in addition to the AWS Cloud9 EC2 instance cost.
Prerequisites
You must have a VPC configured with an attached internet gateway, public and private subnets, and a network address translation (NAT) gateway created in your public subnet. Your VPC must also have DNS resolution and DNS hostnames options enabled. To learn more, you can visit Working with VPCs and subnets, Internet gateways, and NAT gateways.
You must also give your developers access to their AWS Cloud9 environments managed by Session Manager.
AWS Cloud9 requires egress access to the internet for some features, including downloading required libraries or packages needed for updates to the IDE and running AWS Lambda functions. If you don’t want to allow egress internet access for your environment, you can create your VPC without an attached internet gateway, public subnet, and NAT gateway.
Implement the solution
To set up AWS Cloud9 with access via Systems Manager:
- Optionally, if no egress access is required, set up interface VPC endpoints for Session Manager
- Create a no-ingress Amazon EC2 instance for your AWS Cloud9 environment
(Optional) Set up interface VPC endpoints for Session Manager
Note: For no-egress environments only.
You can skip this step if you don’t need your VPC to restrict egress access. If you need your environment to restrict egress access, continue.
Start by using the AWS Management Console to configure Systems Manager to use an interface VPC endpoint (powered by AWS PrivateLink). If you’d prefer, you can use this custom AWS CloudFormation template to configure the VPC endpoints.
Interface endpoints allow you to privately access Amazon EC2 and System Manager APIs by using a private IP address. This also restricts all traffic between your managed instances, Systems Manager, and Amazon EC2 to the Amazon network. Using the interface VPC endpoint, you don’t need to set up an internet gateway, a NAT device, or a virtual private gateway.
To set up interface VPC endpoints for Session Manager
- Create a VPC security group to allow ingress access over HTTPS (port 443) from the subnet where you will deploy your AWS Cloud9 environment. This is applied to your interface VPC endpoints to allow connections from your AWS Cloud9 instance to use Systems Manager.
- Create a VPC endpoint.
- In the list of Service Names, select com.amazonaws.<region>.ssm service as shown in Figure 2.

Figure 2: AWS PrivateLink service selection filter
- Select your VPC and private Subnets you want to associate the interface VPC endpoint with.
- Choose Enable for this endpoint for the Enable DNS name setting.
- Select the security group you created in Step 1.
- Add any optional tags for the interface VPC endpoint.
- Choose Create endpoint.
- Repeat Steps 2 through 8 to create interface VPC endpoints for the com.amazonaws.<region>.ssmmessages and com.amazonaws.<region>.ec2messages services.
- When all three interface VPC endpoints have a status of available, you can move to the next procedure.

Create a no-ingress Amazon EC2 instance for your AWS Cloud9 environment
Deploy a no-ingress Amazon EC2 instance for your AWS Cloud9 environment using the console. Optionally, you can use this custom AWS CloudFormation template to create the no-ingress Amazon EC2 instance. You can also use the AWS Command Line Interface, or AWS Cloud9 API to set up your AWS Cloud9 environment with access via Systems Manager.
As part of this process, AWS Cloud9 automatically creates three IAM resources pre-configured with the appropriate permissions:
- An IAM service-linked role (AWSServiceRoleForAWSCloud9)
- A service role (AWSCloud9SSMAccessRole)
- An instance profile (AWSCloud9SSMInstanceProfile)
The AWSCloud9SSMAccessRole and AWSCloud9SSMInstanceProfile are attached to your AWS Cloud9 EC2 instance. This service role for Amazon EC2 is configured with the minimum permissions required to integrate with Session Manager. By default, AWS Cloud9 makes managed temporary AWS access credentials available to you in the environment. If you need to grant additional permissions to your AWS Cloud9 instance to access other services, you can create a new role and instance profile and attach it to your AWS Cloud9 instance.
By default, your AWS Cloud9 environment is created with a VPC security group with no ingress access and allowing egress access so the AWS Cloud9 IDE can download required libraries or packages needed for urgent updates to IDE plugins. You can optionally configure your AWS Cloud9 environment to restrict egress access by removing the egress rules in the security group. If you restrict egress access, some features won’t work (for example, the AWS Lambda plugin and updates to IDE plugins).
To use the console to create your AWS Cloud9 environment
- Navigate to the AWS Cloud9 console.
- Select Create environment on the top right of the console.
- Enter a Name and Description.
- Select Next step.
- Select Create a new no-ingress EC2 instance for your environment (access via Systems Manager) as shown in Figure 3.

Figure 3: AWS Cloud9 environment settings
- Select your preferred Instance type, Platform, and Cost-saving setting.
- You can optionally configure the Network settings to select the Network (VPC) and private Subnet to create your AWS Cloud9 instance.
- Select Next step.

Your AWS Cloud9 environment is ready to use. You can access your AWS Cloud9 environment console via Session Manager using encrypted connections over the AWS global network as shown in Figure 4.
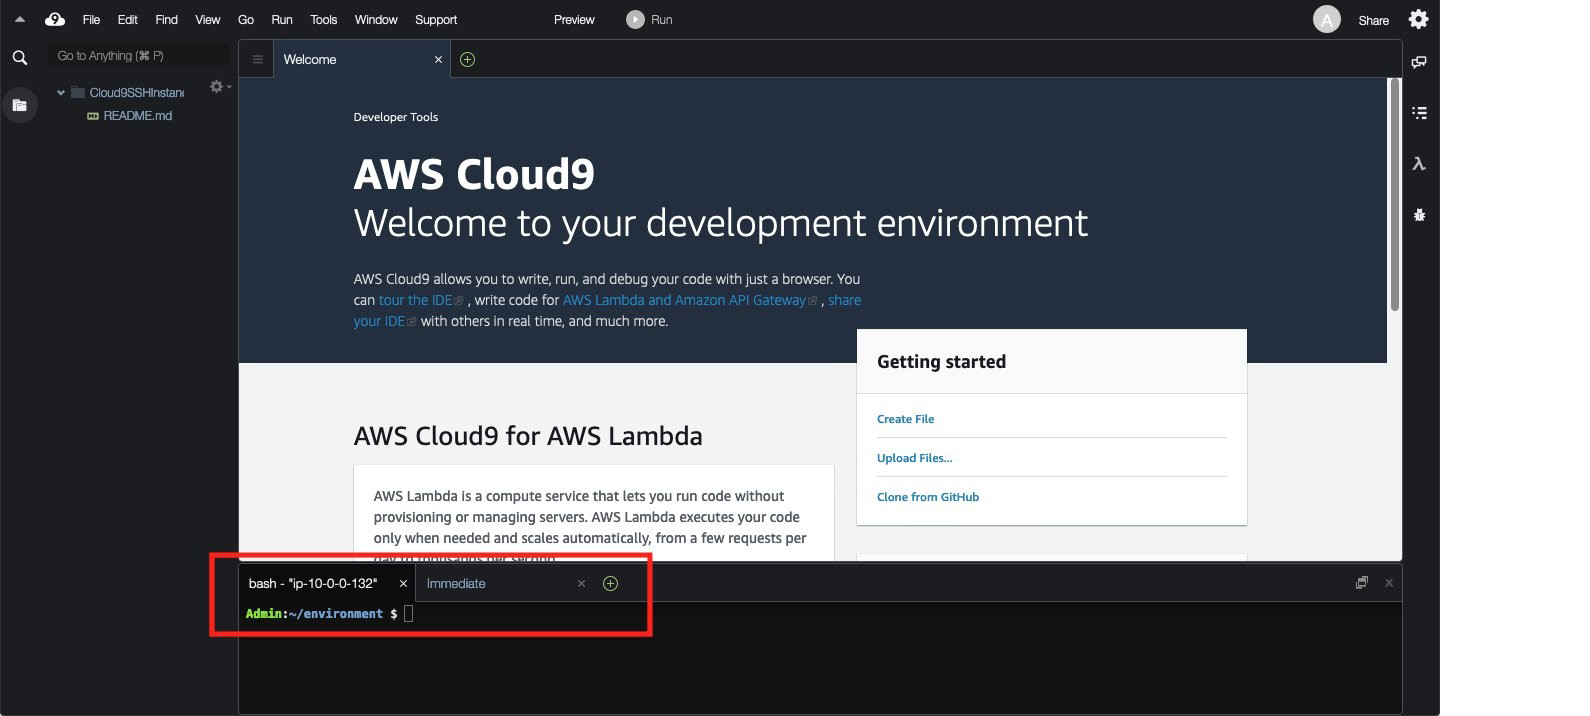
Figure 4: AWS Cloud9 instance console access
You can see that this AWS Cloud9 connection is using Session Manager by navigating to the Session Manager console and viewing the active sessions as shown in Figure 5.
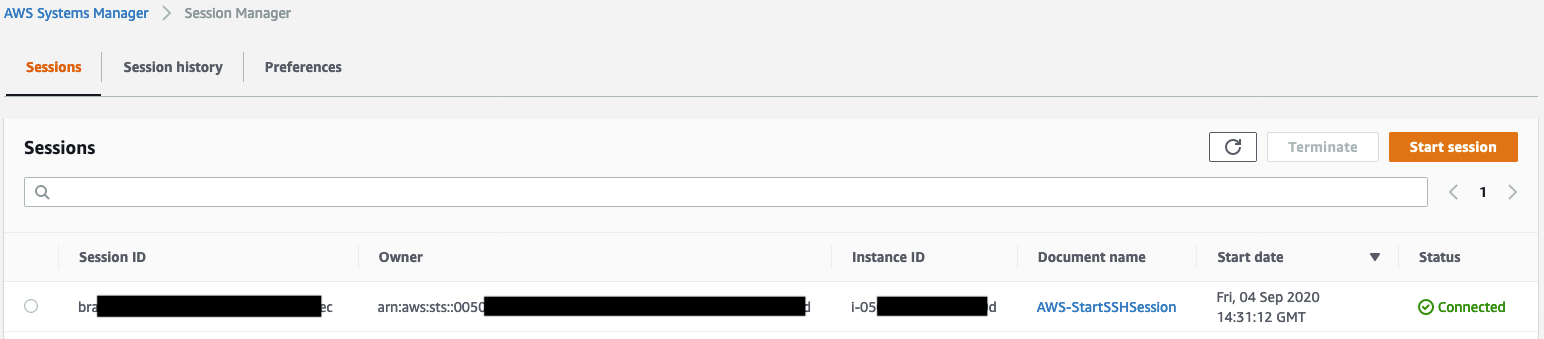
Figure 5: AWS Systems Manager Session Manager active sessions
Summary
Security teams are charged with providing secure operating environments without inhibiting developer productivity. With the ability to deploy your AWS Cloud9 environment instances in a private subnet, you can provide a seamless experience for developing applications using the AWS Cloud9 IDE while enabling security teams to enforce key security controls to protect their corporate networks and intellectual property.
If you have feedback about this post, submit comments in the Comments section below. If you have questions about this post, start a new thread on the AWS Cloud9 forum or contact AWS Support.
Want more AWS Security how-to content, news, and feature announcements? Follow us on Twitter.