Tag Archives: Systems Manager

Using AWS Systems Manager in Hybrid Cloud Environments

Post Syndicated from Shivam Patel original https://aws.amazon.com/blogs/architecture/using-aws-systems-manager-in-hybrid-cloud-environments/

Customers operating in hybrid environments today face tremendous challenges with regard to operational management, security/compliance, and monitoring. Systems administrators have to connect, monitor, patch, and automate across multiple Operating Systems (OS), applications, cloud, and on-premises infrastructure. Each of these scenarios has its own unique vendor and console purpose-built for a specific use case.

Using Hybrid Activations, a capability within AWS Systems Manager, you can manage resources irrespective of where they are hosted. You can securely initiate remote shell connections, automate patch management, and monitor critical metrics. You’re able to gain visibility into networking information and application installations via a single console.

In this post, we’ll discuss how the Session Manager and Patch Manager capabilities of Systems Manager allow you to securely connect to instances and virtual machines (VMs). You can centrally log session activity for later auditing and automate patch management, across both cloud and on-premises environments, within a single interface.

Session Manager

Session Manager is a fully managed feature of AWS Systems Manager. Session Manager provides secure and auditable instance management without the need to open inbound ports, maintain bastion hosts, or manage SSH keys. The centralized session management capability of Session Manager provides administrators the ability to centrally manage access to all compute instances. Irrespective of where your VM is hosted, the Session Manager session can be initiated from the AWS Management Console or from the Command-line interface (CLI). When using the CLI, the Session Manager plugin must be installed. The screenshot following shows an example of this.

Figure 1. Initiating instance management via Session Manager

Figure 1. Initiating instance management via Session Manager

The session is launched using the default system generated ssm-user account. With this account, the system does not prompt for a password when initiating root level commands. To improve security, OS accounts can be used to launch sessions using the Run As feature of Session Manager.

A session initiated via Session Manager is secure. The data exchange between the client and a managed instance takes place over a secure channel using TLS 1.2. To further improve your security posture, AWS Key Management Service (KMS) encryption can be used to encrypt the session traffic between a client and a managed instance. Encrypting session data with a customer managed key enables sessions to handle confidential data interactions. For using KMS encryption, both the user who starts sessions and the managed instance that they connect to, must have permission to use the key. Step-by-step instructions on how to set this up can be found in the Session Manager documentation.

Session Manager integrates with AWS CloudTrail, and this enables security teams to track when a user starts and shuts down sessions. Session Manager can also centrally log all session activity in Amazon CloudWatch or Amazon Simple Storage Service (S3). This gives system administrators the ability to manage details, such as when the session started, what commands were typed during the session, and when it ended. To configure session manager to send logs to CloudWatch and Amazon S3, the instance profile attached to the instance must have permissions to write to CloudWatch and S3. For the Amazon EC2 instance, this will be the IAM role attached to the instance. For VMs running on VMware Cloud on AWS, or on-premises, this is the IAM role from the “Hybrid Activations” page.

Following, we show an example of a session run on an on-premises instance via Session Manager and the corresponding logs in CloudWatch. The logs are continuously streamed into CloudWatch.

Figure 2. CloudWatch log events for session activity via Session Manager

Figure 2. CloudWatch log events for session activity via Session Manager

The following screenshot displays the ipconfig /all command being run remotely within PowerShell of an instance running within VMware Cloud on AWS via Session Manager:

Figure 3. Remote PowerShell session for on-premises VM via Session Manager

Figure 3. Remote PowerShell session for on-premises VM via Session Manager

Patch Manager

Patch management is vital in maintaining a secure and compliant environment. Patch Manager, a capability of AWS Systems Manager, helps you monitor, select, and deploy operating system and software patches automatically. This can happen across compute running on Amazon EC2, VMware on-premises, or VMware Cloud on AWS instances.

The Patch Manager dashboard shows details such as number of instances, high-level patch compliance summaries, compliance reporting age, and common causes of noncompliance. As Patch Manager performs patching operations, it updates the dashboard with a summary of recent patching operations and a list of recurring patching tasks. This provides the operations team a single unified view into environments and simplifies their monitoring efforts.

Figure 4. Patch Manager dashboard

Figure 4. Patch Manager dashboard

Figure 5. List of all recurring patching tasks

Figure 5. List of all recurring patching tasks

A patch baseline in Patch Manager defines which patches are approved for installation on your instances. Patch Manager provides predefined patch baselines for each supported operating system and also lets you create your own custom patch baselines. These patch baselines let you maintain patch consistency across your deployments on Amazon EC2, VMware on-premises, and VMware Cloud on AWS.

Custom patch baselines give you greater control over which patches are approved and when they are automatically applied. By using multiple patch baselines with different auto-approval delays or cutoffs, you can test patches in your development environment. Custom patch baselines also let you assign compliance levels to indicate the severity of the compliance violation when a patch is reported as missing.

Figure 6. List of Patch baselines

Figure 6. List of Patch baselines

You can use a patch group to associate a group of instances with a specific patch baseline in Patch Manager. This ensures that you are deploying the appropriate patches with associated patch baseline rules, to the correct set of instances. These instances can be EC2, VMware on-premises, or VMware Cloud on AWS. You can also use patch groups to schedule patching during a specific maintenance window.

Patch Manager also provides the ability to scan your instances and VMs running within VMware on-premises and/or VMware Cloud on AWS. It can report compliance adherence based on pre-defined schedules. Patch compliance reports can also be saved to an Amazon S3 bucket of your choice and generated as needed. For reports on a single instance/VM, detailed patch data will be included. For reports run on all instances, a summary of missing patch data will be provided.

The Patch Manager feature of AWS Systems Manager also integrates with AWS Security Hub, a service providing a comprehensive view of your security alerts. It additionally offers security check automation capabilities. In the following image, we show non-compliant instances and servers being reported within AWS Security Hub across EC2, VMware on-premises, and VMware Cloud on AWS:

Figure 7. Non-compliant instances and VMs being reported via AWS Security Hub

Figure 7. Non-compliant instances and VMs being reported via AWS Security Hub

Installation and deployment

To ease installation and deployment efforts, the SSM agent is pre-installed on instances created from the following Amazon Machine Images (AMIs):

  • Amazon Linux
  • Amazon Linux 2
  • Amazon Linux 2 ECS-Optimized Base AMIs
  • macOS 10.14.x (Mojave) and 10.15.x (Catalina)
  • Ubuntu Server 16.04, 18.04, and 20.04
  • Windows Server 2008-2012 R2 AMIs published in November 2016 or later
  • Windows Server 2016 and 2019

For other AMI’s and VMs within VMware on-premises and/or VMware Cloud on AWS, manual agent installation must be performed.

Below is an architecture diagram of our solution described in this post:

Figure 8. General example of Systems Manager process flow

Figure 8. General example of Systems Manager process flow

  1. Configure Systems Manager: Use the Systems Manager console, SDK, AWS Command Line Interface (AWS CLI), or AWS Tools for Windows PowerShell to configure, schedule, automate, and run actions that you want to perform on your AWS resources.
  2. Verification and processing: Systems Manager verifies the configurations, including permissions, and sends requests to the AWS Systems Manager SSM Agent running on your instances or servers in your hybrid environment. SSM Agent performs the specified configuration changes.
  3. Reporting: SSM Agent reports the status of the configuration changes and actions to Systems Manager in the AWS Cloud. If configured, Systems Manager then sends the status to the user and various AWS services.

Conclusion

In this post, we showcase how AWS Systems Manager can yield a unified view within your hybrid environments. It spans native AWS, VMware on-premises, and VMware Cloud on AWS. The Session Manager and Patch Manager features simplify instance connectivity and patch management. Other native capabilities of AWS Systems Manager allow application and change management, software inventory, remote initiation, and monitoring. We encourage you to use the features discussed in this post to maintain your servers across your hybrid environment.

Additional links for consideration:

Use AWS Secrets Manager to simplify the management of private certificates

Post Syndicated from Maitreya Ranganath original https://aws.amazon.com/blogs/security/use-aws-secrets-manager-to-simplify-the-management-of-private-certificates/

AWS Certificate Manager (ACM) lets you easily provision, manage, and deploy public and private Secure Sockets Layer/Transport Layer Security (SSL/TLS) certificates for use with Amazon Web Services (AWS) services and your internal connected resources. For private certificates, AWS Certificate Manager Private Certificate Authority (ACM PCA) can be used to create private CA hierarchies, including root and subordinate CAs, without the investment and maintenance costs of operating an on-premises CA. With these CAs, you can issue custom end-entity certificates or use the ACM defaults.

When you manage the lifecycle of certificates, it’s important to follow best practices. You can think of a certificate as an identity of a service you’re connecting to. You have to ensure that these identities are secure and up to date, ideally with the least amount of manual intervention. AWS Secrets Manager provides a mechanism for managing certificates, and other secrets, at scale. Specifically, you can configure secrets to automatically rotate on a scheduled basis by using pre-built or custom AWS Lambda functions, encrypt them by using AWS Key Management Service (AWS KMS) keys, and automatically retrieve or distribute them for use in applications and services across an AWS environment. This reduces the overhead of manually managing the deployment, creation, and secure storage of these certificates.

In this post, you’ll learn how to use Secrets Manager to manage and distribute certificates created by ACM PCA across AWS Regions and accounts.

We present two use cases in this blog post to demonstrate the difference between issuing private certificates with ACM and with ACM PCA. For the first use case, you will create a certificate by using the ACM defaults for private certificates. You will then deploy the ACM default certificate to an Amazon Elastic Compute Cloud (Amazon EC2) instance that is launched in the same account as the secret and private CA. In the second scenario, you will create a custom certificate by using ACM PCA templates and parameters. This custom certificate will be deployed to an EC2 instance in a different account to demonstrate cross-account sharing of secrets.

Solution overview

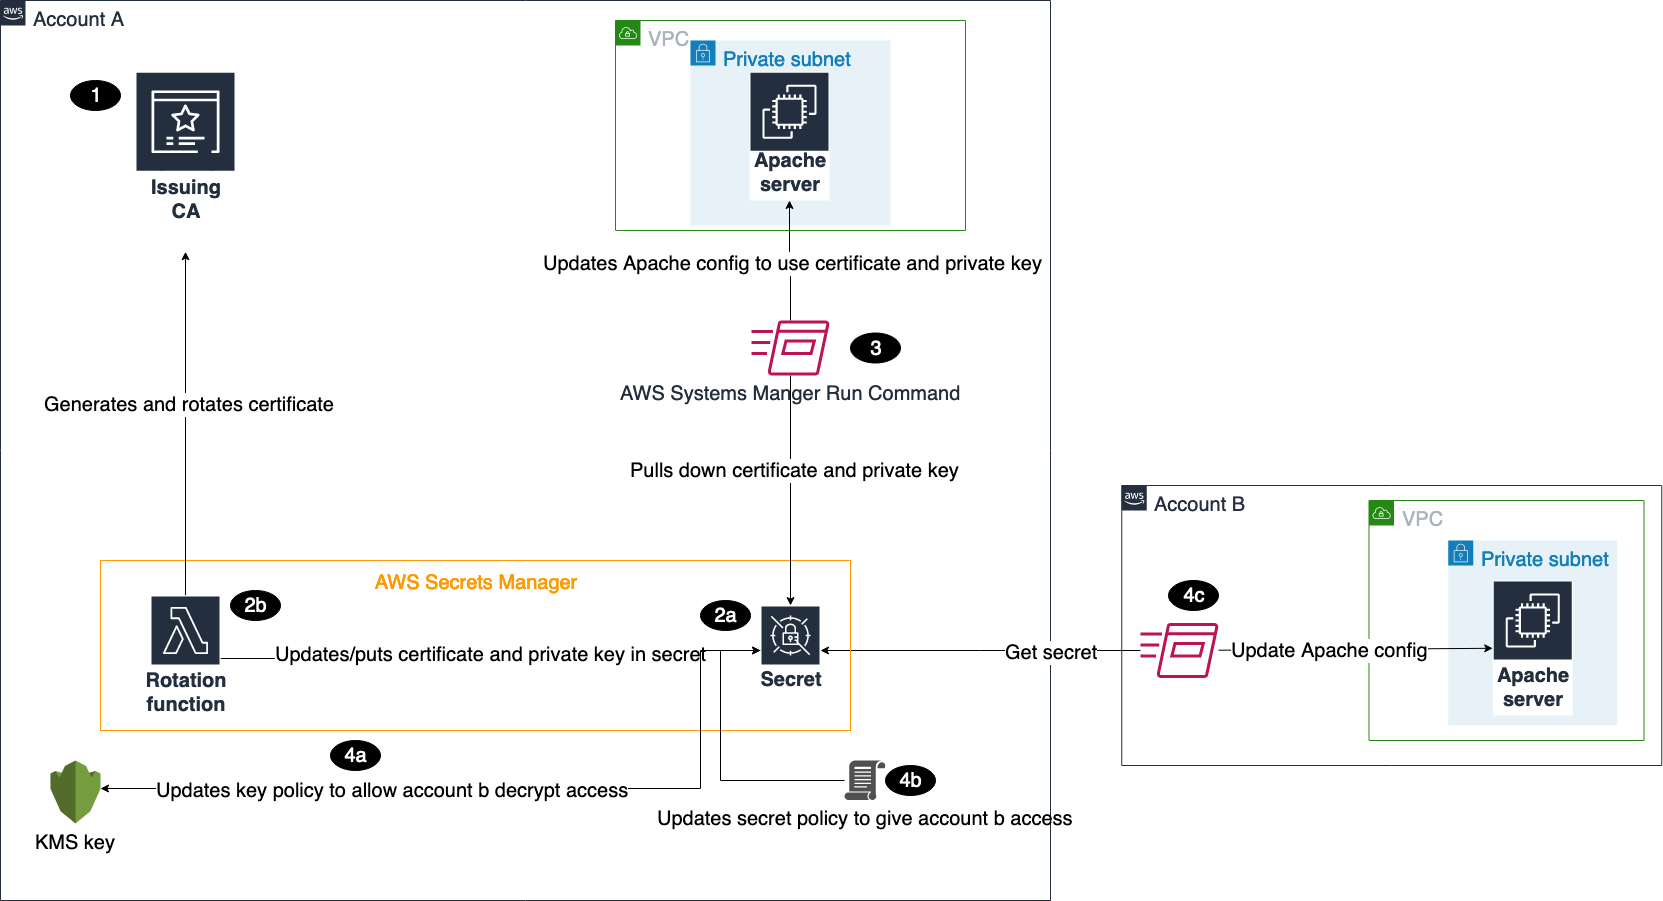
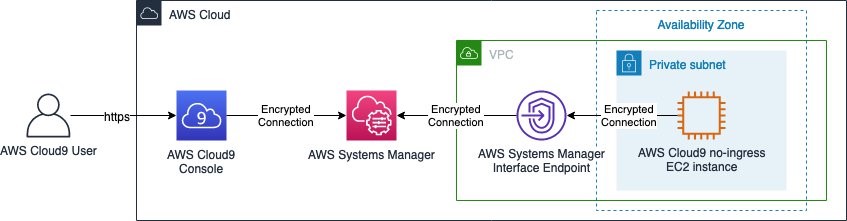
Figure 1 shows the architecture of our solution.

Figure 1: Solution architecture

Figure 1: Solution architecture

This architecture includes resources that you will create during the blog walkthrough and by using AWS CloudFormation templates. This architecture outlines how these services can be used in a multi-account environment. As shown in the diagram:

  1. You create a certificate authority (CA) in ACM PCA to generate end-entity certificates.
  2. In the account where the issuing CA was created, you create secrets in Secrets Manager.
    1. There are several required parameters that you must provide when creating secrets, based on whether you want to create an ACM or ACM PCA issued certificate. These parameters will be passed to our Lambda function to make sure that the certificate is generated and stored properly.
    2. The Lambda rotation function created by the CloudFormation template is attached when configuring secrets rotation. Initially, the function generates two Privacy-Enhanced Mail (PEM) encoded files containing the certificate and private key, based on the provided parameters, and stores those in the secret. Subsequent calls to the function are made when the secret needs to be rotated, and then the function stores the resulting Certificate PEM and Private Key PEM in the desired secret. The function is written using Python, the AWS SDK for Python (Boto3), and OpenSSL. The flow of the function follows the requirements for rotating secrets in Secrets Manager.
  3. The first CloudFormation template creates a Systems Manager Run Command document that can be invoked to install the certificate and private key from the secret on an Apache Server running on EC2 in Account A.
  4. The second CloudFormation template deploys the same Run Command document and EC2 environment in Account B.
    1. To make sure that the account has the ability to pull down the certificate and private key from Secrets Manager, you need to update the key policy in Account A to give Account B access to decrypt the secret.
    2. You also need to add a resource-based policy to the secret that gives Account B access to retrieve the secret from Account A.
    3. Once the proper access is set up in Account A, you can use the Run Command document to install the certificate and private key on the Apache Server.

In a multi-account scenario, it’s common to have a central or shared AWS account that owns the ACM PCA resource, while workloads that are deployed in other AWS accounts use certificates issued by the ACM PCA. This can be achieved in two ways:

  1. Secrets in Secrets Manager can be shared with other AWS accounts by using resource-based policies. Once shared, the secrets can be deployed to resources, such as EC2 instances.
  2. You can share the central ACM PCA with other AWS accounts by using AWS Resource Access Manager or ACM PCA resource-based policies. These two options allow the receiving AWS account or accounts to issue private certificates by using the shared ACM PCA. These issued certificates can then use Secrets Manager to manage the secret in the child account and leverage features like rotation.

We will focus on first case for sharing secrets.

Solution cost

The cost for running this solution comes from the following services:

  • AWS Certificate Manager Private Certificate Authority (ACM PCA)
    Referring to the pricing page for ACM PCA, this solution incurs a prorated monthly charge of $400 for each CA that is created. A CA can be deleted the same day it’s created, leading to a charge of around $13/day (400 * 12 / 365.25). In addition, there is a cost for issuing certificates using ACM PCA. For the first 1000 certificates, this cost is $0.75. For this demonstration, you only need two certificates, resulting in a total charge of $1.50 for issuing certificates using ACM PCA. In all, the use of ACM PCA in this solution results in a charge of $14.50.
  • Amazon EC2
    The CloudFormation templates create t2.micro instances that cost $0.0116/hour, if they’re not eligible for Free Tier.
  • Secrets Manager
    There is a 30-day free trial for Secrets Manager, which is initiated when the first secret is created. After the free trial has completed, it costs $0.40 per secret stored per month. You will use two secrets for this solution and can schedule these for deletion after seven days, resulting in a prorated charge of $0.20.
  • Lambda
    Lambda has a free usage tier that allows for 1 million free requests per month and 400,000 GB-seconds of compute time per month. This fits within the usage for this blog, making the cost $0.
  • AWS KMS
    A single key created by one of the CloudFormation templates costs $1/month. The first 20,000 requests to AWS KMS are free, which fits within the usage of the test environment. In a production scenario, AWS KMS would charge $0.03 per 10,000 requests involving this key.

There are no charges for Systems Manager Run Command.

See the “Clean up resources” section of this blog post to get information on how to delete the resources that you create for this environment.

Deploy the solution

Now we’ll walk through the steps to deploy the solution. The CloudFormation templates and Lambda function code can be found in the AWS GitHub repository.

Create a CA to issue certificates

First, you’ll create an ACM PCA to issue private certificates. A common practice we see with customers is using a subordinate CA in AWS that is used to issue end-entity certificates for applications and workloads in the cloud. This subordinate can either point to a root CA in ACM PCA that is maintained by a central team, or to an existing on-premises public key infrastructure (PKI). There are some considerations when creating a CA hierarchy in ACM.

For demonstration purposes, you need to create a CA that can issue end-entity certificates. If you have an existing PKI that you want to use, you can create a subordinate CA that is signed by an external CA that can issue certificates. Otherwise, you can create a root CA and begin building a PKI on AWS. During creation of the CA, make sure that ACM has permissions to automatically renew certificates, because this feature will be used in later steps.

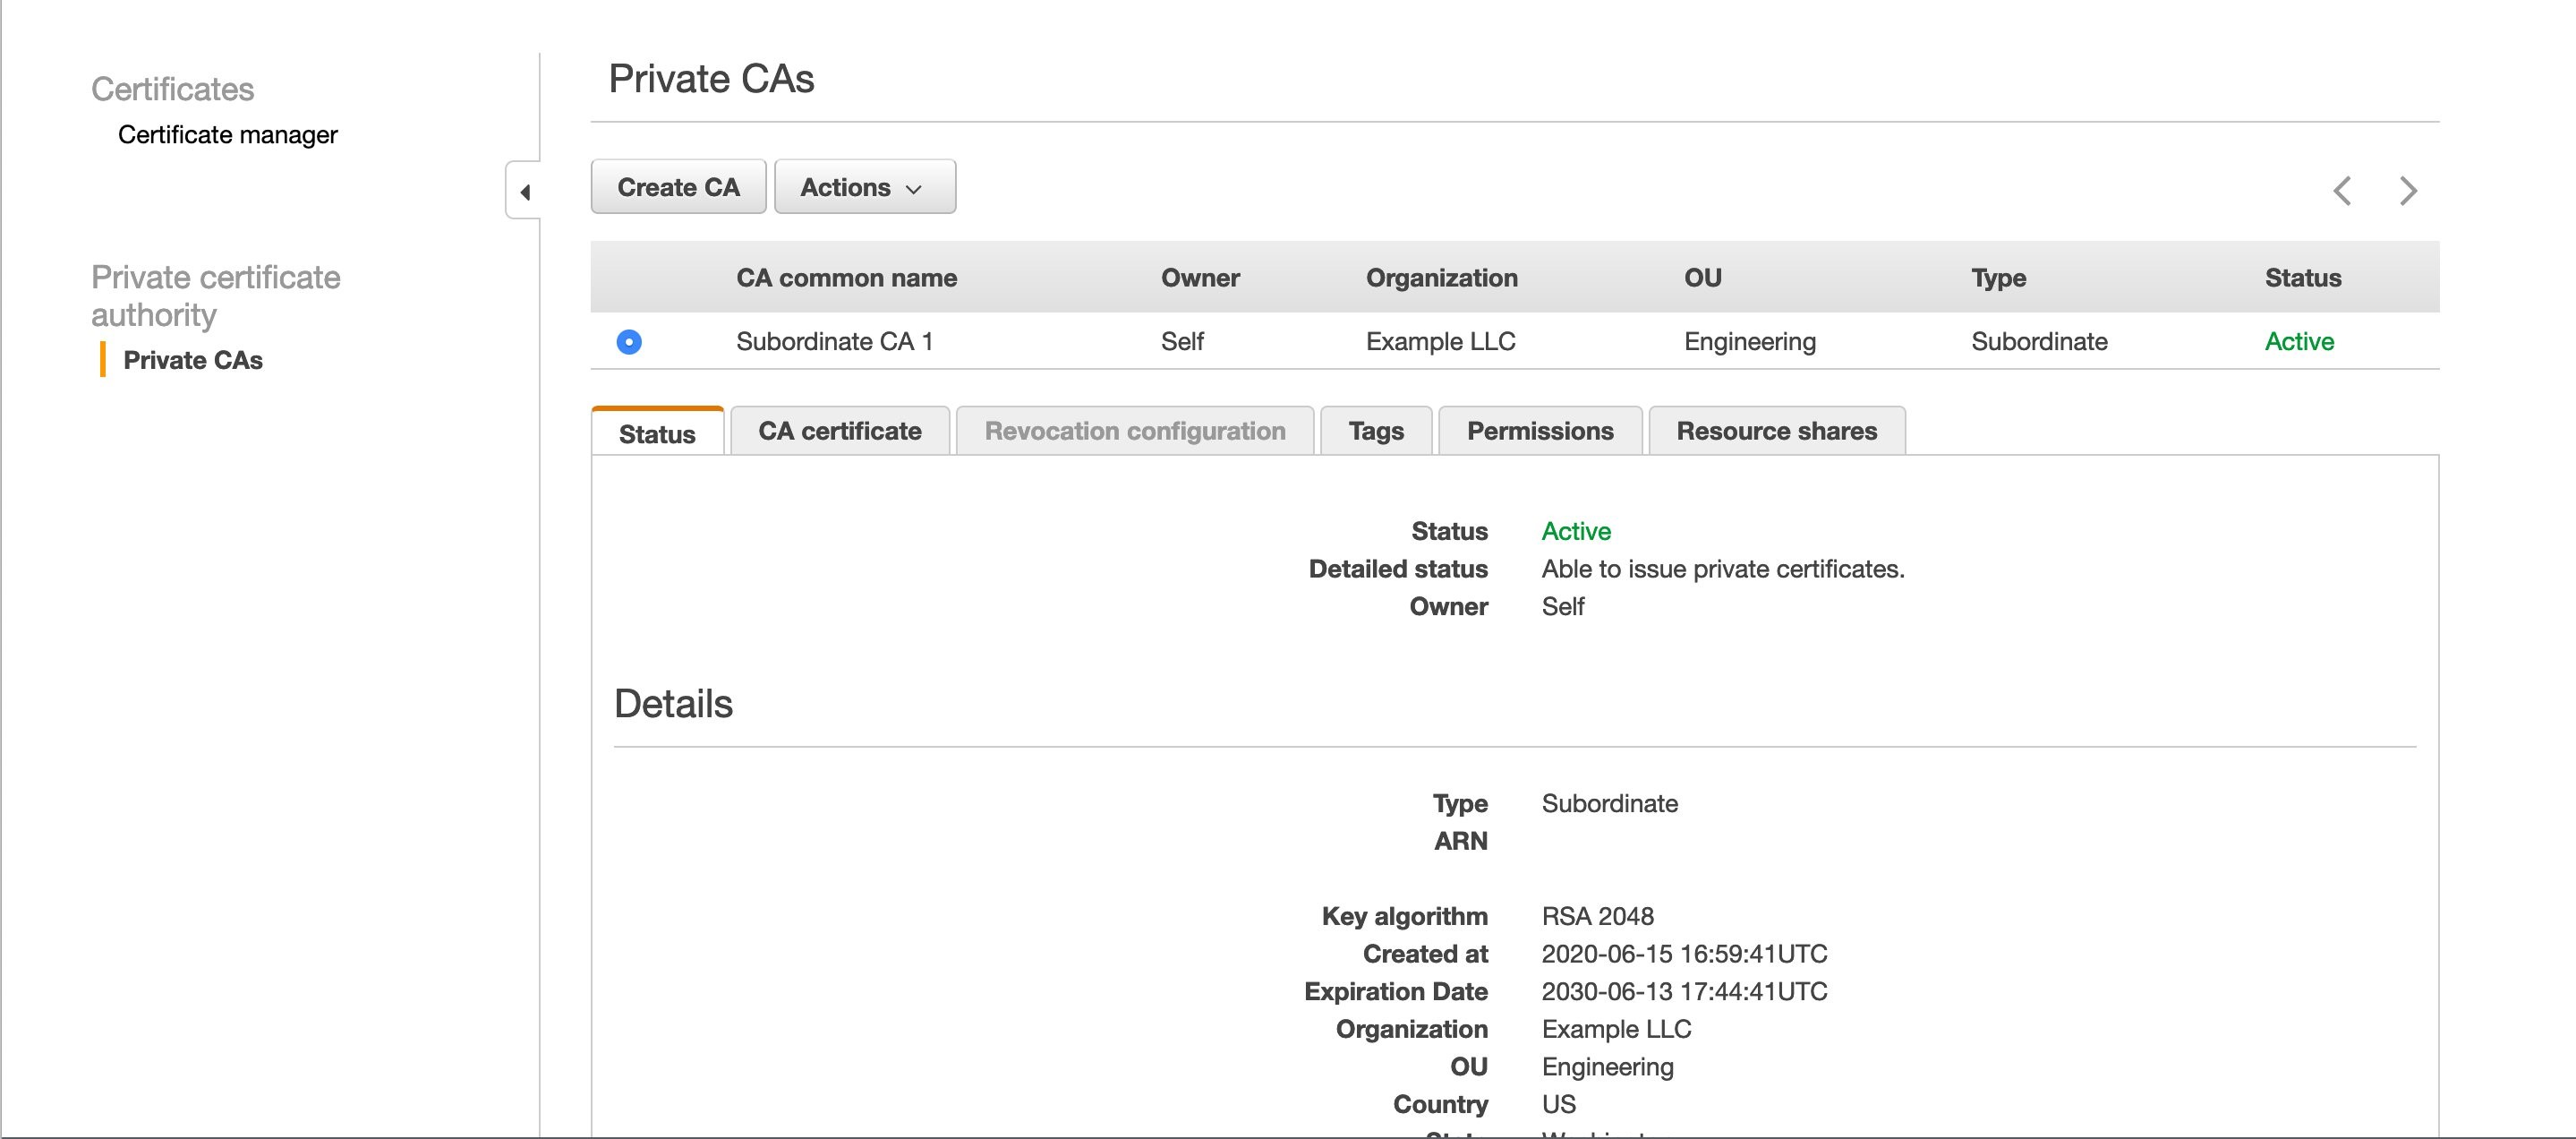
You should have one or more private CAs in the ACM console, as shown in Figure 2.

Figure 2: A private CA in the ACM PCA console

Figure 2: A private CA in the ACM PCA console

You will use two CloudFormation templates for this architecture. The first is launched in the same account where your private CA lives, and the second is launched in a different account. The first template generates the following: a Lambda function used for Secrets Manager rotation, an AWS KMS key to encrypt secrets, and a Systems Manager Run Command document to install the certificate on an Apache Server running on EC2 in Amazon Virtual Private Cloud (Amazon VPC). The second template launches the same Systems Manager Run Command document and EC2 environment.

To deploy the resources for the first template, select the following Launch Stack button. Make sure you’re in the N. Virginia (us-east-1) Region.

Select the Launch Stack button to launch the template

The template takes a few minutes to launch.

Use case #1: Create and deploy an ACM certificate

For the first use case, you’ll create a certificate by using the ACM defaults for private certificates, and then deploy it.

Create a Secrets Manager secret

To begin, create your first secret in Secrets Manager. You will create these secrets in the console to see how the service can be set up and used, but all these actions can be done through the AWS Command Line Interface (AWS CLI) or AWS SDKs.

To create a secret

  1. Navigate to the Secrets Manager console.
  2. Choose Store a new secret.
  3. For the secret type, select Other type of secrets.
  4. The Lambda rotation function has a set of required parameters in the secret type depending on what kind of certificate needs to be generated.For this first secret, you’re going to create an ACM_ISSUED certificate. Provide the following parameters.

    Key Value
    CERTIFICATE_TYPE ACM_ISSUED
    CA_ARN The Amazon Resource Name (ARN) of your certificate-issuing CA in ACM PCA
    COMMON_NAME The end-entity name for your certificate (for example, server1.example)
    ENVIRONMENT TEST (You need this later on to test the renewal of certificates. If using this outside of the blog walkthrough, set it to something like DEV or PROD.)
  5. For Encryption key, select CAKey, and then choose Next.
  6. Give the secret a name and optionally add tags or a description. Choose Next.
  7. Select Enable automatic rotation and choose the Lambda function that starts with <CloudFormation Stack Name>-SecretsRotateFunction. Because you’re creating an ACM-issued certificate, the rotation will be handled 60 days before the certificate expires. The validity is set to 365 days, so any value higher than 305 would work. Choose Next.
  8. Review the configuration, and then choose Store.
  9. This will take you back to a list of your secrets, and you will see your new secret, as shown in Figure 3. Select the new secret.

    Figure 3: The new secret in the Secrets Manager console

    Figure 3: The new secret in the Secrets Manager console

  10. Choose Retrieve secret value to confirm that CERTIFICATE_PEM, PRIVATE_KEY_PEM, CERTIFICATE_CHAIN_PEM, and CERTIFICATE_ARN are set in the secret value.

You now have an ACM-issued certificate that can be deployed to an end entity.

Deploy to an end entity

For testing purposes, you will now deploy the certificate that you just created to an Apache Server.

To deploy the certificate to the Apache Server

  1. In a new tab, navigate to the Systems Manager console.
  2. Choose Documents at the bottom left, and then choose the Owned by me tab.
  3. Choose RunUpdateTLS.
  4. Choose Run command at the top right.
  5. Copy and paste the secret ARN from Secrets Manager and make sure there are no leading or trailing spaces.
  6. Select Choose instances manually, and then choose ApacheServer.
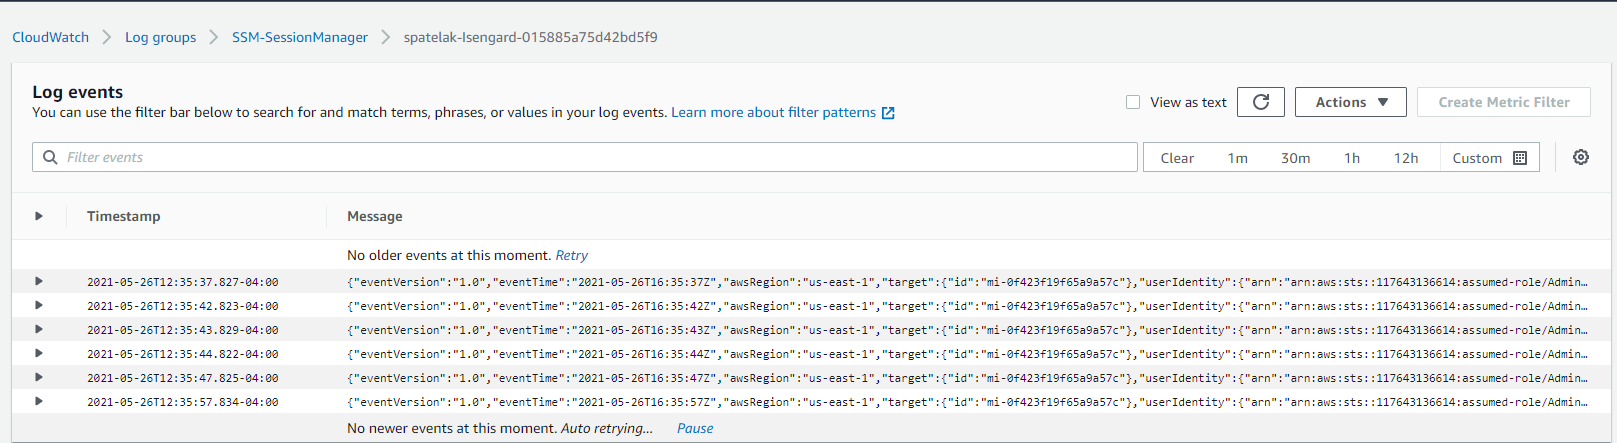
  7. Select CloudWatch output to track progress.
  8. Choose Run.

The certificate and private key are now installed on the server, and it has been restarted.

To verify that the certificate was installed

  1. Navigate to the EC2 console.
  2. In the dashboard, choose Running Instances.
  3. Select ApacheServer, and choose Connect.
  4. Select Session Manager, and choose Connect.
  5. When you’re logged in to the instance, enter the following command.
    openssl s_client -connect localhost:443 | openssl x509 -text -noout
    

    This will display the certificate that the server is using, along with other metadata like the certificate chain and validity period. For the validity period, note the Not Before and Not After dates and times, as shown in figure 4.

    Figure 4: Server certificate

    Figure 4: Server certificate

Now, test the rotation of the certificate manually. In a production scenario, this process would be automated by using maintenance windows. Maintenance windows allow for the least amount of disruption to the applications that are using certificates, because you can determine when the server will update its certificate.

To test the rotation of the certificate

  1. Navigate back to your secret in Secrets Manager.
  2. Choose Rotate secret immediately. Because you set the ENVIRONMENT key to TEST in the secret, this rotation will renew the certificate. When the key isn’t set to TEST, the rotation function pulls down the renewed certificate based on its rotation schedule, because ACM is managing the renewal for you. In a couple of minutes, you’ll receive an email from ACM stating that your certificate was rotated.
  3. Pull the renewed certificate down to the server, following the same steps that you used to deploy the certificate to the Apache Server.
  4. Follow the steps that you used to verify that the certificate was installed to make sure that the validity date and time has changed.

Use case #2: Create and deploy an ACM PCA certificate by using custom templates

Next, use the second CloudFormation template to create a certificate, issued by ACM PCA, which will be deployed to an Apache Server in a different account. Sign in to your other account and select the following Launch Stack button to launch the CloudFormation template.

Select the Launch Stack button to launch the template

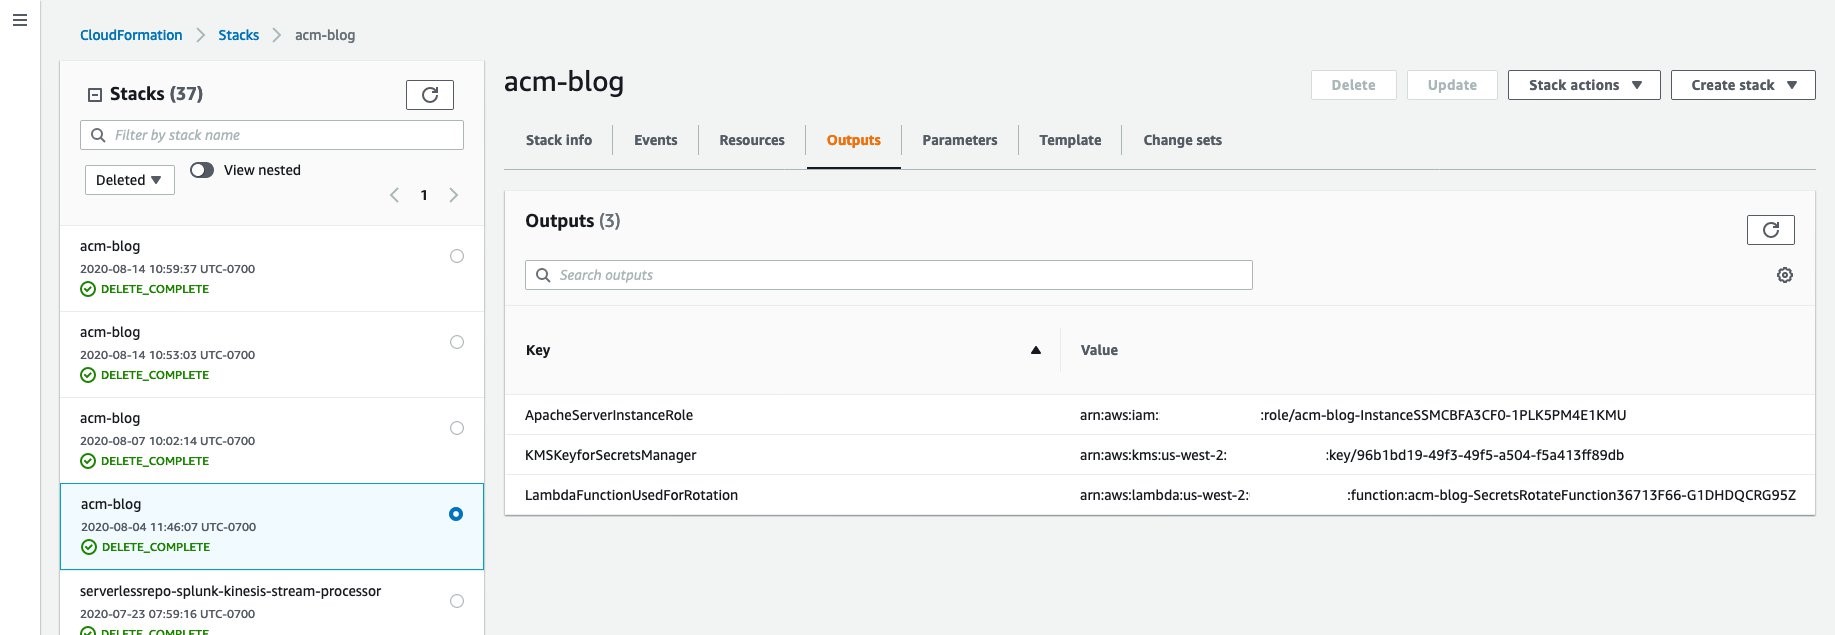
This creates the same Run Command document you used previously, as well as the EC2 and Amazon VPC environment running an Apache Server. This template takes in a parameter for the KMS key ARN; this can be found in the first template’s output section, shown in figure 5.

Figure 5: CloudFormation outputs

Figure 5: CloudFormation outputs

While that’s completing, sign in to your original account so that you can create the new secret.

To create the new secret

  1. Follow the same steps you used to create a secret, but change the secret values passed in to the following.

    Key Value
    CA_ARN The ARN of your certificate-issuing CA in ACM PCA
    COMMON_NAME You can use any name you want, such as server2.example
    TEMPLATE_ARN

    For testing purposes, use arn:aws:acm-pca:::template/EndEntityCertificate/V1

    This template ARN determines what type of certificate is being created and your desired path length. For more information, see Understanding Certificate Templates.

    KEY_ALGORITHM TYPE_RSA
    (You can also use TYPE_DSA)
    KEY_SIZE 2048
    (You can also use 1024 or 4096)
    SIGNING_HASH sha256
    (You can also use sha384 or sha512)
    SIGNING_ALGORITHM RSA
    (You can also use ECDSA if the key type for your issuing CA is set to ECDSA P256 or ECDSA P384)
    CERTIFICATE_TYPE ACM_PCA_ISSUED
  2. Add the following resource policy during the name and description step. This gives your other account access to pull this secret down to install the certificate on its Apache Server.
    {
      "Version" : "2012-10-17",
      "Statement" : [ {
        "Effect" : "Allow",
        "Principal" : {
          "AWS" : "<ARN in output of second CloudFormation Template>"
        },
        "Action" : "secretsmanager:GetSecretValue",
        "Resource" : "*"
      } ]
    }
    

  3. Finish creating the secret.

After the secret has been created, the last thing you need to do is add permissions to the KMS key policy so that your other account can decrypt the secret when installing the certificate on your server.

To add AWS KMS permissions

  1. Navigate to the AWS KMS console, and choose CAKey.
  2. Next to the key policy name, choose Edit.
  3. For the Statement ID (SID) Allow use of the key, add the ARN of the EC2 instance role in the other account. This can be found in the CloudFormation templates as an output called ApacheServerInstanceRole, as shown in Figure 5. The Statement should look something like this:
    {
                "Sid": "Allow use of the key",
                "Effect": "Allow",
                "Principal": {
                    "AWS": [
                        "arn:aws:iam::<AccountID with CA>:role/<Apache Server Instance Role>",
                        "arn:aws:iam:<Second AccountID>:role/<Apache Server Instance Role>"
                    ]
                },
                "Action": [
                    "kms:Encrypt",
                    "kms:Decrypt",
                    "kms:ReEncrypt*",
                    "kms:GenerateDataKey*",
                    "kms:DescribeKey"
                ],
                "Resource": "*"
    }
    

Your second account now has permissions to pull down the secret and certificate to the Apache Server. Follow the same steps described in the earlier section, “Deploy to an end entity.” Test rotating the secret the same way, and make sure the validity period has changed. You may notice that you didn’t get an email notifying you of renewal. This is because the certificate isn’t issued by ACM.

In this demonstration, you may have noticed you didn’t create resources that pull down the secret in different Regions, just in different accounts. If you want to deploy certificates in different Regions from the one where you create the secret, the process is exactly the same as what we described here. You don’t need to do anything else to accomplish provisioning and deploying in different Regions.

Clean up resources

Finally, delete the resources you created in the earlier steps, in order to avoid additional charges described in the section, “Solution cost.”

To delete all the resources created:

  1. Navigate to the CloudFormation console in both accounts, and select the stack that you created.
  2. Choose Actions, and then choose Delete Stack. This will take a few minutes to complete.
  3. Navigate to the Secrets Manager console in the CA account, and select the secrets you created.
  4. Choose Actions, and then choose Delete secret. This won’t automatically delete the secret, because you need to set a waiting period that allows for the secret to be restored, if needed. The minimum time is 7 days.
  5. Navigate to the Certificate Manager console in the CA account.
  6. Select the certificates that were created as part of this blog walkthrough, choose Actions, and then choose Delete.
  7. Choose Private CAs.
  8. Select the subordinate CA you created at the beginning of this process, choose Actions, and then choose Disable.
  9. After the CA is disabled, choose Actions, and then Delete. Similar to the secrets, this doesn’t automatically delete the CA but marks it for deletion, and the CA can be recovered during the specified period. The minimum waiting period is also 7 days.

Conclusion

In this blog post, we demonstrated how you could use Secrets Manager to rotate, store, and distribute private certificates issued by ACM and ACM PCA to end entities. Secrets Manager uses AWS KMS to secure these secrets during storage and delivery. You can introduce additional automation for deploying the certificates by using Systems Manager Maintenance Windows. This allows you to define a schedule for when to deploy potentially disruptive changes to EC2 instances.

If you have feedback about this post, submit comments in the Comments section below. If you have questions about this post, start a new thread on the AWS Secrets Manager forum or contact AWS Support.

Want more AWS Security how-to content, news, and feature announcements? Follow us on Twitter.

Author

Maitreya Ranganath

Maitreya is an AWS Security Solutions Architect. He enjoys helping customers solve security and compliance challenges and architect scalable and cost-effective solutions on AWS.

Author

Blake Franzen

Blake is a Security Solutions Architect with AWS in Seattle. His passion is driving customers to a more secure AWS environment while ensuring they can innovate and move fast. Outside of work, he is an avid movie buff and enjoys recreational sports.

Isolating network access to your AWS Cloud9 environments

Post Syndicated from Brandon Wu original https://aws.amazon.com/blogs/security/isolating-network-access-to-your-aws-cloud9-environments/

In this post, I show you how to create isolated AWS Cloud9 environments for your developers without requiring ingress (inbound) access from the internet. I also walk you through optional steps to further isolate your AWS Cloud9 environment by removing egress (outbound) access. Until recently, AWS Cloud9 required you to allow ingress Secure Shell (SSH) access from authorized AWS Cloud9 IP addresses. Now AWS Cloud 9 allows you to create and run your development environments within your isolated Amazon Virtual Private Cloud (Amazon VPC), without direct connectivity from the internet, adding an additional layer of security.

AWS Cloud9 is an integrated development environment (IDE) that lets you write, run, edit, and debug code using only a web browser. Developers who use AWS Cloud9 have access to an isolated environment where they can innovate, experiment, develop, and perform early testing without impacting the overall security and stability of other environments. By using AWS Cloud9, you can store your code securely in a version control system (like AWS CodeCommit), configure your AWS Cloud9 EC2 development environments to use encrypted Amazon Elastic Block Store (Amazon EBS) volumes, and share your environments within the same account.

Solution overview

Before enhanced virtual private cloud (VPC) support was available, AWS Cloud9 required you to allow ingress Secure Shell (SSH) access from authorized AWS Cloud9 IP addresses in order to use the IDE. The addition of private VPC support enables you to create and run AWS Cloud9 environments in private subnets without direct connectivity from the internet. You can use VPC security groups to configure the ingress and egress traffic that you allow, or choose to disallow all traffic.

Since this feature uses AWS Systems Manager to support using AWS Cloud9 in private subnets, it’s worth taking a minute to read and understand a bit about it before you continue. Systems Manager Session Manager provides an interactive shell connection between AWS Cloud9 and its associated Amazon Elastic Compute Cloud (Amazon EC2) instance in the Amazon Virtual Private Cloud (Amazon VPC). The AWS Cloud9 instance initiates an egress connection to the Session Manager service using the pre-installed Systems Manager agent. In order to use this feature, your developers must have access to instances managed by Session Manager in their IAM policy.

When you create an AWS Cloud9 no-ingress EC2 instance (with access via Systems Manager) into a private subnet, its security group doesn’t have an ingress rule to allow incoming network traffic. The security group does, however, have an egress rule that permits egress traffic from the instance. AWS Cloud9 requires this to download packages and libraries to keep the AWS Cloud9 IDE up to date.

If you want to prevent egress connectivity in addition to ingress traffic for the instance, you can configure Systems Manager to use an interface VPC endpoint. This allows you to restrict egress connections from your environment and ensure the encrypted connections between the AWS Cloud9 EC2 instance and Systems Manager are carried over the AWS global network. The architecture of accessing your AWS Cloud9 instance using Systems Manager and interface VPC endpoints is shown in Figure 1.
 

Figure 1: Accessing AWS Cloud9 environment via AWS Systems Manager and Interface VPC Endpoints

Figure 1: Accessing AWS Cloud9 environment via AWS Systems Manager and Interface VPC Endpoints

Note: The use of interface VPC endpoints incurs an additional charge for each hour your VPC endpoints remain provisioned. This is in addition to the AWS Cloud9 EC2 instance cost.

Prerequisites

You must have a VPC configured with an attached internet gateway, public and private subnets, and a network address translation (NAT) gateway created in your public subnet. Your VPC must also have DNS resolution and DNS hostnames options enabled. To learn more, you can visit Working with VPCs and subnets, Internet gateways, and NAT gateways.

You must also give your developers access to their AWS Cloud9 environments managed by Session Manager.

AWS Cloud9 requires egress access to the internet for some features, including downloading required libraries or packages needed for updates to the IDE and running AWS Lambda functions. If you don’t want to allow egress internet access for your environment, you can create your VPC without an attached internet gateway, public subnet, and NAT gateway.

Implement the solution

To set up AWS Cloud9 with access via Systems Manager:

  1. Optionally, if no egress access is required, set up interface VPC endpoints for Session Manager
  2. Create a no-ingress Amazon EC2 instance for your AWS Cloud9 environment

(Optional) Set up interface VPC endpoints for Session Manager

Note: For no-egress environments only.

You can skip this step if you don’t need your VPC to restrict egress access. If you need your environment to restrict egress access, continue.

Start by using the AWS Management Console to configure Systems Manager to use an interface VPC endpoint (powered by AWS PrivateLink). If you’d prefer, you can use this custom AWS CloudFormation template to configure the VPC endpoints.

Interface endpoints allow you to privately access Amazon EC2 and System Manager APIs by using a private IP address. This also restricts all traffic between your managed instances, Systems Manager, and Amazon EC2 to the Amazon network. Using the interface VPC endpoint, you don’t need to set up an internet gateway, a NAT device, or a virtual private gateway.

To set up interface VPC endpoints for Session Manager

  1. Create a VPC security group to allow ingress access over HTTPS (port 443) from the subnet where you will deploy your AWS Cloud9 environment. This is applied to your interface VPC endpoints to allow connections from your AWS Cloud9 instance to use Systems Manager.
  2. Create a VPC endpoint.
  3. In the list of Service Names, select com.amazonaws.<region>.ssm service as shown in Figure 2.
     
    Figure 2: AWS PrivateLink service selection filter

    Figure 2: AWS PrivateLink service selection filter

  4. Select your VPC and private Subnets you want to associate the interface VPC endpoint with.
  5. Choose Enable for this endpoint for the Enable DNS name setting.
  6. Select the security group you created in Step 1.
  7. Add any optional tags for the interface VPC endpoint.
  8. Choose Create endpoint.
  9. Repeat Steps 2 through 8 to create interface VPC endpoints for the com.amazonaws.<region>.ssmmessages and com.amazonaws.<region>.ec2messages services.
  10. When all three interface VPC endpoints have a status of available, you can move to the next procedure.

Create a no-ingress Amazon EC2 instance for your AWS Cloud9 environment

Deploy a no-ingress Amazon EC2 instance for your AWS Cloud9 environment using the console. Optionally, you can use this custom AWS CloudFormation template to create the no-ingress Amazon EC2 instance. You can also use the AWS Command Line Interface, or AWS Cloud9 API to set up your AWS Cloud9 environment with access via Systems Manager.

As part of this process, AWS Cloud9 automatically creates three IAM resources pre-configured with the appropriate permissions:

  • An IAM service-linked role (AWSServiceRoleForAWSCloud9)
  • A service role (AWSCloud9SSMAccessRole)
  • An instance profile (AWSCloud9SSMInstanceProfile)

The AWSCloud9SSMAccessRole and AWSCloud9SSMInstanceProfile are attached to your AWS Cloud9 EC2 instance. This service role for Amazon EC2 is configured with the minimum permissions required to integrate with Session Manager. By default, AWS Cloud9 makes managed temporary AWS access credentials available to you in the environment. If you need to grant additional permissions to your AWS Cloud9 instance to access other services, you can create a new role and instance profile and attach it to your AWS Cloud9 instance.

By default, your AWS Cloud9 environment is created with a VPC security group with no ingress access and allowing egress access so the AWS Cloud9 IDE can download required libraries or packages needed for urgent updates to IDE plugins. You can optionally configure your AWS Cloud9 environment to restrict egress access by removing the egress rules in the security group. If you restrict egress access, some features won’t work (for example, the AWS Lambda plugin and updates to IDE plugins).

To use the console to create your AWS Cloud9 environment

  1. Navigate to the AWS Cloud9 console.
  2. Select Create environment on the top right of the console.
  3. Enter a Name and Description.
  4. Select Next step.
  5. Select Create a new no-ingress EC2 instance for your environment (access via Systems Manager) as shown in Figure 3.
     
    Figure 3: AWS Cloud9 environment settings

    Figure 3: AWS Cloud9 environment settings

  6. Select your preferred Instance type, Platform, and Cost-saving setting.
  7. You can optionally configure the Network settings to select the Network (VPC) and private Subnet to create your AWS Cloud9 instance.
  8. Select Next step.

Your AWS Cloud9 environment is ready to use. You can access your AWS Cloud9 environment console via Session Manager using encrypted connections over the AWS global network as shown in Figure 4.
 

Figure 4: AWS Cloud9 instance console access

Figure 4: AWS Cloud9 instance console access

You can see that this AWS Cloud9 connection is using Session Manager by navigating to the Session Manager console and viewing the active sessions as shown in Figure 5.
 

Figure 5: AWS Systems Manager Session Manager active sessions

Figure 5: AWS Systems Manager Session Manager active sessions

Summary

Security teams are charged with providing secure operating environments without inhibiting developer productivity. With the ability to deploy your AWS Cloud9 environment instances in a private subnet, you can provide a seamless experience for developing applications using the AWS Cloud9 IDE while enabling security teams to enforce key security controls to protect their corporate networks and intellectual property.

If you have feedback about this post, submit comments in the Comments section below. If you have questions about this post, start a new thread on the AWS Cloud9 forum or contact AWS Support.

Want more AWS Security how-to content, news, and feature announcements? Follow us on Twitter.

Author

Brandon Wu

Brandon is a security solutions architect helping financial services organizations secure their critical workloads on AWS. In his spare time, he enjoys exploring outdoors and experimenting in the kitchen.