Post Syndicated from Cameron Worrell original https://aws.amazon.com/blogs/security/how-to-enhance-amazon-cloudfront-origin-security-with-aws-waf-and-aws-secrets-manager/
Whether your web applications provide static or dynamic content, you can improve their performance, availability, and security by using Amazon CloudFront as your content delivery network (CDN). CloudFront is a web service that speeds up distribution of your web content through a worldwide network of data centers called edge locations. CloudFront ensures that end-user requests are served by the closest edge location. As a result, viewer requests travel a short distance, improving performance for your viewers. When you deliver web content through a CDN such as CloudFront, a best practice is to prevent viewer requests from bypassing the CDN and accessing your origin content directly. In this blog post, you’ll see how to use CloudFront custom headers, AWS WAF, and AWS Secrets Manager to restrict viewer requests from accessing your CloudFront origin resources directly.
You can configure CloudFront to add custom HTTP headers to the requests that it sends to your origin. HTTP header fields are components of the header section of request and response messages in the Hypertext Transfer Protocol (HTTP). These custom headers enable you to send and gather information from your origin that isn’t included in typical viewer requests. You can use custom headers to control access to content. By configuring your origin to respond to requests only when they include a custom header that was added by CloudFront, you prevent users from bypassing CloudFront and accessing your origin content directly. In addition to offloading traffic from your origin servers, this also helps enforce web traffic being processed at CloudFront edge locations according to your AWS WAF rules prior to being forwarded to your origin.
AWS WAF is a web application firewall that helps protect your web applications from common web exploits that could affect application availability, compromise security, or consume excessive resources. It supports managed rules as well as a powerful rule language for custom rules. AWS WAF is tightly integrated with CloudFront and the Application Load Balancer (ALB). AWS Secrets Manager helps you protect the secrets needed to access your applications, services, and IT resources. This service enables you to easily rotate, manage, and retrieve database credentials, API keys, and other secrets throughout their lifecycle.
Solution overview
This blog post includes a sample solution you can deploy to see how its components integrate to implement the origin access restriction. The sample solution includes a web server deployed on Amazon Elastic Compute Cloud (Amazon EC2) Linux instances running in an AWS Auto Scaling group. Elastic Load Balancing distributes the incoming application traffic across the EC2 instances by using an ALB. The ALB is associated with an AWS WAF web access control list (web ACL), which is used to validate the incoming origin requests. Finally, a CloudFront distribution is deployed with an AWS WAF web ACL and configured to point to the origin ALB.
Although the sample solution is designed for deployment with CloudFront with an AWS WAF–associated ALB as its origin, the same approach could be used for origins that use Amazon API Gateway. A custom origin is any origin that is not an Amazon Simple Storage Service (Amazon S3) bucket, with one exception. An S3 bucket that is configured with static website hosting is a custom origin. You can refer to the CloudFront Developer Guide for more information on securing content that CloudFront delivers from S3 origins.
This solution is intended to enhance security for CloudFront custom origins that support AWS WAF, such as ALB, and is not a substitute for authentication and authorization mechanisms within your web applications. In this solution, Secrets Manager is used to control, audit, monitor, and rotate a random string used within your CloudFront and AWS WAF configurations. Although most of these lifecycle attributes could be set manually, Secrets Manager makes it easier.
Figure 1 shows how the provided AWS CloudFormation template creates the sample solution.
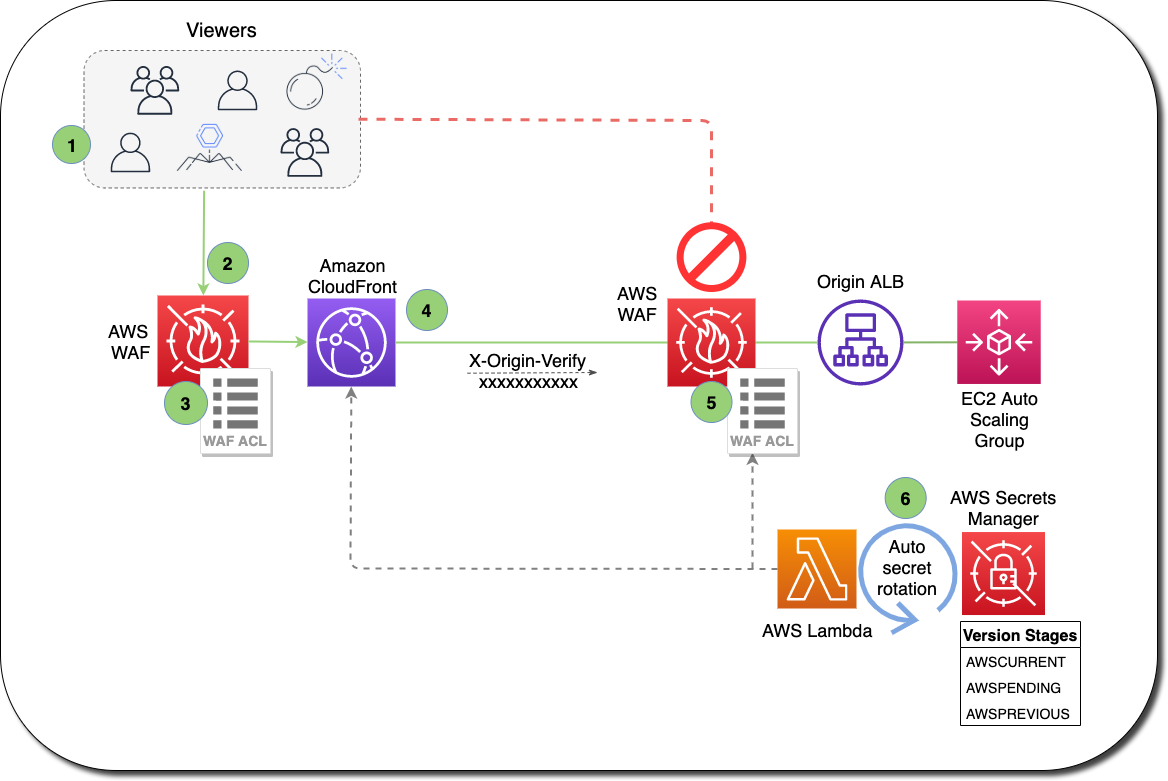
Figure 1: How the CloudFormation template works
Here’s how the solution works, as shown in the diagram:
- A viewer accesses your website or application and requests one or more files, such as an image file and an HTML file.
- DNS routes the request to the CloudFront edge location that can best serve the request—typically the nearest CloudFront edge location in terms of latency.
- At the edge location, AWS WAF inspects the incoming request according to configured web ACL rules.
- At the edge location, CloudFront checks its cache for the requested content. If the content is in the cache, CloudFront returns it to the user. If the content isn’t in the cache, CloudFront adds the custom header, X-Origin-Verify, with the value of the secret from Secrets Manager, and forwards the request to the origin.
- At the origin Application Load Balancer (ALB), AWS WAF inspects the incoming request header, X-Origin-Verify, and allows the request if the string value is valid. If the header isn’t valid, AWS WAF blocks the request.
- At the configured interval, Secrets Manager automatically rotates the custom header value and updates the origin AWS WAF and CloudFront configurations.
Solution deployment
This sample solution includes seven main steps:
- Deploy the CloudFormation template.
- Confirm successful viewer access to the CloudFront URL.
- Confirm that direct viewer access to the origin URL is blocked by AWS WAF.
- Review the CloudFront origin custom header configuration.
- Review the AWS WAF web ACL header validation rule.
- Review the Secrets Manager configuration.
- Review the Secrets Manager AWS Lambda rotation function.
Step 1: Deploy the CloudFormation template
The stack will launch in the N. Virginia (us-east-1) Region. It takes approximately 10 minutes for the CloudFormation stack to complete.
Note: The sample solution requires deployment in the N. Virginia (us-east-1) Region. Although out of scope for this blog post, an additional sample template is available in this solution’s GitHub repository for testing this solution with an existing CloudFront distribution and regional AWS WAF web ACL. Refer to the AWS regional service support information for more details on regional service availability.
To launch the CloudFormation stack
- Choose the following Launch Stack icon to launch a CloudFormation stack in your account in the N. Virginia Region.

- In the CloudFormation console, leave the configured values, and then choose Next.
- On the Specify Details page, provide the following input parameters. You can modify the default values to customize the solution for your environment.
Input parameter Input parameter description EC2InstanceSize The instance size for EC2 web servers. HeaderName The HTTP header name for the secret string. WAFRulePriority The rule number to use for the regional AWS WAF web ACL. 0 is recommended, because rules are evaluated in order based on the value of priority. RotateInterval The rotation interval, in days, for the origin secret value. Full rotation requires two intervals. ArtifactsBucket The S3 bucket with artifact files (Lambda functions, templates, HTML files, and so on). Keep the default value. ArtifactsPrefix The path for the S3 bucket that contains artifact files. Keep the default value. Figure 2 shows an example of values entered under Parameters.

Figure 2: Input parameters for the CloudFormation stack
- Enter values for all of the input parameters, and then choose Next.
- On the Options page, keep the defaults, and then choose Next.
- On the Review page, confirm the details, acknowledge the statements under Capabilities and transforms as shown in Figure 3, and then choose Create stack.

Figure 3: CloudFormation Capabilities and Transforms acknowledgments


Step 2: Confirm access to the website through CloudFront
Next, confirm that website access through CloudFront is functioning as intended. After the CloudFormation stack completes deployment, you can access the test website using the domain name that was automatically assigned to the distribution.
To confirm viewer access to the website through CloudFront
- In the CloudFormation console, choose Services > CloudFormation > CFOriginVerify stack. On the stack Outputs tab, look for the cfEndpoint entry, similar to that shown in Figure 4.

Figure 4: CloudFormation cfEndpoint stack output
- The cfEndpoint is the URL for the site, and it is automatically assigned by CloudFront. Choose the cfEndpoint link to open the test page, as shown in Figure 5.

Figure 5: CloudFormation cfEndpoint test page


In this step, you’ve confirmed that website accessibility through CloudFront is functioning as intended.
Step 3: Confirm that direct viewer access to the origin URL is blocked by AWS WAF
In this step, you confirm that direct access to the test website is blocked by the regional AWS WAF web ACL.
To test direct access to the origin URL
- In the CloudFormation console, choose Services > CloudFormation > CFOriginVerify stack. On the stack Outputs tab, look for the albEndpoint entry.
- Choose the albEndpoint link to go to the test site URL that was automatically assigned to the ALB. Choosing this link will result in a 403 Forbidden response. When AWS WAF blocks a web request based on the conditions that you specify, it returns HTTP status code 403 (Forbidden).
In this step, you’ve confirmed that website accessibility directly to the origin ALB is blocked by the regional AWS WAF web ACL.
Step 4: Review the CloudFront origin custom header configuration
Now that you’ve confirmed that the test website can only be accessed through CloudFront, you can review the detailed CloudFront, WAF, and Secrets Manager configurations that enable this restriction.
To review the custom header configuration
- In the CloudFormation console, choose Services > CloudFormation > CFOriginVerify stack. On the stack Outputs tab, look for the cfDistro entry.
- Choose the cfDistro link to go to this distribution’s configuration in the CloudFront console. On the Origin Groups tab, under Origins, select the origin as shown in Figure 6.

Figure 6: CloudFront Origins and Origin Groups settings
- Choose Edit to go to the Origin Settings section, scroll to the bottom and review the Origin Custom Headers as shown in Figure 7.

Figure 7: CloudFront Origin Custom Headers settings
You can see that the custom header, X-Origin-Verify, has been configured using Secrets Manager with a random 32-character alpha-numeric value. This custom header will be added to web requests that are forwarded from CloudFront to your origin. As you learned in steps 2 and 3, requests without this header are blocked by AWS WAF at the origin ALB. In the next two steps, you will dive deeper into how this works.


Step 5: Review the AWS WAF web ACL header validation rule
In this step, you review the AWS WAF rule configuration that validates the CloudFront custom header X-Origin-Verify.
To review the header validation rule
- In the CloudFormation console, select Services > CloudFormation > CFOriginVerify stack. On the stack Outputs tab, look for the wafWebACLR entry.
- Choose the wafWebACLR link to go to the origin ALB web ACL configuration in the WAF and Shield console. On the Overview tab, you can view the Requests per 5 minute period chart and the Sampled requests list, which shows requests from the last three hours that the ALB has forwarded to AWS WAF for inspection. The sample of requests includes detailed data about each request, such as the originating IP address and Uniform Resource Identifier (URI). You also can view which rule the request matched, and whether the rule Action is configured to ALLOW, BLOCK, or COUNT requests. You can enable AWS WAF logging to get detailed information about traffic that’s analyzed by your web ACL. You send logs from your web ACL to an Amazon Kinesis Data Firehose with a configured storage destination such as Amazon S3. Information that’s contained in the logs includes the time that AWS WAF received the request from your AWS resource, detailed information about the request, and the action for the rule that each request matched.
- Choose the Rules tab to review the rules for this web ACL, as shown in Figure 8.

Figure 8: AWS WAF web ACL rules
On the Rules tab, you can see that the CFOriginVerifyXOriginVerify rule has been configured with the Allow action, while the Default web ACL action is Block. This means that any incoming requests that don’t match the conditions in this rule will be blocked.
In every AWS WAF rule group and every web ACL, rules define how to inspect web requests and what to do when a web request matches the inspection criteria. Each rule requires one top-level statement, which might contain nested statements at any depth, depending on the rule and statement type. You can learn more about AWS WAF rule statements in the AWS WAF Developer Guide, AWS Online Tech Talks, and samples on GitHub.
- Choose the CFOriginVerifyXOriginVerify rule, and then choose Edit to bring up the Rule Builder tool. In the Rule Builder, you can see that a rule has been created with two Rule Statements similar to those in Figure 9.

Figure 9: AWS WAF web ACL rule statement
In the Rule Builder configuration for Statement 1, you can see that the request Header is being inspected for the x-origin-verify Header field name (HTTP header field names are case insensitive), and the String to match value is set to the value you reviewed in step 4. In the Rule Builder, you can also see a logical OR with an additional rule statement, Statement 2. You will notice that the configuration for Statement 2 is the same as Statement 1, except that the String to match value is different. You will learn about this in detail in step 7, but Statement 2 helps to ensure that valid web requests are processed by your origin servers when Secrets Manager automatically rotates the value of the X-Origin-Verify header. The effect of this rule configuration is that inspected web requests will be allowed if they match either of the two statements.
In addition to the visual web ACL representation you just reviewed in the WAF Rule visual editor, every web ACL also has a JSON format representation you can edit by using the WAF Rule JSON editor. You can retrieve the complete configuration for a web ACL in JSON format, modify it as you need, and then provide it to AWS WAF through the console, API, or command line interface (CLI).
This step demonstrated how your request was allowed to access the test website in step 2 and why your request was blocked in step 3.


Step 6: Review Secrets Manager configuration
Now that you’re familiar with the CloudFront and AWS WAF configurations, you will learn how Secrets Manager creates and rotates the secret used for the X-Origin-Verify header field value. Secrets Manager uses an AWS Lambda function to perform the actual rotation of the secret used for the value and update the associated AWS WAF web ACL and CloudFront distribution.
To review the Secrets Manager configuration
- In the CloudFormation console, choose Services > CloudFormation > CFOriginVerify stack. On the stack Outputs tab, look for the OriginVerifySecret entry.
- Choose the OriginVerifySecret link to go to the configuration for the secret in the Secrets Manager console. Scroll down to the section titled Secret value, and then choose Retrieve secret value to display the Secret key/value as shown in Figure 10.

Figure 10: Secrets Manager retrieve value
When you retrieve the secret, Secrets Manager programmatically decrypts the secret and displays it in the console. You can see that the secret is stored as a key-value pair, where the secret key is HEADERVALUE, and the secret value is the string used in the CloudFront and WAF configurations you reviewed in steps 3 and 4.
- While you’re in the Secrets Manager console, review the Rotation configuration section, as shown in Figure 11.

Figure 11: Secrets Manager rotation configuration
You can see that rotation was enabled for this secret at an interval of one day. This configuration also includes a Lambda rotation function. Secrets Manager uses a Lambda function to perform the actual rotation of a secret. If you use your secret for one of the supported Amazon Relational Database Service (Amazon RDS) databases, then Secrets Manager provides the Lambda function for you. If you use your secret for another service, then you must provide the code for the Lambda function, as we’ve done in this solution.


Step 7: Review the Secrets Manager Lambda rotation function
In this step, you review the Secrets Manager Lambda rotation function.
To review the Secrets Manager Lambda rotation function
- In the CloudFormation console, choose Services > CloudFormation > CFOriginVerify stack. In the stack Outputs tab, look for the OriginSecretRotateFunction entry.
- Choose the OriginSecretRotateFunction link to go to the Lambda function that is configured for this secret. The code used for this secrets rotation function is based on the AWS Secrets Manager Rotation Template. Choose the Monitoring tab and review the Invocations graph as shown in Figure 12.

Figure 12: Monitoring tab for the Lambda rotation function
Shortly after the CloudFormation stack creation completes, you should see several invocations in the Invocations graph. When a configured rotation schedule or a manual process triggers rotation, Secrets Manager calls the Lambda function several times, each time with different parameters. The Lambda function performs several tasks throughout the process of rotating a secret. This includes the following steps: createSecret, setSecret, testSecret, and finishSecret. Secrets Manager uses staging labels, a simple text string, to enable you to identify different versions of a secret during rotation. This includes the following staging labels: AWSPENDING, AWSCURRENT, and AWSPREVIOUS, which are covered in the following step.
- To learn more about the rotation steps configured for this solution, choose View logs in CloudWatch on the Monitoring tab.
- On the Log streams tab, select the top entry in the list.
- Enter Event in the Filter events field, and then choose the arrows to expand the details for each event as shown in Figure 13.

Figure 13: CloudWatch event logs for the Lambda rotation function


The four rotation steps annotated in Figure 13 work as follows:
Note: This section provides an overview of the rotation process for this solution. For more detailed information about the Lambda rotation function, see the Secrets Manager User Guide.
- The createSecret step: In this step, the Lambda function generates a new version of the secret. The rotation Lambda function calls the GetRandomPassword method to generate a new random string, and then labels the new version of the secret with the staging label AWSPENDING to mark it as the in-process version of the secret.
- The SetSecret step: In this step, the rotation function retrieves the version of the secret labeled AWSPENDING from Secrets Manager and updates the web ACL rule for the AWS WAF associated with the origin ALB. The two rule statements you reviewed in step 5 of this blog post are updated with the AWSPENDING and AWSCURRENT values. The rotation function also updates the value for the Origin Custom Header X-Origin-Verify. When the rotation function updates your distribution configuration, CloudFront starts to propagate the changes to all edge locations. Maintaining both the AWSPENDING and AWSCURRENT secret values helps to ensure that web requests forwarded to your origin by CloudFront are not blocked. Therefore, once a secret value is created, two rotation intervals are required for it to be removed from the configuration.
- The testSecret step: This step of the Lambda function verifies the AWSPENDING version of the secret by using it to access the origin ALB endpoint with the X-Origin-Verify header. Both AWSPENDING and AWSCURRENT X-Origin-Verify header values are tested to confirm a “200 OK” response from the origin ALB endpoint.
- The finishSecret step: In the last step, the Lambda function moves the label AWSCURRENT from the current version to this new version of the secret. The old version receives the AWSPREVIOUS staging label, and is available for recovery as the last known good version of the secret, if needed. The old version with the AWSPREVIOUS staging label no longer has any staging labels attached, so Secrets Manager considers the old version deprecated and subject to deletion.
When the finishSecret step has successfully completed, Secrets Manager schedules the next rotation by adding the rotation interval (number of days) to the completion date. This automated process causes the values used for the validation headers to be updated at the configured interval. Although out of scope for this blog post, you should monitor your secrets to ensure usage of your secrets and log any changes to them. This helps you to make sure that any unexpected usage or change can be investigated, and unwanted changes can be rolled back.
Summary
You’ve learned how to use Amazon CloudFront, AWS WAF and AWS Secrets Manager to prevent web requests from directly accessing your CloudFront origin resources. You can use this solution to improve security for CloudFront custom origins that support AWS WAF, such as ALB, Amazon API Gateway, and AWS AppSync.
When using this solution, you will incur AWS WAF usage charges for both the ALB and CloudFront associated AWS WAF web ACLs. You might wish to consider subscribing to AWS Shield Advanced, which provides higher levels of protection against distributed denial of service (DDoS) attacks and includes AWS WAF and AWS Firewall Manager at no additional cost for usage on resources protected by AWS Shield Advanced. You can also learn more about pricing for CloudFront, AWS WAF, Secrets Manager, and AWS Shield Advanced.
You can review more options for restricting access to content with CloudFront, additional AWS WAF security automations, or managed rules for AWS WAF. You can explore solutions for using AWS IP address ranges to enhance CloudFront origin security. You might also wish to learn more about Secrets Manager best practices. This code for this solution is available on GitHub.
If you have feedback about this post, submit comments in the Comments section below. If you have questions about using this solution, you can start a thread in the CloudFront, WAF, or Secrets Manager forums, review or open an issue in this solution’s GitHub repository, or contact AWS Support.
Want more AWS Security how-to content, news, and feature announcements? Follow us on Twitter.