Tag Archives: AWS WAF

How Scale to Win uses AWS WAF to block DDoS events

Post Syndicated from Ben "Fuzzy" Shonaldmann original https://aws.amazon.com/blogs/architecture/how-scale-to-win-uses-aws-waf-to-block-ddos-events/

This is a guest post coauthored by Ben “Fuzzy” Shonaldmann of Scale to Win.

Scale to Win was created for organizers by organizers. Born out of the 2020 election cycle, a group of friends and former colleagues came out of a whirlwind presidential primary season with frustrations and ideas to improve campaign technology. With extensive outreach experience on high-profile presidential campaigns such as Biden/Harris 2020, Bernie 2016 and 2020, Warren 2020, and Clinton 2016, we knew the power of organizing. We saw how conversations—neighbor to neighbor, friend to friend, volunteer to voter—could transform communities and drive movements. Yet, the tools available for voter contact programs regularly fell short of our needs. We built and launched our first product in April 2020, a peer-to-peer (P2P) texting tool. We’ve since added a dialer tool that allows organizations to easily call voters, and Scale to Win Text, an all-in-one texting tool for organizing and fundraising.

During the 2024 US presidential election campaign season, we were the target of distributed denial of service (DDoS) events. These events reached peaks of over 2 million requests per second from nearly ten thousand unique IPs. After a brief window of downtime at the start of these events, Scale to Win partnered with Amazon Web Services (AWS) to implement AWS WAF, AWS Shield Advanced, and Amazon CloudFront to mitigate these targeted DDoS events.

One key element of our defense was AWS WAF support for Completely Automated Public Turing test to tell Computers and Humans Apart (CAPTCHA) to automatically present a challenge to suspicious-looking clients. We used this to provide a per-IP rate limit for traffic we expected to see from legitimate clients behind a single IP. For IPs that exceed this rate limit, we present a CAPTCHA and provide a higher rate limit to the maximum amount of traffic we expect to come from a single IP, like a campaign office or college campus.

However, the AWS WAF out-of-the-box CAPTCHA had an important caveat—it doesn’t provide protection against an event using a token that is solved and distributed across a network of machines behind multiple IPs. To prevent this class of event, AWS WAF users need to identify CAPTCHA tokens that are being used from multiple IPs and automatically block this traffic.In this post, you’ll learn how Scale to Win configured our network topology to maximize DDoS protection capacity, configured AWS WAF to block DDoS events, segmented machine-to-machine and browser-to-machine traffic to target CAPTCHA interventions, and blocked token reuse across IP addresses.

Network Topology Overview

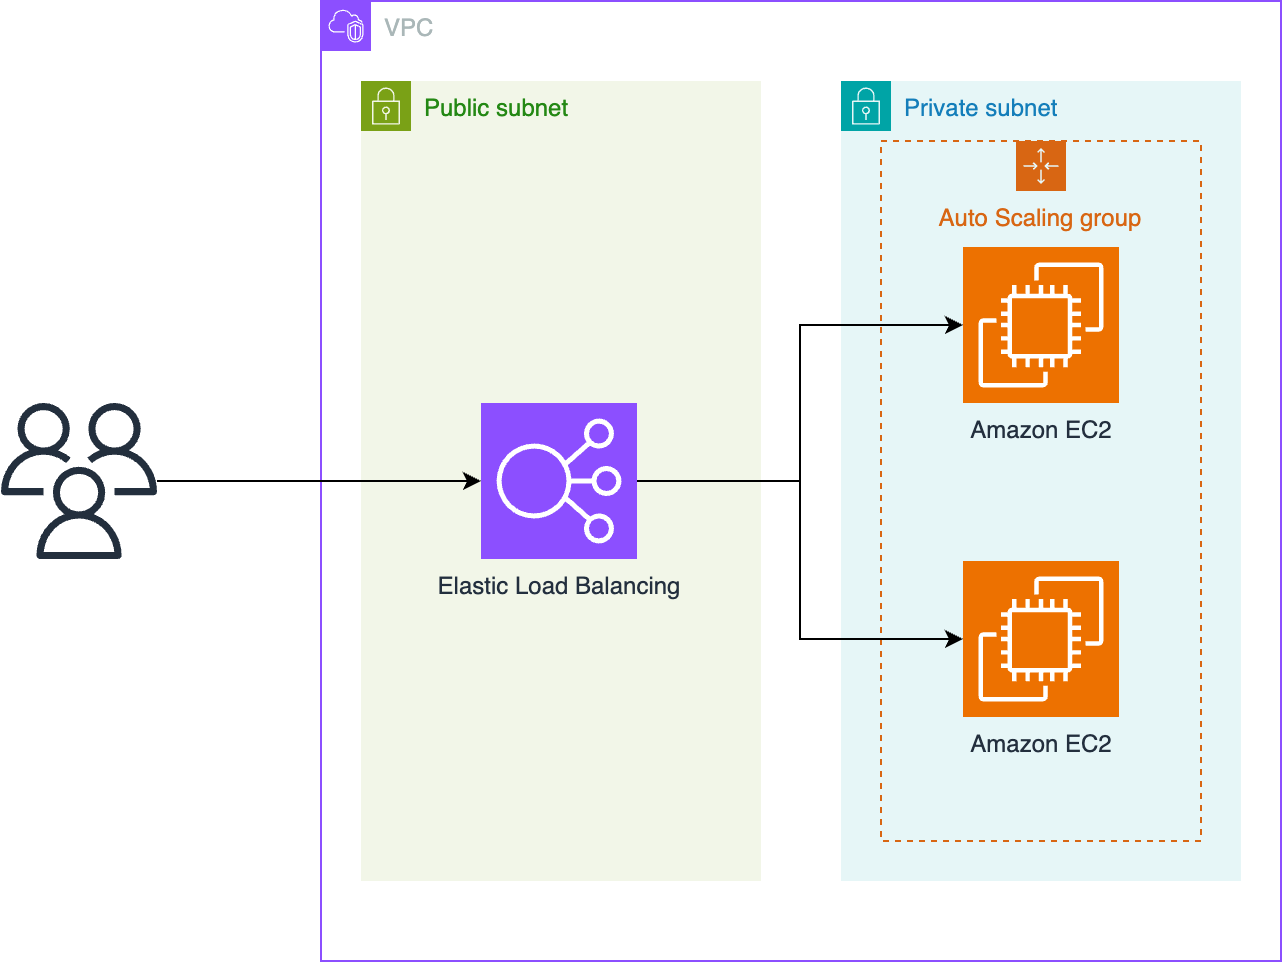
The Scale to Win application runs behind an Application Load Balancer (ALB) that serves as the single point of entry to our application servers. Before implementing AWS WAF, our DNS records resolved to the ALB as shown in the following diagram. The diagram shows a path from users to Elastic Load Balancing to an auto scaling group of Amazon Elastic Compute Cloud (Amazon EC2) instances.

Diagram of a VPC with public and private subnets, Elastic Load Balancing, and Amazon EC2 instances

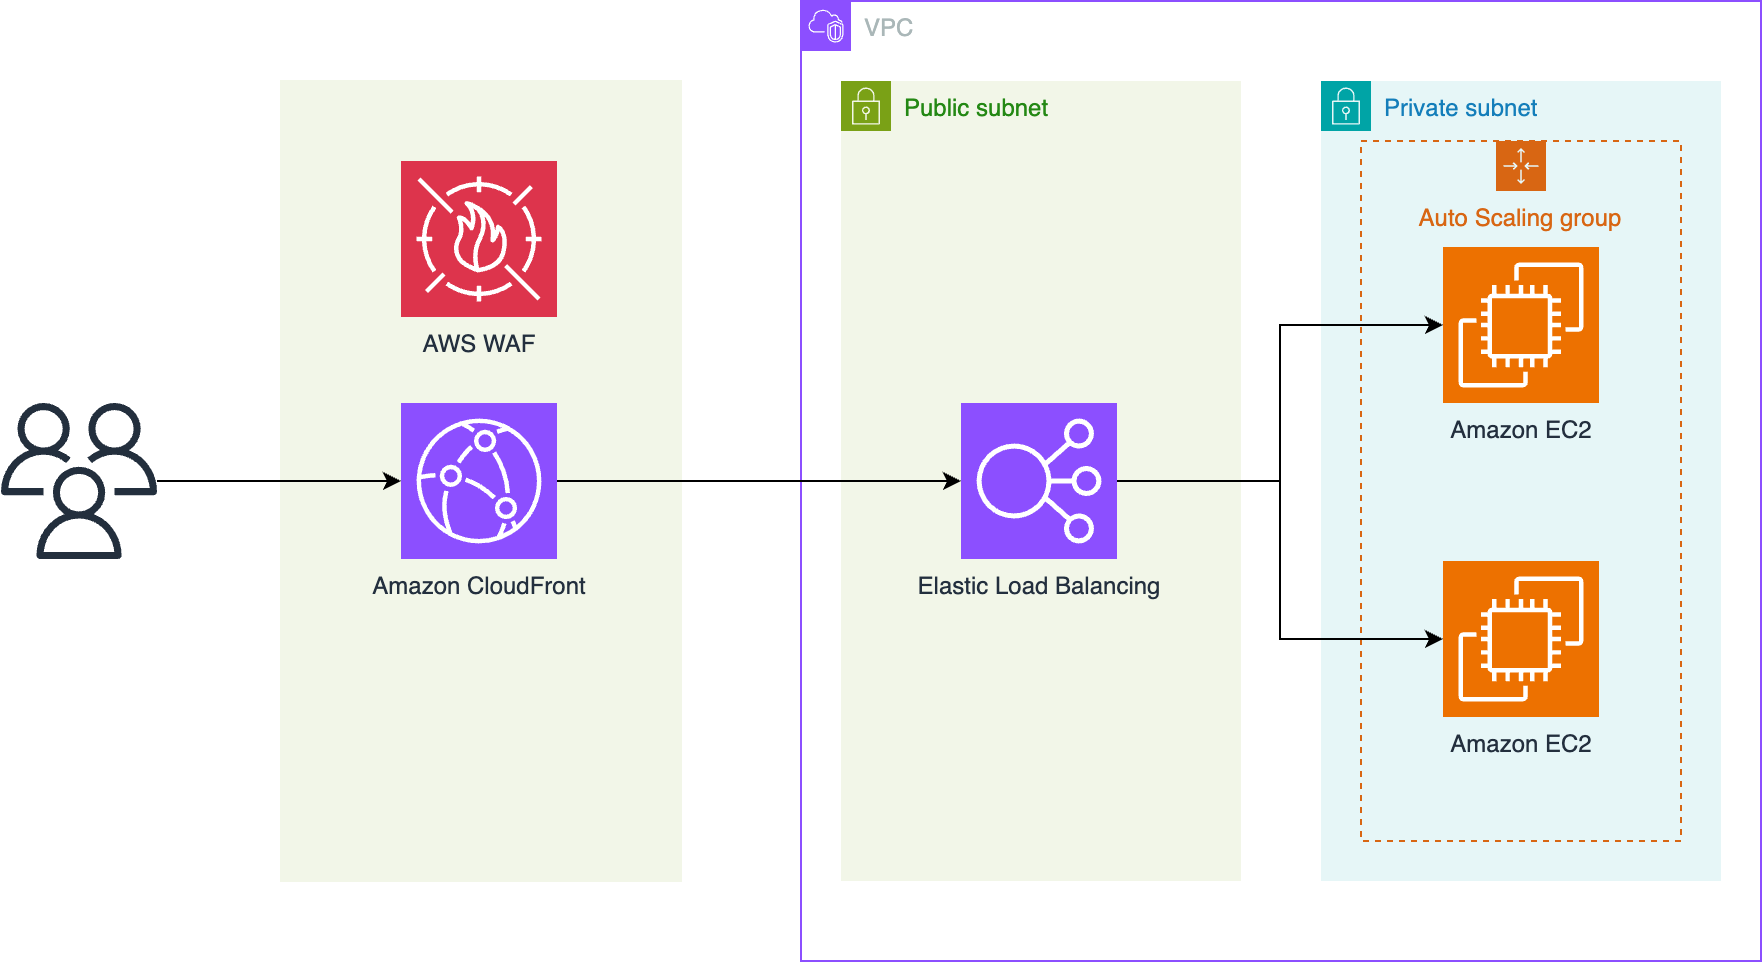
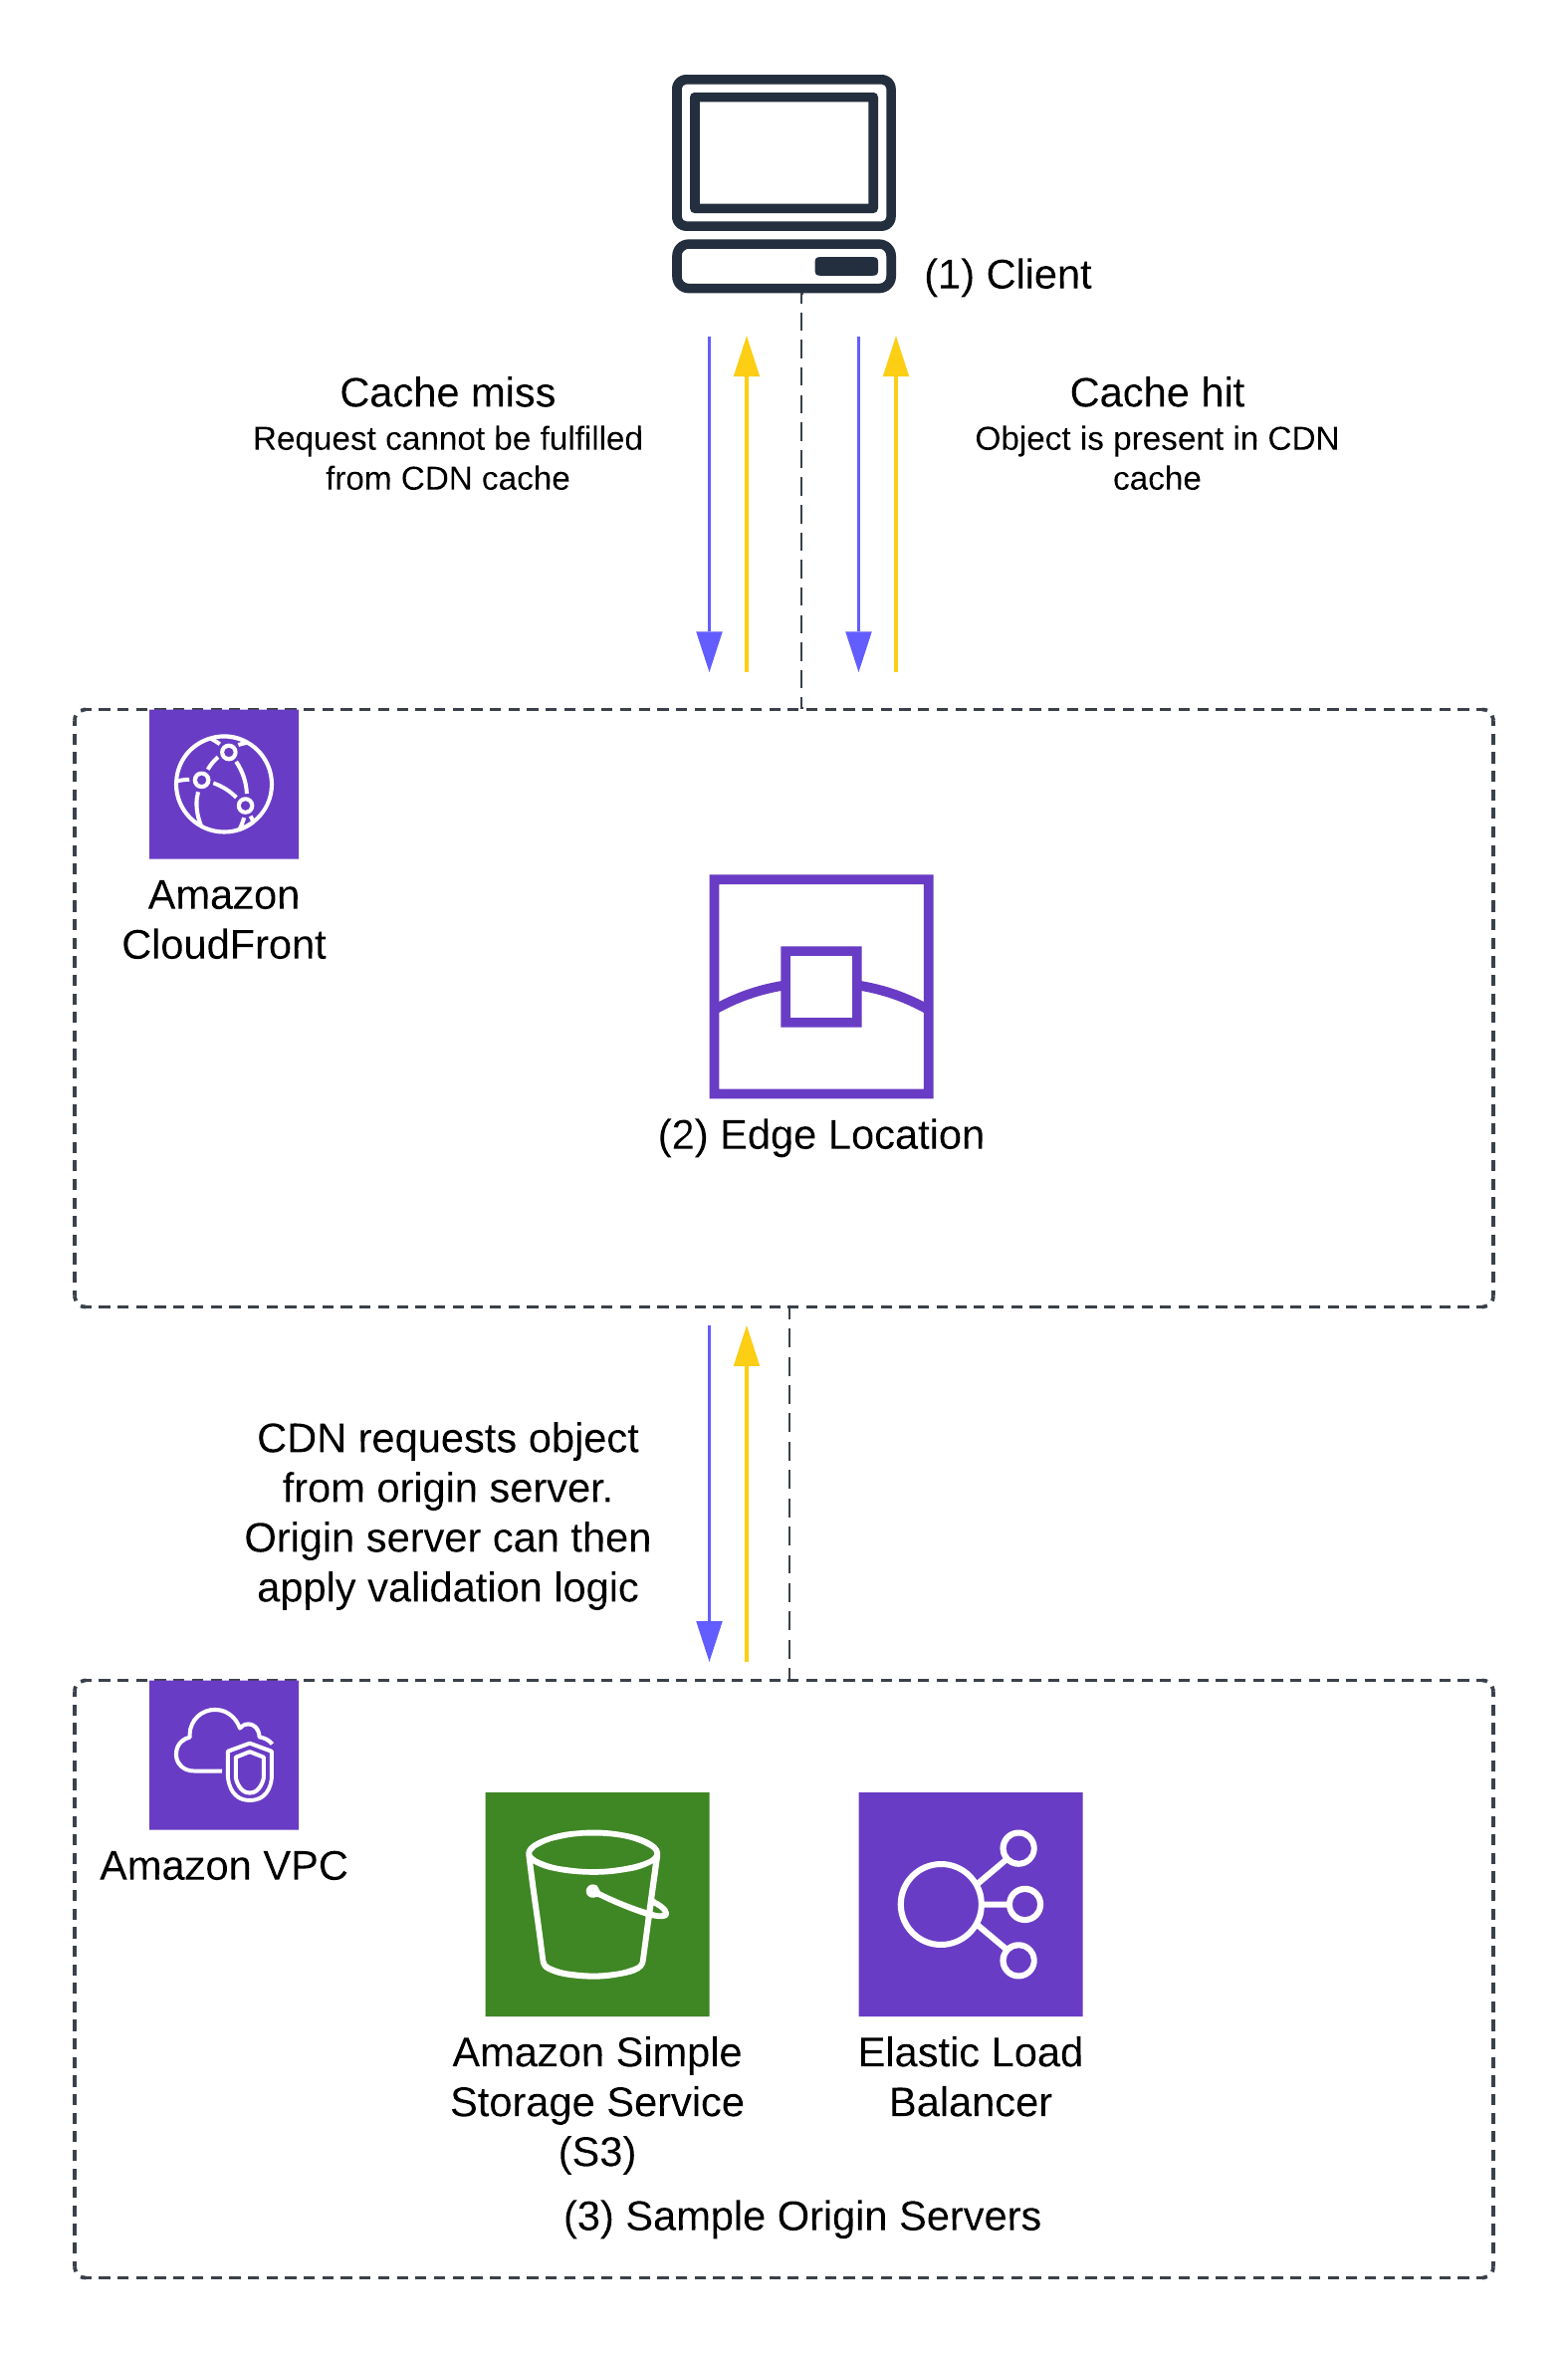
The recommended pattern for using AWS WAF to protect against DDoS events is to instead route traffic through a CloudFront distribution as shown in the following diagram. The diagram shows a path from users to CloudFront with AWS WAF to Elastic Load Balancing to an auto scaling group of EC2 instances.

VPC architecture with AWS WAF, CloudFront, Load Balancing, and EC2 instances

Using this topology, we can take advantage of the following benefits:

  1. The capacity of CloudFront to handle network-layer events sending TCP traffic that aren’t valid HTTP requests is greater than ALB capacity. Network-level protections are strongest when applied by CloudFront before passing traffic to the ALB.
  2. The edge deployment of AWS WAF has higher quotas and capacity than Regional deployments. AWS scales AWS WAF capacity one-to-one with CloudFront capacity, so AWS WAF always has enough capacity to handle incoming traffic.
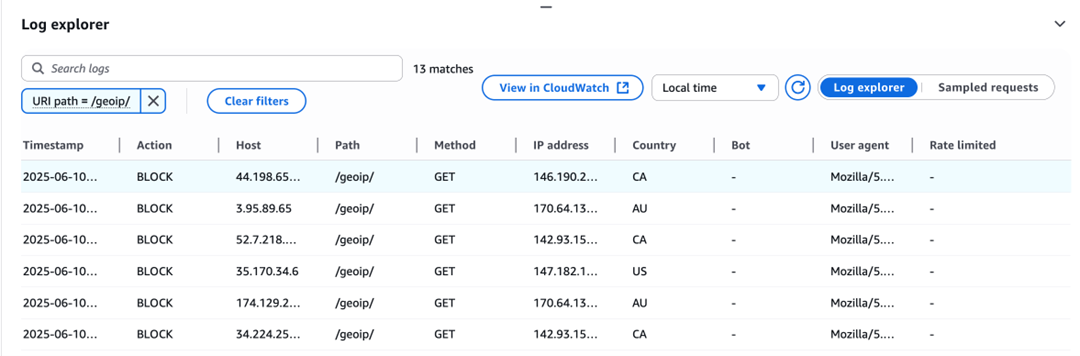
  3. When implementing a geographic based block strategy, such as blocking specific countries, CloudFront provides a geographic restriction feature. In event patterns we observed, over half of malicious traffic originated from countries that we blocked completely in CloudFront, resulting in cost savings on our AWS WAF deployment.

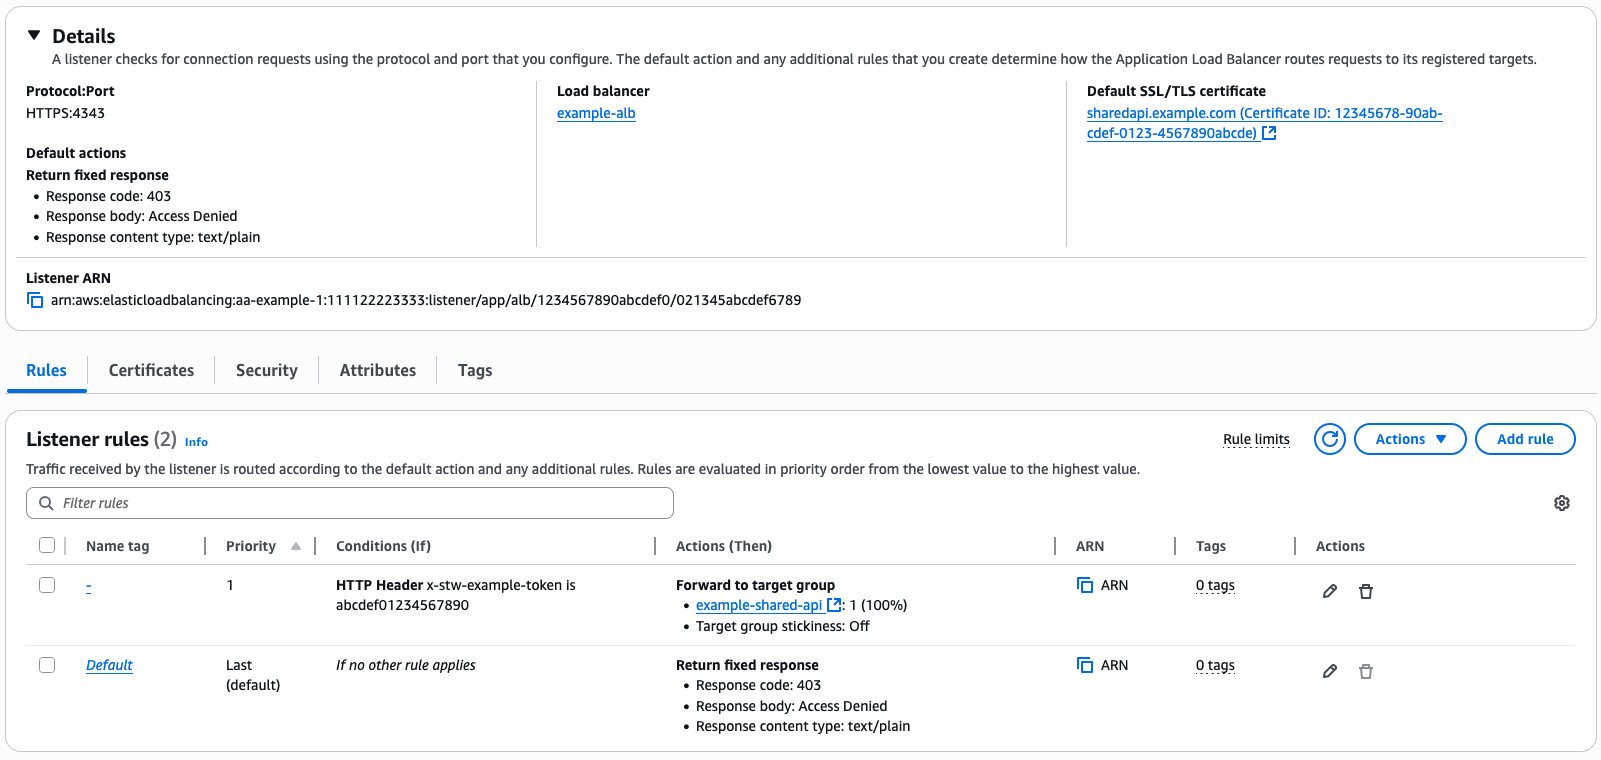
To prevent threat actors from bypassing our CloudFront distribution and AWS WAF, we implemented a security group that allows traffic only from CloudFront edge IP addresses using the managed prefix list to prevent direct connections to the ALB. We then configured the ALB to require a secret, pre-shared token in a request header, for example, our header x-stw-example-secret. We configured the CloudFront distribution to add that request header when forwarding traffic to the origin. This secret isn’t logged to Application Load Balancer logs but is logged to AWS CloudTrail when setting or updating the CloudFront or ALB configuration. It’s possible to rotate this secret on a schedule by generating a random password with AWS Secrets Manager with an AWS Lambda function to update the CloudFront origin configuration and ALB listener configuration, as shown in the following two screenshots. This shared secret between the CloudFront distribution and ALB means that an event can’t bypass the security group control by configuring its own CloudFront distribution with our ALB as an origin.

The following screenshot shows configuration of the Application Load Balancer, showing a priority-1 rule to route traffic to our target group only if the x-stw-example-secret is correct. A default rule returns a 403 if it’s not correct.

AWS Elastic Load Balancing configuration details, displaying the protocol, port, load balancer name, and SSL/TLS certificate for a listener.

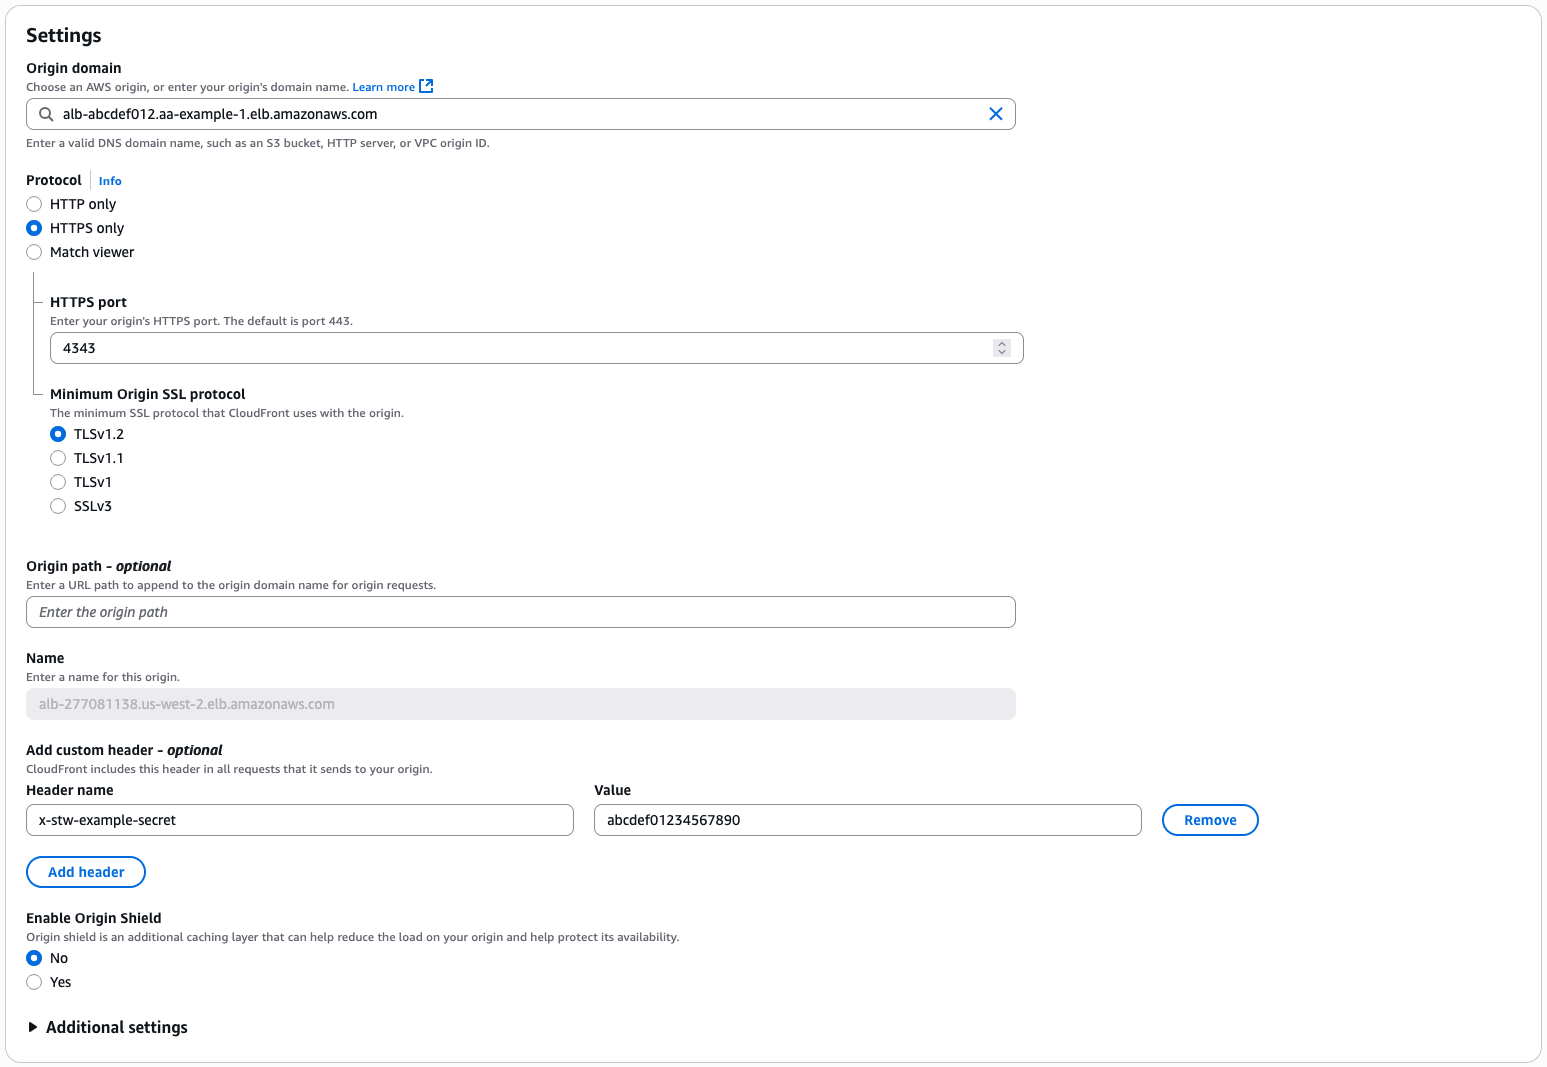
The following screenshot shows CloudFront origin settings, showing a custom header configuration to add the shared secret to requests to the origin.

AWS CloudFront origin settings showing domain, protocol, SSL, and custom header options

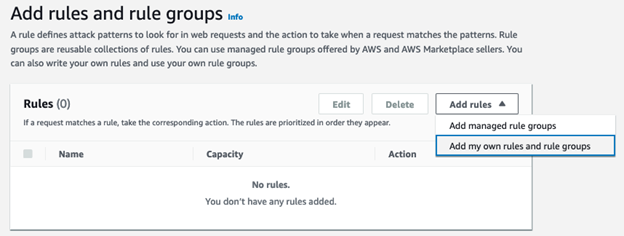
Configuring AWS WAF rules

We use two approaches to identify and block malicious DDoS traffic, a heuristic approach and a hard limit approach.

For the heuristic approach, we observe event traffic in AWS WAF sample requests and AWS WAF logs, identify patterns in the event, and block those specific patterns. To use this tactic in your own AWS WAF configuration, first identify a characteristic that is common to all or most event traffic but rare in legitimate traffic, like a HTTP header or query parameter. Create a AWS WAF rule that blocks the traffic. Using the Count rule action is helpful to test your rule and find false-positive and false-negative rates by correlating requests that match the rule with IPs that are sending high volumes of traffic. You can query AWS WAF logs with Amazon Athena to find these correlations. When you’re satisfied with your false-positive and false-negative rates, set the rule action to Block to actively block the matched traffic.

A motivated threat actor will notice the event is being blocked and randomize these parameters to bypass your rules. For example, they might replay legitimate session parameters, so that request URIs, query parameters, and request bodies are identical to legitimate traffic. Ultimately, the heuristic approach is a useful tool, and a good reason to set up logging and Athena to quickly query your AWS WAF logs, but it’s a solution that requires active reconfiguration of your AWS WAF as event patterns change.

One specific heuristic that’s worth calling out is JA4 fingerprints and their predecessor, JA3 fingerprints. A JA4 fingerprint is a hash of several parameters presented by TLS clients in the client hello packet. JA4 fingerprints roughly correspond to the specific TLS client parameters of the request, so they’re usually stable for a specific type of client. For example, a specific version of Google Chrome on a particular operating system has a fingerprint, but a version on a different operating system would have a different fingerprint. This makes JA4 fingerprints a useful heuristic for blocking malicious traffic because the botnet sending the traffic is likely to have a small number of different fingerprints. However, there are two caveats with blocking requests based on JA4 fingerprints:

  1. Threat actors might have the same JA4 fingerprint as legitimate users. In our case, we saw malicious traffic with the same fingerprint as a common NodeJS API client and were unable to block that fingerprint without blocking legitimate API clients.
  2. A sophisticated threat actor can randomize some of the TLS connection parameters, such as the order of TLS extensions in the client hello packet, which is done by threat actors to avoid JA3 fingerprint blocking and some browsers to preserve user privacy. Although the newer JA4 specification reduces some randomization elements, the fundamental challenge remains—because end users maintain control over the client hello packet, this creates an ongoing challenge of adaptation and response.

For the hard limit approach, we take advantage of request parameters that the event can’t fake, such as the source IP of the request. Although the source IP of a packet can be forged, these requests are dropped because they don’t successfully complete the TCP or TLS handshake. You can create AWS WAF rules that limit how much traffic can be sent from a single source IP using rate-based rule statements, setting the limit above what a legitimate user would send but below what the event needs to be effective.

The simplest approach with rate-based rule statements would be to have a single limit in the AWS WAF policy, but this has challenges. First, we have APIs that receive high volumes of machine-to-machine traffic. For example, we place outbound phone calls using Twilio, and Twilio sends tens of thousands of webhooks to our API per second to relay delivery status, sometimes from a single Twilio IP. Also, our application is often used by campaign offices or student-led phone banks on college campuses that might have hundreds of users behind a single or handful of IPs, so we can’t assume that a single IP is being used by a single user to calculate our acceptable rates of traffic.

Segmenting human and machine traffic

To address these challenges, we structure our AWS WAF rules to segment human and machine traffic. We do this by request path: AWS WAF rules can match based on request path, so we have a set of rules for machine traffic based on the webhook URLs or API paths where we expect machine traffic. For all other paths, we assume the traffic originates from a user visiting the site from their browser.

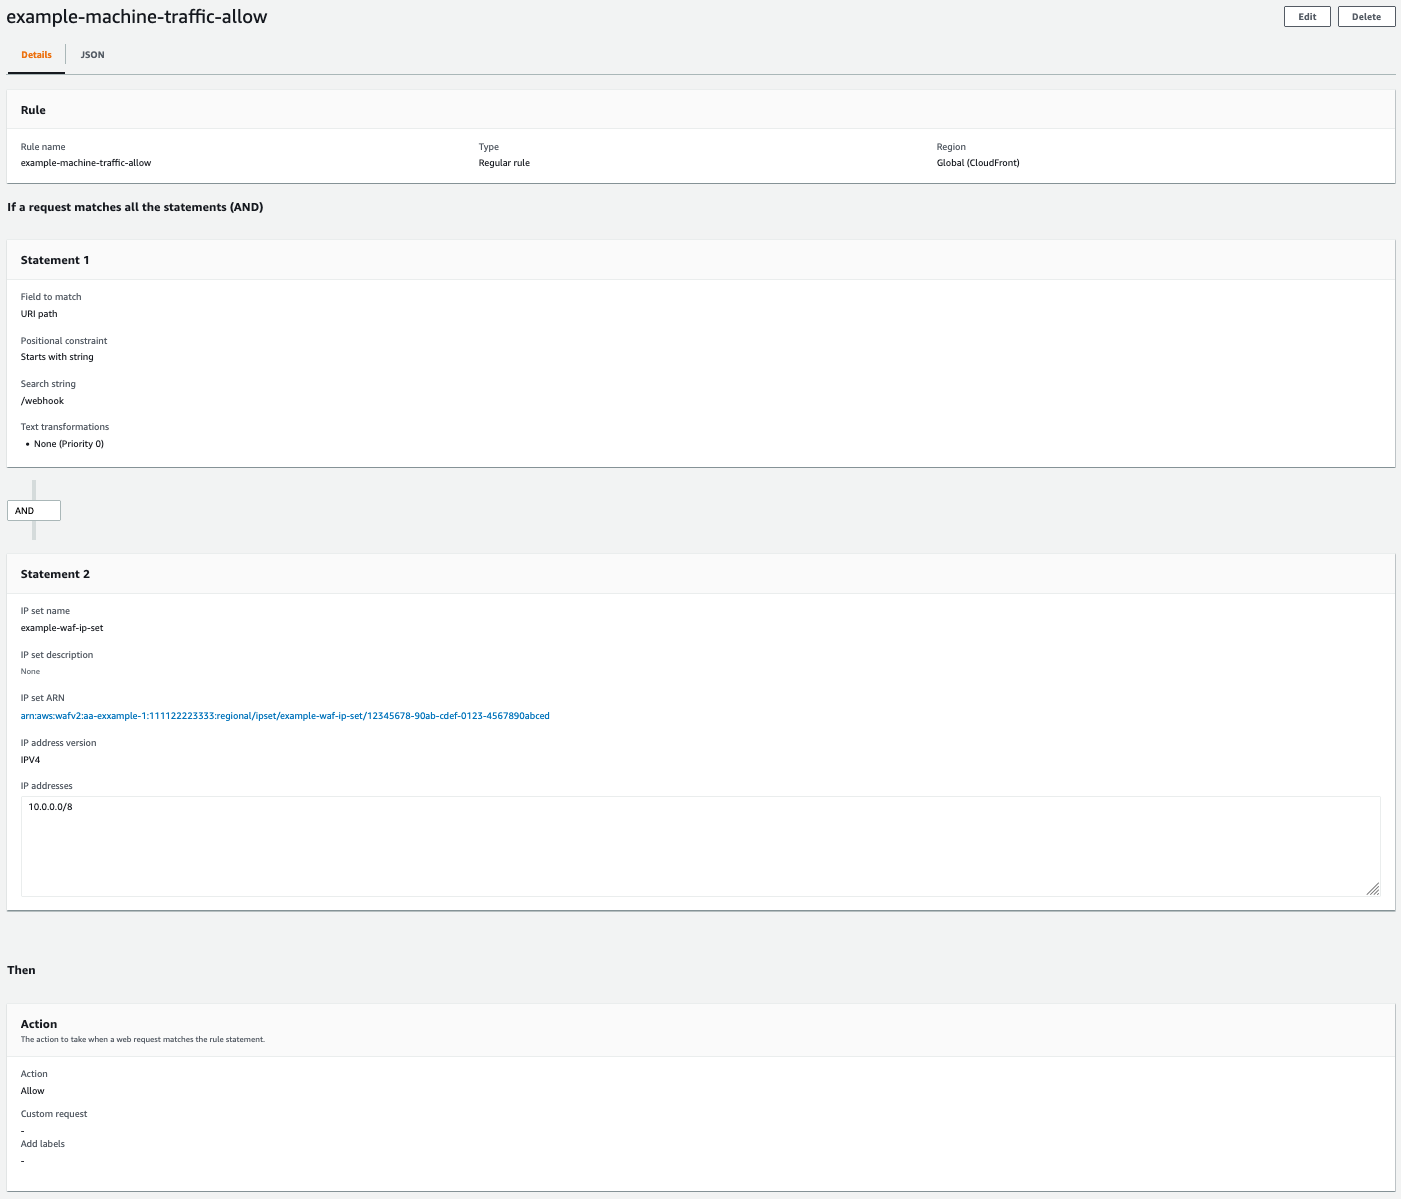
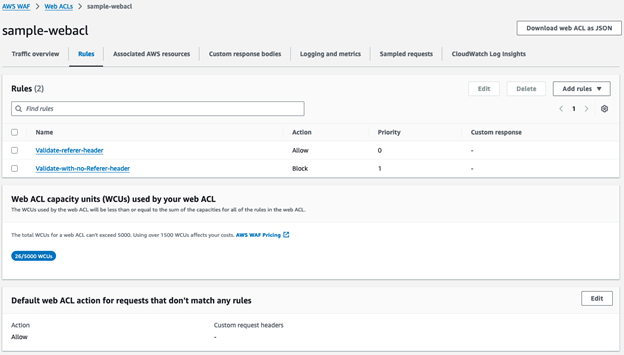
For machine traffic, we can’t use a CAPTCHA. Our API clients and the Twilio webhook infrastructure can’t solve the CAPTCHA, so we validate traffic differently. For our API clients, we set per-IP rate limits to what we expect from a single API client and return a 429 HTTP status when traffic exceeds our limit. We implement automatic retries to handle the occasional 429 error when sending above the limit. For Twilio or other webhook callbacks, we use published IPs from the service provider to create an IP set in AWS WAF. Then, we block requests to our webhook URL that don’t originate from the IP set. Not all service providers use static IPs—for Twilio specifically, we worked with their team to implement their Static Proxy feature to proxy webhook requests from a stable list of IPs. It also makes sense to implement API key authentication, request signing, and certificate-based authentication when possible for your machine traffic. For requests that originate from the IP set, we apply an Allow action in our AWS WAF rule to allow expected machine traffic through, as shown in the following screenshot. These rules allow high-volume machine-to-machine traffic through our AWS WAF configuration before we apply AWS WAF rules to block high volume user-based traffic. The following screenshot shows an example rule allowing expected machine-to-machine traffic.

WAF rule configuration showing machine traffic allow rules with URI path and IP settings

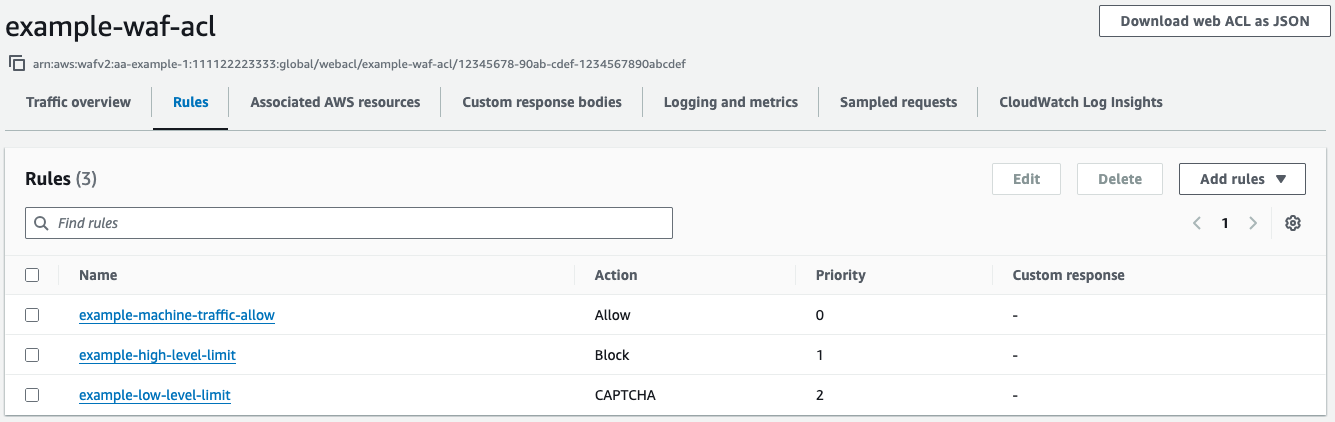
For our browser-based human traffic, we use a tiered rate limit strategy. We implement two tiers of rate limit: a low-level rate limit that corresponds to the maximum rate we expect two to three users to send, and a high-level rate limit that corresponds to the maximum rate we expect from a single IP with hundreds of users sharing the IP. Our low-level rule uses a CAPTCHA rule action when requests exceed the limit. Our high-level rule applies a Block action when requests exceed the limit. We set the high-level rate limit rule priority lower than the low-level rule so it’s processed first, as shown in the following screenshot.

AWS WAF web ACL interface displaying rules for traffic allow, block, and CAPTCHA actions

When a few users are sharing an IP address, they’re unlikely to hit either limit and can use the application without interruption. If a large group of users share an IP address, they’ll need to solve a CAPTCHA. After they solve it, they’re still limited by the high-level rate limit rule, which will prevent a threat actor from solving the CAPTCHA and then sending unlimited traffic using the token issued by AWS WAF.

Handling CAPTCHA on the frontend

For server-rendered applications, AWS WAF handles CAPTCHA challenges automatically through the following process:

  1. When a request matches a CAPTCHA rule without a valid token, AWS WAF presents an AWS managed CAPTCHA challenge page.
  2. Upon successful CAPTCHA completion, AWS WAF issues a Set-Cookie header containing the CAPTCHA token.
  3. Subsequent requests with valid CAPTCHA tokens can pass through AWS WAF for the configured immunity period.

For single-page applications (SPAs) or applications making API requests to a AWS WAF protected backend, additional implementation steps are required:

  1. Configure your frontend to detect blocked requests (HTTP 405 status code indicates CAPTCHA requirement).
  2. Present the CAPTCHA challenge to the user when required.
  3. Resubmit the original request after successful CAPTCHA completion.

The following sample code demonstrates how to implement CAPTCHA handling in a React component using the AWS WAF CAPTCHA JavaScript API:

import { useState, useRef, useEffect, ReactElement } from "react";

declare global {
  class CaptchaError extends Error {
    constructor(message: string);
    kind: "internal_error" | "network_error" | "token_error" | "client_error";
    statusCode?: number;
  }
  interface Window {
    AwsWafCaptcha: {
      renderCaptcha: (
        targetDiv: HTMLElement,
        options: {
          apiKey: string;
          onSuccess: (token: string) => void;
          onError: (err: CaptchaError) => void;
        }
      ) => void;
    };
    AwsWafIntegration: {
      fetch: typeof fetch;
    },
    awsWafCookieDomainList: string[];
  }
}

type DataLoading = {
  state: "loading";
};

type DataError = {
  state: "error";
  message: string;
};

type DataLoaded = {
  state: "loaded";
  data: any;
};

type Data = DataLoading | DataError | DataLoaded;

function MyComponent(): ReactElement {
  const [data, setData] = useState<Data>({ state: "loading" });
  const captchaDiv = useRef<HTMLDivElement>(null);

  useEffect(() => {
    void (async () => {
      try {
        const response = await window.AwsWafIntegration.fetch('/your/api/url');

        if (response.status === 405) {
          // The user needs to solve a captcha. 
          window.AwsWafCaptcha.renderCaptcha(captchaDiv.current!, {
              apiKey: "...API key goes here...",
              onSuccess: async _wafToken => {
                const response = await window.AwsWafIntegration.fetch('/your/api/url');
    
                if (response.status !== 200) {
                  setData({ state: "error", message: "Unable to load data." });
                }
    
                const data = await response.json();
                setData({ state: "loaded", data });
              },
              onError: e => {
                console.error(e);
                setData({ state: "error", message: "Unable to load data." });
              }
              /* ...other configuration parameters as needed... */
          });
          

          return;
        }

        if (response.status !== 200) {
          throw new Error(`Unexpected response status: ${response.status}`);
        }

        const data = await response.json();
        setData({ state: "loaded", data });
      } catch (e) {
        console.error(e);
        setData({ state: "error", message: "Unable to load data." });
      }
    })();
  }, []);

  return (
    <div>
      <div ref={captchaDiv} />
      <div>
        {/* render the data */}
      </div>
    </div>
  );
}

Preventing CAPTCHA token reuse

Although AWS WAF provides built-in CAPTCHA functionality, additional security measures are necessary to prevent token reuse events. In these events, threat actors can solve a CAPTCHA one time and distribute the token across their botnet. AWS WAF Bot Control offers protection against this vulnerability by detecting and blocking CAPTCHA token reuse across multiple IPs, ASNs, or countries.

To implement this protection:

  1. Configure the AWSManagedRulesBotControlRuleSet managed rule group after your rate-limiting rules.
  2. Use the targeted protection level.
  3. Apply Count or Allow actions to specific rules that you don’t want to apply to your traffic instead of a Block or CAPTCHA action.
  4. Monitor and adjust rule actions based on observed traffic patterns.

Conclusion

In this post, you learned how we implemented comprehensive DDoS protection using AWS WAF by:

  • Implementing best practices for AWS WAF network topology using CloudFront
  • Segmenting human and machine traffic in our AWS WAF configuration
  • Using tiered rate limits and CAPTCHA to allow legitimate requests
  • Preventing CAPTCHA token reuse by using AWS WAF Bot Control

To learn more about fine-tuning and optimizing AWS WAF Bot Control, refer to Fine-tune and optimize AWS WAF Bot Control mitigation capability by Dmitriy Novikov in the AWS Security Blog.


About the authors

Amazon CloudFront simplifies web application delivery and security with new user-friendly interface

Post Syndicated from Micah Walter original https://aws.amazon.com/blogs/aws/amazon-cloudfront-simplifies-web-application-delivery-and-security-with-new-user-friendly-interface/

Today, we’re announcing a new simplified onboarding experience for Amazon CloudFront that developers can use to accelerate and secure their web applications in seconds. This new experience, along with improvements to the AWS WAF console experience, makes it easier than ever for developers to configure content delivery and security services without requiring deep technical expertise.

Setting up content delivery and security for web applications traditionally required navigating multiple Amazon Web Services (AWS) services and making numerous configuration decisions. With this new CloudFront onboarding experience, developers can now create a fully configured distribution with DNS and a TLS certificate in just a few clicks.

Amazon CloudFront offers compelling benefits for organizations of all sizes looking to deliver content and applications globally. As a content delivery network (CDN), CloudFront significantly improves application performance by serving content from edge locations closest to your users, reducing latency and improving user experience. Beyond performance, CloudFront provides built-in security features that protect your applications from distributed denial of service (DDoS) attacks and other threats at the edge, preventing malicious traffic from reaching your origin infrastructure. The service automatically scales with your traffic demands without requiring any manual intervention, handling both planned and unexpected traffic spikes with ease. Whether you’re running a small website or a large-scale application, the CloudFront integration with other AWS services and the new simplified console experience makes it easier than ever to implement these essential capabilities for your web applications.

Streamlined CloudFront configuration

The new CloudFront console experience guides developers through a simplified workflow that starts with the domain name they want to use for their distribution. When using Amazon Route 53, the experience automatically handles TLS certificate provisioning and DNS record configuration, while incorporating security best practices by default. This unified approach eliminates the need to switch between multiple services like AWS Certificate Manager, Route 53, and AWS WAF, and offers developers a faster time to production without the need to dive deep on the nuanced configuration options of each service.

For example, a developer can now create a secure CloudFront distribution for their applications fronted by a load balancer by entering their domain name and selecting their load balancer as the origin. The console automatically recommends optimal CDN and security configurations based on the application type and requirements, and developers can deploy with confidence knowing they’re following AWS best practices.

For developers who wish to host a static website on Amazon Simple Storage Service (Amazon S3), CloudFront provides several important benefits. First, it improves your website’s performance by caching content at edge locations closer to your users, reducing latency and improving page load times. Second, it helps protect your S3 bucket by acting as a security layer—CloudFront can be configured to be the only way to access your content, preventing direct access to your S3 bucket. The new experience automatically configures these security best practices for you.

Enhanced security integration with AWS WAF

Complementing the new CloudFront experience, we’re also introducing an improved AWS WAF console that features intelligent Rule Packs—curated sets of security rules based on application type and security requirements. These Rule Packs enable developers to implement comprehensive security controls without needing to be security experts.

When creating a CloudFront distribution, developers can now enable AWS WAF protection through an integrated experience that uses these new Rule Packs. The console provides clear recommendations for security configurations that developers can use to preview and validate their settings before deployment.

Web applications face numerous security threats today, including SQL injection attacks, cross-site scripting (XSS), and other OWASP Top 10 vulnerabilities. With the new AWS WAF integration, you automatically get protection against these common attack vectors. The recommended Rule Packs provide immediate protection against malicious bot traffic, common web exploits, and known bad actors while preventing direct-to-origin attacks that could overwhelm your infrastructure.

Let’s take a look

If you’ve ever created an Amazon CloudFront distribution, you’ll immediately notice that things have changed. The new experience is straightforward to follow and understand. For my example, I chose to create a distribution for a static website using Amazon S3 as my origin.

New onboarding experience for Amazon CloudFront

In Step 1, I give my distribution a name and select from Single website or app or the new Multi-tenant architecture option, which I can use to configure distributions that use multiple domains but share a common configuration. I choose Single website or app and enter an optional domain name. With the new experience, I can use the Check domain button to verify I have my domain as a Route 53 zone file.

Next, I select the origin for the distribution, which is where CloudFront will fetch the content to serve and cache. For my Origin type, I select Amazon S3. As the preceding screenshot shows, there are several additional options to choose from. Each of the options is designed to make configuration as straightforward as possible for the most popular use cases. Next, I select my S3 bucket, either by typing in the bucket name or using the Browse S3 button.

Next, I have several settings related to using Amazon S3 as my origin. The Grant CloudFront access to origin option is an important one. This option (selected by default) will update my S3 bucket policy to allow CloudFront to access my bucket and will configure my bucket for origin access control. This way, I can use a completely private bucket and know that assets in my bucket can only be accessed through CloudFront. This is a critical step to keeping my bucket and assets secure.

In the next step, I’m presented with the option to configure AWS WAF. With AWS WAF enabled, my web servers are better protected because it inspects each incoming request for potential threats before allowing them to make their way to my web servers. There is a cost to enabling AWS WAF, and as you can see in the following screenshot, there is a calculator to help estimate additional charges.

New onboarding experience for Amazon CloudFront

Now available

The new CloudFront onboarding experience and enhanced AWS WAF console are available today in all AWS Regions where these services are offered. You can start using these new features through the AWS Management Console. There are no additional charges for using these new experiences—you pay only for the CloudFront and AWS WAF resources you use, based on their respective pricing models.

To learn more about the new CloudFront onboarding experience and AWS WAF improvements, visit the Amazon CloudFront Documentation and AWS WAF Documentation. Start building faster, more secure web applications today with these simplified experiences.

Introducing the new console experience for AWS WAF

Post Syndicated from Harith Gaddamanugu original https://aws.amazon.com/blogs/security/introducing-the-new-console-experience-for-aws-waf/

Protecting publicly facing web applications can be challenging due to the constantly evolving threat landscape. You must defend against sophisticated threats, including zero-day vulnerabilities, automated events, and changing compliance requirements. Navigating through consoles and selecting the protections best suited to your use case can be complicated, requiring not only security expertise but also a deep understanding of the applications you want to protect.

Today, we’re excited to share that AWS WAF has launched a new console experience designed to simplify security configuration. This enhanced interface provides an integrated security solution that provides comprehensive protection across your application landscape, featuring a streamlined single-page workflow that can reduce deployment time from hours to minutes. AWS WAF now provides pre-configured rule packs for specific workloads, automated security recommendations, and a unified dashboard for clear visibility into security status. The new console also offers flexible protection levels and integrated partner solutions to help you scale security operations effectively.

In this post, we walk you through the features of the enhanced console experience for AWS WAF. You can now select your workload type to automatically apply expert-curated protection packs, helping to maintain comprehensive protection across your workloads.

Reduce web application security implementation steps by 80 percent

The simplified interface consolidates the configuration steps into a single page, reducing the need to navigate through multiple pages. This consolidation creates an intuitive workflow that significantly reduces setup complexity. You can complete configurations that previously took hours within minutes, representing an 80 percent reduction in implementation time.

The new experience offers pre-configured security defaults and documentation, helping users of all technical abilities to effectively secure applications. When starting the setup process, you select the application category and feature focus to protect an API or web application, and AWS WAF automatically customizes the protection parameters accordingly.

AWS WAF now also integrates with AWS Marketplace through a dedicated page for direct deployment of partner solutions.

This streamlined approach, shown in Figure 1, transforms what was previously a complex, time-consuming process into a straightforward, efficient workflow that maintains robust security standards while dramatically reducing implementation time and potential configuration errors.

Figure 1: Workload specific protection

Figure 1: Workload specific protection

Simplified AWS WAF rule deployment through protection packs

AWS WAF simplifies security deployment through three configuration options, each based on AWS security expertise and ready for immediate implementation. These protection packs provide comprehensive configuration optimized for various application types.

  • Recommended: Enables recommended protections for the selected application categories and traffic sources
  • Essentials: Enables essential protections for the selected application categories and traffic sources
  • You build it: Select and customize protections from the available options to fit your needs

Implementation requires a single step: selecting the appropriate protection pack based on your security needs, as shown in Figure 2. This approach minimizes complex configurations while maintaining security standards.

Figure 2: Choosing a rule package during AWS WAF onboarding

Figure 2: Choosing a rule package during AWS WAF onboarding

Real-time monitoring, automated recommendations, and protection activity visualization

The new console features an outcome-driven dashboard, shown in Figure 3, that simplifies security monitoring by consolidating threat detection metrics, rule performance analytics, and actionable insights into a single view. Security teams can now respond to threats faster without having to navigate through multiple screens.

Figure 3: Resources and protections dashboard

Figure 3: Resources and protections dashboard

AWS Threat Intelligence enhances monitoring capabilities by analyzing two weeks of allowed traffic patterns to proactively identify potential vulnerabilities. The service examines critical traffic dimensions including IP reputation, distributed denial of service (DDoS) attacks, bot activities, anonymous IP sources, and vulnerable application traffic. When AWS WAF detects vulnerabilities, it recommends specific AWS Managed Rules to strengthen your security posture, as shown in Figure 4.

Figure 4: Automated recommendations dashboard

Figure 4: Automated recommendations dashboard

The new real-time monitoring dashboard, as shown in Figure 5, offers comprehensive security insights at a glance. It displays request counts for traffic within your specified time range and summarizes protection rules with their corresponding termination actions. A standout feature is the Sankey visualization, which maps protection activity to AWS WAF actions, helping security teams track traffic flow, identify rule interaction patterns, and optimize configurations.

Figure 5: Summary and protection activity visualization dashboard

Figure 5: Summary and protection activity visualization dashboard

Outcome driven dashboards for actionable insights

The new dashboard, shown in Figure 6, displays security metrics based on business impact. The left panel contains four main categories: traffic, bot, rule, and CAPTCHA characteristics. The right panel shows metrics within each category. Under Traffic characteristics, you can view metrics by countries, attack types, and device types.

Figure 6: New, outcome-driven dashboard

Figure 6: New, outcome-driven dashboard

Bot characteristics include detection ratio, categories, token information, signals, session thresholds, IP token reuse thresholds, and coordinated activity. Rule characteristics highlight the top 10 managed rules, while CAPTCHA characteristics show solved, abandoned, and unsolved puzzle metrics. This organized structure helps you analyze data effectively, starting with category selection and progressing to rule evaluation. You can combine categories and metrics to visualize patterns, investigate incidents, and make informed decisions. Interactive features, such as IP blocking on hover, enable immediate action. The new console experience allows you to quickly identify threats, optimize WAF rules, and maintain effective security controls based on specific needs.

Query logs from the console

The new AWS WAF console features an integrated log explorer. You can access two analysis options from the bottom of the new console page: sampled requests for immediate review or log explorer for detailed analysis. The log explorer, shown in Figure 7, requires Amazon CloudWatch logging and provides pre-built filters for rule actions and time frames, enabling quick pattern identification and trend analysis. If CloudWatch logging isn’t enabled, you can still analyze security events through sampled requests.

Figure 7: New log explorer view for traffic analysis

Figure 7: New log explorer view for traffic analysis

Availability and pricing

Starting today, these dashboards are available by default in the AWS WAF console at no additional cost to you and require no additional setup to be completed.

Customer success

Early adopters are already seeing significant benefits. Sarah Chen, Security Engineer at National Retail Corporation, reports: “With the new console, we configured protection for our PHP applications in under 10 minutes. The rule recommendations helped us identify and block sophisticated attacks targeting our applications, reducing our security incidents by 60 percent in the first month.”

Conclusion

By combining intelligent monitoring, guided configuration, and straightforward access to specialized solutions, our enhanced console helps organizations to maintain robust security postures without the complexity traditionally associated with advanced security management.

If you have feedback about this post, submit comments in the Comments section below. If you have questions about this post, contact AWS Support.

Harith Gaddamanugu

Harith Gaddamanugu

Harith is a Sr Edge Specialist Solutions Architect at AWS, where he architects critical infrastructure and security solutions that serve millions of users globally. With a decade of expertise in cloud perimeter protection and web acceleration, he guides large enterprises building resilient architectures. Outside work, Harith enjoys hiking and landscape photography with his family.

AWS Weekly Roundup: AWS re:Inforce 2025, AWS WAF, AWS Control Tower, and more (June 16, 2025)

Post Syndicated from Esra Kayabali original https://aws.amazon.com/blogs/aws/aws-weekly-roundup-aws-reinforce-2025-aws-waf-aws-control-tower-and-more-june-16-2025/

Today marks the start of AWS re:Inforce 2025, where security professionals are gathering for three days of technical learning sessions, workshops, and demonstrations. This security-focused conference brings together AWS security specialists who build and maintain the services that organizations rely on for their cloud security needs.

AWS Chief Information Security Officer (CISO) Amy Herzog will deliver the conference keynote along with guest speakers who will share new security capabilities and implementation insights. The event offers multiple learning paths with sessions designed for various technical roles and expertise levels. Many of my colleagues from across AWS are leading hands-on workshops, demonstrating new security features, and facilitating community discussions. For those unable to join us in Philadelphia, the keynote and innovation talks will be viewable by livestream during the event, and available to watch on demand after the event. Look out for the key announcements and technical insights from the conference in upcoming posts!

Let’s look at last week’s new announcements.

Last week’s launches
Here are the launches that got my attention.

Extend Amazon Q Developer IDE plugins with MCP toolsAmazon Q Developer now supports Model Context Protocol (MCP) in its integrated development environment (IDE) plugins, helping developers integrate external tools for enhanced contextual development workflows. You can now augment the built-in tools with any MCP server that supports the stdio transport layer. These servers can be managed within the Amazon Q Developer user interface. This makes it easy to add, remove, and modify tool permissions. The integration enables more customized responses by orchestrating tasks across both native and MCP server-based tools. MCP support is available in Visual Studio Code and JetBrains IDE plugins, as well as in the Amazon Q Developer command line interface (CLI), with detailed documentation and implementation guides available in the Amazon Q Developer documentation.

AWS WAF now supports automatic application layer DDoS protection – AWS has enhanced its application layer (L7) distributed denial of service (DDoS) protection capabilities with faster automatic detection and mitigation that responds to events within seconds. This AWS Managed Rules group automatically detects and mitigates DDoS attacks of any duration to keep applications running on Amazon CloudFront, Application Load Balancer, and other AWS WAF supported services available to users. The system establishes a baseline within minutes of activation using machine learning (ML) models to detect traffic anomalies, then automatically applies rules to address suspicious requests. Configuration options help you customize responses such as presenting challenges or blocking requests. The feature is available to all AWS WAF and AWS Shield Advanced subscribers in all supported AWS Regions, except Asia Pacific (Thailand), Mexico (Central), and China (Beijing and Ningxia). To learn more about AWS WAF application layer (L7) DDoS protection, visit the AWS WAF documentation or the AWS WAF console.

AWS Control Tower now supports service-linked AWS Config managed AWS Config rulesAWS Control Tower now deploys service-linked AWS Config rules directly in managed accounts, replacing the previous CloudFormation StackSets deployment method. This change improves deployment speed when enabling service-linked AWS Config rules across multiple AWS Control Tower managed accounts and Regions. These service-linked rules are managed entirely by AWS services and can’t be edited or deleted by users. This helps maintain consistency and prevent configuration drift. AWS Control Tower Config rules detect resource noncompliance within accounts and provide alerts through the dashboard. You can deploy these controls using the AWS Control Tower console or AWS Control Tower control APIs.

Powertools for AWS Lambda introduces Bedrock Agents Function utility – The new Amazon Bedrock Agents Function utility in Powertools for AWS Lambda simplifies building serverless applications integrated with Amazon Bedrock Agents. This utility helps developers create AWS Lambda functions that respond to Amazon Bedrock Agents action requests with built-in parameter injection and response formatting, eliminating boilerplate code. The utility seamlessly integrates with other Powertools features like Logger and Metrics, making it easier to build production-ready AI applications. This integration improves the developer experience when building agent-based solutions that use AWS Lambda functions to process actions requested by Amazon Bedrock Agents. The utility is available in Python, TypeScript, and .NET versions of Powertools.

Announcing open sourcing pgactive: active-active replication extension for PostgreSQL – Pgactive is a PostgreSQL extension that enables asynchronous active-active replication for streaming data between database instances, and AWS has made it open source. This extension provides additional resiliency and flexibility for moving data between instances, including writers located in different Regions. It helps maintain availability during operations like switching write traffic. Building on PostgreSQL’s logical replication features, pgactive adds capabilities that simplify managing active-active replication scenarios. The open source approach encourages collaboration on developing PostgreSQL’s active-active capabilities while offering features that streamline using PostgreSQL in multi-active instance environments. For more information and implementation guidance, visit the GitHub repository.

For a full list of AWS announcements, be sure to keep an eye on the What’s New at AWS page.

We launched existing services and instance types in additional Regions:

Other AWS events
Check your calendar and sign up for upcoming AWS events.

AWS GenAI Lofts are collaborative spaces and immersive experiences that showcase AWS expertise in cloud computing and AI. They provide startups and developers with hands-on access to AI products and services, exclusive sessions with industry leaders, and valuable networking opportunities with investors and peers. Find a GenAI Loft location near you and don’t forget to register.

AWS Summits are free online and in-person events that bring the cloud computing community together to connect, collaborate, and learn about AWS. Register in your nearest city: Milano (June 18), Shanghai (June 19 – 20), Mumbai (June 19) and Japan (June 25 – 26).

Browse all upcoming AWS led in-person and virtual events here.

That’s all for this week. Check back next Monday for another Weekly Roundup!

— Esra

This post is part of our Weekly Roundup series. Check back each week for a quick roundup of interesting news and announcements from AWS!

Reduce your operational overhead today with Amazon CloudFront SaaS Manager

Post Syndicated from Veliswa Boya original https://aws.amazon.com/blogs/aws/reduce-your-operational-overhead-today-with-amazon-cloudfront-saas-manager/

Today, I’m happy to announce the general availability of Amazon CloudFront SaaS Manager, a new feature that helps software-as-a-service (SaaS) providers, web development platform providers, and companies with multiple brands and websites efficiently manage delivery across multiple domains. Customers already use CloudFront to securely deliver content with low latency and high transfer speeds. CloudFront SaaS Manager addresses a critical challenge these organizations face: managing tenant websites at scale, each requiring TLS certificates, distributed denial-of-service (DDoS) protection, and performance monitoring.

With CloudFront Saas Manager, web development platform providers and enterprise SaaS providers who manage a large number of domains will use simple APIs and reusable configurations that use CloudFront edge locations worldwide, AWS WAF, and AWS Certificate Manager. CloudFront SaaS Manager can dramatically reduce operational complexity while providing high-performance content delivery and enterprise-grade security for every customer domain.

How it works
In CloudFront, you can use multi-tenant SaaS deployments, a strategy where a single CloudFront distribution serves content for multiple distinct tenants (users or organizations). CloudFront SaaS Manager uses a new template-based distribution model called a multi-tenant distribution to serve content across multiple domains while sharing configuration and infrastructure. However, if supporting single websites or application, a standard distribution would be better or recommended.

A template distribution defines the base configuration that will be used across domains such as origin configurations, cache behaviors, and security settings. Each template distribution has a distribution tenant to represent domain-specific origin paths or origin domain names including web access control list (ACL) overrides and custom TLS certificates.

Optionally, multiple distribution tenants can use the same connection group that provides the CloudFront routing endpoint that serves content to viewers. DNS records point to the CloudFront endpoint of the connection group using a Canonical Name Record (CNAME).

To learn more, visit Understand how multi-tenant distributions work in the Amazon CloudFront Developer Guide.

CloudFront SaaS Manager in action
I’d like to give you an example to help you understand the capabilities of CloudFront SaaS Manager. You have a company called MyStore, a popular e-commerce platform that helps your customer easily set up and manage an online store. MyStore’s tenants already enjoy outstanding customer service, security, reliability, and ease-of-use with little setup required to get a store up and running, resulting in 99.95 percent uptime for the last 12 months.

Customers of MyStore are unevenly distributed across three different pricing tiers: Bronze, Silver, and Gold, and each customer is assigned a persistent mystore.app subdomain. You can apply these tiers to different customer segments, customized settings, and operational Regions. For example, you can add AWS WAF service in the Gold tier as an advanced feature. In this example, MyStore has decided not to maintain their own web servers to handle TLS connections and security for a growing number of applications hosted on their platform. They are evaluating CloudFront to see if that will help them reduce operational overhead.

Let’s find how as MyStore you configure your customer’s websites distributed in multiple tiers with the CloudFront SaaS Manager. To get started, you can create a multi-tenant distribution that acts as a template corresponding to each of the three pricing tiers the MyStore offers: Bronze, Sliver, and Gold shown in Multi-tenant distribution under the SaaS menu on the Amazon CloudFront console.

To create a multi-tenant distribution, choose Create distribution and select Multi-tenant architecture if you have multiple websites or applications that will share the same configuration. Follow the steps to provide basic details such as a name for your distribution, tags, and wildcard certificate, specify origin type and location for your content such as a website or app, and enable security protections with AWS WAF web ACL feature.

When the multi-tenant distribution is created successfully, you can create a distribution tenant by choosing Create tenant in the Distribution tenants menu in the left navigation pane. You can create a distribution tenant to add your active customer to be associated with the Bronze tier.

Each tenant can be associated with up to one multi-tenant distribution. You can add one or more domains of your customers to a distribution tenant and assign custom parameter values such as origin domains and origin paths. A distribution tenant can inherit the TLS certificate and security configuration of its associated multi-tenant distribution. You can also attach a new certificate specifically for the tenant, or you can override the tenant security configuration.

When the distribution tenant is created successfully, you can finalize this step by updating a DNS record to route traffic to the domain in this distribution tenant and creating a CNAME pointed to the CloudFront application endpoint. To learn more, visit Create a distribution in the Amazon CloudFront Developer Guide.

Now you can see all customers in each distribution tenant to associate multi-tenant distributions.

By increasing customers’ business needs, you can upgrade your customers from Bronze to Silver tiers by moving those distribution tenants to a proper multi-tenant distribution.

During the monthly maintenance process, we identify domains associated with inactive customer accounts that can be safely decommissioned. If you’ve decided to deprecate the Bronze tier and migrate all customers who are currently in the Bronze tier to the Silver tier, then you can delete a multi-tenant distribution to associate the Bronze tier. To learn more, visit Update a distribution or Distribution tenant customizations in the Amazon CloudFront Developer Guide.

By default, your AWS account has one connection group that handles all your CloudFront traffic. You can enable Connection group in the Settings menu in the left navigation pane to create additional connection groups, giving you more control over traffic management and tenant isolation.

To learn more, visit Create custom connection group in the Amazon CloudFront Developer Guide.

Now available
Amazon CloudFront SaaS Manager is available today. To learn about, visit CloudFront SaaS Manager product page and documentation page. To learn about SaaS on AWS, visit AWS SaaS Factory.

Give CloudFront SaaS Manager a try in the CloudFront console today and send feedback to AWS re:Post for Amazon CloudFront or through your usual AWS Support contacts.

Veliswa.
_______________________________________________

How is the News Blog doing? Take this 1 minute survey!

(This survey is hosted by an external company. AWS handles your information as described in the AWS Privacy Notice. AWS will own the data gathered via this survey and will not share the information collected with survey respondents.)

How to help prevent hotlinking using referer checking, AWS WAF, and Amazon CloudFront

Post Syndicated from Alex Smith original https://aws.amazon.com/blogs/security/how-to-prevent-hotlinking-by-using-aws-waf-amazon-cloudfront-and-referer-checking/

Note: This post was first published April 21, 2016. The updated version aligns with the latest version of AWS WAF (AWS WAF v2) and includes screenshots that reflect the changes in the AWS console experience.


AWS WAF Classic has been deprecated and will be end-of-life (EOL) in September 2025. This update describes how to use the latest version of AWS WAF (WAFv2) to help prevent hotlinking. Updates have been made to the screenshots to reflect the changes in the AWS Management Console for AWS WAF.

Hotlinking—also known as inline linking—is a form of content leeching where an unauthorized third-party website embeds links to resources originally referenced in a primary site’s HTML. The third-party website doesn’t incur the cost of hosting the content, which means that your website can be charged for the content other sites use. It also results in slow loading times, lost revenue, and potential legal issues.

Now, you can use AWS WAF to help prevent hotlinking. AWS WAF is a web application firewall that’s closely integrated with Amazon CloudFront—a content delivery network (CDN)—and can help protect your web applications from common web exploits that could affect application availability, compromise security, and consume excessive resources. In this blog post, I show you how to help prevent hotlinking by using header inspection in AWS WAF, while still taking advantage of the improved user experience from a CDN such as CloudFront.

Solution overview

You can address hotlinking in various ways. For instance, you can validate the Referer header (sent by a browser to indicate to the server which page the visitor was referred from) at your web server (for example, by using the Apache module mod_rewrite), and either issue a redirect back to your site’s main page or return a 403 Forbidden error to the visitor’s browser.

If you’re using a CDN such as CloudFront to speed up your site’s delivery of content, validating the Referer header at the web server becomes less practical. The CDN stores a copy of your content in the edge of its network of servers, so even if your web server validates the original request’s headers (in this case, the referer), additional requests for that content must be validated by the CDN itself, because they are unlikely to reach the origin web server.

Figure 1 illustrates this process.

Figure 1: Request – response flow showing instances of a cache-miss and a cache-hit

Figure 1: Request – response flow showing instances of a cache-miss and a cache-hit

The process shown in Figure 1 is as follows:

  1. A request is received from a user client (1) at a CloudFront edge location (2).
  2. The edge location attempts to return a cached copy of the file requested. This request, if fulfilled from the cache, is considered a cache hit.
    1. In the case of a cache miss—when the content is either not in the edge or is not valid (for example, if the content is out of date)—the request is forwarded to the origin (3) (such as an Amazon Simple Storage Service (Amazon S3) bucket) for a new copy of the object.
    2. In the case of a cache hit, the origin cannot apply validation logic to the user’s request, because the edge server doesn’t need to contact the origin to fulfil the user’s request.

In the next section, I show you how to inspect the client-request headers using AWS WAF to allow or block requests at the CDN.

Solution implementation—two approaches

This post includes two ways to set up AWS WAF to help prevent hotlinking:

  • Using a separate subdomain: Static files (such as images or styling components) to be protected are moved to a separate subdomain such as static.example.com so that you only need to validate the Referer header.
  • Using the same domain: Static files are located under a directory on the same domain. This solution includes how to extend this example to check for an empty Referer header.

The choice of approach will depend on how your site is structured and the level of protection you want to implement. The first approach enables you to set up a Referer header check to make sure that requests for the images only come from an allowlisted sub-domain, while the second approach has an additional check for an empty Referer header. The second approach extends the first approach and allows for some flexibility for users to share direct links to the image while still preventing unaffiliated third-party sites from embedding the image links on their websites.

Terms

The following list includes key terms used in this post:

  • AWS WAF configurations consist of a web access control list (web ACL), associated with a given CloudFront distribution.
  • Each web ACL is a collection of one or more rules, and each rule can have one or more match conditions.
  • Match conditions are made up of one or more filters, which inspect components of the request (such as its headers or URI) to match for certain conditions.
  • Case-sensitivity: HTTP header names are case-insensitive. Referer and referer point to the same HTTP header. HTTP header values, however, are case-sensitive.

Prerequisites

You must have a CloudFront distribution set up before configuring an AWS WAF web ACL. For information about how to set up a CloudFront distribution with an S3 bucket as an origin, see Configure distributions.

Approach 1: A separate subdomain

In this example, you create an AWS WAF rule set that contains a single rule with a single match condition, which in turn has a single filter. The match condition checks the Referer header and verifies that it contains a given value. If the request matches the condition specified in the rule, the traffic is allowed. Otherwise, the AWS WAF rule blocks the traffic.

For this example, because all the static files are on a separate subdomain (static.example.com) accessed only from the site example.com, you will block hotlinking for any file that don’t have a referer that ends with example.com.

Use the following steps to set this up using the AWS WAF console.

Step 1: Create and name a new web ACL

  1. Sign in to the AWS WAF console.
  2. If you have not created a web ACL before, Choose Create web ACL on the AWS WAF console landing page.
  3. Because you want to associate the web ACL with a CloudFront distribution, select Amazon CloudFront distributions as the Resource type.
    1. Enter a Name for the web ACL that you’re creating. For this example, I used the name sample-webacl. The page will automatically populate an associated Amazon CloudWatch metric name. CloudWatch is a monitoring service that allows you to gather and report on metrics of various services. This CloudWatch metric can be used later to report on how your newly created AWS WAF configuration is being used.
    2. After you have supplied the name of the web ACL, you can select the available AWS resources to be protected by this web ACL. In this example, you will fill that in later, so leave this field blank for now.
    3. By default, AWS WAF can inspect up to 16 KB of the web request body with additional values of 32, 48, and 64 KB for an additional cost. Leave the web request Body size limit at the default value of 16 KB.
    4. Choose Next.
  4. Figure 2: Describing the web ACL and associating it to resources

    Figure 2: Describing the web ACL and associating it to resources

Step 2: Create a string match condition on Referer header

AWS WAF ACLs can use AWS managed rule groups, rule groups from AWS Marketplace providers, or you can write your own rules and rule groups. For this example, you will create your own rules and rule groups.

  1. In the AWS WAF console, choose Add rules, and select Add my own rules and rule groups to create the string match condition.
    Figure 3: Add rules and rule groups

    Figure 3: Add rules and rule groups

  2. This will bring you to the Rule visual editor page. The default Rule type will be set to Rule builder which you can leave unchanged. In the Rule builder section, select Regular rule.
    Figure 4: Rule type and Rule builder

    Figure 4: Rule type and Rule builder

  3. The next step is to construct a string match condition to match on the Referer header. Under Name, enter a name for the rule, such as Referer-check. Make sure that If a request is set to doesn’t match the statement (NOT). The string match condition is a negative match which means that if the Referer header field value does not match the value specified in the rule, the request will be blocked. This makes sure that requests for static.example.com which only originate from example.com are allowed. In the Statement section, use the following settings:
    1. Inspect: Select Single header.
    2. Header field name: Enter referer as the value.
    3. Match type: Select Exactly matches string.
    4. String to match: Enter example.com as the value.
    5. Text transformation: Select Lowercase. This isn’t required for most modern browsers, but is a good practice because HTTP header field values are case sensitive.
    Figure 5: Rule name and statement

    Figure 5: Rule name and statement

  4. In the Action section, select Block as the Action. Choose Add Rule.
    Figure 6: Rule Action

    Figure 6: Rule Action

    In the preceding rule statement, you’re configuring AWS WAF to inspect a header with the name Referer and checking if the value of the header matches the static string example.com. If the value of the Referer header is not example.com, then the request is blocked.

  5. The next page is Add rules and rule groups. It shows the following attributes of the web ACL:
    1. AWS WAF rules that have been added to the web ACL.
    2. Web ACL capacity units (WCUs).
    3. Default web ACL action.
    4. Token domain list.
    5. Because you’re only adding one rule to this web ACL, choose Next.
      Figure 7: Rules and rule groups, WCUs, and default web ACL action

      Figure 7: Rules and rule groups, WCUs, and default web ACL action

  6. On the next page, you will set the rule priority. Because you added only one rule, you will not need to adjust the rule priority. If there is more than one rule, you can select a particular rule and use the Move up or Move down options to organize the rule order. Choose Next.
    Figure 8: Set rule priority

    Figure 8: Set rule priority

  7. The Configure metrics page details can be left at the default values. Choose Next to proceed to the final step.
    Figure 9: Configure metrics

    Figure 9: Configure metrics

  8. The final step is to review the web ACL details. If you need to change one of the settings of the web ACL, you can choose Edit step for the corresponding step. Choose Create web ACL to finalize creating the AWS WAF web ACL.
    Figure 10: Review and create web ACL

    Figure 10: Review and create web ACL

Step 3: Associate the new rule with the relevant CloudFront distribution

You can now associate AWS resources with the web ACL that you created in the previous steps. In this case, the AWS resource is a CloudFront distribution.

  1. In the AWS WAF console, choose Web ACLs in the navigation pane. Select the web ACL named sample-webacl that you created previously.
    Figure 11: Select a Web ACL to configure

    Figure 11: Select a Web ACL to configure

  2. Choose Add AWS resources.
    Figure 12: Add AWS resources

    Figure 12: Add AWS resources

  3. Eligible AWS resources will be displayed in the pop-up page. Select the CloudFront distribution from the Resources list. Choose Add to associate the ACL sample-webacl with the CloudFront distribution.
    Figure 13: Select CloudFront distribution to associate with sample-webacl

    Figure 13: Select CloudFront distribution to associate with sample-webacl

  4. The next page is the Web ACLs page, which will show the CloudFront distribution selected in the previous step in the Associated AWS resources section.
    Figure 14: Web ACLs and Associated AWS resources

    Figure 14: Web ACLs and Associated AWS resources

Test the referer check rule

You’re ready to test the web ACL that you created by issuing a cURL command from the command line and confirming that the referer check is matched correctly. When you request files without the allowlisted Referer header, the requests are blocked at the CDN. However, valid requests still are allowed through.

When a third party embeds your content (request blocked at the CDN)

» curl –H "Referer: example.net -I https://static.example.com/favicon.ico
« HTTP/1.1 403 Forbidden

When you embed your content (request allowed through the CDN)

» curl –H "Referer: example.com -I https://static.example.com/favicon.ico
« HTTP/1.1 200 OK

Note: With Approach 1, you must make the request with an allowlisted Referer header. In this example, all paths are filtered.

Approach 2: All content under the same domain, with filtering by path

In the second approach, you allow a blank Referer header and filter by a given URL path. To do this, you will create an AWS WAF web ACL that contains multiple rules with additional match conditions, which in turn are comprised of multiple filters. As with the first approach, the match condition looks at the Referer header; however, you will validate the header in two ways. First, you validate whether the request contains the expected header, and if it does not, you apply the second validation, which checks to see whether it has a URL style Referer header. This enables you to access the assets directly in a browser when the assets aren’t embedded elsewhere in a website but still provides protection against hotlinking.

Accessing an image directly in the browser can be useful in situations where users might want to share the link to the image directly, thus helping to prevent a negative user experience when sharing the image link with other users. This approach makes it an improvement over the first approach where requests for the images must originate from the sub-domain.

You will also validate the path used in the request (in this example /wp-content), which allows AWS WAF to protect individual folders under a single domain name.

Step 1: Decide what to protect

As in the first approach, rather than filter on everything under a domain, you will filter based on the path. In this case, /wp-content. This allows you to protect your uploaded content that sits under /wp-content, but without having to put the content into a separate subdomain.

Step 2: Create and name a new web ACL

You can use the web ACL that you created for Approach 1, or you can repeat Step 1 of Approach 1 to create a new web ACL.

Step 3: Create string match conditions on the referer

For Approach 2, the assumption is that everything exists under a single domain, so instead of using the catch-all example.com, use the more secure https://example.com/ and mark the header as Starting with https://example.com.

Because you’re explicitly filtering on one header, you must watch out for two things:

  • Switching between www.example.com and example.com in your application.
  • Switching between https:// and http:// in your application.

If either of these switches occurs, you will see a 403 Forbidden error returned instead of your embedded files. In this example, all content is delivered directly through https://example.com/.

For this example, you will construct two rules, each of which will contain multiple string match conditions. AWS WAF allows for conditional match conditions within a rule so you can create nested logic statements. For example, a rule evaluation is true if all the statements within a rule statement are evaluated to true.

First rule: Validate a Referer header:

For this rule, you will set the following match conditions and AWS WAF actions:

Rule name: Validate-Referer-header

If Referer header value starts with https://example.com

AND

If URI path starts with /wp-content

THEN

ALLOW request

  1. Open the AWS Management Console for AWS WAF and navigate to WAF & Shield.
  2. Choose Web ACLs in the navigation pane and select Global (CloudFront) as the AWS Region.
    Figure 15: Web ACLs and AWS Regions

    Figure 15: Web ACLs and AWS Regions

  3. The page will refresh to show the Web ACL sample-webacl that you created in the preceding Step 2. Select sample-webacl.
    Figure 16: Web ACLs list

    Figure 16: Web ACLs list

  4. Select the Rules tab.
    Figure 17: Web ACL rules

    Figure 17: Web ACL rules

  5. Choose Add rules and select Add my own rules and rule groups. If you’re reusing the web ACL created in Approach 1, delete the Referer-check rule before adding new rules.
    Figure 18: Add rules and rule groups

    Figure 18: Add rules and rule groups

  6. For Rule type, select Rule builder.
    Figure 19: Rule type

    Figure 19: Rule type

  7. In the Rule section, use the following settings:
    1. Name: Enter Validate-referer-header as the value.
    2. Type: Select Regular rule.
    3. If a request: Select matches all the statements (AND).
    Figure 20: Rule name and match condition

    Figure 20: Rule name and match condition

  8. In the Statement 1 section, use the following settings:
    1. Inspect: Select Single header.
    2. Header field name: Enter referer as the value.
    3. Match type: Select Starts with string.
    4. String to match: Enter https://example.com as the value.
    5. Text transformation: Select Lowercase.
    Figure 21: First string match condition

    Figure 21: First string match condition

  9. Create the second string match condition (Statement 2). For the URL itself, you want to protect content under /wp-content, so you will create a string match to validate that case using the same steps as for the first string match condition, with two changes:
    1. For Inspect, select URI path.
    2. For String to match, enter /wp-content as the value.
    Figure 22: Second string match condition

    Figure 22: Second string match condition

  10. Change the Action to Allow and choose Add Rule at the bottom of the page.
    Figure 23: Set the Action to Allow

    Figure 23: Set the Action to Allow

  11. In the Set rule priority page, choose Save.
    Figure 24: Save the rule

    Figure 24: Save the rule

Second rule: Validate without a Referer header

For the second rule, you will set the following match conditions and rule actions:

Rule name: Validate- with-no-Referer-header

If Referer header contains ://

AND

If URI path starts with /wp-content

THEN

BLOCK request

The second rule is similar to the first rule, but it matches when the Referer header value includes ://. You use this match condition to check whether the Referer header has been set at all. If it has, you block the request.

  1. In the Web ACL page, choose Add rules and select Add my own rules and rule groups to be taken to the Rule type page.
    Figure 25: Create the second rule

    Figure 25: Create the second rule

  2. For Rule type and Rule builder, use the following settings:
    1. Rule type: Select Rule builder.
    2. Name: Enter Validate-with-no_Referer-header as the value.
    3. Type: Select Regular rule.
    4. If a request: Select matches all the statements (AND).
    Figure 26: Set the rule type and matching

    Figure 26: Set the rule type and matching

  3. For Statement 1, use the following settings:
    1. Inspect: Select Single header.
    2. Header field name: Enter Referer as the value.
    3. Match type: Select Contains string.
    4. String to match: Enter ://
    Figure 27: Configure Statement 1

    Figure 27: Configure Statement 1

  4. For Statement 2, use the following settings:
    1. Inspect: Select URI path.
    2. Match type: Select Starts with string.
    3. String to match: Enter /wp-content as the value.
    Figure 28: Configure Statement 2

    Figure 28: Configure Statement 2

  5. For Action, keep the default setting of Block and choose Add Rule.
    Figure 29: Add rule

    Figure 29: Add rule

  6. The resulting Set rule priority page will list the rules in the sample-webacl web ACL and will look like the following figure. It shows the name of the rule, the rule priority, the web capacity units (WCUs) and the AWS WAF response. Choose Save.
    Figure 30: Rule priority and web ACL units used the web ACL.

    Figure 30: Rule priority and web ACL units used the web ACL.

The Rules tab will now show both of the rules that you added with their corresponding AWS WAF actions in addition to the default action of Allow for requests that don’t match one of the rules.

Figure 31: Rules tab of sample-webacl web ACL

Figure 31: Rules tab of sample-webacl web ACL

Step 4: Associate the new rules with the relevant CloudFront distribution

  1. Select the Associated AWS Resources tab and choose Add AWS resources.
    Figure 32: Add AWS resources

    Figure 32: Add AWS resources

  2. Select the relevant CloudFront distribution and choose Add.
    Figure 33: Select the CloudFront distribution

    Figure 33: Select the CloudFront distribution

  3. The web ACLs page will show the CloudFront distribution in the Associated AWS resources tab.
    Figure 34: Associated AWS resources

    Figure 34: Associated AWS resources

Test the rules

Similar to Approach 1, you have filtering at the CDN, but this time the filtering is based on the path and direct linking is allowed (without a Referer header).

You can use cURL to verify that the new AWS WAF web ACL correctly protects your content. Use the –H argument to send a different Referer header to the CloudFront distribution, which allows you to test as if you are embedding the website content in an unauthorized page.

When a third party embeds your content

» curl –H "Referer: https://example.net/" -I https://example.com/wp-content/uploads/2013/03/shareable-image.jpg
« HTTP/1.1 403 Forbidden

When your content is directly linked (with no Referer)

» curl -I https://example.com/wp-content/uploads/2013/03/shareable-image.jpg
« HTTP/1.1 200 OK

When you embed your content

» curl –H "Referer: https://example.com/" -I https://example.com/wp-content/uploads/2013/03/shareable-image.jpg
« HTTP/1.1 200 OK

Conclusion

AWS WAF is a web application firewall that lets you monitor and control the HTTP(S) requests that are forwarded to your protected web application resources. In this post, you saw how to use the AWS WAF custom rule builder feature to prevent content hotlinking to protect your website’s content hosted in an Amazon S3 bucket.

The two approaches demonstrated in this post provide you with ways to implement a robust referer check solution that helps prevent unauthorized third-party websites from linking back to static assets on your website, thus helping to prevent increased bandwidth costs, bad user experience, and degraded performance because of resource leeching. Following the concept of least privilege, you can further restrict the AWS WAF rules to apply only to certain image file extensions (such as .jpg or .png).

While referer checking helps prevent unaffiliated sites from backlinking to your site’s images and benefitting by using your site’s bandwidth, more sophisticated exploits can carefully craft a request to bypass the referer check. Other web request mechanisms, such as web browser plugins, server-to-server requests that forge referer header values, or privacy-based web browsers may also cause inconsistencies in accurately evaluating the referer header value. Be aware of such inconsistencies and consider using additional private content mechanisms such as signed URLs and token authentication.

Web browsers don’t have a mechanism to validate if a Referer header has been tampered with. Referer checking should be implemented as part of a broader web application security strategy by using AWS WAF application protection rules, Bot Control, Fraud Control, and Distributed Denial of Service (DDOS) protection. Effective web traffic monitoring using AWS WAF logs, Amazon CloudWatch metrics, and web ACL traffic dashboards will help ensure that bad actors aren’t bypassing the AWS WAF rules that you have set up to protect your web traffic.

You can use AWS WAF to build on top of the referer check to implement more advanced content protection solutions such as rate-limiting, bot mitigation, and DDOS mitigations to further secure your website against a wide range of exploits.

If you have feedback about this post, submit comments in the Comments section below. If you have questions about this solution or its implementation, start a new thread on the AWS WAF forum.

Alex Smith was the original author of this post in 2016.

Sanchith Kandaka

Sanchith Kandaka

With over 15 years of experience in the Content Delivery and Application Security space, Sanchith is excited about all things edge related. He has worked as a Solutions Architect and a Solutions Engineer and is now a Specialist Solutions Architect at AWS focused on AWS Edge Services and Perimeter Protection services including Amazon CloudFront, AWS WAF, and AWS Shield.

How UNiDAYS achieved AWS Region expansion in 3 weeks

Post Syndicated from Sanhawat Taongern original https://aws.amazon.com/blogs/architecture/how-unidays-achieved-aws-region-expansion-in-3-weeks/

UNiDAYS is a fast, free digital platform that provides exclusive student offers and benefits to over 29 million verified members worldwide. With a rapidly growing user base and an increasing number of global partnerships, UNiDAYS recognized the need to enhance its platform’s performance to deliver a seamless consumer experience in geographic regions far from its original base of operations.

In this post, we share how UNiDAYS achieved AWS Region expansion in just 3 weeks using AWS services.

Business challenges

In response to growth opportunities, UNiDAYS faced a pressing business requirement: deliver low-latency responses and provide high availability for users across diverse geographic regions. At the same time, the platform needed to guarantee global data consistency while adhering to tight deadlines—all within just a few weeks. However, the existing monolithic application, although built on Amazon Web Services (AWS), wasn’t optimized for active-active multi-Region deployments.

The challenge was further complicated by the need to extend functionality from this legacy system, which used the AWS global network for improved user experience but fell short of meeting new business requirements. Re-architecting the entire platform to support multi-Region deployments within the given timeframe wasn’t feasible.

Solution overview

UNiDAYS opted to create complementary services tailored to these new requirements, using AWS services for a multi-Region, active-active architecture. The key services used included:

This approach allowed UNiDAYS to meet its latency, availability, and consistency goals while seamlessly integrating with existing infrastructure. The following diagram is the architecture for the solution.

Global delivery and resiliency

To provide the lowest latency and multi-Region resiliency, CloudFront was used with latency-based routing configured in Route 53. This routing directs requests to the Regional Application Load Balancers with the lowest latency, automatically providing resiliency in the event of Regional issues. Security was a key consideration. AWS WAF integration with CloudFront provided application-layer protection at the edge. Additional security measures included:

  • Custom HTTP headers on origin requests, enforced using Application Load Balancer listener rule conditions
  • Prefix lists to restrict access to Application Load Balancers, making sure that traffic originated from the intended CloudFront distributions

Rapid Regional deployment

The core infrastructure is deployed through Terraform, and applications are deployed using custom tooling that wraps AWS CloudFormation. This hybrid approach enabled rapid delivery by using existing patterns without disrupting established workflows. Resources were organized into tiers: platform, global, and Regional. Platform and global resources were deployed one time, and Regional resources were rolled out to each activated Region, streamlining expansion efforts.

One technical challenge involved CloudFormation exports, which are Regional by design. To address this, we implemented a custom CloudFormation macro to enable cross-Region access to exported values, providing consistency across deployments.

Amazon ECS enabled progressive application deployments within each Region, allowing teams to focus on scaling applications rather than managing infrastructure. For cost-efficiency, we used Spot Instances. During testing, container start-up latency was observed due to cross-Region image downloads from Amazon Elastic Container Registry (Amazon ECR). This issue was resolved by enabling private image replication in Amazon ECR so that container images were available locally in each Region. This solution significantly reduced start-up times, improving application responsiveness during deployments and scaling events.

Data consistency and performance

DynamoDB global tables were instrumental in providing eventual data consistency and Regional replication. With DynamoDB handling these aspects, we could focus on application logic.

The result was a substantial reduction in latency at key locations. For example, client-experienced latency in one Region dropped from approximately 200 milliseconds to 50 milliseconds upon deployment, as shown in the following screenshot.

Outcome

Key technical hurdles

We addressed the following technical obstacles while developing the solution:

  • Cross-Region CloudFormation exports – CloudFormation exports are Regional by design. We addressed this by creating a custom CloudFormation macro to read exports across Regions.
  • Container start-up latency – Latency caused by cross-Region image downloads was mitigated by implementing Amazon ECR private image replication. This meant that container images were readily available in each Region, reducing deployment times and improving overall performance.
  • Security assurance – By using CloudFront, AWS WAF, and Application Load Balancer security features, we made sure that traffic and data remained secure.

Why AWS?

UNiDAYS chose AWS due to its comprehensive global infrastructure and robust service offerings, which allowed the platform to:

  • Seamlessly expand compute operations to Regions closer to its user base
  • Take advantage of a full stack of services for reliable, secure, and low-latency content delivery
  • Meet tight delivery deadlines without compromising on performance or security
  • Maintain flexibility where required, with the ability to use more managed services, which allowed a focus on our applications

Conclusion

By adopting a multi-Region, active-active architecture on AWS, UNiDAYS successfully met its business goals within only 3 weeks, rapidly expanding to new Regions while promoting platform resiliency. The solution improved latency by 75% in new Regions (from 200 milliseconds to 50 milliseconds), provided Regional data availability through DynamoDB global tables, and maintained 100% service uptime during resiliency tests, even in cases of Regional connectivity loss. Additionally, deployment velocity increased by over 40%, allowing faster feature releases and improved agility. This architecture not only provides a scalable and resilient platform for current operations but also establishes a strong foundation for future global expansion.

Learn more

Is your organization looking to expand into new Regions while maintaining performance and reliability?

  • Contact AWS experts to explore tailored solutions for your multi-Region strategy.
  • Use AWS Global Infrastructure to optimize your expansion.
  • Share your challenges and successes in the comments—we’d love to hear your insights!


About the Authors

AWS Weekly Roundup: Amazon Bedrock, Amazon QuickSight, AWS Amplify, and more (March 31, 2025)

Post Syndicated from Esra Kayabali original https://aws.amazon.com/blogs/aws/aws-weekly-roundup-amazon-bedrock-amazon-quicksight-aws-amplify-and-more-march-31-2025/

It’s AWS Summit season! Free events are now rolling out worldwide, bringing our cloud computing community together to connect, collaborate, and learn. Whether you prefer joining us online or in-person, these gatherings offer valuable opportunities to expand your AWS knowledge. I’ll be attending the AWS Amsterdam Summit and would love to meet you—if you’re planning to be there, please stop by to say hello! Visit the AWS Summit website today to find events in your area, sign up for registration alerts, and reserve your spot at an AWS Summit near you.

Speaking of AWS news, let’s look at last week’s new announcements.

Last week’s launches
Here are the launches that got my attention.

AWS WAF integration with AWS Amplify Hosting now generally available – You can now directly attach AWS WAF to your AWS Amplify applications through a one-click integration in the Amplify console or using infrastructure as code (IaC). This integration provides access to the full range of AWS WAF capabilities, including managed rules that protect against common web exploits like SQL injection and cross-site scripting (XSS). You can also create custom rules based on your application needs, implement rate-based rules to protect against distributed denial of service (DDoS) attacks by limiting request rates from IP addresses, and configure geo-blocking to restrict access from specific countries. Firewall support is available in all AWS Regions in which Amplify Hosting operates.

Amazon Bedrock Custom Model Import introduces real-time cost transparency – If you’re using Amazon Bedrock Custom Model Import to run your customized foundation models (FMs), you can now access full transparency into compute resources and calculate inference costs in real time. Before model invocation, you can view the minimum compute resources (custom model units or CMUs) required through both the Amazon Bedrock console and Amazon Bedrock APIs. As models scale to handle increased traffic, Amazon CloudWatch metrics provide real-time visibility into total CMUs used, enabling better cost control through near-instant visibility. This helps you make on-the-fly model configuration changes to optimize costs. The feature is available in all Regions where Amazon Bedrock Custom Model Import is supported, with additional details available in Calculate the cost of running a custom model in the Amazon Bedrock User Guide.

Amazon Bedrock Knowledge Bases now supports Amazon OpenSearch Managed Cluster for vector storageAmazon Bedrock Knowledge Bases securely connects FMs to company data sources for Retrieval Augmented Generation (RAG), delivering more relevant and accurate responses. With this launch, you can use Amazon OpenSearch Managed Cluster as a vector database while using the full suite of Amazon Bedrock Knowledge Bases features. This integration expands the list of supported vector databases, which already includes Amazon OpenSearch Serverless, Amazon Aurora, Amazon Neptune Analytics, Pinecone, MongoDB Atlas, and Redis. The native integration with vector databases helps mitigate the need to build custom data source integrations. This feature is now generally available in all existing Amazon Bedrock Knowledge Bases and OpenSearch Service Regions.

Amazon Bedrock Guardrails announces the general availability of industry-leading image content filters – This new capability offers industry-leading text and image content safeguards that help you block up to 88% of harmful multimodal content without building custom safeguards or relying on error-prone manual content moderation. Image content filters can be applied across all categories within the content filter policy including hate, insults, sexual, violence, misconduct, and prompt attacks. Amazon Bedrock Guardrails provides configurable safeguards to detect and block harmful content and prompt attacks, define topics to deny and disallow specific topics, redact personally identifiable information (PII) such as personal data, and block specific words. It also provides contextual grounding checks to detect and block model hallucinations and to identify the relevance of model responses and claims, and to identify, correct, and explain factual claims in model responses using Automated Reasoning checks. This capability is generally available in the US East (N. Virginia), US West (Oregon), Europe (Frankfurt), and Asia Pacific (Tokyo) Regions. To learn more, visit Amazon Bedrock Guardrails image content filters provide industry-leading safeguards in the AWS Machine Learning Blog and Stop harmful content in models using Amazon Bedrock Guardrails in the Amazon Bedrock User Guide.

Scenarios capability now generally available for Amazon Q in QuickSight – This capability guides you through data analysis by uncovering hidden trends, making recommendations for your business, and intelligently suggesting next steps for deeper exploration using natural language interactions. Now you can explore past trends, forecast future scenarios, and model solutions without needing specialized skill, analyst support, or manual manipulation of data in spreadsheets. With its intuitive interface and step-by-step guidance, the scenarios capability of Amazon Q in QuickSight helps you perform complex data analysis up to 10x faster than spreadsheets. Whether you’re optimizing marketing budgets, streamlining supply chains, or analyzing investments, Amazon Q makes advanced data analysis accessible so you can make data-driven decisions across your organization. This capability is accessible from any Amazon QuickSight dashboard, so you can move seamlessly from visualizing data to asking what-if questions and comparing alternatives. Previous analyses can be easily modified, extended, and reused, helping you quickly adapt to changing business needs.

For a full list of AWS announcements, be sure to keep an eye on the What’s New at AWS page.

We launched existing services and instance types in additional Regions:

Other AWS events
Check your calendar and sign up for upcoming AWS events.

AWS GenAI Lofts are collaborative spaces and immersive experiences that showcase AWS expertise in cloud computing and AI. They provide startups and developers with hands-on access to AI products and services, exclusive sessions with industry leaders, and valuable networking opportunities with investors and peers. Find a GenAI Loft location near you and don’t forget to register.

Browse all upcoming AWS led in-person and virtual events here.

That’s all for this week. Check back next Monday for another Weekly Roundup!

— Esra

This post is part of our Weekly Roundup series. Check back each week for a quick roundup of interesting news and announcements from AWS!


How is the News Blog doing? Take this 1 minute survey!

(This survey is hosted by an external company. AWS handles your information as described in the AWS Privacy Notice. AWS will own the data gathered via this survey and will not share the information collected with survey respondents.)

Firewall support for AWS Amplify hosted sites

Post Syndicated from Sébastien Stormacq original https://aws.amazon.com/blogs/aws/firewall-support-for-aws-amplify-hosted-sites/

Today, we’re announcing the general availability of the AWS WAF integration with AWS Amplify Hosting.

Web application owners are constantly working to protect their applications from a variety of threats. Previously, if you wanted to implement a robust security posture for your Amplify Hosted applications, you needed to create architectures using Amazon CloudFront distributions with AWS WAF protection, which required additional configuration steps, expertise, and management overhead.

With the general availability of AWS WAF in Amplify Hosting, you can now directly attach a web application firewall to your AWS Amplify apps through a one-click integration in the Amplify console or using infrastructure as code (IaC). This integration gives you access to the full range of AWS WAF capabilities including managed rules, which provide protection against common web exploits and vulnerabilities like SQL injection and cross-site scripting (XSS). You can also create your own custom rules based on your specific application needs.

This new capability helps you implement defense-in-depth security strategies for your web applications. You can take advantage of AWS WAF rate-based rules to protect against distributed denial of service (DDoS) attacks by limiting the rate of requests from IP addresses. Additionally, you can implement geo-blocking to restrict access to your applications from specific countries, which is particularly valuable if your service is designed for specific geographic regions.

Let’s see how it works
Setting up AWS WAF protection for your Amplify app is straightforward. From the Amplify console, navigate to your app settings, select the Firewall tab, and choose the predefined rules you want to apply to your configuration. AWS WAF integration in AWS Amplify Hosting

Amplify hosting simplifies configuring firewall rules. You can activate four categories of protection.

  • Amplify-recommended firewall protection – Protect against the most common vulnerabilities found in web applications, block IP addresses from potential threats based on Amazon internal threat intelligence, and protect against malicious actors discovering application vulnerabilities.
  • Restrict access to amplifyapp.com – Restrict access to the default Amplify generated amplifyapp.com domain. This is useful when you add a custom domain to prevent bots and search engines from crawling the domain.
  • Enable IP address protection – Restrict web traffic by allowing or blocking requests from specified IP address ranges.
  • Enable country protection – Restrict access based on specific countries.

Protections enabled through the Amplify console will create an underlying web access control list (ACL) in your AWS account. For fine-grained rulesets, you can use the AWS WAF console rule builder.

After a few minutes, the rules are associated to your app and AWS WAF blocks suspicious requests.

If you want to see AWS WAF in action, you can simulate an attack and monitor it using the AWS WAF request inspection capabilities. For example, you can send a request with an empty User-Agent value. It will trigger a blocking rule in AWS WAF.

Let’s first send a valid request to my app.

curl -v -H "User-Agent: MyUserAgent" https://main.d3sk5bt8rx6f9y.amplifyapp.com/
* Host main.d3sk5bt8rx6f9y.amplifyapp.com:443 was resolved.
...(redacted for brevity)...
> GET / HTTP/2
> Host: main.d3sk5bt8rx6f9y.amplifyapp.com
> Accept: */*
> User-Agent: MyUserAgent
> 
* Request completely sent off
< HTTP/2 200 
< content-type: text/html
< content-length: 0
< date: Mon, 10 Mar 2025 14:45:26 GMT
 

We can observe that the server returned an HTTP 200 (OK) message.

Then, send a request with no value associated to the User-Agent HTTP header.

 curl -v -H "User-Agent: " https://main.d3sk5bt8rx6f9y.amplifyapp.com/ 
* Host main.d3sk5bt8rx6f9y.amplifyapp.com:443 was resolved.
... (redacted for brevity) ...
> GET / HTTP/2
> Host: main.d3sk5bt8rx6f9y.amplifyapp.com
> Accept: */*
> 
* Request completely sent off
< HTTP/2 403 
< server: CloudFront
... (redacted for brevity) ...
<TITLE>ERROR: The request could not be satisfied</TITLE>
</HEAD><BODY>
<H1>403 ERROR</H1>
<H2>The request could not be satisfied.</H2>

We can observe that the server returned an HTTP 403 (Forbidden) message.

AWS WAF provide visibility into request patterns, helping you fine-tune your security settings over time. You can access logs through Amplify Hosting or the AWS WAF console to analyze traffic trends and refine security rules as needed.

AWS WAF integration in AWS Amplify Hosting - Dashboard

Availability and pricing
Firewall support is available in all AWS Regions in which Amplify Hosting operates. This integration falls under an AWS WAF global resource, similar to Amazon CloudFront. Web ACLs can be attached to multiple Amplify Hosting apps, but they must reside in the same Region.

The pricing for this integration follows the standard AWS WAF pricing model, You pay for the AWS WAF resources you use based on the number of web ACLs, rules, and requests. On top of that, AWS Amplify Hosting adds $15/month when you attach a web application firewall to your application. This is prorated by the hour.

This new capability brings enterprise-grade security features to all Amplify Hosting customers, from individual developers to large enterprises. You can now build, host, and protect your web applications within the same service, reducing the complexity of your architecture and streamlining your security management.

To learn more, visit the AWS WAF integration documentation for Amplify or try it directly in the Amplify console.

— seb


How is the News Blog doing? Take this 1 minute survey!

(This survey is hosted by an external company. AWS handles your information as described in the AWS Privacy Notice. AWS will own the data gathered via this survey and will not share the information collected with survey respondents.)

From virtual machine to Kubernetes to serverless: How dacadoo saved 78% on cloud costs and automated operations

Post Syndicated from Andreas Gehrig original https://aws.amazon.com/blogs/architecture/from-virtual-machine-to-kubernetes-to-serverless-how-dacadoo-saved-78-on-cloud-costs-and-automated-operations/

dacadoo is a global Swiss-based technology company that develops solutions for digital health engagement and health risk quantification. Their products include a software-as-a-service (SaaS)-based digital health engagement platform that uses behavioral science, AI, and gamification to help end users improve their health outcomes.

The company embarked on a journey to modernize an API to quantify health and lifestyle data plus a risk engine to calculate mortality and morbidity probabilities based on years of scientific research data.

To transform a virtual machine–based API service into a globally redundant, scalable health score and risk calculation solution dacadoo chose Amazon Web Services (AWS) technology. The service handles highly sensitive health data from a global customer base and must comply with regional regulations.

The result is a cost reduction of 78% and an infrastructure maintenance effort of less than an hour per year , allowing dacadoo to deliver and operate more AWS infrastructure without scaling its site reliability engineering (SRE) team, thanks to a high level of automation and an agile mindset.

In this post, we walk you step-by-step through dacadoo’s journey of embracing managed services, highlighting their architectural decisions as we go.

Background

The solution architecture went through a three-stage journey:

  1. Incubation – Single virtual machine on premises with disaster recovery (DR) in Switzerland
  2. Global and scalable – Multiple global Kubernetes clusters
  3. Operational excellence – Fully serverless and geo-redundant on AWS

Stage 1: Incubation with a virtual machine

After years of scientific research and development, the service was launched, running on a single on-premises virtual machine that used hypervisor technology to provide disaster recovery (DR). However, it had no high availability (HA) capability and it required manual recovery.

The application serving the API requests and the NoSQL database were both running on the same host. Software deployment and operating system maintenance were performed manually using Secure Shell (SSH)—a typical low-automation setup that also included downtime.

The following architecture diagram shows a virtual machine encompassing the monolithic application and its database.

Monolithic architecture

Challenges

A single virtual machine was quick to set up and inexpensive to operate, but it had considerable shortcomings. The health API was only available in Switzerland, infrastructure maintenance was performed manually, and software deployment was handled manually. Additionally, database backups were done using virtual machine snapshots, uptime monitoring only, and testing was conducted on the developer workstation.

Stage 2: Global and scalable with Kubernetes

At that time, dacadoo made a strategic decision to heavily invest in Kubernetes for managing containerized workloads on a global scale. As part of this technology rollout, the health score and risk service were migrated to Kubernetes.

Due to the geographically distributed customer base and low latency requirements, three Kubernetes clusters were deployed, one on each continent. The NoSQL database was hosted in proximity to the workload to reduce service latency and keep the migration effort low.

To reduce the operational maintenance, the NoSQL database was integrated as a SaaS offering, and monitoring was centralized using Datadog.

All cloud infrastructure was provisioned exclusively with Terraform, covering the Kubernetes cluster, NoSQL database , and integration with GitLab and Datadog.

dacadoo containerized the API service and used Gitlab continuous integration and continuous deployment (CI/CD) pipelines to deploy multiple environments and clusters on a global hyperscaler.

In retrospect, this was a typical replatform modernization project from virtual machine to Kubernetes, with a high level of automation and a SaaS-first approach.

The following diagram is the architecture for the container solution with managed NoSQL database.

Containers architecture

Challenges

The service faced several challenges, including increased costs from deploying three regional Kubernetes clusters across three environments, resulting in 27 cluster nodes and additional expenses from managing NoSQL database SaaS instances for each cluster. The complexity of CI/CD pipelines for multi-environment multi-cluster deployments added to the difficulty. Significant operational effort was required to keep infrastructure and Kubernetes components up to date.

Stage 3: Operational excellence with serverless

The Kubernetes-based architecture met the requirements, but some features in the dacadoo API service backlog needed to fit better with the application architecture at the time.

This was the right moment to take a holistic view of the infrastructure and software architecture and refactor the solution according to the latest AWS technologies and best practices, the next frontier for dacadoo’s engineering team.

Solution requirements

Requirements for the solution refactoring were as follows:

  • Keep the functionality of the API unmodified
  • Constrain data processing to a region of choice for compliance with local data protection laws
  • Avoid weekly patch cycles by exclusively using managed serverless services
  • Reduce costs by choosing services with a pay-as-you-go billing model
  • Delegate authentication to a dedicated service
  • Use an established web framework with an extensive ecosystem

Refactoring the apps

The API service has two components: a developer portal and the health score and risk calculations API. The database is only required for API keys, algorithm parameters, quotas, and usage statistics. Health data is processed regionally by the compute layer but not persisted, opening the door for a distributed database: Amazon DynamoDB global tables is the perfect fit for the solution. Writes are distributed to all connected Regions, whereas reads are local, providing low latency for complying with dacadoo service level agreements (SLAs).

The developer portal is a web UI with API documentation and API key management features. AWS Lambda is a great fit because it scales automatically and has a pay-per-request billing model.

The health and risk API uses algorithms implemented in the C programming language for short bursting, compute-intense simulations. These calls are wrapped by a REST API using the Python FastAPI framework. These characteristics make AWS Lambda a great fit.

Serverless architecture

HTTP requests are routed to the Lambda functions using Amazon API Gateway with AWS WAF for protection from malicious requests and attacks. Static assets are served from an Amazon Simple Storage Service (Amazon S3) bucket through API Gateway. The additional features of Amazon CloudFront aren’t required, and Amazon S3 reduces the complexity.

Amazon Route 53 provides a powerful feature known as latency-based routing, which allows it to direct DNS queries to the endpoint that offers the lowest latency for the requester.

This feature provides Regional high availability for API users without data processing location requirements. Alternatively, the user can call specific Regional endpoints to make sure requests are processed in the desired Region.

API authorization is HTTP header-based and is performed in the application with data stored in Amazon DynamoDB.

The following diagram is the architecture for a geo-redundant fully serverless solution.

Serverless architecture

With a dacadoo SRE team proficient in Python, they opted for Pulumi for its advanced features such as programming language flow control constructs, powerful configuration capabilities, and multi-cloud support.

For continuous integration, GitLab CI compiles the algorithm library, tests the FastAPI applications and packages everything. The application deployment is just an update of the AWS Lambda, a simple and reliable workflow.

Summary

The solution evolved from a managed infrastructure setup, where the customer held most of the responsibility, to an AWS managed service architecture.

Infrastructure provisioning evolved from manual, error-prone processes to powerful code-driven workflows in Pulumi. The SRE needed to enhance their software engineering skills to adopt Pulumi, transitioning from configuration-based approaches to designing and maintaining an infrastructure code base using object-oriented Python. This was part of dacadoo’s investment in the SRE team and broader modernization efforts. The serverless architecture enabled a GitOps engineering culture focused on productivity.

The transformation maximized scalability and availability while reducing costs and operational effort:

Virtual machine

  • Scalability: Low
  • Availability: Best effort
  • Infrastructure costs: Low
  • Maintenance effort: High

Kubernetes

  • Scalability: High
  • Availability: 99.95%
  • Infrastructure costs: High
  • Maintenance effort: Medium

Serverless

  • Scalability: Very high
  • Availability: 99.999% (with failover to another AWS Region)
  • Infrastructure costs: Low
  • Maintenance effort: Very low

The global redundancy elevates availability to an impressive 99.999% while keeping the costs low.

Conclusion

Migrating from a virtual machine to Kubernetes and ultimately to AWS Lambda demonstrates the progression of cloud engineering toward enhanced efficiency and scalability.

Each step in this journey reduced the complexity of managing resources while increasing flexibility and automation. Transitioning dacadoo’s API service to a fully serverless, geo-redundant architecture not only advanced the platform but also upskilled engineers, maintained a lean SRE team, and kept infrastructure costs low. Get started with your own AWS serverless solution.


About the Authors

AWS Weekly Roundup: Omdia recognition, Amazon Bedrock RAG evaluation, International Women’s Day events, and more (March 24, 2025)

Post Syndicated from Betty Zheng (郑予彬) original https://aws.amazon.com/blogs/aws/aws-weekly-roundup-omdia-recognition-amazon-bedrock-rag-evaluation-international-womens-day-events-and-more-march-24-2025/

As we celebrate International Women’s Day (IWD) this March, I had the privilege of attending the ‘Women in Tech’ User Group meetup in Shenzhen last weekend. I was inspired to see over 100 women in tech from different industries come together to discuss AI ethics from a female perspective. Together, we explored strategies such as reducing gender bias in AI systems and promoting diverse representation in model training data. In the AWS Cloud Lab, participants used Amazon Bedrock with large language models (LLMs) to generate rose bloom videos, which was the most popular part of this meetup.

These gatherings are crucial to our efforts to engage more women in AI technology exploration and development, and to help make sure that the generative AI era evolves without gender bias. The collaborative spirit and technical curiosity displayed throughout the event is further proof that diverse teams truly build inclusive and effective solutions.

Speaking of vibrant community engagement, I also had the honor of presenting at Kubernetes Community Day (KCD) Beijing 2025 this weekend. The enthusiasm Omdia Universe: Cloud Container Management & Services 2024-25 reportfor container technologies was remarkable, with nearly 300 developers gathering to share experiences and best practices. During my keynote introducing the DoEKS project from Amazon Web Services (AWS), I was struck by the depth of interest in managed Kubernetes services. The audience’s questions revealed how widely adopted services such as Amazon Elastic Kubernetes Service (Amazon EKS) and Amazon Elastic Container Service (Amazon ECS) have become among Chinese developers building mission-critical applications.This strong community interest aligns perfectly with findings from the Omdia Universe: Cloud Container Management & Services 2024–25 report. In this comprehensive evaluation of container management solutions hosted on public clouds, AWS was recognized as a Leader. The report specifically highlights that AWS offers “widest range of options for working with Kubernetes or its own container management service, across cloud, edge, and on-premises environments.” You can read the full report about AWS offerings to learn more about our comprehensive container portfolio and how we’re helping builders deploy scalable, reliable containerized applications.

Last Week’s launches

In addition to the inspiring community events, here are some AWS launches that caught my attention.

Amazon Q Business browser extension gets upgrades – The Amazon Q Business browser extension now features significant enhancements designed to streamline browser-based tasks. Users gain access to their company’s indexed knowledge alongside web content, direct PDF support within the browser, image file attachment capabilities, and controls to remove irrelevant attachments from conversation context. The expanded context window accommodates larger web pages and more detailed prompts, resulting in more helpful responses. For advanced needs, the extension offers seamless transition to the full Amazon Q Business web experience with access to Actions and Amazon Q Apps. Review the Enhancing web browsing with Amazon Q Business in the documentation for detailed setup instructions and feature descriptions to learn more about this announcement.

Amazon Bedrock RAG evaluation is now generally available – Offering comprehensive assessment of both Bedrock Knowledge Bases and custom Retrieval Augmented Generation (RAG) systems through LLM-as-a-judge methodology. The service evaluates retrieval quality and end-to-end generation with metrics for relevance, correctness, and hallucination detection, and the newly added support for custom RAG pipeline evaluations lets you bring your own input-output pairs and retrieved contexts directly into the evaluation job, along with new citation precision metrics and Amazon Bedrock Guardrails integration for more flexible RAG system optimization. To learn more, visit the Amazon Bedrock Evaluations page and What is Amazon Bedrock? in the documentation.

Amazon Nova expands Tool Choice options for Converse API – We’ve enhanced Amazon Nova with expanded Tool Choice capabilities for the Converse API, giving developers more flexibility in building sophisticated AI applications. This update allows models to determine when to use tools to fulfill user requests more effectively. Learn more in the announcement about expands Tool Choice options.

Amazon Bedrock Guardrails adds policy-based enforcement for responsible AI – Our builders can now enforce responsible AI policies at scale with Amazon Bedrock Guardrails’ new AWS Identity and Access Management (IAM) policy-based enforcement capabilities. This feature helps you to specify required guardrails through IAM policies using the bedrock:GuardrailIdentifiercondition key, so that all model inference calls comply with your organization’s AI safety standards. When your teams make Amazon Bedrock Invoke or Converse API calls, requests are automatically rejected if they don’t include the mandated guardrails, providing consistent protection against undesirable content, sensitive information exposure, and model hallucinations. Refer to the Set up permissions to use Guaidrails for content filtering in the technical documentation and the Amazon Bedrock Guardrails product page to learn more about the announcement about policy based enforcement for responsible AI.

Next generation of Amazon Connect released – We’ve launched the next generation of Amazon Connect, featuring AI-powered interactions designed to strengthen customer relationships and improve business outcomes. This major update brings enhanced agent experiences, smarter customer interactions, and deeper operational insights to contact centers of all sizes. Learn more from the new launch post in the AWS Contact Center Blog.

Amazon Redshift Serverless introduces Current and Trailing release tracksAmazon Redshift Serverless now offers two release tracks to give users more control over their update cadence. The Current track delivers the most up-to-date certified release with the latest features and security updates, while the Trailing track remains on the previous certified release. This dual-track approach allows organizations to validate new releases on select workgroups before implementing them across production environments. Users can easily switch between tracks through the Amazon Redshift console, providing the flexibility to balance innovation with stability for mission-critical workloads. This capability is available in all AWS Regions where Amazon Redshift Serverless is offered. Refer to Tracks for Amazon Redshift provisioned cluster and serverless work groups to learn more about the Current and Trailing tracks in Amazon Redshift Serverless.

AWS WAF now supports URI fragment field matchingAWS WAF has expanded its capability to include URI fragment field matching, allowing security teams to create rules that inspect and match against the fragment portion of URLs. This enhancement enables more precise security controls for web applications that use URI fragments to identify specific sections within pages. Security professionals can now implement more targeted protections, such as restricting access to sensitive page elements, detecting suspicious navigation patterns, and enhancing bot mitigation by analyzing fragment usage patterns characteristic of automated attacks. This feature is available in all AWS Regions where AWS WAF is supported. For more information about URI field for matching, visit the AWS WAF Developer Guide.

For a full list of AWS announcements, be sure to keep an eye on the What’s New at AWS.

Other AWS news

Here are some other additional projects and blog posts that you might find interesting.

Build your generative AI skills at AWS Gen AI Lofts – AWS has established more than 10 global hubs offering training and networking for developers and startups in 2025, where you can gain practical, hands-on experience with the latest AI technologies. These revamped spaces feature dedicated zones where you can participate in workshops on prompt engineering, foundation model (FM) selection, and implementing AI in production environments. If you’re near San Francisco, New York, Tokyo, or other major tech hubs with AWS Gen AI Lofts, stop by to access these free resources and accelerate your generative AI development skills. Check out all of the AWS Gen AI Loft locations and events and to read 5 ways to build your AI skills on AWS Gen AI Loft to learn more.

AWS Lambda‘s architecture for billions of asynchronous invocations – A recent technical article reveals how AWS Lambda handles massive scale through sophisticated engineering approaches. The Lambda asynchronous invocation path employs multiple queuing strategies, consistent hashing for intelligent partitioning, and shuffle-sharding techniques to minimize noisy neighbor effects. The system relies on key observability metrics (AsyncEventReceived, AsyncEventAge, and AsyncEventDropped) to maintain optimal performance. These architectural decisions enable Lambda to process tens of trillions of monthly invocations across 1.5 million active customers while providing reliable scalability and performance isolation. For details read Handling billions of invocations – best practices from AWS Lambda in the AWS computing blog.

AWS is reducing prices by more than 11% for its high-memory U7i instances across all Regions and pricing models. The reduction applies to four instances: u7i-12tb.224xlarge, u7in-16tb.224xlarge, u7in-24tb.224xlarge, and u7in-32tb.224xlarge. The new On-Demand pricing, which covers shared, dedicated, and host tenancy options is retroactive, to March 1, 2025. For new Savings Plan purchases, pricing is effective immediately.

Create your AWS Builder ID and reserve your alias – Builder ID is a universal login credential that gives you access beyond the AWS Management Console to AWS tools and resources, including over 600 free training courses, community features, and developer tools such as Amazon Q Developer.

From community.aws
Here are some of my favorite posts from community.aws.

Model Context Protocol (MCP): why it matters – The recently introduced Model Context Protocol (MCP) creates a standardized way for AI applications to communicate with multiple FMs using consistent prompts and tools.

Build serverless GenAI Apps faster with Amazon Q Developer CLI agent – Discover how Amazon Q Developer CLI Agent revolutionizes cloud development by building a complete serverless generative AI application in minutes instead of days.

Automating code reviews with Amazon Q and GitHub actions – A new developer tutorial demonstrates how to integrate Amazon Q Developer with GitHub Actions to automatically analyze pull requests and provide AI-powered code feedback.

DeepSeek on AWS – A new technical guide demonstrates how to deploy DeepSeek’s powerful open-source AI models on AWS infrastructure. The tutorial provides step-by-step instructions for setting up these cutting-edge models using Amazon SageMaker, Amazon Elastic Compute Cloud (Amazon EC2) instances with GPUs, or through integration with Amazon Bedrock. The guide covers optimization techniques, sample applications, and best practices for balancing performance with cost efficiency.

Upcoming AWS events
Check your calendars and sign up for these upcoming AWS events.

Empowering Futures – Women Leading the Way in Tech and Non-Tech Careers – Whether you’re here to expand your professional circle, learn about the AWS Cloud or gain wisdom from inspiring speakers, this event has something for everyone. This is a public event open to everyone in the Seattle area—for free—on March 27, 2025.

AWS at KubeCon + CloudNativeCon London 2025 – Join us at KubeCon London on April 1 – April 4 , at Excel booth S300 for live product demonstrations that help you simplify Kubernetes operations, optimize costs and performance, harness the power of artificial learning and machine learning (AI/ML), and build scalable platform strategies.

That’s all for this week. Check back next Monday for another Weekly Roundup!

Betty

This post is part of our Weekly Roundup series. Check back each week for a quick roundup of interesting news and announcements from AWS!


How is the News Blog doing? Take this 1 minute survey!

(This survey is hosted by an external company. AWS handles your information as described in the AWS Privacy Notice. AWS will own the data gathered via this survey and will not share the information collected with survey respondents.)

AWS Weekly Roundup: Cloud Club Captain Applications, Formula 1®, Amazon Nova Prompt Engineering, and more (Feb 24, 2025)

Post Syndicated from Elizabeth Fuentes original https://aws.amazon.com/blogs/aws/aws-weekly-roundup-cloud-club-captain-applications-formula-1-amazon-nova-prompt-engineering-and-more-feb-24-2025/

AWS Developer Day 2025, held on February 20th, showcased how to integrate responsible generative AI into development workflows. The event featured keynotes from AWS leaders including Srini Iragavarapu, Director Generative AI Applications and Developer Experiences, Jeff Barr, Vice President of AWS Evangelism, David Nalley, Director Open Source Marketing of AWS, along with AWS Heroes and technical community members. Watch the full event recording on Developer Day 2025.

Cloud Club

Applications are now open through March 6th for the 2025 AWS Cloud Clubs Captains program. AWS Cloud Clubs are student-led groups for post-secondary and independent students, 18 years old and over. Find a club near you on our Meetup page.

Last week’s launches
Here are some launches that got my attention:

Amplify Hosting announces support for IAM roles for server-side rendered (SSR) applications  AWS Amplify Hosting now supports AWS Identity and Access Management (IAM) roles for SSR applications, enabling secure access to AWS services without managing credentials manually. Learn more in the IAM Compute Roles for Server-Side Rendering with AWS Amplify Hosting blog.

AWS WAF enhances Data Protection and logging experience  AWS WAF expands its Data Protection capabilities allowing sensitive data in logs to be replaced with cryptographic hashes (e.g. ‘ade099751d2ea9f3393f0f’) or a predefined static string (‘REDACTED’) before logs are sent to WAF Sample Logs, Amazon Security Lake, Amazon CloudWatch, or other logging destinations.

Announcing AWS DMS Serverless comprehensive premigration assessments AWS Database Migration Service Serverless (AWS DMS Serverless) now supports premigration assessments for replications to identify potential issues before database migrations begin. The tool analyzes source and target databases, providing recommendations for optimal DMS settings and best practices.

Amazon ECS increases the CPU limit for ECS tasks to 192 vCPUs – Amazon Elastic Container Service (Amazon ECS) now supports CPU limits of up to 192 vCPU for ECS tasks deployed on Amazon Elastic Compute Cloud (Amazon EC2) instances, an increase from the previous 10 vCPU limit. This enhancement allows customers to more effectively manage resource allocation on larger Amazon EC2 instances.

AWS Network Firewall introduces automated domain lists and insightsAWS Network Firewall now provides automated domain lists and insights by analyzing 30 days of HTTP/S traffic. This helps create and maintain allow-list policies more efficiently, at no extra cost.

AWS announces Backup Payment Methods for invoices AWS now enables you to set up backup payment methods that automatically activate if primary payment fails. This helps prevent service interruptions and reduces manual intervention for invoice payments.

Get updated with all the announcements of AWS announcements on the What’s New with AWS? page.

Other AWS news
Here are additional noteworthy items:

AWS Partner Network: Essential training resources for ISV partners To help scale solutions effectively, AWS provides essential training resources for Software Vendors (ISVs) partners in four key areas: AWS Marketplace fundamentals, Foundational Technical Review (FTR), APN Customer Engagement (ACE) program and co-selling, and Partner funding opportunities.

How Formula 1® uses generative AI to accelerate race-day issue resolution Formula 1® (F1) uses Amazon Bedrock to speed up race-day issue resolution, reducing troubleshooting time from weeks to minutes through a chatbot that analyzes root causes and suggests fixes.

How Formula 1® uses generative AI to accelerate race-day issue resolution

Reducing hallucinations in LLM agents with a verified semantic cache using Amazon Bedrock Knowledge Bases This blog introduces a solution using Amazon Bedrock Knowledge Bases and Amazon Bedrock Agents to reduce Large language models (LLMs) hallucinations by implementing a verified semantic cache that checks queries against curated answers before generating new responses, improving accuracy and response times.

Reducing hallucinations in LLM agents with a verified semantic cache using Amazon Bedrock Knowledge Bases

Orchestrate an intelligent document processing workflow using tools in Amazon Bedrock This blog demonstrates an intelligent document processing workflow using Amazon Bedrock tools that combines Anthropic’s Claude 3 Haiku for orchestration and Anthropic’s Claude 3.5 Sonnet (v2) for analysis to handle structured, semi-structured, and unstructured healthcare documents efficiently.

From community.aws
Here are my personal favorites posts from community.aws:

Tracing Amazon Bedrock Agents Learn how to track and analyze Amazon Bedrock Agents workflows using AWS X-Ray for better observability, by Randy D.

Testing Amazon ECS Network Resilience with AWS FISThis article demonstrates how to test network resilience in Amazon ECS using AWS FIS with guidance from Amazon Q Developer, by Sunil Govindankutty

Stop Using Default Arguments in AWS Lambda Functions Discover why your AWS Lambda costs might be spiralling out of control due to a common Python programming practice, by Stuart Clark.

Amazon Nova Prompt Engineering on AWS: A Field Guide by Brooke A field guide for using Amazon Nova models, covering prompt engineering patterns and best practices on AWS, by Brooke Jamieson.

Amazon Nova Prompt Engineering on AWS: A Field Guide by Brooke

Creating Deployment Configurations for EKS with Amazon Q Amazon Q Developer helps create EKS deployments by providing templates and best practices for Kubernetes configs, by Ricardo Tasso.

Processing WhatsApp Multimedia with Amazon Bedrock Agents: Images, Video, and DocumentsI invite you to read my latest blog, which explains how to create a WhatsApp AI assistant using Amazon Bedrock and Amazon Nova models to process multimedia content such as images, videos, documents, and audio.

Processing WhatsApp Multimedia with Amazon Bedrock Agents: Images, Video, and Documents

Upcoming AWS events
Check your calendars and sign up for these upcoming AWS events:

AWS GenAI Lofts – GenAI Lofts offer collaborative spaces and immersive experiences for startups and developers. You can join in-person GenAI Loft San Francisco events such as Hands-on with Agentic Graph RAG Workshop (February 25), Unstructured Data Meetup SF (February 26 – 27) and AI Tinkerers – San Francisco – February 2025 Demos + Science Fair (February 27 – 28). GenAI Loft Berlin has events and workshops on February 24 to March 7 that you can’t miss!

AWS Community Days – Join community-led conferences that feature technical discussions, workshops, and hands-on labs led by expert AWS users and industry leaders from around the world: Milan, Italy (April 2), Bay Area – Security Edition (April 4), Timișoara, Romania (April 10), and Prague, Czeh Republic (April 29).

AWS Innovate: Generative AI + Data – Join a free online conference focusing on generative AI and data innovations. Available in multiple geographic regions: APJC and EMEA (March 6), North America (March 13), Greater China Region (March 14), and Latin America (April 8).

AWS Summits – Join free online and in-person events that bring the cloud computing community together to connect, collaborate, and learn about AWS. Register in your nearest city: Paris (April 9), Amsterdam (April 16), London (April 30), and Poland (May 5).

AWS re:Inforce – AWS re:Inforce (June 16–18) in Philadelphia, PA our annual learning event devoted to all things AWS cloud security. Registration opens in March, and be ready to join more than 5,000 security builders and leaders.

Create your AWS Builder ID and reserve your alias. Builder ID is a universal login credential that gives you access–beyond the AWS Management Console–to AWS tools and resources, including over 600 free training courses, community features, and developer tools such as Amazon Q Developer.

You can browse all upcoming in-person and virtual events.

That’s all for this week. Stay tuned for next week’s Weekly Roundup!

Eli

This post is part of our Weekly Roundup series. Check back each week for a quick roundup of interesting news and announcements from AWS!

Streamline AWS WAF log analysis with Apache Iceberg and Amazon Data Firehose

Post Syndicated from Charishma Makineni original https://aws.amazon.com/blogs/big-data/streamline-aws-waf-log-analysis-with-apache-iceberg-and-amazon-data-firehose/

Organizations are rapidly expanding their digital presence, creating opportunities to serve customers better through web applications. AWS WAF logs play a vital role in this expansion by enabling organizations to proactively monitor security, enforce compliance, and strengthen application defense. AWS WAF log analysis is essential across many industries, including banking, retail, and healthcare, each needing to deliver secure digital experiences.

To optimize their security operations, organizations are adopting modern approaches that combine real-time monitoring with scalable data analytics. They are using data lake architectures and Apache Iceberg to efficiently process large volumes of security data while minimizing operational overhead. Apache Iceberg combines enterprise reliability with SQL simplicity when working with security data stored in Amazon Simple Storage Service (Amazon S3), enabling organizations to focus on security insights rather than infrastructure management.

Apache Iceberg enhances security analytics through several key capabilities. It seamlessly integrates with various AWS services and analysis tools while supporting concurrent read-write operations for simultaneous log ingestion and analysis. Its time travel feature enables thorough security forensics and incident investigation, and its schema evolution support allows teams to adapt to emerging security patterns without disrupting existing workflows. These capabilities make Apache Iceberg an ideal choice for building robust security analytics solutions. However, organizations often struggle when building their own solutions to deliver data to Apache Iceberg tables. These include managing complex extract, transform, and load (ETL) processes, handling schema validation, providing reliable delivery, and maintaining custom code for data transformations. Teams must also build resilient error handling, implement retry logic, and manage scaling infrastructure—all while maintaining data consistency and high availability. These challenges take valuable time away from analyzing security data and deriving insights.

To address these challenges, Amazon Data Firehose provides real-time data delivery to Apache Iceberg tables within seconds. Firehose delivers high reliability across multiple Availability Zones while automatically scaling to match throughput requirements. It is fully managed and requires no infrastructure management or custom code development. Firehose delivers streaming data with configurable buffering options that can be optimized for near-zero latency. It also provides built-in data transformation, compression, and encryption capabilities, along with automatic retry mechanisms to provide reliable data delivery. This makes it an ideal choice for streaming AWS WAF logs directly into a data lake while minimizing operational overhead.

In this post, we demonstrate how to build a scalable AWS WAF log analysis solution using Firehose and Apache Iceberg. Firehose simplifies the entire process—from log ingestion to storage—by allowing you to configure a delivery stream that delivers AWS WAF logs directly to Apache Iceberg tables in Amazon S3. The solution requires no infrastructure setup and you pay only for the data you process.

Solution overview

To implement this solution, you first configure AWS WAF logging to capture web traffic information. This captures detailed information about traffic analyzed by the web access control lists (ACLs). Each log entry includes the request timestamp, detailed request information, and rule matches that were triggered. These logs are continuously streamed to Firehose in real time.

Firehose writes these logs into an Apache Iceberg table, which is stored in Amazon S3. When Firehose delivers data to the S3 table, it uses the AWS Glue Data Catalog to store and manage table metadata. This metadata includes schema information, partition details, and file locations, enabling seamless data discovery and querying across AWS analytics services.

Finally, security teams can analyze data in the Apache Iceberg tables using various AWS services, including Amazon Redshift, Amazon Athena, Amazon EMR, and Amazon SageMaker. For this demonstration, we use Athena to run SQL queries against the security logs.

The following diagram illustrates the solution architecture.


The implementation consists of four steps:

  1. Deploy the base infrastructure using AWS CloudFormation.
  2. Create an Apache Iceberg table using an AWS Glue notebook.
  3. Create a Firehose stream to handle the log data.
  4. Configure AWS WAF logging to send data to the Apache Iceberg table through the Firehose stream.

You can deploy the required resources into your AWS environment in the US East (N. Virginia) AWS Region using a CloudFormation template. This template creates an S3 bucket for storing AWS WAF logs, an AWS Glue database for the Apache Iceberg tables, and the AWS Identity and Access Management (IAM) roles and policies needed for the solution.

Prerequisites

Before you get started, make sure you have the following prerequisites:

  • An AWS account with access to the US East (N. Virginia) Region
  • AWS WAF configured with a web ACL in the US East (N. Virginia) Region

If you don’t have AWS WAF set up, refer to the AWS WAF Workshop to create a sample web application with AWS WAF.

AWS WAF logs use case-sensitive field names (like httpRequest and webaclId). For successful log ingestion, this solution uses the Apache Iceberg API through an AWS Glue job to create tables—this is a reliable approach that preserves the exact field names from the AWS WAF logs. Although AWS Glue crawlers and Athena DDLs offer convenient ways to create Apache Iceberg tables, they convert mixed-case column names to lowercase, which can affect AWS WAF log processing. By using an AWS Glue job with the Apache Iceberg API, case-sensitivity of column names is preserved, providing proper mapping between AWS WAF log fields and table columns.

Deploy the CloudFormation stack

Complete the following steps to deploy the solution resources with AWS CloudFormation:

  1. Sign in to the AWS CloudFormation console.
  2. Choose Launch Stack.
    Launch Cloudformation Stack
  3. Choose Next.
  4. For Stack name, leave as WAF-Firehose-Iceberg-Stack.
  5. Under Parameters, specify whether AWS Lake Formation permissions are to be used for the AWS Glue tables.
  6. Choose Next.

  1. Select I acknowledge that AWS CloudFormation might create IAM resources with custom names and choose Next.


  1. Review the deployment and choose Submit.


The stack takes several minutes to deploy. After the deployment is complete, you can review the resources created by navigating to the Resources tab on the CloudFormation stack.

Create an Apache Iceberg table

Before setting up the Firehose delivery stream, you must create the destination Apache Iceberg table in the Data Catalog. This is done using AWS Glue jobs and the Apache Iceberg API, as discussed earlier. Complete the following steps to create an Apache Iceberg table:

  1. On the AWS Glue console, choose Notebooks under ETL jobs in the navigation pane.


  1. Choose Notebook option under Create job.


  1. Under Options, select Start fresh.
  2. For IAM role, choose WAF-Firehose-Iceberg-Stack-GlueServiceRole-*.
  3. Choose Create notebook.

  1. Enter the following configuration command in the notebook to configure the Spark session with Apache Iceberg extensions. Be sure to update the configuration for sql.catalog.glue_catalog.warehouse to the S3 bucket created by the CloudFormation template.
%%configure
{
    "--conf": "spark.sql.extensions=org.apache.iceberg.spark.extensions.IcebergSparkSessionExtensions --conf spark.sql.catalog.glue_catalog=org.apache.iceberg.spark.SparkCatalog --conf spark.sql.catalog.glue_catalog.warehouse=s3://<S3BucketName>/waflogdata --conf spark.sql.catalog.glue_catalog.catalog-impl=org.apache.iceberg.aws.glue.GlueCatalog --conf spark.sql.catalog.glue_catalog.io-impl=org.apache.iceberg.aws.s3.S3FileIO",
    "--datalake-formats": "iceberg"
}

  1. Enter the following SQL in the AWS Glue notebook to create the Apache Iceberg table:
# Note: This code uses Glue version 5.0 (as of April 2024)
# Please check AWS Glue release notes for the latest version and update accordingly:
# https://docs.aws.amazon.com/glue/latest/dg/release-notes.html
# To update: Change the %glue_version parameter below to the latest version

%idle_timeout 2880
%glue_version 5.0
%worker_type G.1X
%number_of_workers 5

import sys
from awsglue.transforms import *
from awsglue.utils import getResolvedOptions
from pyspark.context import SparkContext
from awsglue.context import GlueContext
from awsglue.job import Job
from pyspark.conf import SparkConf

sc = SparkContext.getOrCreate()
glueContext = GlueContext(sc)
spark = glueContext.spark_session
job = Job(glueContext)

spark.sql(""" CREATE TABLE glue_catalog.waf_logs_db.firehose_waf_logs(
  `timestamp` bigint,
  `formatVersion` int,
  `webaclId` string,
  `terminatingRuleId` string,
  `terminatingRuleType` string,
  `action` string,
  `terminatingRuleMatchDetails` array <
                                    struct <
                                        conditiontype: string,
                                        sensitivitylevel: string,
                                        location: string,
                                        matcheddata: array < string >
                                          >
                                     >,
  `httpSourceName` string,
  `httpSourceId` string,
  `ruleGroupList` array <
                      struct <
                          rulegroupid: string,
                          terminatingrule: struct <
                                              ruleid: string,
                                              action: string,
                                              rulematchdetails: array <
                                                                   struct <
                                                                       conditiontype: string,
                                                                       sensitivitylevel: string,
                                                                       location: string,
                                                                       matcheddata: array < string >
                                                                          >
                                                                    >
                                                >,
                          nonterminatingmatchingrules: array <
                                                              struct <
                                                                  ruleid: string,
                                                                  action: string,
                                                                  overriddenaction: string,
                                                                  rulematchdetails: array <
                                                                                       struct <
                                                                                           conditiontype: string,
                                                                                           sensitivitylevel: string,
                                                                                           location: string,
                                                                                           matcheddata: array < string >
                                                                                              >
                                                                   >,
                                                                  challengeresponse: struct <
                                                                            responsecode: string,
                                                                            solvetimestamp: string
                                                                              >,
                                                                  captcharesponse: struct <
                                                                            responsecode: string,
                                                                            solvetimestamp: string
                                                                              >
                                                                    >
                                                             >,
                          excludedrules: string
                            >
                       >,
`rateBasedRuleList` array <
                         struct <
                             ratebasedruleid: string,
                             limitkey: string,
                             maxrateallowed: int
                               >
                          >,
  `nonTerminatingMatchingRules` array <
                                    struct <
                                        ruleid: string,
                                        action: string,
                                        rulematchdetails: array <
                                                             struct <
                                                                 conditiontype: string,
                                                                 sensitivitylevel: string,
                                                                 location: string,
                                                                 matcheddata: array < string >
                                                                    >
                                                             >,
                                        challengeresponse: struct <
                                                            responsecode: string,
                                                            solvetimestamp: string
                                                             >,
                                        captcharesponse: struct <
                                                            responsecode: string,
                                                            solvetimestamp: string
                                                             >
                                          >
                                     >,
  `requestHeadersInserted` array <
                                struct <
                                    name: string,
                                    value: string
                                      >
                                 >,
  `responseCodeSent` string,
  `httpRequest` struct <
                    clientip: string,
                    country: string,
                    headers: array <
                                struct <
                                    name: string,
                                    value: string
                                      >
                                 >,
                    uri: string,
                    args: string,
                    httpversion: string,
                    httpmethod: string,
                    requestid: string
                      >,
  `labels` array <
               struct <
                   name: string
                     >
                >,
  `CaptchaResponse` struct <
                        responsecode: string,
                        solvetimestamp: string,
                        failureReason: string
                          >,
  `ChallengeResponse` struct <
                        responsecode: string,
                        solvetimestamp: string,
                        failureReason: string
                        >,
  `ja3Fingerprint` string,
  `overSizeFields` string,
  `requestBodySize` int,
  `requestBodySizeInspectedByWAF` int
)
USING iceberg
TBLPROPERTIES ("format-version"="2")
""")
job.commit()

  1. Navigate to the Data Catalog and waf_logs_db database to confirm the table firehose_waf_logs is created.

Create a Firehose stream

Complete the following steps to create a Firehose stream:

  1. On the Data Firehose console, choose Create Firehose stream.

  1. Choose Direct PUT for Source and Apache Iceberg Tables for Destination.

  1. For Firehose stream name, enter aws-waf-logs-firehose-iceberg-1.
  1. In the Destination settings section, enable Inline parsing for routing information. Because we’re sending all records to one table, specify the destination database and table names:
    1. For Database expression, enter "waf_logs_db".
    2. For Table expression, enter "firehose_waf_logs".

Make sure to include double quotation marks to use the literal value for the database and table name. If you don’t use double quotation marks, Firehose assumes that this is a JSON query expression and will attempt to parse the expression when processing your stream and fail. Firehose can also route to different Apache Iceberg Tables based on the content of the data. For more information, refer to Route incoming records to different Iceberg Tables.

  1. For S3 backup bucket, enter the S3 bucket created by the CloudFormation template.
  2. For S3 backup bucket error output prefix, enter error/events-1/.

  1. Under Advanced settings, select Enable server-side encryption for source records in Firehose stream.

  1. For Existing IAM roles, choose the role that starts with WAF-Firehose-Iceberg-stack-FirehoseIAMRole-*, created by the CloudFormation template.
  2. Choose Create Firehose stream.

Configure AWS WAF logs to the Firehose stream

Complete the following steps to configure AWS WAF logs to the Firehose stream.

  1. On the AWS WAF console, choose Web ACLs in the navigation pane.

  1. Choose your web ACL.
  2. On the Logging and metrics tab, choose Enable.

  1. For Amazon Data Firehose stream, choose the stream aws-waf-logs-firehose-iceberg-1.
  2. Choose Save.

Query and analyze the logs

You can query the data you’ve written to your Apache Iceberg tables using different processing engines, such as Apache Spark, Apache Flink, or Trino. In this example, we use Athena to query AWS WAF logs data stored in Apache Iceberg tables. Complete the following steps:

  1. On the Athena console, choose Settings in the top right corner.
  2. For Location of query result, enter the S3 bucket created by the CloudFormation template

s3://<S3BucketName>/athena/

  1. Enter the AWS account ID for Expected bucket owner and choose save.

  1. In the query editor, in Tables and views, choose the options menu next to firehose_waf_logs and choose Preview Table.

You should be able to see the AWS WAF logs in the Apache Iceberg tables by using Athena.

The following are some additional useful example queries:

  • Identify potential attack sources by analyzing blocked IP addresses:
-- Top 10 blocked IP addresses
SELECT httpRequest.clientip, COUNT() as block_count
FROM waf_logs_db.firehose_waf_logs
WHERE action = 'BLOCK'
GROUP BY httpRequest.clientip
ORDER BY block_count DESC
LIMIT 10;
  • Monitor attack patterns and trends over time:
-- Rate of blocked requests over time
SELECT DATE_TRUNC('hour', FROM_UNIXTIME(timestamp/1000)) as hour,
       COUNT() as request_count
FROM waf_logs_db.firehose_waf_logs
WHERE action = 'BLOCK'
GROUP BY DATE_TRUNC('hour', FROM_UNIXTIME(timestamp/1000))
ORDER BY hour;

Apache Iceberg table optimization

Although Firehose enables efficient streaming of AWS WAF logs into Apache Iceberg tables, the nature of streaming writes can result in many small files being created. This is because Firehose delivers data based on its buffering configuration, which can lead to suboptimal query performance. To address this, regular table optimization is recommended.

There are two recommended table optimization approaches:

  • Compaction – Data compaction merges small data files to reduce storage usage and improve read performance. Data files are merged and rewritten to remove obsolete data and consolidate fragmented data into larger, more efficient files.
  • Storage optimization – You can manage storage overhead by removing older, unnecessary snapshots and their associated underlying files. Additionally, this includes periodically deleting orphan files to maintain efficient storage utilization and optimal query performance.

These optimizations can be implemented using either the Data Catalog or Athena.

Table optimization using the Data Catalog

The Data Catalog provides automatic table optimization features. Within the table optimization feature, you can configure specific optimizers for compaction, snapshot retention, and orphan file deletion. A table optimization schedule can be managed and status can be monitored from the AWS Glue console.

Table optimization using Athena

Athena supports manual optimization through SQL commands. The OPTIMIZE command rewrites small files into larger files and applies file compaction:

OPTIMIZE waf_logs_db.firehose_waf_logs REWRITE DATA USING BIN_PACK 

The VACUUM command removes old snapshots and cleans up expired data files:

ALTER TABLE waf_logs_db.firehose_waf_logs SET TBLPROPERTIES (
  'vacuum_max_snapshot_age_seconds'='259200'
)
VACUUM waf_logs_db.firehose_waf_logs

You can monitor the table’s optimization status using the following query:

SELECT * FROM "waf_logs_db"."firehose_waf_logs$files"

Clean up

To avoid future charges, complete the following steps:

  1. Empty the S3 bucket.
  2. Delete the CloudFormation stack.
  3. Delete the Firehose stream.
  4. Disable AWS WAF logging.

Conclusion

In this post, we demonstrated how to build an AWS WAF log analytics pipeline using Firehose to deliver AWS WAF logs to Apache Iceberg tables on Amazon S3. The solution handles large-scale AWS WAF log processing without requiring complex code or infrastructure management. Although this post focused on Apache Iceberg tables as the destination, Data Firehose also seamlessly integrates with Amazon S3 tables. To optimize your tables for querying, Amazon S3 Tables continuously performs automatic maintenance operations, such as compaction, snapshot management, and unreferenced file removal. These operations increase table performance by compacting smaller objects into fewer, larger files.

To get started with your own implementation, try the solution in your AWS account and explore the following resources for additional features and best practices:


About the Authors

Charishma Makineni is a Senior Technical Account Manager at AWS. She provides strategic technical guidance for Independent Software Vendors (ISVs) to build and optimize solutions on AWS. She specializes in Big Data and Analytics technologies, helping organizations optimize their data-driven initiatives on AWS.

Phaneendra Vuliyaragoli is a Product Management Lead for Amazon Data Firehose at AWS. In this role, Phaneendra leads the product and go-to-market strategy for Amazon Data Firehose.

AWS Firewall Manager retrofitting: Harmonizing central security with application team flexibility

Post Syndicated from Ian Olson original https://aws.amazon.com/blogs/security/aws-firewall-manager-retrofitting-harmonizing-central-security-with-application-team-flexibility/

AWS Firewall Manager is a powerful tool that organizations can use to define common AWS WAF rules with centralized security policies. These policies specify which accounts and resources are in scope. Firewall Manager creates a web access control list (web ACL) that adheres to the organization’s policy requirements and associates it with the in-scope resources. Figure 1 shows a Firewall Manager security policy and web ACL created in each in-scope account.

Figure 1: A Firewall Manager security policy and Firewall Manager created web ACLs in each in-scope account

Figure 1: A Firewall Manager security policy and Firewall Manager created web ACLs in each in-scope account

In this post, we’ll talk about the benefits of retrofitting and how you can use this feature to allow Firewall Manager to manage existing web ACLs. When retrofitting is enabled, a Firewall Manager security policy doesn’t replace existing web ACLs. Instead, Firewall Manager adds the top and bottom rule sections to existing web ACLs associated with in-scope resources. For application teams, Firewall Manger no longer restricts how they configure and deploy AWS WAF. Teams can use either the AWS Management Console or infrastructure as code (IaC) tools to customize rules in web ACLs, even if those web ACLs are managed by Firewall Manager.

Firewall Manager before retrofitting

Firewall Manager offers significant benefits, but the existing approach results in several challenges:

  1. Compatibility with infrastructure as code (IaC): Firewall Manager creates and associates AWS WAF web ACLs with in-scope resources. IaC tools expect to create and manage resources (in other words, own their lifecycle). Application teams cannot use IaC to manage the WAF rules and other web ACL configuration components that are created by Firewall Manager; there are custom solutions that inject locally defined rules into Firewall Manager-created web ACLs, but these are complex and have risks such as drift. For AWS WAF customers and application teams, this introduces an operational challenge.
  2. Existing WAF migration: Customers who are already using AWS WAF must migrate existing rules to Firewall Manager-managed web ACLs.
  3. Application-specific rule complexity: Forcing all in-scope resources in the same account and AWS Region to use the same web ACL makes application-specific or exception-based rules more complex. In addition, changes to one application’s rules could impact others that share the same web ACL.
  4. Increased costs: When many applications share a single web ACL, application-specific rules are part of a single web ACL, which can increase total WAF capacity units (WCU) usage, sometimes resulting in higher AWS WAF request costs.

Firewall Manager with retrofitting addresses challenges

To address these challenges, Firewall Manager now offers the ability to retrofit existing web ACLs. Let’s get specific about when and how Firewall Manager retrofitting works:

  • Firewall Manager will only retrofit a web ACL when all associated resources (for example, Application Load Balancers, API Gateways, and Amazon CloudFront distributions) are in scope. If a not-in-scope resource is also associated, Firewall Manager will not retrofit or update future security policy changes to a retrofitted web ACL. In that scenario, associated in-scope resources and the web ACL are marked noncompliant with security policies.
  • Retrofitting only modifies customer-created web ACLs. Retrofitting will not act on web ACLs retrofitted by another security policy or managed by Firewall Manager. If either scenario occurs, the web ACL and associated resources are marked noncompliant with security policies.
  • Retrofitting adds the following on top of an existing web ACL that is associated with one or more in-scope resources:
    • Retrofitting adds first rule groups and last rule groups defined in a security policy to the web ACL. Existing rules within the web ACL are not changed. The order of rule evaluation changes is the following:
      1. Security policy–defined first rule group rules
      2. Security policy–defined last rule group rules
    • Retrofitting adds a WAF logging configuration if one is defined by the security policy. If the web ACL already has a logging configuration, Firewall Manager does not replace the existing logging configuration and marks the web ACL noncompliant.
    • Retrofitting does not verify or configure other attributes that are defined by the security policy. This includes the following properties: default action, custom request headers, web ACL Captcha or challenge configurations, and token domain list. These properties are used only when Firewall Manager creates a web ACL.
  • If an in-scope resource that supports AWS WAF does not have a web ACL, Firewall Manager creates and associates a Firewall Manager-managed web ACL with that resource.

Figure 2 shows the rules and logging configuration before and after a Firewall Manager security policy retrofits a web ACL that is associated with in-scope resources.

Figure 2: Using retrofitting to update an existing web ACL

Figure 2: Using retrofitting to update an existing web ACL

This new retrofitting capability solves the previous challenges in the following ways:

  1. IaC compatible: Application teams can provision and manage AWS WAF with IAC tools. Firewall Manager retrofits existing web ACLs by adding rules defined in the security policy to web ACLs created by IaC tools. Application teams can manage AWS WAF exactly the same as when Firewall Manager was not in use.
  2. Existing WAF integration: Customers with existing AWS WAF deployments can adopt Firewall Manager without the need to migrate existing WAF rules.
  3. Application-specific rules: Multiple resources in the same account can use separate web ACLs, which simplifies application-specific rules.
  4. Help prevent additional costs: Application-specific rules are applied only to the relevant web ACLs. This helps prevent increased AWS WAF request costs from shared web ACLs that have a high WCU usage.

By enhancing Firewall Manager to retrofit existing web ACLs, customers can use the power of centralized WAF management without restricting how AWS WAF is deployed and configured by application teams in member accounts.

Firewall Manager security policy for AWS WAF – Enabling retrofitting

Figure 3 shows an example of a Firewall Manager security policy.

Figure 3: An example Firewall Manager security policy that uses the new Retrofit existing webACLs feature

Figure 3: An example Firewall Manager security policy that uses the new Retrofit existing webACLs feature

This security policy defines WAF rules in the first rule group section. It applies to all Application Load Balancers (ALBs) across your organization in AWS Organizations in the Region where this security policy is created. The policy action is set to automatically remediate. Under Web ACL management, there is a new section, Managed web ACL source, with two options, Default and Retrofit existing webACLs. Default is the existing behavior: Firewall Manager creates and associates a Firewall Manager managed web ACL. Retrofit existing webACLs applies the WAF rules and logging configuration (if any) defined by a security policy to existing web ACLs when they are associated with an in-scope resource. This policy specifies Retrofit existing webACLs. If an in-scope resource does not have a web ACL, Firewall Manager still creates and associates a web ACL by default.

Retrofitting in action

Let’s walk through what happens when you set Managed web ACL source to Retrofit existing webACLs. Figure 4 shows two ALBs that are in-scope of our security policy, LoadBalancer1 and LoadBalancer2.

Figure 4: Two existing ALBs, one with an existing web ACL and the other without

Figure 4: Two existing ALBs, one with an existing web ACL and the other without

LoadBalancer1 has the following characteristics:

  • LoadBalancer1 does NOT have a web ACL associated.
  • After the Firewall Manager security policy applies, LoadBalancer1 is associated with a Firewall Manager created web ACL, as shown in Figure 5.

    Figure 5: LoadBalancer1 is now associated with a Firewall Manager managed and created web ACL

    Figure 5: LoadBalancer1 is now associated with a Firewall Manager managed and created web ACL

  • The Firewall Manager-created web ACL contains the WAF rules defined in the security policy.

LoadBalancer2 has the following characteristics:

  • LoadBalancer2 has an existing customer created web ACL associated with it, as shown in Figure 6.

    Figure 6: LoadBalancer2 is associated with a customer-created web ACL

    Figure 6: LoadBalancer2 is associated with a customer-created web ACL

  • This web ACL was created by the application team with an application-specific rule. The web ACL could have been created with the AWS Management Console, AWS CloudFormation, or other IaC tools like Terraform.
  • After the Firewall Manager security policy takes effect, LoadBalancer2 remains associated with the existing customer-created web ACL MyCustomWebACL.
  • Retrofitting adds WAF rules in the first rule group according to the security policy, as shown in Figure 7. Existing WAF rules are not changed, and rules and other aspects of the web ACL are not changed and can continue to be managed exactly as you would without Firewall Manager present.

    Figure 7: Firewall Manager has retrofitted a customer-created web ACL and added the security policy–defined first rule groups rules

    Figure 7: Firewall Manager has retrofitted a customer-created web ACL and added the security policy–defined first rule groups rules

Figure 8 shows that both ALBs are now compliant with our security policy. LoadBalancer1 has a web ACL created by Firewall Manager; future ALBs that don’t have a web ACL associated would also become associated to this web ACL. LoadBalancer2 is associated with a web ACL the application team previously created. The application-defined WAF rules are not changed and the WAF rules defined by the security policy are added to this web ACL.

Figure 8: Multiple ALBs in scope for the same security policy

Figure 8: Multiple ALBs in scope for the same security policy

Associate a web ACL with Firewall Manager already in place

Let’s continue from our previous scenario. The application team for LoadBalancer1 now configures application-specific rules for their ALB by using the following process.

  1. The application team creates a web ACL and defines their own WAF rules. They might do this with the console, AWS CloudFormation, or other IaC tools like Terraform.
  2. The application team associates LoadBalancer1 with the custom web ACL.

    Figure 9: From the web ACL, only LoadBalancer1 is associated with the app team’s web ACL

    Figure 9: From the web ACL, only LoadBalancer1 is associated with the app team’s web ACL

  3. After a moment, Firewall Manager detects the change to an in-scope resource (LoadBalancer1). Firewall Manager retrofits the application team’s web ACL AppTeamNewWebACL, making it align with the security policy.

    Figure 10: Firewall Manager has retrofitted the app team–created web ACL and added the security policy–defined first rule group rules

    Figure 10: Firewall Manager has retrofitted the app team–created web ACL and added the security policy–defined first rule group rules

The diagram in Figure 11 shows the workflow that happens when the application team creates their own web ACL and associates it with LoadBalancer1. Firewall Manager detects the association change and retrofits the application team’s web ACL again, bringing LoadBalancer1 into alignment with security policies.

Figure 11: Firewall Manager retrofitting a web ACL in response to being associated with an existing in-scope resource

Figure 11: Firewall Manager retrofitting a web ACL in response to being associated with an existing in-scope resource

Out-of-scope resources associated with a retrofitted web ACL

Let’s make a change to our security policy. In Figure 12, the policy scope has been updated to only apply to resources when they have the resource tag Tier: Production. Application teams add this tag to LoadBalancer1 and LoadBalancer2.

Figure 12: The Firewall Manager security policy scope has been updated to include a resource tag

Figure 12: The Firewall Manager security policy scope has been updated to include a resource tag

Later, an application team creates LoadBalancer3 and associates it with AppTeamNewWebACL (Figure 13).

Figure 13: A new ALB associated with a custom WAF web ACL

Figure 13: A new ALB associated with a custom WAF web ACL

The application team does not tag LoadBalancer3, making it out of scope with the security policy, as shown in Figure 14.

Figure 14: A new ALB that is out of scope with a security policy

Figure 14: A new ALB that is out of scope with a security policy

This web ACL is currently retrofitted by our security policy and associated with LoadBalancer2 (in-scope), as shown in Figure 15.

Figure 15: A retrofitted web ACL associated with in-scope and out-of-scope ALBs

Figure 15: A retrofitted web ACL associated with in-scope and out-of-scope ALBs

Firewall Manager detects that an out-of-scope resource is associated with a retrofitted web ACL. As shown in Figure 16, Firewall Manager marks the web ACL AppTeamNewWebACL noncompliant. It also marks LoadBalancer2 noncompliant.

Figure 16: Shows retrofit-specific reasons a resource or web ACL will be marked noncompliant. In this case, a not-in-scope resource is associated with a web ACL where another associated resource is in-scope.

Figure 16: Shows retrofit-specific reasons a resource or web ACL will be marked noncompliant. In this case, a not-in-scope resource is associated with a web ACL where another associated resource is in-scope.

As long as the web ACL is noncompliant, Firewall Manager will not retrofit a non-retrofitted web ACL, and future security policy changes will not be applied to that web ACL. Existing retrofitted WAF rules for that web ACL are not modified or removed. When the web ACL later becomes compliant, it will again retrofit the latest state of the security policy. Figure 17 shows how Firewall Manager keeps the existing retrofitting but does not apply updates. Using our example, one of three things would need to happen for the web ACL to become compliant:

  1. LoadBalancer3 can be made in-scope with the current security policy. The application team can then add the resource tag Tier: Production to this ALB.
  2. The resource tag can be removed from the policy scope.
  3. LoadBalancer3 can be disassociated with the web ACL.

Note: We recommend that you promptly address not-in-scope resources associated with web ACLs that are shared by in-scope resources. For example, if the preceding scenario was not addressed and LoadBalancer3 was deleted three months later, Firewall Manager would at that point retrofit the web ACL (3 months later). This is not necessarily a problem, but could trigger unexpected changes to a web ACL’s rules.

Figure 17: Firewall Manager retains existing but not future changes as long as a not-in-scope resource is associated with this web ACL

Figure 17: Firewall Manager retains existing but not future changes as long as a not-in-scope resource is associated with this web ACL

In summary: Firewall Manager initially retrofits and will apply future updates to existing web ACLs while all associated resources are in-scope. When an out-of-scope resource is associated, an initial retrofit is delayed and security policy retrofit updates are paused until the out-of-scope resource is addressed.

Figure 18 demonstrates how Firewall Manager will not perform an initial retrofit of a web ACL associated with both in-scope and not-in-scope resources.

Figure 18: Firewall Manger will only perform an initial retrofit when only in-scope resources are associated with a web ACL

Figure 18: Firewall Manger will only perform an initial retrofit when only in-scope resources are associated with a web ACL

Conclusion

Firewall Manager verifies that in-scope resources adhere to relevant security policies or are marked noncompliant. You can enable retrofitting for Firewall Manager for AWS WAF to seamlessly enforce these security policies without changing how your application teams manage the configuration of their WAF rules.

Note: Retrofitting is only available for AWS Firewall Manager security policies for AWS WAF; it is not available for AWS WAF Classic.

If you have feedback about this post, submit comments in the Comments section below. If you have questions about this post, start a new thread on the AWS Firewall Manager re:Post or contact AWS Support.
 

Ian Olson
Ian Olson

Ian is a Senior Security Specialist Solutions Architect at AWS. He helps customers automate security services to safeguard against threats like DDoS and web exploitations. Through intelligent automation, he delivers security solutions tailored to organizations of any scale. When he’s not working, Ian enjoys spending quality time with his two young children.
Bryan Van Hook
Bryan Van Hook

Bryan is a Senior Security Solutions Architect at AWS. He has over 25 years of experience in software engineering, cloud operations, and internet security. He spends most of his time helping customers gain the most value from native AWS security services. Outside of his day job, Bryan can be found playing tabletop games and acoustic guitar.

How to mitigate bot traffic by implementing Challenge actions in your AWS WAF custom rules

Post Syndicated from Javier Sanchez Navarro original https://aws.amazon.com/blogs/security/how-to-mitigate-bot-traffic-by-implementing-challenge-actions-in-your-aws-waf-custom-rules/

If you are new to AWS WAF and are interested in learning how to mitigate bot traffic by implementing Challenge actions in your AWS WAF custom rules, here is a basic, cost-effective way of using this action to help you reduce the impact of bot traffic in your applications. We also cover the basics of using the Bot Control feature to implement Challenge actions as a more sophisticated and robust option for an additional cost.

AWS WAF is a web application firewall that helps you protect against common web exploits and bots that can affect availability, compromise security, or consume excessive resources. In AWS WAF, you can create web access control lists (ACLs) that you can set with managed or custom rules. There are five possible actions you can define to take when the rules are triggered: Allow, Count, Block, CAPTCHA, or Challenge. The Challenge action, which we focus on in this post, is useful for detecting requests from automated tools without affecting the user experience.

Why is it important to mitigate bot traffic?

In cybersecurity, we typically use the term bot to describe a range of tools that allow the automation or simulation of HTTP requests. These bots can be legitimate (such as search engine crawlers that index your app or site) or malicious (tools that are used to automate unwanted requests), but both types have the potential to impact your app availability and performance. By properly handling bot traffic, you can reduce this impact, which can help you optimize costs and improve the stability of your infrastructure and the availability of your business.

Before starting

If you’ve never used AWS WAF before, we recommend that you read Getting started with AWS WAF to learn the basics of how to set up this service.

How does the Challenge action work, and what are the benefits?

When a request matches your rule that contains a Challenge action, the HTTP client is presented with a challenge, which most web browsers or non-automated clients are able to process. After solving that challenge, the client receives a token that will be included in subsequent requests—that’s how AWS WAF considers the request to be non-automated and permits access. Using a Challenge action adds a protection layer because bots and other automated tools typically can’t process the challenge as a legitimate web browser would.

A more effective mechanism against bots is to present a CAPTCHA action, in which the user must solve a puzzle. However, this action affects the user experience because it requires human interaction, and it typically involves higher costs than the Challenge option. Challenge actions, which consist of a JavaScript function that most web browsers can support and process in the background, are a great first step to monitor web requests because they don’t affect the user experience directly and are more economic than CAPTCHA.

Implementation options

In this blog post, we discuss two options for you to start handling the traffic from bots. Although the focus of this post is implementing the Challenge action through a custom rule (a rule you can create and set yourself), we’ve also included basic instructions for implementing the Challenge action through Bot Control, which allows you to directly use client application integration for more sophisticated detections.

Option 1: Implementing the Challenge action through a custom rule

The first step in setting up a custom rule with the Challenge option is to understand and define clearly what the expected normal behaviors are from users who access your app. Specifically, you need to know the expected number of requests in a given period of time from a single IP and the maximum time length of a typical session.

How do I define the normal rate of requests?

Both the maximum session length and the rate of requests expected will vary depending on each webpage or app, and this information needs to come from the business and application teams. When a user browses a page, they might trigger several requests (for example, the user will trigger a separate request for each image the page contains). You can use this information to estimate and define how many requests per IP a valid user can generate in a given time.

Additionally, you can enable web ACL logging, which will allow you to query logs from Amazon CloudWatch Logs Insights. From these logs, you can get an understanding of the current behaviors and trends in your web traffic and compare that with the expected behavior that you defined.

What parameters should I use to trigger the challenge?

  • Implementing challenges based on the headers in the request or the user-agent isn’t a good idea. Although you can act based on either of these fields for valid crawlers like those used by search engines, malicious bots might evolve and tamper with these fields as their creators notice they are being stopped.
  • Filtering by static IP won’t always work. Only valid crawlers tend to use the same IP range over time and malicious bots often change IP ranges.
  • Filtering by path might be a good option. If there are parts of your app that shouldn’t be indexed or crawled, you can declare that in your robots.txt file. Bots that disregard these directives can be considered suspicious, and you can present them with the challenge. However, this approach isn’t always good enough: A bot might be set to respect the directives.
  • A rate-limit rule is an effective option for triggering your challenge when you’re attempting to handle malicious bots. You can define the normal rate of requests that you expect valid users to make as described earlier in this section. Users that go over that rate will be presented with the challenge. You should set this rule as the top priority in order for it to be more efficient.

To create and set the rate-limit rule

  1. Open the AWS WAF & Shield console, choose Web ACLs, and then choose the web ACL to which you will add the rule.

    Figure 1: AWS WAF web ACLs

    Figure 1: AWS WAF web ACLs

  2. On the Web ACL page, choose the Rules tab.
  3. In the Add rules drop-down list, choose Add my own rules and rule groups. If you already have your rate-based custom rule in place, select the checkbox to the left of the rule, and then choose Edit.

    Figure 2: Add your own rules and rule groups

    Figure 2: Add your own rules and rule groups

  4. For Rule type, choose Rule builder. For Rule, enter a name for your rule. For Type, choose Rate-based rule.

    Figure 3: Start the rule builder

    Figure 3: Start the rule builder

  5. Under Rate-limiting criteria, set the rate limit and define the evaluation window, which is customizable.
  6. For Request aggregation, choose Source IP address. For Scope of inspection and rate limiting, choose Consider all requests.

    Figure 4: Set the rate-limiting criteria

    Figure 4: Set the rate-limiting criteria

  7. For Action, choose Challenge.
  8. For Immunity time (which specifies how long a Challenge token is valid before a new one is needed), choose a value according to the maximum time a normal session could last.

    When you set a challenge through custom rules and the token expires, subsequent requests will include an invalid cookie and will therefore be rejected until a new session is started. For example, if a normal session’s maximum duration is 5 minutes, you can leave immunity set to the default, but if the maximum duration can be longer (as in an online shop), then you will need to increase the immunity time according to your use case. (Note that SDK application integration, which we cover in the next section, takes care of presenting a new token if the current one expires, without impacting human users.)

    Figure 5: Set the action to Challenge

    Figure 5: Set the action to Challenge

  9. Choose Add rule.
  10. Set the rule priority by selecting the rule and moving it up in the list. Note that we’re considering a scenario where you set a web ACL for a single account. In this case, remember to place the rate-limiting rule at the top of the list, so that you prevent undesired traffic from triggering additional rules. This is even more important if you have paid rules later in the list.

    Figure 6: Set the rule priority

    Figure 6: Set the rule priority

Option 2: Implementing the Challenge action by using Bot Control

Implementing Challenge actions through the Bot Control feature in AWS WAF is an easier, more robust and flexible solution than using a custom rule. However, it has extra costs associated that you should be aware of and evaluate.

Bot Control is a managed rules group that provides improved visibility and automated detection and mitigation mechanisms for bots. You are charged differently depending on the tier of Bot Control you use (Common or Targeted). The Common tier detects a variety of self-identifying bots by using static request data analysis. The Targeted tier adds active analysis of client blueprints and behavior as well as machine learning, and is capable of detection and mitigation of more sophisticated agents. You can read more about the Bot Control protection levels in the documentation.

Some of the main features of Bot Control include the following:

An in-depth explanation of how to use Bot Control is beyond the scope of this post, but we provide instructions on how to enable it here. For further recommendations, see the AWS WAF Bot Control main page and the topics in the AWS WAF Developer Guide.

To enable Bot Control and configure the rule

  1. Open the WAF & Shield console, choose Web ACLs, and choose the web ACL you want Bot Control enabled on.
  2. On the Rules tab, in the Add rules drop-down list, instead of adding your own rules, choose Add managed rule groups.

    Figure 7: Add managed rule groups to your web ACL

    Figure 7: Add managed rule groups to your web ACL

  3. On the Add managed rule groups page, expand the first option, AWS managed rule groups, and scroll down to find Bot Control. Then select the Add to web ACL toggle button to enable Bot Control.

    Figure 8: Enable the Bot Control rule group

    Figure 8: Enable the Bot Control rule group

  4. You will need to customize the configuration. To do so, choose Edit.
  5. First, choose the level of inspection you want to use. Common detects a variety of self-identifying bots, but, in this example, we chose Targeted because it adds advanced detection for sophisticated bots by using machine learning and allows the challenge application integration that we mentioned earlier.
  6. Choose the scope of inspection. You can keep the scope set to Inspect all web requests or choose to use scope-down statements if you want a more granular filtering.
  7. Choose the action on a per-bot category basis or choose a single action for all the categories. In this example, we used the same settings for the Challenge action for all the categories.

    Figure 9: Set Bot Control actions

    Figure 9: Set Bot Control actions

  8. Similar to the recommendations for Option 1 earlier in this post, we recommend that you define your use cases and how you want to handle each bot category in the Common section and each rule in the Targeted The settings need to be aligned with your business needs, with the understanding that your needs can change over time. The settings you choose might also be specific to each application—for example, in the case of search engine bots, you need to consider the impact of blocking or mitigating them on your search engine optimization (SEO) and find a balance with app performance.

    Figure 10: Targeted rules

    Figure 10: Targeted rules

  9. Choose Save rule and then choose Add rules.
  10. On the Set rule priority page, set the rule priority by selecting the rule and moving it up or down in the list. Make sure you set the Bot Control managed rule group (AWS-AWSManagedRulesBotControlRuleSet) to be lower in priority than the free rules (both custom and managed). Because Bot Control rules pricing is based on the number of requests processed and the number of CAPTCHA or Challenge actions presented, putting Bot Control rules at the bottom of the list helps you to optimize your costs.
  11. You can now integrate the challenge into your application by using the SDK. For more information, see AWS WAF client application integration.

Next steps

As your cloud infrastructure grows, you need to start managing your protection at scale and centrally. AWS Firewall Manager provides you with a single place to centrally configure, manage, and monitor your AWS WAF firewall, AWS Shield Advanced protections, Amazon Virtual Private Cloud (Amazon VPC) security groups, VPC network ACLs, AWS Network Firewall instances, and Amazon Route 53 Resolver DNS Firewall rules across multiple AWS accounts and resources.

For more information, see the Security Blog posts Centrally manage AWS WAF and AWS Managed Rules at scale with Firewall Manager and How to enforce a security baseline for an AWS WAF ACL across your organization using AWS Firewall Manager.

Conclusion

In this post, we reviewed how you can mitigate bot traffic by implementing Challenge actions. By implementing this action type through a custom rule, you can set up basic, cost-effective measures to handle basic bots and control automated traffic to your applications. As your business grows, you can achieve higher efficiency and better protection against more sophisticated bots by enabling Bot Control rules, which use machine learning for advanced detection. To learn more about these topics, see the following links.

Recommended reading

If you have feedback about this post, submit comments in the Comments section below. If you have questions about this post, contact AWS Support.

Javier Sanchez Navarro

Javier is a Technical Account Manager at AWS, based in Argentina. He is passionate about cybersecurity, the game industry, and knowledge sharing. In his current role, he supports customers’ business success by helping them operate their workloads efficiently in the cloud.

How AWS WAF threat intelligence features help protect the player experience for betting and gaming customers

Post Syndicated from Harith Gaddamanugu original https://aws.amazon.com/blogs/security/how-aws-waf-threat-intelligence-features-help-protect-the-player-experience-for-betting-and-gaming-customers/

The betting and gaming industry has grown into a data-rich landscape that presents an enticing target for sophisticated bots. The sensitive personally identifiable information (PII) that is collected and the financial data involved in betting and in-game economies is especially valuable. Microtransactions and in-game purchases are frequently  targeted, making them an ideal case for safeguarding with AWS WAF.

In this blog post, we’ll explore some of these threats in more detail and explain how a layered bot mitigation strategy that uses AWS WAF can minimize the risk and impact of bot activity.

Understanding common automated threats

Automations deployed by threat actors can perform web scraping, perform betting arbitrage to gain an unfair advantage, and use automated techniques to undermine fair competition. Aggressive web scraping can also lead to application overload, service disruptions, and degraded user experience. At AWS, we routinely identify and mitigate automated threats for betting and gaming customers. Some of the common tactics we see in this space include the following:

Scraping tactics

Scraper bots often use fake accounts or compromised credentials to systematically harvest betting odds and other competitive data from multiple sites. A common example of scraping is arbitrage betting, where the scraped data is used to place simultaneous bets in different venues in order to make profits from tiny differences in the asset’s listed price. There are also competitive scraper bots that use this data to improve their betting applications.

Account-related tactics

Account creation fraud aims at claiming sign-up bonuses or other incentives at scale by using bot-generated accounts. Account takeover fraud aims at logging into user accounts to change account details, make purchases, withdraw funds, steal personal information or loyalty points, or use this data to access other accounts on different websites. A common form of this tactic is automated brute force login techniques, such as credential stuffing.

Denial-of-service tactics

Volumetric floods can cause betting and gaming sites to experience slow page-loads, downtime, and damaged brand reputation. DDoS attacks are another common security concern for many customers.

In-game tactics

In-game bots can use automated cheating or expediting techniques to manipulate resources and gain unfair advantages. These bots typically manipulate client applications and make malicious API requests.

AWS WAF intelligent threat mitigation features

To help protect customers from such automated tactics, AWS WAF offers the following intelligent threat mitigation features.

AWS WAF Common Bot Control managed rule group

The AWS WAF Common Bot Control managed rule group uses static analysis to identify web requests and header information that is correlated with known good bots and bad bots. These techniques are helpful in detecting a variety of self-identifying bots, such as web scraping frameworks, search engines, and automated browsers. Using these predetermined patterns and signatures can help gaming customers to identify and block known bot behaviors.

CAPTCHA and challenge rule actions

CAPTCHA rule action – Configured rules in AWS WAF can have a CAPTCHA action. When a rule is configured with a CAPTCHA action, users are required to solve a puzzle to prove that a human being is sending the request. When a user successfully solves a CAPTCHA challenge, a token is placed on their browser so it won’t challenge future requests, using a configurable immunity time. Learn about best practices for configuring CAPTCHA.

Challenge rule action – Challenge scripts run a silent challenge that requires the client session to verify that it’s a browser and not a bot. The verification runs in the background without involving the end user. Challenge-based bot detection can check each visitor’s ability to run JavaScript and store cookies. When a challenge is solved correctly, AWS WAF vends out an AWS WAF token, as seen in Figure 1, which allows bot control to track user activity across sessions. A reduced ability to process these challenges is a sign of bot traffic. The challenge action is a good option for verifying clients that you suspect of being invalid. You can use this feature by setting a selected AWS WAF rule action to CHALLENGE or by using a targeted bot control managed rule group. To learn more about protecting against bots with the AWS WAF challenge and CAPTCHA actions, see this blog post.

Figure 1: A sequence diagram explaining the flow of requests when Challenge is set as a rule action for an AWS WAF rule

Figure 1: A sequence diagram explaining the flow of requests when Challenge is set as a rule action for an AWS WAF rule

Client application integration

AWS WAF provides the following levels of integration.

Intelligent threat integration

To improve the user experience and reduce latency for mobile and API-driven applications, AWS WAF provides client-side application APIs to integrate with your application. These integrations help verify that the client applications that send web requests to your protected resources are the intended clients and that your end users are human beings. This functionality is available for JavaScript and for Android and iOS mobile applications. As shown in Figure 2, the token acquisition process is similar to a challenge action, but slightly different. The basic approach for using the SDK is to create a token provider by using a configuration object, then to use the token provider to retrieve tokens from AWS WAF. By default, the token provider includes the retrieved tokens in your web requests to your protected resource. The intelligent threat integration APIs work with web access control lists (ACLs) that use the intelligent threat rule groups to enable the full functionality of these advanced managed rule groups. You can use the AWS WAF mobile SDKs to implement AWS WAF intelligent threat integration SDKs for Android and iOS mobile applications.

Figure 2: A sequence diagram explaining the flow of requests when AWS WAF intelligent threat mitigation SDKs are configured

Figure 2: A sequence diagram explaining the flow of requests when AWS WAF intelligent threat mitigation SDKs are configured

CAPTCHA JavaScript integration

You can also verify end users by making them solve customized CAPTCHA puzzles that you manage in your application. This is similar to the functionality provided by the AWS WAF CAPTCHA rule action, but with added control over the puzzle placement and behavior. This integration uses the JavaScript intelligent threat integration to run silent challenges and provide AWS WAF tokens to the customer’s page.

AWS WAF Targeted Bot Control

The AWS WAF Targeted Bot Control tier includes the common-level protections described earlier and adds targeted detection for sophisticated bots that don’t self-identify. Targeted protections mitigate bot activity by using a combination of rate limiting and CAPTCHA and background browser challenges. Targeted protections use detection techniques such as the following:

  • Implementing browser fingerprinting – Browser fingerprinting is a powerful tracking and identification technique employed by online gaming sites to gain deep insights into their players’ computing setups. This technique involves probing the unique characteristics and configuration of each gamer’s browser. By collecting dozens of browser data points, a fingerprint can be generated that allows the requests coming from that specific browser to be identified and tracked across gaming sessions. Even if players try to randomize or spoof some browser attributes, perhaps in an attempt to bypass certain restrictions or gain an unfair advantage, the overall fingerprint still allows detection of such attempts. For example, if the user agent claims to be Chrome on Windows but other fingerprint attributes indicate Linux and Firefox, that suggests an attempted spoofing by the player, which can then be flagged by the gaming site’s security measures.

    By using browser fingerprinting and looking for discrepancies, gaming and betting sites gain tools to help detect and block sophisticated bots even when the bots try to mask their true identity and intent. AWS WAF uses tokens for detecting browser inconsistencies, such as when the characteristics of a browser do not match the user agent. The AWS Targeted Bot Control rule group offers this functionality by emitting labels like TGT_SignalBrowserInconsistency, and the recommended mitigation action for inconsistent browsers is to serve a CAPTCHA puzzle.

  • Detecting browser automation – Many threat actors who operate automated programs use scripting languages to carry out their tasks, such as data scraping or launching exploits. They often employ tools that mimic the behavior of a web browser to bypass security measures. To address these challenges, AWS WAF Bot Control offers solutions to help detect and block automated software that simulates browser activity. It uses specific rules like TGT_SignalAutomatedBrowser to examine requests for signs that suggest the browser is not operated by a human, helping to identify and mitigate potential threats from automated systems.
  • Understand normal volumetric activity with unique browser ID tracking – AWS WAF Targeted Bot Control monitors application visitors by assigning each one a unique browser ID (UBID) embedded in a token. It establishes baselines for the number of requests a client sends within a five-minute session and sets three thresholds per device: high, medium, and low. The system identifies clients that exceed normal request rates and challenges them with a CAPTCHA puzzle using the TGT_VolumetricSession rule. For verified bots, the rule group takes no action but labels the traffic with awswaf:managed:aws:bot-control:bot:verified.
  • Using real-time machine learning models for clustering and behavior analysis – Traditional solutions to fight advanced bots faced limitations: handling massive amounts of player traffic, accurately identifying bots without labeling every request (ground truth), and staying cost-effective. To address these challenges, the AWS WAF team created a machine learning model. This model finds hidden bot networks by analyzing patterns in website traffic. It automatically analyzes traffic statistics to identify suspicious activity that suggests coordinated bot activity.

    The model aggregates data at different levels, including the client, session, and behavioral cluster levels. It uses features like session statistics, behavioral cluster information (derived from clustering), and relative entropy to identify suspicious behavior. This feature analyzes web traffic every few minutes and optimizes the analysis for the detection of low intensity, long-duration bots that are distributed across many IP addresses. AWS WAF emits the labels TGT_ML_CoordinatedActivityMedium and TGT_ML_CoordinatedActivityHigh, based on the confidence level of the detection.

    This machine learning capability is included by default in the AWS WAF Targeted Bot Control rules, but you can choose to disable it if needed.

AWS WAF Fraud Control: Account creation fraud prevention

Fraudulent account creation involves the creation of fake accounts for activities such as bonus abuse, impersonation, and phishing. These fake accounts can damage your reputation and expose you to financial fraud. To help prevent account creation fraud, we recommend using the AWS WAF Fraud Control account creation fraud prevention (ACFP) feature. This feature is available in the AWS Managed Rules rule group AWSManagedRulesACFPRuleSet, along with companion application integration SDKs. By integrating this feature into your system, you can effectively monitor and control account creation attempts, helping to provide a safer and more secure environment for your customers.

AWS WAF Fraud Control: Account takeover prevention

Threat actors might try to gain unauthorized access to a player’s account by using stolen credentials, guessing passwords through brute-force exploits, or other means. After they gain access, they can steal money, information, or services, or even pose as the victim to gain access to other accounts. This can lead to financial loss and damage to your reputation. To help prevent account takeovers, we recommend using the AWS WAF Fraud Control account takeover prevention (ATP) feature. This feature is available in the AWS Managed Rules rule group AWSManagedRulesATPRuleSet, along with companion application integration SDKs.

Conclusion

Bot management involves choosing controls to identify traffic coming from bots, and then blocking undesired traffic. The more threat actors are motivated to target a web application, the more they will invest in detection evasion techniques, requiring more advanced mitigation capabilities. We recommend that you adopt a layered approach to managing bots, with differentiated tooling that is adapted to specific bot tactics.

Ready to start putting the tools in place to protect your gaming or betting application from sophisticated bot threats? Check out our solution overview guide for AWS WAF and the Implementing a bot control strategy on AWS whitepaper to learn more about deploying a layered bot mitigation strategy on AWS. You can also sign up for an AWS Activation Day to work directly with our experts on implementing capabilities like AWS WAF, AWS WAF Bot Control, and AWS Shield for your specific use case. For hands-on experience, try our bot mitigation workshops—you can enable managed rule groups like Bot Control in just a few steps. Start your proof-of-concept by contacting your AWS account representative today.

 
If you have feedback about this post, submit comments in the Comments section below. If you have questions about this post, contact AWS Support.
 

Harith Gaddamanugu
Harith Gaddamanugu

Harith is a Senior Edge Specialist Solutions Architect at AWS, specializing in AWS Perimeter Protection and Edge services. With over a decade of experience in network engineering, content delivery networks, and security, he helps customers improve their application security and performance. Outside of work, Harith enjoys spending time outdoors with friends and family.
Kaustubh Phatak
Kaustubh Phatak

Kaustubh is a seasoned product leader with over 11 years of experience in developing scalable solutions and driving operational excellence. He currently leads the AWS WAF Bot Control and Fraud Control initiatives, where he helps to develop cutting-edge security solutions that protect applications. Kaustubh is passionate about sports, particularly soccer and cricket, and loves spending time with his wife and kid.

Reduce risks of user sign-up fraud and SMS pumping with Amazon Cognito user pools

Post Syndicated from Edward Sun original https://aws.amazon.com/blogs/security/reduce-risks-of-user-sign-up-fraud-and-sms-pumping-with-amazon-cognito-user-pools/

If you have a customer facing application, you might want to enable self-service sign-up, which allows potential customers on the internet to create an account and gain access to your applications. While it’s necessary to allow valid users to sign up to your application, self-service options can open the door to unintended use or sign-ups. Bad actors might leverage the user sign-up process for unintended purposes, launching large-scale distributed denial of service (DDoS) attacks to disrupt access for legitimate users or committing a form of telecommunications fraud known as SMS pumping. SMS pumping is when bad actors purchase a block of high-rate phone numbers from a telecom provider and then coerces unsuspecting services into sending SMS messages to those numbers.

Amazon Cognito is a managed OpenID Connect (OIDC) identity provider (IdP) that you can use to add self-service sign-up, sign-in, and control access features to your web and mobile applications. AWS customers who use Cognito might encounter SMS pumping if SMS functions are enabled to send SMS messages, for example, perform user phone number verification during the registration process, to facilitate SMS multi-factor authentication (MFA) flows, or to support account recovery using SMS. In this blog post, we explore how SMS pumping may be perpetrated and options to reduce risks, including blocking unexpected user registration, detecting anomalies, and responding to risk events with your Cognito user pool.

Cognito user sign-up process

After a user has signed up in your application with an Amazon Cognito user pool, their account is placed in the Registered (unconfirmed) state in your user pool and the user won’t be able to sign in yet. You can use the Cognito-assisted verification and confirmation process to verify user-provided attributes (such as email or phone number) and then confirm the user’s status. This verified attribute is also used for MFA and account recovery purposes. If you choose to verify the user’s phone number, Cognito sends SMS messages with a one-time password (OTP). After a user has provided the correct OTP, their email or phone number is marked as verified and the user can sign in to your application.

Figure 1: Amazon Cognito sign-up process

Figure 1: Amazon Cognito sign-up process

If the sign-up process isn’t protected, bad actors can create scripts or deploy bots to sign up a large number of accounts, resulting in a significant volume of SMS messages sent in a short period of time. We dive deep into prevention, detection, and remediation mechanisms and strategies that you can apply to help protect against SMS pumping based on your use case.

Protect the sign-up flow

In this section, we review several prevention strategies to help protect against SMS sign-up frauds and help reduce the amount of SMS messages sent to bad actors.

Implement bot mitigation

Implementing bot mitigation techniques, such as CAPTCHA, can be very effective in preventing simple bots from pumping user creation flows. You can integrate a CAPTCHA framework on your application’s frontend and validate that the client initiating the sign-up request is operated by a human user. If the user has passed the verification, you then pass the CAPTCHA user response token in ClientMetadata together with user attributes to an Amazon Cognito SignUp API call. As part of the sign-up process, Cognito invokes an AWS Lambda function called pre sign-up Lambda trigger, which you can use to reject sign-up requests if there isn’t a valid CAPTCHA token presented. This will slow down bots and help reduce unintended account creation in your Cognito user pool.

Validate phone number before user sign-up

Another layer of mitigation is to identify the actor’s phone number early in your application’s sign-up process. You can validate the user provided phone number in the backend to catch incorrectly formatted phone numbers and add logic to help filter out unwanted phone numbers prior to sending text messages. Amazon Pinpoint offers a Phone Number Validate feature that can help you determine if a user-provided phone number is valid, determine phone number type (such as mobile, landline, or VoIP), and identify the country and service provider the phone number is associated with. The returned phone number metadata can be used to decide whether the user will continue the sign-up process and send an SMS message to that user. Note that there’s an additional charge for using the phone number validation service. For more information, see Amazon Pinpoint pricing.

To build this validation check into the Amazon Cognito sign-up process, you can customize the pre sign-up Lambda trigger, which Cognito uses to invoke your code before allowing users to sign-up and sending out an SMS OTP. The Lambda trigger invokes the Amazon Pinpoint phone number validate API, and based on the validation response, you can build a custom pattern that fits your application to continue or reject the user sign-up. For example, you can reject user sign-ups with VoIP numbers or reject users who provide a phone number that’s associated with countries that you don’t operate in, or even reject certain cellular service providers. After you reject a user sign-up using the Lambda trigger, Cognito will deny the user sign-up request and will not invoke user confirmation flow nor send out an SMS message.

Example validation command using AWS CLI

aws pinpoint phone-number-validate --number-validate-request PhoneNumber=+155501001234

When you send a request to the Amazon Pinpoint phone number validation service, it returns the following metadata about the phone number. The following example represents a valid mobile phone number data set:

{
    "NumberValidateResponse": {
        "Carrier": "ExampleCorp Mobile",
        "City": "Seattle",
        "CleansedPhoneNumberE164": "+155501001234",
        "CleansedPhoneNumberNational": "55501001234",
        "Country": "United States",
        "CountryCodeIso2": "US",
        "CountryCodeNumeric": "1",
        "OriginalPhoneNumber": "+155501001234",
        "PhoneType": "MOBILE",
        "PhoneTypeCode": 0,
        "Timezone": "America/Seattle",
        "ZipCode": "98109"
    }
}

Note that PhoneType includes type MOBILE, LANDLINE, VOIP, INVALID, or OTHER. INVALID phone numbers don’t include information about the carrier or location associated with the phone number and are unlikely to belong to actual recipients. This helps you decide when to reject user sign-ups and reduces SMS messages to undesired phone numbers. You can see details about other responses in the Amazon Pinpoint developer guide.

Example pre sign-up Lambda function to block user sign-up except with a valid MOBILE number

The following pre sign-up Lambda function example invokes the Amazon Pinpoint phone number validation service and rejects user sign-ups unless the validation service returns a valid mobile phone number.

import { PinpointClient, PhoneNumberValidateCommand } from "@aws-sdk/client-pinpoint"; // ES Modules import

const validatePhoneNumber = async (phoneNumber) => {
  const pinpoint = new PinpointClient();
  const input = { // PhoneNumberValidateRequest
    NumberValidateRequest: { // NumberValidateRequest
      PhoneNumber: phoneNumber,
    },
  };
  const command = new PhoneNumberValidateCommand(input);
  const response = await pinpoint.send(command);

  return response;
};

const handler = async (event, context, callback) => {

  const phoneNumber = event.request.userAttributes.phone_number;
  const validationResponse = await validatePhoneNumber(phoneNumber);

  if (validationResponse.NumberValidateResponse.PhoneType != "MOBILE") {
    var error = new Error("Cannot register users without a mobile number");
    // Return error to Amazon Cognito
    callback(error, event);
  }
  // Return to Amazon Cognito
  callback(null, event);
};

export { handler };

Use a custom user-initiated confirmation flow or alternative OTP delivery method

In your user pool configurations, you can opt out of using Amazon Cognito-assisted verification and confirmation to send SMS messages to confirm users. Instead, you can build a custom reverse OTP flow to ask your users to initiate the user confirmation process. For example, instead of automatically sending SMS messages to a user when they sign up, your application can display an OTP and direct the user to initiate the SMS conversation by texting the OTP to your service number. After your application has received the SMS message and confirmed the correct OTP is provided, invoke a service such as a Lambda function to call the AdminConfirmSignUp administrative API operation to confirm user, then call AdminUpdateUserAttributes to set the phone_number_verified attribute as true to indicate that the user phone number is verified.

You can also choose to deliver an OTP using other methods, such as email, especially if your application doesn’t require the user’s phone number. During the user sign-up process, you can configure a custom SMS sender Lambda trigger in Amazon Cognito to send a user verification code through email or another method. Additionally, you can use the Cognito email MFA feature to send MFA codes through email.

Detect SMS pumping

When you’re considering the various prevention options, it’s important to set up detection mechanisms to identify SMS pumping as they arise. In this section, we show you how to use AWS CloudTrail and Amazon CloudWatch to monitor your Amazon Cognito user pool and detect anomalies that could lead to SMS pumping. Note that building detection mechanism based on anomalies requires knowing your average or baseline traffic and the difference in metrics that represent regular activity and metrics that can indicate unauthorized or unintended activity.

Service quotas dashboard and CloudWatch alarms

Bad actors may attempt to leverage either the sign-up confirmation or the reset password functionality of Amazon Cognito. As shown previously in Figure 1, when a new user signs up to your Cognito user pool, the SignUp API operation is invoked. When the user provides the OTP confirmation code, the ConfirmSignUp API operation is invoked. The call rate of both APIs is tracked collectively under Rate of UserCreation requests under Amazon Cognito service in the service quotas dashboard.

You can set up Amazon CloudWatch alarms to monitor and issue notifications when you’re close to a quota value threshold. These alarms could be an early indication of a sudden usage increase, and you can use them to triage potential incidents.

Additionally, when your services are sending SMS messages, those transactions count towards the Amazon Simple Notification Service (Amazon SNS) service quota. You should set up alarms to monitor the Transactional SMS Message Delivery Rate per Second quota and the SMS Message Spending in USD quota.

CloudTrail event history

When bad actors plan SMS pumping, they are likely attempting to trick you to send as many SMS messages as possible rather than completing the user confirmation process. Under the context of a user sign-up event, you might notice in the CloudTrail event history that there are more SignUp and ResendConfirmationCode events—which send out SMS messages—than ConfirmSignUp operations; indicating a user has initiated but not completed the sign-up process. You can use Amazon Athena or CloudWatch Logs Insights to search and analyze your Amazon Cognito CloudTrail events and identify if there’s a significant reduction in finishing the user sign-up process.

Figure 2: SignUp API logged in CloudTrail event history

Figure 2: SignUp API logged in CloudTrail event history

Similarly, you can apply this observability towards the user password reset flow by analyzing the ForgotPassword API and ConfirmForgotPassword API operations for deviations.

Note that the slight deviations in user completion flow in the CloudTrail event history alone might not be an indication of unauthorized activity, however a substantial deviation above the regular baseline might be a signal of unintended use.

Monitor excessive billing

Another opportunity for detecting and identifying unauthorized Amazon Cognito activity is by using AWS Cost Explorer. You can use this interface to visualize, understand, and manage your AWS costs and usage over time, which might assist by highlighting the source of excessive billing in your AWS account. Be aware that charges in your account can take up to 24 hours to be displayed, so while this method can help provide some assistance in identifying SMS pumping activity, it should only be used as a supplement to other detection methods.

To use Cost Explorer:

  1. Open the AWS Management Console, and go to Billing and Cost Management.
  2. In the navigation pane, under Cost Analysis, choose Cost Explorer.
  3. In the Cost and Usage Report, under Report Parameters, select Date Range to include the start and end date of the time period that you want to apply a filter to. In Figure 3 that follows, we use an example date range between 2024-07-03 and 2024-07-17.
  4. In the same Report Parameter area, under Filters, for Service, select SNS (Simple Notification Service). Because Amazon Cognito uses Amazon SNS for delivery of SMS messages, filtering on SNS can help you identify excessive billing.

Figure 3: Reviewing billing charges by service

Figure 3: Reviewing billing charges by service

Apply AWS WAF rules as mitigation approaches

It’s recommended that you apply AWS WAF with your Amazon Cognito user pool to protect against common threats. In this section, we show you a few advanced options using AWS WAF rules to block or throttle specific bad actor’s traffic when you have observed irregular sign-up attempts and suspect they were part of fraudulent activities.

Target a specific bad actor’s IP address

When building AWS WAF remediation strategies, you can start by building an IP deny list to block traffic from known malicious IP addresses. This method is straightforward and can be highly effective in preventing unwanted access. For detailed instructions on how to set up an IP deny list, see Creating an IP set.

Target a specific phone number area code regex pattern

In an SMS pumping scheme, bad actors often purchase blocks of cell phone numbers from a wireless service provider and use phone numbers with the same area code. If you observe a pattern and identify that these attempts use the same area code, you can apply an AWS WAF rule to block that specific traffic.

To configure an AWS WAF web ACL to block using an area code regex pattern:

  1. Open the AWS WAF console.
  2. In the navigation pane, under AWS WAF, choose WAF ACLs.
  3. Choose Create web ACL. Under Web ACL details, select Regional resources, and select the AWS Region as your Amazon Cognito user pool. Under Associated AWS resources, select Add AWS resources, and choose your Cognito user pool. Choose Next.
  4. On the Add rules and rule groups page, choose Add rules, Add my own rules and rule groups, and Rule builder.
  5. Create a rule in Rule builder.
    1. For If a request, select matches the statement.
    2. For Inspect, select Body.
    3. For Match type, select Matches regular expression.
    4. For Regular expression, enter a match for the observed pattern. For example, the regular expression ^303|^\+1303|^001303 will match requests that include the digits 303, +1303, or 001303 at the beginning of any string in the body of a request:

    Figure 4: Creating a web ACL

    Figure 4: Creating a web ACL

  6. Under Action, choose Block. Then, choose Add rule.
  7. Continue with Set rule priority and Configure metrics, then choose Create web ACL.

Be aware that this method will block all user sign-up requests that contain phone numbers matching the regex pattern for the target area code and could prevent legitimate users whose numbers match the defined pattern from signing up. For example, the rule above will apply to all users with phone numbers starting with 303, +1303, or 001303. You should consider implementing this method as an as-needed solution to address an ongoing SMS pumping attack.

Target a specific bad actor’s client fingerprint

Another method is to examine an actor’s TLS traffic. If your application UI is hosted using Amazon CloudFront or Application Load Balancer (ALB), you can build AWS WAF rules to match the client’s JA3 fingerprint. The JA3 fingerprint is a 32-character MD5 hash derived from the TLS three-way handshake when the client sends a ClientHello packet to the server. It serves as a unique identifier for the client’s TLS configuration because various attributes such as TLS version, cipher suites, and extensions are derived to calculate the fingerprint, allowing for the unique detection of clients even when the source IP and other commonly used identification information might have changed.

Fraudulent activities, such as SMS pumping, are typically carried out using automated tools and scripts. These tools often have a consistent SSL/TLS handshake pattern, resulting in a unique JA3 fingerprint. By configuring an AWS WAF web ACL rule to match the JA3 fingerprint associated with this traffic, you can identify clients with a high degree of accuracy, even if they change other attributes, such as IP addresses.

AWS WAF has introduced support for JA3 fingerprint matching, which you can use to identify and differentiate clients based on the way they initiate TLS connections, enabling you to inspect incoming requests for their JA3 fingerprints. You can build the remediation strategy by first evaluating AWS WAF logs to extract JA3 fingerprints for potential malicious hosts, then proceed with creating rules to block requests where the fingerprint matches the malicious JA3 fingerprint associated with previous attacks.

To configure an AWS WAF web ACL to block using JA3 fingerprint matching for CloudFront resources:

  1. Open the AWS WAF console.
  2. In the navigation pane, under AWS WAF, choose WAF ACLs.
  3. Choose Create web ACL. Under Web ACL details, select Amazon CloudFront distributions. Under Associated AWS resources, select Add AWS resources, and select your CloudFront distribution. Choose Next.
  4. On the Add rules and rule groups page, choose Add rules, Add my own rules and rule groups, and Rule builder.
  5. In Rule builder:
    1. For If a request, select matches the statement.
    2. For Inspect, select JA3 fingerprint.
    3. For Match type, keep Exactly matches string.
    4. For String to match, enter the JA3 fingerprint that you want to block.
    5. For Text transformation, choose None.
    6. For Fallback for missing JA3 fingerprint, select a fallback match status for cases where no JA3 fingerprint is detected. We recommend choosing No match to prevent unintended traffic blocking.
    7. If you need to block multiple JA3 fingerprints, include each one in the rule and for If a request select matches at least one of the statements (OR).

      Figure 5: Creating an AWS WAF statement for a JA3 fingerprint

      Figure 5: Creating an AWS WAF statement for a JA3 fingerprint

    8. Under Action, select Block, and choose Add rule. You can choose other actions such as COUNT or CAPTCHA that suit your use case.
  6. Continue with Set rule priority and Configure metrics, then choose Create web ACL.

Note that JA3 fingerprints can change over time due to the randomization of TLS ClientHello messages by modern browsers. It’s important to dynamically update your web ACL rules or manually review logs to update the JA3 fingerprint search string in your match rule when applicable.

AWS WAF remediation considerations

These AWS WAF remediation approaches help to block potential threats by providing mechanisms to filter out malicious traffic. It’s essential to continually review the effectiveness of these rules to minimize the risk of blocking legitimate sources and make dynamic adjustments to the rules when you detect new bad actors and patterns.

Summary

In this blog post, we introduced mechanisms that you can use to detect and protect your Amazon Cognito user pool against unintended user sign-up and SMS pumping. By implementing these strategies, you can enhance the security of your web and mobile applications and help to safeguard your services from potential abuse and financial loss. We suggest that you apply a combination of these prevention, detection, and mitigation approaches to protect your Cognito user pools.

 
If you have feedback about this post, submit comments in the Comments section below. If you have questions about this post, contact AWS Support.

Edward Sun
Edward Sun

Edward is a Security Specialist Solutions Architect focused on identity and access management. He loves helping customers throughout their cloud transformation journey with architecture design, security best practices, migration, and cost optimizations. Outside of work, Edward enjoys hiking, golfing, and cheering for his alma mater, the Georgia Bulldogs.
Steve de Vera
Steve de Vera

Steve is a manager in the AWS Customer Incident Response Team (CIRT). He is passionate about American-style BBQ and is a certified competition BBQ judge. He has a dog named Brisket.
Tony Suarez
Tony Suarez

Tony Suarez is a San Diego, CA based Solutions Architect with over 15 years of experience in IT operations. As a member of the AWS VMware technical field community, Tony enjoys helping customers solve challenging problems in innovative ways. Enabling customers to efficiently manage, automate, and orchestrate large-scale hybrid infrastructure projects is Tony’s passion.

Network perimeter security protections for generative AI

Post Syndicated from Riggs Goodman III original https://aws.amazon.com/blogs/security/network-perimeter-security-protections-for-generative-ai/

Generative AI–based applications have grown in popularity in the last couple of years. Applications built with large language models (LLMs) have the potential to increase the value companies bring to their customers. In this blog post, we dive deep into network perimeter protection for generative AI applications. We’ll walk through the different areas of network perimeter protection you should consider, discuss how those apply to generative AI–based applications, and provide architecture patterns. By implementing network perimeter protection for your generative AI–based applications, you gain controls to help protect from unauthorized use, cost overruns, distributed denial of service (DDoS), and other threat actors or curious users.

Perimeter protection for LLMs

Network perimeter protection for web applications helps answer important questions, for example:

  • Who can access the app?
  • What kind of data is sent to the app?
  • How much data is the app is allowed to use?

For the most part, the same network protection methods used for other web apps also work for generative AI apps. The main focus of these methods is controlling network traffic that is trying to access the app, not the specific requests and responses the app creates. We’ll focus on three key areas of network perimeter protection:

  1. Authentication and authorization for the app’s frontend
  2. Using a web application firewall
  3. Protection against DDoS attacks

The security concerns of using LLMs in these apps, including issues with prompt injections, sensitive information leaks, or excess agency, is beyond the scope of this post.

Frontend authentication and authorization

When designing network perimeter protection, you first need to decide whether you will allow certain users to access the application, based on whether they are authenticated (AuthN) and whether they are authorized (AuthZ) to ask certain questions of the generative AI–based applications. Many generative AI–based applications sit behind an authentication layer so that a user must sign in to their identity provider before accessing the application. For public applications that are not behind any authentication (a chatbot, for example), additional considerations are required with regard to AWS WAF and DDoS protection, which we discuss in the next two sections.

Let’s look at an example. Amazon API Gateway is an option for customers for the application frontend, providing metering of users or APIs with authentication and authorization. It’s a fully managed service that makes it convenient for developers to publish, maintain, monitor, and secure APIs at scale. With API Gateway, you create AWS Lambda authorizers to control access to APIs within your application. Figure 1 shows how access works for this example.

Figure 1: An API Gateway, Lambda authorizer, and basic filter in the signal path between client and LLM

Figure 1: An API Gateway, Lambda authorizer, and basic filter in the signal path between client and LLM

The workflow in Figure 1 is as follows:

  1. A client makes a request to your API that is fronted by the API Gateway.
  2. When the API Gateway receives the request, it sends the request to a Lambda authorizer that authenticates the request through OAuth, SAML, or another mechanism. The Lambda authorizer returns an AWS Identity and Access Management (IAM) policy to the API Gateway, which will permit or deny the request.
  3. If permitted, the API Gateway sends the API request to the backend application. In Figure 1, this is a Lambda function that provides additional capabilities in the area of LLM security, standing in for more complex filtering. In addition to the Lambda authorizer, you can configure throttling on the API Gateway on a per-client basis or on the application methods clients are accessing before traffic makes it to the backend application. Throttling can provide some mitigation against not only DDoS attacks but also model cloning and inversion attacks.
  4. Finally, the application sends requests to your LLM that is deployed on AWS. In this example, the LLM is deployed on Amazon Bedrock.

The combination of Lambda authorizers and throttling helps support a number of perimeter protection mechanisms. First, only authorized users gain access to the application, helping to prevent bots and the public from accessing the application. Second, for authorized users, you limit the rate at which they can invoke the LLM to prevent excessive costs related to requests and responses to the LLM. Third, after users have been authenticated and authorized by the application, the application can pass identity information to the backend data access layer in order to restrict the data available to the LLM, aligning with what the user is authorized to access.

Besides API Gateway, AWS provides other options you can use to provide frontend authentication and authorization. AWS Application Load Balancer (ALB) supports OpenID Connect (OIDC) capabilities to require authentication to your OIDC provider prior to access. For internal applications, AWS Verified Access combines both identity and device trust signals to permit or deny access to your generative AI application.

AWS WAF

Once the authentication or authorization decision is made, the next consideration for network perimeter protection is on the application side. New security risks are being identified for generative AI–based applications, as described in the OWASP Top 10 for Large Language Model Applications. These risks include insecure output handling, insecure plugin design, and other mechanisms that cause the application to provide responses that are outside the desired norm. For example, a threat actor could craft a direct prompt injection to the LLM, which causes the LLM behave improperly. Some of these risks (insecure plugin design) can be addressed by passing identity information to the plugins and data sources. However, many of those protections fall outside the network perimeter protection and into the realm of security within the application. For network perimeter protection, the focus is on validating the users who have access to the application and supporting rules that allow, block, or monitor web requests based on network rules and patterns at the application level prior to application access.

In addition, bot traffic is an important consideration for web-based applications. According to Security Today, 47% of all internet traffic originates from bots. Bots that send requests to public applications drive up the cost of using generative AI–based applications by causing higher request loads.

To protect against bot traffic before the user gains access to the application, you can implement AWS WAF as part of the perimeter protection. Using AWS WAF, you can deploy a firewall to monitor and block the HTTP(S) requests that are forwarded to your protected web application resources. These resources exist behind Amazon API Gateway, ALB, AWS Verified Access, and other resources. From a web application point of view, AWS WAF is used to prevent or limit access to your application before invocation of your LLM takes place. This is an important area to consider because, in addition to protecting the prompts and completions going to and from the LLM itself, you want to make sure only legitimate traffic can access your application. AWS Managed Rules or AWS Marketplace managed rule groups provide you with predefined rules as part of a rule group.

Let’s expand the previous example. As your application shown in Figure 1 begins to scale, you decide to move it behind Amazon CloudFront. CloudFront is a web service that gives you a distributed ingress into AWS by using a global network of edge locations. Besides providing distributed ingress, CloudFront gives you the option to deploy AWS WAF in a distributed fashion to help protect against SQL injections, bot control, and other options as part of your AWS WAF rules. Let’s walk through the new architecture in Figure 2.

Figure 2: Adding AWS WAF and CloudFront to the client-to-model signal path

Figure 2: Adding AWS WAF and CloudFront to the client-to-model signal path

The workflow shown in Figure 2 is as follows:

  1. A client makes a request to your API. DNS directs the client to a CloudFront location, where AWS WAF is deployed.
  2. CloudFront sends the request through an AWS WAF rule to determine whether to block, monitor, or allow the traffic. If AWS WAF does not block the traffic, AWS WAF sends it to the CloudFront routing rules.

    Note: It is recommended that you restrict access to the API Gateway so users cannot bypass the CloudFront distribution to access the API Gateway. An example of how to accomplish this goal can be found in the Restricting access on HTTP API Gateway Endpoint with Lambda Authorizer blog post.

  3. CloudFront sends the traffic to the API Gateway, where it runs through the same traffic path as discussed in Figure 1.

To dive into more detail, let’s focus on bot traffic. With AWS WAF Bot Control, you can monitor, block, or rate limit bots such as scrapers, scanners, crawlers, status monitors, and search engines. Bot Control provides multiple options in terms of configured rules and inspection levels. For example, if you use the targeted inspection level of the rule group, you can challenge bots that don’t self-identify, making it harder and more expensive for malicious bots to operate against your generative AI–based application. You can use the Bot Control managed rule group alone or in combination with other AWS Managed Rules rule groups and your own custom AWS WAF rules. Bot Control also provides granular visibility on the number of bots that are targeting your application, as shown in Figure 3.

Figure 3: Bot control dashboard for bot requests and non-bot requests

Figure 3: Bot control dashboard for bot requests and non-bot requests

How does this functionality help you? For your generative AI–based application, you gain visibility into how bots and other traffic are targeting your application. AWS WAF provides options to monitor and customize the web request handling of bot traffic, including allowing specific bots or blocking bot traffic to your application. In addition to bot control, AWS WAF provides a number of different managed rule groups, including baseline rule groups, use-case specific rule groups, IP reputation rules groups, and others. For more information, take a look at the documentation on both AWS Managed Rules rule groups and AWS Marketplace managed rule groups.

DDoS protection

The last topic we’ll cover in this post is DDoS with LLMs. Similar to threats against other Layer 7 applications, threat actors can send requests that consume an exceptionally high amount of resources, which results in a decline in the service’s responsiveness or an increase in the cost to run the LLMs that are handling the high number of requests. Although throttling can help support a per-user or per-method rate limit, DDoS attacks use more advanced threat vectors that are difficult to protect against with throttling.

AWS Shield helps to provide protection against DDoS for your internet-facing applications, both at Layer 3/4 with Shield standard or Layer 7 with Shield Advanced. For example, Shield Advanced responds automatically to mitigate application threats by counting or blocking web requests that are part of the exploit by using web access control lists (ACLs) that are part of your already deployed AWS WAF. Depending on your requirements, Shield can provide multiple layers of protection against DDoS attacks.

Figure 4 shows how your deployment might look after Shield is added to the architecture.

Figure 4: Adding Shield Advanced to the client-to-model signal path

Figure 4: Adding Shield Advanced to the client-to-model signal path

The workflow in Figure 4 is as follows:

  1. A client makes a request to your API. DNS directs the client to a CloudFront location, where AWS WAF and Shield are deployed.
  2. CloudFront sends the request through an AWS WAF rule to determine whether to block, monitor, or allow the traffic. AWS Shield can mitigate a wide range of known DDoS attack vectors and zero-day attack vectors. Depending on the configuration, Shield Advanced and AWS WAF work together to rate-limit traffic coming from individual IP addresses. If AWS WAF or Shield Advanced don’t block the traffic, the services will send it to the CloudFront routing rules.
  3. CloudFront sends the traffic to the API Gateway, where it will run through the same traffic path as discussed in Figure 1.

When you implement AWS Shield and Shield Advanced, you gain protection against security events and visibility into both global and account-level events. For example, at the account level, you get information on the total number of events seen on your account, the largest bit rate and packet rate for each resource, and the largest request rate for CloudFront. With Shield Advanced, you also get access to notifications of events that are detected by Shield Advanced and additional information about detected events and mitigations. These metrics and data, along with AWS WAF, provide you with visibility into the traffic that is trying to access your generative AI–based applications. This provides mitigation capabilities before the traffic accesses your application and before invocation of the LLM.

Considerations

When deploying network perimeter protection with generative AI applications, consider the following:

  • AWS provides multiple options, on both the frontend authentication and authorization side and the AWS WAF side, for how to configure perimeter protections. Depending on your application architecture and traffic patterns, multiple resources can provide the perimeter protection with AWS WAF and integrate with identity providers for authentication and authorization decisions.
  • You can also deploy more advanced LLM-specific prompt and completion filters by using Lambda functions and other AWS services as part of your deployment architecture. Perimeter protection capabilities are focused on preventing undesired traffic from reaching the end application.
  • Most of the network perimeter protections used for LLMs are similar to network perimeter protection mechanisms for other web applications. The difference is that additional threat vectors come into play compared to regular web applications. For more information on the threat vectors, see OWASP Top 10 for Large Language Model Applications and Mitre ATLAS.

Conclusion

In this blog post, we discussed how traditional network perimeter protection strategies can provide defense in depth for generative AI–based applications. We discussed the similarities and differences between LLM workloads and other web applications. We walked through why authentication and authorization protection is important, showing how you can use Amazon API Gateway to throttle through usage plans and to provide authentication through Lambda authorizers. Then, we discussed how you can use AWS WAF to help protect applications from bots. Lastly, we talked about how AWS Shield can provide advanced protection against different types of DDoS attacks at scale. For additional information on network perimeter protection and generative AI security, take a look at other blogs posts in the AWS Security Blog Channel.

 
If you have feedback about this post, submit comments in the Comments section below. If you have questions about this post, contact AWS Support.

Riggs Goodman III

Riggs Goodman III
Riggs is a Principal Partner Solution Architect at AWS. His current focus is on AI security and data security, providing technical guidance, architecture patterns, and leadership for customers and partners to build AI workloads on AWS. Internally, Riggs focuses on driving overall technical strategy and innovation across AWS service teams to address customer and partner challenges.

Implement a full stack serverless search application using AWS Amplify, Amazon Cognito, Amazon API Gateway, AWS Lambda, and Amazon OpenSearch Serverless

Post Syndicated from Anand Komandooru original https://aws.amazon.com/blogs/big-data/implement-a-full-stack-serverless-search-application-using-aws-amplify-amazon-cognito-amazon-api-gateway-aws-lambda-and-amazon-opensearch-serverless/

Designing a full stack search application requires addressing numerous challenges to provide a smooth and effective user experience. This encompasses tasks such as integrating diverse data from various sources with distinct formats and structures, optimizing the user experience for performance and security, providing multilingual support, and optimizing for cost, operations, and reliability.

Amazon OpenSearch Serverless is a powerful and scalable search and analytics engine that can significantly contribute to the development of search applications. It allows you to store, search, and analyze large volumes of data in real time, offering scalability, real-time capabilities, security, and integration with other AWS services. With OpenSearch Serverless, you can search and analyze a large volume of data without having to worry about the underlying infrastructure and data management. An OpenSearch Serverless collection is a group of OpenSearch indexes that work together to support a specific workload or use case. Collections have the same kind of high-capacity, distributed, and highly available storage volume that’s used by provisioned Amazon OpenSearch Service domains, but they remove complexity because they don’t require manual configuration and tuning. Each collection that you create is protected with encryption of data at rest, a security feature that helps prevent unauthorized access to your data. OpenSearch Serverless also supports OpenSearch Dashboards, which provides an intuitive interface for analyzing data.

OpenSearch Serverless supports three primary use cases:

  • Time series – The log analytics workloads that focus on analyzing large volumes of semi-structured, machine-generated data in real time for operational, security, user behavior, and business insights
  • Search – Full-text search that powers applications in your internal networks (content management systems, legal documents) and internet-facing applications, such as ecommerce website search and content search
  • Vector search – Semantic search on vector embeddings that simplifies vector data management and powers machine learning (ML) augmented search experiences and generative artificial intelligence (AI) applications, such as chatbots, personal assistants, and fraud detection

In this post, we walk you through a reference implementation of a full-stack cloud-centered serverless text search application designed to run using OpenSearch Serverless.

Solution overview

The following services are used in the solution:

  • AWS Amplify is a set of purpose-built tools and features that enables frontend web and mobile developers to quickly and effortlessly build full-stack applications on AWS. These tools have the flexibility to use the breadth of AWS services as your use cases evolve. This solution uses the Amplify CLI to build the serverless movie search web application. The Amplify backend is used to create resources such as the Amazon Cognito user pool, API Gateway, Lambda function, and Amazon S3 storage.
  • Amazon API Gateway is a fully managed service that makes it straightforward for developers to create, publish, maintain, monitor, and secure APIs at any scale. We use API Gateway as a “front door” for the movie search application for searching movies.
  • AWS CloudFront accelerates the delivery of web content such as static and dynamic web pages, video streams, and APIs to users across the globe by caching content at edge locations closer to the end-users. This solution uses CloudFront with Amazon S3 to deliver the search application user interface to the end users.
  • Amazon Cognito makes it straightforward for adding authentication, user management, and data synchronization without having to write backend code or manage any infrastructure. We use Amazon Cognito for creating a user pool so the end-user can log in to the movie search application through Amazon Cognito.
  • AWS Lambda is a serverless, event-driven compute service that lets you run code for virtually any type of application or backend service without provisioning or managing servers. Our solution uses a Lambda function to query OpenSearch Serverless. API Gateway forwards all requests to the Lambda function to serve up the requests.
  • Amazon OpenSearch Serverless is a serverless option for OpenSearch Service. In this post, you use common methods for searching documents in OpenSearch Service that improve the search experience, such as request body searches using domain-specific language (DSL) for queries. The query DSL lets you specify the full range of OpenSearch search options, including pagination and sorting the search results. Pagination and sorting are implemented on the server side using DSL as part of this implementation.
  • Amazon Simple Storage Service (Amazon S3) is an object storage service that offers industry-leading scalability, data availability, security, and performance. The solution uses Amazon S3 as storage for storing movie trailers.
  • AWS WAF helps protects web applications from attacks by allowing you to configure rules that allow, block, or monitor (count) web requests based on conditions that you define. We use AWS WAF to allow access to the movie search app from only IP addresses on an allow list.

The following diagram illustrates the solution architecture.

The workflow includes the following steps:

  1. The end-user accesses the CloudFront and Amazon S3 hosted movie search web application from their browser or mobile device.
  2. The user signs in with their credentials.
  3. A request is made to an Amazon Cognito user pool for a login authentication token, and a token is received for a successful sign-in request.
  4. The search application calls the search API method with the token in the authorization header to API Gateway. API Gateway is protected by AWS WAF to enforce rate limiting and implement allow and deny lists.
  5. API Gateway passes the token for validation to the Amazon Cognito user pool. Amazon Cognito validates the token and sends a response to API Gateway.
  6. API Gateway invokes the Lambda function to process the request.
  7. The Lambda function queries OpenSearch Serverless and returns the metadata for the search.
  8. Based on metadata, content is returned from Amazon S3 to the user.

In the following sections, we walk you through the steps to deploy the solution, ingest data, and test the solution.

Prerequisites

Before you get started, make sure you complete the following prerequisites:

  1. Install Nodejs latest LTS version.
  2. Install and configure the AWS Command Line Interface (AWS CLI).
  3. Install awscurl for data ingestion.
  4. Install and configure the Amplify CLI. At the end of configuration, you should successfully set up the new user using the amplify-dev user’s AccessKeyId and SecretAccessKey in your local machine’s AWS profile.
  5. Amplify users need additional permissions in order to deploy AWS resources. Complete the following steps to create a new inline AWS Identity and Access Management (IAM) policy and attach it to the user:
    • On the IAM console, choose Users in the navigation pane.
    • Choose the user amplify-dev.
    • On the Permissions tab, choose the Add permissions dropdown menu, then choose Inline policy.
    • In the policy editor, choose JSON.

You should see the default IAM statement in JSON format.

This environment name needs to be used when performing amplify init when bringing up the backend. The actions in the IAM statement are largely open (*) but restricted or limited by the target resources; this is done to satisfy the maximum inline policy length (2,048 characters).

    • Enter the updated JSON into the policy editor, then choose Next.
    • For Policy name, enter a name (for this post, AddionalPermissions-Amplify).
    • Choose Create policy.

You should now see the new inline policy attached to the user.

Deploy the solution

Complete the following steps to deploy the solution:

  1. Clone the repository to a new folder on your desktop using the following command:
    git clone https://github.com/aws-samples/amazon-opensearchserverless-searchapp.git

  2. Deploy the movie search backend.
  3. Deploy the movie search frontend.

Ingest data

To ingest the sample movie data into the newly created OpenSearch Serverless collection, complete the following steps:

  • On the OpenSearch Service console, choose Ingestion: Pipelines in the navigation pane.
  • Choose the pipeline movie-ingestion and locate the ingestion URL.

  • Replace the ingestion endpoint and Region in the following snippet and run the awscurl command to save data into the collection:
awscurl --service osis --region <region> \
-X POST \
-H "Content-Type: application/json" \
-d "@project_assets/movies-data.json" \
https://<ingest_url>/movie-ingestion/data 

You should see a 200 OK response.

  • On the Amazon S3 console, open the trailer S3 bucket (created as part of the backend deployment.
  • Upload some movie trailers.

Storage

Make sure the file name matches the ID field in sample movie data (for example, tt1981115.mp4, tt0800369.mp4, and tt0172495.mp4). Uploading a trailer with ID tt0172495.mp4 is used as the default trailer for all movies, without having to upload one for each movie.

Test the solution

Access the application using the CloudFront distribution domain name. You can find this by opening the CloudFront console, choosing the distribution, and copying the distribution domain name into your browser.

Sign up for application access by entering your user name, password, and email address. The password should be at least eight characters in length, and should include at least one uppercase character and symbol.

Sign Up

After you’re logged in, you’re redirected to the Movie Finder home page.

Home Page

You can search using a movie name, actor, or director, as shown in the following example. The application returns results using OpenSearch DSL.

Search Results

If there’s a large number of search results, you can navigate through them using the pagination option at the bottom of the page. For more information about how the application uses pagination, see Paginating search results.

Pagination

You can choose movie tiles to get more details and watch the trailer if you took the optional step of uploading a movie trailer.

Movie Details

You can sort the search results using the Sort by feature. The application uses the sort functionality within OpenSearch.

Sort

There are many more DSL search patterns that allow for intricate searches. See Query DSL for complete details.

Monitoring OpenSearch Serverless

Monitoring is an important part of maintaining the reliability, availability, and performance of OpenSearch Serverless and your other AWS services. AWS provides Amazon CloudWatch and AWS CloudTrail to monitor OpenSearch Serverless, report when something is wrong, and take automatic actions when appropriate. For more information, see Monitoring Amazon OpenSearch Serverless.

Clean up

To avoid unnecessary charges, clean up the solution implementation by running the following command at the project root folder you created using the git clone command during deployment:

amplify delete

You can also clean up the solution by deleting the AWS CloudFormation stack you deployed as part of the setup. For instructions, see Deleting a stack on the AWS CloudFormation console.

Conclusion

In this post, we implemented a full-stack serverless search application using OpenSearch Serverless. This solution seamlessly integrates with various AWS services, such as Lambda for serverless computing, API Gateway for constructing RESTful APIs, IAM for robust security, Amazon Cognito for streamlined user management, and AWS WAF for safeguarding the web application against threats. By adopting a serverless architecture, this search application offers numerous advantages, including simplified deployment processes and effortless scalability, with the benefits of a managed infrastructure.

With OpenSearch Serverless, you get the same interactive millisecond response times as OpenSearch Service with the simplicity of a serverless environment. You pay only for what you use by automatically scaling resources to provide the right amount of capacity for your application without impacting performance and scale as needed. You can use OpenSearch Serverless and this reference implementation to build your own full-stack text search application.


About the Authors

Anand Komandooru is a Principal Cloud Architect at AWS. He joined AWS Professional Services organization in 2021 and helps customers build cloud-native applications on AWS cloud. He has over 20 years of experience building software and his favorite Amazon leadership principle is “Leaders are right a lot“.

Rama Krishna Ramaseshu is a Senior Application Architect at AWS. He joined AWS Professional Services in 2022 and with close to two decades of experience in application development and software architecture, he empowers customers to build well architected solutions within the AWS cloud. His favorite Amazon leadership principle is “Learn and Be Curious”.

Sachin Vighe is a Senior DevOps Architect at AWS. He joined AWS Professional Services in 2020, and specializes in designing and architecting solutions within the AWS cloud to guide customers through their DevOps and Cloud transformation journey. His favorite leadership principle is “Customer Obsession”.

Molly Wu is an Associate Cloud Developer at AWS. She joined AWS Professional Services in 2023 and specializes in assisting customers in building frontend technologies in AWS cloud. Her favorite leadership principle is “Bias for Action”.

Andrew Yankowsky is a Security Consultant at AWS. He joined AWS Professional Services in 2023, and helps customers build cloud security capabilities and follow security best practices on AWS. His favorite leadership principle is “Earn Trust”.

How to enforce a security baseline for an AWS WAF ACL across your organization using AWS Firewall Manager

Post Syndicated from Omner Barajas original https://aws.amazon.com/blogs/security/how-to-enforce-a-security-baseline-for-an-aws-waf-acl-across-your-organization-using-aws-firewall-manager/

Most organizations prioritize protecting their web applications that are exposed to the internet. Using the AWS WAF service, you can create rules to control bot traffic, help prevent account takeover fraud, and block common threat patterns such as SQL injection or cross-site scripting (XSS). Further, for those customers managing multi-account environments, it is possible to enforce security baselines for AWS WAF access control lists (ACLs) across the whole organization by using AWS Firewall Manager.

In a previous AWS Security Blog post, there is a good explanation about how to create Firewall Manager policies to deploy AWS WAF ACLs across multiple accounts. In addition, this AWS Architecture Blog post goes deeper, describing operating models for web applications security governance in Amazon Web Services (AWS). This post will show, in a central or hybrid operating model, how to create a policy to enforce a security baseline in your AWS WAF ACLs while still allowing application administrators or developers to apply specific ACL rules for their particular use case.

Centrally manage firewall policies

It’s a common scenario that a security team in an organization wants to implement a security baseline, consisting of a set of rules, across multiple applications that are distributed in multiple accounts. Those rules are not always applicable for all workloads because different applications might have different needs for protection or exposure to the public. Furthermore, sometimes local teams responsible for managing applications have permissions to create their own rules and decide not to follow policies mandated by the organization.

AWS Firewall Manager solves this problem by allowing you to centrally configure and manage firewall policies, deploy preconfigured AWS WAF rules across your organization, and automatically enforce them in existing and newly created resources.

The following architecture diagram describes how you can design a Firewall Manager policy from a central security account, establishing a security baseline that will be enforced within other member accounts in your organization. To do so, you create a managed AWS WAF ACL with the first and last group rules not editable, but allowing a custom rule group to be modified by administrators of member accounts.

Figure 1: AWS Firewall Manager enforcing security baseline for AWS WAF

Figure 1: AWS Firewall Manager enforcing security baseline for AWS WAF

Firewall Manager delegated administrators

At the time of writing this post, Firewall Manager supports up to 10 administrators who can manage firewall resources in your organization by applying scope conditions. For example, you can define an administrator for specific accounts or even a complete organization unit (OU), AWS Region, or policy type. Using this feature, you can enforce the principle of least privilege access, in addition to assigning administrators to enforce security baselines for your AWS ACL rules across your organization in a more granular way. This delegation needs to be completed from the AWS Organizations management account, as shown in Figure 2.

Figure 2: AWS Firewall Manager administrator account delegation

Figure 2: AWS Firewall Manager administrator account delegation

Firewall Manager policies

A Firewall Manager policy contains the rule groups that will be applied to your protected resources. The service creates a web ACL in each account where the policy is enforced. Account administrators can add rules or rule groups to the resulting web ACL in addition to the rules groups defined by the Firewall Manager policy.

Rules groups

AWS WAF ACLs that are managed by Firewall Manager policies contain three sets of rules that provide a higher level of prioritization in the ACL. AWS WAF evaluates rule groups in the following order:

  1. Rule groups that are defined in the Firewall Manager policy with the highest priority
  2. Rules that are defined by the account administrator in the web ACL after the first rule group
  3. Rule groups that are defined in Firewall Manager to be evaluated at the end

Within each rule set, AWS WAF evaluates rules according to their priority settings, evaluating the rules from the lowest number up until either finds a match that terminates the evaluation or exhausts all of the rules.

Security baseline policy

Figure 3 shows an example of a Firewall Manager policy that will serve as the security web ACL baseline across your organization. This policy should be created in a delegated administrator acco­­unt and enforced across all or specific accounts in your organization where the administrator has permissions. Refer to the service documentation for additional guidance on setting up this type of policy.

Figure 3: AWS Firewall Manager policy rules acting as the security baseline

Figure 3: AWS Firewall Manager policy rules acting as the security baseline

First rule group

The first rule group in the policy will contain the following:

  • Organization-level blocked list – Known bad IP addresses by organization.
  • AWS IP reputation list – Recommended AWS managed rules for IP addresses with a bad reputation.
  • AWS Anonymous IP list – Recommended AWS managed rules for anonymous IP addresses.
  • Organization-level rate limit – A high-level rate limit defined by the organization.

Last rule group

The last rule group in the policy will contain the following:

  • Organization-level allowed list – Even if these are well-known IP addresses, they still need to be evaluated against the set of rules enforced by the organization and specific rules per application. If a “good” IP address is supplanted, it might hide the real source identity, bypassing AWS WAF rules.
  • AWS bot control – Recommended if you want to enforce bot control across your organization or a set of accounts managed by an administrator.

This configuration will allow individual account administrators to define and include their own rules to protect applications based on specific use cases and the expected number of requests.

When designing your own security baselines, take into consideration that some managed rules, such as bot control, might have additional cost, and enforcing them across your organization would increase the overall cost of the service.

Policy scope

The policy scope for your security baseline defines where the policy applies. It can apply to all accounts and resources in your organization or just a subset of accounts and resources. Based on the settings selected, Firewall Manager will apply policy for accounts in scope by using the following options:

  1. All accounts in your organization
  2. Only a specific list of accounts and organization units
  3. All accounts and OUs except a specific list of those to exclude

On the other hand, when selecting the scope for resources, you can use the following options:

  1. All resources
  2. Resources that have all of the specified tags
  3. All resources except those that have all the specified tags

For delegated administrators, scope definition will apply only for accounts, Regions, or OUs defined during the delegation process. Figure 4 shows an example of the scope definition for a policy.

Figure 4: Firewall Manager scope definition

Figure 4: Firewall Manager scope definition

Use case–specific rule groups

Figure 5 is an example of a specific use case, where AWS WAF administrators in a member account within the Firewall Manager policy scope want to protect their web application by using the following rules.

Figure 5: Web ACL managed by Firewall Manager containing rules in a member account

Figure 5: Web ACL managed by Firewall Manager containing rules in a member account

Middle rule group

The middle rule group is configured in each account within the ACL deployed by Firewall Manager. The examples from Figure 5 are rules oriented to apply protection that is specific for the application where the ACL is assigned:

  • App-level blocked list – Known IP addresses blocked by the administrator.
  • App-level rate limit – The rate limit supported by the application.
  • Core rule set – The recommended rule set, focused on OWASP Top Ten vulnerabilities.
  • Technology-specific protection – An example for PHP applications.
  • App-level allowed list – Well-known IP addresses that still need to be evaluated against some rules but bypass others, such as fraud prevention.
  • Account takeover prevention – This managed rule needs specific configuration per application to work as expected. However, it is recommended that you use it after the bot control managed rule to optimize cost. Take that into consideration when building your own security baseline.

This rule group will be second priority between the first and the last rule groups coming from the Firewall Manager policy. This configuration provides account administrators the ability to design their set of rules to cover the specific use case for their application and also the possibility to override rules evaluated in a lower priority (last rule group). For example, having a higher rate limit in the app-level rule than the org-level rule would have no impact on the traffic being filtered, since the org-level rule in the first group of the policy will have priority. However, having more granular bot control rules at the app-level will supersede the org-level rules contained in the last group of the policy. Take that logic into consideration when you decide which rules need to be in the first and last groups of your Firewall Manager policies.

Recommended approach for testing

Before you deploy your web ACL implementation for production, test and tune it in a staging or testing environment until you are comfortable with the potential impact on your traffic. Then, test and tune the rules in count mode with your production traffic before enabling them.

  1. Prepare the environment for testing:
    1. Enable logging and web request sampling for your ACL.
    2. Set the protection to count mode.
    3. Associate the ACL with a resource.
  2. Monitor and tune in the test environment:
    1. Monitor traffic and rules matching by using logs, metrics, the dashboard, or sampled requests.
    2. Configure mitigation rules such as false positive, matching, scope-down, and label match.
  3. Enable protection in production:
    1. Remove any additional rules that are no longer needed.
    2. Enable rules in production accounts.
    3. Closely monitor your application behavior to be sure requests are being handled as expected.

Cleanup

To avoid unexpected charges in your accounts, delete any unnecessary policies and resources. You can do that from the console by following these steps.

  1. On the Firewall Manager policies page, choose the radio button next to the policy name, and then choose Delete.
  2. In the Delete confirmation box, select Delete all policy resources, and then choose Delete again.

AWS WAF removes the policy and any associated resources, like web ACLs, that it created in your account. The changes might take a few minutes to propagate to all accounts.

Conclusion

By using Firewall Manager, you can take advantage of native cloud features to enforce security baseline configurations for your AWS WAF rules in a multi-account environment across your organization. It is possible to centrally design policies with broad rule groups to protect workloads from a high-level perspective while allowing application administrators to design custom rules to protect, for instance, web applications from specific use cases such as OWASP Top Ten or technology-related vulnerabilities.

The examples provided in this post can be further customized and adapted to align with your organization’s needs. Design policies to comply with security requirements and specific use cases to protect your workloads.

If you want to learn more, visit the Automations for AWS Firewall Manager webpage, which provides a solution with preset rules to create a quick security baseline to protect against distributed denial of service (DDoS).

 
If you have feedback about this post, submit comments in the Comments section below. If you have questions about this post, contact AWS Support.

Want more AWS Security news? Follow us on X.

Omner Barajas

Omner Barajas

Omner is a senior security specialist solutions architect based in Mexico, supporting customers in LATAM. He usually collaborates with account teams to help clients accelerate cloud adoption and improve security posture for their workloads, resolving complex technical challenges related to cybersecurity and compliance with international standards and regulations.