Post Syndicated from Andrew Gregory original https://www.raspberrypi.org/blog/read-rfid-and-nfc-tokens-with-raspberry-pi-hackspace-37/
Add a bit of security to your project or make things selectable
by using different cards. In the latest issue of HackSpace magazine, PJ Evans goes contactless.
NFC (near-field communication) is based on the RFID (radio-frequency identification) standard. Both allow a device to receive data from a passive token or tag (meaning it doesn’t require external power to work). RFID supports a simple ID message that shouts ‘I exist’, whereas NFC allows for both reading and writing of data.
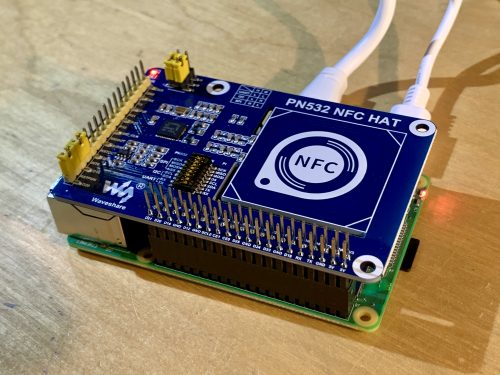
Most people come into contact with these systems every day, whether it’s using contactless payment, or a card to unlock a hotel or office door. In this tutorial we’ll look at the Waveshare NFC HAT, an add-on for Raspberry Pi computers that allows you to interact with NFC and RFID tokens.
Prepare your Raspberry Pi
We start with the usual step of preparing a Raspberry Pi model for the job. Reading RFID tags is not strenuous work for our diminutive friend, so you can use pretty much any variant of the Raspberry Pi range you like, so long as it has the 40-pin GPIO. We only need Raspberry Pi OS Lite (Buster) for this tutorial; however, you can install any version you wish. Make sure you’ve configured it how you want, have a network connection, and have updated everything by running sudo apt -y update && sudo apt -y upgrade on the command line.
Enable the serial interface
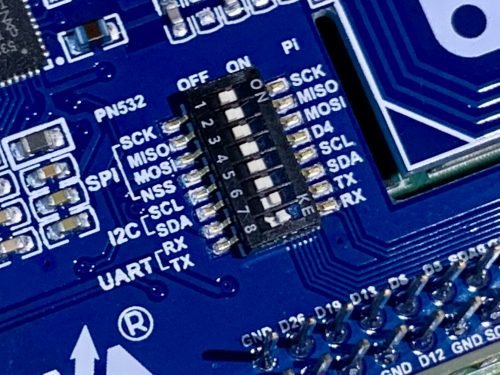
This NFC HAT is capable of communicating over three different interfaces: I2C, SPI, and UART. We’re going with UART as it’s the simplest to demonstrate, but you may wish to use the others. Start by running sudo raspi-config, going to ‘Interfacing options’, and selecting ‘Serial Interface’. When asked if you want to log into the console, say ‘No’. Then, when asked if you want to enable the serial interface, say ‘Yes’. You’ll need to reboot now. This will allow the HAT to talk to our Raspberry Pi over the serial interface.
Configure and install the HAT
As mentioned in the previous step, we have a choice of interfaces and swapping between them means changing some physical settings on the NFC HAT itself. Do not do this while the HAT is powered up in any way. Our HAT can be configured for UART/Serial by default but do check on the wiki at hsmag.cc/iHj1XA. The jumpers at I1 and I0 should both be shorting ‘L’, D16 and D20 should be shorted and on the DIP switch, everything should be off except RX and TX. Check, double-check, attach the HAT to the GPIO, and boot up.

Download the examples
You can download some examples directly from Waveshare. First, we need to install some dependencies. Run the following at the command line:sudo apt install rpi.gpio p7zip-full python3-pip
pip3 install spidev pyserial
Now, download the files and unpack them:cd
wget https://www.waveshare.com/w/upload/6/67/Pn532-nfc-hat-code.7z
7z x Pn532-nfc-hat-code.7z
Before you try anything out, you need to edit the example file so that we use UART (see the accompanying code listing).cd ~/raspberrypi/python
nano example_get_uid.py
Find the three lines that start pn532 = and add a # to the top one (to comment it out). Now remove the # from the line starting pn532 = PN532_UART. Save, and exit.
Try it out!
Finally, we get to the fun part. Start the example code as follows:python3 example_get_uid.py
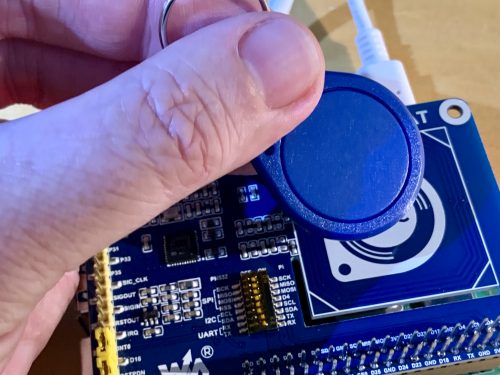
If all is well, the connection to the HAT will be announced. You can now place your RFID token over the area of the HAT marked ‘NFC’. Hexadecimal numbers will start scrolling up the screen; your token has been detected! Each RFID token has a unique number, so it can be used to uniquely identify someone. However, this HAT is capable of much more than that as it also supports NFC and can communicate with common standards like MIFARE Classic, which allows for 1kB of storage on the card. Check out example_dump_mifare.py in the same directory (but make sure you make the same edits as above to use the serial connection).
Going further
You can now read unique identifiers on RFID and NFC tokens. As we just mentioned, if you’re using the MIFARE or NTAG2 standards, you can also write data back to the card. The examples folder contains some C programs that let you do just that. The ability to read and write small amounts of data onto cards can lead to some fun projects. At the Electromagnetic Field festival in 2018, an entire game was based around finding physical locations and registering your presence with a MIFARE card. Even more is possible with smartphones, where NFC can be used to exchange data in any form.
Get HackSpace magazine 37 – Out Now!

Each month, HackSpace magazine brings you the best projects, tips, tricks and tutorials from the makersphere. You can get it from the Raspberry Pi Press online store, The Raspberry Pi store in Cambridge, or your local newsagents.
Each issue is free to download from the HackSpace magazine website.
The post Read RFID and NFC tokens with Raspberry Pi | HackSpace 37 appeared first on Raspberry Pi.