Post Syndicated from Sakti Mishra original https://aws.amazon.com/blogs/big-data/orchestrating-an-aws-glue-databrew-job-and-amazon-athena-query-with-aws-step-functions/
As the industry grows with more data volume, big data analytics is becoming a common requirement in data analytics and machine learning (ML) use cases. Also, as we start building complex data engineering or data analytics pipelines, we look for a simpler orchestration mechanism with graphical user interface-based ETL (extract, transform, load) tools.
Recently, AWS announced the general availability of AWS Glue DataBrew, a new visual data preparation tool that helps you clean and normalize data without writing code. This reduces the time it takes to prepare data for analytics and ML by up to 80% compared to traditional approaches to data preparation.
Regarding orchestration or workflow management, AWS provides AWS Step Functions, a serverless function orchestrator that makes it easy to build a workflow by integrating different AWS services like AWS Lambda, Amazon Simple Notification Service (Amazon SNS), AWS Glue, and more. With its built-in operational controls, Step Functions manages sequencing, error handling, retry logic, and states, removing a significant operational burden from your team.
Today, we’re launching Step Functions support for DataBrew, which means you can now invoke DataBrew jobs in your Step Functions workflow to build an end-to-end ETL pipeline. Recently, Step Functions also started supporting Amazon Athena integration, which means that you can submit SQL queries to the Athena engine through a Step Functions state.
In this post, we walk through a solution where we integrate a DataBrew job for data preparation, invoke a series of Athena queries for data refresh, and integrate Amazon QuickSight for business reporting. The whole solution is orchestrated through Step Functions and is invoked through Amazon EventBridge.
Use case overview
For our use case, we use two public datasets. The first dataset is a sales pipeline dataset, which contains a list of over 20,000 sales opportunity records for a fictitious business. Each record has fields that specify the following:
- A date, potentially when an opportunity was identified
- The salesperson’s name
- A market segment to which the opportunity belongs
- Forecasted monthly revenue
The second dataset is an online marketing metrics dataset. This dataset contains records of marketing metrics, aggregated by day. The metrics describe user engagement across various channels, such as websites, mobile, and social media, plus other marketing metrics. The two datasets are unrelated, but for the purpose of this post, we assume that they’re related.
For our use case, these sales and marketing CSV files are maintained by your organization’s Marketing team, which uploads the updated full CSV file to Amazon Simple Storage Service (Amazon S3) every month. The aggregated output data is created through a series of data preparation steps, and the business team uses the output data to create business intelligence (BI) reports.
Architecture overview
To automate the complete process, we use the following architecture, which integrates Step Functions for orchestration, DataBrew for data preparation, Athena for data analysis with standard SQL, and QuickSight for business reporting. In addition, we use Amazon SNS for sending notifications to users, and EventBridge is integrated to schedule running the Step Functions workflow.
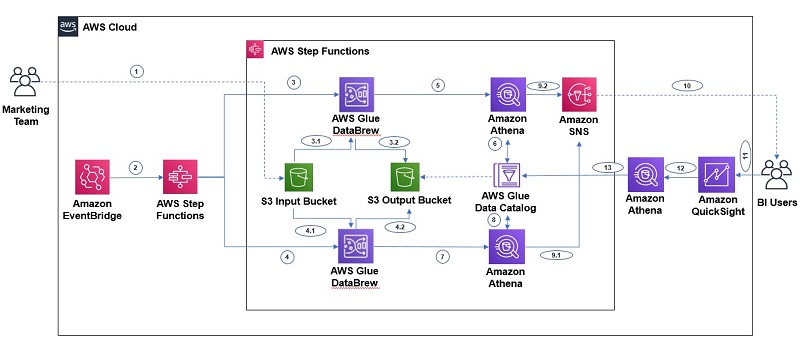
The workflow includes the following steps:
- Step 1 – The Marketing team uploads the full CSV file to an S3 input bucket every month.
- Step 2 – An EventBridge rule, scheduled to run every month, triggers the Step Functions state machine.
- Steps 3 and 4 – We receive two separate datasets (sales data and marketing data), so Step Functions triggers two parallel DataBrew jobs, which create additional year, month, and day columns from the existing date field and uses those three columns for partitioning. The jobs write the final output to our S3 output bucket.
- Steps 5, 6, 7, 8 – After the output data is written, we can create external tables on top of it with Athena create table statements and then load partitions with MCSK REPAIR commands. After the AWS Glue Data Catalog tables are created for sales and marketing, we run an additional query through Athena, which merges these two tables by year and month to create another table with aggregated output.
- Steps 9 and 10 – As the last step of the Step Functions workflow, we send a notification to end-users through Amazon SNS to notify them that the data refresh job completed successfully.
- Steps 11, 12, 13 – After the aggregated table data is refreshed, business users can use QuickSight for BI reporting, which fetches data through Athena. Data analysts can also use Athena to analyze the complete refreshed dataset.
Prerequisites
Before beginning this tutorial, make sure you have the required permissions to create the resources required as part of the solution.
Additionally, create the S3 input and output buckets with the required subfolders to capture the sales and marketing data, and upload the input data into their respective folders.
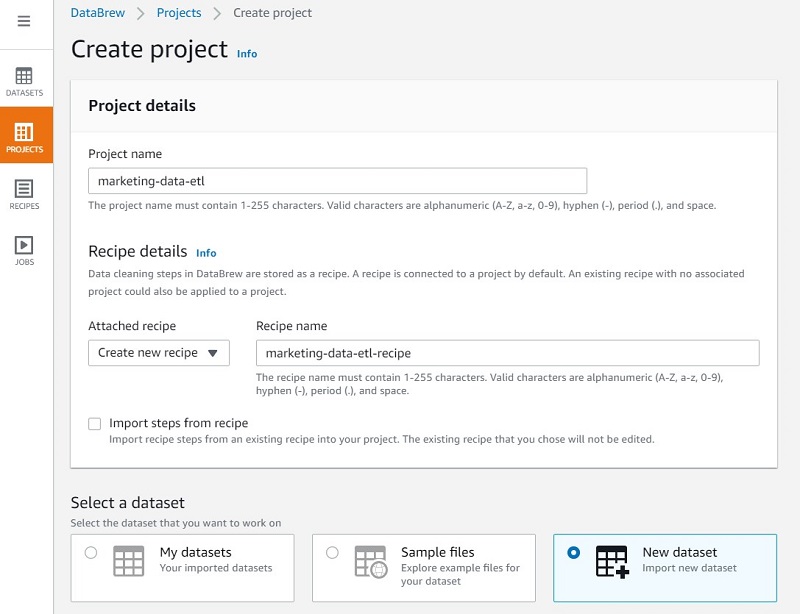
Creating a DataBrew project
To create a DataBrew project for the marketing data, complete the following steps:
- On the DataBrew console, choose Projects.
- Choose Create a project.
- For Project name, enter a name (for this post,
marketing-data-etl). - For Select a dataset, select New dataset.
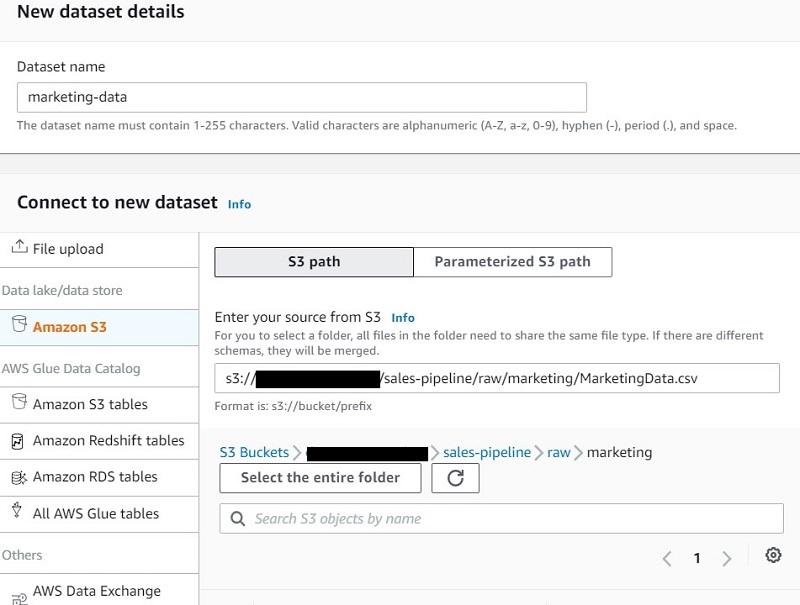
- For Enter your source from S3, enter the S3 path of the marketing input CSV.
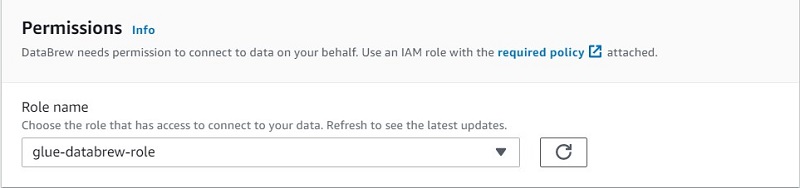
- Under Permissions, for Role name, choose an AWS Identity and Access Management (IAM) role that allows DataBrew to read from your Amazon S3 input location.
You can choose a role if you already created one, or create a new one. Please read here for steps to create the IAM role.
- After the dataset is loaded, on the Functions menu, choose Date functions.
- Choose YEAR.
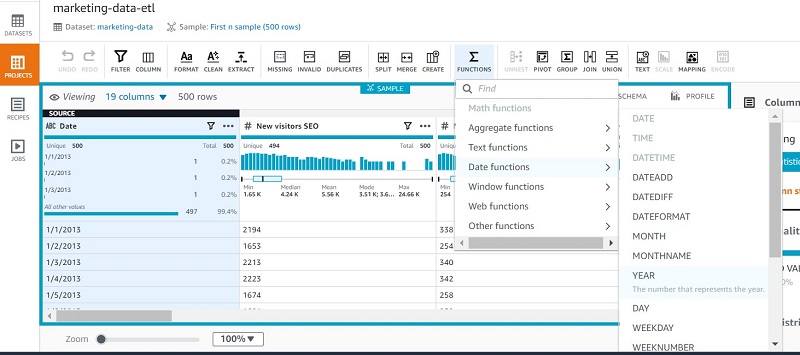
- Apply the year function on the date column to create a new column called
year.
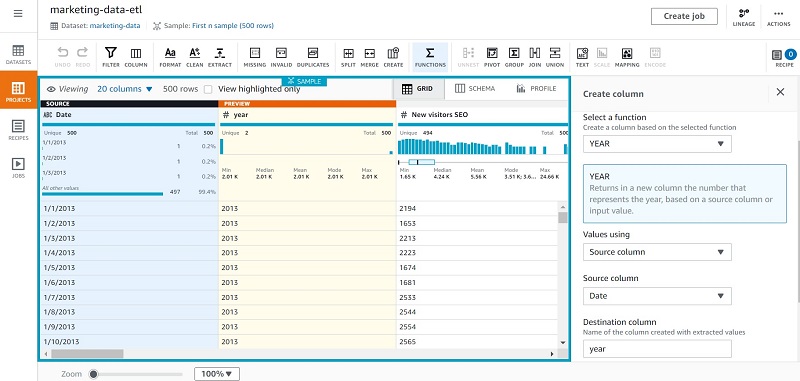
- Repeat these steps to create
monthanddaycolumns.
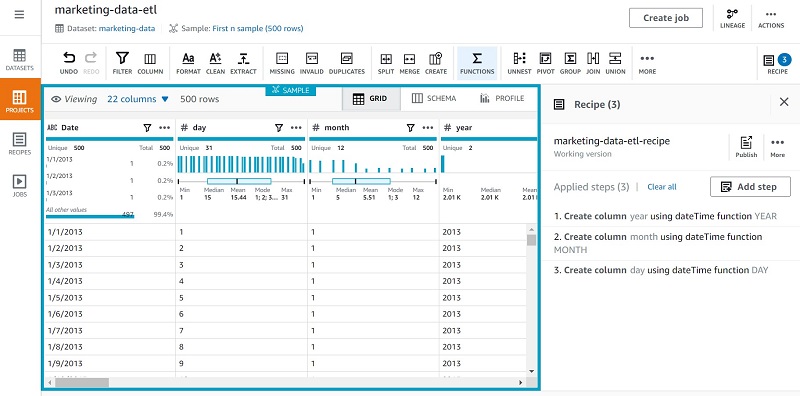
For our use case, we created a few new columns that we plan to use for partitioning, but you can integrate additional transformations as needed.
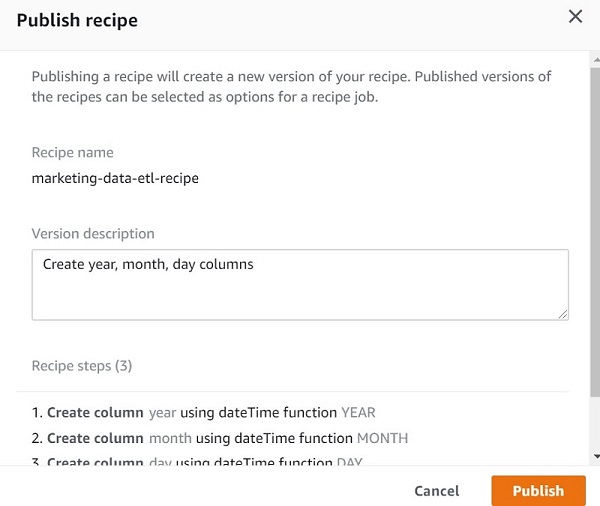
- After you have finished applying all your transformations, choose Publish on the recipe.
- Provide a description of the recipe version and choose Publish.
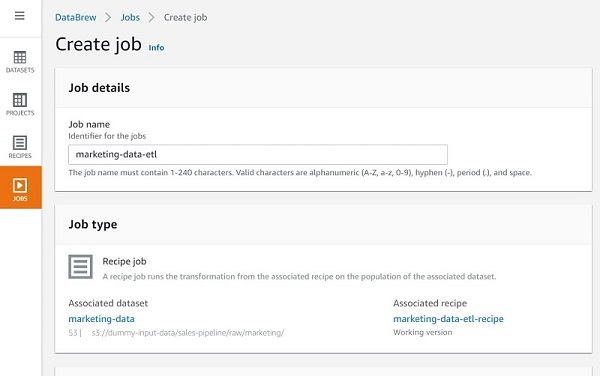
Creating a DataBrew job
Now that our recipe is ready, we can create a job for it, which gets invoked through our Step Functions state machine.
- On the DataBrew console, choose Jobs.
- Choose Create a job.
- For Job name¸ enter a name (for example,
marketing-data-etl).
Your recipe is already linked to the job.
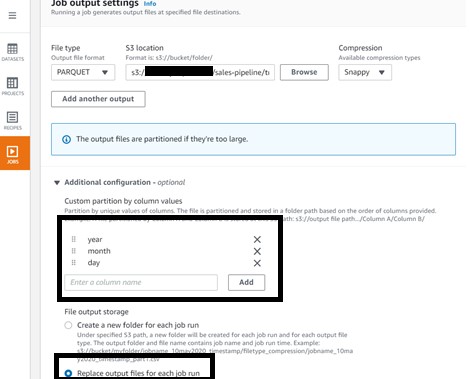
- Under Job output settings¸ for File type, choose your final storage format (for this post, we choose PARQUET).
- For S3 location, enter your final S3 output bucket path.
- For Compression, choose the compression type you want to apply (for this post, we choose Snappy).
- Under Additional configurations, for Custom partition by column values, choose year, month, and day.
- For File output storage, select Replace output files for each job run.
We choose this option because our use case is to do a full refresh.
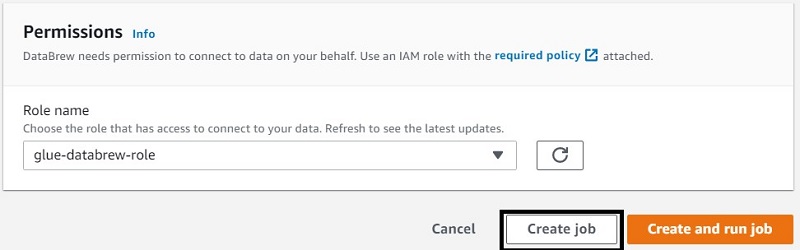
- Under Permissions, for Role name¸ choose your IAM role.
- Choose Create job.
We choose this because we don’t want to run it now; we plan to invoke it through Step Functions.
- When your marketing job is ready, repeat the same steps for your sales data, using the sales data output file location as needed.
Creating a Step Functions state machine
We’re now ready to create a Step Functions state machine for the complete flow.
- On the Step Functions console, choose Create state machine.
- For Define state machine¸ select Author with code snippets.
- For Type, choose Standard.

In the Definition section, Step Functions provides a list of service actions that you can use to automatically generate a code snippet for your state machine’s state. The following screenshot shows that we have options for Athena and DataBrew, among others.
- For Generate code snippet, choose AWS Glue DataBrew: Start a job run.

- For Job name, choose Select job name from a list and choose your DataBrew job.
The JSON snippet appears in the Preview pane.
- Select Wait for DataBrew job runs to complete.
- Choose Copy to clipboard.

- Integrate the code into the final state machine JSON code:
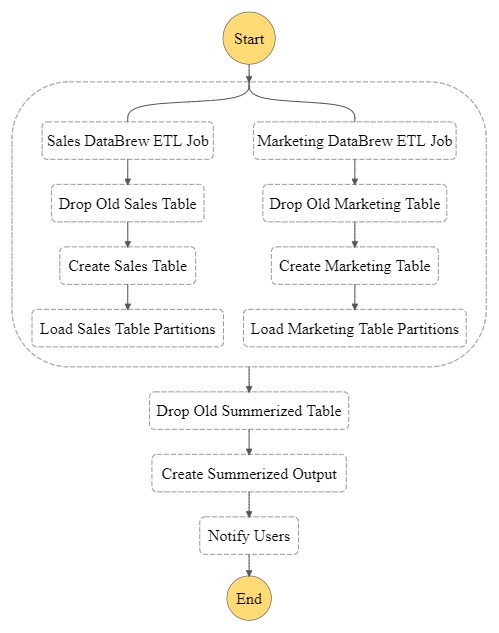
The following diagram is the visual representation of the state machine flow. With the Step Functions parallel task type, we created two parallel job runs for the sales and marketing data. When both flows are complete, they join to create an aggregated table in Athena and send an SNS notification to the end-users.
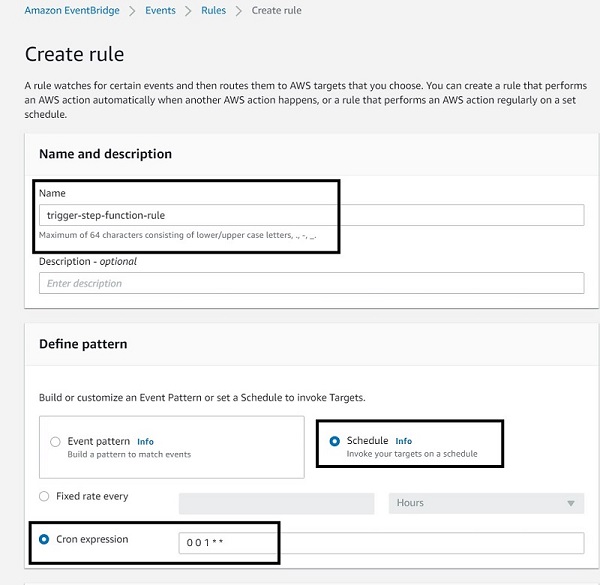
Creating an EventBridge scheduling rule
Now let’s integrate EventBridge to schedule the invocation of our Step Functions state machine on the first day of every month.
- On the EventBridge console, under Events, choose Rules.
- Choose Create a rule.
- For Name, enter a name (for example,
trigger-step-funcion-rule). - Under Define pattern, select Schedule.
- Select Cron expression.
- Enter
001**to specify that the job runs on the first day of every month at midnight.
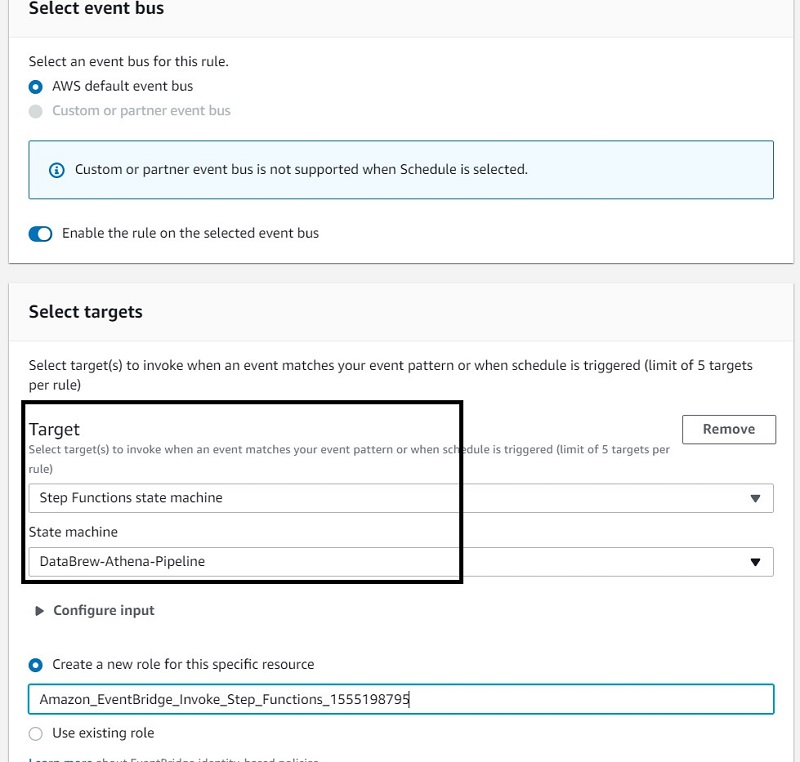
- In the Select targets section, for Target, choose Step Functions state machine
- For State machine, choose your state machine.
Now when the step function is being invoked, its run flow looks like the following screenshot, where blue represents the DataBrew jobs currently running.
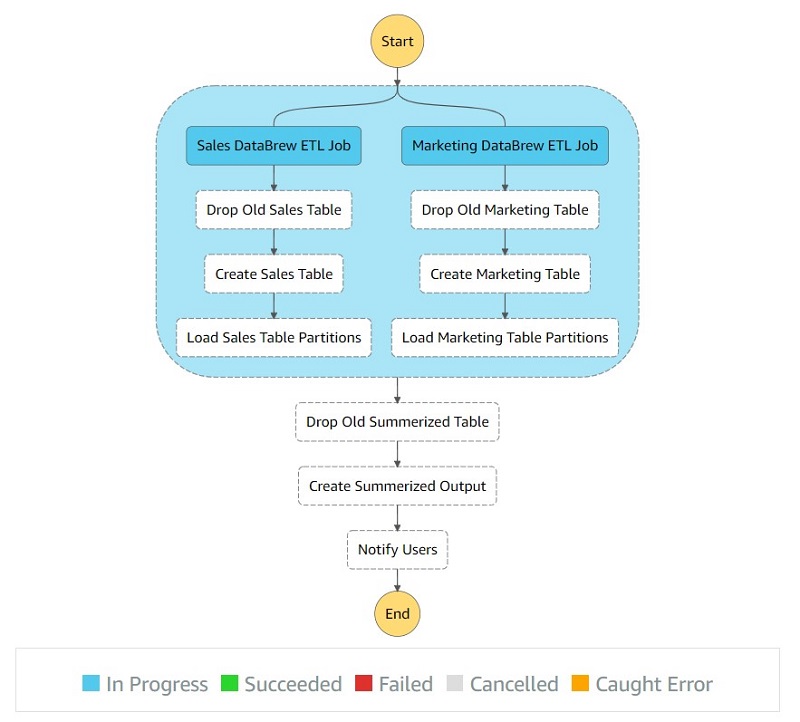
When the job is complete, all the steps should be green.
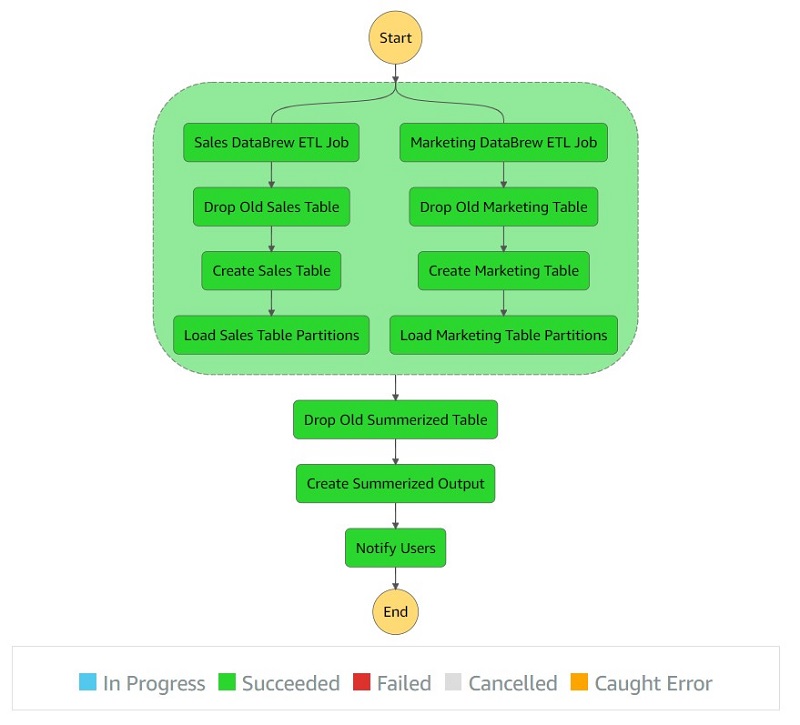
You also receive the notification “Monthly sales marketing data refreshed successfully!”
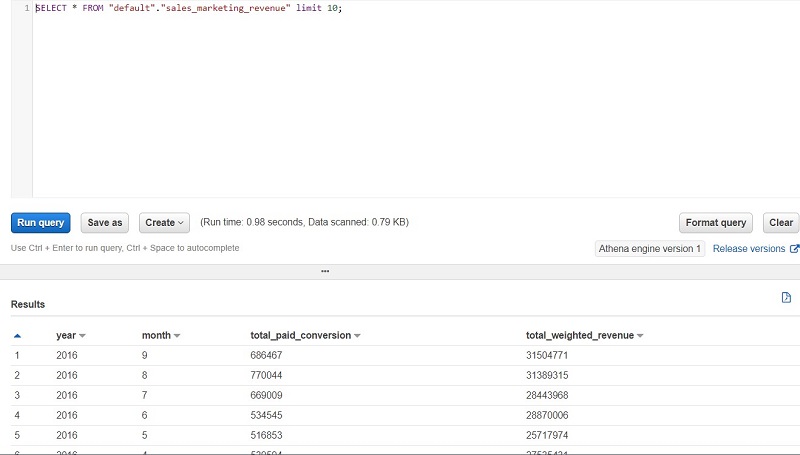
Running an Athena query
Let’s validate the aggregated table output in Athena by running a simple SELECT query. The following screenshot shows the output.
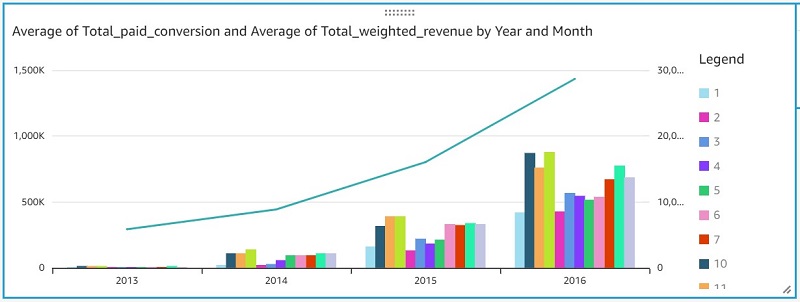
Creating reports in QuickSight
Now let’s do our final step of the architecture, which is creating BI reports through QuickSight by connecting to the Athena aggregated table.
- On the QuickSight console, choose Athena as your data source.

- Select the database and table name you have in Athena.

Now you can create a quick report to visualize your output, as shown in the following screenshot.
If QuickSight is using SPICE storage, you need to refresh the dataset in QuickSight after you receive notification about the completion of data refresh. If the QuickSight report is running an Athena query for every request, you might see a “table not found” error when data refresh is in progress. We recommend leveraging SPICE storage to get better performance.
Conclusion
This post explains how to integrate a DataBrew job and Athena queries with Step Functions to implement a simple ETL pipeline that refreshes aggregated sales and marketing data for BI reporting.
I hope this gives you a great starting point for using this solution with your datasets and applying business rules to build a complete serverless data analytics pipeline.
About the Author

Sakti Mishra is a Senior Data Lab Solution Architect at AWS, where he helps customers architect data analytics solutions, which gives them an accelerated path towards modernization initiatives. Outside of work, Sakti enjoys learning new technologies, watching movies, and visiting places.