Post Syndicated from Alasdair Allan original https://www.raspberrypi.org/blog/how-to-add-a-reset-button-to-your-raspberry-pi-pico/
We’ve tried to make it as easy as possible for you to load your code onto your new Raspberry Pi Pico: press and hold the BOOTSEL button, plug your Pico into your computer, and it’ll mount as a mass storage volume. Then just drag and drop a UF2 file onto the board.
However, not everybody is keen to keep unplugging their micro USB cable every time they want to upload a UF2 onto the board. Don’t worry — there’s more than one way around that problem.

Firstly, if you’re developing in MicroPython there isn’t any real need to unplug and replug Pico to write code. The only time you’ll need to do it is the initial upload of the MicroPython firmware, which comes as a UF2. From there on in, you’re talking to the board via the REPL and a serial connection, either in Thonny or some other editor.
However, if you’re developing using our C SDK, then to upload new code to your Pico you have to upload a new UF2. This means you’ll need to unplug and replug the board to put Pico into BOOTSEL mode each time you make a change in your code and want to test it.
No more unplugging with SWD?
The best way around this is to use SWD mode (see Chapter 5 of our C/C++ Getting Started book) to upload code using the debug port, instead of using mass storage (BOOTSEL) mode.
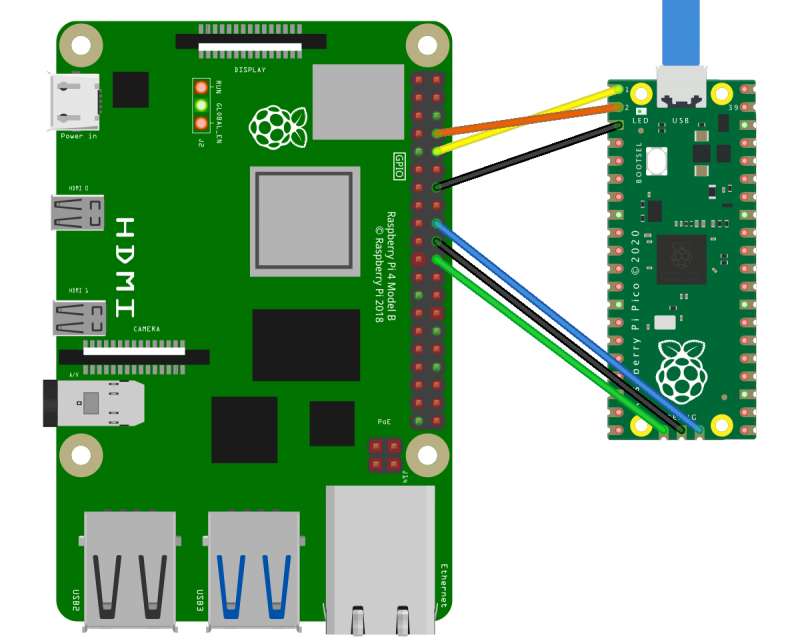
This gets you debugger support, which is invaluable while developing, and involves adding just three more wires. Afterwards, you’ll never have to unplug your Pico again.
Keep on dragging and dropping
But if you want to stick with uploading by drag-and-drop, adding a reset button to your Raspberry Pi Pico is pretty easy.
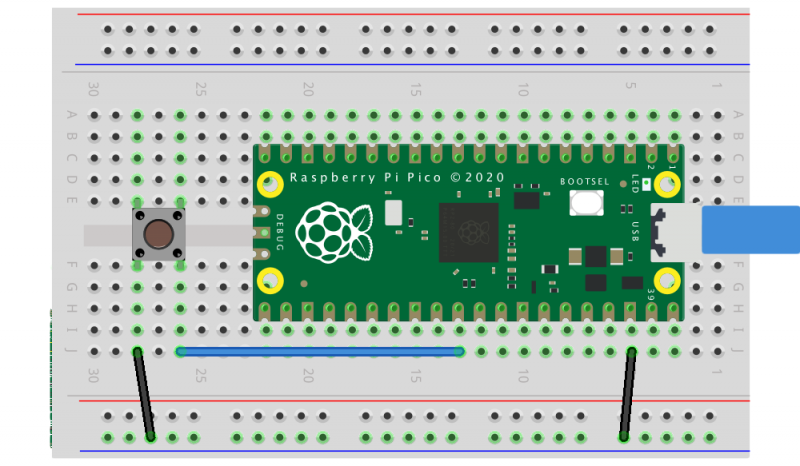
All you need to do is to wire the GND and RUN pins together and add an extra momentary contact button to your breadboard. Pushing the button will reset the board.
Then, instead of unplugging and replugging the USB cable when you want to load code onto Pico, you push and hold the RESET button, push the BOOTSEL button, release the RESET button, then release the BOOTSEL button.
If your board is in BOOTSEL mode and you want to start code you’ve already loaded running again, all you have to do now is briefly push the RESET button.
We’ve see some people use the 3V3_EN pin instead of the RUN pin. While it’ll work in a pinch, the problem with disabling 3.3V is that GPIOs that are driven from powered external devices will leak like crazy while 3.3V is disabled. There is even the possibility of damage to the chip. So it’s much better to use the RUN pin to make a reset button than the 3V3_EN pin.
What about the other button?
As an aside, if you want to break out the BOOTSEL button as well — perhaps you’re intending to bury your Pico inside an enclosure — you can use TP6 (that is, Test Point 6) on the rear of the board to do so. See Chapter 2 of the Pico Datasheet for details.
Where to find more help and information
Support for developing for Pico can be found on the Raspberry Pi forums. There is also an (unofficial) Discord server where a lot of people active in the new community seem to be hanging out. Feedback on the documentation should be posted as an issue to the pico-feedback repository on GitHub, or directly to the relevant repository it concerns.
All of the documentation, along with lots of other help and links, can be found on the same Getting Started page from which we grabbed our original UF2 file.
If you lose track of where that is in the future, you can always find it from your Pico: to access the page, just press and hold the BOOTSEL button on your Pico, plug it into your laptop or Raspberry Pi, then release the button. Go ahead and open the RPI-RP2 volume, and then click on the INDEX.HTM file.
That will always take you to the Getting Started page.
The post How to add a reset button to your Raspberry Pi Pico appeared first on Raspberry Pi.