Post Syndicated from Andrew Gregory original https://www.raspberrypi.org/blog/make-an-animated-sign-with-raspberry-pi-pico/
Light up your living room like Piccadilly Circus with this Raspberry Pi Pico project from the latest issue of HackSpace magazine. Don’t forget, it’s not too late to get your hands on our new microcontroller for FREE if you subscribe to HackSpace magazine.
HUB75 LED panels provide an affordable way to add graphical output to your projects. They were originally designed for large advertising displays (such as the ones made famous by Piccadilly Circus in London, and Times Square in New York). However, we can use a little chunk of these bright lights in our projects. They’re often given a ‘P’ value, such as P3 or P5 for the number of millimetres between the different RGB LEDs. These don’t affect the working or wiring in any way.
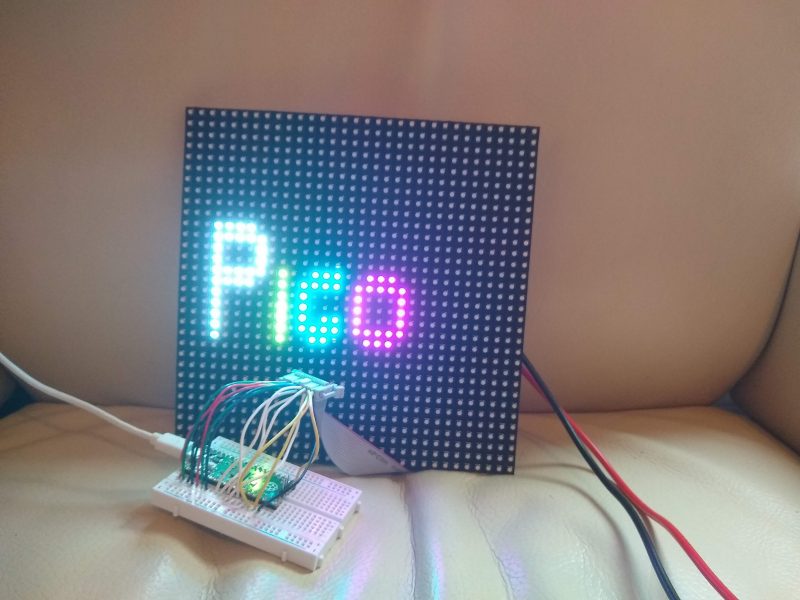
We used a 32×32 Adafruit screen. Other screens of this size may work, or may be wired differently. It should be possible to get screens of different sizes working, but you’ll have to dig through the code a little more to get it running properly.
The protocol for running these displays involves throwing large amounts of data down six different data lines. This lets you light up one portion of the display. You then switch to a different portion of the display and throw the data down the data lines again. When you’re not actively writing to a particular segment of the display, those LEDs are off.
There’s no in-built control over the brightness levels – each LED is either on or off. You can add some control over brightness by flicking pixels on and off for different amounts of time, but you have to manage this yourself. We won’t get into that in this tutorial, but if you’d like to investigate this, take a look at the box on ‘Going Further’.
The first thing you need to do is wire up the screen. There are 16 connectors, and there are three different types of data sent – colour values, address values, and control values. You can wire this up in different ways, but we just used header wires to connect between a cable and a breadboard. See here for details of the connections.
These screens can draw a lot of power, so it’s best not to power them from your Pico’s 5V output. Instead, use a separate 5V supply which can output enough current. A 1A supply should be more than enough for this example. If you’re changing it, start with a small number of pixels lit up and use a multimeter to read the current.
With it wired up, the first thing to do is grab the code and run it. If everything’s working correctly, you should see the word Pico bounce up and down on the screen. It is a little sensitive to the wiring, so if you see some flickering, make sure that the wires are properly seated. You may want to just display the word ‘Pico’. If so, congratulations, you’re finished!
However, let’s take a look at how to customise the display. The first things you’ll need to adapt if you want to display different data are the text functions – there’s one of these for each letter in Pico. For example, the following draws a lower-case ‘i’:
def i_draw(init_x, init_y, r, g, b):
    for i in range(4):
        light_xy(init_x, init_y+i+2, r, g, b)
    light_xy(init_x, init_y, r, g, b)
As you can see, this uses the light_xy method to set a particular pixel a particular colour (r, g, and b can all be 0 or 1). You’ll also need your own draw method. The current one is as follows:
def draw_text():
    global text_y
    global direction
    global writing
    global current_rows
    global rows

    writing = True
    text_y = text_y + direction
    if text_y > 20: direction = -1
    if text_y < 5: direction = 1
    rows = [0]*num_rows
    #fill with black
    for j in range(num_rows):
    rows[j] = [0]*blocks_per_row

    p_draw(3, text_y-4, 1, 1, 1)
    i_draw(9, text_y, 1, 1, 0)
    c_draw(11, text_y, 0, 1, 1)
    o_draw(16, text_y, 1, 0, 1)
    writing = False
This sets the writing global variable to stop it drawing this frame if it’s still being updated, and then just scrolls the text_y variable between 5 and 20 to bounce the text up and down in the middle of the screen.
This method runs on the second core of Pico, so it can still throw out data constantly from the main processing core without it slowing down to draw images.
Get HackSpace magazine – Issue 40
Each month, HackSpace magazine brings you the best projects, tips, tricks and tutorials from the makersphere. You can get it from the Raspberry Pi Press online store, The Raspberry Pi store in Cambridge, or your local newsagents.
Each issue is free to download from the HackSpace magazine website.
When you subscribe, we’ll send you a Raspberry Pi Pico for FREE.

The post Make an animated sign with Raspberry Pi Pico appeared first on Raspberry Pi.