Post Syndicated from Carlos Santos original https://aws.amazon.com/blogs/devops/ec2-image-builder-for-windows-on-aws-elastic-beanstalk/
AWS Elastic Beanstalk takes care of undifferentiated heavy lifting for customers by regularly providing new platform versions to update all Linux-based and Windows Server-based platforms. In addition to the updates to existing software components and support for new features and configuration options incorporated into the Elastic Beanstalk managed Amazon Machine Images (AMI), you may need to install third-party packages, or apply additional controls in order to meet industry or internal security criteria; for example, the Defense Information Systems Agency’s (DISA) Security Technical Implementation Guides (STIG).
In this blog post you will learn how to automate the process of customizing Elastic Beanstalk managed AMIs using EC2 Image Builder and apply the medium and low severity STIG settings to Windows instances whenever new platform versions are released.
You can extend the solution in this blog post to go beyond system hardening. EC2 Image Builder allows you to execute scripts that define the custom configuration for an image, known as Components. There are over 20 Amazon managed Components that you can use. You can also create your own, and even share with others.
These services are discussed in this blog post:
- EC2 Image Builder simplifies the building, testing, and deployment of virtual machine and container images.
- Amazon EventBridge is a serverless event bus that simplifies the process of building event-driven architectures.
- AWS Lambda lets you run code without provisioning or managing servers.
- AWS Systems Manager Parameter Store provides secure, hierarchical storage for configuration data, and secrets.
- AWS Elastic Beanstalk is an easy-to-use service for deploying and scaling web applications and services.
Prerequisites
This solution has the following prerequisites:
- AWS SAM CLI to deploy the solution. See the installing the AWS CLI page for instructions if needed.
- Either the AWS Command Line Interface (AWS CLI) or the AWS Tools for PowerShell should be installed and configured on your machine. This blog post provides equivalent commands when applicable.
- Microsoft .NET 5 SDK to compile the included Lambda functions
- Docker Desktop to create the container image used to publish the Lambda function
All of the code necessary to deploy the solution is available on the . The repository details the solution’s codebase, and the “Deploying the Solution” section walks through the deployment process. Let’s start with a walkthrough of the solution’s design.
Overview of solution
The solution automates the following three steps.
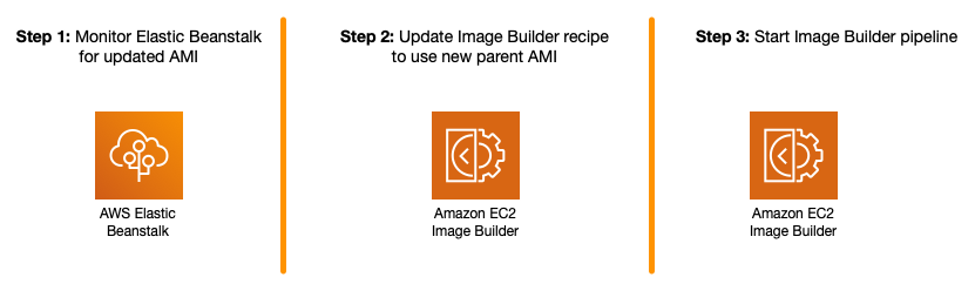
Figure 1 – Steps being automated
The Image Builder Pipeline takes care of launching an EC2 instance using the Elastic Beanstalk managed AMI, hardens the image using EC2 Image Builder’s STIG Medium Component, and outputs a new AMI that can be used by application teams to create their Elastic Beanstalk Environments.

Figure 2 – EC2 Image Builder Pipeline Steps
To automate Step 1, an Amazon EventBridge rule is used to trigger an AWS Lambda function to get the latest AMI ID for the Elastic Beanstalk platform used, and ensures that the Parameter Store parameter is kept up to date.
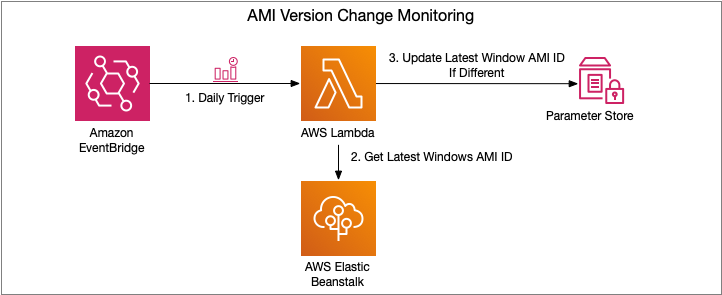
Figure 3 – AMI Version Change Monitoring Flow
Steps 2 and 3 are trigged upon change to the Parameter Store parameter. An EventBridge rule is created to trigger a Lambda function, which manages the creation of a new EC2 Image Builder Recipe, updates the EC2 Image Builder Pipeline to use this new recipe, and starts a new instance of an EC2 Image Builder Pipeline.

Figure 4 – EC2 Image Builder Pipeline Execution Flow
If you would also like to store the ID of the newly created AMI, see the Tracking the latest server images in Amazon EC2 Image Builder pipelines blog post on how to use Parameter Store for this purpose. This will enable you to notify teams that a new AMI is available for consumption.
Let’s dive a bit deeper into each of these pieces and how to deploy the solution.
Walkthrough
The following are the high-level steps we will be walking through in the rest of this post.
- Deploy SAM template that will provision all pieces of the solution. Checkout the Using container image support for AWS Lambda with AWS SAM blog post for more details.
- Invoke the AMI version monitoring AWS Lambda function. The EventBridge rule is configured for a daily trigger and for the purposes of this blog post, we do not want to wait that long prior to seeing the pipeline in action.
- View the details of the resultant image after the Image Builder Pipeline completes
Deploying the Solution
The first step to deploying the solution is to create the Elastic Container Registry Repository that will be used to upload the image artifacts created. You can do so using the following AWS CLI or AWS Tools for PowerShell command:
aws ecr create-repository --repository-name elastic-beanstalk-image-pipeline-trigger --image-tag-mutability IMMUTABLE --image-scanning-configuration scanOnPush=true --region us-east-1New-ECRRepository -RepositoryName elastic-beanstalk-image-pipeline-trigger -ImageTagMutability IMMUTABLE -ImageScanningConfiguration_ScanOnPush $True -Region us-east-1This will return output similar to the following. Take note of the repositoryUri as you will be using that in an upcoming step.
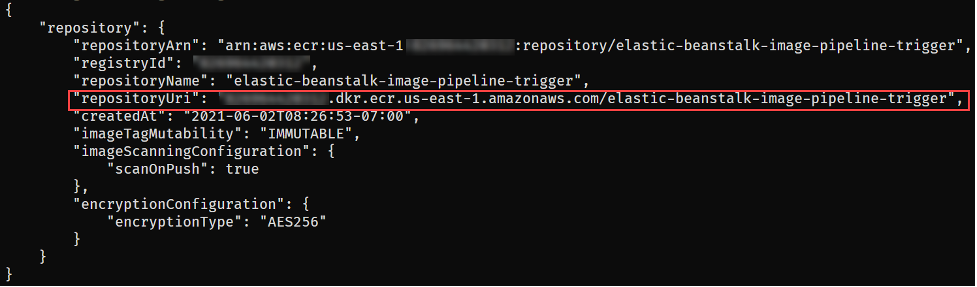
Figure 5 – ECR repository creation output
With the repository configured, you are ready to get the solution. Either download or clone the project’s aws-samples/elastic-beanstalk-image-pipeline-trigger GitHub repository to a local directory. Once you have the project downloaded, you can compile it using the following command from the project’s src/BeanstalkImageBuilderPipeline directory.
dotnet publish -c Release -o ./bin/Release/net5.0/linux-x64/publishThe output should look like:

Figure 6 – .NET project compilation output
Now that the project is compiled, you are ready to create the container image by executing the following SAM CLI command.
sam build --template-file ./serverless.template
Figure 7 – SAM build command output
Next up deploy the SAM template with the following command, replacing REPOSITORY_URL with the URL of the ECR repository created earlier:
sam deploy --stack-name elastic-beanstalk-image-pipeline --image-repository <REPOSITORY_URL> --capabilities CAPABILITY_IAM --region us-east-1The SAM CLI will both push the container image and create the CloudFormation Stack, deploying all resources needed for this solution. The deployment output will look similar to:
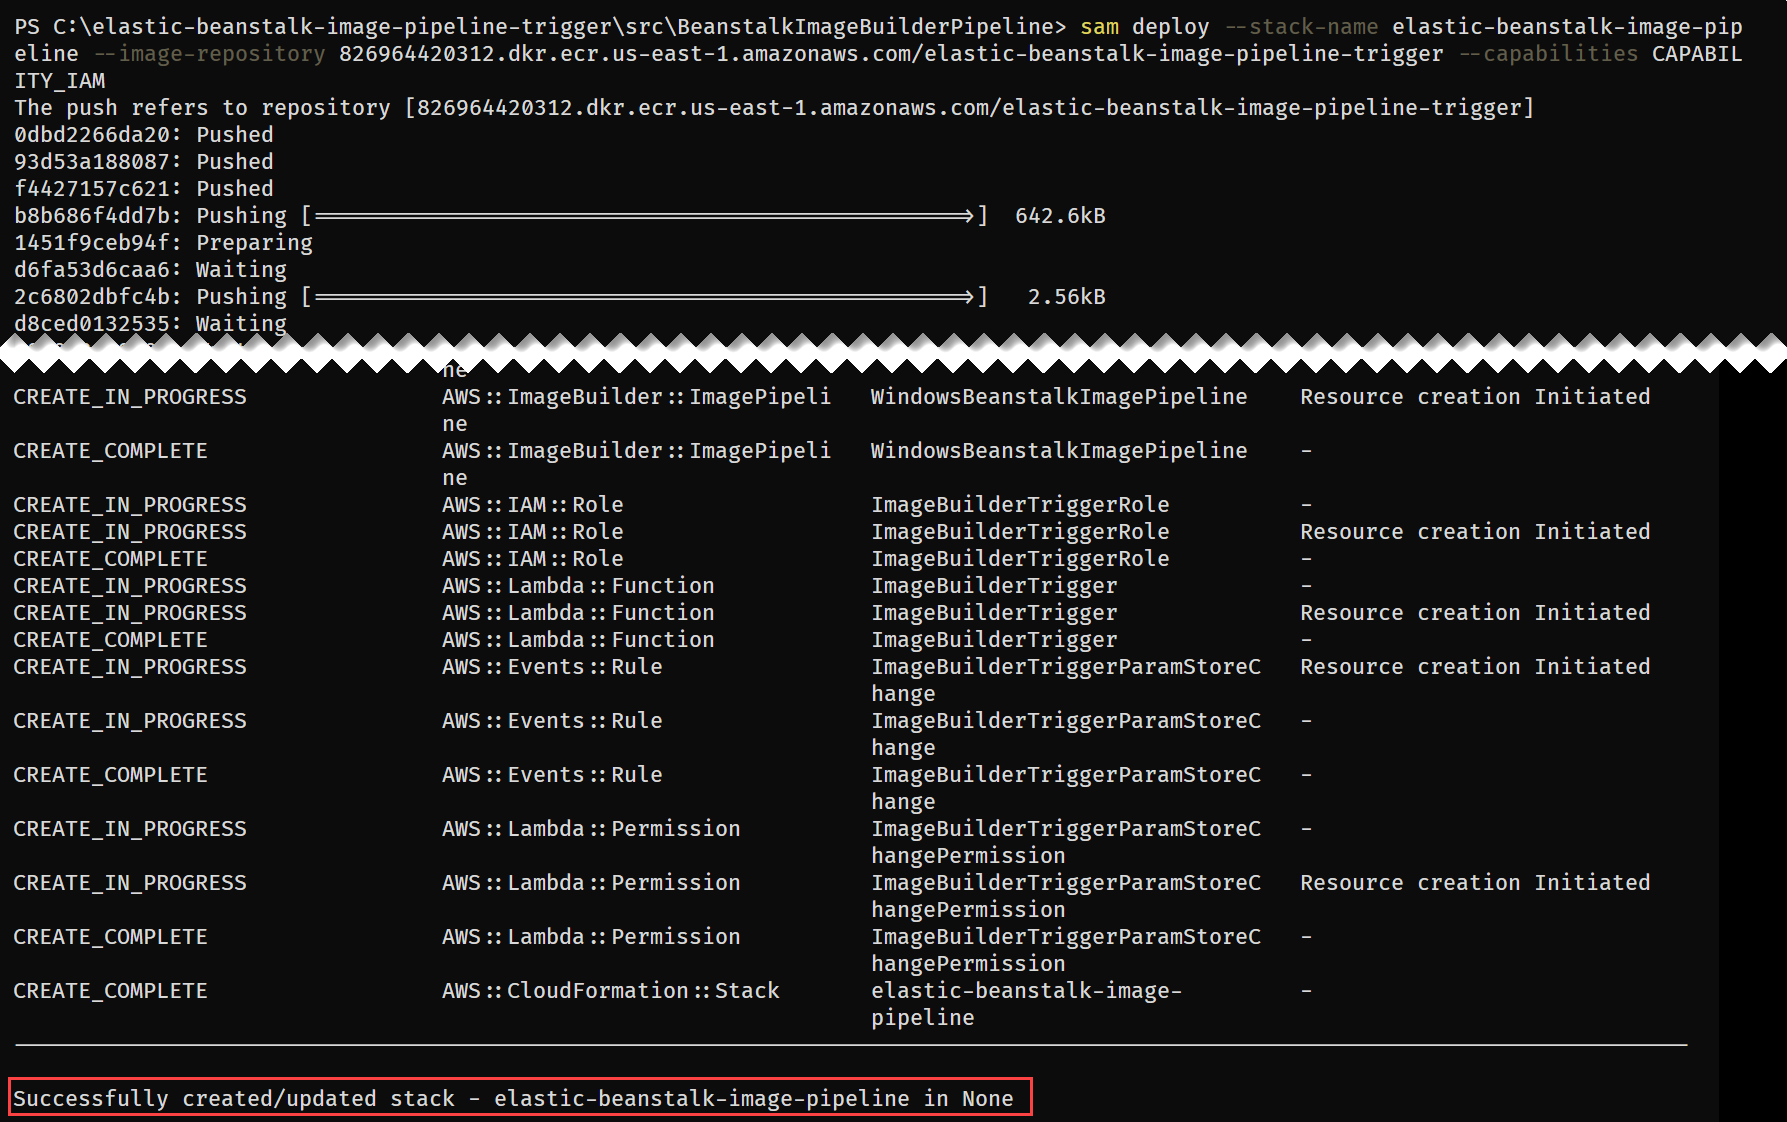
Figure 8 – SAM deploy command output
With the CloudFormation Stack completed, you are ready to move onto starting the pipeline to create a custom Windows AMI with the medium DISA STIG applied.
Invoke AMI ID Monitoring Lambda
Let’s start by invoking the Lambda function, depicted in Figure 3, responsible for ensuring that the latest Elastic Beanstalk managed AMI ID is stored in Parameter Store.
aws lambda invoke --function-name BeanstalkManagedAmiMonitor response.json --region us-east-1Invoke-LMFunction -FunctionName BeanstalkManagedAmiMonitor -Region us-east-1
Figure 9 – Lambda invocation output
The Lambda’s CloudWatch log group contains the BeanstalkManagedAmiMonitor function’s output. For example, below you can see that the SSM parameter is being updated with the new AMI ID.

Figure 10 – BeanstalkManagedAmiMonitor Lambda’s log
After this Lambda function updates the Parameter Store parameter with the latest AMI ID, the EC2 Image Builder recipe will be updated to use this AMI ID as the parent image, and the Image Builder pipeline will be started. You can see evidence of this by going to the ImageBuilderTrigger Lambda function’s CloudWatch log group. Below you can see a log entry with the message “Starting image pipeline execution…”.
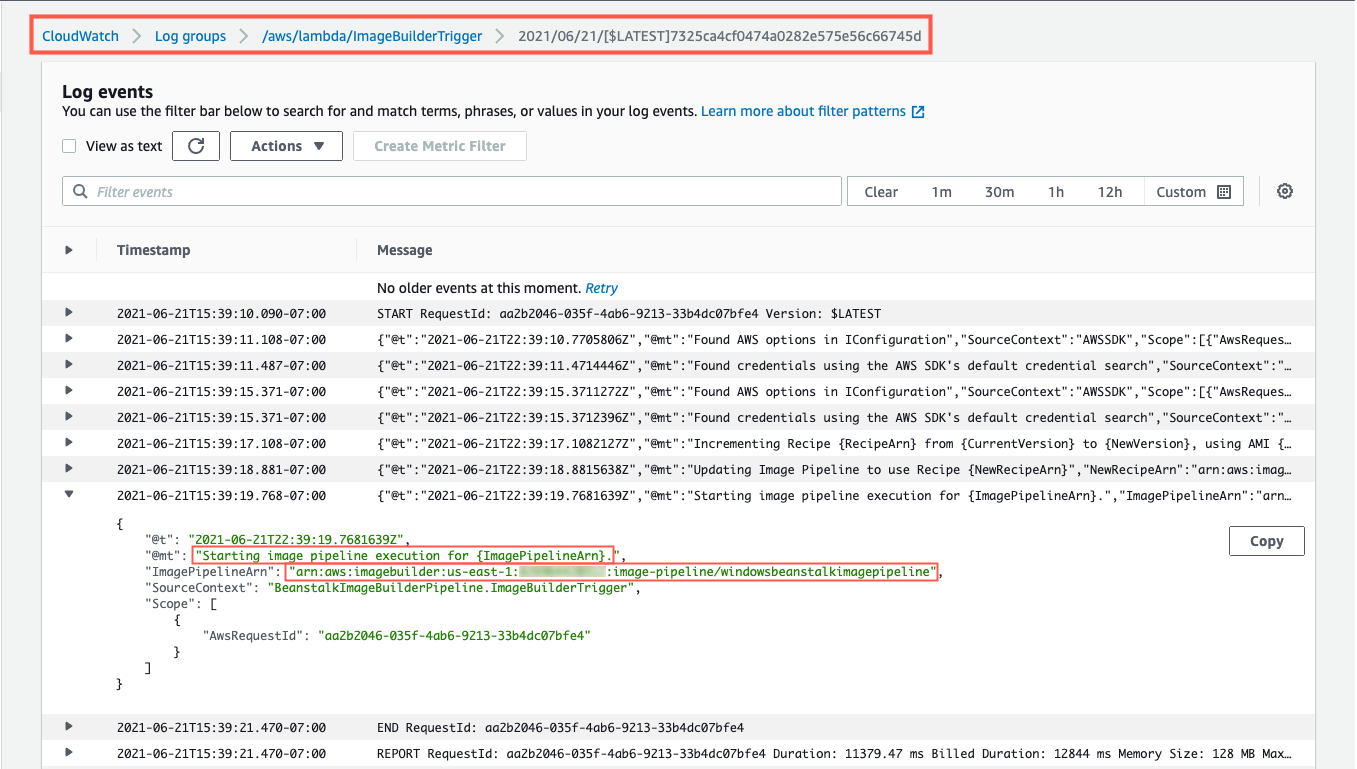
Figure 11 – ImageBuilderTrigger Lambda’s log
To keep track of the status of the image creation, navigate to the EC2 Image Builder console, and select the 1.0.1 version of the demo-beanstalk-image.

Figure 12 – EC2 Image Builder images list
This will display the details for that build. Keep an eye on the status. While the image is being create, you will see the status as “Building”. Applying the latest Windows updates and DISA STIG can take about an hour.

Figure 13 – EC2 Image Builder image build version details
Once the AMI has been created, the status will change to “Available”. Click on the version column’s link to see the details of that version.

Figure 14 – EC2 Image Builder image build version details
You can use the AMI ID listed when creating an Elastic Beanstalk application. When using the create new environment wizard, you can modify the capacity settings to specify this custom AMI ID. The automation is configured to run on a daily basis. Only for the purposes of this post, did we have to invoke the Lambda function directly.
Cleaning up
To avoid incurring future charges, delete the resources using the following commands, replacing the AWS_ACCOUNT_NUMBER placeholder with appropriate value.
aws imagebuilder delete-image --image-build-version-arn arn:aws:imagebuilder:us-east-1:<AWS_ACCOUNT_NUMBER>:image/demo-beanstalk-image/1.0.1/1 --region us-east-1

aws imagebuilder delete-image-pipeline --image-pipeline-arn arn:aws:imagebuilder:us-east-1:<AWS_ACCOUNT_NUMBER>:image-pipeline/windowsbeanstalkimagepipeline --region us-east-1

aws imagebuilder delete-image-recipe --image-recipe-arn arn:aws:imagebuilder:us-east-1:<AWS_ACCOUNT_NUMBER>:image-recipe/demo-beanstalk-image/1.0.1 --region us-east-1

aws cloudformation delete-stack --stack-name elastic-beanstalk-image-pipeline --region us-east-1

aws cloudformation wait stack-delete-complete --stack-name elastic-beanstalk-image-pipeline --region us-east-1

aws ecr delete-repository --repository-name elastic-beanstalk-image-pipeline-trigger --force --region us-east-1
Remove-EC2IBImage -ImageBuildVersionArn arn:aws:imagebuilder:us-east-1:<AWS_ACCOUNT_NUMBER>:image/demo-beanstalk-image/1.0.1/1 -Region us-east-1
Remove-EC2IBImagePipeline -ImagePipelineArn arn:aws:imagebuilder:us-east-1:<AWS_ACCOUNT_NUMBER>:image-pipeline/windowsbeanstalkimagepipeline -Region us-east-1
Remove-EC2IBImageRecipe -ImageRecipeArn arn:aws:imagebuilder:us-east-1:<AWS_ACCOUNT_NUMBER>:image-recipe/demo-beanstalk-image/1.0.1 -Region us-east-1
Remove-CFNStack -StackName elastic-beanstalk-image-pipeline -Region us-east-1
Wait-CFNStack -StackName elastic-beanstalk-image-pipeline -Region us-east-1
Remove-ECRRepository -RepositoryName elastic-beanstalk-image-pipeline-trigger -IgnoreExistingImages $True -Region us-east-1Conclusion
In this post, you learned how to leverage EC2 Image Builder, Lambda, and EventBridge to automate the creation of a Windows AMI with the medium DISA STIGs applied that can be used for Elastic Beanstalk environments. Don’t stop there though, you can apply these same techniques whenever you need to base recipes on AMIs that the image origin is not available in EC2 Image Builder.
Further Reading
EC2 Image Builder has a number of image origins supported out of the box, see the Automate OS Image Build Pipelines with EC2 Image Builder blog post for more details. EC2 Image Builder is also not limited to just creating AMIs. The Build and Deploy Docker Images to AWS using EC2 Image Builder blog post shows you how to build Docker images that can be utilized throughout your organization.
These resources can provide additional information on the topics touched on in this article:
- A simpler deployment experience with AWS SAM CLI
- AWS Tools for PowerShell is now generally available with version 4.0
- .NET 5 on AWS

Carlos Santos
Carlos Santos is a Microsoft Specialist Solutions Architect with Amazon Web Services (AWS). In his role, Carlos helps customers through their cloud journey, leveraging his experience with application architecture, and distributed system design.