Earlier this year in May, we announced the general availability of AWS Transform for .NET, the first agentic AI service for modernizing .NET applications at scale. During the early adoption period of the service, we received valuable feedback indicating that, in addition to .NET application modernization, you would like to modernize SQL Server and legacy UI frameworks. Your applications typically follow a three-tier architecture—presentation tier, application tier, and database tier—and you need a comprehensive solution that can transform all of these tiers in a coordinated way.
Today, based on your feedback, we’re excited to announce AWS Transform for full-stack Windows modernization, to offload complex, tedious modernization work across the Windows application stack. You can now identify application and database dependencies and modernize them in an orchestrated way through a centralized experience.
AWS Transform accelerates full-stack Windows modernization by up to five times across application, UI, database, and deployment layers. Along with porting .NET Framework applications to cross-platform .NET, it migrates SQL Server databases to Amazon Aurora PostgreSQL-Compatible Edition with intelligent stored procedure conversion and dependent application code refactoring. For validation and testing, AWS Transform deploys applications to Amazon Elastic Compute Cloud (Amazon EC2) Linux or Amazon Elastic Container Service (Amazon ECS), and provides customizable AWS CloudFormation templates and deployment configurations for production use. AWS Transform has also added capabilities to modernize ASP.NET Web Forms UI to Blazor.
There is much to explore, so in this post I’ll provide the first look at AWS Transform for full-stack Windows modernization capabilities across all layers.
Create a full-stack Windows modernization transformation job AWS Transform connects to your source code repositories and database servers, analyzes application and database dependencies, creates modernization waves, and orchestrates full-stack transformations for each wave.
To get started with AWS Transform, I first complete the onboarding steps outlined in the getting started with AWS Transform user guide. After onboarding, I sign in to the AWS Transform console using my credentials and create a job for full-stack Windows modernization.
After creating the job, I complete the prerequisites. Then, I configure the database connector for AWS Transform to securely access SQL Server databases running on Amazon EC2 and Amazon Relational Database Service (Amazon RDS). The connector can connect to multiple databases within the same SQL Server instance.
Furthermore, I have the option to choose if I would like AWS Transform to deploy the transformed applications. I choose Yes and provide the target AWS account ID and AWS Region for deploying the applications. The deployment option can be configured later as well.
After the connectors are set up, AWS Transform connects to the resources and runs the validation to verify IAM roles, network settings, and related AWS resources.
After the successful validation, AWS Transform discovers databases and their associated source code repositories. It identifies dependencies between databases and applications to create waves for transforming related components together. Based on this analysis, AWS Transform creates a wave-based transformation plan.
Assessing database and dependent applications For the assessment, I review the databases and source code repositories discovered by AWS Transform and choose the appropriate branches for code repositories. AWS Transform scans these databases and source code repositories, then presents a list of databases along with their dependent .NET applications and transformation complexity.
I choose the target databases and repositories for modernization. AWS Transform analyzes these selections and generates a comprehensive SQL Modernization Assessment Report with a detailed wave plan. I download the report to review the proposed modernization plan. The report includes an executive summary, wave plan, dependencies between databases and code repositories, and complexity analysis.
Wave transformation at scale The wave plan generated by AWS Transform consists of four steps for each wave. First, it converts the SQL Server schema to PostgreSQL. Second, it migrates the data. Third, it transforms the dependent .NET application code to make it PostgreSQL compatible. Finally, it deploys the application for testing.
Before converting the SQL Server schema, I can either create a new PostgreSQL database or choose an existing one as the target database.
After I choose the source and target databases, AWS Transform generates conversion reports for my review. AWS Transform converts the SQL Server schema to PostgreSQL-compatible structures, including tables, indexes, constraints, and stored procedures.
For any schema that AWS Transform can’t automatically convert, I can manually address them in the AWS Database Migration Service (AWS DMS) console. Alternatively, I can fix them in my preferred SQL editor and update the target database instance.
After completing schema conversion, I have the option to proceed with data migration, which is an optional step. AWS Transform uses AWS DMS to migrate data from my SQL Server instance to the PostgreSQL database instance. I can choose to perform data migration later, after completing all transformations, or work with test data by loading it into my target database.
The next step is code transformation. I specify a target branch for AWS Transform to upload the transformed code artifacts. AWS Transform updates the codebase to make the application compatible with the converted PostgreSQL database.
With this release, AWS Transform for full-stack Windows modernization supports only codebases in .NET 6 or later. For codebases in .NET Framework 3.1+, I first use AWS Transform for .NET to port them to cross-platform .NET. I’ll expand on this in a following section.
After the conversion is completed, I can view the source and target branches along with their code transformation status. I can also download and review the transformation report.
Modernizing .NET Framework applications with UI layer One major feature we’re releasing today is the modernization of UI frameworks from ASP.NET Web Forms to Blazor. This is added to existing support for modernizing model-view-controller (MVC) Razor views to ASP.NET Core Razor views.
As mentioned previously, if I have a .NET application in legacy .NET Framework, then I continue using AWS Transform for .NET to port it to cross-platform .NET. For legacy applications with UIs built on ASP.NET Web Forms, AWS Transform now modernizes the UI layer to Blazor along with porting the backend code.
AWS Transform for .NET converts ASP.NET Web Forms projects to Blazor on ASP.NET Core, facilitating the migration of ASP.NET websites to Linux. The UI modernization feature is enabled by default in AWS Transform for .NET on both the AWS Transform web console and Visual Studio extension.
During the modernization process, AWS Transform handles the conversion of ASPX pages, ASCX custom controls, and code-behind files, implementing them as server-side Blazor components rather than web assembly. The following project and file changes are made during the transformation:
From
To
Description
*.aspx, *.ascx
*.razor
.aspx pages and .ascx custom controls become .razor files
Web.config
appsettings.json
Web.config settings become appsettings.json settings
Global.asax
Program.cs
Global .asax code becomes Program.cs code
*.master
*layout.razor
Master files become layout.razor files
Other new features in AWS Transform for .NET Along with UI porting, AWS Transform for .NET has added support for more transformation capabilities and enhanced developer experience. These new features include the following:
Port to .NET 10 and .NET Standard – AWS Transform now supports porting to .NET 10, the latest Long-Term Support (LTS) release, which was released on November 11, 2025. It also supports porting class libraries to .NET Standard, a formal specification for a set of APIs that are common across all .NET implementations. Furthermore, AWS Transform is now available with AWS Toolkit for Visual Studio 2026.
Editable transformation report – After the assessment is complete, you can now view and customize the transformation plan based on your specific requirements and preferences. For example, you can update package replacement details.
Real-time transformation updates with estimated remaining time – Depending on the size and complexity of the codebase, AWS Transform can take some time to complete the porting. You can now track transformation updates in real-time along with the estimated remaining time.
Next steps markdown – After the transformation is complete, AWS Transform now generates a next steps markdown file with the remaining tasks to complete the porting. You can use this as a revised plan to repeat the transformation with AWS Transform or use AI code-companions to complete the porting.
Things to know Some more things to know are:
AWS Regions – AWS Transform for full-stack Windows modernization is generally available today in the US East (N. Virginia) Region. For Regional availability and future roadmap, visit the AWS Capabilities by Region.
Pricing – Currently, there is no added charge for Windows modernization features of AWS Transform. Any resources you create or continue to use in your AWS account using the output of AWS Transform are billed according to their standard pricing. For limits and quotas, refer to the AWS Transform User Guide.
SQL Server versions supported – AWS Transform supports the transformation of SQL Server versions from 2008 R2 through 2022, including all editions (Express, Standard, and Enterprise). SQL Server must be hosted on Amazon RDS or Amazon EC2 in the same Region as AWS Transform.
Entity Framework versions supported – AWS Transform supports the modernization of Entity Framework versions 6.3 through 6.5 and Entity Framework Core 1.0 through 8.0.
Getting started – To get started, visit AWS Transform for full-stack Windows modernization User Guide.
I started my career as a .NET developer and have seen .NET evolve over the last couple of decades. Like many of you, I also developed multiple enterprise applications in .NET Framework that ran only on Windows. I fondly remember building my first enterprise application with .NET Framework. Although it served us well, the technology landscape has significantly shifted. Now that there is an open source and cross-platform version of .NET that can run on Linux, these legacy enterprise applications built on .NET Framework need to be ported and modernized.
The benefits of porting to Linux are compelling: applications cost 40 percent less to operate because they save on Windows licensing costs, run 1.5–2 times faster with improved performance, and handle growing workloads with 50 percent better scalability. Having helped port several applications, I can say the effort is worth the rewards.
However, porting .NET Framework applications to cross-platform .NET is a labor-intensive and error-prone process. You have to perform multiple steps, such as analyzing the codebase, detecting incompatibilities, implementing fixes while porting the code, and then validating the changes. For enterprises, the challenge becomes even more complex because they might have hundreds of .NET Framework applications in their portfolio.
Now that we’ve incorporated your valuable feedback and suggestions, we’re excited to announce today the general availability of AWS Transform for .NET. We’ve also added new capabilities to support projects with private NuGet packages, port model-view-controller (MVC) Razor views to ASP .NET Core Razor views, and execute the ported unit tests.
I’ll expand on the key new capabilities in a moment, but let’s first take a quick look at the two porting experiences of AWS Transform for .NET.
Large-scale porting experience for .NET applications Enterprise digital transformation is typically driven by central teams responsible for modernizing hundreds of applications across multiple business units. Different teams have ownership of different applications and their respective repositories. Success requires close coordination between these teams and the application owners and developers across business units. To accelerate this modernization at scale, AWS Transform for .NET provides a web experience that enables teams to connect directly to source code repositories and efficiently transform multiple applications across the organization. For select applications requiring dedicated developer attention, the same agent capabilities are available to developers as an extension for Visual Studio IDE.
Let’s start by looking at how the web experience of AWS Transform for .NET helps port hundreds of .NET applications at scale.
Web experience of AWS Transform for .NET To get started with the web experience of AWS Transform, I onboard using the steps outlined in the documentation, sign in using my credentials, and create a job for .NET modernization.
AWS Transform for .NET creates a job plan, which is a sequence of steps that the agent will execute to assess, discover, analyze, and transform applications at scale. It then waits for me to set up a connector to connect to my source code repositories.
After the connector is in place, AWS Transform begins discovering repositories in my account. It conducts an assessment focused on three key areas: repository dependencies, required private packages and third-party libraries, and supported project types within your repositories.
Based on this assessment, it generates a recommended transformation plan. The plan orders repositories according to their last modification dates, dependency relationships, private package requirements, and the presence of supported project types.
AWS Transform for .NET then prepares for the transformation process by requesting specific inputs, such as the target branch destination, target .NET version, and the repositories to be transformed.
To select the repositories to transform, I have two options: use the recommended plan or customize the transformation plan by selecting repositories manually. For selecting repositories manually, I can use the UI or download the repository mapping and upload the customized list.
AWS Transform for .NET automatically ports the application code, builds the ported code, executes unit tests, and commits the ported code to a new branch in my repository. It provides a comprehensive transformation summary, including modified files, test outcomes, and suggested fixes for any remaining work.
While the web experience helps accelerate large-scale porting, some applications may require developer attention. For these cases, the same agent capabilities are available in the Visual Studio IDE.
Visual Studio IDE experience of AWS Transform for .NET Now, let’s explore how AWS Transform for .NET works within Visual Studio.
I open a .NET Framework solution, and in the Solution Explorer, I see the context menu item Port project with AWS Transform for an individual project.
I provide the required inputs, such as the target .NET version and the approval for the agents to autonomously transform code, execute unit tests, generate a transformation summary, and validate Linux-readiness.
I can review the code changes made by the agents locally and continue updating my codebase.
Let’s now explore some of the key new capabilities added to AWS Transform for .NET.
Support for projects with private NuGet package dependencies During preview, only projects with public NuGet package dependencies were supported. With general availability, we now support projects with private NuGet package dependencies. This has been one of the most requested features during the preview.
The feature I really love is that AWS Transform can detect cross-repository dependencies. If it finds the source code of my private NuGet package, it automatically transforms that as well. However, if it can’t locate the source code, in the web experience, it provides me the flexibility to upload the required NuGet packages.
AWS Transform displays the missing package dependencies that need to be resolved. There are two ways to do this: I can either use the provided PowerShell script to create and upload packages, or I can build the application locally and upload the NuGet packages from the packages folder in the solution directory.
After I upload the missing NuGet packages, AWS Transform is able to resolve the dependencies. It’s best to provide both the .NET Framework and cross platform .NET versions of the NuGet packages. If the cross platform .NET version is not available, then at a minimum the .NET Framework version is required for AWS Transform to add it as an assembly reference and proceed for transformation.
Unit test execution During preview, we supported porting unit tests from .NET Framework to cross-platform .NET. With general availability, we’ve also added support for executing unit tests after the transformation is complete.
After the transformation is complete and the unit tests are executed, I can see the results in the dashboard and view the status of the tests at each individual test project level.
Transformation visibility and summary After the transformation is complete, I can download a detailed report in JSON format that gives me a list of transformed repositories, details about each repository, and the status of the transformation actions performed for each project within a repository. I can view the natural language transformation summary at the project level to understand AWS Transform output with project-level granularity. The summary provides me with an overview of updates along with key technical changes to the codebase.
Other new features Let’s have a quick look at other new features we’ve added with general availability:
Support for porting UI layer – During preview, you could only port the business logic layers of MVC applications using AWS Transform, and you had to port the UI layer manually. With general availability, you can now use AWS Transform to port MVC Razor views to ASP.NET Core Razor views.
Expanded connector support – During preview, you could connect only to GitHub repositories. Now with general availability, you can connect to GitHub, GitLab, and Bitbucket repositories.
Cross repository dependency – When you select a repository for transformation, dependent repositories are automatically selected for transformation.
Download assessment report – You can download a detailed assessment report of the identified repositories in your account and private NuGet packages referenced in these repositories.
Email notifications with deep links – You’ll receive email notifications when a job’s status changes to completed or stopped. These notifications include deep links to the transformed code branches for review and continued transformation in your IDE.
Things to know Some additional things to know are:
Regions – AWS Transform for .NET is generally available today in the Europe (Frankfurt) and US East (N. Virginia) Regions.
Pricing – Currently, there is no additional charge for AWS Transform. Any resources you create or continue to use in your AWS account using the output of AWS Transform will be billed according to their standard pricing. For limits and quotas, refer to the documentation.
.NET versions supported – AWS Transform for .NET supports transforming applications written using .NET Framework versions 3.5+, .NET Core 3.1, and .NET 5+, and the cross-platform .NET version, .NET 8.
Application types supported – AWS Transform for .NET supports porting C# code projects of the following types: console application, class library, unit tests, WebAPI, Windows Communication Foundation (WCF) service, MVC, and single-page application (SPA).
Getting started – To get started, visit AWS Transform for .NET User Guide.
(This survey is hosted by an external company. AWS handles your information as described in the AWS Privacy Notice. AWS will own the data gathered via this survey and will not share the information collected with survey respondents.)
Software runs the world – not just the new software applications built in modern languages and deployed on the most optimized cloud infrastructure, but also legacy software built over years and barely understood by the teams that inherit them. These legacy applications may have snowballed into monolithic blocks or may be fragmented across siloed on-premises infrastructure. The significant maintenance, security, and compliance challenges caused can create lasting implications for business performance and competitiveness. Therefore, transformation of legacy applications using modern languages, new frameworks, and cloud services has become an organizational imperative.
Application modernization challenges
Modernization of software applications is a long and painful journey – requiring large teams of developers, domain experts, and consultants who first need to understand the application landscape, devise strategic modernization plans, and then tactically implement the plans in phases, typically over a span of many years. This process is linear, slow, and complex. Traditional labor-intensive modernization approaches incur significant costs and take years to leverage new cloud technologies and innovations for business-critical applications.
Generative AI can help with intelligent automation, domain expertise, and scalability to transform modernization journeys.
Amazon Q Developer, the most capable generative AI–powered assistant for software development, is now the first generative AI-powered assistant for large-scale modernization and migration of .NET, mainframe, and VMware workloads. This extends Q Developer’s transformation capabilities for Java upgrades launched in April 2024 to new types of workloads. Q Developer combines both foundational models and specialized tools based on AI and automated reasoning via autonomous agents that tackle workload-specific modernization steps spanning analysis, planning, and implementation.
Multifunctional teams, including consultants, IT experts, workload domain experts, and developers, can use a unified web experience to offload transformation tasks to Amazon Q Developer agents and transform hundreds of workloads at a time. The agents can port .NET Framework to cross-platform Linux-ready .NET, modernize COBOL applications on mainframes to Java applications on AWS, or virtualized workloads on VMware to scalable workloads on EC2. The modernization teams engage with Q Developer using natural language and share transformation objectives, code repositories, and context. Q Developer agents analyze artifacts like code segments, dependencies, and integrations, applying expertise from prior modernizations. They propose customized plans tailored to codebases, resource utilization, and objectives. The teams can then review, adjust, and approve the plans with iterative engagement with the agents. After the plans are approved, the agents implement the transformation keeping the modernization teams updated on milestones completed and blockers needing human guidance. The transformation journey is an interactive process between the modernization team and Q Developer, with modernization team maintaining control and visibility over the transformation.
Natural language chat with Q Developer AI agents
Faster, scalable, and better modernization
Amazon Q Developer enhances transformation in three primary ways – acceleration, scalability, and quality.
Amazon Q Developer automates and accelerates complex, multi-step processes. Agents conduct assessment and discovery of legacy artifacts to build documentation and dependency maps that improve the understanding of source assets. Most large-scale modernization projects are done in waves that need to be carefully planned. The agents develop modernization wave plans based on source dependencies, stated project goals, and teams can review and approve the plans. Thereafter, the goal-seeking autonomous agents handle implementation complexities to execute the plans. Customers using Amazon Q Developer can modernize Windows .NET applications to Linux up to four times faster than traditional methods and help customers realize up to 40% savings in licensing costs. Migration Planning for the sequence to transform monolith z/OS COBOL application code that takes months to accomplish with human subject matter experts, Amazon Q Developer generates in minutes. Q Developer agents convert on-premises VMware network configurations into modern AWS equivalents in hours vs. the weeks required with traditional manual approaches. The shorter time spent on manual modernization means more freedom for your team to focus on innovation.
Modernization has traditionally been a linear journey with multiple steps and dependencies on cross-functional teams with limited mechanisms for collaboration. This limits teams’ ability to tackle large-scale projects. Amazon Q Developer addresses the challenges by task parallelization and web-based collaboration. Multiple generative AI agents work simultaneously on tasks. Large monolithic applications can be decomposed along business functions like engineering, marketing, sales applications, and transformed in parallel. A unified web-based experience for large-scale transformation means multi-functional team members can collaborate with the autonomous agents, and review and approve key decisions in one place, enabling teams to execute larger and more complex projects in a given time.
Finally, the quality of transformation manifested in functional equivalence, security, and resilience of modernized applications determines the business outcomes like project ROI and operational performance. To ensure transformation quality, you need expertise in languages and frameworks like COBOL, Java, .NET; specialized steps like code base analysis, monolith decomposition, code refactoring, network translation; and domains like mainframe, virtualization, and cloud. You may not have the requisite expertise in your team. That is where Amazon Q Developer can help. Q Developer agents are trained with specific domain expertise to identify code dependencies and frameworks, replace deprecated code, upgrade to new language frameworks, incorporate security best practices, and validate upgraded workloads using workload-tailored plans. Your team can examine the agents’ recommendations, make informed decisions, and guide the modernization journey towards better outcomes like enhanced security, compliance, and performance.
Workloads supported by Amazon Q Developer transformation capabilities
Next steps
Amazon Q Developer transformation capabilities are now available in preview. To learn more, please visit Q Developer web page featuring short demo videos and documentation that can get you started. Read the AWS News blogs that walk you through the unified web experience and IDE experience. Dive deeper into the transformation of specific workloads by reading the workload-specific blogs related to transformation of .NET, mainframe, and VMware workloads.
.NET Framework, introduced in 2002, runs only on Windows and although it’s still supported, it’s no longer in active development. However, cross-platform .NET, launched in 2016, is open source, runs on Linux, and is lightweight and higher performing. It receives regular updates, with new features and performance improvements every year. By porting your .NET applications from .NET Framework to cross-platform .NET, you can migrate from Windows to Linux. As a result, you can not only take advantage of the latest innovations in the .NET platform, you can also reduce your Microsoft licensing spend.
Amazon Q Developer transform for .NET automatically analyzes the codebase, generates a transformation plan, and executes transformation tasks. These tasks include upgrading and replacing NuGet packages and APIs, rewriting deprecated and inefficient code components, and porting to cross-platform .NET.
Let’s see it in action!
Porting a .NET Framework application to cross-platform .NET I’m using Visual Studio in this walkthrough because Amazon Q Developer transform for .NET is available as a Visual Studio extension. I install the latest version of AWS Toolkit with Amazon Q and sign in using the AWS IAM Identity Center credentials provided by my organization.
I open a .NET Framework solution that I need to port to the latest long-term support (LTS) version of supported cross-platform .NET, which is currently .NET 8. In the Solution Explorer, the option to transform is available as a context menu item for both the entire solution and individual projects. Depending on the size and complexity of the application, I can transform the entire application at once or transform the projects in the application step-by-step. In this walkthrough, I showcase the transformation of one of the projects of the solution.
I choose the context menu for one of the projects, and then choose Port Project with Amazon Q Developer.
This opens a dialog where I choose additional projects to transform and select the target .NET version. I select .NET 8 and choose Confirm to proceed with the transformation.
I see the status in the CodeTransformation Plan window and the progress in Amazon Q Developer Code Transformation Hub window.
Though I have selected only one project to transform, all dependent projects will also be transformed by Amazon Q Developer. The selected project and its dependent projects are combined to form a decomposable buildable unit. This is to make sure that the codebase after the transformation is in a successful build state.
Amazon Q Developer first builds the project locally and then copies the selected code and dependencies to a secure and ephemeral sandbox environment in AWS for processing. You can use customer managed keys for encrypting your code in this environment.
Amazon Q Developer analyzes the codebase and generates a transformation plan. It then kicks off the transformation workflow and steps through the plan iteratively for each project in the transformation plan. For each project, it upgrades NuGet packages and APIs, updates the startup or runtime configuration, rewrites deprecated code, and debugs errors.
After the transformation is complete, I choose Transformation Summary by Q Developer to see the summary. I see the transformation status as succeeded. For each project, it shows Files changed, Packages updated, APIs changed, and Linux porting status. In the Linux porting status column, I can see if the project is ported automatically or needs inputs to resolve any pending issues.
I can download the Linux readiness report to look into the issues that require manual resolution.
All the code changes are done in the sandbox, and I can review them before applying the updates to my local working repository. To manually review the changes done by Amazon Q Developer, I choose View Diff view and then choose Show changes for one of the files in the Amazon Q Developer Transformation Hub window.
After reviewing the changes, I choose Accept suggested changes in the Transformation Summary by Q Developer window to apply changes to my local working repository.
I can now continue to work on my local working repository to fix the pending issues in the Linux readiness report and then use the same steps to transform the remaining projects iteratively.
Things to know
Availability – Amazon Q Developer transformation capabilities for .NET porting are available today in preview with Amazon Q Developer Pro Tier subscription.
.NET versions supported – Amazon Q Developer transformation capabilities for .NET supports transforming applications written using .NET Framework versions 3.5+, .NET Core 3.1, and .NET 5+ to the currently supported cross-platform .NET versions such as .NET 8 and .NET 9.
Application types supported – Amazon Q Developer transformation capabilities for .NET supports porting C# code projects of the following types: console application, class library, unit tests, web API, Windows Communication Foundation (WCF) service, and business logic layers of Model View Controller (MVC) and Single Page Application (SPA). However, the UI layer such as Razor Views and WebForms are not ported. Also, only the projects with Microsoft authored NuGet package dependencies are supported. For .NET Framework applications dependent on Internet Information Server (IIS), only default IIS configurations are supported for porting to cross-platform .NET.
Amazon Q Developer accelerates large-scale transformation of enterprise workloads with domain-expert generative AI agents supervised by modernization teams in a unified collaborative web experience.
Using the transformation capabilities of Amazon Q Developer, modernization teams can deliver large and complex projects, accelerating .NET porting, mainframe modernization, and VMware migration, while enhancing application security, resilience, performance, and scalability.
Getting started with Amazon Q Developer transformation web experience My organization’s Amazon Q Developer administrator previously provided me access to the web experience. The prerequisites are that I need to be part of the Amazon Q Developer Pro Tier subscription and a member of my organization’s AWS IAM Identity Center.
I sign in to the web experience using my credentials and create a new workspace. I’m presented with a page to create a transformation job with Amazon Q Developer.
I choose Ask Q to create a job, and it presents me with three options to choose from for creating a transformation job: Mainframe modernization, .NET modernization, and VMware migration.
Amazon Q Developer works collaboratively with me throughout the transformation journey spanning assessment, planning, and migration and modernization. I can add other team members to work alongside me, and Amazon Q Developer seamlessly integrates as a dependable part of my team. Amazon Q Developer helps me through every step of the transformation, including asset discovery, codebase analysis, wave planning, code refactoring, addressing incompatibilities, and implementing network automation.
Let’s have a closer look at the transformation process of each of the three workloads.
Porting of .NET applications from Windows to Linux To start, I ask Amazon Q Developer to create a job for .NET modernization.
Amazon Q Developer provides a default name for the .NET modernization job and asks me if I would like to change anything before it creates the job. I continue with the default name and choose Create Job.
After the request is initiated, I can see the transformation steps and their progress in the left-side pane labeled Job Plan. On the right-side pane, I can see the details in the Dashboard section, any activities pending for me to act on in the Collaboration section, and the sequence of actions that have occurred in the Worklog section.
To begin the assessment, I connect Amazon Q Developer to my source code repositories using the steps outlined in the documentation. I was able to ask Amazon Q Developer about these steps, to receive in-product guidance as I progressed.
After connecting the source code repositories, Amazon Q Developer discovers the supported .NET applications. It then prepares for the transformation process by requesting from me specific inputs, such as selecting the target .NET version and choosing which repositories need to be transformed.
I provide the required inputs, save the information and choose Send to Q.
Amazon Q Developer automatically ports .NET applications I selected to the target version and commits the transformed code to a new branch in my repository when the task is complete, preserving the original source code. I can monitor the transformation’s progress on the Dashboard.
Modernization of mainframe applications Now, let’s explore how Amazon Q Developer assists in the modernization of mainframe applications.
I ask Amazon Q Developer to create a new job for mainframe modernization. I see four phases in the Job Plan: Kick off modernization, Analyze code, Decompose code, and Plan migration wave.
Amazon Q Developer then analyzes the codebase, maps dependencies, and creates detailed documentation.
Next, Amazon Q Developer works with me to decompose my large monolith into simple and more loosely coupled business domains. I provide input on the files I need to group into different domains, and Amazon Q Developer decomposes them accordingly.
Then, using built-in mainframe and cloud domain expertise, Amazon Q Developer proposes a wave plan that I can review, update, and approve.
After approval, Amazon Q Developer implements automated refactoring of COBOL to Java, providing alerts when it needs input and status updates for tracking.
As you can see, Amazon Q Developer reduces timelines for large-scale assessment and modernization of mainframe applications through automated code analysis, documentation, decomposition, iterative planning, and refactoring.
Migration of VMware workloads Let’s now examine how Amazon Q Developer helps me in migrating VMware applications.
I ask Amazon Q Developer to create a new job, and it creates an initial job plan for me to migrate my VMware virtual machines to Amazon Elastic Compute Cloud (Amazon EC2).
A typical VMware migration job consists of data discovery, application grouping, network migration and server migration steps. As the job progresses, Amazon Q Developer dynamically updates job plans and adds new steps, based on continual learning.
To discover on-premises data, I have an option to upload exports from tools such as RVtools, or I can use the AWS Application Discovery Service agentless or agent-based collectors to collect on-premises, server, and network traffic data.
Amazon Q Developer analyzes the discovered data, classifies it, and provides me a summary that includes data completeness indicators such as whether it has received enough network connection data to optimally group application servers and generate wave plans.
Amazon Q Developer then works collaboratively with me to build migration waves. It automatically suggests the waves and provides me with an option to edit by downloading the recommendations and uploading the new file.
Next, I select a target AWS account and ask Amazon Q Developer to use the uploaded network configuration to generate my AWS network. Amazon Q Developer translates the on-premises VMware network to generate the corresponding AWS network constructs.
Amazon Q Developer continues to work in collaboration with me to deploy the generated network and verifies its reach ability and performs reachability testing.
When the network migration is complete, Amazon Q Developer lets me select the waves I want to migrate. It prompts me to set Amazon EC2 instance preferences and generates a migration plan combining its previously generated artifacts. I can review and edit this plan according to my needs before uploading it to Amazon Q Developer to initiate migration with AWS Application Migration Service.
During the migration, I can track the overall transformation progress, including the state of network deployment and individual servers and waves, using the dashboard.
Join the preview The transformation capabilities of Amazon Q Developer are available today in preview with an Amazon Q Developer Pro Tier subscription. To get started, visit the Amazon Q Developer User Guide.
We will be highlighting Projen’s powerful features that cater to various aspects of project management and development. We’ll examine how Projen enhances polyglot programming within Amazon Web Services (AWS) Cloud Development Kit constructs. We’ll also touch on its built-in support for common development tools and practices.
In our previous blog, we introduced you to the basics of getting started with Projen. Projen is a powerful project generator that simplifies the management of complex software configurations. In our prior blog, we discussed developing a new AWS cloud development kit (CDK) construct library project. For consistency, we will continue using this construct library project as our example while exploring linting, dependency management, and test coverage. It’s important to note that these practices are equally applicable to CDK applications and other project types.
AWS CDK Polyglot Construct Library
The AWS Cloud Development Kit (AWS CDK) is an open-source software development framework that allows developers to define cloud infrastructure using familiar programming languages. In a CDK application, constructs serve as the foundational elements, allowing developers to represent either a single AWS resource or a complex combination of resources. These constructs are not only reusable but can be incorporated into other AWS CDK projects, promoting efficient and scalable development practices.
Projen and Polyglot Programming
Projen leverages the power of the JSII library, enabling developers to write constructs once and generate equivalent constructs across multiple programming languages. This feature streamlines the development process, especially when working with teams that have expertise in different languages.
Automated Publishing with Projen
With its publisher module, Projen automates the distribution of c ructs to various package managers. This process can be integrated into a GitHub workflow, such as a build job, which triggers the publication of the library to the designated package managers.
Starting with Projen
Initiating an AWS CDK construct library project is straightforward through the Projen command npx projen new <project_type>. By executing the command npx projen new awscdk-construct, you initialize a new project complete with a projenrc file. This file contains the essential configuration for a CDK construct library, setting the stage for further customization and development.
import { awscdk } from 'projen';
const project = new awscdk.AwsCdkConstructLibrary({
  author: 'github username',
  authorAddress: 'github email',
  cdkVersion: '2.1.0',
  defaultReleaseBranch: 'main',
  jsiiVersion: '~5.0.0',
  name: 'cdkconstruct',
  projenrcTs: true,
  repositoryUrl: 'https://github.com/*****/cdkconstruct.git',

  // deps: [],                /* Runtime dependencies of this module. */
  // description: undefined,  /* The description is just a string that helps people understand the purpose of the package. */
  // devDeps: [],             /* Build dependencies for this module. */
  // packageName: undefined,  /* The "name" in package.json. */
});
project.synth();
A release.yml file is generated by projen under the github>workflow directory. This file has the details of the public registry where the construct needs to be published. By default, it will add the details for npm.
release_npm:
    name: Publish to npm
The construct can be developed in typescript under src/main.ts, our previous blog shows how to create one. If the construct needs to be published to other public registries (such as Maven for java, Pypi for python), then a projenrc file can be updated to synthesize a new release.yml file.
For example, to publish a construct developed in typescript to Maven (so that it can be used in a java application) add publishToMaven API to the projenrc file.
This way the construct is built once and published to multiple registries with different programming languages.
Figure 1: High-level Architecture showing publication to multiple public registries
Linting, Dependency Management & Test Coverage
Projen streamlines the setup process by generating a comprehensive package.json file. This file includes pre-configured dependencies for ESLint and Jest, enabling developers to maintain coding standards and ensure robust test coverage right from the start. ESLint, a widely adopted static code analysis utility, empowers developers to enforce consistent coding practices by analyzing the source code and identifying potential errors, bugs, and stylistic issues. Additionally, Jest equips developers with a comprehensive suite of tools for writing and executing unit tests, facilitating comprehensive test coverage for their codebase. While Projen provides Jest as the default testing framework, it offers developers the flexibility to incorporate alternative testing frameworks based on their project requirements.
Following with the awscdk-construct from the previous section, under test>main.test.ts a default test file is created, which can be updated for writing test cases. A default package.json is generated in the root directory.
Projen can be extensively configured. For example, if you need to configure webpack as a module bundler, then you need to add a webpack.config.js file and update the projenrc file project.
The other dependencies can be updated in package.json by adding deps in the projenrc.ts file.
Run npx projen build to synthesize a package.json.
Continuous Integration and Continuous Delivery (CI/CD)
When you create a project using Projen, it comes equipped with an automated build process that triggers upon the submission of a pull request. This is one of the key, “out-of-the-box” features that streamlines development workflows.
Projen orchestrates this process through GitHub Actions, utilizing a sequence of tasks predefined in the project’s base ‘Project’ class.
When a build is initiated, it systematically carries out several sub-tasks:
Synthesis: It starts by synthesizing all the project files, ensuring they are up-to-date and correctly configured.
Bundling: Next, it bundles the necessary assets for the project.
Compilation: The project’s code is then compiled.
Testing: Following compilation, Projen runs the suite of tests defined for the project.
Packaging: Finally, it packages everything together, preparing it for deployment or distribution.
Projen manages these steps by auto-generating a build.yml file, which it places within the workflow directory of your project’s structure. This YAML file contains all the instructions for the GitHub Actions to execute the build process.
For instance, when you run the command npx projen new awscdk-app-ts, Projen sets up a TypeScript application for AWS CDK. It automatically creates a ‘build.yml’ file through the default projenrc file, which can be found in the github/workflow folder of your project repository. This automated process is designed to save time and reduce manual errors, making it an essential feature for efficient project management.
 .github
   workflow
    build.yml
A Projen build is self-mutating because files generated by Projen are part of the source directory. To ensure that a pull request branch always represents the final state of the repository, you can enable the mutableBuild option in your project configuration (currently only supported for projects derived from NodeProject).
The build process can be customized by adding any task in the project class, which can execute a shell command.
const buildproject = project.addTask('build');
buildproject.exec('npm run build');
The Task also supports the condition option that determines if the condition is true before running the task.
const hello = project.addTask('hello', {
  condition: '[ -n "$CI" ]', // only execute if the CI environment variable is defined
  exec: 'echo running in a CI environment'
});
Releases and Versioning
Projen uses Conventional Commits to generate semantic versioning of the releases automatically. This means that based on the commit message format, it can create the release version automatically.
Initially, the project is released under version 0.0.0. Anything may change at any time and public APIs should not be considered stable. Commits marked as a breaking change will increase the minor version. All other commits will increase the patch version.
You need to manually promote the major version to 1 once your project is considered stable. For major versions 1 and above, if a release includes fix commits only, it will increase the patch version. If a release includes any feat commits, then the new version will be a minor version.
One of the nice, out-of-the-box features that comes with Projen for AWS CDK constructs is the creation of API documentation for your constructs. By leveraging jsii-docgen, Projen’s build step will generate API documentation (API.md) from the comments in your code.
This feature is powerful for several reasons. Firstly, it ensures that documentation is kept up-to-date with the codebase, as the API documentation is generated directly from the source code comments. This reduces the risk of discrepancies between the code and its documentation, which can lead to misunderstandings and errors in usage.
Secondly, it streamlines the development process by automating a task that is often tedious and time-consuming. Developers can focus more on writing code and less on updating documentation manually.
Thirdly, it promotes better coding practices, as developers are encouraged to write clear and detailed comments in their code. This not only benefits the generation of documentation, but also helps any new developers who may work on the codebase in the future to understand the code more quickly and thoroughly.
Moreover, having readily available and accurate documentation can significantly enhance the developer experience. It makes it more straightforward for users of the CDK constructs to understand the functionality, parameters, return types, and the structure of the code they are working with.
In the context of team collaboration and open-source projects, this feature is especially beneficial. It ensures that anyone who contributes to the codebase is able to generate and view the latest documentation without any additional setup or configuration, facilitating smoother collaboration and integration processes.
Let’s recap all of the features that Projen can introduce into your project right out of the box:
Projen’s automation for linting and testing to maintain high code quality from the beginning.
Automated API documentation feature to keep your project’s documentation synchronized with the latest code changes.
Polyglot capabilities to cater to a diverse development team, ensuring flexibility in language preference.
The publisher module to streamline the release process across multiple package managers, saving time and reducing the scope for human error.
As we wrap up our deep dive into some of the advanced features of Projen within AWS CDK, it’s clear that Projen helps alleviate a lot of the pain points of a new greenfield project. By leveraging Projen, developers can navigate the complexities of polyglot programming, automate the mundane tasks of publishing and documentation, and ensure consistent code quality through linting and testing. Projen elevates the development workflow to a level where efficiency and scalability are the norms, not the exception.
What’s more compelling is Projen’s commitment to developer empowerment. Through its automated systems, it encourages developers to adhere to best practices without the overhead of manual enforcement. Its ability to seamlessly integrate with various package managers and generate detailed API documentation from inline comments signifies a leap in developer tooling.
Contact an AWS Representative to know how we can help accelerate your business.
The .NET 8 runtime is built on the Amazon Linux 2023 (AL2023) minimal container image. This provides a smaller deployment footprint than earlier Amazon Linux 2 (AL2) based runtimes and updated versions of common libraries such as glibc 2.34 and OpenSSL 3.
The new image also uses microdnf as a package manager, symlinked as dnf. This replaces the yum package manager used in earlier AL2-based images. If you deploy your Lambda functions as container images, you must update your Dockerfiles to use dnf instead of yum when upgrading to the .NET 8 base image. For more information, see Introducing the Amazon Linux 2023 runtime for AWS Lambda.
Performance
There are a number of language performance improvements available as part of .NET 8. Initialization time can impact performance, as Lambda creates new execution environments to scale your function automatically. There are a number of ways to optimize performance for Lambda-based .NET workloads, including using source generators in System.Text.Json or using Native AOT.
Lambda has increased the default memory size from 256 MB to 512 MB in the blueprints and templates for improved performance with .NET 8. Perform your own functional and performance tests on your .NET 8 applications. You can use AWS Compute Optimizer or AWS Lambda Power Tuning for performance profiling.
At launch, new Lambda runtimes receive less usage than existing established runtimes. This can result in longer cold start times due to reduced cache residency within internal Lambda subsystems. Cold start times typically improve in the weeks following launch as usage increases. As a result, AWS recommends not drawing performance comparison conclusions with other Lambda runtimes until the performance has stabilized.
Native AOT
Lambda introduced .NET Native AOT support in November 2022. Benchmarks show up to 86% improvement in cold start times by eliminating the JIT compilation. Deploying .NET 8 Native AOT functions using the managed dotnet8 runtime rather than the OS-only provided.al2023 runtime gives your function access to .NET system libraries. For example, libicu, which is used for globalization, is not included by default in the provided.al2023 runtime but is in the dotnet8 runtime.
While Native AOT is not suitable for all .NET functions, .NET 8 has improved trimming support. This allows you to more easily run ASP.NET APIs. Improved trimming support helps eliminate build time trimming warnings, which highlight possible runtime errors. This can give you confidence that your Native AOT function behaves like a JIT-compiled function. Trimming support has been added to the Lambda runtime libraries, AWS .NET SDK, .NET Lambda Annotations, and .NET 8 itself.
Using.NET 8 with Lambda
To use .NET 8 with Lambda, you must update your tools.
If you use the .NET Lambda Global Tools extension (Amazon.Lambda.Tools), install the CLI extension and templates. You can upgrade existing tools with dotnet tool update -g Amazon.Lambda.Tools and existing templates with dotnet new install Amazon.Lambda.Templates.
You can also use .NET 8 with Powertools for AWS Lambda (.NET), a developer toolkit to implement serverless best practices such as observability, batch processing, retrieving parameters, idempotency, and feature flags.
Building new .NET 8 functions
Using AWS SAM
Run sam init.
Choose 1- AWS Quick Start Templates.
Choose one of the available templates such as Hello World Example.
Select N for Use the most popular runtime and package type?
Select dotnet8 as the runtime. The dotnet8Hello World Example also includes a Native AOT template option.
Follow the rest of the prompts to create the .NET 8 function.
AWS SAM .NET 8 init options
You can amend the generated function code and use sam deploy --guided to deploy the function.
Using AWS Toolkit for Visual Studio
From the Create a new project wizard, filter the templates to either the Lambda or Serverless project type and select a template. Use Lambda for deploying a single function. Use Serverless for deploying a collection of functions using AWS CloudFormation.
Continue with the steps to finish creating your project.
You can amend the generated function code.
To deploy, right click on the project in the Solution Explorer and select Publish to AWS Lambda.
Using AWS extensions for the .NET CLI
Run dotnet new list --tag Lambda to get a list of available Lambda templates.
Choose a template and run dotnet new <template name>. To build a function using Native AOT, use dotnet new lambda.NativeAOT or dotnet new serverless.NativeAOT when using the .NET Lambda Annotations Framework.
Locate the generated Lambda function in the directory under src which contains the .csproj file. You can amend the generated function code.
To deploy, run dotnet lambda deploy-function and follow the prompts.
You can test the function in the cloud using dotnet lambda invoke-function or by using the test functionality in the Lambda console.
You can build and deploy .NET Lambda functions using container images. Follow the instructions in the documentation.
Migrating from .NET 6 to .NET 8 without Native AOT
Using AWS SAM
Open the template.yaml file.
Update Runtime to dotnet8.
Open a terminal window and rebuild the code using sam build.
Run sam deploy to deploy the changes.
Using AWS Toolkit for Visual Studio
Open the .csproj project file and update the TargetFramework to net8.0. Update NuGet packages for your Lambda functions to the latest version to pull in .NET 8 updates.
Verify that the build command you are using is targeting the .NET 8 runtime.
There may be additional steps depending on what build/deploy tool you’re using. Updating the function runtime may be sufficient.
Using AWS extensions for the .NET CLI or AWS Toolkit for Visual Studio
Open the aws-lambda-tools-defaults.json file if it exists.
Set the framework field to net8.0. If unspecified, the value is inferred from the project file.
Set the function-runtime field to dotnet8.
Open the serverless.template file if it exists. For any AWS::Lambda::Function or AWS::Servereless::Function resources, set the Runtime property to dotnet8.
Open the .csproj project file if it exists and update the TargetFramework to net8.0. Update NuGet packages for your Lambda functions to the latest version to pull in .NET 8 updates.
Migrating from .NET 6 to .NET 8 Native AOT
The following example migrates a .NET 6 class library function to a .NET 8 Native AOT executable function. This uses the optional Lambda Annotations framework which provides idiomatic .NET coding patterns.
Update your project file
Open the project file.
Set TargetFramework to net8.0.
Set OutputType to exe.
Remove PublishReadyToRun if it exists.
Add PublishAot and set to true.
Add or update NuGet package references to Amazon.Lambda.Annotations and Amazon.Lambda.RuntimeSupport. You can update using the NuGet UI in your IDE, manually, or by running dotnet add package Amazon.Lambda.RuntimeSupport and dotnet add package Amazon.Lambda.Annotations from your project directory.
Your project file should look similar to the following:
<Project Sdk="Microsoft.NET.Sdk">
  <PropertyGroup>
    <OutputType>exe</OutputType>
    <TargetFramework>net8.0</TargetFramework>
    <ImplicitUsings>enable</ImplicitUsings>
    <Nullable>enable</Nullable>
    <AWSProjectType>Lambda</AWSProjectType>
    <CopyLocalLockFileAssemblies>true</CopyLocalLockFileAssemblies>
    <!-- Generate native aot images during publishing to improve cold start time. -->
    <PublishAot>true</PublishAot>
	  <!-- StripSymbols tells the compiler to strip debugging symbols from the final executable if we're on Linux and put them into their own file.
		This will greatly reduce the final executable's size.-->
	  <StripSymbols>true</StripSymbols>
  </PropertyGroup>
  <ItemGroup>
    <PackageReference Include="Amazon.Lambda.Core" Version="2.2.0" />
    <PackageReference Include="Amazon.Lambda.RuntimeSupport" Version="1.10.0" />
    <PackageReference Include="Amazon.Lambda.Serialization.SystemTextJson" Version="2.4.0" />
  </ItemGroup>
</Project>
Updating your function code
Reference the annotations library with using Amazon.Lambda.Annotations;
Add [assembly:LambdaGlobalProperties(GenerateMain = true)] to allow the annotations framework to create the main method. This is required as the project is now an executable instead of a library.
Add the below partial class and include a JsonSerializable attribute for any types that you need to serialize, including for your function input and output This partial class is used at build time to generate reflection free code dedicated to serializing the listed types. The following is an example:
/// <summary>
/// This class is used to register the input event and return type for the FunctionHandler method with the System.Text.Json source generator.
/// There must be a JsonSerializable attribute for each type used as the input and return type or a runtime error will occur
/// from the JSON serializer unable to find the serialization information for unknown types.
/// </summary>
[JsonSerializable(typeof(APIGatewayHttpApiV2ProxyRequest))]
[JsonSerializable(typeof(APIGatewayHttpApiV2ProxyResponse))]
public partial class MyCustomJsonSerializerContext : JsonSerializerContext
{
    // By using this partial class derived from JsonSerializerContext, we can generate reflection free JSON Serializer code at compile time
    // which can deserialize our class and properties. However, we must attribute this class to tell it what types to generate serialization code for
    // See https://docs.microsoft.com/en-us/dotnet/standard/serialization/system-text-json-source-generation
}
After the using statement, add the following to specify the serializer to use. [assembly: LambdaSerializer(typeof(SourceGeneratorLambdaJsonSerializer<LambdaFunctionJsonSerializerContext>))]
Swap LambdaFunctionJsonSerializerContext for your context if you are not using the partial class from the previous step.
Updating your function configuration
If you are using aws-lambda-tools-defaults.json.
Set function-runtime to dotnet8.
Set function-architecture to match your build machine – either x86_64 or arm64.
Set (or update) environment-variables to include ANNOTATIONS_HANDLER=<YourFunctionHandler>. Replace <YourFunctionHandler> with the method name of your function handler, so the annotations framework knows which method to call from the generated main method.
Set function-handler to the name of the executable assembly in your bin directory. By default, this is your project name, which tells the .NET Lambda bootstrap script to run your native binary instead of starting the .NET runtime. If your project file has AssemblyName then use that value for the function handler.
Deploy your function. If you are using Amazon.Lambda.Tools, run dotnet lambda deploy-function. Check for trim warnings during build and refactor to eliminate them.
Test your function to ensure that the native calls into AL2023 are working correctly. By default, running local unit tests on your development machine won’t run natively and will still use the JIT compiler. Running with the JIT compiler does not allow you to catch native AOT specific runtime errors.
Conclusion
Lambda is introducing the new .NET 8 managed runtime. This post highlights new features in .NET 8. You can create new Lambda functions or migrate existing functions to .NET 8 or .NET 8 Native AOT.
Today, I’m happy to announce that a new open-source sample application, a fictitious used books eCommerce store we call Bob’s Used Books, is available for .NET developers working with AWS. The .NET advocacy and development teams at AWS talk to customers regularly and, during those conversations, often receive requests for more in-depth samples. Customers tell us that, while small code snippets serve well to illustrate the mechanics of an API, their development teams also need and want to make use of fuller, more real-world samples to understand better how to construct modern applications for the cloud. Today’s sample application release is in response to those requests.
Bob’s Used Books is a sample eCommerce application built using ASP.NET Core version 6 and represents an initial modernization of a typical on-premises custom application. Representing a first stage of modernization, the application uses modern cross-platform .NET, enabling it to run on both Windows and Linux systems in the cloud. It’s typical of what many .NET developers are just now going through, porting their own applications from .NET Framework to .NET using freely available tools from AWS such as the Toolkit for .NET Refactoring and the Porting Assistant for .NET.
Sample application features Customers of our fictional bookstore can browse and search on the store for used books and view details on selected books such as price, condition, genre, and more:
Just like a real e-commerce store, customers can add books to a shopping cart, pending subsequent checkout, or to a personal wish list. When the time comes to purchase, the customer can start the checkout process, which will encourage them to sign in if they are an existing customer or sign up during the process.
In this sample application, the bookstore’s staff uses the same web application to manage inventory and customer orders. Role-based authentication is used to determine whether it’s a staff member signing in, in which case they can view an administrative portal, or a regular store customer. For staff, having accessed the admin portal, they start with a dashboard view that summarizes pending, in-process, or completed orders and the state of the store’s inventory:
Staff can edit inventory to add new books, complete with cover images, or adjust stock levels. From the same dashboard, staff can also view and process pending orders.
Not shown here, but something I think is pretty cool, is a simulated workflow where customers can re-sell their books through the store. This involves the customer submitting an application, the store admin evaluating and deciding whether to purchase from the customer, the customer “posting” the book to the store if accepted, and finally the admin adding the book into inventory and reimbursing the customer. Remember, this is all fictional, however—no actual financial transactions take place!
Application architecture The bookstore sample didn’t start as a .NET Framework-based application that needed porting to .NET, but it does use a monolithic MVC (model-view-controller) application design, typical of the .NET Framework development era (and still in use today). It also uses a single Microsoft SQL Server database to contain inventory, shopping cart, user data, and more.
When fully deployed to AWS, the application makes use of several services. These provide resources to host the application, provide configuration to the running application, and also provide useful functionality to the running code, such as image verification:
Amazon Cognito – used for customer and bookstore staff authentication. The application uses Cognito‘s Hosted UI to provide sign-in and sign-up functionality.
Amazon Relational Database Service (RDS) – manages a single Microsoft SQL Server Express instance containing inventory, customer, and other typical data for an e-commerce application.
AWS Systems Manager Parameter Store – contains runtime configuration data, including the name of the S3 bucket for cover images, and Cognito user pool details.
AWS Secrets Manager – holds the user and password details for the underlying SQL Server database in RDS.
Amazon CloudFront – provides a domain for accessing the cover images in the S3 bucket, which means the bucket does not need to be publicly available.
Amazon Rekognition – used to verify that cover images uploaded for a book do not contain objectionable content.
The application is a starting point to showcase further modernization opportunities in the future, such as adopting purpose-built databases instead of using a single relational database, decomposing the monolith to use microservices (for the latter, AWS provides the Microservice Extractor for .NET), and more. The .NET development, advocacy, and solution architect teams here at AWS are quite excited at the opportunities for new content, using this sample, to illustrate those modernization opportunities in the upcoming months. And, as the sample is open-source, we’re also interested to see where the .NET development community takes it regarding modernization.
Running the application My colleague Brad Webber, a Solutions Architect at AWS, has written the first in a series of technical blog posts we’ll be publishing about the sample. You’ll find these on the new .NET on AWS blog channel. In his first post, you’ll learn more about how to run or debug the application on your own machine as well as deploy it completely to the AWS cloud.
The application uses SQL Server Express localdb instance for its database needs when running outside the cloud, which means you do currently need to be using a Windows machine to run or debug. Launch profiles, accessible from Visual Studio, Visual Studio Code, or JetBrains Rider (all on Windows), are used to select how the application runs (for example, with no or some cloud resources):
Local – When you select this launch profile, the application runs completely on your machine, using no cloud resources, and doesn’t need an AWS account. This enables you to investigate and experiment with the code incurring no charges for cloud resources.
Integrated – When you use this profile, the application still runs locally on your Windows machine and continues to use the localdb database instance, but now also uses some AWS resources, such as an S3 bucket, Rekognition, Cognito, and others. This profile enables you to learn how you can use AWS services within your application code, using the AWS SDK for .NET and various extension libraries that we distribute on NuGet (for a full list of all available libraries you can use when developing your applications, see the .NET on AWS repository on GitHub). To enable you to set up the cloud resources needed by the application when using this profile, an AWS Cloud Development Kit (AWS CDK) project is provided in the sample repository, making it easy to set up and tear down those resources on demand.
Deploying the Sample to AWS You can also deploy the entire application to the AWS Cloud, in this case, to virtual machines in Amazon Elastic Compute Cloud (Amazon EC2) with a SQL Server Express database instance in Amazon Relational Database Service (RDS). The deployment uses resources compatible with the AWS Free Tier but do note, however, that you may still incur charges if you exceed the Free Tier limits. Unlike running the application on your own machine, which requires Windows because of the localdb dependency, you can deploy the application to AWS from any machine, including those running macOS and Linux. Once again, a CDK project is included in the repository to get you started, and Brad’s blog post goes into more detail on these steps so I won’t repeat them here.
Using virtual machines in the cloud is often a first step in modernizing on-premises applications because of similarity with an on-premises server setup, hence the reason for supporting Amazon EC2 deployments out-of-the-box. In the future, we’ll be adding content showing how to deploy the application to container services on AWS, such as AWS App Runner, Amazon Elastic Container Service (Amazon ECS), and Amazon Elastic Kubernetes Service (EKS).
Next steps The Bob’s Used Books sample application is available now on GitHub. We encourage you, if you’re a .NET developer working on AWS and looking for a deeper, more real-world sample, to clone the repository and take the application for a spin. We’re also curious about what modernization journeys you would decide to take with the application, which will help us create future content for the sample. Let us know in the issues section of the repository. And if you want to contribute to the sample, we welcome contributions!
In this blog post, we will explore the process of creating a Continuous Integration/Continuous Deployment (CI/CD) pipeline for a .NET AWS Lambda function using the CDK Pipelines. We will cover all the necessary steps to automate the deployment of the .NET Lambda function, including setting up the development environment, creating the pipeline with AWS CDK, configuring the pipeline stages, and publishing the test reports. Additionally, we will show how to promote the deployment from a lower environment to a higher environment with manual approval.
Background
AWS CDK makes it easy to deploy a stack that provisions your infrastructure to AWS from your workstation by simply running cdk deploy. This is useful when you are doing initial development and testing. However, in most real-world scenarios, there are multiple environments, such as development, testing, staging, and production. It may not be the best approach to deploy your CDK application in all these environments using cdk deploy. Deployment to these environments should happen through more reliable, automated pipelines. CDK Pipelines makes it easy to set up a continuous deployment pipeline for your CDK applications, powered by AWS CodePipeline.
The AWS CDK Developer Guide’s Continuous integration and delivery (CI/CD) using CDK Pipelines page shows you how you can use CDK Pipelines to deploy a Node.js based Lambda function. However, .NET based Lambda functions are different from Node.js or Python based Lambda functions in that .NET code first needs to be compiled to create a deployment package. As a result, we decided to write this blog as a step-by-step guide to assist our .NET customers with deploying their Lambda functions utilizing CDK Pipelines.
In this post, we dive deeper into creating a real-world pipeline that runs build and unit tests, and deploys a .NET Lambda function to one or multiple environments.
Architecture
CDK Pipelines is a construct library that allows you to provision a CodePipeline pipeline. The pipeline created by CDK pipelines is self-mutating. This means, you need to run cdk deploy one time to get the pipeline started. After that, the pipeline automatically updates itself if you add new application stages or stacks in the source code.
The following diagram captures the architecture of the CI/CD pipeline created with CDK Pipelines. Let’s explore this architecture at a high level before diving deeper into the details.
Figure 1: Reference architecture diagram
The solution creates a CodePipeline with a AWS CodeCommit repo as the source (CodePipeline Source Stage). When code is checked into CodeCommit, the pipeline is automatically triggered and retrieves the code from the CodeCommit repository branch to proceed to the Build stage.
Build stage compiles the CDK application code and generates the cloud assembly.
Update Pipeline stage updates the pipeline (if necessary).
Publish Assets stage uploads the CDK assets to Amazon S3.
After Publish Assets is complete, the pipeline deploys the Lambda function to both the development and production environments. For added control, the architecture includes a manual approval step for releases that target the production environment.
Before you use AWS CDK to deploy CDK Pipelines, you must bootstrap the AWS environments where you want to deploy the Lambda function. An environment is the target AWS account and Region into which the stack is intended to be deployed.
In this post, you deploy the Lambda function into a development environment and, optionally, a production environment. This requires bootstrapping both environments. However, deployment to a production environment is optional; you can skip bootstrapping that environment for the time being, as we will cover that later.
This is one-time activity per environment for each environment to which you want to deploy CDK applications. To bootstrap the development environment, run the below command, substituting in the AWS account ID for your dev account, the region you will use for your dev environment, and the locally-configured AWS CLI profile you wish to use for that account. See the documentation for additional details.
‐‐profile specifies the AWS CLI credential profile that will be used to bootstrap the environment. If not specified, default profile will be used. The profile should have sufficient permissions to provision the resources for the AWS CDK during bootstrap process.
‐‐cloudformation-execution-policies specifies the ARNs of managed policies that should be attached to the deployment role assumed by AWS CloudFormation during deployment of your stacks.
For this post, you will use CodeCommit to store your source code. First, create a git repository named dotnet-lambda-cdk-pipeline in CodeCommit by following these steps in the CodeCommit documentation.
After you have created the repository, generate git credentials to access the repository from your local machine if you don’t already have them. Follow the steps below to generate git credentials.
Sign in to the AWS Management Console and open the IAM console.
Next. open the user details page, choose the Security Credentials tab, and in HTTPS Git credentials for AWS CodeCommit, choose Generate.
Download credentials to download this information as a .CSV file.
Clone the recently created repository to your workstation, then cd into dotnet-lambda-cdk-pipeline directory.
git clone <CODECOMMIT-CLONE-URL>
cd dotnet-lambda-cdk-pipeline
Alternatively, you can use git-remote-codecommit to clone the repository with git clone codecommit::<REGION>://<PROFILE>@<REPOSITORY-NAME> command, replacing the placeholders with their original values. Using git-remote-codecommit does not require you to create additional IAM users to manage git credentials. To learn more, refer AWS CodeCommit with git-remote-codecommit documentation page.
Initialize the CDK project
From the command prompt, inside the dotnet-lambda-cdk-pipeline directory, initialize a AWS CDK project by running the following command.
cdk init app --language csharp
Open the generated C# solution in Visual Studio, right-click the DotnetLambdaCdkPipeline project and select Properties. Set the Target framework to .NET 6.
Create a CDK stack to provision the CodePipeline
Your CDK Pipelines application includes at least two stacks: one that represents the pipeline itself, and one or more stacks that represent the application(s) deployed via the pipeline. In this step, you create the first stack that deploys a CodePipeline pipeline in your AWS account.
From Visual Studio, open the solution by opening the .sln solution file (in the src/ folder). Once the solution has loaded, open the DotnetLambdaCdkPipelineStack.cs file, and replace its contents with the following code. Note that the filename, namespace and class name all assume you named your Git repository as shown earlier.
Note: be sure to replace “<CODECOMMIT-REPOSITORY-NAME>” in the code below with the name of your CodeCommit repository (in this blog post, we have used dotnet-lambda-cdk-pipeline).
using Amazon.CDK;
using Amazon.CDK.AWS.CodeBuild;
using Amazon.CDK.AWS.CodeCommit;
using Amazon.CDK.AWS.IAM;
using Amazon.CDK.Pipelines;
using Constructs;
using System.Collections.Generic;

namespace DotnetLambdaCdkPipeline
{
    public class DotnetLambdaCdkPipelineStack : Stack
    {
        internal DotnetLambdaCdkPipelineStack(Construct scope, string id, IStackProps props = null) : base(scope, id, props)
        {

            var repository = Repository.FromRepositoryName(this, "repository", "<CODECOMMIT-REPOSITORY-NAME>");

            // This construct creates a pipeline with 3 stages: Source, Build, and UpdatePipeline
            var pipeline = new CodePipeline(this, "pipeline", new CodePipelineProps
            {
                PipelineName = "LambdaPipeline",
                SelfMutation = true,

                // Synth represents a build step that produces the CDK Cloud Assembly.
                // The primary output of this step needs to be the cdk.out directory generated by the cdk synth command.
                Synth = new CodeBuildStep("Synth", new CodeBuildStepProps
                {
                    // The files downloaded from the repository will be placed in the working directory when the script is executed
                    Input = CodePipelineSource.CodeCommit(repository, "master"),

                    // Commands to run to generate CDK Cloud Assembly
                    Commands = new string[] { "npm install -g aws-cdk", "cdk synth" },

                    // Build environment configuration
                    BuildEnvironment = new BuildEnvironment
                    {
                        BuildImage = LinuxBuildImage.AMAZON_LINUX_2_4,
                        ComputeType = ComputeType.MEDIUM,

                        // Specify true to get a privileged container inside the build environment image
                        Privileged = true
                    }
                })
            });
        }
    }
}
In the preceding code, you use CodeBuildStep instead of ShellStep, since ShellStep doesn’t provide a property to specify BuildEnvironment. We need to specify the build environment in order to set privileged mode, which allows access to the Docker daemon in order to build container images in the build environment. This is necessary to use the CDK’s bundling feature, which is explained in later in this blog post.
Open the file src/DotnetLambdaCdkPipeline/Program.cs, and edit its contents to reflect the below. Be sure to replace the placeholders with your AWS account ID and region for your dev environment.
using Amazon.CDK;

namespace DotnetLambdaCdkPipeline
{
    sealed class Program
    {
        public static void Main(string[] args)
        {
            var app = new App();
            new DotnetLambdaCdkPipelineStack(app, "DotnetLambdaCdkPipelineStack", new StackProps
            {
                Env = new Amazon.CDK.Environment
                {
                    Account = "<DEV-ACCOUNT-ID>",
                    Region = "<DEV-REGION>"
                }
            });
            app.Synth();
        }
    }
}
Note: Instead of committing the account ID and region to source control, you can set environment variables on the CodeBuild agent and use them; see Environments in the AWS CDK documentation for more information. Because the CodeBuild agent is also configured in your CDK code, you can use the BuildEnvironmentVariableType property to store environment variables in AWS Systems Manager Parameter Store or AWS Secrets Manager.
After you make the code changes, build the solution to ensure there are no build issues. Next, commit and push all the changes you just made. Run the following commands (or alternatively use Visual Studio’s built-in Git functionality to commit and push your changes):
Then navigate to the root directory of repository where your cdk.json file is present, and run the cdk deploy command to deploy the initial version of CodePipeline. Note that the deployment can take several minutes.
The pipeline created by CDK Pipelines is self-mutating. This means you only need to run cdk deploy one time to get the pipeline started. After that, the pipeline automatically updates itself if you add new CDK applications or stages in the source code.
After the deployment has finished, a CodePipeline is created and automatically runs. The pipeline includes three stages as shown below.
Source – It fetches the source of your AWS CDK app from your CodeCommit repository and triggers the pipeline every time you push new commits to it.
Build – This stage compiles your code (if necessary) and performs a cdk synth. The output of that step is a cloud assembly.
UpdatePipeline – This stage runs cdk deploy command on the cloud assembly generated in previous stage. It modifies the pipeline if necessary. For example, if you update your code to add a new deployment stage to the pipeline to your application, the pipeline is automatically updated to reflect the changes you made.
Figure 2: Initial CDK pipeline stages
Define a CodePipeline stage to deploy .NET Lambda function
In this step, you create a stack containing a simple Lambda function and place that stack in a stage. Then you add the stage to the pipeline so it can be deployed.
To create a Lambda project, do the following:
In Visual Studio, right-click on the solution, choose Add, then choose New Project.
In the New Project dialog box, choose the AWS Lambda Project (.NET Core – C#) template, and then choose OK or Next.
For Project Name, enter SampleLambda, and then choose Create.
From the Select Blueprint dialog, choose Empty Function, then choose Finish.
Next, create a new file in the CDK project at src/DotnetLambdaCdkPipeline/SampleLambdaStack.cs to define your application stack containing a Lambda function. Update the file with the following contents (adjust the namespace as necessary):
using Amazon.CDK;
using Amazon.CDK.AWS.Lambda;
using Constructs;
using AssetOptions = Amazon.CDK.AWS.S3.Assets.AssetOptions;

namespace DotnetLambdaCdkPipeline
{
    class SampleLambdaStack: Stack
    {
        public SampleLambdaStack(Construct scope, string id, StackProps props = null) : base(scope, id, props)
        {
            // Commands executed in a AWS CDK pipeline to build, package, and extract a .NET function.
            var buildCommands = new[]
            {
                "cd /asset-input",
                "export DOTNET_CLI_HOME=\"/tmp/DOTNET_CLI_HOME\"",
                "export PATH=\"$PATH:/tmp/DOTNET_CLI_HOME/.dotnet/tools\"",
                "dotnet build",
                "dotnet tool install -g Amazon.Lambda.Tools",
                "dotnet lambda package -o output.zip",
                "unzip -o -d /asset-output output.zip"
            };

            new Function(this, "LambdaFunction", new FunctionProps
            {
                Runtime = Runtime.DOTNET_6,
                Handler = "SampleLambda::SampleLambda.Function::FunctionHandler",

                // Asset path should point to the folder where .csproj file is present.
                // Also, this path should be relative to cdk.json file.
                Code = Code.FromAsset("./src/SampleLambda", new AssetOptions
                {
                    Bundling = new BundlingOptions
                    {
                        Image = Runtime.DOTNET_6.BundlingImage,
                        Command = new[]
                        {
                            "bash", "-c", string.Join(" && ", buildCommands)
                        }
                    }
                })
            });
        }
    }
}
Building inside a Docker container
The preceding code uses bundling feature to build the Lambda function inside a docker container. Bundling starts a new docker container, copies the Lambda source code inside /asset-input directory of the container, runs the specified commands that write the package files under /asset-output directory. The files in /asset-output are copied as assets to the stack’s cloud assembly directory. In a later stage, these files are zipped and uploaded to S3 as the CDK asset.
Building Lambda functions inside Docker containers is preferable than building them locally because it reduces the host machine’s dependencies, resulting in greater consistency and reliability in your build process.
Bundling requires the creation of a docker container on your build machine. For this purpose, the privileged: true setting on the build machine has already been configured.
Adding development stage
Create a new file in the CDK project at src/DotnetLambdaCdkPipeline/DotnetLambdaCdkPipelineStage.cs to hold your stage. This class will create the development stage for your pipeline.
using Amazon.CDK;
using Constructs;

namespace DotnetLambdaCdkPipeline
{
    public class DotnetLambdaCdkPipelineStage : Stage
    {
        internal DotnetLambdaCdkPipelineStage(Construct scope, string id, IStageProps props = null) : base(scope, id, props)
        {
            Stack lambdaStack = new SampleLambdaStack(this, "LambdaStack");
        }
    }
}
Edit src/DotnetLambdaCdkPipeline/DotnetLambdaCdkPipelineStack.cs to add the stage to your pipeline. Add the bolded line from the code below to your file.
using Amazon.CDK;
using Amazon.CDK.Pipelines;

namespace DotnetLambdaCdkPipeline
{
    public class DotnetLambdaCdkPipelineStack : Stack
    {
        internal DotnetLambdaCdkPipelineStack(Construct scope, string id, IStackProps props = null) : base(scope, id, props)
        {

            var repository = Repository.FromRepositoryName(this, "repository", "dotnet-lambda-cdk-application");

            // This construct creates a pipeline with 3 stages: Source, Build, and UpdatePipeline
            var pipeline = new CodePipeline(this, "pipeline", new CodePipelineProps
            {
                PipelineName = "LambdaPipeline",
                .
                .
                .
            });

            var devStage = pipeline.AddStage(new DotnetLambdaCdkPipelineStage(this, "Development"));
        }
    }
}
Next, build the solution, then commit and push the changes to the CodeCommit repo. This will trigger the CodePipeline to start.
When the pipeline runs, UpdatePipeline stage detects the changes and updates the pipeline based on the code it finds there. After the UpdatePipeline stage completes, pipeline is updated with additional stages.
Let’s observe the changes:
An Assets stage has been added. This stage uploads all the assets you are using in your app to Amazon S3 (the S3 bucket created during bootstrapping) so that they could be used by other deployment stages later in the pipeline. For example, the CloudFormation template used by the development stage, includes reference to these assets, which is why assets are first moved to S3 and then referenced in later stages.
A Development stage with two actions has been added. The first action is to create the change set, and the second is to execute it.
Figure 3: CDK pipeline with development stage to deploy .NET Lambda function
After the Deploy stage has completed, you can find the newly-deployed Lambda function by visiting the Lambda console, selecting “Functions” from the left menu, and filtering the functions list with “LambdaStack”. Note the runtime is .NET.
Right click on the solution, choose Add, then choose New Project.
In the New Project dialog box, choose the xUnit Test Project template, and then choose OK or Next.
For Project Name, enter SampleLambda.Tests, and then choose Create or Next. Depending on your version of Visual Studio, you may be prompted to select the version of .NET to use. Choose .NET 6.0 (Long Term Support), then choose Create.
Right click on SampleLambda.Tests project, choose Add, then choose Project Reference. Select SampleLambda project, and then choose OK.
Next, edit the src/SampleLambda.Tests/UnitTest1.cs file to add a unit test. You can use the code below, which verifies that the Lambda function returns the input string as upper case.
using Xunit;

namespace SampleLambda.Tests
{
    public class UnitTest1
    {
        [Fact]
        public void TestSuccess()
        {
            var lambda = new SampleLambda.Function();

            var result = lambda.FunctionHandler("test string", context: null);

            Assert.Equal("TEST STRING", result);
        }
    }
}
You can add pre-deployment or post-deployment actions to the stage by calling its AddPre() or AddPost() method. To execute above test cases, we will use a pre-deployment action.
To add a pre-deployment action, we will edit the src/DotnetLambdaCdkPipeline/DotnetLambdaCdkPipelineStack.cs file in the CDK project, after we add code to generate test reports.
To run the unit test(s) and publish the test report in CodeBuild, we will construct a BuildSpec for our CodeBuild project. We also provide IAM policy statements to be attached to the CodeBuild service role granting it permissions to run the tests and create reports. Update the file by adding the new code (starting with “// Add this code for test reports”) below the devStage declaration you added earlier:
using Amazon.CDK;
using Amazon.CDK.Pipelines;
...

namespace DotnetLambdaCdkPipeline
{
    public class DotnetLambdaCdkPipelineStack : Stack
    {
        internal DotnetLambdaCdkPipelineStack(Construct scope, string id, IStackProps props = null) : base(scope, id, props)
        {
            // ...
            // ...
            // ...
            var devStage = pipeline.AddStage(new DotnetLambdaCdkPipelineStage(this, "Development"));


            // Add this code for test reports
            var reportGroup = new ReportGroup(this, "TestReports", new ReportGroupProps
            {
                ReportGroupName = "TestReports"
            });

            // Policy statements for CodeBuild Project Role
            var policyProps = new PolicyStatementProps()
            {
                Actions = new string[] {
                    "codebuild:CreateReportGroup",
                    "codebuild:CreateReport",
                    "codebuild:UpdateReport",
                    "codebuild:BatchPutTestCases"
                },
                Effect = Effect.ALLOW,
                Resources = new string[] { reportGroup.ReportGroupArn }
            };

            // PartialBuildSpec in AWS CDK for C# can be created using Dictionary
            var reports = new Dictionary<string, object>()
            {
                {
                    "reports", new Dictionary<string, object>()
                    {
                        {
                            reportGroup.ReportGroupArn, new Dictionary<string,object>()
                            {
                                { "file-format", "VisualStudioTrx" },
                                { "files", "**/*" },
                                { "base-directory", "./testresults" }
                            }
                        }
                    }
                }
            };
            // End of new code block
        }
    }
}
Finally, add the CodeBuildStep as a pre-deployment action to the development stage with necessary CodeBuildStepProps to set up reports. Add this after the new code you added above.
devStage.AddPre(new Step[]
{
    new CodeBuildStep("Unit Test", new CodeBuildStepProps
    {
        Commands= new string[]
        {
            "dotnet test -c Release ./src/SampleLambda.Tests/SampleLambda.Tests.csproj --logger trx --results-directory ./testresults",
        },
        PrimaryOutputDirectory = "./testresults",
        PartialBuildSpec= BuildSpec.FromObject(reports),
        RolePolicyStatements = new PolicyStatement[] { new PolicyStatement(policyProps) },
        BuildEnvironment = new BuildEnvironment
        {
            BuildImage = LinuxBuildImage.AMAZON_LINUX_2_4,
            ComputeType = ComputeType.MEDIUM
        }
    })
});
Build the solution, then commit and push the changes to the repository. Pushing the changes triggers the pipeline, runs the test cases, and publishes the report to the CodeBuild console. To view the report, after the pipeline has completed, navigate to TestReports in CodeBuild’s Report Groups as shown below.
Figure 4: Test report in CodeBuild report group
Deploying to production environment with manual approval
CDK Pipelines makes it very easy to deploy additional stages with different accounts. You have to bootstrap the accounts and Regions you want to deploy to, and they must have a trust relationship added to the pipeline account.
To bootstrap an additional production environment into which AWS CDK applications will be deployed by the pipeline, run the below command, substituting in the AWS account ID for your production account, the region you will use for your production environment, the AWS CLI profile to use with the prod account, and the AWS account ID where the pipeline is already deployed (the account you bootstrapped at the start of this blog).
The --trust option indicates which other account should have permissions to deploy AWS CDK applications into this environment. For this option, specify the pipeline’s AWS account ID.
Use below code to add a new stage for production deployment with manual approval. Add this code below the “devStage.AddPre(...)” code block you added in the previous section, and remember to replace the placeholders with your AWS account ID and region for your prod environment.
var prodStage = pipeline.AddStage(new DotnetLambdaCdkPipelineStage(this, "Production", new StageProps
{
    Env = new Environment
    {
        Account = "<PROD-ACCOUNT-ID>",
        Region = "<PROD-REGION>"
    }
}), new AddStageOpts
{
    Pre = new[] { new ManualApprovalStep("PromoteToProd") }
});
To support deploying CDK applications to another account, the artifact buckets must be encrypted, so add a CrossAccountKeys property to the CodePipeline near the top of the pipeline stack file, and set the value to true (see the line in bold in the code snippet below). This creates a KMS key for the artifact bucket, allowing cross-account deployments.
var pipeline = new CodePipeline(this, "pipeline", new CodePipelineProps
{
PipelineName = "LambdaPipeline",
SelfMutation = true,
CrossAccountKeys = true,EnableKeyRotation = true, //Enable KMS key rotation for the generated KMS keys
// ...
}
After you commit and push the changes to the repository, a new manual approval step called PromoteToProd is added to the Production stage of the pipeline. The pipeline pauses at this step and awaits manual approval as shown in the screenshot below.
Figure 5: Pipeline waiting for manual review
When you click the Review button, you are presented with the following dialog. From here, you can choose to approve or reject and add comments if needed.
Figure 6: Manual review approval dialog
Once you approve, the pipeline resumes, executes the remaining steps and completes the deployment to production environment.
Figure 7: Successful deployment to production environment
Clean up
To avoid incurring future charges, log into the AWS console of the different accounts you used, go to the AWS CloudFormation console of the Region(s) where you chose to deploy, select and click Delete on the stacks created for this activity. Alternatively, you can delete the CloudFormation Stack(s) using cdk destroy command. It will not delete the CDKToolkit stack that the bootstrap command created. If you want to delete that as well, you can do it from the AWS Console.
Conclusion
In this post, you learned how to use CDK Pipelines for automating the deployment process of .NET Lambda functions. An intuitive and flexible architecture makes it easy to set up a CI/CD pipeline that covers the entire application lifecycle, from build and test to deployment. With CDK Pipelines, you can streamline your development workflow, reduce errors, and ensure consistent and reliable deployments. For more information on CDK Pipelines and all the ways it can be used, see the CDK Pipelines reference documentation.
I could almost title this blog post the “AWS AI/ML Week in Review.” This past week, we announced several new innovations and tools for building with generative AI on AWS. Let’s dive right into it.
Last Week’s Launches Here are some launches that got my attention during the previous week:
Announcing Amazon Bedrock and Amazon Titan models – Amazon Bedrock is a new service to accelerate your development of generative AI applications using foundation models through an API without managing infrastructure. You can choose from a wide range of foundation models built by leading AI startups and Amazon. The new Amazon Titan foundation models are pre-trained on large datasets, making them powerful, general-purpose models. You can use them as-is or privately to customize them with your own data for a particular task without annotating large volumes of data. Amazon Bedrock is currently in limited preview. Sign up here to learn more.
Amazon EC2 Trn1n and Inf2 instances are now generally available – Trn1n instances, powered by AWS Trainium accelerators, double the network bandwidth (compared to Trn1 instances) to 1,600 Gbps of Elastic Fabric Adapter (EFAv2). The increased bandwidth delivers even higher performance for training network-intensive generative AI models such as large language models (LLMs) and mixture of experts (MoE). Inf2 instances, powered by AWS Inferentia2 accelerators, deliver high performance at the lowest cost in Amazon EC2 for generative AI models, including LLMs and vision transformers. They are the first inference-optimized instances in Amazon EC2 to support scale-out distributed inference with ultra-high-speed connectivity between accelerators. Compared to Inf1 instances, Inf2 instances deliver up to 4x higher throughput and up to 10x lower latency. Check out my blog posts on Trn1 instances and Inf2 instances for more details.
Amazon CodeWhisperer, free for individual use, is now generally available – Amazon CodeWhisperer is an AI coding companion that generates real-time single-line or full-function code suggestions in your IDE to help you build applications faster. With GA, we introduce two tiers: CodeWhisperer Individual and CodeWhisperer Professional. CodeWhisperer Individual is free to use for generating code. You can sign up with an AWS Builder ID based on your email address. The Individual Tier provides code recommendations, reference tracking, and security scans. CodeWhisperer Professional—priced at $19 per user, per month—offers additional enterprise administration capabilities. Steve’s blog post has all the details.
Amazon GameLift adds support for Unreal Engine 5 – Amazon GameLift is a fully managed solution that allows you to manage and scale dedicated game servers for session-based multiplayer games. The latest version of the Amazon GameLift Server SDK 5.0 lets you integrate your Unreal 5-based game servers with the Amazon GameLift service. In addition, the latest Amazon GameLift Server SDK with Unreal 5 plugin is built to work with Amazon GameLift Anywhere so that you can test and iterate Unreal game builds faster and manage game sessions across any server hosting infrastructure. Check out the release notes to learn more.
Amazon Rekognition launches Face Liveness to deter fraud in facial verification – Face Liveness verifies that only real users, not bad actors using spoofs, can access your services. Amazon Rekognition Face Liveness analyzes a short selfie video to detect spoofs presented to the camera, such as printed photos, digital photos, digital videos, or 3D masks, as well as spoofs that bypass the camera, such as pre-recorded or deepfake videos. This AWS Machine Learning Blog post walks you through the details and shows how you can add Face Liveness to your web and mobile applications.
Other AWS News Here are some additional news items and blog posts that you may find interesting:
Updates to the AWS Well-Architected Framework – The most recent content updates and improvements focus on providing expanded guidance across the AWS service portfolio to help you make more informed decisions when developing implementation plans. Services that were added or expanded in coverage include AWS Elastic Disaster Recovery, AWS Trusted Advisor, AWS Resilience Hub, AWS Config, AWS Security Hub, Amazon GuardDuty, AWS Organizations, AWS Control Tower, AWS Compute Optimizer, AWS Budgets, Amazon CodeWhisperer, and Amazon CodeGuru. This AWS Architecture Blog post has all the details.
Amazon releases largest dataset for training “pick and place” robots – In an effort to improve the performance of robots that pick, sort, and pack products in warehouses, Amazon has publicly released the largest dataset of images captured in an industrial product-sorting setting. Where the largest previous dataset of industrial images featured on the order of 100 objects, the Amazon dataset, called ARMBench, features more than 190,000 objects. Check out this Amazon Science Blog post to learn more.
AWS open-source news and updates – My colleague Ricardo writes this weekly open-source newsletter in which he highlights new open-source projects, tools, and demos from the AWS Community. Read edition #153 here.
Upcoming AWS Events Check your calendars and sign up for these AWS events:
#BuildOn Generative AI – Join our weekly live Build On Generative AI Twitch show. Every Monday morning, 9:00 US PT, my colleagues Emily and Darko take a look at aspects of generative AI. They host developers, scientists, startup founders, and AI leaders and discuss how to build generative AI applications on AWS.
In today’s episode, Emily walks us through the latest AWS generative AI announcements. You can watch the video here.
.NET Developer Day – .NET Enterprise Developer Day EMEA 2023 (April 25) is a free, one-day virtual event providing enterprise developers with the most relevant information to swiftly and efficiently migrate and modernize their .NET applications and workloads on AWS.
AWS Developer Innovation Day – AWS Developer Innovation Day (April 26) is a new, free, one-day virtual event designed to help developers and teams be productive and collaborate from discovery to delivery, to running software and building applications. Get a first look at exciting product updates, technical deep dives, and keynotes.
Last weekend, I enjoyed the spring vibes at Seoul Forest, a large park in the middle of Seoul city, where cherry blossoms are in full bloom.
Compared to last year, there were crowds of people, so I realized that it was really back to normal after the pandemic. I hope you all enjoy the season of spring or fall with your family.
Last Week’s Launches Like an April Fool’s Day joke, there were 65 launches last week, far more than usual. AWS product teams are working hard with a customer obsession.
So, I had a lot of trouble choosing the important ones. Other than the ones I’ve picked out, there may be important feature releases that fit your needs. Be sure to take a look at the full launches list in the last week.
First, here is a list of the general availability of AWS services and features treated by AWS News Blog:
Let’s take a look at some launches from the last week that I want to remind you of:
The Preview of Amazon DataZone – At AWS re:Invent 2022, we preannounced Amazon DataZone, a new data management service to catalog, discover, analyze, share, and govern data between data producers and consumers in the organization. You can now try out the public preview of Amazon DataZone.
Data producers populate the business data catalog from AWS Glue Data Catalog and Amazon Redshift tables. Data consumers search for and subscribe to data assets in the data catalog and analyze with tools such as Amazon Athena query editors in the Amazon DataZone portal. To get started with Amazon DataZone, see our Quick Start Guide to include sample datasets to implement a complete use case.
AWS Incident Manager helps you bring the right people and information together when a critical issue is detected, activating preconfigured response plans to engage responders using SMS, phone calls, and chat channels, as well as to run AWS Systems Manager Automation runbooks. To learn how to get started with an-call schedules in Incident Manager, see our Working with on-call schedules in Incident Manager in the AWS documentation.
AWS CloudShell Colsone Toolbar – You can now use AWS Cloudshell Console Toolbar with AWS Management Console in a single view. The Console Toolbar maintains its state (e.g., open, closed) and commands will continue to run in CloudShell as you navigate between services in the Console. For example, it allows you to run a command in CloudShell and view a CloudWatch alarm in the Console at the same time.
After signing into the Console, you can access CloudShell in the lower left of the Console by selecting the CloudShell icon in the Console Toolbar.
New Features of AWS Well-Architected Tool – The Consolidated Report and Enhanced Search enable customers to quickly identify risk themes across their workloads and scale improvements across their organization. This macro-level view helps executive stakeholders understand where common issues lie and prioritize team resources to drive widespread improvement. To learn more, see AWS Well-Architected Tool Dashboard in the AWS documentation.
For a full list of AWS announcements, be sure to keep an eye on the What’s New at AWS page.
Other AWS News Here are some other news items that you may find interesting from the last week:
Welcome to the .NET on AWS Blog – We launched a new blog channel for millions of .NET developers across the world. Blog posts will also cover built-for-the-cloud development, modernizing .NET Framework applications, and how to deploy .NET workloads on different AWS services. We will use this channel to share news on the work we’ve done with the .NET open-source community, post follow-ups from important events, and post announcements about upcoming presentations from our .NET developer advocates. To learn more, visit our .NET on AWS website and follow us on Twitter at @dotnetonAWS.
AWS Knowledge Center in AWS re:Post – You can now access trusted, authoritative articles and videos of AWS Knowledge Center on AWS re:Post to get answers to technical questions. Knowledge Center content is produced by an AWS team and covers the most frequent questions and requests from AWS customers. These articles are available in 10 localized languages: English, French, German, Italian, Japanese, Korean, Portuguese, Simplified Chinese, Spanish, and Traditional Chinese.
TF1’s FIFA Worldcup Digital Broadcasting Story – Sébastien shared an awesome story about how the French broadcaster TF1 use AWS Cloud technology and expertise to bring the FIFA World Cup to millions of people. He shared the history of redesigning its digital broadcasting architecture on AWS, testing the new platform on large-scale sporting events. For the preparation of the FIFA Worldcup event, TF1 enhanced monitoring to detect anomalies during the event and established the backup plan in a “war room” for the worst scenario. Even if you’re not a fan of football, I recommend reading the behind-the-scenes of the FIFA Worldcup Finals. It’s long but really fun!
Upcoming AWS Events Check your calendars and sign up for these AWS-led events:
AWS re:Inforce 2023 – Now register AWS re:Inforce, in Anaheim, California, June 13–14. AWS Chief Information Security Officer CJ Moses will share the latest innovations in cloud security and what AWS Security is focused on. The breakout sessions will provide real-world examples of how security is embedded into the way businesses operate. To learn more and get the limited discount code to register, see CJ’s blog post of Gain insights and knowledge at AWS re:Inforce 2023 in the AWS Security Blog.
AWS Community Day – Join community-led conferences driven by AWS user group leaders closest to your city: Peru (April 15), Helsinki (April 20), Chicago (June 15), Philippines (June 29–30), and Munich (September 14). Recently, we are bringing together AWS user groups from around the world into Meetup Pro accounts. Find your group and its meetups in your city!
Welcome to the 21st edition of the AWS Serverless ICYMI (in case you missed it) quarterly recap. Every quarter, we share all the most recent product launches, feature enhancements, blog posts, webinars, live streams, and other interesting things that you might have missed!
In case you missed our last ICYMI, check out what happened last quarter here.
Example notification of a story hosted with Next.js and App Runner
Serverless Land is a website maintained by the Serverless Developer Advocate team to help you build serverless applications and includes workshops, code examples, blogs, and videos. There is now enhanced search functionality so you can search across resources, patterns, and video content.
ServerlessLand search
AWS Lambda
AWS Lambda has improved how concurrency works with Amazon SQS. You can now control the maximum number of concurrent Lambda functions invoked.
The launch blog post explains the scaling behavior of Lambda using this architectural pattern, challenges this feature helps address, and a demo of maximum concurrency in action.
Maximum concurrency is set to 10 for the SQS queue.
AWS Lambda Powertools is an open-source library to help you discover and incorporate serverless best practices more easily. Lambda Powertools for .NET is now generally available and currently focused on three observability features: distributed tracing (Tracer), structured logging (Logger), and asynchronous business and application metrics (Metrics). Powertools is also available for Python, Java, and Typescript/Node.js programming languages.
Lambda announced a new feature, runtime management controls, which provide more visibility and control over when Lambda applies runtime updates to your functions. The runtime controls are optional capabilities for advanced customers that require more control over their runtime changes. You can now specify a runtime management configuration for each function with three settings, Automatic (default), Function update, or manual.
There are three new Amazon CloudWatch metrics for asynchronous Lambda function invocations: AsyncEventsReceived, AsyncEventAge, and AsyncEventsDropped. You can track the asynchronous invocation requests sent to Lambda functions to monitor any delays in processing and take corrective actions if required. The launch blog post explains the new metrics and how to use them to troubleshoot issues.
Lambda now supports Amazon DocumentDB change streams as an event source. You can use Lambda functions to process new documents, track updates to existing documents, or log deleted documents. You can use any programming language that is supported by Lambda to write your functions.
There is a helpful blog post suggesting best practices for developing portable Lambda functions that allow you to port your code to containers if you later choose to.
AWS Step Functions
AWS Step Functions has expanded its AWS SDK integrations with support for 35 additional AWS services including Amazon EMR Serverless, AWS Clean Rooms, AWS IoT FleetWise, AWS IoT RoboRunner and 31 other AWS services. In addition, Step Functions also added support for 1000+ new API actions from new and existing AWS services such as Amazon DynamoDB and Amazon Athena. For the full list of added services, visit AWS SDK service integrations.
EventBridge event buses now also support enhanced integration with Service Quotas. Your quota increase requests for limits such as PutEvents transactions-per-second, number of rules, and invocations per second among others will be processed within one business day or faster, enabling you to respond quickly to changes in usage.
AWS SAM
The AWS Serverless Application Model (SAM) Command Line Interface (CLI) has added the sam list command. You can now show resources defined in your application, including the endpoints, methods, and stack outputs required to test your deployed application.
AWS SAM has a preview of sam build support for building and packaging serverless applications developed in Rust. You can use cargo-lambda in the AWS SAM CLI build workflow and AWS SAM Accelerate to iterate on your code changes rapidly in the cloud.
You can now use AWS SAM connectors as a source resource parameter. Previously, you could only define AWS SAM connectors as a AWS::Serverless::Connector resource. Now you can add the resource attribute on a connector’s source resource, which makes templates more readable and easier to update over time.
AWS SAM connectors now also support multiple destinations to simplify your permissions. You can now use a single connector between a single source resource and multiple destination resources.
In October 2022, AWS released OpenID Connect (OIDC) support for AWS SAM Pipelines. This improves your security posture by creating integrations that use short-lived credentials from your CI/CD provider. There is a new blog post on how to implement it.
Amazon S3 now automatically applies default encryption to all new objects added to S3, at no additional cost and with no impact on performance.
You can now use an S3 Object Lambda Access Point alias as an origin for your Amazon CloudFront distribution to tailor or customize data to end users. For example, you can resize an image depending on the device that an end user is visiting from.
S3 has introduced Mountpoint for S3, a high performance open source file client that translates local file system API calls to S3 object API calls like GET and LIST.
S3 Multi-Region Access Points now support datasets that are replicated across multiple AWS accounts. They provide a single global endpoint for your multi-region applications, and dynamically route S3 requests based on policies that you define. This helps you to more easily implement multi-Region resilience, latency-based routing, and active-passive failover, even when data is stored in multiple accounts.
Amazon Kinesis
Amazon Kinesis Data Firehose now supports streaming data delivery to Elastic. This is an easier way to ingest streaming data to Elastic and consume the Elastic Stack (ELK Stack) solutions for enterprise search, observability, and security without having to manage applications or write code.
Amazon DynamoDB
Amazon DynamoDB now supports table deletion protection to protect your tables from accidental deletion when performing regular table management operations. You can set the deletion protection property for each table, which is set to disabled by default.
Amazon SNS
Amazon SNS now supports AWS X-Ray active tracing to visualize, analyze, and debug application performance. You can now view traces that flow through Amazon SNS topics to destination services, such as Amazon Simple Queue Service, Lambda, and Kinesis Data Firehose, in addition to traversing the application topology in Amazon CloudWatch ServiceLens.
SNS also now supports setting content-type request headers for HTTPS notifications so applications can receive their notifications in a more predictable format. Topic subscribers can create a DeliveryPolicy that specifies the content-type value that SNS assigns to their HTTPS notifications, such as application/json, application/xml, or text/plain.
EDA Visuals collection added to Serverless Land
The Serverless Developer Advocate team has extended Serverless Land and introduced EDA visuals. These are small bite sized visuals to help you understand concept and patterns about event-driven architectures. Find out about batch processing vs. event streaming, commands vs. events, message queues vs. event brokers, and point-to-point messaging. Discover bounded contexts, migrations, idempotency, claims, enrichment and more!
There is also a new section on Serverless Land containing helpful code repositories. You can search for code repos to use for examples, learning or building serverless applications. You can also filter by use-case, runtime, and level.
Weekly office hours live stream. In each session we talk about a specific topic or technology related to serverless and open it up to helping you with your real serverless challenges and issues. Ask us anything you want about serverless technologies and applications.
Marcia Villalba frequently publishes new videos on her popular serverless YouTube channel. You can view all of Marcia’s videos at https://www.youtube.com/c/FooBar_codes.
Eric Johnson is exploring how developers are building serverless applications. We spend time talking about AWS SAM as well as others like AWS CDK, Terraform, Wing, and AMPT.
The Serverless landing page has more information. The Lambda resources page contains case studies, webinars, whitepapers, customer stories, reference architectures, and even more Getting Started tutorials.
This blog post is written by Amir Khairalomoum, Senior Solutions Architect.
Modern applications are built with modular architectural patterns, serverless operational models, and agile developer processes. They allow you to innovate faster, reduce risk, accelerate time to market, and decrease your total cost of ownership (TCO). A microservices architecture comprises many distributed parts that can introduce complexity to application observability. Modern observability must respond to this complexity, the increased frequency of software deployments, and the short-lived nature of AWS Lambda execution environments.
The Serverless Applications Lens for the AWS Well-Architected Framework focuses on how to design, deploy, and architect your serverless application workloads in the AWS Cloud. AWS Lambda Powertools for .NET translates some of the best practices defined in the serverless lens into a suite of utilities. You can use these in your application to apply structured logging, distributed tracing, and monitoring of metrics.
This post shows how to use the new open source Powertools library to implement observability best practices with minimal coding. It walks through getting started, with the provided examples available in the Powertools GitHub repository.
About Powertools
Powertools for .NET is a suite of utilities that helps with implementing observability best practices without needing to write additional custom code. It currently supports Lambda functions written in C#, with support for runtime versions .NET 6 and newer. Powertools provides three core utilities:
Tracing provides a simpler way to send traces from functions to AWS X-Ray. It provides visibility into function calls, interactions with other AWS services, or external HTTP requests. You can add attributes to traces to allow filtering based on key information. For example, when using the Tracing attribute, it creates a ColdStart annotation. You can easily group and analyze traces to understand the initialization process.
Logging provides a custom logger that outputs structured JSON. It allows you to pass in strings or more complex objects, and takes care of serializing the log output. The logger handles common use cases, such as logging the Lambda event payload, and capturing cold start information. This includes appending custom keys to the logger.
Metrics simplifies collecting custom metrics from your application, without the need to make synchronous requests to external systems. This functionality allows capturing metrics asynchronously using Amazon CloudWatch Embedded Metric Format (EMF) which reduces latency and cost. This provides convenient functionality for common cases, such as validating metrics against CloudWatch EMF specification and tracking cold starts.
Getting started
The following steps explain how to use Powertools to implement structured logging, add custom metrics, and enable tracing with AWS X-Ray. The example application consists of an Amazon API Gateway endpoint, a Lambda function, and an Amazon DynamoDB table. It uses the AWS Serverless Application Model (AWS SAM) to manage the deployment.
When you send a GET request to the API Gateway endpoint, the Lambda function is invoked. This function calls a location API to find the IP address, stores it in the DynamoDB table, and returns it with a greeting message to the client.
Example application
The AWS Lambda Powertools for .NET utilities are available as NuGet packages. Each core utility has a separate NuGet package. It allows you to add only the packages you need. This helps to make the Lambda package size smaller, which can improve the performance.
To implement each of these core utilities in a separate example, use the Globals sections of the AWS SAM template to configure Powertools environment variables and enable active tracing for all Lambda functions and Amazon API Gateway stages.
Sometimes resources that you declare in an AWS SAM template have common configurations. Instead of duplicating this information in every resource, you can declare them once in the Globals section and let your resources inherit them.
Logging
The following steps explain how to implement structured logging in an application. The logging example shows you how to use the logging feature.
To add the Powertools logging library to your project, install the packages from NuGet gallery, from Visual Studio editor, or by using following .NET CLI command:
dotnet add package AWS.Lambda.Powertools.Logging
Use environment variables in the Globals sections of the AWS SAM template to configure the logging library:
Decorate the Lambda function handler method with the Logging attribute in the code. This enables the utility and allows you to use the Logger functionality to output structured logs by passing messages as a string. For example:
[Logging]
public async Task<APIGatewayProxyResponse> FunctionHandler
         (APIGatewayProxyRequest apigProxyEvent, ILambdaContext context)
{
  ...
  Logger.LogInformation("Getting ip address from external service");
  var location = await GetCallingIp();
  ...
}
Another common use case, especially when developing new Lambda functions, is to print a log of the event received by the handler. You can achieve this by enabling LogEvent on the Logging attribute. This is disabled by default to prevent potentially leaking sensitive event data into logs.
With logs available as structured JSON, you can perform searches on this structured data using CloudWatch Logs Insights. To search for all logs that were output during a Lambda cold start, and display the key fields in the output, run following query:
Using the Tracing attribute, you can instruct the library to send traces and metadata from the Lambda function invocation to AWS X-Ray using the AWS X-Ray SDK for .NET. The tracing example shows you how to use the tracing feature.
When your application makes calls to AWS services, the SDK tracks downstream calls in subsegments. AWS services that support tracing, and resources that you access within those services, appear as downstream nodes on the service map in the X-Ray console.
You can instrument all of your AWS SDK for .NET clients by calling RegisterXRayForAllServices before you create them.
public class Function
{
  private static IDynamoDBContext _dynamoDbContext;
  public Function()
  {
    AWSSDKHandler.RegisterXRayForAllServices();
    ...
  }
  ...
}
To add the Powertools tracing library to your project, install the packages from NuGet gallery, from Visual Studio editor, or by using following .NET CLI command:
dotnet add package AWS.Lambda.Powertools.Tracing
Use environment variables in the Globals sections of the AWS SAM template to configure the tracing library.
Decorate the Lambda function handler method with the Tracing attribute to enable the utility. To provide more granular details for your traces, you can use the same attribute to capture the invocation of other functions outside of the handler. For example:
Once traffic is flowing, you see a generated service map in the AWS X-Ray console. Decorating the Lambda function handler method, or any other method in the chain with the Tracing attribute, provides an overview of all the traffic flowing through the application.
AWS X-Ray trace service view
You can also view the individual traces that are generated, along with a waterfall view of the segments and subsegments that comprise your trace. This data can help you pinpoint the root cause of slow operations or errors within your application.
AWS X-Ray waterfall trace view
You can also filter traces by annotation and create custom service maps with AWS X-Ray Trace groups. In this example, use the filter expression annotation.ColdStart = true to filter traces based on the ColdStart annotation. The Tracing attribute adds these automatically when used within the handler method.
View trace attributes
Metrics
CloudWatch offers a number of included metrics to help answer general questions about the application’s throughput, error rate, and resource utilization. However, to understand the behavior of the application better, you should also add custom metrics relevant to your workload.
In the sample application, you want to understand how often your service is calling the location API to identify the IP addresses. The metrics example shows you how to use the metrics feature.
To add the Powertools metrics library to your project, install the packages from the NuGet gallery, from the Visual Studio editor, or by using the following .NET CLI command:
dotnet add package AWS.Lambda.Powertools.Metrics
Use environment variables in the Globals sections of the AWS SAM template to configure the metrics library:
To create custom metrics, decorate the Lambda function with the Metrics attribute. This ensures that all metrics are properly serialized and flushed to logs when the function finishes its invocation.
You can then emit custom metrics by calling AddMetric or push a single metric with a custom namespace, service and dimensions by calling PushSingleMetric. You can also enable the CaptureColdStart on the attribute to automatically create a cold start metric.
[Metrics(CaptureColdStart = true)]
public async Task<APIGatewayProxyResponse> FunctionHandler
         (APIGatewayProxyRequest apigProxyEvent, ILambdaContext context)
{
  ...
  // Add Metric to capture the amount of time
  Metrics.PushSingleMetric(
        metricName: "CallingIP",
        value: 1,
        unit: MetricUnit.Count,
        service: "lambda-powertools-metrics-example",
        defaultDimensions: new Dictionary<string, string>
        {
            { "Metric Type", "Single" }
        });
  ...
}
Conclusion
CloudWatch and AWS X-Ray offer functionality that provides comprehensive observability for your applications. Lambda Powertools .NET is now available in preview. The library helps implement observability when running Lambda functions based on .NET 6 while reducing the amount of custom code.
It simplifies implementing the observability best practices defined in the Serverless Applications Lens for the AWS Well-Architected Framework for a serverless application and allows you to focus more time on the business logic.
You can find the full documentation and the source code for Powertools in GitHub. We welcome contributions via pull request, and encourage you to create an issue if you have any feedback for the project. Happy building with AWS Lambda Powertools for .NET.
For more serverless learning resources, visit Serverless Land.
No tricks, just treats in this weekly roundup of news and announcements. Let’s switch our AWS Management Console into dark mode and dive right into it.
Last Week’s Launches Here are some launches that got my attention during the previous week:
AWS Local Zones in Hamburg and Warsaw now generally available – AWS Local Zones help you run latency-sensitive applications closer to end users. The AWS Local Zones in Hamburg, Germany, and Warsaw, Poland, are the first Local Zones in Europe. AWS Local Zones are now generally available in 20 metro areas globally, with announced plans to launch 33 additional Local Zones in metro areas around the world. See the full list of available and announced AWS Local Zones, and learn how to get started.
Amazon SageMaker multi-model endpoint (MME) now supports GPU instances – MME is a managed capability of SageMaker Inference that lets you deploy thousands of models on a single endpoint. MMEs can now run multiple models on a GPU core, share GPU instances behind an endpoint across multiple models, and dynamically load and unload models based on the incoming traffic. This can help you reduce costs and achieve better price performance. Learn how to run multiple deep learning models on GPU with Amazon SageMaker multi-model endpoints.
Amazon EC2 now lets you replace the root Amazon EBS volume for a running instance – You can now use the Replace Root Volume for patching features in Amazon EC2 to replace your instance root volume using an updated AMI without needing to stop the instance. This makes patching of the guest operating system and applications easier, while retraining the instance store data, networking, and IAM configuration. Check out the documentation to learn more.
AWS Fault Injection Simulator now supports network connectivity disruption – AWS Fault Injection Simulator (FIS) is a managed service for running controlled fault injection experiments on AWS. AWS FIS now has a new action type to disrupt network connectivity and validate that your applications are resilient to a total or partial loss of connectivity. To learn more, visit Network Actions in the AWS FIS user guide.
Amazon SageMaker Automatic Model Tuning now supports Grid Search – SageMaker Automatic Model Tuning helps you find the hyperparameter values that result in the best-performing model for a chosen metric. Until now, you could choose between random, Bayesian, and hyperband search strategies. Grid search now lets you cover every combination of the specified hyperparameter values for use cases in which you need reproducible tuning results. Learn how Amazon SageMaker Automatic Model Tuning now supports grid search.
Other AWS News Here are some additional news items that you may find interesting:
Celebrating over 20 years of AI/ML innovation – On October 25, we hosted the AWS AI/ML Innovation Day. Bratin Saha and other leaders in the field shared the great strides we have made in the past and discussed what’s next in the world of ML. You can watch the recording here.
AWS open-source news and updates – My colleague Ricardo Sueiras writes this weekly open-source newsletter in which he highlights new open-source projects, tools, and demos from the AWS Community. Read edition #133 here.
Upcoming AWS Events Check your calendars and sign up for these AWS events:
AWS re:Invent is only 4 weeks away! Join us live in Las Vegas from November 28–December 2 for keynote announcements, training and certification opportunities, access to 1,500+ technical sessions, and much more. Seats are still available to reserve, and walk-ups are available onsite. You can also join us online to watch live keynotes and leadership sessions.
On November 2, there is a virtual event for building modern .NET applications on AWS. You can register for free.
On November 11–12, AWS User Groups in India are hosting the AWS Community Day India 2022, with success stories, use cases, and much more from industry leaders. Sign up for free to join this virtual event.
That’s all for this week. Check back next Monday for another Week in Review!
Monday means it’s time for another Week in Review post, so, without further ado, let’s dive right in!
Last Week’s Launches Here’s some launch announcements from last week you may have missed.
AWS Directory Service for Microsoft Active Directory is now available on Windows Server 2019, and all new directories will run on this server platform. Those of you with existing directories can choose to update with either a few clicks on the AWS Managed Microsoft AD console, or you can update programmatically using an API. With either approach, you can update at a time convenient to you and your organization between now and March 2023. After March 2023, directories will be updated automatically.
AWS Activate is a program that offers free tools, resources, and the opportunity to apply for credits to smaller early stage businesses and also more advanced digital businesses, helping them get started quickly on AWS. The program is now open to any self-identified startup.
Amazon QuickSight users who employ row-level security (RLS) to control access to restricted datasets will be interested in a new feature that enables you to ask questions against topics in these datasets. User-based rules control the answers received to questions and any auto-complete suggestions provided when the questions are being framed. This ensures that users only ever receive answer data that they are granted permission to access.
Other AWS News This interesting blog post focus on the startup Pieces Technologies, who are putting predictive artificial intelligence (AI) and machine learning (ML) tools to work on AWS to predict and offer clinical insights on patient outcomes such as such as projected discharge dates, anticipated clinical and non-clinical barriers to discharge, and risk of readmission. To help healthcare teams work more efficiently, the insights are provided in natural language and seek to optimize overall clarity of a patient’s clinical issues.
As usual, there’s another AWS open-source and updates newsletter. The newsletter is published weekly to bring you up to date on the latest news on open-source projects, posts, and events.
Upcoming Events Speaking of upcoming events, the following are some you may be interested in joining, especially if you work with .NET:
Looking to modernize .NET workloads using Windows containers on AWS? There’s a free webinar, with follow-along lab, in just a couple of days on October 20. You can find more details and register here.
My .NET colleagues are also hosting another webinar on November 2 related to building modern .NET applications on AWS. If you’re curious about the hosting and development capabilities of AWS for .NET applications, this is a webinar you should definitely check out. You’ll find further information and registration here.
And finally, a reminder that reserved seating for sessions at AWS re:Invent 2022 is now open. We’re now just 6 weeks away from the event! There are lots of great sessions for your attention, but those of particular interest to me are the ones related to .NET, and at this year’s event we have seven breakouts, three chalk talks, and a workshop for you. You can find all the details using the .NET filter in the session catalog (the sessions all start with the prefix XNT, by the way).
That’s all for this week. Check back next Monday for another AWS Week in Review!
As an ex-.NET developer, and now Developer Advocate for .NET at AWS, I’m excited to bring you this week’s Week in Review post, for reasons that will quickly become apparent! There are several updates, customer stories, and events I want to bring to your attention, so let’s dive straight in!
Last Week’s launches .NET developers, here are two new updates to be aware of—and be sure to check out the events section below for another big announcement:
Developers refactoring applications to a microservice-based architecture should look at new automated recommendations in the AWS Microservice Extractor for .NET that help identify code suitable to refactor as a microservice. Now, instead of developers needing to identify and group classes for extraction, Microservice Extractor identifies common extraction candidates and highlights those in its built-in visualization of an application’s source code. You can use the recommendations as is, or adopt them as a starting point to extract microservices off of a monolithic codebase.
Tiered pricing for AWS Lambda will interest customers running large workloads on Lambda. The tiers, based on compute duration (measured in GB-seconds), help you save on monthly costs—automatically. Find out more about the new tiers, and see some worked examples showing just how they can help reduce costs, in this AWS Compute Blog post by Heeki Park, a Principal Solutions Architect for Serverless.
RDS for PostgreSQL now supports new minor versions. Besides the version upgrades, there are also updates for the PostgreSQL extensions pglogical, pg_hint_plan, and hll.
RDS for MySQL can now enforce SSL/TLS for client connections to your databases to help enhance transport layer security. You can enforce SSL/TLS by simply enabling the require_secure_transport parameter (disabled by default) via the Amazon RDS Management console, the AWS Command Line Interface (AWS CLI), AWS Tools for PowerShell, or using the API. When you enable this parameter, clients will only be able to connect if an encrypted connection can be established.
Amazon Elastic Compute Cloud (Amazon EC2)expanded availability of the latest generation storage-optimized Is4gen and Im4gn instances to the Asia Pacific (Sydney), Canada (Central), Europe (Frankfurt), and Europe (London) Regions. Built on the AWS Nitro System and powered by AWS Graviton2 processors, these instance types feature up to 30 TB of storage using the new custom-designed AWS Nitro System SSDs. They’re ideal for maximizing the storage performance of I/O intensive workloads that continuously read and write from the SSDs in a sustained manner, for example SQL/NoSQL databases, search engines, distributed file systems, and data analytics.
Lastly, there’s a new URL from AWS Support API to use when you need to access the AWS Support Center console. I recommend bookmarking the new URL, https://support.console.aws.amazon.com/, which the team built using the latest architectural standards for high availability and Region redundancy to ensure you’re always able to contact AWS Support via the console.
In one recent AWS on Air livestream segment from AWS re:MARS, discussing the increasing scale of machine learning (ML) models, our guests mentioned billion-parameter ML models which quite intrigued me. As an ex-developer, my mental model of parameters is a handful of values, if that, supplied to methods or functions—not billions. Of course, I’ve since learned they’re not the same thing! As I continue my own ML learning journey I was particularly interested in reading this Amazon Science blog on 20B-parameter Alexa Teacher Models (AlexaTM). These large-scale multilingual language models can learn new concepts and transfer knowledge from one language or task to another with minimal human input, given only a few examples of a task in a new language.
When developing games intended to run fully in the cloud, what benefits might there be in going fully cloud-native and moving the entire process into the cloud? Find out in this customer story from Return Entertainment, who did just that to build a cloud-native gaming infrastructure in a few months, reducing time and cost with AWS services.
Upcoming events Check your calendar and sign up for these online and in-person AWS events:
AWS Storage Day: On August 10, tune into this virtual event on twitch.tv/aws, 9:00 AM–4.30 PM PT, where we’ll be diving into building data resiliency into your organization, and how to put data to work to gain insights and realize its potential, while also optimizing your storage costs. Register for the event here.
AWS Global Summits: These free events bring the cloud computing community together to connect, collaborate, and learn about AWS. Registration is open for the following AWS Summits in August:
AWS .NET Enterprise Developer Days 2022 – North America: Registration for this free, 2-day, in-person event and follow-up 2-day virtual event opened this past week. The in-person event runs September 7–8, at the Palmer Events Center in Austin, Texas. The virtual event runs September 13–14. AWS .NET Enterprise Developer Days (.NET EDD) runs as a mini-conference within the DeveloperWeek Cloud conference (also in-person and virtual). Anyone registering for .NET EDD is eligible for a free pass to DeveloperWeek Cloud, and vice versa! I’m super excited to be helping organize this third .NET event from AWS, our first that has an in-person version. If you’re a .NET developer working with AWS, I encourage you to check it out!
That’s all for this week. Be sure to check back next Monday for another Week in Review roundup!
We announce the general availability of license-included Visual Studio software on Amazon Elastic Cloud Compute (Amazon EC2) instances. You can now purchase fully compliant AWS-provided licenses of Visual Studio with a per-user subscription fee. Amazon EC2 provides preconfigured Amazon Machine Images (AMIs) of Visual Studio Enterprise 2022 and Visual Studio Professional 2022. You can launch on-demand Windows instances including Visual Studio and Windows Server licenses without long-term licensing commitments.
Amazon EC2 provides a broad choice of instances, and customers not only have the flexibility of paying for what their end users use but can also provide the capacity and right hardware to their end users. You can simply launch EC2 instances using license-included AMIs, and multiple authorized users can connect to these EC2 instances by using Remote Desktop software. Your administrator can authorize users centrally using AWS License Manager and AWS Managed Microsoft Active Directory (AD).
Configure Visual Studio License with AWS License Manager As a prerequisite, your administrator needs to create an instance of AWS Managed Microsoft AD and allow AWS License Manager to onboard to it by accepting permission. To set up authorized users, see AWS Managed Microsoft AD documentation.
AWS License Manager makes it easier to manage your software licenses from vendors such as Microsoft, SAP, Oracle, and IBM across AWS and on-premises environments. To display a list of available Visual Studio software licenses, select User-based subscriptions in the AWS Licence Manager console.
You can see listed products to support user-based subscriptions. Each product has a descriptive name, a count of the subscribed users to utilize the product, and whether the subscription has been activated for use with a directory. Also, you are required to purchase Remote Desktop Services SAL licenses in the same way as Visual Studio by authorizing users for those licenses.
When you select Visual Studio Professional, you can see product details and subscribed users. By selecting Subscribe users, you can add authorized users to the license of Visual Studio Professional software.
You can perform the administrative tasks using the AWS Command Line Interface (CLI) tools via AWS License Manager APIs. For example, you can subscribe a user to the product in your Active Directory.
To launch a Windows instance with preconfigured Visual Studio software, go to the EC2 console and select Launch instances. In the Application and OS Images (Amazon Machine Image), search for “Visual Studio on EC2,” and you can find AMIs under the Quickstart AMIs and AWS Marketplace AMIs tabs.
After launching your Windows instance, your administrator associates a user to the product in the Instances screen of the License Manager console. You can see the listed instances were launched using an AMI to provide the specified product to users who can then be associated.
These steps will be performed by the administrators who are responsible for managing users, instances, and costs across the organization. To learn more about administrative tasks, see User-based subscriptions in AWS License Manager.
Run Visual Studio Software on EC2 Instances Once administrators authorize end users and launch the instances, you can remotely connect to Visual Studio instances using your AD account information shared by your administrator via Remote Desktop software. That’s all!
Now Available License-included Visual Studio on Amazon EC2 is now available in all AWS commercial and public Regions. You are billed per user for licenses of Visual Studio through a monthly subscription and per vCPU for license-included Windows Server instances on EC2. You can use On-Demand Instances, Reserved Instances, and Savings Plan pricing models like you do today for EC2 instances.
Last Week’s Launches It’s been a quiet week on the AWS News Blog, however a glance at What’s New page shows the various service teams have been busy as usual. Here’s a round-up of announcements that caught my attention this past week.
VPC endpoint support is now available in Amazon SageMaker Canvas – SageMaker Canvas is a visual point-and-click service enabling business analysts to generate accurate machine-learning (ML) models without requiring ML experience or needing to write code. The new VPC endpoint support, available in all Regions where SageMaker Canvas is suppported, eliminates the need for an internet gateway, NAT instance, or a VPN connection when connecting from your SageMaker Canvas environment to services such as Amazon Simple Storage Service (Amazon S3), Amazon Redshift, and more.
Additional data sources for Amazon AppFlow – Facebook Ads, Google Ads, and Mixpanel are now supported as data sources, providing the ability to ingest marketing and product analytics for downstream analysis in AppFlow-connected software-as-a-service (SaaS) applications such as Marketo and Salesforce Marketing Cloud.
Some of the breakout session recordings from our .NET Enterprise Developer Day event in EMEA during April are now available on the .NET on AWS YouTube playlist.
Upcoming AWS Events The AWS New York Summit is approaching quickly, on July 12. Registration is also now open for the AWS Summit Canberra, an in-person event scheduled for August 31.
Amazon re:MARS is taking place this week in Las Vegas. I’ll be there as a host of the AWS on Air show, along with special guests highlighting their latest news from the conference. I also have some On Air sessions on using our AI services from .NET lined up! As usual, we’ll be streaming live from the expo hall, so if you’re at the conference, give us a wave. You can watch the show live on Twitch.tv/aws, Twitter.com/AWSOnAir, and LinkedIn Live.
No doubt there’ll be a whole new batch of releases and announcements from re:MARS, so be sure to check back next Monday for a summary of the announcements that caught our attention!
This post expands on the functionality introduced with the PowerShell custom runtime for AWS Lambda. The previous blog explains how the custom runtime approach makes it easier to run Lambda functions written in PowerShell.
You can add additional functionality to your PowerShell serverless applications by importing PowerShell modules, which are shareable packages of code. Build your own modules or import from the wide variety of existing vendor modules to manage your infrastructure and applications.
You can also take advantage of the event-driven nature of Lambda, which allows you to run Lambda functions in response to events. Events can include an object being uploaded to Amazon S3, a message placed on an Amazon SQS queue, a scheduled task using Amazon EventBridge, or an HTTP request from Amazon API Gateway. Lambda functions support event triggers from over 200 AWS services and software as a service (SaaS) applications.
Adding PowerShell modules
You can add PowerShell modules from a number of locations. These can include modules from the AWS Tools for PowerShell, from the PowerShell Gallery, or your own custom modules. Lambda functions access these PowerShell modules within specific folders within the Lambda runtime environment.
You can include PowerShell modules via Lambda layers, within your function code package, or container image. When using .zip archive functions, you can use layers to package and share modules to use with your functions. Layers reduce the size of uploaded deployment archives and can make it faster to deploy your code. You can attach up to five layers to your function, one of which must be the PowerShell custom runtime layer. You can include multiple modules per layer.
The custom runtime configures PowerShell’s PSModulePath environment variable, which contains the list of folder locations to search to find modules. The runtime searches the folders in the following order:
1. User supplied modules as part of function package
You can include PowerShell modules inside the published Lambda function package in a /modules subfolder.
2. User supplied modules as part of Lambda layers
You can publish Lambda layers that include PowerShell modules in a /modules subfolder. This allows you to share modules across functions and accounts. Lambda extracts layers to /opt within the Lambda runtime environment so the modules are located in /opt/modules. This is the preferred solution to use modules with multiple functions.
3. Default/user supplied modules supplied with PowerShell
You can also include additional default modules and add them within a /modules folder within the PowerShell custom runtime layer.
For example, the following function includes four Lambda layers. One layer includes the custom runtime. Three additional layers include further PowerShell modules; the AWS Tools for PowerShell, your own custom modules, and third-party modules. You can also include additional modules with your function code.
Lambda layers
Within your PowerShell code, you can load modules during the function initialization (init) phase. This initializes the modules before the handler function runs, which speeds up subsequent warm-start invocations.
Adding modules from the AWS Tools for PowerShell
This post shows how to use the AWS Tools for PowerShell to manage your AWS services and resources. The tools are packaged as a set of PowerShell modules that are built on the functionality exposed by the AWS SDK for .NET. You can follow similar packaging steps to add other modules to your functions.
The AWS Tools for PowerShell are available as three distinct packages:
The AWS.Tools package is the preferred modularized version, which allows you to load only the modules for the services you want to use. This reduces package size and function memory usage. The AWS.Tools cmdlets support auto-importing modules without having to call Import-Module first. However, specifically importing the modules during the function init phase is more efficient and can reduce subsequent invoke duration. The AWS.Tools.Common module is required and provides cmdlets for configuration and authentication that are not service specific.
The accompanying GitHub repository contains the code for the custom runtime, along with a number of example applications. There are also module build instructions for adding a number of common PowerShell modules as Lambda layers, including AWS.Tools.
Building an event-driven PowerShell function
The repository contains an example of an event-driven demo application that you can build using serverless services.
A clothing printing company must manage its t-shirt size and color inventory. The printers store t-shirt orders for each day in a CSV file. The inventory service is one service that must receive the CSV file. It parses the file and, for each order, records the details to manage stock deliveries.
The stores upload the files to S3. This automatically invokes a PowerShell Lambda function, which is configured to respond to the S3 ObjectCreated event. The Lambda function receives the S3 object location as part of the $LambdaInput event object. It uses the AWS Tools for PowerShell to download the file from S3. It parses the contents and, for each line in the CSV file, sends the individual order details as an event to an EventBridge event bus.
In this example, there is a single rule to log the event to Amazon CloudWatch Logs to show the received event. However, you could route each order, depending on the order details, to different targets. For example, you can send different color combinations to SQS queues, which the dyeing service can use to order dyes. You could send particular size combinations to another Lambda function that manages cloth orders.
Example event-driven application
The previous blog post shows how to use the AWS Serverless Application Model (AWS SAM) to build a Lambda layer, which includes only the AWS.Tools.Common module to run Get-AWSRegion. To build a PowerShell application to process objects from S3 and send events to EventBridge, you can extend this functionality by also including the AWS.Tools.S3 and AWS.Tools.EventBridge modules in a Lambda layer.
Lambda layers, including S3 and EventBridge
Building the AWS Tools for PowerShell layer
You could choose to add these modules and rebuild the existing layer. However, the example in this post creates a new Lambda layer to show how you can have different layers for different module combinations of AWS.Tools. The example also adds the Lambda layer Amazon Resource Name (ARN) to AWS Systems Manager Parameter Store to track deployed layers. This allows you to reference them more easily in infrastructure as code tools.
The repository includes build scripts for both Windows and non-Windows developers. Windows does not natively support Makefiles. When using Windows, you can use either Windows Subsystem for Linux (WSL), Docker Desktop, or native PowerShell.
When using Linux, macOS, WSL, or Docker, the Makefile builds the Lambda layers. After downloading the modules, it also extracts the additional AWS.Tools.S3 and AWS.Tools.EventBridge modules.
When using native PowerShell on Windows to build the layer, the build-AWSToolsLayer.ps1 script performs the same file copy functionality as the Makefile. You can use this option for Windows without WSL or Docker.
### Extract entire AWS.Tools modules to stage area but only move over select modules
…
Move-Item "$PSScriptRoot\stage\AWS.Tools.Common" "$PSScriptRoot\modules\" -Force
Move-Item "$PSScriptRoot\stage\AWS.Tools.S3" "$PSScriptRoot\modules\" -Force
Move-Item "$PSScriptRoot\stage\AWS.Tools.EventBridge" "$PSScriptRoot\modules\" -Force
The Lambda function code imports the required modules in the function init phase.
For other combinations of AWS.Tools, amend the example build-AWSToolsLayer.ps1 scripts to add the modules you require. You can use a similar download and copy process, or PowerShell’s Save-Module to build layers for modules from other locations.
Building and deploying the event-driven serverless application
Follow the instructions in the GitHub repository to build and deploy the application.
The demo application uses AWS SAM to deploy the following resources:
PowerShell custom runtime.
Additional Lambda layer containing the AWS.Tools.Common, AWS.Tools.S3, and AWS.Tools.EventBridge modules from AWS Tools for PowerShell. The layer ARN is stored in Parameter Store.
S3 bucket to store CSV files.
Lambda function triggered by S3 upload.
Custom EventBridge event bus and rule to send events to CloudWatch Logs.
Testing the event-driven application
Use the AWS CLI or AWS Tools for PowerShell to copy the sample CSV file to S3. Replace BUCKET_NAME with your S3 SourceBucket Name from the AWS SAM outputs.
The S3 file copy action generates an S3 notification event. This invokes the PowerShell Lambda function, passing the S3 file location details as part of the function $LambdaInput event object.
The function downloads the S3 CSV file, parses the contents, and sends the individual lines to EventBridge, which logs the events to CloudWatch Logs.
Navigate to the CloudWatch Logs group /aws/events/demo-s3-lambda-eventbridge.
You can see the individual orders logged from the CSV file.
EventBridge logs showing CSV lines
Conclusion
You can extend PowerShell Lambda applications to provide additional functionality.
This post shows how to import your own or vendor PowerShell modules and explains how to build Lambda layers for the AWS Tools for PowerShell.
You can also take advantage of the event-driven nature of Lambda to run Lambda functions in response to events. The demo application shows how a clothing printing company builds a PowerShell serverless application to manage its t-shirt size and color inventory.
See the accompanying GitHub repository, which contains the code for the custom runtime, along with additional installation options and additional examples.
Start running PowerShell on Lambda today.
For more serverless learning resources, visit Serverless Land.
The new PowerShell custom runtime for AWS Lambda makes it even easier to run Lambda functions written in PowerShell to process events. Using this runtime, you can run native PowerShell code in Lambda without having to compile code, which simplifies deployment and testing. You can also now view PowerShell code in the AWS Management Console, and have more control over function output and logging.
Lambda has supported running PowerShell since 2018. However, the existing solution uses the .NET Core runtime implementation for PowerShell. It uses the additional AWSLambdaPSCore modules for deployment and publishing, which require compiling the PowerShell code into C# binaries to run on .NET. This adds additional steps to the development process.
This blog post explains the benefits of using a custom runtime and information about the runtime options. You can deploy and run an example native PowerShell function in Lambda.
PowerShell custom runtime benefits
The new custom runtime for PowerShell uses native PowerShell, instead of compiling PowerShell and hosting it on the .NET runtime. Using native PowerShell means the function runtime environment matches a standard PowerShell session, which simplifies the development and testing process.
You can now also view and edit PowerShell code within the Lambda console’s built-in code editor. You can embed PowerShell code within an AWS CloudFormation template, or other infrastructure as code tools.
PowerShell code in Lambda console
This custom runtime returns everything placed on the pipeline as the function output, including the output of Write-Output. This gives you more control over the function output, error messages, and logging. With the previous .NET runtime implementation, your function returns only the last output from the PowerShell pipeline.
Building and packaging the custom runtime
The custom runtime is based on Lambda’s provided.al2 runtime, which runs in an Amazon Linux environment. This includes AWS credentials from an AWS Identity and Access Management (IAM) role that you manage. You can build and package the runtime as a Lambda layer, or include it in a container image. When packaging as a layer, you can add it to multiple functions, which can simplify deployment.
The runtime is based on the cross-platform PowerShell Core. This means that you can develop Lambda functions for PowerShell on Windows, Linux, or macOS.
Lambda function with three different handler options.
To build the custom runtime and the AWS Tools for PowerShell layer for this example, AWS SAM uses a Makefile. This downloads the specified version of PowerShell from GitHub and the AWSTools.
Clone the repository and change into the example directory
git clone https://github.com/awslabs/aws-lambda-powershell-runtime
cd examples/demo-runtime-layer-function
Use one of the following Build options, A, B, C, depending on your operating system and tools.
A) Build using Linux or WSL
Build the custom runtime, Lambda layer, and function packages using native Linux or WSL.
sam build --parallel
sam build –parallel
B) Build using Docker
You can build the custom runtime, Lambda layer, and function packages using Docker. This uses a Linux-based Lambda-like Docker container to build the packages. Use this option for Windows without WSL or as an isolated Mac/Linux build environment.
sam build --parallel --use-container
sam build –parallel –use-container
C) Build using PowerShell for Windows
You can use native PowerShell for Windows to download and extract the custom runtime and Lambda layer files. This performs the same file copy functionality as the Makefile. It adds the files to the source folders rather than a build location for subsequent deployment with AWS SAM. Use this option for Windows without WSL or Docker.
.\build-layers.ps1
Build layers using PowerShell
Test the function locally
Once the build process is complete, you can use AWS SAM to test the function locally.
sam local invoke
This uses a Lambda-like environment to run the function locally and returns the function response, which is the result of Get-AWSRegion.
sam local invoke
Deploying to the AWS Cloud
Use AWS SAM to deploy the resources to your AWS account. Run a guided deployment to set the default parameters for the first deploy.
sam deploy -g
For subsequent deployments you can use sam deploy.
Enter a Stack Name and accept the remaining initial defaults.
AWS SAM deploy –g
AWS SAM deploys the infrastructure and outputs the details of the resources.
AWS SAM resources
View, edit, and invoke the function in the AWS Management Console
You can view, edit code, and invoke the Lambda function in the Lambda Console.
Navigate to the Functions page and choose the function specified in the sam deployOutputs.
Using the built-in code editor, you can view the function code.
This function imports the AWS.Tools.Common module during the init process. The function handler runs and returns the output of Get-AWSRegion.
To invoke the function, select the Test button and create a test event. For more information on invoking a function with a test event, see the documentation.
You can see the results in the Execution result pane.
Lambda console test
You can also view a snippet of the generated Function Logs below the Response. View the full logs in Amazon CloudWatch Logs. You can navigate directly via the Monitor tab.
Invoke the function using the AWS CLI
From a command prompt invoke the function. Amend the --function-name and --region values for your function. This should return "StatusCode": 200 for a successful invoke.
View the function results which are outputted to invoke-result.
cat invoke-result
cat invoke result
Invoke the function using the AWS Tools for PowerShell
You can invoke the Lambda function using the AWS Tools for PowerShell and capture the response in a variable. The response is available in the Payload property of the $Response object, which can be read using the .NET StreamReader class.
Use AWS SAM to delete the AWS resources created by this template.
sam delete
PowerShell runtime information
Variables
The runtime defines the following variables which are made available to the Lambda function.
$LambdaInput: A PSObject that contains the Lambda function input event data.
$LambdaContext: An object that provides methods and properties with information about the invocation, function, and runtime environment. For more information, see the GitHub repository.
PowerShell module support
You can include additional PowerShell modules either via a Lambda Layer, or within your function code package, or container image. Using Lambda layers provides a convenient way to package and share modules that you can use with your Lambda functions. Layers reduce the size of uploaded deployment archives and make it faster to deploy your code.
The PSModulePath environment variable contains a list of folder locations that are searched to find user-supplied modules. This is configured during the runtime initialization. Folders are specified in the following order:
Modules as part of function package in a /modules subfolder.
Modules as part of Lambda layers in a /modules subfolder.
Modules as part of the PowerShell custom runtime layer in a /modules subfolder.
Lambda handler options
There are three different Lambda handler formats supported with this runtime.
<script.ps1>
You provide a PowerShell script that is the handler. Lambda runs the entire script on each invoke.
<script.ps1>::<function_name>
You provide a PowerShell script that includes a PowerShell function name. The PowerShell function name is the handler. The PowerShell runtime dot-sources the specified <script.ps1>. This allows you to run PowerShell code during the function initialization cold start process. Lambda then invokes the PowerShell handler function <function_name>. On subsequent invokes using the same runtime environment, Lambda invokes only the handler function <function_name>.
Module::<module_name>::<function_name>
You provide a PowerShell module. You include a PowerShell function as the handler within the module. Add the PowerShell module using a Lambda Layer or by including the module in the Lambda function code package. The PowerShell runtime imports the specified <module_name>. This allows you to run PowerShell code during the module initialization cold start process. Lambda then invokes the PowerShell handler function <function_name> in a similar way to the <script.ps1>::<function_name> handler method.
Function logging and metrics
Lambda automatically monitors Lambda functions on your behalf and sends function metrics to Amazon CloudWatch. Your Lambda function comes with a CloudWatch Logs log group and a log stream for each instance of your function. The Lambda runtime environment sends details about each invocation to the log stream, and relays logs and other output from your function’s code. For more information, see the documentation.
Output from Write-Host, Write-Verbose, Write-Warning, and Write-Error is written to the function log stream. The output from Write-Output is added to the pipeline, which you can use with your function response.
Error handling
The runtime can terminate your function because it ran out of time, detected a syntax error, or failed to marshal the response object into JSON.
Your function code can throw an exception or return an error object. Lambda writes the error to CloudWatch Logs and, for synchronous invocations, also returns the error in the function response output.
See the documentation on how to view Lambda function invocation errors for the PowerShell runtime using the Lambda console and the AWS CLI.
Conclusion
The PowerShell custom runtime for Lambda makes it even easier to run Lambda functions written in PowerShell.
The custom runtime runs native PowerShell. You can view, and edit your code within the Lambda console. The runtime supports a number of different handler options, and you can include additional PowerShell modules.
See the accompanying GitHub repository which contains the code for the custom runtime, along with installation options and a number of examples. Start running PowerShell on Lambda today.
For more serverless learning resources, visit Serverless Land.
To provide the best experiences, we use technologies like cookies to store and/or access device information. Consenting to these technologies will allow us to process data such as browsing behavior or unique IDs on this site. Not consenting or withdrawing consent, may adversely affect certain features and functions.
Functional
Always active
The technical storage or access is strictly necessary for the legitimate purpose of enabling the use of a specific service explicitly requested by the subscriber or user, or for the sole purpose of carrying out the transmission of a communication over an electronic communications network.
Preferences
The technical storage or access is necessary for the legitimate purpose of storing preferences that are not requested by the subscriber or user.
Statistics
The technical storage or access that is used exclusively for statistical purposes.The technical storage or access that is used exclusively for anonymous statistical purposes. Without a subpoena, voluntary compliance on the part of your Internet Service Provider, or additional records from a third party, information stored or retrieved for this purpose alone cannot usually be used to identify you.
Marketing
The technical storage or access is required to create user profiles to send advertising, or to track the user on a website or across several websites for similar marketing purposes.


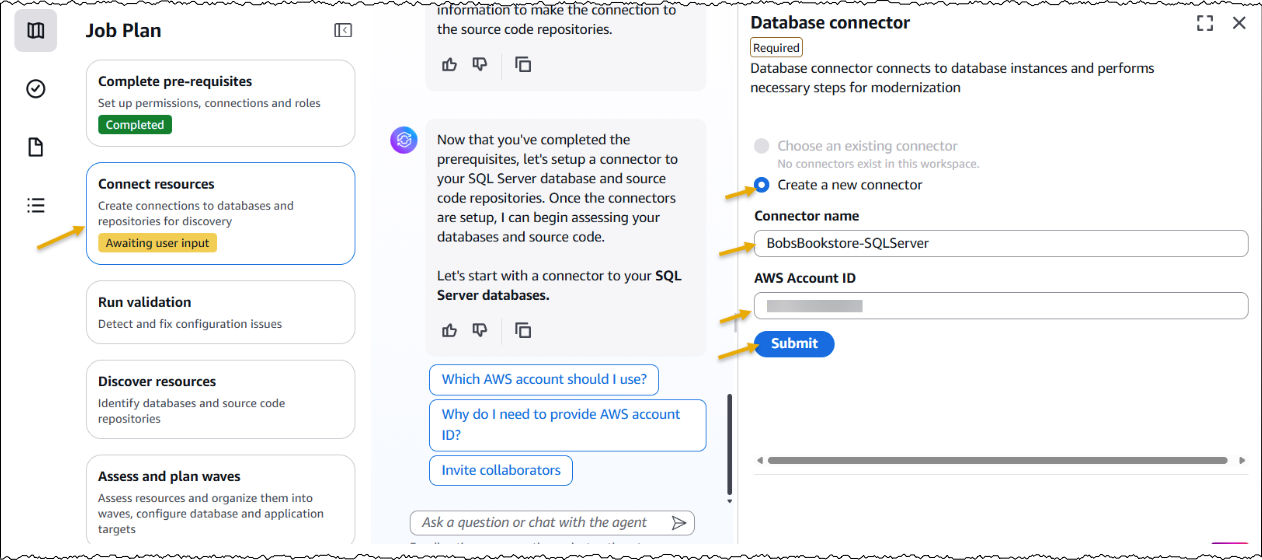
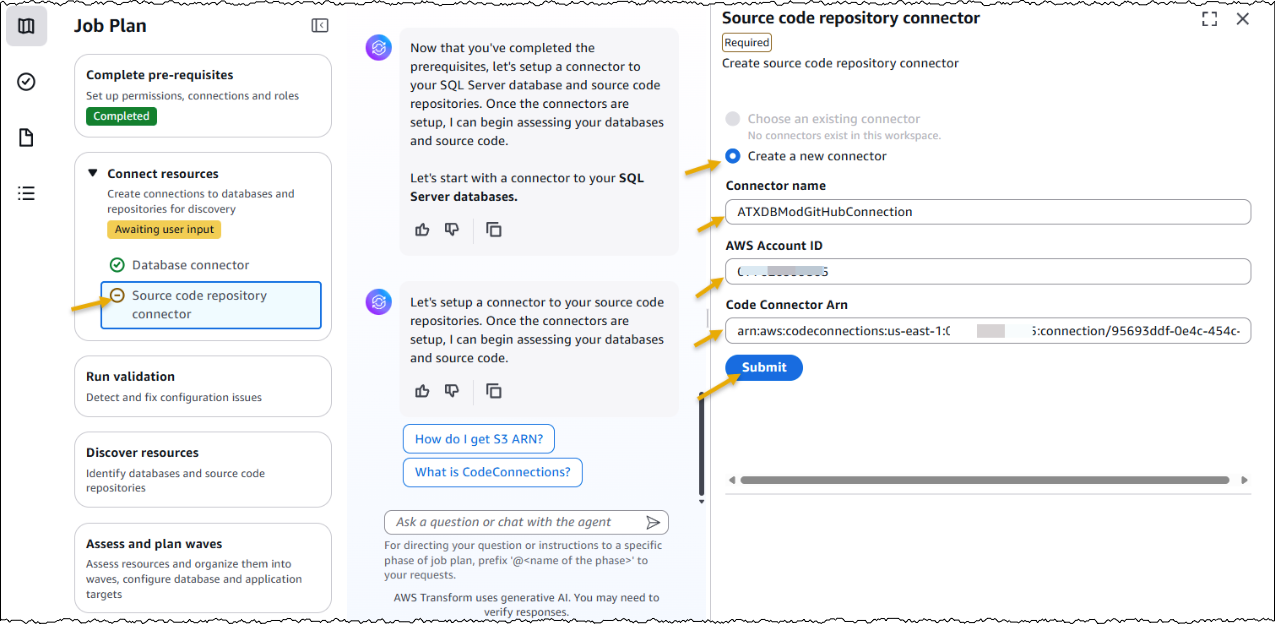
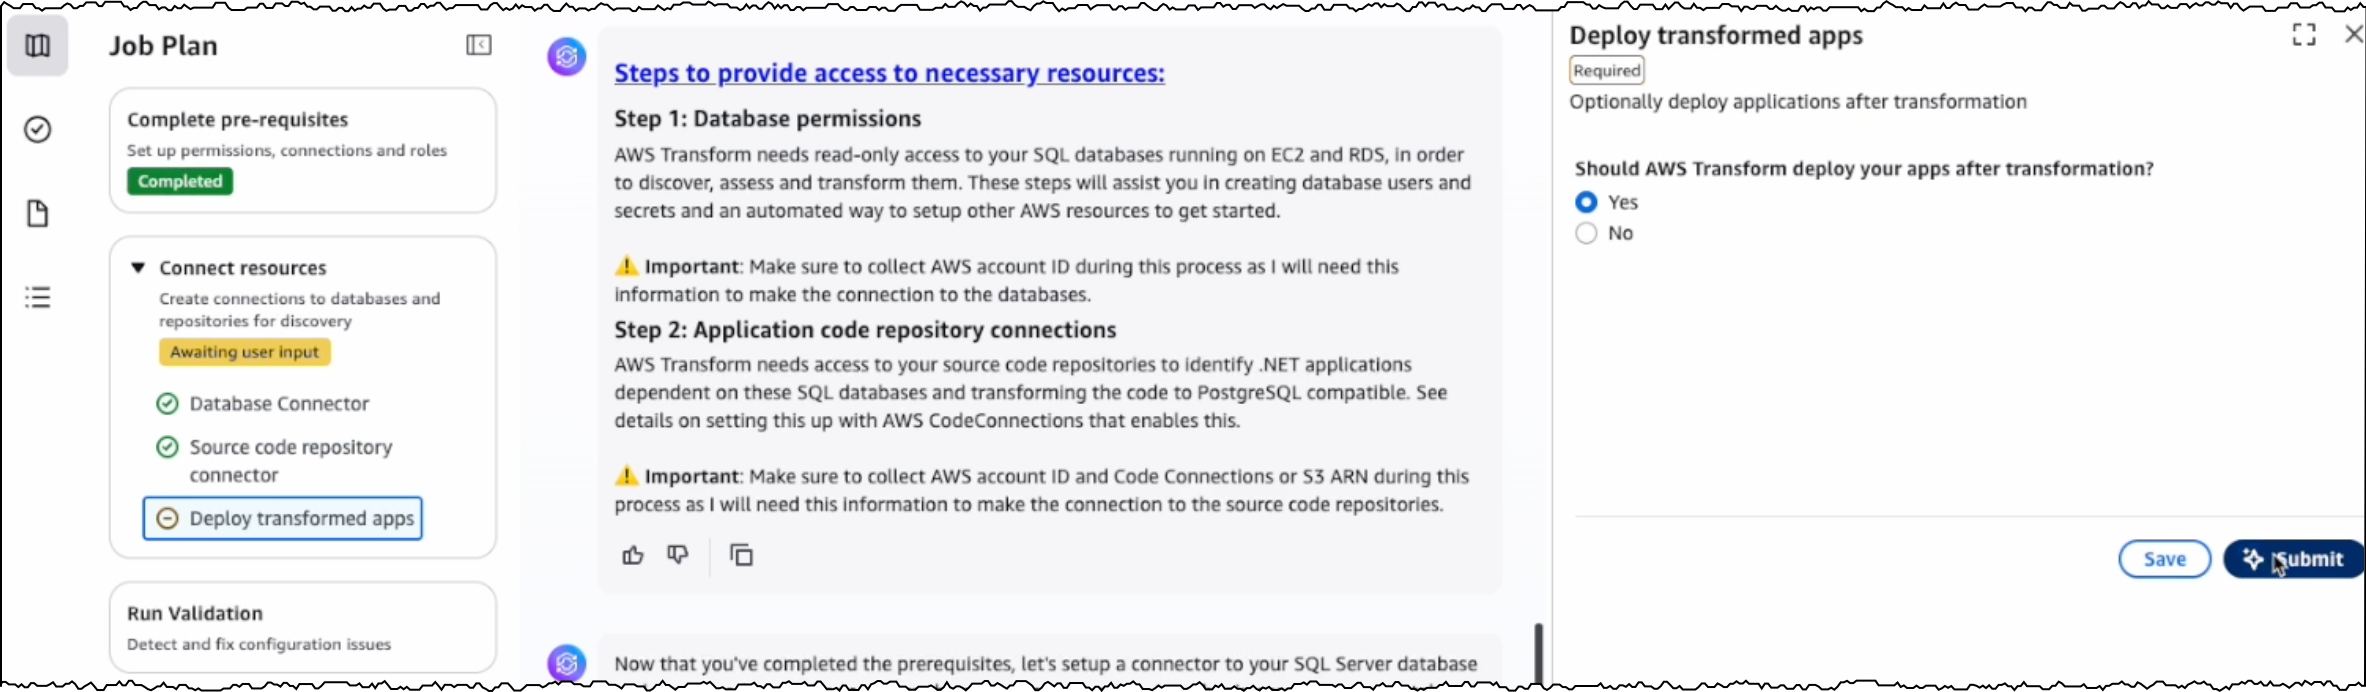

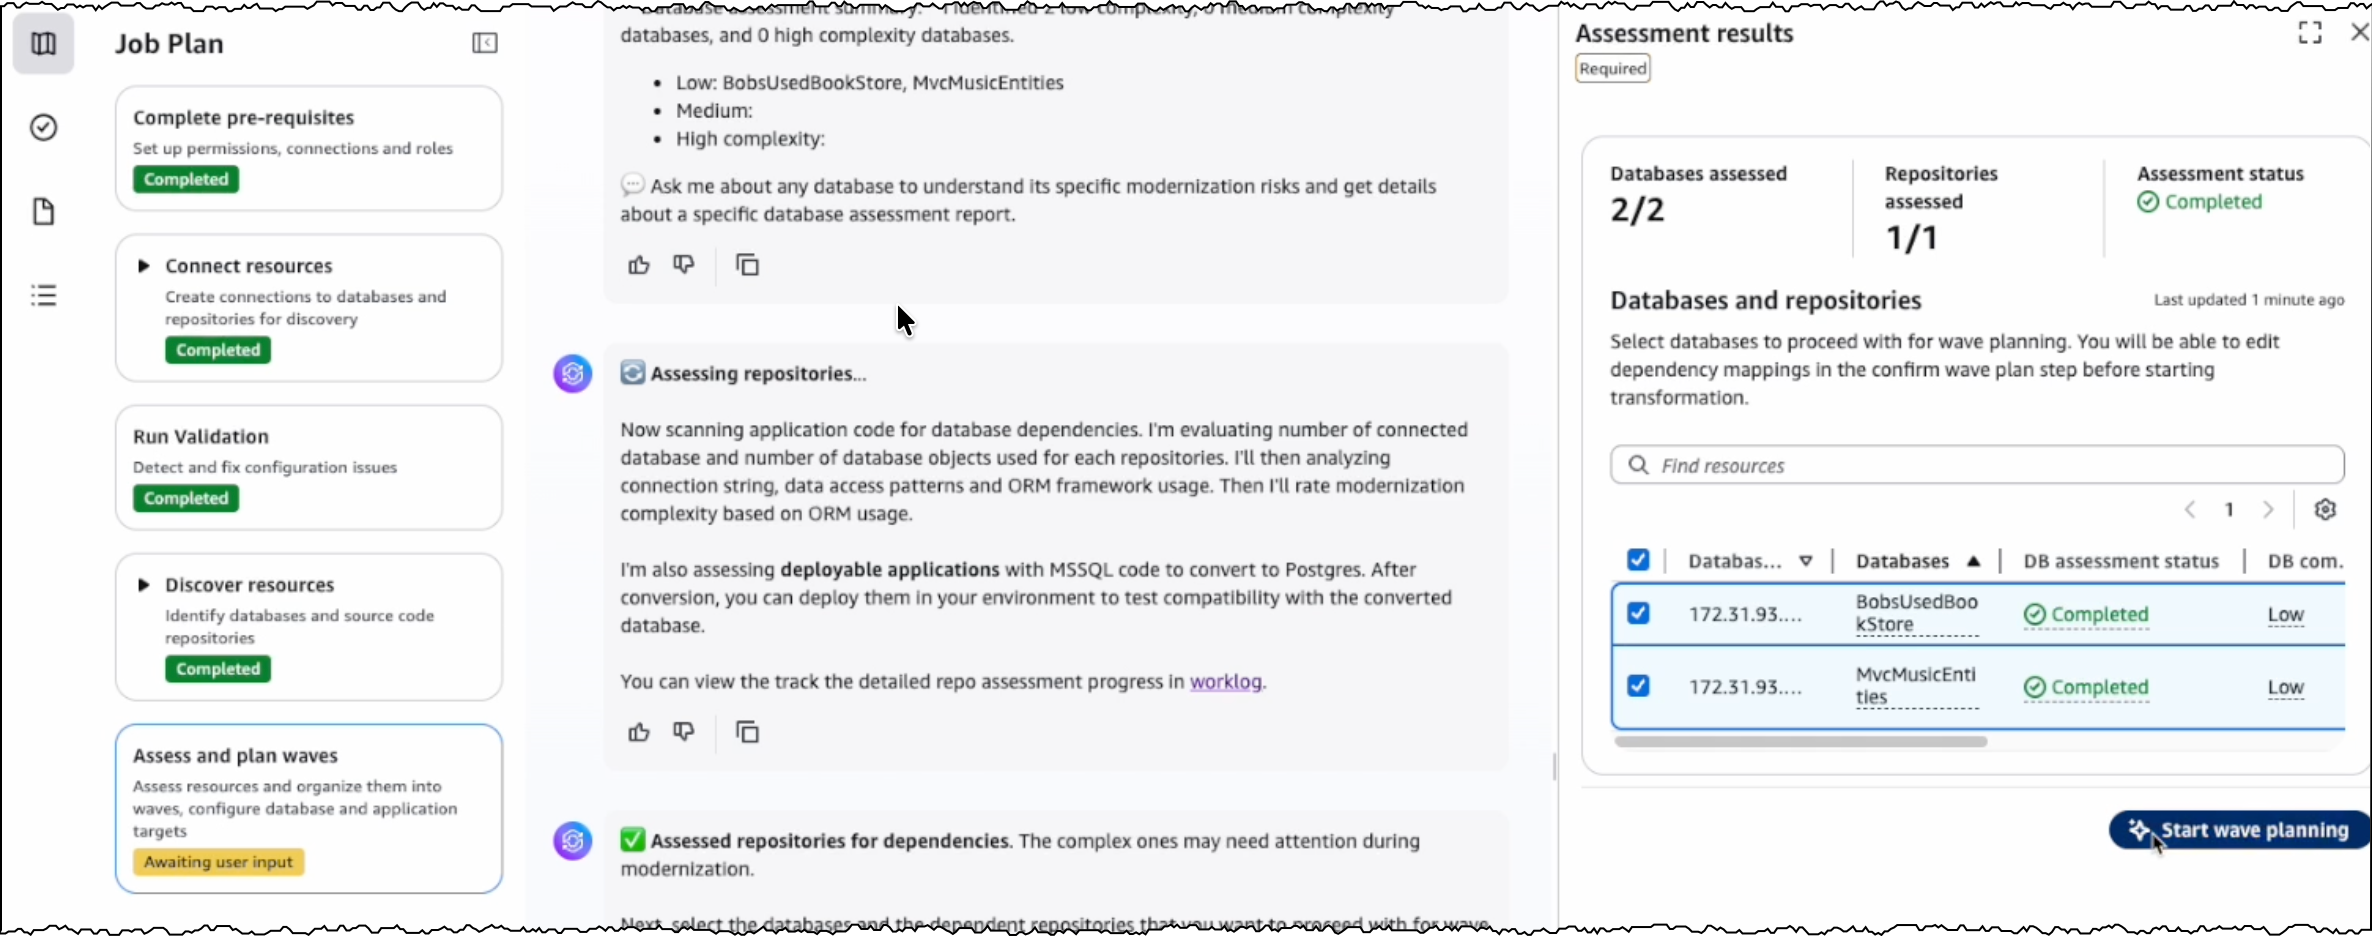
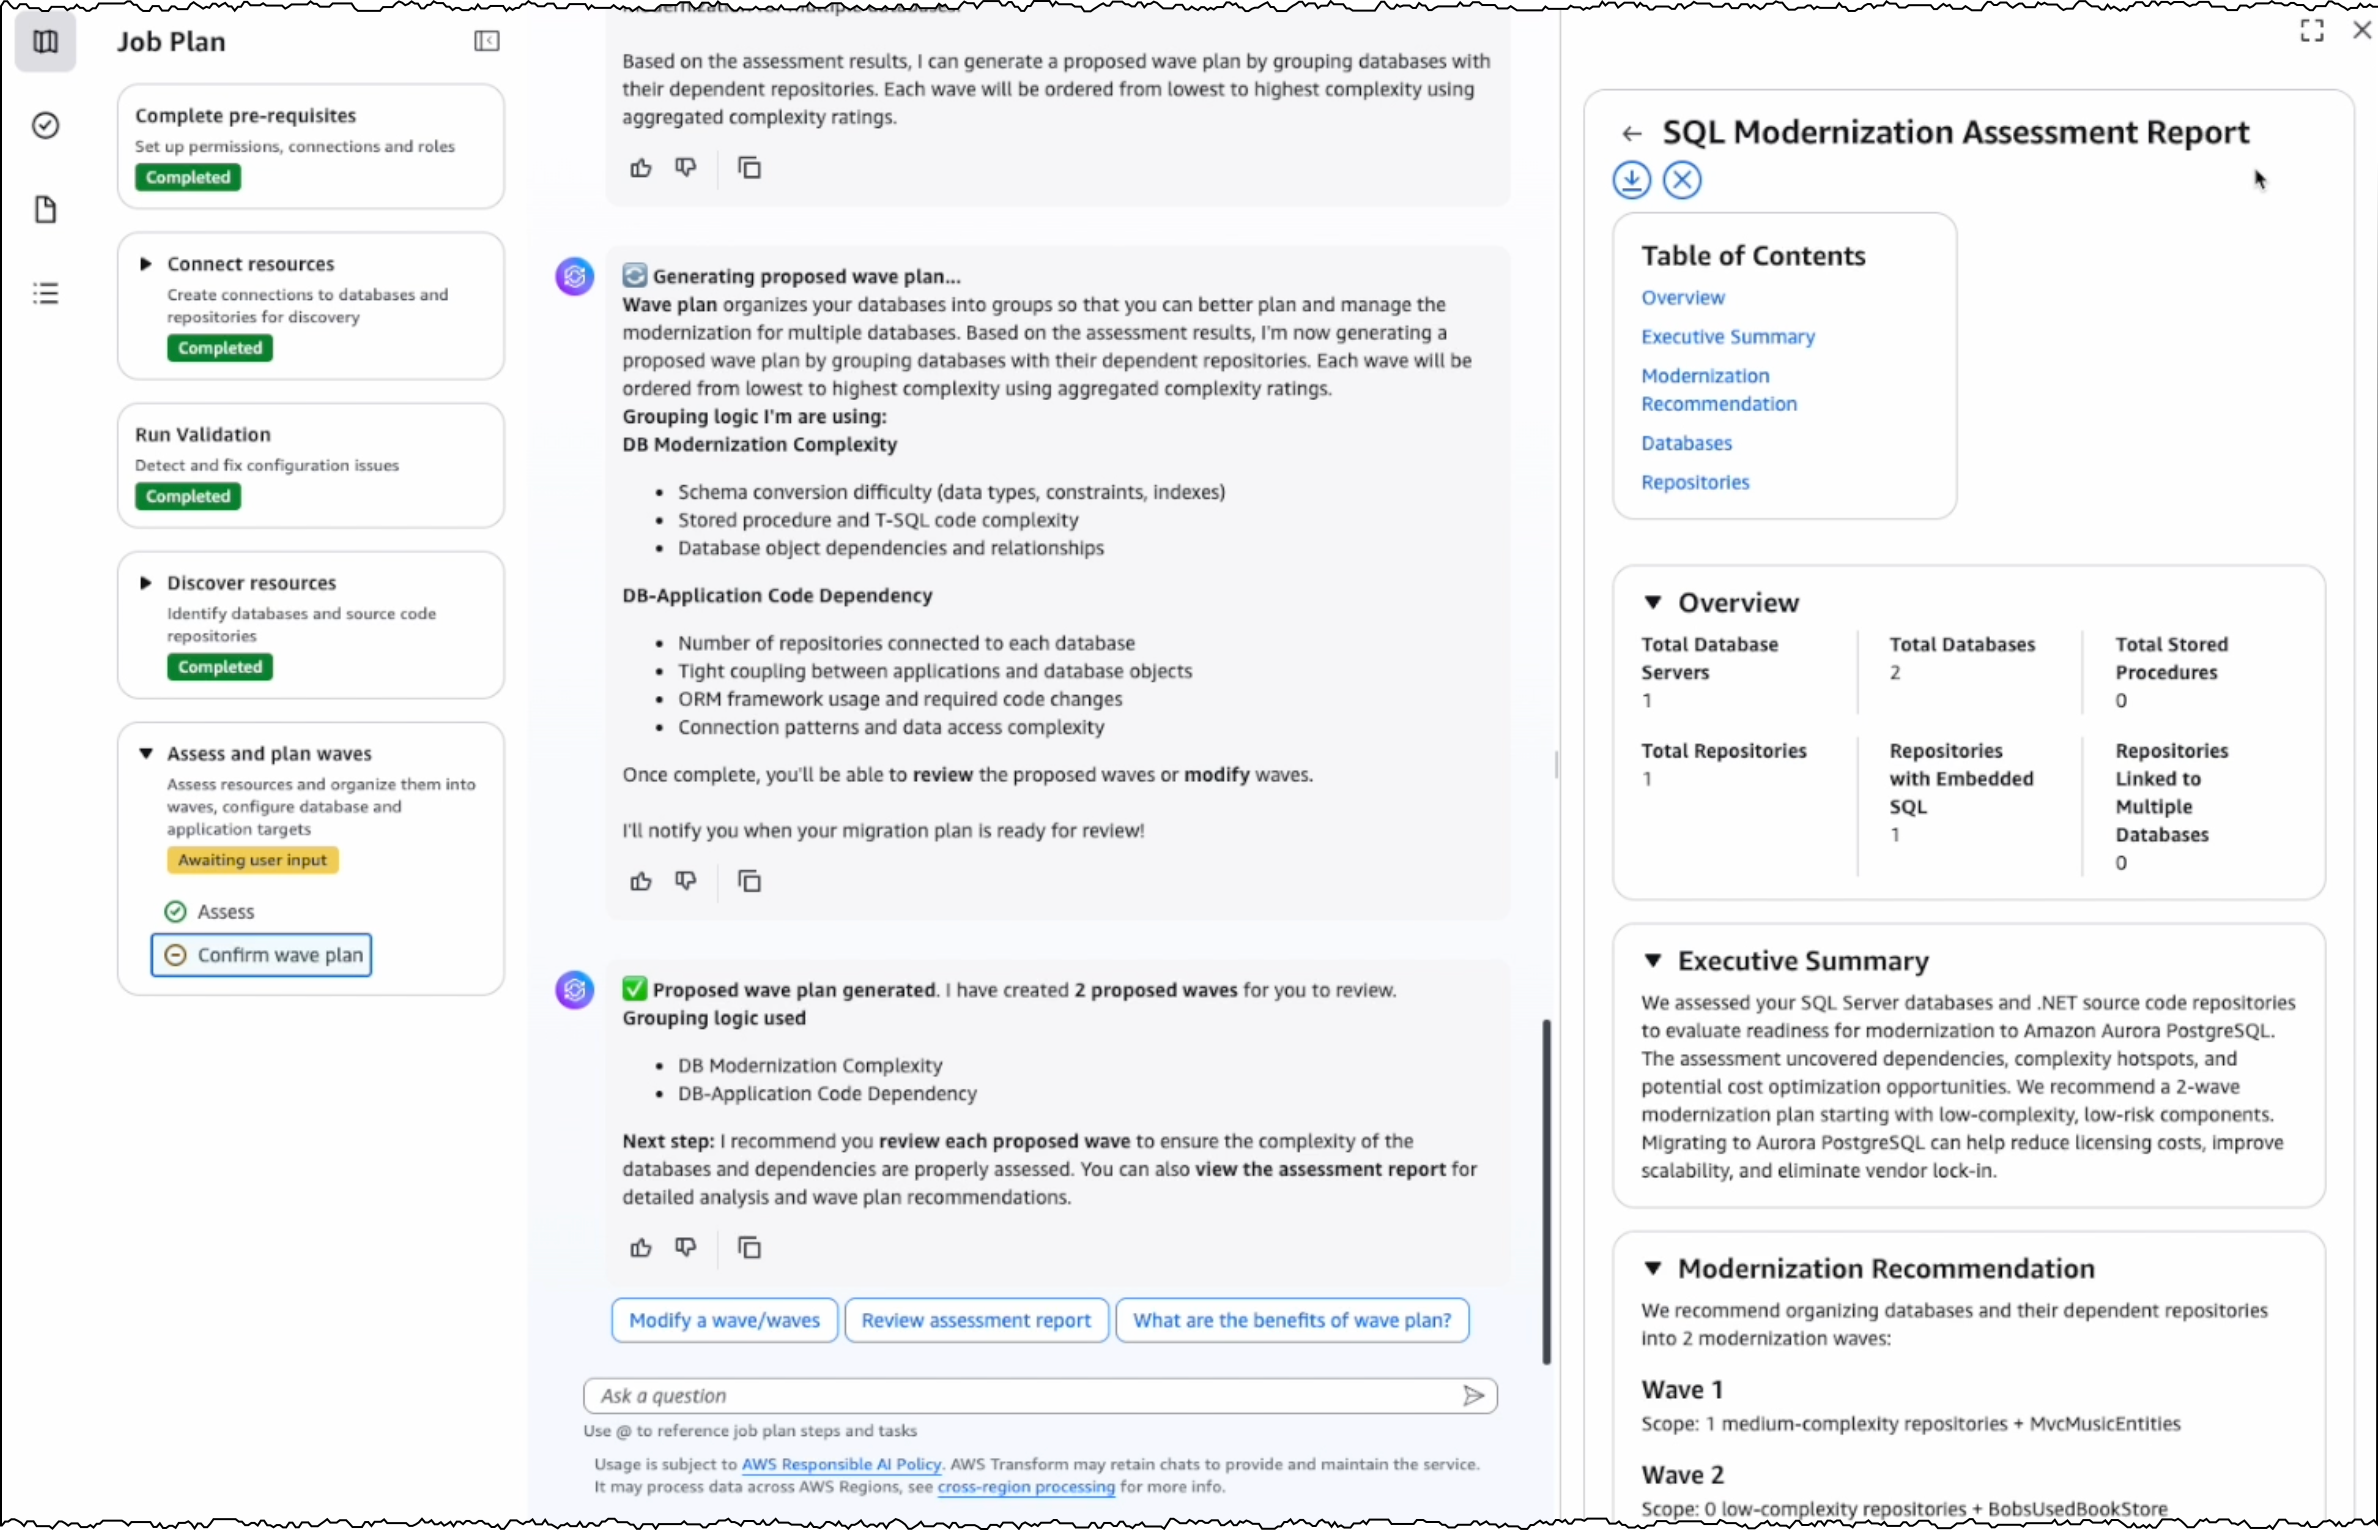
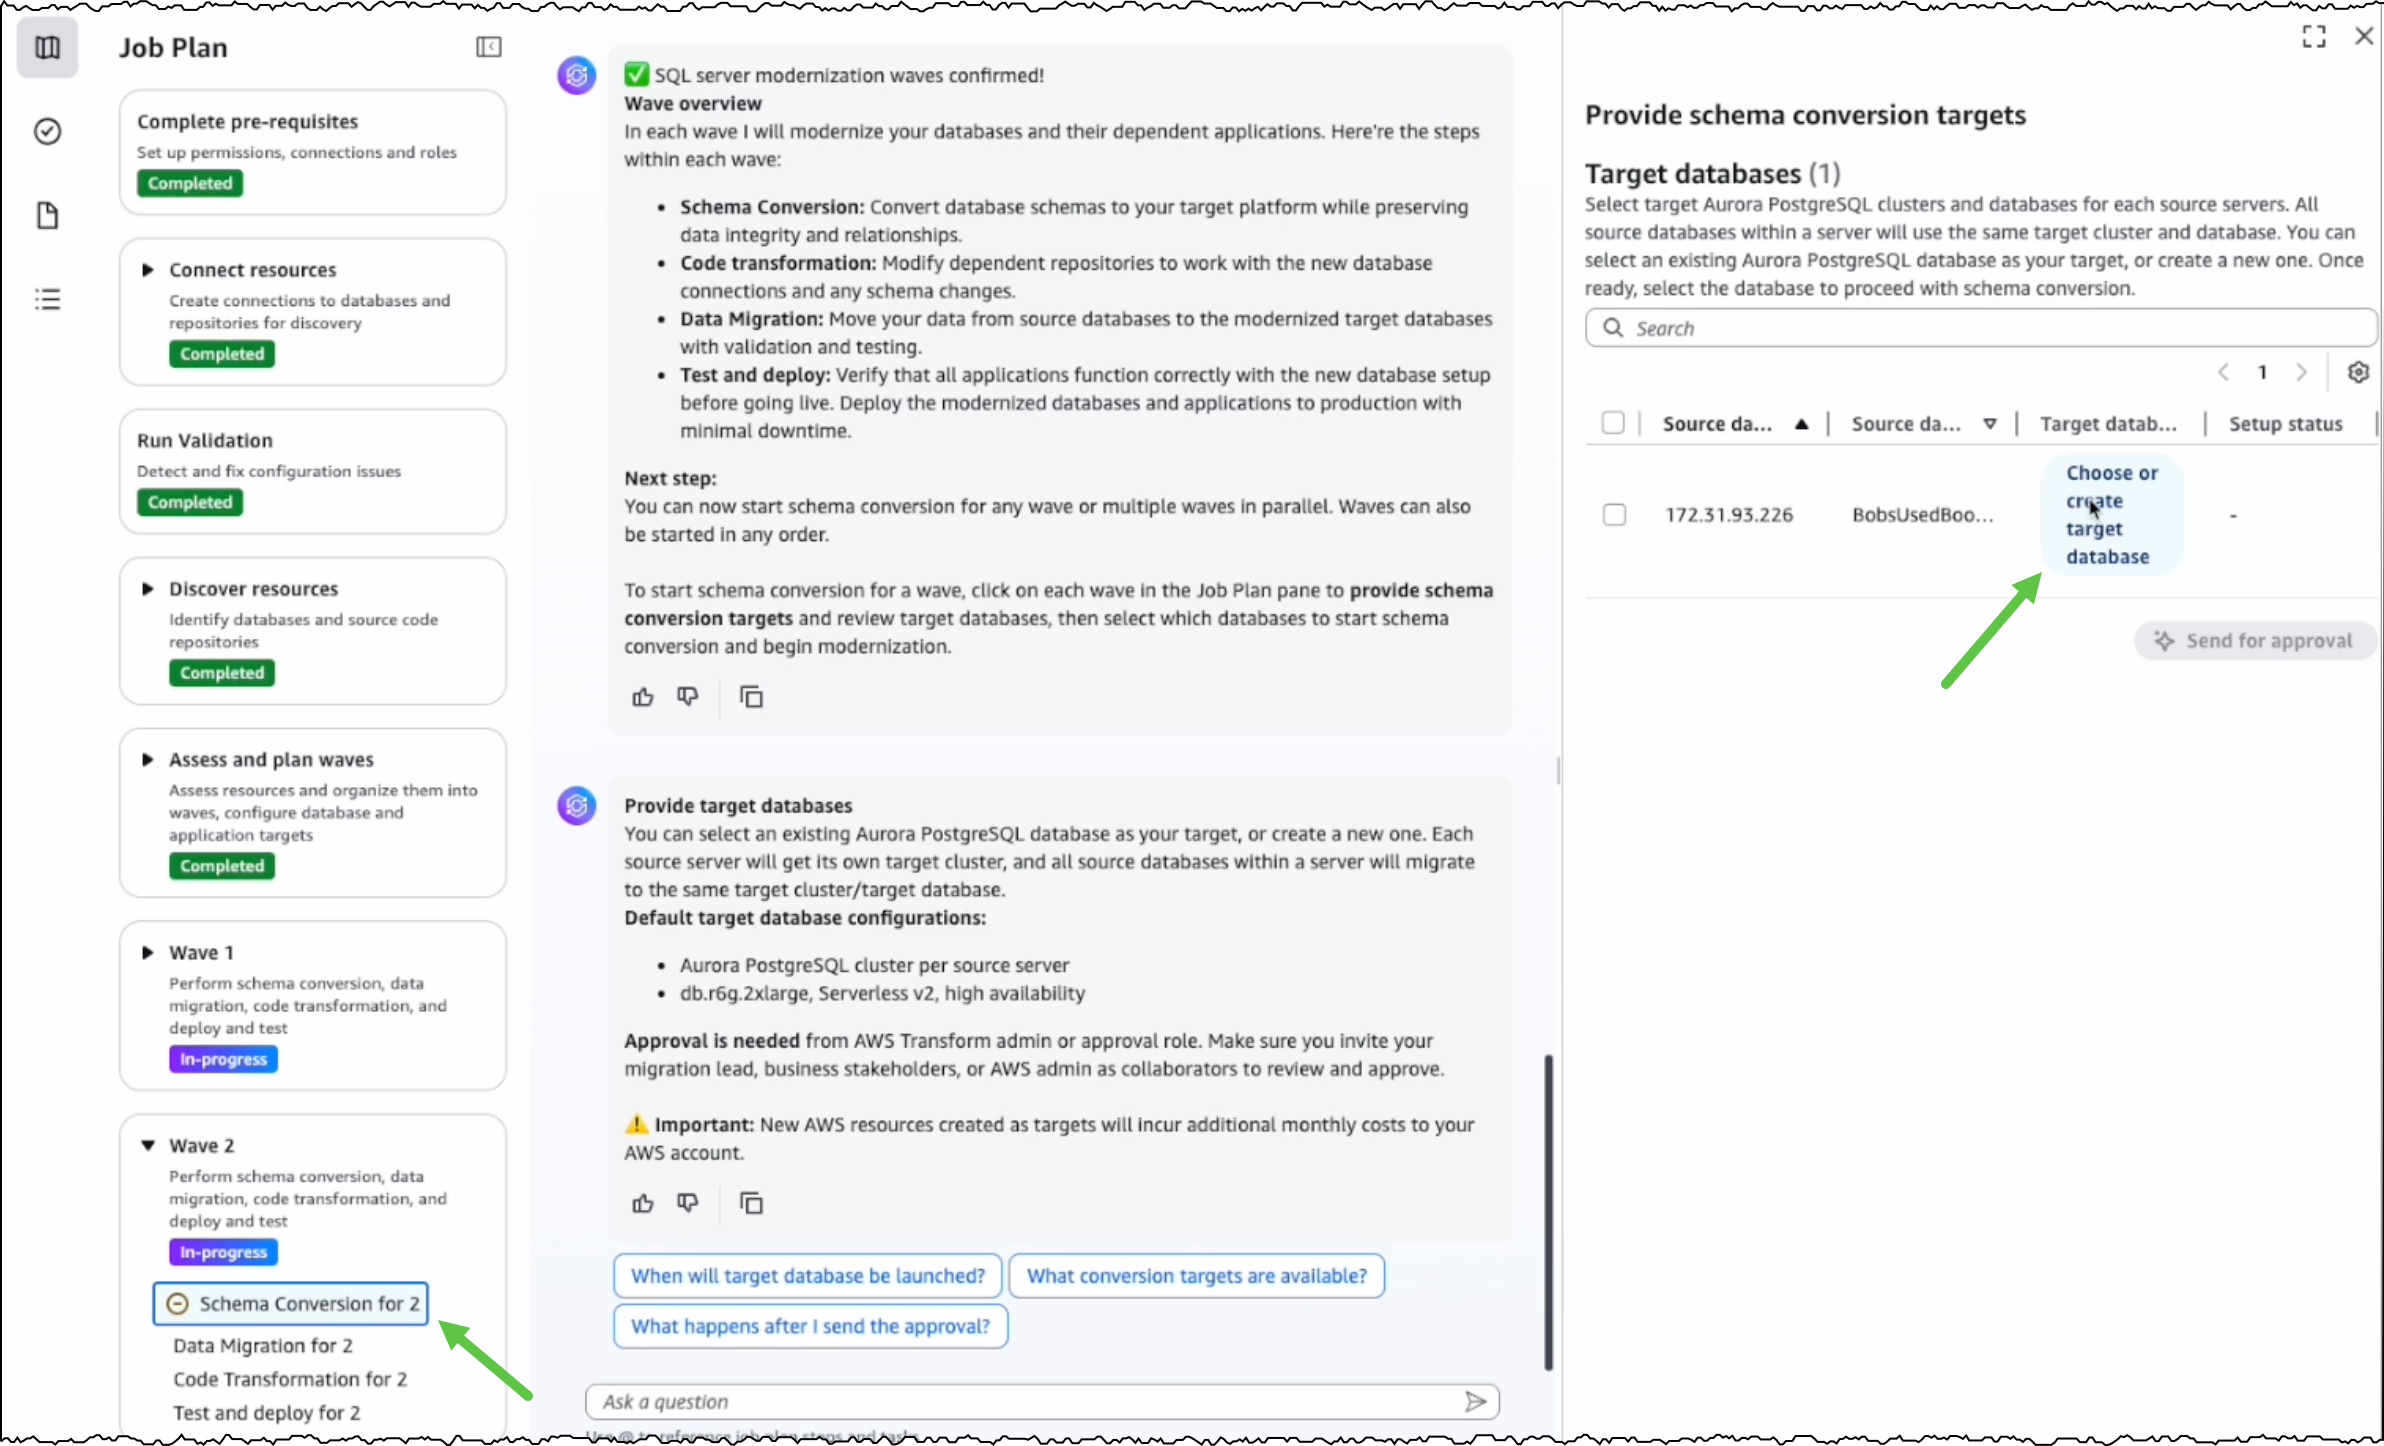

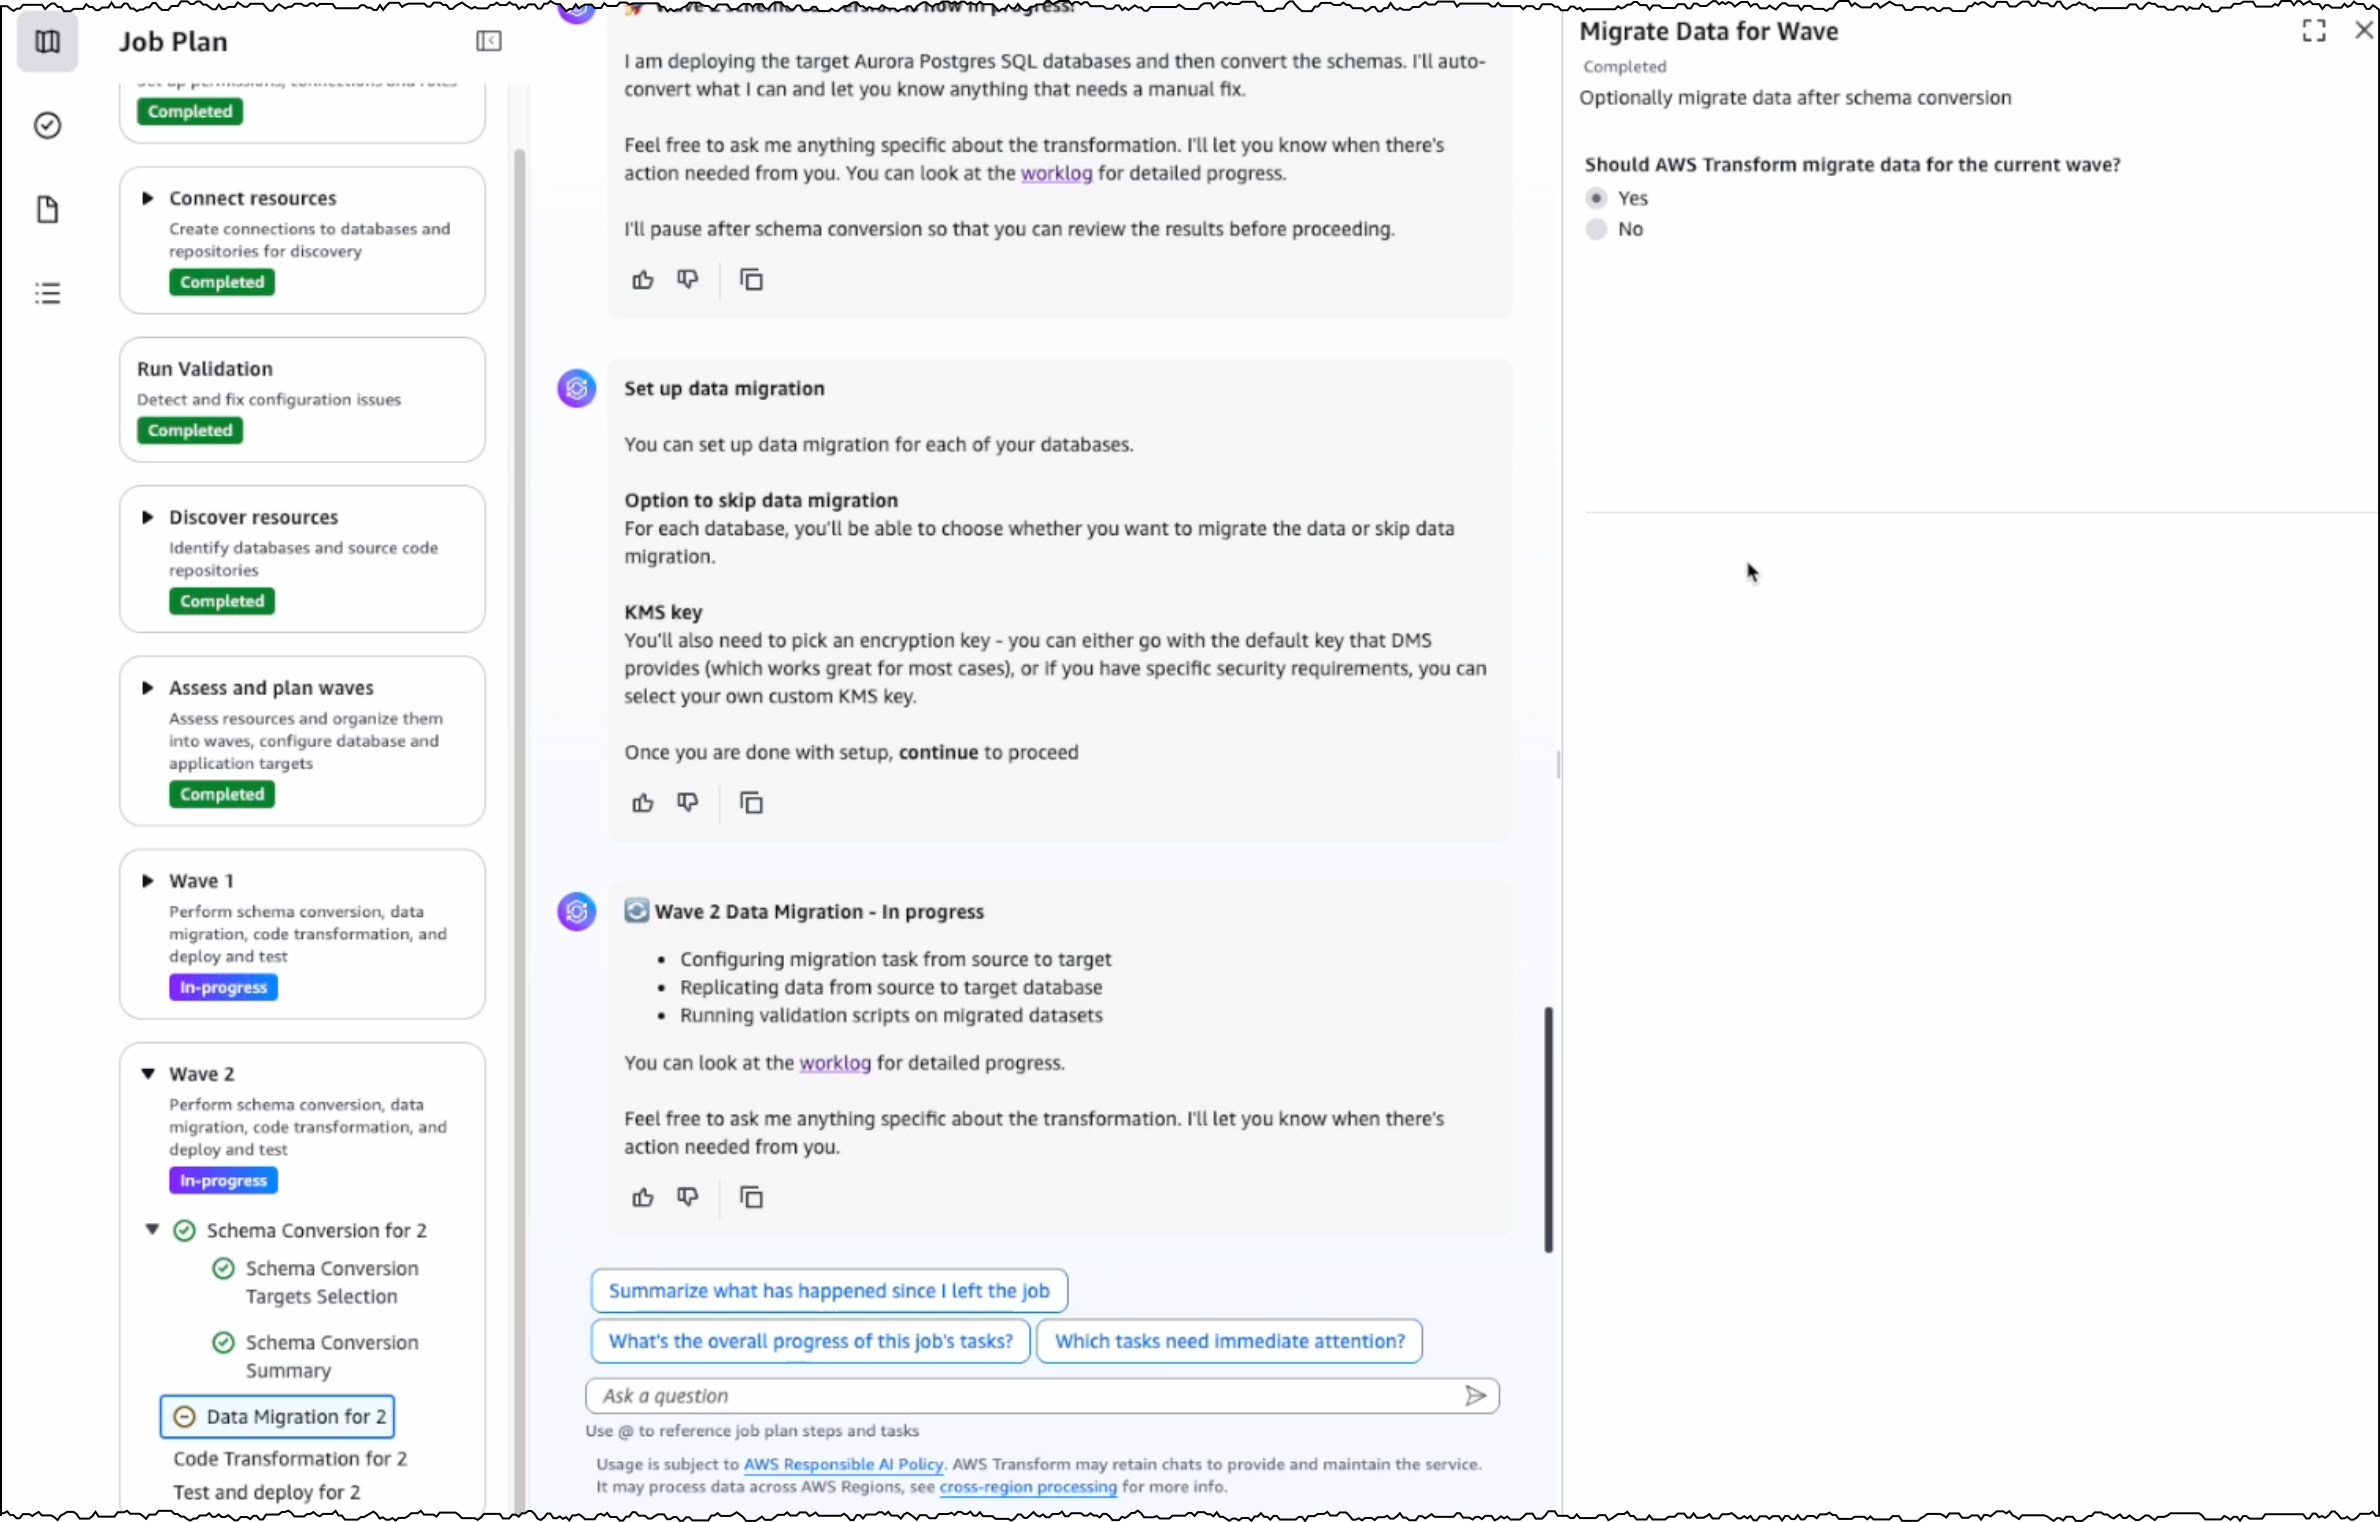
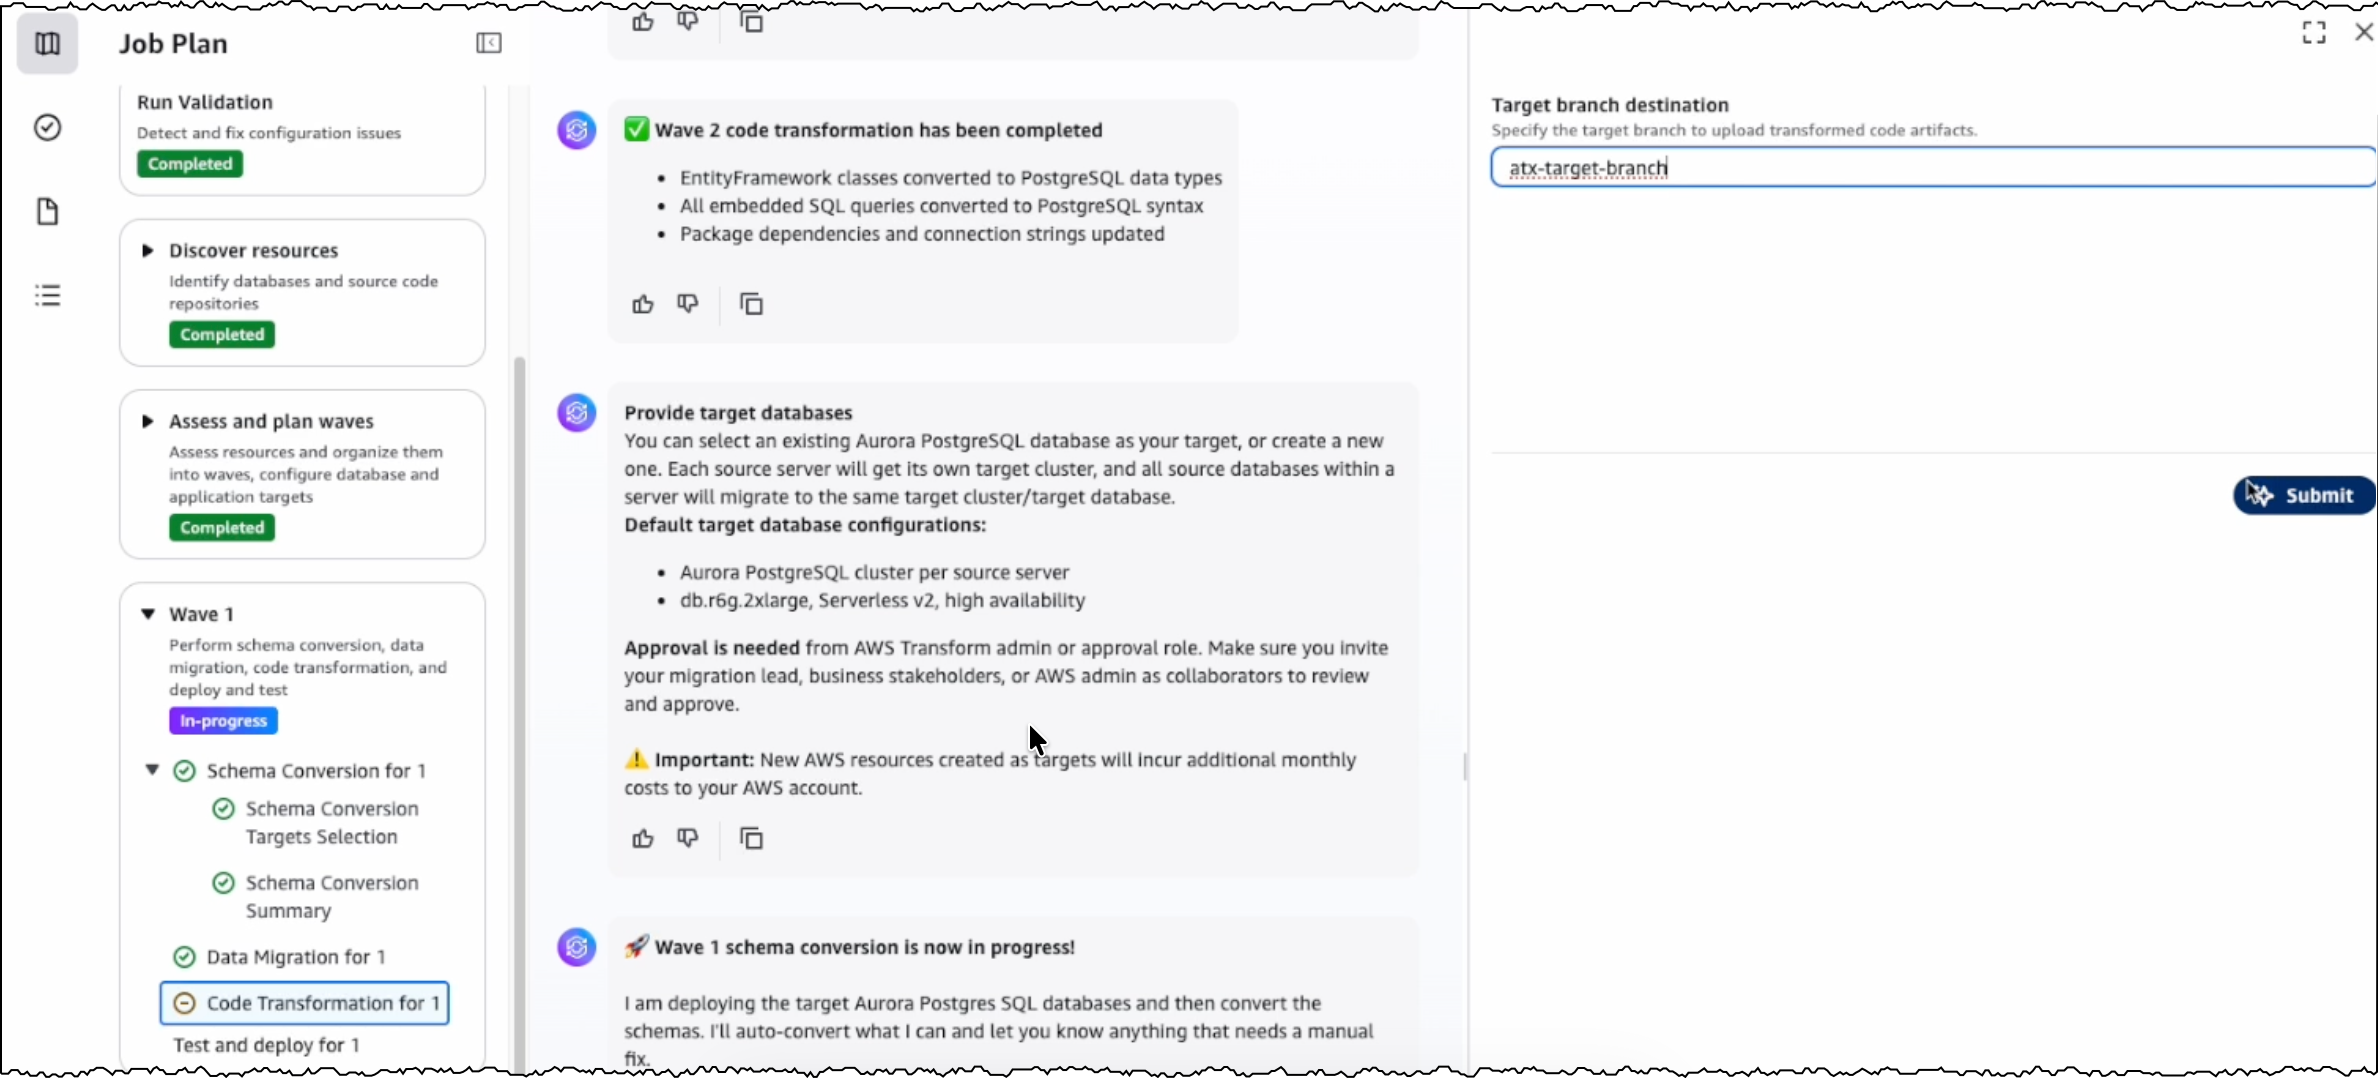
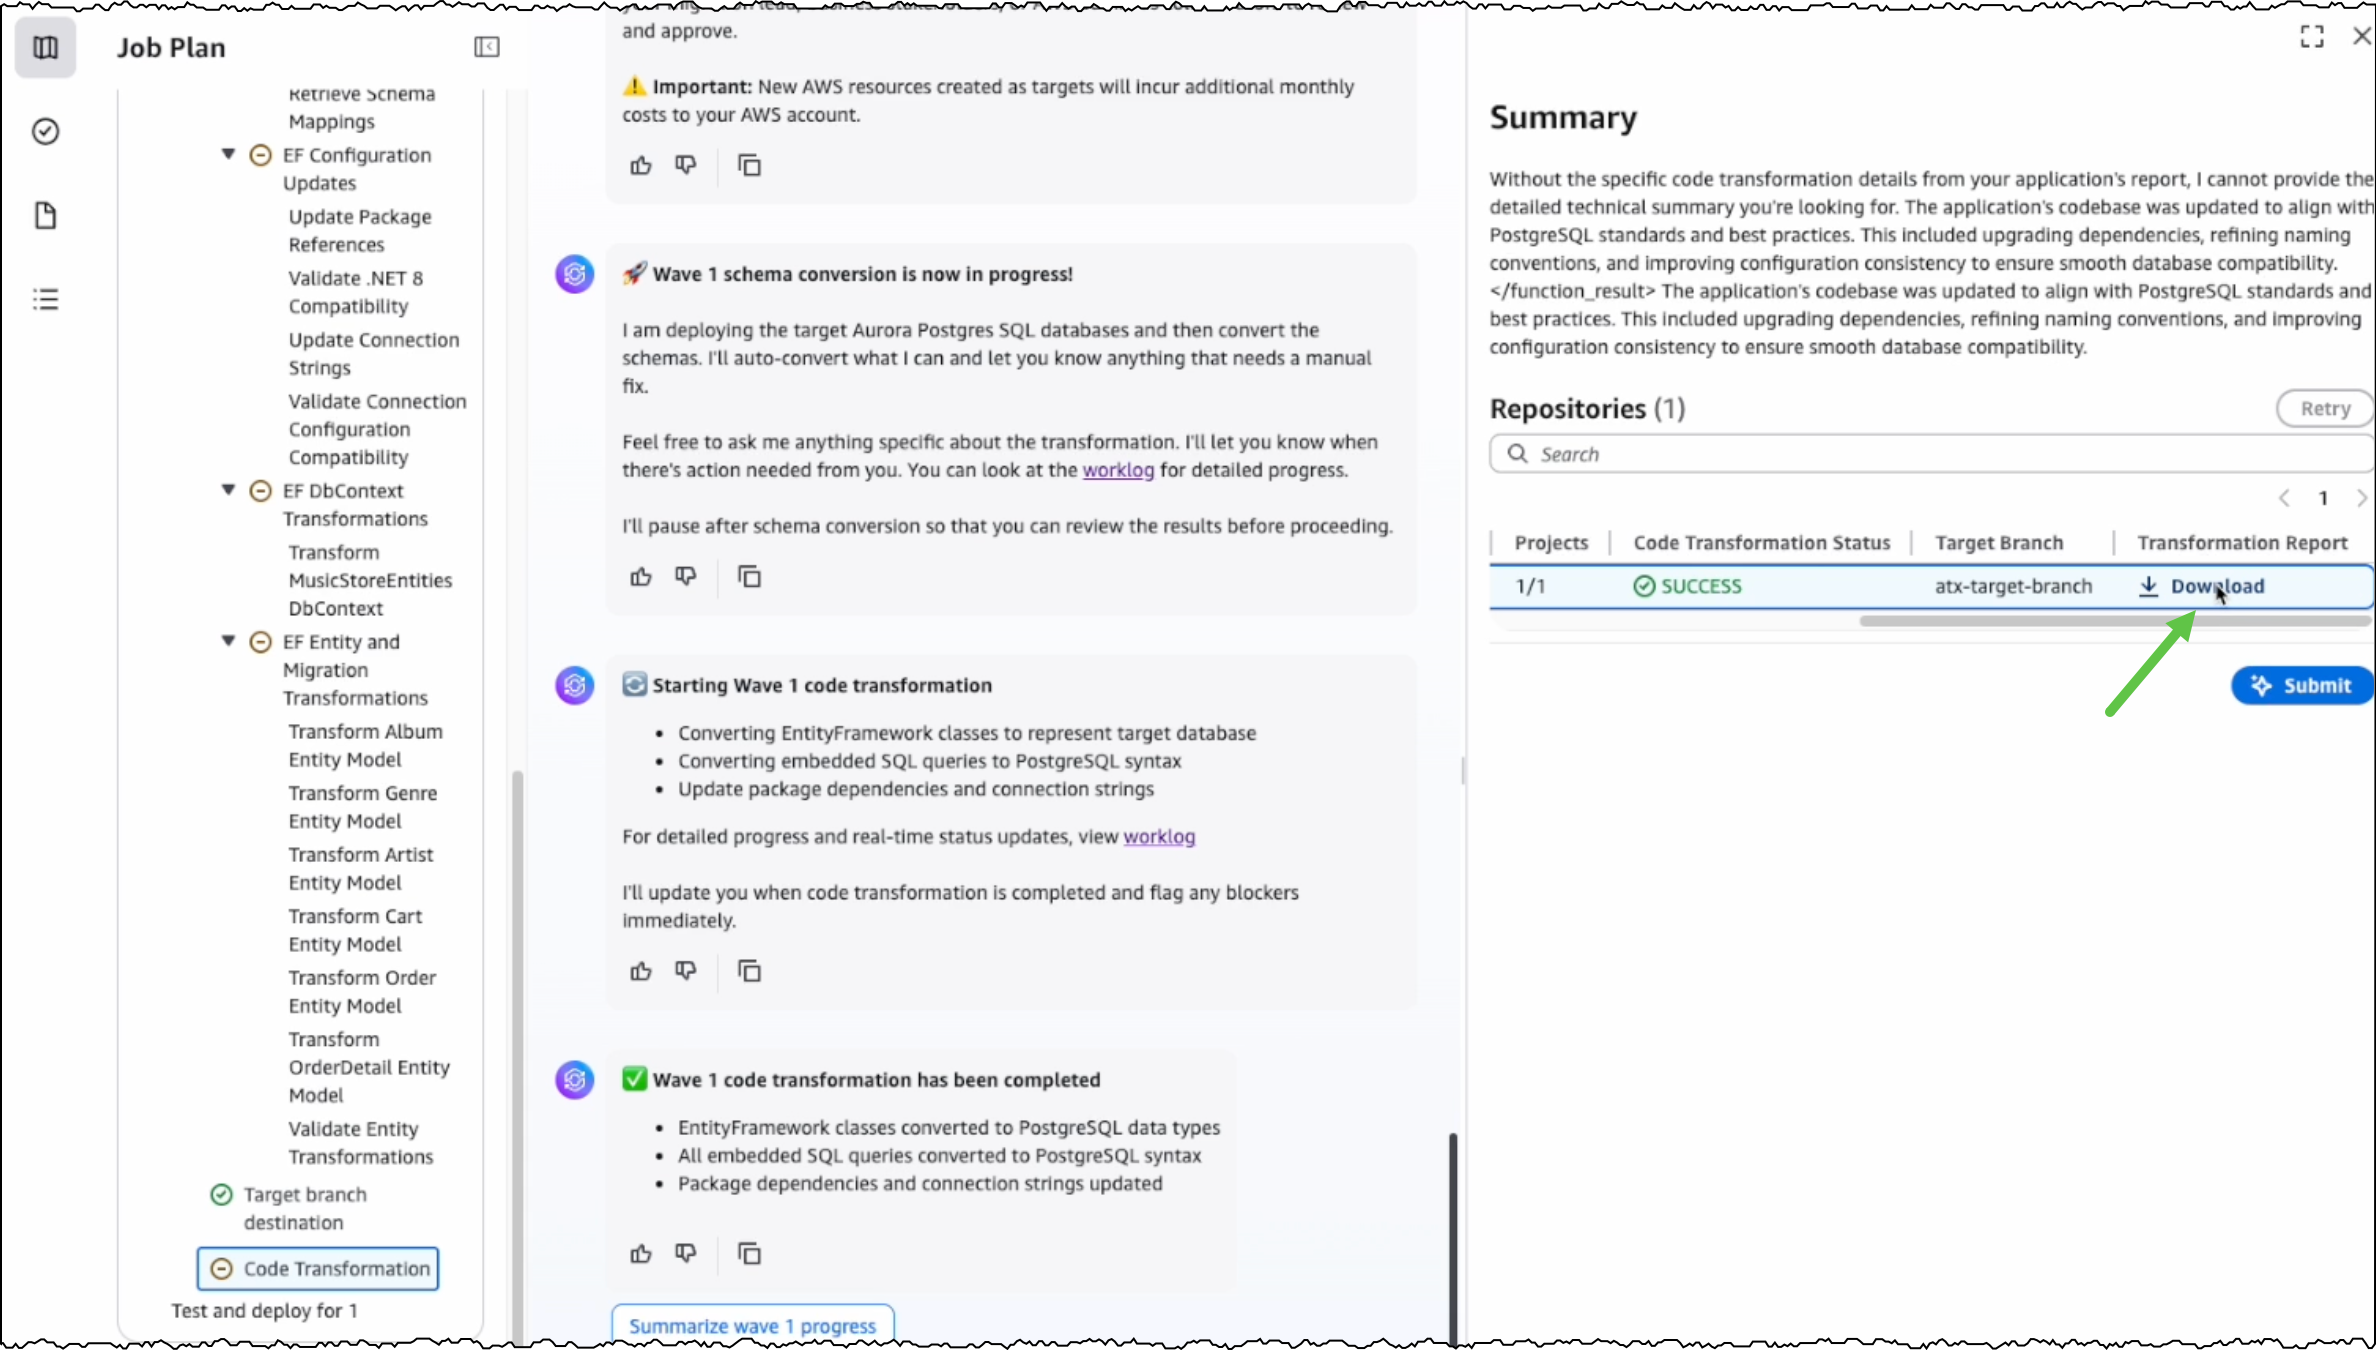
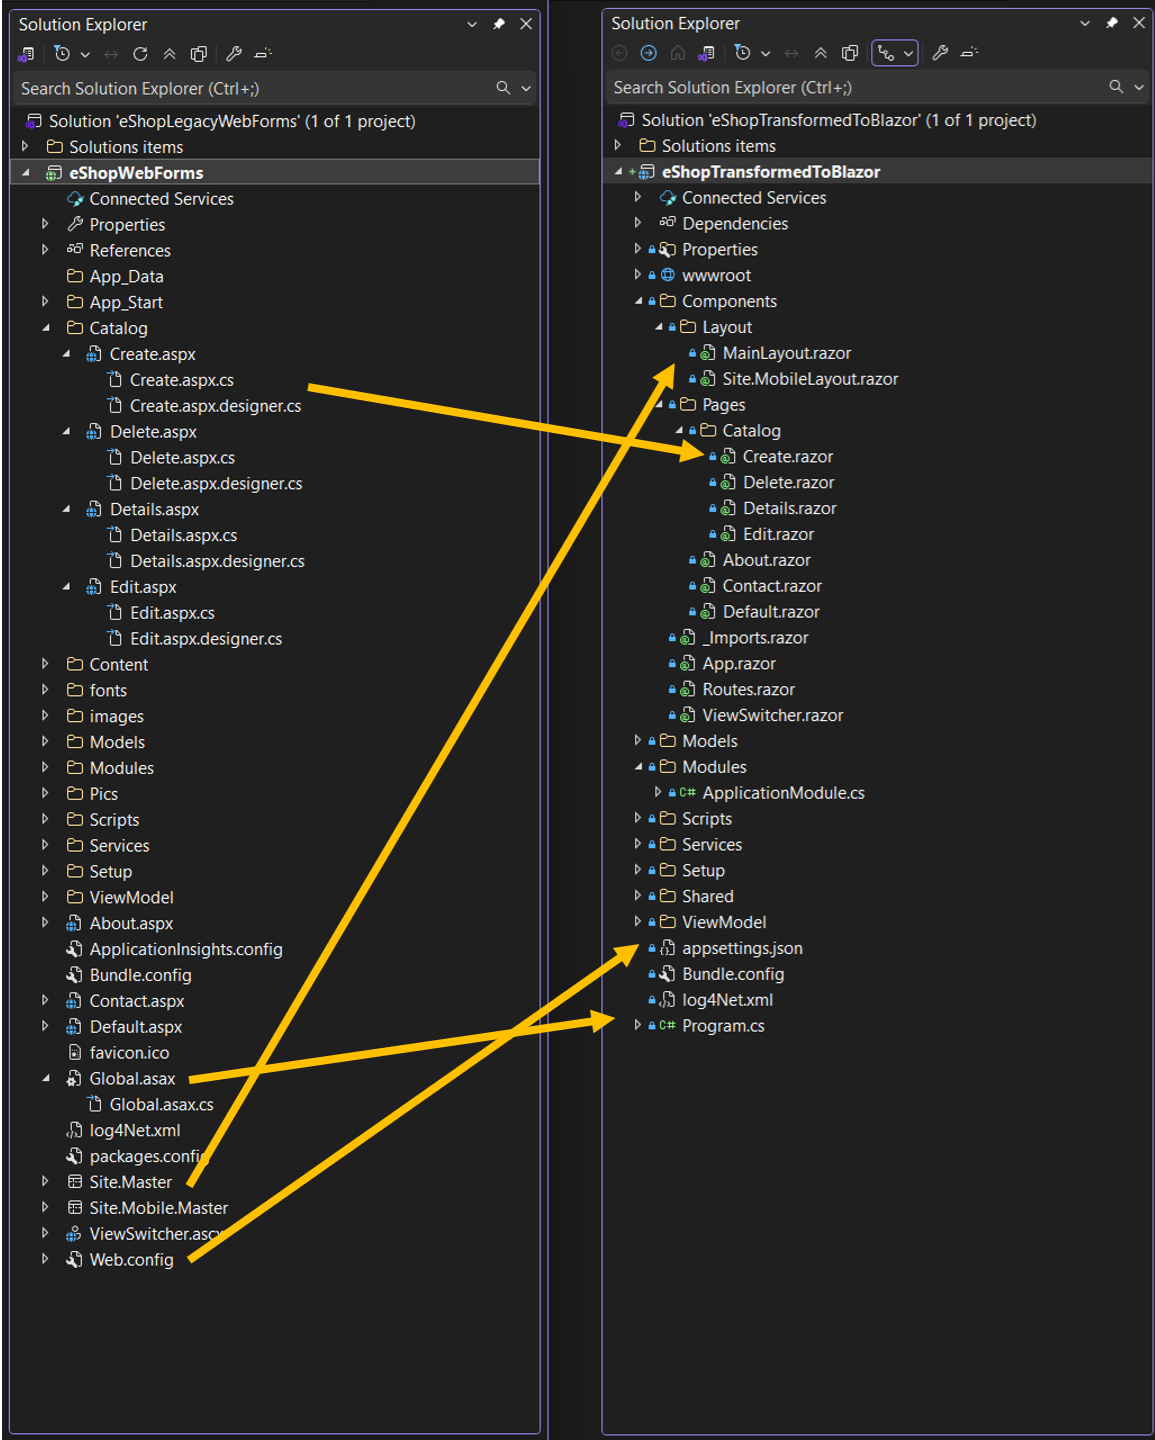


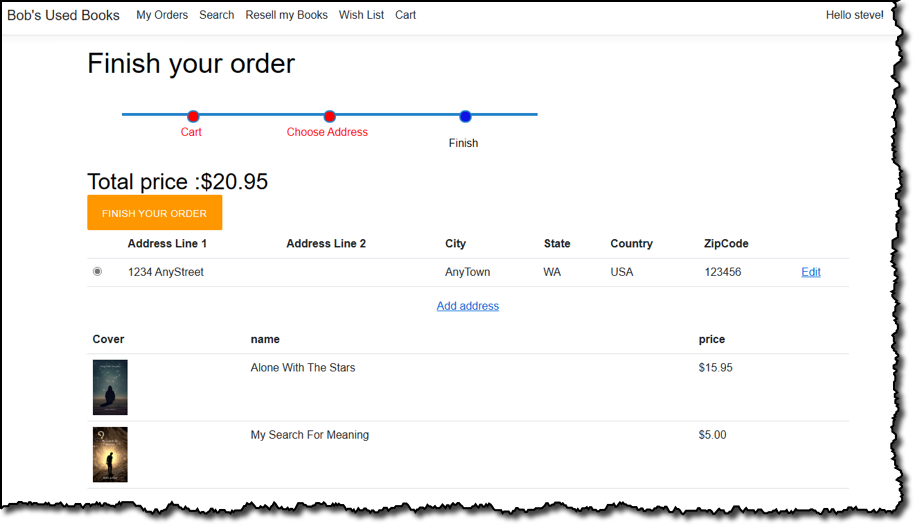


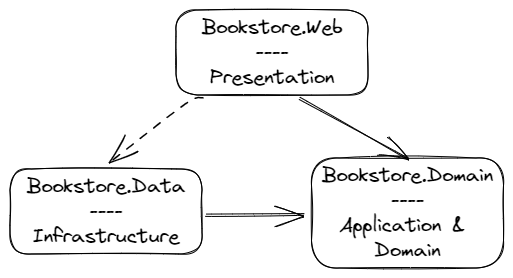
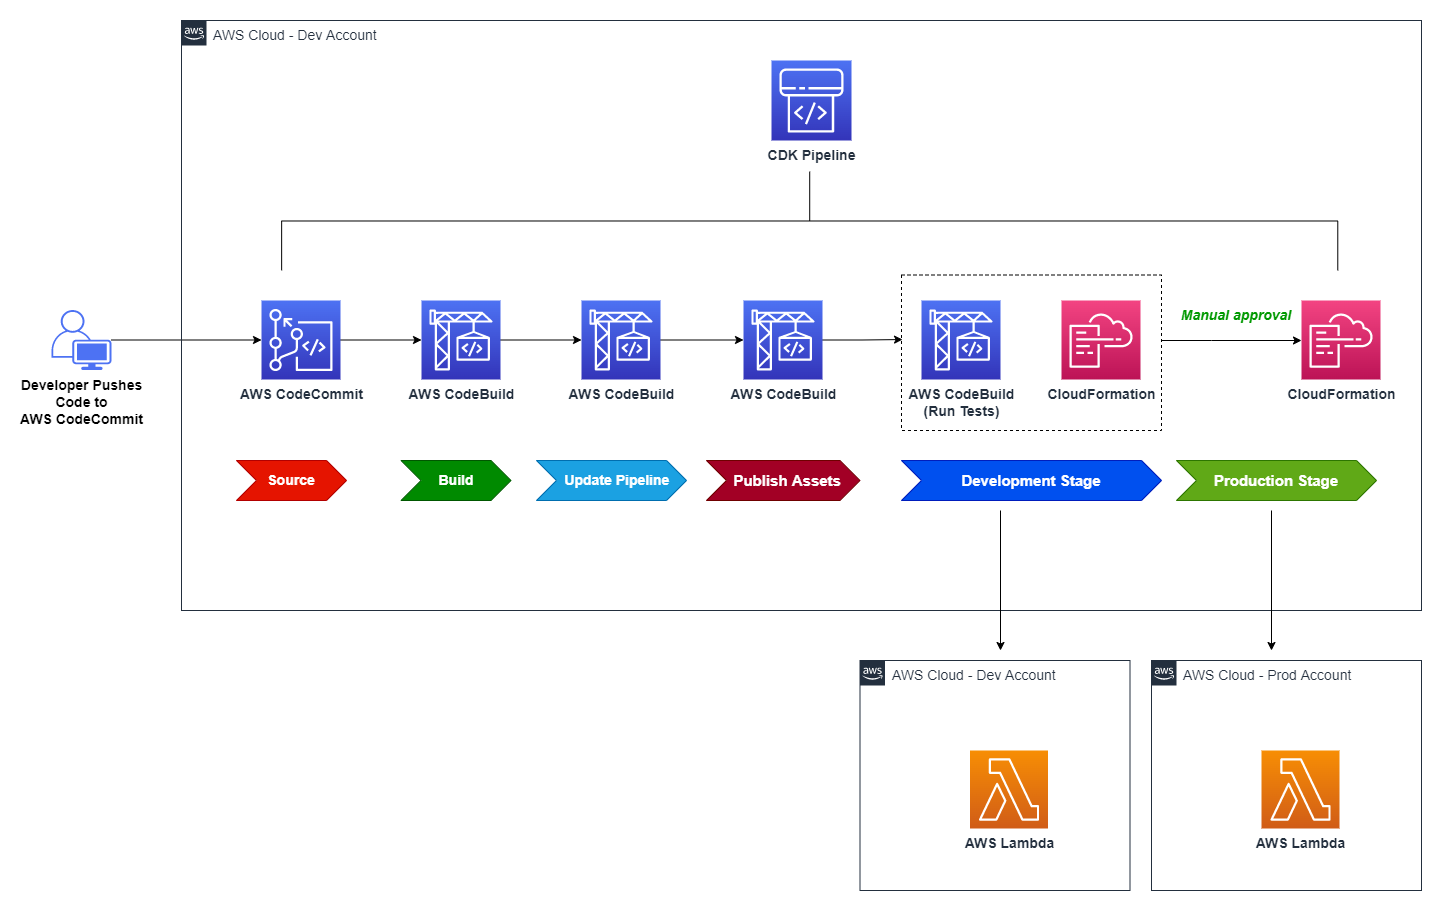
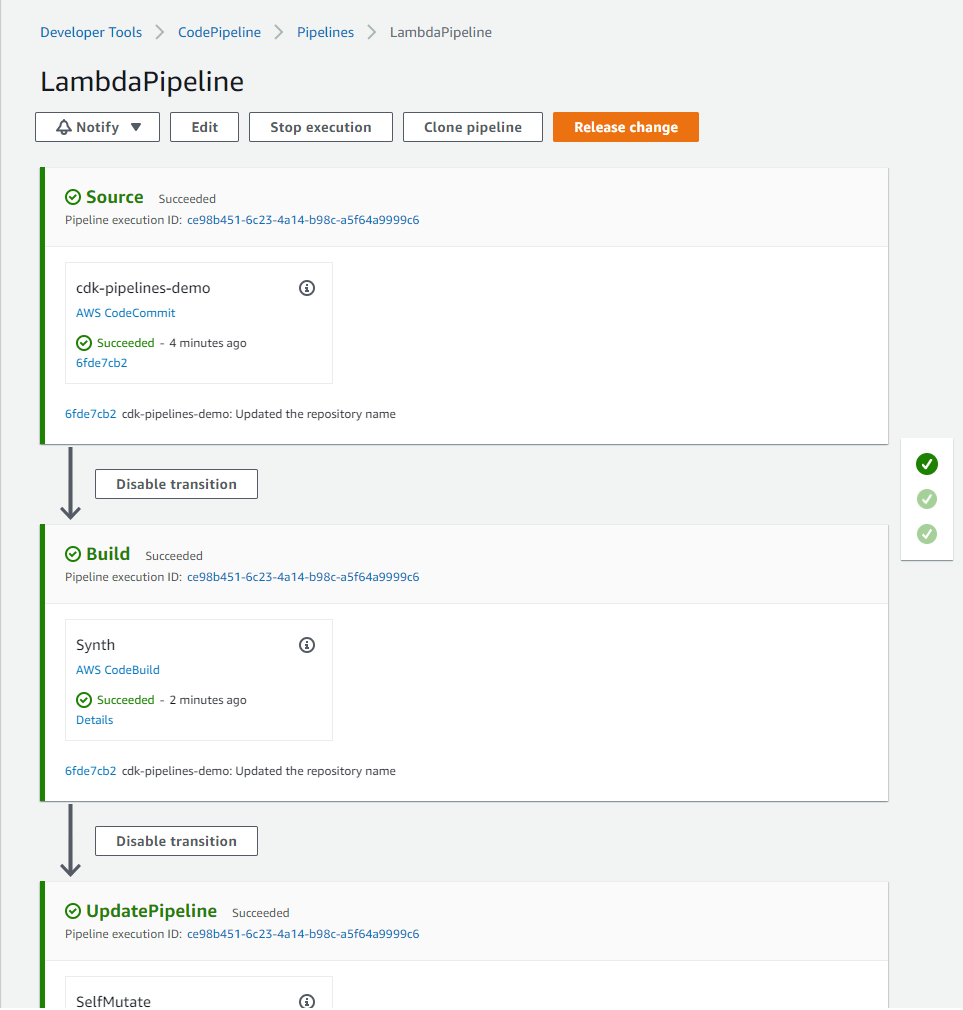
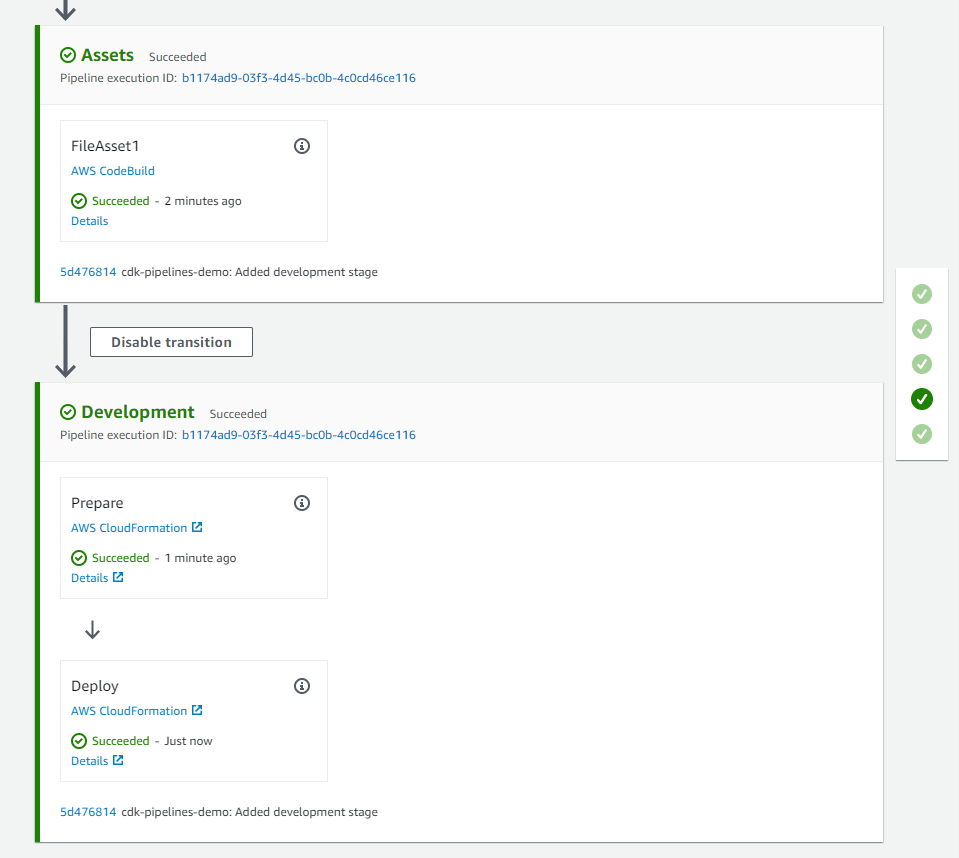
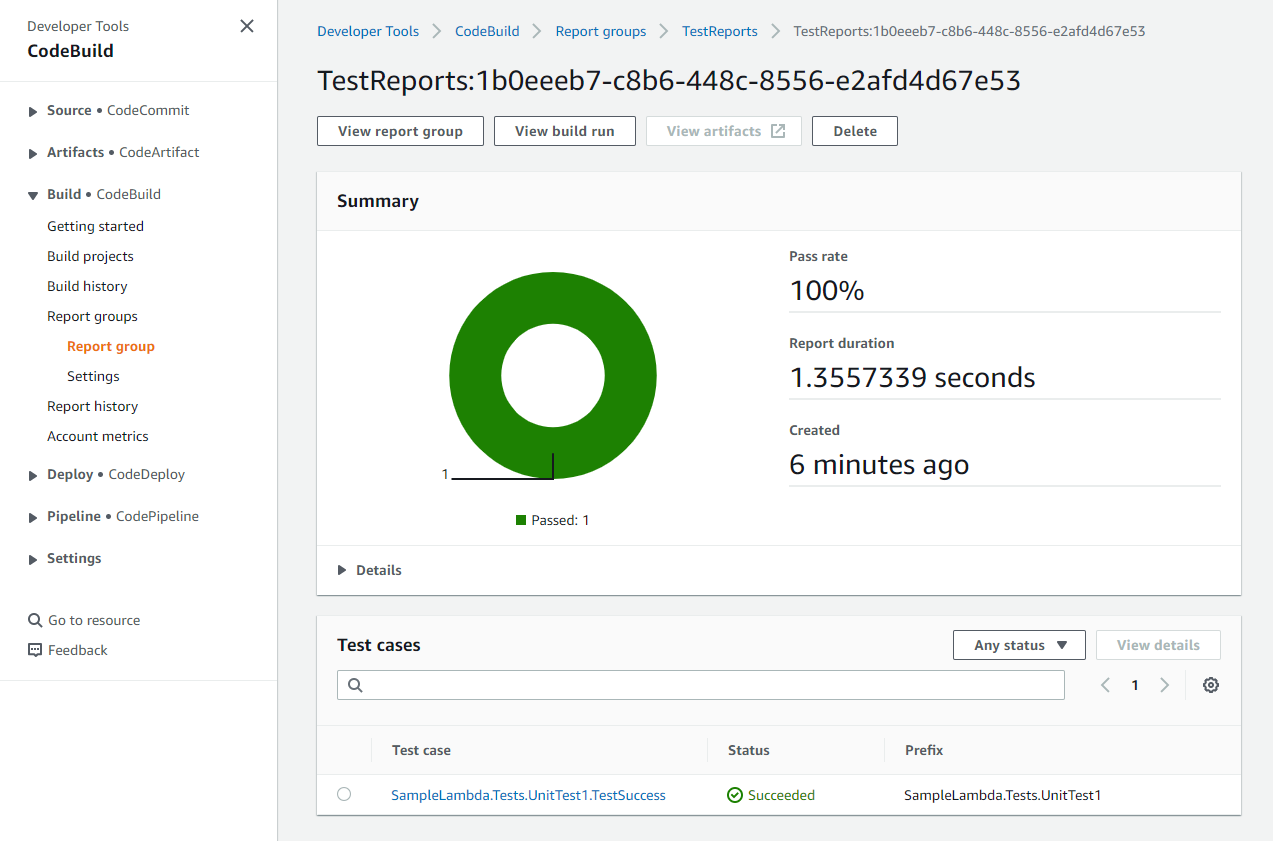
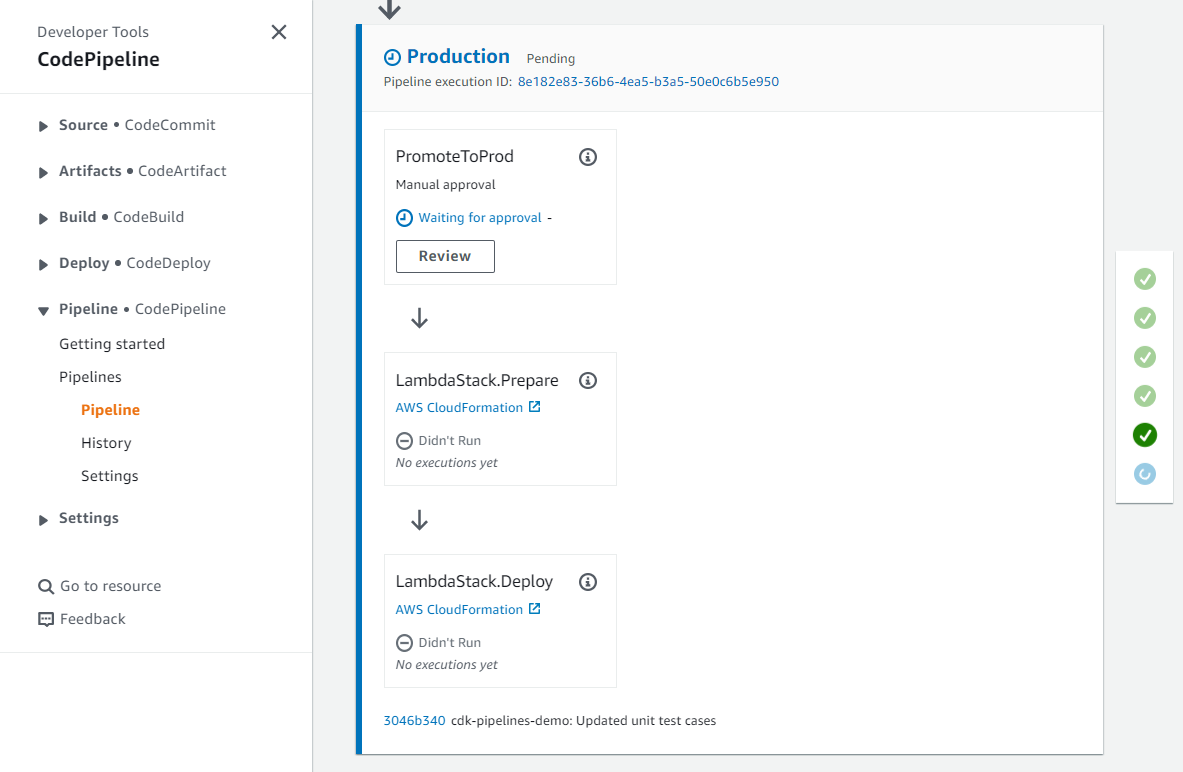
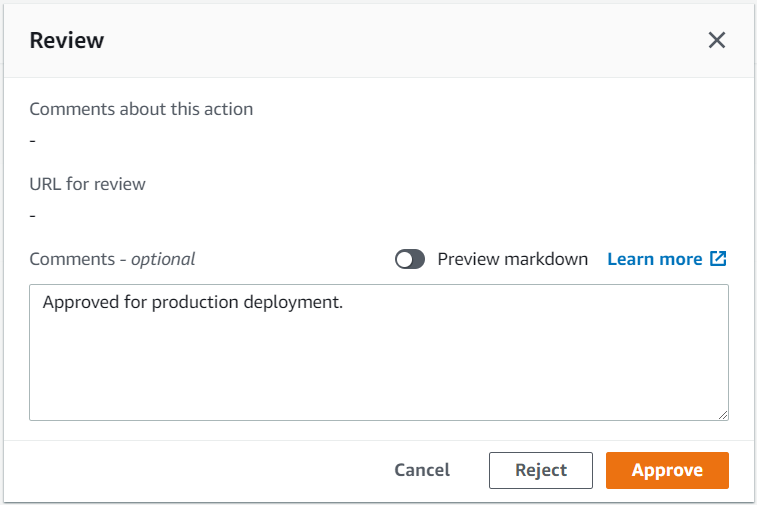
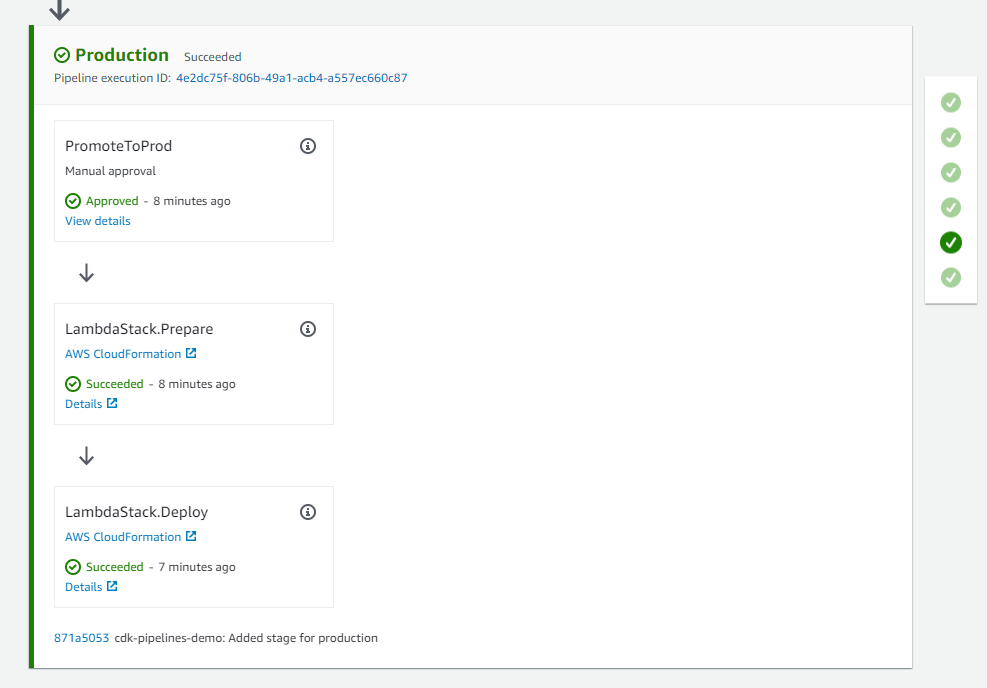
 .NET Developer Day –
 AWS Global Summits – Check your calendars and sign up for the AWS Summit close to where you live or work:
  Last weekend, I enjoyed the spring vibes at
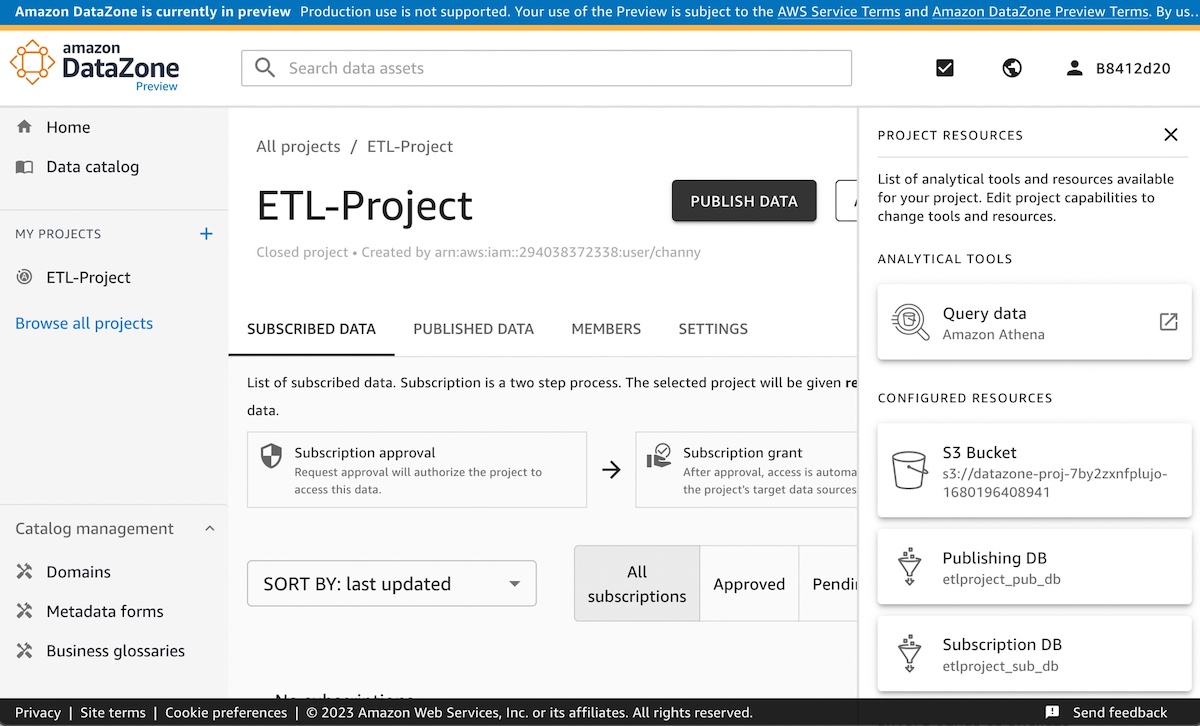

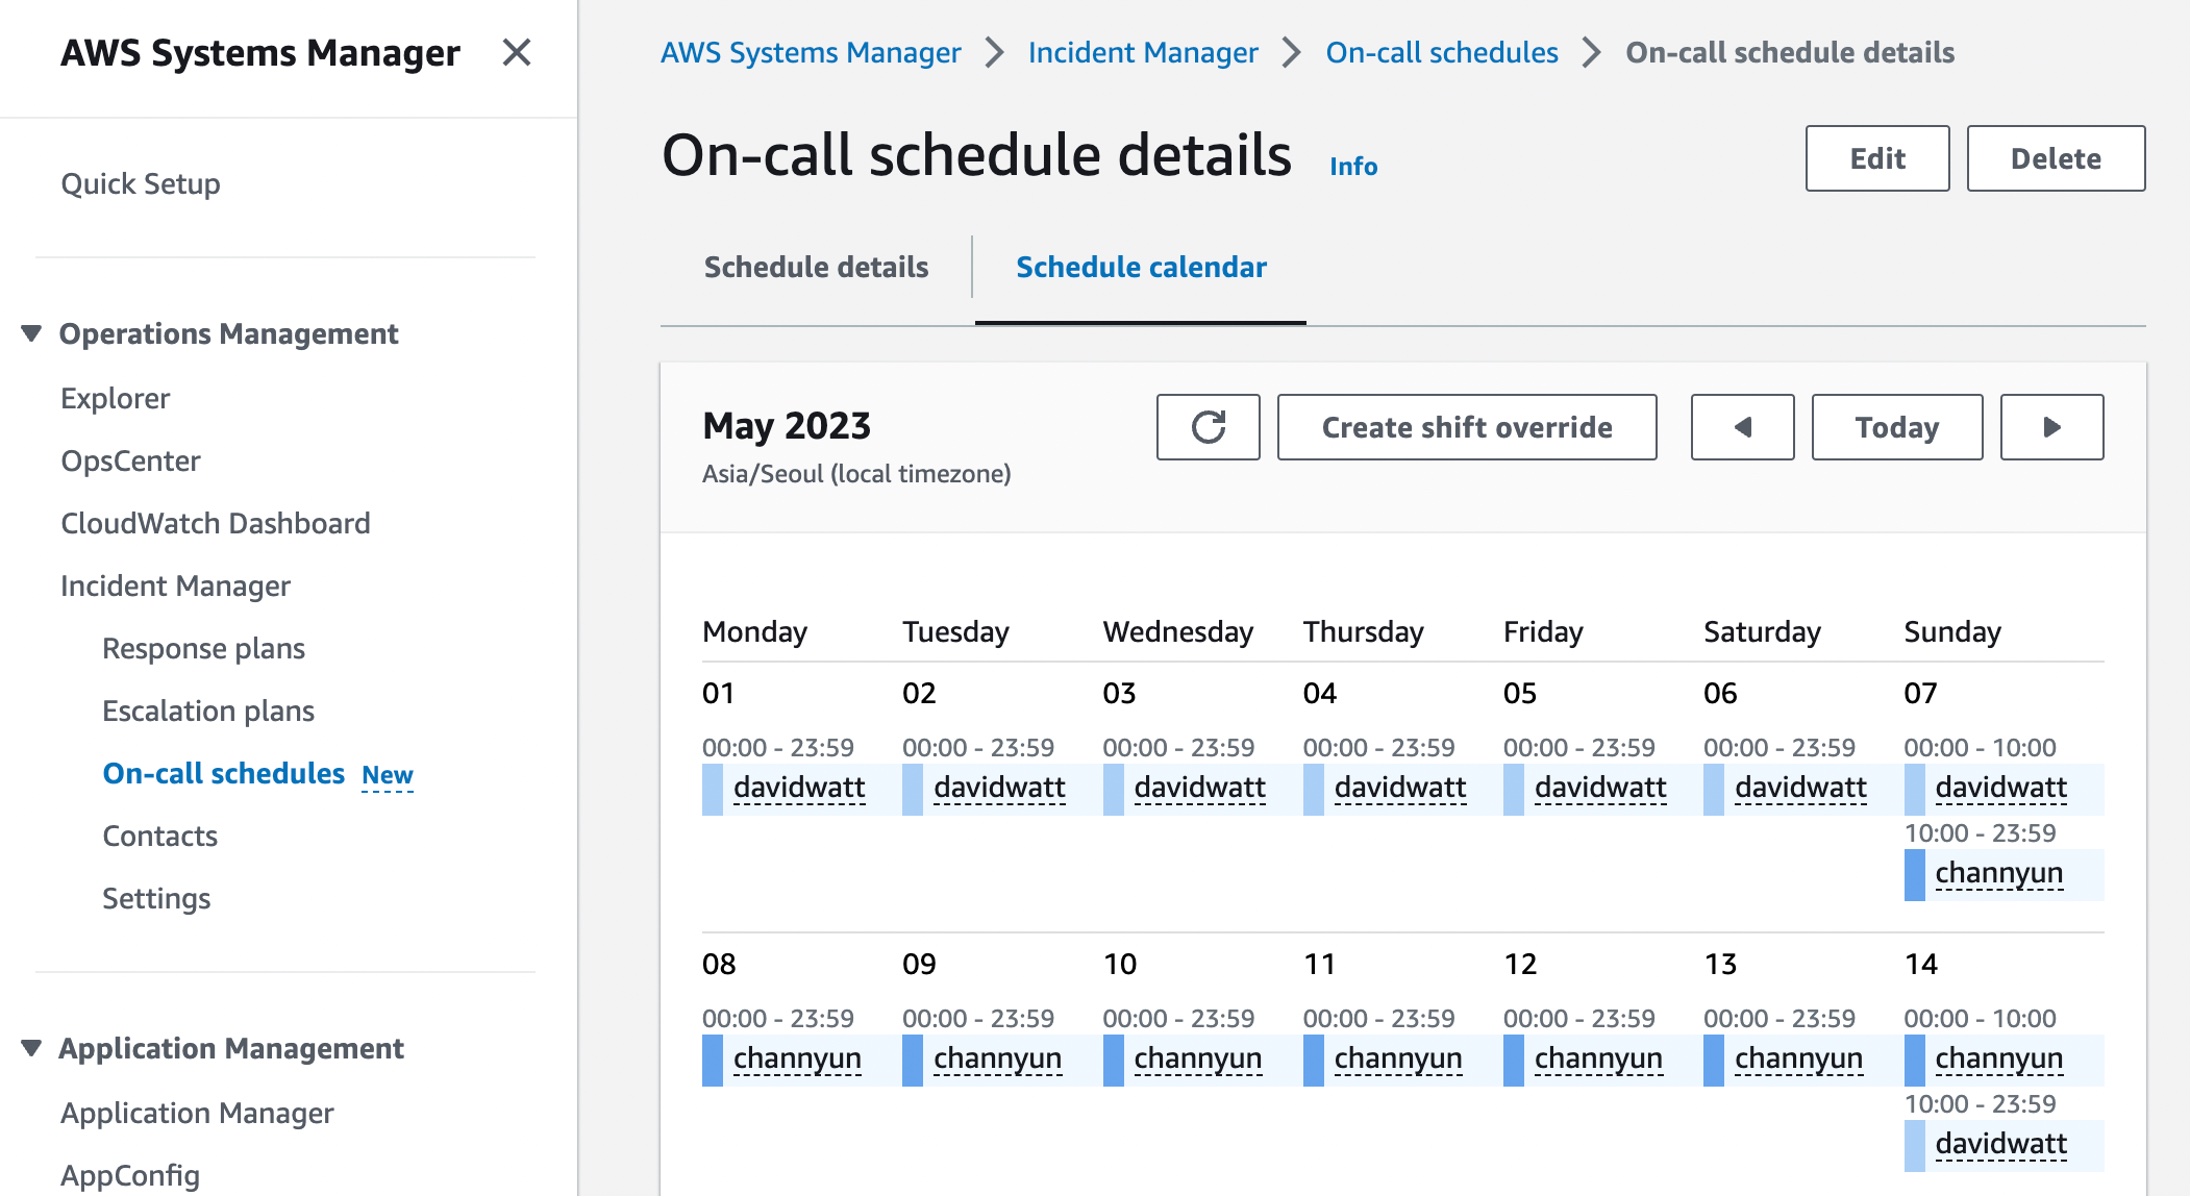

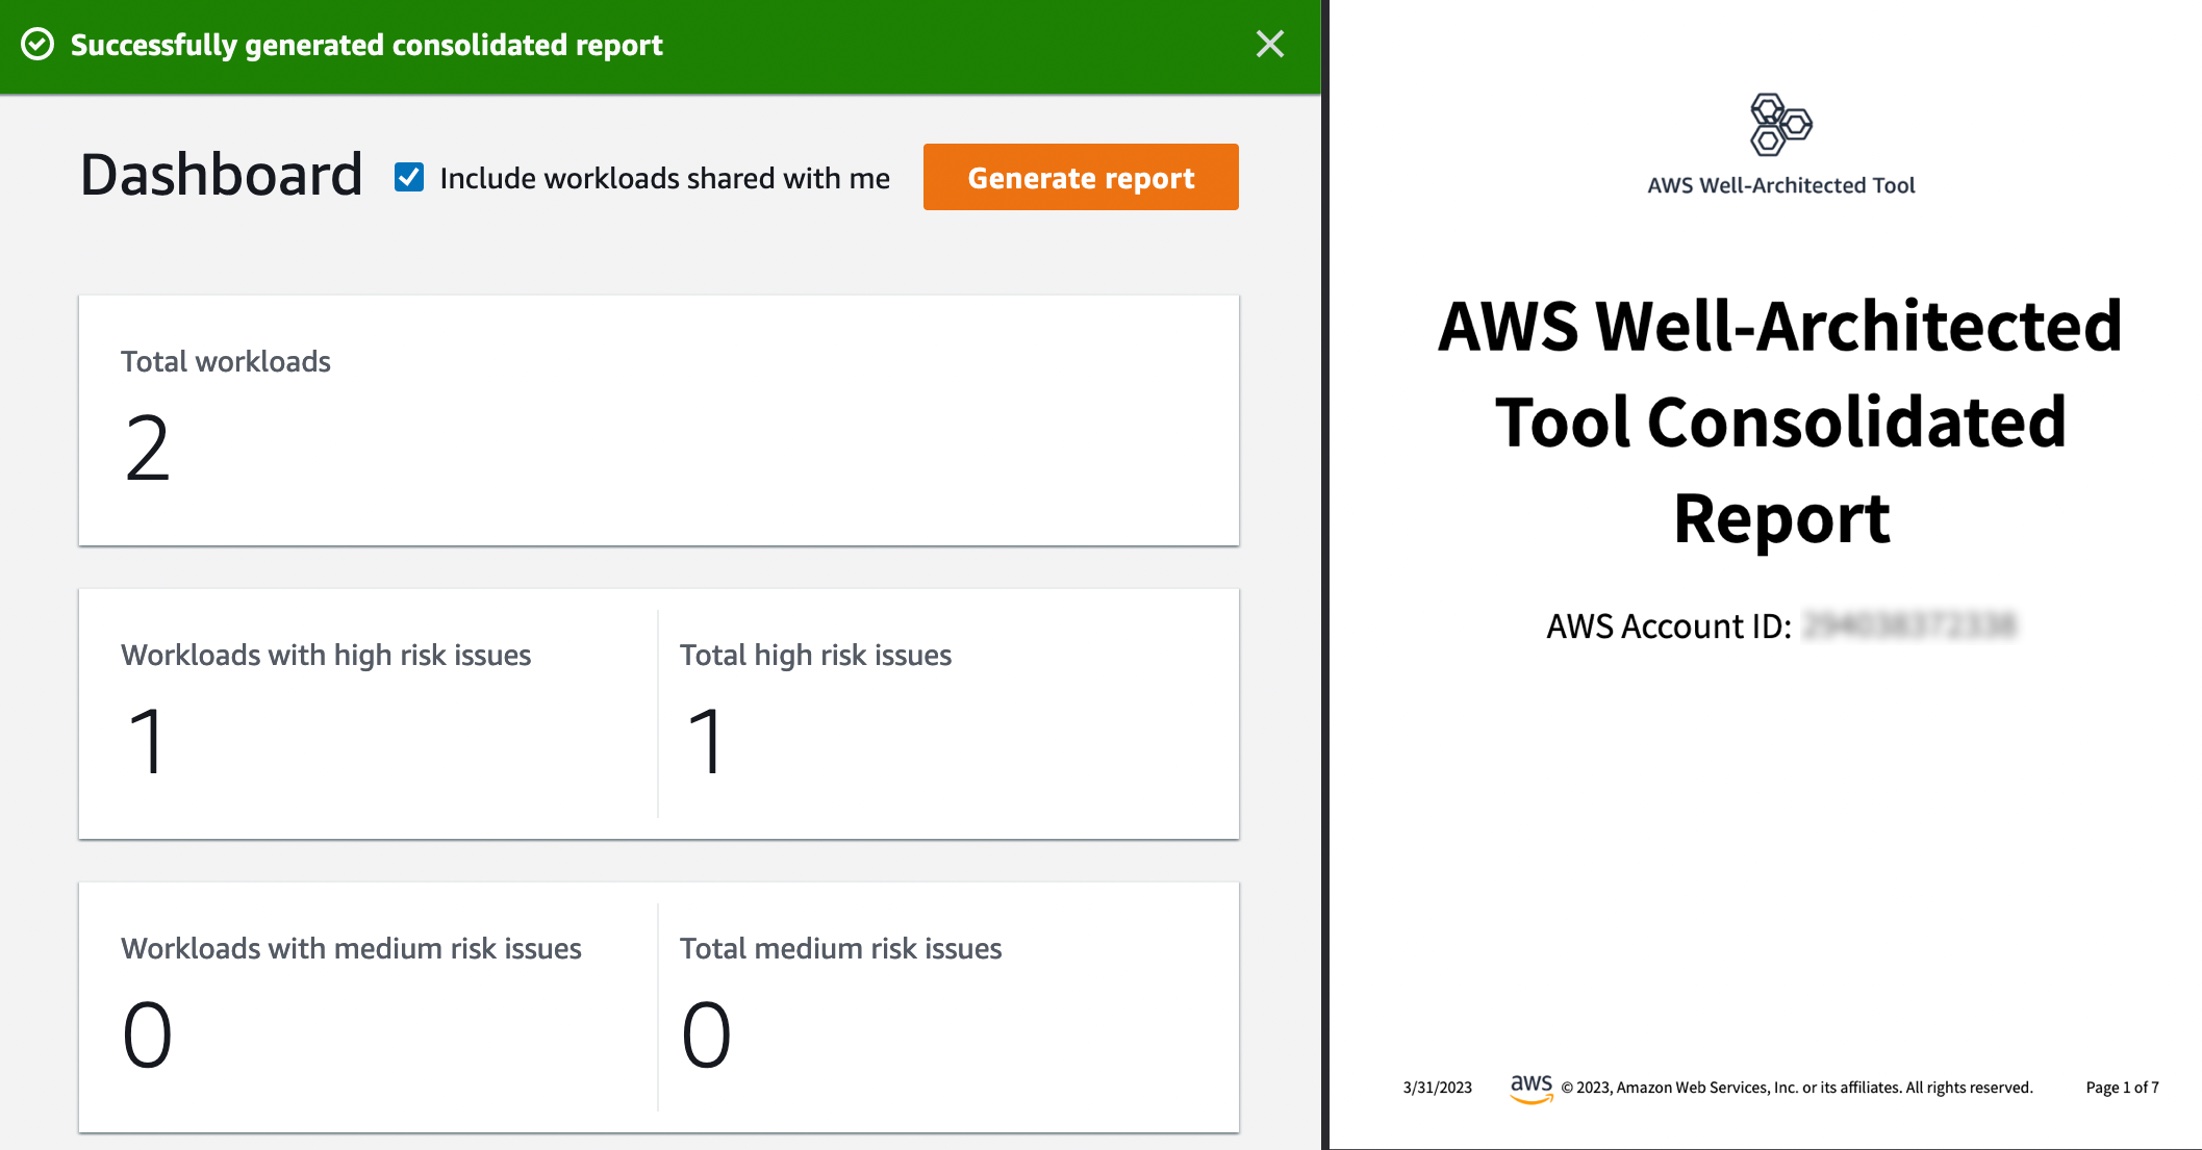


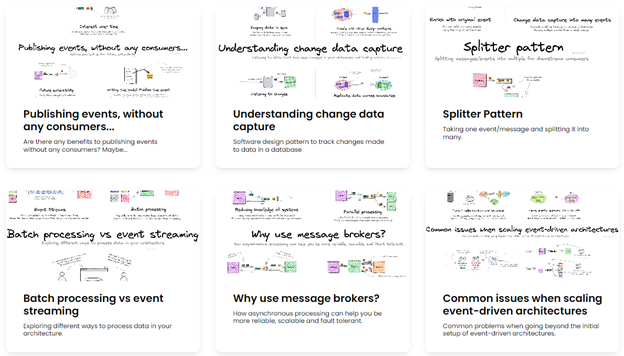


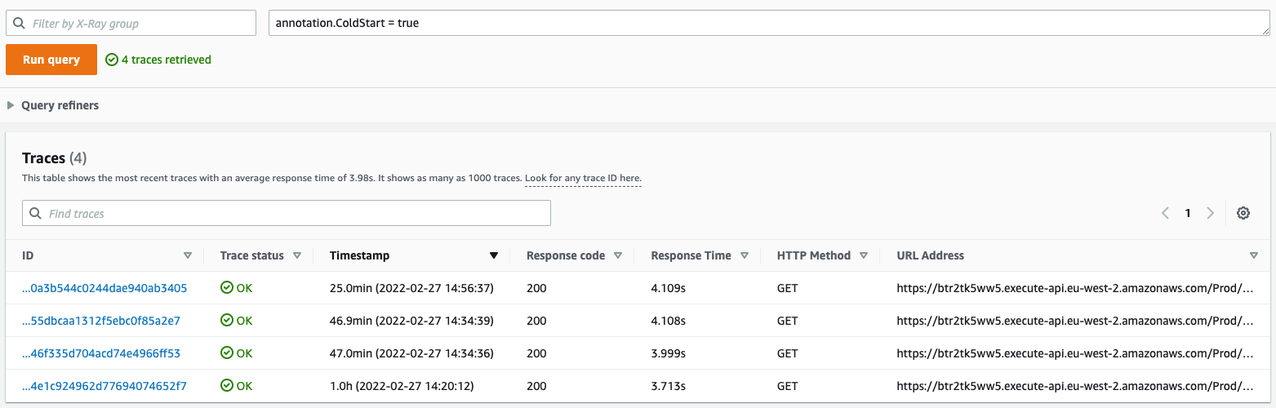
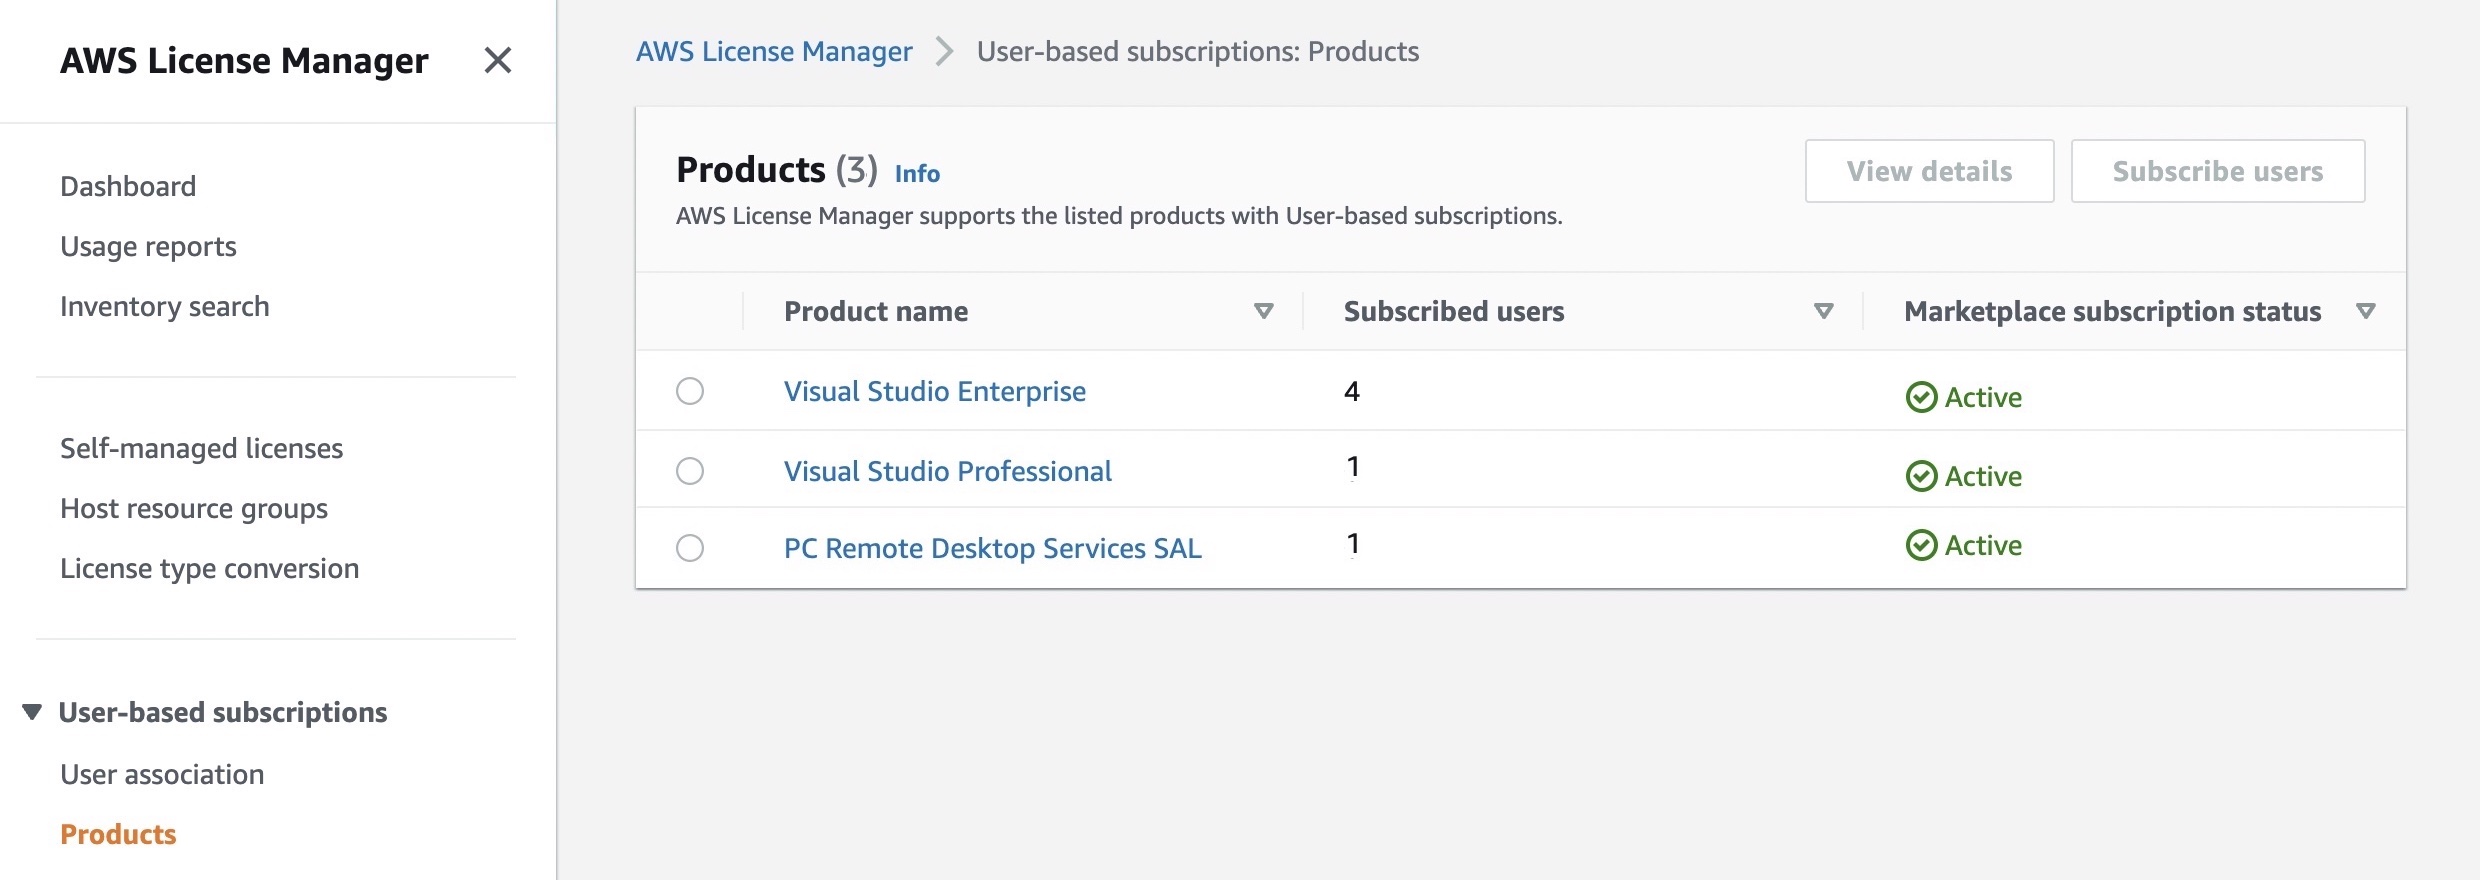
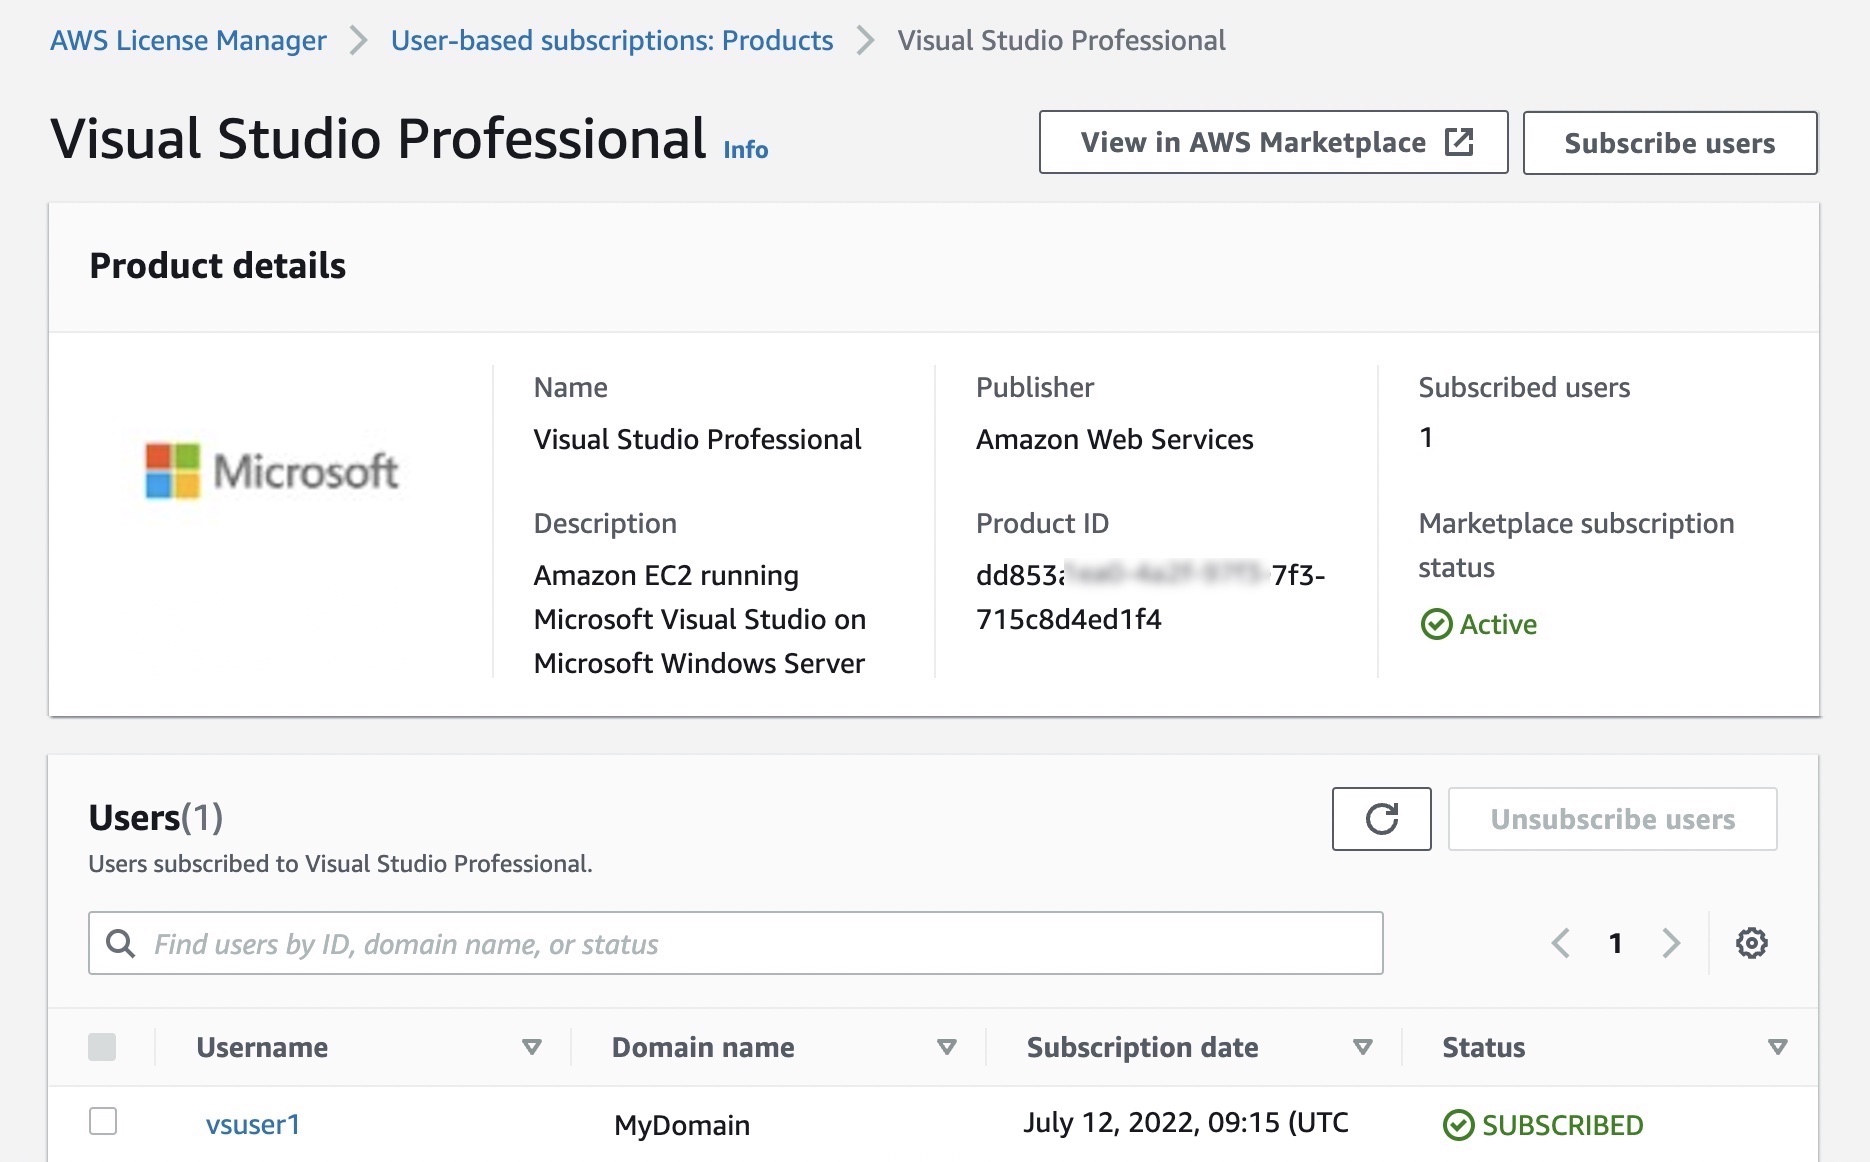


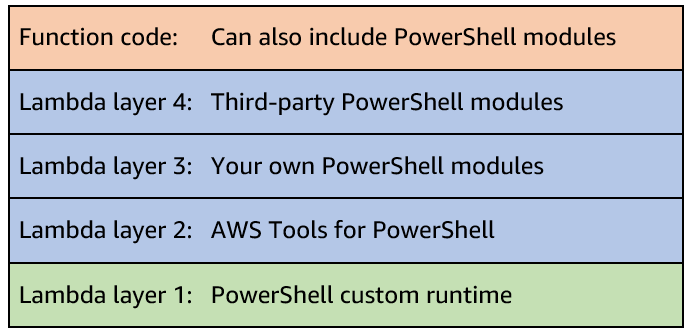


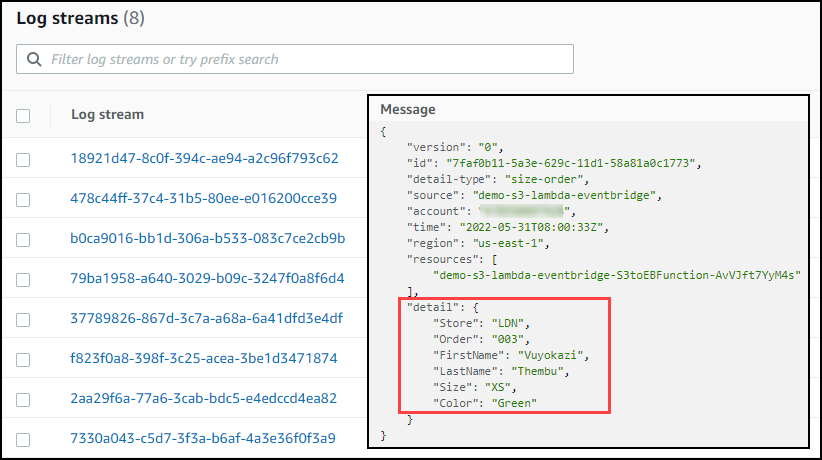
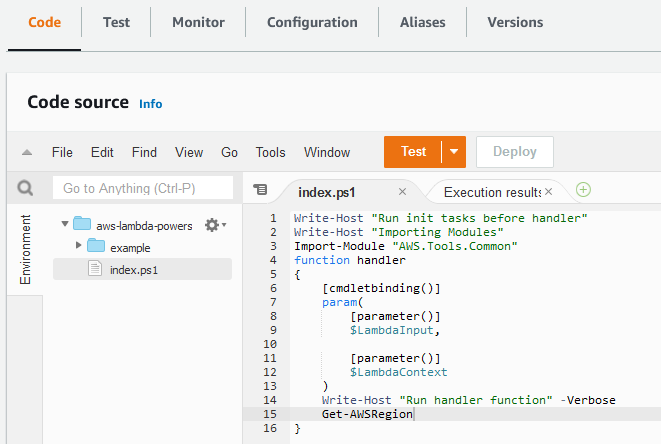


