Tag Archives: Windows on AWS

Introducing the .NET 8 runtime for AWS Lambda

Post Syndicated from Julian Wood original https://aws.amazon.com/blogs/compute/introducing-the-net-8-runtime-for-aws-lambda/

This post is written by Beau Gosse, Senior Software Engineer and Paras Jain, Senior Technical Account Manager.

AWS Lambda now supports .NET 8 as both a managed runtime and container base image. With this release, Lambda developers can benefit from .NET 8 features including API enhancements, improved Native Ahead of Time (Native AOT) support, and improved performance. .NET 8 supports C# 12, F# 8, and PowerShell 7.4. You can develop Lambda functions in .NET 8 using the AWS Toolkit for Visual Studio, the AWS Extensions for .NET CLI, AWS Serverless Application Model (AWS SAM), AWS CDK, and other infrastructure as code tools.

Creating .NET 8 function in the console

Creating .NET 8 function in the console

What’s new

Upgraded operating system

The .NET 8 runtime is built on the Amazon Linux 2023 (AL2023) minimal container image. This provides a smaller deployment footprint than earlier Amazon Linux 2 (AL2) based runtimes and updated versions of common libraries such as glibc 2.34 and OpenSSL 3.

The new image also uses microdnf as a package manager, symlinked as dnf. This replaces the yum package manager used in earlier AL2-based images. If you deploy your Lambda functions as container images, you must update your Dockerfiles to use dnf instead of yum when upgrading to the .NET 8 base image. For more information, see Introducing the Amazon Linux 2023 runtime for AWS Lambda.

Performance

There are a number of language performance improvements available as part of .NET 8. Initialization time can impact performance, as Lambda creates new execution environments to scale your function automatically. There are a number of ways to optimize performance for Lambda-based .NET workloads, including using source generators in System.Text.Json or using Native AOT.

Lambda has increased the default memory size from 256 MB to 512 MB in the blueprints and templates for improved performance with .NET 8. Perform your own functional and performance tests on your .NET 8 applications. You can use AWS Compute Optimizer or AWS Lambda Power Tuning for performance profiling.

At launch, new Lambda runtimes receive less usage than existing established runtimes. This can result in longer cold start times due to reduced cache residency within internal Lambda subsystems. Cold start times typically improve in the weeks following launch as usage increases. As a result, AWS recommends not drawing performance comparison conclusions with other Lambda runtimes until the performance has stabilized.

Native AOT

Lambda introduced .NET Native AOT support in November 2022. Benchmarks show up to 86% improvement in cold start times by eliminating the JIT compilation. Deploying .NET 8 Native AOT functions using the managed dotnet8 runtime rather than the OS-only provided.al2023 runtime gives your function access to .NET system libraries. For example, libicu, which is used for globalization, is not included by default in the provided.al2023 runtime but is in the dotnet8 runtime.

While Native AOT is not suitable for all .NET functions, .NET 8 has improved trimming support. This allows you to more easily run ASP.NET APIs. Improved trimming support helps eliminate build time trimming warnings, which highlight possible runtime errors. This can give you confidence that your Native AOT function behaves like a JIT-compiled function. Trimming support has been added to the Lambda runtime libraries, AWS .NET SDK, .NET Lambda Annotations, and .NET 8 itself.

Using.NET 8 with Lambda

To use .NET 8 with Lambda, you must update your tools.

  1. Install or update the .NET 8 SDK.
  2. If you are using AWS SAM, install or update to the latest version.
  3. If you are using Visual Studio, install or update the AWS Toolkit for Visual Studio.
  4. If you use the .NET Lambda Global Tools extension (Amazon.Lambda.Tools), install the CLI extension and templates. You can upgrade existing tools with dotnet tool update -g Amazon.Lambda.Tools and existing templates with dotnet new install Amazon.Lambda.Templates.

You can also use .NET 8 with Powertools for AWS Lambda (.NET), a developer toolkit to implement serverless best practices such as observability, batch processing, retrieving parameters, idempotency, and feature flags.

Building new .NET 8 functions

Using AWS SAM

  1. Run sam init.
  2. Choose 1- AWS Quick Start Templates.
  3. Choose one of the available templates such as Hello World Example.
  4. Select N for Use the most popular runtime and package type?
  5. Select dotnet8 as the runtime. The dotnet8 Hello World Example also includes a Native AOT template option.
  6. Follow the rest of the prompts to create the .NET 8 function.
AWS SAM .NET 8 init options

AWS SAM .NET 8 init options

You can amend the generated function code and use sam deploy --guided to deploy the function.

Using AWS Toolkit for Visual Studio

  1. From the Create a new project wizard, filter the templates to either the Lambda or Serverless project type and select a template. Use Lambda for deploying a single function. Use Serverless for deploying a collection of functions using AWS CloudFormation.
  2. Continue with the steps to finish creating your project.
  3. You can amend the generated function code.
  4. To deploy, right click on the project in the Solution Explorer and select Publish to AWS Lambda.

Using AWS extensions for the .NET CLI

  1. Run dotnet new list --tag Lambda to get a list of available Lambda templates.
  2. Choose a template and run dotnet new <template name>. To build a function using Native AOT, use dotnet new lambda.NativeAOT or dotnet new serverless.NativeAOT when using the .NET Lambda Annotations Framework.
  3. Locate the generated Lambda function in the directory under src which contains the .csproj file. You can amend the generated function code.
  4. To deploy, run dotnet lambda deploy-function and follow the prompts.
  5. You can test the function in the cloud using dotnet lambda invoke-function or by using the test functionality in the Lambda console.

You can build and deploy .NET Lambda functions using container images. Follow the instructions in the documentation.

Migrating from .NET 6 to .NET 8 without Native AOT

Using AWS SAM

  1. Open the template.yaml file.
  2. Update Runtime to dotnet8.
  3. Open a terminal window and rebuild the code using sam build.
  4. Run sam deploy to deploy the changes.

Using AWS Toolkit for Visual Studio

  1. Open the .csproj project file and update the TargetFramework to net8.0. Update NuGet packages for your Lambda functions to the latest version to pull in .NET 8 updates.
  2. Verify that the build command you are using is targeting the .NET 8 runtime.
  3. There may be additional steps depending on what build/deploy tool you’re using. Updating the function runtime may be sufficient.

.NET function in AWS Toolkit for Visual Studio

Using AWS extensions for the .NET CLI or AWS Toolkit for Visual Studio

  1. Open the aws-lambda-tools-defaults.json file if it exists.
    1. Set the framework field to net8.0. If unspecified, the value is inferred from the project file.
    2. Set the function-runtime field to dotnet8.
  2. Open the serverless.template file if it exists. For any AWS::Lambda::Function or AWS::Servereless::Function resources, set the Runtime property to dotnet8.
  3. Open the .csproj project file if it exists and update the TargetFramework to net8.0. Update NuGet packages for your Lambda functions to the latest version to pull in .NET 8 updates.

Migrating from .NET 6 to .NET 8 Native AOT

The following example migrates a .NET 6 class library function to a .NET 8 Native AOT executable function. This uses the optional Lambda Annotations framework which provides idiomatic .NET coding patterns.

Update your project file

  1. Open the project file.
  2. Set TargetFramework to net8.0.
  3. Set OutputType to exe.
  4. Remove PublishReadyToRun if it exists.
  5. Add PublishAot and set to true.
  6. Add or update NuGet package references to Amazon.Lambda.Annotations and Amazon.Lambda.RuntimeSupport. You can update using the NuGet UI in your IDE, manually, or by running dotnet add package Amazon.Lambda.RuntimeSupport and dotnet add package Amazon.Lambda.Annotations from your project directory.

Your project file should look similar to the following:

<Project Sdk="Microsoft.NET.Sdk">
  <PropertyGroup>
    <OutputType>exe</OutputType>
    <TargetFramework>net8.0</TargetFramework>
    <ImplicitUsings>enable</ImplicitUsings>
    <Nullable>enable</Nullable>
    <AWSProjectType>Lambda</AWSProjectType>
    <CopyLocalLockFileAssemblies>true</CopyLocalLockFileAssemblies>
    <!-- Generate native aot images during publishing to improve cold start time. -->
    <PublishAot>true</PublishAot>
	  <!-- StripSymbols tells the compiler to strip debugging symbols from the final executable if we're on Linux and put them into their own file. 
		This will greatly reduce the final executable's size.-->
	  <StripSymbols>true</StripSymbols>
  </PropertyGroup>
  <ItemGroup>
    <PackageReference Include="Amazon.Lambda.Core" Version="2.2.0" />
    <PackageReference Include="Amazon.Lambda.RuntimeSupport" Version="1.10.0" />
    <PackageReference Include="Amazon.Lambda.Serialization.SystemTextJson" Version="2.4.0" />
  </ItemGroup>
</Project>

Updating your function code

    1. Reference the annotations library with using Amazon.Lambda.Annotations;
    2. Add [assembly:LambdaGlobalProperties(GenerateMain = true)] to allow the annotations framework to create the main method. This is required as the project is now an executable instead of a library.
    3. Add the below partial class and include a JsonSerializable attribute for any types that you need to serialize, including for your function input and output This partial class is used at build time to generate reflection free code dedicated to serializing the listed types. The following is an example:
    4. /// <summary>
      /// This class is used to register the input event and return type for the FunctionHandler method with the System.Text.Json source generator.
      /// There must be a JsonSerializable attribute for each type used as the input and return type or a runtime error will occur 
      /// from the JSON serializer unable to find the serialization information for unknown types.
      /// </summary>
      [JsonSerializable(typeof(APIGatewayHttpApiV2ProxyRequest))]
      [JsonSerializable(typeof(APIGatewayHttpApiV2ProxyResponse))]
      public partial class MyCustomJsonSerializerContext : JsonSerializerContext
      {
          // By using this partial class derived from JsonSerializerContext, we can generate reflection free JSON Serializer code at compile time
          // which can deserialize our class and properties. However, we must attribute this class to tell it what types to generate serialization code for
          // See https://docs.microsoft.com/en-us/dotnet/standard/serialization/system-text-json-source-generation
      }

    5. After the using statement, add the following to specify the serializer to use. [assembly: LambdaSerializer(typeof(SourceGeneratorLambdaJsonSerializer<LambdaFunctionJsonSerializerContext>))]

    Swap LambdaFunctionJsonSerializerContext for your context if you are not using the partial class from the previous step.

    Updating your function configuration

    If you are using aws-lambda-tools-defaults.json.

    1. Set function-runtime to dotnet8.
    2. Set function-architecture to match your build machine – either x86_64 or arm64.
    3. Set (or update) environment-variables to include ANNOTATIONS_HANDLER=<YourFunctionHandler>. Replace <YourFunctionHandler> with the method name of your function handler, so the annotations framework knows which method to call from the generated main method.
    4. Set function-handler to the name of the executable assembly in your bin directory. By default, this is your project name, which tells the .NET Lambda bootstrap script to run your native binary instead of starting the .NET runtime. If your project file has AssemblyName then use that value for the function handler.
    {
      "function-architecture": "x86_64",
      "function-runtime": "dotnet8",
      "function-handler": "<your-assembly-name>",
      "environment-variables",
      "ANNOTATIONS_HANDLER=<your-function-handler>",
    }

    Deploy and test

    1. Deploy your function. If you are using Amazon.Lambda.Tools, run dotnet lambda deploy-function. Check for trim warnings during build and refactor to eliminate them.
    2. Test your function to ensure that the native calls into AL2023 are working correctly. By default, running local unit tests on your development machine won’t run natively and will still use the JIT compiler. Running with the JIT compiler does not allow you to catch native AOT specific runtime errors.

    Conclusion

    Lambda is introducing the new .NET 8 managed runtime. This post highlights new features in .NET 8. You can create new Lambda functions or migrate existing functions to .NET 8 or .NET 8 Native AOT.

    For more information, see the AWS Lambda for .NET repository, documentation, and .NET on Serverless Land.

    For more serverless learning resources, visit Serverless Land.

Optimize costs by up to 70% with new Amazon T3 Dedicated Hosts

Post Syndicated from Emma White original https://aws.amazon.com/blogs/compute/optimize-costs-by-up-to-70-with-new-amazon-t3-dedicated-hosts/

This post is written by Andy Ward, Senior Specialist Solutions Architect, and Yogi Barot, Senior Specialist Solutions Architect.

Customers have been taking advantage of Amazon Elastic Compute Cloud (Amazon EC2) Dedicated Hosts to enable them to use their eligible software licenses from vendors such as Microsoft and Oracle since the feature launched in 2015. Amazon EC2 Dedicated Hosts have gained new features over the years. For example, Customers can launch different-sized instances within the same instance family and use AWS License Manager to track and manage software licenses. Host Resource Groups have enabled customers to take advantage of automated host management. Further, the ability to use license included Windows Server on Dedicated Hosts has opened up new possibilities for cost-optimization.

The ability to bring your own license (BYOL) to Amazon EC2 Dedicated Hosts has been an invaluable cost-optimization tool for customers. Since the introduction of Dedicated Hosts on Amazon EC2, customers have requested additional flexibility to further optimize their ability to save on licensing costs on AWS. We listened to that feedback, and are now launching a new type of Amazon EC2 Dedicated Host to enable additional cost savings.

In this blog post, we discuss how our customers can benefit from the newest member of our Amazon EC2 Dedicated Hosts family – the T3 Dedicated Host. The T3 Dedicated Host is the first Amazon EC2 Dedicated Host to support general-purpose burstable T3 instances, providing the most cost-efficient way of using eligible BYOL software on dedicated hardware.

Introducing T3 Dedicated Hosts

When we talk to our customers about BYOL, we often hear the following:

  • We currently run our workloads on-premises and want to move our workloads to AWS with BYOL.
  • We currently benefit from oversubscribing CPU on our on-premises hosts, and want to retain our oversubscription benefits when bringing our eligible BYOL software to AWS.
  • How can we further cost-optimize our AWS environment, increasing the flexibility and cost effectiveness of our licenses?
  • Some of our virtual servers use minimal resources. How can we use smaller instance sizes with BYOL?

T3 Dedicated Hosts differ from our other EC2 Dedicated Hosts. Where our traditional EC2 Dedicated Hosts provide fixed CPU resources, T3 Dedicated Hosts support burstable instances capable of sharing CPU resources, providing a baseline CPU performance and the ability to burst when needed. Sharing CPU resources, also known as oversubscription, is what enables a single T3 Dedicated Host to support up to 4x more instances than comparable general-purpose Dedicated Hosts. This increase in the number of instances supported can enable customers to save on licensing and infrastructure costs by as much as 70%.

Advantages of T3 Dedicated Hosts

 T3 Dedicated Hosts drive a lower total cost of ownership (TCO) by delivering a higher instance density than any other EC2 Dedicated Host. Burstable T3 instances allow customers to consolidate a higher number of instances with low-to-moderate average CPU utilization on fewer hosts than ever before.

T3 Dedicated Hosts also offer smaller instance sizes, in a greater number of vCPU and memory combinations, than other EC2 Dedicated Hosts. Smaller instance sizes can contribute to lower TCO and help deliver consolidation ratios equivalent to or greater than on-premises hosts.

AWS hypervisor management features provide consistent performance for customer workloads. Customers can choose between a wide selection of instance configurations with different vCPU and memory sizes, mixing and matching instances sizes from t3.nano up to t3.2xlarge

You can use your existing eligible per-socket, per-core, or per-VM software licenses, including licenses for Windows Server, SQL Server, SUSE Linux Enterprise Server and Red Hat Enterprise Linux. As licensing terms often change over time, we recommend checking eligibility for BYOL with your license vendor.

You can track your license usage using your license configuration in AWS License Manager. For more information, see the Track your license using AWS License Manager blog post and the Manage Software Licenses with AWS License Manager video on YouTube.

When to use T3 Dedicated Hosts

T3 Dedicated Hosts are best suited for running instances such as small and medium databases and application servers, virtual desktops, and development and test environments. In common with on-premises hypervisor hosts that allow CPU oversubscription, T3 Dedicated Hosts are less suitable for workloads that experience correlated CPU burst patterns.

T3 Dedicated Hosts support all instance sizes of the T3 family, with a wide variety of CPU and RAM ratios. Additionally, as T3 Dedicated Hosts are powered by the AWS Nitro System, they support multiple instance sizes on a single host. Customers can run up to 192 instances on a single T3 Dedicated Host, each capable of supporting multiple processes. The maximum instance limits are shown in the following table:

Instance Family Sockets Physical Cores nano micro small medium large xlarge 2xlarge
t3 2 48 192 192 192 192 96 48 24


Any combination of T3 instance types can be run, up to the memory limit of the host (768GB). Examples of supported blended instance type combinations are:

  • 132 t3.small and 60 t3.large
  • 128 t3.small and 64 t3.large
  • 24 t3.xlarge and 12 t3.2xlarge

Use Cases

If you are looking for ways to decrease your license costs and host footprint in order to achieve the lowest TCO, then using T3 Dedicated Hosts enables a set of previously unavailable scenarios to help you achieve this goal. The ability to run a greater number of instances per host compared to existing Dedicated Hosts leads directly to lower licensing and infrastructure costs on AWS, for suitable BYOL workloads.

The following three scenarios are typical examples of benefits that can be realized by customers using T3 Dedicated Hosts.

Retaining Existing Server Consolidation Ratios While Migrating to AWS

On-premises, you are taking advantage of the fact that you can easily oversubscribe your physical CPUs on VMware hosts and achieve high-levels of consolidation. As you can license Windows Server on a per-physical-core basis, you only need to license the physical cores of the VMware hosts, and not the vCPUs of the Windows Server virtual machines.

  • You are currently running 7 x 48 core VMware Hosts on-premises.
  • Each host is running 150 x 2 vCPU low average-CPU-utilization Windows Server virtual machines.
  • You have Windows Server Datacenter licenses that are eligible for BYOL to AWS.

In this scenario, T3 Dedicated Hosts enable you to achieve similar, or better, levels of consolidation. Additionally, the number of Windows Server Datacenter licenses required in order to bring your workloads to AWS is reduced from 336 cores to 288 cores – a saving of 14%.

On-Premises VMware Hosts T3 Dedicated Hosts Savings
Physical Servers (48 Cores) 7 6
2 vCPU VMs per Host 150 192
Total number of VMs 1000 1000
Total Windows Server Datacenter Licenses (Per Core) 336 288 14%

Reducing License Requirements While Migrating To AWS

On-premises you are taking advantage of the fact that you can easily oversubscribe your physical CPUs on VMware hosts and achieve high-levels of consolidation. You can now achieve far greater levels of consolidation by moving your virtual machines to T3 Dedicated Hosts, which have double the amount of RAM compared to your current on-premises VMware hosts.

  • You are currently using 10 x 36 core, 384GB RAM VMware Hosts on-premises.
  • Each host is running 96 x 2 vCPU, 4GB RAM low average-CPU-utilization Windows Server virtual machines.

By taking advantage of oversubscription and the increased RAM on T3 Dedicated Hosts, you can now achieve far greater levels of consolidation. Additionally, you are able to reduce the number of Windows Server Datacenter licenses required for BYOL. In this scenario, you can achieve a license reduction from 360 cores to 240 cores – a 33% saving.

On-Premises VMware Hosts T3 Dedicated Hosts Savings
Physical Servers 10 5
Physical Cores per Host 36 48
RAM per Host (GB) 384 768
2 vCPU, 4GB RAM VMs per Host 96 192
Total number of VMs 960 960
Total Windows Server Datacenter Licenses (Per Core) = Number of Servers * Physical Core Count 10 * 36 = 360 5 * 48 = 240 33%

Reducing License and Infrastructure Cost by Migrating from C5 Dedicated Hosts to T3 Dedicated Hosts

In this scenario, you are taking advantage of the fact that you can bring your own eligible Windows Server and SQL Server licenses to AWS for use on Dedicated Hosts. However, as your instances all have low average-CPU-utilization, your current C5 Dedicated Hosts, with fixed CPU resources, are largely underutilized.

  • You are currently using C5 EC2 Dedicated Hosts on AWS with eligible Windows Server Datacenter licenses and SQL Server 2017 Enterprise Edition (BYOL).
  • Each host is running 36 x 2 vCPU low average-CPU-utilization Windows Server virtual machines.

By migrating to T3 Dedicated Hosts, you can achieve a substantial reduction in licensing costs. As the total number of physical cores requiring licensing is reduced, you can benefit from a corresponding reduction in the number of SQL Server Enterprise Edition licenses required – a saving of 71%.

C5 Dedicated Hosts T3 Dedicated Hosts Savings
Total Number of Hosts Required 28 6
2 vCPU, 4GB VMs per Host 36 192
Total number of VMs 1008 1008
Total SQL Server EE Licenses = Number of Servers * Physical Core Count 36 * 28 = 1008 48 * 6 = 288 71%

Conclusion

In this blog post, we described the new T3 Dedicated Hosts and how they help customers benefit from running more instances per host in BYOL scenarios. We showed that heavily oversubscribed on-premises environments can be migrated to T3 Dedicated Hosts on AWS while lowering existing licensing and infrastructure costs. We further showed how significant licensing and infrastructure savings can be realized by moving existing workloads from EC2 Dedicated Hosts with fixed CPU resources to new T3 Dedicated Hosts.

Visit the Dedicated Hosts, AWS License Manager and host resource group pages to get started with saving costs on licensing and infrastructure.

AWS can help you assess how your company can get the most out of cloud. Join the millions of AWS customers that trust us to migrate and modernize their most important applications in the cloud. To learn more on modernizing Windows Server or SQL Server, visit Windows on AWS. Contact us to start your migration journey today.

Create CIS hardened Windows images using EC2 Image Builder

Post Syndicated from Vinay Kuchibhotla original https://aws.amazon.com/blogs/devops/cis-windows-ec2-image-builder/

Many organizations today require their systems to be compliant with the CIS (Center for Internet Security) Benchmarks. Enterprises have adopted the guidelines or benchmarks drawn by CIS to maintain secure systems. Creating secure Linux or Windows Server images on the cloud and on-premises can involve manual update processes or require teams to build automation scripts to maintain images. This blog post details the process of automating the creation of CIS compliant Windows images using EC2 Image Builder.

EC2 Image Builder simplifies the building, testing, and deployment of Virtual Machine and container images for use on AWS or on-premises. Keeping Virtual Machine and container images up-to-date can be time consuming, resource intensive, and error-prone. Currently, customers either manually update and snapshot VMs or have teams that build automation scripts to maintain images. EC2 Image Builder significantly reduces the effort of keeping images up-to-date and secure by providing a simple graphical interface, built-in automation, and AWS-provided security settings. With Image Builder, there are no manual steps for updating an image nor do you have to build your own automation pipeline. EC2 Image Builder is offered at no cost, other than the cost of the underlying AWS resources used to create, store, and share the images.

Hardening is the process of applying security policies to a system and thereby, an Amazon Machine Image (AMI) with the CIS security policies in place would be a CIS hardened AMI. CIS benchmarks are a published set of recommendations that describe the security policies required to be CIS-compliant. They cover a wide range of platforms including Windows Server and Linux. For example, a few recommendations in a Windows Server environment are to:

  • Have a password requirement and rotation policy.
  • Set an idle timer to lock the instance if there is no activity.
  • Prevent guest users from using Remote Desktop Protocol (RDP) to access the instance.

While Deploying CIS L1 hardened AMIs with EC2 Image Builder discusses about Linux AMIs, this blog post demonstrates how EC2 Image Builder can be used to publish hardened Windows 2019 AMIs. This solutions uses the following AWS services:

EC2 Image Builder provides all the necessary resources needed for publishing AMIs and that involves –

  • Creating a pipeline by providing details such as a name, description, tags, and a schedule to run automated builds.
  • Creating a recipe by providing a name and version, select a source operating system image, and choose components to add for building and testing. Components are the building blocks that are consumed by an image recipe or a container recipe. For example, packages for installation, security hardening steps, and tests. The selected source operating system image and components make up an image recipe.
  • Defining infrastructure configuration – Image Builder launches Amazon EC2 instances in your account to customize images and run validation tests. The Infrastructure configuration settings specify infrastructure details for the instances that will run in your AWS account during the build process.
  • After the build is complete and has passed all its tests, the pipeline automatically distributes the developed AMIs to the select AWS accounts and regions as defined in the distribution configuration.
    More details on creating an Image Builder pipeline using the AWS console wizard can be found here.

Solution Overview and prerequisites

The objective of this pipeline is to publish CIS L1 compliant Windows 2019 AMIs and this is achieved by applying a Windows Group Policy Object(GPO) stored in an Amazon S3 bucket for creating the hardened AMIs. The workflow includes the following steps:

  • Download and modify the CIS Microsoft Windows Server 2019 Benchmark Build Kit available on the Center for Internet Security website. Note: Access to the benchmarks on the CIS site requires a paid subscription.
  • Upload the modified GPO file to an S3 bucket in an AWS account.
  • Create a custom Image Builder component by referencing the GPO file uploaded to the S3 bucket.
  • Create an IAM Instance Profile that the
  • Launch the EC2 Image Builder pipeline for publishing CIS L1 hardened Windows 2019 AMIs.

Make sure to have these prerequisites checked before getting started:

Implementation

Now that you have the prerequisites met, let’s begin with modifying the downloaded GPO file.

Creating the GPO File

This step involves modifying two files, registry.pol and GptTmpl.inf

  • On your workstation, create a folder of your choice, lets say C:\Utils
  • Move both the CIS Benchmark build kit and the LGPO utility to C:\Utils
  • Unzip the benchmark file to C:\Utils\Server2019v1.1.0. You should find the following folder structure in the benchmark build kit.

Screenshot of folder structure

  • To make the GPO file work with AWS EC2 instances, you need to change the GPO file to prevent it from applying the following CIS recommendations mentioned in the below table and execute the commands mentioned below the table for getting there:


Benchmark rule # Recommendation Value to be configured Reason
2.2.21 (L1) Configure ‘Deny Access to this computer from the network’ Guests Does not include ‘Local account and member of Administrators group’ to allow for remote login.
2.2.26 (L1) Ensure ‘Deny log on through Remote Desktop Services’ is set to include ‘Guests, Local account’ Guests Does not include ‘Local account’ to allow for RDP login.
2.3.1.1 (L1) Ensure ‘Accounts: Administrator account status’ is set to ‘Disabled’ Not Configured Administrator account remains enabled in support of allowing login to the instance after launch.
2.3.1.5 (L1) Ensure ‘Accounts: Rename administrator account’ is configured Not Configured We have retained “Administrator” as the default administrative account for the sake of provisioning scripts that may not have knowledge of “CISAdmin” as defined in the CIS remediation kit.
2.3.1.6 (L1) Configure ‘Accounts: Rename guest account’ Not Configured Sysprep process renames this account to default of ‘Guest’.
2.3.7.4 Interactive logon: Message text for users attempting to log on Not Configured This recommendation is not configured as it causes issues with AWS Scanner.
2.3.7.5 Interactive logon: Message title for users attempting to log on Not Configured This recommendation is not configured as it causes issues with AWS Scanner.
9.3.5 (L1) Ensure ‘Windows Firewall: Public: Settings: Apply local firewall rules’ is set to ‘No’ Not Configured This recommendation is not configured as it causes issues with RDP.
9.3.6 (L1) Ensure ‘Windows Firewall: Public: Settings: Apply local connection security rules’ Not Configured This recommendation is not configured as it causes issues with RDP.
18.2.1 (L1) Ensure LAPS AdmPwd GPO Extension / CSE is installed (MS only) Not Configured LAPS is not configured by default in the AWS environment.
18.9.58.3.9.1 (L1) Ensure ‘Always prompt for password upon connection’ is set to ‘Enabled’ Not Configured This recommendation is not configured as it causes issues with RDP.


  • Parse the policy file located inside MS-L1\{6B8FB17A-45D6-456D-9099-EB04F0100DE2}\DomainSysvol\GPO\Machine\registry.pol into a text file using the command:

C:\Utils\LGPO.exe /parse /m C:\Utils\Server2019v1.1.0\MS-L1\DomainSysvol\GPO\Machine\registry.pol >> C:\Utils\MS-L1.txt

  • Open the generated MS-L1.txt file and delete the following sections:

Computer
Software\Policies\Microsoft\Windows NT\Terminal Services
fPromptForPassword
DWORD:1

Computer
Software\Policies\Microsoft\WindowsFirewall\PublicProfile
AllowLocalPolicyMerge
DWORD:0

Computer
Software\Policies\Microsoft\WindowsFirewall\PublicProfile
AllowLocalIPsecPolicyMerge
DWORD:0

  • Save the file and convert it back to policy file using command:

C:\Utils\LGPO.exe /r C:\Utils\MS-L1.txt /w C:\Utils\registry.pol

  • Copy the newly generated registry.pol file from C:\Utils\ to C:\Utils\Server2019v1.1.0\MS-L1\DomainSysvol\GPO\Machine\. Note:This will replace the existing registry.pol file.
  • Next, open C:\Utils\Server2019v1.1.0\MS-L1\DomainSysvol\GPO\Machine\microsoft\windows nt\SecEdit\GptTmpl.inf using Notepad.
  • Under the [System Access] section, delete the following lines:

NewAdministratorName = "CISADMIN"
NewGuestName = "CISGUEST"
EnableAdminAccount = 0

  • Under the section [Privilege Rights], modify the values as given below:

SeDenyNetworkLogonRight = *S-1-5-32-546
SeDenyRemoteInteractiveLogonRight = *S-1-5-32-546

  • Under the section [Registry Values], remove the following two lines:

MACHINE\Software\Microsoft\Windows\CurrentVersion\Policies\System\LegalNoticeCaption=1,"ADD TEXT HERE"
MACHINE\Software\Microsoft\Windows\CurrentVersion\Policies\System\LegalNoticeText=7,ADD TEXT HERE

  • Save the C:\Utils\Server2019v1.1.0\MS-L1\DomainSysvol\GPO\Machine\microsoft\windows nt\SecEdit\GptTmpl.inf file.
  • Rename the root folder C:\Utils\Server2019v1.1.0 to a simpler name like C:\Utilis\gpos
  • Compress both the C:\Utilis\gpos folder along with the C:\Utils\LGPO.exe file and name it as C:\Utilis\cisbuild.zip and upload it to the image-builder-assets S3 bucket.

Create Build Component

Next step for us is to develop the build component file that details what gets to be installed on the AMI that will be created at the end of the process. For example, you can use the component definition for installing external tools like Python. To build a component, you must provide a YAML-based document, which represents the phases and steps to create the component. Create the CISL1Component following the below steps:

  • Login to the AWS Console and open the EC2 Image Builder dashboard.
  • Click on Components in the left pane.
  • Click on Create Component.
  • Choose Windows for Image Operating System (OS).
  • Type a name for the Component, in this case, we will name it as CIS-Windows-2019-Build-Component.
  • Type in a component version. Since it is the first version, we will choose 1.0.0
  • Optionally, under KMS keys, if you have a custom KMS key to encrypt the image, you can choose that or leave as default.
  • Type in a meaningful description.
  • Under Definition Document, choose “Define document content” and paste the following YAML code:

name: CISLevel1Build
description: Build Component to build a CIS Level 1 Image along with additional libraries
schemaVersion: 1.0

phases:
  - name: build
    steps:
      - name: DownloadUtilities
        action: ExecutePowerShell
        inputs:
          commands:
            - New-Item -ItemType directory -Path C:\Utils
            - Invoke-WebRequest -Uri "https://www.python.org/ftp/python/3.8.2/python-3.8.2-amd64.exe" -OutFile "C:\Utils\python.exe"
      - name: BuildKitDownload
        action: S3Download
        inputs:
          - source: s3://image-builder-assets/cisbuild.zip
            destination: C:\Utils\BuildKit.zip
      - name: InstallPython
        action: ExecuteBinary
        onFailure: Continue
        inputs:
          path: 'C:\Utils\python.exe'
          arguments:
            - '/quiet'
      - name: InstallGPO
        action: ExecutePowerShell
        inputs:
          commands:
            - Expand-Archive -LiteralPath C:\Utils\BuildKit.Zip -DestinationPath C:\Utils
            - "$GPOPath=Get-ChildItem -Path C:\\Utils\\gpos\\USER-L1 -Exclude \"*.xml\""
            - "&\"C:\\Utils\\LGPO.exe\" /g \"$GPOPath\""
            - "$GPOPath=Get-ChildItem -Path C:\\Utils\\gpos\\MS-L1 -Exclude \"*.xml\""
            - "&\"C:\\Utils\\LGPO.exe\" /g \"$GPOPath\""
            - New-NetFirewallRule -DisplayName "WinRM Inbound for AWS Scanner" -Direction Inbound -Action Allow -EdgeTraversalPolicy Block -Protocol TCP -LocalPort 5985
      - name: RebootStep
        action: Reboot
        onFailure: Abort
        maxAttempts: 2
        inputs:
          delaySeconds: 60


The above template has a build phase with the following steps:

  • DownloadUtilities – Executes a command to create a directory (C:\Utils) and another command to download Python from the internet and save it in the created directory as python.exe. Both are executed in PowerShell.
  • BuildKitDownload – Downloads the GPO archive created in the previous section from the bucket we stored it in.
  • InstallPython – Installs Python in the system using the executable downloaded in the first step.
  • InstallGPO – Installs the GPO files we prepared from the previous section to apply the CIS security policies. In this example, we are creating a Level 1 CIS hardened AMI.
    • Note: In order to create a Level 2 CIS hardened AMIs, you need to apply User-L1, User-L2, MS-L1, MS-L2 GPOs.
    • To apply the policy, we use the LGPO.exe tool and run the following command:
      LGPO.exe /g "Path\of\GPO\directory"
    • As an example, to apply the MS-L1 GPO, the command would be as follows:
      LGPO.exe /g "C:\Utils\gpos\MS-L1\DomainSysvol"
    • The last command opens the 5985 port in the firewall to allow AWS Scanner inbound connection. This is a CIS recommendation.
  • RebootStep – Reboots the instance after applying the security policies. A reboot is necessary to apply the policies.

Note: If you need to run any tests/validation you need to include another phase to run the test scripts. Guidelines on that can be found here.

Create an instance profile role for the Image Pipeline

Image Builder launches Amazon EC2 instances in your account to customize images and run validation tests. The Infrastructure configuration settings specify infrastructure details for the instances that will run in your AWS account during the build process. In this step, you will create an IAM Role to attach to the instance that the Image Pipeline will use to create an image. Create the IAM Instance Profile following the below steps:

  • Open the AWS Identity and Access Management (AWS IAM) console and click on Roles on the left pane.
  • Click on Create Role.
  • Choose AWS service for trusted entity and choose EC2 and click Next.
  • Attach the following policies: AmazonEC2RoleforSSM, AmazonS3ReadOnlyAccess, EC2InstanceProfileForImageBuilder and click Next.
  • Optionally, add tags and click Next
  • Give the role a name and description and review if all the required policies are attached. In this case, we will name the IAM Instance Profile as CIS-Windows-2019-Instance-Profile
  • Click Create role.

Create Image Builder Pipeline

In this step, you create the image pipeline which will produce the desired AMI as an output. Image Builder image pipelines provide an automation framework for creating and maintaining custom AMIs and container images. Pipelines deliver the following functionality:

  • Assemble the source image, components for building and testing, infrastructure configuration, and distribution settings.
  • Facilitate scheduling for automated maintenance processes using the Schedule builder in the console wizard, or entering cron expressions for recurring updates to your images.
  • Enable change detection for the source image and components, to automatically skip scheduled builds when there are no changes.

To create an Image Builder pipeline, perform the following steps:

  • Open the EC2 Image Builder console and choose create Image Pipeline.
  • Select Windows for the Image Operating System.
  • Under Select Image, choose Select Managed Images and browse for the latest Windows Server 2019 English Full Base x86 image.
  • Under Build components, choose the Build component CIS-Windows-2019-Build-Component created in the previous section.
  • Optionally, under Tests, if you have a test component created, you can select that.
  • Click Next.
  • Under Pipeline details, give the pipeline a name and a description. For IAM role, select the role CIS-Windows-2019-Instance-Profile that was created in the previous section.
  • Under Build Schedule, you can choose how frequently you want to create an image through this pipeline based on an update schedule. You can select Manual for now.
  • (Optional) Under Infrastructure Settings, select an instance type to customize your image for that type, an Amazon SNS topic to get alerts from as well as Amazon VPC settings. If you would like to troubleshoot in case the pipeline faces any errors, you can uncheck “Terminate Instance on failure” and choose an EC2 Key Pair to access the instance via Remote Desktop Protocol (RDP). You may wish to store the Logs in an S3 bucket as well. Note: Make sure the chosen VPC has outbound access to the internet in case you are downloading anything from the web as part of the custom component definition.
  • Click Next.
  • Under Configure additional settings, you can optionally choose to attach any licenses that you own through AWS License Manager to the AMI.
  • Under Output AMI, give a name and optional tags.
  • Under AMI distribution settings, choose the regions or AWS accounts you want to distribute the image to. By default, your current region is included. Click on Review.
  • Review the details and click Create Pipeline.
  • Since we have chosen Manual under the Build Schedule, manually trigger the Image Builder pipeline for kicking off the AMI creation process. On successful run, Image Builder pipeline will create the image and the output image can be found under Images on the left pane of the EC2 Image Builder console.
  • To troubleshoot any issues, the reasons for failure can be found by clicking on the Image Pipeline you created and view the corresponding output image with the Status as Failed.

Cleanup

Following the above detailed step-by-step process creates EC2 Image Builder Pipeline, Custom Component and an IAM Instance Profile. While none of these resources have any costs associated with them, you are charged for the runtime of the EC2 instance used during the AMI built process and the EBS volume costs associated with the size of the AMI. Make sure to clear the AMIs when not needed for avoiding any unwanted costs.

Conclusion

This blog post demonstrated how you can use EC2 Image Builder to create a CIS L1 hardened Windows 2019 Image in an automated fashion. Additionally, this post also demonstrated on how you can use build components to install any dependencies or executables from different sources like the internet or from an Amazon S3 bucket. Feel free to test this solution in your AWS accounts and provide feedback.

EC2 Image Builder and Hands-free Hardening of Windows Images for AWS Elastic Beanstalk

Post Syndicated from Carlos Santos original https://aws.amazon.com/blogs/devops/ec2-image-builder-for-windows-on-aws-elastic-beanstalk/

AWS Elastic Beanstalk takes care of undifferentiated heavy lifting for customers by regularly providing new platform versions to update all Linux-based and Windows Server-based platforms. In addition to the updates to existing software components and support for new features and configuration options incorporated into the Elastic Beanstalk managed Amazon Machine Images (AMI), you may need to install third-party packages, or apply additional controls in order to meet industry or internal security criteria; for example, the Defense Information Systems Agency’s (DISA) Security Technical Implementation Guides (STIG).

In this blog post you will learn how to automate the process of customizing Elastic Beanstalk managed AMIs using EC2 Image Builder and apply the medium and low severity STIG settings to Windows instances whenever new platform versions are released.

You can extend the solution in this blog post to go beyond system hardening. EC2 Image Builder allows you to execute scripts that define the custom configuration for an image, known as Components. There are over 20 Amazon managed Components that you can use. You can also create your own, and even share with others.

These services are discussed in this blog post:

  • EC2 Image Builder simplifies the building, testing, and deployment of virtual machine and container images.
  • Amazon EventBridge is a serverless event bus that simplifies the process of building event-driven architectures.
  • AWS Lambda lets you run code without provisioning or managing servers.
  • AWS Systems Manager Parameter Store provides secure, hierarchical storage for configuration data, and secrets.
  • AWS Elastic Beanstalk is an easy-to-use service for deploying and scaling web applications and services.

Prerequisites

This solution has the following prerequisites:

All of the code necessary to deploy the solution is available on the . The repository details the solution’s codebase, and the “Deploying the Solution” section walks through the deployment process. Let’s start with a walkthrough of the solution’s design.

Overview of solution

The solution automates the following three steps.

Steps being automated

Figure 1 – Steps being automated

The Image Builder Pipeline takes care of launching an EC2 instance using the Elastic Beanstalk managed AMI, hardens the image using EC2 Image Builder’s STIG Medium Component, and outputs a new AMI that can be used by application teams to create their Elastic Beanstalk Environments.

Figure 2 – EC2 Image Builder Pipeline Steps

Figure 2 – EC2 Image Builder Pipeline Steps

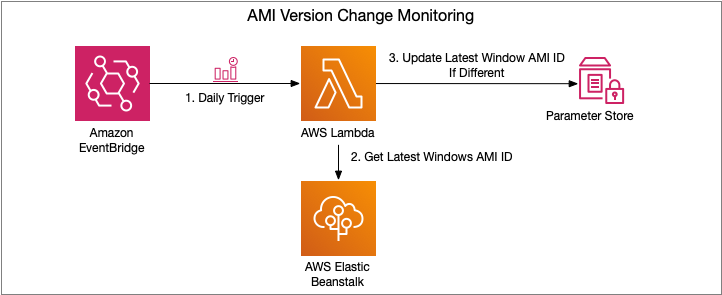
To automate Step 1, an Amazon EventBridge rule is used to trigger an AWS Lambda function to get the latest AMI ID for the Elastic Beanstalk platform used, and ensures that the Parameter Store parameter is kept up to date.

AMI Version Change Monitoring Flow

Figure 3 – AMI Version Change Monitoring Flow

Steps 2 and 3 are trigged upon change to the Parameter Store parameter. An EventBridge rule is created to trigger a Lambda function, which manages the creation of a new EC2 Image Builder Recipe, updates the EC2 Image Builder Pipeline to use this new recipe, and starts a new instance of an EC2 Image Builder Pipeline.

EC2 Image Builder Pipeline Execution Flow

Figure 4 – EC2 Image Builder Pipeline Execution Flow

If you would also like to store the ID of the newly created AMI, see the Tracking the latest server images in Amazon EC2 Image Builder pipelines blog post on how to use Parameter Store for this purpose. This will enable you to notify teams that a new AMI is available for consumption.

Let’s dive a bit deeper into each of these pieces and how to deploy the solution.

Walkthrough

The following are the high-level steps we will be walking through in the rest of this post.

  • Deploy SAM template that will provision all pieces of the solution. Checkout the Using container image support for AWS Lambda with AWS SAM blog post for more details.
  • Invoke the AMI version monitoring AWS Lambda function. The EventBridge rule is configured for a daily trigger and for the purposes of this blog post, we do not want to wait that long prior to seeing the pipeline in action.
  • View the details of the resultant image after the Image Builder Pipeline completes

Deploying the Solution

The first step to deploying the solution is to create the Elastic Container Registry Repository that will be used to upload the image artifacts created. You can do so using the following AWS CLI or AWS Tools for PowerShell command:

aws ecr create-repository --repository-name elastic-beanstalk-image-pipeline-trigger --image-tag-mutability IMMUTABLE --image-scanning-configuration scanOnPush=true --region us-east-1
New-ECRRepository -RepositoryName elastic-beanstalk-image-pipeline-trigger -ImageTagMutability IMMUTABLE -ImageScanningConfiguration_ScanOnPush $True -Region us-east-1

This will return output similar to the following. Take note of the repositoryUri as you will be using that in an upcoming step.

ECR repository creation output

Figure 5 – ECR repository creation output

With the repository configured, you are ready to get the solution. Either download or clone the project’s aws-samples/elastic-beanstalk-image-pipeline-trigger GitHub repository to a local directory. Once you have the project downloaded, you can compile it using the following command from the project’s src/BeanstalkImageBuilderPipeline directory.

dotnet publish -c Release -o ./bin/Release/net5.0/linux-x64/publish

The output should look like:

NET project compilation output

Figure 6 – .NET project compilation output

Now that the project is compiled, you are ready to create the container image by executing the following SAM CLI command.

sam build --template-file ./serverless.template
SAM build command output

Figure 7 – SAM build command output

Next up deploy the SAM template with the following command, replacing REPOSITORY_URL with the URL of the ECR repository created earlier:

sam deploy --stack-name elastic-beanstalk-image-pipeline --image-repository <REPOSITORY_URL> --capabilities CAPABILITY_IAM --region us-east-1

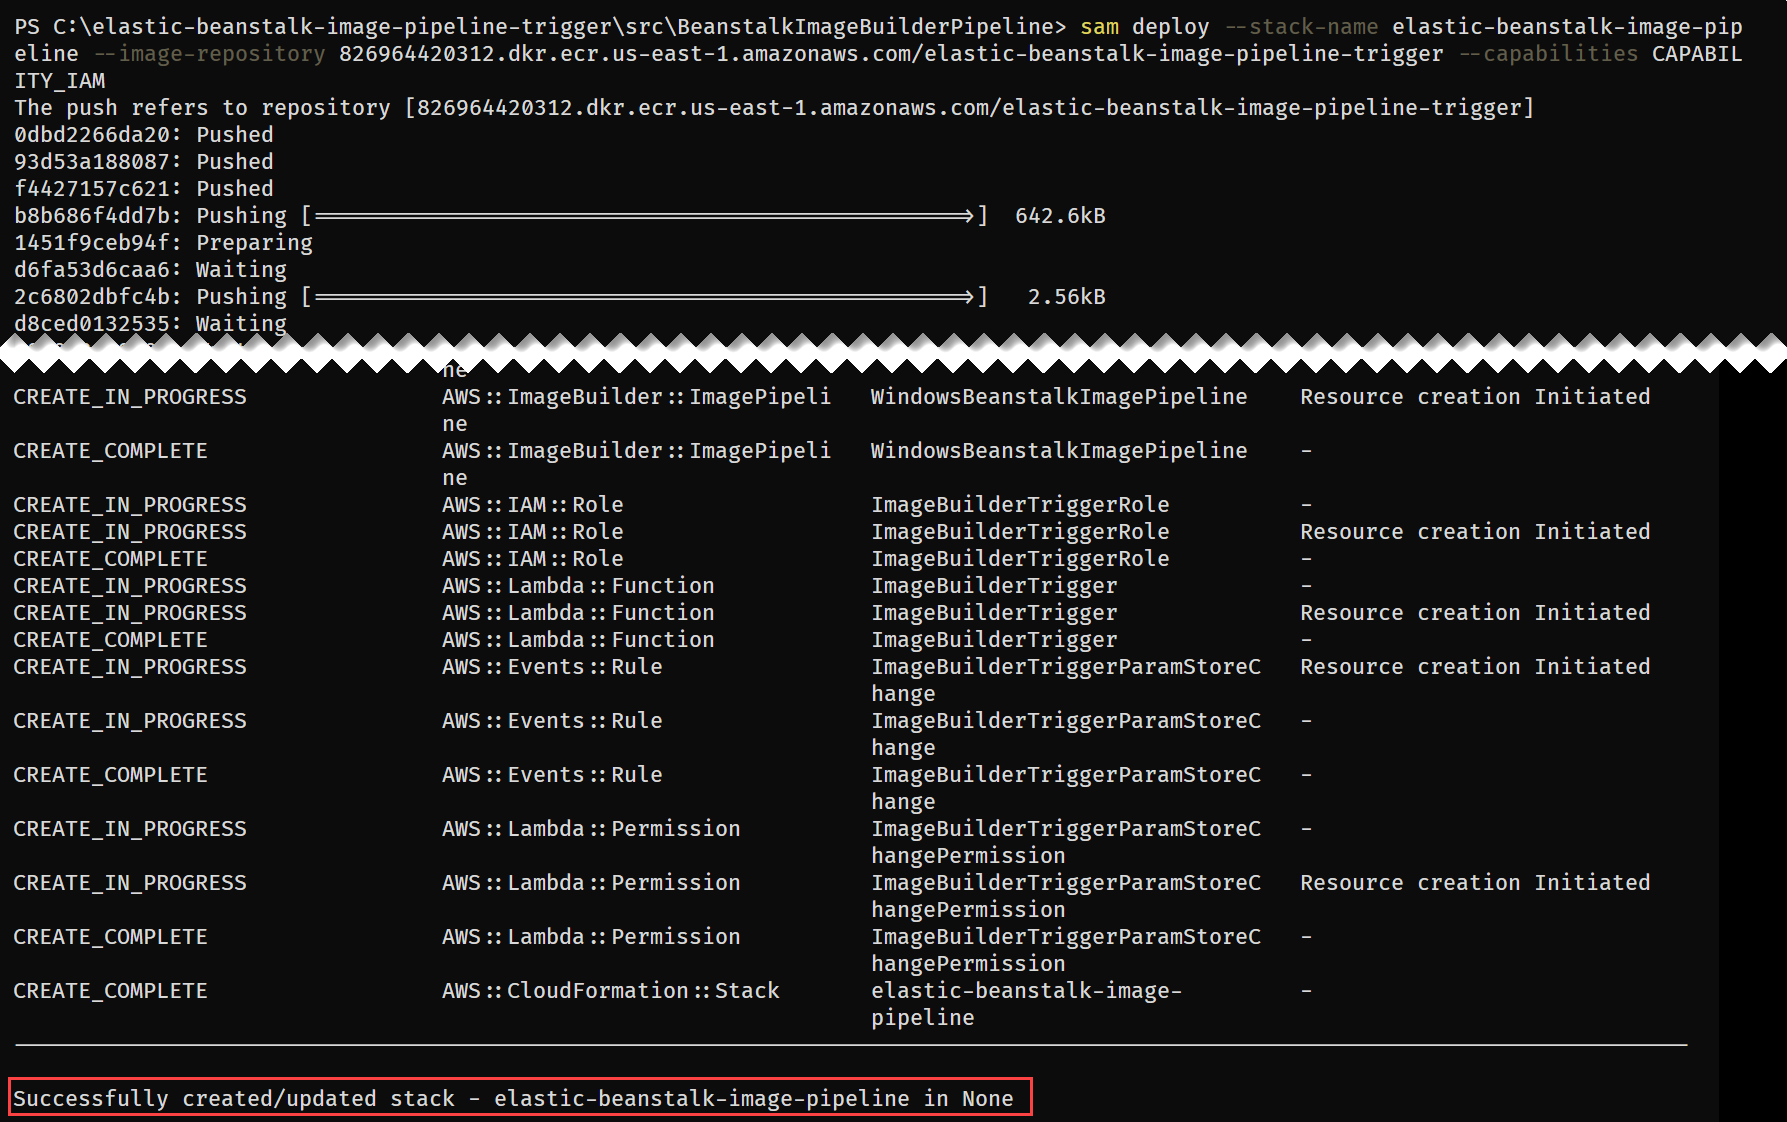
The SAM CLI will both push the container image and create the CloudFormation Stack, deploying all resources needed for this solution. The deployment output will look similar to:

SAM deploy command output

Figure 8 – SAM deploy command output

With the CloudFormation Stack completed, you are ready to move onto starting the pipeline to create a custom Windows AMI with the medium DISA STIG applied.

Invoke AMI ID Monitoring Lambda

Let’s start by invoking the Lambda function, depicted in Figure 3, responsible for ensuring that the latest Elastic Beanstalk managed AMI ID is stored in Parameter Store.

aws lambda invoke --function-name BeanstalkManagedAmiMonitor response.json --region us-east-1
Invoke-LMFunction -FunctionName BeanstalkManagedAmiMonitor -Region us-east-1
Lambda invocation output

Figure 9 – Lambda invocation output

The Lambda’s CloudWatch log group contains the BeanstalkManagedAmiMonitor function’s output. For example, below you can see that the SSM parameter is being updated with the new AMI ID.

BeanstalkManagedAmiMonitor Lambda’s log

Figure 10 – BeanstalkManagedAmiMonitor Lambda’s log

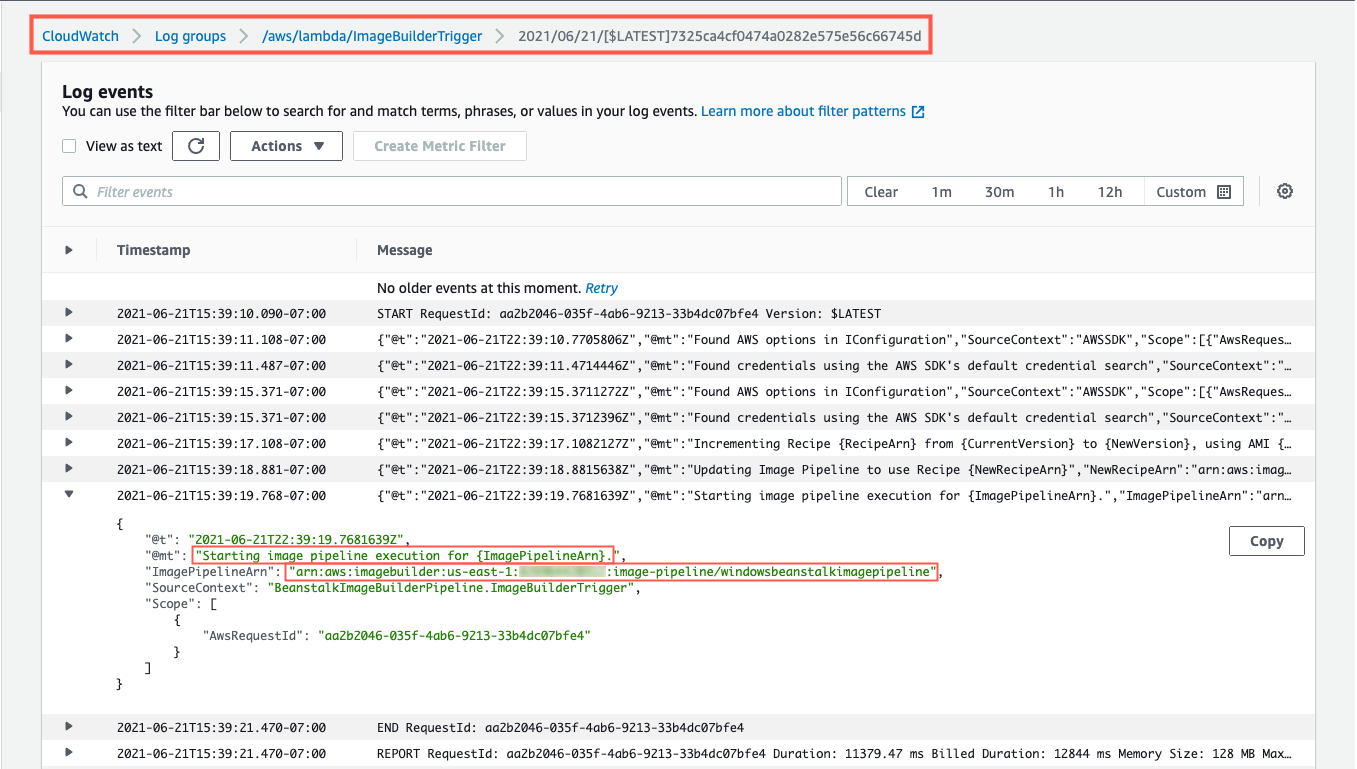
After this Lambda function updates the Parameter Store parameter with the latest AMI ID, the EC2 Image Builder recipe will be updated to use this AMI ID as the parent image, and the Image Builder pipeline will be started. You can see evidence of this by going to the ImageBuilderTrigger Lambda function’s CloudWatch log group. Below you can see a log entry with the message “Starting image pipeline execution…”.

ImageBuilderTrigger Lambda’s log

Figure 11 – ImageBuilderTrigger Lambda’s log

To keep track of the status of the image creation, navigate to the EC2 Image Builder console, and select the 1.0.1 version of the demo-beanstalk-image.

EC2 Image Builder images list

Figure 12 – EC2 Image Builder images list

This will display the details for that build. Keep an eye on the status. While the image is being create, you will see the status as “Building”. Applying the latest Windows updates and DISA STIG can take about an hour.

EC2 Image Builder image build version details

Figure 13 – EC2 Image Builder image build version details

Once the AMI has been created, the status will change to “Available”. Click on the version column’s link to see the details of that version.

EC2 Image Builder image build version details

Figure 14 – EC2 Image Builder image build version details

You can use the AMI ID listed when creating an Elastic Beanstalk application. When using the create new environment wizard, you can modify the capacity settings to specify this custom AMI ID. The automation is configured to run on a daily basis. Only for the purposes of this post, did we have to invoke the Lambda function directly.

Cleaning up

To avoid incurring future charges, delete the resources using the following commands, replacing the AWS_ACCOUNT_NUMBER placeholder with appropriate value.

aws imagebuilder delete-image --image-build-version-arn arn:aws:imagebuilder:us-east-1:<AWS_ACCOUNT_NUMBER>:image/demo-beanstalk-image/1.0.1/1 --region us-east-1

aws imagebuilder delete-image-pipeline --image-pipeline-arn arn:aws:imagebuilder:us-east-1:<AWS_ACCOUNT_NUMBER>:image-pipeline/windowsbeanstalkimagepipeline --region us-east-1

aws imagebuilder delete-image-recipe --image-recipe-arn arn:aws:imagebuilder:us-east-1:<AWS_ACCOUNT_NUMBER>:image-recipe/demo-beanstalk-image/1.0.1 --region us-east-1

aws cloudformation delete-stack --stack-name elastic-beanstalk-image-pipeline --region us-east-1

aws cloudformation wait stack-delete-complete --stack-name elastic-beanstalk-image-pipeline --region us-east-1

aws ecr delete-repository --repository-name elastic-beanstalk-image-pipeline-trigger --force --region us-east-1
Remove-EC2IBImage -ImageBuildVersionArn arn:aws:imagebuilder:us-east-1:<AWS_ACCOUNT_NUMBER>:image/demo-beanstalk-image/1.0.1/1 -Region us-east-1

Remove-EC2IBImagePipeline -ImagePipelineArn arn:aws:imagebuilder:us-east-1:<AWS_ACCOUNT_NUMBER>:image-pipeline/windowsbeanstalkimagepipeline -Region us-east-1

Remove-EC2IBImageRecipe -ImageRecipeArn arn:aws:imagebuilder:us-east-1:<AWS_ACCOUNT_NUMBER>:image-recipe/demo-beanstalk-image/1.0.1 -Region us-east-1

Remove-CFNStack -StackName elastic-beanstalk-image-pipeline -Region us-east-1

Wait-CFNStack -StackName elastic-beanstalk-image-pipeline -Region us-east-1

Remove-ECRRepository -RepositoryName elastic-beanstalk-image-pipeline-trigger -IgnoreExistingImages $True -Region us-east-1

Conclusion

In this post, you learned how to leverage EC2 Image Builder, Lambda, and EventBridge to automate the creation of a Windows AMI with the medium DISA STIGs applied that can be used for Elastic Beanstalk environments. Don’t stop there though, you can apply these same techniques whenever you need to base recipes on AMIs that the image origin is not available in EC2 Image Builder.

Further Reading

EC2 Image Builder has a number of image origins supported out of the box, see the Automate OS Image Build Pipelines with EC2 Image Builder blog post for more details. EC2 Image Builder is also not limited to just creating AMIs. The Build and Deploy Docker Images to AWS using EC2 Image Builder blog post shows you how to build Docker images that can be utilized throughout your organization.

These resources can provide additional information on the topics touched on in this article:

Carlos Santos

Carlos Santos

Carlos Santos is a Microsoft Specialist Solutions Architect with Amazon Web Services (AWS). In his role, Carlos helps customers through their cloud journey, leveraging his experience with application architecture, and distributed system design.

Better performance for less: AWS continues to beat Azure on SQL Server price/performance

Post Syndicated from Fred Wurden original https://aws.amazon.com/blogs/compute/sql-server-runs-better-on-aws/

By Fred Wurden, General Manager, AWS Enterprise Engineering (Windows, VMware, RedHat, SAP, Benchmarking)

AWS R5b.8xlarge delivers better performance at lower cost than Azure E64_32s_v4 for a SQL Server workload

In this blog, we will review a recent benchmark that Principled Technologies published on 2/25. The benchmark found that an Amazon Elastic Compute Cloud (Amazon EC2) R5b.8xlarge instance delivered better performance for a SQL Server workload at a lower cost when directly tested against an Azure E64_32s_v4 VM.

Behind the study: Understanding how SQL Server performed better, for a lower cost with an AWS EC2 R5b instance

Principled Technologies tested an online transaction processing (OLTP) workload for SQL Server 2019 on both an R5b instance on Amazon EC2 with Amazon Elastic Block Store (EBS) as storage and Azure E64_32s_v4. This particular Azure VM was chosen as an equivalent to the R5b instance, as both instances have comparable specifications for input/output operations per second (IOPS) performance, use Intel Xeon processors from the same generation (Cascade Lake), and offer the same number of cores (32). For storage, Principled Technologies mirrored storage configurations across the Azure VM and the EC2 instance (which used Amazon Elastic Block Store (EBS)), maxing out the IOPS specs on each while offering a direct comparison between instances.

Test Configurations

Source: Principled Technologies

When benchmarking, Principled Technologies ran a TPC-C-like OLTP workload from HammerDB v3.3 on both instances, testing against new orders per minute (NOPM) performance. NOPM shows the number of new-order transactions completed in one minute as part of a serialized business workload. HammerDB claims that because NOPM is “independent of any particular database implementation [it] is the recommended primary metric to use.”

The results: SQL Server on AWS EC2 R5b delivered 2x performance than the Azure VM and 62% less expensive 

Graphs that show AWS instance outperformed the Azure instance

Source: Principled Technologies

These test results from the Principled Technologies report show the price/performance and performance comparisons. The performance metric is New Orders Per Minute (NOPM); faster is better. The price/performance calculations are based on the cost of on-demand, License Included SQL Server instances and storage to achieve 1,000 NOPM performance, smaller is better.

An EC2 r5b.8xlarge instance powered by an Intel Xeon Scalable processor delivered better SQL Server NOPM performance on the HammerDB benchmark and a lower price per 1,000 NOPM than an Azure E64_32s_v4 VM powered by similar Intel Xeon Scalable processors.

On top of that, AWS’s storage price-performance exceeded Azure’s. The Azure managed disks offered 53 percent more storage than the EBS storage, but the EC2 instance with EBS storage cost 24 percent less than the Azure VM with managed disks. Even by reducing Azure storage by the difference in storage, something customers cannot do, EBS would have cost 13 percent less per storage GB than the Azure managed disks.

Why AWS is the best cloud to run your Windows and SQL Server workloads

To us, these results aren’t surprising. In fact, they’re in line with the success that customers find running Windows on AWS for over 12 years. Customers like Pearson and Expedia have all found better performance and enhanced cost savings by moving their Windows, SQL Server, and .NET workloads to AWS. In fact, RepricerExpress migrated its Windows and SQL Server environments from Azure to AWS to slash outbound bandwidth costs while gaining agility and performance.

Not only do we offer better price-performance for your Windows workloads, but we also offer better ways to run Windows in the cloud. Whether you want to rehost your databases to EC2, move to managed with Amazon Relational Database for SQL Server (RDS), or even modernize to cloud-native databases, AWS stands ready to help you get the most out of the cloud.


To learn more on migrating Windows Server or SQL Server, visit Windows on AWS. For more stories about customers who have successfully migrated and modernized SQL Server workloads with AWS, visit our Customer Success page. Contact us to start your migration journey today.

Using NuGet with AWS CodeArtifact

Post Syndicated from John Standish original https://aws.amazon.com/blogs/devops/using-nuget-with-aws-codeartifact/

Managing NuGet packages for .NET development can be a challenge. Tasks such as initial configuration, ongoing maintenance, and scaling inefficiencies are the biggest pain points for developers and organizations. With its addition of NuGet package support, AWS CodeArtifact now provides easy-to-configure and scalable package management for .NET developers. You can use NuGet packages stored in CodeArtifact in Visual Studio, allowing you to use the tools you already know.

In this post, we show how you can provision NuGet repositories in 5 minutes. Then we demonstrate how to consume packages from your new NuGet repositories, all while using .NET native tooling.

All relevant code for this post is available in the aws-codeartifact-samples GitHub repo.

Prerequisites

For this walkthrough, you should have the following prerequisites:

Architecture overview

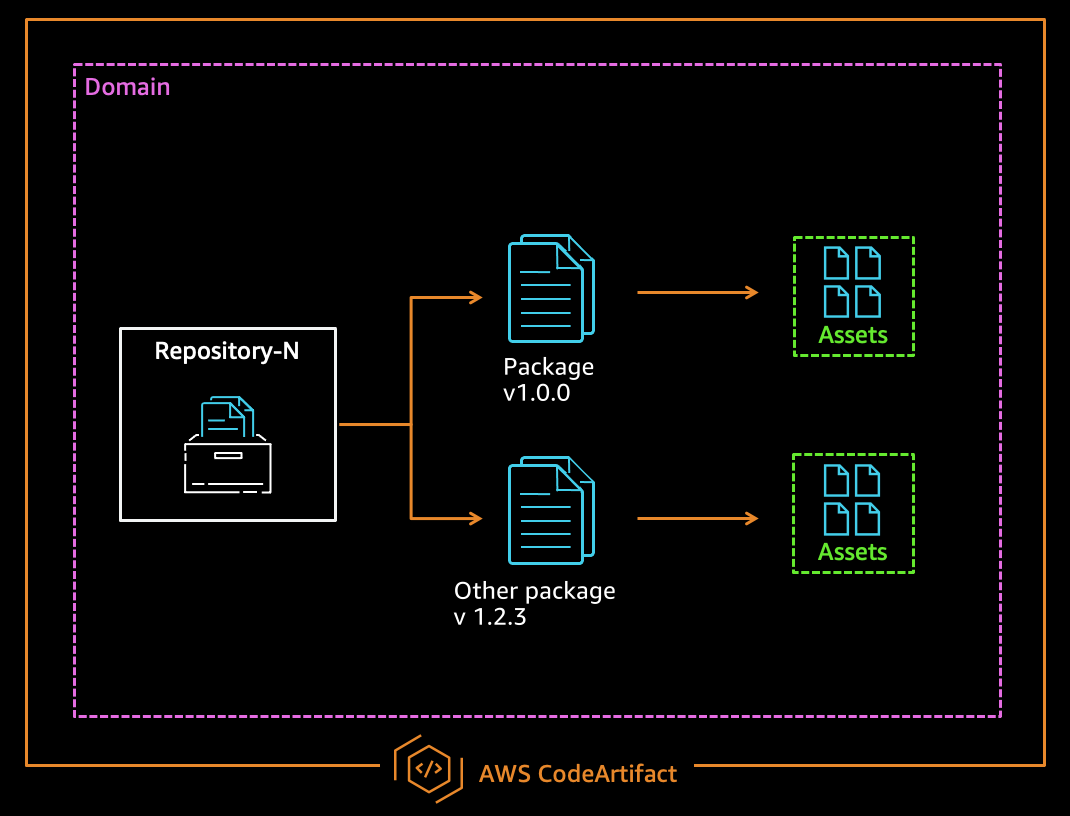
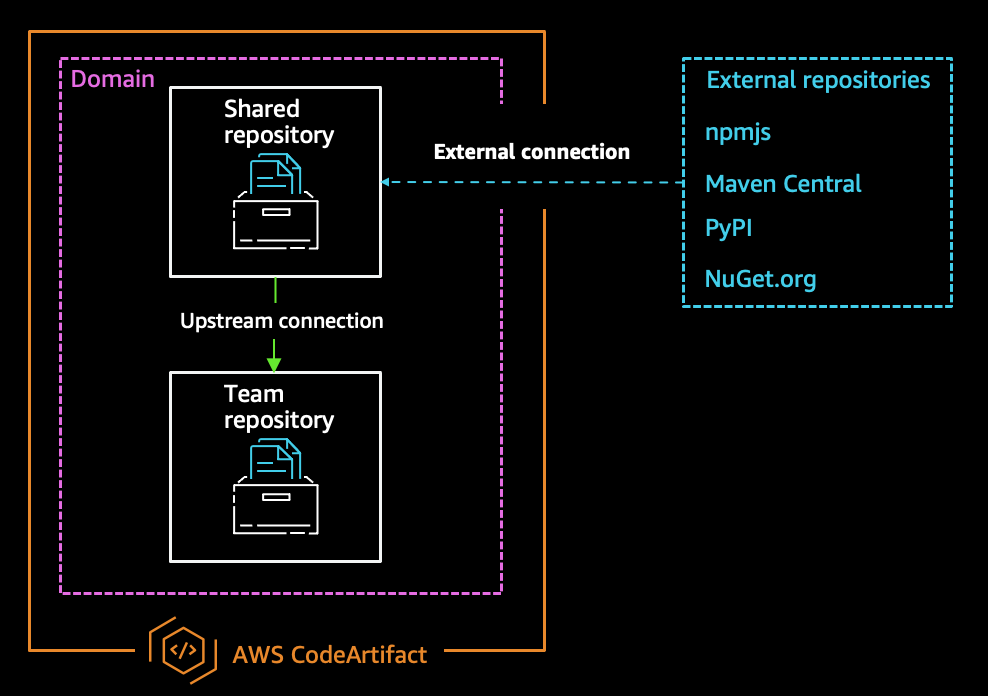
Two core resource types make up CodeArtifact: domains and repositories. Domains provide an easy way manage multiple repositories within an organization. Repositories store packages and their assets. You can connect repositories to other CodeArtifact repositories, or popular public package repositories such as nuget.org, using upstream and external connections. For more information about these concepts, see AWS CodeArtifact Concepts.

The following diagram illustrates this architecture.

AWS CodeArtifact core concepts

Figure: AWS CodeArtifact core concepts

Creating CodeArtifact resources with AWS CloudFormation

The AWS CloudFormation template provided in this post provisions three CodeArtifact resources: a domain, a team repository, and a shared repository. The team repository is configured to use the shared repository as an upstream repository, and the shared repository has an external connection to nuget.org.

The following diagram illustrates this architecture.

Example AWS CodeArtifact architecture

Figure: Example AWS CodeArtifact architecture

The following CloudFormation template used in this walkthrough:

AWSTemplateFormatVersion: '2010-09-09'
Description: AWS CodeArtifact resources for dotnet

Resources:
  # Create Domain
  ExampleDomain:
    Type: AWS::CodeArtifact::Domain
    Properties:
      DomainName: example-domain
      PermissionsPolicyDocument:
        Version: 2012-10-17
        Statement:
          - Effect: Allow
            Principal:
              AWS: 
              - !Sub arn:aws:iam::${AWS::AccountId}:root
            Resource: "*"
            Action:
              - codeartifact:CreateRepository
              - codeartifact:DescribeDomain
              - codeartifact:GetAuthorizationToken
              - codeartifact:GetDomainPermissionsPolicy
              - codeartifact:ListRepositoriesInDomain

  # Create External Repository
  MyExternalRepository:
    Type: AWS::CodeArtifact::Repository
    Condition: ProvisionNugetTeamAndUpstream
    Properties:
      DomainName: !GetAtt ExampleDomain.Name
      RepositoryName: my-external-repository       
      ExternalConnections:
        - public:nuget-org
      PermissionsPolicyDocument:
        Version: 2012-10-17
        Statement:
          - Effect: Allow
            Principal:
              AWS: 
              - !Sub arn:aws:iam::${AWS::AccountId}:root
            Resource: "*"
            Action:
              - codeartifact:DescribePackageVersion
              - codeartifact:DescribeRepository
              - codeartifact:GetPackageVersionReadme
              - codeartifact:GetRepositoryEndpoint
              - codeartifact:ListPackageVersionAssets
              - codeartifact:ListPackageVersionDependencies
              - codeartifact:ListPackageVersions
              - codeartifact:ListPackages
              - codeartifact:PublishPackageVersion
              - codeartifact:PutPackageMetadata
              - codeartifact:ReadFromRepository

  # Create Repository
  MyTeamRepository:
    Type: AWS::CodeArtifact::Repository
    Properties:
      DomainName: !GetAtt ExampleDomain.Name
      RepositoryName: my-team-repository
      Upstreams:
        - !GetAtt MyExternalRepository.Name
      PermissionsPolicyDocument:
        Version: 2012-10-17
        Statement:
          - Effect: Allow
            Principal:
              AWS: 
              - !Sub arn:aws:iam::${AWS::AccountId}:root
            Resource: "*"
            Action:
              - codeartifact:DescribePackageVersion
              - codeartifact:DescribeRepository
              - codeartifact:GetPackageVersionReadme
              - codeartifact:GetRepositoryEndpoint
              - codeartifact:ListPackageVersionAssets
              - codeartifact:ListPackageVersionDependencies
              - codeartifact:ListPackageVersions
              - codeartifact:ListPackages
              - codeartifact:PublishPackageVersion
              - codeartifact:PutPackageMetadata
              - codeartifact:ReadFromRepository

Getting the CloudFormation template

To use the CloudFormation stack, we recommend you clone the following GitHub repo so you also have access to the example projects. See the following code:

git clone https://github.com/aws-samples/aws-codeartifact-samples.git
cd aws-codeartifact-samples/getting-started/dotnet/cloudformation/

Alternatively, you can copy the previous template into a file on your local filesystem named deploy.yml.

Provisioning the CloudFormation stack

Now that you have a local copy of the template, you need to provision the resources using a CloudFormation stack. You can deploy the stack using the AWS CLI or on the AWS CloudFormation console.

To use the AWS CLI, enter the following code:

aws cloudformation deploy \
--template-file deploy.yml \
--region <YOUR_PREFERRED_REGION> \
--stack-name CodeArtifact-GettingStarted-DotNet

To use the AWS CloudFormation console, complete the following steps:

  1. On the AWS CloudFormation console, choose Create stack.
  2. Choose With new resources (standard).
  3. Select Upload a template file.
  4. Choose Choose file.
  5. Name the stack CodeArtifact-GettingStarted-DotNet.
  6. Continue to choose Next until prompted to create the stack.

Configuring your local development experience

We use the CodeArtifact credential provider to connect the Visual Studio IDE to a CodeArtifact repository. You need to download and install the AWS Toolkit for Visual Studio to configure the credential provider. The toolkit is an extension for Microsoft Visual Studio on Microsoft Windows that makes it easy to develop, debug, and deploy .NET applications to AWS. The credential provider automates fetching and refreshing the authentication token required to pull packages from CodeArtifact. For more information about the authentication process, see AWS CodeArtifact authentication and tokens.

To connect to a repository, you complete the following steps:

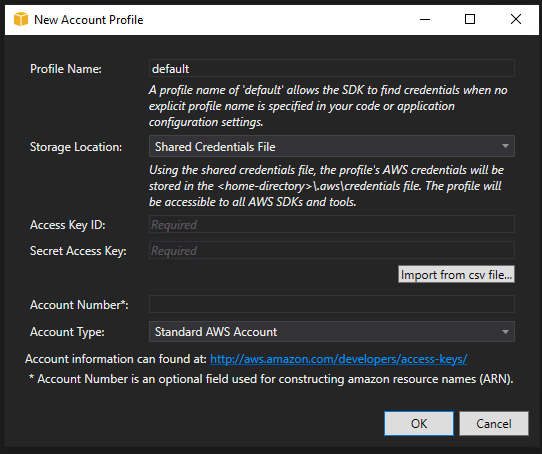
  1. Configure an account profile in the AWS Toolkit.
  2. Copy the source endpoint from the AWS Explorer.
  3. Set the NuGet package source as the source endpoint.
  4. Add packages for your project via your CodeArtifact repository.

Configuring an account profile in the AWS Toolkit

Before you can use the Toolkit for Visual Studio, you must provide a set of valid AWS credentials. In this step, we set up a profile that has access to interact with CodeArtifact. For instructions, see Providing AWS Credentials.

Visual Studio Toolkit for AWS Account Profile Setup

Figure: Visual Studio Toolkit for AWS Account Profile Setup

Copying the NuGet source endpoint

After you set up your profile, you can see your provisioned repositories.

  1. In the AWS Explorer pane, navigate to the repository you want to connect to.
  2. Choose your repository (right-click).
  3. Choose Copy NuGet Source Endpoint.
AWS CodeArtifact repositories shown in the AWS Explorer

Figure: AWS CodeArtifact repositories shown in the AWS Explorer


You use the source endpoint later to configure your NuGet package sources.

Setting the package source using the source endpoint

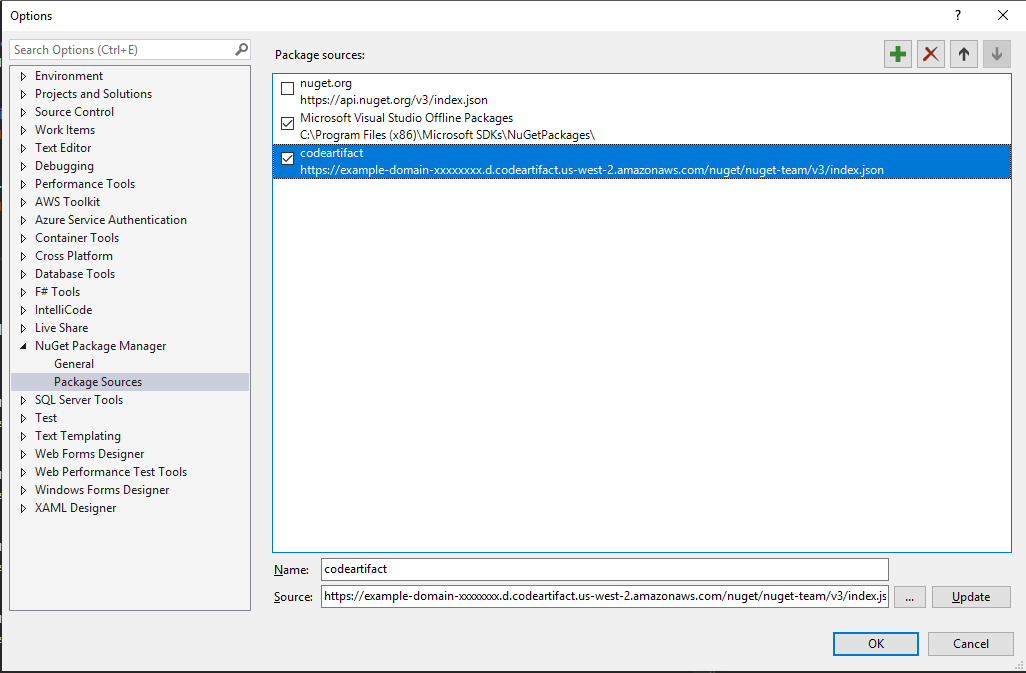
Now that you have your source endpoint, you can set up the NuGet package source.

  1. In Visual Studio, under Tools, choose Options.
  2. Choose NuGet Package Manager.
  3. Under Options, choose the + icon to add a package source.
  4. For Name , enter codeartifact.
  5. For Source, enter the source endpoint you copied from the previous step.
Configuring Nuget package sources for AWS CodeArtifact

Figure: Configuring NuGet package sources for AWS CodeArtifact


Adding packages via your CodeArtifact repository

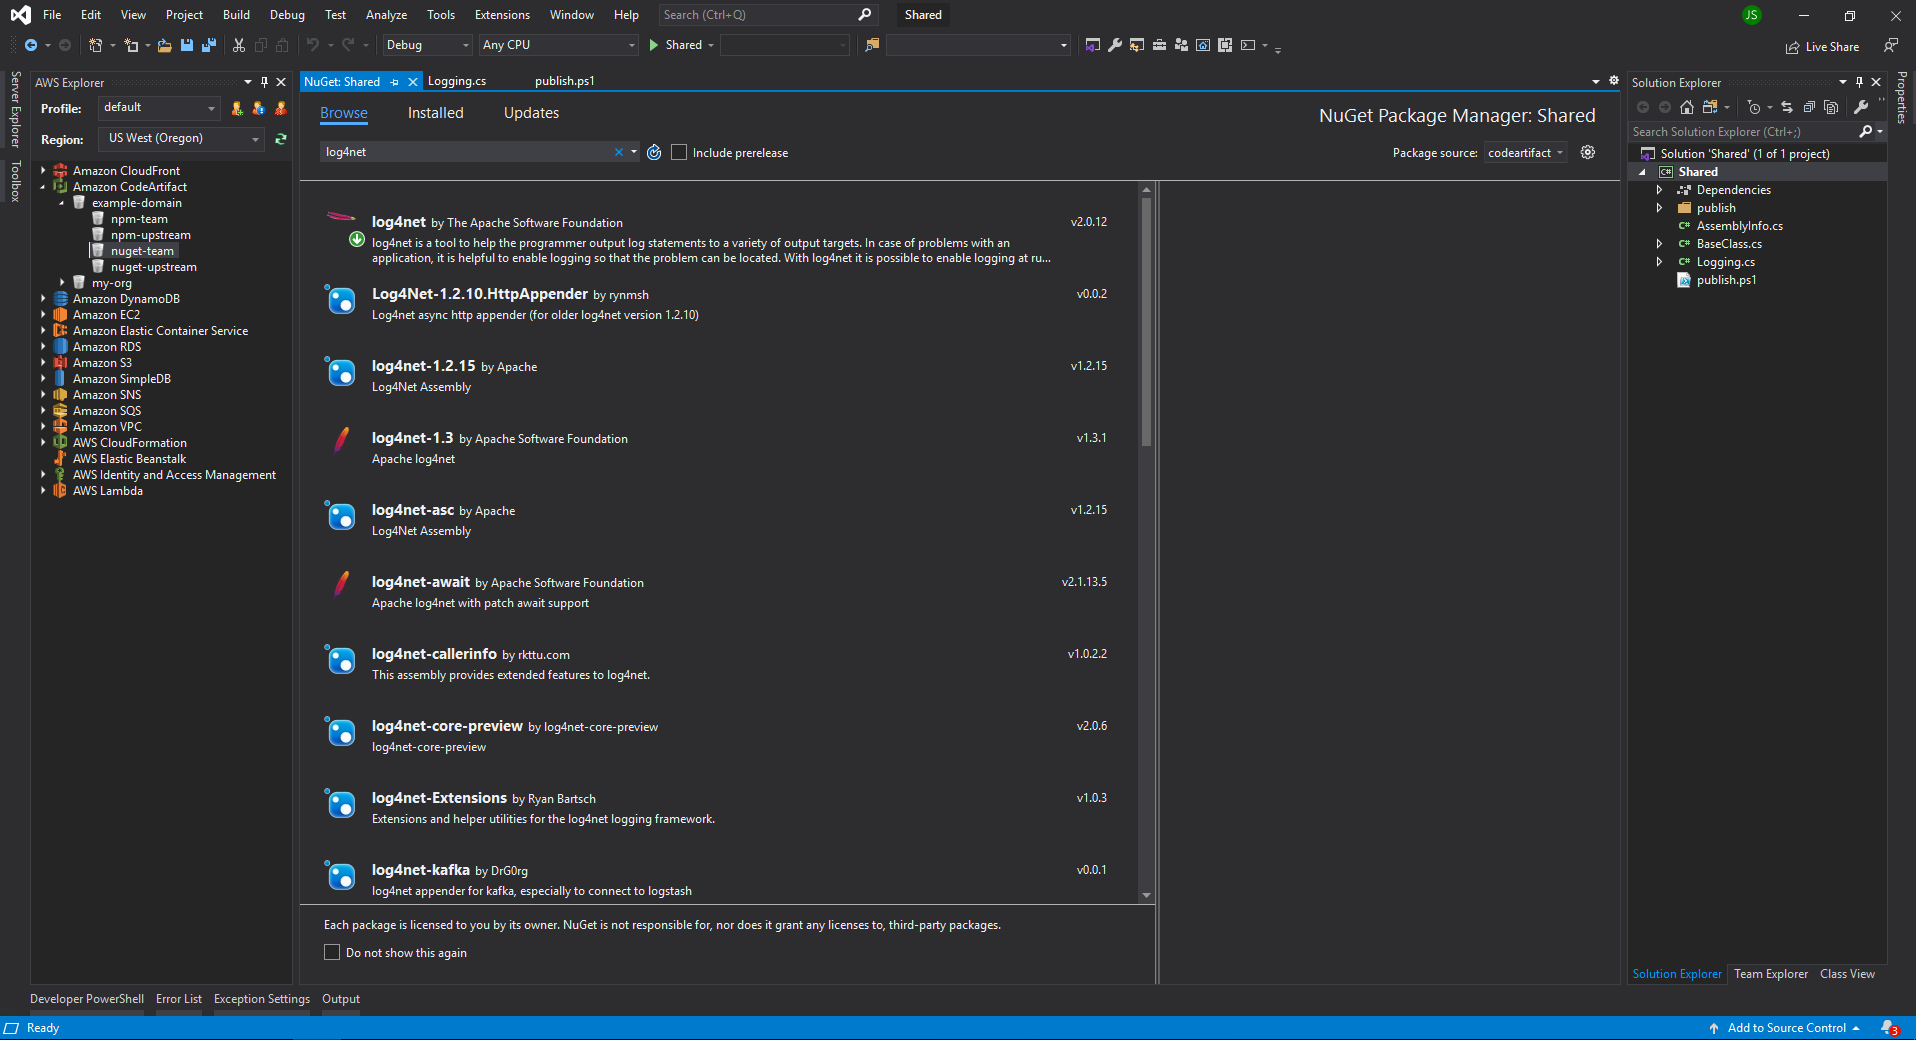
After the package source is configured against your team repository, you can pull packages via the upstream connection to the shared repository.

  1. Choose Manage NuGet Packages for your project.
    • You can now see packages from nuget.org.
  2. Choose any package to add it to your project.
Exploring packages while connected to a AWS CodeArtifact repository

Exploring packages while connected to a AWS CodeArtifact repository

Viewing packages stored in your CodeArtifact team repository

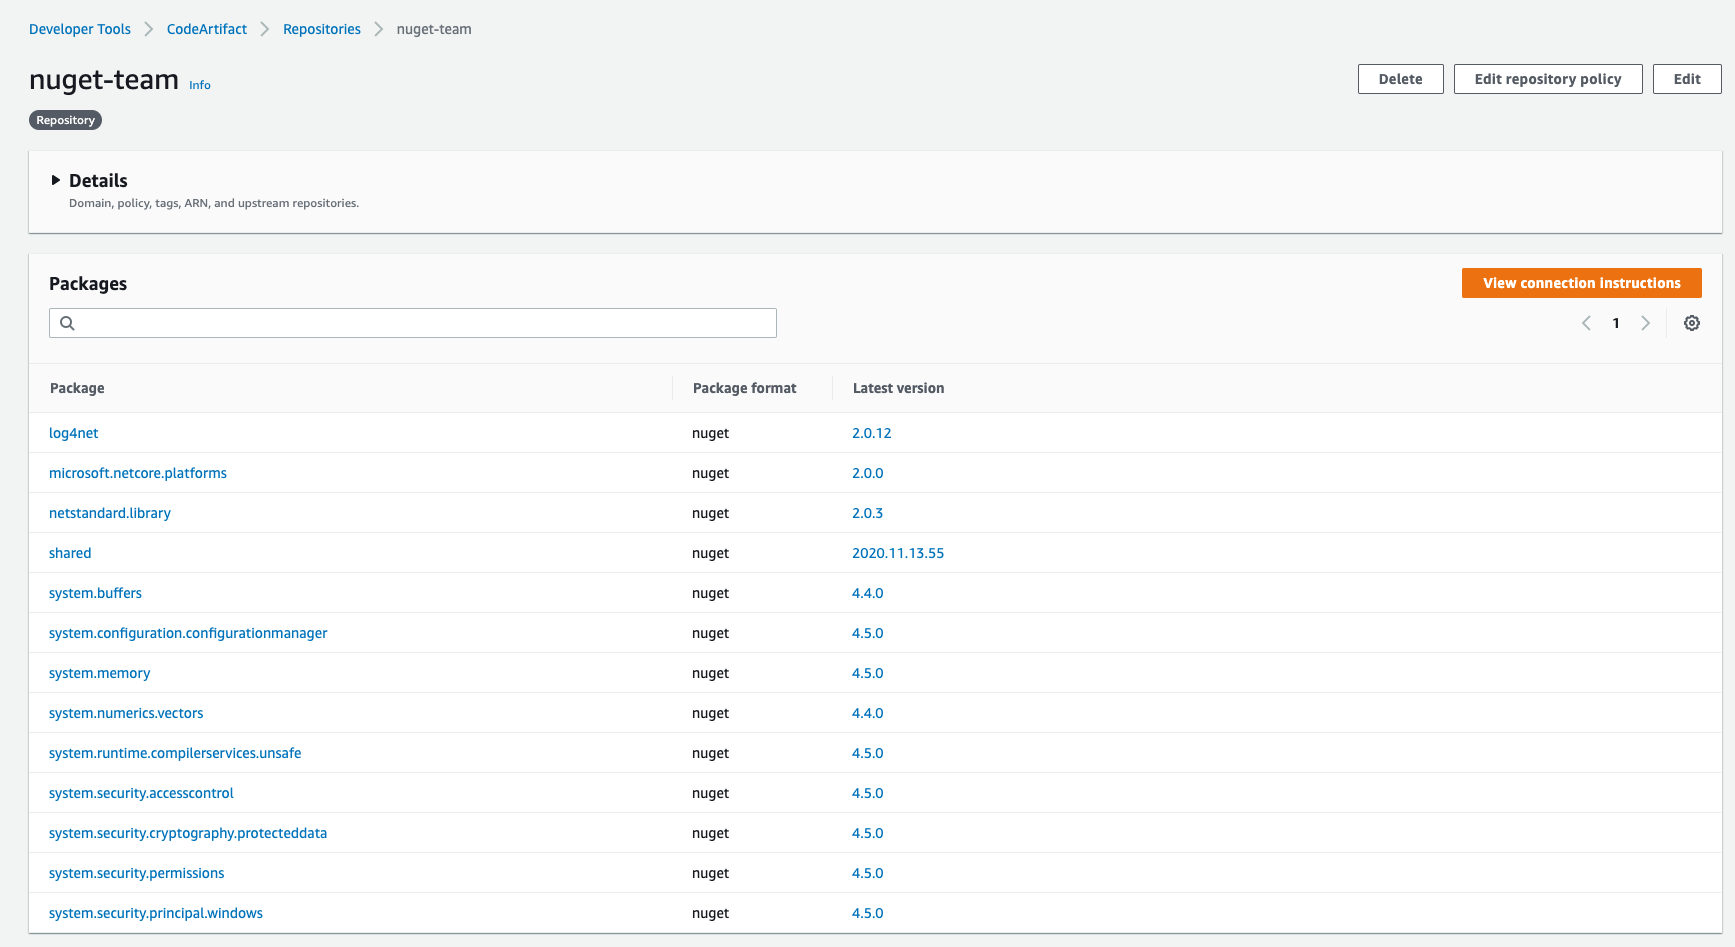
Packages are stored in a repository you pull from, or referenced via the upstream connection. Because we’re pulling packages from nuget.org through an external connection, you can see cached copies of those packages in your repository. To view the packages, navigate to your repository on the CodeArtifact console.

Packages stored in a AWS CodeArtifact repository

Packages stored in a AWS CodeArtifact repository

Cleaning Up

When you’re finished with this walkthrough, you may want to remove any provisioned resources. To remove the resources that the CloudFormation template created, navigate to the stack on the AWS CloudFormation console and choose Delete Stack. It may take a few minutes to delete all provisioned resources.

After the resources are deleted, there are no more cleanup steps.

Conclusion

We have shown you how to set up CodeArtifact in minutes and easily integrate it with NuGet. You can build and push your package faster, from hours or days to minutes. You can also integrate CodeArtifact directly in your Visual Studio environment with four simple steps. With CodeArtifact repositories, you inherit the durability and security posture from the underlying storage of CodeArtifact for your packages.

As of November 2020, CodeArtifact is available in the following AWS Regions:

  • US: US East (Ohio), US East (N. Virginia), US West (Oregon)
  • AP: Asia Pacific (Mumbai), Asia Pacific (Singapore), Asia Pacific (Sydney), Asia Pacific (Tokyo)
  • EU: Europe (Frankfurt), Europe (Ireland), Europe (Stockholm)

For an up-to-date list of Regions where CodeArtifact is available, see AWS CodeArtifact FAQ.

About the Authors

John Standish

John Standish is a Solutions Architect at AWS and spent over 13 years as a Microsoft .Net developer. Outside of work, he enjoys playing video games, cooking, and watching hockey.

Nuatu Tseggai

Nuatu Tseggai is a Cloud Infrastructure Architect at Amazon Web Services. He enjoys working with customers to design and build event-driven distributed systems that span multiple services.

Neha Gupta

Neha Gupta is a Solutions Architect at AWS and have 16 years of experience as a Database architect/ DBA. Apart from work, she’s outdoorsy and loves to dance.

Elijah Batkoski

Elijah is a Technical Writer for Amazon Web Services. Elijah has produced technical documentation and blogs for a variety of tools and services, primarily focused around DevOps.

Learn why AWS is the best cloud to run Microsoft Windows Server and SQL Server workloads

Post Syndicated from Fred Wurden original https://aws.amazon.com/blogs/compute/learn-why-aws-is-the-best-cloud-to-run-microsoft-windows-server-and-sql-server-workloads/

Fred Wurden, General Manager, AWS Enterprise Engineering (Windows, VMware, RedHat, SAP, Benchmarking)

For companies that rely on Windows Server but find it daunting to move those workloads to the cloud, there is no easier way to run Windows in the cloud than AWS. Customers as diverse as Expedia, Pearson, Seven West Media, and RepricerExpress have chosen AWS over other cloud providers to unlock the Microsoft products they currently rely on, including Windows Server and SQL Server. The reasons are several: by embracing AWS, they’ve achieved cost savings through forthright pricing options and expanded breadth and depth of capabilities. In this blog, we break down these advantages to understand why AWS is the simplest, most popular and secure cloud to run your business-critical Windows Server and SQL Server workloads.

AWS lowers costs and increases choice with flexible pricing options

Customers expect accurate and transparent pricing so you can make the best decisions for your business. When assessing which cloud to run your Windows workloads, customers look at the total cost of ownership (TCO) of workloads.

Not only does AWS provide cost-effective ways to run Windows and SQL Server workloads, we also regularly lower prices to make it even more affordable. Since launching in 2006, AWS has reduced prices 85 times. In fact, we recently dropped pricing by and average of 25% for Amazon RDS for SQL Server Enterprise Edition database instances in the Multi-AZ configuration, for both On-Demand Instance and Reserved Instance types on the latest generation hardware.

The AWS pricing approach makes it simple to understand your costs, even as we actively help you pay AWS less now and in the future. For example, AWS Trusted Advisor provides real-time guidance to provision your resources more efficiently. This means that you spend less money with us. We do this because we know that if we aren’t creating more and more value for you each year, you’ll go elsewhere.

In addition, we have several other industry-leading initiatives to help lower customer costs, including AWS Compute Optimizer, Amazon CodeGuru, and AWS Windows Optimization and Licensing Assessments (AWS OLA). AWS Compute Optimizer recommends optimal AWS Compute resources for your workloads by using machine learning (ML) to analyze historical utilization metrics. Customers who use Compute Optimizer can save up to 25% on applications running on Amazon Elastic Compute Cloud (Amazon EC2). Machine learning also plays a key role in Amazon CodeGuru, which provides intelligent recommendations for improving code quality and identifying an application’s most expensive lines of code. Finally, AWS OLA helps customers to optimize licensing and infrastructure provisioning based on actual resource consumption (ARC) to offer cost-effective Windows deployment options.

Cloud pricing shouldn’t be complicated

Other cloud providers bury key pricing information when making comparisons to other vendors, thereby incorrectly touting pricing advantages. Often those online “pricing calculators” that purport to clarify pricing neglect to include hidden fees, complicating costs through licensing rules (e.g., you can run this workload “for free” if you pay us elsewhere for “Software Assurance”). At AWS, we believe such pricing and licensing tricks are contrary to the fundamental promise of transparent pricing for cloud computing.

By contrast, AWS makes it straightforward for you to run Windows Server applications where you want. With our End-of-Support Migration Program (EMP) for Windows Server, you can easily move your legacy Windows Server applications—without needing any code changes. The EMP technology decouples the applications from the underlying OS. This enables AWS Partners or AWS Professional Services to migrate critical applications from legacy Windows Server 2003, 2008, and 2008 R2 to newer, supported versions of Windows Server on AWS. This allows you to avoid extra charges for extended support that other cloud providers charge.

Other cloud providers also may limit your ability to Bring-Your-Own-License (BYOL) for SQL Server to your preferred cloud provider. Meanwhile, AWS improves the BYOL experience using EC2 Dedicated Hosts and AWS License Manager. With EC2 Dedicated Hosts, you can save costs by moving existing Windows Server and SQL Server licenses do not have Software Assurance to AWS. AWS License Manager simplifies how you manage your software licenses from software vendors such as Microsoft, SAP, Oracle, and IBM across AWS and on-premises environments. We also work hard to help our customers spend less.

How AWS helps customers save money on Windows Server and SQL Server workloads

The first way AWS helps customers save money is by delivering the most reliable global cloud infrastructure for your Windows workloads. Any downtime costs customers in terms of lost revenue, diminished customer goodwill, and reduced employee productivity.

With respect to pricing, AWS offers multiple pricing options to help our customers save. First, we offer AWS Savings Plans that provide you with a flexible pricing model to save up to 72 percent on your AWS compute usage. You can sign up for Savings Plans for a 1- or 3-year term. Our Savings Plans help you easily manage your plans by taking advantage of recommendations, performance reporting and budget alerts in AWS Cost Explorer, which is a unique benefit only AWS provides. Not only that, but we also offer Amazon EC2 Spot Instances that help you save up to 90 percent on your compute costs vs. On-Demand Instance pricing.

Customers don’t need to walk this migration path alone. In fact, AWS customers often make the most efficient use of cloud resources by working with assessment partners like Cloudamize, CloudChomp, or Migration Evaluator (formerly TSO Logic), which is now part of AWS. By running detailed assessments of their environments with Migration Evaluator before migration, customers can achieve an average of 36 percent savings using AWS over three years. So how do you get from an on-premises Windows deployment to the cloud? AWS makes it simple.

AWS has support programs and tools to help you migrate to the cloud

Though AWS Migration Acceleration Program (MAP) for Windows is a great way to reduce the cost of migrating Windows Server and SQL Server workloads, MAP is more than a cost savings tool. As part of MAP, AWS offers a number of resources to support and sustain your migration efforts. This includes an experienced APN Partner ecosystem to execute migrations, our AWS Professional Services team to provide best practices and prescriptive advice, and a training program to help IT professionals understand and carry out migrations successfully. We help you figure out which workloads to move first, then leverage the combined experience of our Professional Services and partner teams to guide you through the process. For customers who want to save even more (up to 72% in some cases) we are the leaders in helping customers transform legacy systems to modernized managed services.

Again, we are always available to help guide you in your Windows journey to the cloud. We guide you through our technologies like AWS Launch Wizard, which provides a guided way of sizing, configuring, and deploying AWS resources for Microsoft applications like Microsoft SQL Server Always On, or through our comprehensive ecosystem of tens of thousands of partners and third-party solutions, including many with deep expertise with Windows technologies.

Why run Windows Server and SQL Server anywhere else but AWS?

Not only does AWS offer significantly more services than any other cloud, with over 48 services without comparable equivalents on other clouds, but AWS also provides better ways to use Microsoft products than any other cloud. This includes Active Directory as a managed service and FSx for Windows File Server, the only fully managed file storage service for Windows. If you’re interested in learning more about how AWS improves the Windows experience, please visit this article on our Modernizing with AWS blog.

Bring your Windows Server and SQL Server workloads to AWS for the most secure, reliable, and performant cloud, providing you with the depth and breadth of capabilities at the lowest cost. To learn more, visit Windows on AWS. Contact us today to learn more on how we can help you move your Windows to AWS or innovate on open source solutions.

About the Author
Fred Wurden is the GM of Enterprise Engineering (Windows, VMware, Red Hat, SAP, benchmarking) working to make AWS the most customer-centric cloud platform on Earth. Prior to AWS, Fred worked at Microsoft for 17 years and held positions, including: EU/DOJ engineering compliance for Windows and Azure, interoperability principles and partner engagements, and open source engineering. He lives with his wife and a few four-legged friends since his kids are all in college now.