Post Syndicated from Talia Nassi original https://aws.amazon.com/blogs/compute/authenticating-and-authorizing-amazon-mq-users-with-lightweight-directory-access-protocol/
This post is written by Dominic Gagné and Mithun Mallick.
Amazon MQ is a managed message broker service for Apache ActiveMQ and RabbitMQ that simplifies setting up and operating message brokers in the AWS Cloud. Integrating an Amazon MQ broker with a Lightweight Directory Access Protocol (LDAP) server allows you to manage credentials and permissions for users in a single location. There is also the added benefit of not requiring a message broker reboot for new authorization rules to take effect.
This post explores concepts around Amazon MQ’s authentication and authorization model. It covers the steps to set up Amazon MQ access for a Microsoft Active Directory user.
Authentication and authorization
Amazon MQ for ActiveMQ uses native ActiveMQ authentication to manage user permissions by default. Users are created within Amazon MQ to allow broker access, and are mapped to read, write, and admin operations on various destinations. This local user model is referred to as the simple authentication type.
As an alternative to simple authentication, you can maintain broker access control authorization rules within an LDAP server on a per-destination or destination set basis. Wildcards are also supported for rules that apply to multiple destinations.
The LDAP integration feature uses the ActiveMQ standard Java Authentication and Authorization Service (JAAS) plugin. Additional details on the plugin can be found within ActiveMQ security documentation. Authentication details are defined as part of the ldapServerMetadata attribute. Authorization settings are configured as part of the cachedLDAPAuthorizationMap node in the broker’s activemq.xml configuration.
Here is an overview of the integration:
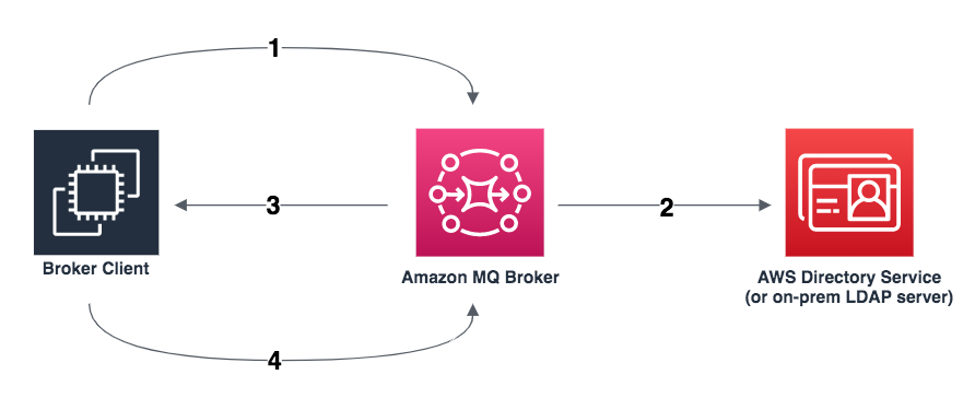
- Client requests access to a queue or topic.
- Authenticate and authorize the client via JAAS.
- Grant or deny Access to the specified queue or topic.
- If access is granted, allow the client to read, write, or create.
Integration with LDAP
ActiveMQ integration with LDAP sets up a secure LDAP access connection between an Amazon MQ for ActiveMQ broker and a Microsoft Active Directory server. You can also use other implementations of LDAP as the directory server, such as OpenLDAP.
Amazon MQ encrypts all data between a broker and LDAP server, and enforces secure LDAP (LDAPS) via public certificates. Unsecured LDAP on port 389 is not supported; traffic must communicate via the secure LDAP port 636. In this example, a Microsoft Active Directory server has LDAPS configured with a public certificate. To set up a Simple AD server with LDAPS and a public certificate, read this blog post.
To integrate with a Microsoft Active Directory server:
- Configure users in the Microsoft Active Directory directory information tree (DIT) structure for client authentication to the broker.
- Configure destinations in the Microsoft Active Directory DIT structure to allow destination-level authorization for individual users or entire groups.
- Create an ActiveMQ configuration to allow authorization via LDAP.
- Create a broker and perform a basic test to validate authentication and authorization access for a test user.
Configuring Microsoft Active Directory for client authentication
Create the hierarchy structure within the Microsoft Active Directory DIT to provision users. The server must be part of the domain and has a domain admin user. The domain admin user is needed in the broker configuration.
In this DIT, the domain corp.example.com is used, though you can use any domain name. An organizational unit (OU) named corp exists under the root. ActiveMQ related entities are defined under the corp OU.

This OU is the user base that the broker uses to search for users when performing authentication operations. Represented as LDIF, the user base is:
OU=Users,OU=corp,DC=corp,DC=example,DC=com
To create this OU and user:
- Log on to the Windows Server using a domain admin user.
- Open Active Directory Users and Computers by running dsa.msc from the command line.
- Choose corp and create an OU named Users, located within corp.
- Select the Users OU and enter the name mquser.
- Deselect the option to change password on next logon.

- Finally, choose Next to create the user.

Because the ActiveMQ source code hardcodes the attribute name for users to uid, make sure that each user has this attribute set. For simplicity, use the user’s connection user name. For more information, see the ActiveMQ source code and knowledgebase article.
Users must belong to the amazonmq-console-admins group to enable console access. Members of this group can create and delete any destinations via the console, regardless of other authorization rules in place. Access to this group should be granted sparingly.
Configuring Microsoft Active Directory for authorization
Now that our broker knows where to search for users, configure the DIT such that the broker can search for user permissions relating to authorization.
Back in the root OU corp where the Users OU was previously created:
- Create a new OU named Destination.
- Within the Destination OU, create an OU for each type of destination that ActiveMQ offers. These are Queue, Topic, and Temp.


For each destination that you want to allow authorization:
- Add an OU under the type of destination.
- Provide the name of the destination as the name of the OU. Wildcards are also supported, as found in ActiveMQ documentation.
This example shows three OUs that require authorization. These are DEMO.MYQUEUE, DEMO.MYSECONDQUEUE, and DEMO.EVENTS.$. The queue search base, which provides authorization information for destinations of type Queue, has the following location in the DIT:
OU=Queue,OU=Destination,OU=corp,DC=corp,DC=example,DC=com
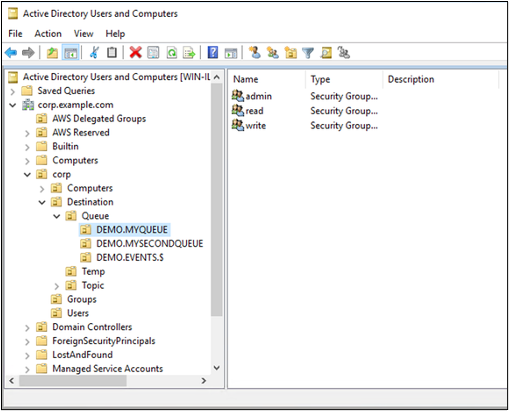
Note the DEMO.EVENTS.$ wildcard queue name. Permissions in that OU apply to all queue names matching that wildcard.
Within each OU representing a destination or wildcard destination set, create three security groups. These groups relate to specific permissions on the relevant destination, using the same admin, read, and write permissions rules as ActiveMQ documentation describes.
There is a conflict with the group name “admin”. Legacy “pre-Windows 2000” rules do not allow groups to share the same name, even in different locations of the DIT. The value in the “pre-Windows 2000” text box does not impact the setup but it must be globally unique. In the following screenshot, a uuid suffix is appended to each admin group name.

Adding a user to the admin security group for a particular destination enables the user to create and delete that topic. Adding them to the read security group enables them to read from the destination, and adding them to the write group enables them to write to the destination.
In this example, mquser is added to the admin and write groups for the queue DEMO.MYQUEUE. Later, you test this user’s authorization permissions to confirm that the integration works as expected.
In addition to adding individual users to security group permissions, you can add entire groups. Because ActiveMQ hardcodes attribute names for groups, ensure that the group has the object class groupOfNames, as shown in the ActiveMQ source code.
To do this, follow the same process as with the UID for users. See the knowledgebase article for additional information.
The LDAP server is now compatible with ActiveMQ. Next, create a broker and configure LDAP values based on the LDAP deployment.
Creating a configuration to enable authorization via LDAP
Authorization rules in ActiveMQ are sourced from the broker’s activemq.xml configuration file.
- Begin by navigating to the Amazon MQ console to create a configuration with the Authentication Type set as LDAP.

- Edit this configuration to include the cachedLDAPAuthorizationMap, which is the node used to configure the locations in the LDAP DIT where authorization rules are stored. For more information on this topic, visit ActiveMQ documentation.

- Within the cachedLDAPAuthorizationMap in the broker’s configuration,Add the location of the OUs related to authorization in the broker’s configuration.
- Under the authorizationPlugin tag, enter a cachedLDAPAuthorizationMap node.
- Do not specify connectionUrl, connectionUsername, or connectionPassword. These values are filled in using the LDAP Server Metadata specified when creating the broker. If you specify these values, they are ignored.An example cachedLDAPAuthorizationMap is presented in the following image:


Creating a broker and testing Active Directory integration
Start by creating a broker using the default durability optimized storage.
- Select a Single-instance broker. You can use Active/standby broker or Network of Brokers if required.
- Choose Next.

- In the next page, under Configure Settings, set a name for the broker.
- Select an instance type.

- In the ActiveMQ Access section, select LDAP Authentication & Authorization.The input fields display parameters for connecting with the LDAP server. The service account must be associated with a user that can bind to your LDAP server. The server does not need to be public but the domain name must be publicly resolvable.

- The next section of the page includes the search configuration for Active Directory users who are authorized to access the queues and topics. The values depend on the org structure created in the Active Directory setup. These values are based on your DIT.

- Once users and role search metadata are provided, configure the broker to launch with the configuration created in the previous section (named my-ldap-authorization-conf). Do this by selecting the Additional Settings drop-down and choose the correct configuration file.

- Use the configuration where you defined cachedLDAPAuthorizationMap. This enables the broker to enforce read/write/admin permissions for client connections to the broker. These are defined in the LDAP server’s Destination OU.


Once the broker is running, authentication and authorization rules are enforced using the users and authorization rules defined in the configured LDAP server. During the Microsoft Active Directory setup, mquser is added to the admin and write groups for the queue DEMO.MYQUEUE. This means mquser can create and write to the queue DEMO.MYQUEUE but cannot perform any actions on other queues.
Test this by writing to the queue:

The client can connect to the broker and send messages to the queue DEMO.MYQUEUE using the credentials for mquser.
Conclusion
This post shows the steps to integrate an LDAP server with an Amazon MQ broker. After the integration, you can manage authentication and authorization rules for your users, without rebooting the broker.
For more serverless learning resources, visit Serverless Land.