Post Syndicated from Arthi Jaganathan original https://aws.amazon.com/blogs/architecture/field-notes-three-steps-to-port-your-containerized-application-to-aws-lambda/
AWS Lambda support for container images allows porting containerized web applications to run in a serverless environment. This gives you automatic scaling, built-in high availability, and a pay-for-value billing model so you don’t pay for over-provisioned resources. If you are currently using containers, container image support for AWS Lambda means you can use these benefits without additional upfront engineering efforts to adopt new tooling or development workflows. You can continue to use your team’s familiarity with containers while gaining the benefits from the operational simplicity and cost effectiveness of Serverless computing.
This blog post describes the steps to take a containerized web application and run it on Lambda with only minor changes to the development, packaging, and deployment process. We use Ruby, as an example, but the steps are the same for any programming language.
Overview of solution
The following sample application is a containerized web service that generates PDF invoices. We will migrate this application to run the business logic in a Lambda function, and use Amazon API Gateway to provide a Serverless RESTful web API. API Gateway is a managed service to create and run API operations at scale.

Figure 1: Generating PDF invoice with Lambda
Walkthrough
In this blog post, you will learn how to port the containerized web application to run in a serverless environment using Lambda.
At a high level, you are going to:
- Get the containerized application running locally for testing
- Port the application to run on Lambda
- Create a Lambda function handler
- Modify the container image for Lambda
- Test the containerized Lambda function locally
- Deploy and test on Amazon Web Services (AWS)
Prerequisites
For this walkthrough, you need the following:
- An AWS account
- IAM permissions to create Lambda function, API Gateway, AWS Identity and Access Management (IAM) roles, and Amazon Elastic Container Registry (Amazon ECR)
- Docker and AWS Command Line Interface (AWS CLI) installed
- A basic understanding of how Lambda works
1. Get the containerized application running locally for testing
The sample code for this application is available on GitHub. Clone the repository to follow along.
```bash
git clone https://github.com/aws-samples/aws-lambda-containerized-custom-runtime-blog.git
```
1.1. Build the Docker image
Review the Dockerfile in the root of the cloned repository. The Dockerfile uses Bitnami’s Ruby 3.0 image from the Amazon ECR Public Gallery as the base. It follows security best practices by running the application as a non-root user and exposes the invoice generator service on port 4567. Open your terminal and navigate to the folder where you cloned the GitHub repository. Build the Docker image using the following command.
```bash
docker build -t ruby-invoice-generator .
```
1.2 Test locally
Run the application locally using the Docker run command.
```bash
docker run -p 4567:4567 ruby-invoice-generator
```
In a real-world scenario, the order and customer details for the invoice would be passed as POST request body or GET request query string parameters. To keep things simple, we are randomly selecting from a few hard coded values inside lib/utils.rb. Open another terminal, and test invoice creation using the following command.
```bash
curl "http://localhost:4567/invoice" \
--output invoice.pdf \
--header 'Accept: application/pdf'
```
This command creates the file invoice.pdf in the folder where you ran the curl command. You can also test the URL directly in a browser. Press Ctrl+C to stop the container. At this point, we know our application works and we are ready to port it to run on Lambda as a container.
2. Port the application to run on Lambda
There is no change to the Lambda operational model and request plane. This means the function handler is still the entry point to application logic when you package a Lambda function as a container image. Also, by moving our business logic to a Lambda function, we get to separate out two concerns and replace the web server code from the container image with an HTTP API powered by API Gateway. You can focus on the business logic in the container with API Gateway acting as a proxy to route requests.
2.1. Create the Lambda function handler
The code for our Lambda function is defined in function.rb, and the handler function from that file will be described shortly. The main difference to note between the original Sintra-powered code and our Lambda handler version is the need to base64 encode the PDF. This is a requirement for returning binary media from API Gateway Lambda proxy integration. API Gateway will automatically decode this to return the PDF file to the client.
```ruby
def self.process(event:, context:)
self.logger.debug(JSON.generate(event))
invoice_pdf = Base64.encode64(Invoice.new.generate)
{ 'headers' => { 'Content-Type': 'application/pdf' },
'statusCode' => 200,
'body' => invoice_pdf,
'isBase64Encoded' => true
}
end
```
If you need a reminder on the basics of Lambda function handlers, review the documentation on writing a Lambda handler in Ruby. This completes the new addition to the development workflow—creating a Lambda function handler as the wrapper for the business logic.
2.2 Modify the container image for Lambda
AWS provides open source base images for Lambda. At this time, these base images are only available for Ruby runtime versions 2.5 and 2.7. But, you can bring any version of your preferred runtime (Ruby 3.0 in this case) by packaging it with your Docker image. We will use Bitnami’s Ruby 3.0 image from the Amazon ECR Public Gallery as the base. Amazon ECR is a fully managed container registry, and it is important to note that Lambda only supports running container images that are stored in Amazon ECR; you can’t upload an arbitrary container image to Lambda directly.
Because the function handler is the entry point to business logic, the Dockerfile CMD must be set to the function handler instead of starting the web server. In our case, because we are using our own base image to bring a custom runtime, there is an additional change we must make. Custom images need the runtime interface client to manage the interaction between the Lambda service and our function’s code.
The runtime interface client is an open-source lightweight interface that receives requests from Lambda, passes the requests to the function handler, and returns the runtime results back to the Lambda service. The following are the relevant changes to the Dockerfile.
```bash
ENTRYPOINT ["aws_lambda_ric"]
CMD [ "function.Billing::InvoiceGenerator.process" ]
```
The Docker command that is implemented when the container runs is: aws_lambda_ric function.Billing::InvoiceGenerator.process.
Refer to Dockerfile.lambda in the cloned repository for the complete code. This image follows best practices for optimizing Lambda container images by using a multi-stage build. The final image uses tag named 3.0-prod as its base. This does not include development dependencies and helps keep the image size down. Create the Lambda-compatible container image using the following command.
```bash
docker build -f Dockerfile.lambda -t lambda-ruby-invoice-generator .
```
This concludes changes to the Dockerfile. We have introduced a new dependency on the runtime interface client and used it as our container’s entrypoint.
2.3. Test the containerized Lambda function locally
The runtime interface client expects requests from the Lambda Runtime API. But when we test on our local development workstation, we don’t run the Lambda service. So, we need a way to proxy the Runtime API for local testing. Because local testing is an integral part of most development workflows, AWS provides the Lambda runtime interface emulator. The emulator is a lightweight web server running on port 8080 that converts HTTP requests to Lambda-compatible JSON events. The flow for local testing is shown in Figure 2.
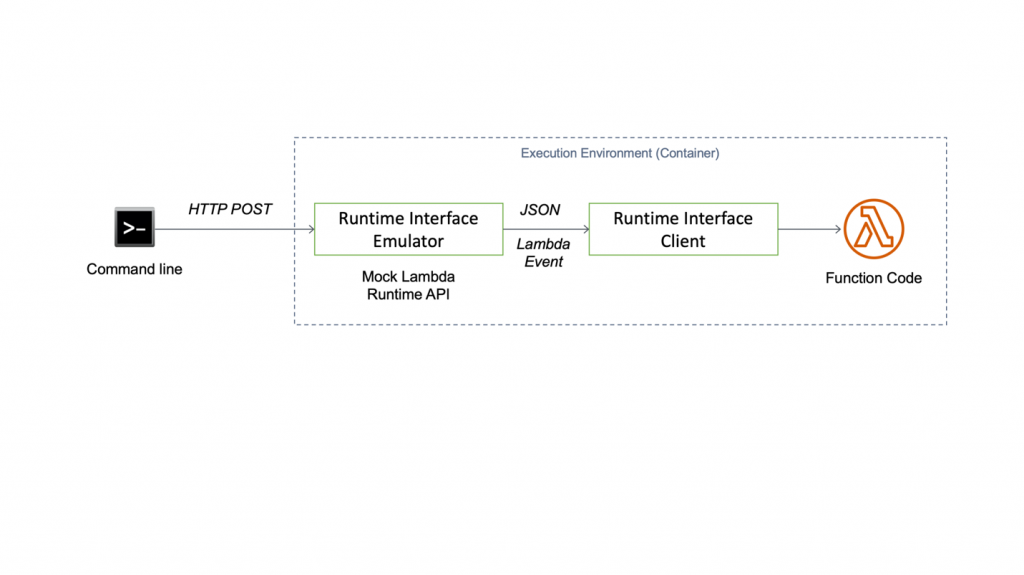
Figure 2: Testing the Lambda container image locally
When we want to perform local testing, the runtime interface emulator becomes the entrypoint. Consequently, the Docker command that is executed when the container runs locally is: aws-lambda-rie aws_lambda_ric function.Billing::InvoiceGenerator.process.
You can package the emulator with the image. The Lambda container image support launch blog documents steps for this approach. However, to keep the image as slim as possible, we recommend that you install it locally, and mount it while running the container instead. Here is the installation command for Linux platforms.
``` bash
mkdir -p
~/.aws-lambda-rie && curl -Lo ~/.aws-lambda-rie/aws-lambda-rie
https://github.com/aws/aws-lambda-runtime-interface-emulator/releases/latest/download/aws-lambda-rie
&& chmod +x ~/.aws-lambda-rie/aws-lambda-rie
```
Use the Docker run command with the appropriate overrides to entrypoint and cmd to start the Lambda container. The emulator is mapped to local port 9000.
```bash
docker run \
-v ~/.aws-lambda-rie:/aws-lambda \
-p 9000:8080 \
-e LOG_LEVEL=DEBUG \
--entrypoint /aws-lambda/aws-lambda-rie \
lambda-ruby-invoice-generator \
/opt/bitnami/ruby/bin/aws_lambda_ric function.Billing::InvoiceGenerator.process
```
Open another terminal and run the curl command below to simulate a Lambda request.
```bash
curl -XPOST "http://localhost:9000/2015-03-31/functions/function/invocations" -d '{}'
```
You will see a JSON output with the base64 encoded value of the invoice for body and isBase64Encoded property set to true. After Lambda is integrated with API Gateway, the API endpoint uses the flag to decode the text before returning the response to the caller. The client will receive the decoded PDF invoice. Push Ctrl+C to stop the container. This concludes changes to the local testing workflow.
3. Deploy and test on AWS
The final step is to deploy the invoice generator service. Set your AWS Region and AWS Account ID as environment variables.
```bash
export AWS_REGION=Region
export AWS_ACCOUNT_ID=account
```
3.1. Push the Docker image to Amazon ECR
Create an Amazon ECR repository for the image.
```bash
ECR_REPOSITORY=`aws ecr create-repository \
--region $AWS_REGION \
--repository-name lambda-ruby-invoice-generator \
--tags Key=Project,Value=lambda-ruby-invoice-generator-blog \
--query "repository.repositoryName" \
--output text`
```
Login to Amazon ECR, and push the container image to the newly-created repository.
```bash
aws ecr get-login-password \
--region $AWS_REGION | docker login \
--username AWS \
--password-stdin $AWS_ACCOUNT_ID.dkr.ecr.$AWS_REGION.amazonaws.com
docker tag \
lambda-ruby-invoice-generator:latest \
$AWS_ACCOUNT_ID.dkr.ecr.$AWS_REGION.amazonaws.com/$ECR_REPOSITORY:latest
docker push
$AWS_ACCOUNT_ID.dkr.ecr.$AWS_REGION.amazonaws.com/$ECR_REPOSITORY:latest
```
3.2. Create the Lambda function
After the push succeeds, you can create the Lambda function. You need to create a Lambda execution role first and attach the managed IAM policy named AWSLambdaBasicExecutionRole. This gives the function access to Amazon CloudWatch for logging and monitoring.
```bash
LAMBDA_ROLE=`aws iam create-role \
--region $AWS_REGION \
--role-name ruby-invoice-generator-lambda-role \
--assume-role-policy-document file://lambda-role-trust-policy.json \
--tags Key=Project,Value=lambda-ruby-invoice-generator-blog \
--query "Role.Arn" \
--output text`
aws iam attach-role-policy \
--region $AWS_REGION \
--role-name ruby-invoice-generator-lambda-role \
--policy-arn arn:aws:iam::aws:policy/service-role/AWSLambdaBasicExecutionRole
LAMBDA_ARN=`aws lambda create-function \
--region $AWS_REGION \
--function-name ruby-invoice-generator \
--description "[AWS Blog] Lambda Ruby Invoice Generator" \
--role $LAMBDA_ROLE \
--package-type Image \
--code ImageUri=$AWS_ACCOUNT_ID.dkr.ecr.$AWS_REGION.amazonaws.com/$ECR_REPOSITORY:latest \
--timeout 15 \
--memory-size 256 \
--tags Project=lambda-ruby-invoice-generator-blog \
--query "FunctionArn" \
--output text`
```
Wait for the function to be ready. Use the following command to verify that the function state is set to Active.
```bash
aws lambda get-function \
--region $AWS_REGION \
--function-name ruby-invoice-generator \
--query "Configuration.State"
```
3.3. Integrate with API Gateway
API Gateway offers two option to create RESTful APIs: HTTP and REST. We will use HTTP API because it offers lower cost and latency when compared to REST API. REST API provides additional features that we don’t need for this demo.
```bash
aws apigatewayv2 create-api \
--region $AWS_REGION \
--name invoice-generator-api \
--protocol-type HTTP \
--target $LAMBDA_ARN \
--route-key "GET /invoice" \
--tags Key=Project,Value=lambda-ruby-invoice-generator-blog \
--query "{ApiEndpoint: ApiEndpoint, ApiId: ApiId}" \
--output json
```
Record the ApiEndpoint and ApiId from the earlier command, and substitute them for the placeholders in the following command. You need to update the Lambda resource policy to allow HTTP API to invoke it.
```bash
export API_ENDPOINT="<ApiEndpoint>"
export API_ID="<ApiId>"
aws lambda add-permission \
--region $AWS_REGION \
--statement-id invoice-generator-api \
--action lambda:InvokeFunction \
--function-name $LAMBDA_ARN \
--principal apigateway.amazonaws.com \
--source-arn "arn:aws:execute-api:$AWS_REGION:$AWS_ACCOUNT_ID:$API_ID/*/*/invoice"
```
3.4. Verify the AWS deployment
Use the curl command to generate a PDF invoice.
```bash
curl "$API_ENDPOINT/invoice" \
--output lambda-invoice.pdf \
--header 'Accept: application/pdf'
```
This creates the file lambda-invoice.pdf in the local folder. You can also test directly from a browser.
This concludes the final step for porting the containerized invoice web service to Lambda. This deployment workflow is very similar to any other containerized application where you first build the image and then create or update your application to the new image as part of deployment. Only the actual deploy command has changed because we are deploying to Lambda instead of a container platform.
Cleaning up
To avoid incurring future charges, delete the resources. Follow cleanup instructions in the README file on the GitHub repo.
Conclusion
In this blog post, we learned how to port an existing containerized application to Lambda with only minor changes to development, packaging, and testing workflows. For teams with limited time, this accelerates the adoption of Serverless by using container domain knowledge and promoting reuse of existing tooling. We also saw how you can easily bring your own runtime by packaging it in your image and how you can simplify your application by eliminating the web application framework.
For more Serverless learning resources, visit https://serverlessland.com.
Field Notes provides hands-on technical guidance from AWS Solutions Architects, consultants, and technical account managers, based on their experiences in the field solving real-world business problems for customers.