Post Syndicated from Randy DeFauw original https://aws.amazon.com/blogs/big-data/configure-amazon-emr-studio-and-amazon-eks-to-run-notebooks-with-amazon-emr-on-eks/
Amazon EMR on Amazon EKS provides a deployment option for Amazon EMR that allows you to run analytics workloads on Amazon Elastic Kubernetes Service (Amazon EKS). This is an attractive option because it allows you to run applications on a common pool of resources without having to provision infrastructure. In addition, you can use Amazon EMR Studio to build analytics code running on Amazon EKS clusters. EMR Studio is a web-based, integrated development environment (IDE) using fully managed Jupyter notebooks that can be attached to any EMR cluster, including EMR on EKS. It uses AWS Single Sign-On (SSO) or a compatible identity provider (IdP) to log directly in to EMR Studio through a secure URL using corporate credentials.
Deploying EMR Studio to attach to EMR on EKS requires integrating several AWS services:
- Amazon EKS
- Amazon EMR
- AWS SSO
- Amazon Virtual Private Cloud (Amazon VPC)
- Amazon Elastic Compute Cloud (Amazon EC2) Application Load Balancer
- AWS Identity and Access Management (IAM) roles and policies
In addition, you need to install the following EMR on EKS components:
- AWS Load Balancer Controller
- Jupyter Enterprise Gateway
This post helps you build all the necessary components and stitch them together by running a single script. We also describe the architecture of this setup and how the components work together.
Architecture overview
With EMR on EKS, you can run Spark applications alongside other types of applications on the same Amazon EKS cluster, which improves resource allocation and simplifies infrastructure management. For more information about how Amazon EMR operates inside an Amazon EKS cluster, see New – Amazon EMR on Amazon Elastic Kubernetes Service (EKS). EMR Studio provides a web-based IDE that makes it easy to develop, visualize, and debug applications that run in EMR. For more information, see Amazon EMR Studio (Preview): A new notebook-first IDE experience with Amazon EMR.
Spark kernels are scheduled pods in a namespace in an Amazon EKS cluster. EMR Studio uses Jupyter Enterprise Gateway (JEG) to launch Spark kernels on Amazon EKS. A managed endpoint of type JEG is provisioned as a Kubernetes deployment in the EMR virtual cluster’s associated namespace and exposed as a Kubernetes service. Each EMR virtual cluster maps to a Kubernetes namespace registered with the Amazon EKS cluster; virtual clusters don’t manage physical compute or storage, but point to the Kubernetes namespace where the workload is scheduled. Each virtual cluster can have several managed endpoints, each with their own configured kernels for different use cases and needs. JEG managed endpoints provide HTTPS endpoints, serviced by an Application Load Balancer (ALB), that are reachable only from EMR Studio and self-hosted notebooks that are created within a private subnet of the Amazon EKS VPC.
The following diagram illustrates the solution architecture.
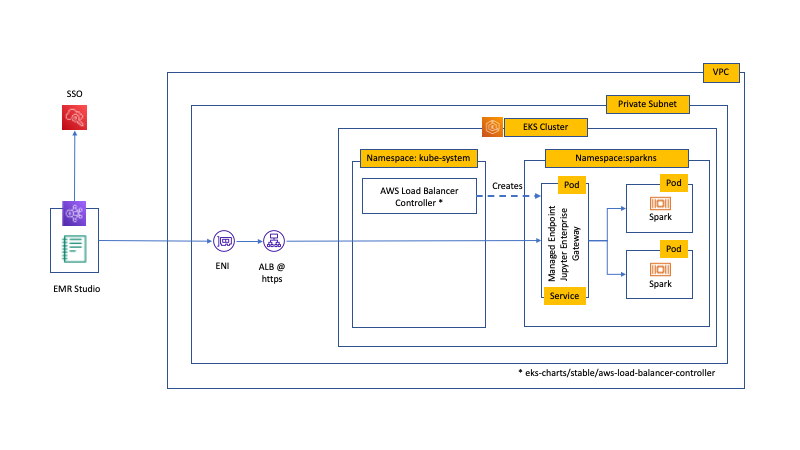
The managed endpoint is created in the virtual cluster’s Amazon EKS namespace (in this case, sparkns) and the HTTPS endpoints are serviced from private subnets. The kernel pods run with the job-execution IAM role defined in the managed endpoint. During managed endpoint creation, EMR on EKS uses the AWS Load Balancer Controller in the kube-system namespace to create an ALB with a target group that connects with the JEG managed endpoint in the virtual cluster’s Kubernetes namespace.
You can configure each managed endpoint’s kernel differently. For example, to permit a Spark kernel to use AWS Glue as their catalog, you can apply the following configuration JSON file in the —configuration-overrides flag when creating a managed endpoint:
The managed endpoint is a Kubernetes deployment fronted by a service inside the configured namespace (in this case, sparkns). When we trace the endpoint information, we can see how the Jupyter Enterprise Gateway deployment connects with the ALB and the target group:
To look at how this connects, consider two EMR Studio sessions. The ALB exposes port 18888 to the EMR Studio sessions. The JEG service maps the external port 18888 on the ALB to the dynamic NodePort on the JEG service (in this case, 30091). The JEG service forwards the traffic to the TargetPort 9547, which routes the traffic to the appropriate Spark driver pod. Each notebook session has its own kernel, which has its own respective Spark driver and executor pods, as the following diagram illustrates.

Attach EMR Studio to a virtual cluster and managed endpoint
Each time a user attaches a virtual cluster and a managed endpoint to their Studio Workspace and launches a Spark session, Spark drivers and Spark executors are scheduled. You can see that when you run kubectl to check what pods were launched:
Each notebook Spark kernel session deploys a driver pod and executor pods that continue running until the kernel session is shut down.
The code in the notebook cells runs in the executor pods that were deployed in the Amazon EKS cluster.
Set up EMR on EKS and EMR Studio
Several steps and pieces are required to set up both EMR on EKS and EMR Studio. Enabling AWS SSO is a prerequisite. You can use the two provided launch scripts in this section or manually deploy it using the steps provided later in this post.
We provide two launch scripts in this post. One is a bash script that uses AWS CloudFormation, eksctl, and AWS Command Line Interface (AWS CLI) commands to provide an end-to-end deployment of a complete solution. The other uses the AWS Cloud Development Kit (AWS CDK) to do so.
The following diagram shows the architecture and components that we deploy.

Prerequisites
Make sure to complete the following prerequisites:
- Enable AWS SSO in the same Region where the EMR Studio resides. If the account is part of an organizational account, AWS SSO needs to be enabled in the primary account.
- Enable AWS SSO and set up users in AWS SSO. For instructions, see Getting Started and How to create and manage users within AWS Single Sign-On.
For information about the supported IdPs, see Enable AWS Single Sign-On for Amazon EMR Studio.
Bash script
The script is available on GitHub.
Prerequisites
The script requires you to use AWS Cloud9. Follow the instructions in the Amazon EKS Workshop. Make sure to follow these instructions carefully:
- Create the AWS Cloud9 Workspace
- Install Kubernetes tools
- Create an IAM role with AdministratorAccess
- Attach the IAM role to your workspace
- Update IAM setting for your workspace
- Install eksctl
After you deploy the AWS Cloud9 desktop, proceed to the next steps.
Preparation
Use the following code to clone the GitHub repo and prepare the AWS Cloud9 prerequisites:
Deploy the stack
Before running the script, provide the following information:
- The AWS account ID and Region, if your AWS Cloud9 desktop isn’t in the same account ID or Region where you want to deploy EMR on EKS
- The name of the Amazon Simple Storage Service (Amazon S3) bucket to create
- The AWS SSO user to be associated with the EMR Studio session
After the script deploys the stack, the URL to the deployed EMR Studio is displayed:
AWS CDK script
The AWS CDK scripts are available on GitHub. You need to checkout the main branch. The stacks deploy an Amazon EKS cluster and EMR on EKS virtual cluster in a new VPC with private subnets, and optionally an Amazon Managed Apache Airflow (Amazon MWAA) environment and EMR Studio.
Prerequisites
You need the AWS CDK version 1.90.1 or higher. For more information, see Getting started with the AWS CDK.
We use a prefix list to restrict access to some resources to network IP ranges that you approve. Create a prefix list if you don’t already have one.
If you plan to use EMR Studio, you need AWS SSO configured in your account.
Preparation
After you clone the repository and checkout the main branch, create and activate a new Python virtual environment:
Now install the Python dependencies:
Lastly, bootstrap the AWS CDK:
Deploy the stacks
Synthesize the AWS CDK stacks with the following code:
This command generates four stacks:
- emr-eks-cdk – The main stack
- mwaa-cdk – Adds Amazon MWAA
- studio-cdk – Adds EMR Studio prerequisites
- studio-cdk-live – Adds EMR Studio
The following diagram illustrates the resources deployed by the AWS CDK stacks.

Start by deploying the first stack:
If you want to use Apache Airflow as your orchestrator, deploy that stack:
Deploy the first EMR Studio stack:
Wait for the managed endpoint to become active. You can check the status by running the following code:
The virtual cluster ID is available in the AWS CDK output from the emr-eks-cdk stack.
When the endpoint is active, deploy the second EMR Studio stack:
Manual deployment
If you prefer to manually deploy EMR on EKS and EMR Studio, use the steps in this section.
Set up a VPC
If you’re using Amazon EKS v. 1.18, set up a VPC that also has private subnets and appropriately tagged for external load balancers. For tagging, see: Application load balancing on Amazon EKS and Create an EMR Studio service role.
Create an Amazon EKS cluster
Launch an Amazon EKS cluster with at least one managed node group. For instructions, see Setting up and Getting Started with Amazon EKS.
Create relevant IAM policies, roles, IdP, and SSL/TLS certificate
To create your IAM policies, roles, IdP, and SSL/TLS certificate, complete the following steps:
- Enable cluster access for EMR on EKS.
- Create an IdP in IAM based on the EKS OIDC provider URL.
- Create an SSL/TLS certificate and place it in AWS Certificate Manager.
- Create the relevant IAM policies and roles:
- Job execution role
- Update the trust policy for the job execution role
- Deploy and create the IAM policy for the AWS Load Balancer Controller
- EMR Studio service role
- EMR Studio user role
- EMR Studio user policies associated with AWS SSO users and groups
- Register the Amazon EKS cluster with Amazon EMR to create the virtual EMR cluster
- Create the appropriate security groups to be attached to each EMR Studio created:
- Workspace security group
- Engine security group
- Tag the security groups with the appropriate tags. For instructions, see Create an EMR Studio service role.
Required installs in Amazon EKS
Deploy the AWS Load Balancer Controller in the Amazon EKS cluster if you haven’t already done so.
Create EMR on EKS relevant pieces and map the user to EMR Studio
Complete the following steps:
- Create at least one EMR virtual cluster associated with the Amazon EKS cluster. For instructions, see Step 1 of Set up Amazon EMR on EKS for EMR Studio.
- Create at least one managed endpoint. For instructions, see Step 2 of Set up Amazon EMR on EKS for EMR Studio.
- Create at least one EMR Studio; associate the EMR Studio with the private subnets configured with the Amazon EKS cluster. For instructions, see Create an EMR Studio.
- When the EMR Studio is available, map an AWS SSO user or group to the EMR Studio and apply an appropriate IAM policy to that user.
Use EMR Studio
To start using EMR Studio, complete the following steps:
- Find the URL for EMR Studio by the studios in a Region:
- With the listed URL, log in using the AWS SSO username you used earlier.
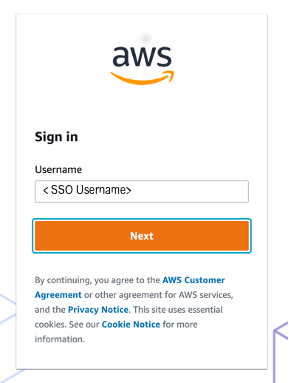
After authentication, the user is routed to the EMR Studio dashboard.

- Choose Create Workspace.
- For Workspace name, enter a name.
- For Subnet, choose the subnet that corresponds to one of the subnets associated with the managed node group.
- For S3 location, enter an S3 bucket where you can store the notebook content.

- After you create the Workspace, choose one that is in the
Readystatus.

- In the sidebar, choose the EMR cluster icon.
- Under Cluster type¸ choose EMR Cluster on EKS.
- Choose the available virtual cluster and available managed endpoint.
- Choose Attach.
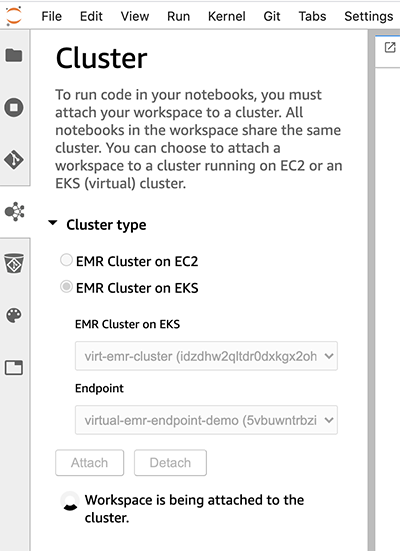
After it’s attached, EMR Studio displays the kernels available in the Notebook and Console section.
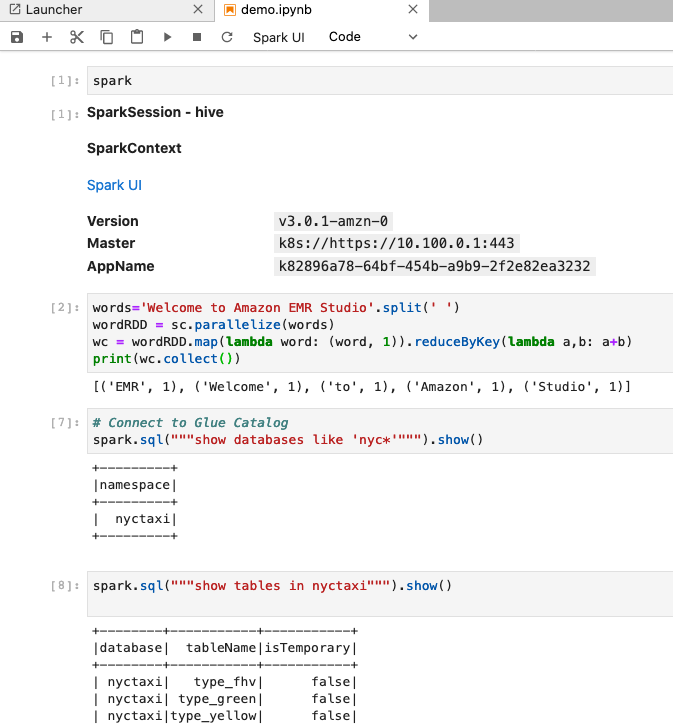
- Choose PySpark (Kubernetes) to launch a notebook kernel and start a Spark session.

Because the endpoint configuration here uses AWS Glue for its metastore, you can list the databases and tables connected to the AWS Glue Data Catalog. You can use the following example script to test the setup. Modify the script as necessary for the appropriate database and table that you have in your Data Catalog:

Clean up
To avoid incurring future charges, delete the resources launched here by running remove_setup.sh:
Conclusion
EMR on EKS allows you to run applications on a common pool of resources inside an Amazon EKS cluster without having to provision infrastructure. EMR Studio is a fully managed Jupyter notebook and tool that provisions kernels that run on EMR clusters, including virtual clusters on Amazon EKS. In this post, we described the architecture of how EMR Studio connects with EMR on EKS and provided scripts to automatically deploy all the components to connect the two services.
If you have questions or suggestions, please leave a comment.
About the Authors
 Randy DeFauw is a Principal Solutions Architect at Amazon Web Services. He works with the AWS customers to provide guidance and technical assistance on database projects, helping them improve the value of their solutions when using AWS.
 Matthew Tan is a Senior Analytics Solutions Architect at Amazon Web Services and provides guidance to customers developing solutions with AWS Analytics services on their analytics workloads.