Post Syndicated from Bruno Silveira original https://aws.amazon.com/blogs/security/enabling-data-classification-for-amazon-rds-database-with-amazon-macie/
Customers have been asking us about ways to use Amazon Macie data discovery on their Amazon Relational Database Service (Amazon RDS) instances. This post presents how to do so using AWS Database Migration Service (AWS DMS) to extract data from Amazon RDS, store it on Amazon Simple Storage Service (Amazon S3), and then classify the data using Macie. Macie’s resulting findings will also be made available to be queried with Amazon Athena by appropriate teams.
The challenge
Let’s suppose you need to find sensitive data in an RDS-hosted database using Macie, which currently only supports S3 as a data source. Therefore, you will need to extract and store the data from RDS in S3. In addition, you will need an interface for audit teams to audit these findings.
Solution overview
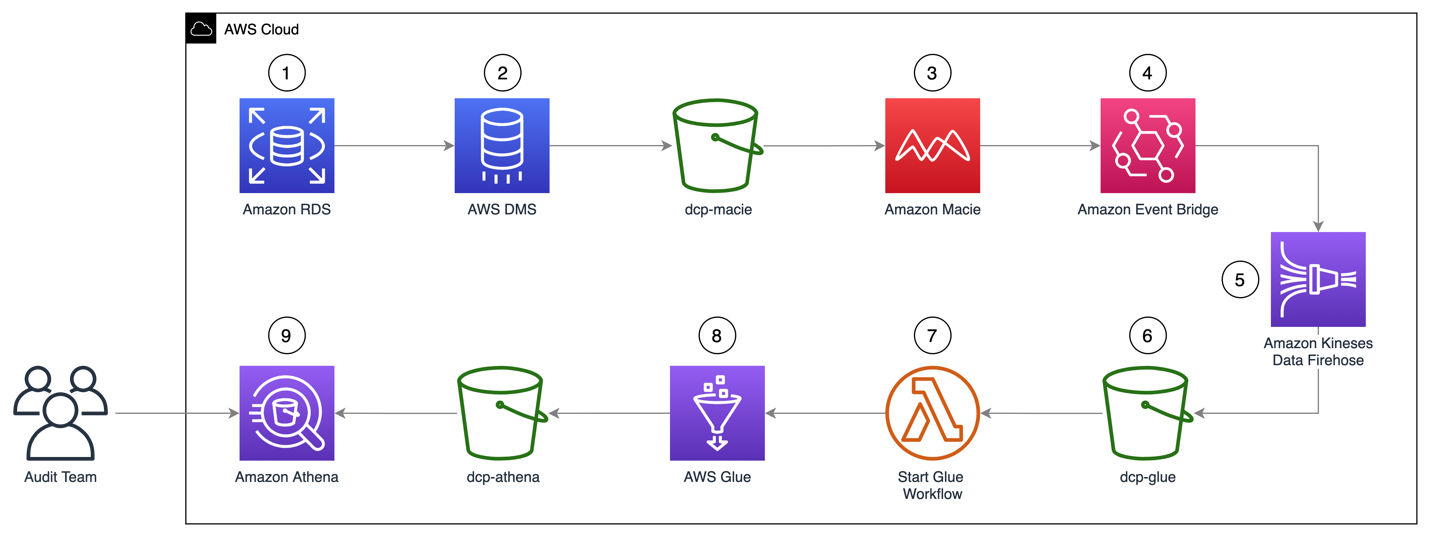
Figure 1: Solution architecture workflow
The architecture of the solution in Figure 1 can be described as:
- A MySQL engine running on RDS is populated with the Sakila sample database.
- A DMS task connects to the Sakila database, transforms the data into a set of Parquet compressed files, and loads them into the dcp-macie bucket.
- A Macie classification job analyzes the objects in the dcp-macie bucket using a combination of techniques such as machine learning and pattern matching to determine whether the objects contain sensitive data and to generate detailed reports on the findings.
- Amazon EventBridge routes the Macie findings reports events to Amazon Kinesis Data Firehose.
- Kinesis Data Firehose stores these reports in the dcp-glue bucket.
- S3 event notification triggers an AWS Lambda function whenever an object is created in the dcp-glue bucket.
- The Lambda function named Start Glue Workflow starts a Glue Workflow.
- Glue Workflow transforms the data from JSONL to Apache Parquet file format and places it in the dcp-athena bucket. This provides better performance during data query and optimized storage usage using a binary optimized columnar storage.
- Athena is used to query and visualize data generated by Macie.
Note: For better readability, the S3 bucket nomenclature omits the suffix containing the AWS Region and AWS account ID used to meet the global uniqueness naming requirement (for example, dcp-athena-us-east-1-123456789012).
The Sakila database schema consists of the following tables:
- actor
- address
- category
- city
- country
- customer
Building the solution
Prerequisites
Before configuring the solution, the AWS Identity and Access Management (IAM) user must have appropriate access granted for the following services:
- AWS CloudFormation
- AWS IAM
- Amazon Virtual Private Cloud (Amazon VPC)
- Amazon Elastic Compute Cloud (Amazon EC2)
- AWS Key Management Service (AWS KMS)
- AWS Secrets Manager
- AWS Lambda
- Amazon RDS
- Amazon S3
- AWS DMS
- Amazon Macie
- Amazon Kinesis Data Firehose
- Amazon EventBridge
- AWS Glue
- Amazon Athena
You can find an IAM policy with the required permissions here.
Step 1 – Deploying the CloudFormation template
You’ll use CloudFormation to provision quickly and consistently the AWS resources illustrated in Figure 1. Through a pre-built template file, it will create the infrastructure using an Infrastructure-as-Code (IaC) approach.
- Download the CloudFormation template.
- Go to the CloudFormation console.
- Select the Stacks option in the left menu.
- Select Create stack and choose With new resources (standard).
- On Step 1 – Specify template, choose Upload a template file, select Choose file, and select the file template.yaml downloaded previously.
- On Step 2 – Specify stack details, enter a name of your preference for Stack name. You might also adjust the parameters as needed, like the parameter CreateRDSServiceRole to create a service role for RDS if it does not exist in the current account.
- On Step 3 – Configure stack options, select Next.
- On Step 4 – Review, check the box for I acknowledge that AWS CloudFormation might create IAM resources with custom names, and then select Create Stack.
- Wait for the stack to show status CREATE_COMPLETE.
Note: It is expected that provisioning will take around 10 minutes to complete.
Step 2 – Running an AWS DMS task
To extract the data from the Amazon RDS instance, you need to run an AWS DMS task. This makes the data available for Amazon Macie in an S3 bucket in Parquet format.
- Go to the AWS DMS console.
- In the left menu, select Database migration tasks.
- Select the task Identifier named rdstos3task.
- Select Actions.
- Select the option Restart/Resume.
When the Status changes to Load Complete the task has finished and you will be able to see migrated data in your target bucket (dcp-macie).
Inside each folder you can see parquet file(s) with names similar to LOAD00000001.parquet. Now you can use Macie to discover if you have sensitive data in your database contents as exported to S3.
Step 3 – Running a classification job with Amazon Macie
Now you need to create a data classification job so you can assess the contents of your S3 bucket. The job you create will run once and evaluate the complete contents of your S3 bucket to determine whether it can identify PII among the data. As mentioned earlier, this job only uses the managed identifiers available with Macie – you could also add your own custom identifiers.
- Go to the Macie console.
- Select the S3 buckets option in the left menu.
- Select Create job.
- Select Next to continue.
- Create a job with the following scope.
- Sensitive data Discovery options: One-time job
- Sampling Depth: 100%
- Leave all other settings with their default values
- Select Next to continue.
- Select Next again to skip past the Custom data identifiers section.
- Give the job a name and description.
- Select Next to continue.
- Verify the details of the job you have created and select Submit to continue.
Choose the S3 bucket dcp-macie containing the output data from the DMS task. You may need to wait a minute and select the Refresh icon if the bucket names do not display.
You will see a green banner stating that The Job was successfully created. The job can take up to 15 minutes to conclude and the Status will change from Active to Complete. To open the findings from the job, select the job’s check box, choose Show results, and select Show findings.
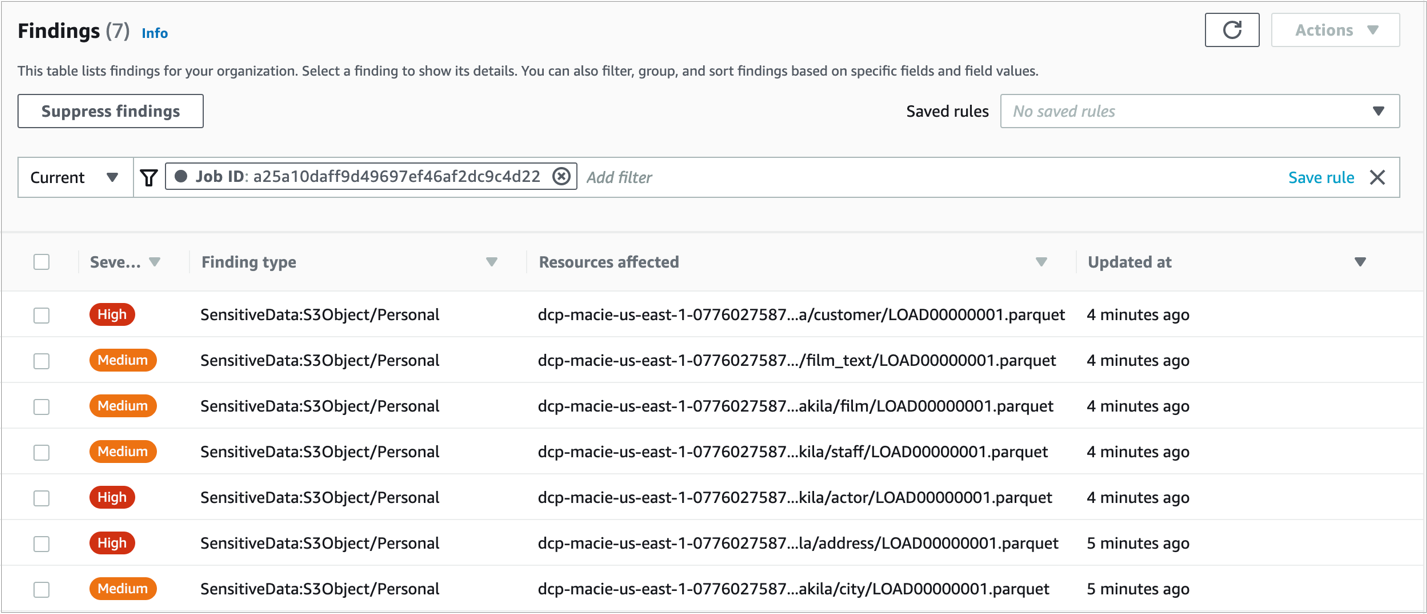
Figure 2: Macie Findings screen
Note: You can navigate in the findings and select each checkbox to see the details.
Step 4 – Enabling querying on classification job results with Amazon Athena
- Go to the Athena console and open the Query editor.
- If it’s your first-time using Athena you will see a message Before you run your first query, you need to set up a query result location in Amazon S3. Learn more. Select the link presented with this message.
- In the Settings window, choose Select and then choose the bucket dcp-assets to store the Athena query results.
- (Optional) To store the query results encrypted, check the box for Encrypt query results and select your preferred encryption type. To learn more about Amazon S3 encryption types, see Protecting data using encryption.
- Select Save.
Step 5 – Query Amazon Macie results with Amazon Athena.
It might take a few minutes for the data to complete the flow between Amazon Macie and AWS Glue. After it’s finished, you’ll be able to see in Athena’s console the table dcp_athena within the database dcp.
Then, select the three dots next to the table dcp_athena and select the Preview table option to see a data preview, or run your own custom queries.
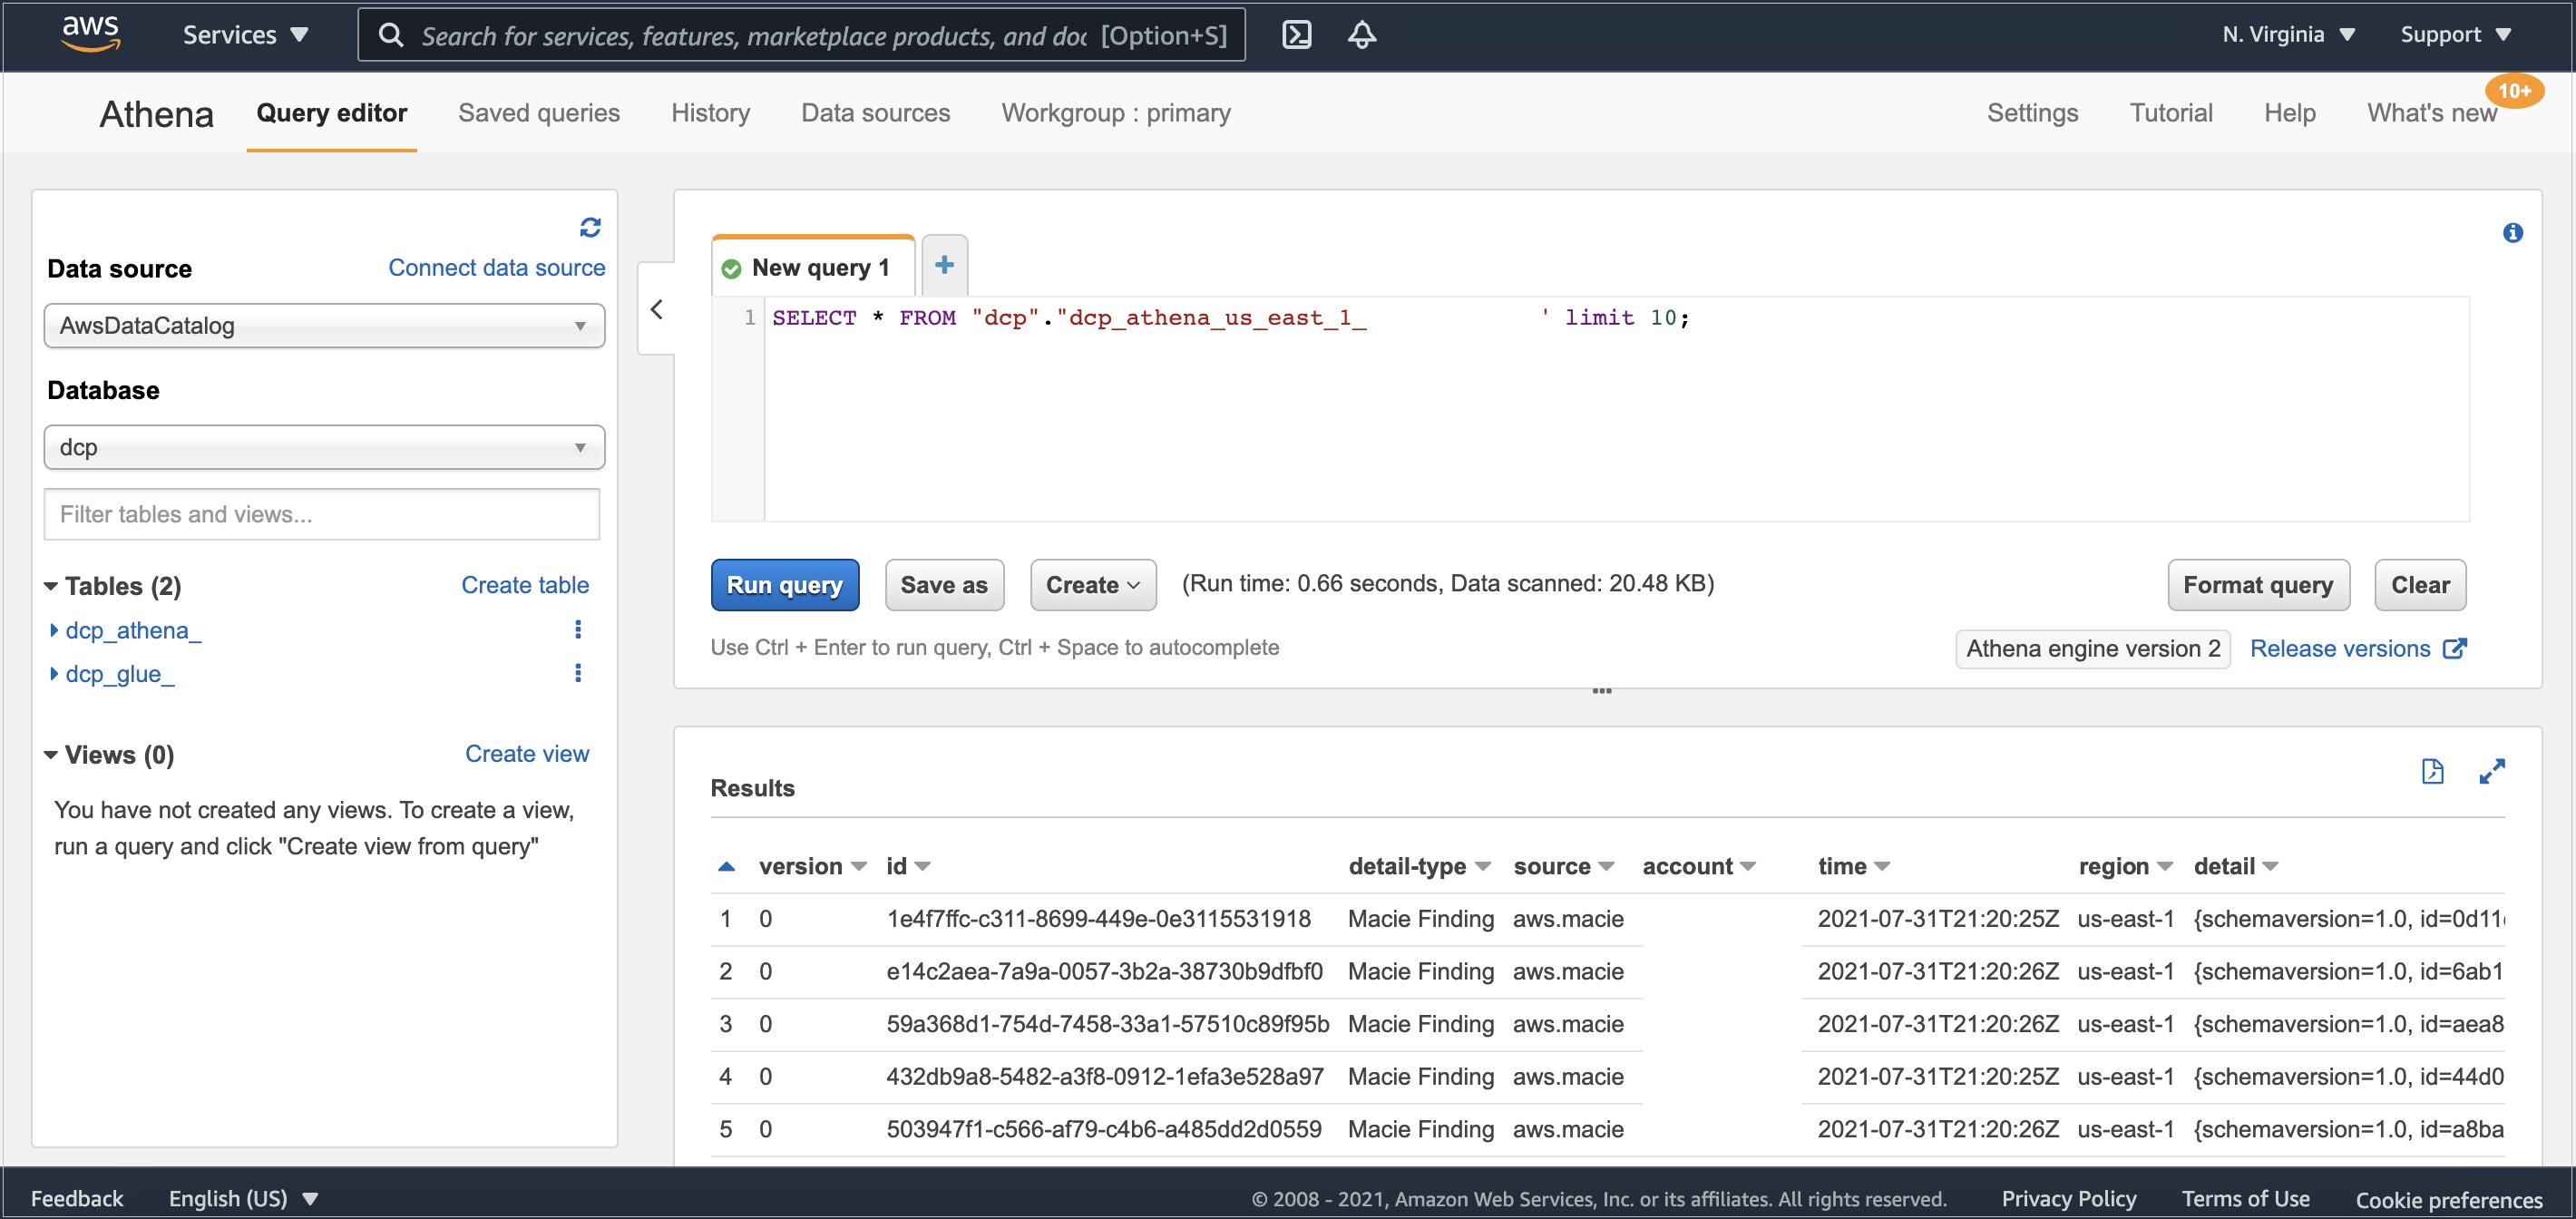
Figure 3: Athena table preview
As your environment grows, this blog post on Top 10 Performance Tuning Tips for Amazon Athena can help you apply partitioning of data and consolidate your data into larger files if needed.
Clean up
After you finish, to clean up the solution and avoid unnecessary expenses, complete the following steps:
- Go to the Amazon S3 console.
- Navigate to each of the buckets listed below and delete all its objects:
- dcp-assets
- dcp-athena
- dcp-glue
- dcp-macie
- Go to the CloudFormation console.
- Select the Stacks option in the left menu.
- Choose the stack you created in Step 1 – Deploying the CloudFormation template.
- Select Delete and then select Delete Stack in the pop-up window.
Conclusion
In this blog post, we show how you can find Personally Identifiable Information (PII), and other data defined as sensitive, in Macie’s Managed Data Identifiers in an RDS-hosted MySQL database. You can use this solution with other relational databases like PostgreSQL, SQL Server, or Oracle, whether hosted on RDS or EC2. If you’re using Amazon DynamoDB, you may also find useful the blog post Detecting sensitive data in DynamoDB with Macie.
By classifying your data, you can inform your management of appropriate data protection and handling controls for the use of that data.
If you have feedback about this post, submit comments in the Comments section below.
Want more AWS Security how-to content, news, and feature announcements? Follow us on Twitter.