Post Syndicated from Ratan Kumar original https://aws.amazon.com/blogs/security/how-to-set-up-amazon-cognito-for-federated-authentication-using-azure-ad/
In this blog post, I’ll walk you through the steps to integrate Azure AD as a federated identity provider in Amazon Cognito user pool. A user pool is a user directory in Amazon Cognito that provides sign-up and sign-in options for your app users.
Identity management and authentication flow can be challenging when you need to support requirements such as OAuth, social authentication, and login using a Security Assertion Markup Language (SAML) 2.0 based identity provider (IdP) to meet your enterprise identity management requirements. Amazon Cognito provides you a managed, scalable user directory, user sign-up and sign-in, and federation through third-party identity providers. An added benefit for developers is that it provides you a standardized set of tokens (Identity, Access and Refresh Token). So, in situations when you have to support authentication with multiple identity providers (e.g. Social authentication, SAML IdP, etc.), you don’t have to write code for handling different tokens issued by different identity providers. Instead, you can just work with a consistent set of tokens issued by Amazon Cognito user pool.
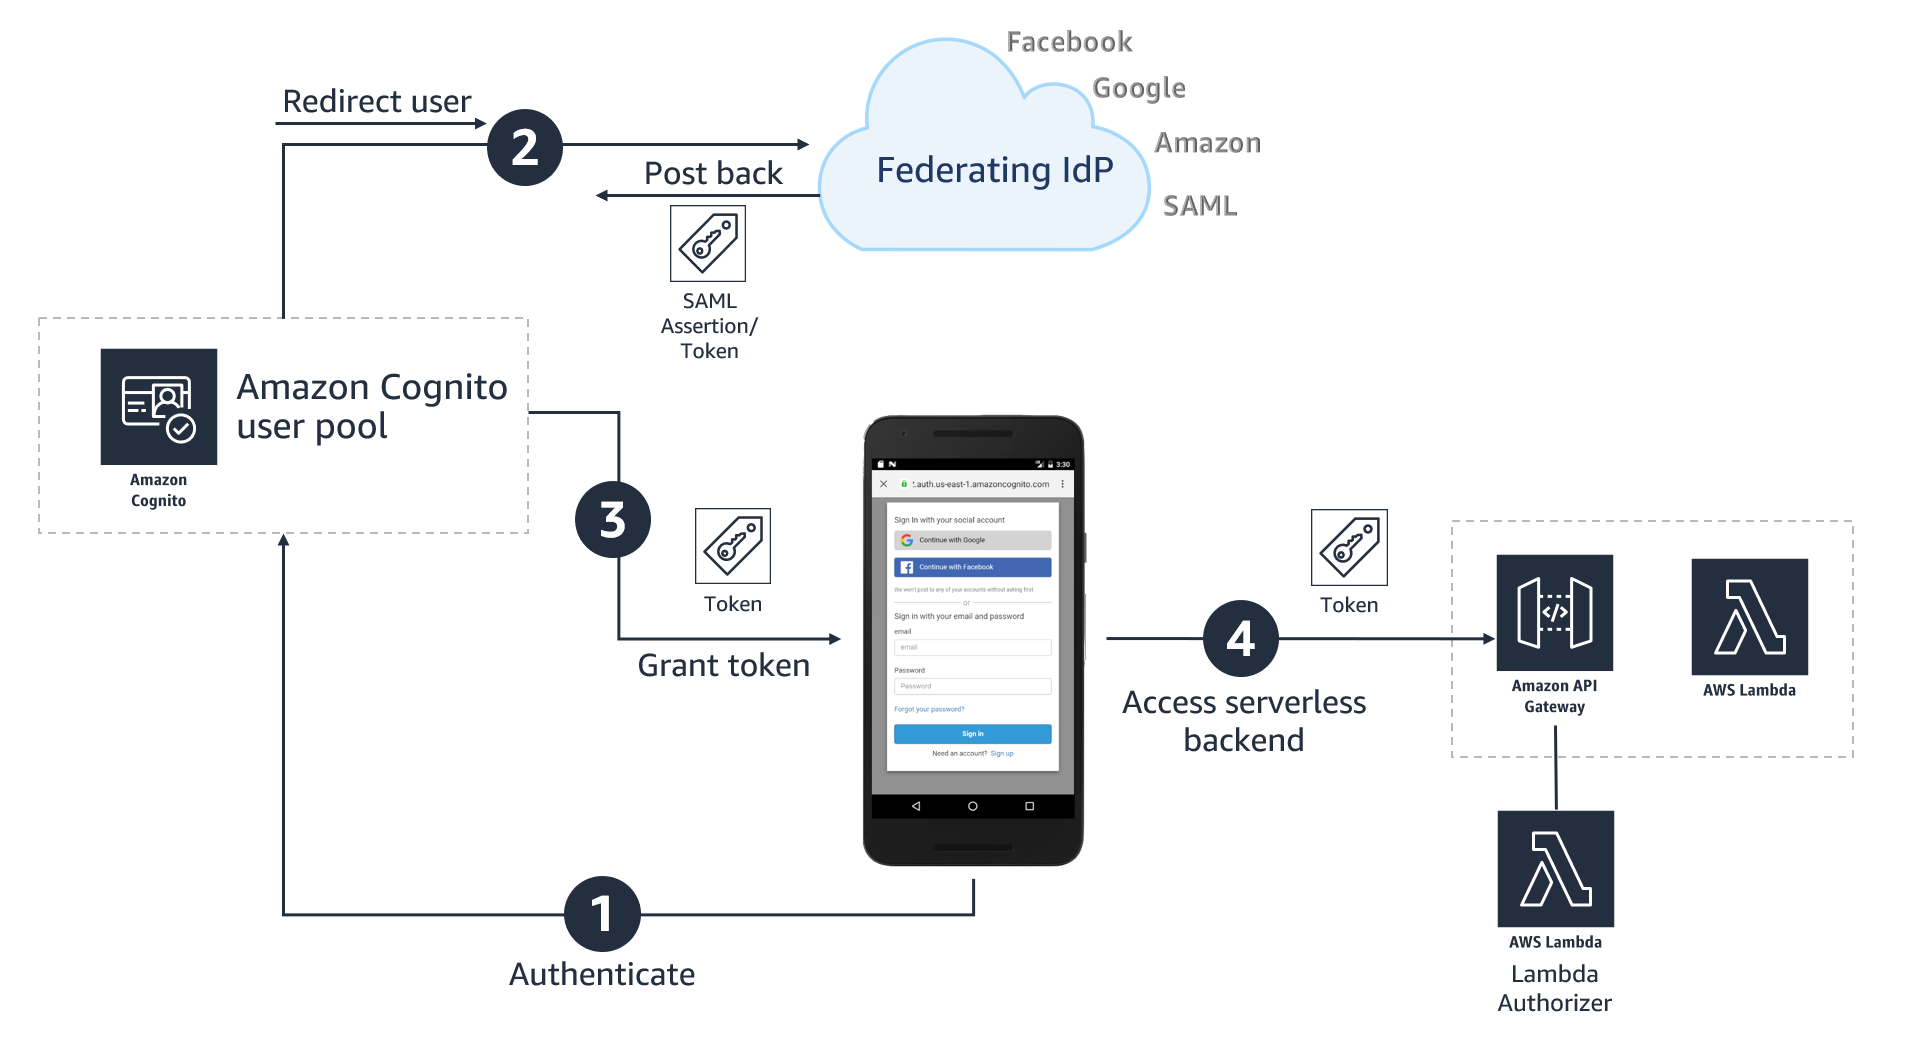
Figure 1: High-level architecture for federated authentication in a web or mobile app
As shown in Figure 1, the high-level application architecture of a serverless app with federated authentication typically involves following steps:
- User selects their preferred IdP to authenticate.
- User gets re-directed to the federated IdP for login. On successful authentication, the IdP posts back a SAML assertion or token containing user’s identity details to an Amazon Cognito user pool.
- Amazon Cognito user pool issues a set of tokens to the application
- Application can use the token issued by the Amazon Cognito user pool for authorized access to APIs protected by Amazon API Gateway.
To learn more about the authentication flow with SAML federation, see the blog post Building ADFS Federation for your Web App using Amazon Cognito User Pools.
Step-by-step instructions for enabling Azure AD as federated identity provider in an Amazon Cognito user pool
This post will walk you through the following steps:
- Create an Amazon Cognito user pool
- Add Amazon Cognito as an enterprise application in Azure AD
- Add Azure AD as SAML identity provider (IDP) in Amazon Cognito
- Create an app client and use the newly created SAML IDP for Azure AD
Prerequisites
You’ll need to have administrative access to Azure AD, an AWS account and the AWS Command Line Interface (AWS CLI) installed on your machine. Follow the instructions for installing, updating, and uninstalling the AWS CLI version 2; and then to configure your installation, follow the instructions for configuring the AWS CLI. If you don’t want to install AWS CLI, you can also run these commands from AWS CloudShell which provides a browser-based shell to securely manage, explore, and interact with your AWS resources.
Step 1: Create an Amazon Cognito user pool
The procedures in this post use the AWS CLI, but you can also follow the instructions to use the AWS Management Console to create a new user pool.
To create a user pool in the AWS CLI
- Use the following command to create a user pool with default settings. Be sure to replace <yourUserPoolName> with the name you want to use for your user pool.
You should see an output containing number of details about the newly created user pool.
- Copy the value of user pool ID, in this example, ap-southeast-2_xx0xXxXXX. You will need this value for the next steps.
Add a domain name to user pool
One of the many useful features of Amazon Cognito is hosted UI which provides a configurable web interface for user sign in. Hosted UI is accessible from a domain name that needs to be added to the user pool. There are two options for adding a domain name to a user pool. You can either use an Amazon Cognito domain, or a domain name that you own. This solution uses an Amazon Cognito domain, which will look like the following:
To add a domain name to user pool
- Use following CLI command to add an Amazon Cognito domain to the user pool. Replace <yourDomainPrefix> with a unique domain name prefix (for example example-corp-prd). Note that you cannot use keywords aws, amazon, or cognito for domain prefix.
Prepare information for Azure AD setup
Next, you prepare Identifier (Entity ID) and Reply URL, which are required to add Amazon Cognito as an enterprise application in Azure AD (done in Step 2 below). Azure AD expects these values in a very specific format. In a text editor, note down your values for Identifier (Entity ID) and Reply URL according to the following formats:
- For Identifier (Entity ID) the format is:
For example:
- For Reply URL the format is:
For example:
Note: The Reply URL is the endpoint where Azure AD will send SAML assertion to Amazon Cognito during the process of user authentication.
Update the placeholders above with your values (without < >), and then note the values of Identifier (Entity ID) and Reply URL in a text editor for future reference.
For more information, see Adding SAML Identity Providers to a User Pool in the Amazon Cognito Developer Guide.
Step 2: Add Amazon Cognito as an enterprise application in Azure AD
In this step, you add an Amazon Cognito user pool as an application in Azure AD, to establish a trust relationship between them.
To add new application in Azure AD
- Log in to the Azure Portal.
- In the Azure Services section, choose Azure Active Directory.
- In the left sidebar, choose Enterprise applications.
- Choose New application.
- On the Browse Azure AD Gallery page, choose Create your own application.
- Under What’s the name of your app?, enter a name for your application and select Integrate any other application you don’t find in the gallery (Non-gallery), as shown in Figure 2. Choose Create.

Figure 2: Add an enterprise app in Azure AD

It will take few seconds for the application to be created in Azure AD, then you should be redirected to the Overview page for the newly added application.
Note: Occasionally, this step can result in a Not Found error, even though Azure AD has successfully created a new application. If that happens, in Azure AD navigate back to Enterprise applications and search for your application by name.
To set up Single Sign-on using SAML
- On the Getting started page, in the Set up single sign on tile, choose Get started, as shown in Figure 3.

Figure 3: Application configuration page in Azure AD
- On the next screen, select SAML.
- In the middle pane under Set up Single Sign-On with SAML, in the Basic SAML Configuration section, choose the edit icon (
 ).
). - In the right pane under Basic SAML Configuration, replace the default Identifier ID (Entity ID) with the Identifier (Entity ID) you copied previously. In the Reply URL (Assertion Consumer Service URL) field, enter the Reply URL you copied previously, as shown in Figure 4. Choose Save.

Figure 4: Azure AD SAML-based Sign-on setup
- In the middle pane under Set up Single Sign-On with SAML, in the User Attributes & Claims section, choose Edit.
- Choose Add a group claim.
- On the User Attributes & Claims page, in the right pane under Group Claims, select Groups assigned to the application, leave Source attribute as Group ID, as shown in Figure 5. Choose Save.

Figure 5: Option to select group claims to release to Amazon Cognito
This adds the group claim so that Amazon Cognito can receive the group membership detail of the authenticated user as part of the SAML assertion.
- In a text editor, note down the Claim names under Additional claims, as shown in Figure 5. You’ll need these when creating attribute mapping in Amazon Cognito.
- Close the User Attributes & Claims screen by choosing the X in the top right corner. You’ll be redirected to the Set up Single Sign-on with SAML page.
- Scroll down to the SAML Signing Certificate section, and copy the App Federation Metadata Url by choosing the copy into clipboard icon (highlighted with red arrow in Figure 6). Keep this URL in a text editor, as you’ll need it in the next step.

Figure 6: Copy SAML metadata URL from Azure AD


Step 3: Add Azure AD as SAML IDP in Amazon Cognito
Next, you need an attribute in the Amazon Cognito user pool where group membership details from Azure AD can be received, and add Azure AD as an identity provider.
To add custom attribute to user pool and add Azure AD as an identity provider
- Use the following CLI command to add a custom attribute to the user pool. Replace <yourUserPoolID> and <customAttributeName> with your own values.
If the command succeeds, you’ll not see any output.
- Use the following CLI command to add Azure AD as an identity provider. Be sure to replace the following with your own values:
- Replace <yourUserPoolID> with Amazon Cognito user pool ID copied previously.
- Replace <IDProviderName> with a name for your identity provider (for example, Example-Corp-IDP).
- Replace <MetadataURLCopiedFromAzureAD> with the Metadata URL copied from Azure AD.
- Replace <customAttributeName> with custom attribute name created previously.
Successful running of this command adds Azure AD as a SAML IDP to your Amazon Cognito user pool.
Step 4: Create an app client and use the newly created SAML IDP for Azure AD
Before you can use Amazon Cognito in your web application, you need to register your app with Amazon Cognito as an app client. An app client is an entity within an Amazon Cognito user pool that has permission to call unauthenticated API operations (operations that do not require an authenticated user), for example to register, sign in, and handle forgotten passwords.
To create an app client
- Use following command to create an app client. Be sure to replace the following with your own values:
- Replace <yourUserPoolID> with the Amazon Cognito user pool ID created previously.
- Replace <yourAppClientName> with a name for your app client.
- Replace <callbackURL> with the URL of your web application that will receive the authorization code. It must be an HTTPS endpoint, except for in a local development environment where you can use http://localhost:PORT_NUMBER.
- Use parameter –allowed-o-auth-flows for allowed OAuth flows that you want to enable. In this example, we use code for Authorization code grant.
- Use parameter –allowed-o-auth-scopes to specify which OAuth scopes (such as phone, email, openid) Amazon Cognito will include in the tokens. In this example, we use openid.
- Replace <IDProviderName> with the same name you used for ID provider previously.
Successful running of this command will provide an output in following format. In a text editor, note down the ClientId for referencing in the web application. In this following example, the ClientId is 7xyxyxyxyxyxyxyxyxyxy.
Test the setup
Next, do a quick test to check if everything is configured properly.
- Open the Amazon Cognito console.
- Choose Manage User Pools, then choose the user pool you created in Step 1: Create an Amazon Cognito user pool.
- In the left sidebar, choose App client settings, then look for the app client you created in Step 4: Create an app client and use the newly created SAML IDP for Azure AD. Scroll to the Hosted UI section and choose Launch Hosted UI, as shown in Figure 7.

Figure 7: App client settings showing link to access Hosted UI
- On the sign-in page as shown in Figure 8, you should see all the IdPs that you enabled on the app client. Choose the Azure-AD button, which redirects you to the sign-in page hosted on https://login.microsoftonline.com/.

Figure 8: Amazon Cognito hosted UI
- Sign in using your corporate ID. If everything is working properly, you should be redirected back to the callback URL after successful authentication.


(Optional) Add authentication to a single page application
One way to add secure authentication using Amazon Cognito into a single page application (SPA) is to use the Auth.federatedSignIn() method of Auth class from AWS Amplify. AWS Amplify provides SDKs to integrate your web or mobile app with a growing list of AWS services, including integration with Amazon Cognito user pool. The federatedSign() method will render the hosted UI that gives users the option to sign in with the identity providers that you enabled on the app client (in Step 4), as shown in Figure 8. One advantage of hosted UI is that you don’t have to write any code for rendering it. Additionally, it will transparently implement the Authorization code grant with PKCE and securely provide your client-side application with the tokens (ID, Access and Refresh) that are required to access the backend APIs.
For a sample web application and instructions to connect it with Amazon Cognito authentication, see the aws-amplify-oidc-federation GitHub repository.
Conclusion
In this blog post, you learned how to integrate an Amazon Cognito user pool with Azure AD as an external SAML identity provider, to allow your users to use their corporate ID to sign in to web or mobile applications.
For more information about this solution, see our video Integrating Amazon Cognito with Azure Active Directory (from timestamp 25:26) on the official AWS twitch channel. In the video, you’ll find an end-to-end demo of how to integrate Amazon Cognito with Azure AD, and then how to use AWS Amplify SDK to add authentication to a simple React app (using the example of a pet store). The video also includes how you can access group membership details from Azure AD for authorization and fine-grained access control.
If you have feedback about this post, submit comments in the Comments section below. If you have questions about this post, start a new thread on the Amazon Cognito forum or contact AWS Support.
Want more AWS Security how-to content, news, and feature announcements? Follow us on Twitter.