Many organizations implement intelligent document processing pipelines in order to extract meaningful insights from an increasing volume of unstructured content (such as insurance claims, loan applications and more). Traditionally, these pipelines require significant engineering efforts, as the implementation often involves using several machine learning (ML) models and orchestrating complex workflows.
As organizations integrate these pipelines to customer facing applications (such as web applications for customers to upload documents such as insurance claims, loan approval documents and more), they set goals to provide insights in real time to increase the end customer experience. These organizations also aim to run and scale these workloads with minimal operational overhead and optimizing on costs. In addition, these organizations require the implementation of common security practices such as identity and access management, to make sure that only authorized and authenticated users are allowed to perform specific actions or access specific resources.
In this post, we show you a solution to simplify the creation of an intelligent document processing pipeline, with a web application for customers to upload their files (documents and images) and derive insights from it (summarization, fields extraction and classification). The solution primarily use serverless technologies, it includes a web socket to receive insights in real time and offers several benefits, such as automatic scaling, built-in high availability, and a pay-per-use billing model to optimize on costs. The solution also includes an authentication layer and an authorization layer to manage identities and permissions.
Solution overview
In this post, we provide an operational overview of the solution, and then describe how to set it up with the following services:
Amazon Cognito to implement an identity platform (user directory and authorization management) for the web application.
Amazon Simple Storage Service (Amazon S3) to store uploaded files (to be processed by the processing pipeline) and web application-related assets.
The solution architecture is illustrated in the following diagram:
Step 1: The user authenticates to the web application (hosted in AWS Amplify). Step 2: Amazon Cognito validates the authentication details. After this, the user is now logged in the web application. Steps 3aand 3b:
Step 3a: The web application (AWS Amplify) subscribes to an AWS AppSync Events web socket.
Step 3b: The AWS AppSync Events web socket calls an AWS Lambda authorizer to confirm that the user is authorized to subscribe to the web socket.
Step 4: The user uploads a file (document or image) using the web application. Step 5: The web application (hosted in AWS Amplify) calls Amazon Cognito (identity pool) to confirm that the user is authorized to upload a file. Step 6: The file is uploaded in an Amazon S3 bucket. Steps 7a and 7b: Upon reception of an Amazon S3 upload event (which notifies that the file was uploaded in the Amazon S3 bucket) in the default Amazon Event Bridge bus, an Amazon Event Bridge bus rule triggers the execution of an AWS Step Functions state machine to start the orchestration workflow. Step 8 (Step to extract fields from a file and classify it):
Step 8a: The first AWS Lambda function starts a new Amazon Bedrock Automation job (this job extracts specific fields from the uploaded file and classify it)
Step 8b: Once the job is completed, the results are stored in an Amazon S3 bucket.
Step 8c and 8d: Upon reception of an Amazon S3 event (which notifies that the results were stored in the Amazon S3 bucket) in the default Amazon Event Bridge, an Amazon Event Bridge bus rule triggers the execution of an AWS Lambda function
Step 8e: An AWS Lambda function publishes the results to the web socket.
Steps 9a and 9b: The second AWS Lambda function submits a prompt to an Amazon Bedrock foundation model (Sonnet 3), to request a summarization in streaming of the uploaded file. The AWS Lambda function publishes the streaming data to the web socket.
After Step 8e and Step 9b, the user can now consult the summarization result and extraction insights of the uploaded file in the web application.
Pre-requisites
To follow along and set up this solution, you must have the following:
An AWS account
A device with access to your AWS account with the following:
Enable Model Access to the Claude 3 Sonnet model in Amazon Bedrock
Note: Deploying this solution will incur costs. Review the pricing page of each AWS service used in this post for details on costs. The cost of running this solution will primarily depend on:
The number of documents (and the size of each document)
A project contains a list of blueprints, and each blueprint defines the fields to extract from different types of files (such as documents or images). In this post, we define a blueprint for a driving license.
Complete the following steps to create an Amazon Bedrock Data Automation project and a driving license blueprint:
Go to the sample-create-idp-with-appsyncevents-and-amazonbedrock folder
cd sample-create-idp-with-appsyncevents-and-amazonbedrock
Initialize the environment (make the shell script files, from the GitHub repository, ready to be used)
chmod +x ./init-env.sh && source ./init-env.sh
Run the script setup-bda-project.sh to create an Amazon Bedrock Data Automation project and a sample driving license blueprint:
./setup-bda-project.sh
Create the web socket and orchestration backend
In this section, we create the following resources:
A user directory for web authentication and authorization, created with an Amazon Cognito user pool. An Amazon Cognito identity pool is also created to validate that users are authorized to upload files via the web application.
A web socket using AWS AppSync Events. This allows our web application to receive real time updates for summarization and extraction results. An authorization layer is also created to protect the web socket from unauthorized users. This is implemented with a Lambda authorizer function to validate that incoming requests include valid authorization details.
A state machine using AWS Step Functions and AWS Lambda to orchestrate the summarization and extraction operations from the unstructured content
Amazon S3 buckets to store files for document processing, and code files for AWS Lambda functions
Complete the following steps to create the web socket and the orchestration backend of the solution, using AWS CloudFormation templates:
Create Amazon S3 buckets used by the solution by running the following script. These buckets will store the files uploaded by users and code files of the AWS Lambda functions used in this solution.
cd $CURRENT_DIR/s3; ./create-s3-buckets.sh
Create the Amazon Cognito user pool and identity pool by running the create-cognito-userpool.sh script:
cd $CURRENT_DIR/cognito; ./create-cognito-userpool.sh
Create the AWS AppSync Events web socket by running the following script:
cd $CURRENT_DIR/appsync/; ./create-appsync-api.sh
Create the AWS Step Functions state machine (including AWS Lambda functions) by running the following scripts:
cd $CURRENT_DIR/orchestration/; ./create-orchestration.sh
Configure the Amazon Cognito user pool
In this section, we create a user in our Amazon Cognito user pool. This user will log in to our web application.
Run the script create-cognito-testuser.sh to create the user (make sure to provide your email address):
cd $CURRENT_DIR/cognito; ./create-cognito-testuser.sh #your-email-address#
After you create the user, you should receive an email with a temporary password in this format: “Your username is #your-email-address# and temporary password is #temporary-password#.”
Keep note of these login details (email address and temporary password) to use later when testing the web application.
Create the web application
In this section, we build a web application using AWS Amplify and publish it to make it accessible through an endpoint URL.
Complete the following steps to create the web application:
Run the script create-webapp.sh to create the web application with AWS Amplify:
cd $CURRENT_DIR/amplify/; ./create-webapp.sh
Run the script deploy.sh to deploy the web application
cd $CURRENT_DIR/amplify/amplify-idp; ./deploy.sh
The web application is now available for testing and a URL should be displayed, as shown in the following screenshot. Take note of the URL to use in the following section.
Test the web application
In this section, we test the web application and upload a file to be processed:
Open the URL of the AWS Amplify application in your web browser.
Enter your login information (your email and the temporary password you received earlier while configuring the user pool in Amazon Cognito) and choose Sign in.
When prompted, enter a new password and choose Change Password.
You should now be able to see a web interface.
Download the sample driving license at this location and upload it via the web application using either your camera or a file in your local device, as illustrated
Once the file is uploaded, you should start receiving responses in the web application. When all the operations are completed, you should see a result equivalent to what is shown in the following screenshot:
To make sure that no additional cost is incurred, remove the resources provisioned in your account. Make sure you’re in the correct AWS account before deleting the following resources.
Important note: You should exercise caution when performing the preceding steps. Make sure you are deleting the resources in the correct AWS account.
You can either navigate to the AWS CloudFormation console to delete the CloudFormation stacks associated to the resources provisioned or use the cleanup helper script cleanup.sh available at the root of the sample-create-idp-with-appsyncevents-and-amazonbedrock folder:
./cleanup.sh #region#
Conclusion
In this post, we walked through a solution to create a document processing pipeline, with a web application using serverless services. Via the web application, we were able to upload a file and receive responses in real time for different types of operations (summarization, extraction of specific fields and classification). First, we created an Amazon Bedrock Data Automation project (with a driving license blueprint). Then we created a web socket along with an orchestration solution using a state machine (AWS Step Functions and AWS Lambda functions). We also configured a user pool to grant a user access to the web application. Finally, we created the frontend of the web application in AWS Amplify.
Amazon Cognito is a managed customer identity and access management (CIAM) service that enables seamless user sign-up and sign-in for web and mobile applications. Through user pools, Amazon Cognito provides a user directory with strong authentication features, including passkeys, federation to external identity providers (IdPs), and OAuth 2.0 flows for secure machine-to-machine (M2M) authorization.
This post demonstrates how Amazon Cognito enables AI agents to perform authorized actions on behalf of users through user-contextualized access tokens for OAuth 2.0-enabled resource servers. AI agents represent a class of autonomous services that require robust identity management and precise access control, especially when acting on behalf of users. By using the Amazon Cognito client credentials flow with access token customization, you can establish distinct identities for AI agents that carry critical information about their capabilities, scope of access, and intended use cases. This approach provides a foundation for more secure, auditable AI agent operations while maintaining clear boundaries around their authorized activities.
The identity of an AI agent can be represented within Amazon Cognito as an app client. The AI agent obtains an access token (JSON Web Token (JWT)) through an OAuth 2.0 client credentials grant. This JWT can be customized to contain claims that represent the authenticated human user whom the AI agent is acting on behalf of. This token can then be used to authorize access to other services that has established trust with the Amazon Cognito user pool by trusting the issuer and audience of the token. For example, this third-party service could be a claims processor, a travel agency service, or a scheduling service acting on behalf of a user. The focus of this post is on foundational building blocks using Amazon Cognito for AI agents and how to obtain a customized access token with user context.
Solution overview and reference architecture
Looking at an example architecture (Figure 1), a user signs in to a web or mobile application using an Amazon Cognito user pool, and tokens for the user are returned to the client. Here, the application could be a serverless digital assistant using an Amazon Bedrock agent that needs to gather and process data residing in a third-party cross-domain service. The AI agent obtains its own access token by performing an OAuth 2.0 client credentials grant while passing the user’s access token as context using the aws_client_metadata request parameter. The AI agent receives the user contextualized access token and calls an external, third-party, or cross-domain service that trusts the issuer and audience of the AI agent’s access token issued from an Amazon Cognito user pool. The cross-domain service can obtain the JSON Web Key Set (JWKS) to verify the token and extract claims presenting both the AI agent and most importantly, the underlying user. Authorization takes place within the cross-domain service using the claims of the customized access token and for fine-grain authorization, Amazon Verified Permissions is used. See Figure 1 for a detailed flow of this example.
Figure 1: AI agent identity reference architecture
The user navigates to the application through the client.
There is no existing session or token for the user, so the user authentication flow with the Amazon Cognito user pool begins.
After a successful sign-in, Amazon Cognito returns access, ID, and refresh tokens to the client for the user.
As the user interacts with AI agent through the application, the client sends the user’s access token to an Amazon API Gateway endpoint.
The AI agent obtains its own access token from an Amazon Cognito user pool using an OAuth 2.0 client credentials grant. The user’s access token, obtained in step 1, is sent with the token request in the aws_client_metadata request parameter.
Note: You can use different Amazon Cognito user pools for user authentication and for agent (machine) authentication. This promotes separation and provides the ability to apply different settings and controls on each user pool if needed to meet security requirements.
Amazon Cognito validates the client ID and secret from the AI agent and invokes the pre token generation Lambda trigger to customize the access token for the AI agent.
Note: Within the pre token generation Lambda trigger, the user’s access token is verified before returning a customized access token to the AI agent using the aws-jwt-verify library.
The customized access token is returned to the AI agent, including custom claims representing the user.
The AI agent, using its own access token, calls the cross-domain service to perform the requested action on behalf of the user. For example, this can be a third-party reservation system or a photo sharing service.
The resource server in the cross-domain service verifies that the access token from the AI agent is valid. The resource server must be pre-configured to trust the user pool that issued the agent access token.
Coarse- and fine-grained authorization can happen either locally in the service code or using Verified Permissions.
A response from the cross-domain service flows back to the AI agent, if necessary.
A response from the AI agent to the user application or client is returned, if necessary.
Actions that take place throughout the flow are logged in AWS CloudTrail, providing end-to-end logging and auditing.
Implementation details
Let’s take a deeper look into the three core components of this scenario:
The AI agent obtaining its own OAuth 2.0 access token
The Amazon Cognito pre token generation Lambda trigger used to enrich the AI agent’s access token with user context
The cross-domain resource server performing fine-grained authorization
AI agent
Figure 2: AI agent obtaining a user access token from the frontend application through API Gateway
Amazon Bedrock Agents is used in this solution with a custom orchestration configured to use Lambda. When the application interacts with the Amazon Bedrock agent, the custom orchestrator initiation begins with the agent passing the user’s access token to a Lambda function as part of the custom orchestration (shown in Figure 2). The Lambda function validates the user’s token to verify that it’s not expired and hasn’t been tampered with. This custom orchestrator begins the process for the agent to obtain its own OAuth access token and to access downstream and cross-domain resources on behalf of the user. The human user’s access token is included in the call from the application through the client. To learn more about Amazon Bedrock Agents custom orchestrator, see Getting started with Amazon Bedrock Agents custom orchestrator. The following is an example of what a human user’s decoded access token provided through an API Gateway REST API might look like.
The following is a Node.js code sample that an AI agent can use to obtain its own access token from Amazon Cognito. This can be the Lambda function part of the custom orchestration for the Amazon Bedrock agent. Notice the clientMetadata variable being set, which will be passed to the Cognito /token endpoint using the aws_client_metadata request parameter. This request parameter is where the user’s access token is provided. In the following code example, you will find an attribute called callerApp, which is set to ExampleChatApplication, which serves as a unique identifier for the application. The callerApp value is preconfigured in the backend of the solution. This unique application identifier is included in the customized access token for the agent and used for additional authorization checks later. It’s a security best practice to use AWS Secrets Manager to store the client ID and client secret and obtain these credentials at runtime. As a security best practice, the user’s access token should be verified prior to passing it to the AI agent backend.
The access token for the AI agent is returned only if the client ID and secret are correct and the provided user access token is valid. However, before it’s returned, the AI agent’s access token is customized by the Amazon Cognito pre token generation Lambda trigger.
Amazon Cognito pre token generation Lambda trigger
Figure 3: AI agent access token customization with Cognito pre token generation Lambda trigger
After the AI agent’s action calls the Amazon Cognito /token endpoint with a valid client ID and secret, Cognito invokes the pre token generation Lambda trigger. The following is an example Lambda function that takes the aws_client_metadata request parameter, which contains the access token of the user and the callerApp attribute that was defined while the user was authenticating. In the following Lambda function, the access token provided from the user is verified (shown in Figure 3). The aws-jwt-verify library is used to verify the token is not expired, the token has not been tampered with by verifying the signature, and it’s making sure that an access token was provided. The Lambda function is also pre-configured to accept user tokens from a specific issuer and audience, this protects against malicious context injection risks. This is also an opportunity to perform additional authorization. For example, check if the user is a member of certain groups.
After the token is verified, the Lambda function customizes the access token to be returned to the AI agent.
import { CognitoJwtVerifier } from "aws-jwt-verify";

// Initialize the JWT verifier to verify the user’s access token
// Provide the user pool ID, token use, and client ID
const jwtVerifier = CognitoJwtVerifier.create({
  userPoolId: process.env.USER_POOL_ID,  // user pool for user authentication
  clientId: process.env.CLIENT_ID,
  // groups: "exampleChatApplicationAccess", // optional group membership authorization
  tokenUse: 'access'
});

export const handler = async function(event, context) {
  try {
    const onBehalfOfToken = event.request.clientMetadata?.onBehalfOfToken || '';
    // It’s recommended that the provided “callerApp” value from the application is authorized for use with the app client for the AI agent
    const callerApp = event.request.clientMetadata?.callerApp || '';

    // The below console log will display the authenticated user’s JWT
    // Keep this logging with caution in a production environment
    console.log('Original event:', event);

    // Verify the access token from the human user
    // You could optionally also perform some authorization checks here as well
    // Example: check for the membership of a group
    let decodedJWT;
    if (onBehalfOfToken) {
      try {
        decodedJWT = await jwtVerifier.verify(onBehalfOfToken);
        console.log('Decoded JWT:', decodedJWT);
      } catch (err) {
        console.error('Token verification failed:', err);
        throw new Error('Token verification failed');
      }
    }

    // Create the onBehalfOf claim structure
    const behalfOfClaim = decodedJWT ? {
      sub: decodedJWT.sub,
      username: decodedJWT.username,
      groups: decodedJWT['cognito:groups'] || []
    } : {};

    // Customized token returned to client
    event.response = {
      "claimsAndScopeOverrideDetails": {
        "accessTokenGeneration": {
          "claimsToAddOrOverride": {
            "onBehalfOf": behalfOfClaim,
            "callerApp": callerApp
          },
        }
      }
    };

    return event;

  } catch (error) {
    console.error('Error in Lambda execution:', error);
    throw error;
  }
};
Notice in the preceding Lambda function that two custom claims are being dynamically created within the event.response: onBehalfOf and callerApp. The onBehalfOf claim contains nested claims that were extracted from the human user’s access token. The callerApp is carried forward from the frontend application and provided alongside the user access token. It’s recommended for the callerApp value to also be verified against some custom logic to add additional layer of protection. The return AI agent’s access token would look like the following JWT.
At this point, shown in Figure 4, the human user has successfully authenticated to the web application, the human user’s access token was sent as context to the backend, an AI agent obtained its own customized access token containing the human user context, and now the agent is ready to call an external cross-domain service.
Figure 4: Cross-domain resource server performing fine-grained authorization with Amazon Verified Permissions
As shown in Figure 4, the cross-domain service is the resource server and therefore needs to perform an authorization check. For this example, we’ll keep things straightforward and make sure that three core things are verified:
The AI agent’s OAuth access token is valid
The AI agent is authorized to access this service
The AI agent is authorized to interact with the user data
Depending on your use case and requirements, you might also need to verify that the user’s consent has been obtained prior to the AI agent acting on their behalf. Ultimately, you want to verify that the AI agent can access a user’s data on their behalf and only for the purpose for which consent has been provided by the user.
For the token verification, use the aws-jwt-verify library again. The following is a Node.js example to verify the AI agent’s access token.
import { CognitoJwtVerifier } from "aws-jwt-verify";

// add custom logic to verify that AI agent is authorized to perform this action on behalf of the user

// Verifier that expects valid access tokens:
const verifier = CognitoJwtVerifier.create({
  userPoolId: "<user_pool_id>", // user pool for AI agent authentication
  tokenUse: "access",
  clientId: "<client_id>",
});

try {
  const payload = await verifier.verify(
    "eyJraWQeyJhdF9oYXNoIjoidk..." //this will be the AI agent's access token
  );
  console.log("Token is valid. Payload:", payload);
} catch {
  console.log("Token not valid!");
}
Fine-grained authorization with Verified Permissions
As a security best practice, the zero trust principle of enforcing fine-grained identity-based authorization should take place using Verified Permissions. The preceding Node.js code sample is a basic validation of the AI agents access token that can happen within the application logic. Instead of keeping authorization logic within the resource server, you can use Verified Permissions to offload the authorization policies to a managed service. The following is an example Cedar policy for this use case.
With the preceding Cedar policy example, you are permitting the AI agent to read userData from the crossDomainService123 resource. This is only permitted when the AI agent’s access token contains the crossDomainService/read scope and when the resource owner and the onBehalfOf user (from the access token) are the same—the human user in this case. There’s also an additional when clause in the policy to make sure that this interaction initiated from ExampleChatApplication.
Based on the preceding examples of the AI agent’s access token (with user context), the Cedar policy, and the IsAuthorizedWithToken API call, the resource server would get an Allow decision for this action to take place. The following is an example of the authorization decision response.
Before this policy can be evaluated, you must define a schema that includes the relevant entity types (Agent, User, Resource, Scope, and so on), and create corresponding entities in your policy store that match the IDs used in the policy and request.
Bringing it all together, the requested data from the AI agent, on behalf of the user, is returned from the cross-domain service to the AI agent. This additional data can now be used within the context of the AI agent workload. The entire solution can be used for a chat application, such as the one described in Protect sensitive data in RAG applications with Amazon Bedrock.
Conclusion
Amazon Cognito M2M access token customization and support for passing client metadata provides you the extensibility to solve complex use cases and enables emerging ones like AI agent identity and access management. For example, passing contextual client metadata and customizing access tokens at runtime can help software as a service (SaaS) and multi-tenant service providers scale to an unlimited number of resource servers, because these can be dynamically determined at runtime. As organizations increasingly explore the use of AI agents, having a secure, scalable identity management solution becomes crucial for maintaining control and accountability. By using these new features, you can build more secure and scalable solutions with Amazon Cognito to prepare for the future of autonomous AI agent use cases.
Use the comments section to leave feedback about this post. If you have questions about this post, start a new thread on Amazon Cognito re:Post or contact AWS Support.
Summit season is in full throttle! If you haven’t been to an AWS Summit, I highly recommend you check one out that’s nearby. They are large-scale all-day events where you can attend talks, watch interesting demos and activities, connect with AWS and industry people, and more. Best of all, they are free—so all you need to do is register! You can find a list of them here in the AWS Events page. Incidentally, you can also discover other AWS events going in your area on that same page; just use the filters on the side to find something that interests you.
Speaking of AWS Summits, this week is the AWS Summit London (April 30). It’s local for me, and I have been heavily involved in the planning. You do not want to miss this! Make sure to check it out and hopefully I’ll be seeing you there.
Ready to find out some highlights from last week’s exciting AWS launches? Let’s go!
New features and capabilities highlights Let’s start by looking at some of the enhancements launched last week.
Amazon Q Developer releases state of the art agent for feature development — AWS has announced an update to Amazon Q Developer’s software development agent, which achieves state-of-the-art performance on industry benchmarks and can generate multiple candidate solutions for coding problems. This new agent provides more reliable suggestions helping to reduce debugging time and enabling developers to focus on higher-level design and innovation.
Amazon Cognito now supports refresh token rotation — Amazon Cognito now supports OAuth 2.0 refresh token rotation, allowing user pool clients to automatically replace existing refresh tokens with new ones at regular intervals, enhancing security without requiring users to re-authenticate. This feature helps customers achieve both seamless user experience and improved security by automatically updating refresh tokens frequently, rather than having to choose between long-lived tokens for convenience, or short-lived tokens for security.
Amazon Bedrock Intelligent Prompt Routing is now generally available — Amazon Bedrock’s Intelligent Prompt Routing, now generally available, automatically routes prompts to different foundation models within a model family to optimize response quality and cost. The service now offers increased configurability across multiple model families including Claude (Anthropic), Llama (Meta), and Nova (Amazon), allowing users to choose any two models from a family and set custom routing criteria.
Upgrades to Amazon Q Business integrations for M365 Word and Outlook — Amazon Q Business integrations for Microsoft Word and Outlook now have the ability to search company knowledge bases, support image attachments, and handle larger context windows for more detailed prompts. These enhancements enable users to seamlessly access indexed company data and incorporate richer content while working on documents and emails, without needing to switch between different applications or contexts.
Security There were a few new security improvements released last week, but these are the ones that caught my eye:
AWS Account Management now supports account name update via authorized IAM principals — AWS now allows IAM principals to update account names, removing the previous requirement for root user access. This applies to both standalone accounts and member accounts within AWS Organizations, where authorized IAM principals in management and delegated admin accounts can manage account names centrally.
AWS Resource Explorer now supports AWS PrivateLink — AWS Resource Explorer now supports AWS PrivateLink across all commercial Regions, enabling secure resource discovery and search capabilities across AWS Regions and accounts within your VPC, without requiring public internet access.
Amazon SageMaker Lakehouse now supports attribute based access control — Amazon SageMaker Lakehouse now supports attribute-based access control (ABAC), allowing administrators to manage data access permissions using dynamic attributes associated with IAM identities rather than creating individual policies. This simplifies access management by enabling permissions to be automatically granted to any IAM principal with matching tags, making it more efficient to handle access control as teams grow.
Networking As you may be aware, there is a growing industry push to adopt IPv6 as the default protocol for new systems while migrating existing infrastructure where possible. This week, two more services have added their support to help customers towards that goal:
Capacity and costs Customers using Amazon Kinesis Data Streams can enjoy higher default quotas, while Amazon Redshift Serverless customers get a new cost saving opportunity.
Serverless Reservations for Amazon Redshift Serverless — You can now reduce Amazon Redshift Serverless costs by up to 24% by committing to a specific RPU capacity for one year, choosing either to pay nothing upfront for a 20% discount or pay all upfront for maximum savings.
For a full list of AWS announcements, be sure to visit the What’s New with AWS? page.
Recommended Learning Resources Everyone’s talking about MCP recently! Here are two great blog posts that I think will help you catch up and learn more about the possibilities of how to use MCP on AWS.
Our Weekly Roundup is published every Monday to help you keep up with AWS launches, so don’t forget to check it again next week for more exciting news!
(This survey is hosted by an external company. AWS handles your information as described in the AWS Privacy Notice. AWS will own the data gathered via this survey and will not share the information collected with survey respondents.)
As the weather improves in the Northern hemisphere, there are more opportunities to learn and connect. This week, I’ll be in San Francisco, and we can meet at the Nova Networking Night at the AWS GenAI Loft where we’ll dive into the world of Amazon Novafoundation models (FMs) with live demos and real-world implementations.
AWS Pi Dayis now a yearly tradition. It started in 2021 as a celebration of the 15th anniversary of Amazon S3. This year, there will be in-depth discussions with AWS product teams on how to build a data foundation for a unified seamless experience, managing and using data for analytics and AI workloads. Join us online to learn about the latest innovations through hands-on demos, and ask questions during our interactive livestream.
Last week’s launches Another busy week, here are the launches that got my attention.
Amazon Q Business – Now supports the ingestion of audio and video data. This capability streamlines information retrieval, enhances knowledge sharing, and improves decision-making processes, by making multimedia content as searchable and accessible as text-based documents.
AWS Step Functions– Workflow Studio for VS Code is now available, a visual builder you can use to compose workflows on a canvas. You can generate workflow definitions in the background to create workflows in your local development environment. Read more about this enhanced local IDE experience.
Amazon Cognito – You can now customize access tokens for machine-to-machine (M2M) flows, enabling you to implement fine-grained authorization in your applications, APIs, and workloads. M2M authorization is commonly used for automated processes such as scheduled data synchronization tasks, event-driven workflows, microservices communication, or real-time data streaming between systems.
Amazon GameLift – Introducing Amazon GameLift Streams, a new managed capability that developers can use to stream games at up to 1080p resolution and 60 frames per second to any device with a WebRTC-enabled browser. To learn more, explore Donnie’s blog post.
Other AWS news Here are some additional projects, blog posts, and news items that you might find interesting:
Accelerate AWS Well-Architected reviews with Generative AI – In this post, we explore a generative AI solution to streamline the Well-Architected Framework Reviews (WAFRs) process. We demonstrate how to build an intelligent, scalable system that analyzes architecture documents and generates insightful recommendations based on best practices.
Build a Multi-Agent System with LangGraph and Mistral on AWS – The Multi-Agent City Information System demonstrated in this post exemplifies the potential of agent-based architectures to create sophisticated, adaptable, and highly capable AI applications.
Evaluate RAG responses with Amazon Bedrock, LlamaIndex and RAGAS – How to enhance your Retrieval Augmented Generation (RAG) implementations with practical techniques to evaluate and optimize your AI systems and enable more accurate, context-aware responses that align with your specific needs.
From community.aws Here are some of my favorite posts from community.aws. Create your AWS Builder ID to start sharing your tips and connect with fellow builders. Your Builder ID is a universal login credential that gives you access, beyond the AWS Management Console, to AWS tools and resources, including over 600 free training courses, community features, and developer tools such as Amazon Q Developer.
AWS Innovate: Generative AI + Data – Join a free online conference focusing on generative AI and data innovations. Available in multiple geographic regions: North America (March 13), Greater China Region (March 14), and Latin America (April 8).
AWS Summits – The AWS Summit season is coming along! Join free online and in-person events that bring the cloud computing community together to connect, collaborate, and learn about AWS. Register in your nearest city: Paris (April 9), Amsterdam (April 16), London (April 30), and Poland (May 5).
AWS re:Inforce (June 16–18) – Our annual learning event devoted to all things AWS Cloud security. This year is in Philadelphia, PA. Registration opens in March, so be ready to join more than 5,000 security builders and leaders.
AWS DevDays are free, technical events where developers can learn about some of the hottest topics in cloud computing. DevDays offer hands-on workshops, technical sessions, live demos, and networking with AWS technical experts and your peers. Register to access AWS DevDays sessions on demand.
That’s all for this week. Check back next Monday for another Weekly Roundup!
(This survey is hosted by an external company. AWS handles your information as described in the AWS Privacy Notice. AWS will own the data gathered via this survey and will not share the information collected with survey respondents.)
Amazon Cognito is a developer-centric and security-focused customer identity and access management (CIAM) service that simplifies the process of adding user sign-up, sign-in, and access control to your mobile and web applications. Cognito is a highly available service that supports a range of use cases, from managing user authentication and authorization to enabling secure access to your APIs and workloads. It’s a managed service that can act as an identity provider (IdP) for your applications, can scale to millions of users, provides advanced security features, and can support identity federation with third-party IdPs.
A feature of Amazon Cognito is support for OAuth 2.0 client credentials grants, used for machine-to-machine (M2M) authorization. As your M2M use cases scale, it becomes important to have proper monitoring, optimization of token issuance, and awareness of security best practices and considerations. It’s a best practice for app clients to locally cache and reuse access tokens while still valid and not expired. You can customize how long issued tokens are valid, so it’s important to make sure that the timeframe is aligned with your security requirements. If caching and reusing access tokens isn’t possible at the client level or cannot be enforced, then combining your M2M use cases with a REST API proxy integration using Amazon API Gateway enables you to cache token responses. By using API Gateway caching, you can optimize the request and response of access tokens for M2M authorization. This reduces redundant calls to Cognito for access tokens, thus improving the overall performance, availability, and security of your M2M use cases.
In this post, we explore strategies to help monitor, optimize, and secure Amazon Cognito M2M authorization. You’ll first learn some effective monitoring techniques to keep track of your usage, then delve into optimization strategies using API Gateway and token caching. Lastly, we will cover security best practices and considerations to bolster the security of your M2M use cases. Let’s dive in and discover how to make the most out of your Amazon Cognito M2M implementation.
Machine-to-machine authorization
Amazon Cognito uses an OAuth 2.0 client credentials grant to handle M2M authorization. A Cognito user pool can issue a client ID and client secret to allow your service to request a JSON web token (JWT)-compliant access token to access protected resources. Figure 1 illustrates how an app client requests an access token using the client credentials grant flow with Amazon Cognito.
Figure 1: Client credentials grant flow
The client credential grant flow (Figure 1) includes the following steps:
The app client makes an HTTP POST request to the Amazon Cognito user pool /token endpoint (see The token issuer endpoint for more information), which provides an authorization header consisting of the client ID and client secret, and request parameters consisting of grant type, client ID, and scopes.
After validating the request, Cognito will return a JWT-compliant access token.
The client can make subsequent requests to a downstream resource server using the Cognito issued access token.
The resource server gets a JSON Web Key Set (JWKS) from the Cognito user pool. The JWKS contains the user pool’s public keys, which should be used to verify the token signature.
The resource server uses the public key to verify the signature of the access token is valid (proving the token has not been tampered with). The resource server also needs to verify that the token is not expired and required claims and values are present, including scopes. The resource server should use the aws-jwt-verify library to verify that the access token is valid.
After the access token is verified and the app client is authorized, the requested resource is returned to the app client.
Now, let’s dive deep into the monitoring, optimization, and security considerations around M2M authorization with Amazon Cognito.
Monitoring usage and costs
In May 2024, Amazon Cognito introduced pricing for M2M authorization to support continued growth and expand M2M features. Customer accounts using M2M with Cognito prior to May 9, 2024, are exempt from M2M pricing until May 9, 2025 (for more information, see Amazon Cognito introduces tiered pricing for machine-to-machine (M2M) usage). To get better visibility into your existing Amazon Cognito usage types, you can use the Security tab of the Cost and Usage Dashboards Operations Solution (CUDOS) dashboard. This dashboard is part of the Cloud Intelligence Dashboard, an opensource framework that provides AWS customers actionable insights and optimization opportunities at an organization scale. As shown in Figure 2, the Security tab in the CUDOS dashboard provides visuals that show the cost and spend of Amazon Cognito per usage type and the projected cost for M2M app clients and token requests after the exemption period with daily granularity. This daily breakdown allows you to track how your cost optimization efforts are trending.
Figure 2: Example Amazon Cognito spend and projected cost with daily granularity
You can also see the monthly spend per account for each usage type, as shown in Figure 3.
Figure 3: Example Amazon Cognito spend and projected cost per AWS account
You can see the usage and spend per resource ID of user pools contributing to the cost, as shown in Figure 4. This resource-level granularity enables you to identify the top spending user pool and prioritize usage and cost management efforts accordingly. An interactive demo of this dashboard is available. For more information, see Cloud Intelligence Dashboards.
Figure 4: Example Amazon Cognito resource usage and cost by resource ID, account, and AWS Region
In addition to using the CUDOS dashboard to help understand Cognito M2M usage and costs, you can also request fine-grained usage details down to the app client level. This can include the number of access tokens successfully requested per app client and the last time the app client was used to issue tokens. To understand fine-grained app client usage, you need to make sure that token requests include the client_id request query parameter. This will result in an AWS CloudTrail log event that includes the client ID within the additionalEventData JSON object that is associated with the client credentials token request, as shown in Figure 5.
Figure 5: Sample CloudTrail event log including client_id
You can also use an Amazon CloudWatch log group to capture and store your CloudTrail logs for longer retention and analysis. Then using CloudWatch Logs Insights, you can use the following sample query to gather app client usage.
fields additionalEventData.userPoolId as user_pool_id, additionalEventData.requestParameters.client_id.0 as client_id, eventName, additionalEventData.responseParameters.status
| filter additionalEventData.requestParameters.grant_type.0="client_credentials" and eventName="Token_POST" and additionalEventData.responseParameters.status="200"
| stats count(*) as count, latest(eventTime) as last_used by user_pool_id, client_id
| sort count desc
Figure 6 is an example result from the preceding CloudWatch Logs Insights query. The result includes the user_pool_id, client_id, count, and last_used columns. The total number of successful token requests grouped per user pool and client ID will be displayed in the count column and the last time the app client successfully issued an access token will be displayed in the last_used column.
Figure 6: Example screenshot result set from CloudWatch Logs Insights query
Optimizing token requests
Now that you know how to better monitor your Amazon Cognito usage and costs, let’s dive deeper into how to optimize your token requests usage. For M2M, it’s recommended that clients use mechanisms to locally cache access tokens to use for authorization. This will reduce the need for the client to request a new access token until the previously issued token is no longer valid. However, the environment where the client runs could be hosted by an external third party or owned by a different team and as the resource owner, you won’t have control over whether the third party implements token caching at the client side. If this is a scenario that you have, you can use a HTTP proxy integration to cache the access token using API Gateway. Because the M2M use case follows the client credentials grant flow of the OAuth 2.0 specification, the /token endpoint of your user pool is what will be configured with the API Gateway proxy integration. This proxy integration is where caching in API Gateway can be used. With caching, you can reduce the number of token requests made to your user pool /token endpoint and improve the latency of the client receiving a cached token in the response. With caching, you can achieve additional benefits, such as cost optimization, improved performance efficiency, higher levels of availability, and custom domain flexibility.
Solution overview
Figure 7: Token caching solution
The solution (shown in the Figure 7) includes the following steps.
The client makes an HTTP POST request to an API Gateway REST API.
The API Gateway method request caches the scope URL query string parameter and the Authorization HTTP request header as caching keys. The integration request is configured as a proxy to the /oauth2/token endpoint of your Amazon Cognito user pool.
Cognito validates the request, making sure that the client ID and client secret are correct from the authorization header, a valid client ID has been provided as a query string parameter, and the client is authorized for the requested scopes.
If the request is valid, Cognito returns an access token to the gateway through the integration response. With caching enabled, the response from the HTTP integration (Cognito token endpoint) is cached for the specified time-to-live (TTL) period.
The method response of the gateway returns the access token to the client.
Subsequent token requests with a remaining cached TTL will be returned, using the authorization header and scope as the caching keys.
To set up token caching, follow the steps in Managing user pool token expiration and caching. After a valid token request is returned through the API Gateway proxy integration and cached, subsequent token requests to the proxy that match the caching keys (authorization header and scope parameter) will return that same access token. This token will be returned to the client until the TTL of the cached token has expired. It’s recommended to set the TTL of the cache to be a few minutes less than the TTL of the access token issued from Amazon Cognito. For example, if your security posture requires access tokens to be valid for 1 hour, then set your caching TTL to be a few minutes less than the 1-hour token validity. It’s also important to understand the ideal caching capacity for your use case. The caching capacity affects the CPU, memory, and network bandwidth of the cache instance within the gateway. As a result, the cache capacity can affect the performance of your cache. See Enable Amazon API Gateway caching for more information. For information about how to determine the ideal cache capacity for your use case, see How do I select the best Amazon API Gateway Cache capacity to avoid hitting a rate limit?. Let’s now explore some security best practices and considerations to raise the security bar of your M2M use cases.
Security best practices
Now that you know how to monitor Amazon Cognito M2M usage and costs and how to optimize access token requests, let’s review some security best practices and considerations. Using OAuth 2.0 client credentials grant for M2M authorization helps protect your APIs. One of the key factors for this is that the access token used by the client to connect to the resource server is a temporary and time-bound token. The client must obtain a new access token after its previous token has expired so you won’t have to issue long-lived credentials that are used directly between the client and the resource server. The client ID and client secret remain confidential on the client and are only used between the client and the Amazon Cognito user pool to request an access token.
Use AWS Secrets Manager
If the workload is running on AWS, use AWS Secrets Manager so you don’t have to worry about hard-coding credentials into workloads and applications. If the workload is running on premises or through another provider, then use a similar secrets’ vault or privileged access management solution to house the workload credentials. The workload should retrieve credentials for authentication only at runtime.
Use AWS WAF
It’s a security best practice to use AWS WAF to protect your Amazon Cognito user pool endpoints. This can help protect your user pools from unwanted HTTP web requests by forwarding selected non-confidential headers, request body, query parameters, and other request components to an AWS WAF web access control list (ACL) associated with your user pool. By using AWS WAF, you can also add managed rule groups to your user pool, such as the AWS managed rule group for Bot Control, to add protection against automated bots that can consume excess resources, cause downtime, or perform malicious activities. Learn more about how to associate an AWS WAF Web ACL with your Cognito user pool.
Always verify tokens
After a client has obtained an access token, it’s important to make sure the client is authorized to access the requested resources. If the resource is using API Gateway and the built-in Amazon Cognito authorizer, then the integrity of the token, the signature, and token expiration are checked and validated for you. However, if you require a more custom authorization decision with API Gateway, you can use an AWS Lambda authorizer along with the aws-jwt-verify library. By doing so, you can verify that the signature of the JWT token is valid, make sure that the token isn’t expired, and that the necessary and expected claims are present (including necessary scopes). For more fine-grained authorization decisions, look into using Amazon Verified Permissions with the resource server or even within a Lambda authorizer. If the resource server is an external system that is, outside of AWS or a custom resource server, you want to make sure that the access token is validated and verified before the requested resources are returned to the client.
Define scopes at the app client level
It’s important to carefully define and constrain the scope of access for each app client to align with the principle of least privilege. By restricting each client ID to only the necessary scopes, organizations can minimize the risk of issuing access tokens with more access and permissions than is required. If your use case aligns with M2M multi-tenancy, consider creating a dedicated app client per tenant and using defined custom scopes for that tenant. Remember that the number of M2M app clients is a pricing dimension and will incur a cost. See Custom scope multi-tenancy best practices for more information.
Security considerations
If you’re using API Gateway to proxy token requests and caching access tokens, the following are some security considerations to raise the security bar of your M2M workload.
Allow token requests only through an API Gateway proxy
After your API Gateway proxy integration is configured and set up for optimization and you have AWS WAF configured for your user pool, you can add an additional layer of security by using an allow list so that only requests from your API Gateway proxy to your Amazon Cognito user pool are accepted. For this, inject a custom HTTP header within the integration request of the POST method execution and create an allow rule within your web ACL that looks for that specific header. You will also create an additional web ACL rule to block all traffic. The single allow rule will have a priority order of 0 and the block-all-traffic rule will have a priority order of 1. Ultimately, this will block all requests that go directly to your Cognito user pool /token endpoint and only allow requests that have been made through the API Gateway proxy. Figure 8 that follows is a deeper explanation of this setup.
Figure 8: Token caching solution with AWS WAF
The process shown in Figure 8 has the following steps:
The client makes a direct HTTP POST call to the /oauth2/token endpoint of the Amazon Cognito user pool. This request would be denied by the AWS WAF web ACL deny all rule.
The client initiates an OAuth2 client credentials grant (HTTP POST) against an API Gateway stage (/token).
The REST API gateway is a proxy integration to the /oauth2/token endpoint of the Cognito user pool.
Within the integration request settings, configure a custom header (for example, x-wafAuthAllowRule). Treat the value of this header as a secret that remains only within the API Gateway integration request and is not exposed outside of the gateway.
Consider using Lambda, Amazon EventBridge, and AWS Secrets Manager to automatically rotate this header value in both the API Gateway integration request and in the AWS WAF web ACL rule.
The request is proxied to the Cognito /oauth2/token endpoint and AWS WAF is configured to protect the Cognito user pool endpoints and therefore web ACL rules are evaluated.
The custom header from the integration request (the preceding step) is evaluated against the web ACL rules to allow this request.
Cognito will verify the authorization header (containing the client ID and client secret) and requested scopes.
After successful credential validation, an access token is returned to the gateway within the integration response.
The access token is cached using the following caching keys:
Authorization header.
Scope query string parameter.
The access token is returned to the client through API Gateway.
Subsequent token requests with a remaining cached TTL are returned to client immediately, using the authorization header and scope as the caching keys.
Additional authorizer with API Gateway
Using the client credentials grant is designed to obtain an access token so that an app client can access downstream resources. If you’re using API Gateway as a proxy integration to your token endpoint, as described previously, you can also use a separate authorizer with an API Gateway proxy. Therefore, to begin the OAuth 2.0 client credentials grant flow, a separate authorization takes place first. For example, if you’re in a highly regulated industry, you might require the use of mTLS authentication to obtain an access token. This might seem like a double-authentication scenario; however, this helps prevent unauthenticated attempts against your API Gateway proxy integration to get an access token from Amazon Cognito.
Encrypting the API cache
While configuring your API Gateway proxy integration and provisioning your API cache, you can enable encryption of the cached response data. Because this caches access tokens for the set TTL of your choosing, you should consider encrypting this data at rest if necessary to help meet your security requirements. You can use the default method caching or set an override stage-level caching and enable encryption at rest.
Conclusion
In this post, we shared how you can monitor, optimize, and enhance the security posture of your machine-to-machine (M2M) authorization use cases with Amazon Cognito. This involved using the Cost and Usage Dashboards Operations Solution (CUDOS) to understand your Cognito M2M token requests and costs. We also discussed using caching from Amazon API Gateway as an HTTP proxy integration to the Cognito user pool /oauth2/token endpoint. By following the guidance in this post, you can better understand your M2M usage and costs and achieve added benefits such as cost optimization, performance efficiency, and higher levels of availability. Lastly, we provided several security best practices and considerations that can be used as additional layers to elevate your security posture.
If you have feedback about this post, submit comments in the Comments section below. If you have questions about this post, start a new thread on Amazon Cognito re:Post or contact AWS Support.
Introduced 10 years ago, Amazon Cognito is a service that helps you implement customer identity and access management (CIAM) in your web and mobile applications. You can use Amazon Cognito for various use cases, from providing your customers to quickly add sign-in and sign-up experiences to your applications and authorization to securing machine-to-machine authentication and enabling role-based access to AWS resources.
Today, I’m excited to share a series of significant updates to Amazon Cognito. These enhancements aim to provide you with more flexibility, improved security, and a better user experience for your applications.
A new developer-focused console experience Amazon Cognito now offers a streamlined getting-started experience featuring a quick wizard and use case-specific recommendations. This new approach helps you set up configurations and reach your end users faster and more efficiently than ever before.
This is the new Amazon Cognito flow to help you quickly set up your application. You can get started in three steps:
Choose the type of application you need to build
Configure the sign-in options according to the type of your application
Follow the instructions to integrate the sign-in and sign-up pages with your application
Then, select Create.
Amazon Cognito then automatically creates your application and a new user pool, which is a user directory for authentication and authorization. From here, you can review your sign-in page by selecting View login page or get started with the example code for your application. Furthermore, Amazon Cognito supports major application frameworks and offers detailed instructions for integrating them using standard OpenID Connect (OIDC) and OAuth open source libraries.
This is the new overview dashboard for your application. The user pool dashboard now provides important information in the Details section, as well as a set of Recommendations to help you continue your development journey.
On this page, you can customize your users’ sign-in and sign-up experience with the Managed Login feature. This is a good segue for me to provide you with a quick overview of the next new feature.
Introducing Managed Login The introduction of Managed Login brings a new level of customization to Amazon Cognito. Managed Login handles the heavy lifting of availability, scaling, and security for your company. Once integrated, you automatically get all the new security patches and future features without further code changes.
This feature allows you to create personalized sign-up and sign-in experiences that are a seamless part of your company’s application for your end users.
Before you can use Managed Login, you need to assign a domain. There are two ways to do this: use a prefix domain, a randomly generated sub-domain of Amazon Cognito domain, or use your own custom domain to provide your users with a familiar domain name.
Then, you can choose your Branding version, selecting either Managed login or classic Hosted UI.
If you’re an existing Amazon Cognito user, you might be familiar with the classic Hosted UI feature. Managed Login is the improved version of Hosted UI, offering a new collection of web interfaces for sign-up and sign-in, built-in responsiveness for different screen sizes, multi-factor authentication, and password-reset activities in your user pool.
With Managed Login, you can use the new branding designer, a no-code visual editor for managed login assets and style, and a set of API operations for programmatic configuration or deployment via infrastructure-as-code with AWS CloudFormation.
With the branding designer, you have the flexibility to customize the look and feel of the entire user journey, from sign up and sign in to password recovery and multi-factor authentication. This feature provides a real time preview and convenient shortcuts to preview screens in different screen sizes and display modes before you launch it.
Passwordless login support The Managed Login feature also offers pre-built integrations for passwordless authentication methods, including signing in with passkeys, email OTP (one-time-password) and SMS OTP. Passkey support allows users to authenticate using cryptographic keys stored securely on their devices, offering better security compared to traditional passwords. This capability helps you implement low-friction and secure authentication methods without the need to understand and implement WebAuthn related protocols.
By reducing the friction associated with traditional password-based sign-ins, this feature simplifies application access for your users while maintaining high security standards.
More options on pricing tiers: Lite, Essentials and Plus Amazon Cognito has introduced new user pool feature tiers: Lite, Essentials, and Plus. These tiers are designed to cater to different customer needs and use cases with the Essentials tier being the default tier for new users pools created by customers. This new tier structure also allows you to choose the most appropriate option based on your application requirements, with the flexibility to switch between tiers as needed.
To check your current tier, you can go to your application dashboard and select Feature plan. You can also select Settings from the navigation menu.
On this page, you’ll get detailed information for each tier and the option to downgrade or upgrade your plan.
Here’s a quick overview of each tier:
Lite tier: Existing features such as user registration, password-based authentication, and social identity provider integration are now packaged in this tier. If you’re an existing Amazon Cognito user, you can continue using these features without making changes to your user pools.
Essentials tier: Offers comprehensive authentication and access control features, allowing you to implement secure, scalable, and customized sign-up and sign-in experiences for your application within minutes. It includes all capabilities in Lite along with supporting Managed Login and passwordless login options using passkeys, email, or SMS. Essentials also supports customizing access tokens and disallowing password reuse.
Plus tier: Builds upon the Essentials tier, focusing on elevated security needs. It includes all Essentials features plus threat protection capabilities against suspicious login activity, detection of compromised credentials, risk-based adaptive authentication, and the ability to export user authentication event logs for threat analysis.
Pricing for the Lite, Essentials and Plus tiers is based on monthly active users. Customers currently using the advanced security features of Amazon Cognito should consider the Plus tier, which includes all the advanced security features, additional capabilities such as passwordless, and up to 60 percent savings as compared to using the standalone advanced security features.
If you want to learn about these new pricing tiers, see the Amazon Cognito pricing page.
Things you need to know
Availability – The Essentials and Plus tier are available in all AWS Regions where Amazon Cognito is available except AWS GovCloud (US) Regions.
Free tier on Lite and Essentials tiers – Customers on the Lite and Essentials tiers can enjoy the free tier each month that does not automatically expire. It is available to both existing and new AWS customers indefinitely. For more details on free tier, please visit the Amazon Cognito pricing page.
Extended pricing benefit for existing customers – Customers are eligible to upgrade their user pools without advanced security features (ASF) in their existing accounts to Essentials and pay the same price as Cognito user pools until November 30, 2025. To be eligible, customers’ accounts must have had at least 1 monthly active user (MAU) in the last 12 months on or before 10:00am Pacific Time, November 22, 2024. These customers are also eligible to create new user pools with Essentials tier at the same price as Cognito users pools in those accounts until November 30, 2025.
With these updates, you can implement secure, scalable, and customizable authentication solutions for your applications with Amazon Cognito.
Organizations of all sizes and types are using generative AI to create products and solutions. A common adoption pattern is to introduce document search tools to internal teams, especially advanced document searches based on semantic search. In semantic search, documents are stored as vectors, a numeric representation of the document content, in a vector database such as Amazon OpenSearch Service, and are retrieved by performing similarity search with a vector representation of the search query.
In a real-world scenario, organizations want to make sure their users access only documents they are entitled to access. They are looking for a reliable and scalable solution to implement robust access controls to make sure these documents are only accessible to individuals who have a legitimate business need and the appropriate level of authorization. The permission mechanism has to be secure, built on top of built-in security features, and scalable for manageability when the user base scales out. Maintaining proper access controls for these sensitive assets is paramount, because unauthorized access could lead to severe consequences, such as data breaches, compliance violations, and reputational damage.
In this post, we show you how to manage user access to enterprise documents in generative AI-powered tools according to the access you assign to each persona.
Common use cases
The following are industry-specific use cases for document access management across different departments:
In R&D and engineering, access to product design documents evolves from restricted to broader as development progresses
HR maintains open access to general policies while limiting access to sensitive employee information
Finance and accounting documents require varying levels of access for auditing and executive decision-making
Sales and marketing teams carefully manage customer data and strategies, implementing tiered access for different roles and departments
These examples demonstrate the need for dynamic, role-based access control to balance information sharing with confidentiality in various business contexts.
Solution overview
By combining the powerful vector search capabilities of OpenSearch Service with the access control features provided by Amazon Cognito, this solution enables organizations to manage access controls based on custom user attributes and document metadata.
This approach simplifies the management of access rights, making sure only authorized users can access and interact with specific documents based on their roles, departments, and other relevant attributes. Following this approach, you can manage the access to your organization’s documents at scale. The following diagram depicts the solution architecture.
The solution workflow consists of the following steps:
The user accesses a smart search portal and lands on a web interface deployed on AWS Amplify.
The user authenticates through an Amazon Cognito user pool and an access token is returned to the client. This access token will be used to retrieve the key pair custom attributes assigned to the user. In our case, we created two custom attributes (custom:department and custom:access_level).
For each user query, an API is invoked on Amazon API Gateway to process the request. Each invocation includes the user access token in the header.
The API is integrated with AWS Lambda, which processes the user query and generates the answers based on available documents and user access using retrieval augmented generation (RAG). The process starts by creating a vector based on the question (embedding) by invoking the embedding model.
A query is sent to OpenSearch Service that includes the following:
The embedding vector generated.
User custom attributes retrieved by Lambda based on their access token, by calling the Amazon Cognito GetUser API.
The query relies on the support of an efficient k-NN filter in OpenSearch Service to perform the search.
Pre-filtered documents that relate to the user query are included in the prompt of the large language model (LLM) that summarizes the answer. Then, Lambda replies back to the web interface with the LLM completion (reply).
If the user’s access needs to be modified (assigned attributes), an API call is made through API Gateway to a Lambda function that processes the request to add or update the custom attributes’ value for a specific user.
New attributes are reflected in the user’s profile in Amazon Cognito.
Our sample documents assume a fictional manufacturing company called Unicorn Robotics Factory, which develops robotic unicorns. The dataset contains over 900 documents that are a mix of engineering, roadmap, and business reporting documents. The following is an example of a document’s content:
**CONFIDENTIAL - UNICORNS ROBOTICS INTERNAL DOCUMENT**

**Project: "Galactic Unicorn"**

Unicorns Robotics is proud to announce the development of our latest project, the "Galactic Unicorn".
This top-secret project aims to create a robotic unicorn that can travel through space and time, bringing magic and joy to children and adults alike.....
The associated metadata file for this document consists of the following:
Our solution in the GitHub repo takes care of loading the documents with associated metadata tags. For illustration purposes, we used the following mapping for the users and document access.
This solution is meant to delegate access management to the application tier, to simplify the implementation of use cases like generative AI-powered document search tools. However, if your use case requires a stricter approach to control document access, like multi-tenant environments or field-level security, you might want to use the fine-grained access control feature in OpenSearch Service. In our solution, we manage the access on the document level according to the assigned metadata.
Prerequisites
To deploy the solution, you need the following prerequisites:
An AWS account. If you don’t already have an AWS account, you can create one.
In case of LLM inference based on Amazon SageMaker, a sufficient service limit to deploy an ml.g5.12xlarge instance for the SageMaker endpoint. If needed, you can initiate a quota increase request. Refer to Service Quotas for more details.
Deploy the solution
To deploy the solution to your AWS account, refer to the Readme file in our GitHub repo.
Query documents with different personas
Now let’s test the application using different personas. In this example, we use the same users with their corresponding custom attributes as illustrated in the solution overview.
To start, let’s log in using the researcher account and run the search around a confidential document.
We ask, “What is the projected profit margin of the Galactic Unicorn project?” and get the result as shown in the following screenshot.
The question invokes a query to OpenSearch Service using the custom attributes assigned to the researcher. The following code illustrates how the query is structured:
for attr, values in user_attributes.items():
        must_conditions.append(
            {
                "bool": {
                    "should": [{"term": {attr: value}} for value in values],
                    "minimum_should_match": 1,
                }
            }
        )

query = {
        "size": 5,
        "query": {
            "knn": {
                "doc_embedding": {
                    "vector": query_vector,
                    "k": 10,
                    "filter": {"bool": {"must": must_conditions}},
                }
            }
        },
    }
Let’s sign out and log in again with an engineer profile to test the same query. Based on the assigned attributes and document metadata, the result should look like that in the following screenshot.
If you tried to query some support documents, you will get the desired answer, as shown in the following screenshot.
Modify user access
As depicted in the solution diagram, we’ve added a feature in the web interface to allow you to modify user access, which you could use to perform further tests. To do so, log in as a tool admin and choose Manage Attributes. Then modify the custom attribute value for a given user, as shown in the following screenshot.
Clean up
When deleting a stack, most resources will be deleted upon stack deletion, but that’s not the case for all resources. The Amazon Simple Storage Service (Amazon S3) bucket, Amazon Cognito user pool, and OpenSearch Service domain will be retained by default. However, our AWS CDK code altered this default behavior by setting the RemovalPolicy to DESTROY for the mentioned resources. If you want to retain them, you can adjust the RemovalPolicy in the AWS CDK code for the different resources.
You can use the following command to clean up the resources deployed to your AWS account:
make destroy
Conclusion
This post illustrated how to build a document search RAG solution that makes sure only authorized users can access and interact with specific documents based on their roles, departments, and other relevant attributes. It combines OpenSearch Service and Amazon Cognito custom attributes to make a tag-based access control mechanism that makes it straightforward to manage at scale.
For demonstration purposes, the following points weren’t included in the AWS CDK code. However, they’re still applicable and you might want to work on them before deploying for production purposes:
Karim Akhnoukh is a Solutions Architect at AWS working with manufacturing customers in Germany. He is passionate about applying machine learning and generative AI to solve customers’ business challenges. Besides work, he enjoys playing sports, aimless walks, and good quality coffee.
Ahmed Ewis is a Senior Solutions Architect at AWS GenAI Labs. He helps customers build generative AI-based solutions to solve business problems. When not collaborating with customers, he enjoys playing with his kids and cooking.
Fortune Hui is a Solutions Architect at AWS Hong Kong, working with conglomerate customers. He helps customers and partners build big data platform and generative AI applications. In his free time, he plays badminton and enjoys whisky.
Recently, passwordless authentication has gained popularity compared to traditional password-based authentication methods. Application owners can add user management to their applications while offloading most of the security heavy-lifting to Amazon Cognito. You can use Amazon Cognito to customize user authentication flow by implementing passwordless authentication. Amazon Cognito enhances the security posture of your applications because it handles the storage and management of user information securely. Additionally, Amazon Cognito provides secure authentication flow and verifiable tokens.
This post explores how you can use the advanced security features of Amazon Cognito to add threat detection to your passwordless authentication custom authentication flow, further strengthening your defenses against account takeover risks.
Overview
Amazon Cognito is a customer identity and access management (CIAM) service that streamlines the process of building secure, scalable, and user-friendly authentication solutions. With Amazon Cognito, you can integrate user sign-up, sign-in, and access control functionalities into your web and mobile applications. One of the key features of Amazon Cognito is that it supports custom authentication flow, which you can use to implement passwordless authentication for your users or you can require users to solve a CAPTCHA or answer a security question before being allowed to authenticate.
Custom authentication flows, such as passwordless authentication, offer an improved user experience while enhancing security by using strong custom factors. In addition, it is recommended to implement additional measures to detect and mitigate potential risks. Amazon Cognito advanced security provides a suite of powerful features designed to detect risks and allows you to take action to protect your user accounts.
By combining passwordless authentication with Amazon Cognito advanced security features, you can enhance your application’s overall security posture while providing a seamless and user-friendly authentication experience to your users.
Advanced security support for custom authentication flow
Amazon Cognito advanced security now supports custom authentication flows to provide additional threat detection, including passwordless authentication. You can improve the security of applications that use custom authentication factors by enabling risk detection and adaptive authentication.
The custom authentication flow triggers three AWS Lambda functions, as shown in Figure 1.
Figure 1: Custom authentication flow
The custom authentication flow depicted in Figure 1 includes the following steps:
A user initiates authentication from the custom sign-in page, which sends the authentication request to the Amazon Cognito user pool.
The user pool calls the Define Auth Challenge Lambda function. This function determines which custom challenge needs to be created. At the end, it reports back to Amazon Cognito to issue a token if authentication is successful. The function is invoked at the start of the custom authentication flow and after each completion of the Verify Auth Challenge Response Lambda trigger.
The user pool calls the Create Auth Challenge Lambda function. This function is invoked to create a unique challenge for the user based on the instruction of the Define Auth Challenge Lambda trigger.
The user responds to the challenge with their answer, which is sent by making a RespondToAuthChallenge API call to the Amazon Cognito user pool.
The user pool calls the Verify Auth Challenge Response Lambda function with the response from the user. The function determines if the answer is correct.
The user pool then calls the Define Auth Challenge Lambda function. This function verifies that the challenge has been successfully answered and that no further challenge is needed. It includes issueTokens: true in its response to the user pool.
When advanced security is enabled, Amazon Cognito performs risk analysis on the authentication request. If a risk is detected, it’s mitigated as configured in advanced security. The user pool now considers the user to be authenticated and sends the user a valid JSON Web Token (JWT) (in response to step 4, the authentication challenge).
How to configure advanced security for custom authentication flow
In this section, you set up a custom passwordless authentication flow and then add advanced security features (ASF) to protect your existing authentication flow.
After setting up passwordless authentication, go to the AWS Management Console for Amazon Cognito and configure advanced security features for your passwordless authentication flow.
Navigate to the user pool that has been created for the passwordless authentication solution.
Choose the Advanced Security tab and choose Activate.
In the Included features and initial states pop-up, you’ll see the Threat protection for standard authentication and Threat protection for custom authentication have already been included in Audit-only mode, choose Activate.
Note: It’s recommended to run advanced security features in audit only mode initially to evaluate risk patterns and decide the appropriate settings for each risk level.
Figure 2: Activate advanced security features
To set up full function mode and enforcement for Threat protection for custom authentication, choose Set up full-function mode.
Figure 3: Activate threat protection for custom authentication flow
For Custom authentication enforcement mode, you can select:
No enforcement – Amazon Cognito doesn’t gather metrics on detected risks or automatically take preventive actions.
Audit-only – Amazon Cognito gathers metrics on detected risks, but doesn’t take automatic action.
Full-function – Amazon Cognito automatically takes preventive actions in response to different levels of risk that you configure for your user pool.
Select Full-function.
Figure 4: Configure enforcement level
You can choose either Cognito defaults or Custom to respond to each level of risk when Amazon Cognito detects potential malicious activity.
Cognito defaults will block sign-in attempts for low, medium, and high risks.
Figure 5: Adaptive authentication configuration
If you choose Custom, you can customize the risk configuration for each risk level.
Allow – Sign-in attempts will be allowed without additional authentication factors.
Optional MFA – Amazon Cognito will send a multi-factor authentication (MFA) challenge to the user if the user is eligible for MFA. A user is eligible for MFA if:
They have configured an authenticator app and TOTP MFA is enabled for the user pool.
They have a phone number or email address, and SMS or email message MFA is enabled for the user pool.
If the user is eligible for MFA, they must respond correctly to the MFA challenge. If the user is not eligible for MFA, Cognito will allow sign-in without additional authentication factors.
Require MFA – Amazon Cognito will send an MFA challenge to the user if the user is eligible for MFA. If the user is eligible for MFA, they must respond correctly to the MFA challenge. If the user is not eligible for MFA, Cognito will block the sign-in attempt.
Block – Cognito blocks future sign-in attempts.
You can notify users when adaptive authentication detects potentially suspicious activity using a customized email message. This notification is sent to users to confirm their activity, and Amazon Cognito uses the user’s response to learn their behavior patterns over time. By customizing the notification message, you can provide a better user experience and make sure communication regarding the security measure is clear to your users.
To test the configuration, sign in from multiple devices and locations. Amazon Cognito will calculate risk and take action based on your configuration. After you’ve signed in multiple times through different devices, you can view the User event history.
In the Amazon Cognito console, go to the user pool and search for the user you signed in as.
Select the user name and navigate to User event history.
Figure 8: User event history
You can see the user event history with the risk levels and actions taken by Amazon Cognito as shown in Figure 8. In the figure, Amazon Cognito advanced security has detected a high-risk event and has blocked the sign-in attempt.
Amazon Cognito will associate a risk level with each sign-in attempt and based on your adaptive configuration; it will either allow the sign in, request an MFA response, or block the request.
Note: Populating UserContextData in the request is important to the functionality of the risk engine. Some SDKs, such as AWS Amplify, will populate this object by default, but in custom code, you need to make sure userContextData is calculated and populated correctly in relevant events. See Adding user device and session data to API requests for more information about populating userContextData.
In this post, you learned how to enable threat detection for a custom authentication flow such as passwordless authentication in Amazon Cognito. Threat detection helps you to monitor user activity and enhances security measures even when your users sign in through a custom authentication flow.
If you have feedback about this post, submit comments in the Comments section below.
Amazon Web Services (AWS) recently released AWS IAM Identity Centertrusted identity propagation to create identity-enhanced IAM role sessions when requesting access to AWS services as well as to trusted token issuers. These two features can help customers build custom applications on top of AWS, which requires fine-grained access to data analytics-focused AWS services such as Amazon Q Business, Amazon Athena, and AWS Lake Formation, and Amazon S3 Access Grants. You can use AWS services compatible with trusted identity propagation to grant access to users and groups belonging to IAM Identity Center instead of solely relying on AWS Identity and Access Management (IAM) role permissions. With a trusted token issuer, you can propagate identities that you have authenticated in your custom application to the underlying AWS services. In the case of an Amazon Q Business application, you can create a different web experience or integrate an Amazon Q Business application as an assistant into an existing web application to help your workforce.
These two features rely on the OAuth 2.0 protocol to exchange user information. For the identity to be consumable by AWS services, your custom application’s identity provider needs to be able to issue OAuth 2.0 tokens for your users.
This blog post from November 2023 covers how to interconnect with an OAuth 2.0 compatible identity provider such as Microsoft Entra ID, Okta, or PingFederate.
In this post, I show you how to use an Amazon Cognito user pool as a trusted token issuer for IAM Identity Center. You will also learn how to use IAM Identity Center as a federated identity provider for a Cognito user pool to provide a seamless authentication flow for your IAM Identity Center custom applications. Note that this content doesn’t cover building a custom application for Amazon Q Business. If needed, you can find more details in Build a custom UI for Amazon Q Business.
IAM Identity Center concepts
IAM Identity Center is the recommended service for managing your workforce’s access to AWS applications. It supports multiple identity sources, such as an internal directory, external Active Directory, or a SAML-compliant identity provider (IdP) with optional SCIM integration.
With trusted identity propagation, a user can sign in to an application, and that application can pass the user’s identity context when creating an identity-enhanced AWS session to access data in AWS services. Because access is now tied to the user’s identity in IAM Identity Center, AWS services can rely on both the IAM role permissions to authorize access as well as the user’s granted scopes and group memberships.
Trusted token issuers are OAuth 2.0 authorization servers that create signed tokens and enable you to use trusted identity propagation with applications that authenticate outside of AWS. With trusted token issuers, you can authorize these applications to make requests on behalf of their users to access AWS managed applications. The trusted token issuers feature is completely independent from the authentication feature of IAM Identity Center and doesn’t need to be the same identity provider as is used for authenticating into IAM Identity Center.
When performing a token exchange, the token must contain an attribute that maps to an existing user in IAM Identity Center, such as an email address or external ID. A token can be exchanged only once.
On the other side, an Amazon Cognito user pool is a user directory and an OAuth 2.0 compliant identity provider (IdP). From the perspective of your application, a Cognito user pool is an OpenID Connect (OIDC) IdP. Your application users can either sign in directly through a user pool, or they can federate through a third-party IdP. When you federate Cognito to a SAML IdP, or OIDC IdPs, your user pool acts as a bridge between multiple identity providers and your application.
Overview of solution
The solution architecture includes the following elements and steps and is depicted in Figure 1.
The custom application: The custom application provides access to the Amazon Q Business application through APIs. Users are authenticated using Amazon Cognito as an OAuth 2.0 IdP.
Amazon Q Business: The Amazon Q Business application requires identity-enhanced AWS credentials issued by AWS Security Token Service (AWS STS) to authorize requests from the custom application.
AWS STS: STS issues identity-enhanced AWS credentials to the custom application through the setContext and AssumeRole API calls. SetContext requires the user’s identity context to be passed from a JSON web token (JWT) issued by IAM Identity Center.
IAM Identity Center: To issue a JWT, IAM Identity Center requires the custom application to perform a token exchange operation from a trusted IAM role and a trusted token issuer (Cognito).
Amazon Cognito user pool: The user pool authenticates users into the custom application. The user pool uses SAML federation to delegate authentication to Identity Center. Users are automatically created in the user pool when the federated authentication is successful. The user pool returns a JWT to the custom application.
SAML-based customer managed application (when IAM Identity Center is acting as a SAML identity provider): By using the SAML customer managed application in IAM Identity Center, you can delegate the authentication from Cognito to IAM Identity Center. One benefit of using IAM Identity Center is to help guarantee that the user exists in IAM Identity Center before authenticating to Cognito, as long as IAM Identity Center is the only way to authenticate to the client application. User existence is a requirement to perform the token exchange operation.
Figure 1: Solution architecture
Walkthrough
The focus of this post is steps 3–6 of the architecture, which follow a three-step approach.
Creation and initial configuration of the Amazon Cognito user pool and domain
Configuration of the OAuth integration for trusted identity propagation
Configuration of the SAML federation trust between IAM Identity Center and Cognito
Prerequisites
For this walkthrough, you need the following prerequisites:
Step 1: Create the Cognito user pool, the user pool domain and the user pool client
The following bash script sets up the Amazon Cognito user pool, user pool domain, and user pool client and outputs the issuer URL and audience that you need to set up IAM Identity Center.
Note: The Cognito user pool domain prefix must be unique across all AWS accounts for a given AWS Region. Replace <demo-tti> with a unique prefix for your user pool domain.
#!/bin/bash
export AWS_PAGER="" # Disable sending response to less
export USER_POOL_NAME=BlogTrustedTokenIssuer
export COGNITO_DOMAIN_PREFIX=<demo-tti> # Must be unique
# Create the user pool
USER_POOL_ID=$(aws cognito-idp create-user-pool \
  --pool-name ${USER_POOL_NAME} \
  --alias-attributes email \
  --schema Name=email,Required=true,Mutable=true,AttributeDataType=String \
  --query "UserPool.Id" \
  --admin-create-user-config AllowAdminCreateUserOnly=True \
  --output text)
# Create the user pool domain
aws cognito-idp create-user-pool-domain \
  --domain ${COGNITO_DOMAIN_PREFIX} \
  --user-pool-id ${USER_POOL_ID}
# Create the user pool client
AUDIENCE=$(aws cognito-idp create-user-pool-client \
  --user-pool-id ${USER_POOL_ID} \
  --client-name TTI \
  --explicit-auth-flows ALLOW_REFRESH_TOKEN_AUTH ALLOW_USER_SRP_AUTH \
  --allowed-o-auth-flows-user-pool-client \
  --allowed-o-auth-scopes openid email profile \
  --allowed-o-auth-flows code \
  --callback-urls "http://localhost:8080" \
  --query "UserPoolClient.ClientId" \
  --output text )
ISSUER_URL="https://cognito-idp.${AWS_REGION}.amazonaws.com/${USER_POOL_ID}"
Step 2: Create the OAuth integration for trusted identity propagation
To create the OAuth integration, you need to set up a trusted token issuer and configure the OAuth customer managed application.
Configure a trusted token issuer
Start by configuring IAM Identity Center to trust tokens issued by the Amazon Cognito user pool.
Create the OAuth customer managed application, which will allow your AWS account to exchange tokens issued for the Cognito user pool client.
# Create the OAuth customer managed application
OAUTH_APPLICATION_ARN=$(aws sso-admin create-application \
    --instance-arn $INSTANCE_ARN \
    --application-provider-arn "arn:aws:sso::aws:applicationProvider/custom" \
    --name DemoApplication \
    --output text \
    --query "ApplicationArn")

# Disable using explicit assignment for user access to this application
aws sso-admin put-application-assignment-configuration \
    --application-arn $OAUTH_APPLICATION_ARN \
    --no-assignment-required
# Allow token exchange process for tokens issuer by the trusted token issuer
cat << EOF > /tmp/grant.json
{
  "JwtBearer": {
    "AuthorizedTokenIssuers": [
      {
        "TrustedTokenIssuerArn": "$TRUSTED_TOKEN_ISSUER_ARN",
        "AuthorizedAudiences": ["$AUDIENCE"]
      }
    ]
  }
}
EOF
aws sso-admin put-application-grant \
    --application-arn $OAUTH_APPLICATION_ARN \
    --grant-type "urn:ietf:params:oauth:grant-type:jwt-bearer" \
    --grant file:///tmp/grant.json
# Allow use of this application for Q Business applications
for scope in qbusiness:messages:access qbusiness:messages:read_write qbusiness:conversations:access qbusiness:conversations:read_write qbusiness:qapps:access; do
    aws sso-admin put-application-access-scope \
        --application-arn $OAUTH_APPLICATION_ARN \
        --scope $scope
done
# Allow this AWS Account Id to invoke the API to exchange token (CreateTokenWithIAM)
AWS_ACCOUNTID=$(aws sts get-caller-identity --output text --query "Account")
cat << EOF > /tmp/authentication-method.json
{
  "Iam": {
    "ActorPolicy": {
      "Version": "2012-10-17",
      "Statement": [
        {
          "Effect": "Allow",
          "Principal": {
            "AWS": "${AWS_ACCOUNTID}"
          },
          "Action": "sso-oauth:CreateTokenWithIAM",
          "Resource": "$OAUTH_APPLICATION_ARN",
        }
      ]
    }
  }
}
EOF
aws sso-admin put-application-authentication-method \
  --application-arn $OAUTH_APPLICATION_ARN \
  --authentication-method file:///tmp/authentication-method.json \
  --authentication-method-type IAM
Step 3: Create the SAML federation trust between IAM Identity Center and Cognito
The SAML integration between IAM Identity Center and Amazon Cognito is useful when your source of identity is IAM Identity Center. In this scenario, SAML integration helps ensure that users will authenticate with IAM Identity Center credentials before being authenticated to your Cognito user pool. When using federated identities, the Cognito user pool will automatically create user profiles, so you don’t need to maintain the user directory separately.
Configure IAM Identity Center
Sign in to the AWS Management Console and navigate to IAM Identity Center.
Choose Applications from the navigation pane.
Choose Add application.
Select I have an application I want to set up, select SAML 2.0, and then choose Next.
For Display name, enter DemoSAMLApplication.
Copy the IAM Identity Center SAML metadata file URL for later use.
For Application properties, leave both fields blank.
For Application ACS URL, enter https://<CognitoUserPoolDomain>.auth.<AWS_REGION>.amazoncognito.com/saml2/idpresonse.
Replace <CognitoUserPoolDomain> with the domain you chose in Step 1 and <AWS_REGION> with the Region in which you created the Cognito user pool.
For Application SAML audience, enter urn:amazon:cognito:sp:<CognitoUserPoolId>.
Replace <CognitoUserPoolId> with the ID of the Cognito user pool you created in Step 1.
Choose Submit.
Configure mapping attributes
Choose Actions and select Edit attribute mappings.
Enter ${user:email} for the field Maps to this string value or user attribute in IAM Identity Center.
Select Persistent for Format.
Choose Save changes.
Configure Cognito user pool
Navigate to the Amazon Cognito console and choose User pools from the navigation pane.
Select the user pool created in Step 1.
Choose the Sign-in experience tab.
Under Federated identity provider sign-in, choose Add identity provider.
Select SAML.
Under Provider name, enter IAMIdentityCenter.
Under Metadata document source, select Enter metadata document endpoint URL and paste the URL copied from step 6 of Configure IAM Identity Center
Under SAML attribute, enter Subject.
Choose Add Identity Provider.
Configure app integration to use IAM Identity Center
Choose the App integration tab.
Under App clients and analytics, choose TTI.
Under Hosted UI, choose Edit.
For Identity providers, select IAMIdentityCenter.
Choose Save changes.
Architecture diagram
Figure 2 shows the authentication flow from the user connecting to the web application up to the chat interaction with Amazon Q Business APIs.
Note: The AWS resources can be in the same Region, but it’s not required for Amazon Cognito and IAM Identity Center.
The application redirects the user to Amazon Cognito for authentication.
Cognito redirects the user to IAM Identity Center for authentication.
Cognito parses the SAML assertion from IAM Identity Center.
Cognito returns a JWT to the application.
The application exchanges the token with IAM Identity Center.
The application assumes an IAM role and sets the context using the IAM Identity Center token.
The application invokes the Amazon Q Business APIs with the context-aware STS session.
Figure 2: Authentication flow
Clean up
To avoid future charges to your AWS account, delete the resources you created in this walkthrough. The resources include:
The Amazon Cognito user pool (deleting this will also delete sub resources such as the user pool client)
The SAML application in IAM Identity Center
The OAuth application in IAM Identity Center
The trusted token issuer configuration in IAM Identity Center
Conclusion
In this post, we demonstrated how to implement trusted identity propagation for applications that are protected by Amazon Cognito. We also showed you how to authenticate Cognito users with IAM Identity Center to help ensure that users are authenticating using the correct mechanisms and policies and to reduce the operational burden of managing the Cognito directory by automatically provisioning users as they sign in.
Using Amazon Cognito as a trusted token issuer is useful when your application is already secured with a user pool, and you want to implement data functionalities such as Amazon Q Business chat capabilities or secure access to S3 buckets using S3 Access Grants.
If your users are authenticating with different identity providers, the solution in this post can reduce the work needed for identity integration by enabling you to add multiple identity providers to a single user pool. By using this solution, you will need to configure the trusted token issuer in IAM Identity Center only for Amazon Cognito and not for every token provider.
This walkthrough doesn’t include a demo web application because I wanted to dive into the integration of IAM Identity Center and Amazon Cognito. I recommend reading Build a custom UI for Amazon Q Business, which shows you how to implement a custom user interface for an Amazon Q Business application using Amazon Cognito for user authentication.
Because trusted identity propagation is becoming more prevalent within AWS services, I recommend the following blog posts to learn more about using it with various services.
Externalized authorization for custom applications is a security approach where access control decisions are managed outside of the application logic. Instead of embedding authorization rules within the application’s code, these rules are defined as policies, which are evaluated by a separate system to make an authorization decision. This separation enhances an application’s security posture by aligning with Zero Trust principles of continual real-time authorization, simplifies the management of security policies, and enables consistent policy enforcement across multiple applications. Amazon Verified Permissions is a scalable permissions management and fine-grained authorization service that you can use to externalize application authorization.
Two common access control models that you might consider when implementing your authorization system are role-based access control (RBAC) and attribute-based access control (ABAC). RBAC grants permissions to users based on their assigned roles within an organization, simplifying the management of access by grouping permissions into roles that correspond to job functions. ABAC grants permissions based on a set of attributes associated with users, resources, and the context, allowing for more fine-grained and dynamic authorization decisions. However, as systems become more complex and have more interconnected data—especially in environments like social networks, collaborative environments, and multi-tenant applications—the limitations of RBAC and ABAC become apparent. These models often fail to effectively capture the relationships between entities. Relationship-based access control (ReBAC) offers a more nuanced approach by using the relationships between users and resources to make decisions about permitted actions, thus addressing scenarios more efficiently than other models.
In this blog post, we show you how to implement ReBAC using Verified Permissions and Amazon Neptune, a managed, serverless graph database on AWS.
What is relationship-based access control?
The core principle of ReBAC is that authorization decisions are based on the relationships between the principal requesting access and the resource being accessed. These relationships can be of several types—ownership, collaboration, or membership relationships—that form hierarchical structures. Examples of ReBAC can be found in multiple domains, including social media sites, project management tools, and content management systems. For example, in a social media application, ReBAC can be used to control who can view, comment, or share a post based on the relationships between the poster, their connections, and the content itself.
Conceptually, roles are types of relationships, and relationships are subsets of attributes.
Benefits of ReBAC
In some types of applications, relationships change dynamically. For example, in a collaborative or social media application, relationships such as contributor or co-owner are continually being established between individual users and resources. Compared to traditional access control models, ReBAC offers the following benefits in these use cases.
Fine-grained access control – ReBAC grants access at the level of an individual resource based on a user’s relationship with that resource. For example, a user can update individual photo albums with which they have a contributor relationship.
Scalability and adaptability – Relationships can change dynamically. Access permissions are updated automatically when a relationship changes. For example, when the contributor relationship is removed, the user no longer has access.
Support for hierarchies – ReBAC can handle hierarchical relationships. For example, the contributor relationship can be inherited down through an album hierarchy, permitting the user to update photo albums that are members of the album with which they have the relationship.
Common relationship models in ReBAC
Here are some common relationship models, also shown in Figure 1, for consideration when building the application and its authorization system:
Resource ownership – Permissions to access or manipulate a resource are granted based on whether a user owns that resource. For example, you can delete a GitHub repository if you are the owner of the repository.
Resource hierarchies – Permissions to access or manipulate a resource are granted based on the permissions that a principal has for the parent resource. For example, a GitHub repository contributor can close issues that belong to that repository.
User hierarchies – These are similar to AWS Identity and Access Management (IAM) user groups. Principals that belong to a group will have the permissions granted to that group.
Figure 1: Common relationship models in ReBAC
In a relationship model, direct relationships represent clear, explicit links between users and resources, such as an employee owns their expense reports or a file is a member of a folder. These connections are straightforward and simply definable.
However, relationship models often extend beyond these direct links to include hierarchical structures. These create indirect relationships that are more complex in nature. For example, team managers might have access to all expense reports filed by their subordinates, even though they don’t directly own these reports. Similarly, folder owners might have access to all files within their subfolders, regardless of who created those files.
These indirect relationships are derived from a series of direct relationships. They form a relationship chain that, while not explicitly defined, is implied by the hierarchical structure. Because of their complexity and potential for far-reaching implications, these indirect relationships require careful consideration when designing an authorization system.
In this blog post, we focus on the implementation of the relationship models that use resource ownership and resource hierarchies, and relationship hierarchies in these models.
Example scenario
Consider a video application that allows users to manage and share videos of their pets. Alice and Bob are individual users within the environment and so they only have access permissions to their own directory or videos. Because Alice and Bob directly own their resources, they have direct OWNER relationships to these resources, represented as solid lines in Figure 2. aliceCatVideo.mp4 is a video resource stored in the aliceVideoDirectory directory. There is a MemberOf relationship between these resources.
Figure 2: Alice has direct relationship to resources that she has direct ownership
Charlie has direct OWNER relationship to the root directory petVideosDirectory. Because aliceVideoDirectory is a subdirectory of petVideosDirectory, Charlie inherits an OWNER relationship to aliceVideoDirectory and the video resource aliceCatVideo.mp4 inside. This indirect OWNER relationship is inherited through the MemberOf relationship between resources and is represented as dotted lines in Figure 3.
Figure 3: Charlie has indirect relationship to resources that inherited from the MemberOf relationship
When implementing access control for this scenario, both RBAC and ABAC offer distinct approaches. In RBAC, you might define roles such as OWNER and VIEWER, and grant Charlie full access to each resource through the OWNER role. While initially straightforward, this method can become inflexible as the application grows, potentially leading to role proliferation. For example, you might want to have separate roles to manage different resources (such as photos or videos) for each type of pet (such as cats or dogs). In ABAC, you might assign attributes such as OWNER and VIEWER and grant each user permissions to resources with specific attributes. This approach offers more flexibility, but fine-grained control can be more complex to set up and manage. As the application’s hierarchy becomes more intricate, both models face challenges in maintaining scalability while maintaining proper access control.
ReBAC addresses these limitations by implementing an access control model that uses direct and indirect relationships between principals and resources. In the example scenario, when Charlie requests access to the video resource aliceCatVideo.mp4, the application traverses the relationship graph in Neptune to retrieve the inherited OWNER relationship through the MemberOf relationship and make the authorization decision.
Overview of a ReBAC application
In this solution, relationship data is stored in Neptune. Prior to requesting an authorization decision from Verified Permissions, the application runs a Neptune query that traverses the relationship graph to retrieve the set of principals that have a specific relationship with the resource. The application then constructs an authorization request for Verified Permissions, using the results of this query to populate the entity data in the request.
In the Cedar schema, the resource has an attribute—named for the relationship—that contains the set of principals that have that relationship with the resource. In our sample application, entities of type Video have an attribute called OWNER, which contains the set of users that have an owner relationship, directly or indirectly, with a video. Each potential relationship is represented by a distinct resource attribute and requires a dedicated query to fetch the set of principals that have that relationship.
See the GitHub repository for the step-by-step walkthrough. In this post, we focus on the key concepts of the solution.
Architecture
Figure 4: Solution architecture
The solution architecture, as shown in Figure 4, includes the following:
The user authenticates with Amazon Cognito and obtains an access token and an ID token.
The user accesses the application through Amazon API Gateway with the provided token.
An application AWS Lambda function traverses the relationship graph in Neptune and returns the set of principals that have a specific relationship with the resource.
The application Lambda function constructs the requests by putting relationship data in the entities field and passes the requests to Verified Permissions. Verified Permissions acts as the policy decision point (PDP) and evaluates the Cedar policies to arrive at an authorization decision.
The application Lambda function acts as the policy enforcement point (PEP) to enforce the authorization decision returned by Verified Permissions by allowing or denying access to the API.
Data modelling and queries in Neptune
Relationships between entities are created and stored in Neptune as a property graph. A property graph is a set of vertices and edges with respective properties (key-value pairs). The vertices represent entities such as User, Directory, and Video in our example, and the edges represent directional relationships between vertices. Each edge has a label that denotes the type of relationship.
Neptune supports multiple graph query languages, including Gremlin, openCypher, and SPARQL, to access a graph. In this solution, we use Gremlin as the graph query language. For more information about Gremlin, see the documentation from Apache TinkerPop. You can use Neptune graph notebooks to work with a Neptune graph.
You can visualize the relationship graph (Figure 5) using the following query. We use elementMap() to include attributes to represent a vertex or an edge.
# Visualizing the relationship graph and extracting the attributes of each vertex and edge
%%gremlin -p v,oute,inv
g.V().outE().inV().path().by(elementMap('name','directoryId','videoId','ownerName','ownerId','userId','isPublic').order().by(keys))
Figure 5: Relationship graph in Neptune
The following code snippet shows how to add a vertex for entity and an edge for relationship in a relationship graph. Static attributes such as ownerId, ownerName, and isPublic are defined as properties of a vertex. In our example, we will define two relationships—MEMBEROF and OWNER—to denote the direct relationships between resources-to-resources and resources-to-users respectively.
It’s a best practice to assign universally unique identifiers (UUIDs) for all principal and resource identifiers. Another best practice is to not include personally identifying, confidential, or sensitive information as part of the unique identifier for your principals or resources.
To traverse the relationship graph to obtain the owner vertex of a resource vertex, you can use the following query. This query returns the vertex that has a direct OWNER relationship to the resource vertex aliceCatVideo.mp4.
# Retrieve the direct owner of a specific video
g.V().hasLabel('video').has('name', 'aliceCatVideo.mp4').in('OWNER').values(‘name’)
You can use the following query to discover inherited OWNER relationships through MemberOf relationships between resources. The query traverses the relationship graph starting from a video vertex and return the OWNER vertex of each resource vertex along the path to the root directory petVideosDirectory. It outputs the set of owners after deduplication. This query discovers the inherited OWNER in the file system hierarchy and includes them in the entities list of authorization requests.
# Retrieve the direct and transitive owners of a specific video
g.V().hasLabel('video').has('videoId',video_id).union(in('OWNER'),repeat(out('MEMBEROF')).until(has('name', 'petVideosDirectory')).in('OWNER')).dedup().values('userId').toList()
Cedar policy design
Verified Permissions uses the Cedar policy language to define fine-grained permissions. The default decision for an authorization response is DENY. The first policy permits a principal to perform actions in the action group OwnerActions on resources in petVideosDirectory only when the same principal is included in the set of resource owners.
// Resource owner and related persons can access the resources
permit (
	principal,
	action in [PetVideosApp::Action::"OwnerActions"],
	resource in PetVideosApp::Directory::<petVideosDirectory_UUID> )
when {
	resource has owner &&
	principal in resource.owner };
The second policy is an ABAC policy that permits a principal to perform actions in the action group PublicActions on resources in petVideosDirectory only when the resource has the static attribute isPublic and its value is true.
// Allow public access to the resources
permit (
	principal,
	action in [PetVideosApp::Action::"PublicActions"],
	resource in PetVideosApp::Directory::<petVideosDirectory_UUID> )
when {
	resource has isPublic &&
	resource.isPublic == true };
Implementing ReBAC using this Cedar design pattern in conjunction with a relationship graph requires the careful construction of queries. Verified Permissions will validate that the Cedar policies are correct, based on the Cedar schema, but cannot validate that the Neptune queries correctly traverse the graph to return the correct set of principals with the referenced relationship.
When designing your policies and queries, take account of the following guidelines.
Each Cedar policy governs the behaviors of a specific relationship, in this case OWNER. Use a distinct Cedar policy for each relationship in your use cases.
Define action groups for each relationship in your use cases.
Each new relationship referenced in a Cedar policy requires its own query, and the application needs to run this query if the relationship is relevant to the authorization request. Policy writers must collaborate closely with the application developer to help ensure that the application fetches all data that’s relevant to the authorization request.
Indirect relationships can be hard to intuit and prone to errors. The example here of an OWNER relationship inherited through the MEMBEROF relationship is relatively intuitive. However, we recommend avoiding policies that rely on indirect relationships that are derived from multiple different types of direct relationship.
Indirect relationships can be over-permissive when there is no permission boundary defined. In our example, the boundary for inherited relationship is defined at the root level of the directory (petVideosDirectory). Follow the least privilege principle to limit inherited relationship within a clearly defined permission boundary.
Use MEMBEROF to denote the parent relationship in your graph to align with Cedar policy terminology. However, remember that Verified Permissions cannot auto-discover the Neptune graph, so your queries will still need to be designed to traverse it correctly.
Authorization request to Verified Permissions
The following example shows the structure of an authorization request made to Verified Permissions. In the example, Amazon Cognito is used as the identity source of the Verified Permissions policy store. Cognito user ID claims are mapped to the user entity PetVideosApp::User. Tokens issued by Cognito are mapped to a principal ID in the format <user pool ID>|<sub> by Verified Permissions.
The following request was made for action ViewVideo to the video resource entity with UUID 878c101a-ca0e-4733-904d-af3f252abf50 (the video ID of aliceCatVideo.mp4) using the ID token of alice. The user IDs for alice and charlie were returned after traversing the relationship graph in Neptune to fetch users with the OWNER relationship and include these in the owner attribute in the entities field. The entities field is an array of attributes that Verified Permissions can examine when evaluating the policies. The resource hierarchy of this video resource was shown by including the parent directories (petVideosDirectory and aliceVideosDirectory) as the parent entities in the authorization request.
With reference to the Cedar policy <Resource owner and related persons can access the resources>, the following authorization request returns an ALLOW decision.
ReBAC policies are a great fit when you want to create access based on a relationship between the principal and the resource. However, there can be cases where an ABAC policy is a more intuitive expression of a business rule. For example, in the sample application, you might want to grant all principals permission to view any public resource.
With ReBAC, you would need to create a vertex public in the relationship graph, create MEMBEROF relationships between all public resources and this vertex, and then create a VIEWER relationship between all principals and the vertex public.
With Cedar, you can create a policy store that is a mix of ReBAC and ABAC policies, enabling you to express this access rule with a single ABAC policy that allows public access to resources, as described in the section Cedar Policy Design. This policy grants broad access on resources with the attribute isPublic set to true.
You can use the following Gremlin query to modify the static property isPublic of the video resource vertex bobDogVideo.mp4 to true.
# Set the property "isPublic" to "true" for a specific video
g.V().hasLabel('video').has('name','bobDogVideo.mp4').property(single,'isPublic',true)
You can verify the value of property isPublic of bobDogVideo.mp4 with the following Gremlin query.
# Verify the value of property "isPublic" of a specific video
g.V().hasLabel('video').has('name','bobDogVideo.mp4').values('isPublic')
The following authorization request is made to Verified Permissions using the principal alice after you have set the isPublic property of the video resource bobDogVideo.mp4. In the entities field, there is the attribute isPublic with true as the value.
With reference to the Cedar policy <Allow public access to the resources>, the following authorization request returns ALLOW.
In this post, we showed you what ReBAC is and its benefits and demonstrated the implementation of ReBAC using Amazon Verified Permissions and Amazon Neptune. We also reviewed Cedar policy design patterns and considerations, in addition to the authorization request structure for a ReBAC application. You also saw how to combine ReBAC policies with ABAC policies.
If you have a customer facing application, you might want to enable self-service sign-up, which allows potential customers on the internet to create an account and gain access to your applications. While it’s necessary to allow valid users to sign up to your application, self-service options can open the door to unintended use or sign-ups. Bad actors might leverage the user sign-up process for unintended purposes, launching large-scale distributed denial of service (DDoS) attacks to disrupt access for legitimate users or committing a form of telecommunications fraud known as SMS pumping. SMS pumping is when bad actors purchase a block of high-rate phone numbers from a telecom provider and then coerces unsuspecting services into sending SMS messages to those numbers.
Amazon Cognito is a managed OpenID Connect (OIDC) identity provider (IdP) that you can use to add self-service sign-up, sign-in, and control access features to your web and mobile applications. AWS customers who use Cognito might encounter SMS pumping if SMS functions are enabled to send SMS messages, for example, perform user phone number verification during the registration process, to facilitate SMS multi-factor authentication (MFA) flows, or to support account recovery using SMS. In this blog post, we explore how SMS pumping may be perpetrated and options to reduce risks, including blocking unexpected user registration, detecting anomalies, and responding to risk events with your Cognito user pool.
Cognito user sign-up process
After a user has signed up in your application with an Amazon Cognito user pool, their account is placed in the Registered (unconfirmed) state in your user pool and the user won’t be able to sign in yet. You can use the Cognito-assisted verification and confirmation process to verify user-provided attributes (such as email or phone number) and then confirm the user’s status. This verified attribute is also used for MFA and account recovery purposes. If you choose to verify the user’s phone number, Cognito sends SMS messages with a one-time password (OTP). After a user has provided the correct OTP, their email or phone number is marked as verified and the user can sign in to your application.
Figure 1: Amazon Cognito sign-up process
If the sign-up process isn’t protected, bad actors can create scripts or deploy bots to sign up a large number of accounts, resulting in a significant volume of SMS messages sent in a short period of time. We dive deep into prevention, detection, and remediation mechanisms and strategies that you can apply to help protect against SMS pumping based on your use case.
Protect the sign-up flow
In this section, we review several prevention strategies to help protect against SMS sign-up frauds and help reduce the amount of SMS messages sent to bad actors.
Implement bot mitigation
Implementing bot mitigation techniques, such as CAPTCHA, can be very effective in preventing simple bots from pumping user creation flows. You can integrate a CAPTCHA framework on your application’s frontend and validate that the client initiating the sign-up request is operated by a human user. If the user has passed the verification, you then pass the CAPTCHA user response token in ClientMetadata together with user attributes to an Amazon Cognito SignUp API call. As part of the sign-up process, Cognito invokes an AWS Lambda function called pre sign-up Lambda trigger, which you can use to reject sign-up requests if there isn’t a valid CAPTCHA token presented. This will slow down bots and help reduce unintended account creation in your Cognito user pool.
Validate phone number before user sign-up
Another layer of mitigation is to identify the actor’s phone number early in your application’s sign-up process. You can validate the user provided phone number in the backend to catch incorrectly formatted phone numbers and add logic to help filter out unwanted phone numbers prior to sending text messages. Amazon Pinpoint offers a Phone Number Validate feature that can help you determine if a user-provided phone number is valid, determine phone number type (such as mobile, landline, or VoIP), and identify the country and service provider the phone number is associated with. The returned phone number metadata can be used to decide whether the user will continue the sign-up process and send an SMS message to that user. Note that there’s an additional charge for using the phone number validation service. For more information, see Amazon Pinpoint pricing.
To build this validation check into the Amazon Cognito sign-up process, you can customize the pre sign-up Lambda trigger, which Cognito uses to invoke your code before allowing users to sign-up and sending out an SMS OTP. The Lambda trigger invokes the Amazon Pinpoint phone number validate API, and based on the validation response, you can build a custom pattern that fits your application to continue or reject the user sign-up. For example, you can reject user sign-ups with VoIP numbers or reject users who provide a phone number that’s associated with countries that you don’t operate in, or even reject certain cellular service providers. After you reject a user sign-up using the Lambda trigger, Cognito will deny the user sign-up request and will not invoke user confirmation flow nor send out an SMS message.
When you send a request to the Amazon Pinpoint phone number validation service, it returns the following metadata about the phone number. The following example represents a valid mobile phone number data set:
Note that PhoneType includes type MOBILE, LANDLINE, VOIP, INVALID, or OTHER. INVALID phone numbers don’t include information about the carrier or location associated with the phone number and are unlikely to belong to actual recipients. This helps you decide when to reject user sign-ups and reduces SMS messages to undesired phone numbers. You can see details about other responses in the Amazon Pinpoint developer guide.
Example pre sign-up Lambda function to block user sign-up except with a valid MOBILE number
The following pre sign-up Lambda function example invokes the Amazon Pinpoint phone number validation service and rejects user sign-ups unless the validation service returns a valid mobile phone number.
import { PinpointClient, PhoneNumberValidateCommand } from "@aws-sdk/client-pinpoint"; // ES Modules import

const validatePhoneNumber = async (phoneNumber) => {
  const pinpoint = new PinpointClient();
  const input = { // PhoneNumberValidateRequest
    NumberValidateRequest: { // NumberValidateRequest
      PhoneNumber: phoneNumber,
    },
  };
  const command = new PhoneNumberValidateCommand(input);
  const response = await pinpoint.send(command);

  return response;
};

const handler = async (event, context, callback) => {

  const phoneNumber = event.request.userAttributes.phone_number;
  const validationResponse = await validatePhoneNumber(phoneNumber);

  if (validationResponse.NumberValidateResponse.PhoneType != "MOBILE") {
    var error = new Error("Cannot register users without a mobile number");
    // Return error to Amazon Cognito
    callback(error, event);
  }
  // Return to Amazon Cognito
  callback(null, event);
};

export { handler };
Use a custom user-initiated confirmation flow or alternative OTP delivery method
In your user pool configurations, you can opt out of using Amazon Cognito-assisted verification and confirmation to send SMS messages to confirm users. Instead, you can build a custom reverse OTP flow to ask your users to initiate the user confirmation process. For example, instead of automatically sending SMS messages to a user when they sign up, your application can display an OTP and direct the user to initiate the SMS conversation by texting the OTP to your service number. After your application has received the SMS message and confirmed the correct OTP is provided, invoke a service such as a Lambda function to call the AdminConfirmSignUp administrative API operation to confirm user, then call AdminUpdateUserAttributes to set the phone_number_verified attribute as true to indicate that the user phone number is verified.
You can also choose to deliver an OTP using other methods, such as email, especially if your application doesn’t require the user’s phone number. During the user sign-up process, you can configure a custom SMS sender Lambda trigger in Amazon Cognito to send a user verification code through email or another method. Additionally, you can use the Cognito email MFA feature to send MFA codes through email.
Detect SMS pumping
When you’re considering the various prevention options, it’s important to set up detection mechanisms to identify SMS pumping as they arise. In this section, we show you how to use AWS CloudTrail and Amazon CloudWatch to monitor your Amazon Cognito user pool and detect anomalies that could lead to SMS pumping. Note that building detection mechanism based on anomalies requires knowing your average or baseline traffic and the difference in metrics that represent regular activity and metrics that can indicate unauthorized or unintended activity.
Service quotas dashboard and CloudWatch alarms
Bad actors may attempt to leverage either the sign-up confirmation or the reset password functionality of Amazon Cognito. As shown previously in Figure 1, when a new user signs up to your Cognito user pool, the SignUp API operation is invoked. When the user provides the OTP confirmation code, the ConfirmSignUp API operation is invoked. The call rate of both APIs is tracked collectively under Rate of UserCreation requests under Amazon Cognito service in the service quotas dashboard.
You can set up Amazon CloudWatch alarms to monitor and issue notifications when you’re close to a quota value threshold. These alarms could be an early indication of a sudden usage increase, and you can use them to triage potential incidents.
Additionally, when your services are sending SMS messages, those transactions count towards the Amazon Simple Notification Service (Amazon SNS) service quota. You should set up alarms to monitor the Transactional SMS Message Delivery Rate per Second quota and the SMS Message Spending in USD quota.
CloudTrail event history
When bad actors plan SMS pumping, they are likely attempting to trick you to send as many SMS messages as possible rather than completing the user confirmation process. Under the context of a user sign-up event, you might notice in the CloudTrail event history that there are more SignUp and ResendConfirmationCode events—which send out SMS messages—than ConfirmSignUp operations; indicating a user has initiated but not completed the sign-up process. You can use Amazon Athena or CloudWatch Logs Insights to search and analyze your Amazon Cognito CloudTrail events and identify if there’s a significant reduction in finishing the user sign-up process.
Figure 2: SignUp API logged in CloudTrail event history
Similarly, you can apply this observability towards the user password reset flow by analyzing the ForgotPassword API and ConfirmForgotPassword API operations for deviations.
Note that the slight deviations in user completion flow in the CloudTrail event history alone might not be an indication of unauthorized activity, however a substantial deviation above the regular baseline might be a signal of unintended use.
Monitor excessive billing
Another opportunity for detecting and identifying unauthorized Amazon Cognito activity is by using AWS Cost Explorer. You can use this interface to visualize, understand, and manage your AWS costs and usage over time, which might assist by highlighting the source of excessive billing in your AWS account. Be aware that charges in your account can take up to 24 hours to be displayed, so while this method can help provide some assistance in identifying SMS pumping activity, it should only be used as a supplement to other detection methods.
In the navigation pane, under Cost Analysis, choose Cost Explorer.
In the Cost and Usage Report, under Report Parameters, select Date Range to include the start and end date of the time period that you want to apply a filter to. In Figure 3 that follows, we use an example date range between 2024-07-03 and 2024-07-17.
In the same Report Parameter area, under Filters, for Service, select SNS (Simple Notification Service). Because Amazon Cognito uses Amazon SNS for delivery of SMS messages, filtering on SNS can help you identify excessive billing.
Figure 3: Reviewing billing charges by service
Apply AWS WAF rules as mitigation approaches
It’s recommended that you apply AWS WAF with your Amazon Cognito user pool to protect against common threats. In this section, we show you a few advanced options using AWS WAF rules to block or throttle specific bad actor’s traffic when you have observed irregular sign-up attempts and suspect they were part of fraudulent activities.
Target a specific bad actor’s IP address
When building AWS WAF remediation strategies, you can start by building an IP deny list to block traffic from known malicious IP addresses. This method is straightforward and can be highly effective in preventing unwanted access. For detailed instructions on how to set up an IP deny list, see Creating an IP set.
Target a specific phone number area code regex pattern
In an SMS pumping scheme, bad actors often purchase blocks of cell phone numbers from a wireless service provider and use phone numbers with the same area code. If you observe a pattern and identify that these attempts use the same area code, you can apply an AWS WAF rule to block that specific traffic.
To configure an AWS WAF web ACL to block using an area code regex pattern:
Open the AWS WAF console.
In the navigation pane, under AWS WAF, choose WAF ACLs.
Choose Create web ACL. Under Web ACL details, select Regional resources, and select the AWS Region as your Amazon Cognito user pool. Under Associated AWS resources, select Add AWS resources, and choose your Cognito user pool. Choose Next.
On the Add rules and rule groups page, choose Add rules, Add my own rules and rule groups, and Rule builder.
Create a rule in Rule builder.
For If a request, select matches the statement.
For Inspect, select Body.
For Match type, select Matches regular expression.
For Regular expression, enter a match for the observed pattern. For example, the regular expression ^303|^\+1303|^001303 will match requests that include the digits 303, +1303, or 001303 at the beginning of any string in the body of a request:
Figure 4: Creating a web ACL
Under Action, choose Block. Then, choose Add rule.
Continue with Set rule priority and Configure metrics, then choose Create web ACL.
Be aware that this method will block all user sign-up requests that contain phone numbers matching the regex pattern for the target area code and could prevent legitimate users whose numbers match the defined pattern from signing up. For example, the rule above will apply to all users with phone numbers starting with 303, +1303, or 001303. You should consider implementing this method as an as-needed solution to address an ongoing SMS pumping attack.
Target a specific bad actor’s client fingerprint
Another method is to examine an actor’s TLS traffic. If your application UI is hosted using Amazon CloudFront or Application Load Balancer (ALB), you can build AWS WAF rules to match the client’s JA3 fingerprint. The JA3 fingerprint is a 32-character MD5 hash derived from the TLS three-way handshake when the client sends a ClientHello packet to the server. It serves as a unique identifier for the client’s TLS configuration because various attributes such as TLS version, cipher suites, and extensions are derived to calculate the fingerprint, allowing for the unique detection of clients even when the source IP and other commonly used identification information might have changed.
Fraudulent activities, such as SMS pumping, are typically carried out using automated tools and scripts. These tools often have a consistent SSL/TLS handshake pattern, resulting in a unique JA3 fingerprint. By configuring an AWS WAF web ACL rule to match the JA3 fingerprint associated with this traffic, you can identify clients with a high degree of accuracy, even if they change other attributes, such as IP addresses.
AWS WAF has introduced support for JA3 fingerprint matching, which you can use to identify and differentiate clients based on the way they initiate TLS connections, enabling you to inspect incoming requests for their JA3 fingerprints. You can build the remediation strategy by first evaluating AWS WAF logs to extract JA3 fingerprints for potential malicious hosts, then proceed with creating rules to block requests where the fingerprint matches the malicious JA3 fingerprint associated with previous attacks.
To configure an AWS WAF web ACL to block using JA3 fingerprint matching for CloudFront resources:
Open the AWS WAF console.
In the navigation pane, under AWS WAF, choose WAF ACLs.
Choose Create web ACL. Under Web ACL details, select Amazon CloudFront distributions. Under Associated AWS resources, select Add AWS resources, and select your CloudFront distribution. Choose Next.
On the Add rules and rule groups page, choose Add rules, Add my own rules and rule groups, and Rule builder.
In Rule builder:
For If a request, select matches the statement.
For Inspect, select JA3 fingerprint.
For Match type, keep Exactly matches string.
For String to match, enter the JA3 fingerprint that you want to block.
For Text transformation, choose None.
For Fallback for missing JA3 fingerprint, select a fallback match status for cases where no JA3 fingerprint is detected. We recommend choosing No match to prevent unintended traffic blocking.
If you need to block multiple JA3 fingerprints, include each one in the rule and for If a request select matches at least one of the statements (OR).
Figure 5: Creating an AWS WAF statement for a JA3 fingerprint
Under Action, select Block, and choose Add rule. You can choose other actions such as COUNT or CAPTCHA that suit your use case.
Continue with Set rule priority and Configure metrics, then choose Create web ACL.
Note that JA3 fingerprints can change over time due to the randomization of TLS ClientHello messages by modern browsers. It’s important to dynamically update your web ACL rules or manually review logs to update the JA3 fingerprint search string in your match rule when applicable.
AWS WAF remediation considerations
These AWS WAF remediation approaches help to block potential threats by providing mechanisms to filter out malicious traffic. It’s essential to continually review the effectiveness of these rules to minimize the risk of blocking legitimate sources and make dynamic adjustments to the rules when you detect new bad actors and patterns.
Summary
In this blog post, we introduced mechanisms that you can use to detect and protect your Amazon Cognito user pool against unintended user sign-up and SMS pumping. By implementing these strategies, you can enhance the security of your web and mobile applications and help to safeguard your services from potential abuse and financial loss. We suggest that you apply a combination of these prevention, detection, and mitigation approaches to protect your Cognito user pools.
If you have feedback about this post, submit comments in the Comments section below. If you have questions about this post, contact AWS Support.
Amazon Cognito is a customer identity and access management (CIAM) service that can scale to millions of users. Although the Cognito documentation details which multi-tenancy models are available, determining when to use each model can sometimes be challenging. In this blog post, we’ll provide guidance on when to use each model and review their pros and cons to help inform your decision.
Cognito overview
Amazon Cognito handles user identity management and access control for web and mobile apps. With Cognito user pools, you can add sign-up, sign-in, and access control to your apps. A Cognito user pool is a user directory within a specific AWS Region where users can authenticate and register for applications. In addition, a Cognito user pool is an OpenID Connect (OIDC) identity provider (IdP). App users can either sign in directly through a user pool or federate through a third-party IdP. Cognito issues a user pool token after successful authentication, which can be used to securely access backend APIs and resources.
Cognito issues three types of tokens:
ID token – Contains user identity claims like name, email, and phone number. This token type authenticates users and enables authorization decisions in apps and API gateways.
Access token – Includes user claims, groups, and authorized scopes. This token type grants access to API operations based on the authenticated user and application permissions. It also enables fine-grained, user-based access control within the application or service.
Refresh token – Retrieves new ID and access tokens when these are expired. Access and ID tokens are short-lived, while the refresh token is long-lived. By default, refresh tokens expire 30 days after the user signs in, but this can be configured to a value between 60 minutes and 10 years.
You can find more information on using tokens and their contents in the Cognito documentation.
Multi-tenancy approaches
Software as a service (SaaS) architectures often use silo, pool, or bridge deployment models, which also apply to CIAM services like Cognito. The silo model isolates tenants in dedicated resources. The pool model shares resources between tenants. The bridge model connects siloed and pooled components. This post compares the Cognito silo and pool models for SaaS identity management.
It’s also possible to combine the silo and pool models by having multiple tiers of resources. For example, you could have a siloed tier for sensitive tenant data along with a pooled tier for shared functionality. This is similar to the silo model but with added routing complexity to connect the tiers. When you have multiple pools or silos, this is a similar approach to the pure silo model but with more components to manage.
More detail on these models are included in the AWS SaaS Lens.
We’ve detailed five possible patterns in the following sections and explored the scenarios where each of the patterns can be used, along with the advantages and disadvantages for each. The rest of the post delves deeper into the details of these different patterns, enabling you to make an informed decision that best aligns with your unique requirements and constraints.
Pattern 1: Representing SaaS identity with custom attributes
To implement multi-tenancy in a SaaS application, tenant context needs to be associated with user identity. This allows implementation of the multi-tenant policies and strategies that comprise our SaaS application. Cognito has user pool attributes, which are pieces of information to represent identity. There are standard attributes, such as name and email, that describe the user identity. Cognito also supports custom attributes that can be used to hold information about the user’s relationship to a tenant, such as tenantId.
By using custom attributes for multi-tenancy in Amazon Cognito, the tenant context for each user can be stored in their user profile.
To enable multi-tenancy, you can add a custom attribute like tenantId to the user profile. When a new user signs up, this tenantId attribute can be set to a value indicating which tenant the user belongs to. For example, users with tenantId “1234” belong to Tenant A, while users with tenantId “5678” belong to Tenant B.
The tenantId attribute value gets returned in the ID token after a successful user authentication. (This value can also be added to the access token through customization by using a pre-token generation Lambda trigger.) The application can then inspect this claim to determine which tenant the user belongs to. The tenantId attribute is typically managed at the SaaS platform level and is read-only to users and the application layer. (Note: SaaS providers need to configure the tenantId attribute to be read-only.)
In addition to storing a tenant ID, you can use custom attributes to model additional tenant context. For instance, attributes like tenantName, tenantTier, or tenantRegion could be defined and set appropriately for each user to provide relevant informational context for the application. However, make sure not to use custom attributes as a database—they are meant to represent identity, not store application data. Custom attributes should only contain information that is relevant for authorization decisions and JSON web token (JWT) compactness and should be relatively static because their values are stored in the Cognito directory. Updating frequently changing data requires modifying the directory, which can be cumbersome.
The custom attributes themselves need to be defined at the time of creating the Amazon Cognito user pool, and there is a maximum of 50 custom attributes that you can create. Once the pool is created, these custom attribute fields will be present on every user profile in that user pool. However, they won’t have values populated yet. The actual tenant attribute values get populated only when a new user is created in the user pool. This can be done in two ways:
During user sign-up, a post confirmation AWS Lambda trigger can be used to set the appropriate tenant attribute values based on the user’s input.
An admin user can provision a new user through the AdminCreateUser API operation and specify the tenant attribute values at that time.
After user creation, the custom tenant attribute values can still be updated by an administrator through the AdminUpdateUserAttributes API operation or by a user with the UpdateUserAttributes API operation, if needed. But the key point is that the custom attributes themselves must be predefined at user pool creation, while the values get set later during user creation and provisioning flows. Figure 1 shows how custom attributes are associated with an ID token and used subsequently in downstream applications.
Figure 1: Associating tenant context with custom attributes
As shown in Figure 1:
The custom tenant attribute values from the user profile are included in the Cognito ID token that is generated after a successful user authentication. These values can be used for access control for other AWS services, such as Amazon API Gateway.
You can configure Amazon API Gateway with a Lambda authorizer function that validates the ID token signature (the aws-jwt-verify library can be used for this purpose) and inspects the tenant ID claim in each request.
Based on the tenant ID value extracted from the ID token, the Lambda authorizer can determine which backend resources and services each authenticated user is authorized to access.
You can use this method to provide fine-grained access control, as described in this blog post, by using tenant claims as context in addition to the user claims embedded within the token. This pattern of embedding information about the user’s identity, along with details on their associated tenant, in a single token is what AWS refers to as SaaS identity.
The multi-tenancy approaches of using siloed user pools, shared pools, or custom attributes rely on embedding tenant context within the user identity. This is accomplished by having Cognito include claims with tenant information in the JWTs issued after authentication.
The JWT encodes user identity information like the username, email address, and so on. By adding custom claims that contain tenant identifiers or metadata, the tenant context gets tightly coupled to the user identity. The embedded tenant context in the JWT allows applications to implement access control and authorization based on the associated tenant for each user.
This combination of user identity information and tenant context in the issued JWT represents the SaaS identity—a unified identity spanning both user and tenant dimensions. The application uses this SaaS identity for implementing multi-tenant logic and policies.
Pattern 2: Shared user pool (pool model)
A single, shared Amazon Cognito user pool simplifies identity management for multi-tenant SaaS applications. With one consolidated pool, changes and configurations apply across tenants in one place, which can reduce overhead.
For example, you can define password complexity rules and other settings once at the user pool level, and then these settings are shared across tenants. Adding new tenants is streamlined by using the settings in the existing shared pool, without duplicating setup per tenant. This avoids deploying isolated pools when onboarding new tenants.
Additionally, the tokens issued from the shared pool are signed by the same issuer. There is no tenant-specific issuer in the tokens when using a shared pool. For SaaS apps with common identity needs, a shared multi-tenant pool minimizes friction for rapid onboarding despite that loss of per-tenant customization.
Advantages of the pool model:
This model uses a single shared user pool for tenants. This simplifies onboarding by setting user attributes rather than configuring multiple user pools.
Tenants authenticate using the same application client and user pool, which keeps the SaaS client configuration simple.
Disadvantages of the pool model:
Sharing one pool means that settings like password policies and MFA apply uniformly, without customization per tenant.
Some resource quotas are managed at a user pool level (for example, the number of application clients or customer attributes), so you need to consider quotas carefully when adopting this model.
Pattern 3: Group-based multi-tenancy (pool model)
Amazon Cognito user pools give an administrator the capability to add groups and associate users with groups. Doing so introduces specific attributes (cognito:groups and cognito:roles) that are managed and maintained by Cognito and available within the ID tokens. (Access tokens only have the cognito:groups attribute.) These groups can be used to enable multi-tenancy by creating a separate group for each tenant. Users can be assigned to the appropriate tenant group based on the value of a custom tenantId attribute. The application can then implement authorization logic to limit access to resources and data based on the user’s tenant group membership that is encoded in the tokens. This provides isolation and access control across tenants, making use of the native group constructs in Cognito rather than relying entirely on custom attributes.
The group information contained in the tokens can then be used by downstream services to make authorization decisions. Groups are often combined with custom attributes for more granular access control. For example, in the SaaS Factory Serverless SaaS – Reference Solution developed by the AWS SaaS Factory team, roles are specified by using Cognito groups, but tenant identity relies on a custom tenantId attribute. The tenant ID attribute provides isolation between tenants, while the groups define individual user roles and access privileges that apply within a tenant.
Figure 2 shows how groups are associated with the user and then the Lambda authorizer can determine which backend resources and services each authenticated user is authorized to access.
Figure 2: Group-based multi-tenancy
In this model, groups can provide role-based controls, while custom attributes like tenant ID provide the contextual information needed to enforce tenant isolation. The authorization decisions are then made by evaluating a user’s group memberships and attribute values in order to provide fine-grained access tailored to each tenant and user. So groups directly enable role-based checks, while custom attributes provide broader context for conditional access across tenants. Together they can provide the data that is needed to implement granular authorization in a multi-tenant application.
Advantages of group-based multi-tenancy:
This model uses a single shared user pool for tenants, so that onboarding requires setting user attributes rather than configuring multiple pools.
Tenants authenticate through the same application client and pool, keeping SaaS client configuration straightforward.
Disadvantages of group-based multi-tenancy:
Sharing one pool means that settings like password policies and MFA apply uniformly without per-tenant customization.
There is a limit of 10,000 groups per user pool.
Pattern 4: Dedicated user pool per tenant (silo model)
Another common approach for multi-tenant identity with Cognito is to provision a separate user pool for each tenant. A Cognito user pool is a user directory, so using distinct pools provides maximum isolation. However, this approach requires that you implement tenant routing logic in the application to determine which user pool a user should authenticate against, based on their tenant.
Tenant routing
With separate user pools per tenant (or application clients, as we’ll discuss later), the application needs logic to route each user to the appropriate pool (or client) for authentication. There are a few options that you can use for this approach:
Use a subdomain in the URL that maps to the tenant—for example, tenant1.myapp.com routes to Tenant 1’s user pool. This requires mapping subdomains to tenant pools.
Rely on unique email domains per tenant—for example, @tenant1.com goes to Tenant 1’s pool. This requires mapping email domains to pools.
Have the user select their tenant from a dropdown list. This requires the tenant choices to be configured.
Prompt the user to enter a tenant ID code that maps to pools. This requires mapping codes to pools.
No matter the approach you chose, the key requirements are the following:
A data point to identify the tenant (such as subdomain, email, selection, or code).
A mapping dataset that takes tenant identifying information from the user and looks up the corresponding user pool to route to for authentication.
Routing logic to redirect to the appropriate user pool.
The tenant name retrieves tenant-specific information like the user pool ID, application client ID, and API URLs.
Tenant-specific information is passed to the SaaS app to initialize authentication to the correct user pool and app client, and this is used to initialize an authorization code flow.
The app redirects to the Cognito hosted UI for authentication.
User credentials are validated, and Cognito issues an OAuth code.
The OAuth code is exchanged for a JWT token from Cognito.
The JWT token is used to authenticate the user to access microservices.
Advantages of the one pool per tenant model:
Users exist in a single directory with no cross-tenant visibility. Tokens are issued and signed with keys that are unique to that pool.
Each pool can have customized security policies, like password rules or MFA requirements per tenant.
Pools can be hosted in different AWS Regions to meet data residency needs.
Potential disadvantages of the one pool per tenant model:
There are limits on the number of pools per account. (The default is 1,000 pools, and the maximum is 10,000.)
Additional automation is required to create multiple pools, especially with customized configurations.
Applications must implement tenant routing to direct authentication requests to the correct user pool.
Troubleshooting can be more difficult, because configuration of each pool is managed separately and tenant routing functionality is added.
In summary, separate user pools maximize tenant isolation but require more complex provisioning and routing. You might also need to consider limits on the pool count for large multi-tenant deployments.
Pattern 5: Application client per tenant (bridge model)
You can achieve some extra tenant isolation by using separate application clients per tenant in a single user pool, in addition to using groups and custom attributes. Cognito configurations from the application client, such as OAuth scopes, hosted UI customization, and security policies can be specific to each tenant. The application client also enables external IdP federation per tenant. However, user pool–level settings, such as password policy, remain shared.
Figure 4 shows how a single user pool can be configured with multiple application clients. Each of those application clients is assigned to a tenant. However, this approach requires that you implement tenant routing logic in the application to determine which application client a tenant should be mapped to (similar to the approach we discussed for the shared user pool). Once the user is authenticated, you can configure Amazon API Gateway with a Lambda authorizer function that validates the ID token signature. Subsequently, the Lambda authorizer can determine which backend resources and services each authenticated user is authorized to access.
Figure 4: Application client based multi-tenancy
For tenants that want to use their own IdP through SAML or OpenID Connect federation, you can create a dedicated application client that will redirect users to authenticate with the tenant’s federated IdP. This has some key benefits:
If a single external IdP is enabled on the application client, the hosted UI automatically redirects users without presenting Cognito sign-in screens. This provides a familiar sign-in experience for tenants and is frictionless if users have existing sessions with the tenant IdP.
Management of user activities like joining and leaving, passwords, and other tasks are entirely handled by the tenant in their own IdP. The SaaS provider doesn’t need to get involved in these processes.
Importantly, even with federation, Cognito still issues tokens after successful external authentication. So the SaaS provider gets consistent tokens from Cognito to validate during authorization, regardless of the IdP.
Attribute mapping
When federating with an external IdP, Amazon Cognito can dynamically map attributes to populate the tokens it issues. This allows attributes like groups, email addresses, and roles created in the IdP to be passed to Cognito during authentication and added to the tokens.
The mapping occurs upon every sign-in, overwriting the existing mapped attributes to stay in sync with the latest IdP values. Therefore, changes made in the external IdP related to mapped attributes are reflected in Cognito after signing in. If a mapped attribute is required in the Cognito user pool, like email for sign-in, it must have an equivalent in the IdP to map. The target attributes in Cognito must be configured as mutable, since immutable attributes cannot be overwritten after creation, even through mapping.
Important: For SaaS identity, tenant attributes should be defined in Cognito rather than mapped from an external IdP. This helps to prevent tenants from tampering with values and maintains isolation. However, user attributes like groups and roles can be mapped from the tenant’s IdP to manage permissions. This allows tenants to configure application roles by using their own IdP groups.
Advantages of the bridge model:
This model enables tenant-specific configuration like OAuth scopes, UI, and IdPs.
Tenant users access familiar workflows through external IdPs, and when using external IdPs, tenant user management is handled externally.
No custom claim mappings are needed, but can be used optionally.
Cognito still issues tokens for authorization.
Disadvantages of the bridge model:
Requires routing users to the correct app client per tenant.
There is a limit on the number of app clients per user pool.
Some user pool settings remain shared, such as password policy.
There is no dynamic group claim modification.
Conclusion
In this blog post, we explored various ways Amazon Cognito user pools can enable multi-tenant identity for SaaS solutions. A single shared user pool simplifies management but limits the option to customize user pool–level policies, while separate pools maximize isolation and configurability at the cost of complexity. If you use multiple application clients, you can balance tailored options like external IdPs and OAuth scopes with centralized policies in the user pool. Custom claim mappings provide flexibility but require additional logic.
These two approaches can also be combined. For example, you can have dedicated user pools for select high-tier tenants while others share a multi-tenant pool. The optimal choice depends on the specific tenant needs and on the customization that is required.
In this blog post, we have mainly focused on a static approach. You can also use a pre-token generation Lambda trigger to modify tokens by adding, changing, or removing claims dynamically. The trigger can also override the group membership in both the identity and access tokens. Other claim changes only apply to the ID token. A common use case for this trigger is injecting tenant attributes into the token dynamically.
Evaluate the pros and cons of each approach against the requirements of the SaaS architecture and tenants. Often a hybrid model works best. Cognito constructs like user pools, IdPs, and triggers provide various levers that you can use to fine-tune authentication and authorization across tenants.
If you have feedback about this post, submit comments in the Comments section below. If you have questions about this post, start a new thread on Amazon Cognito re:Post
Designing a full stack search application requires addressing numerous challenges to provide a smooth and effective user experience. This encompasses tasks such as integrating diverse data from various sources with distinct formats and structures, optimizing the user experience for performance and security, providing multilingual support, and optimizing for cost, operations, and reliability.
Amazon OpenSearch Serverless is a powerful and scalable search and analytics engine that can significantly contribute to the development of search applications. It allows you to store, search, and analyze large volumes of data in real time, offering scalability, real-time capabilities, security, and integration with other AWS services. With OpenSearch Serverless, you can search and analyze a large volume of data without having to worry about the underlying infrastructure and data management. An OpenSearch Serverless collection is a group of OpenSearch indexes that work together to support a specific workload or use case. Collections have the same kind of high-capacity, distributed, and highly available storage volume that’s used by provisioned Amazon OpenSearch Service domains, but they remove complexity because they don’t require manual configuration and tuning. Each collection that you create is protected with encryption of data at rest, a security feature that helps prevent unauthorized access to your data. OpenSearch Serverless also supports OpenSearch Dashboards, which provides an intuitive interface for analyzing data.
OpenSearch Serverless supports three primary use cases:
Time series – The log analytics workloads that focus on analyzing large volumes of semi-structured, machine-generated data in real time for operational, security, user behavior, and business insights
Search – Full-text search that powers applications in your internal networks (content management systems, legal documents) and internet-facing applications, such as ecommerce website search and content search
Vector search – Semantic search on vector embeddings that simplifies vector data management and powers machine learning (ML) augmented search experiences and generative artificial intelligence (AI) applications, such as chatbots, personal assistants, and fraud detection
In this post, we walk you through a reference implementation of a full-stack cloud-centered serverless text search application designed to run using OpenSearch Serverless.
Solution overview
The following services are used in the solution:
AWS Amplify is a set of purpose-built tools and features that enables frontend web and mobile developers to quickly and effortlessly build full-stack applications on AWS. These tools have the flexibility to use the breadth of AWS services as your use cases evolve. This solution uses the Amplify CLI to build the serverless movie search web application. The Amplify backend is used to create resources such as the Amazon Cognito user pool, API Gateway, Lambda function, and Amazon S3 storage.
Amazon API Gateway is a fully managed service that makes it straightforward for developers to create, publish, maintain, monitor, and secure APIs at any scale. We use API Gateway as a “front door” for the movie search application for searching movies.
AWS CloudFront accelerates the delivery of web content such as static and dynamic web pages, video streams, and APIs to users across the globe by caching content at edge locations closer to the end-users. This solution uses CloudFront with Amazon S3 to deliver the search application user interface to the end users.
Amazon Cognito makes it straightforward for adding authentication, user management, and data synchronization without having to write backend code or manage any infrastructure. We use Amazon Cognito for creating a user pool so the end-user can log in to the movie search application through Amazon Cognito.
AWS Lambda is a serverless, event-driven compute service that lets you run code for virtually any type of application or backend service without provisioning or managing servers. Our solution uses a Lambda function to query OpenSearch Serverless. API Gateway forwards all requests to the Lambda function to serve up the requests.
Amazon OpenSearch Serverless is a serverless option for OpenSearch Service. In this post, you use common methods for searching documents in OpenSearch Service that improve the search experience, such as request body searches using domain-specific language (DSL) for queries. The query DSL lets you specify the full range of OpenSearch search options, including pagination and sorting the search results. Pagination and sorting are implemented on the server side using DSL as part of this implementation.
Amazon Simple Storage Service (Amazon S3) is an object storage service that offers industry-leading scalability, data availability, security, and performance. The solution uses Amazon S3 as storage for storing movie trailers.
AWS WAF helps protects web applications from attacks by allowing you to configure rules that allow, block, or monitor (count) web requests based on conditions that you define. We use AWS WAF to allow access to the movie search app from only IP addresses on an allow list.
The following diagram illustrates the solution architecture.
The workflow includes the following steps:
The end-user accesses the CloudFront and Amazon S3 hosted movie search web application from their browser or mobile device.
The user signs in with their credentials.
A request is made to an Amazon Cognito user pool for a login authentication token, and a token is received for a successful sign-in request.
The search application calls the search API method with the token in the authorization header to API Gateway. API Gateway is protected by AWS WAF to enforce rate limiting and implement allow and deny lists.
API Gateway passes the token for validation to the Amazon Cognito user pool. Amazon Cognito validates the token and sends a response to API Gateway.
API Gateway invokes the Lambda function to process the request.
The Lambda function queries OpenSearch Serverless and returns the metadata for the search.
Based on metadata, content is returned from Amazon S3 to the user.
In the following sections, we walk you through the steps to deploy the solution, ingest data, and test the solution.
Prerequisites
Before you get started, make sure you complete the following prerequisites:
Install and configure the Amplify CLI. At the end of configuration, you should successfully set up the new user using the amplify-dev user’s AccessKeyId and SecretAccessKey in your local machine’s AWS profile.
Amplify users need additional permissions in order to deploy AWS resources. Complete the following steps to create a new inline AWS Identity and Access Management (IAM) policy and attach it to the user:
On the IAM console, choose Users in the navigation pane.
Choose the user amplify-dev.
On the Permissions tab, choose the Add permissions dropdown menu, then choose Inline policy.
In the policy editor, choose JSON.
You should see the default IAM statement in JSON format.
Copy the file contents in AddionalPermissions-Amplify, replacing the tags with your target AWS Region, account, and environment.
This environment name needs to be used when performing amplify init when bringing up the backend. The actions in the IAM statement are largely open (*) but restricted or limited by the target resources; this is done to satisfy the maximum inline policy length (2,048 characters).
Enter the updated JSON into the policy editor, then choose Next.
For Policy name, enter a name (for this post, AddionalPermissions-Amplify).
Choose Create policy.
You should now see the new inline policy attached to the user.
Deploy the solution
Complete the following steps to deploy the solution:
Clone the repository to a new folder on your desktop using the following command:
On the Amazon S3 console, open the trailer S3 bucket (created as part of the backend deployment.
Upload some movie trailers.
Make sure the file name matches the ID field in sample movie data (for example, tt1981115.mp4, tt0800369.mp4, and tt0172495.mp4). Uploading a trailer with ID tt0172495.mp4 is used as the default trailer for all movies, without having to upload one for each movie.
Test the solution
Access the application using the CloudFront distribution domain name. You can find this by opening the CloudFront console, choosing the distribution, and copying the distribution domain name into your browser.
Sign up for application access by entering your user name, password, and email address. The password should be at least eight characters in length, and should include at least one uppercase character and symbol.
After you’re logged in, you’re redirected to the Movie Finder home page.
You can search using a movie name, actor, or director, as shown in the following example. The application returns results using OpenSearch DSL.
If there’s a large number of search results, you can navigate through them using the pagination option at the bottom of the page. For more information about how the application uses pagination, see Paginating search results.
You can choose movie tiles to get more details and watch the trailer if you took the optional step of uploading a movie trailer.
You can sort the search results using the Sort by feature. The application uses the sort functionality within OpenSearch.
There are many more DSL search patterns that allow for intricate searches. See Query DSL for complete details.
Monitoring OpenSearch Serverless
Monitoring is an important part of maintaining the reliability, availability, and performance of OpenSearch Serverless and your other AWS services. AWS provides Amazon CloudWatch and AWS CloudTrail to monitor OpenSearch Serverless, report when something is wrong, and take automatic actions when appropriate. For more information, see Monitoring Amazon OpenSearch Serverless.
Clean up
To avoid unnecessary charges, clean up the solution implementation by running the following command at the project root folder you created using the git clone command during deployment:
In this post, we implemented a full-stack serverless search application using OpenSearch Serverless. This solution seamlessly integrates with various AWS services, such as Lambda for serverless computing, API Gateway for constructing RESTful APIs, IAM for robust security, Amazon Cognito for streamlined user management, and AWS WAF for safeguarding the web application against threats. By adopting a serverless architecture, this search application offers numerous advantages, including simplified deployment processes and effortless scalability, with the benefits of a managed infrastructure.
With OpenSearch Serverless, you get the same interactive millisecond response times as OpenSearch Service with the simplicity of a serverless environment. You pay only for what you use by automatically scaling resources to provide the right amount of capacity for your application without impacting performance and scale as needed. You can use OpenSearch Serverless and this reference implementation to build your own full-stack text search application.
About the Authors
Anand Komandooru is a Principal Cloud Architect at AWS. He joined AWS Professional Services organization in 2021 and helps customers build cloud-native applications on AWS cloud. He has over 20 years of experience building software and his favorite Amazon leadership principle is “Leaders are right a lot“.
Rama Krishna Ramaseshu is a Senior Application Architect at AWS. He joined AWS Professional Services in 2022 and with close to two decades of experience in application development and software architecture, he empowers customers to build well architected solutions within the AWS cloud. His favorite Amazon leadership principle is “Learn and Be Curious”.
Sachin Vighe is a Senior DevOps Architect at AWS. He joined AWS Professional Services in 2020, and specializes in designing and architecting solutions within the AWS cloud to guide customers through their DevOps and Cloud transformation journey. His favorite leadership principle is “Customer Obsession”.
Molly Wu is an Associate Cloud Developer at AWS. She joined AWS Professional Services in 2023 and specializes in assisting customers in building frontend technologies in AWS cloud. Her favorite leadership principle is “Bias for Action”.
Andrew Yankowsky is a Security Consultant at AWS. He joined AWS Professional Services in 2023, and helps customers build cloud security capabilities and follow security best practices on AWS. His favorite leadership principle is “Earn Trust”.
When an identity provider (IdP) serves multiple service providers (SPs), IdP-initiated single sign-on provides a consistent sign-in experience that allows users to start the authentication process from one centralized portal or dashboard. It helps administrators have more control over the authentication process and simplifies the management.
However, when you support IdP-initiated authentication, the SP (Amazon Cognito in this case) can’t verify that it has solicited the SAML response that it receives from IdP because there is no SAML request initiated from the SP. To accept unsolicited SAML assertions in your user pool, you must consider its effect on your app security. Although your user pool can’t verify an IdP-initiated sign-in session, Amazon Cognito validates your request parameters and SAML assertions.
Amazon Cognito has recently enhanced support for the SAML 2.0 protocol by adding support to IdP-initiated single sign-on (SSO), SAML request signing and accepting encrypted SAML responses.
Amazon Cognito acts as the SP representing your application and generates a token after federation that can be used by the application to access protected backends. The SAML provider acts as an IdP, where the user identities and credentials are stored, and is responsible for authenticating the user.
This post describes the steps to integrate a SAML IdP, Microsoft Entra ID, with an Amazon Cognito user pool and use SAML IdP-initiated SSO flow. It also describes steps to enable signing authentication requests and accepting encrypted SAML responses.
IdP-initiated authentication flow using SAML federation
Figure 1: High-level diagram for SAML IdP-initiated authentication flow in a web or mobile app
As shown in Figure 1, the high-level flow diagram of an application with federated authentication typically involves the following steps:
An enterprise user opens their SSO portal and signs in. This usually opens a portal with several applications that the user has access to. When the user selects an Amazon Cognito protected application from their SSO portal, an IdP-initiated SSO flow is initiated.
When the user launches an application from the SSO portal, Entra ID sends a SAML assertion to the Cognito endpoint to federate the user.
Amazon Cognito validates the SAML assertion and creates the user in Cognito if this is first-time federation for the user or updates the user’s record if user has signed in before from this IdP. Cognito then generates an authorization code and redirects the user to the application URL with this authorization code. The application exchanges the authorization code for tokens from the Cognito token endpoint.
After the application has tokens, it uses them to authorize access within the application stack as needed.
The SAML response contains claims or assertions that contain user-specific data. The SAML response is transferred over HTTPS to protect confidentiality of the data, but you can also enable encryption to further protect the confidentiality of transferred user information. This enables trusted parties who have the decryption key to decrypt the data. It protects the confidentiality of the data after it’s received by the SP.
Setting up SAML federation between Amazon Cognito and Entra ID
To set up SAML federation and use IdP-initiated SSO, you will complete the following steps:
Create an Amazon Cognito user pool.
Create an app client in the Cognito user pool.
Add Cognito as an enterprise application in Entra ID.
Add Entra ID as the SAML IdP and enable IdP-initiated SSO in Cognito.
Add the newly created SAML IdP to your user pool app client.
Enable encrypting the SAML response.
Add RelayState in Entra ID SAML SSO.
Prerequisites
To implement the solution, you must have the necessary permissions to perform these tasks in Azure portal and in your AWS account.
Step 1: Create an Amazon Cognito user pool
Create a new user pool in Amazon Cognito with the default settings. Make a note of the user pool ID, for example, us-east-1_abcd1234. You will need this value for the next steps.
Add a domain name to user pool
The Cognito user pool’s hosted UI can be used as the OAuth 2.0 authorization server with a customizable web interface for sign-up and sign-in. Cognito OAuth 2.0 endpoints are accessible from a domain name that must be added to the user pool. There are two options for adding a domain name to a user pool. You can either use a Cognito domain or a domain name that you own. This solution uses a Cognito domain, which will look like the following:
In the AWS Management Console for Amazon Cognito, navigate to the App integration tab for your user pool.
On the right side of the pane, choose Actions and select Create Cognito domain.
Figure 2: Create a Cognito domain
Enter an available domain prefix (for example example-corp-prd) to use with the Cognito domain.
Figure 3: Add a domain prefix
Choose Create Cognito domain.
Step 2: Create an app client in the Cognito user pool
Before you can use Amazon Cognito in your web application, you must register your app with Amazon Cognito as an app client. The IdP-initiated SAML flow can’t be enabled on one app client with the other SP-initiated authentication SAML IdPs or social IdPs. IdP-initiated SAML introduces additional risks that other SSO providers aren’t subject to. For example, it’s not possible to add a state parameter, which is usually used for cross-site request forgery (CSRF) mitigation. Because of this, you can’t add IdPs that aren’t SAML, including the user pool itself, to an app client that uses a SAML provider with IdP-initiated SSO.
To create an app client:
In the Amazon Cognito console, navigate to the App integration tab for the same user pool and locate App clients. Choose Create an app client.
Select an Application type. For this example, create a public client.
Enter an App client name.
Choose Don’t generate client secret.
Keep the rest of the settings as default.
Under Hosted UI settings, add Allowed callback URLs for your app client. This is where you will be directed after authentication.
Choose Authorization code grant for OAuth 2.0 grant types.
You can keep the remaining configuration as default and choose Create app client.
After the app client is successfully created, capture the app client ID from the App integration tab of the user pool.
Prepare information for the Entra ID setup
Prepare the Identifier (Entity ID) and Reply URL, which are required to add Amazon Cognito as an enterprise application in Entra ID (Step 3).
Create values for Identifier (Entity ID) and Reply URL according to the following formats:
For Identifier (Entity ID), the format is: urn:amazon:cognito:sp:<yourUserPoolID>
For example: urn:amazon:cognito:sp:us-east-1_abcd1234
For Reply URL, the format is: https://<yourDomainPrefix>.auth.<aws-region>.amazoncognito.com/saml2/idpresponse
For example: https://example-corp-prd.auth.us-east-1.amazoncognito.com/saml2/idpresponse
The reply URL is the endpoint where Entra ID will send the SAML assertion to Amazon Cognito during user authentication.
Step 3: Add Amazon Cognito as an enterprise application in Entra ID
With the user pool and app client created and the information for Entra ID prepared, you can add Amazon Cognito as an application in Entra ID. To complete this step, you will add Cognito as an enterprise application and set up SSO.
To add Cognito as an enterprise application
Sign in to the Azure portal.
In the search box, search for the service Microsoft Entra ID.
In the left sidebar, select Enterprise applications.
Choose New application.
On the Browse Microsoft Entra Gallery page, choose Create your own application.
Figure 4: Create an application in Entra ID
Under What’s the name of your app?, enter a name for your application and select Integrate any other application you don’t find in the gallery (Non-gallery), as shown in Figure 4. Choose Create.
It will take few seconds for the application to be created in Entra ID, and then you should be redirected to the Overview page for the newly added application.
To set up SSO using SAML:
On the Getting started page, in the Set up single sign on tile, choose Get started, as shown in Figure 5.
Figure 5: Choose Set up single sign-on in Getting Started
On the next screen, select SAML.
In the middle pane under Set up Single Sign-On with SAML, in the Basic SAML Configuration section, choose the edit icon.
In the right pane under Basic SAML Configuration, replace the default Identifier ID (Entity ID) with the identifier (entity ID) you created in Step 2. Replace Reply URL (Assertion Consumer Service URL) with the reply URL you created in Step 2.
Figure 6: Add the identifier (entity ID) and reply URL
Now go to Attributes & Claims and note the claims, as shown in Figure 7. You’ll need these when creating attribute mapping in Amazon Cognito.
Figure 7: Entra ID Attributes & Claims
Scroll down to the SAML Certificates section and copy the App Federation Metadata Url by choosing the copy into clipboard icon. Make a note of this URL to use in the next step.
Figure 8: Copy SAML metadata URL from Entra ID
Step 4: Add Entra ID as SAML IdP in Amazon Cognito
In this step, you’ll add Entra ID as a SAML IdP to your user pool and download the signing and encryption certificates.
To add the SAML IdP:
In the Amazon Cognito console, navigate to the Sign-in experience tab of the same user pool. Locate Federated identity provider sign-in and choose Add an Identity provider.
Choose a SAML IdP.
Enter a Provider name, for example, EntraID.
Under IdP-initiated SAML sign-in, choose Accept SP-initiated and IdP-initiated SAML assertions.
Under Metadata document source, enter the metadata document endpoint URL you captured in Step 3.
(Optional) Under SAML signing and encryption, select Require encrypted SAML assertion from this provider.
Enable Required encrypted SAML assertion from this provider only if you can turn on token encryption in the Entra ID application. See Step 6.
Under Map attributes between your SAML provider and your user pool to map SAML provider attributes to the user profile in your user pool. Include your user pool required attributes in your attribute map.
After the IdP has been created, you can navigate to the recently added EntraID IdP in the user pool for downloading the SAML signing and encryption certificate. These certificates must be imported into the Entra ID enterprise application.
To download the certificates
To download the SAML signing certificate, Choose View signing certificate and Download as .crt
To download the SAML encryption certificate, Choose View encryption certificate and Download as .crt.
Step 5: Add the newly created SAML IdP to your user pool app client
Before you can use Amazon Cognito in your web application, you must add the SAML IdP created in Step 4 to your app client.
To add the SAML IdP:
In the Amazon Cognito console, navigate to the App integration tab for the same user pool and locate App clients.
Choose the app client you created in Step 2.
Locate the Hosted UI section and choose Edit.
Under Identity providers, select the identity provider you created in Step 4 and choose Save changes.
Figure 10: Enabling the Entra ID SAML identity provider in the Cognito app client
At this stage, the Amazon Cognito OAuth 2.0 server is up and running and the web interface is accessible and ready to use. You can access the Cognito hosted UI from your app client using the Cognito console to test it further.
Step 6: Enable encrypting the SAML response in EntraID
For additional security and privacy of user data, enable encrypting the SAML response. Amazon Cognito and your IdP can establish confidentiality in SAML responses when users sign in and sign out. Cognito assigns a public-private RSA key pair and a certificate to each external SAML provider that you configure in your user pool. You will use the SAML encryption certificate downloaded in step 4.
To enable encrypting the SAML response:
Navigate to your Enterprise application in Entra ID and in the left menu, under Security, select Token encryption.
Import the SAML encryption certificate you have already downloaded in step 4.
Figure 11: Import the Cognito encryption certificate to Entra ID
After the certificate is imported, it’s inactive by default. To activate it, right-click on the certificate and select Activate token encryption certificate. This enables the encrypted SAML response.
Figure 12: Activate the token encryption certificate in Entra ID
Step 7: Add RelayState in Entra ID SAML SSO
A RelayState parameter is required when using SAML IdP-initiated authentication flow. Set this up in Entra ID for the Amazon Cognito user pool and the enabled app client ID.
To add RelayState in Entra ID SAML SSO:
Sign in to the Azure portal and open the enterprise application created in Step 3.
In the left sidebar, choose Single sign-on.
In the middle pane under Set up Single Sign-On with SAML, in the Basic SAML Configuration section, choose the edit icon.
In the right pane under Basic SAML Configuration, apply the value as the format below to the Relay State (Optional) field.
Replace <IDProviderName> with the name you previously used for ID provider.
Replace <ClientId> with the app client’s ClientID created in Step 2.
Replace <ecallbackURL> with the URL of your web application that will receive the authorization code. It must be an HTTPS endpoint, except for in a local development environment where you can use http://localhost:PORT_NUMBER.
After you are signed in, choose the application icon registered as the IdP-initiated SSO.
Figure 14: Testing IdP-initiated SSO from an Office 365 application
The application will start the IdP-initiated authentication flow and the user will be redirected to the application as a signed-in user.
Signing an authentication request in case of SP-initiated flow
The preceding authentication flow that you tested uses IdP-initiated SSO. If you’re using an SP-initiated flow, you can enable signing of the SAML request that is sent from the SP (Amazon Cognito) to the IdP (Entra ID) for additional security and integrity of communication between them.
You can enable the authentication request signing in Cognito while creating the IdP or by updating your existing IdP.
To enable signing of the SAML request:
In the Amazon Cognito console, when you create or edit your SAML identity provider, under SAML signing and encryption, select the box Sign SAML requests to this provider and choose Save changes.
Figure 15: Enabling signing SAML request
Sign in to the Azure portal and access your Entra ID enterprise application. Go to Set up single sign on and edit Verification certificates (optional).
Select the checkbox Require verification certificates and upload the Cognito user pool SAML signing certificate already downloaded in Step 4 with a .cer file extension. You must convert the .crt file to a .cer file because Entra ID requires a verification certificate in a .cer extension.
To convert the .crt certificate extension to .cer:
Right-click the .crt file and choose Open.
Navigate to the Details tab.
Select Copy to File… and choose Next.
Select Base-64 encoded X.509 (.CER) and choose Next.
Give your export file a name (for example, Entra ID.cer) and choose Save.
Choose Next.
Confirm the details and choose Finish.
Test the SP-initiated flow
Next, do a quick test to check if everything is configured properly.
In the Amazon Cognito console, navigate to the App integration tab for the same user pool and locate App clients.
Choose the app client you created in Step 2.
Locate the Hosted UI section and choose View Hosted UI.
From the hosted UI, authenticate yourself using Entra ID as the identity provider.
After authentication is completed successfully, you will be redirected to the callback URL you configured in your app client with the authorization code.
If you capture the SAML request, you will see that Amazon Cognito is sending a cryptographic signature with the signing certificate in the SAML request to the IdP, and the IdP will match the cryptographic signature with the uploaded certificate to ensure the integrity of the request.
Conclusion
In this post, you learned the benefits of using IdP-initiated single sign-on. It helps centralize administration and lowers dependency on service provider applications. Also, you learned how to integrate an Amazon Cognito user pool with Microsoft Entra ID as an external SAML IdP using IdP-initiated SSO so your users can use their corporate ID to sign in to web or mobile applications. Also, you learned about how to enable signed authentication requests when using an SP-initiated flow and encrypting SAML responses for additional security between Cognito and the SAML IdP.
If you have feedback about this post, submit comments in the Comments section below. If you have questions about this post, contact AWS Support.
Want more AWS Security news? Follow us on Twitter.
While traditional channels like email and SMS remain important, businesses are increasingly exploring alternative messaging services to reach their customers more effectively. In recent years, WhatsApp has emerged as a simple and effective way to engage with users. According to statista, as of 2024, WhatsApp is the most popular mobile messenger app worldwide and has reached over two billion monthly active users in January 2024.
Amazon Cognito lets you add user sign-up and authentication to your mobile and web applications. Among many other features, Cognito provides a custom SMS sender AWS Lambda trigger for using third-party providers to send notifications. In this post, we’ll be using WhatsApp as the third-party provider to send verification codes or multi-factor authentication (MFA) codes instead of SMS during Cognito user pool sign up.
Note: WhatsApp is a third-party service subject to additional terms and charges. Amazon Web Services (AWS) isn’t responsible for third-party services that you use to send messages with a custom SMS sender in Amazon Cognito.
Overview
By default, Amazon Cognito uses Amazon Simple Notification Service (Amazon SNS) for delivery of SMS text messages. Cognito also supports custom triggers that will allow you to invoke an AWS Lambda function to support additional providers such as WhatsApp.
The architecture shown in Figure 1 depicts how to use a custom SMS sender trigger and WhatsApp to send notifications. The steps are as follows:
A user signs up to an Amazon Cognito user pool.
Cognito invokes the custom SMS sender Lambda function and sends the user’s attributes, including the phone number and a one-time code to the Lambda function. This one-time code is encrypted using a custom symmetric encryption AWS Key Management Service (AWS KMS) key that you create.
The Lambda function decrypts the one-time code using a Decrypt API call to your AWS KMS key.
The Lambda function then obtains the WhatsApp access token from AWS Secrets Manager. The WhatsApp access token needs to be generated through Meta Business Settings (which are covered in the next section) and added to Secrets Manager. Lambda also parses the phone number, user attributes, and encrypted secrets.
Lambda sends a POST API call to the WhatsApp API and WhatsApp delivers the verification code to the user as a message. The user can then use the verification code to verify their contact information and confirm the sign-up.
Figure 1: Custom SMS sender trigger flow
Prerequisites
Create an AWS account if you don’t already have one and sign in. The AWS Identity and Access Management (IAM) role that you use must have sufficient permissions to make the necessary AWS service calls and manage AWS resources such as creating and updating Lambda functions, Amazon Cognito user pools, Secrets Manager, AWS KMS keys, and IAM roles.
In the next steps, we look at how to create a Meta app, create a new system user, get the WhatsApp access token and create the template to send the WhatsApp token.
Create and configure an app for WhatsApp communication
To get started, create a Meta app with WhatsApp added to it, along with the customer phone number that will be used to test.
To create and configure an app
Open the Meta for Developers console, choose My Apps and then choose Create App (or choose an existing Business type app and skip to step 4).
Select Other choose Next and then select Business as the app type and choose Next.
Enter an App name, App contact email, choose whether or not to attach a Business portfolio and choose Create app.
Open the app Dashboard and in the Add product to your app section, under WhatsApp, choose Set up.
Create or select an existing Meta business portfolio and choose Continue.
In the left navigation pane, under WhatsApp,choose API Setup.
Under Send and receive messages, take a note of the Phone number ID, which will be needed in the AWS CDK template later.
Under To, add the customer phone number you want to use for testing. Follow the instructions to add and verify the phone number.
Note: You must have WhatsApp registered with the number and the WhatsApp client installed on your mobile device.
Create a user for accessing WhatsApp
Create a system user in Meta’s Business Manager and assign it to the app created in the previous step. The access tokens generated for this user will be used to make the WhatsApp API calls.
To create a user
Open Meta’s Business Manager and select the business you created or associated your application with earlier from the dropdown menu under Business settings.
Under Users, select System users and then choose Add to create a new system user.
Enter a name for the System Username and set their role as Admin and choose Create system user.
Choose Assign assets.
From the Select asset type list, select Apps. Under Select assets, select your WhatsApp application’s name. Under Partial access, turn on the Test app option for the user. Choose Save Changes and then choose Done.
Choose Generate New Token, select the WhatsApp application created earlier, and leave the default 60 days as the token expiration. Under Permissions select WhatsApp_business_messaging and WhatsApp_business_management and choose Generate Token at the bottom.
Use the Secrets Manager console to create a Secrets Manager secret and set the secret to the WhatsApp access token.
To create a secret
Open the AWS Management Console and go to Secrets Manager.
Figure 2: Open the Secrets Manager console
Choose Store a new secret.
Figure 3: Store a new secret
Under Choose a secret type, choose Other type of secret and under Key/value pairs, select the Plaintext tab and enter Bearer followed by the WhatsApp access token (Bearer<WhatsApp access token>).
Figure 4: Add the secret
For the encryption key, you can use either the AWS KMS key that Secrets Manager creates or a customer managed AWS KMS key that you create and then choose Next.
Provide the secret name as the WhatsAppAccessToken, choose Next, and then choose Store to create the secret.
Note the secret Amazon Resource Name (ARN) to use in later steps.
Deploy the solution
In this section, you clone the GitHub repository and deploy the stack to create the resources in your account.
To clone the repository
Create a new directory, navigate to that directory in a terminal and use the following command to clone the GitHub repository that has the Lambda and AWS CDK code:
Open the lib/constants.ts file and edit the fields. The SELF_SIGNUP value must be set to true for the purpose of this proof of concept. The SELF_SIGNUP value represents the Boolean value for the Amazon Cognito user pool sign-up option, which when set to true allows public users to sign up.
Warning: If you activate user sign-up (enable self-registration) in your user pool, anyone on the internet can sign up for an account and sign in to your applications.
Install the AWS CDK required dependencies by running the following command:
npm install
This project uses typescript as the client language for AWS CDK. Run the following command to compile typescript to JavaScript:
npm run build
From the command line, configure AWS CDK (if you have not already done so):
cdk bootstrap <account number>/<AWS Region>
Install and run Docker. We’re using the aws-lambda-python-alpha package in the AWS CDK code to build the Lambda deployment package. The deployment package installs the required modules in a Lambda compatible Docker container.
Deploy the stack:
cdk synth
cdk deploy --all
Test the solution
Now that you’ve completed implementation, it’s time to test the solution by signing up a user on Amazon Cognito and confirming that the Lambda function is invoked and sends the verification code.
Select the WhatsappOtpStack that was deployed through AWS CDK.
On the Outputs tab, copy the value of cognitocustomotpsenderclientappid.
Run the following AWS Command Line Interface (AWS CLI) command, replacing the client ID with the output of cognitocustomotpsenderclientappid, username, password, email address, name, phone number, and AWS Region to sign up a new Amazon Cognito user.
Note: Password requirements are a minimum length of eight characters with at least one number, one lowercase letter, and one special character.
The new user should receive a message on WhatsApp with a verification code that they can use to complete their sign-up.
Cleanup
Run the following command to delete the resources that were created. It might take a few minutes for the CloudFormation stack to be deleted.
cdk destroy --all
Delete the secret WhatsAppAccessToken that was created from the Secrets Manager console.
Conclusion
In this post, we showed you how to use an alternative messaging platform such as WhatsApp to send notification messages from Amazon Cognito. This functionality is enabled through the Amazon Cognito custom SMS sender trigger, which invokes a Lambda function that has the custom code to send messages through the WhatsApp API. You can use the same method to use other third-party providers to send messages.
If you have feedback about this post, submit comments in the Comments section below. If you have questions about this post, start a new thread on the Amazon Cognito re:Post or contact AWS Support.
Externalizing authorization logic for application APIs can yield multiple benefits for Amazon Web Services (AWS) customers. These benefits can include freeing up development teams to focus on application logic, simplifying application and resource access audits, and improving application security by using continual authorization. Amazon Verified Permissions is a scalable permissions management and fine-grained authorization service that you can use for externalizing application authorization. Along with controlling access to application resources, you can use Verified Permissions to restrict API access to authorized users by using Cedar policies. However, a key challenge in adopting an external authorization system like Verified Permissions is the effort involved in defining the policy logic and integrating with your API. This blog post shows how Verified Permissions accelerates the process of securing REST APIs that are hosted on Amazon API Gateway for Amazon Cognito customers.
Setting up API authorization using Amazon Verified Permissions
As a developer, there are several tasks you need to do in order to use Verified Permissions to store and evaluate policies that define which APIs a user is permitted to access. Although Verified Permissions enables you to decouple authorization logic from your application code, you may need to spend time up front integrating Verified Permissions with your applications. You may also need to spend time learning the Cedar policy language, defining a policy schema, and authoring policies that enforce access control on APIs. Lastly, you may need to spend additional time developing and testing the AWS Lambda authorizer function logic that builds the authorization request for Verified Permissions and enforces the authorization decision.
Getting started with the simplified wizard
Amazon Verified Permissions now includes a console-based wizard that you can use to quickly create building blocks to set up your application’s API Gateway to use Verified Permissions for authorization. Verified Permissions generates an authorization model based on your APIs and policies that allows only authorized Cognito groups access to your APIs. Additionally, it deploys a Lambda authorizer, which you attach to the APIs you want to secure. After the authorizer is attached, API requests are authorized by Verified Permissions. The generated Cedar policies and schema flatten the learning curve, yet allow you full control to modify and help you adhere to your security requirements.
Overview of sample application
In this blog post, we demonstrate how you can simplify the task of securing permissions to a sample application API by using the Verified Permissions console-based wizard. We use a sample pet store application which has two resources:
PetStorePool – An Amazon Cognito user pool with users in one of three groups: customers, employees, and owners.
PetStore – An Amazon API Gateway REST API derived from importing the PetStore example API and extended with a mock integration for administration. This mock integration returns a message with a URI path that uses {“statusCode”: 200} as the integration request and {“Message”: “User authorized for $context.path”} as the integration response.
The PetStore has the following four authorization requirements that allow access to the related resources. All other behaviors should be denied.
Both authenticated and unauthenticated users are allowed to access the root URL.
GET /
All authenticated users are allowed to get the list of pets, or get a pet by its identifier.
GET /pets
GET /pets/{petid}
The employees and owners group are allowed to add new pets.
POST /pets
Only the owners group is allowed to perform administration functions. These are defined using an API Gateway proxy resource that enables a single integration to implement a set of API resources.
ANY /admin/{proxy+}
Walkthrough
Verified Permissions includes a setup wizard that connects a Cognito user pool to an API Gateway REST API and secures resources based on Cognito group membership. In this section, we provide a walkthrough of the wizard that generates authorization building blocks for our sample application.
To set up API authorization based on Cognito groups
On the Specify policy store details page under Starting options, select Set up with Cognito and API Gateway, and then choose Next.
Figure 1: Starting options
On the Import resources and actions pageunder API Gateway details, select the API and Deployment stage from the dropdown lists. (A REST API stage is a named reference to a deployment.) For this example, we selected the PetStore API and the demo stage.
Figure 2: API Gateway and deployment stage
Choose Import API to generate a Map of imported resources and actions. For our example, this list includes Action::”get /pets” for getting the list of pets, Action::”get /pets/{petId}” for getting a single pet, and Action::”post /pets” for adding a new pet. Choose Next.
Figure 3: Map of imported resources and actions
On the Choose identity source page, select an Amazon Cognito user pool (PetStorePool in our example). For Token type to pass to API, select a token type. For our example, we chose the default value, Access token, because Cognito recommends using the access token to authorize API operations. The additional claims available in an id token may support more fine-grained access control. For Client application validation, we also specified the default, to not validate that tokens match a configured app client ID. Consider validation when you have multiple user pool app clients configured with different permissions.
Figure 4: Choose Cognito user pool as identity source
Choose Next.
On the Assign actions to groups page under Group selection, choose the Cognito user pool groups that can take actions in the application. This solution uses native Cognito group membership to control permissions. In Figure 5, the customers group is not used for access control, we deselected it and it isn’t included in the generated policies. Instead, access to get /pets and get/pets/{petId} is granted to all authenticated users using a different authorizer that we define later in this post.
Figure 5: Assign actions to groups
For each of the groups, choose which actions are allowed. In our example, post /pets is the only action selected for the employees group. For the owners group, all of the /admin/{proxy+} actions are additionally selected. Choose Next.
Figure 6: Groups employees and owners
On the Deploy app integration page, review the API Gateway Integration details. Choose Create policy store.
Figure 7: API Gateway integration
On the Create policy store summary page, review the progress of the setup. Choose Check deployment to check the progress of Lambda authorizer.
Figure 8: Create policy store
The setup wizard deployed a CloudFormation stack with a Lambda authorizer. This authorizes access to the API Gateway resources for the employees and owners groups. For the resources that should be authorized for all authenticated users, a separate Cognito User Pool authorizer is required. You can use the following AWS CLI apigateway create-authorizer command to create the authorizer.
After the CloudFormation stack deployment completes and the second Cognito authorizer is created, there are two authorizers that can be attached to PetStore API resources, as shown in Figure 9.
Figure 9: PetStore API Authorizers
In Figure 9, Cognito-PetStorePool is a Cognito user pool authorizer. Because this example uses an access token, an authorization scope (for example, a custom scope like petstore/api) is specified when attached to the GET /pets and GET /pets/{petId} resources.
AVPAuthorizer-XXX is a request parameter-based Lambda authorizer, which determines the caller’s identity from the configured identity sources. In Figure 9, these sources are Authorization (Header), httpMethod (Context), and path (Context). This authorizer is attached to the POST /pets and ANY /admin/{proxy+} resources. Authorization caching is initially set at 120 seconds and can be configured using the API Gateway console.
This combination of multiple authorizers and caching reduces the number of authorization requests to Verified Permissions. For API calls that are available to all authenticated users, using the Cognito-PetStorePool authorizer instead of a policy permitting the customers group helps avoid chargeable authorization requests to Verified Permissions. Applications where the users initiate the same action multiple times or have a predictable sequence of actions will experience high cache hit rates. For repeated API calls that use the same token, AVPAuthorizer-XXX caching results in lower latency, fewer requests per second, and reduced costs from chargeable requests. The use of caching can delay the time between policy updates and policy enforcement, meaning that the policy updates to Verified Permissions are not realized until the timeout or the FlushStageAuthorizersCache API is called.
Deployment architecture
Figure 10 illustrates the runtime architecture after you have used the Verified Permissions setup wizard to perform the deployment and configuration steps. After the users are authenticated with the Cognito PetStorePool, API calls to the PetStore API are authorized with the Cognito access token. Fine-grained authorization is performed by Verified Permissions using a Lambda authorizer. The wizard automatically created the following four items for you, which are labelled in Figure 10:
A Verified Permissions policy store that is connected to a Cognito identity source.
A Cedar schema that defines the User and UserGroup entities, and an action for each API Gateway resource.
Cedar policies that assign permissions for the employees and owners groups to related actions.
Verified Permissions uses the Cedar policy language to define fine-grained permissions. The default decision for an authorization response is “deny.” The Cedar policies that are generated by the setup wizard can determine an “allow” decision. The principal for each policy is a UserGroup entity with an entity ID format of {user pool id}|{group name}. The action IDs for each policy represent the set of selected API Gateway HTTP methods and resource paths. Note that post /pets is permitted for both employees and owners. The resource in the policy scope is unspecified, because the resource is implicitly the application.
permit (
    principal in PetStore::UserGroup::"us-west-2_iwWG5nyux|employees",
    action in [PetStore::Action::"post /pets"],
    resource
);

permit (
    principal in PetStore::UserGroup::"us-west-2_iwWG5nyux|owners",
    action in
        [PetStore::Action::"delete /admin/{proxy+}",
         PetStore::Action::"post /admin/{proxy+}",
         PetStore::Action::"get /admin/{proxy+}",
         PetStore::Action::"patch /admin/{proxy+}",
         PetStore::Action::"put /admin/{proxy+}",
         PetStore::Action::"post /pets"],
    resource
);
Validating API security
A set of terminal-based curl commands validate API security for both authorized and unauthorized users, by using different access tokens. For readability, a set of environment variables is used to represent the actual values. TOKEN_C, TOKEN_E, and TOKEN_O contain valid access tokens for respective users in the customers, employees, and owners groups. API_STAGE is the base URL for the PetStore API and demo stage that we selected earlier.
To test that an unauthenticated user is allowed for the GET / root path (Requirement 1 as described in the Overview section of this post), but not allowed to call the GET /pets API (Requirement 2), run the following curl commands. The Cognito-PetStorePool authorizer should return {“message”:”Unauthorized”}.
curl -X GET ${API_STAGE}/
<html>
...Welcome to your Pet Store API...
</html>

curl -X GET ${API_STAGE}/pets
{"message":"Unauthorized"}
To test that an authenticated user is allowed to call the GET /pets API (Requirement 2) by using an access token (due to the Cognito-PetStorePool authorizer), run the following curl commands. The user should receive an error message when they try to call the POST /pets API (Requirement 3), because of the AVPAuthorizer. There are no Cedar polices defined for the customers group with the action post /pets.
curl -H "Authorization: Bearer ${TOKEN_C}" -X GET ${API_STAGE}/pets
[
  {
    "id": 1,
    "type": "dog",
    "price": 249.99
  },
  {
    "id": 2,
    "type": "cat",
    "price": 124.99
  },
  {
    "id": 3,
    "type": "fish",
    "price": 0.99
  }
]

curl -H "Authorization: Bearer ${TOKEN_C}" -X POST ${API_STAGE}/pets
{"Message":"User is not authorized to access this resource with an explicit deny"}
The following commands will verify that a user in the employees group is allowed the post /pets action (Requirement 3).
The following commands will verify that a user in the employees group is not authorized for the admin APIs, but a user in the owners group is allowed (Requirement 4).
curl -H "Authorization: Bearer ${TOKEN_E}" -X GET ${API_STAGE}/admin/curltest1
{"Message":"User is not authorized to access this resource with an explicit deny"}

curl -H "Authorization: Bearer ${TOKEN_O}" -X GET ${API_STAGE}/admin/curltest1
{"Message": "User authorized for /demo/admin/curltest1"}
Try it yourself
How could this work with your user pool and REST API? Before you try out the solution, make sure that you have the following prerequisites in place, which are required by the Verified Permissions setup wizard:
A Cognito user pool, along with Cognito groups that control authorization to the API endpoints.
An API Gateway REST API in the same Region as the Cognito user pool.
As you review the resources generated by the solution, consider these authorization modeling topics:
Are access tokens or id tokens preferable for your API? Are there custom claims on your tokens that you would use in future Cedar policies for fine-grained authorization?
Do multiple authorizers fit your model, or do you have an “all users” group for use in Cedar policies?
How might you extend the Cedar schema, allowing for new Cedar policies that include URL path parameters, such as {petId} from the example?
Conclusion
This post demonstrated how the Amazon Verified Permissions setup wizard provides you with a step-by-step process to build authorization logic for API Gateway REST APIs using Cognito user groups. The wizard generates a policy store, schema, and Cedar policies to manage access to API endpoints based on the specification of the APIs deployed. In addition, the wizard creates a Lambda authorizer that authorizes access to the API Gateway resources based on the configured Cognito groups. This removes the modeling effort required for initial configuration of API authorization logic and setup of Verified Permissions to receive permission requests. You can use the wizard to set up and test access controls to your APIs based on Cognito groups in non-production accounts. You can further extend the policy schema and policies to accommodate fine-grained or attribute-based access controls, based on specific requirements of the application, without making code changes.
For businesses, particularly those in highly regulated industries, managing user accounts isn’t just a matter of security but also a compliance necessity. In sectors such as finance, healthcare, and government, where regulations often mandate strict control over user access, disabling stale user accounts is a key compliance activity. In this post, we show you a solution that uses serverless technologies to track and disable inactive user accounts. While this process is particularly relevant for those in regulated industries, it can also be beneficial for other organizations looking to maintain a clean and secure user base.
The solution focuses on identifying inactive user accounts in Amazon Cognito and automatically disabling them. Disabling a user account in Cognito effectively restricts the user’s access to applications and services linked with the Amazon Cognito user pool. After their account is disabled, the user cannot sign in, access tokens are revoked for their account and they are unable to perform API operations that require user authentication. However, the user’s data and profile within the Cognito user pool remain intact. If necessary, the account can be re-enabled, allowing the user to regain access and functionality.
While the solution focuses on the example of a single Amazon Cognito user pool in a single account, you also learn considerations for multi-user pool and multi-account strategies.
Solution overview
In this section, you learn how to configure an AWS Lambda function that captures the latest sign-in records of users authenticated by Amazon Cognito and write this data to an Amazon DynamoDB table. A time-to-live (TTL) indicator is set on each of these records based on the user inactivity threshold parameter defined when deploying the solution. This TTL represents the maximum period a user can go without signing in before their account is disabled. As these items reach their TTL expiry in DynamoDB, a second Lambda function is invoked to process the expired items and disable the corresponding user accounts in Cognito. For example, if the user inactivity threshold is configured to be 7 days, the accounts of users who don’t sign in within 7 days of their last sign-in will be disabled. Figure 1 shows an overview of the process.
Note: This solution functions as a background process and doesn’t disable user accounts in real time. This is because DynamoDB Time to Live (TTL) is designed for efficiency and to remain within the constraints of the Amazon Cognito quotas. Set your users’ and administrators’ expectations accordingly, acknowledging that there might be a delay in the reflection of changes and updates.
Figure 1: Architecture diagram for tracking user activity and disabling inactive Amazon Cognito users
As shown in Figure 1, this process involves the following steps:
An application user signs in by authenticating to Amazon Cognito.
Upon successful user authentication, Cognito initiates a post authentication Lambda trigger invoking the PostAuthProcessorLambda function.
The PostAuthProcessorLambda function puts an item in the LatestPostAuthRecordsDDB DynamoDB table with the following attributes:
sub: A unique identifier for the authenticated user within the Amazon Cognito user pool.
timestamp: The time of the user’s latest sign-in, formatted in UTC ISO standard.
username: The authenticated user’s Cognito username.
userpool_id: The identifier of the user pool to which the user authenticated.
ttl: The TTL value, in seconds, after which a user’s inactivity will initiate account deactivation.
Items in the LatestPostAuthRecordsDDB DynamoDB table are automatically purged upon reaching their TTL expiry, launching events in DynamoDB Streams.
DynamoDB Streams events are filtered to allow invocation of the DDBStreamProcessorLambda function only for TTL deleted items.
The DDBStreamProcessorLambda function runs to disable the corresponding user accounts in Cognito.
Implementation details
In this section, you’re guided through deploying the solution, demonstrating how to integrate it with your existing Amazon Cognito user pool and exploring the solution in more detail.
Note: This solution begins tracking user activity from the moment of its deployment. It can’t retroactively track or manage user activities that occurred prior to its implementation. To make sure the solution disables currently inactive users in the first TTL period after deploying the solution, you should do a one-time preload of those users into the DynamoDB table. If this isn’t done, the currently inactive users won’t be detected because users are detected as they sign in. For the same reason, users who create accounts but never sign in won’t be detected either. To detect user accounts that sign up but never sign in, implement a post confirmation Lambda trigger to invoke a Lambda function that processes user sign-up records and writes them to the DynamoDB table.
Prerequisites
Before deploying this solution, you must have the following prerequisites in place:
An existing Amazon Cognito user pool. This user pool is the foundation upon which the solution operates. If you don’t have a Cognito user pool set up, you must create one before proceeding. See Creating a user pool.
The ability to launch a CloudFormation template. The second prerequisite is the capability to launch an AWS CloudFormation template in your AWS environment. The template provisions the necessary AWS services, including Lambda functions, a DynamoDB table, and AWS Identity and Access Management (IAM) roles that are integral to the solution. The template simplifies the deployment process, allowing you to set up the entire solution with minimal manual configuration. You must have the necessary permissions in your AWS account to launch CloudFormation stacks and provision these services.
To deploy the solution
Choose the following Launch Stack button to deploy the solution’s CloudFormation template:
The solution deploys in the AWS US East (N. Virginia) Region (us-east-1) by default. To deploy the solution in a different Region, use the Region selector in the console navigation bar and make sure that the services required for this walkthrough are supported in your newly selected Region. For service availability by Region, see AWS Services by Region.
On the Quick Create Stack screen, do the following:
Specify the stack details.
Stack name: The stack name is an identifier that helps you find a particular stack from a list of stacks. A stack name can contain only alphanumeric characters (case sensitive) and hyphens. It must start with an alphabetic character and can’t be longer than 128 characters.
CognitoUserPoolARNs: A comma-separated list of Amazon Cognito user pool Amazon Resource Names (ARNs) to monitor for inactive users.
UserInactiveThresholdDays: Time (in days) that the user account is allowed to be inactive before it’s disabled.
Scroll to the bottom, and in the Capabilities section, select I acknowledge that AWS CloudFormation might create IAM resources with custom names.
Choose Create Stack.
Integrate with your existing user pool
With the CloudFormation template deployed, you can set up Lambda triggers in your existing user pool. This is a key step for tracking user activity.
Note: This walkthrough is using the new AWS Management Console experience. Alternatively, These steps could also be done using CloudFormation.
To integrate with your existing user pool
Navigate to the Amazon Cognito console and select your user pool.
Navigate to User pool properties.
Under Lambda triggers, choose Add Lambda trigger. Select the Authentication radio button, then add a Post authentication trigger and assign the PostAuthProcessorLambda function.
Note: Amazon Cognito allows you to set up one Lambda trigger per event. If you already have a configured post authentication Lambda trigger, you can refactor the existing Lambda function, adding new features directly to minimize the cold starts associated with invoking additional functions (for more information, see Anti-patterns in Lambda-based applications). Keep in mind that when Cognito calls your Lambda function, the function must respond within 5 seconds. If it doesn’t and if the call can be retried, Cognito retries the call. After three unsuccessful attempts, the function times out. You can’t change this 5-second timeout value.
Figure 2: Add a post-authentication Lambda trigger and assign a Lambda function
When you add a Lambda trigger in the Amazon Cognito console, Cognito adds a resource-based policy to your function that permits your user pool to invoke the function. When you create a Lambda trigger outside of the Cognito console, including a cross-account function, you must add permissions to the resource-based policy of the Lambda function. Your added permissions must allow Cognito to invoke the function on behalf of your user pool. You can add permissions from the Lambda console or use the Lambda AddPermission API operation. To configure this in CloudFormation, you can use the AWS::Lambda::Permission resource.
Explore the solution
The solution should now be operational. It’s configured to begin monitoring user sign-in activities and automatically disable inactive user accounts according to the user inactivity threshold. Use the following procedures to test the solution:
Note: When testing the solution, you can set the UserInactiveThresholdDays CloudFormation parameter to 0. This minimizes the time it takes for user accounts to be disabled.
Step 1: User authentication
Create a user account (if one doesn’t exist) in the Amazon Cognito user pool integrated with the solution.
Authenticate to the Cognito user pool integrated with the solution.
Figure 3: Example user signing in to the Amazon Cognito hosted UI
Step 2: Verify the sign-in record in DynamoDB
Confirm the sign-in record was successfully put in the LatestPostAuthRecordsDDB DynamoDB table.
Navigate to the DynamoDB console.
Select the LatestPostAuthRecordsDDB table.
Select Explore Table Items.
Locate the sign-in record associated with your user.
Figure 4: Locating the sign-in record associated with the signed-in user
Step 3: Confirm user deactivation in Amazon Cognito
After the TTL expires, validate that the user account is disabled in Amazon Cognito.
Navigate to the Amazon Cognito console.
Select the relevant Cognito user pool.
Under Users, select the specific user.
Verify the Account status in the User information section.
Figure 5: Screenshot of the user that signed in with their account status set to disabled
Note: TTL typically deletes expired items within a few days. Depending on the size and activity level of a table, the actual delete operation of an expired item can vary. TTL deletes items on a best effort basis, and deletion might take longer in some cases.
The user’s account is now disabled. A disabled user account can’t be used to sign in, but still appears in the responses to GetUser and ListUsers API requests.
Design considerations
In this section, you dive deeper into the key components of this solution.
DynamoDB schema configuration:
The DynamoDB schema has the Amazon Cognito sub attribute as the partition key. The Cognito sub is a globally unique user identifier within Cognito user pools that cannot be changed. This configuration ensures each user has a single entry in the table, even if the solution is configured to track multiple user pools. See Other considerations for more about tracking multiple user pools.
Using DynamoDB Streams and Lambda to disable TTL deleted users
This solution uses DynamoDB TTL and DynamoDB Streams alongside Lambda to process user sign-in records. The TTL feature automatically deletes items past their expiration time without write throughput consumption. The deleted items are captured by DynamoDB Streams and processed using Lambda. You also apply event filtering within the Lambda event source mapping, ensuring that the DDBStreamProcessorLambda function is invoked exclusively for TTL-deleted items (see the following code example for the JSON filter pattern). This approach reduces invocations of the Lambda functions, simplifies code, and reduces overall cost.
The DDBStreamProcessorLambda function is configured to comply with the AdminDisableUser API’s quota limits. It processes messages in batches of 25, with a parallelization factor of 1. This makes sure that the solution remains within the nonadjustable 25 requests per second (RPS) limit for AdminDisableUser, avoiding potential API throttling. For more details on these limits, see Quotas in Amazon Cognito.
Dead-letter queues:
Throughout the architecture, dead-letter queues (DLQs) are used to handle message processing failures gracefully. They make sure that unprocessed records aren’t lost but instead are queued for further inspection and retry.
Other considerations
The following considerations are important for scaling the solution in complex environments and maintaining its integrity. The ability to scale and manage the increased complexity is crucial for successful adoption of the solution.
Multi-user pool and multi-account deployment
While this solution discussed a single Amazon Cognito user pool in a single AWS account, this solution can also function in environments with multiple user pools. This involves deploying the solution and integrating with each user pool as described in Integrating with your existing user pool. Because of the AdminDisableUser API’s quota limit for the maximum volume of requests in one AWS Region in one AWS account, consider deploying the solution separately in each Region in each AWS account to stay within the API limits.
Efficient processing with Amazon SQS:
Consider using Amazon Simple Queue Service (Amazon SQS) to add a queue between the PostAuthProcessorLambda function and the LatestPostAuthRecordsDDB DynamoDB table to optimize processing. This approach decouples user sign-in actions from DynamoDB writes, and allows for batching writes to DynamoDB, reducing the number of write requests.
Clean up
Avoid unwanted charges by cleaning up the resources you’ve created. To decommission the solution, follow these steps:
Remove the Lambda trigger from the Amazon Cognito user pool:
Navigate to the Amazon Cognito console.
Select the user pool you have been working with.
Go to the Triggers section within the user pool settings.
Manually remove the association of the Lambda function with the user pool events.
Remove the CloudFormation stack:
Open the CloudFormation console.
Locate and select the CloudFormation stack that was used to deploy the solution.
Delete the stack.
CloudFormation will automatically remove the resources created by this stack, including Lambda functions, Amazon SQS queues, and DynamoDB tables.
Conclusion
In this post, we walked you through a solution to identify and disable stale user accounts based on periods of inactivity. While the example focuses on a single Amazon Cognito user pool, the approach can be adapted for more complex environments with multiple user pools across multiple accounts. For examples of Amazon Cognito architectures, see the AWS Architecture Blog.
Proper planning is essential for seamless integration with your existing infrastructure. Carefully consider factors such as your security environment, compliance needs, and user pool configurations. You can modify this solution to suit your specific use case.
Maintaining clean and active user pools is an ongoing journey. Continue monitoring your systems, optimizing configurations, and keeping up-to-date on new features. Combined with well-architected preventive measures, automated user management systems provide strong defenses for your applications and data.
If you have feedback about this post, submit comments in the Comments section. If you have questions about this post, start a new thread on the Amazon Cognito re:Post forum or contact AWS Support.
Implementing authentication and authorization mechanisms in modern applications can be challenging, especially when dealing with various client types and use cases. As developers, we often struggle to choose the right authentication flow to balance security, user experience, and application requirements. This is where understanding the OAuth 2.0 grant types comes into play. Whether you’re building a traditional web application, a mobile app, or a machine-to-machine communication system, understanding the OAuth 2.0 grant types can help you implement robust and secure authentication and authorization mechanism.
In this blog post, we show you the different OAuth 2.0 grants and how to implement them in Amazon Cognito. We review the purpose of each grant, their relevance in modern application development, and which grant is best suited for different application requirements.
OAuth 2.0 is an authorization framework that enables secure and seamless access to resources on behalf of users without the need to share sensitive credentials. The primary objective of OAuth 2.0 is to establish a secure, delegated, and scoped access mechanism that allows third-party applications to interact with user data while maintaining robust privacy and security measures.
OpenID Connect, often referred to as OIDC, is a protocol based on OAuth 2.0. It extends OAuth 2.0 to provide user authentication, identity verification, and user information retrieval. OIDC is a crucial component for building secure and user-friendly authentication experiences in applications. Amazon Cognito supports OIDC, meaning it supports user authentication and identity verification according to OIDC standards.
Amazon Cognito is an identity environment for web and mobile applications. Its two main components are user pools and identity pools. A Cognito user pool is a user directory, an authentication server, and an authorization service for OAuth 2.0 tokens. With it, you can authenticate and authorize users natively or from a federated identity such as your enterprise directory, or from consumer identity providers such as Google or Facebook. Cognito Identity Pool can exchange OAuth 2.0 tokens (among other options) for AWS credentials.
Implementing OAuth 2.0 grants using Amazon Cognito
The OAuth 2.0 standard defines four main roles; these are important to know as we discuss the grants:
A resource owner owns the data in the resource server and can grant access to the resource (such as a database admin).
A resource server hosts the protected resources that the application wants to access (such as a SQL server).
A client is an application making requests for the protected resources on behalf of the resource owner and with its authorization (such as an analytics application).
An authorization server is a server that issues scoped tokens after the user is authenticated and has consented to the issuance of the token under the desired scope (such as Amazon Cognito).
A few other useful concepts before we dive into the OAuth 2.0 grants:
Access tokens are at the core of OAuth 2.0’s operation. These tokens are short-lived credentials that the client application uses to prove its authorized status when requesting resources from the resource server. Additionally, OAuth 2.0 might involve the use of refresh tokens, which provide a mechanism for clients to obtain new access tokens without requiring the resource owner’s intervention.
An ID token is a JSON Web Token (JWT) introduced by OpenID Connect that contains information about the authentication event of the user. They allow applications to verify the identity of the user, make informed decisions about the user’s authentication status, and personalize the user’s experience.
A scope is a level of access that an application can request to a resource. Scopes define the specific permissions that a client application can request when obtaining an access token. You can use scopes to fine-tune the level of access granted to the client. For example, an OAuth 2.0 request might include the scope read:profile, indicating that the client application is requesting read-only access to the user’s profile information. Another request might include the scope write:photos, indicating the client’s need to write to the user’s photo collection. In Amazon Cognito, you can define custom scopes along with standard OAuth 2.0 scopes such as openid, profile, email, or phone to align with your application’s requirements. You can use this flexibility to manage access permissions efficiently and securely.
A typical high-level OAuth 2.0 flow looks like the Figure 1:
Figure 1: OAuth 2.0 flow
Below are the steps involved in the OAuth 2.0 flow
The client requests authorization from the resource owner. This is done through the authorization server (Amazon Cognito) as an intermediary.
The resource owner provides the authorization grant to the client. This can be one of the many grant types, which are discussed in detail in the next paragraph. The type of grant used depends on the method used by the client to request authorization from the resource owner.
The client requests an access token by authenticating with Cognito.
Cognito authenticates the client (the authentication method based on the grant type) and issues an access token if the authorization is valid.
The access token is presented to the resource server as the client requests the protected resource.
The resource server checks the access token’s signature and attributes and serves the request if it is valid.
There are several different grant types, four of which are described in the following sections.
Authorization code grant
The authorization code grant type is used by clients to securely exchange an authorization code for an access token. It’s used by both web applications and native applications to get an access token after a user authenticates to an application. After the user returns to the client through the redirect URI (the URL where the authentication server redirects the browser after it authorizes the user), the application gets the authorization code from the URL and uses it to request an access token.
This grant type is suitable for general cases as only one authentication flow is used, regardless of what operation is performed or who is performing it. This grant is considered secure as it requests an access token with a single-use code instead of exposing the actual access tokens. This helps prevent the application from potentially accessing user credentials.
Figure 2: Authorization code grant flow
Below are the steps involved in the authorization code grant flow
The process begins with the client initiating the sequence, directing the user-agent (that is, the browser) of the resource owner to the authorization endpoint. In this action, the client provides its client identifier, the scope it’s requesting, a local state, and a redirection URI to which the authorization server (Amazon Cognito) will return the user agent after either granting or denying access.
Cognito authenticates the resource owner (through the user agent) and establishes whether the resource owner grants or denies the client’s access request using user pool authentication.
Cognito redirects the user agent back to the client using the redirection URI that was provided in step (1) with an authorization code in the query string (such as http://www.example.com/webpage?code=<authcode>).
The client requests an access token from the Cognito’s token endpoint by including the authorization code received in step (3). When making the request, the client authenticates with the Cognito typically with a client ID and a secret. The client includes the redirection URI used to obtain the authorization code for verification.
Cognito authenticates the client, validates the authorization code, and makes sure that the redirection URI received matches the URI used to redirect the client in step (3). If valid, Cognito responds with an access token.
An implementation of the authorization code grant using Amazon Cognito looks like the following:
An application makes an HTTP GET request to _DOMAIN/oauth2/authorize, where AUTH_DOMAIN represents the user pool’s configured domain. This request includes the following query parameters:
response_type – Set to code for this grant type.
client_id – The ID for the desired user pool app client.
redirect_uri – The URL that a user is directed to after successful authentication.
state (optional but recommended) – A random value that’s used to prevent cross-site request forgery (CSRF) attacks.
scope (optional) – A space-separated list of scopes to request for the generated tokens. Note that:
An ID token is only generated if the openid scope is requested.
The phone, email, and profile scopes can only be requested if openid is also requested.
A vended access token can only be used to make user pool API calls if aws.cognito.signin.user.admin (user pool’s reserved API scope) is requested.
identity_provider (optional) – Indicates the provider that the end user should authenticate with.
idp_identifier (optional) – Same as identity_provider but doesn’t expose the provider’s real name.
nonce (optional) – A random value that you can add to the request. The nonce value that you provide is included in the ID token that Amazon Cognito issues. To guard against replay attacks, your app can inspect the nonce claim in the ID token and compare it to the one you generated. For more information about the nonce claim, see ID token validation in the OpenID Connect standard.
A CSRF token is returned in a cookie. If an identity provider was specified in the request from step 1, the rest of this step is skipped. The user is automatically redirected to the appropriate identity provider’s authentication page. Otherwise, the user is redirected to https://AUTH_DOMAIN/login (which hosts the auto-generated UI) with the same query parameters set from step 1. They can then either authenticate with the user pool or select one of the third-party providers that’s configured for the designated app client.
The user authenticates with their identity provider through one of the following means:
If the user uses the native user pool to authenticate, the hosted UI submits the user’s credentials through a POST request to https://AUTH_DOMAIN/login (including the original query parameters) along with some additional metadata.
If the user selects a different identity provider to authenticate with, the user is redirected to that identity provider’s authentication page. After successful authentication the provider redirects the user to https://AUTH_DOMAIN/saml2/idpresponse with either an authorization token in the code query parameter or a SAML assertion in a POST request.
After Amazon Cognito verifies the user pool credentials or provider tokens it receives, the user is redirected to the URL that was specified in the original redirect_uri query parameter. The redirect also sets a code query parameter that specifies the authorization code that was vended to the user by Cognito.
The custom application that’s hosted at the redirect URL can then extract the authorization code from the query parameters and exchange it for user pool tokens. The exchange occurs by submitting a POST request to https://AUTH_DOMAIN/oauth2/token with the following application/x-www-form-urlencoded parameters:
grant_type – Set to authorization_code for this grant.
code – The authorization code that’s vended to the user.
client_id – Same as from the request in step 1.
redirect_uri – Same as from the request in step 1.
If the client application that was configured with a secret, the Authorization header for this request is set as Basic BASE64(CLIENT_ID:CLIENT_SECRET), where BASE64(CLIENT_ID:CLIENT_SECRET) is the base64 representation of the application client ID and application client secret, concatenated with a colon.
The JSON returned in the resulting response has the following keys:
refresh_token – A valid user pool refresh token. This can be used to retrieve new tokens by sending it through a POST request to https://AUTH_DOMAIN/oauth2/token, specifying the refresh_token and client_id parameters, and setting the grant_type parameter to refresh_token.
id_token – A valid user pool ID token. Note that an ID token is only provided if the openid scope was requested.
expires_in – The length of time (in seconds) that the provided ID or access tokens are valid.
token_type – Set to Bearer.
Here are some of the best practices to be followed when using the authorization code grant:
Use the Proof Key for Code Exchange (PKCE) extension with the authorization code grant, especially for public clients such as a single page web application. This is discussed in more detail in the following section.
Regularly rotate client secrets and credentials to minimize the risk of unauthorized access.
Implement session management to handle user sessions securely. This involves managing access token lifetimes, storing tokens, rotating refresh tokens, implementing token revocations and providing easy logout mechanisms that invalidate access and refresh tokens on user’s devices.
Authorization code grant with PKCE
To enhance security when using the authorization code grant, especially in public clients such as native applications, the PKCE extension was introduced. PKCE adds an extra layer of protection by making sure that only the client that initiated the authorization process can exchange the received authorization code for an access token. This combination is sometimes referred to as a PKCE grant.
It introduces a secret called the code verifier, which is a random value created by the client for each authorization request. This value is then hashed using a transformation method such as SHA256—this is now called the code challenge. The same steps are followed as the flow from Figure 2, however the code challenge is now added to the query string for the request to the authorization server (Amazon Cognito). The authorization server stores this code challenge for verification after the authentication process and redirects back with an authorization code. This authorization code along with the code verifier is sent to the authorization server, which then compares the previously stored code challenge with the code verifier. Access tokens are issued after the verification is successfully completed. Figure 3 outlines this process.
Figure 3: Authorization code grant flow with PKCE
Authorization code grant with PKCE implementation is identical to authorization code grant except that Step 1 requires two additional query parameters:
code_challenge – The hashed, base64 URL-encoded representation of a random code that’s generated client side (code verifier). It serves as a PKCE, which mitigates bad actors from being able to use intercepted authorization codes.
code_challenge_method – The hash algorithm that’s used to generate the code_challenge. Amazon Cognito currently only supports setting this parameter to S256. This indicates that the code_challenge parameter was generated using SHA-256.
In step 5, when exchanging the authorization code with the user pool token, include an additional parameter:
code_verifier – The base64 URL-encoded representation of the unhashed, random string that was used to generate the PKCE code_challenge in the original request.
Implicit grant (not recommended)
Implicit grant was an OAuth 2.0 authentication grant type that allowed clients such as single-page applications and mobile apps to obtain user access tokens directly from the authorization endpoint. The grant type was implicit because no intermediate credentials (such as an authorization code) were issued and later used to obtain an access token. The implicit grant has been deprecated and it’s recommended that you use authorization code grant with PKCE instead. An effect of using the implicit grant was that it exposed access tokens directly in the URL fragment, which could potentially be saved in the browser history, intercepted, or exposed to other applications residing on the same device.
Figure 4: Implicit grant flow
The implicit grant flow was designed to enable public client-side applications—such as single-page applications or mobile apps without a backend server component—to exchange authorization codes for tokens.
Steps 1, 2, and 3 of the implicit grant are identical to the authorization code grant steps, except that the response_type query parameter is set to token. Additionally, while a PKCE challenge can technically be passed, it isn’t used because the /oauth2/token endpoint is never accessed. The subsequent steps—starting with step 4—are as follows:
After Amazon Cognito verifies the user pool credentials or provider tokens it receives, the user is redirected to the URL that was specified in the original redirect_uri query parameter. The redirect also sets the following query parameters:
expires_in – The length of time (in seconds) that the provided ID or access tokens are valid for.
token_type – Set to Bearer.
id_token – A valid user pool ID token. Note that an ID token is only provided if the openid scope was requested.
Note that no refresh token is returned during an implicit grant, as specified in the RFC standard.
The custom application that’s hosted at the redirect URL can then extract the access token and ID token (if they’re present) from the query parameters.
Here are some best practices for implicit grant:
Make access token lifetimes short. Implicit grant tokens can’t be revoked, so expiry is the only way to end their validity.
Implicit grant type is deprecated and should be used only for scenarios where a backend server component can’t be implemented, such as browser-based applications.
Client credentials grant
The client credentials grant is for machine-to-machine authentication. For example, a third-party application must verify its identity before it can access your system. The client can request an access token using only its client credentials (or other supported means of authentication) when the client is requesting access to the protected resources under its control or those of another resource owner that have been previously arranged with the authorization server.
The client credentials grant type must be used only by confidential clients. This means the client must have the ability to protect a secret string from users. Note that to use the client credentials grant, the corresponding user pool app client must have an associated app client secret.
Figure 5: Client credentials grant
The flow illustrated in Figure 5 includes the following steps:
The client authenticates with the authorization server using a client ID and secret and requests an access token from the token endpoint.
The authorization server authenticates the client, and if valid, issues an access token.
The detailed steps for the process are as follows:
The application makes a POST request to https://AUTH_DOMAIN/oauth2/token, and specifies the following parameters:
grant_type – Set to client_credentials for this grant type.
client_id – The ID for the desired user pool app client.
scope – A space-separated list of scopes to request for the generated access token. Note that you can only use a custom scope with the client credentials grant.
In order to indicate that the application is authorized to make the request, the Authorization header for this request is set as Basic BASE64(CLIENT_ID:CLIENT_SECRET), where BASE64(CLIENT_ID:CLIENT_SECRET) is the base64 representation of the client ID and client secret, concatenated with a colon.
The Amazon Cognito authorization server returns a JSON object with the following keys:
expires_in – The length of time (in seconds) that the provided access token is valid.
token_type – Set to Bearer.
Note that, for this grant type, an ID token and a refresh token aren’t returned.
The application uses the access token to make requests to an associated resource server.
The resource server validates the received token and, if everything checks out, processes the request from the app.
Following are a few recommended practices while using the client credentials grant:
Store client credentials securely and avoid hardcoding them in your application. Use appropriate credential management practices, such as environment variables or secret management services.
Limit use cases. The client credentials grant is suitable for machine-to-machine authentication in highly trusted scenarios. Limit its use to cases where other grant types are not applicable.
Extension grant
Extension grants are a way to add support for non-standard token issuance scenarios such as token translation, delegation, or custom credentials. It lets you exchange access tokens from a third-party OAuth 2.0 authorization service with access tokens from Amazon Cognito. By defining the grant type using an absolute URI (determined by the authorization server) as the value of the grant_type argument of the token endpoint, and by adding other parameters required, the client can use an extension grant type.
An example of an extension grant is OAuth 2.0 device authorization grant (RFC 8628). This authorization grant makes it possible for internet-connected devices with limited input capabilities or that lack a user-friendly browser (such as wearables, smart assistants, video-streaming devices, smart-home automation, and health or medical devices) to review the authorization request on a secondary device, such as a smartphone, that has more advanced input and browser capabilities.
Some of the best practices to be followed when deciding to use extension grants are:
Extension grants are for non-standard token issuance scenarios. Use them only when necessary, and thoroughly document their use and purpose.
Conduct security audits and code reviews when implementing Extension grants to identify potential vulnerabilities and mitigate risks.
While Amazon Cognito doesn’t natively support extension grants currently, here is an example implementation of OAuth 2.0 device grant flow using AWS Lambda and Amazon DynamoDB.
Conclusion
In this blog post, we’ve reviewed various OAuth 2.0 grants, each catering to specific application needs, The authorization code grant ensures secure access for web applications (and offers additional security with the PKCE extension), and the client credentials grant is ideal for machine-to-machine authentication. Amazon Cognito acts as an encompassing identity platform, streamlining user authentication, authorization, and integration. By using these grants and the features provided by Cognito, developers can enhance security and the user experience in their applications. For more information and examples, see OAuth 2.0 grants in the Cognito Developer Guide.
Now that you understand implementing OAuth 2.0 grants in Amazon Cognito, see How to customize access tokens in Amazon Cognito user pools to learn about customizing access tokens to make fine-grained authorization decisions and provide a differentiated end-user experience.
If you have feedback about this post, submit comments in the Comments section below. If you have questions about this post, contact AWS Support.
With Amazon Cognito, you can implement customer identity and access management (CIAM) into your web and mobile applications. You can add user authentication and access control to your applications in minutes.
In this post, I introduce you to the new access token customization feature for Amazon Cognito user pools and show you how to use it. Access token customization is included in the advanced security features (ASF) of Amazon Cognito. Note that ASF is subject to additional pricing as described on the Amazon Cognito pricing page.
What is access token customization?
When a user signs in to your app, Amazon Cognito verifies their sign-in information, and if the user is authenticated successfully, returns the ID, access, and refresh tokens. The access token, which uses the JSON Web Token (JWT) format following the RFC7519 standard, contains claims in the token payload that identify the principal being authenticated, and session attributes such as authentication time and token expiration time. More importantly, the access token also contains authorization attributes in the form of user group memberships and OAuth scopes. Your applications or API resource servers can evaluate the token claims to authorize specific actions on behalf of users.
With access token customization, you can add application-specific claims to the standard access token and then make fine-grained authorization decisions to provide a differentiated end-user experience. You can refine the original scope claims to further restrict access to your resources and enforce the least privileged access. You can also enrich access tokens with claims from other sources, such as user subscription information stored in an Amazon DynamoDB table. Your application can use this enriched claim to determine the level of access and content available to the user. This reduces the need to build a custom solution to look up attributes in your application’s code, thereby reducing application complexity, improving performance, and smoothing the integration experience with downstream applications.
How do I use the access token customization feature?
Amazon Cognito works with AWS Lambda functions to modify your user pool’s authentication behavior and end-user experience. In this section, you’ll learn how to configure a pre token generation Lambda trigger function and invoke it during the Amazon Cognito authentication process. I’ll also show you an example function to help you write your own Lambda function.
Lambda trigger flow
During a user authentication, you can choose to have Amazon Cognito invoke a pre token generation trigger to enrich and customize your tokens.
Figure 1: Pre token generation trigger flow
Figure 1 illustrates the pre token generation trigger flow. This flow has the following steps:
An end user signs in to your app and authenticates with an Amazon Cognito user pool.
After the user completes the authentication, Amazon Cognito invokes the pre token generation Lambda trigger, and sends event data to your Lambda function, such as userAttributes and scopes, in a pre token generation trigger event.
Your Lambda function code processes token enrichment logic, and returns a response event to Amazon Cognito to indicate the claims that you want to add or suppress.
Amazon Cognito vends a customized JWT to your application.
The pre token generation trigger flow supports OAuth 2.0 grant types, such as the authorization code grant flow and implicit grant flow, and also supports user authentication through the AWS SDK.
Enable access token customization
Your Amazon Cognito user pool delivers two different versions of the pre token generation trigger event to your Lambda function. Trigger event version 1 includes userAttributes, groupConfiguration, and clientMetadata in the event request, which you can use to customize ID token claims. Trigger event version 2 adds scope in the event request, which you can use to customize scopes in the access token in addition to customizing other claims.
In this section, I’ll show you how to update your user pool to trigger event version 2 and enable access token customization.
Choose the target user pool for token customization.
On the User pool properties tab, in the Lambda triggers section, choose Add Lambda trigger.
Figure 2: Add Lambda trigger
In the Lambda triggers section, do the following:
For Trigger type, select Authentication.
For Authentication, select Pre token generation trigger.
For Trigger event version, select Basic features + access token customization – Recommended. If this option isn’t available to you, make sure that you have enabled advanced security features. You must have advanced security features enabled to access this option.
Figure 3: Select Lambda trigger
Select your Lambda function and assign it as the pre token generation trigger. Then choose Add Lambda trigger.
Figure 4: Add Lambda trigger
Example pre token generation trigger
Now that you have enabled access token customization, I’ll walk you through a code example of the pre token generation Lambda trigger, and the version 2 trigger event. This code example examines the trigger event request, and adds a new custom claim and a custom OAuth scope in the response for Amazon Cognito to customize the access token to suit various authorization scheme.
Here is an example version 2 trigger event. The event request contains the user attributes from the Amazon Cognito user pool, the original scope claims, and the original group configurations. It has two custom attributes—membership and location—which are collected during the user registration process and stored in the Cognito user pool.
In the following code example, I transformed the user’s location attribute and membership attribute to add a custom claim and a custom scope. I used the claimsToAddOrOverride field to create a new custom claim called demo:membershipLevel with a membership value of Premium from the event request. I also constructed a new scope with the value of membership:USA.Premium through the scopesToAdd claim, and added the new claim and scope in the event response.
With the preceding code, the Lambda trigger sends the following response back to Amazon Cognito to indicate the customization that was needed for the access tokens.
Your application can then use the newly-minted, custom scope and claim to authorize users and provide them with a personalized experience.
Considerations and best practices
There are four general considerations and best practices that you can follow:
Some claims and scopes aren’t customizable. For example, you can’t customize claims such as auth_time, iss, and sub, or scopes such as aws.cognito.signin.user.admin. For the full list of excluded claims and scopes, see the Excluded claims and scopes.
Work backwards from authorization. When you customize access tokens, you should start with your existing authorization schema and then decide whether to customize the scopes or claims, or both. Standard OAuth based authorization scenarios, such as Amazon API Gateway authorizers, typically use custom scopes to provide access. However, if you have complex or fine-grained authorization requirements, then you should consider using both scopes and custom claims to pass additional contextual data to the application or to a policy-based access control service such as Amazon Verified Permission.
Establish governance in token customization. You should have a consistent company engineering policy to provide nomenclature guidance for scopes and claims. A syntax standard promotes globally unique variables and avoids a name collision across different application teams. For example, Application X at AnyCompany can choose to name their scope as ac.appx.claim_name, where ac represents AnyCompany as a global identifier and appx.claim_name represents Application X’s custom claim.
Be aware of limits. Because tokens are passed through various networks and systems, you need to be aware of potential token size limitations in your systems. You should keep scope and claim names as short as possible, while still being descriptive.
Conclusion
In this post, you learned how to integrate a pre token generation Lambda trigger with your Amazon Cognito user pool to customize access tokens. You can use the access token customization feature to provide differentiated services to your end users based on claims and OAuth scopes. For more information, see pre token generation Lambda trigger in the Amazon Cognito Developer Guide.
If you have feedback about this post, submit comments in the Comments section below. If you have questions about this post, contact AWS Support.
Want more AWS Security news? Follow us on Twitter.
Designing a system to be either stateful or stateless is an important choice with tradeoffs regarding its performance and scalability. In a stateful system, data from one session is carried over to the next. A stateless system doesn’t preserve data between sessions and depends on external entities such as databases or cache to manage state.
Stateful and stateless architectures are both widely adopted.
Stateful applications are typically simple to deploy. Stateful applications save client session data on the server, allowing for faster processing and improved performance. Stateful applications excel in predictable workloads and offer consistent user experiences.
Stateless architectures typically align with the demands of dynamic workload and changing business requirements. Stateless application design can increase flexibility with horizontal scaling and dynamic deployment. This flexibility helps applications handle sudden spikes in traffic, maintain resilience to failures, and optimize cost.
Figure 1 provides a conceptual comparison of stateful and stateless architectures.
Figure 1. Conceptual diagram for stateful vs stateless architectures
For example, an eCommerce application accessible from web and mobile devices manages several aspects of the customer transaction life cycle. This lifecycle starts with account creation, then moves to placing items in the shopping cart, and proceeds through checkout. Session and user profile data provide session persistence and cart management, which retain the cart’s contents and render the latest updated cart from any device. A stateless architecture is preferable for this application because it decouples user data and offloads the session data. This provides the flexibility to scale each component independently to meet varying workloads and optimize resource utilization.
In this blog, we outline the process and benefits of converting from a stateful to stateless architecture.
Solution overview
This section walks you through the steps for converting stateful to stateless architecture:
Identifying and understanding the stateful requirements
Decoupling user profile data
Offloading session data
Scaling each component dynamically
Designing a stateless architecture
Step 1: Identifying and understanding the stateful components
Transforming a stateful architecture to a stateless architecture starts with reviewing the overall architecture and source code of the application, and then analyzing dataflow and dependencies.
Review the architecture and source code
It’s important to understand how your application accesses and shares data. Pay attention to components that persist state data and retain state information. Examples include user credentials, user profiles, session tokens, and data specific to sessions (such as shopping carts). Identifying how this data is handled serves as the foundation for planning the conversion to a stateless architecture.
Analyze dataflow and dependencies
Analyze and understand the components that maintain state within the architecture. This helps you assess the potential impact of transitioning to a stateless design.
You can use the following questionnaire to assess the components. Customize the questions according to your application.
What data is specific to a user or session?
How is user data stored and managed?
How is the session data accessed and updated?
Which components rely on the user and session data?
Are there any shared or centralized data stores?
How does the state affect scalability and tolerance?
Can the stateful components be decoupled or made stateless?
Step 2: Decoupling user profile data
Decoupling user data involves separating and managing user data from the core application logic. Delegate responsibilities for user management and secrets, such as application programming interface (API) keys and database credentials, to a separate service that can be resilient and scale independently. For example, you can use:
AWS Secrets Manager to decouple user data by storing secrets in a secure, centralized location. This means that the application code doesn’t need to store secrets, which makes it more secure.
Amazon S3 to store large, unstructured data, such as images and documents. Your application can retrieve this data when required, eliminating the need to store it in memory.
Amazon DynamoDB to store information such as user profiles. Your application can query this data in near-real time.
Step 3: Offloading session data
Offloading session data refers to the practice of storing and managing session related data external to the stateful components of an application. This involves separating the state from business logic. You can offload session data to a database, cache, or external files.
Factors to consider when offloading session data include:
Stateless architecture gives the flexibility to scale each component independently, allowing the application to meet varying workloads and optimize resource utilization. While planning for scaling, consider using:
AWS Autoscaling, which supports automatic scaling of resources based on predefined policies and metrics.
AWS Load Balancer, which supports dynamic scaling by automatically adding or removing instances based on the configured scaling policies and health checks.
After you identify which state and user data need to be persisted, and your storage solution of choice, you can begin designing the stateless architecture. This involves:
Understanding how the application interacts with the storage solution.
Planning how session creation, retrieval, and expiration logic work with the overall session management.
Refactoring application logic to remove references to the state information that’s stored on the server.
Rearchitecting the application into smaller, independent services, as described in steps 2, 3, and 4.
Performing thorough testing to ensure that all functionalities produce the desired results after the conversion.
The following figure is an example of a stateless architecture on AWS. This architecture separates the user interface, application logic, and data storage into distinct layers, allowing for scalability, modularity, and flexibility in designing and deploying applications. The tiers interact through well-defined interfaces and APIs, ensuring that each component focuses on its specific responsibilities.
Figure 2. Example of a stateless architecture
Benefits
Benefits of adopting a stateless architecture include:
Scalability: Stateless components don’t maintain a local state. Typically, you can easily replicate and distribute them to handle increasing workloads. This supports horizontal scaling, making it possible to add or remove capacity based on fluctuating traffic and demand.
Reliability and fault tolerance: Stateless architectures are inherently resilient to failures. If a stateless component fails, it can be replaced or restarted without affecting the overall system. Because stateless applications don’t have a shared state, failures in one component don’t impact other components. This helps ensure continuity of user sessions, minimizes disruptions, and improves fault tolerance and overall system reliability.
Cost-effectiveness: By leveraging on-demand scaling capabilities, your application can dynamically adjust resources based on actual demand, avoiding overprovisioning of infrastructure. Stateless architectures lend themselves to serverless computing models, paying for the actual run time and resulting in cost savings.
Performance: Externalizing session data by using services optimized for high-speed access, such as in-memory caches, can reduce the latency compared to maintaining session data internally.
Flexibility and extensibility: Stateless architectures provide flexibility and agility in application development. Offloaded session data provides more flexibility to adopt different technologies and services within the architecture. Applications can easily integrate with other AWS services for enhanced functionality, such as analytics, near real-time notifications, or personalization.
Conclusion
Converting stateful applications to stateless applications requires careful planning, design, and implementation. Your choice of architecture depends on your application’s specific needs. If an application is simple to develop and debug, then a stateful architecture might be a good choice. However, if an application needs to be scalable and fault tolerant, then a stateless architecture might be a better choice. It’s important to understand the current application thoroughly before embarking on a refactoring journey.
To provide the best experiences, we use technologies like cookies to store and/or access device information. Consenting to these technologies will allow us to process data such as browsing behavior or unique IDs on this site. Not consenting or withdrawing consent, may adversely affect certain features and functions.
Functional
Always active
The technical storage or access is strictly necessary for the legitimate purpose of enabling the use of a specific service explicitly requested by the subscriber or user, or for the sole purpose of carrying out the transmission of a communication over an electronic communications network.
Preferences
The technical storage or access is necessary for the legitimate purpose of storing preferences that are not requested by the subscriber or user.
Statistics
The technical storage or access that is used exclusively for statistical purposes.The technical storage or access that is used exclusively for anonymous statistical purposes. Without a subpoena, voluntary compliance on the part of your Internet Service Provider, or additional records from a third party, information stored or retrieved for this purpose alone cannot usually be used to identify you.
Marketing
The technical storage or access is required to create user profiles to send advertising, or to track the user on a website or across several websites for similar marketing purposes.
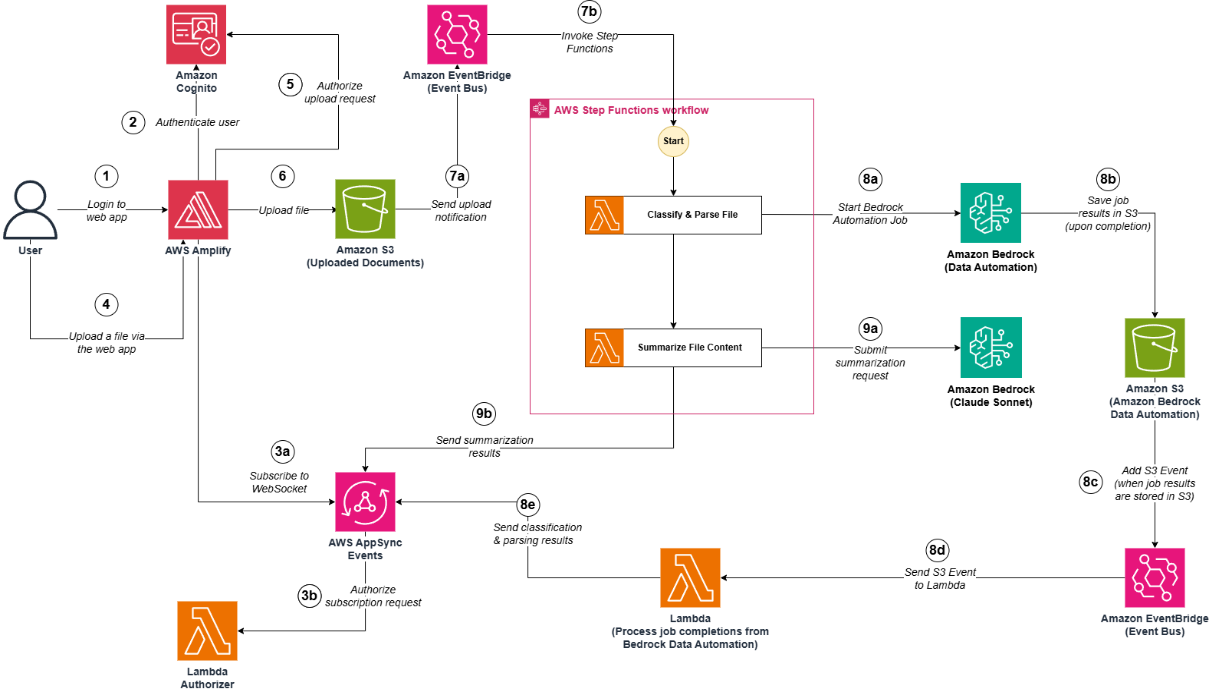
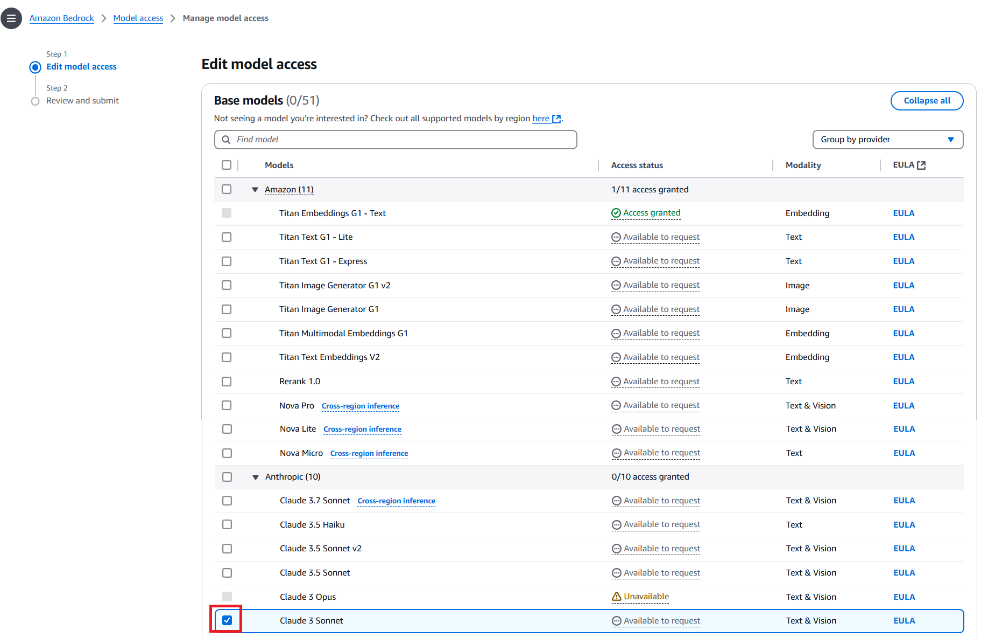
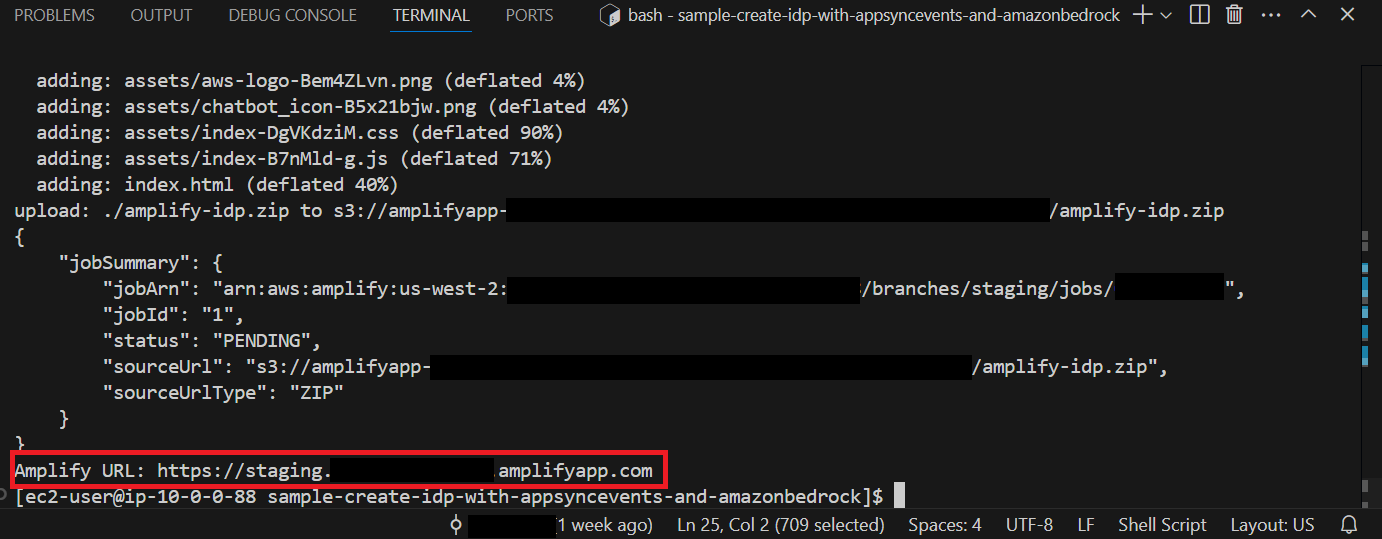


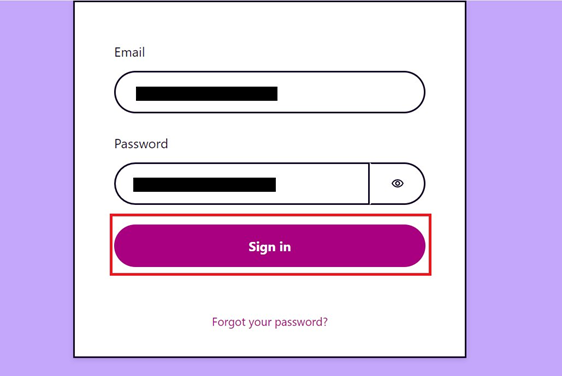
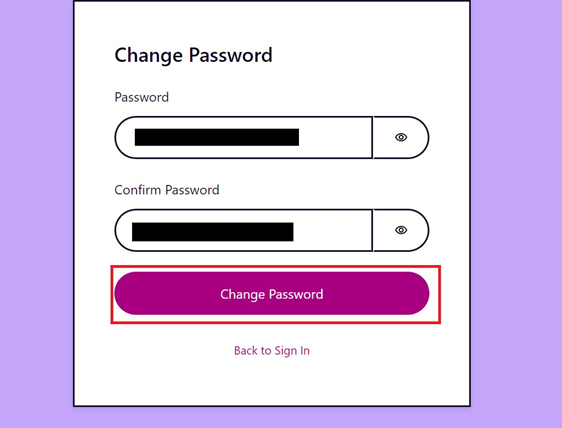
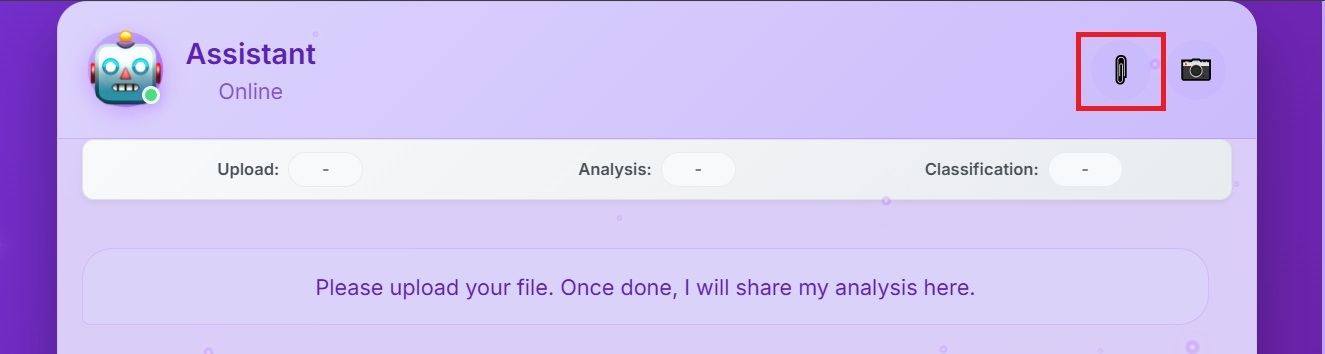
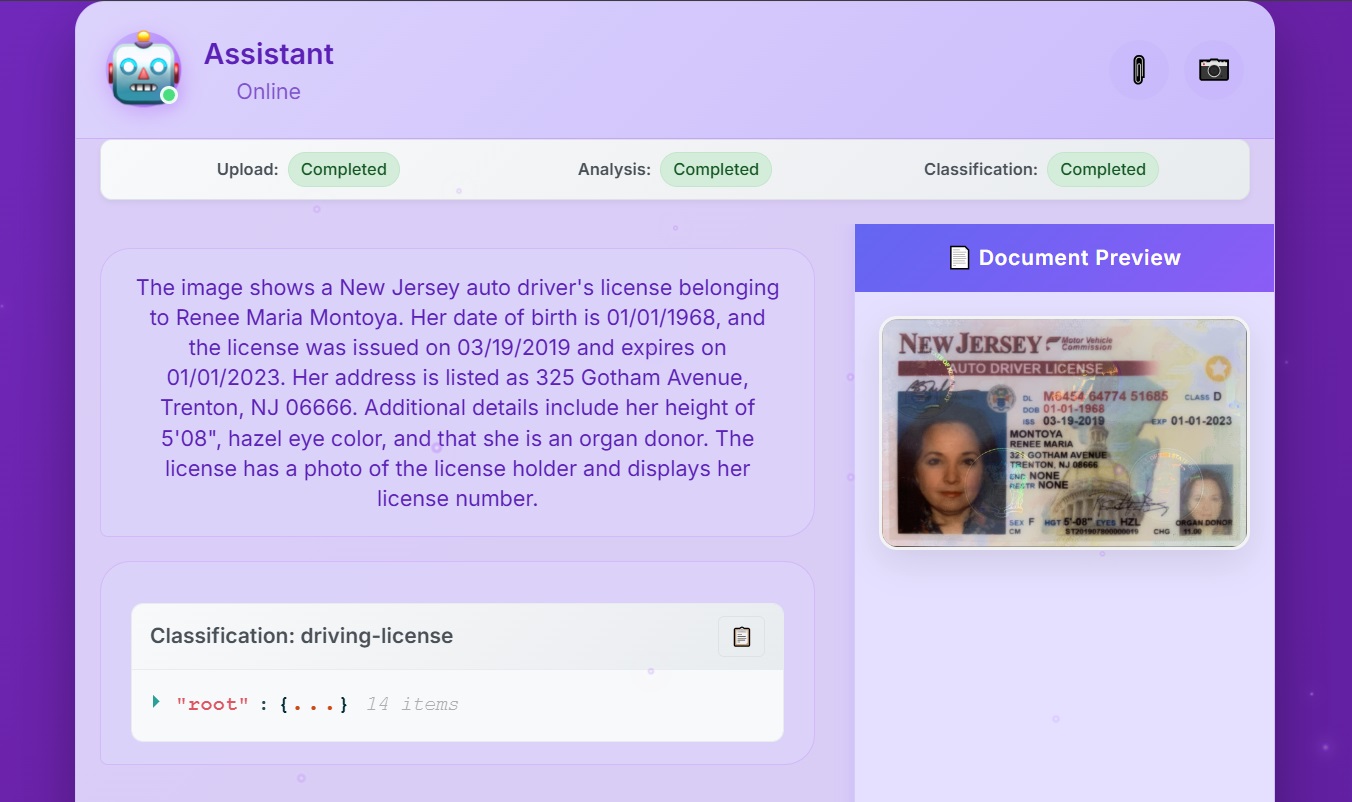


 Anand Komandooru is a Principal Cloud Architect at AWS. He joined AWS Professional Services organization in 2021 and helps customers build cloud-native applications on AWS cloud. He has over 20 years of experience building software and his favorite Amazon leadership principle is “
 Rama Krishna Ramaseshu is a Senior Application Architect at AWS. He joined AWS Professional Services in 2022 and with close to two decades of experience in application development and software architecture, he empowers customers to build well architected solutions within the AWS cloud. His favorite Amazon leadership principle is “
 Sachin Vighe is a Senior DevOps Architect at AWS. He joined AWS Professional Services in 2020, and specializes in designing and architecting solutions within the AWS cloud to guide customers through their DevOps and Cloud transformation journey. His favorite leadership principle is “
 Molly Wu is an Associate Cloud Developer at AWS. She joined AWS Professional Services in 2023 and specializes in assisting customers in building frontend technologies in AWS cloud. Her favorite leadership principle is “
 Andrew Yankowsky is a Security Consultant at AWS. He joined AWS Professional Services in 2023, and helps customers build cloud security capabilities and follow security best practices on AWS. His favorite leadership principle is “
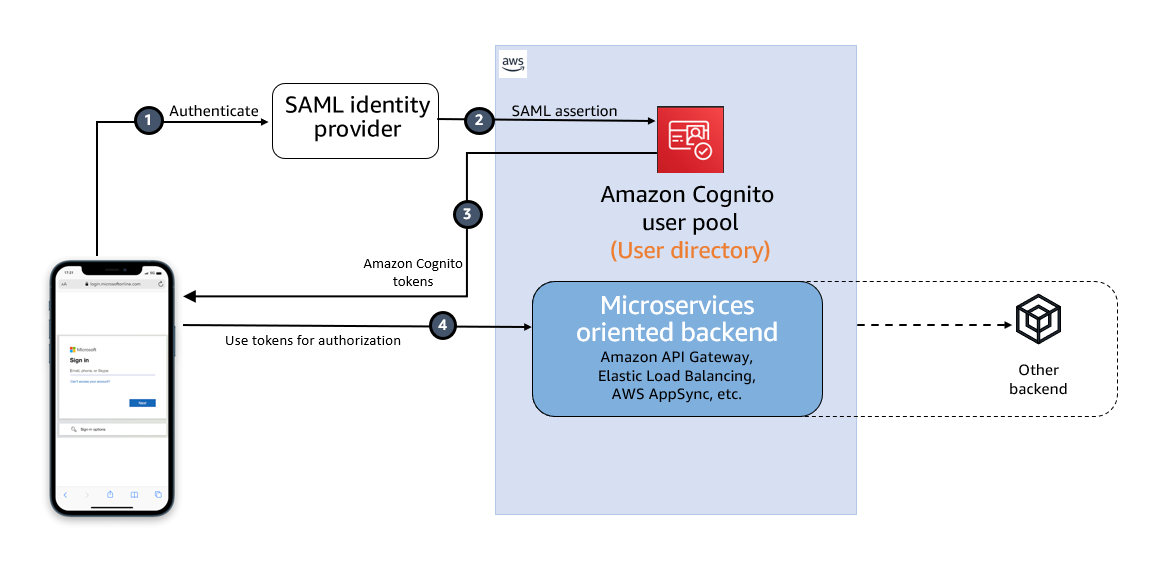


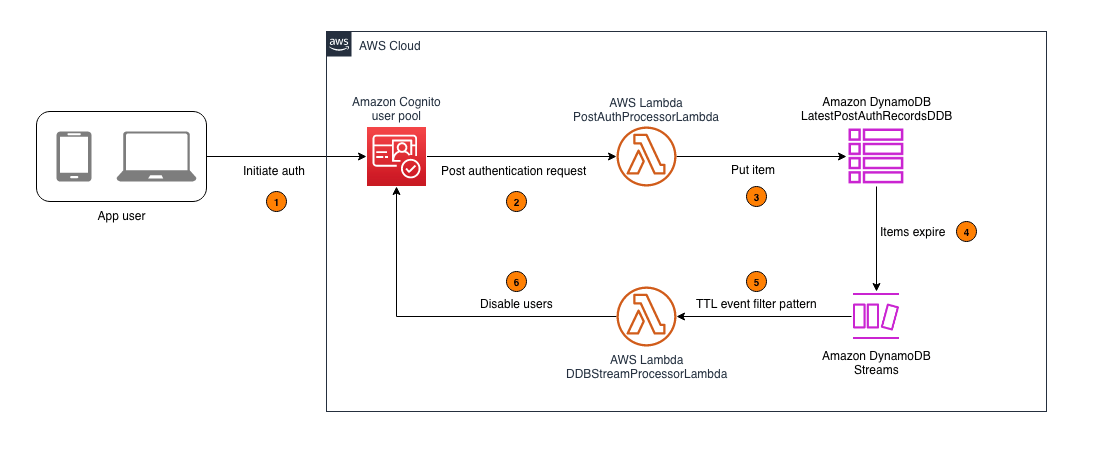


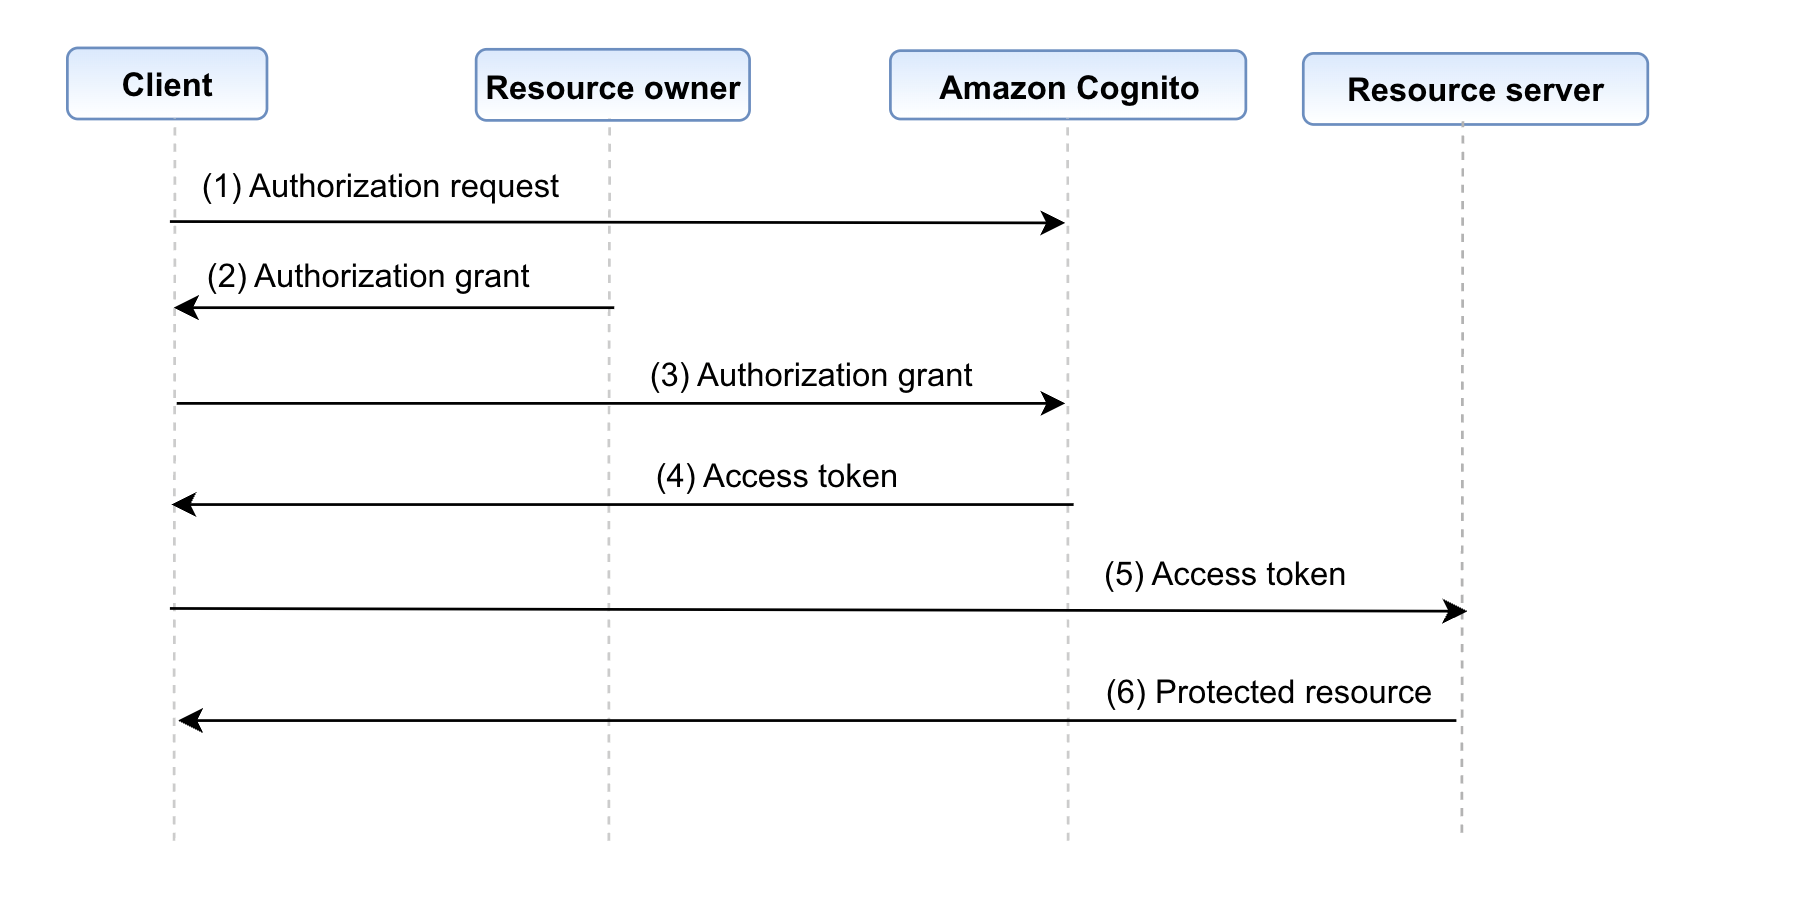
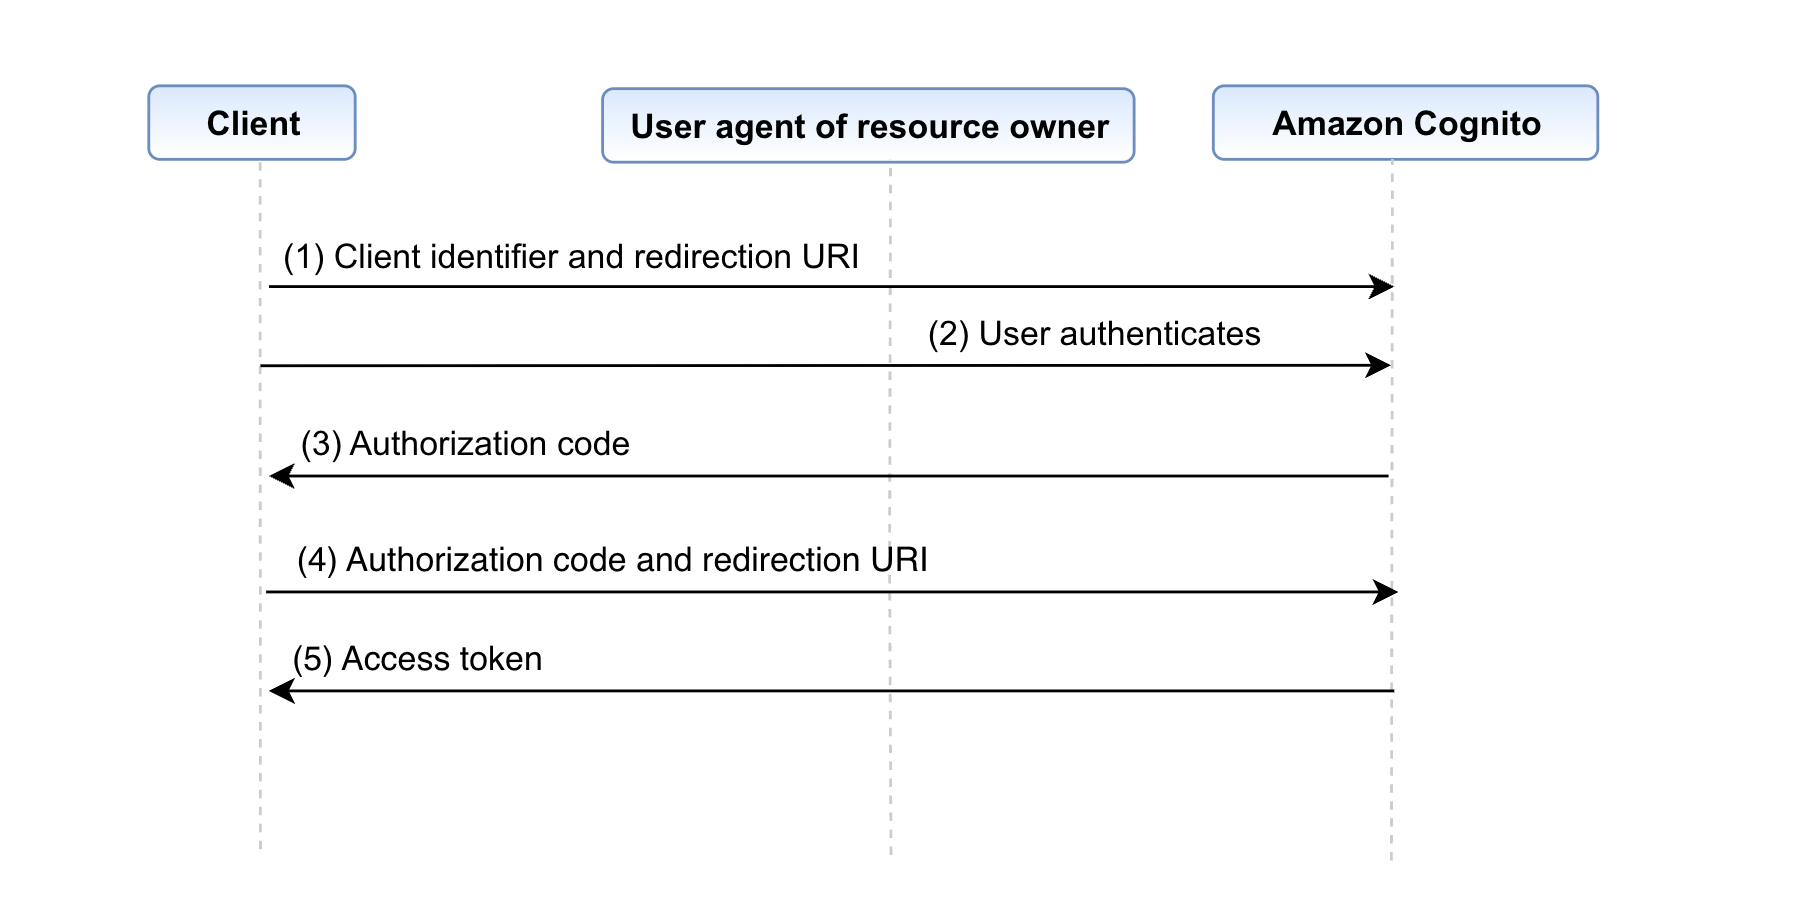
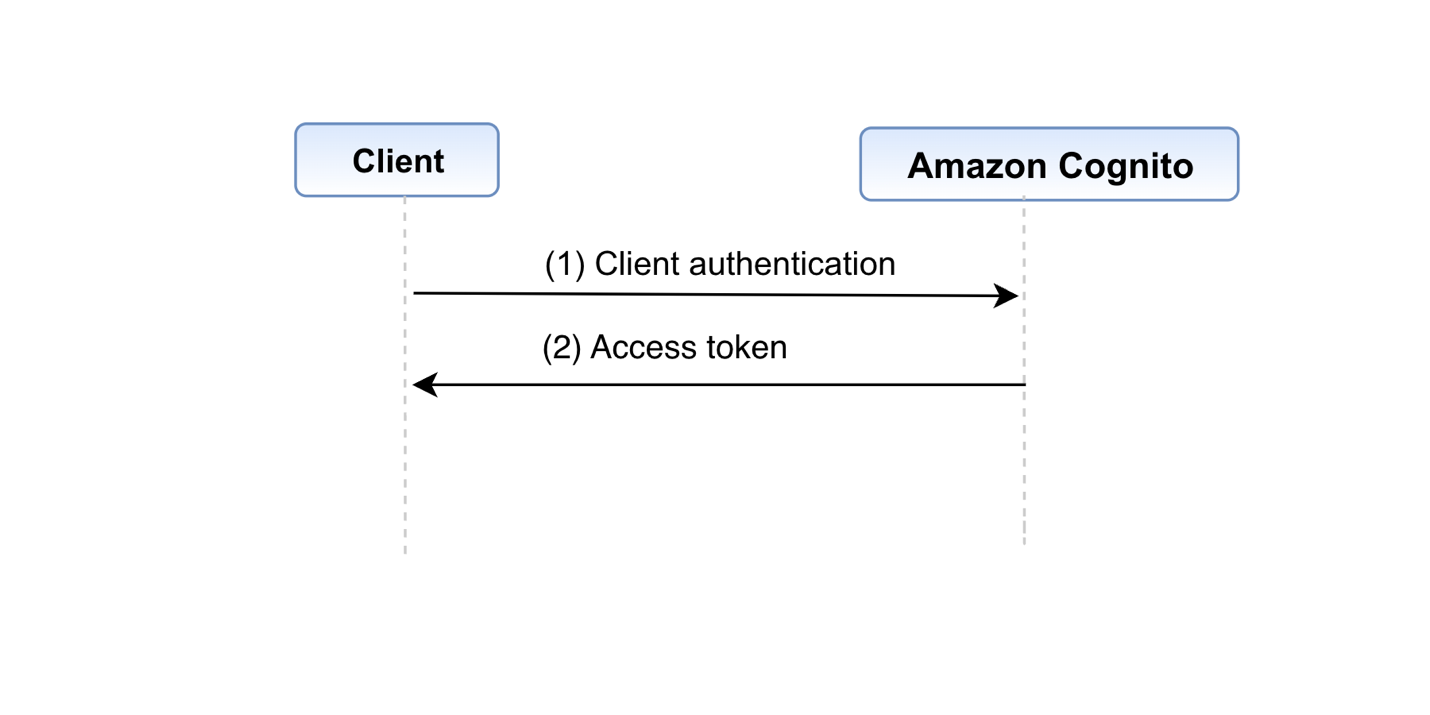
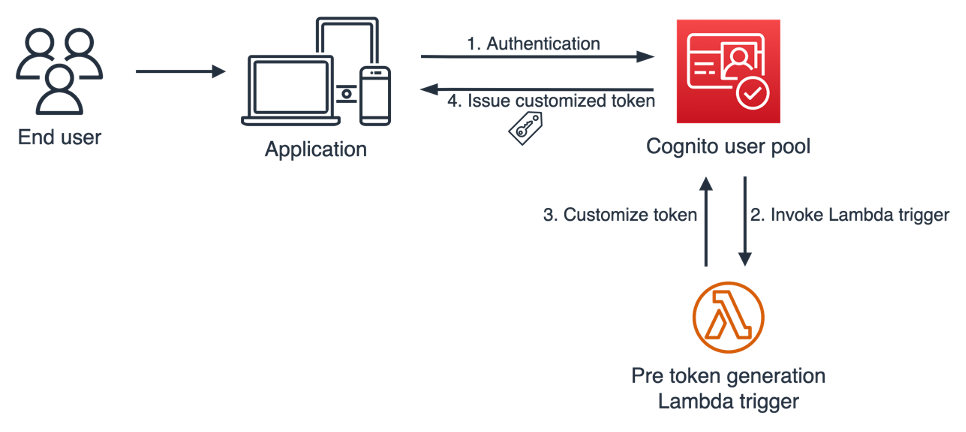
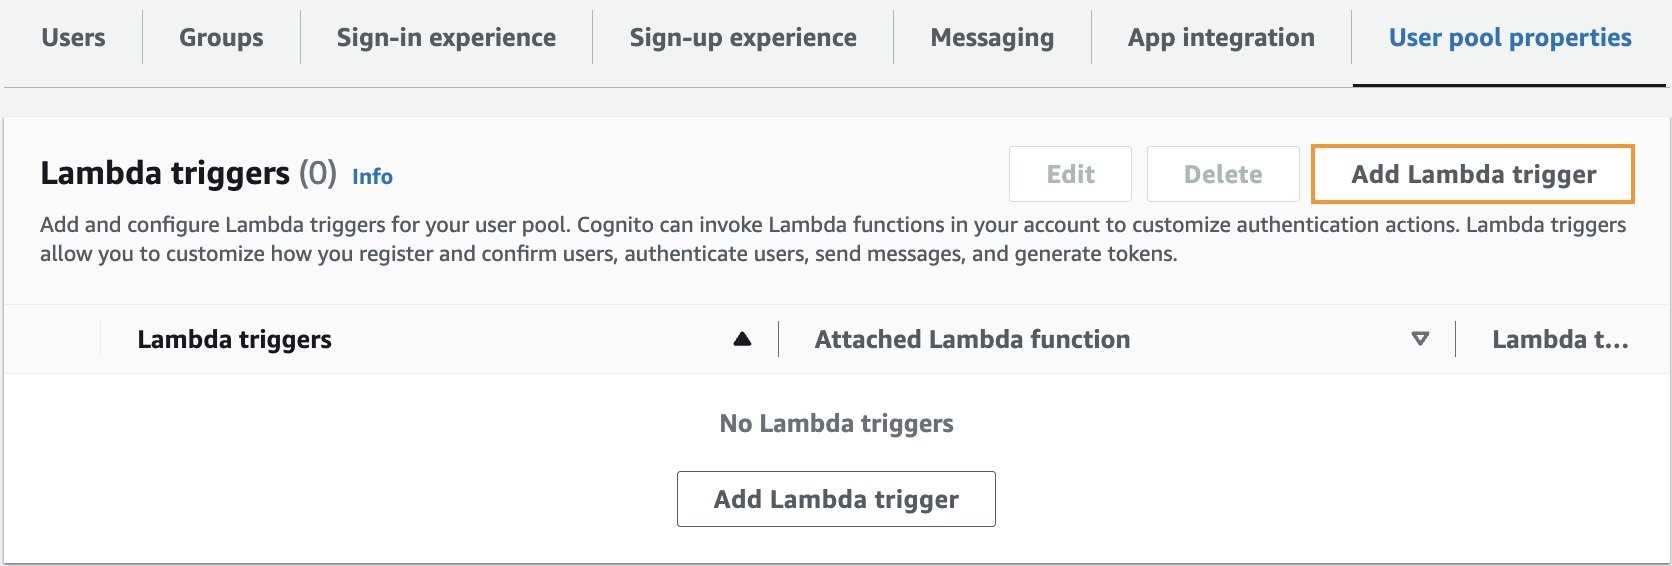
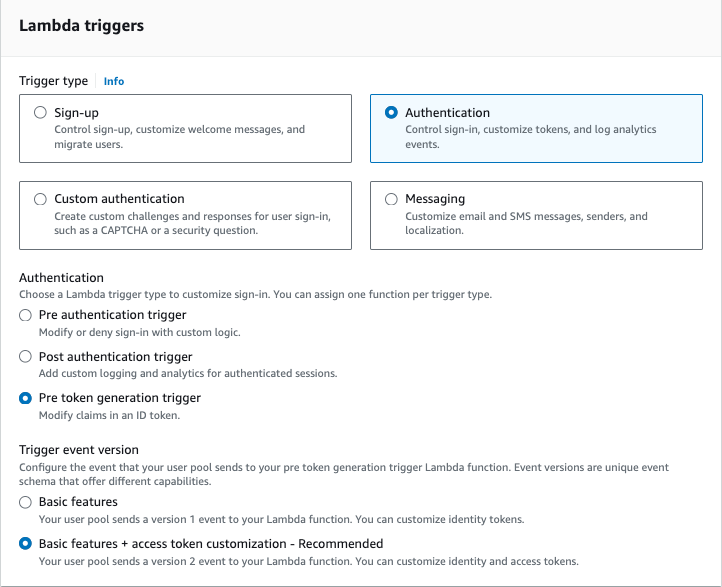
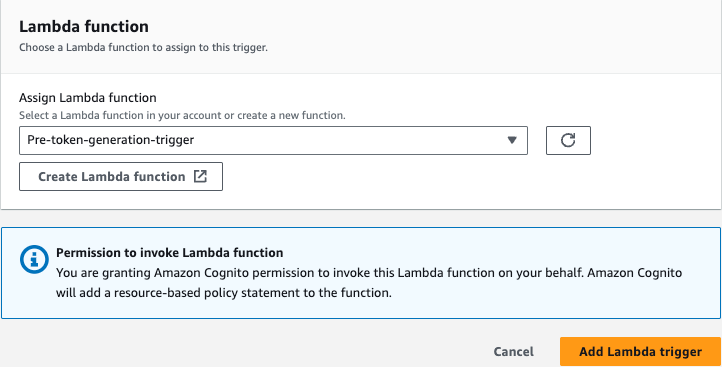

