Tag Archives: OAuth2

Reduce risk by implementing HttpOnly cookie authentication in Amazon API Gateway

Post Syndicated from Marc Borntraeger original https://aws.amazon.com/blogs/security/reduce-risk-by-implementing-httponly-cookie-authentication-in-amazon-api-gateway/

Some web applications need to protect their authentication tokens or session IDs from cross-site scripting (XSS). It’s an Open Web Application Security Project (OWASP) best practice for session management to store secrets in the browsers’ cookie store with the HttpOnly attribute enabled. When cookies have the HttpOnly attribute set, the browser will prevent client-side JavaScript code from accessing the value. This reduces the risk of secrets being compromised.

In this blog post, you’ll learn how to store access tokens and authenticate with HttpOnly cookies in your own workloads when using Amazon API Gateway as the client-facing endpoint. The tutorial in this post will show you a solution to store OAuth2 access tokens in the browser cookie store, and verify user authentication through Amazon API Gateway. This post describes how to use Amazon Cognito to issue OAuth2 access tokens, but the solution is not limited to OAuth2. You can use other kinds of tokens or session IDs.

The solution consists of two decoupled parts:

  1. OAuth2 flow
  2. Authentication check

Note: This tutorial takes you through detailed step-by-step instructions to deploy an example solution. If you prefer to deploy the solution with a script, see the api-gw-http-only-cookie-auth GitHub repository.

Prerequisites

No costs should incur when you deploy the application from this tutorial because the services you’re going to use are included in the AWS Free Tier. However, be aware that small charges may apply if you have other workloads running in your AWS account and exceed the free tier. Make sure to clean up your resources from this tutorial after deployment.

Solution architecture

This solution uses Amazon Cognito, Amazon API Gateway, and AWS Lambda to build a solution that persists OAuth2 access tokens in the browser cookie store. Figure 1 illustrates the solution architecture for the OAuth2 flow.

Figure 1: OAuth2 flow solution architecture

Figure 1: OAuth2 flow solution architecture

  1. A user authenticates by using Amazon Cognito.
  2. Amazon Cognito has an OAuth2 redirect URI pointing to your API Gateway endpoint and invokes the integrated Lambda function oAuth2Callback.
  3. The oAuth2Callback Lambda function makes a request to the Amazon Cognito token endpoint with the OAuth2 authorization code to get the access token.
  4. The Lambda function returns a response with the Set-Cookie header, instructing the web browser to persist the access token as an HttpOnly cookie. The browser will automatically interpret the Set-Cookie header, because it’s a web standard. HttpOnly cookies can’t be accessed through JavaScript—they can only be set through the Set-Cookie header.

After the OAuth2 flow, you are set up to issue and store access tokens. Next, you need to verify that users are authenticated before they are allowed to access your protected backend. Figure 2 illustrates how the authentication check is handled.
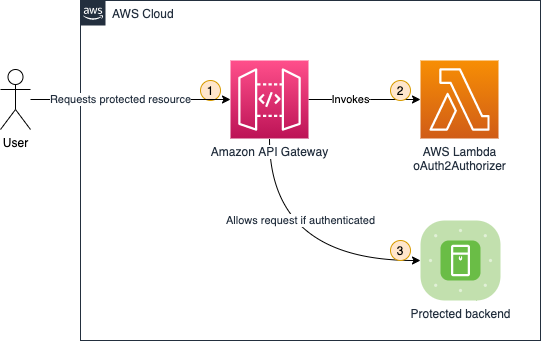
Figure 2: Authentication check solution architecture

Figure 2: Authentication check solution architecture

  1. A user requests a protected backend resource. The browser automatically attaches HttpOnly cookies to every request, as defined in the web standard.
  2. The Lambda function oAuth2Authorizer acts as the Lambda authorizer for HTTP APIs. It validates whether requests are authenticated. If requests include the proper access token in the request cookie header, then it allows the request.
  3. API Gateway only passes through requests that are authenticated.

Amazon Cognito is not involved in the authentication check, because the Lambda function can validate the OAuth2 access tokens by using a JSON Web Token (JWT) validation check.

1. Deploying the OAuth2 flow

In this section, you’ll deploy the first part of the solution, which is the OAuth2 flow. The OAuth2 flow is responsible for issuing and persisting OAuth2 access tokens in the browser’s cookie store.

1.1. Create a mock protected backend

As shown in in Figure 2, you need to protect a backend. For the purposes of this post, you create a mock backend by creating a simple Lambda function with a default response.

To create the Lambda function

  1. In the Lambda console, choose Create function.

    Note: Make sure to select your desired AWS Region.

  2. Choose Author from scratch as the option to create the function.
  3. In the Basic information section as shown in , enter or select the following values:
  4. Choose Create function.
    Figure 3: Configuring the getProtectedResource Lambda function

    Figure 3: Configuring the getProtectedResource Lambda function

The default Lambda function code returns a simple Hello from Lambda message, which is sufficient to demonstrate the concept of this solution.

1.2. Create an HTTP API in Amazon API Gateway

Next, you create an HTTP API by using API Gateway. Either an HTTP API or a REST API will work. In this example, choose HTTP API because it’s offered at a lower price point (for this tutorial you will stay within the free tier).

To create the API Gateway API

  1. In the API Gateway console, under HTTP API, choose Build.
  2. On the Create and configure integrations page, as shown in Figure 4, choose Add integration, then enter or select the following values:
    • Select Lambda.
    • For Lambda function, select the getProtectedResource Lambda function that you created in the previous section.
    • For API name, enter a name. In this example, I used MyApp.
    • Choose Next.
    Figure 4: Configuring API Gateway integrations and API name

    Figure 4: Configuring API Gateway integrations and API name

  3. On the Configure routes page, as shown in Figure 5, enter or select the following values:
    • For Method, select GET.
    • For Resource path, enter / (a single forward slash).
    • For Integration target, select the getProtectedResource Lambda function.
    • Choose Next.
    Figure 5: Configuring API Gateway routes

    Figure 5: Configuring API Gateway routes

  4. On the Configure stages page, keep all the default options, and choose Next.
  5. On the Review and create page, choose Create.
  6. Note down the value of Invoke URL, as shown in Figure 6.
    Figure 6: Note down the invoke URL

    Figure 6: Note down the invoke URL

Now it’s time to test your API Gateway API. Paste the value of Invoke URL into your browser. You’ll see the following message from your Lambda function: Hello from Lambda.

1.3. Use Amazon Cognito

You’ll use Amazon Cognito user pools to create and maintain a user directory, and add sign-up and sign-in to your web application.

To create an Amazon Cognito user pool

  1. In the Amazon Cognito console, choose Create user pool.
  2. On the Authentication providers page, as shown in Figure 7, for Cognito user pool sign-in options, select Email, then choose Next.
    Figure 7: Configuring authentication providers

    Figure 7: Configuring authentication providers

  3. In the Multi-factor authentication pane of the Configure Security requirements page, as shown in Figure 8, choose your MFA enforcement. For this example, choose No MFA to make it simpler for you to test your solution. However, in production for data sensitive workloads you should choose Require MFA – Recommended. Choose Next.
    Figure 8: Configuring MFA

    Figure 8: Configuring MFA

  4. On the Configure sign-up experience page, keep all the default options and choose Next.
  5. On the Configure message delivery page, as shown in Figure 9, choose your email provider. For this example, choose Send email with Cognito to make it simple to test your solution. In production workloads, you should choose Send email with Amazon SES – Recommended. Choose Next.
    Figure 9: Configuring email

    Figure 9: Configuring email

  6. In the User pool name section of the Integrate your app page, as shown in Figure 10, enter or select the following values:
    1. For User pool name, enter a name. In this example, I used MyUserPool.
      Figure 10: Configuring user pool name

      Figure 10: Configuring user pool name

    2. In the Hosted authentication pages section, as shown in Figure 11, select Use the Cognito Hosted UI.
      Figure 11: Configuring hosted authentication pages

      Figure 11: Configuring hosted authentication pages

    3. In the Domain section, as shown in Figure 12, for Domain type, choose Use a Cognito domain. For Cognito domain, enter a domain name. Note that domains in Cognito must be unique. Make sure to enter a unique name, for example by appending random numbers at the end of your domain name. For this example, I used https://http-only-cookie-secured-app.
      Figure 12: Configuring an Amazon Cognito domain

      Figure 12: Configuring an Amazon Cognito domain

    4. In the Initial app client section, as shown in Figure 13, enter or select the following values:
      • For App type, keep the default setting Public client.
      • For App client name, enter a friendly name. In this example, I used MyAppClient.
      • For Client secret, keep the default setting Don’t generate a client secret.
      • For Allowed callback URLs, enter <API_GW_INVOKE_URL>/oauth2/callback, replacing <API_GW_INVOKE_URL> with the invoke URL you noted down from API Gateway in the previous section.
        Figure 13: Configuring the initial app client

        Figure 13: Configuring the initial app client

    5. Choose Next.
  7. Choose Create user pool.

Next, you need to retrieve some Amazon Cognito information for later use.

To note down Amazon Cognito information

  1. In the Amazon Cognito console, choose the user pool you created in the previous steps.
  2. Under User pool overview, make note of the User pool ID value.
  3. On the App integration tab, under Cognito Domain, make note of the Domain value.
  4. Under App client list, make note of the Client ID value.
  5. Under App client list, choose the app client name you created in the previous steps.
  6. Under Hosted UI, make note of the Allowed callback URLs value.

Next, create the user that you will use in a later section of this post to run your test.

To create a user

  1. In the Amazon Cognito console, choose the user pool you created in the previous steps.
  2. Under Users, choose Create user.
  3. For Email address, enter [email protected]. For this tutorial, you don’t need to send out actual emails, so the email address does not need to actually exist.
  4. Choose Mark email address as verified.
  5. For password, enter a password you can remember (or even better: use a password generator).
  6. Remember the email and password for later use.
  7. Choose Create user.

1.4. Create the Lambda function oAuth2Callback

Next, you create the Lambda function oAuth2Callback, which is responsible for issuing and persisting the OAuth2 access tokens.

To create the Lambda function oAuth2Callback

  1. In the Lambda console, choose Create function.

    Note: Make sure to select your desired Region.

  2. For Function name, enter oAuth2Callback.
  3. For Runtime, select Node.js 16.x.
  4. For Architecture, select arm64.
  5. Choose Create function.

After you create the Lambda function, you need to add the code. Create a new folder on your local machine and open it with your preferred integrated development environment (IDE). Add the package.json and index.js files, as shown in the following examples.

package.json

{
  "name": "oAuth2Callback",
  "version": "0.0.1",
  "dependencies": {
    "axios": "^0.27.2",
    "qs": "^6.11.0"
  }
}

In a terminal at the root of your created folder, run the following command.

$ npm install

In the index.js example code that follows, be sure to replace the placeholders with your values.

index.js

const qs = require("qs");
const axios = require("axios").default;
exports.handler = async function (event) {
  const code = event.queryStringParameters?.code;
  if (code == null) {
    return {
      statusCode: 400,
      body: "code query param required",
    };
  }
  const data = {
    grant_type: "authorization_code",
    client_id: "<your client ID from Cognito>",
    // The redirect has already happened, but you still need to pass the URI for validation, so a valid oAuth2 access token can be generated
    redirect_uri: encodeURI("<your callback URL from Cognito>"),
    code: code,
  };
  // Every Cognito instance has its own token endpoints. For more information check the documentation: https://docs.aws.amazon.com/cognito/latest/developerguide/token-endpoint.html
  const res = await axios.post(
    "<your App Client Cognito domain>/oauth2/token",
    qs.stringify(data),
    {
      headers: {
        "Content-Type": "application/x-www-form-urlencoded",
      },
    }
  );
  return {
    statusCode: 302,
    // These headers are returned as part of the response to the browser.
    headers: {
      // The Location header tells the browser it should redirect to the root of the URL
      Location: "/",
      // The Set-Cookie header tells the browser to persist the access token in the cookie store
      "Set-Cookie": `accessToken=${res.data.access_token}; Secure; HttpOnly; SameSite=Lax; Path=/`,
    },
  };
};

Along with the HttpOnly attribute, you pass along two additional cookie attributes:

  • Secure – Indicates that cookies are only sent by the browser to the server when a request is made with the https: scheme.
  • SameSite – Controls whether or not a cookie is sent with cross-site requests, providing protection against cross-site request forgery attacks. You set the value to Lax because you want the cookie to be set when the user is forwarded from Amazon Cognito to your web application (which runs under a different URL).

For more information, see Using HTTP cookies on the MDN Web Docs site.

Afterwards, upload the code to the oAuth2Callback Lambda function as described in Upload a Lambda Function in the AWS Toolkit for VS Code User Guide.

1.5. Configure an OAuth2 callback route in API Gateway

Now, you configure API Gateway to use your new Lambda function through a Lambda proxy integration.

To configure API Gateway to use your Lambda function

  1. In the API Gateway console, under APIs, choose your API name. For me, the name is MyApp.
  2. Under Develop, choose Routes.
  3. Choose Create.
  4. Enter or select the following values:
    • For method, select GET.
    • For path, enter /oauth2/callback.
  5. Choose Create.
  6. Choose GET under /oauth2/callback, and then choose Attach integration.
  7. Choose Create and attach an integration.
    • For Integration type, choose Lambda function.
    • For Lambda function, choose oAuth2Callback from the last step.
  8. Choose Create.

Your route configuration in API Gateway should now look like Figure 14.

Figure 14: Routes for API Gateway

Figure 14: Routes for API Gateway

2. Testing the OAuth2 flow

Now that you have the components in place, you can test your OAuth2 flow. You test the OAuth2 flow by invoking the login on your browser.

To test the OAuth2 flow

  1. In the Amazon Cognito console, choose your user pool name. For me, the name is MyUserPool.
  2. Under the navigation tabs, choose App integration.
  3. Under App client list, choose your app client name. For me, the name is MyAppClient.
  4. Choose View Hosted UI.
  5. In the newly opened browser tab, open your developer tools, so you can inspect the network requests.
  6. Log in with the email address and password you set in the previous section. Change your password, if you’re asked to do so. You can also choose the same password as you set in the previous section.
  7. You should see your Hello from Lambda message.

To test that the cookie was accurately set

  1. Check your browser network tab in the browser developer settings. You’ll see the /oauth2/callback request, as shown in Figure 15.
    Figure 15: Callback network request

    Figure 15: Callback network request

    The response headers should include a set-cookie header, as you specified in your Lambda function. With the set-cookie header, your OAuth2 access token is set as an HttpOnly cookie in the browser, and access is prohibited from any client-side code.

  2. Alternatively, you can inspect the cookie in the browser cookie storage, as shown in Figure 16.

  3. If you want to retry the authentication, navigate in your browser to your Amazon Cognito domain that you chose in the previous section and clear all site data in the browser developer tools. Do the same with your API Gateway invoke URL. Now you can restart the test with a clean state.

3. Deploying the authentication check

In this section, you’ll deploy the second part of your application: the authentication check. The authentication check makes it so that only authenticated users can access your protected backend. The authentication check works with the HttpOnly cookie, which is stored in the user’s cookie store.

3.1. Create the Lambda function oAuth2Authorizer

This Lambda function checks that requests are authenticated.

To create the Lambda function

  1. In the Lambda console, choose Create function.

    Note: Make sure to select your desired Region.

  2. For Function name, enter oAuth2Authorizer.
  3. For Runtime, select Node.js 16.x.
  4. For Architecture, select arm64.
  5. Choose Create function.

After you create the Lambda function, you need to add the code. Create a new folder on your local machine and open it with your preferred IDE. Add the package.json and index.js files as shown in the following examples.

package.json

{
  "name": "oAuth2Authorizer",
  "version": "0.0.1",
  "dependencies": {
    "aws-jwt-verify": "^3.1.0"
  }
}

In a terminal at the root of your created folder, run the following command.

$ npm install

In the index.js example code, be sure to replace the placeholders with your values.

index.js

const { CognitoJwtVerifier } = require("aws-jwt-verify");
function getAccessTokenFromCookies(cookiesArray) {
  // cookieStr contains the full cookie definition string: "accessToken=abc"
  for (const cookieStr of cookiesArray) {
    const cookieArr = cookieStr.split("accessToken=");
    // After splitting you should get an array with 2 entries: ["", "abc"] - Or only 1 entry in case it was a different cookie string: ["test=test"]
    if (cookieArr[1] != null) {
      return cookieArr[1]; // Returning only the value of the access token without cookie name
    }
  }
  return null;
}
// Create the verifier outside the Lambda handler (= during cold start),
// so the cache can be reused for subsequent invocations. Then, only during the
// first invocation, will the verifier actually need to fetch the JWKS.
const verifier = CognitoJwtVerifier.create({
  userPoolId: "<your user pool ID from Cognito>",
  tokenUse: "access",
  clientId: "<your client ID from Cognito>",
});
exports.handler = async (event) => {
  if (event.cookies == null) {
    console.log("No cookies found");
    return {
      isAuthorized: false,
    };
  }
  // Cookies array looks something like this: ["accessToken=abc", "otherCookie=Random Value"]
  const accessToken = getAccessTokenFromCookies(event.cookies);
  if (accessToken == null) {
    console.log("Access token not found in cookies");
    return {
      isAuthorized: false,
    };
  }
  try {
    await verifier.verify(accessToken);
    return {
      isAuthorized: true,
    };
  } catch (e) {
    console.error(e);
    return {
      isAuthorized: false,
    };
  }
};

After you add the package.json and index.js files, upload the code to the oAuth2Authorizer Lambda function as described in Upload a Lambda Function in the AWS Toolkit for VS Code User Guide.

3.2. Configure the Lambda authorizer in API Gateway

Next, you configure your authorizer Lambda function to protect your backend. This way you control access to your HTTP API.

To configure the authorizer Lambda function

  1. In the API Gateway console, under APIs, choose your API name. For me, the name is MyApp.
  2. Under Develop, choose Routes.
  3. Under / (a single forward slash) GET, choose Attach authorization.
  4. Choose Create and attach an authorizer.
  5. Choose Lambda.
  6. Enter or select the following values:
    • For Name, enter oAuth2Authorizer.
    • For Lambda function, choose oAuth2Authorizer.
    • Clear Authorizer caching. For this tutorial, you disable authorizer caching to make testing simpler. See the section Bonus: Enabling authorizer caching for more information about enabling caching to increase performance.
    • Under Identity sources, choose Remove.

      Note: Identity sources are ignored for your Lambda authorizer. These are only used for caching.

    • Choose Create and attach.
  7. Under Develop, choose Routes to inspect all routes.

Now your API Gateway route /oauth2/callback should be configured as shown in Figure 17.
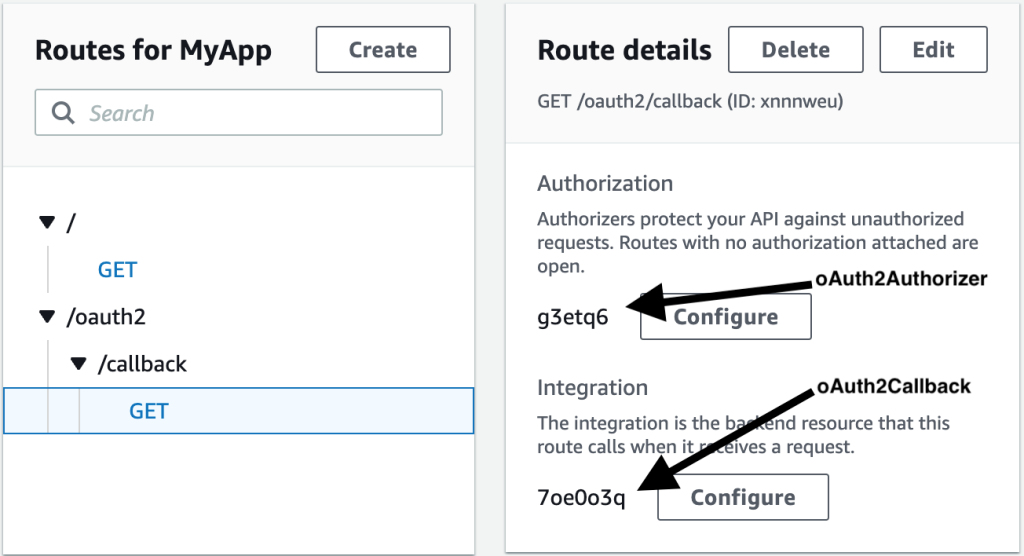
Figure 17: API Gateway route configuration

Figure 17: API Gateway route configuration

4. Testing the OAuth2 authorizer

You did it! From your last test, you should still be authenticated. So, if you open the API Gateway Invoke URL in your browser, you’ll be greeted from your protected backend.

In case you are not authenticated anymore, you’ll have to follow the steps again from the section Testing the OAuth2 flow to authenticate.

When you inspect the HTTP request that your browser makes in the developer tools as shown in Figure 18, you can see that authentication works because the HttpOnly cookie is automatically attached to every request.
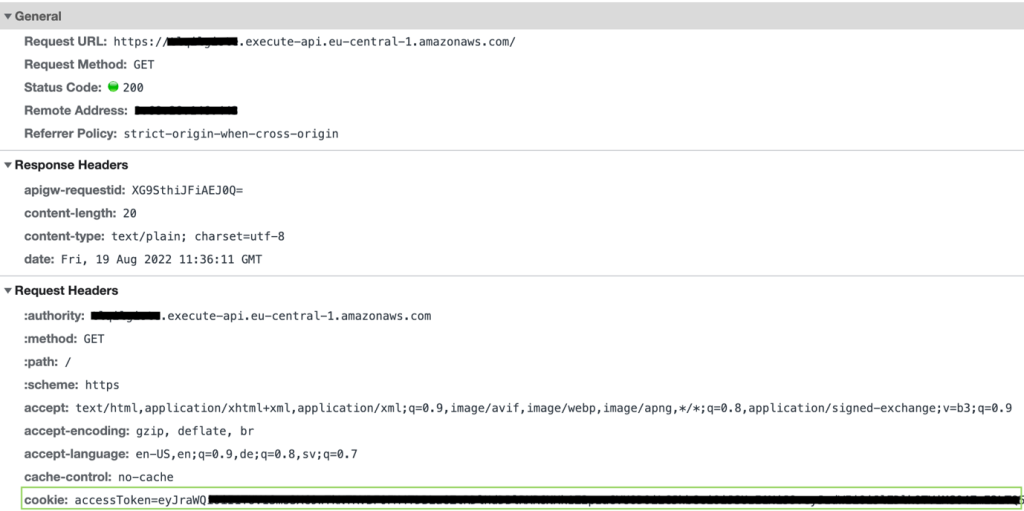
Figure 18: Browser requests include HttpOnly cookies

Figure 18: Browser requests include HttpOnly cookies

To verify that your authorizer Lambda function works correctly, paste the same Invoke URL you noted previously in an incognito window. Incognito windows do not share the cookie store with your browser session, so you see a {"message":"Forbidden"} error message with HTTP response code 403 – Forbidden.

Cleanup

Delete all unwanted resources to avoid incurring costs.

To delete the Amazon Cognito domain and user pool

  1. In the Amazon Cognito console, choose your user pool name. For me, the name is MyUserPool.
  2. Under the navigation tabs, choose App integration.
  3. Under Domain, choose Actions, then choose Delete Cognito domain.
  4. Confirm by entering your custom Amazon Cognito domain, and choose Delete.
  5. Choose Delete user pool.
  6. Confirm by entering your user pool name (in my case, MyUserPool), and then choose Delete.

To delete your API Gateway resource

  1. In the API Gateway console, select your API name. For me, the name is MyApp.
  2. Under Actions, choose Delete and confirm your deletion.

To delete the AWS Lambda functions

  1. In the Lambda console, select all three of the Lambda functions you created.
  2. Under Actions, choose Delete and confirm your deletion.

Bonus: Enabling authorizer caching

As mentioned earlier, you can enable authorizer caching to help improve your performance. When caching is enabled for an authorizer, API Gateway uses the authorizer’s identity sources as the cache key. If a client specifies the same parameters in identity sources within the configured Time to Live (TTL), then API Gateway uses the cached authorizer result, rather than invoking your Lambda function.

To enable caching, your authorizer must have at least one identity source. To cache by the cookie request header, you specify $request.header.cookie as the identity source. Be aware that caching will be affected if you pass along additional HttpOnly cookies apart from the access token.

For more information, see Working with AWS Lambda authorizers for HTTP APIs in the Amazon API Gateway Developer Guide.

Conclusion

In this blog post, you learned how to implement authentication by using HttpOnly cookies. You used Amazon API Gateway and AWS Lambda to persist and validate the HttpOnly cookies, and you used Amazon Cognito to issue OAuth2 access tokens. If you want to try an automated deployment of this solution with a script, see the api-gw-http-only-cookie-auth GitHub repository.

The application of this solution to protect your secrets from potential cross-site scripting (XSS) attacks is not limited to OAuth2. You can protect other kinds of tokens, sessions, or tracking IDs with HttpOnly cookies.

In this solution, you used NodeJS for your Lambda functions to implement authentication. But HttpOnly cookies are widely supported by many programing frameworks. You can find more implementation options on the OWASP Secure Cookie Attribute page.

Although this blog post gives you a tutorial on how to implement HttpOnly cookie authentication in API Gateway, it may not meet all your security and functional requirements. Make sure to check your business requirements and talk to your stakeholders before you adopt techniques from this blog post.

Furthermore, it’s a good idea to continuously test your web application, so that cookies are only set with your approved security attributes. For more information, see the OWASP Testing for Cookies Attributes page.

 
If you have feedback about this post, submit comments in the Comments section below. If you have questions about this post, start a new thread on the Amazon API Gateway re:Post or contact AWS Support.

Want more AWS Security news? Follow us on Twitter.

Marc Borntraeger

Marc Borntraeger

Marc is a Solutions Architect in healthcare, based in Zurich, Switzerland. He helps security-sensitive customers such as hospitals to re-innovate themselves with AWS.

How to set up Amazon Cognito for federated authentication using Azure AD

Post Syndicated from Ratan Kumar original https://aws.amazon.com/blogs/security/how-to-set-up-amazon-cognito-for-federated-authentication-using-azure-ad/

In this blog post, I’ll walk you through the steps to integrate Azure AD as a federated identity provider in Amazon Cognito user pool. A user pool is a user directory in Amazon Cognito that provides sign-up and sign-in options for your app users.

Identity management and authentication flow can be challenging when you need to support requirements such as OAuth, social authentication, and login using a Security Assertion Markup Language (SAML) 2.0 based identity provider (IdP) to meet your enterprise identity management requirements. Amazon Cognito provides you a managed, scalable user directory, user sign-up and sign-in, and federation through third-party identity providers. An added benefit for developers is that it provides you a standardized set of tokens (Identity, Access and Refresh Token). So, in situations when you have to support authentication with multiple identity providers (e.g. Social authentication, SAML IdP, etc.), you don’t have to write code for handling different tokens issued by different identity providers. Instead, you can just work with a consistent set of tokens issued by Amazon Cognito user pool.
 

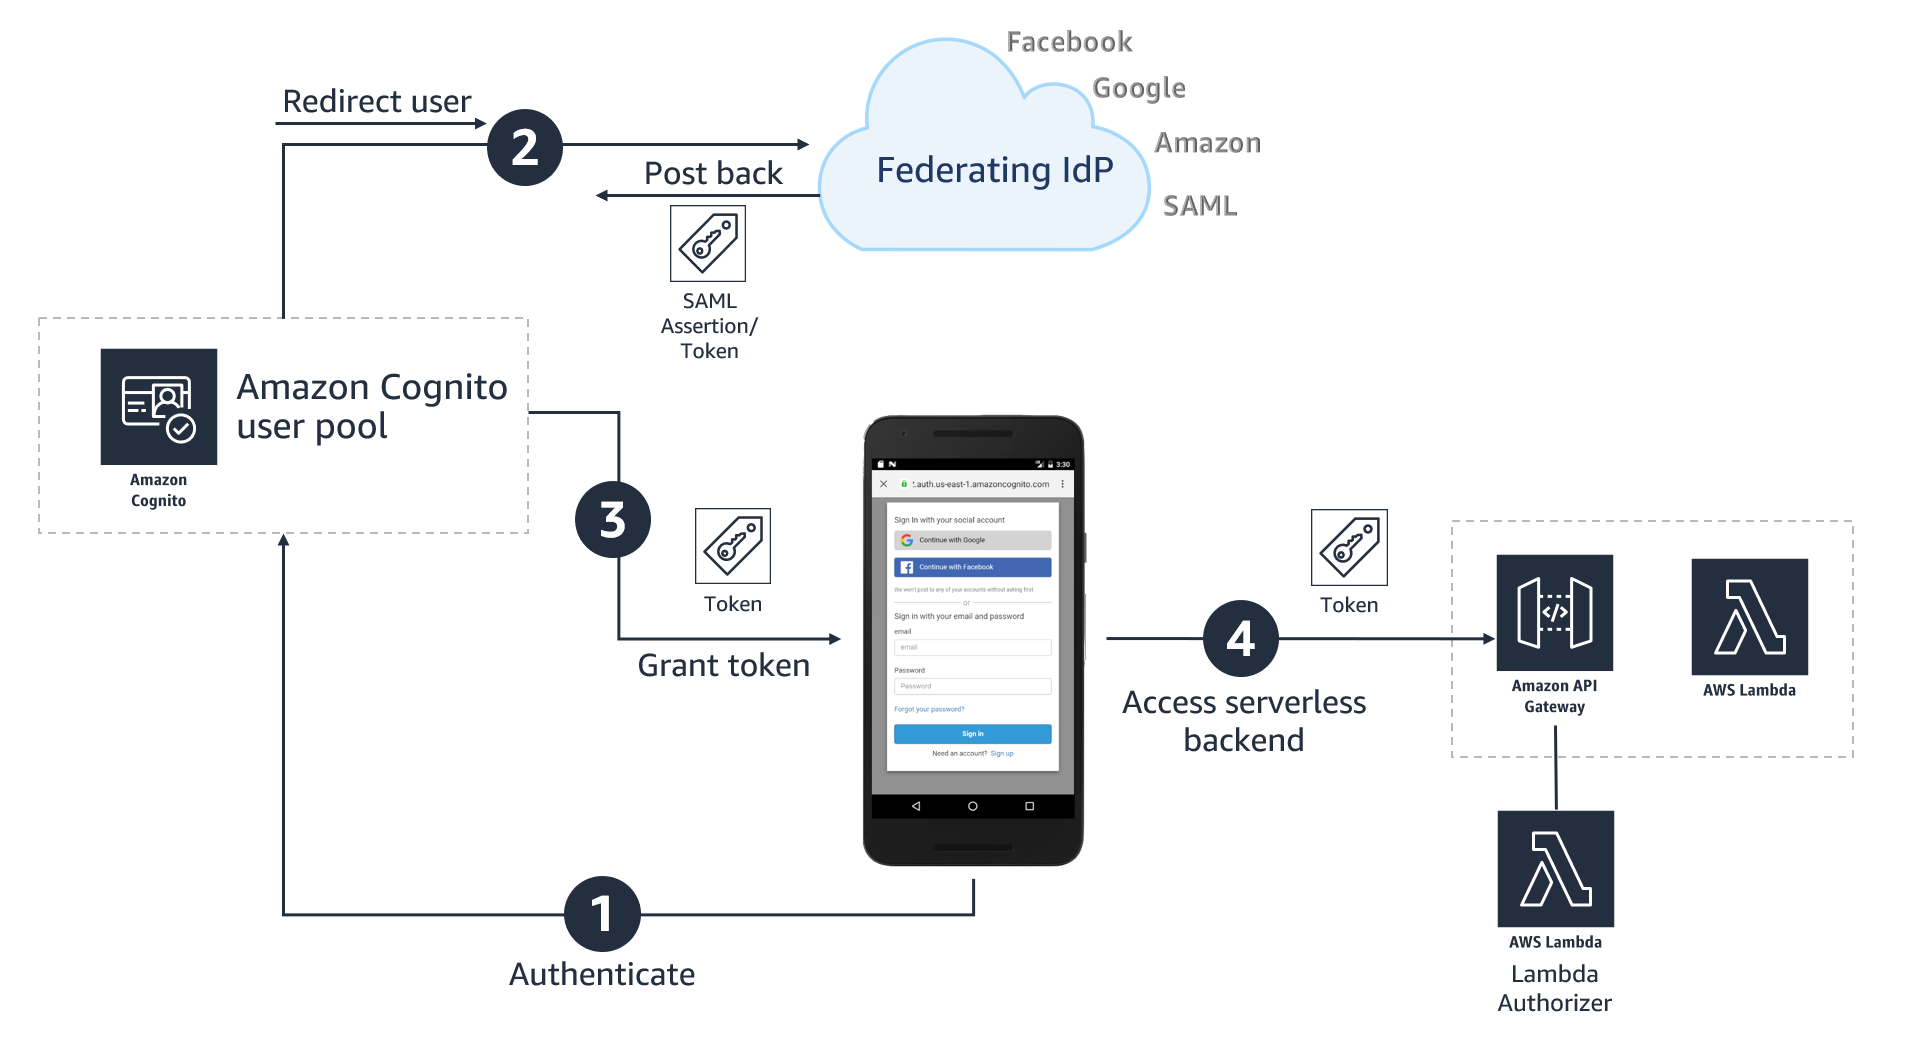
Figure 1: High-level architecture for federated authentication in a web or mobile app

Figure 1: High-level architecture for federated authentication in a web or mobile app

As shown in Figure 1, the high-level application architecture of a serverless app with federated authentication typically involves following steps:

  1. User selects their preferred IdP to authenticate.
  2. User gets re-directed to the federated IdP for login. On successful authentication, the IdP posts back a SAML assertion or token containing user’s identity details to an Amazon Cognito user pool.
  3. Amazon Cognito user pool issues a set of tokens to the application
  4. Application can use the token issued by the Amazon Cognito user pool for authorized access to APIs protected by Amazon API Gateway.

To learn more about the authentication flow with SAML federation, see the blog post Building ADFS Federation for your Web App using Amazon Cognito User Pools.

Step-by-step instructions for enabling Azure AD as federated identity provider in an Amazon Cognito user pool

This post will walk you through the following steps:

  1. Create an Amazon Cognito user pool
  2. Add Amazon Cognito as an enterprise application in Azure AD
  3. Add Azure AD as SAML identity provider (IDP) in Amazon Cognito
  4. Create an app client and use the newly created SAML IDP for Azure AD

Prerequisites

You’ll need to have administrative access to Azure AD, an AWS account and the AWS Command Line Interface (AWS CLI) installed on your machine. Follow the instructions for installing, updating, and uninstalling the AWS CLI version 2; and then to configure your installation, follow the instructions for configuring the AWS CLI. If you don’t want to install AWS CLI, you can also run these commands from AWS CloudShell which provides a browser-based shell to securely manage, explore, and interact with your AWS resources.

Step 1: Create an Amazon Cognito user pool

The procedures in this post use the AWS CLI, but you can also follow the instructions to use the AWS Management Console to create a new user pool.

To create a user pool in the AWS CLI

  1. Use the following command to create a user pool with default settings. Be sure to replace <yourUserPoolName> with the name you want to use for your user pool.
    aws cognito-idp create-user-pool \
    --pool-name <yourUserPoolName>
    

    You should see an output containing number of details about the newly created user pool.

  2. Copy the value of user pool ID, in this example, ap-southeast-2_xx0xXxXXX. You will need this value for the next steps.
    "UserPool": {
            "Id": "ap-southeast-2_xx0xXxXXX",
            "Name": "example-corp-prd-userpool"
           "Policies": { …
    

Add a domain name to user pool

One of the many useful features of Amazon Cognito is hosted UI which provides a configurable web interface for user sign in. Hosted UI is accessible from a domain name that needs to be added to the user pool. There are two options for adding a domain name to a user pool. You can either use an Amazon Cognito domain, or a domain name that you own. This solution uses an Amazon Cognito domain, which will look like the following:

https://<yourDomainPrefix>.auth.<aws-region>.amazoncognito.com

To add a domain name to user pool

  1. Use following CLI command to add an Amazon Cognito domain to the user pool. Replace <yourDomainPrefix> with a unique domain name prefix (for example example-corp-prd). Note that you cannot use keywords aws, amazon, or cognito for domain prefix.
    aws cognito-idp create-user-pool-domain \
    --domain <yourDomainPrefix> \
    --user-pool-id <yourUserPoolID>
    

Prepare information for Azure AD setup

Next, you prepare Identifier (Entity ID) and Reply URL, which are required to add Amazon Cognito as an enterprise application in Azure AD (done in Step 2 below). Azure AD expects these values in a very specific format. In a text editor, note down your values for Identifier (Entity ID) and Reply URL according to the following formats:

  • For Identifier (Entity ID) the format is:
    urn:amazon:cognito:sp:<yourUserPoolID>
    

    For example:

    urn:amazon:cognito:sp:ap-southeast-2_nYYYyyYyYy
    

  • For Reply URL the format is:
    https://<yourDomainPrefix>.auth.<aws-region>.amazoncognito.com/saml2/idpresponse
    

    For example:

    https://example-corp-prd.auth.ap-southeast-2.amazoncognito.com/saml2/idpresponse
    

    Note: The Reply URL is the endpoint where Azure AD will send SAML assertion to Amazon Cognito during the process of user authentication.

Update the placeholders above with your values (without < >), and then note the values of Identifier (Entity ID) and Reply URL in a text editor for future reference.

For more information, see Adding SAML Identity Providers to a User Pool in the Amazon Cognito Developer Guide.

Step 2: Add Amazon Cognito as an enterprise application in Azure AD

In this step, you add an Amazon Cognito user pool as an application in Azure AD, to establish a trust relationship between them.

To add new application in Azure AD

  1. Log in to the Azure Portal.
  2. In the Azure Services section, choose Azure Active Directory.
  3. In the left sidebar, choose Enterprise applications.
  4. Choose New application.
  5. On the Browse Azure AD Gallery page, choose Create your own application.
  6. Under What’s the name of your app?, enter a name for your application and select Integrate any other application you don’t find in the gallery (Non-gallery), as shown in Figure 2. Choose Create.
     
    Figure 2: Add an enterprise app in Azure AD

    Figure 2: Add an enterprise app in Azure AD

It will take few seconds for the application to be created in Azure AD, then you should be redirected to the Overview page for the newly added application.

Note: Occasionally, this step can result in a Not Found error, even though Azure AD has successfully created a new application. If that happens, in Azure AD navigate back to Enterprise applications and search for your application by name.

To set up Single Sign-on using SAML

  1. On the Getting started page, in the Set up single sign on tile, choose Get started, as shown in Figure 3.
     
    Figure 3: Application configuration page in Azure AD

    Figure 3: Application configuration page in Azure AD

  2. On the next screen, select SAML.
  3. In the middle pane under Set up Single Sign-On with SAML, in the Basic SAML Configuration section, choose the edit icon ().
  4. In the right pane under Basic SAML Configuration, replace the default Identifier ID (Entity ID) with the Identifier (Entity ID) you copied previously. In the Reply URL (Assertion Consumer Service URL) field, enter the Reply URL you copied previously, as shown in Figure 4. Choose Save.
     
    Figure 4: Azure AD SAML-based Sign-on setup

    Figure 4: Azure AD SAML-based Sign-on setup

  5. In the middle pane under Set up Single Sign-On with SAML, in the User Attributes & Claims section, choose Edit.
  6. Choose Add a group claim.
  7. On the User Attributes & Claims page, in the right pane under Group Claims, select Groups assigned to the application, leave Source attribute as Group ID, as shown in Figure 5. Choose Save.
     
    Figure 5: Option to select group claims to release to Amazon Cognito

    Figure 5: Option to select group claims to release to Amazon Cognito

    This adds the group claim so that Amazon Cognito can receive the group membership detail of the authenticated user as part of the SAML assertion.

  8. In a text editor, note down the Claim names under Additional claims, as shown in Figure 5. You’ll need these when creating attribute mapping in Amazon Cognito.
  9. Close the User Attributes & Claims screen by choosing the X in the top right corner. You’ll be redirected to the Set up Single Sign-on with SAML page.
  10. Scroll down to the SAML Signing Certificate section, and copy the App Federation Metadata Url by choosing the copy into clipboard icon (highlighted with red arrow in Figure 6). Keep this URL in a text editor, as you’ll need it in the next step.
     
    Figure 6: Copy SAML metadata URL from Azure AD

    Figure 6: Copy SAML metadata URL from Azure AD

Step 3: Add Azure AD as SAML IDP in Amazon Cognito

Next, you need an attribute in the Amazon Cognito user pool where group membership details from Azure AD can be received, and add Azure AD as an identity provider.

To add custom attribute to user pool and add Azure AD as an identity provider

  1. Use the following CLI command to add a custom attribute to the user pool. Replace <yourUserPoolID> and <customAttributeName> with your own values.
    aws cognito-idp add-custom-attributes \
    --user-pool-id <yourUserPoolID> \
    --custom-attributes Name=<customAttributeName>,AttributeDataType="String"
    

    If the command succeeds, you’ll not see any output.

  2. Use the following CLI command to add Azure AD as an identity provider. Be sure to replace the following with your own values:
    • Replace <yourUserPoolID> with Amazon Cognito user pool ID copied previously.
    • Replace <IDProviderName> with a name for your identity provider (for example, Example-Corp-IDP).
    • Replace <MetadataURLCopiedFromAzureAD> with the Metadata URL copied from Azure AD.
    • Replace <customAttributeName> with custom attribute name created previously.
    aws cognito-idp create-identity-provider \
    --user-pool-id <yourUserPoolID> \
    --provider-name=<IDProviderName> \
    --provider-type SAML \
    --provider-details MetadataURL=<MetadataURLCopiedFromAzureAD> \
    --attribute-mapping email=http://schemas.xmlsoap.org/ws/2005/05/identity/claims/emailaddress,<customAttributeName>=http://schemas.microsoft.com/ws/2008/06/identity/claims/groups
    

    Successful running of this command adds Azure AD as a SAML IDP to your Amazon Cognito user pool.

Step 4: Create an app client and use the newly created SAML IDP for Azure AD

Before you can use Amazon Cognito in your web application, you need to register your app with Amazon Cognito as an app client. An app client is an entity within an Amazon Cognito user pool that has permission to call unauthenticated API operations (operations that do not require an authenticated user), for example to register, sign in, and handle forgotten passwords.

To create an app client

  1. Use following command to create an app client. Be sure to replace the following with your own values:
    • Replace <yourUserPoolID> with the Amazon Cognito user pool ID created previously.
    • Replace <yourAppClientName> with a name for your app client.
    • Replace <callbackURL> with the URL of your web application that will receive the authorization code. It must be an HTTPS endpoint, except for in a local development environment where you can use http://localhost:PORT_NUMBER.
    • Use parameter –allowed-o-auth-flows for allowed OAuth flows that you want to enable. In this example, we use code for Authorization code grant.
    • Use parameter –allowed-o-auth-scopes to specify which OAuth scopes (such as phone, email, openid) Amazon Cognito will include in the tokens. In this example, we use openid.
    • Replace <IDProviderName> with the same name you used for ID provider previously.
    aws cognito-idp create-user-pool-client \
    --user-pool-id <yourUserPoolID> \
    --client-name <yourAppClientName> \
    --no-generate-secret \
    --callback-urls <callbackURL> \
    --allowed-o-auth-flows code \
    --allowed-o-auth-scopes openid email\
    --supported-identity-providers <IDProviderName> \
    --allowed-o-auth-flows-user-pool-client
    

Successful running of this command will provide an output in following format. In a text editor, note down the ClientId for referencing in the web application. In this following example, the ClientId is 7xyxyxyxyxyxyxyxyxyxy.

{
    "UserPoolClient": {
        "UserPoolId": "ap-southeast-2_xYYYYYYY",
        "ClientName": "my-client-name",
        "ClientId": "7xyxyxyxyxyxyxyxyxyxy",
        "LastModifiedDate": "2021-05-04T17:33:32.936000+12:00",
        "CreationDate": "2021-05-04T17:33:32.936000+12:00",
        "RefreshTokenValidity": 30,
        "SupportedIdentityProviders": [
            "Azure-AD"
        ],
        "CallbackURLs": [
            "http://localhost:3030"
        ],
        "AllowedOAuthFlows": [
            "code"
        ],
        "AllowedOAuthScopes": [
            "openid", "email"
        ],
        "AllowedOAuthFlowsUserPoolClient": true
    }
}

Test the setup

Next, do a quick test to check if everything is configured properly.

  1. Open the Amazon Cognito console.
  2. Choose Manage User Pools, then choose the user pool you created in Step 1: Create an Amazon Cognito user pool.
  3. In the left sidebar, choose App client settings, then look for the app client you created in Step 4: Create an app client and use the newly created SAML IDP for Azure AD. Scroll to the Hosted UI section and choose Launch Hosted UI, as shown in Figure 7.
     
    Figure 7: App client settings showing link to access Hosted UI

    Figure 7: App client settings showing link to access Hosted UI

  4. On the sign-in page as shown in Figure 8, you should see all the IdPs that you enabled on the app client. Choose the Azure-AD button, which redirects you to the sign-in page hosted on https://login.microsoftonline.com/.
     
    Figure 8: Amazon Cognito hosted UI

    Figure 8: Amazon Cognito hosted UI

  5. Sign in using your corporate ID. If everything is working properly, you should be redirected back to the callback URL after successful authentication.

(Optional) Add authentication to a single page application

One way to add secure authentication using Amazon Cognito into a single page application (SPA) is to use the Auth.federatedSignIn() method of Auth class from AWS Amplify. AWS Amplify provides SDKs to integrate your web or mobile app with a growing list of AWS services, including integration with Amazon Cognito user pool. The federatedSign() method will render the hosted UI that gives users the option to sign in with the identity providers that you enabled on the app client (in Step 4), as shown in Figure 8. One advantage of hosted UI is that you don’t have to write any code for rendering it. Additionally, it will transparently implement the Authorization code grant with PKCE and securely provide your client-side application with the tokens (ID, Access and Refresh) that are required to access the backend APIs.

For a sample web application and instructions to connect it with Amazon Cognito authentication, see the aws-amplify-oidc-federation GitHub repository.

Conclusion

In this blog post, you learned how to integrate an Amazon Cognito user pool with Azure AD as an external SAML identity provider, to allow your users to use their corporate ID to sign in to web or mobile applications.

For more information about this solution, see our video Integrating Amazon Cognito with Azure Active Directory (from timestamp 25:26) on the official AWS twitch channel. In the video, you’ll find an end-to-end demo of how to integrate Amazon Cognito with Azure AD, and then how to use AWS Amplify SDK to add authentication to a simple React app (using the example of a pet store). The video also includes how you can access group membership details from Azure AD for authorization and fine-grained access control.

If you have feedback about this post, submit comments in the Comments section below. If you have questions about this post, start a new thread on the Amazon Cognito forum or contact AWS Support.

Want more AWS Security how-to content, news, and feature announcements? Follow us on Twitter.

Author

Ratan Kumar

Ratan is a solutions architect based out of Auckland, New Zealand. He works with large enterprise customers helping them design and build secure, cost-effective, and reliable internet scale applications using the AWS cloud. He is passionate about technology and likes sharing knowledge through blog posts and twitch sessions.

Author

Vishwanatha Nayak

Vish is a solutions architect at AWS. He engages with customers to create innovative solutions that are secure, reliable, and cost optimised to address business problems and accelerate the adoption of AWS services. He has over 15 years of experience in various software development, consulting, and architecture roles.

Implement OAuth 2.0 device grant flow by using Amazon Cognito and AWS Lambda

Post Syndicated from Jeff Lombardo original https://aws.amazon.com/blogs/security/implement-oauth-2-0-device-grant-flow-by-using-amazon-cognito-and-aws-lambda/

In this blog post, you’ll learn how to implement the OAuth 2.0 device authorization grant flow for Amazon Cognito by using AWS Lambda and Amazon DynamoDB.

When you implement the OAuth 2.0 authorization framework (RFC 6749) for internet-connected devices with limited input capabilities or that lack a user-friendly browser—such as wearables, smart assistants, video-streaming devices, smart-home automation, and health or medical devices—you should consider using the OAuth 2.0 device authorization grant (RFC 8628). This authorization flow makes it possible for the device user to review the authorization request on a secondary device, such as a smartphone, that has more advanced input and browser capabilities. By using this flow, you can work around the limits of the authorization code grant flow with Proof Key for Code Exchange (PKCE)-defined OpenID Connect Core specifications. This will help you to avoid scenarios such as:

  • Forcing end users to define a dedicated application password or use an on-screen keyboard with a remote control
  • Degrading the security posture of the end users by exposing their credentials to the client application or external observers

One common example of this type of scenario is a TV HDMI streaming device where, to be able to consume videos, the user must slowly select each letter of their user name and password with the remote control, which exposes these values to other people in the room during the operation.

Solution overview

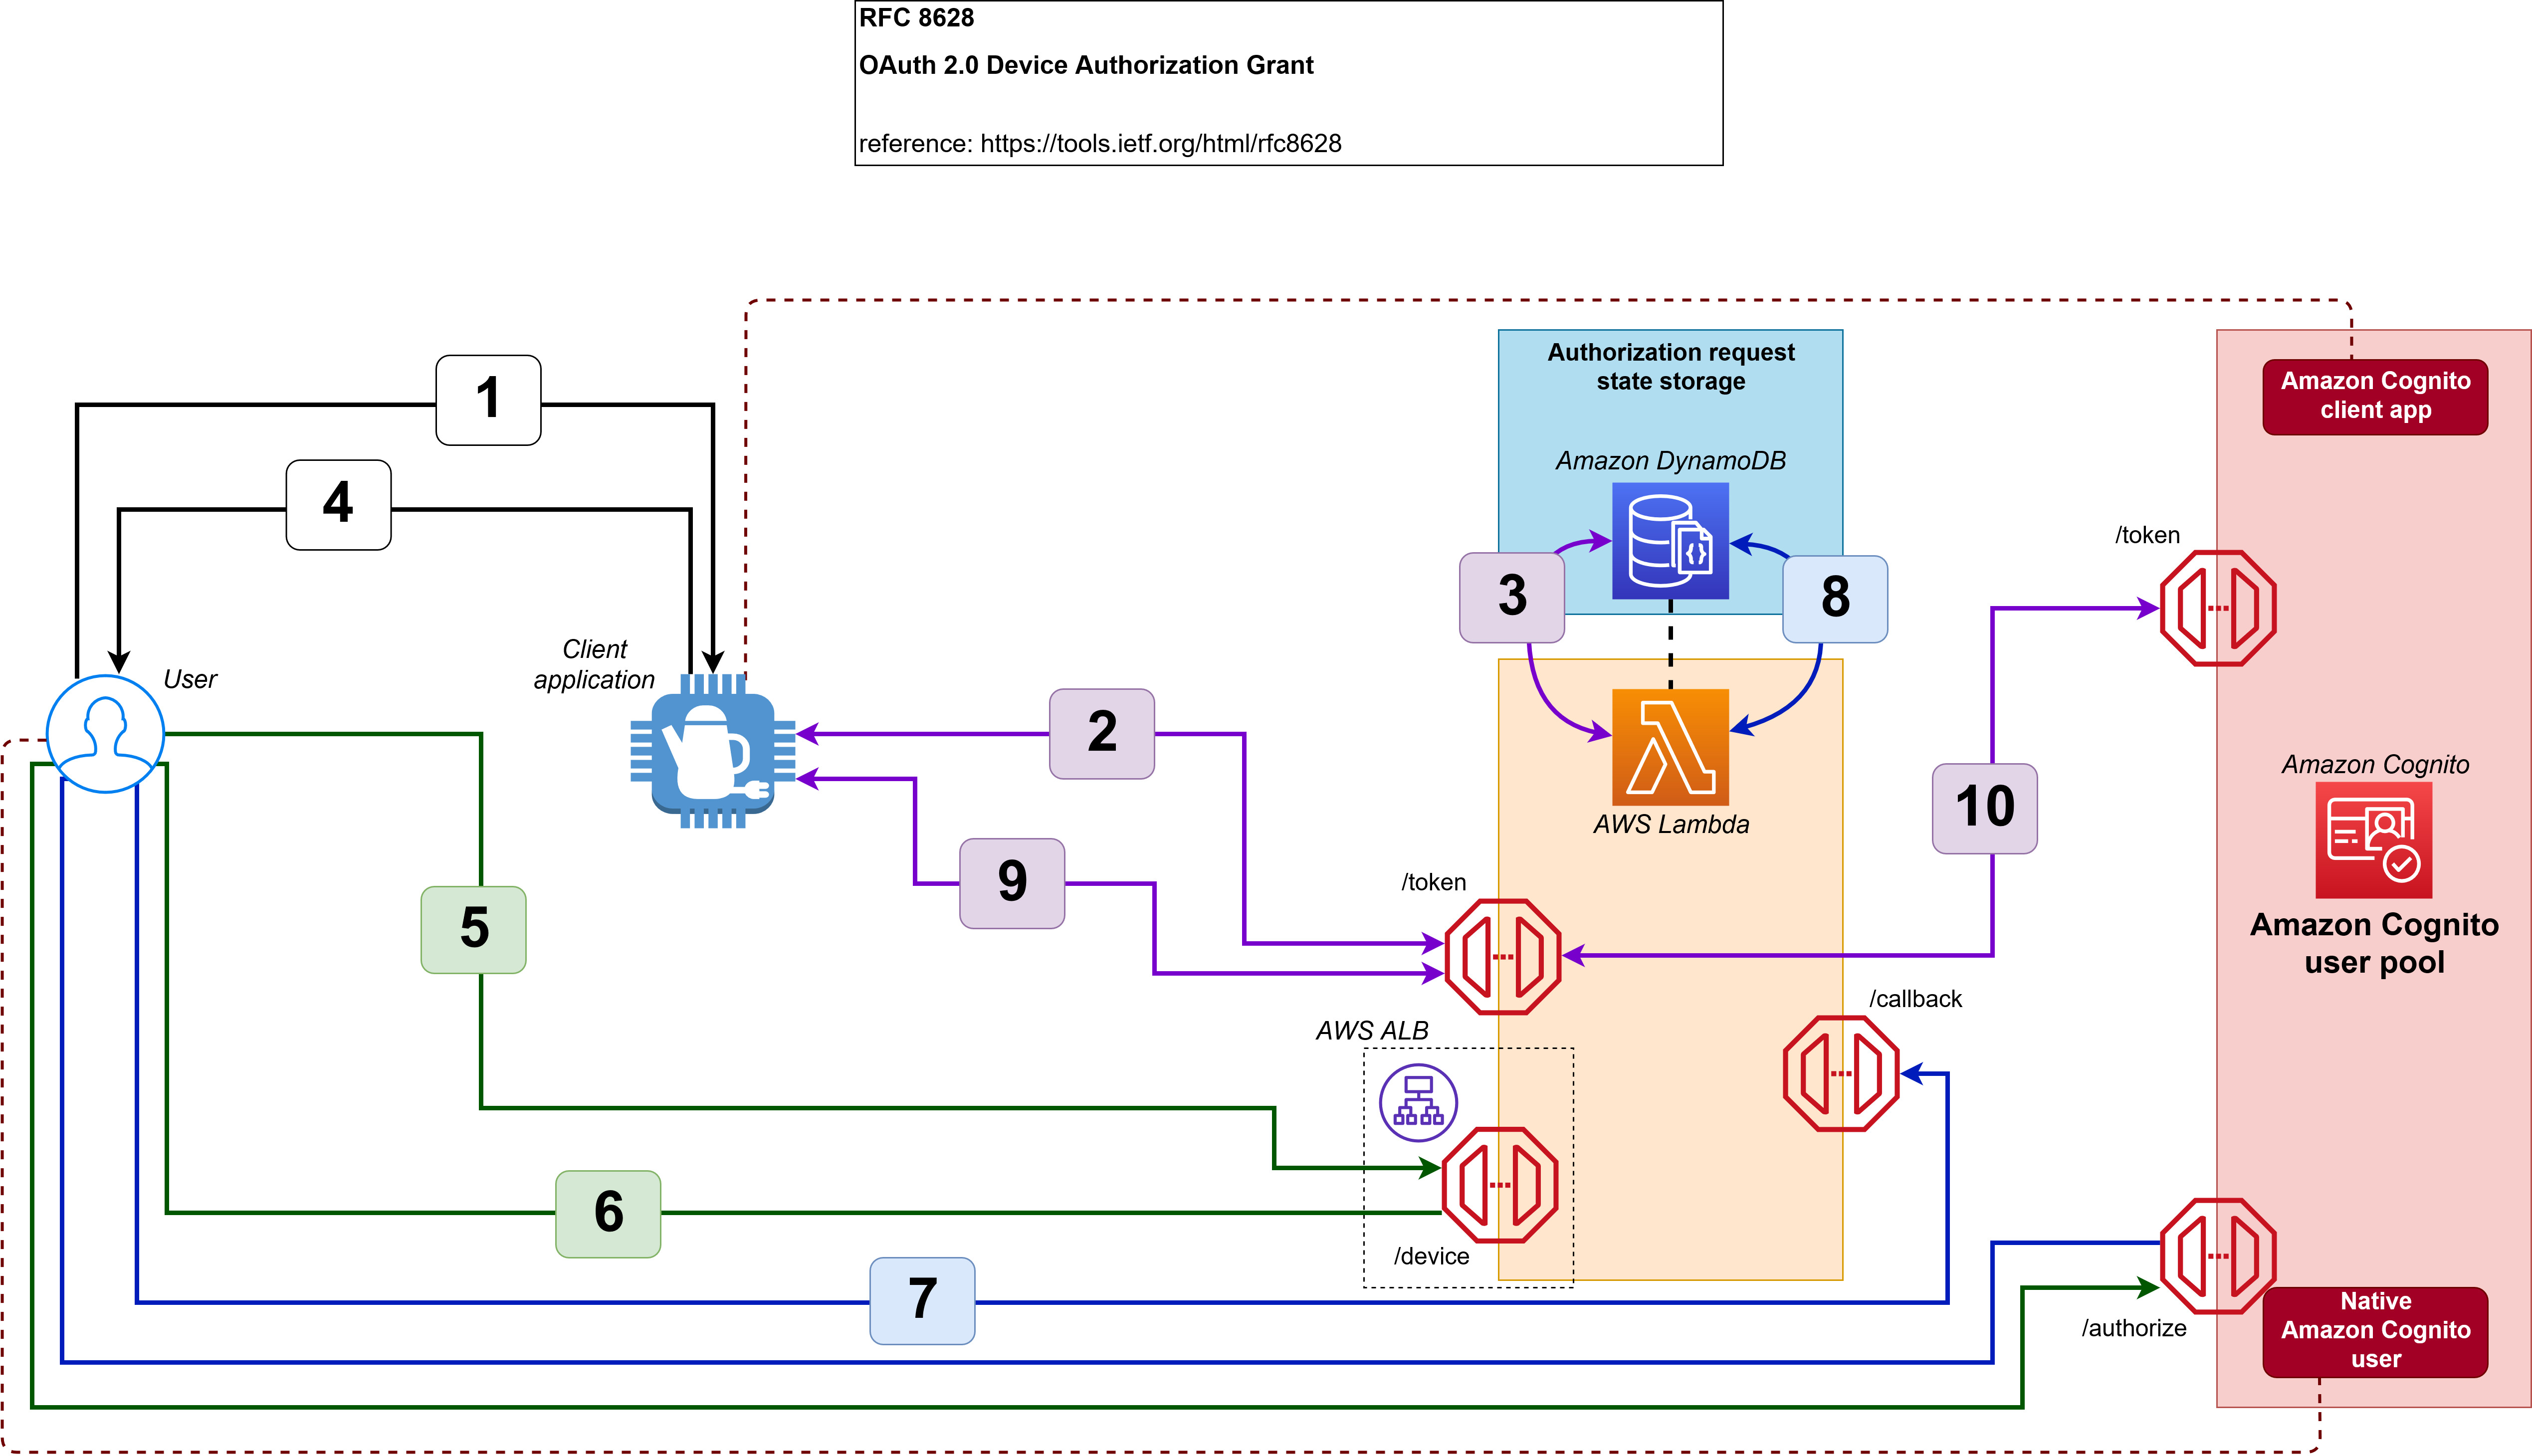
The OAuth 2.0 device authorization grant (RFC 8628) is an IETF standard that enables Internet of Things (IoT) devices to initiate a unique transaction that authenticated end users can securely confirm through their native browsers. After the user authorizes the transaction, the solution will issue a delegated OAuth 2.0 access token that represents the end user to the requesting device through a back-channel call, as shown in Figure 1.
 

Figure 1: The device grant flow implemented in this solution

Figure 1: The device grant flow implemented in this solution

The workflow is as follows:

  1. An unauthenticated user requests service from the device.
  2. The device requests a pair of random codes (one for the device and one for the user) by authenticating with the client ID and client secret.
  3. The Lambda function creates an authorization request that stores the device code, user code, scope, and requestor’s client ID.
  4. The device provides the user code to the user.
  5. The user enters their user code on an authenticated web page to authorize the client application.
  6. The user is redirected to the Amazon Cognito user pool /authorize endpoint to request an authorization code.
  7. The user is returned to the Lambda function /callback endpoint with an authorization code.
  8. The Lambda function stores the authorization code in the authorization request.
  9. The device uses the device code to check the status of the authorization request regularly. And, after the authorization request is approved, the device uses the device code to retrieve a set of JSON web tokens from the Lambda function.
  10. In this case, the Lambda function impersonates the device to the Amazon Cognito user pool /token endpoint by using the authorization code that is stored in the authorization request, and returns the JSON web tokens to the device.

To achieve this flow, this blog post provides a solution that is composed of:

  • An AWS Lambda function with three additional endpoints:
    • The /token endpoint, which will handle client application requests such as generation of codes, the authorization request status check, and retrieval of the JSON web tokens.
    • The /device endpoint, which will handle user requests such as delivering the UI for approval or denial of the authorization request, or retrieving an authorization code.
    • The /callback endpoint, which will handle the reception of the authorization code associated with the user who is approving or denying the authorization request.
  • An Amazon Cognito user pool with:
  • Finally, an Amazon DynamoDB table to store the state of all the processed authorization requests.

Implement the solution

The implementation of this solution requires three steps:

  1. Define the public fully qualified domain name (FQDN) for the Application Load Balancer public endpoint and associate an X.509 certificate to the FQDN
  2. Deploy the provided AWS CloudFormation template
  3. Configure the DNS to point to the Application Load Balancer public endpoint for the public FQDN

Step 1: Choose a DNS name and create an SSL certificate

Your Lambda function endpoints must be publicly resolvable when they are exposed by the Application Load Balancer through an HTTPS/443 listener.

To configure the Application Load Balancer component

  1. Choose an FQDN in a DNS zone that you own.
  2. Associate an X.509 certificate and private key to the FQDN by doing one of the following:
  3. After you have the certificate in ACM, navigate to the Certificates page in the ACM console.
  4. Choose the right arrow (►) icon next to your certificate to show the certificate details.
     
    Figure 2: Locating the certificate in ACM

    Figure 2: Locating the certificate in ACM

  5. Copy the Amazon Resource Name (ARN) of the certificate and save it in a text file.
     
    Figure 3: Locating the certificate ARN in ACM

    Figure 3: Locating the certificate ARN in ACM

Step 2: Deploy the solution by using a CloudFormation template

To configure this solution, you’ll need to deploy the solution CloudFormation template.

Before you deploy the CloudFormation template, you can view it in its GitHub repository.

To deploy the CloudFormation template

  1. Choose the following Launch Stack button to launch a CloudFormation stack in your account.
    Select the Launch Stack button to launch the template

    Note: The stack will launch in the N. Virginia (us-east-1) Region. To deploy this solution into other AWS Regions, download the solution’s CloudFormation template, modify it, and deploy it to the selected Region.

  2. During the stack configuration, provide the following information:
    • A name for the stack.
    • The ARN of the certificate that you created or imported in AWS Certificate Manager.
    • A valid email address that you own. The initial password for the Amazon Cognito test user will be sent to this address.
    • The FQDN that you chose earlier, and that is associated to the certificate that you created or imported in AWS Certificate Manager.
    Figure 4: Configure the CloudFormation stack

    Figure 4: Configure the CloudFormation stack

  3. After the stack is configured, choose Next, and then choose Next again. On the Review page, select the check box that authorizes CloudFormation to create AWS Identity and Access Management (IAM) resources for the stack.
     
    Figure 5: Authorize CloudFormation to create IAM resources

    Figure 5: Authorize CloudFormation to create IAM resources

  4. Choose Create stack to deploy the stack. The deployment will take several minutes. When the status says CREATE_COMPLETE, the deployment is complete.

Step 3: Finalize the configuration

After the stack is set up, you must finalize the configuration by creating a DNS CNAME entry in the DNS zone you own that points to the Application Load Balancer DNS name.

To create the DNS CNAME entry

  1. In the CloudFormation console, on the Stacks page, locate your stack and choose it.
     
    Figure 6: Locating the stack in CloudFormation

    Figure 6: Locating the stack in CloudFormation

  2. Choose the Outputs tab.
  3. Copy the value for the key ALBCNAMEForDNSConfiguration.
     
    Figure 7: The ALB CNAME output in CloudFormation

    Figure 7: The ALB CNAME output in CloudFormation

  4. Configure a CNAME DNS entry into your DNS hosted zone based on this value. For more information on how to create a CNAME entry to the Application Load Balancer in a DNS zone, see Creating records by using the Amazon Route 53 console.
  5. Note the other values in the Output tab, which you will use in the next section of this post.

    Output key Output value and function
    DeviceCognitoClientClientID The app client ID, to be used by the simulated device to interact with the authorization server
    DeviceCognitoClientClientSecret The app client secret, to be used by the simulated device to interact with the authorization server
    TestEndPointForDevice The HTTPS endpoint that the simulated device will use to make its requests
    TestEndPointForUser The HTTPS endpoint that the user will use to make their requests
    UserPassword The password for the Amazon Cognito test user
    UserUserName The user name for the Amazon Cognito test user

Evaluate the solution

Now that you’ve deployed and configured the solution, you can initiate the OAuth 2.0 device code grant flow.

Until you implement your own device logic, you can perform all of the device calls by using the curl library, a Postman client, or any HTTP request library or SDK that is available in the client application coding language.

All of the following device HTTPS requests are made with the assumption that the device is a private OAuth 2.0 client. Therefore, an HTTP Authorization Basic header will be present and formed with a base64-encoded Client ID:Client Secret value.

You can retrieve the URI of the endpoints, the client ID, and the client secret from the CloudFormation Output table for the deployed stack, as described in the previous section.

Initialize the flow from the client application

The solution in this blog post lets you decide how the user will ask the device to start the authorization request and how the user will be presented with the user code and URI in order to verify the request. However, you can emulate the device behavior by generating the following HTTPS POST request to the Application Load Balancer–protected Lambda function /token endpoint with the appropriate HTTP Authorization header. The Authorization header is composed of:

  • The prefix Basic, describing the type of Authorization header
  • A space character as separator
  • The base64 encoding of the concatenation of:
    • The client ID
    • The colon character as a separator
    • The client secret
     POST /token?client_id=AIDACKCEVSQ6C2EXAMPLE HTTP/1.1
     User-Agent: Mozilla/4.0 (compatible; MSIE5.01; Windows NT)
     Host: <FQDN of the ALB protected Lambda function>
     Accept: */*
     Accept-Encoding: gzip, deflate
     Connection: Keep-Alive
     Authorization: Basic QUlEQUNLQ0VWUwJalrXUtnFEMI/K7MDENG/bPxRfiCYEXAMPLEKEY VORy9iUHhSZmlDWUVYQU1QTEVLRVkg
    

The following JSON message will be returned to the client application.

Server: awselb/2.0
Date: Tue, 06 Apr 2021 19:57:31 GMT
Content-Type: application/json
Content-Length: 33
Connection: keep-alive
cache-control: no-store
{
    "device_code": "APKAEIBAERJR2EXAMPLE",
    "user_code": "ANPAJ2UCCR6DPCEXAMPLE",
    "verification_uri": "https://<FQDN of the ALB protected Lambda function>/device",
    "verification_uri_complete":"https://<FQDN of the ALB protected Lambda function>/device?code=ANPAJ2UCCR6DPCEXAMPLE&authorize=true",
    "interval": <Echo of POLLING_INTERVAL environment variable>,
    "expires_in": <Echo of CODE_EXPIRATION environment variable>
}

Check the status of the authorization request from the client application

You can emulate the process where the client app regularly checks for the authorization request status by using the following HTTPS POST request to the Application Load Balancer–protected Lambda function /token endpoint. The request should have the same HTTP Authorization header that was defined in the previous section.

POST /token?client_id=AIDACKCEVSQ6C2EXAMPLE&device_code=APKAEIBAERJR2EXAMPLE&grant_type=urn:ietf:params:oauth:grant-type:device_code HTTP/1.1
 User-Agent: Mozilla/4.0 (compatible; MSIE5.01; Windows NT)
 Host: <FQDN of the ALB protected Lambda function>
 Accept: */*
 Accept-Encoding: gzip, deflate
 Connection: Keep-Alive
 Authorization: Basic QUlEQUNLQ0VWUwJalrXUtnFEMI/K7MDENG/bPxRfiCYEXAMPLEKEY VORy9iUHhSZmlDWUVYQU1QTEVLRVkg

Until the authorization request is approved, the client application will receive an error message that includes the reason for the error: authorization_pending if the request is not yet authorized, slow_down if the polling is too frequent, or expired if the maximum lifetime of the code has been reached. The following example shows the authorization_pending error message.

HTTP/1.1 400 Bad Request
Server: awselb/2.0
Date: Tue, 06 Apr 2021 20:57:31 GMT
Content-Type: application/json
Content-Length: 33
Connection: keep-alive
cache-control: no-store
{
"error":"authorization_pending"
}

Approve the authorization request with the user code

Next, you can approve the authorization request with the user code. To act as the user, you need to open a browser and navigate to the verification_uri that was provided by the client application.

If you don’t have a session with the Amazon Cognito user pool, you will be required to sign in.

Note: Remember that the initial password was sent to the email address you provided when you deployed the CloudFormation stack.

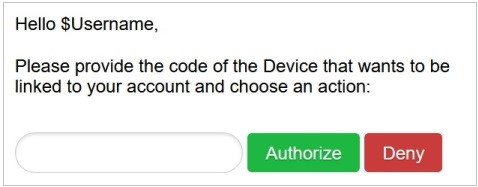
If you used the initial password, you’ll be asked to change it. Make sure to respect the password policy when you set a new password. After you’re authenticated, you’ll be presented with an authorization page, as shown in Figure 8.
 

Figure 8: The user UI for approving or denying the authorization request

Figure 8: The user UI for approving or denying the authorization request

Fill in the user code that was provided by the client application, as in the previous step, and then choose Authorize.

When the operation is successful, you’ll see a message similar to the one in Figure 9.
 

Figure 9: The “Success” message when the authorization request has been approved

Figure 9: The “Success” message when the authorization request has been approved

Finalize the flow from the client app

After the request has been approved, you can emulate the final client app check for the authorization request status by using the following HTTPS POST request to the Application Load Balancer–protected Lambda function /token endpoint. The request should have the same HTTP Authorization header that was defined in the previous section.

POST /token?client_id=AIDACKCEVSQ6C2EXAMPLE&device_code=APKAEIBAERJR2EXAMPLE&grant_type=urn:ietf:params:oauth:grant-type:device_code HTTP/1.1
 User-Agent: Mozilla/4.0 (compatible; MSIE5.01; Windows NT)
 Host: <FQDN of the ALB protected Lambda function>
 Accept: */*
 Accept-Encoding: gzip, deflate
 Connection: Keep-Alive
 Authorization: Basic QUlEQUNLQ0VWUwJalrXUtnFEMI/K7MDENG/bPxRfiCYEXAMPLEKEY VORy9iUHhSZmlDWUVYQU1QTEVLRVkg

The JSON web token set will then be returned to the client application, as follows.

HTTP/1.1 200 OK
Server: awselb/2.0
Date: Tue, 06 Apr 2021 21:41:50 GMT
Content-Type: application/json
Content-Length: 3501
Connection: keep-alive
cache-control: no-store
{
"access_token":"eyJrEXAMPLEHEADER2In0.eyJznvbEXAMPLEKEY6IjIcyJ9.eYEs-zaPdEXAMPLESIGCPltw",
"refresh_token":"eyJjdEXAMPLEHEADERifQ. AdBTvHIAPKAEIBAERJR2EXAMPLELq -co.pjEXAMPLESIGpw",
"expires_in":3600

The client application can now consume resources on behalf of the user, thanks to the access token, and can refresh the access token autonomously, thanks to the refresh token.

Going further with this solution

This project is delivered with a default configuration that can be extended to support additional security capabilities or to and adapted the experience to your end-users’ context.

Extending security capabilities

Through this solution, you can:

  • Use an AWS KMS key issued by AWS KMS to:
    • Encrypt the data in the database;
    • Protect the configuration in the Amazon Lambda function;
  • Use AWS Secret Manager to:
    • Securely store sensitive information like Cognito application client’s credentials;
    • Enforce Cognito application client’s credentials rotation;
  • Implement additional Amazon Lambda’s code to enforce data integrity on changes;
  • Activate AWS WAF WebACLs to protect your endpoints against attacks;

Customizing the end-user experience

The following table shows some of the variables you can work with.

Name Function Default value Type
CODE_EXPIRATION Represents the lifetime of the codes generated 1800 Seconds
DEVICE_CODE_FORMAT Represents the format for the device code #aA A string where:
# represents numbers
a lowercase letters
A uppercase letters
! special characters
DEVICE_CODE_LENGTH Represents the device code length 64 Number
POLLING_INTERVAL Represents the minimum time, in seconds, between two polling events from the client application 5 Seconds
USER_CODE_FORMAT Represents the format for the user code #B A string where:
# represents numbers
a lowercase letters
b lowercase letters that aren’t vowels
A uppercase letters
B uppercase letters that aren’t vowels
! special characters
USER_CODE_LENGTH Represents the user code length 8 Number
RESULT_TOKEN_SET Represents what should be returned in the token set to the client application ACCESS+REFRESH A string that includes only ID, ACCESS, and REFRESH values separated with a + symbol

To change the values of the Lambda function variables

  1. In the Lambda console, navigate to the Functions page.
  2. Select the DeviceGrant-token function.
     
    Figure 10: AWS Lambda console—Function selection

    Figure 10: AWS Lambda console—Function selection

  3. Choose the Configuration tab.
     
    Figure 11: AWS Lambda function—Configuration tab

    Figure 11: AWS Lambda function—Configuration tab

  4. Select the Environment variables tab, and then choose Edit to change the values for the variables.
     
    Figure 12: AWS Lambda Function—Environment variables tab

    Figure 12: AWS Lambda Function—Environment variables tab

  5. Generate new codes as the device and see how the experience changes based on how you’ve set the environment variables.

Conclusion

Although your business and security requirements can be more complex than the example shown in this post, this blog post will give you a good way to bootstrap your own implementation of the Device Grant Flow (RFC 8628) by using Amazon Cognito, AWS Lambda, and Amazon DynamoDB.

Your end users can now benefit from the same level of security and the same experience as they have when they enroll their identity in their mobile applications, including the following features:

  • Credentials will be provided through a full-featured application on the user’s mobile device or their computer
  • Credentials will be checked against the source of authority only
  • The authentication experience will match the typical authentication process chosen by the end user
  • Upon consent by the end user, IoT devices will be provided with end-user delegated dynamic credentials that are bound to the exact scope of tasks for that device

If you have feedback about this post, submit comments in the Comments section below. If you have questions about this post, start a new thread on the Amazon Cognito forum or reach out through the post’s GitHub repository.

Want more AWS Security how-to content, news, and feature announcements? Follow us on Twitter.

Author

Jeff Lombardo

Jeff is a solutions architect expert in IAM, Application Security, and Data Protection. Through 16 years as a security consultant for enterprises of all sizes and business verticals, he delivered innovative solutions with respect to standards and governance frameworks. Today at AWS, he helps organizations enforce best practices and defense in depth for secure cloud adoption.