Post Syndicated from Pavlos Ioannou Katidis original https://aws.amazon.com/blogs/messaging-and-targeting/dynamically-personalize-your-in-product-user-experience-using-amazon-pinpoint-in-app-messaging/
Many businesses today struggle to align out-of-product messaging through channels such as email and SMS, with in-product messaging shown when a users is within a mobile or web application. Customers will present one message to a user through a targeted email, but once a user visits the application they are presented with different messaging. This creates confusion for the user, and reduces the chances of them performing a high-value action such as a purchasing a discounted product. Customers can get around this by hard coding certain messages into their application, however this is time consuming for development teams, and slower to implement as it requires a new release of a mobile or web client.
Amazon Pinpoint in-app messaging allows customers to create, target and display in-product messages to users dynamically without the need to update client-side code after initial implementation. This allows a non-technical persona such as a marketer to modify the application experience and target user messaging independently of a development team. This also allows the in-product messaging to share the user targeting as the out-of-app messaging. This creates consistent user messaging, and increases the chance a user performs a high value action.
The blog outlines how to create in-app endpoints, segments, and campaigns. Then how to fetch in-app messages, implement simple logic to control message prioritization, message caps, and to listen for events in order to show the message at the desired moment.
Solution Overview
Assume you are a retailer and want to display a banner with a promotion to all customers with a recent purchase over $500 when they launch the application. To deliver the above experience using the in-app messaging channel, you will need to create a dynamic customer segment where User.UserAttribute.LastPurchaseValue > $500, design an in-app message template with a call-to-action to claim the promotion, and create an in-app campaign. The in-app campaign will be triggered based on the customer event app_launch and only for customers who belong to the dynamic segment created above. To render the message and send in-app message engagement events back to Amazon Pinpoint, you will need to go through an one time setup that is explained in a later section of this blog. Monitor your in-app campaign performance across different metrics, using the Amazon Pinpoint campaign analytics dashboard.
In-app channel implementation can differ depending the use case and requirements. The creation of customer segments, message templates and campaigns can be done either via the Amazon Pinpoint console or programmatically using Amazon Pinpoint APIs. The in-app messages retrieval, rendering and recording of engagement events can either be build and managed from you or use AWS Amplify.

In the following sections you will be introduced to the seven components of the in-app channel and how they operate together:
- Step 1: Creating in-app endpoints & segment
- Step 2: Creating an in-app message template
- Step 3: Creating an in-app campaign
- Step 4: Querying available in-app messages for an Amazon Pinpoint customer
- Step 5: Rendering in-app messages
- Step 6: Recording in-app events
- Step 7: In-app message display logic using SessionCap, DailyCap, TotalCap
Prerequisites
For this blog post, you should have the following prerequisites:
- An AWS account
- An Amazon Pinpoint project
- Access to AWS CloudShell
Step 1: Creating an Amazon Pinpoint customer segment
In Amazon Pinpoint, users can have one or more endpoints. An endpoint describes a unique address, such as an email or mobile number. Similar to other Amazon Pinpoint channels, you need to create or import in-app endpoints with Channel = IN_APP. To retrieve in-app messages for a user, you have to use their IN_APP endpoint id. Note that the Address is not a required field for in-app and can be left blank.
- Copy the text below and save it as CSV in your computer
Id,ChannelType,Address,User.UserId,OptOut 111,IN_APP,123,userid1,NONE - Navigate to the Amazon Pinpoint console
- Select the Amazon Pinpoint project that you want to set up the in-app channel
- Navigate to the Segments’ section
- Choose Import a segment
- Select Upload files from your computer as Import method
- Select Choose files and find the CSV file you created in step 1
- Choose Create segment
- Navigate to AWS Cloudshell console and wait till the terminal loads
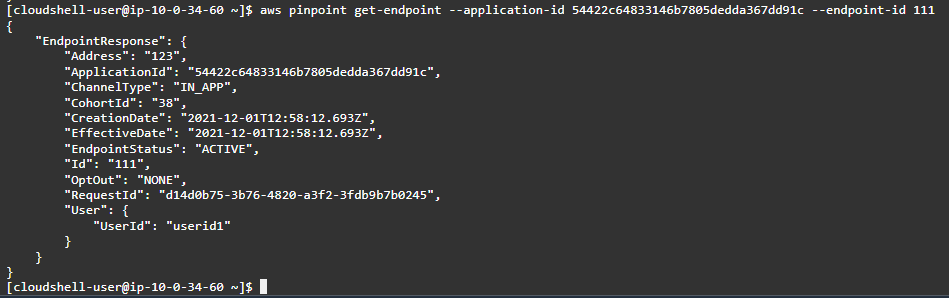
- Replace <Application id> with your Amazon Pinpoint application id in the following command aws pinpoint get-endpoint –application-id <Application id> —endpoint-id 111
- Execute the command in step 10 by pasting it in the AWS CloudShell terminal and press Enter. You should be able to see a response similar to the one below

Step 2: Creating an in-app Message Template
In-app message templates contain a variety of fields with some of them offering the option to choose from pre-defined values such as Header alignment and others in a form of free text such as Message. The end result is a banner that includes a Header, Message, Image, Button(s) and Custom data with all of them being fully customizable. While building an in-app template, you can preview the banner across Phone, Tablet and Browser. This preview is for reference purposes only as the rendering can vary according to the end user’s device as well as your preference on how to render it.
Note: The message template for in-app currently doesn’t support message helpers for personalization but it is a feature the Amazon Pinpoint product team is exploring.
- Navigate to Message templates
- Select Create template and choose In-app messaging as Channel
- Type my_first_in-app_message_template as Template name
- Complete the section, as per your message requirements

- Select Create

Step 3: Creating an in-app Campaign
A campaign is a messaging initiative that engages a specific audience segment. A campaign sends tailored messages according to a schedule or customer event that you define.
- Navigate to your Amazon Pinpoint project and select Campaigns and Create a campaign
- Type my_first_in-app_campaign as Campaign name
- Select Standard campaign as Campaign type and In-app messaging as Channel
- Select Very important for Set prioritization. This configuration is specific to the in-app channel and it helps you identify the most important in-app message for an endpoint
- Select Next and choose the segment in-app-segment from the dropdown. This should be an imported segment that you created in Step 1: Creating an Amazon Pinpoint customer segment. The Segment estimate should show 1 endpoints
- Select Next and choose the in-app message template with the name my_first_in-app_message_template, then select Next
- An in-app campaign needs to have a Trigger event, which will determine when the in-app message will be displayed. You can add event Attributes and/or Metrics to make it more specific. To learn how to record events with Amazon Pinpoint visit Reporting events in your application. If you currently do not record any events in your Amazon Pinpoint project type test_event as Trigger events
- Select Start and End date and time for Campaign dates. Note that in-app campaigns need to start at least 15 minutes later from the time of publishing
- In the Edit campaign settings section you will find the fields, which specify the Maximum number of session messages viewed per endpoint (SessionCap), Maximum number of daily messages viewed per endpoint (DailyCap) and Maximum number of messages viewed per endpoint (TotalCap). These values indicate how many times the in-app message can be displayed to the customer for that in-app campaign within a session, day and in total respectively. In all three campaign setting fields enter the number 10 and select Override project-level setting where applicable Set prioritization, Trigger events and Caps are part of the in-app message payload that you receive when calling Amazon Pinpoint’s In-app messages REST API operation. You will use this information to decide whether to render or not that in-app message.
- Select Next scroll down and select Launch campaign
Step 4: Querying available in-app messages for an Amazon Pinpoint customer
To retrieve in-app messages for an Amazon Pinpoint customer, you will need to have their IN_APP endpoint id and either use the In-app messages REST API operation, one of the AWS SDKs that support Amazon Pinpoint, AWS Command Line Interface or AWS Amplify.
Note: AWS Amplify manages on your behalf the in-app messages request, rendering and tracking, thus if you are using AWS Amplify for Amazon Pinpoint in-app channel the steps below are not required.
In the request body you need to specify the IN_APP endpoint id. If there are any available in-app messages for that endpoint id, the response will contain a JSON object with the top ten active in-app messages based on their priority (the ten in app message response is a hard limit). Loop through the in-app messages and identify the one that meets the criteria based on the Trigger event and Prioritization.
- Navigate to the AWS CloudShell console
- Replace <Application id> with your Amazon Pinpoint application id in the following command aws pinpoint get-in-app-messages –application-id <Application id> —endpoint-id 111
- Execute the command in step 2 by pasting it in the AWS CloudShell terminal and press Enter. You should be able to see a response similar to the one below

The response should contain only one in-app campaign. You can see all the in-app message template data and campaign configuration are present in the response.
Note: Campaigns that have passed their end date, or have reached their daily or total cap limit won’t show in the response. In case the response contains more than one in app message with the same priority and they both haven’t exceeded their caps, you can use the in-app campaign start date to evaluate which one to display.
It is recommended to retrieve the in-app messages once per session and store them locally. That way in every event the customer triggers in your mobile / web app you would check against the in-app messages stored locally instead of performing additional calls to Amazon Pinpoint. This approach decreases the in-app channel cost as you pay per request.
You can perform the operation of retrieving in-app messages for an Amazon Pinpoint customer either client side or server side. Server side can be implemented using the architecture illustrated below, which utilizes Amazon API Gateway and AWS Lambda creating a development framework agnostic approach. Furthermore Amazon API Gateway is offering a great variety of authentication and authorization mechanisms.
The server side architecture depicted below doesn’t cover the use case for offline customers. If this is a requirement then it is recommend to store in-app messages and fetch them locally when the device doesn’t have internet connectivity. Once the device is connected back to the internet you can retrospectively send any in-app related events.
Note: If you are using AWS Amplify, it will retry to publish customer offline events that occurred once the device gets back online.

Step 5: Rendering in-app messages
Render the in-app messages yourself based on the in-app message API response or use AWS Amplify which will render it on your behalf. AWS Amplify allows you to provide your own In-App Messaging UI component to override the default Amplify provided UI.
Step 6: Recording in-app events
Measuring in-app campaigns’ performance is based on four metrics:
- Message displayed: a message has been displayed to an end user
- Message dismissed: a user has dismissed a message
- Message clicked: a user has clicked through a message
- Any event type: Any event that a user can trigger on the mobile or web app
Fire the above events either from client or server side as Amazon Pinpoint custom events. Amazon Pinpoint custom events can be recorded using put_events REST API operation or AWS SDKs that support Amazon Pinpoint.
Note: If you are using AWS Amplify, the in-app events will be recorded automatically
To have these events recorded under Amazon Pinpoint Campaign deliver metrics dashboard, you have to use the following EventType names:
- Message displayed: _inapp.message_displayed
- Message dismissed: _inapp.message_dismissed
- Message clicked: _inapp.message_clicked
- Any event type: No specific name is required

In addition to the EventType, a few other fields are required in order to attribute these events to the correct in-app campaign. Within the event attributes’ object of the request payload, the fields campaign_id and delivery_type must be provided. Campaign_id should match the InApp campaign_id, while the delivery_type should be IN_APP_MESSAGE. Additionally, the treatment_id is necessary if you are running an A/B test.
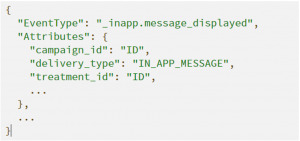
Note: If you do not use the above event names and attributes, you won’t see any events under Campaign delivery metrics and Campaign engagement rates on the Amazon Pinpoint console.
Step 7: In-app message display logic using SessionCap, DailyCap and TotalCap
Message display logic refers to the logic that stores and assesses the number of times a user has seen / interacted with the in-app message. Amazon Pinpoint calculates the DailyCap & TotalCap as long as you record the _inapp.message_displayed event or using AWS Amplify. For the SessionCap event you need to count the _inapp.message_displayed locally on your mobile / web application unless you are using AWS Amplify.
Note: When retrieving the in-app messages from Amazon Pinpoint, the payload contains the remaining number of times you can display the in-app message daily & total.
Conclusion
This post walks you through how to configure Amazon Pinpoint to send in-app messages to your customers when browsing your mobile / web application. Using this Amazon Pinpoint channel, you can now:
- Create in-app segments, message templates and campaigns
- Retrieve in-app messages per user
- Render in-app messages
- Record customer engagement data with the in-app message
Related links
To learn more about the technologies or features used to create this solution, explore the following pages: