Post Syndicated from Pavlos Ioannou Katidis original https://aws.amazon.com/blogs/messaging-and-targeting/best-practices-for-building-high-performance-whatsapp-ai-assistant-using-aws/
WhatsApp is one of the most widely used messaging platforms globally, making it an ideal
channel for customer engagement. Whether you’re building a virtual assistant, a customer AI assistant, or an internal communication tool, developing a WhatsApp AI assistant presents unique design and operational challenges.
In this post, we explore best practices for building a WhatsApp AI assistant using AWS services—with a focus on how the AWS Summit Assistant used AWS End User Messaging and Amazon Bedrock to power a responsive, secure, and scalable generative AI assistant.
Why build a WhatsApp AI assistant with AWS End User Messaging
AWS offers a comprehensive set of services that can seamlessly handle the full lifecycle of a WhatsApp interaction—from ingesting and validating inbound messages, storing session context, generating AI responses, to monitoring key performance indicators in real time.
AWS End User Messaging provides native integration with WhatsApp, so you can send and receive messages directly using a REST API or SDK. It also supports AWS Identity and Access Management (IAM), enabling fine-grained control over access, authentication, and user roles.
The following sections outline best practices for designing, building, and operating WhatsApp AI assistants on AWS. Although not every recommendation will apply to every use case, they are based on real-world lessons learned from production deployments like the AWS Summit Assistant.
Use a modular, event-driven architecture
Rather than relying on tightly coupled services or monolithic workflows, design your WhatsApp AI assistant as a set of loosely coupled, modular components. AWS services such as Amazon Simple Notification Service (Amazon SNS), Amazon Simple Queue Service (Amazon SQS), and AWS Lambda are ideal for building scalable, event-driven systems.
By default, AWS End User Messaging publishes inbound WhatsApp messages and engagement events to an SNS topic. To manage throughput and avoid overwhelming downstream components, subscribe an SQS queue to this topic. With this setup, you can process messages at a controlled pace and buffer traffic during bursts.
Depending on your use case, you might choose to skip dead-letter queues (DLQs) in favor of logging failures to Amazon CloudWatch Logs, especially given the real-time nature of chatbots where retrying a failed message hours later might no longer be relevant. Instead, the AI assistant should respond to the user immediately, explaining the issue and suggesting corrective actions such as rephrasing their question or trying again later.
A typical modular structure might have the following components:
- SQS queue – An SQS queue subscribed to the WhatsApp Messages & Events SNS topic to control throughput and isolate retries.
- A messages processor function for inbound processing and audio processing (optional) – This AWS Lambda function handles initial validation and message-type filtering and transcribes the voice message. The output is published to the Processed messages SNS topic.
- Fan-out to downstream consumers – Other Lambda functions through Amazon SQS subscribe to the Processed messages SNS topic to handle specialized tasks like response generation using Amazon Bedrock or categorization and analytics’ purposes.
The following diagram illustrates the solution architecture.
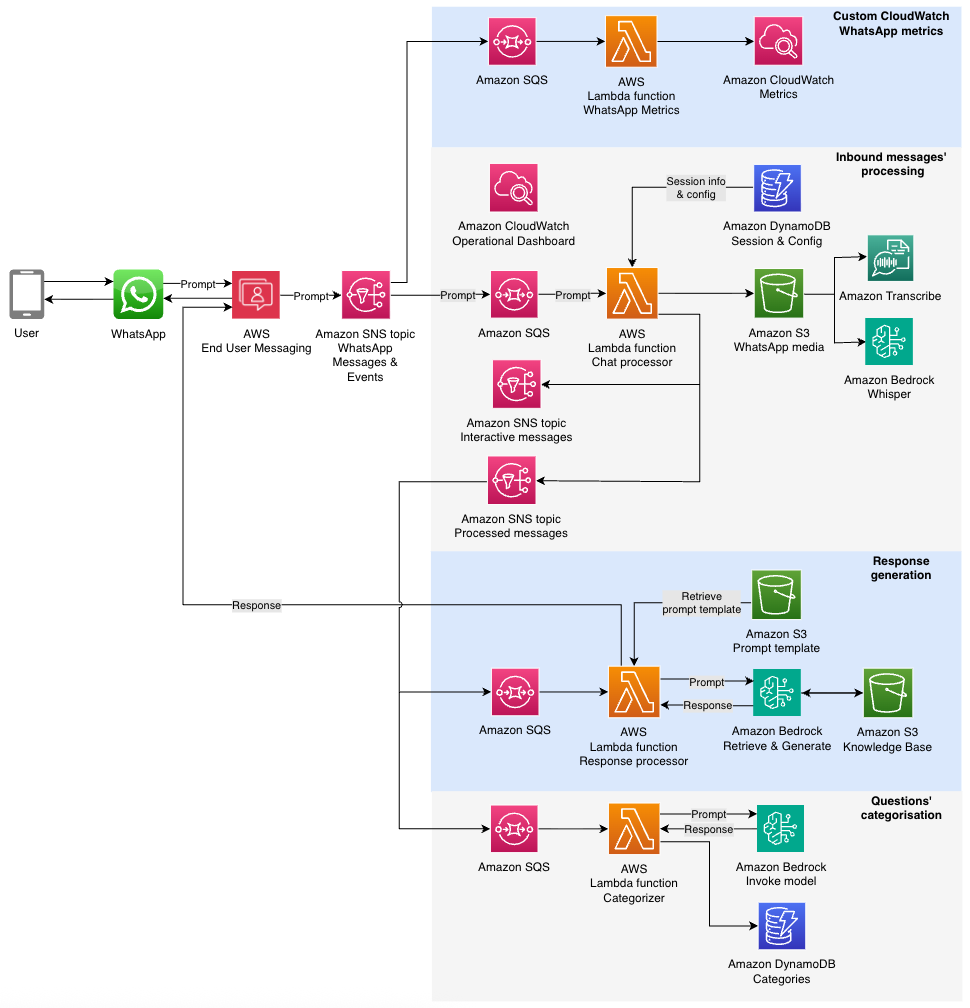
This fan-out architecture promotes clean separation of concerns, avoids redundant processing, and makes it straightforward to introduce new capabilities such as sentiment analysis or content moderation by simply adding new subscribers. By decoupling components and using Amazon SNS and Amazon SQS patterns, each part of the system can scale independently and recover gracefully from localized failures.
Design for controlled processing throughput
When integrating with other AWS services such as Amazon Bedrock, with soft service quotas, it’s critical to manage throughput carefully. Use Amazon SQS to decouple the SNS topic from Lambda invocations. This makes sure spikes in message volume don’t result in throttling or failed invocations. It also lets you scale consumer Lambda functions based on queue depth, allowing for burst handling without dropping messages. In cases where message failure is unrecoverable (such as invalid content or unsupported message types), log the error and notify the user with a helpful message rather than retrying. This keeps the user informed and prevents queues from growing unnecessarily due to retry cycles. This design pattern of Amazon SNS to Amazon SQS to Lambda is foundational for building resilient, scalable AI assistants that meet user expectations for speed and reliability.
Handle voice messages with Amazon Transcribe or Whisper
WhatsApp voice messages are received in OGG format. To process these messages, you can use the AWS End User Messaging GetWhatsAppMessageMedia API to retrieve media files, including audio, images, and video. The audio needs to be converted to a compatible format for transcription: PCM for Amazon Transcribe or WAV for Hugging Face Whisper (available through Amazon Bedrock Marketplace). This conversion can be achieved using a library like FFmpeg, implemented as a Lambda layer.
The processing flow involves fetching audio from WhatsApp, which is then automatically stored in Amazon Simple Storage Service (Amazon S3) in a bucket you create and own (this is the default behavior of the GetWhatsAppMessageMedia API). Next, the audio is converted to the required format and stored locally in Lambda for faster processing before being transcribed.
As a best practice, consider deleting audio files after processing to simplify data management and reduce storage requirements for personally identifiable information (PII). This approach facilitates efficient handling and transcription of WhatsApp voice messages while maintaining data privacy standards.
Enforce strict message validation
To promote quality and security, implement layered validation within your message processing Lambda function. This might differ depending your use case and requirements:
- Message status indicators – Mark inbound messages as read and indicate you are responding to maintain the recipients’ interest while generating a response. WhatsApp’s API allows marking messages as read by message ID and setting the typing indicator to
true. The typing indicator automatically dismisses after 25 seconds without a reply. - Message type validation – Filter by message type using the inbound WhatsApp message payload’s
typefield. Implement checks based on your AI assistant’s supported message types and provide static responses for unsupported formats. For example, a text only AI assistant shouldn’t process message types such as Media, Reaction, Template, Location, Contacts or Interactive. - Size limit protection – Add message size validation based on character count. This prevents resource drainage from potential bad actors who might attempt to send extremely large text chunks that could generate excessive large language model (LLM) input tokens.
- Conversation management – Track message counts and total character length per conversation, resetting the context when necessary to manage costs and prevent resource drainage. Implement this using Amazon DynamoDB with the recipient’s hashed phone number as the primary key.
- Processing lock mechanism – Prevent duplicate processing by implementing a flag system in DynamoDB. When processing a message, set the recipient’s flag to
true. While active, new messages receive a static response indicating that a previous message is being processed, avoiding out-of-sync responses and resource waste. - Access control – Consider implementing an allow list for beta functionality or controlled access. This provides selective AI assistant activation for testing while restricting general audience access when needed.
- Error handling – Manage response generation failures with clear, static replies to the customer. Include troubleshooting steps or alternative contact channels based on the issue’s severity to maintain a positive user experience.
Security
Consider the following security best practices for message processing systems:
- Encryption standards – Encrypt SNS topics, SQS queues, and DynamoDB tables using AWS Key Management Service (AWS KMS) service managed keys or customer managed keys (CMKs) to facilitate data protection at rest and in transit.
- PII data protection – For analytics and troubleshooting purposes, avoid logging raw phone numbers when the full number isn’t required. Instead, implement hashing of phone numbers before logging to maintain user privacy while preserving tracking capabilities.
- Data retention management – Enable Time-To-Live (TTL) attributes on DynamoDB tables to automatically purge old session data, maintaining data hygiene and avoiding storing PII data when not needed.
- Content safety controls – Implement Amazon Bedrock Guardrails to prevent processing or generating unwanted content and messages. When required, use the data loss protection features of Amazon Bedrock Guardrails to safeguard sensitive information.
- LLM security framework – Follow OWASP’s top 10 risk & mitigations for LLMs and Gen AI Apps guidelines to filter unsafe or inappropriate content in generative responses, maintaining a secure and appropriate interaction environment.
Use Amazon Bedrock for generative responses and categorization
The AWS Summit Assistant used two key Amazon Bedrock capabilities:
- Amazon Bedrock Knowledge Bases – Powered by Amazon Bedrock Knowledge Bases using OpenSearch vector embeddings and Anthropic on Amazon Bedrock, the AI assistant could answer user questions using publicly available event data.
- Categorization – Using the
InvokeModelAPI, inbound messages were tagged with categories for analytics. A DynamoDB table stored category counts, enabling trend detection across users.
Sessions persisted using the Amazon Bedrock native session ID feature for consistent conversation flow.
Monitoring
Consider the following monitoring and data analysis options:
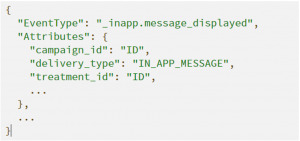
- Message status tracking – WhatsApp provides six distinct events per message. Though valuable, these should be complemented with AWS service operational metrics for comprehensive monitoring. These events are published on the WhatsApp SNS topic in your AWS account.
- Real-time monitoring with CloudWatch – Set up CloudWatch alarms to track SNS message publication rates, providing real-time visibility into WhatsApp activity for both inbound and outbound messages. Extend monitoring to include Lambda function and Amazon Bedrock metrics. For tracking WhatsApp’s six message states, implement a dedicated Lambda function that subscribes to the WhatsApp SNS topic and records each event as a custom CloudWatch metric.
- Detailed analysis with CloudWatch Logs Insights – Use CloudWatch Logs Insights for granular monitoring with minimal development overhead. This approach enables advanced queries for metrics not available through standard CloudWatch metrics, such as unique conversation counts and user engagement statistics. The logs’ content depends on your requirements.
- Advanced analytics integration – For sophisticated use cases, implement a data pipeline using Amazon Data Firehose to store events in Amazon S3, then visualize using business intelligence tools like Amazon Quick Sight for custom dashboards. For a reference implementation, refer to the following GitHub repo.
Example use case: AWS Summit Assistant
Deployed at AWS Summit Dubai 2025, AWS Summit Johannesburg 2025, AWS Cloud Day Türkiye, AWS Cloud Day Riyadh and re:Inforce re:Cap London 2025, this WhatsApp AI assistant performed the following functions:
- Used Amazon Bedrock Knowledge Bases to answer attendee questions
- Transcribed voice messages using Whisper
- Categorized questions for trend reporting
- Operated with near real-time responsiveness using Amazon SNS, Amazon SQS, and Lambda
The AI assistant processed over 2,000 questions with no service interruptions, showing the viability of serverless architecture for WhatsApp-based assistants.
Conclusion
Building a scalable and secure WhatsApp AI assistant with AWS offers numerous advantages for businesses looking to enhance customer engagement. By using AWS services like AWS End User Messaging, Amazon Bedrock, Lambda, and DynamoDB, builders can create robust, AI-powered assistants that handle high message volumes while maintaining security and performance. Key takeaways include:
- Adopting a modular, event-driven architecture for flexibility and scalability
- Implementing thorough message validation and security measures
- Using Amazon Bedrock for advanced Gen AI capabilities
- Establishing comprehensive monitoring and analytics
Although these practices provide a strong foundation, they represent just a subset of possible best practices. As WhatsApp and AWS services grow and industry standards change, best practices continue to evolve. Stay current by regularly reviewing AWS documentation and keeping up with new feature releases.
To get started with your WhatsApp AI assistant implementation, refer to the Github repository Chat Orchestrator for Generative AI Conversations.


 Navigate to Amazon SES > Mail Manager > Ingress endpoint, select the ingress endpoint named Archiving and copy the ARecord, which looks like this <unique-id>.fips.wmjb.mail-manager-smtp.amazonaws.com – see screenshot below. Add this value to your MX record.