Post Syndicated from Siva Rajamani original https://aws.amazon.com/blogs/security/how-to-enrich-aws-security-hub-findings-with-account-metadata/
In this blog post, we’ll walk you through how to deploy a solution to enrich AWS Security Hub findings with additional account-related metadata, such as the account name, the Organization Unit (OU) associated with the account, security contact information, and account tags. Account metadata can help you search findings, create insights, and better respond to and remediate findings.
AWS Security Hub ingests findings from multiple AWS services, including Amazon GuardDuty, Amazon Inspector, Amazon Macie, AWS Firewall Manager, AWS Identity and Access Management (IAM) Access Analyzer, and AWS Systems Manager Patch Manager. Findings from each service are normalized into the AWS Security Finding Format (ASFF), so you can review findings in a standardized format and take action quickly. You can use AWS Security Hub to provide a single view of all security-related findings, and to set up alerts, automate remediation, and export specific findings to third‑party incident management systems.
The Security or DevOps teams responsible for investigating, responding to, and remediating Security Hub findings may need additional account metadata beyond the account ID, to determine what to do about the finding or where to route it. For example, determining whether the finding originated from a development or production account can be key to determining the priority of the finding and the type of remediation action needed. Having this metadata information in the finding allows customers to create custom insights in Security Hub to track which OUs or applications (based on account tags) have the most open security issues. This blog post demonstrates a solution to enrich your findings with account metadata to help your Security and DevOps teams better understand and improve their security posture.
Solution Overview
In this solution, you will use a combination of AWS Security Hub, Amazon EventBridge and AWS Lambda to ingest the findings and automatically enrich them with account related metadata by querying AWS Organizations and Account management service APIs. The solution architecture is shown in Figure 1 below:

Figure 1: Solution Architecture and workflow for metadata enrichment
The solution workflow includes the following steps:
- New findings and updates to existing Security Hub findings from all the member accounts flow into the Security Hub administrator account. Security Hub generates Amazon EventBridge events for the findings.
- An EventBridge rule created as part of the solution in the Security Hub administrator account will trigger a Lambda function configured as a target every time an EventBridge notification for a new or updated finding imported into Security Hub matches the EventBridge rule shown below:
- The Lambda function uses the account ID from the event payload to retrieve both the account information and the alternate contact information from the AWS Organizations and Account management service API. The following code within the helper.py constructs the account_details object representing the account information to enrich the finding:
- The Lambda function updates the finding using the Security Hub BatchUpdateFindings API to add the account related data into the Note and UserDefinedFields attributes of the SecurityHub finding:
Note: All state change events published by AWS services through Amazon Event Bridge are free of cost. The AWS Lambda free tier includes 1M free requests per month, and 400,000 GB-seconds of compute time per month at the time of publication of this post. If you process 2M requests per month, the estimated cost for this solution would be approximately $7.20 USD per month.
- Your AWS organization must have all features enabled.
- This solution requires that you have AWS Security Hub enabled in an AWS multi-account environment which is integrated with AWS Organizations. The AWS Organizations management account must designate a Security Hub administrator account, which can view data from and manage configuration for its member accounts. Follow these steps to designate a Security Hub administrator account for your AWS organization.
- All the members accounts are tagged per your organization’s tagging strategy and their security alternate contact is filled. If the tags or alternate contacts are not available, the enrichment will be limited to the Account Name and the Organizational Unit name.
- Trusted access must be enabled with AWS Organizations for AWS Account Management service. This will enable the AWS Organizations management account to call the AWS Account Management API operations (such as GetAlternateContact) for other member accounts in the organization. Trusted access can be enabled either by using AWS Management Console or by using AWS CLI and SDKs.
The following AWS CLI example enables trusted access for AWS Account Management in the calling account’s organization.
- An IAM role with a read only access to lookup the GetAlternateContact details must be created in the Organizations management account, with a trust policy that allows the Security Hub administrator account to assume the role.
- Create an IAM role in your Organizations management account, giving it necessary permissions as described in the Create the IAM role procedure below.
- Deploy the Lambda function and the other associated resources to your Security Hub administrator account
- In your Security Hub administrator account, launch the template by choosing the Launch Stack button below, which creates the stack the in us-east-1 Region.
Note: if your Security Hub aggregation region is different than us-east-1 or want to deploy the solution in a different AWS Region, you can deploy the solution from the GitHub repository described in the next section.

- On the Quick create stack page, for Stack name, enter a unique stack name for this account; for example, aws-security-hub–findings-enrichment-stack, as shown in Figure 2 below.

Figure 2: Quick Create CloudFormation stack for the Solution
- For ManagementAccount, enter the AWS Organizations management account ID.
- For OrgManagementAccountContactRole, enter the role ARN of the role you created previously in the Create IAM role procedure.
- Choose Create stack.
- Once the stack is created, go to the Resources tab and take note of the name of the IAM Role which was created.
- Update the principal element of the IAM role trust policy which you previously created in the Organization management account in the Create the IAM role procedure above, replacing it with the role name you noted down, as shown below.
Figure 3 Update Management Account Role’s Trust
- Install the AWS SAM CLI
- Download or clone the github repository using the following commands
- Update the content of the profile.txt file with the profile name you want to use for the deployment
- To create a new bucket for deployment artifacts, run create-bucket.sh by specifying the region as argument as below.
- Deploy the solution to the account by running the deploy.sh script by specifying the region as argument
- Once the stack is created, go to the Resources tab and take note of the name of the IAM Role which was created.
- Update the principal element of the IAM role trust policy which you previously created in the Organization management account in the Create the IAM role procedure above, replacing it with the role name you noted down, as shown below.
- Create a Security Group using following AWS CLI command:
- Make a note of the security group ID from the output, and use it in Step 3 below.
- Add an ingress rule to the security group which allows unrestricted traffic on port 100:
- Go to Security Hub and click on Findings on the left-hand navigation.
- Click in the filter field at the top to add additional filters. Choose a filter field of AWS Account ID, a filter match type of is, and a value of the AWS Account ID where you created the TestSecHubEnrichmentSG security group.
- Add one more filter. Choose a filter field of Resource type, a filter match type of is, and the value of AwsEc2SecurityGroup.
- Identify the finding for security group TestSecHubEnrichmentSG with updates to Note and UserDefinedFields, as shown in Figures 4 and 5 below:
Figure 4: Account metadata enrichment in Security Hub finding’s Note field
Figure 5: Account metadata enrichment in Security Hub finding’s UserDefinedFields field
Note: The actual attributes you will see as part of the UserDefinedFields may be different from the above screenshot. Attributes shown will depend on your tagging configuration and the alternate contact configuration. At a minimum, you will see the AccountName and OU fields.
- Once you confirm that the solution is working as expected, delete the stand-alone security group TestSecHubEnrichmentSG, which was created for testing purposes.
Prerequisites
Solution Deployment
This solution consists of two parts:
Create the IAM role
Using console, AWS CLI or AWS API
Follow the Creating a role to delegate permissions to an IAM user instructions to create a IAM role using the console, AWS CLI or AWS API in the AWS Organization management account with role name as account-contact-readonly, based on the trust and permission policy template provided below. You will need the account ID of your Security Hub administrator account.
The IAM trust policy allows the Security Hub administrator account to assume the role in your Organization management account.
IAM Role trust policy
Note: Replace the <SH Delegated Account ID> with the account ID of your Security Hub administrator account. Once the solution is deployed, you should update the principal in the trust policy shown above to use the new IAM role created for the solution.
IAM Permission Policy
The IAM permission policy allows the Security Hub administrator account to look up the alternate contact information for the member accounts.
Make a note of the Role ARN for the IAM role similar to this format:
You will need this while the deploying the solution in the next procedure.
Using AWS CloudFormation
Alternatively, you can use the provided CloudFormation template to create the role in the management account. The IAM role ARN is available in the Outputs section of the created CloudFormation stack.
Deploy the Solution to your Security Hub administrator account
You can deploy the solution using either the AWS Management Console, or from the GitHub repository using the AWS SAM CLI.
Note: if you have designated an aggregation Region within the Security Hub administrator account, you can deploy this solution only in the aggregation Region, otherwise you need to deploy this solution separately in each Region of the Security Hub administrator account where Security Hub is enabled.
To deploy the solution using the AWS Management Console


To deploy the solution from the GitHub Repository and AWS SAM CLI
Using the enriched attributes
To test that the solution is working as expected, you can create a standalone security group with an ingress rule that allows traffic from the internet. This will trigger a finding in Security Hub, which will be populated with the enriched attributes. You can then use these enriched attributes to filter and create custom insights, or take specific response or remediation actions.
To generate a sample Security Hub finding using AWS CLI
Within few minutes, a new finding will be generated in Security Hub, warning about the unrestricted ingress rule in the TestSecHubEnrichmentSG security group. For any new or updated findings which do not have the UserDefinedFields attribute findingEnriched set to true, the solution will enrich the finding with account related fields in both the Note and UserDefinedFields sections in the Security Hub finding.
To see and filter the enriched finding


Create custom insights using the enriched attributes
You can use the attributes available in the UserDefinedFields in the Security Hub finding to filter the findings. This lets you generate custom Security Hub Insight and reports tailored to suit your organization’s needs. The example shown in Figure 6 below creates a custom Security Hub Insight for findings grouped by severity for a specific owner, using the Owner attribute within the UserDefinedFields object of the Security Hub finding.
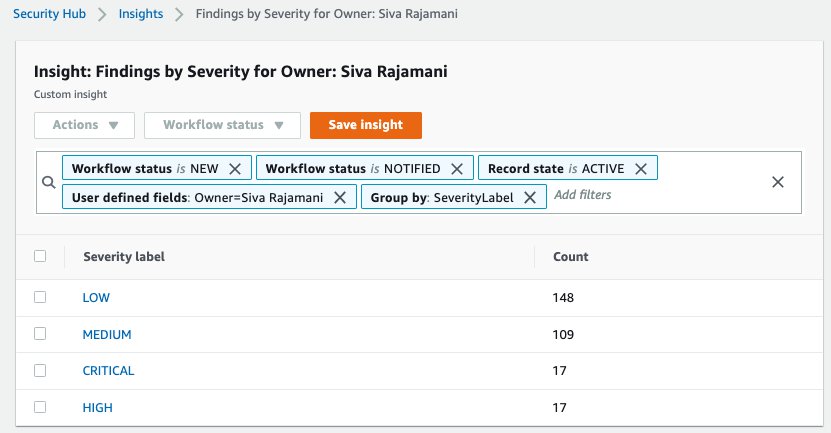
Figure 6: Custom Insight with Account metadata filters
Event Bridge rule for response or remediation action using enriched attributes
You can also use the attributes in the UserDefinedFields object of the Security Hub finding within the EventBridge rule to take specific response or remediation actions based on values in the attributes. In the example below, you can see how the Environment attribute can be used within the EventBridge rule configuration to trigger specific actions only when value matches PROD.
Conclusion
This blog post walks you through a solution to enrich AWS Security Hub findings with AWS account related metadata using Amazon EventBridge notifications and AWS Lambda. By enriching the Security Hub findings with account related information, your security teams have better visibility, additional insights and improved ability to create targeted reports for specific account or business teams, helping them prioritize and improve overall security response. To learn more, see:
- AWS Solution Implementation for AWS Security Hub Automated Response and Remediation
- Visualize AWS Security Hub Findings using Analytics and Business Intelligence Tools
If you have feedback about this post, submit comments in the Comments section below. If you have any questions about this post, start a thread on the AWS Security Hub forum.
Want more AWS Security news? Follow us on Twitter.