Post Syndicated from James Beswick original https://aws.amazon.com/blogs/compute/building-a-serverless-image-catalog-with-aws-step-functions-workflow-studio/
This post is written by Pascal Vogel, Associate Solutions Architect, and Benjamin Meyer, Sr. Solutions Architect.
Workflow Studio is a low-code visual workflow designer for AWS Step Functions that enables the orchestration of serverless workflows through a guided interactive interface. With the integration of Step Functions and the AWS SDK, you can now access more than 200 AWS services and over 9,000 API actions in your state machines.
This walkthrough uses Workflow Studio to implement a serverless image cataloging pipeline. It includes content moderation, automated tagging, and parallel image processing. Workflow Studio allows you to set up API integrations to other AWS services quickly with drag and drop actions, without writing custom application code.
Solution overview
Photo sharing websites often allow users to publish user-generated content such as text, images, or videos. Manual content review and categorization can be challenging. This solution enables the automation of these tasks.
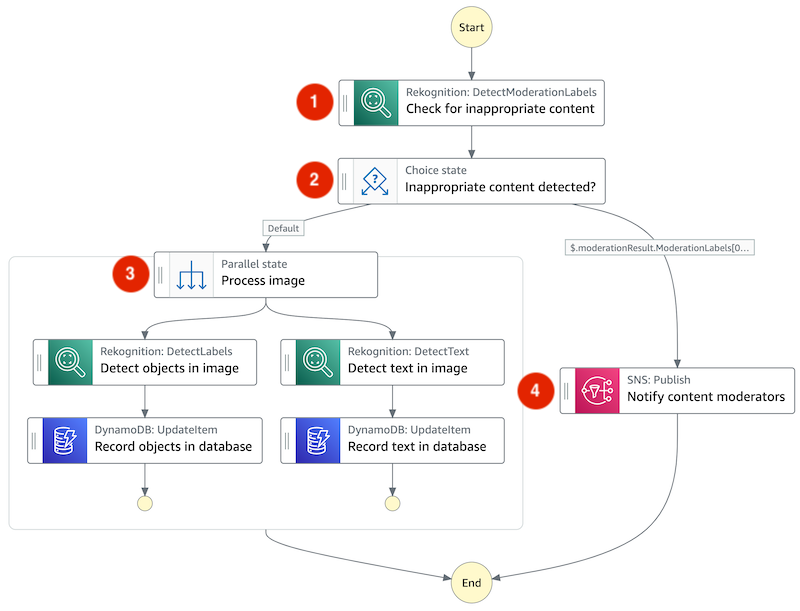
In this workflow:
- An image stored in Amazon S3 is checked for inappropriate content using the Amazon Rekognition
DetectModerationLabelsAPI. - Based on the result of (1), appropriate images are forwarded to image processing while inappropriate ones trigger an email notification.
- Appropriate images undergo two processing steps in parallel: the detection of objects and text in the image via Amazon Rekognition’s
DetectLabelsandDetectTextAPIs. The results of both processing steps are saved in an Amazon DynamoDB table. - An inappropriate image triggers an email notification for manual content moderation via the Amazon Simple Notification Service (SNS).
Prerequisites
To follow this walkthrough, you need:
- An AWS account.
- An AWS user with
AdministratorAccess(see the instructions on the AWS Identity and Access Management (IAM) console). - AWS CLI using the instructions here.
- AWS Serverless Application Model (AWS SAM) CLI using the instructions here.
Initial project setup
Get started by cloning the project repository from GitHub:
git clone https://github.com/aws-samples/aws-step-functions-image-catalog-blog.gitThe cloned repository contains two AWS SAM templates.
- The starter directory contains a template. It deploys AWS resources and permissions that you use later for building the image cataloging workflow.
- The solution directory contains a template that deploys the finished image cataloging pipeline. Use this template if you want to skip ahead to the finished solution.
Both templates deploy the following resources to your AWS account:
- An Amazon S3 bucket that holds the image files for the catalog.
- A DynamoDB table as the data store of the image catalog.
- An SNS topic and subscription that allow you to send an email notification.
- A Step Functions state machine that defines the processing steps in the cataloging pipeline.
To follow the walkthrough, deploy the AWS SAM template in the starter directory using the AWS SAM CLI:
cd aws-step-functions-image-catalog-blog/starter
sam build
sam deploy --guided
Configure the AWS SAM deployment as follows. Input your email address for the parameter ModeratorEmailAddress:

During deployment, you receive an email asking you to confirm the subscription to notifications generated by the Step Functions workflow. In the email, choose Confirm subscription to receive these notifications.

Confirm successful resource creation by going to the AWS CloudFormation console. Open the serverless-image-catalog-starter stack and choose the Stack info tab:

View the Outputs tab of the CloudFormation stack. You reference these items later in the walkthrough:

Implementing the image cataloging pipeline
Accessing Step Functions Workflow Studio
To access Step Functions in Workflow Studio:
- Access the Step Functions console.
- In the list of State machines, select image-catalog-workflow-starter.
- Choose the Edit button.
- Choose Workflow Studio.

Workflow Studio consists of three main areas:
- The Canvas lets you modify the state machine graph via drag and drop.
- The States Browser lets you browse and search more than 9,000 API Actions from over 200 AWS services.
- The Inspector panel lets you configure the properties of state machine states and displays the Step Functions definition in the Amazon States Language (ASL).
For the purpose of this walkthrough, you can delete the Pass state present in the state machine graph. Right click on it and choose Delete state.
Auto-moderating content with Amazon Rekognition and the Choice State
Use Amazon Rekognition’s DetectModerationLabels API to detect inappropriate content in the images processed by the workflow:
- In the States browser, search for the
DetectModerationLabelsAPI action. - Drag and drop the API action on the state machine graph on the canvas.

In the Inspector panel, select the Configuration tab and add the following API Parameters:
{
  "Image": {
    "S3Object": {
      "Bucket.$": "$.bucket",
      "Name.$": "$.key"
    }
  }
}
Switch to the Output tab and check the box next to Add original input to output using ResultPath. This allows you to pass both the original input and the task’s output on to the next state on the state machine graph.
Input the following ResultPath:
$.moderationResultStep Functions enables you to make decisions based on the output of previous task states via the choice state. Use the result of the DetectModerationLabels API action to decide how to proceed with the image:
- Access the Flow tab in the States browser. Drag and drop a Choice state to the state machine graph below the
DetectModerationLabelsAPI action. - In the States browser, choose Flow.
- Select a Choice state and place it after the
DetectModerationLabelsstate on the graph. - Select the added Choice state.
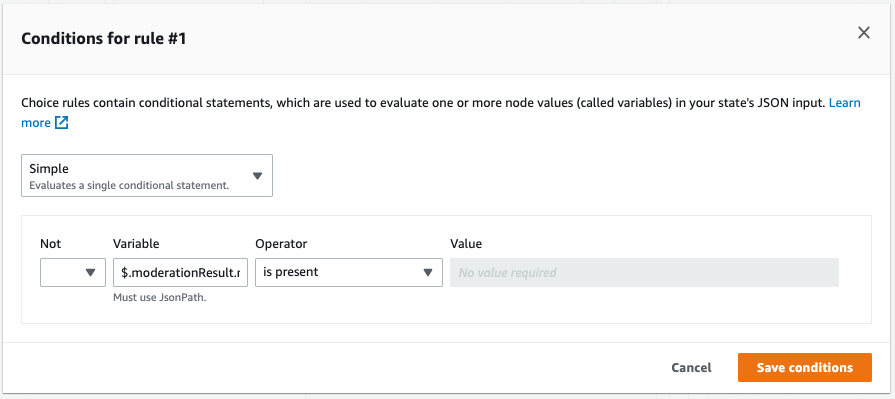
- In the Inspector panel, choose Rule #1 and select Edit.
- Choose Add conditions.
- For Variable, enter
$.moderationResult.ModerationLabels[0]. - For Operator, choose is present.
- Choose Save conditions.

If Amazon Rekognition detects inappropriate content, the workflow notifies content moderators to inspect the image manually:
- In the States browser, find the SNS Publish API Action.
- Drag the Action into the Rule #1 branch of the Choice state.
- For API Parameters, select the SNS topic that is visible in the Outputs of the
serverless-image-catalog-starterstack in the CloudFormation console.

Speeding up image cataloging with the Parallel state
Appropriate images should be processed and included in the image catalog. In this example, processing includes the automated generation of tags based on objects and text identified in the image.
To accelerate this, instruct Step Functions to perform these tasks concurrently via a Parallel state:
- In the States browser, select the Flow tab.
- Drag and drop a Parallel state onto the Default branch of the previously added Choice state.
- Search the Amazon Rekognition
DetectLabelsAPI action in the States browser - Drag and drop it inside the parallel state.
- Configure the following API parameters:
{ "Image": { "S3Object": { "Bucket.$": "$.bucket", "Name.$": "$.key" } } } - Switch to the Output tab and check the box next to Add original input to output using ResultPath. Set the ResultPath to
$.output.
Record the results of the Amazon Rekognition DetectLabels API Action to the DynamoDB database:
- Place a DynamoDB
UpdateItemAPI Action inside the Parallel state below the Amazon RekognitionDetectLabelsAPI action. - Configure the following API Parameters to save the tags to the DynamoDB table. Input the name of the DynamoDB table visible in the Outputs of the
serverless-image-catalog-starter stackin the CloudFormation console:
{
  "TableName": "<DynamoDB table name>",
  "Key": {
    "Id": {
      "S.$": "$.key"
    }
  },
  "UpdateExpression": "set detectedObjects=:o",
  "ExpressionAttributeValues": {
    ":o": {
      "S.$": "States.JsonToString($.output.Labels)"
    }
  }
}
This API parameter definition makes use of an intrinsic function to convert the list of objects identified by Amazon Rekognition from JSON to String.

In addition to objects, you also want to identify text in images and store it in the database. To do so:
- Drag and drop an Amazon Rekognition
DetectTextAPI action into the Parallel state next to theDetectLabelsAction. - Configure the API Parameters and ResultPath identical to the
DetectLabelsAPI Action. - Place another DynamoDB
UpdateItemAPI Action inside the Parallel state below the Amazon RekognitionDetectTextAPI Action. Set the following API Parameters and input the same DynamoDB table name as before.
{
  "TableName": "<DynamoDB table name>",
  "Key": {
    "Id": {
      "S.$": "$.key"
    }
  },
  "UpdateExpression": "set detectedText=:t",
  "ExpressionAttributeValues": {
    ":t": {
      "S.$": "States.JsonToString($.output.TextDetections)"
    }
  }
}
To save the state machine:
- Choose Apply and exit.
- Choose Save.
- Choose Save anyway.
Finishing up and testing the image cataloging workflow
To test the image cataloging workflow, upload an image to the S3 bucket created as part of the initial project setup. Find the name of the bucket in the Outputs of the serverless-image-catalog-starter stack in the CloudFormation console.
- Select the
image-catalog-workflow-starterstate machine in the Step Functions console. - Choose Start execution.
- Paste the following test event (use your S3 bucket name):
{ "bucket": "<S3-bucket-name>", "key": "<Image-name>.jpeg" } - Choose Start execution.
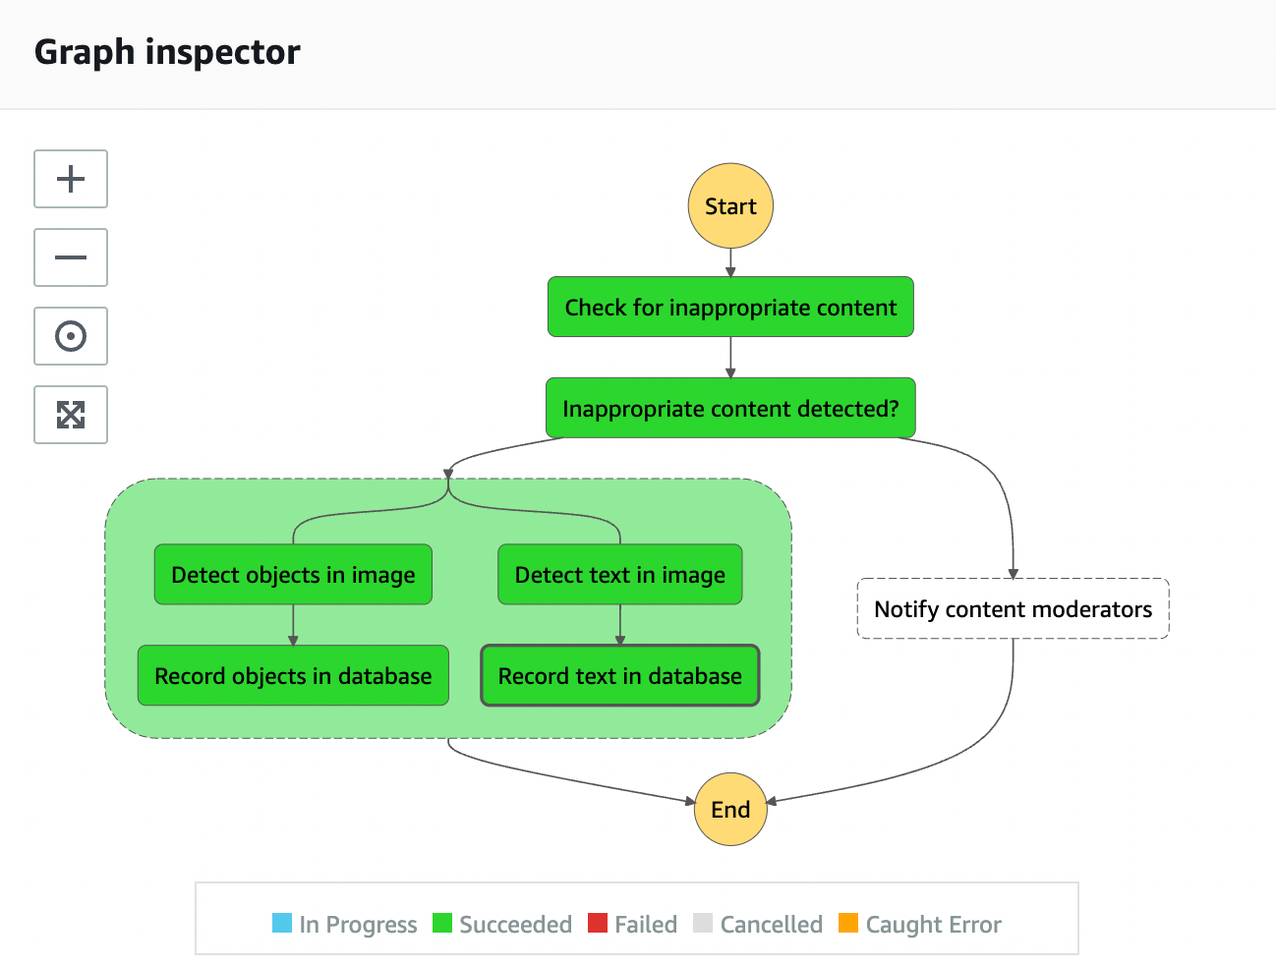
Once the execution has started, you can follow the state of the state machine live in the Graph inspector. For an appropriate image, the result will look as follows:
Next, repeat the test process with an image that Amazon Rekognition classifies as inappropriate. Find out more about inappropriate content categories here. This produces the following result:
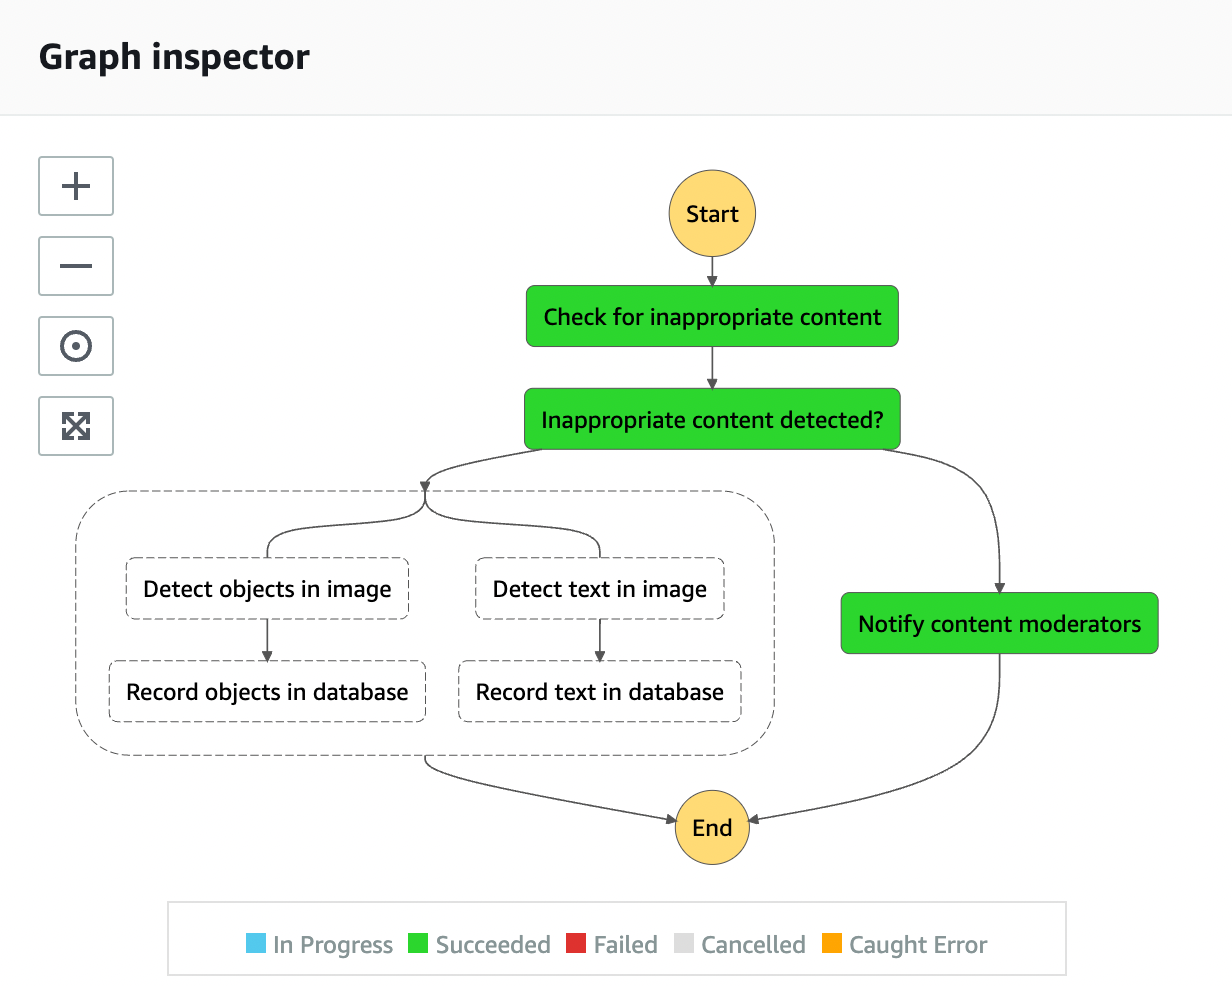
You receive an email notifying you regarding the inappropriate image and its properties.
Cleaning up
To clean up the resources provisioned as part of the solution run the following command in the aws-step-functions-image-catalog-blog/starter directory:
sam deleteConclusion
This blog post demonstrates how to implement a serverless image cataloging pipeline using Step Functions Workflow Studio. By orchestrating AWS API actions and flow states via drag and drop, you can process user-generated images. This example checks images for appropriateness and generates tags based on their content without custom application code.
You can now expand and improve this workflow by triggering it automatically each time an image is uploaded to the Amazon S3 bucket or by adding a manual approval step for submitted content. To find out more about Workflow Studio, visit the AWS Step Functions Developer Guide.
For more serverless learning resources, visit Serverless Land.