Post Syndicated from Andrea Amorosi original https://aws.amazon.com/blogs/compute/node-js-24-runtime-now-available-in-aws-lambda/
You can now develop AWS Lambda functions using Node.js 24, either as a managed runtime or using the container base image. Node.js 24 is in active LTS status and ready for production use. It is expected to be supported with security patches and bugfixes until April 2028.
The Lambda runtime for Node.js 24 includes a new implementation of the Runtime Interface Client (RIC), which integrates your functions code with the Lambda service. Written in TypeScript, the new RIC streamlines and simplifies Node.js support in Lambda, removing several legacy features. In particular, callback-based function handlers are no longer supported.
Node.js 24 includes several additions to the language, such as Explicit Resource Management, as well as changes to the runtime implementation and the standard library. With this release, Node.js developers can take advantage of these new features and enhancements when creating serverless applications on Lambda.
You can develop Node.js 24 Lambda functions using the AWS Management Console, AWS Command Line Interface (AWS CLI), AWS SDK for JavaScript, AWS Serverless Application Model (AWS SAM), AWS Cloud Development Kit (AWS CDK), and other infrastructure as code tools. You can use Node.js 24 with Powertools for AWS Lambda (TypeScript), a developer toolkit to implement serverless best practices and increase developer velocity. Powertools includes libraries to support common tasks such as observability, AWS Systems Manager Parameter Store integration, idempotency, batch processing, and more. You can also use Node.js 24 with Lambda@Edge to customize low-latency content delivered through Amazon CloudFront.
This blog post highlights important changes to the Node.js runtime, notable Node.js language updates, and how you can use the new Node.js 24 runtime in your serverless applications.
Node.js 24 runtime changes
The Lambda Runtime for Node.js 24 includes the following changes relative to the Node.js 22 and earlier runtimes.
Removing support for callback-based function handlers
Starting with the Node.js 24 runtime, Lambda no longer supports the callback-based handler signature for asynchronous operations. Callback-based handlers take three parameters, with the third parameter a callback. For example:
The modern approach to asynchronous programming in Node.js is to use the async/await pattern. Lambda introduced support for async handlers with the Node.js 8 runtime, launched in 2018. Here’s how the above function looks when using an async handler:
The Node.js 24 runtime still supports synchronous function handlers that do not use callbacks:
And Node.js 24 still supports response streaming, enabling more responsive applications by accelerating the time-to-first-byte:
This change to remove support for callback-based function handlers only affects Node.js 24 (and later) runtimes. Existing runtimes for Node.js 22 and earlier continue to support callback-based function handlers. When migrating functions that use callback-based handlers to Node.js 24, you need to modify your code to use one of the supported function handler signatures
As part of this change, context.callbackWaitsForEmptyEventLoop is removed. In addition, the previously deprecated context.succeed, context.fail, and context.done methods have also been removed. This aligns the runtime with modern Node.js patterns for clearer, more consistent error and result handling.
Harmonizing streaming and non-streaming behavior for unresolved promises
The Node.js 24 runtime also resolves a previous inconsistency in how unresolved promises were handled. Previously, Lambda would not wait for unresolved promises once the handler returns except when using response streaming. Starting with Node.js 24, the response streaming behavior is now consistent with non-streaming behavior, and Lambda no longer waits for unresolved promises once your handler returns or the response stream ends. Any background work (for example, pending timers, fetches, or queued callbacks) is not awaited implicitly. If your response depends on additional asynchronous operations, ensure you await them in your handler or integrate them into the streaming pipeline before closing the stream or returning, so the response only completes after all required work has finished.
Experimental Node.js features
Node.js enables certain experimental features by default in the upstream language releases. Such features include support for importing modules using require() in ECMAScript modules (ES modules) and automatically detecting ES vs CommonJS modules. As they are experimental, these features may be unstable or undergo breaking changes in future Node.js updates. To provide a stable experience, Lambda disables these features by default in the corresponding Lambda runtimes.
Lambda allows you to re-enable these features by adding the --experimental-require-module flag or the --experimental-detect-module flag to the NODE_OPTIONS environment variable. Enabling experimental Node.js features may affect performance and stability, and these features can change or be removed in future Node.js releases; such issues are not covered by AWS Support or the Lambda SLA.
ES modules in CloudFormation inline functions
With AWS CloudFormation inline functions, you provide your function code directly in the CloudFormation template. They’re particularly useful when deploying custom resources. With inline functions, the code filename is always index.js, which by default Node.js interprets as a CommonJS module. With the Node.js 24 runtime, you can use ES modules when authoring inline functions by passing the --experimental-detect-module flag via the NODE_OPTIONS environment variable. Previously, you needed a zip or container package to use ES modules. With Node.js 24, you can write inline functions using standard ESM syntax (import/export) and top‑level await), which simplifies small utilities and bootstrap logic without requiring a packaging step.
Node.js 24 language features
Node.js 24 introduces several language updates and features that enhance developer productivity and improve application performance.
Node.js 24 includes Undici 7, a newer version of the HTTP client that powers global fetch. This version brings performance improvements and broader protocol capabilities. Network‑heavy Lambda functions that call AWS services or external APIs can benefit from better connection management and throughput, especially when reusing clients or using HTTP/2 where supported. Most applications should work without changes, but you should validate behavior for advanced scenarios, such as custom headers or streaming bodies, and continue to define HTTP clients outside of the handler to maximize connection reuse across invocations.
The JavaScript Explicit Resource Management syntax (using and await using) enables deterministic clean-up of resources when a block completes. For Lambda handlers, this makes it easier to ensure short‑lived objects, such as streams, temporary buffers, or file handles, are disposed of promptly, which reduces the risk of resource leaks across warm invocations. You should continue to define long‑lived clients, for example SDK clients or database pools, outside the handler to benefit from connection reuse, and apply explicit disposal only to resources you want to tear down at the end of each invocation.
Finally, the AsyncLocalStorage API now uses AsyncContextFrame by default, improving the performance and reliability of async context propagation. This benefits common serverless patterns such as timers, correlating logs, managing tracing IDs and request‑scoped metadata across async and await boundaries, and streams without manual parameter threading. If you already use AsyncLocalStorage‑based libraries for logging or observability, you may see lower overhead and more consistent context propagation in Node.js 24.
For a detailed overview of Node.js 24 language features, see the Node.js 24 release blog post and the Node.js 24 changelog.
Performance considerations
At launch, new Lambda runtimes receive less usage than existing established runtimes. This can result in longer cold start times due to reduced cache residency within internal Lambda sub-systems. Cold start times typically improve in the weeks following launch as usage increases. As a result, AWS recommends not drawing conclusions from side-by-side performance comparisons with other Lambda runtimes until the performance has stabilized. Since performance is highly dependent on workload, customers with performance-sensitive workloads should conduct their own testing, instead of relying on generic test benchmarks.
Builders should continue to measure and test function performance and optimize function code and configuration for any impact. To learn more about how to optimize Node.js performance in Lambda, see our blog post Optimizing Node.js dependencies in AWS Lambda.
Migration from earlier Node.js runtimes
We’ve already discussed changes that are new to the Node.js 24 runtime, such as removing support for callback-based function handlers. As a reminder, we’ll recap some previous changes for customers upgrading from older Node.js functions.
AWS SDK for JavaScript
Up until Node.js 16, Lambda’s Node.js runtimes included the AWS SDK for JavaScript version 2. This has since been superseded by the AWS SDK for JavaScript version 3, which was released in December 2024. Starting with Node.js 18, and continuing with Node.js 24, the Lambda Node.js runtimes include version 3. When upgrading from Node.js 16 or earlier runtimes and using the included version 2, you must upgrade your code to use the v3 SDK.
For optimal performance, and to have full control over your code dependencies, we recommend bundling and minifying the AWS SDK in your deployment package, rather than using the SDK included in the runtime. For more information, see Optimizing Node.js dependencies in AWS Lambda.
Amazon Linux 2023
The Node.js 24 runtime is based on the provided.al2023 runtime, which is based on the Amazon Linux 2023 minimal container image. The Amazon Linux 2023 minimal image uses microdnf as a package manager, symlinked as dnf. This replaces the yum package manager used in Node.js 18 and earlier AL2-based images. If you deploy your Lambda function as a container image, you must update your Dockerfile to use dnf instead of yum when upgrading to the Node.js 24 base image from Node.js 18 or earlier.
Learn more about the provided.al2023 runtime in the blog post Introducing the Amazon Linux 2023 runtime for AWS Lambda and the Amazon Linux 2023 launch blog post.
Using the Node.js 24 runtime in AWS Lambda
Finally, we’ll review how to configure your functions to use Node.js 24, using a range of deployment tools.
AWS Management Console
When using the AWS Lambda Console, you can choose Node.js 24.x in the Runtime dropdown when creating a function:
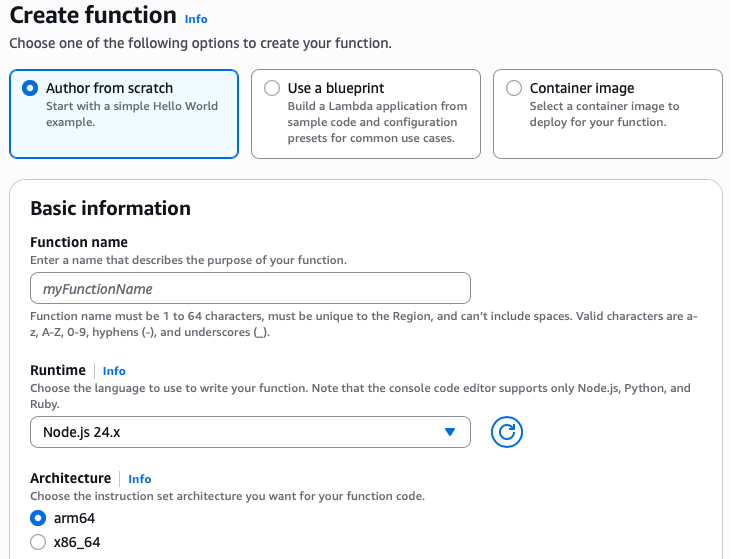
Creating Node.js function in the AWS Management Console
To update an existing Lambda function to Node.js 24, navigate to the function in the Lambda console, click Edit in the Runtime settings panel, then choose Node.js 24.x from the Runtime dropdown:

Editing Node.js function runtime
AWS Lambda container image
Change the Node.js base image version by modifying the FROM statement in your Dockerfile.
AWS Serverless Application Model
In AWS SAM, set the Runtime attribute to node24.x to use this version:
AWS SAM supports generating this template with Node.js 24 for new serverless applications using the sam init command. For more information, refer to the AWS SAM documentation.
AWS Cloud Development Kit (AWS CDK)
In AWS CDK, set the runtime attribute to Runtime.NODEJS_24_X to use this version.
Conclusion
AWS Lambda now supports Node.js 24 as a managed runtime and container base image. This release uses a new runtime interface client, removes support for callback-based function handlers, and includes several other changes to streamline and simplify Node.js support in Lambda.
You can build and deploy functions using Node.js 24 using the AWS Management Console, AWS CLI, AWS SDK, AWS SAM, AWS CDK, or your choice of infrastructure as code tool. You can also use the Node.js 24 container base image if you prefer to build and deploy your functions using container images.
To find more Node.js examples, use the Serverless Patterns Collection. For more serverless learning resources, visit Serverless Land


 Michael Davies is a Data Engineer at OUA. He has extensive experience within the education industry, with a particular focus on building robust and efficient data architecture and pipelines.
 Emma Arrigo is a Solutions Architect at AWS, focusing on education customers across Australia. She specializes in leveraging cloud technology and machine learning to address complex business challenges in the education sector. Emma’s passion for data extends beyond her professional life, as evidenced by her dog named Data.