Post Syndicated from Talia Nassi original https://aws.amazon.com/blogs/compute/building-an-event-driven-application-with-amazon-eventbridge/
In event-driven architecture, services interact with each other through events. An event is something that happened in your application (for example, an item was put into a cart, a new order was placed). Events are JSON objects that tell you information about something that happened in your application. In event-driven architecture, each component of the application raises an event whenever anything changes. Other components listen and decide what to do with it and how they would like to react.
When you build applications with event-driven architecture, you decouple your event sources and event targets. This can enable teams to act more independently, because your services are loosely coupled. When you add new features to your applications, you raise new events and then decide on the event source and event target. The event source is what emits the event, and the event target is what subscribes to or receives the event. Decoupling event sources and event targets can greatly speed up development time, and it can simplify making changes to your application.
Decoupling your application can allow for more seamless cross-team collaboration. For example, let’s say you are a developer at an ecommerce company and you are building a serverless ecommerce application. Your team is in charge of the account creation and authentication process. You build the login workflow, and raise an event when a new user creates an account.
When the event is raised, other teams can be alerted. The marketing team can listen for the Account Created event and act on it (for example, send promotional emails). In this decoupled architecture, event producers and consumers don’t have to know about each other. They only have to listen to events and act accordingly when they are interested in an event. This can speed up development by reducing the complexity caused by building new features.
In AWS, events are choreographed through Amazon EventBridge rules. A rule matches incoming events from an event source and sends them to event targets for processing.
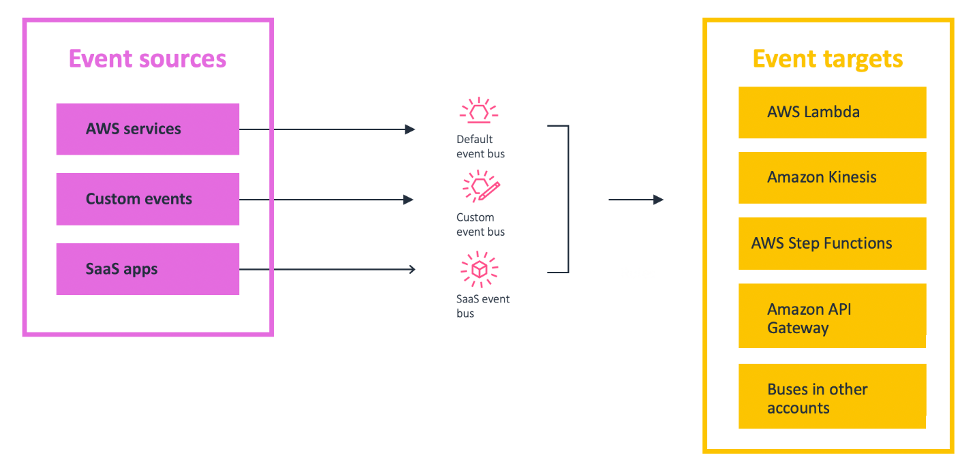
EventBridge accepts events from many different event sources, including over 200 AWS services, custom events from your Lambda functions or applications, and third-party SaaS applications. You specify an action to take when EventBridge receives an event that matches the event pattern in the rule. When an event matches, Amazon EventBridge sends the event to the specified target and triggers the action defined in the rule.
To route events from these sources to the correct target, the events must be placed on a corresponding event bus. There are three types of event buses. The first type is the default bus, which is always available in every account, and it’s where AWS events are routed to. The second type is a custom event bus. You can create custom event buses for your own applications to meet your business needs. Lastly, you can also create SaaS event buses, which are created when you configure SaaS applications as an event source.
There are many potential event targets. Event targets are what the event bus route to once a corresponding event happens. Targets include AWS Lambda, Amazon Kinesis, AWS Step Functions, Amazon API Gateway, and even event buses in other accounts. This flexible design allows you to create a wide variety of integration patterns based on your specific needs.
Configuring events with Amazon EventBridge
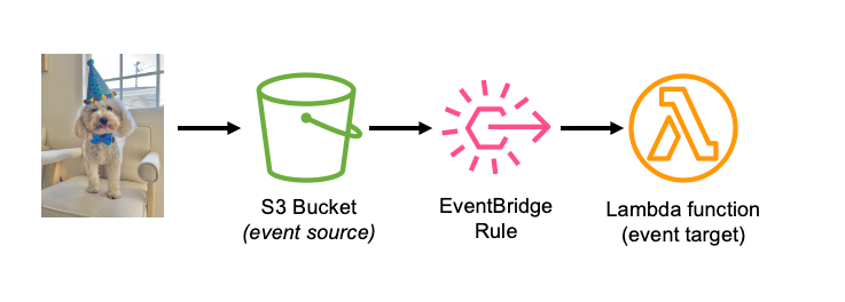
This tutorial sends an event from Amazon S3 (the event source) to AWS Lambda (the event target) using an event rule.
In this tutorial, you learn how to configure events with Amazon EventBridge by deploying an AWS Serverless Application Model template. The AWS Serverless Application Model (AWS SAM) is an open-source framework for building serverless applications. It provides shorthand syntax to express functions, APIs, databases, and event source mappings. AWS SAM is an extension of AWS CloudFormation, which is the AWS infrastructure as code tool. You define resources using CloudFormation in your AWS SAM template and use the full suite of resources, intrinsic functions, and other template features that are available in AWS CloudFormation.
First, you upload images to an S3 bucket. This raises an event, which invokes a Lambda function, which resizes the image and places it in a different S3 bucket.
Prerequisites:
- AWS SAM CLI (If you use AWS Cloud9, this is installed for you)
To configure events with Amazon EventBridge:
- Navigate to the Serverlessland Patterns Collection and choose the pattern Amazon S3 to Amazon EventBridge to AWS Lambda. This AWS SAM template deploys an S3 bucket, a Lambda function, an EventBridge rule, and the IAM resources required to run the application.
- Copy and paste the cloning instructions in your terminal.
- Run
sam deploy --guidedto deploy the pattern. - You see the success message:

- Navigate to the EventBridge console and choose Rules from the left panel. Then choose the rule that was created by AWS SAM (starting with sam-app)
 The event source is S3 and the rule is invoked when an image is put into the source bucket in S3. Next, notice that the event target is the Lambda function that you created from the AWS SAM template.
 - Navigate to the S3 console and choose Buckets on the left panel. Then choose the bucket that was created for you (starting with sam-app). Choose the Properties tab, and note that the integration with EventBridge is on.

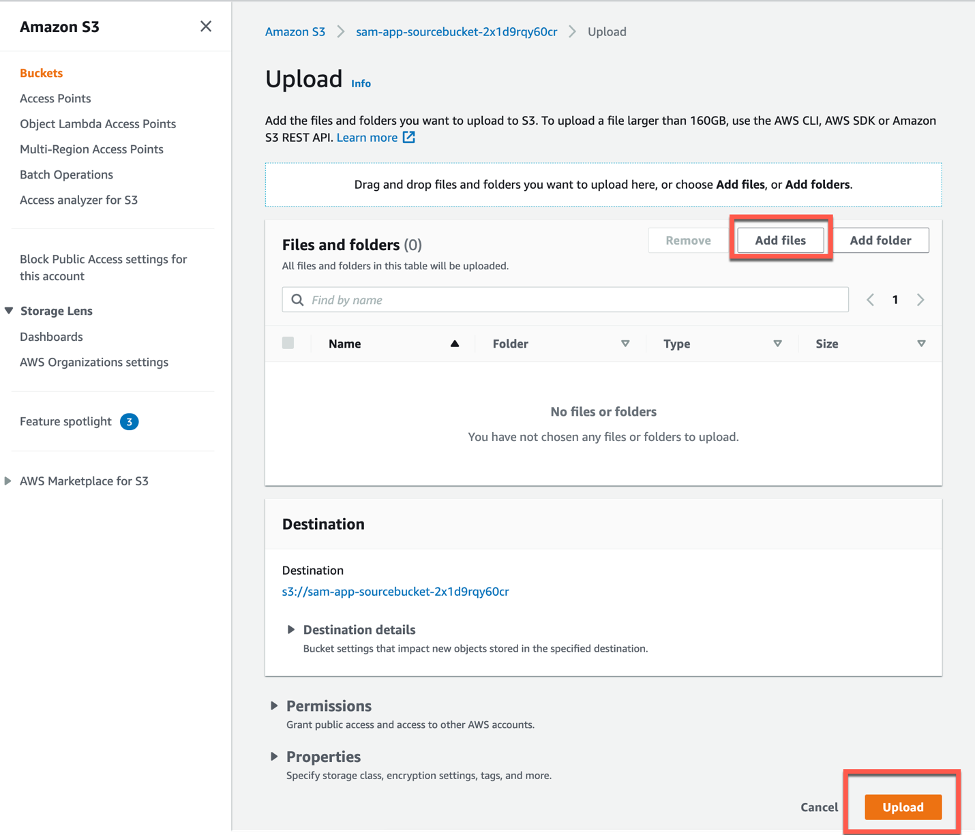
- From the Objects tab, choose Upload, and upload an image.


- Navigate to the Lambda console and choose your Lambda function (starting with sam-app). Select the Monitor tab, and choose View Logs in CloudWatch.

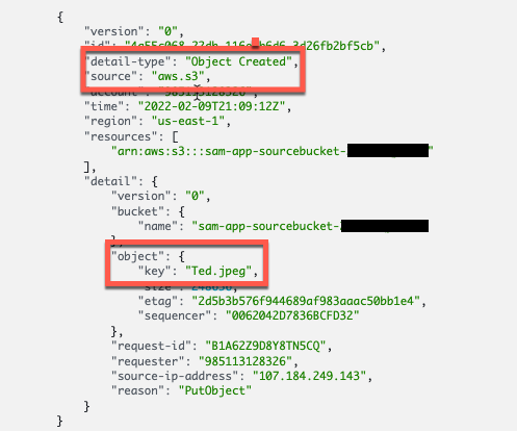
- You can see the event that triggered the Lambda function in the logs:


Adding more event rules to your application
In the previous example, you add an EventBridge rule that routes events from S3 (the event source) to Lambda (the event target) using an event bus. Now, add another rule:
- From the EventBridge console, choose Rules, and then choose Create rule.
- Enter a name and description for the rule.

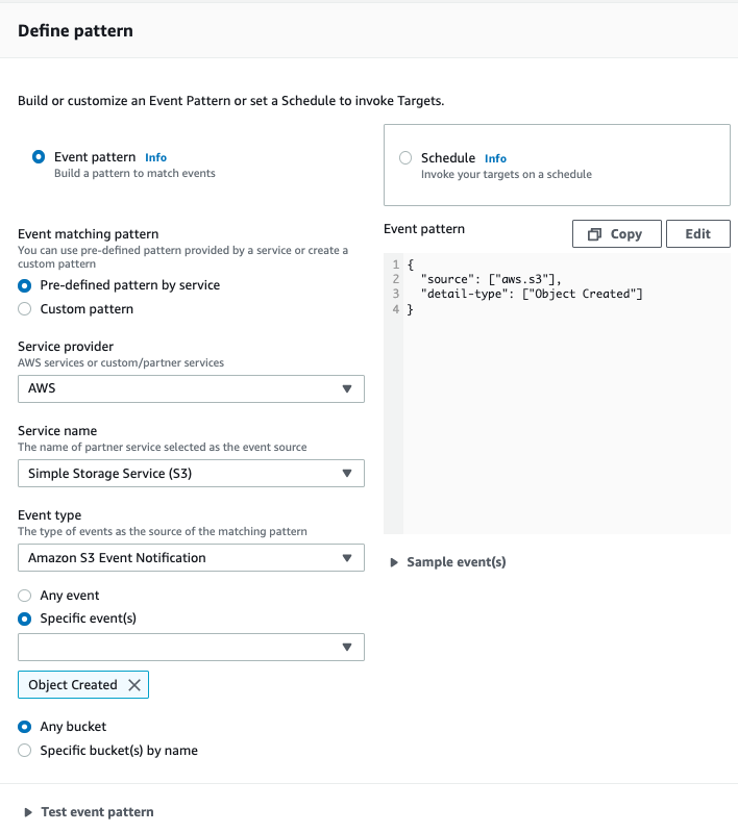
- Define the event pattern that is used to invoke the event targets. For Service provider, choose AWS, and for Service name choose S3. For Event type, choose Amazon S3 event notification, and in the event dropdown choose Object created. You are configuring the event source to be an object created in your S3 bucket.

- Select either the default AWS event bus or a custom event bus.

- Select the event target. In this example, configure an Amazon CloudWatch log group. Enter any name for the log group, which is created automatically.

- Choose Create.
- Upload an image to the S3 bucket, as shown in step 7 above.
- Navigate to the Amazon CloudWatch console and choose Log groups from the left panel. Choose the log group, and then choose a log stream.
- The event is logged to CloudWatch Logs.


Adding a second event rule did not change the event source’s behavior or affect other event targets.
Conclusion
This post is a brief introduction of event-driven architecture, and walks through a tutorial where you create an event-driven application with the Serverlessland Patterns Collection. You also add two different event rules to your event bus.
For more serverless learning resources, visit Serverless Land.