Post Syndicated from Jonathan Nguyen original https://aws.amazon.com/blogs/security/generate-machine-learning-insights-for-amazon-security-lake-data-using-amazon-sagemaker/
Amazon Security Lake automatically centralizes the collection of security-related logs and events from integrated AWS and third-party services. With the increasing amount of security data available, it can be challenging knowing what data to focus on and which tools to use. You can use native AWS services such as Amazon QuickSight, Amazon OpenSearch, and Amazon SageMaker Studio to visualize, analyze, and interactively identify different areas of interest to focus on, and prioritize efforts to increase your AWS security posture.
In this post, we go over how to generate machine learning insights for Security Lake using SageMaker Studio. SageMaker Studio is a web integrated development environment (IDE) for machine learning that provides tools for data scientists to prepare, build, train, and deploy machine learning models. With this solution, you can quickly deploy a base set of Python notebooks focusing on AWS Security Hub findings in Security Lake, which can also be expanded to incorporate other AWS sources or custom data sources in Security Lake. After you’ve run the notebooks, you can use the results to help you identify and focus on areas of interest related to security within your AWS environment. As a result, you might implement additional guardrails or create custom detectors to alert on suspicious activity.
Prerequisites
- Specify a delegated administrator account to manage the Security Lake configuration for all member accounts within your organization.
- Security Lake has been enabled in the delegated administrator AWS account.
- As part of the solution in this post, we focus on Security Hub as a data source. AWS Security Hub must be enabled for your AWS Organizations. When enabling Security Lake, select All log and event sources to include AWS Security Hub findings.
- Configure subscriber query access to Security Lake. Security Lake uses AWS Lake Formation cross-account table sharing to support subscriber query access. Accept the resource share request in the subscriber AWS account in AWS Resource Access Manager (AWS RAM). Subscribers with query access can query the data that Security Lake collects. These subscribers query Lake Formation tables in an Amazon Simple Storage Service (Amazon S3) bucket with Security Lake data using services such as Amazon Athena.
Solution overview
Figure 1 that follows depicts the architecture of the solution.
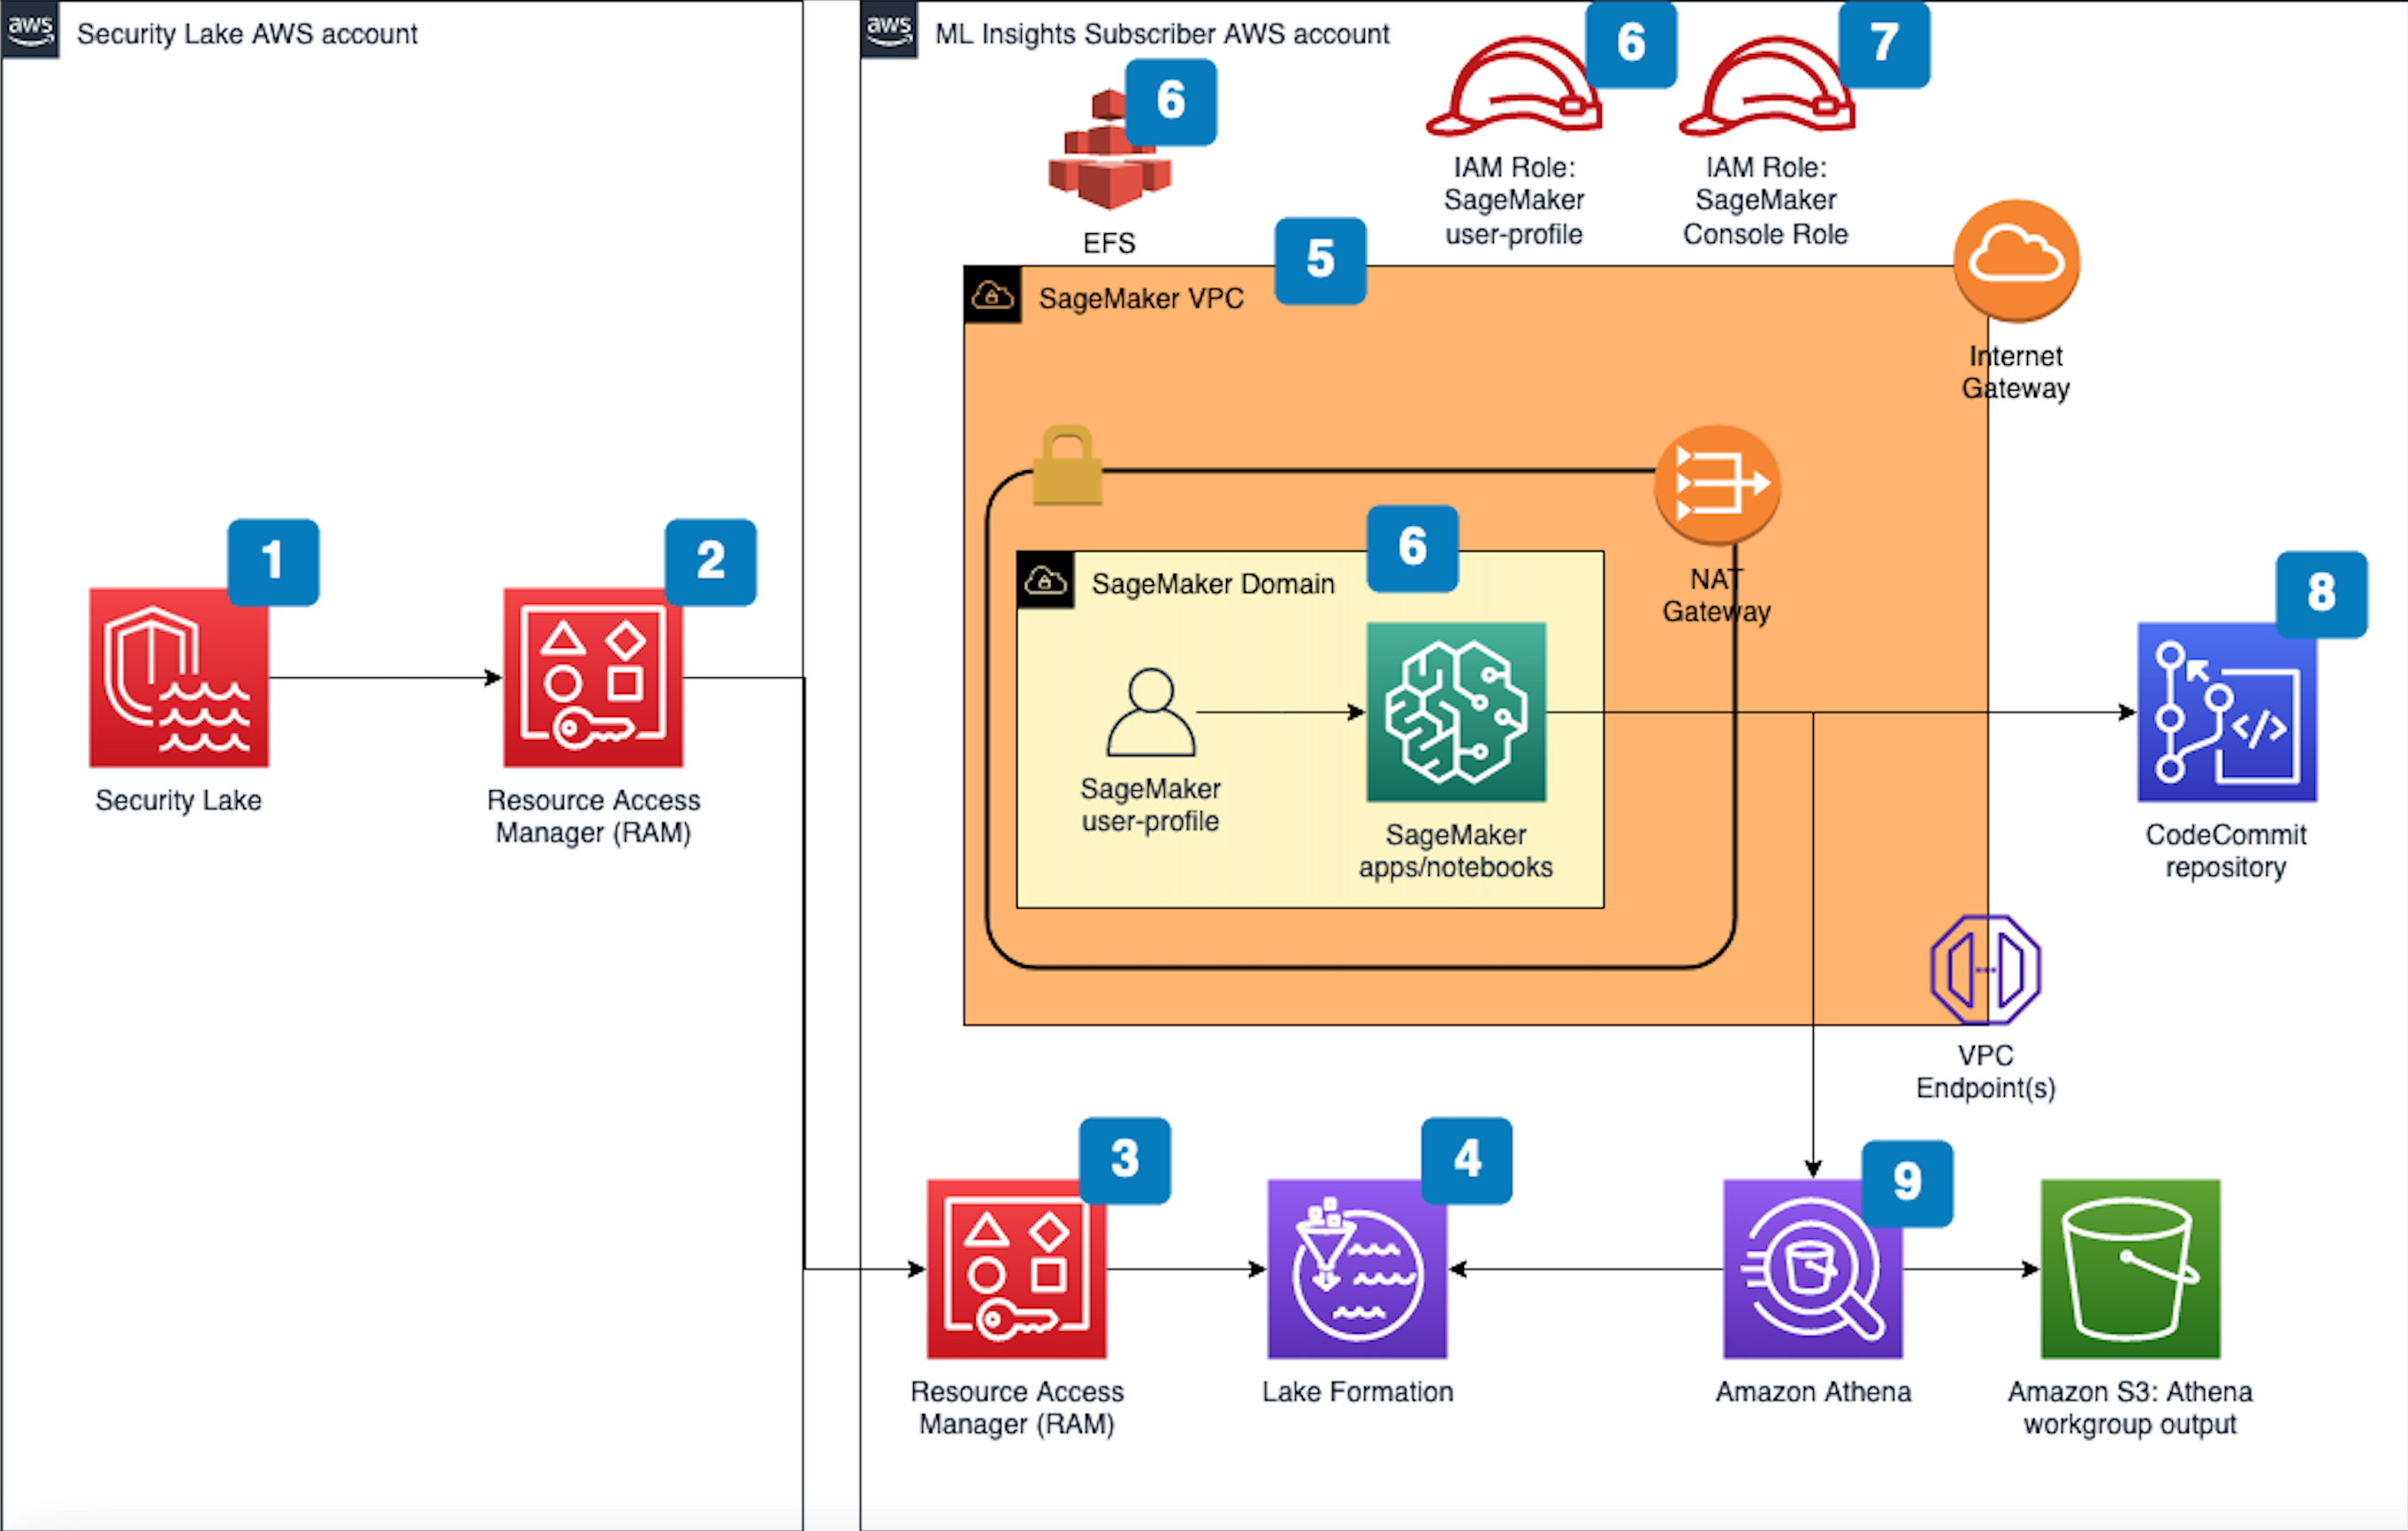
Figure 1 SageMaker machine learning insights architecture for Security Lake
The deployment builds the architecture by completing the following steps:
- A Security Lake is set up in an AWS account with supported log sources — such as Amazon VPC Flow Logs, AWS Security Hub, AWS CloudTrail, and Amazon Route53 — configured.
- Subscriber query access is created from the Security Lake AWS account to a subscriber AWS account.
Note: See Prerequisite #4 for more information.
- The AWS RAM resource share request must be accepted in the subscriber AWS account where this solution is deployed.
Note: See Prerequisite #4 for more information.
- A resource link database in Lake Formation is created in the subscriber AWS account and grants access for the Athena tables in the Security Lake AWS account.
- VPC is provisioned for SageMaker with IGW, NAT GW, and VPC endpoints for the AWS services used in the solution. IGW and NAT are required to install external open-source packages.
- A SageMaker Domain for SageMaker Studio is created in VPCOnly mode with a single SageMaker user profile that is tied to a dedicated AWS Identity and Access Management (IAM) role.
- A dedicated IAM role is created to restrict access to create and access the presigned URL for the SageMaker Domain from a specific CIDR for accessing the SageMaker notebook.
- An AWS CodeCommit repository containing Python notebooks is used for the AI and ML workflow by the SageMaker user-profile.
- An Athena workgroup is created for the Security Lake queries with an S3 bucket for output location (access logging configured for the output bucket).
Deploy the solution
You can deploy the SageMaker solution by using either the AWS Management Console or the AWS Cloud Development Kit (AWS CDK).
Option 1: Deploy the solution with AWS CloudFormation using the console
Use the console to sign in to your subscriber AWS account and then choose the Launch Stack button to open the AWS CloudFormation console pre-loaded with the template for this solution. It takes approximately 10 minutes for the CloudFormation stack to complete.
![]()
Option 2: Deploy the solution by using the AWS CDK
You can find the latest code for the SageMaker solution in the SageMaker machine learning insights GitHub repository, where you can also contribute to the sample code. For instructions and more information on using the AWS CDK, see Get Started with AWS CDK.
To deploy the solution by using the AWS CDK
- To build the app when navigating to the project’s root folder, use the following commands:
- Update IAM_role_assumption_for_sagemaker_presigned_url and security_lake_aws_account default values in source/lib/sagemaker_domain.ts with their respective appropriate values.
- Run the following commands in your terminal while authenticated in your subscriber AWS account. Be sure to replace <INSERT_AWS_ACCOUNT> with your account number and replace <INSERT_REGION> with the AWS Region that you want the solution deployed to.
Post deployment steps
Now that you’ve deployed the SageMaker solution, you must grant the SageMaker user profile in the subscriber AWS account query access to your Security Lake. You can Grant permission for the SageMaker user profile to Security Lake in Lake Formation in the subscriber AWS account.
Grant permission to the Security Lake database
- Copy the SageMaker user-profile Amazon resource name (ARN) arn:aws:iam::<account-id>:role/sagemaker-user-profile-for-security-lake
- Go to Lake Formation in the console.
- Select the amazon_security_lake_glue_db_us_east_1 database.
- From the Actions Dropdown, select Grant.
- In Grant Data Permissions, select SAML Users and Groups.
- Paste the SageMaker user profile ARN from Step 1.
- In Database Permissions, select Describe and then Grant.
Grant permission to Security Lake – Security Hub table
- Copy the SageMaker user-profile ARN arn:aws:iam:<account-id>:role/sagemaker-user-profile-for-security-lake
- Go to Lake Formation in the console.
- Select the amazon_security_lake_glue_db_us_east_1 database.
- Choose View Tables.
- Select the amazon_security_lake_table_us_east_1_sh_findings_1_0 table.
- From Actions Dropdown, select Grant.
- In Grant Data Permissions, select SAML Users and Groups.
- Paste the SageMaker user-profile ARN from Step 1.
- In Table Permissions, select Describe and then Grant.
Launch your SageMaker Studio application
Now that you have granted permissions for a SageMaker user-profile, we can move on to launching the SageMaker application associated to that user-profile.
- Navigate to the SageMaker Studio domain in the console.
- Select the SageMaker domain security-lake-ml-insights-<account-id>.
- Select the SageMaker user profile sagemaker-user-profile-for-security-lake.
- Select the Launch drop-down and select Studio

Figure 2: SageMaker domain user-profile AWS console screen

Clone Python notebooks
You’ll work primarily in the SageMaker user profile to create a data-science app to work in. As part of the solution deployment, we’ve created Python notebooks in CodeCommit that you will need to clone.
To clone the Python notebooks
- Navigate to CloudFormation in the console.
- In the Stacks section, select the SageMakerDomainStack.
- Select to the Outputs tab/
- Copy the value for sagemakernotebookmlinsightsrepositoryURL. (For example: https://git-codecommit.us-east-1.amazonaws.com/v1/repos/sagemaker_ml_insights_repo)
- Go back to your SageMaker app.
- In Studio, in the left sidebar, choose the Git icon (identified by a diamond with two branches), then choose Clone a Repository.

Figure 3: SageMaker clone CodeCommit repository
- Paste the CodeCommit repository link from Step 4 under the Git repository URL (git). After you paste the URL, select Clone “https://git-codecommit.us-east-1.amazonaws.com/v1/repos/sagemaker_ml_insights_repo”, then select Clone.
NOTE: If you don’t select from the auto-populated drop-down, SageMaker won’t be able to clone the repository.

Figure 4: SageMaker clone CodeCommit URL


Generating machine learning insights using SageMaker Studio
You’ve successfully pulled the base set of Python notebooks into your SageMaker app and they can be accessed at sagemaker_ml_insights_repo/notebooks/tsat/. The notebooks provide you with a starting point for running machine learning analysis using Security Lake data. These notebooks can be expanded to existing native or custom data sources being sent to Security Lake.
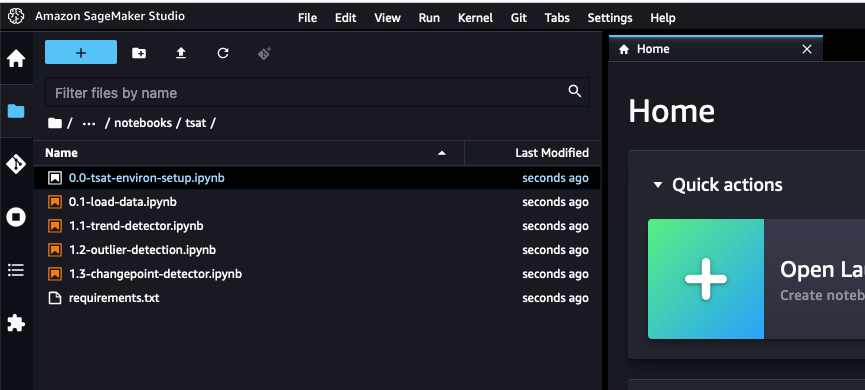
Figure 5: SageMaker cloned Python notebooks
Notebook #1 – Environment setup
The 0.0-tsat-environ-setup notebook handles the installation of the required libraries and dependencies needed for the subsequent notebooks within this blog. For our notebooks, we use an open-source Python library called Kats, which is a lightweight, generalizable framework to perform time series analysis.
- Select the 0.0-tsat-environ-setup.ipynb notebook for the environment setup.
Note: If you have already provisioned a kernel, you can skip steps 2 and 3.
- In the right-hand corner, select No Kernel
- In the Set up notebook environment pop-up, leave the defaults and choose Select.
Figure 6: SageMaker application environment settings
- After the kernel has successfully started, choose the Terminal icon to open the image terminal.

Figure 7: SageMaker application terminal
- To install open-source packages from https instead of http, you must update the sources.list file. After the terminal opens, send the following commands:
- Go back to the 0.0-tsat-environ-setup.ipynb notebook and select the Run drop-down and select Run All Cells. Alternatively, you can run each cell independently, but it’s not required. Grab a coffee! This step will take about 10 minutes.
IMPORTANT: If you complete the installation out of order or update the requirements.txt file, you might not be able to successfully install Kats and you will need to rebuild your environment by using a net-new SageMaker user profile.
- After installing all the prerequisites, check the Kats version to determine if it was successfully installed.

Figure 8: Kats installation verification
- Install PyAthena (Python DB API client for Amazon Athena) which is used to query your data in Security Lake.


You’ve successfully set up the SageMaker app environment! You can now load the appropriate dataset and create a time series.
Notebook #2 – Load data
The 0.1-load-data notebook establishes the Athena connection to query data in Security Lake and creates the resulting time series dataset. The time series dataset will be used for subsequent notebooks to identify trends, outliers, and change points.
- Select the 0.1-load-data.ipynb notebook.
- If you deployed the solution outside of us-east-1, update the con details to the appropriate Region. In this example, we’re focusing on Security Hub data within Security Lake. If you want to change the underlying data source, you can update the TABLE value.
Figure 9: SageMaker notebook load Security Lake data settings
- In the Query section, there’s an Athena query to pull specific data from Security Hub, this can be expanded as needed to a subset or can include all products within Security Hub. The query below pulls Security Hub information after 01:00:00 1/1/2022 from the products listed in productname.
Figure 10: SageMaker notebook Athena query
- After the values have been updated, you can create your time series dataset. For this notebook, we recommend running each cell individually instead of running all cells at once so you can get a bit more familiar with the process. Select the first cell and choose the Run icon.
Figure 11: SageMaker run Python notebook code
- Follow the same process as Step 4 for the subsequent cells.
Note: If you encounter any issues with querying the table, make sure you completed the post-deployment step for Grant permission to Security Lake – Security Hub table.


You’ve successfully loaded your data and created a timeseries! You can now move on to generating machine learning insights from your timeseries.
Notebook #3 – Trend detector
The 1.1-trend-detector.ipynb notebook handles trend detection in your data. Trend represents a directional change in the level of a time series. This directional change can be either upward (increase in level) or downward (decrease in level). Trend detection helps detect a change while ignoring the noise from natural variability. Each environment is different, and trends help us identify where to look more closely to determine why a trend is positive or negative.
- Select 1.1-trend-detector.ipynb notebook for trend detection.
- Slopes are created to identify the relationship between x (time) and y (counts).

Figure 12: SageMaker notebook slope view
- If the counts are increasing with time, then it’s considered a positive slope and the reverse is considered a negative slope. A positive slope isn’t necessarily a good thing because in an ideal state we would expect counts of a finding type to come down with time.

Figure 13: SageMaker notebook trend view
- Now you can plot the top five positive and negative trends to identify the top movers.
Figure 14: SageMaker notebook trend results view


Notebook #4 – Outlier detection
The 1.2-outlier-detection.ipynb notebook handles outlier detection. This notebook does a seasonal decomposition of the input time series, with additive or multiplicative decomposition as specified (default is additive). It uses a residual time series by either removing only trend or both trend and seasonality if the seasonality is strong. The intent is to discover useful, abnormal, and irregular patterns within data sets, allowing you to pinpoint areas of interest.
- To start, it detects points in the residual that are over 5 times the inter-quartile range.
- Inter-quartile range (IQR) is the difference between the seventy-fifth and twenty-fifth percentiles of residuals or the spread of data within the middle two quartiles of the entire dataset. IQR is useful in detecting the presence of outliers by looking at values that might lie outside of the middle two quartiles.
- The IQR multiplier controls the sensitivity of the range and decision of identifying outliers. By using a larger value for the iqr_mult_thresh parameter in OutlierDetector, outliers would be considered data points, while a smaller value would identify data points as outliers.
Note: If you don’t have enough data, decrease iqr_mult_thresh to a lower value (for example iqr_mult_thresh=3).
Figure 15: SageMaker notebook outlier setting
- Along with outlier detection plots, investigation SQL will be displayed as well, which can help with further investigation of the outliers.
In the diagram that follows, you can see that there are several outliers in the number of findings, related to failed AWS Firewall Manager policies, which have been identified by the vertical red lines within the line graph. These are outliers because they deviate from the normal behavior and number of findings on a day-to-day basis. When you see outliers, you can look at the resources that might have caused an unusual increase in Firewall Manager policy findings. Depending on the findings, it could be related to an overly permissive or noncompliant security group or a misconfigured AWS WAF rule group.
Figure 16: SageMaker notebook outlier results view


Notebook #5 – Change point detection
The 1.3-changepoint-detector.ipynb notebook handles the change point detection. Change point detection is a method to detect changes in a time series that persist over time, such as a change in the mean value. To detect a baseline to identify when several changes might have occurred from that point. Change points occur when there’s an increase or decrease to the average number of findings within a data set.
- Along with identifying change points within the data set, the investigation SQL is generated to further investigate the specific change point if applicable.
In the following diagram, you can see there’s a change point decrease after July 27, 2022, with confidence of 99.9 percent. It’s important to note that change points differ from outliers, which are sudden changes in the data set observed. This diagram means there was some change in the environment that resulted in an overall decrease in the number of findings for S3 buckets with block public access being disabled. The change could be the result of an update to the CI/CD pipelines provisioning S3 buckets or automation to enable all S3 buckets to block public access. Conversely, if you saw a change point that resulted in an increase, it could mean that there was a change that resulted in a larger number of S3 buckets with a block public access configuration consistently being disabled.
Figure 17: SageMaker changepoint detector view

By now, you should be familiar with the set up and deployment for SageMaker Studio and how you can use Python notebooks to generate machine learning insights for your Security Lake data. You can take what you’ve learned and start to curate specific datasets and data sources within Security Lake, create a time series, detect trends, and identify outliers and change points. By doing so, you can answer a variety of security-related questions such as:
- CloudTrail
Is there a large volume of Amazon S3 download or copy commands to an external resource? Are you seeing a large volume of S3 delete object commands? Is it possible there’s a ransomware event going on?
- VPC Flow Logs
Is there an increase in the number of requests from your VPC to external IPs? Is there an increase in the number of requests from your VPC to your on-premises CIDR? Is there a possibility of internal or external data exfiltration occurring?
- Route53
Which resources are making DNS requests that they haven’t typically made within the last 30–45 days? When did it start? Is there a potential command and control session occurring on an Amazon Elastic Compute Cloud (Amazon EC2) instance?
It’s important to note that this isn’t a solution to replace Amazon GuardDuty, which uses foundational data sources to detect communication with known malicious domains and IP addresses and identify anomalous behavior, or Amazon Detective, which provides customers with prebuilt data aggregations, summaries, and visualizations to help security teams conduct faster and more effective investigations. One of the main benefits of using Security Lake and SageMaker Studio is the ability to interactively create and tailor machine learning insights specific to your AWS environment and workloads.
Clean up
If you deployed the SageMaker machine learning insights solution by using the Launch Stack button in the AWS Management Console or the CloudFormation template sagemaker_ml_insights_cfn, do the following to clean up:
- In the CloudFormation console for the account and Region where you deployed the solution, choose the SageMakerML stack.
- Choose the option to Delete the stack.
If you deployed the solution by using the AWS CDK, run the command cdk destroy.
Conclusion
Amazon Security Lake gives you the ability to normalize and centrally store your security data from various log sources to help you analyze, visualize, and correlate appropriate security logs. You can then use this data to increase your overall security posture by implementing additional security guardrails or take appropriate remediation actions within your AWS environment.
In this blog post, you learned how you can use SageMaker to generate machine learning insights for your Security Hub findings in Security Lake. Although the example solution focuses on a single data source within Security Lake, you can expand the notebooks to incorporate other native or custom data sources in Security Lake.
There are many different use-cases for Security Lake that can be tailored to fit your AWS environment. Take a look at this blog post to learn how you can ingest, transform and deliver Security Lake data to Amazon OpenSearch to help your security operations team quickly analyze security data within your AWS environment. In supported Regions, new Security Lake account holders can try the service free for 15 days and gain access to its features.
If you have feedback about this post, submit comments in the Comments section below. If you have questions about this post, contact AWS Support.
Want more AWS Security news? Follow us on Twitter.