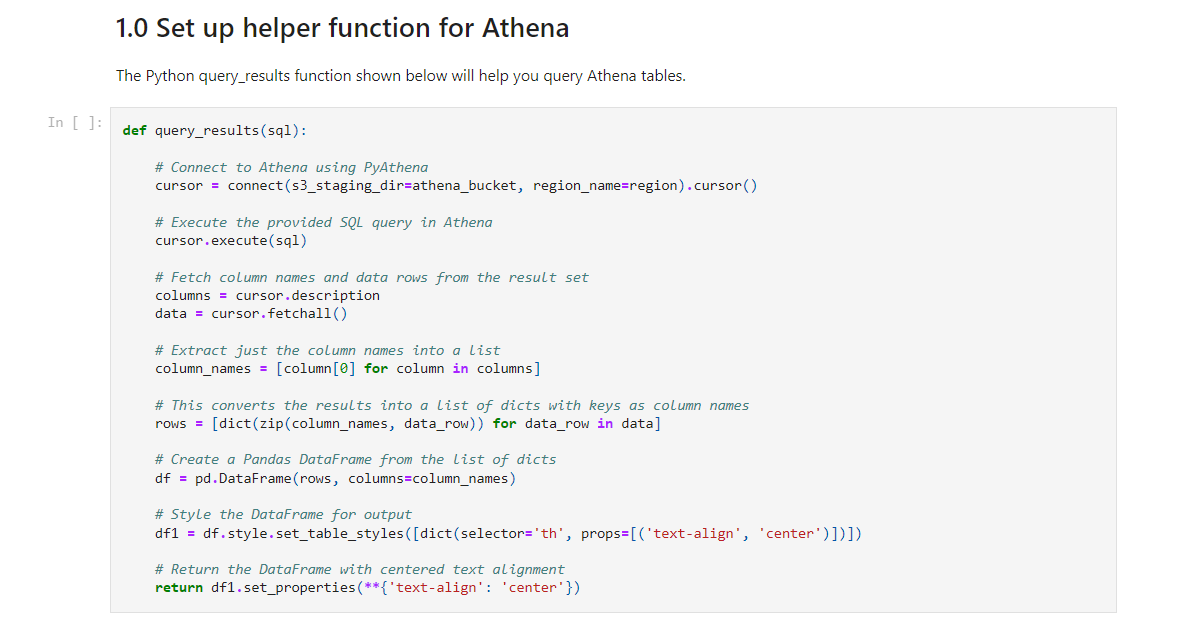
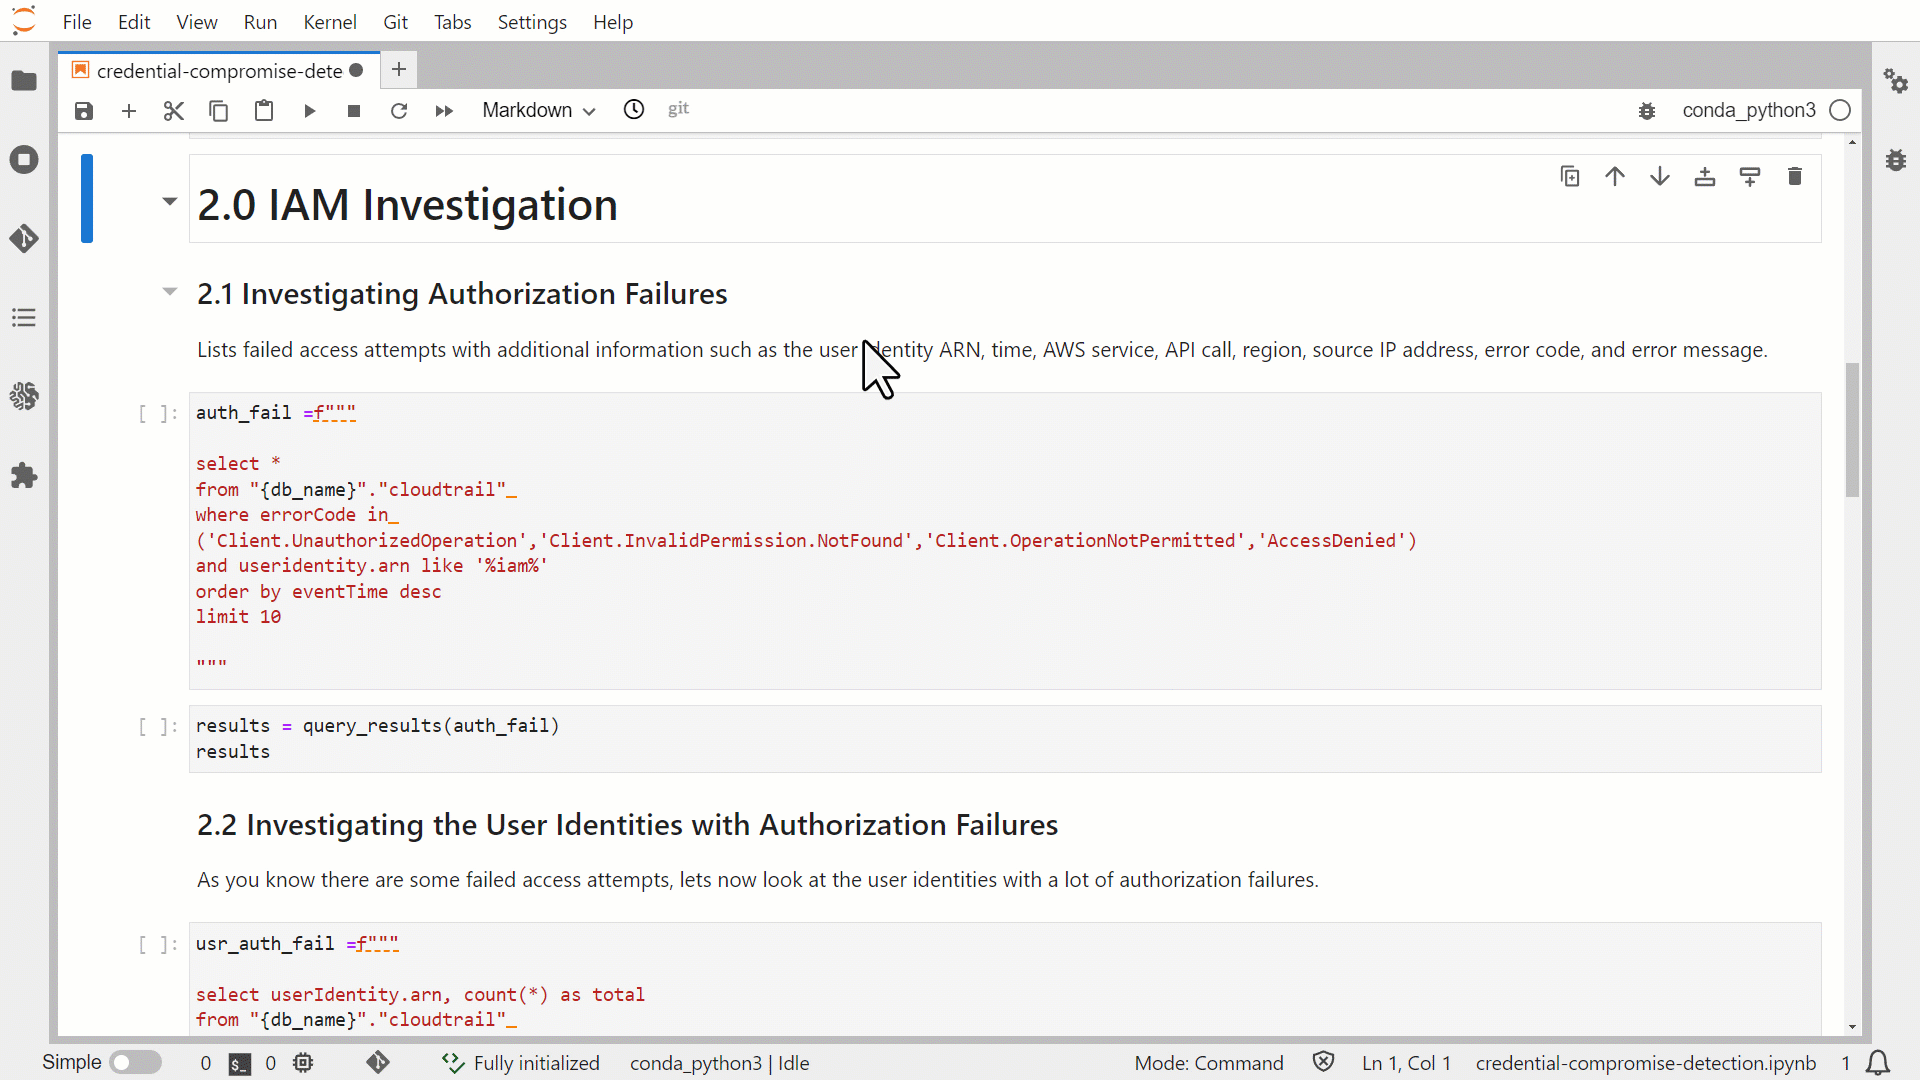
Tag Archives: SageMaker

Generate AI powered insights for Amazon Security Lake using Amazon SageMaker Studio and Amazon Bedrock

Post Syndicated from Jonathan Nguyen original https://aws.amazon.com/blogs/security/generate-ai-powered-insights-for-amazon-security-lake-using-amazon-sagemaker-studio-and-amazon-bedrock/

In part 1, we discussed how to use Amazon SageMaker Studio to analyze time-series data in Amazon Security Lake to identify critical areas and prioritize efforts to help increase your security posture. Security Lake provides additional visibility into your environment by consolidating and normalizing security data from both AWS and non-AWS sources. Security teams can use Amazon Athena to query data in Security Lake to aid in a security event investigation or proactive threat analysis. Reducing the security team’s mean time to respond to or detect a security event can decrease your organization’s security vulnerabilities and risks, minimize data breaches, and reduce operational disruptions. Even if your security team is already familiar with AWS security logs and is using SQL queries to sift through data, determining appropriate log sources to review and crafting customized SQL queries can add time to an investigation. Furthermore, when security analysts conduct their analysis using SQL queries, the results are point-in-time and don’t automatically factor results from previous queries.

In this blog post, we show you how to extend the capabilities of SageMaker Studio by using Amazon Bedrock, a fully-managed generative artificial intelligence (AI) service natively offering high-performing foundation models (FMs) from leading AI companies with a single API. By using Amazon Bedrock, security analysts can accelerate security investigations by using a natural language companion to automatically generate SQL queries, focus on relevant data sources within Security Lake, and use previous SQL query results to enhance the results from future queries. We walk through a threat analysis exercise to show how your security analysts can use natural language processing to answer questions such as which AWS account has the most AWS Security Hub findings, irregular network activity from AWS resources, or which AWS Identity and Access Management (IAM) principals invoked highly suspicious activity. By identifying possible vulnerabilities or misconfigurations, you can minimize mean time to detect and pinpoint specific resources to assess overall impact. We also discuss methods to customize Amazon Bedrock integration with data from your Security Lake. While large language models (LLMs) are useful conversational partners, it’s important to note that LLM responses can include hallucinations, which might not reflect truth or reality. We discuss some mechanisms to validate LLM responses and mitigate hallucinations. This blog post is best suited for technologists who have an in-depth understanding of generative artificial intelligence concepts and the AWS services used in the example solution.

Solution overview

Figure 1 depicts the architecture of the sample solution.

Figure 1: Security Lake generative AI solution architecture

Figure 1: Security Lake generative AI solution architecture

Before you deploy the sample solution, complete the following prerequisites:

  1. Enable Security Lake in your organization in AWS Organizations and specify a delegated administrator account to manage the Security Lake configuration for all member accounts in your organization. Configure Security Lake with the appropriate log sources: Amazon Virtual Private Cloud (VPC) Flow Logs, AWS Security Hub, AWS CloudTrail, and Amazon Route53.
  2. Create subscriber query access from the source Security Lake AWS account to the subscriber AWS account.
  3. Accept a resource share request in the subscriber AWS account in AWS Resource Access Manager (AWS RAM).
  4. Create a database link in AWS Lake Formation in the subscriber AWS account and grant access for the Athena tables in the Security Lake AWS account.
  5. Grant Claude v2 model access for Amazon Bedrock LLM Claude v2 in the AWS subscriber account where you will deploy the solution. If you try to use a model before you enable it in your AWS account, you will get an error message.

After you set up the prerequisites, the sample solution architecture provisions the following resources:

  1. A VPC is provisioned for SageMaker with an internet gateway, a NAT gateway, and VPC endpoints for all AWS services within the solution. An internet gateway or NAT gateway is required to install external open-source packages.
  2. A SageMaker Studio domain is created in VPCOnly mode with a single SageMaker user-profile that’s tied to an IAM role. As part of the SageMaker deployment, an Amazon Elastic File System (Amazon EFS) is provisioned for the SageMaker domain.
  3. A dedicated IAM role is created to restrict access to create or access the SageMaker domain’s presigned URL from a specific Classless Inter-Domain Routing (CIDR) for accessing the SageMaker notebook.
  4. An AWS CodeCommit repository containing Python notebooks used for the artificial intelligence and machine learning (AI/ML) workflow by the SageMaker user profile.
  5. An Athena workgroup is created for Security Lake queries with a S3 bucket for output location (access logging is configured for the output bucket).

Cost

Before deploying the sample solution and walking through this post, it’s important to understand the cost factors for the main AWS services being used. The cost will largely depend on the amount of data you interact with in Security Lake and the duration of running resources in SageMaker Studio.

  1. A SageMaker Studio domain is deployed and configured with default setting of a ml.t3.medium instance type. For a more detailed breakdown, see SageMaker Studio pricing. It’s important to shut down applications when they’re not in use because you’re billed for the number of hours an application is running. See the AWS samples repository for an automated shutdown extension.
  2. Amazon Bedrock on-demand pricing is based on the selected LLM and the number of input and output tokens. A token is comprised of a few characters and refers to the basic unit of text that a model learns to understand the user input and prompts. For a more detailed breakdown, see Amazon Bedrock pricing.
  3. The SQL queries generated by Amazon Bedrock are invoked using Athena. Athena cost is based on the amount of data scanned within Security Lake for that query. For a more detailed breakdown, see Athena pricing.

Deploy the sample solution

You can deploy the sample solution by using either the AWS Management Console or the AWS Cloud Development Kit (AWS CDK). For instructions and more information on using the AWS CDK, see Get Started with AWS CDK.

Option 1: Deploy using AWS CloudFormation using the console

Use the console to sign in to your subscriber AWS account and then choose the Launch Stack button to open the AWS CloudFormation console that’s pre-loaded with the template for this solution. It takes approximately 10 minutes for the CloudFormation stack to complete.

Select the Launch Stack button to launch the template

Option 2: Deploy using AWS CDK

  1. Clone the Security Lake generative AI sample repository.
  2. Navigate to the project’s source folder (…/amazon-security-lake-generative-ai/source).
  3. Install project dependencies using the following commands:
    npm install -g aws-cdk-lib
    npm install
    

  4. On deployment, you must provide the following required parameters:
    • IAMroleassumptionforsagemakerpresignedurl – this is the existing IAM role you want to use to access the AWS console to create presigned URLs for SageMaker Studio domain.
    • securitylakeawsaccount – this is the AWS account ID where Security Lake is deployed.
  5. Run the following commands in your terminal while signed in to your subscriber AWS account. Replace <INSERT_AWS_ACCOUNT> with your account number and replace <INSERT_REGION> with the AWS Region that you want the solution deployed to.
    cdk bootstrap aws://<INSERT_AWS_ACCOUNT>/<INSERT_REGION>
    
    cdk deploy --parameters IAMroleassumptionforsagemakerpresignedurl=arn:aws:iam::<INSERT_AWS_ACCOUNT>:role/<INSERT_IAM_ROLE_NAME> --parameters securitylakeawsaccount=<INSERT_SECURITY_LAKE_AWS_ACCOUNT_ID>
    

Post-deployment configuration steps

Now that you’ve deployed the solution, you must add permissions to allow SageMaker and Amazon Bedrock to interact with your Security Lake data.

Grant permission to the Security Lake database

  1. Copy the SageMaker user profile Amazon Resource Name (ARN)
    arn:aws:iam::<account-id>:role/sagemaker-user-profile-for-security-lake
    

  2. Go to the Lake Formation console.
  3. Select the amazon_security_lake_glue_db_<YOUR-REGION> database. For example, if your Security Lake is in us-east-1, the value would be amazon_security_lake_glue_db_us_east_1
  4. For Actions, select Grant.
  5. In Grant Data Permissions, select SAML Users and Groups.
  6. Paste the SageMaker user profile ARN from Step 1.
  7. In Database Permissions, select Describe, and then Grant.

Grant permission to Security Lake tables

You must repeat these steps for each source configured within Security Lake. For example, if you have four sources configured within Security Lake, you must grant permissions for the SageMaker user profile to four tables. If you have multiple sources that are in separate Regions and you don’t have a rollup Region configured in Security Lake, you must repeat the steps for each source in each Region.

The following example grants permissions to the Security Hub table within Security Lake. For more information about granting table permissions, see the AWS LakeFormation user-guide.

  1. Copy the SageMaker user-profile ARN arn:aws:iam:<account-id>:role/sagemaker-user-profile-for-security-lake.
  2. Go to the Lake Formation console.
  3. Select the amazon_security_lake_glue_db_<YOUR-REGION> database.
    For example, if your Security Lake database is in us-east-1 the value would be amazon_security_lake_glue_db_us_east_1
  4. Choose View Tables.
  5. Select the amazon_security_lake_table_<YOUR-REGION>_sh_findings_1_0 table.
    For example, if your Security Lake table is in us-east-1 the value would be amazon_security_lake_table_us_east_1_sh_findings_1_0

    Note: Each table must be granted access individually. Selecting All Tables won’t grant the access needed to query Security Lake.

  6. For Actions, select Grant.
  7. In Grant Data Permissions, select SAML Users and Groups.
  8. Paste the SageMaker user profile ARN from Step 1.
  9. In Table Permissions, select Describe, and then Grant.

Launch your SageMaker Studio application

Now that you’ve granted permissions for a SageMaker user profile, you can move on to launching the SageMaker application associated to that user profile.

  1. Navigate to the SageMaker Studio domain in the console.
  2. Select the SageMaker domain security-lake-gen-ai-<subscriber-account-id>.
  3. Select the SageMaker user profile sagemaker-user-profile-for-security-lake.
  4. For Launch, select Studio.
Figure 2: SageMaker Studio domain view

Figure 2: SageMaker Studio domain view

Clone the Python notebook

As part of the solution deployment, we’ve created a foundational Python notebook in CodeCommit to use within your SageMaker app.

  1. Navigate to CloudFormation in the console.
  2. In the Stacks section, select the SageMakerDomainStack.
  3. Select the Outputs tab.
  4. Copy the value for the SageMaker notebook generative AI repository URL. (For example: https://git-codecommit.us-east-1.amazonaws.com/v1/repos/sagemaker_gen_ai_repo)
  5. Go back to your SageMaker app.
  6. In SageMaker Studio, in the left sidebar, choose the Git icon (a diamond with two branches), then choose Clone a Repository.
    Figure 3: SageMaker Studio clone repository option

    Figure 3: SageMaker Studio clone repository option

  7. Paste the CodeCommit repository link from Step 4 under the Git repository URL (git). After you paste the URL, select Clone “https://git-codecommit.us-east-1.amazonaws.com/v1/repos/sagemaker_gen_ai_repo”, then select Clone.

Note: If you don’t select from the auto-populated list, SageMaker won’t be able to clone the repository and will return a message that the URL is invalid.

Figure 4: SageMaker Studio clone HTTPS repository URL

Figure 4: SageMaker Studio clone HTTPS repository URL

Configure your notebook to use generative AI

In the next section, we walk through how we configured the notebook and why we used specific LLMs, agents, tools, and additional configurations so you can extend and customize this solution to your use case.

The notebook we created uses the LangChain framework. LangChain is a framework for developing applications powered by language models and processes natural language inputs from the user, generates SQL queries, and runs those queries on your Security Lake data. For our use case, we’re using LangChain with Anthropic’s Claude 2 model on Amazon Bedrock.

Set up the notebook environment

  1. After you’re in the generative_ai_security_lake.ipynb notebook, you can set up your notebook environment. Keep the default settings and choose Select.
    Figure 5: SageMaker Studio notebook start-up configuration

    Figure 5: SageMaker Studio notebook start-up configuration

  2. Run the first cell to install the requirements listed in the requirements.txt file.

Connect to the Security Lake database using SQLAlchemy

The example solution uses a pre-populated Security Lake database with metadata in the AWS Glue Data Catalog. The inferred schema enables the LLM to generate SQL queries in response to the questions being asked.

LangChain uses SQLAlchemy, which is a Python SQL toolkit and object relational mapper, to access databases. To connect to a database, first import SQLAlchemy and create an engine object by specifying the following:

  • SCHEMA_NAME
  • S3_STAGING_DIR
  • AWS_REGION
  • ATHENA REST API details

You can use the following configuration code to establish database connections and start querying.

import os
ACCOUNT_ID = os.environ["AWS_ACCOUNT_ID"]
REGION_NAME = os.environ.get('REGION_NAME', 'us-east-1')
REGION_FMT = REGION_NAME.replace("-","_")

from langchain import SQLDatabase
from sqlalchemy import create_engine

#Amazon Security Lake Database
SCHEMA_NAME = f"amazon_security_lake_glue_db_{REGION_FMT}"

#S3 Staging location for Athena query output results and this will be created by deploying the Cloud Formation stack
S3_STAGING_DIR = f's3://athena-gen-ai-bucket-results-{ACCOUNT_ID}/output/'

engine_athena = create_engine(
    "awsathena+rest://@athena.{}.amazonaws.com:443/{}?s3_staging_dir={}".
    format(REGION_NAME, SCHEMA_NAME, S3_STAGING_DIR)
)

athena_db = SQLDatabase(engine_athena)
db = athena_db

Initialize the LLM and Amazon Bedrock endpoint URL

Amazon Bedrock provides a list of Region-specific endpoints for making inference requests for models hosted in Amazon Bedrock. In this post, we’ve defined the model ID as Claude v2 and the Amazon Bedrock endpoint as us-east-1. You can change this to other LLMs and endpoints as needed for your use case.

Obtain a model ID from the AWS console

  1. Go to the Amazon Bedrock console.
  2. In the navigation pane, under Foundation models, select Providers.
  3. Select the Anthropic tab from the top menu and then select Claude v2.
  4. In the model API request note the model ID value in the JSON payload.

Note: Alternatively, you can use the AWS Command Line Interface (AWS CLI) to run the list-foundation-models command in a SageMaker notebook cell or a CLI terminal to the get the model ID. For AWS SDK, you can use the ListFoundationModels operation to retrieve information about base models for a specific provider.

Figure 6: Amazon Bedrock Claude v2 model ID

Figure 6: Amazon Bedrock Claude v2 model ID

Set the model parameters

After the LLM and Amazon Bedrock endpoints are configured, you can use the model_kwargs dictionary to set model parameters. Depending on your use case, you might use different parameters or values. In this example, the following values are already configured in the notebook and passed to the model.

  1. temperature: Set to 0. Temperature controls the degree of randomness in responses from the LLM. By adjusting the temperature, users can control the balance between having predictable, consistent responses (value closer to 0) compared to more creative, novel responses (value closer to 1).

    Note: Instead of using the temperature parameter, you can set top_p, which defines a cutoff based on the sum of probabilities of the potential choices. If you set Top P below 1.0, the model considers the most probable options and ignores less probable ones. According to Anthropic’s user guide, “you should either alter temperature or top_p, but not both.”

  2. top_k: Set to 0. While temperature controls the probability distribution of potential tokens, top_k limits the sample size for each subsequent token. For example, if top_k=50, the model selects from the 50 most probable tokens that could be next in a sequence. When you lower the top_k value, you remove the long tail of low probability tokens to select from in a sequence.
  3. max_tokens_to_sample: Set to 4096. For Anthropic models, the default is 256 and the max is 4096. This value denotes the absolute maximum number of tokens to predict before the generation stops. Anthropic models can stop before reaching this maximum.
Figure 7: Notebook configuration for Amazon Bedrock

Figure 7: Notebook configuration for Amazon Bedrock

Create and configure the LangChain agent

An agent uses a LLM and tools to reason and determine what actions to take and in which order. For this use case, we used a Conversational ReAct agent to remember conversational history and results to be used in a ReAct loop (Question → Thought → Action → Action Input → Observation ↔ repeat → Answer). This way, you don’t have to remember how to incorporate previous results in the subsequent question or query. Depending on your use case, you can configure a different type of agent.

Create a list of tools

Tools are functions used by an agent to interact with the available dataset. The agent’s tools are used by an action agent. We import both SQL and Python REPL tools:

  1. List the available log source tables in the Security Lake database
  2. Extract the schema and sample rows from the log source tables
  3. Create SQL queries to invoke in Athena
  4. Validate and rewrite the queries in case of syntax errors
  5. Invoke the query to get results from the appropriate log source tables
Figure 8: Notebook LangChain agent tools

Figure 8: Notebook LangChain agent tools

Here’s a breakdown for the tools used and the respective prompts:

  • QuerySQLDataBaseTool: This tool accepts detailed and correct SQL queries as input and returns results from the database. If the query is incorrect, you receive an error message. If there’s an error, rewrite and recheck the query, and try again. If you encounter an error such as Unknown column xxxx in field list, use the sql_db_schema to verify the correct table fields.
  • InfoSQLDatabaseTool: This tool accepts a comma-separated list of tables as input and returns the schema and sample rows for those tables. Verify that the tables exist by invoking the sql_db_list_tables first. The input format is: table1, table2, table3
  • ListSQLDatabaseTool: The input is an empty string, the output is a comma separated list of tables in the database
  • QuerySQLCheckerTool: Use this tool to check if your query is correct before running it. Always use this tool before running a query with sql_db_query
  • PythonREPLTool: A Python shell. Use this to run python commands. The input should be a valid python command. If you want to see the output of a value, you should print it out with print(…).

Note: If a native tool doesn’t meet your needs, you can create custom tools. Throughout our testing, we found some of the native tools provided most of what we needed but required minor tweaks for our use case. We changed the default behavior for the tools for use with Security Lake data.

Create an output parser

Output parsers are used to instruct the LLM to respond in the desired output format. Although the output parser is optional, it makes sure the LLM response is formatted in a way that can be quickly consumed and is actionable by the user.

Figure 9: LangChain output parser setting

Figure 9: LangChain output parser setting

Adding conversation buffer memory

To make things simpler for the user, previous results should be stored for use in subsequent queries by the Conversational ReAct agent. ConversationBufferMemory provides the capability to maintain state from past conversations and enables the user to ask follow-up questions in the same chat context. For example, if you asked an agent for a list of AWS accounts to focus on, you want your subsequent questions to focus on that same list of AWS accounts instead of writing the values down somewhere and keeping track of it in the next set of questions. There are many other types of memory that can be used to optimize your use cases.

Figure 10: LangChain conversation buffer memory setting

Figure 10: LangChain conversation buffer memory setting

Initialize the agent

At this point, all the appropriate configurations are set and it’s time to load an agent executor by providing a set of tools and a LLM.

  1. tools: List of tools the agent will have access to.
  2. llm: LLM the agent will use.
  3. agent: Agent type to use. If there is no value provided and agent_path is set, the agent used will default to AgentType.ZERO_SHOT_REACT_DESCRIPTION.
  4. agent_kwargs: Additional keyword arguments to pass to the agent.
Figure 11: LangChain agent initialization

Figure 11: LangChain agent initialization

Note: For this post, we set verbose=True to view the agent’s intermediate ReAct steps, while answering questions. If you’re only interested in the output, set verbose=False.

You can also set return_direct=True to have the tool output returned to the user and closing the agent loop. Since we want to maintain the results of the query and used by the LLM, we left the default value of return_direct=False.

Provide instructions to the agent on using the tools

In addition to providing the agent with a list of tools, you would also give instructions to the agent on how and when to use these tools for your use case. This is optional but provides the agent with more context and can lead to better results.

Figure 12: LangChain agent instructions

Figure 12: LangChain agent instructions

Start your threat analysis journey with the generative AI-powered agent

Now that you’ve walked through the same set up process we used to create and initialize the agent, we can demonstrate how to analyze Security Lake data using natural language input questions that a security researcher might ask. The following examples focus on how you can use the solution to identify security vulnerabilities, risks, and threats and prioritize mitigating them. For this post, we’re using native AWS sources, but the agent can analyze any custom log sources configured in Security Lake. You can also use this solution to assist with investigations of possible security events in your environment.

For each of the questions that follow, you would enter the question in the free-form cell after it has run, similar to Figure 13.

Note: Because the field is free form, you can change the questions. Depending on the changes, you might see different results than are shown in this post. To end the conversation, enter exit and press the Enter key.

Figure 13: LangChain agent conversation input

Figure 13: LangChain agent conversation input

Question 1: What data sources are available in Security Lake?

In addition to the native AWS sources that Security Lake automatically ingests, your security team can incorporate additional custom log sources. It’s important to know what data is available to you to determine what and where to investigate. As shown in Figure 14, the Security Lake database contains the following log sources as tables:

If there are additional custom sources configured, they will also show up here. From here, you can focus on a smaller subset of AWS accounts that might have a larger number of security-related findings.

Figure 14: LangChain agent output for Security Lake tables

Figure 14: LangChain agent output for Security Lake tables

Question 2: What are the top five AWS accounts that have the most Security Hub findings?

Security Hub is a cloud security posture management service that not only aggregates findings from other AWS security services—such as Amazon GuardDuty, Amazon Macie, AWS Firewall Manager, and Amazon Inspector—but also from a number of AWS partner security solutions. Additionally, Security Hub has its own security best practices checks to help identify any vulnerabilities within your AWS environment. Depending on your environment, this might be a good starting place to look for specific AWS accounts to focus on.

Figure 15: LangChain output for AWS accounts with Security Hub findings

Figure 15: LangChain output for AWS accounts with Security Hub findings

Question 3: Within those AWS accounts, were any of the following actions found in (CreateUser, AttachUserPolicy, CreateAccessKey, CreateLoginProfile, DeleteTrail, DeleteMembers, UpdateIPSet, AuthorizeSecurityGroupIngress) in CloudTrail?

With the list of AWS accounts to look at narrowed down, you might be interested in mutable changes in your AWS account that you would deem suspicious. It’s important to note that every AWS environment is different, and some actions might be suspicious for one environment but normal in another. You can tailor this list to actions that shouldn’t happen in your environment. For example, if your organization normally doesn’t use IAM users, you can change the list to look at a list of actions for IAM, such as CreateAccessKey, CreateLoginProfile, CreateUser, UpdateAccessKey, UpdateLoginProfile, and UpdateUser.

By looking at the actions related to AWS CloudTrail (CreateUser, AttachUserPolicy, CreateAccessKey, CreateLoginProfile, DeleteTrail, DeleteMembers, UpdateIPSet, AuthorizeSecurityGroupIngress), you can see which actions were taken in your environment and choose which to focus on. Because the agent has access to previous chat history and results, you can ask follow-up questions on the SQL results without having to specify the AWS account IDs or event names.

Figure 16: LangChain agent output for CloudTrail actions taken in AWS Organization

Figure 16: LangChain agent output for CloudTrail actions taken in AWS Organization

Question 4: Which IAM principals took those actions?

The previous question narrowed down the list to mutable actions that shouldn’t occur. The next logical step is to determine which IAM principals took those actions. This helps correlate an actor to the actions that are either unexpected or are reserved for only authorized principals. For example, if you have an IAM principal tied to a continuous integration and delivery (CI/CD) pipeline, that could be less suspicious. Alternatively, if you see an IAM principal that you don’t recognize, you could focus on all actions taken by that IAM principal, including how it was provisioned in the first place.

Figure 17: LangChain agent output for CloudTrail IAM principals that invoked events from the previous query

Figure 17: LangChain agent output for CloudTrail IAM principals that invoked events from the previous query

Question 5: Within those AWS accounts, were there any connections made to “3.0.0.0/8”?

If you don’t find anything useful related to mutable changes to CloudTrail, you can pivot to see if there were any network connections established from a specific Classless Inter-Domain Routing (CIDR) range. For example, if an organization primarily interacts with AWS resources within your AWS Organizations from your corporate-owned CIDR range, anything outside of that might be suspicious. Additionally, if you have threat lists or suspicious IP ranges, you can add them to the query to see if there are any network connections established from those ranges. The agent knows that the query is network related and to look in VPC flow logs and is focusing on only the AWS accounts from Question 2.

Figure 18: LangChain agent output for VPC flow log matches to specific CIDR

Figure 18: LangChain agent output for VPC flow log matches to specific CIDR

Question 6: As a security analyst, what other evidence or logs should I look for to determine if there are any indicators of compromise in my AWS environment?

If you haven’t found what you’re looking for and want some inspiration from the agent, you can ask the agent what other areas you should look at within your AWS environment. This might help you create a threat analysis thesis or use case as a starting point. You can also refer to the MITRE ATT&CK Cloud Matrix for more areas to focus on when setting up questions for your agent.

Figure 19: LangChain agent output for additional scenarios and questions to investigate

Figure 19: LangChain agent output for additional scenarios and questions to investigate

Based on the answers given, you can start a new investigation to identify possible vulnerabilities and threats:

  • Is there any unusual API activity in my organization that could be an indicator of compromise?
  • Have there been any AWS console logins that don’t match normal geographic patterns?
  • Have there been any spikes in network traffic for my AWS resources?

Agent running custom SQL queries

If you want to use a previously generated or customized SQL query, the agent can run the query as shown in Figure 20 that follows. In the previous questions, a SQL query is generated in the agent’s Action Input field. You can use that SQL query as a baseline, edit the SQL query manually to fit your use case, and then run the modified query through the agent. The modified query results are stored in memory and can be used for subsequent natural language questions to the agent. Even if your security analysts already have SQL experience, having the agent give a recommendation or template SQL query can shorten your investigation.

Figure 20: LangChain agent output for invoking custom SQL queries

Figure 20: LangChain agent output for invoking custom SQL queries

Agent assistance to automatically generate visualizations

You can get help from the agent to create visualizations by using the PythonREPL tool to generate code and plot SQL query results. As shown in Figure 21, you can ask the agent to get results from a SQL query and generate code to create a visualization based on those results. You can then take the generated code and put it into the next cell to create the visualization.

Figure 21: LangChain agent output to generate code to visualize SQL results in a plot

Figure 21: LangChain agent output to generate code to visualize SQL results in a plot

The agent returns example code after To plot the results. You can copy the code between ‘‘‘python and ’’’ and input that code in the next cell. After you run that cell, a visual based on the SQL results is created similar to Figure 22 that follows. This can be helpful to share the notebook output as part of an investigation to either create a custom detection to monitor or determine how a vulnerability can be mitigated.

Figure 22: Notebook Python code output from code generated by LangChain agent

Figure 22: Notebook Python code output from code generated by LangChain agent

Tailoring your agent to your data

As previously discussed, use cases and data vary between organizations. It’s important to understand the foundational components in terms of how you can configure and tailor the LLM, agents, tools, and configuration to your environment. The notebook in the solution was the result of experiments to determine and display what’s possible. Along the way, you might encounter challenges or issues depending on changes you make in the notebook or by adding additional data sources. Below are some tips to help you create and tailor the notebook to your use case.

  • If the agent pauses in the intermediate steps or asks for guidance to answer the original question, you can guide the agent with prompt engineering techniques, using commands such as execute or continue to move the process along.
  • If the agent is hallucinating or providing data that isn’t accurate, see Anthropic’s user guide for mechanisms to reduce hallucinations. An example of a hallucination would be the response having generic information such as an AWS account that is 1234567890 or the resulting count of a query being repeated for multiple rows.

    Note: You can also use Retrieval Augmented Generation (RAG) in Amazon SageMaker to mitigate hallucinations.

SageMaker Studio and Amazon Bedrock provide native integration to use a variety of generative AI tools with your Security Lake data to help increase your organization’s security posture. Some other use cases you can try include:

  • Investigating impact and root cause for a suspected compromise of an Amazon Elastic Compute Cloud (Amazon EC2) instance from a GuardDuty finding.
  • Determining if network ACL or firewall changes in your environment affected the number of AWS resources communicating with public endpoints.
  • Checking if any S3 buckets with possibly confidential or sensitive data were accessed by non-authorized IAM principals.
  • Identify if an EC2 instance that might be compromised made any internal or external connections to other AWS resources and then if those resources were impacted.

Conclusion

This solution demonstrates how you can use the generative AI capabilities of Amazon Bedrock and natural language input in SageMaker Studio to analyze data in Security Lake and work towards reducing your organization’s risk and increase your security posture. The Python notebook is primarily meant to serve as a starting point to walk through an example scenario to identify potential vulnerabilities and threats.

Security Lake is continually working on integrating native AWS sources, but there are also custom data sources outside of AWS that you might want to import for your agent to analyze. We also showed you how we configured the notebook to use agents and LLMs, and how you can tune each component within a notebook to your specific use case.

By enabling your security team to analyze and interact with data in Security Lake using natural language input, you can reduce the amount of time needed to conduct an investigation by automatically identifying the appropriate data sources, generating and invoking SQL queries, and visualizing data from your investigation. This post focuses on Security Lake, which normalizes data into Open Cybersecurity Schema Framework (OCSF), but as long as the database data schema is normalized, the solution can be applied to other data stores.

If you have feedback about this post, submit comments in the Comments section below. If you have questions about this post, start a new thread on the Generative AI on AWS re:Post or contact AWS Support.

Author

Jonathan Nguyen

Jonathan is a Principal Security Architect at AWS. His background is in AWS security with a focus on threat detection and incident response. He helps enterprise customers develop a comprehensive AWS security strategy and deploy security solutions at scale, and trains customers on AWS security best practices.

Madhunika-Reddy-Mikkili

Madhunika Reddy Mikkili

Madhunika is a Data and Machine Learning Engineer with the AWS Professional Services Shared Delivery Team. She is passionate about helping customers achieve their goals through the use of data and machine learning insights. Outside of work, she loves traveling and spending time with family and friends.

Harsh Asnani

Harsh Asnani

Harsh is a Machine Learning Engineer at AWS. His Background is in applied Data Science with a focus on operationalizing Machine Learning workloads in the cloud at scale.

Kartik Kannapur

Kartik Kannapur

Kartik is a Senior Data Scientist with AWS Professional Services. His background is in Applied Mathematics and Statistics. He works with enterprise customers, helping them use machine learning to solve their business problems.

How to improve your security incident response processes with Jupyter notebooks

Post Syndicated from Tim Manik original https://aws.amazon.com/blogs/security/how-to-improve-your-security-incident-response-processes-with-jupyter-notebooks/

Customers face a number of challenges to quickly and effectively respond to a security event. To start, it can be difficult to standardize how to respond to a partic­ular security event, such as an Amazon GuardDuty finding. Additionally, silos can form with reliance on one security analyst who is designated to perform certain tasks, such as investigate all GuardDuty findings. Jupyter notebooks can help you address these challenges by simplifying both standardization and collaboration.

Jupyter Notebook is an open-source, web-based application to run and document code. Although Jupyter notebooks are most frequently used for data science and machine learning, you can also use them to more efficiently and effectively investigate and respond to security events.

In this blog post, we will show you how to use Jupyter Notebook to investigate a security event. With this solution, you can automate the tasks of gathering data, presenting the data, and providing procedures and next steps for the findings.

Benefits of using Jupyter notebooks for security incident response

The following are some ways that you can use Jupyter notebooks for security incident response:

  • Develop readable code for analysts – Within a notebook, you can combine markdown text and code cells to improve readability. Analysts can read context around the code cell, run the code cell, and analyze the results within the notebook.
  • Standardize analysis and response – You can reuse notebooks after the initial creation. This makes it simpler for you to standardize your incident response processes for how to respond to a certain type of security event. Additionally, you can use notebooks to achieve repeatable responses. You can rerun an entire notebook or a specific cell.
  • Collaborate and share incident response knowledge – After you create a Jupyter notebook, you can share it with peers to more seamlessly collaborate and share knowledge, which helps reduce silos and reliance on certain analysts.
  • Iterate on your incident response playbooks – Developing a security incident response program involves continuous iteration. With Jupyter notebooks, you can start small and iterate on what you have developed. You can keep Jupyter notebooks under source code control by using services such as AWS CodeCommit. This allows you to approve and track changes to your notebooks.

Architecture overview

Figure 1: Architecture for incident response analysis

Figure 1: Architecture for incident response analysis

The architecture shown in Figure 1 consists of the foundational services required to analyze and contain security incidents on AWS. You create and access the playbooks through the Jupyter console that is hosted on Amazon SageMaker. Within the playbooks, you run several Amazon Athena queries against AWS CloudTrail logs hosted in Amazon Simple Storage Service (Amazon S3).

Solution implementation

To deploy the solution, you will complete the following steps:

  1. Deploy a SageMaker notebook instance
  2. Create an Athena table for your CloudTrail trail
  3. Grant AWS Lake Formation access
  4. Access the Credential Compromise playbooks by using JupyterLab

Step 1: Deploy a SageMaker notebook instance

You will host your Jupyter notebooks on a SageMaker notebook instance. We chose to use SageMaker instead of running the notebooks locally because SageMaker provides flexible compute, seamless integration with CodeCommit and GitHub, temporary credentials through AWS Identity and Access Management (IAM) roles, and lower latency for Athena queries.

You can deploy the SageMaker notebook instance by using the AWS CloudFormation template from our jupyter-notebook-for-incident-response GitHub repository. We recommend that you deploy SageMaker in your security tooling account or an equivalent.

The CloudFormation template deploys the following resources:

  • A SageMaker notebook instance to run the analysis notebooks. Because this is a proof of concept (POC), the deployed SageMaker instance is the smallest instance type available. However, within an enterprise environment, you will likely need a larger instance type.
  • An AWS Key Management Service (AWS KMS) key to encrypt the SageMaker notebook instance and protect sensitive data.
  • An IAM role that grants the SageMaker notebook permissions to query CloudTrail, VPC Flow Logs, and other log sources.
  • An IAM role that allows access to the pre-signed URL of the SageMaker notebook from only an allowlisted IP range.
  • A VPC configured for SageMaker with an internet gateway, NAT gateway, and VPC endpoints to access required AWS services securely. The internet gateway and NAT gateway provide internet access to install external packages.
  • An S3 bucket to store results for your Athena log queries—you will reference the S3 bucket in the next step.

Step 2: Create an Athena table for your CloudTrail trail

The solution uses Athena to query CloudTrail logs, so you need to create an Athena table for CloudTrail.

There are two main ways to create an Athena table for CloudTrail:

For either of these methods to create an Athena table, you need to provide the URI of an S3 bucket. For this blog post, use the URI of the S3 bucket that the CloudFormation template created in Step 1. To find the URI of the S3 bucket, see the Output section of the CloudFormation stack.

Step 3: Grant AWS Lake Formation access

If you don’t use AWS Lake Formation in your AWS environment, skip to Step 4. Otherwise, continue with the following instructions. Lake Formation is how data access control for your Athena tables is managed.

To grant permission to the Security Log database

  1. Open the Lake Formation console.
  2. Select the database that you created in Step 2 for your security logs. If you used the Security Analytics Bootstrap, then the table name is either security_analysis or a custom name that you provided—you can find the name in the CloudFormation stack. If you created the Athena table by using the CloudTrail console, then the database is named default.
  3. From the Actions dropdown, select Grant.
  4. In Grant data permissions, select IAM users and roles.
  5. Find the IAM role used by the SageMaker Notebook instance.
  6. In Database permissions, select Describe and then Grant.

To grant permission to the Security Log CloudTrail table

  1. Open the Lake Formation console.
  2. Select the database that you created in Step 2.
  3. Choose View Tables.
  4. Select CloudTrail. If you created VPC flow log and DNS log tables, select those, too.
  5. From the Actions dropdown, select Grant.
  6. In Grant data permissions, select IAM users and roles.
  7. Find the IAM role used by the SageMaker notebook instance.
  8. In Table permissions, select Describe and then Grant.

Step 4: Access the Credential Compromise playbooks by using JupyterLab

The CloudFormation template clones the jupyter-notebook-for-incident-response GitHub repo into your Jupyter workspace.

You can access JupyterLab hosted on your SageMaker notebook instance by following the steps in the Access Notebook Instances documentation.

Your folder structure should match that shown in Figure 2. The parent folder should be jupyter-notebook-for-incident-response, and the child folders should be playbooks and cfn-templates.

Figure 2: Folder structure after GitHub repo is cloned to the environment

Figure 2: Folder structure after GitHub repo is cloned to the environment

Sample investigation of a spike in failed login attempts

In the following sections, you will use the Jupyter notebook that we created to investigate a scenario where failed login attempts have spiked. We designed this notebook to guide you through the process of gathering more information about the spike.

We discuss the important components of these notebooks so that you can use the framework to create your own playbooks. We encourage you to build on top of the playbook, and add additional queries and steps in the playbook to customize it for your organization’s specific business and security goals.

For this blog post, we will focus primarily on the analysis phase of incident response and walk you through how you can use Jupyter notebooks to help with this phase.

Before you get started with the following steps, open the credential-compromise-analysis.ipynb notebook in your JupyterLab environment.

How to import Python libraries and set environment variables

The notebooks require that you have the following Python libraries:

  • Boto3 – to interact with AWS services through API calls
  • Pandas – to visualize the data
  • PyAthena – to simplify the code to connect to Athena

To install the required Python libraries, in the Setup section of the notebook, under Load libraries, edit the variables in the two code cells as follows:

  • region – specify the AWS Region that you want your AWS API commands to run in (for example, us-east-1).
  • athena_bucket – specify the S3 bucket URI that is configured to store your Athena queries. You can find this information at Athena > Query Editor > Settings > Query result location.
  • db_name – specify the database used by Athena that contains your Athena table for CloudTrail.
Figure 3: Load the Python libraries in the notebook

Figure 3: Load the Python libraries in the notebook

This helps ensure that subsequent code cells that run are configured to run in your environment.

Run each code cell by choosing the cell and pressing SHIFT+ENTER or by choosing the play button (▶) in the toolbar at the top of the console.

How to set up the helper function for Athena

The Python query_results function, shown in the following figure, helps you query Athena tables. Run this code cell. You will use the query_results function later in the 2.0 IAM Investigation section of the notebook.

Figure 4: Code cell for the helper function to query with Athena

Figure 4: Code cell for the helper function to query with Athena

Credential Compromise Analysis Notebook

The credential-compromise-analysis.ipynb notebook includes several prebuilt queries to help you start your investigation of a potentially compromised credential. In this post, we discuss three of these queries:

  • The first query provides a broad view by retrieving the CloudTrail events related to authorization failures. By reviewing these results, you get baseline information about where users and roles are attempting to access resources or take actions without having the proper permissions.
  • The second query narrows the focus by identifying the top five IAM entities (such as users, roles, and identities) that are causing most of the authorization failures. Frequent failures from specific entities often indicate that their credentials are compromised.
  • The third query zooms in on one of the suspicious entities from the previous query. It retrieves API activity and events initiated by that entity across AWS services or resource. Analyzing actions performed by a suspicious entity can reveal if valid permissions are being misused or if the entity is systematically trying to access resources it doesn’t have access to.

Investigate authorization failures

The notebook has markdown cells that provide a description of the expected result of the query. The next cell contains the query statement. The final cell calls the query_result function to run your query by using Athena and display your results in tabular format.

In query 2.1, you query for specific error codes such as AccessDenied, and filter for anything that is an IAM entity by looking for useridentity.arn like ‘%iam%’. The notebook orders the entries by eventTime. If you want to look for specific IAM Identity Center entities, update the query to filter by useridentity.sessioncontext.sessionissuer.arn like ‘%sso.amazonaws.com%’.

This query retrieves a list of failed API calls to AWS services. From this list, you can gain additional insight into the context surrounding the spike in failed login attempts.

When you investigate denied API access requests, carefully examine details such as the user identity, timestamp, source IP address, and other metadata. This information helps you determine if the event is a legitimate threat or a false positive. Here are some specific questions to ask:

  • Does the IP address originate from within your network, or is it external? Internal addresses might be less concerning.
  • Is the access attempt occurring during normal working hours for that user? Requests outside of normal times might warrant more scrutiny.
  • What resources or changes is the user trying to access or make? Attempts to modify sensitive data or systems might indicate malicious intent.

By thoroughly evaluating the context around denied API calls, you can more accurately assess the risk they pose and whether you need to take further action. You can use the specifics in the logs to go beyond just the fact that access was denied, and learn the story of who, when, and why.

As shown in the following figure, the queries in the notebook use the following structure.

  1. Markdown cell to explain the purpose of the query (the query statement).
  2. Code cell to run the query and display the query results.

In the figure, the first code cell that runs stores the input for the query statement. After that finishes, the next code block displays the query results.

Figure 5: Run predefined Athena queries in JupyterLab

Figure 5: Run predefined Athena queries in JupyterLab

Figure 6 shows the output of the query that you ran in the 2.1 Investigation Authorization Failures section. It contains critical details for understanding the context around a denied API call:

  • The eventtime field shows the date and time that the request was completed.
  • The useridentity field reveals which IAM identity made a request.
  • The sourceipddress provides the IP address that the request was made from.
  • The useragent shows which client or app was used to make the call.
Figure 6: Results from the first investigative query

Figure 6: Results from the first investigative query

Figure 6 only shows a subset of the many details captured in CloudTrail logs. By scrolling to the right in the query output, you can view additional attributes that provide further context around the event. The CloudTrail record contents guide contains a comprehensive list of the fields included in the logs, along with descriptions of each attribute.

Often, you will need to search for more information to determine if remediation is necessary. For this reason, we have included additional queries to help you further examine the sequence of events leading up to the failed login attempt spike and after the spike occurred.

Triaging suspicious entities (Queries 2.2 and 2.3)

By running the second and third queries you can dig deeper into anomalous authorization failures. As shown in Figure 7, Query 2.2 provides the top five IAM entities with the most frequent access denials. This highlights the specific users, roles, and identities causing the most failures, which indicates potentially compromised credentials.

Query 2.3 takes the investigation further by isolating the activity from one suspicious entity. Retrieving the actions attempted by a single problematic user or role reveals useful context to determine if you need to revoke credentials. For example, is the entity probing resources that it shouldn’t have access to? Are there unusual API calls outside of normal hours? By scrutinizing an entity’s full history, you can make an informed decision on remediation.

Figure 7: Overview of queries 2.2 and 2.3

Figure 7: Overview of queries 2.2 and 2.3

You can use these two queries together to triage authorization failures: query 2 identifies high-risk entities, and query 3 gathers intelligence to drive your response. This progression from a macro view to a micro view is crucial for transforming signals into action.

Although log analysis relies on automation and queries to facilitate insights, human judgment is essential to interpret these signals and determine the appropriate response. You should discuss flagged events with stakeholders and resource owners to benefit from their domain expertise. You can export the results of your analysis by exporting your Jupyter notebook.

By collaborating with other people, you can gather contextual clues that might not be captured in the raw data. For example, an owner might confirm that a suspicious login time is expected for users in a certain time zone. By pairing automated detection with human perspectives, you can accurately assess risk and decide if credential revocation or other remediation is truly warranted. Uptime or downtime technical issues alone can’t dictate if remediation is necessary—the human element provides pivotal context.

Build your own queries

In addition to the existing queries, you can run your own queries and include them in your copy of the Credential-compromise-analysis.ipynb notebook. The AWS Security Analytics Bootstrap contains a library of common Athena queries for CloudTrail. We recommend that you review these queries before you start to build your own queries. The key takeaway is that these notebooks are highly customizable. You can use the Jupyter Notebook application to help meet the specific incident response requirements of your organization.

Contain compromised IAM entities

If the investigation reveals that a compromised IAM entity requires containment, follow these steps to revoke access:

  • For federated users, revoke their active AWS sessions according to the guidance in How to revoke federated users’ active AWS sessions. This uses IAM policies and AWS Organizations service control policies (SCPs) to revoke access to assumed roles.
  • Avoid using long-lived IAM credentials such as access keys. Instead, use temporary credentials through IAM roles. However, if you detect a compromised access key, immediately rotate or deactivate it by following the guidance in What to Do If You Inadvertently Expose an AWS Access Key. Review the permissions granted to the compromised IAM entity and consider if these permissions should be reduced after access is restored. Overly permissive policies might have enabled broader access for the threat actor.

Going forward, implement least privilege access and monitor authorization activity to detect suspicious behavior. By quickly containing compromised entities and proactively improving IAM hygiene, you can minimize the adversaries’ access duration and prevent further unauthorized access.

Additional considerations

In addition to querying CloudTrail, you can use Athena to query other logs, such as VPC Flow Logs and Amazon Route 53 DNS logs. You can also use Amazon Security Lake, which is generally available, to automatically centralize security data from AWS environments, SaaS providers, on-premises environments, and cloud sources into a purpose-built data lake stored in your account. To better understand which logs to collect and analyze as part of your incident response process, see Logging strategies for security incident response.

We recommended that you understand the playbook implementation described in this blog post before you expand the scope of your incident response solution. The running of queries and automation of containment are two elements to consider as you think about the next steps to evolve your incident response processes.

Conclusion

In this blog post, we showed how you can use Jupyter notebooks to simplify and standardize your incident response processes. You reviewed how to respond to a potential credential compromise incident using a Jupyter notebook style playbook. You also saw how this helps reduce the time to resolution and standardize the analysis and response. Finally, we presented several artifacts and recommendations showing how you can tailor this solution to meet your organization’s specific security needs. You can use this framework to evolve your incident response process.

Further resources

If you have feedback about this post, submit comments in the Comments section below. If you have questions about this post, start a new thread on AWS re:Post or contact AWS Support.

Want more AWS Security how-to content, news, and feature announcements? Follow us on Twitter.

Tim Manik

Tim Manik

Tim is a Solutions Architect at AWS working with enterprise customers in North America. He specializes in cybersecurity and AI/ML. When he’s not working, you can find Tim exploring new hiking trails, swimming, or playing the guitar.

Daria Pshonkina

Daria Pshonkina

Daria is a Solutions Architect at AWS supporting enterprise customers that started their business journey in the cloud. Her specialization is in security. Outside of work, she enjoys outdoor activities, travelling, and spending quality time with friends and family.

Bryant Pickford

Bryant Pickford

Bryant is a Security Specialist Solutions Architect within the Prototyping Security team under the Worldwide Specialist Organization. He has experience in incident response, threat detection, and perimeter security. In his free time, he likes to DJ, make music, and skydive.

Generate machine learning insights for Amazon Security Lake data using Amazon SageMaker

Post Syndicated from Jonathan Nguyen original https://aws.amazon.com/blogs/security/generate-machine-learning-insights-for-amazon-security-lake-data-using-amazon-sagemaker/

Amazon Security Lake automatically centralizes the collection of security-related logs and events from integrated AWS and third-party services. With the increasing amount of security data available, it can be challenging knowing what data to focus on and which tools to use. You can use native AWS services such as Amazon QuickSight, Amazon OpenSearch, and Amazon SageMaker Studio to visualize, analyze, and interactively identify different areas of interest to focus on, and prioritize efforts to increase your AWS security posture.

In this post, we go over how to generate machine learning insights for Security Lake using SageMaker Studio. SageMaker Studio is a web integrated development environment (IDE) for machine learning that provides tools for data scientists to prepare, build, train, and deploy machine learning models. With this solution, you can quickly deploy a base set of Python notebooks focusing on AWS Security Hub findings in Security Lake, which can also be expanded to incorporate other AWS sources or custom data sources in Security Lake. After you’ve run the notebooks, you can use the results to help you identify and focus on areas of interest related to security within your AWS environment. As a result, you might implement additional guardrails or create custom detectors to alert on suspicious activity.

Prerequisites

  1. Specify a delegated administrator account to manage the Security Lake configuration for all member accounts within your organization.
  2. Security Lake has been enabled in the delegated administrator AWS account.
  3. As part of the solution in this post, we focus on Security Hub as a data source. AWS Security Hub must be enabled for your AWS Organizations. When enabling Security Lake, select All log and event sources to include AWS Security Hub findings.
  4. Configure subscriber query access to Security Lake. Security Lake uses AWS Lake Formation cross-account table sharing to support subscriber query access. Accept the resource share request in the subscriber AWS account in AWS Resource Access Manager (AWS RAM). Subscribers with query access can query the data that Security Lake collects. These subscribers query Lake Formation tables in an Amazon Simple Storage Service (Amazon S3) bucket with Security Lake data using services such as Amazon Athena.

Solution overview

Figure 1 that follows depicts the architecture of the solution.

Figure 1 SageMaker machine learning insights architecture for Security Lake

Figure 1 SageMaker machine learning insights architecture for Security Lake

The deployment builds the architecture by completing the following steps:

  1. A Security Lake is set up in an AWS account with supported log sources — such as Amazon VPC Flow Logs, AWS Security Hub, AWS CloudTrail, and Amazon Route53 — configured.
  2. Subscriber query access is created from the Security Lake AWS account to a subscriber AWS account.

    Note: See Prerequisite #4 for more information.

  3. The AWS RAM resource share request must be accepted in the subscriber AWS account where this solution is deployed.

    Note: See Prerequisite #4 for more information.

  4. A resource link database in Lake Formation is created in the subscriber AWS account and grants access for the Athena tables in the Security Lake AWS account.
  5. VPC is provisioned for SageMaker with IGW, NAT GW, and VPC endpoints for the AWS services used in the solution. IGW and NAT are required to install external open-source packages.
  6. A SageMaker Domain for SageMaker Studio is created in VPCOnly mode with a single SageMaker user profile that is tied to a dedicated AWS Identity and Access Management (IAM) role.
  7. A dedicated IAM role is created to restrict access to create and access the presigned URL for the SageMaker Domain from a specific CIDR for accessing the SageMaker notebook.
  8. An AWS CodeCommit repository containing Python notebooks is used for the AI and ML workflow by the SageMaker user-profile.
  9. An Athena workgroup is created for the Security Lake queries with an S3 bucket for output location (access logging configured for the output bucket).

Deploy the solution

You can deploy the SageMaker solution by using either the AWS Management Console or the AWS Cloud Development Kit (AWS CDK).

Option 1: Deploy the solution with AWS CloudFormation using the console

Use the console to sign in to your subscriber AWS account and then choose the Launch Stack button to open the AWS CloudFormation console pre-loaded with the template for this solution. It takes approximately 10 minutes for the CloudFormation stack to complete.

Select this image to open a link that starts building the CloudFormation stack

Option 2: Deploy the solution by using the AWS CDK

You can find the latest code for the SageMaker solution in the SageMaker machine learning insights GitHub repository, where you can also contribute to the sample code. For instructions and more information on using the AWS CDK, see Get Started with AWS CDK.

To deploy the solution by using the AWS CDK

  1. To build the app when navigating to the project’s root folder, use the following commands:
    npm install -g aws-cdk-lib
    npm install

  2. Update IAM_role_assumption_for_sagemaker_presigned_url and security_lake_aws_account default values in source/lib/sagemaker_domain.ts with their respective appropriate values.
  3. Run the following commands in your terminal while authenticated in your subscriber AWS account. Be sure to replace <INSERT_AWS_ACCOUNT> with your account number and replace <INSERT_REGION> with the AWS Region that you want the solution deployed to.
    cdk bootstrap aws://<INSERT_AWS_ACCOUNT>/<INSERT_REGION>
    cdk deploy

Post deployment steps

Now that you’ve deployed the SageMaker solution, you must grant the SageMaker user profile in the subscriber AWS account query access to your Security Lake. You can Grant permission for the SageMaker user profile to Security Lake in Lake Formation in the subscriber AWS account.

Grant permission to the Security Lake database

  1. Copy the SageMaker user-profile Amazon resource name (ARN) arn:aws:iam::<account-id>:role/sagemaker-user-profile-for-security-lake
  2. Go to Lake Formation in the console.
  3. Select the amazon_security_lake_glue_db_us_east_1 database.
  4. From the Actions Dropdown, select Grant.
  5. In Grant Data Permissions, select SAML Users and Groups.
  6. Paste the SageMaker user profile ARN from Step 1.
  7. In Database Permissions, select Describe and then Grant.

Grant permission to Security Lake – Security Hub table

  1. Copy the SageMaker user-profile ARN arn:aws:iam:<account-id>:role/sagemaker-user-profile-for-security-lake
  2. Go to Lake Formation in the console.
  3. Select the amazon_security_lake_glue_db_us_east_1 database.
  4. Choose View Tables.
  5. Select the amazon_security_lake_table_us_east_1_sh_findings_1_0 table.
  6. From Actions Dropdown, select Grant.
  7. In Grant Data Permissions, select SAML Users and Groups.
  8. Paste the SageMaker user-profile ARN from Step 1.
  9. In Table Permissions, select Describe and then Grant.

Launch your SageMaker Studio application

Now that you have granted permissions for a SageMaker user-profile, we can move on to launching the SageMaker application associated to that user-profile.

  1. Navigate to the SageMaker Studio domain in the console.
  2. Select the SageMaker domain security-lake-ml-insights-<account-id>.
  3. Select the SageMaker user profile sagemaker-user-profile-for-security-lake.
  4. Select the Launch drop-down and select Studio
    Figure 2 SageMaker domain user-profile AWS console screen

    Figure 2: SageMaker domain user-profile AWS console screen

Clone Python notebooks

You’ll work primarily in the SageMaker user profile to create a data-science app to work in. As part of the solution deployment, we’ve created Python notebooks in CodeCommit that you will need to clone.

To clone the Python notebooks

  1. Navigate to CloudFormation in the console.
  2. In the Stacks section, select the SageMakerDomainStack.
  3. Select to the Outputs tab/
  4. Copy the value for sagemakernotebookmlinsightsrepositoryURL. (For example: https://git-codecommit.us-east-1.amazonaws.com/v1/repos/sagemaker_ml_insights_repo)
  5. Go back to your SageMaker app.
  6. In Studio, in the left sidebar, choose the Git icon (identified by a diamond with two branches), then choose Clone a Repository.
    Figure 3 SageMaker clone CodeCommit repository

    Figure 3: SageMaker clone CodeCommit repository

  7. Paste the CodeCommit repository link from Step 4 under the Git repository URL (git). After you paste the URL, select Clone “https://git-codecommit.us-east-1.amazonaws.com/v1/repos/sagemaker_ml_insights_repo”, then select Clone.

    NOTE: If you don’t select from the auto-populated drop-down, SageMaker won’t be able to clone the repository.

    Figure 4 SageMaker clone CodeCommit URL

    Figure 4: SageMaker clone CodeCommit URL

Generating machine learning insights using SageMaker Studio

You’ve successfully pulled the base set of Python notebooks into your SageMaker app and they can be accessed at sagemaker_ml_insights_repo/notebooks/tsat/. The notebooks provide you with a starting point for running machine learning analysis using Security Lake data. These notebooks can be expanded to existing native or custom data sources being sent to Security Lake.

Figure 5: SageMaker cloned Python notebooks

Figure 5: SageMaker cloned Python notebooks

Notebook #1 – Environment setup

The 0.0-tsat-environ-setup notebook handles the installation of the required libraries and dependencies needed for the subsequent notebooks within this blog. For our notebooks, we use an open-source Python library called Kats, which is a lightweight, generalizable framework to perform time series analysis.

  1. Select the 0.0-tsat-environ-setup.ipynb notebook for the environment setup.

    Note: If you have already provisioned a kernel, you can skip steps 2 and 3.

  2. In the right-hand corner, select No Kernel
  3. In the Set up notebook environment pop-up, leave the defaults and choose Select.
    Figure 6 SageMaker application environment settings

    Figure 6: SageMaker application environment settings

  4. After the kernel has successfully started, choose the Terminal icon to open the image terminal.
    Figure 7: SageMaker application terminal

    Figure 7: SageMaker application terminal

  5. To install open-source packages from https instead of http, you must update the sources.list file. After the terminal opens, send the following commands:
    cd /etc/apt
    sed -i 's/http:/https:/g' sources.list

  6. Go back to the 0.0-tsat-environ-setup.ipynb notebook and select the Run drop-down and select Run All Cells. Alternatively, you can run each cell independently, but it’s not required. Grab a coffee! This step will take about 10 minutes.

    IMPORTANT: If you complete the installation out of order or update the requirements.txt file, you might not be able to successfully install Kats and you will need to rebuild your environment by using a net-new SageMaker user profile.

  7. After installing all the prerequisites, check the Kats version to determine if it was successfully installed.
    Figure 8: Kats installation verification

    Figure 8: Kats installation verification

  8. Install PyAthena (Python DB API client for Amazon Athena) which is used to query your data in Security Lake.

You’ve successfully set up the SageMaker app environment! You can now load the appropriate dataset and create a time series.

Notebook #2 – Load data

The 0.1-load-data notebook establishes the Athena connection to query data in Security Lake and creates the resulting time series dataset. The time series dataset will be used for subsequent notebooks to identify trends, outliers, and change points.

  1. Select the 0.1-load-data.ipynb notebook.
  2. If you deployed the solution outside of us-east-1, update the con details to the appropriate Region. In this example, we’re focusing on Security Hub data within Security Lake. If you want to change the underlying data source, you can update the TABLE value.
    Figure 9: SageMaker notebook load Security Lake data settings

    Figure 9: SageMaker notebook load Security Lake data settings

  3. In the Query section, there’s an Athena query to pull specific data from Security Hub, this can be expanded as needed to a subset or can include all products within Security Hub. The query below pulls Security Hub information after 01:00:00 1/1/2022 from the products listed in productname.
    Figure 10: SageMaker notebook Athena query

    Figure 10: SageMaker notebook Athena query

  4. After the values have been updated, you can create your time series dataset. For this notebook, we recommend running each cell individually instead of running all cells at once so you can get a bit more familiar with the process. Select the first cell and choose the Run icon.
    Figure 11: SageMaker run Python notebook code

    Figure 11: SageMaker run Python notebook code

  5. Follow the same process as Step 4 for the subsequent cells.

    Note: If you encounter any issues with querying the table, make sure you completed the post-deployment step for Grant permission to Security Lake – Security Hub table.

You’ve successfully loaded your data and created a timeseries! You can now move on to generating machine learning insights from your timeseries.

Notebook #3 – Trend detector

The 1.1-trend-detector.ipynb notebook handles trend detection in your data. Trend represents a directional change in the level of a time series. This directional change can be either upward (increase in level) or downward (decrease in level). Trend detection helps detect a change while ignoring the noise from natural variability. Each environment is different, and trends help us identify where to look more closely to determine why a trend is positive or negative.

  1. Select 1.1-trend-detector.ipynb notebook for trend detection.
  2. Slopes are created to identify the relationship between x (time) and y (counts).
    Figure 12: SageMaker notebook slope view

    Figure 12: SageMaker notebook slope view

  3. If the counts are increasing with time, then it’s considered a positive slope and the reverse is considered a negative slope. A positive slope isn’t necessarily a good thing because in an ideal state we would expect counts of a finding type to come down with time.
    Figure 13: SageMaker notebook trend view

    Figure 13: SageMaker notebook trend view

  4. Now you can plot the top five positive and negative trends to identify the top movers.
    Figure 14: SageMaker notebook trend results view

    Figure 14: SageMaker notebook trend results view

Notebook #4 – Outlier detection

The 1.2-outlier-detection.ipynb notebook handles outlier detection. This notebook does a seasonal decomposition of the input time series, with additive or multiplicative decomposition as specified (default is additive). It uses a residual time series by either removing only trend or both trend and seasonality if the seasonality is strong. The intent is to discover useful, abnormal, and irregular patterns within data sets, allowing you to pinpoint areas of interest.

  1. To start, it detects points in the residual that are over 5 times the inter-quartile range.
  2. Inter-quartile range (IQR) is the difference between the seventy-fifth and twenty-fifth percentiles of residuals or the spread of data within the middle two quartiles of the entire dataset. IQR is useful in detecting the presence of outliers by looking at values that might lie outside of the middle two quartiles.
  3. The IQR multiplier controls the sensitivity of the range and decision of identifying outliers. By using a larger value for the iqr_mult_thresh parameter in OutlierDetector, outliers would be considered data points, while a smaller value would identify data points as outliers.

    Note: If you don’t have enough data, decrease iqr_mult_thresh to a lower value (for example iqr_mult_thresh=3).

    Figure 15: SageMaker notebook outlier setting

    Figure 15: SageMaker notebook outlier setting

  4. Along with outlier detection plots, investigation SQL will be displayed as well, which can help with further investigation of the outliers.

    In the diagram that follows, you can see that there are several outliers in the number of findings, related to failed AWS Firewall Manager policies, which have been identified by the vertical red lines within the line graph. These are outliers because they deviate from the normal behavior and number of findings on a day-to-day basis. When you see outliers, you can look at the resources that might have caused an unusual increase in Firewall Manager policy findings. Depending on the findings, it could be related to an overly permissive or noncompliant security group or a misconfigured AWS WAF rule group.

    Figure 16: SageMaker notebook outlier results view

    Figure 16: SageMaker notebook outlier results view

Notebook #5 – Change point detection

The 1.3-changepoint-detector.ipynb notebook handles the change point detection. Change point detection is a method to detect changes in a time series that persist over time, such as a change in the mean value. To detect a baseline to identify when several changes might have occurred from that point. Change points occur when there’s an increase or decrease to the average number of findings within a data set.

  1. Along with identifying change points within the data set, the investigation SQL is generated to further investigate the specific change point if applicable.

    In the following diagram, you can see there’s a change point decrease after July 27, 2022, with confidence of 99.9 percent. It’s important to note that change points differ from outliers, which are sudden changes in the data set observed. This diagram means there was some change in the environment that resulted in an overall decrease in the number of findings for S3 buckets with block public access being disabled. The change could be the result of an update to the CI/CD pipelines provisioning S3 buckets or automation to enable all S3 buckets to block public access. Conversely, if you saw a change point that resulted in an increase, it could mean that there was a change that resulted in a larger number of S3 buckets with a block public access configuration consistently being disabled.

    Figure 17: SageMaker changepoint detector view

    Figure 17: SageMaker changepoint detector view

By now, you should be familiar with the set up and deployment for SageMaker Studio and how you can use Python notebooks to generate machine learning insights for your Security Lake data. You can take what you’ve learned and start to curate specific datasets and data sources within Security Lake, create a time series, detect trends, and identify outliers and change points. By doing so, you can answer a variety of security-related questions such as:

  • CloudTrail

    Is there a large volume of Amazon S3 download or copy commands to an external resource? Are you seeing a large volume of S3 delete object commands? Is it possible there’s a ransomware event going on?

  • VPC Flow Logs

    Is there an increase in the number of requests from your VPC to external IPs? Is there an increase in the number of requests from your VPC to your on-premises CIDR? Is there a possibility of internal or external data exfiltration occurring?

  • Route53

    Which resources are making DNS requests that they haven’t typically made within the last 30–45 days? When did it start? Is there a potential command and control session occurring on an Amazon Elastic Compute Cloud (Amazon EC2) instance?

It’s important to note that this isn’t a solution to replace Amazon GuardDuty, which uses foundational data sources to detect communication with known malicious domains and IP addresses and identify anomalous behavior, or Amazon Detective, which provides customers with prebuilt data aggregations, summaries, and visualizations to help security teams conduct faster and more effective investigations. One of the main benefits of using Security Lake and SageMaker Studio is the ability to interactively create and tailor machine learning insights specific to your AWS environment and workloads.

Clean up

If you deployed the SageMaker machine learning insights solution by using the Launch Stack button in the AWS Management Console or the CloudFormation template sagemaker_ml_insights_cfn, do the following to clean up:

  1. In the CloudFormation console for the account and Region where you deployed the solution, choose the SageMakerML stack.
  2. Choose the option to Delete the stack.

If you deployed the solution by using the AWS CDK, run the command cdk destroy.

Conclusion

Amazon Security Lake gives you the ability to normalize and centrally store your security data from various log sources to help you analyze, visualize, and correlate appropriate security logs. You can then use this data to increase your overall security posture by implementing additional security guardrails or take appropriate remediation actions within your AWS environment.

In this blog post, you learned how you can use SageMaker to generate machine learning insights for your Security Hub findings in Security Lake. Although the example solution focuses on a single data source within Security Lake, you can expand the notebooks to incorporate other native or custom data sources in Security Lake.

There are many different use-cases for Security Lake that can be tailored to fit your AWS environment. Take a look at this blog post to learn how you can ingest, transform and deliver Security Lake data to Amazon OpenSearch to help your security operations team quickly analyze security data within your AWS environment. In supported Regions, new Security Lake account holders can try the service free for 15 days and gain access to its features.

 
If you have feedback about this post, submit comments in the Comments section below. If you have questions about this post, contact AWS Support.

Want more AWS Security news? Follow us on Twitter.

Jonathan Nguyen

Jonathan Nguyen

Jonathan is a Principal Security Architect at AWS. His background is in AWS security, with a focus on threat detection and incident response. He helps enterprise customers develop a comprehensive AWS security strategy, deploy security solutions at scale, and train customers on AWS security best practices.

Madhunika Reddy Mikkili

Madhunika Reddy Mikkili

Madhunika is a Data and Machine Learning Engineer with the AWS Professional Services Shared Delivery Team. She is passionate about helping customers achieve their goals through the use of data and machine learning insights. Outside of work, she loves traveling and spending time with family and friends.

Amazon SageMaker Continues to Lead the Way in Machine Learning and Announces up to 18% Lower Prices on GPU Instances

Post Syndicated from Julien Simon original https://aws.amazon.com/blogs/aws/amazon-sagemaker-leads-way-in-machine-learning/

Since 2006, Amazon Web Services (AWS) has been helping millions of customers build and manage their IT workloads. From startups to large enterprises to public sector, organizations of all sizes use our cloud computing services to reach unprecedented levels of security, resiliency, and scalability. Every day, they’re able to experiment, innovate, and deploy to production in less time and at lower cost than ever before. Thus, business opportunities can be explored, seized, and turned into industrial-grade products and services.

As Machine Learning (ML) became a growing priority for our customers, they asked us to build an ML service infused with the same agility and robustness. The result was Amazon SageMaker, a fully managed service launched at AWS re:Invent 2017 that provides every developer and data scientist with the ability to build, train, and deploy ML models quickly.

Today, Amazon SageMaker is helping tens of thousands of customers in all industry segments build, train and deploy high quality models in production: financial services (Euler Hermes, Intuit, Slice Labs, Nerdwallet, Root Insurance, Coinbase, NuData Security, Siemens Financial Services), healthcare (GE Healthcare, Cerner, Roche, Celgene, Zocdoc), news and media (Dow Jones, Thomson Reuters, ProQuest, SmartNews, Frame.io, Sportograf), sports (Formula 1, Bundesliga, Olympique de Marseille, NFL, Guiness Six Nations Rugby), retail (Zalando, Zappos, Fabulyst), automotive (Atlas Van Lines, Edmunds, Regit), dating (Tinder), hospitality (Hotels.com, iFood), industry and manufacturing (Veolia, Formosa Plastics), gaming (Voodoo), customer relationship management (Zendesk, Freshworks), energy (Kinect Energy Group, Advanced Microgrid Systems), real estate (Realtor.com), satellite imagery (Digital Globe), human resources (ADP), and many more.

When we asked our customers why they decided to standardize their ML workloads on Amazon SageMaker, the most common answer was: “SageMaker removes the undifferentiated heavy lifting from each step of the ML process.” Zooming in, we identified five areas where SageMaker helps them most.

#1 – Build Secure and Reliable ML Models, Faster
As many ML models are used to serve real-time predictions to business applications and end users, making sure that they stay available and fast is of paramount importance. This is why Amazon SageMaker endpoints have built-in support for load balancing across multiple AWS Availability Zones, as well as built-in Auto Scaling to dynamically adjust the number of provisioned instances according to incoming traffic.

For even more robustness and scalability, Amazon SageMaker relies on production-grade open source model servers such as TensorFlow Serving, the Multi-Model Server, and TorchServe. A collaboration between AWS and Facebook, TorchServe is available as part of the PyTorch project, and makes it easy to deploy trained models at scale without having to write custom code.

In addition to resilient infrastructure and scalable model serving, you can also rely on Amazon SageMaker Model Monitor to catch prediction quality issues that could happen on your endpoints. By saving incoming requests as well as outgoing predictions, and by comparing them to a baseline built from a training set, you can quickly identify and fix problems like missing features or data drift.

Says Aude Giard, Chief Digital Officer at Veolia Water Technologies: “In 8 short weeks, we worked with AWS to develop a prototype that anticipates when to clean or change water filtering membranes in our desalination plants. Using Amazon SageMaker, we built a ML model that learns from previous patterns and predicts the future evolution of fouling indicators. By standardizing our ML workloads on AWS, we were able to reduce costs and prevent downtime while improving the quality of the water produced. These results couldn’t have been realized without the technical experience, trust, and dedication of both teams to achieve one goal: an uninterrupted clean and safe water supply.” You can learn more in this video.

#2 – Build ML Models Your Way
When it comes to building models, Amazon SageMaker gives you plenty of options. You can visit AWS Marketplace, pick an algorithm or a model shared by one of our partners, and deploy it on SageMaker in just a few clicks. Alternatively, you can train a model using one of the built-in algorithms, or your own code written for a popular open source ML framework (TensorFlow, PyTorch, and Apache MXNet), or your own custom code packaged in a Docker container.

You could also rely on Amazon SageMaker AutoPilot, a game-changing AutoML capability. Whether you have little or no ML experience, or you’re a seasoned practitioner who needs to explore hundreds of datasets, SageMaker AutoPilot takes care of everything for you with a single API call. It automatically analyzes your dataset, figures out the type of problem you’re trying to solve, builds several data processing and training pipelines, trains them, and optimizes them for maximum accuracy. In addition, the data processing and training source code is available in auto-generated notebooks that you can review, and run yourself for further experimentation. SageMaker Autopilot also now creates machine learning models up to 40% faster with up to 200% higher accuracy, even with small and imbalanced datasets.

Another popular feature is Automatic Model Tuning. No more manual exploration, no more costly grid search jobs that run for days: using ML optimization, SageMaker quickly converges to high-performance models, saving you time and money, and letting you deploy the best model to production quicker.

NerdWallet relies on data science and ML to connect customers with personalized financial products“, says Ryan Kirkman, Senior Engineering Manager. “We chose to standardize our ML workloads on AWS because it allowed us to quickly modernize our data science engineering practices, removing roadblocks and speeding time-to-delivery. With Amazon SageMaker, our data scientists can spend more time on strategic pursuits and focus more energy where our competitive advantage is—our insights into the problems we’re solving for our users.” You can learn more in this case study.
Says Tejas Bhandarkar, Senior Director of Product, Freshworks Platform: “We chose to standardize our ML workloads on AWS because we could easily build, train, and deploy machine learning models optimized for our customers’ use cases. Thanks to Amazon SageMaker, we have built more than 30,000 models for 11,000 customers while reducing training time for these models from 24 hours to under 33 minutes. With SageMaker Model Monitor, we can keep track of data drifts and retrain models to ensure accuracy. Powered by Amazon SageMaker, Freddy AI Skills is constantly-evolving with smart actions, deep-data insights, and intent-driven conversations.

#3 – Reduce Costs
Building and managing your own ML infrastructure can be costly, and Amazon SageMaker is a great alternative. In fact, we found out that the total cost of ownership (TCO) of Amazon SageMaker over a 3-year horizon is over 54% lower compared to other options, and developers can be up to 10 times more productive. This comes from the fact that Amazon SageMaker manages all the training and prediction infrastructure that ML typically requires, allowing teams to focus exclusively on studying and solving the ML problem at hand.

Furthermore, Amazon SageMaker includes many features that help training jobs run as fast and as cost-effectively as possible: optimized versions of the most popular machine learning libraries, a wide range of CPU and GPU instances with up to 100GB networking, and of course Managed Spot Training which lets you save up to 90% on your training jobs. Last but not least, Amazon SageMaker Debugger automatically identifies complex issues developing in ML training jobs. Unproductive jobs are terminated early, and you can use model information captured during training to pinpoint the root cause.

Amazon SageMaker also helps you slash your prediction costs. Thanks to Multi-Model Endpoints, you can deploy several models on a single prediction endpoint, avoiding the extra work and cost associated with running many low-traffic endpoints. For models that require some hardware acceleration without the need for a full-fledged GPU, Amazon Elastic Inference lets you save up to 90% on your prediction costs. At the other end of the spectrum, large-scale prediction workloads can rely on AWS Inferentia, a custom chip designed by AWS, for up to 30% higher throughput and up to 45% lower cost per inference compared to GPU instances.

Lyft, one of the largest transportation networks in the United States and Canada, launched its Level 5 autonomous vehicle division in 2017 to develop a self-driving system to help millions of riders. Lyft Level 5 aggregates over 10 terabytes of data each day to train ML models for their fleet of autonomous vehicles. Managing ML workloads on their own was becoming time-consuming and expensive. Says Alex Bain, Lead for ML Systems at Lyft Level 5: “Using Amazon SageMaker distributed training, we reduced our model training time from days to couple of hours. By running our ML workloads on AWS, we streamlined our development cycles and reduced costs, ultimately accelerating our mission to deliver self-driving capabilities to our customers.

#4 – Build Secure and Compliant ML Systems
Security is always priority #1 at AWS. It’s particularly important to customers operating in regulated industries such as financial services or healthcare, as they must implement their solutions with the highest level of security and compliance. For this purpose, Amazon SageMaker implements many security features, making it compliant with the following global standards: SOC 1/2/3, PCI, ISO, FedRAMP, DoD CC SRG, IRAP, MTCS, C5, K-ISMS, ENS High, OSPAR, and HITRUST CSF. It’s also HIPAA BAA eligible.

Says Ashok Srivastava, Chief Data Officer, Intuit: “With Amazon SageMaker, we can accelerate our Artificial Intelligence initiatives at scale by building and deploying our algorithms on the platform. We will create novel large-scale machine learning and AI algorithms and deploy them on this platform to solve complex problems that can power prosperity for our customers.”

#5 – Annotate Data and Keep Humans in the Loop
As ML practitioners know, turning data into a dataset requires a lot of time and effort. To help you reduce both, Amazon SageMaker Ground Truth is a fully managed data labeling service that makes it easy to annotate and build highly accurate training datasets at any scale (text, image, video, and 3D point cloud datasets).

Says Magnus Soderberg, Director, Pathology Research, AstraZeneca: “AstraZeneca has been experimenting with machine learning across all stages of research and development, and most recently in pathology to speed up the review of tissue samples. The machine learning models first learn from a large, representative data set. Labeling the data is another time-consuming step, especially in this case, where it can take many thousands of tissue sample images to train an accurate model. AstraZeneca uses Amazon SageMaker Ground Truth, a machine learning-powered, human-in-the-loop data labeling and annotation service to automate some of the most tedious portions of this work, resulting in reduction of time spent cataloging samples by at least 50%.

Amazon SageMaker is Evaluated
The hundreds of new features added to Amazon SageMaker since launch are testimony to our relentless innovation on behalf of customers. In fact, the service was highlighted in February 2020 as the overall leader in Gartner’s Cloud AI Developer Services Magic Quadrant. Gartner subscribers can click here to learn more about why we have an overall score of 84/100 in their “Solution Scorecard for Amazon SageMaker, July 2020”, the highest rating among our peer group. According to Gartner, we met 87% of required criteria, 73% of preferred, and 85% of optional.

Announcing a Price Reduction on GPU Instances

To thank our customers for their trust and to show our continued commitment to make Amazon SageMaker the best and most cost-effective ML service, I’m extremely happy to announce a significant price reduction on all ml.p2 and ml.p3 GPU instances. It will apply starting October 1st for all SageMaker components and across the following regions: US East (N. Virginia), US East (Ohio), US West (Oregon), EU (Ireland), EU (Frankfurt), EU (London), Canada (Central), Asia Pacific (Singapore), Asia Pacific (Sydney), Asia Pacific (Seoul), Asia Pacific (Tokyo), Asia Pacific (Mumbai), and AWS GovCloud (US-Gov-West).

Instance Name Price Reduction
ml.p2.xlarge -11%
ml.p2.8xlarge -14%
ml.p2.16xlarge -18%
ml.p3.2xlarge -11%
ml.p3.8xlarge -14%
ml.p3.16xlarge -18%
ml.p3dn.24xlarge -18%

Getting Started with Amazon SageMaker
As you can see, there are a lot of exciting features in Amazon SageMaker, and I encourage you to try them out! Amazon SageMaker is available worldwide, so chances are you can easily get to work on your own datasets. The service is part of the AWS Free Tier, letting new users work with it for free for hundreds of hours during the first two months.

If you’d like to kick the tires, this tutorial will get you started in minutes. You’ll learn how to use SageMaker Studio to build, train, and deploy a classification model based on the XGBoost algorithm.

Last but not least, I just published a book named “Learn Amazon SageMaker“, a 500-page detailed tour of all SageMaker features, illustrated by more than 60 original Jupyter notebooks. It should help you get up to speed in no time.

As always, we’re looking forward to your feedback. Please share it with your usual AWS support contacts, or on the AWS Forum for SageMaker.

– Julien