Post Syndicated from Ulrich Hinze original https://aws.amazon.com/blogs/big-data/set-up-fine-grained-permissions-for-your-data-pipeline-using-mwaa-and-eks/
This is a guest blog post co-written with Patrick Oberherr from Contentful and Johannes Günther from Netlight Consulting.
This blog post shows how to improve security in a data pipeline architecture based on Amazon Managed Workflows for Apache Airflow (Amazon MWAA) and Amazon Elastic Kubernetes Service (Amazon EKS) by setting up fine-grained permissions, using HashiCorp Terraform for infrastructure as code.
Many AWS customers use Amazon EKS to execute their data workloads. The advantages of Amazon EKS include different compute and storage options depending on workload needs, higher resource utilization by sharing underlying infrastructure, and a vibrant open-source community that provides purpose-built extensions. The Data on EKS project provides a series of templates and other resources to help customers get started on this journey. It includes a description of using Amazon MWAA as a job scheduler.
Contentful is an AWS customer and AWS Partner Network (APN) partner. Behind the scenes of their Software-as-a-Service (SaaS) product, the Contentful Composable Content Platform, Contentful uses insights from data to improve business decision-making and customer experience. Contentful engaged Netlight, an APN consulting partner, to help set up a data platform to gather these insights.
Most of Contentful’s application workloads run on Amazon EKS, and knowledge of this service and Kubernetes is widespread in the organization. That’s why Contentful’s data engineering team decided to run data pipelines on Amazon EKS as well. For job scheduling, they started with a self-operated Apache Airflow on an Amazon EKS cluster and later switched to Amazon MWAA to reduce engineering and operations overhead. The job execution remained on Amazon EKS.
Contentful runs a complex data pipeline using this infrastructure, including ingestion from multiple data sources and different transformation jobs, for example using dbt. The whole pipeline shares a single Amazon MWAA environment and a single Amazon EKS cluster. With a diverse set of workloads in a single environment, it is necessary to apply the principle of least privilege, ensuring that individual tasks or components have only the specific permissions they need to function.
By segmenting permissions according to roles and responsibilities, Contentful’s data engineering team was able to create a more robust and secure data processing environment, which is essential for maintaining the integrity and confidentiality of the data being handled.
In this blog post, we walk through setting up the infrastructure from scratch and deploying a sample application using Terraform, Contentful’s tool of choice for infrastructure as code.
Prerequisites
To follow along this blog post, you need the latest version of the following tools installed:
- AWS CLI, configured with access to your AWS account
- Terraform CLI
- kubectl
Overview
In this blog post, you will create a sample application with the following infrastructure:
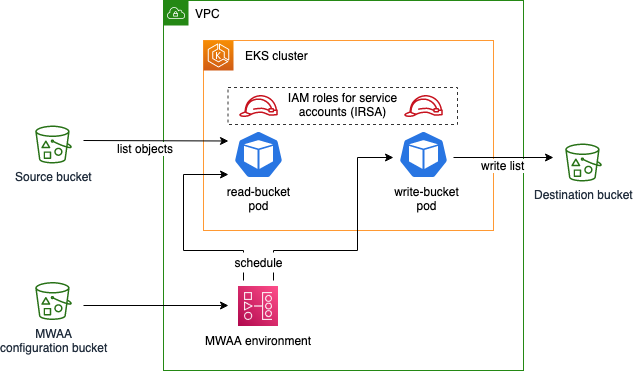
The sample Airflow workflow lists objects in the source bucket, temporarily stores this list using Airflow XComs, and writes the list as a file to the destination bucket. This application is executed using Amazon EKS pods, scheduled by an Amazon MWAA environment. You deploy the EKS cluster and the MWAA environment into a virtual private cloud (VPC) and apply least-privilege permissions to the EKS pods using IAM roles for service accounts. The configuration bucket for Amazon MWAA contains runtime requirements, as well as the application code specifying an Airflow Directed Acyclic Graph (DAG).
Initialize the project and create buckets
Create a file main.tf with the following content in an empty directory:
This file defines the Terraform AWS provider as well as the source and destination bucket, whose names are exported as AWS Systems Manager parameters. It also tells Terraform to upload an empty object named dummy.txt into the source bucket, which enables the Airflow sample application we will create later to receive a result when listing bucket content.
Initialize the Terraform project and download the module dependencies by issuing the following command:
Create the infrastructure:
Terraform asks you to acknowledge changes to the environment and then starts deploying resources in AWS. Upon successful deployment, you should see the following success message:
Create VPC
Create a new file vpc.tf in the same directory as main.tf and insert the following:
This file defines the VPC, a virtual network, that will later host the Amazon EKS cluster and the Amazon MWAA environment. Note that we use an existing Terraform module for this, which wraps configuration of underlying network resources like subnets, route tables, and NAT gateways.
Download the VPC module:
Deploy the new resources:
Note which resources are being created. By using the VPC module in our Terraform file, much of the underlying complexity is taken away when defining our infrastructure, but it’s still useful to know what exactly is being deployed.
Note that Terraform now handles resources we defined in both files, main.tf and vpc.tf, because Terraform includes all .tf files in the current working directory.
Create the Amazon MWAA environment
Create a new file mwaa.tf and insert the following content:
Like before, we use an existing module to save configuration effort for the Amazon MWAA environment. The module also creates the configuration bucket, which we use to specify the runtime dependency of the application (apache-airflow-cncf-kubernetes) in the requirements.txt file. This package, in combination with the preinstalled package apache-airflow-amazon, enables interaction with Amazon EKS.
Download the MWAA module:
Deploy the new resources:
This operation takes 20–30 minutes to complete.
Create the Amazon EKS cluster
Create a file eks.tf with the following content:
To create the cluster itself, we take advantage of the Amazon EKS Blueprints for Terraform project. We also define a managed node group with one node as the target size. Note that in cases with fluctuating load, scaling your cluster with Karpenter instead of the managed node group approach shown above makes the cluster scale more flexibly. We used managed node groups primarily because of the ease of configuration.
We define the identity that the Amazon MWAA execution role assumes in Kubernetes using the map_roles variable. After configuring the Terraform Kubernetes provider, we give the Amazon MWAA execution role permissions to manage pods in the cluster.
Download the EKS Blueprints for Terraform module:
Deploy the new resources:
This operation takes about 12 minutes to complete.
Create IAM roles for service accounts
Create a file roles.tf with the following content:
This file defines two Kubernetes service accounts, source-bucket-reader-sa and destination-bucket-writer-sa, and their permissions against the AWS API, using IAM roles for service accounts (IRSA). Again, we use a module from the Amazon EKS Blueprints for Terraform project to simplify IRSA configuration. Note that both roles only get the minimum permissions that they need, defined using AWS IAM policies.
Download the new module:
Deploy the new resources:
Create the DAG
Create a file dag.py defining the Airflow DAG:
The DAG is defined to run on an hourly schedule, with two tasks read_bucket with service account source-bucket-reader-sa and write_bucket with service account destination-bucket-writer-sa, running after one another. Both are run using the EksPodOperator, which is responsible for scheduling the tasks on Amazon EKS, using the AWS CLI Docker image to run commands. The first task lists files in the source bucket and writes the list to Airflow XCom. The second task reads the list from XCom and stores it in the destination bucket. Note that the service_account_name parameter differentiates what each task is permitted to do.
Create a file dag.tf to upload the DAG code to the Amazon MWAA configuration bucket:
Deploy the changes:
The Amazon MWAA environment automatically imports the file from the S3 bucket.
Run the DAG
In your browser, navigate to the Amazon MWAA console and select your environment. In the top right-hand corner, select Open Airflow UI . You should see the following:

To trigger the DAG, in the Actions column, select the play symbol and then select Trigger DAG. Click on the DAG name to explore the DAG run and its results.
Navigate to the Amazon S3 console and choose the bucket starting with “destination”. It should contain a file list.json recently created by the write_bucket task. Download the file to explore its content, a JSON list with a single entry.
Clean up
The resources you created in this walkthrough incur AWS costs. To delete the created resources, issue the following command:
And approve the changes in the Terraform CLI dialog.
Conclusion
In this blog post, you learned how to improve the security of your data pipeline running on Amazon MWAA and Amazon EKS by narrowing the permissions of each individual task.
To dive deeper, use the working example created in this walkthrough to explore the topic further: What happens if you remove the service_account_name parameter from an Airflow task? What happens if you exchange the service account names in the two tasks?
For simplicity, in this walkthrough we used a flat file structure with Terraform and Python files inside a single directory. We did not adhere to the standard module structure proposed by Terraform, which is generally recommended. In a real-life project, splitting up the project into multiple Terraform projects or modules may also increase flexibility, speed, and independence between teams owning different parts of the infrastructure.
Lastly, make sure to study the Data on EKS documentation, which provides other valuable resources for running your data pipeline on Amazon EKS, as well as the Amazon MWAA and Apache Airflow documentation for implementing your own use cases. Specifically, have a look at this sample implementation of a Terraform module for Amazon MWAA and Amazon EKS, which contains a more mature approach to Amazon EKS configuration and node automatic scaling, as well as networking.
If you have any questions, you can start a new thread on AWS re:Post or reach out to AWS Support.
About the Authors
 Ulrich Hinze is a Solutions Architect at AWS. He partners with software companies to architect and implement cloud-based solutions on AWS. Before joining AWS, he worked for AWS customers and partners in software engineering, consulting, and architecture roles for 8+ years.
 Patrick Oberherr is a Staff Data Engineer at Contentful with 4+ years of working with AWS and 10+ years in the Data field. At Contentful he is responsible for infrastructure and operations of the data stack which is hosted on AWS.
 Johannes Günther is a cloud & data consultant at Netlight with 5+ years of working with AWS. He has helped clients across various industries designing sustainable cloud platforms and is AWS certified.